Embed Size (px)
Citation preview
© 2008 Seán Duggan All Rights Reserved www.seanduggan.com
The Actions palette in Photoshop lets you automate a series of steps so they can be quickly applied to other images, or even entire folders of images. In this article I’ll go over the anatomy of the Actions palette and cover how to create some simple actions, as well as how to edit an action once you’ve recorded it. Batch pro-cessing, applying actions to many images at the same time, will be covered in a separate article.
What is an Action?An action is simply a set of commands that you apply to an image that are recorded and can be used again to save yourself the time and keystrokes. Creating an action is as simple as pressing a record button and then going through the steps you want to record. Almost any command (or series of commands) can be recorded as an action that can then be used on a single image, or multiple images. With Batch Processing, you can even run actions on an entire folder of images. For instance, if you open your digital camera images and find they you always add a Levels and Curves adjustment layer for basic color and tonal correction, you could automate that step so that Photoshop does it for you. You can even program the action so that it pauses at the Levels and Curves dialogs so you can customize them adjustment for each image. Actions can also be used for simple, single-command tasks, such as hiding or showing specific groups of palettes, or bringing up com-monly used filters and dialogs, such as Unsharp Mask and Image Size.
Working with Actions in Photoshop CS3
Seán Duggan
Before we get into recording an action, let’s take a look at the different controls in the Actions palette. Make sure you have Photoshop running as you read this so you can try out some of the techniques that are dis-cussed. The Actions palette may already be visible on your screen, or you might see its name or icon in the docked palettes on the right side screen. If you can’t locate it, go to the Window menu and choose Actions to bring up the palette.
Figure 1. The Actions palette
© 2008 Seán Duggan All Rights Reserved www.seanduggan.com
If you have not created any of your own actions yet you’ll see a folder at the top of the palette called “Default Actions”, which is a group of actions created by the Adobe team that ships with Photoshop. In the illustration on this page, you can see several other sets that I have created for my own use. These include specific Actions used in the production of images for my Creative Digital Darkroom book, prepping files for slide shows, and a set of custom actions that I call Duggan ImageWorks.
If you click on the small triangular icon next to an Action Set, you can see all the actions in that set. If you click on the triangle icon next to the name of an action, you can see all the different commands that have been recorded for that action. Finally, if you click on the triangle icon next to a command, you can see the details of each setting that was used for that command. This could be specific Levels adjustment numbers, or the type characteristics if you added text, or the size of the image and the resolution if it was resized.On the left-hand side of the palette are two columns. In the first one, you’re likely to see some checkmarks
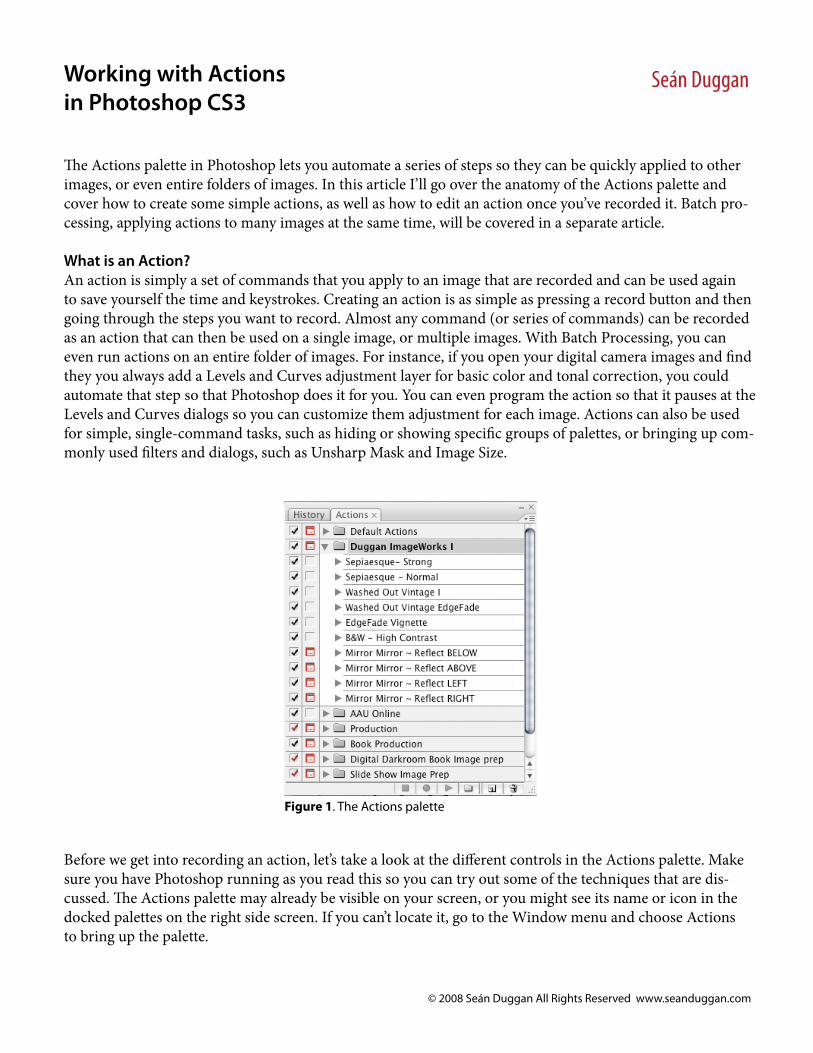
Let’s start with the controls on the bottom of the palette. Starting on the left, there are buttons for Stop, Record and Play, which are styled so they look very similar to any standard VCR, CD or DVD player (see illustration below). Next we have some standard Photoshop UI buttons for adding a new Set of actions (a folder containing several different actions); the New button for creating a new action or making a copy of an existing one; and the humble Trash icon, used for deleting items from the Actions palette.
Figure 2. Anatomy of the Actions Palette.
© 2008 Seán Duggan All Rights Reserved www.seanduggan.com
next to each action or each command contained in an action. The checkmark controls whether or not an ac-tion is active and can be played. When applied to an action command, it controls whether or not that specific step is included when the action is played on an image. Being able to turn specific steps on and off is a very useful way to customize how an action affects an image.
In the second column in from the left you will see a red box with a row of dots in it. This is the icon that indicates that a “stop” in included in an action, or, if you see it next to a set, in actions that are contained in the set. The stop icon for a set or an action is red and for an individual action command, it is gray. A stop is a pause that is programmed into the action that allows the user to change the settings in a dialog. Once the set-tings have been entered, the action can continue. Stops allow you to use the same action on several different images, even if you need to use different settings. Stops can also be programmed to display instructions on how a file needs to be set up in order for the action to run successfully. This is useful in situations where you are creating actions that other people may be using.
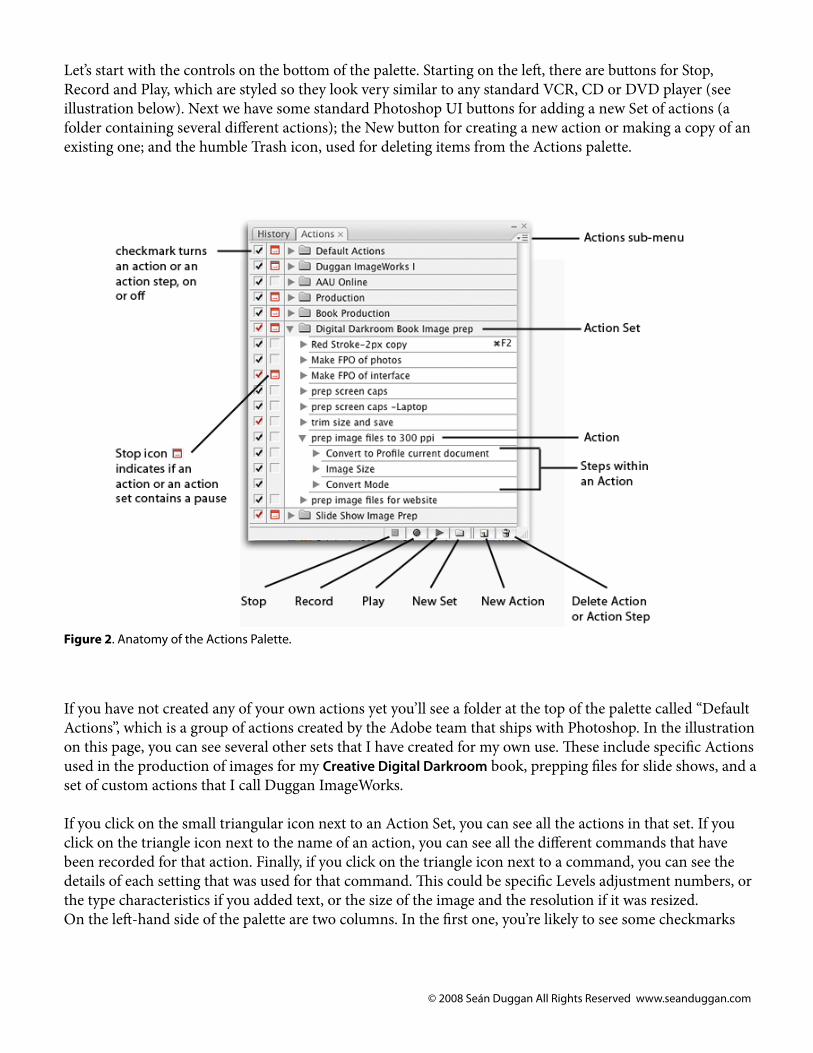
Up at the top right corner of the palette is the but-ton/icon that opens up the sub-menu for the Ac-tions palette (Figure 3). Several of the choices here are simply duplicates of what the palette icons do, but others provide functionality that is not covered by the icons. We’ll explore some of these options a bit later in this tutorial. Figure 3. Accessing the palette
submenu.
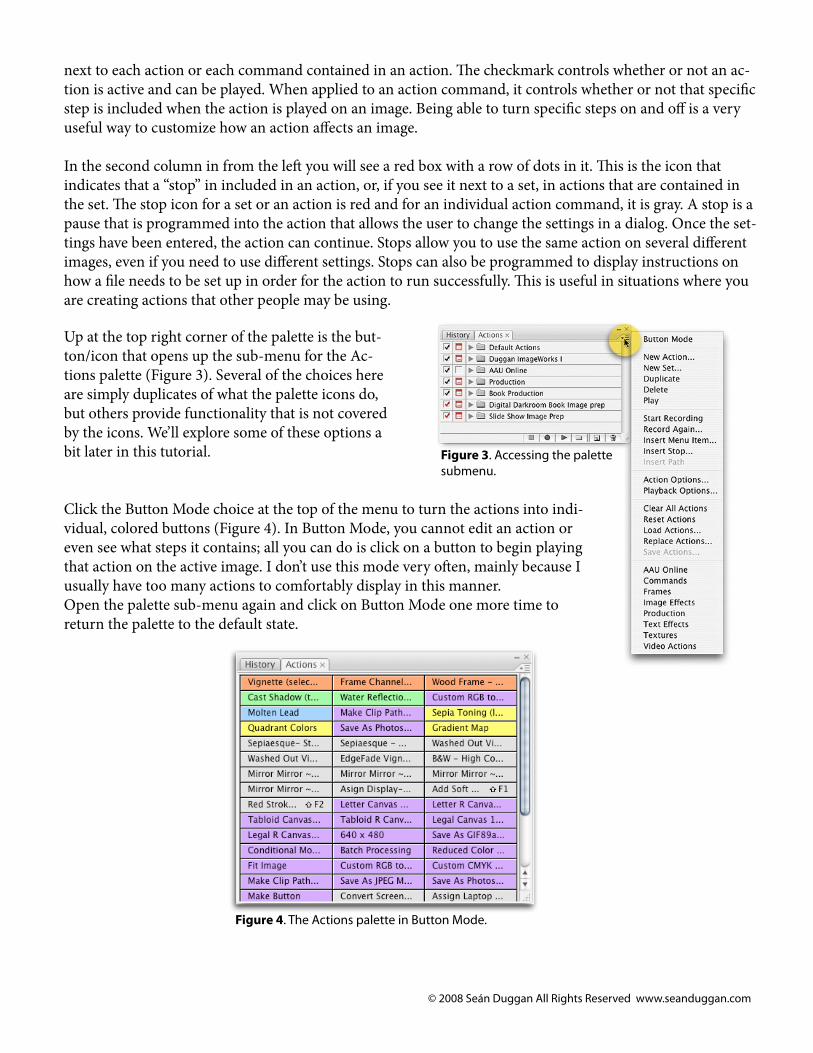
Click the Button Mode choice at the top of the menu to turn the actions into indi-vidual, colored buttons (Figure 4). In Button Mode, you cannot edit an action or even see what steps it contains; all you can do is click on a button to begin playing that action on the active image. I don’t use this mode very often, mainly because I usually have too many actions to comfortably display in this manner.Open the palette sub-menu again and click on Button Mode one more time to return the palette to the default state.
Figure 4. The Actions palette in Button Mode.
© 2008 Seán Duggan All Rights Reserved www.seanduggan.com
Tutorial: Recording a Simple Action
Let’s begin our exploration of creating actions with a sim-ple action that prepares an image for web display and adds your copyright notice as a semi-transparent watermark. I use an action just like this to prepare photos for posting on my blog.
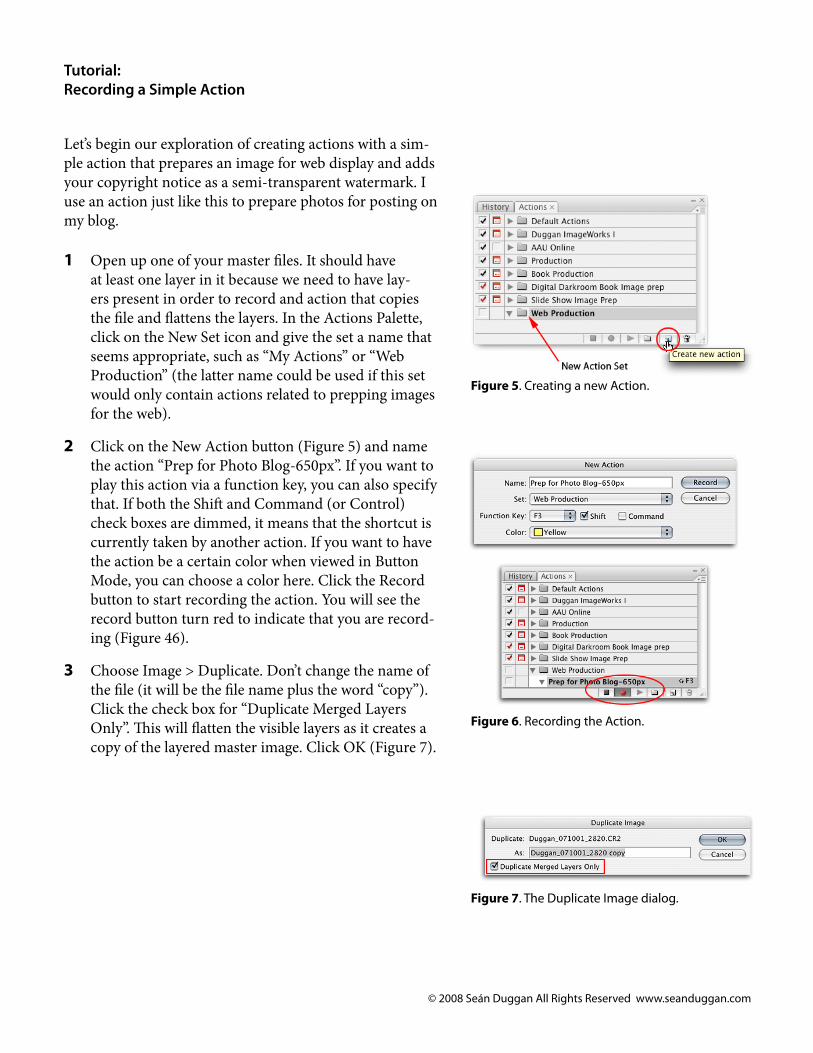
1 Open up one of your master files. It should have at least one layer in it because we need to have lay-ers present in order to record and action that copies the file and flattens the layers. In the Actions Palette, click on the New Set icon and give the set a name that seems appropriate, such as “My Actions” or “Web Production” (the latter name could be used if this set would only contain actions related to prepping images for the web).
2 Click on the New Action button (Figure 5) and name the action “Prep for Photo Blog-650px”. If you want to play this action via a function key, you can also specify that. If both the Shift and Command (or Control) check boxes are dimmed, it means that the shortcut is currently taken by another action. If you want to have the action be a certain color when viewed in Button Mode, you can choose a color here. Click the Record button to start recording the action. You will see the record button turn red to indicate that you are record-ing (Figure 46).
3 Choose Image > Duplicate. Don’t change the name of the file (it will be the file name plus the word “copy”). Click the check box for “Duplicate Merged Layers Only”. This will flatten the visible layers as it creates a copy of the layered master image. Click OK (Figure 7).
Figure 5. Creating a new Action.
Figure 6. Recording the Action.
Figure 7. The Duplicate Image dialog.
© 2008 Seán Duggan All Rights Reserved www.seanduggan.com
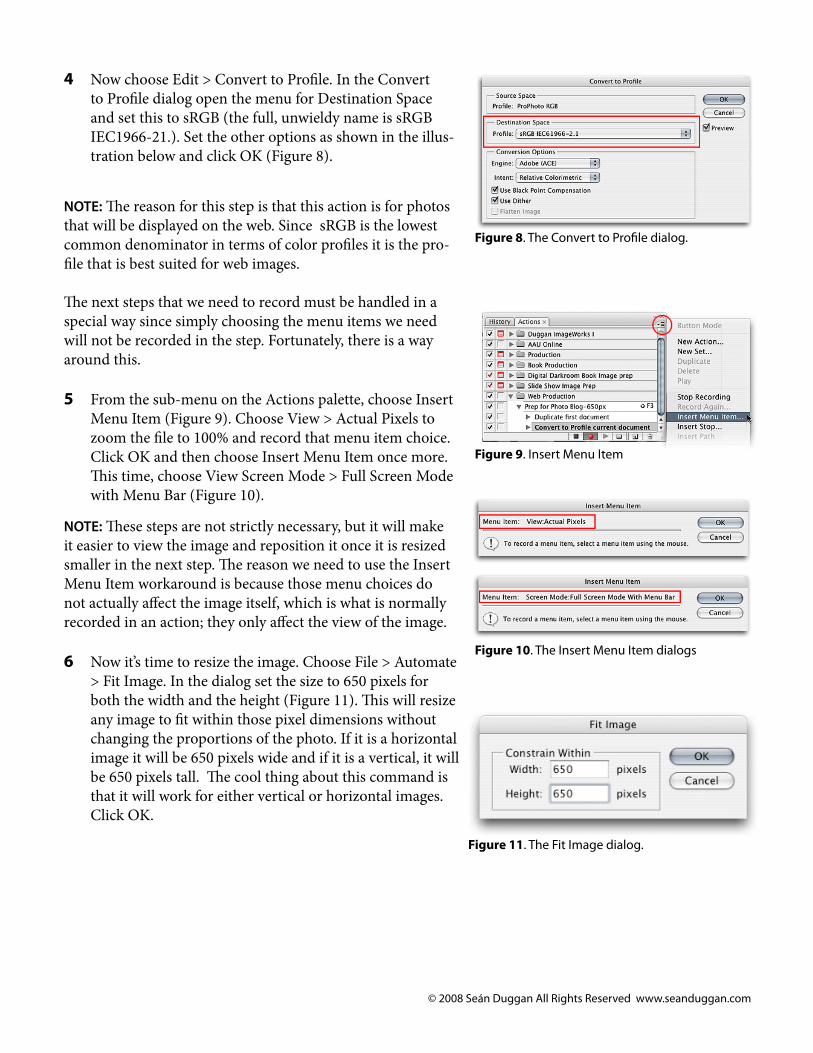
4 Now choose Edit > Convert to Profile. In the Convert to Profile dialog open the menu for Destination Space and set this to sRGB (the full, unwieldy name is sRGB IEC1966-21.). Set the other options as shown in the illus-tration below and click OK (Figure 8).
NOTE: The reason for this step is that this action is for photos that will be displayed on the web. Since sRGB is the lowest common denominator in terms of color profiles it is the pro-file that is best suited for web images.
The next steps that we need to record must be handled in a special way since simply choosing the menu items we need will not be recorded in the step. Fortunately, there is a way around this.
5 From the sub-menu on the Actions palette, choose Insert Menu Item (Figure 9). Choose View > Actual Pixels to zoom the file to 100% and record that menu item choice. Click OK and then choose Insert Menu Item once more. This time, choose View Screen Mode > Full Screen Mode with Menu Bar (Figure 10).
NOTE: These steps are not strictly necessary, but it will make it easier to view the image and reposition it once it is resized smaller in the next step. The reason we need to use the Insert Menu Item workaround is because those menu choices do not actually affect the image itself, which is what is normally recorded in an action; they only affect the view of the image.
6 Now it’s time to resize the image. Choose File > Automate > Fit Image. In the dialog set the size to 650 pixels for both the width and the height (Figure 11). This will resize any image to fit within those pixel dimensions without changing the proportions of the photo. If it is a horizontal image it will be 650 pixels wide and if it is a vertical, it will be 650 pixels tall. The cool thing about this command is that it will work for either vertical or horizontal images. Click OK.
Figure 8. The Convert to Profile dialog.
Figure 10. The Insert Menu Item dialogs
Figure 11. The Fit Image dialog.
Figure 9. Insert Menu Item
© 2008 Seán Duggan All Rights Reserved www.seanduggan.com
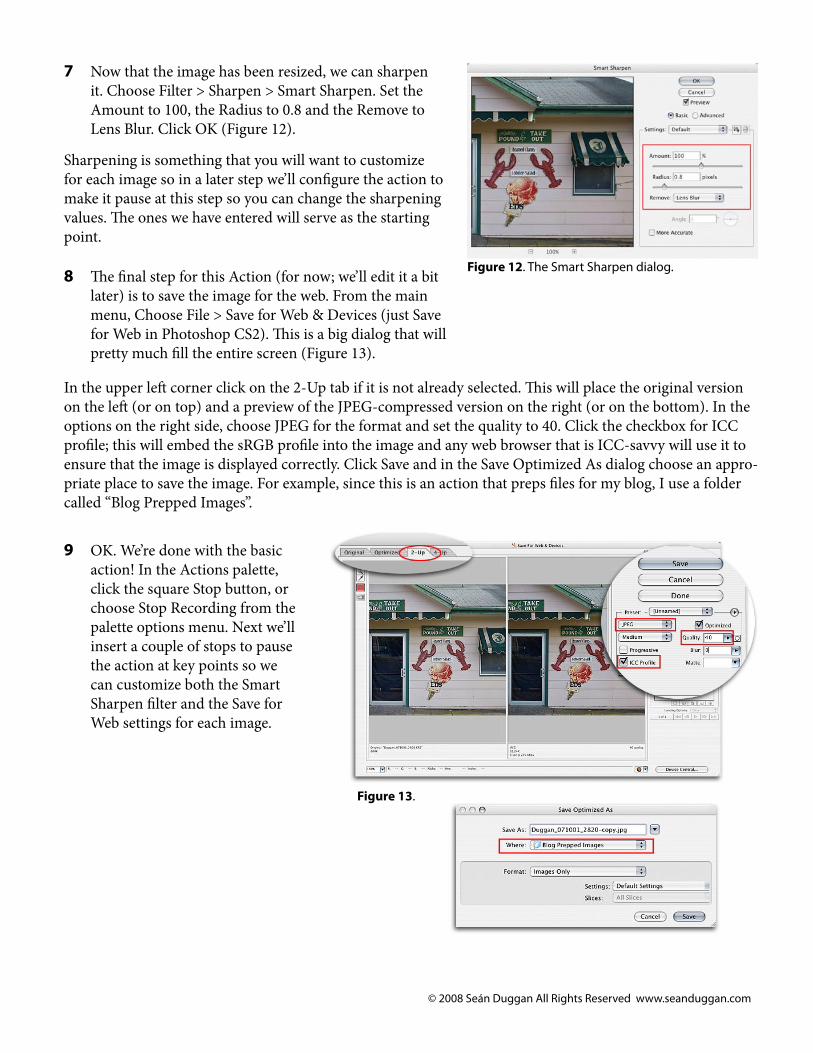
7 Now that the image has been resized, we can sharpen it. Choose Filter > Sharpen > Smart Sharpen. Set the Amount to 100, the Radius to 0.8 and the Remove to Lens Blur. Click OK (Figure 12).
Sharpening is something that you will want to customize for each image so in a later step we’ll configure the action to make it pause at this step so you can change the sharpening values. The ones we have entered will serve as the starting point.
8 The final step for this Action (for now; we’ll edit it a bit later) is to save the image for the web. From the main menu, Choose File > Save for Web & Devices (just Save for Web in Photoshop CS2). This is a big dialog that will pretty much fill the entire screen (Figure 13).
Figure 12. The Smart Sharpen dialog.
In the upper left corner click on the 2-Up tab if it is not already selected. This will place the original version on the left (or on top) and a preview of the JPEG-compressed version on the right (or on the bottom). In the options on the right side, choose JPEG for the format and set the quality to 40. Click the checkbox for ICC profile; this will embed the sRGB profile into the image and any web browser that is ICC-savvy will use it to ensure that the image is displayed correctly. Click Save and in the Save Optimized As dialog choose an appro-priate place to save the image. For example, since this is an action that preps files for my blog, I use a folder called “Blog Prepped Images”.
Figure 13.
9 OK. We’re done with the basic action! In the Actions palette, click the square Stop button, or choose Stop Recording from the palette options menu. Next we’ll insert a couple of stops to pause the action at key points so we can customize both the Smart Sharpen filter and the Save for Web settings for each image.
© 2008 Seán Duggan All Rights Reserved www.seanduggan.com
Testing the Action
The basic action is done. The next step is to take it for a test spin and make some key edits.
If you want to test out the action you just made, navigate to the destination folder where you saved the blog -prepped file when the action was made. Delete this file (it will have the word “copy” appended to the original file name). This is not strictly necessary, but doing so will make it easier to verify that the file is being saved to the right location.
Go back to Photoshop and close the duplicate image and do not save it. Switch back to your original lay-ered master image file. In the Actions palette, click on the Action you just made to make it the active ac-tion. Click the Play button (or use the keyboard shortcut if you assigned one). The action will run pretty fast; before you know it, it’s done.
Check the destination folder and you should see the copy JPEG file there.
Tutorial: Editing an Action
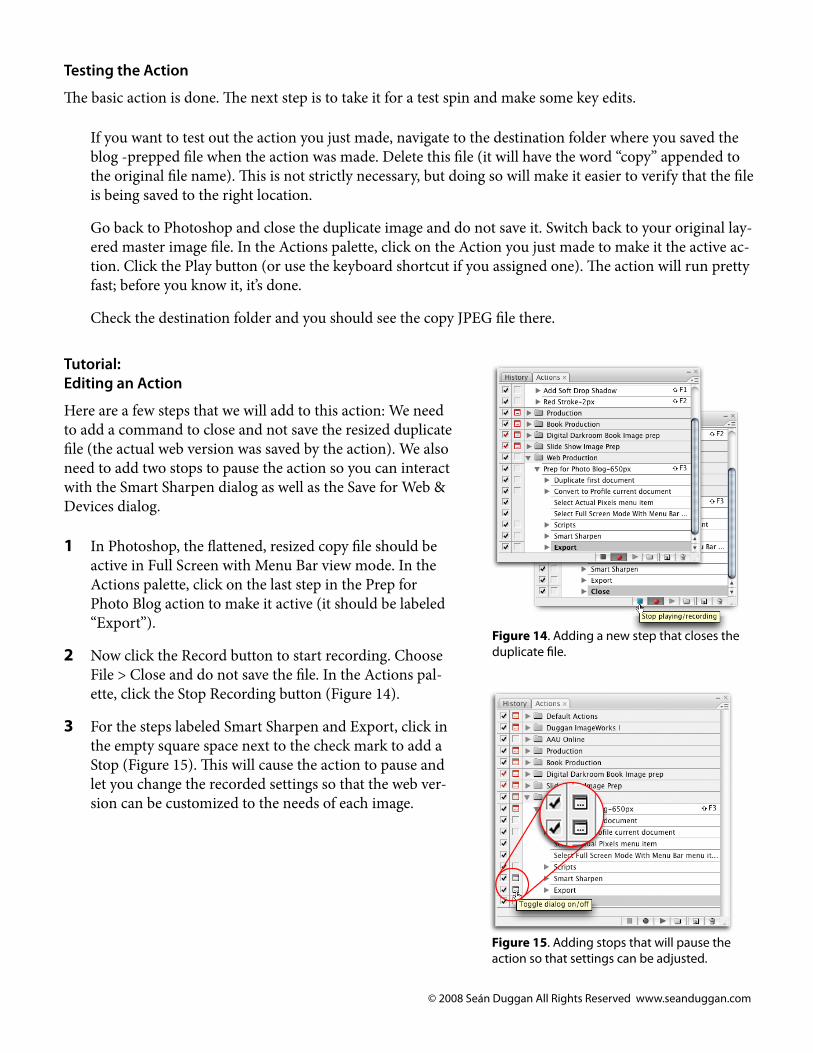
Here are a few steps that we will add to this action: We need to add a command to close and not save the resized duplicate file (the actual web version was saved by the action). We also need to add two stops to pause the action so you can interact with the Smart Sharpen dialog as well as the Save for Web & Devices dialog.
1 In Photoshop, the flattened, resized copy file should be active in Full Screen with Menu Bar view mode. In the Actions palette, click on the last step in the Prep for Photo Blog action to make it active (it should be labeled “Export”).
2 Now click the Record button to start recording. Choose File > Close and do not save the file. In the Actions pal-ette, click the Stop Recording button (Figure 14).
3 For the steps labeled Smart Sharpen and Export, click in the empty square space next to the check mark to add a Stop (Figure 15). This will cause the action to pause and let you change the recorded settings so that the web ver-sion can be customized to the needs of each image.
Figure 14. Adding a new step that closes the duplicate file.
Figure 15. Adding stops that will pause the action so that settings can be adjusted.
© 2008 Seán Duggan All Rights Reserved www.seanduggan.com
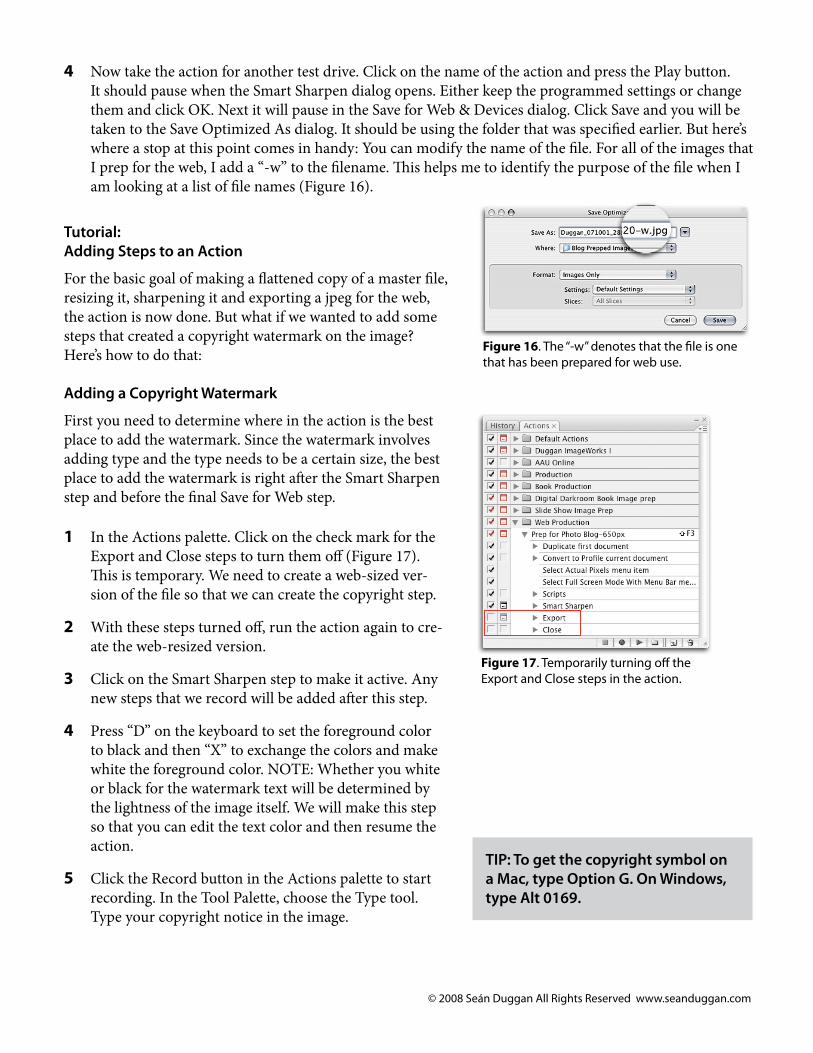
4 Now take the action for another test drive. Click on the name of the action and press the Play button. It should pause when the Smart Sharpen dialog opens. Either keep the programmed settings or change them and click OK. Next it will pause in the Save for Web & Devices dialog. Click Save and you will be taken to the Save Optimized As dialog. It should be using the folder that was specified earlier. But here’s where a stop at this point comes in handy: You can modify the name of the file. For all of the images that I prep for the web, I add a “-w” to the filename. This helps me to identify the purpose of the file when I am looking at a list of file names (Figure 16).
Tutorial: Adding Steps to an Action
For the basic goal of making a flattened copy of a master file, resizing it, sharpening it and exporting a jpeg for the web, the action is now done. But what if we wanted to add some steps that created a copyright watermark on the image? Here’s how to do that:
Adding a Copyright Watermark
First you need to determine where in the action is the best place to add the watermark. Since the watermark involves adding type and the type needs to be a certain size, the best place to add the watermark is right after the Smart Sharpen step and before the final Save for Web step.
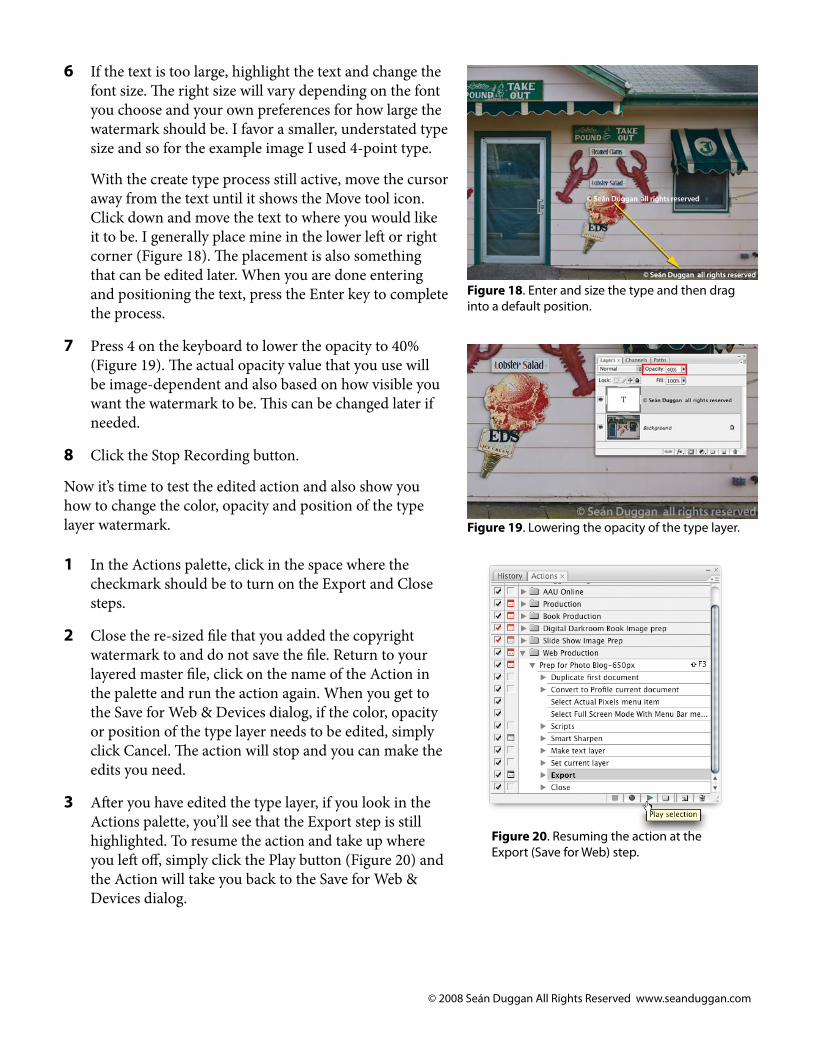
1 In the Actions palette. Click on the check mark for the Export and Close steps to turn them off (Figure 17). This is temporary. We need to create a web-sized ver-sion of the file so that we can create the copyright step.
2 With these steps turned off, run the action again to cre-ate the web-resized version.
3 Click on the Smart Sharpen step to make it active. Any new steps that we record will be added after this step.
4 Press “D” on the keyboard to set the foreground color to black and then “X” to exchange the colors and make white the foreground color. NOTE: Whether you white or black for the watermark text will be determined by the lightness of the image itself. We will make this step so that you can edit the text color and then resume the action.
5 Click the Record button in the Actions palette to start recording. In the Tool Palette, choose the Type tool. Type your copyright notice in the image.
Figure 16. The “-w” denotes that the file is one that has been prepared for web use.
Figure 17. Temporarily turning off the Export and Close steps in the action.
TIP: To get the copyright symbol on a Mac, type Option G. On Windows, type Alt 0169.
© 2008 Seán Duggan All Rights Reserved www.seanduggan.com
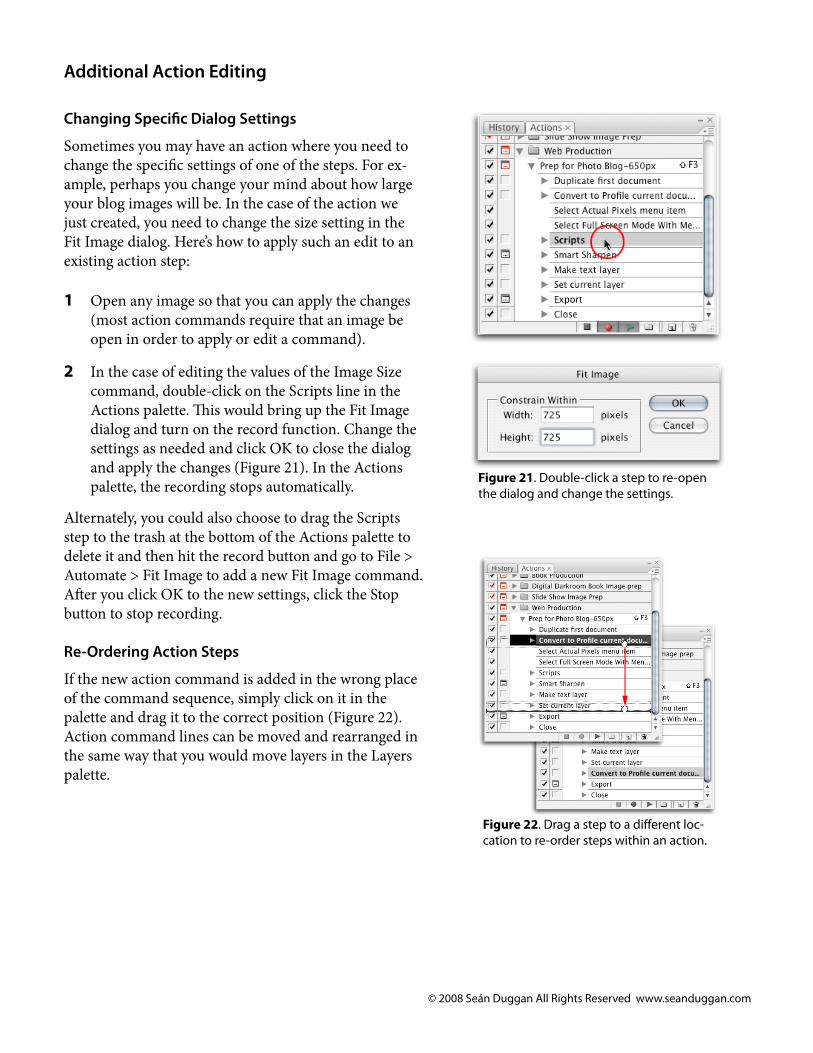
6 If the text is too large, highlight the text and change the font size. The right size will vary depending on the font you choose and your own preferences for how large the watermark should be. I favor a smaller, understated type size and so for the example image I used 4-point type.
With the create type process still active, move the cursor away from the text until it shows the Move tool icon. Click down and move the text to where you would like it to be. I generally place mine in the lower left or right corner (Figure 18). The placement is also something that can be edited later. When you are done entering and positioning the text, press the Enter key to complete the process.
7 Press 4 on the keyboard to lower the opacity to 40% (Figure 19). The actual opacity value that you use will be image-dependent and also based on how visible you want the watermark to be. This can be changed later if needed.
8 Click the Stop Recording button.
Now it’s time to test the edited action and also show you how to change the color, opacity and position of the type layer watermark.
1 In the Actions palette, click in the space where the checkmark should be to turn on the Export and Close steps.
2 Close the re-sized file that you added the copyright watermark to and do not save the file. Return to your layered master file, click on the name of the Action in the palette and run the action again. When you get to the Save for Web & Devices dialog, if the color, opacity or position of the type layer needs to be edited, simply click Cancel. The action will stop and you can make the edits you need.
3 After you have edited the type layer, if you look in the Actions palette, you’ll see that the Export step is still highlighted. To resume the action and take up where you left off, simply click the Play button (Figure 20) and the Action will take you back to the Save for Web & Devices dialog.
Figure 18. Enter and size the type and then drag into a default position.
Figure 19. Lowering the opacity of the type layer.
Figure 20. Resuming the action at the Export (Save for Web) step.
© 2008 Seán Duggan All Rights Reserved www.seanduggan.com
Additional Action Editing
Changing Specific Dialog Settings
Sometimes you may have an action where you need to change the specific settings of one of the steps. For ex-ample, perhaps you change your mind about how large your blog images will be. In the case of the action we just created, you need to change the size setting in the Fit Image dialog. Here’s how to apply such an edit to an existing action step:
1 Open any image so that you can apply the changes (most action commands require that an image be open in order to apply or edit a command).
2 In the case of editing the values of the Image Size command, double-click on the Scripts line in the Actions palette. This would bring up the Fit Image dialog and turn on the record function. Change the settings as needed and click OK to close the dialog and apply the changes (Figure 21). In the Actions palette, the recording stops automatically.
Alternately, you could also choose to drag the Scripts step to the trash at the bottom of the Actions palette to delete it and then hit the record button and go to File > Automate > Fit Image to add a new Fit Image command. After you click OK to the new settings, click the Stop button to stop recording.
Re-Ordering Action Steps
If the new action command is added in the wrong place of the command sequence, simply click on it in the palette and drag it to the correct position (Figure 22). Action command lines can be moved and rearranged in the same way that you would move layers in the Layers palette.
Figure 21. Double-click a step to re-open the dialog and change the settings.
Figure 22. Drag a step to a different loc-cation to re-order steps within an action.
© 2008 Seán Duggan All Rights Reserved www.seanduggan.com
Recording a Message Stop
For some Actions, you may want to insert a message that reminds you that the file needs to be set up a certain way in order for the action to work properly. This can also be useful if you are making an action hat will be used by other people.
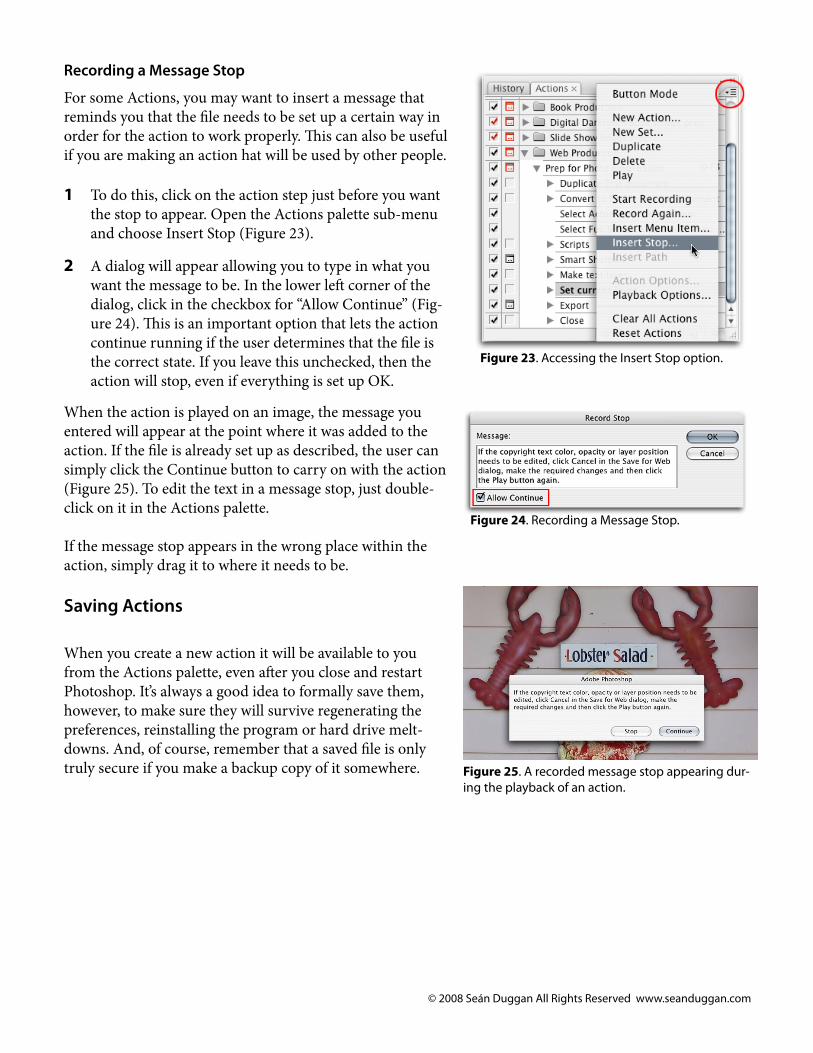
1 To do this, click on the action step just before you want the stop to appear. Open the Actions palette sub-menu and choose Insert Stop (Figure 23).
2 A dialog will appear allowing you to type in what you want the message to be. In the lower left corner of the dialog, click in the checkbox for “Allow Continue” (Fig-ure 24). This is an important option that lets the action continue running if the user determines that the file is the correct state. If you leave this unchecked, then the action will stop, even if everything is set up OK.
When the action is played on an image, the message you entered will appear at the point where it was added to the action. If the file is already set up as described, the user can simply click the Continue button to carry on with the action (Figure 25). To edit the text in a message stop, just double-click on it in the Actions palette.
If the message stop appears in the wrong place within the action, simply drag it to where it needs to be.
Saving Actions
When you create a new action it will be available to you from the Actions palette, even after you close and restart Photoshop. It’s always a good idea to formally save them, however, to make sure they will survive regenerating the preferences, reinstalling the program or hard drive melt-downs. And, of course, remember that a saved file is only truly secure if you make a backup copy of it somewhere.
Figure 23. Accessing the Insert Stop option.
Figure 24. Recording a Message Stop.
Figure 25. A recorded message stop appearing dur-ing the playback of an action.
© 2008 Seán Duggan All Rights Reserved www.seanduggan.com
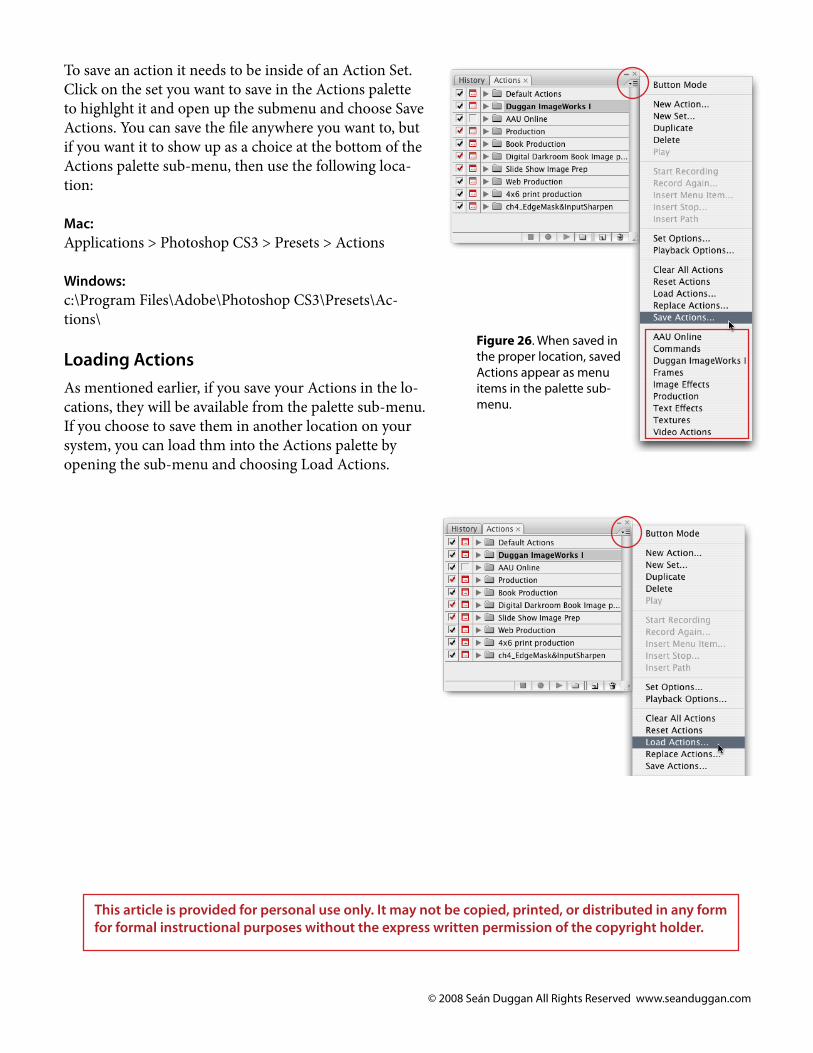
To save an action it needs to be inside of an Action Set. Click on the set you want to save in the Actions palette to highlght it and open up the submenu and choose Save Actions. You can save the file anywhere you want to, but if you want it to show up as a choice at the bottom of the Actions palette sub-menu, then use the following loca-tion:
Mac: Applications > Photoshop CS3 > Presets > Actions
Windows: c:\Program Files\Adobe\Photoshop CS3\Presets\Ac-tions\
Loading ActionsAs mentioned earlier, if you save your Actions in the lo-cations, they will be available from the palette sub-menu. If you choose to save them in another location on your system, you can load thm into the Actions palette by opening the sub-menu and choosing Load Actions.
Figure 26. When saved in the proper location, saved Actions appear as menu items in the palette sub-menu.
This article is provided for personal use only. It may not be copied, printed, or distributed in any form for formal instructional purposes without the express written permission of the copyright holder.