Embed Size (px)
Citation preview

W O R K B O O K

Table of ContentsCurriculum Implementation Framework ......................................................................................................................01
Background ......................................................................................................................................................................................02
How to Use this Workbook ...................................................................................................................................................03
Framework Cheatsheet ...........................................................................................................................................................04
Phase I: Select Materials ........................................................................................................................................................05
Key Action I.1: Plan Your Process ...........................................................................................................................06
Key Action I.2: Establish the Vision........................................................................................................................ 12
Key Action I.3: Develop the Rubric and Prepare for Reviews ........................................................... 15
Key Action I.4: Review, Pilot, and Decide .........................................................................................................20
Key Action I.5: Procure and Distribute Materials .......................................................................................25
Phase II: Prepare to Launch ................................................................................................................................................30
Key Action II.1: Set Goals, Roles, and Monitoring Plan ............................................................................ 31
Key Action II.2: Determine the Plan for Assessment and Grading ................................................37
Key Action II.3: Determine Expectations for Use and the Plan for
Collaborative Planning ............................................................................................................. 46
Key Action II.4: Determine the Plan for Coaching.....................................................................................54
Key Action II.5: Determine the Plan for Training Teachers and Leaders .................................. 61
Finish Key Action II.1: Set Goals, Roles, and Monitoring Plan ............................................................ 67
Phase III: Teach and Learn ................................................................................................................................................... 69
Key Action III.1: Work the Plan and Gather Data .......................................................................................70
Key Action III.2: Step Back and Adjust the Plan ......................................................................................... 74
Key Action III.3: Annually Reset............................................................................................................................... 79
Appendix ............................................................................................................................................................................................84
Starting Point Diagnostic ............................................................................................................................................85
ReflectiveImplementationChecklist ..................................................................................................................86
Selection Plan ......................................................................................................................................................................89
Implementation Plan ......................................................................................................................................................92
Timeline .................................................................................................................................................................................... 95
About Us ............................................................................................................................................................................................. 96

1

2
Background
Our schools are full of children with amazing potential. But, getting kids excited about
learning—especiallywhentheyallhavedifferentstrengthsandneeds—ishardwork,and
too often we ask teachers to do it all on their own. Research shows that providing teachers
withhigh-qualityinstructionalmaterialstosupporttheirteachingisaneffectivestrategy
for increasing student learning. When teachers have great instructional materials, they
can focus their time, energy, and creativity on meeting the diverse needs of students and
helping them all learn and grow.
However, teachers need much more than a new box of materials. They need to
be supported by a team of leaders who recognize that the process of introducing
new instructional materials is a complex one. It demands knowledge of content and
instructional pedagogy, attention to detail, and a keen understanding of how curriculum
connects to other pieces of a district’s plan.

3
How toUSE THIS WORKBOOK
You can download this workbook and use it on your computer, or you can print copies of
the workbook for each member of your team. All the content in this workbook is available
electronically at curriculumsupport.org.
There is also a Resources section on the website that allows you to search for all of the
resources described in the guide. Many of the resources are editable so you can customize
for the needs of your group. As you read through the workbook, names of resources will
be bolded and hyperlinked. Go to the Resources section of the website and search by
phase,keyaction,andsteptofindthetoolsyouneed.
IntheAppendix,you’llfindaStartingPointDiagnosticandaReflectiveImplementation
Checklist that serve as diagnostic tools to help you locate parts of the Framework that
mightbeusefultoyourspecificcontext.
Instruction Partners, 2018
The Curriculum Support Guide is licensed under the Creative Commons Attribution 4.0 International License. To view a copy of this license, visit http://creativecommons.org/licenses/by/4.0/. Note that some external resources linked to in this document may be subject to another license arrangement.

4
FRAMEWORKCHEATSHEET
This document outlines all three phases of the process, each key action
within the phases, and the steps that make up key actions. This can help
you see the whole framework at a more detailed level.
I.1 Plan Your Process• I.1.A Identify the Selection Team and Leader• I.1.B Determine How the Final Decision Will be Made• I.1.C Map the Schedule of Events• I.1.D Establish a Vision of Excellent Instruction• I.1.E Organize Next Steps and Communicate a Plan
Phase I. Select Materials
I.2 Establish the Vision• I.2.A Train the Selection Team and Review Committee• I.2.B Articulate the Vision of Instruction and Core Beliefs
I.3 Develop the Rubric and Prepare for Reviews• I.3.A Solicit Stakeholder Input• I.3.B Develop the Rubric• I.3.C Identify the Options You Will Review• I.3.D Train the Review Committee on the Rubric and Process
I.4 Review, Pilot, and Decide• I.4.A Conduct the Reviews and Gather Feedback• I.4.B Pilot the Materials• I.4.C Make the Final Selection Decision• I.4.D Communicate Decision and Rationale
I.5 Procure and Distribute Materials• I.5.A Understand Your Procurement Options• I.5.B Place and Track Your Orders• I.5.C Communicate a Realistic Timeline• I.5.D Distribute the materials
II.1 Set Goals, Roles, and Monitoring Plan• II.1.A Identify the Implementation Support Team and Leader• II.1.B Map out the Implementation Planning Process • II.1.C Draft the Goals for Successful Implementation
Phase II. Prepare to Launch
II.2 Determine the Plan for Assessment and Grading• II.2.A Study the Assessments in the Curriculum• II.2.B Inventory All Currently Used Assessments for Purpose, Frequency, and Quality• II.2.C Determine the Plan for Common Assessment and What You Will Do with the Data• II.2.D Establish Grading Guidance for the New Materials• II.2.E Organize Next Steps and Communicate the Plan
II.3 Determine Expectations for Use and the Plan for Collaborative Planning• II.3.A Study the Design of the Materials• II.3.B Ensure Every School has Appropriate Time in the Schedule• II.3.C Determine the Yearlong Pacing Schedule• II.3.D Establish Guidance for Common Use and Customization• II.3.E Determine How You will Support Collaborative and Individual Planning• II.3.F Organize Next Steps and Communicate the Plan
II.4 Determine the Plan for Coaching• II.4.A Understand Your Current Coaching Practices• II.4.B Establish Your Observation and Coaching Tool• II.4.C Determine How You Will Support Those Responsible for Coaching• II.4.D Organize Next Steps and Communicate the Plan
II.5 Determine the Plan for Training Teachers and Leaders• II.5.A Understand Available Training Time and Current Plans• II.5.B Study the Training and PD Resources that Come with Your Materials• II.5.C Determine Training Needs for Each Group• II.5.D Determine the Plan and Prepare the Facilitators• II.5.E Organize Next Steps and Communicate the Plan
Phase III. Teach and Learn
III.1 Work the Plan and Gather Data• III.1.A Train, Plan, and Coach Teachers• III.1.B See the Work in Action and Listen to Questions and Concerns• III.1.C Check in to Track the Trends and Solve Quick Problems
III.2 Step Back and Adjust the Plan• III.2.A Prepare Data for the Stepback•III.2.BStepBacktoReflecton Progress and Challenges• III.2.C Adjust the Plan and Communicate the Changes
III.3 Annually Reset• III.3.A Prepare Data for the Annual Stepback• III.3.B Step Back as a Team toReflectonProgressand Challenges• III.3.C Adjust the Goals and Plan for Coming Year

SELECT MATERIALSPhase I
OVERVIEWThe goal of Phase I is to select materials that support a clear and common vision of great
instruction for the subject, with stakeholder participation in the process. Teachers are
central to every great selection story and reported learning from the process when it was
done well.
Successful early implementers:
• Wereclearonthevisionofinstructionfirstsoitcouldinformeverystepoftheprocess
• Involved educators throughout the process in a meaningful way
• Trained the team on the vision and the standards — not only the review process
• Identifiednon-negotiablesandusedthemtoprescreenthelistofoptionssothatreviewers had fewer materials to review and could go deeper into each
• Communicated the process and decision transparently to the community
• Ordered materials for arrival before summer break, or at least before training

6
I.1: PLAN YOUR PROCESS
WHAT IS THE GOAL?The goal of this key action is to plan your selection process.
WHY IS THIS KEY ACTION IMPORTANT?This key action begins once you decide that you need to select new materials. The way
you approach selecting the materials sets the stage for how stakeholders will think and
feel about the materials and implementation journey. If your process has a clear and
compelling vision, especially one that includes engaging teachers and incorporating
perspectives of all members of the community, odds are you’ll build a team of champions
who will stick through the process even when the going gets tough. Among early
implementers, those who were clear about the plan from the start built clarity and
confidence,andthosewhoskippedthiskeyactionoftenexperiencedconfusion,suspicion,
and downstream investment challenges.
Key Action I.1: Plan Your Process
Key Action I.2: Establish a Vision of Excellent Instruction
Key Action I.3: Develop the Rubric and Prepare for Reviews
Key Action I.4: Review, Pilot, and Decide
Key Action I.5: Procure and Distribute Materials
Step I.1.A: Identify the Selection Team and Leader
Step I.1.B: Determine how the Final Decision will be Made
Step I.1.C: Map the Schedule of Events
Step I.1.D: Form the Review Committee
Step I.1.E: Organize Next Steps and Communicate the Plan
EXPLANATION OF LANGUAGE
We use the term Selection Team to refer to the central system team responsible for
guiding this process across a system (full district or network of schools). In school systems
that delegate materials selection to the school, the Selection Team would be a school
level team. This team, facilitated by a Selection Team Leader, designs and manages
the process. The Review Committee is a broader group that engages in the review of
materials.
Phase I: Select

7
I.1.A: IDENTIFY THE SELECTION TEAM AND LEADER
GUIDING QUESTIONS NOTES
i. What subject and/or grade span are you seeking new materials for?
ii. How will the Selection Team be named?
iii. What perspectives are needed on our Selection Team?
Typically, the school system leader
(Director of Schools) or Chief Academic
OfficernamestheSelectionTeamLeader.
The resource Selection Team Process and Team Member Criteria lays out
thedifferentwaystheSelectionTeam,
Selection Team Leader, and Review
Committee can be chosen. At this point in
the process, focus on the Selection Team
Leader and Selection Team. You will learn
more about the Review Committee in Step I.1.D: Form the Review Committee.
Because this team’s job is to plan and
manage the process, keep the team
as small and nimble as possible while
ensuring key perspectives are represented.
See Selection Team Process and Team Member Criteria for considerations in
building the team.
The Selection Team will come together
to design the process in Step C: Map the
schedule of events. That process will
dictatethespecifics,butSelectionTeam
members should have the time to dedicate
several full days of training, planning,
and regular meetings across the selection
process. Check out the Selection Timelines.
The Selection Team Leader is typically
the instructional leader for the system or
the leader for that content area. Selection Leader Competencies lists the key skills
and competencies needed.
You can adapt the Sample Email for Launching the Work of the Selection Team resource and send it to Selection
Team members to launch the work. This
does not include broader communication
to all stakeholder groups — that will
come in Step E: Organize next steps and
communicate the plan.
SeeStepB:Determinehowthefinal
decision will be made for a sample
agenda and prep email for the
launch meeting.
iv. Who will serve on the Selection Team?
v. Who will lead the Selection Team?
vi. When and how will we launch the work with the Selection Team?

8
GUIDING QUESTIONS
I.1.B: DETERMINE HOW THE FINAL DECISION WILL BE MADE
NOTES
i. What are our wishes for the selection process?
ii. Are there any state adoption deadlines or considerations that we need to factor into our process?
iv. Do we plan to pilot the materials?
v. If so, how do we plan to pilot the materials?
vi. How will the final selection decision be made?
vii. When do we need to have our final decision?
Agenda for Planning the Selection Process
is a sample agenda for a planning
meeting.
There are usually process must-haves
that are worth naming from the start.
For example, state laws and adoption
requirements, bargaining agreements, or
localboardpoliciesmayormaynotaffect
your process.
Pilotingaffectsyourtimelineconsiderably.
Although this step is optional, many early
implementers found piloting materials
helpful in surfacing the challenges and
best practices for using the materials.
It also helped build investment and
excitement around the materials.
Guidance on Pilots and Selection provides
piloting options and the pros and cons
experienced by early implementers.
Naminghowthefinaldecisionwill
be made allows everyone to see and
understand their roles. The resource
Selection Decision-Making Approaches
sharesafewdifferentoptions.The
EdReports Selection Case Study shares a
case study of one district’s approach.
When choosing the decision date, factor in
sufficienttime(afterthedecisionismade)
to order materials. Use the Selection Timelines and guidance from Key Action
I.5: Procure and distribute materials.
iii. Are there any local policies that we need to factor into our process?

9
GUIDING QUESTIONS
I.1.C: MAP THE SCHEDULE OF EVENTS
NOTES
i. What is our ideal selection date?
ii. What key events do we want to include in our selection process?
iii. What is the timeline of events for our process?
iv. Who is responsible for each event?
v. What Selection Team routines do we need to support this process?
In this step, your Selection Team backward
maps the selection process. Download the
Selection Plan template, which you can use
to organize your decisions and next steps.
This template can serve as an organizing
document during Phase I.
Go to the Description of Selection Events
for a list of common events in the selection
process that can be used as a starting
point. Begin setting up times for events in
the Selection Plan.
Our sample Selection Timelines can serve
as a starting point for you to use.
Most systems found it helpful to order
materials three months in advance of
when they’re needed. Make sure to factor
this into your timeline.
Some regular meetings and/or email
updates serve to keep Selection Teams on
the same page.

10
GUIDING QUESTIONS
I.1.D: FORM THE REVIEW COMMITTEE
NOTES
i. Given how the selection decision will be made, what is the Review Committee’s job?
ii. What is the time commitment?
iii. What compensation or recognition can we offer?
iv. What perspectives do we need?
v. How many committee members will we need?
vi. How will we recruit and advertise the opportunity?
vii. What process will we use for nominations and applications?
viii. How will we select Review Committee members?
The Review Committee plays a particularly
critical role in the selection of materials.
Look back at your notes from the Selection Team Process and Team Member Criteria to revisit the role of the Review Committee
and the Selection Plan for your key events
timeline to identify the time commitment
and any key dates for the Review
Committee.
The Review Committee Job Description is
a sample job description for the Review
Committee members that you can use as
a starting point.
Selection Team Process and Team Member Criteria has key considerations for the
composition of your Review Committee.
Selection Team Process and Team Member Criteria highlights approaches that early
implementers used to select Review
Committee members.
The resource Equitable Committee Recruitment Guidance includes a set of
key questions to think through in order to
ensure a fair recruitment process.

11
GUIDING QUESTIONS
I.1.E: ORGANIZE NEXT STEPS AND COMMUNICATE THE PLAN
NOTES
i. What groups in our community have an interest in the outcome of this process?
ii. What will each stakeholder group want to know?
iii. What communication channels already exist that we can use to communicate with each group?
iv. What are the key messages that we want to reinforce in all communications about our materials selection and implementation?
v. What will each stakeholder group want to know about this selection process?
vi. What will each stakeholder group want to know about why we designed this particular process?
vii. How do we plan to proactively communicate this information? Who will deliver the communication? When?
viii. What questions do we expect we will get? How will we answer them?
Proactively thinking through your
stakeholders’ needs and questions and
designing your communications to
addresstheirneedsbuildsconfidencethat
you have everyone’s interests at heart.
Use the Selection Plan template, which
allows you to identify key stakeholder
groups, and see the Stakeholders for Selection resource for a list of the common
groups and subgroups.
You will keep coming back to this
stakeholder list throughout the process.
Go back to your Selection Plan to make
sure you have included communication
to stakeholder groups. Key Messages on the Selection Process includes some of the
commonly cited key messages.
Go back to your Selection Plan to review
the decisions you made as a Selection
Team.
For each stakeholder group, identify
the key information that you want
to communicate. Use the Selection Plan template to map out your
communications.
Download the Email for Communicating About the Selection Process and the
PowerPoint for Communicating About the Selection Process resources to use
as a starting point to communicate your
process.
Role playing (which can be awkward
but equally useful) can help make sure
Selection Team members are on the same
page as questions come up.

12
I.2: ESTABLISH THE VISION
WHAT IS THE GOAL?The goal of this key action is to prepare the Selection Team and Review Committee to
understandthestandardsanddevelopasharedvisionofeffectiveinstructionforeach
relevant subject for all students.
WHY IS THIS KEY ACTION IMPORTANT?Interviewswithearlyimplementerswereclearandconclusive:tomakeadifferencein
student learning, materials selection and implementation has to start and end with a
vision of great instruction for students. From the start, everyone involved needs to center
on that aspiration. Otherwise, this process will become an exercise in compliance. Early
implementersthatlaunchedintorubricdevelopmentwithoutfirstdevelopingacommon
understanding of the expectations for students and vision of instruction saw competing
visionspullingindifferentdirectionsduringselectionand/orimplementation.Thisisthe
keyactionthatdifferentiatedselectionsuccessamongearlyimplementers.
Key Action I.1: Plan Your Process
Key Action I.2: Establish the Vision
Key Action I.3: Develop the Rubric and Prepare for Reviews
Key Action I.4: Review, Pilot, and Decide
Key Action I.5: Procure and Distribute Materials
Step I.2.A: Train the Selection Team and Review Committee
Step I.2.B: Articulate the Vision of Instruction and Core Beliefs
EXPLANATION OF LANGUAGE
We use the term expectations for students interchangeably with standards. These terms
refer to the stated expectations for student performance for that year. We also reference
sample test items, meaning sample items from your state assessment or similar state
assessments. We use the terms content area and subject interchangeably to refer to the
discipline of focus (math, ELA, etc.). We use the term vision of instructional excellence
todescribeastatementoftheessentialelementsofeffectiveinstructionforthatcontent
area,informedbycontent-specificpedagogicalpractices.Weusethetermwalkthrough
tool to describe an observation guide that can be used on an informal, regular basis
toreflectonthecontentfundamentalsinthevision.Weusethephrasecore beliefs to
describe the foundational principles about student learning that will guide and support
selection and implementation.
Phase I: Select

13
GUIDING QUESTIONS
I.2.A: TRAIN THE SELECTION TEAM AND REVIEW COMMITTEE
NOTES
i. What are our desired outcomes for this training?
ii. What are the key activities we want to prioritize?
iii. Who will lead this training?
iv. If we are doing it in-house, how many facilitators do we need?
v. How much time do we need?
vi. Where and when will it take place?
vii. What materials will we need?
viii. What do participants need to do in advance?
ix. What feedback do we want to get from participants?
Educators bring a variety of experiences
and perspectives to this work. Establishing
a common foundation and viewpoint of
the subject area prior to selection gives
everyone a common starting point.
This training should feel like school —
doing problems and tasks together as a
group. This should not be about “breaking
down the standards,” but rather seeing
what the standards look like in action.
Go to the resource Standards Training Guidance and Examples to see key
elements of standards training, key
content pedagogy for each subject, and
PowerPoints and materials.
Whoever facilitates this training needs to
know the standards and content discipline
deeply,andalsobeeffectiveatdesigning
and facilitating adult learning.
Generally, your options are:
• Leverage someone in your system
• Find someone in a neighboring system
• Ask for help from the state or regional support centers
• Find an independent consultant or PD provider that can come to you
• Send your team to a conference
The Email for Communicating Standards Training to the Review Committee resource
is a sample email for communicating
training information to participants.

14
GUIDING QUESTIONS
I.2.B: ARTICULATE VISION OF INSTRUCTION AND CORE BELIEFS
NOTES
i. What is the vision of instructional excellence for this subject that we want to anchor our work?
ii. What would we want to see in instruction in every lesson?
iii. What would we want to see in instruction in every unit?
iv. What are the core beliefs that will be the foundation for our work?
v. How do we anticipate that these core beliefs will be challenged? How will we handle it if/when they are?
A vision is most concretely articulated as
a walkthrough tool — what would we want
to see in the enacted daily instruction in
this subject? Some aspects of the vision
may feel like they live at the unit (not
daily) level. The Vision Statements and Tools resource includes sample vision
statements.
Some early implementers took the
Selection Team and Review Committee to
observe classrooms or watch videos of a
lesson to look for evidence of the vision
and standards in action. These experiences
oftenrevealeddifferencesofopinionthat
helpedrefinethevisionandkeyneedsfor
the materials.
Changing materials often accompanies
a fundamental shift in expectations for
students. Naming your agreements about
core beliefs (i.e. that all students are
capable of high-level work) can create a
touchstone you can return to throughout
the process. The resource Core Beliefs
gives you a starting point.
For early implementers, this was the
firstplacethatquestionsaboutwhether
students would be able to do the work
came up. See the resource Key Messages for Maintaining High Expectations for Students for research and talking points
that you can use in these conversations.

15
I.3: DEVELOP THE RUBRIC AND PREPARE FOR REVIEWS
WHAT IS THE GOAL?Thegoalofthiskeyactionistodeterminethefinalrubricyouwilluse,whatmaterialsyou
are going to review, and prepare the Review Committee to conduct the reviews. The goal is
also to use this moment to gather broad stakeholder input on the wishes for the materials
to inform to process.
WHY IS THIS KEY ACTION IMPORTANT?Gettingclearaboutwhatismostessentialtoyourfinalmaterialsishardbutimportant
work. Doing this before anyone opens a book allows reviewers to know what they need
to look for and for the community to trust that there are objective criteria guiding the
process. Then, a clear operational plan for how the reviews will take place and a training
plan to ensure the Review Committee knows what they should look for allows for everyone
to be ready for the reviews.
Key Action I.1: Plan Your Process
Key Action I.2: Establish the Vision
Key Action I.3: Develop the Rubric and Prepare for Reviews
Key Action I.4: Review, Pilot, and Decide
Key Action I.5: Procure and Distribute Materials
Step I.3.A: Solicit Stakeholder Input
Step I.3.B: Develop the Rubric
Step I.3.C: Identify the Options You will Review
Step I.3.D: Train the Review Committee on the Rubric and Process
EXPLANATION OF LANGUAGE
We use the word rubric to refer to a clear articulation of the criteria and a vision into what
evidence will be required to evaluate those criteria. We use the distinction between non-
negotiable criteria and nice-to-have criteria as a method of prioritization.
Phase I: Select

16
GUIDING QUESTIONS
I.3.A: SOLICIT STAKEHOLDER INPUT
NOTES
i. What do we want to learn from each stakeholder group?
ii. How are we going to get this input?
iii. Who is responsible for gathering input?
iv. When will this be done?
v. When and how will we see the information?
This is a powerful opportunity to gather
upfront stakeholder feedback and begin to
build investment.
This step would ideally be completed with
data compiled before developing the
rubric.
Questions for Naming Curriculum Criteria is
a starting point for the kinds of questions
you can ask in a survey or focus group.
Many early implementers valued a
combination of a survey for breadth and
focus groups for depth.
The key upfront perspectives that early
implementers valued were 1) broad
teacher perspective for all teachers that
will be asked to use the materials and 2)
parent and family perspectives.
Return to your Selection Plan template to
organize next steps.

17
GUIDING QUESTIONS
I.3.B: DEVELOP THE RUBRIC
NOTES
i. What do we need in our materials given our vision of instructional excellence?
ii. What are must-haves? What are nice-to-haves?
iii. What matters most to our community?
iv. For the must-haves, what would they look like to meet that criteria?
v. What evidence do we need to look for to determine if the must-haves meet our bar?
The resource Curriculum Criteria includes
an initial list of questions to consider when
determining criteria as well as sample
criteria early implementers used that you
can use as a starting point.
The team that develops the rubric can be
the Selection Team or a combination of
the Selection Team and Review Committee.
These guiding questions invite you
to develop a rubric. Check out the
Instructional Materials Evaluation Tool (IMET) from Student Achievement Partners
to see an example rubric and review tool.

18
GUIDING QUESTIONS
I.3.C: IDENTIFY THE OPTIONS YOU WILL REVIEW
NOTES
i. Given our must-haves, which materials should we review?
ii. Are there any materials that do not meet the minimum requirements that we can rule out before the review?
iii. What is the timeline that reviewers will have to conduct the reviews?
iv. What materials will reviewers need access to and how will we get them access?
v. How will we collect Review Committee notes and final scores?
The EdReports website is a well-respected review of available math and ELA materials.ThisspecificEdReports resource provides tips and guidance for the materials review process.
If you are using a recommended list from your state as your starting point (and you have the option of a waiver), it may be beneficialtolookbeyondthelisttoensurethat there aren’t any additional high-quality materials worth reviewing.
Every set of materials you review will requiresignificanttimeforeachandeveryreviewer. Narrowing the list before the broaderreviewwillsignificantlyimprove
theefficiencyoftheprocess.
Depending on your review team, you may
need to identify the list of materials you
will review before this step.

19
GUIDING QUESTIONS
I.3.D: TRAIN REVIEW COMMITTEE ON RUBRIC AND PROCESS
NOTES
i. What key knowledge and skills will Review Committee members need to conduct reviews?
ii. What key activities do we need to engage in as part of this training?
iii. Who will deliver this training?
iv. When and where will this training take place?
v. What materials do we need to prepare for it?
This presumes that the team has already
been trained on the standards and key
content pedagogy.
This can typically be done in 1–2 sessions
with the Review Committee.
Check out the Review Committee Training Agenda, Email, and Survey resource for
samples of each.

20
I.4: REVIEW, PILOT, AND DECIDE
WHAT IS THE GOAL?The goal of this key action is to come to a decision about the best materials to serve your
instructional vision and to communicate the decision to all stakeholder groups.
WHY IS THIS KEY ACTION IMPORTANT?Makingthefinalselectiondecision,informedbyrobustreviewsandlivetrialsifpossible,
allows you to present the best choice for your system. This is a big commitment and the
decision should not be made until the Selection Team is ready. No materials are perfect
and all will require implementation considerations. Once ready, communicating the
decisioneffectivelyshowsasenseofdirectionandbuildsinvestment.Movingforward
with a decision allows your system to begin to map these considerations and prepare for
launch.
Key Action I.1: Plan Your Process
Key Action I.2: Establish the Vision
Key Action I.3: Develop the Rubric and Prepare for Reviews
Key Action I.4: Review, Pilot, and Decide
Key Action I.5: Procure and Distribute Materials
Step I.4.A: Conduct the Reviews and Gather Feedback
Step I.4.B: Pilot the Materials
Step I.4.C: Make the Final Selection Decision
Step I.4.D: Communicate the Decision and Rationale
EXPLANATION OF LANGUAGE
We use the term pilot to refer to any trial of the materials before selection. Pilots can be
a single unit or a full year and can include a small number of teachers or entire schools or
grades.
Phase I: Select

21
GUIDING QUESTIONS
I.4.A: CONDUCT THE REVIEWS AND GATHER FEEDBACK
NOTES
i. Which materials had the strongest reviews?
ii. Are there any we can rule out?
iii. What were the trends in strengths and concerns for the top-rated materials?
iv. Does our budget match the cost of the top-rated materials?
Agenda for Materials Review and Discussion is a sample agenda for
conducting the review and leading a
debrief conversation.
Remember to gather feedback based
on your rubric in Step I.3.B: Develop the rubric.
Thespecificcostswillbecalculatedin
Key Action I.5, Step A: Understand your
procurement options. For now, this cost
consideration allows you to ensure that
continuing the conversation about the
finalistsisviable.

22
GUIDING QUESTIONS
I.4.B: PILOT THE MATERIALS
NOTES
i. What do we want to learn from the pilot?
ii. How are we going to collect and evaluate the implications of the pilot?
iii. What grade or teachers would be best for our pilot group?
iv. Which units will we pilot?
v. What materials, training, or orientation do pilot teachers need before they launch?
vi. What did we learn from the pilot to inform selection?
vii. What did we learn from the pilot to inform needed implementation support?
Pilots can be conducted with multiple sets of materials to distinguish between them as part of decision-making or after you haveafrontrunnertoconfirmthedecisionand inform implementation.
A pilot can take as little time as one unit or as much as a year. The resource Guidance on Pilots and Selection provides overviews of pilot purposes and design considerations. Page 27 of Lift Education’s Instructional Materials Implementation Guidebook also outlines some of the benefitsofpilotinginstructionalmaterials.
Pilots will bring up plenty of questions. Make sure you have a way of logging all the questions that come up because these will only intensify with full scale implementation.
Not all early implementers chose to pilot. The ones who did shared that it was helpful for surfacing strengths and challengesofdifferentmaterials.Thisisanoptional step, but can be very helpful for better understanding the materials and
gaining investment across the system.
Setting up the pilot with a clear sense of
what you are looking to learn and how
you will test the materials gives teachers a
starting point to organize their trial.
You can look at how to set up training on
pilot materials in Phase II, Key Action 5:
Determine the plan for training teachers
and leaders.
Return to the rubric and non-negotiable
criteria to anchor the conversation
about what challenges should inform
implementation versus selection.

23
GUIDING QUESTIONS
I.4.C: MAKE THE FINAL SELECTION DECISION
NOTES
i. Which materials are we going to select?
ii. Why did we select these materials?
iii. What are we most excited and optimistic about with these materials?
iv. What do we anticipate will need attention during implementation with these materials?
You outlined how you intended to make
the decision in Key Action I.1, Step B:
Determinehowthefinaldecisionwillbe
made. Now it is time to do so.
Remember, this is about supporting and
strengthening instruction. This decision
is a big one, but materials alone do not
guarantee great instruction.

24
GUIDING QUESTIONS
I.4.D: COMMUNICATE THE DECISION AND RATIONALE
NOTES
i. How will we communicate the final decision?
ii. Is there a sequence we need to plan for how we roll out the decision? Who will communicate what?
iii. What are the key talking points that we want to reinforce in all communications?
iv. What questions will each group of stakeholders have, and what answers can we have ready?
For each stakeholder group, identify
the key information that you want to
communicate. You can use the notes in
your Selection Plan from Key Action I.1,
Step E: Organize next steps and
communicate the plan.
The Email Sharing Selection Decision and Rationale and PowerPoint Sharing Selection Decision and Rationale resources
are a sample email and PowerPoint
you can use as a starting point to
communicate your process.
Role playing (which can be awkward
but equally useful) can help make sure
Selection Team members are on the same
page as questions come up.
The Curriculum Talking Points and FAQ on Selection is a template with talking points
and frequently asked questions.
You will get questions that you are not
going to be able to answer and will need
to work through in Phase II. Do not try to
answer implementation questions right
now — but do make a promise you’ll be
able to keep about when you will be able
to answer them.

25
I.5: PROCURE AND DISTRIBUTE MATERIALS
WHAT IS THE GOAL?The goal of this key action is to procure all necessary materials and get them into
teachers’ hands before training.
WHY IS THIS KEY ACTION IMPORTANT?There is nothing more frustrating than being asked to try something new, but not
being given the resources you need for it to be successful. And nothing will undermine
confidenceinthesupportasystemleaderpromisesthangettingmaterialslaterthan
promised.Ontheflipside,thereisnothingmorefunthangettingthematerials,opening
them,andleafingthroughthemforthefirsttime.Oncethedecisiononthecurriculumhas
beenmade,thefirstquestionteacherswillaskis“WhendoIgetmymaterials?”System
leadershavealotofoptionsforhowtheycanobtaindifferentmaterialstoday.Thisis
good because it can free up funds, but it can also complicate decision-making. Getting this
step right — a step that is historically a pain for all involved — is a refreshing change and
deeply investing for all involved. Hopefully you have worked this into your timeline already.
If not, don’t worry. Get your information together, make decisions, and communicate
realistic expectations for delivery that you can meet or beat.
Key Action I.1: Plan Your Process
Key Action I.2: Establish the Vision
Key Action I.3: Develop the Rubric and Prepare for Reviews
Key Action I.4: Review, Pilot, and Decide
Key Action I.5: Procure and Distribute Materials
Step I.5.A: Understand Your Procurement Options
Step I.5.B Place and Track Your Orders
Step I.5.C: Communicate a Realistic Timeline
Step I.5.D: Form the Review Committee and Distribute Materials
EXPLANATION OF LANGUAGE
We use the word procure to describe the process of obtaining materials. We use the word
distribute to include all actions needed to get materials into teacher and student hands.
The term open source here refers to materials that are in the public domain and therefore
may need to be printed but will not need to be purchased. We use the word distributor
to refer to anyone — a developer or printer or third party — that produces and shares
materials.
Phase I: Select

26
GUIDING QUESTIONS
I.5.A: UNDERSTAND YOUR PROCUREMENT OPTIONS
NOTES
i. Who needs to be engaged in our procurement planning?
ii. What is our procurement process?
iii. For our selected curriculum, what are all the possible resources we might need?
iv. What are the priority resources?
v. What are the options for how we could print or procure each resource?
vi. What is the unit cost for each option?
vii. What enablers (i.e. technology) will we need?
viii. What’s the total number of materials needed?
Thisstepmayinvolveadifferentset
of people than the Selection Team.
Procurement Responsibilities outlines
all tasks in the procurement process
and provides a template to organize
everyone’s responsibilities.
Everysystemwillhaveadifferentcontext
for these decisions due to state policy and
local requirements. Bidding processes,
board approvals, contracting options, and
grant funding requirements should be
thought through upfront.
In the past, textbooks were consistently
purchased directly from the developer.
Today, systems have more options,
particularly for the open source materials.
Be sure to explore all options, as they
cansavesignificantcosts.Procurement Options gives an overview of the current
distributors for commonly used materials.
The Materials Procurement Organization Template can help you organize the list of
all possible materials.
In certain cases (more often for ELA
materials), you will need to decide which
units you are going to teach in order
to make the procurement decisions. If
that is the case, skip to Key Action II.2: Determine the plan for assessment and grading and return to this step as soon as
you can determine the units.
Remember to account for special
education teachers, ELL teachers,
homebound teachers and students, and
any alternative school or alternative
program teachers and students.
Including extras in your initial order saves
future coordination due to misreported
student numbers, new students coming to
the school, or migration between schools.

27
GUIDING QUESTIONS
I.5.B: PLACE AND TRACK YOUR ORDERS
NOTES
i. What are we are going to purchase now?
ii. Which materials do we want to procure as soon as possible? When do we think that will be?
iii. What will be the recurring costs? (Which materials are reusable, and which will be reordered each year?)
iv. How will we track all purchases through delivery?
v. When will we need to follow up with vendors?
Go back to the Procurement Options
resourceandmakefinaldecisionsabout
purchasing.
Depending on the structure of the
materials, it may be helpful to order the
firstunitquicklysothatmaterialsarrive
sooner, and stagger the purchase of
additional units.
Tracking Materials Orders is a tracking
template for all materials with a sample
calendar to track when to follow up with
vendors.

28
GUIDING QUESTIONS
I.5.C: COMMUNICATE A REALISTIC TIMELINE
NOTES
i. What will each stakeholder group want to know about the materials timeline?
ii. What are the key messages we want to share about the materials arrival?
iii. How do we plan to proactively communicate this information? Who will deliver the communication? When?
iv. What questions do we expect we will get? How will we answer them?
Ensure that you can underpromise and
overdeliver on the timeline.
Go back to your Selection Plan to review
your stakeholder lists.
For each stakeholder group, identify
the key information that you want to
communicate.
Email Communicating Materials Ordering and Distribution is a sample email that you
can adapt.
Role playing (which can be awkward but
equally useful) can help make sure all
parties are on the same page as questions
come up.

29
GUIDING QUESTIONS
I.5.D: FORM THE REVIEW COMMITTEE AND DISTRIBUTE MATERIALS
NOTES
i. Where will we store the materials before distribution can occur?
ii. How will we inventory materials once they arrive?
iii. How will we inventory and track materials once they are distributed to schools?
iv. What information does each teacher need to record? How will they record it?
The resource Tracking Materials Orders is
a sample inventory plan that you can use
as a starting point.

PREPARE TO LAUNCHPhase II
OVERVIEWThe goal of Phase II is to develop an intentional implementation plan — thinking through
what it will take to use and support the materials well.
Successful early implementers:
• Understood what great implementation of the materials would look like and the kind of planning it would require in a practical way
• Kept teachers and leaders on the same page and invested equal time in deeply understanding the materials
• Had a plan for what they wanted all teachers to use within the materials (assessments and materials) and how they would support planning and use
• Got ahead of mixed signals that might come from evaluation structures, grading policies, and old lesson planning requirements
• Developed a clear picture of what everyone at the system level and school level needed to do in order to support implementation and communicated those responsibilities clearly
• Knew their plan would not be perfect and set time aside during the school year to step back and adjust the support structures

31
II.1: SET GOALS, ROLES, AND MONITORING PLAN
WHAT IS THE GOAL?The goal of this key action is to set your implementation goals, organize roles and
responsibilities, and determine how you will monitor progress and step back to adjust
your plans. We recommend this be done in two parts — at the beginning of Phase II and
thenfinishedafterallotherPhaseIIplanning.Theworkdescribedtakesplaceattwo
levels — system and school. Implementation Support Teams can be school-based or
include multiple schools. While the work of the system and school isn’t always exactly the
same, the resources and guidance support planning for both teams. Refer to the notes
and resources throughout Phase II for considerations on what decisions should be school
versus system level.
WHY IS THIS KEY ACTION IMPORTANT?Naming the team that is responsible for supporting implementation and the goals creates
focusandaclearaimfortheimplementationeffort.Thiskeyactionisimportantbecause
it sets the conditions for all the planning and implementation support to follow.
Key Action II.1: Set Goals, Roles, and Monitoring Plan
Key Action II.2: Determine the Plan for Assessment and Grading
Key Action II.3: Determine Expectations for Use and the Plan for Collaborative Planning
Key Action II.4: Determine the Plan for Coaching
Key Action II.5: Determine the Plan for Training Teachers and Leaders
Step II.1.A: Identify Implementation Support Team and Leader
Step II.1.B: Map out the Implementation Planning Process
Step II.1.C: Draft the Goals for Successful Implementation
EXPLANATION OF LANGUAGE
We use the phrase Implementation Support Team to refer to the team that will work
together to plan for curriculum implementation. Implementation includes all plans for use
and instructional support. We use the phrase progress monitoring plan to refer to the
work you will need to do in order to know how things are going.
Phase II: Prepare

32
II.1.A: IDENTIFY IMPLEMENTATION SUPPORT TEAM AND LEADER
GUIDING QUESTIONS NOTES
i. What perspectives do we need on the Implementation Support Team?
ii. Who will serve on the Implementation Support Team?
iii. Who will lead the Implementation Support Team?
The Implementation Support Team will
engage across all implementation work
(Phases II and III). This team will ultimately
be accountable for the success of the
implementationeffort.
Some of the decisions in Phase II are
system level decisions, but many are
school level decisions. This team will vary
based on the size of system, but should
always include school perspectives and
teacher perspectives in addition to central
system leaders.
The resource Implementation Support Team Roles and Responsibilities contains
notes on how you might think about this
team.
The work of this phase will include
assessment implications, grading, pacing,
scheduling, coaching, planning support,
and training. The person leading this
team should have the scope of authority
to navigate decisions across these
instructional systems.
The document Implementation Support Team Leader Roles and Responsibilities
outlines things to consider in the selection
of the team leader.

33
II.1.B: MAP OUT THE IMPLEMENTATION PLANNING PROCESS
GUIDING QUESTIONS NOTES
i. What are the decisions we will need to make before teachers start using the materials?
ii. When can we launch our work as an Implementation Support Team?
iii. How often will we need to meet as an Implementation Support Team?
iv. How will we track decisions and plans?
v. What do we need to do to train any new members that were not part of the selection process?
The Phase II Decision-Making Map previews
the decisions you will make as you prepare
to launch. It’s important to identify which
decisions will be made at the school level
versus system level.
The Phase II Decision-Making Template
provides space for you to outline each
decision and the people that need to be
involved.
See Phase II of the timeline from the
vignette case study for one way of
organizing all of the meetings.
The Agenda for Phase II Launch Meeting
is an adaptable resource you can use and
send your team to prepare.
Based on the decisions you need to make
and who will be involved, go back to
your Implementation Plan template and
determine how you will take notes and
track next steps. There will likely be a
version of the Implementation Plan at the
system level and school level. Systems and
schools should determine the best way to
organize and align the work.
Go back to Step I.2.B: Articulate the vision of instruction and core beliefs
for any members who were not part of
the selection process to ensure that they
understand the standards and vision.

34
II.1.C: DRAFT THE GOALS FOR SUCCESSFUL IMPLEMENTATION
GUIDING QUESTIONS NOTES
i. How will we work as a team?
ii. What are the norms we will operate with in our work together?
iii. What are our goals for effective implementation?
iv. How do these goals connect to our system’s mission, values, and goals?
v. What are the core beliefs that underpin our goals?
vi. What will success look like over time?
vii. What will success look like in year one?
Implementation Team Charge is a
draft charge that you can put to the
Implementation Support Team.
The resource Goals for Implementation
contains a list of sample goals and
outcomes for the implementation work,
along with considerations from early
implementers. Key Action II.2: Determine
the plan for assessment and grading will
inform and support your goals around
student outcomes.
If you have not done so already, go to
Key Action I.2: Establish the vision to
articulate the core beliefs. This will help
with communication.
This is the time to think through the next
few years and look at your goals in a
bigger context — don’t be afraid to think
beyond year one.
Return to your Implementation Plan to
support goal setting. Your team will come
backtofinalizethesegoalsattheendof
Phase II.

35
II.1.D: REVISIT AND SET IMPLEMENTATION GOALS ANDDETERMINE HOW YOU WILL MONITOR PROGRESS
GUIDING QUESTIONS NOTES
i. What, if any, adjustments do we need to make to ourdraft goals for implementation?
ii. How will we know if we reach our goals?
iii. For each goal, when will we know if we are on track?
iv. What data will we review?
v. Operationally, what needs to happen to get this data?Who is responsible?
vi. In addition to monitoring progress, how will we collectstakeholder feedback?
vii. When will we step back to review our progress toward ourgoals holistically? Who will be part of these stepbacks?
viii. Who should each group of stakeholders go to withquestions?
Youfirstestablisheddraftwishesand
goals in Step II.1.C: Draft the goals for successful implementation.
Goals tend to stay fairly stable for the
year, but you will have the opportunity to
evaluate and adjust the measures every
quarter in Key Action III.2: Step back and adjust the plan.
The resource Progress Monitoring Plan and Approaches includes common progress
monitoring approaches for the frequently
used goals.
Record your plans for progress monitoring
in your Implementation Plan. There will
likely be both system and school level
progress monitoring needs.
For school level roles and responsibilities,
you can see sample distributions and
guidance in the Roles and Responsibilities Matrix.
The Stakeholder Feedback Survey includes
sample questions that can be asked for
periodic feedback.
Earlyimplementersbenefitedfromregular opportunities to bring the team together to look at how things were going and adjust course. Progress Monitoring Practices shares some best practices around progress monitoring and frequency suggestions. Page 11 from LIFT Education’s Instructional Materials Implementation Guidebook provides suggestions for how to use student worksamplesasaneffectivemeansofmonitoring progress along the way. The resource Challenge Solving Protocols outlinessomeeffectiveprotocolstoshareemerging challenges.
Refer to Key Action III.2: Step back and adjust the plan to see sample agendas and the process for leading quarterly stepbacks. Setting these dates now will help ensure the implementation team hasdedicatedtimetoreflect.

36
II.1.E: REVISIT ROLES AND RESPONSIBILITIES AND SET THE PLAN
GUIDING QUESTIONS NOTES
i. Go back to the roles and responsibilities list. Does anything need to change?
ii. Are the roles and responsibilities clear? Are there places of potential overlap or confusion?
iii. Does any group or one person have an unreasonable workload? What can we do to prioritize and reassign?
iv. For each workstream, what are the key activities and deadlines?
v. How will we check in to ensure that all of the work gets done?
vi. Are our systems for planning, coaching, and training aligned and coherent?
vii. What are we going to do as an Implementation Support Team to celebrate finishing this important planning work?
Your team originally set the roles
and responsibilities in Step A: Identify
Implementation Support Team and Leader
and you have been able to adjust across
Phase II.
Step back from this list and make sure the
distribution of work makes sense.
Just like in Phase I, setting up decision-
making protocols in advance will make
things easier down the road.
Go back to your Implementation Plan and
be sure that everyone involved knows their
key work and deadlines.
Review the plans you developed for
supporting planning, coaching, and
training in Key Actions II.3–II.5. These
represent your Three Pillars of Teacher Support. Make sure that these systems
work together to support teachers and
ensure that teachers are getting consistent
messages and feedback about how to
utilize materials.
You have finished Phase II! You should
now have a clear plan for implementation
support. Next, it is time to launch the work.
Find a list of ways that you can celebrate
in the resource Celebration Ideas!
37
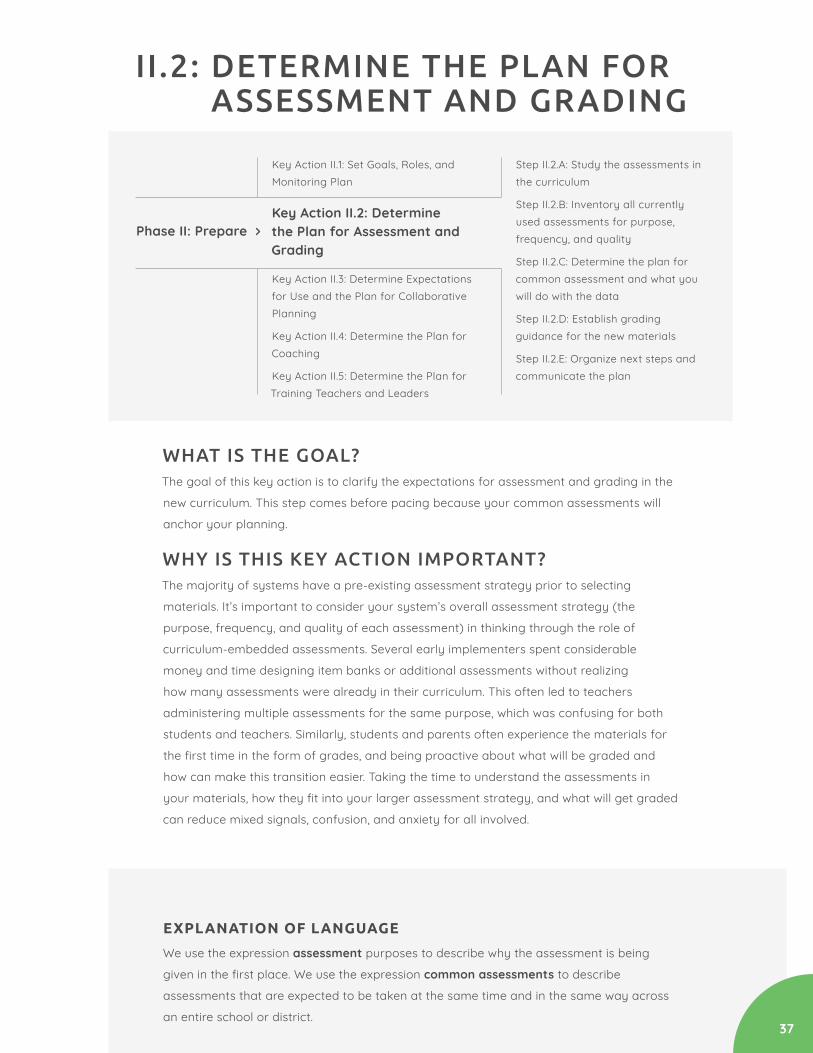
II.2: DETERMINE THE PLAN FOR ASSESSMENT AND GRADING
WHAT IS THE GOAL?The goal of this key action is to clarify the expectations for assessment and grading in the
new curriculum. This step comes before pacing because your common assessments will
anchor your planning.
WHY IS THIS KEY ACTION IMPORTANT?The majority of systems have a pre-existing assessment strategy prior to selecting
materials. It’s important to consider your system’s overall assessment strategy (the
purpose, frequency, and quality of each assessment) in thinking through the role of
curriculum-embedded assessments. Several early implementers spent considerable
money and time designing item banks or additional assessments without realizing
how many assessments were already in their curriculum. This often led to teachers
administering multiple assessments for the same purpose, which was confusing for both
students and teachers. Similarly, students and parents often experience the materials for
thefirsttimeintheformofgrades,andbeingproactiveaboutwhatwillbegradedand
how can make this transition easier. Taking the time to understand the assessments in
yourmaterials,howtheyfitintoyourlargerassessmentstrategy,andwhatwillgetgraded
can reduce mixed signals, confusion, and anxiety for all involved.
Key Action II.1: Set Goals, Roles, and Monitoring Plan
Key Action II.2: Determine the Plan for Assessment and Grading
Key Action II.3: Determine Expectations for Use and the Plan for Collaborative Planning
Key Action II.4: Determine the Plan for Coaching
Key Action II.5: Determine the Plan for Training Teachers and Leaders
Step II.2.A: Study the assessments in the curriculum
Step II.2.B: Inventory all currently used assessments for purpose, frequency, and quality
Step II.2.C: Determine the plan for common assessment and what you will do with the data
Step II.2.D: Establish grading guidance for the new materials
Step II.2.E: Organize next steps and communicate the plan
Phase II: Prepare
EXPLANATION OF LANGUAGE
We use the expression assessment purposes to describe why the assessment is being
giveninthefirstplace.Weusetheexpressioncommon assessments to describe
assessments that are expected to be taken at the same time and in the same way across
an entire school or district.

38
II.2.A: STUDY THE ASSESSMENTS IN THE CURRICULUM
GUIDING QUESTIONS NOTES
i. Is there an end of year assessment?
ii. What does it assess?
iii. How is it designed?
iv. What kind of information will this assessment give teachers?
v. How is this similar or different than our state test?
Study one grade or one grade per grade
bandiftherearesignificantdifferences
(i.e. K–2 and 3–5 ELA will likely look
different).
Have the team take the assessments
individually (perhaps outlining instead
of writing full essays) to understand the
mental work required.
Not every curriculum has (or needs to
have) a culminating performance task for
the year.
The resource Agenda for Assessment Study has an agenda that you can adapt
to facilitate this meeting.
It can be tempting to become a literalist
in assessment format and lose the big
picture of the kind of content work that
the state test requires. That is the work
students need practice with daily, in a
variety of formats. Don’t get too caught up
informatdifferences.

39
II.2.A: STUDY THE ASSESSMENTS IN THE CURRICULUM (CONT.)
GUIDING QUESTIONS NOTES
x. Within a module/unit, what assessments are included?
xi. What do they assess?
xii. How are they designed?
xiii. What information will the assessments within modules/units give teachers?
Assessments within modules/units vary
considerablyacrossdifferentmaterials.
Have the Implementation Support Team
take the assessments to understand the
mental work required.
vi. Are there end of module/unit assessments?
vii. What do they assess?
viii. How are they designed?
ix. What information will the end of module/unit assessments give teachers?
The end of module/unit assessments
are the assessments that most early
implementers chose to have all teachers
complete in common.
Have the team take the assessments
individually to understand the mental work
required.
Ifthedifficultyoftheassessmentcauses
feelings of fear and concern, go back to
your core beliefs in Step I.2.B: Articulate the vision of instruction and core beliefs
and allow time to process, but persevere.
Follow the Guide for Discussing Assessment for managing emotions.

40
II.2.B: INVENTORY ALL CURRENTLY USED ASSESSMENTS FOR PURPOSE, FREQUENCY, AND QUALITY
GUIDING QUESTIONS NOTES
i. What are our key purposes for assessments?
ii. What are all the assessments that students in our district currently take and how often do they take them?
iii. What purpose(s) does each assessment serve?
iv. What is the quality of each assessment?
v. What do we do with the data from each assessment?
vi. Are there any purposes that we lack assessments for at this time?
The resource Assessment Purposes
provides a starting point, and pages
36–39 of ANet’s Analyzing Assessment Strategy Case Study describe how one
implementation team conducted this step.
Use the Assessment Inventory Template to
develop your inventory, and take a look at
the Completed Assessment Inventory for a
completed example.
This step is typically completed by the
system team, but can be replicated
at each school if schools have added
additional assessments.
Your inventory will likely vary by subject
and grade. The Implementation Support
Team can complete the inventory for the
grade they have studied, but ensure that
the same study is conducted for other
grades.
The resource Assessment Review Tools provides guidance and tools for
determining the quality of assessments.
At the highest level, early implementers
in ELA found it helpful to focus on quality
texts and quality items. In math, they
focused on quality items and standards
being assessed at the right level of rigor.
Researchshowsthatstudentsdobenefit
from one full-length practice test to
understand the format and layout, but
they don’t need every assessment to
reflectthesamestructureandmodel.In
fact, they learn more from experiencing a
variety of item types.

41
II.2.B: INVENTORY ALL CURRENTLY USED ASSESSMENTS FOR PURPOSE, FREQUENCY, AND QUALITY (CONT.)
GUIDING QUESTIONS NOTES
vii. What purposes can the curriculum-embedded assessments we studied serve?
viii. Are there any assessments that have redundant purposes that we can discontinue?
ix. Are there any assessments that have overlapping purposes? What is the best course of action?
x. Which assessments are we going to administer across the district in each grade?
The resource ANet’s Analyzing Assessment Strategy Case Study describes how one
system thought through these questions
and the decisions they came to.
Simplifying the number of assessments
allows for more time on instruction and
more time to process and use the data
you get from the assessments students
are taking.
Curriculum-embedded assessments
serveadifferentpurposethaninterims
or summatives. They give shorter-cycle
feedback (i.e. at the end of a unit) on
student understanding of the standards
and content, often highlighting student
misconceptions.
Some teachers desire to blend the
curriculum-embedded assessments with
sample state test items to give some
format experience. In assessment design,
the design of the item is quite complex,
and altering items to make them look like
state assessments (such as making them
multiplechoice)willaffectthevalidity
and reliability of the item. It is better to
keepitemsintactanddrawfromdifferent
sources (i.e. pull some state test items into
the curriculum assessment) than to adjust
the design of the items themselves.

42
II.2.C: DETERMINE THE PLAN FOR COMMON ASSESSMENT AND WHAT YOU WILL DO WITH THE DATA
GUIDING QUESTIONS NOTES
i. What assessments are we going to administer across the district?
ii. What is the purpose each assessment is seeking to serve?
iii. Is each assessment high-quality? How do we know?
iv. What will we do with the results from each assessment?
v. What feedback will students get from each assessment?
vi. When will we give each assessment?
Dothisfirstforthegrade(s)youare
studying, then determine the plan to get
answers for all other grades.
The Assessment Purpose Template can
help you organize your answers, and
includes a few sample responses.
These questions often need to be
considered at both the system and school
levels.
Make sure to bring teacher voice into this
discussion. The natural inclination is to
make testing decisions based on what the
system needs (predictive and evaluative
data for summatives), but not necessarily
for what the teacher needs (instructional
data). Many districts had success with
getting teacher input on shared interim
assessments and having teacher leaders
defineformativeassessmentpractices.

43
II.2.C: DETERMINE THE PLAN FOR COMMON ASSESSMENT AND WHAT YOU WILL DO WITH THE DATA (CONT.)
GUIDING QUESTIONS NOTES
ix. For each assessment, what do we expect teachers to do with the data?
x. How will we know if that is happening?
You will lay out your plan in more detailed
in Phase II, Key Action 3, Step E: Determine
how you will support collaborative and
individual planning.
vii. For each assessment, will we collect the data centrally? If so, how?
viii. How will results get reported?
There are a number of platform providers
that are able to import your assessments
directly and help with administration and
roll-up.
Be careful in standard-based reporting for
ELA—thisisnotreflectiveofhowthestate
test is designed or how students learn to
read. SAP’s Text at the Center paper is an
overviewofwhatisdifferentforELA,and
SAP’s ELA Assessment Quick Reference Guide shares dos and don’ts for ELA
assessment.

44
II.2.D: ESTABLISH GRADING GUIDANCE FOR THE NEW MATERIALS
GUIDING QUESTIONS NOTES
i. What is our district/school grading policy, if any, for this subject/grade band?
ii. What assignments in this curriculum do we expect to be graded?
iii. What questions will come up about how to grade these assignments? What are our answers to these questions?
iv. What other questions will come up about grading? How will we handle them?
Resources on Grading shares a compilation
of good resources around grading policy.
Make sure the team has done the work of
Steps A–C before tackling grading. Grading
decisions should be made in the larger
contextofadefinedassessmentstrategy.
In considering what to grade, review your
formative assessment list.
While curriculum developers tend to
produce a fair amount of guidance on use
and pacing, they rarely provide guidance
or support on how to handle grading.
Occasionally, there will be rubrics and
sample student work, but there is a lot of
judgment that teachers and leaders need
to make to match the curriculum to your
grading policy.
Common Grading Challenges includes
frequent issues that come up in grading
and options for how to approach them.

45
II.2.E: ORGANIZE NEXT STEPS AND COMMUNICATE THE PLAN
GUIDING QUESTIONS NOTES
i. In this key action, we reviewed the assessment and grading plan. What are the next steps that we need to take based on the decisions we made together?
ii. What can we add to our roles and responsibilities tracker?
iii. What training will all teachers using this curriculum need prior to launching the materials in order to be ready for their assessment and grading responsibilities?
iv. What training will all leaders supporting this curriculum need prior to launching the materials to be ready for their assessment and grading responsibilities?
v. What will each identified stakeholder group want to know about assessment and grading?
vi. How do we plan to proactively communicate this information? Who will deliver the communication? When?
vii. What questions do we expect we will get? How will we answer them?
Go back to your Implementation Plan to
track your next steps and add to your
roles and responsibilities tracker.
Throughout Phase II, you will track the
training needs at the end of every step,
and in Key Action II.5: Determine the plan
for training teachers and leaders, you will
prioritize and sequence these needs.
Remember to track all of the needs as you
go in your Implementation Plan.
Go back to your Implementation Plan to
review your list of stakeholders and key
messages.
Use the resources Email Communicating Assessment Choices and PowerPoint Communicating Assessment Choices as
a starting point to communicate your
process.

46
II.3: DETERMINE EXPECTATIONS
WHAT IS THE GOAL?The goal of this key action is to set up the plans for pacing, use, and planning. This key action includes ensuring the right time is in the daily schedule and setting the expectations for materials use and customizations.
WHY IS THIS KEY ACTION IMPORTANT?Instructional judgment (deciding what to teach and what to adapt) is fundamental to good curriculum implementation. Having a strong starting point creates relief for teachers from the constant hunt for resources. However, it does not eliminate the work of preparing for instruction. Setting up clear plans for use and lesson preparation creates clarity about what needs to be taught andthespecificrolethematerialsneedtoplayininstruction.Qualitycollaborationopportunitiesinvigorate practice and strengthen implementation; however, these structures require clarity, support, and a clear plan of action. This key action begins with a curriculum study to help all decision makers deeply understand the intent and design of the materials. This understanding supports strong decision-making about material adaptations.. Key Actions 3-5 focus on systems for teacher and leader support, or the system’s overall plan for supporting professional learning. These systems must work together so that teachers do not receive mixed messages about how to use the materials. These systems also depend on a strong instructional culture within the school and system.
Key Action II.1: Set Goals, Roles, and Monitoring Plan
Key Action II.2: Determine the Plan for Assessment and Grading
Key Action II.3: Determine Expectations for Use and the Plan for Collaborative Planning
Key Action II.4: Determine the Plan for Coaching
Key Action II.5: Determine the Plan for Training Teachers and Leaders
Step II.3.A: Study the Design of the Materials
Step II.3.B. Ensure every School has Appropriate Time in the Schedule
Step II.3.C. Determine the Yearlong Pacing Schedule
Step II.3.D. Establish Guidance for Common Use and Customization
Step II.3.E. Determine How You will Support Collaborative and Individual Planning
Step II.3.F. Organize Next Steps and Communicate the Plan
Phase II: Prepare
EXPLANATION OF LANGUAGE
We do NOT use the word “fidelity” because we have found that it is often used as a
blanket term to the whole curriculum — as opposed to identifying which aspects of the
curriculum (i.e. assessments, units, lessons) that should be taught in a common way,
across the school or system. The schedule refers to the daily plan for time. Pacing refers
to the instructional calendar across the school year. We use the term collaborative
planning to refer to the planning work that teachers may do with other teachers using the
same materials. We do NOT use the term “professional learning collaborative” or “PLC”
throughout this step, although many schools will probably equate collaborative planning
with PLCs. We focus instead on “collaborative planning.”

47
II.3.A: STUDY THE DESIGN OF THE MATERIALS
GUIDING QUESTIONS NOTES
i. Which grade(s) are we studying? Which unit(s)?
ii. How many modules/units are there? How long are the units?
iii. How are units organized? What is the structure within the unit?
iv. How are lessons organized? Is there a structure within the lesson?
v. Are there any supplemental materials that apply to this unit? What do those materials include?
The Implementation Support Team will
make better decisions with a common
understanding of the design of the
materials.
There is an enormous amount of helpful
information available for every set of
materials (i.e. overview guides, videos,
materials, sample student work, etc.).
There is a lot you can learn from working
through one grade of materials together.
This takes time and close reading, but
doing it upfront saves time on the back
end.
Pick one grade, or a couple of grades
if the structure of the materials is
fundamentallydifferentindifferentgrade
bands(i.e.K–2isdifferentthan3–5).
The resource Curriculum Study provides
guidance, a sample agenda, and prep
email. You can pick one member of the
team to do a more comprehensive study
and pull the key resources that the full
team should review. Ask your materials
developer or district colleagues that have
used the materials before for a quick
orientation and links to the most helpful
materials.

48
II.3.B: ENSURE EVERY SCHOOL HAS APPROPRIATE TIME IN THE SCHEDULE
GUIDING QUESTIONS NOTES
i. What guidance does the curriculum developer offer about scheduling and time needed per lesson?
ii. Does this match our current structure (for every school using these materials)?
It is very hard to implement a curriculum
well if you do not have the same amount
of time allocated in the schedule as
intended in the designed lesson. Almost
every early implementer we interviewed
talked about matching the length of the
curriculum as a key enabler of success.
If the school or district schedule has an
immovable, shorter time for the block than
the design, materials will likely need to be
cut down or edited. If the school or district
schedule has an immovable, longer time
for the block than the design calls for,
lessons will need to be doubled up. Making
these types of adjustments requires a
strong understanding of the intent of each
lesson and unit, as well as the standards.
Therefore, you’ll need to factor that time
and support into your decision. Use the
resource Scheduling Considerations to
guide your thought process.
This step will require both system and
school level planning and decision-making. iv. If not, how will we adjust
i. Are there intervention programs being used that currently take up ELA or Math instructional minutes? How does that impact pacing?

49
II.3.C: DETERMINE THE YEARLONG PACING SCHEDULE
GUIDING QUESTIONS NOTES
i. What guidance does the curriculum developer offer about pacing?
ii. How many units? How many days/units across the year?
iii. What school or district-wide events do we already know of that we need to plan around?
iv. How many units do we want all teachers to complete in common? Which units?
v. What points in the curriculum do we want all teachers reaching at the same time?
vi. Do we want to build flexibility into the schedule?
vii. Are there additional topics that we need to add?
viii. What is our yearlong pacing schedule for this grade?
ix. What needs to happen to get to a final pacing schedule for the other grades?
Revisit the Curriculum Study and the work
your team did together during Step II.3.A:
Study the design of the materials. Pick
one grade to study as an Implementation
Support Team. Developers and
neighboring districts can point you to the
best resources for pacing guidance within
your curriculum.
While the pacing plan can start at the
system level, typically each school may
need to make it their own, given any
school-specificconsiderations.
The resource Pacing Guidance can help
you arrive at a pacing schedule.
This is a great place for teacher leadership.
The Agenda and Email for Determining Pacing is a sample agenda and preparation
email that you can send to grade
leaders to draft pacing guidance.

50
II.3.D: ESTABLISH GUIDANCE FOR COMMON USE AND CUSTOMIZATION
GUIDING QUESTIONS NOTES
i. What guidance does the curriculum developer offer about planning routines and customizations?
ii. What decisions are teachers going to need to make within a given unit?
iii. What decisions are teachers going to need to make within a given lesson?
iv. Which aspects of the unit do we want all students to experience in a common way?
v. Which aspects of the lessons do we want all teachers to teach in common?
vi. What kinds of customizations will we support? What kinds of customization would we not want to see?
There are heartfelt emotions that come
up when teachers see the more scripted
pieces of many materials. Some may
love the clarity, but many experience a
sense of restrictiveness when they see
the instructional design done for them in
complete form. In every curriculum, there
are decisions that teachers will need to
make within the lesson and unit to ensure
instruction meets the needs of students.
Effectiveinstructionrequiresprofessional
judgment — look for the places that
judgment lives in the materials.
Guidance on Curriculum Use provides
context on how to think about key
decisions within a curriculum.
This step is about your guidance on
use.Specificplanningroutinesand
support structures will come next, in Step
II.3.E: Determine how you will support
collaborative and individual planning.
The resource Example Curriculum Use Guidance gives an overview of potential
customizations and a sample approach
which early implementers found helpful.

51
II.3.E: DETERMINE HOW YOU WILL SUPPORT COLLABORATIVE AND INDIVIDUAL PLANNING
GUIDING QUESTIONS NOTES
i. What are your current lesson planning structures or expectations? What is done with any plans that teachers submit?
ii. What structures do you currently have in place for collaborative planning?
iii. What is done during any collaborative planning time? What is most valued and effective in this time?
iv. What planning do we want teachers to do together?
v. What student work review and reflection do we want teachers to do together?
vi. When can they do this collaboration?
vii. What is the best structure for this time?
viii. Who is best positioned to support the effective use of this time?
Determining supports for collaborative
and individual planning is part of your
larger professional learning system. It can
be helpful to start by assessing the current
state using the Practice What You Teach Checklist for Schools and Systems. Over
the next two key actions, you’ll continue
to build your teacher support systems by
thinking about coaching and training.
Gathering any lesson planning template
requirements or conducting a focus group
with teachers about the current use of
collaborative planning time can be a good
starting point. The resource Teacher Focus Group on Planning Support has some
focus group questions you can use to ask
teachers directly.
The answers to these questions may vary
considerably from school to school or
subject to subject, so include a group with
multiple school perspectives.
Look back at your assessment and
grading notes in Key Action II.2: Determine
the plan for assessment and grading to
connectstudentworkreflectionwithyour
assessment and grading plans.
The Student Work Protocols resource
overviews protocols for analysis of
student work. This can be done either at
the system or school level (frequently at
the school level). However, it requires a
group of teachers who are teaching the
same grade and materials. If that group
does not exist within a single school, then
explore options across schools.
Collaborative Planning Protocols includes
protocols that you can explore for time
use and an adaptable template for your
agenda.
Collaborative Planning Models includes
models for teacher leader facilitation
ofcollaborativeplanningandreflection
structures. It’s important to consider any
training implications
for collaborative planning leaders.

52
II.3.E: DETERMINE HOW YOU WILL SUPPORT COLLABORATIVE AND INDIVIDUAL PLANNING (CONT.)
GUIDING QUESTIONS NOTES
ix. What individual preparation and analysis will teachers need to do outside of collaborative planning time?
x. How do we best support individual preparation? What does this mean we need to change about any lesson planning routines or requirements?
xi. Who is responsible for supporting collaborative planning and reflection?
xii. What will the people supporting collaborative planning and reflection need to know and be able to do?
xiii. How will we train and support them to do this work well?
The resource Lesson Planning Structures
gives an overview of individual planning
structures that early implementers used
toensureeffectivepreparation.Some
systems opted to have teachers use the
planning structures in their collaborative
planning meetings. Review the resources
from developers for guidance or
supporting materials for lesson and unit
preparation.
The resource Support Roles for Teacher Planning outlines the potential roles for
supporting collaborative planning and the
support needs for the individuals doing
this work.
This is a ripe place for teacher leadership,
and building the instructional leadership
of teachers can also support your future
leadership pipeline.
Protocols alone do not create a vision of
howtofacilitateeffectivecollaboration.
Facilitatorsbenefitfromseeingamodel
and collaborating with other facilitators.
Early implementers consistently indicated
thatitwasbeneficialtokeepthe
collaboration structures grounded in the
materials and student work. Straying too
far from these touchstones often created
challenges.

53
II.3.F: ORGANIZE NEXT STEPS AND COMMUNICATE THE PLAN
GUIDING QUESTIONS NOTES
i. In this key action, we reviewed the collaborative planning and reflection support structures. What next steps do we need to take based on the decisions we made together?
ii. What can we add to our roles and responsibilities tracker based on the work we outlined in this key action?
iii. What information or training will all teachers need in order to be ready to engage in collaborative planning and reflection?
iv. What information or training will all leaders need prior to launching the materials to be ready for collaborative planning and reflection support structures?
v. How do we plan to proactively communicate this information? Who will deliver the communication? When?
vi. What questions do we expect we will get? How will we answer them?
Go back to your Implementation Plan to
track your next steps and add to your
roles and responsibilities tracker.
Throughout Phase II, you will track the
training needs at the end of every step,
and in Key Action II.5: Determine the plan
for training teachers and leaders, you will
prioritize and sequence these needs.
Remember to track all of the needs as you
go in your Implementation Plan.
Use the resources Email for Communicating Pacing, Use, and Planning and PowerPoint for Communicating Pacing, Use, and Planning as a starting point to
communicate your process.

54
II.4: DETERMINE THE PLAN FOR COACHING
WHAT IS THE GOAL?The triangle of teacher support includes three pillars: training, collaborative planning, and
coaching. The resource Three Pillars of Teacher Support is a summary of how these three
pillars work together to support instruction. You started this planning in Key Action II.3:
Determine expectations for use and the plan for collaborative planning by determining
your systems for supporting planning. The goal of this key action is to organize the plan
for coaching, including all observation and feedback structures.
WHY IS THIS KEY ACTION IMPORTANT?Feedbackandcoachingcanhaveasignificantandpositiveimpactonteachingand
learning. Teachers want helpful feedback and support — but they want that feedback
to truly come from a place of help and to give them concrete ideas that will make a
differencefortheirstudents.Thereisnofasterwaytoundermineteacherconfidencein
newmaterialsthantogivethemfeedbackthatconflictswiththedesignofthematerials.
There is also no faster way to lose teacher trust than to judge their choices without
understanding their perspective.
Key Action II.1: Set Goals, Roles, and Monitoring Plan
Key Action II.2: Determine the Plan for Assessment and Grading
Key Action II.3: Determine Expectations for Use and the Plan for Collaborative Planning
Key Action II.4: Determine the Plan for Coaching
Key Action II.5: Determine the Plan for Training Teachers and Leaders
Step II.4.A: Understand Your Current Coaching Practices
Step II.4.B: Establish Your Observation and Coaching Tool
Step II.4.C: Determine How You will Support Those Responsible for Coaching
Step II.4.D: Organize Next Steps and Communicate the PlanPhase II: Prepare
EXPLANATION OF LANGUAGE
We use the word coach throughout to refer to anyone who provides teachers with
feedback and support. This could be someone with the job title of teacher leader, coach,
assistant principal, or principal. All of these individuals — and anyone who supports their
work — need to be on the same page about what they are looking for in classrooms. We
use the term walkthrough tool to describe what you look for on a daily basis when you
observe instruction. We include questions about evaluation structures (how a teacher’s
performance is evaluated) in this key action because the core intent of evaluation is
improvement. We know that these are loaded terms and structures and that they vary
from state to state and district to district.

55
II.4.A: UNDERSTAND YOUR CURRENT COACHING PRACTICES
GUIDING QUESTIONS NOTES
i. What structures do we currently have in place for coaching?
ii. Who receives coaching? How often?
iii. Who does the coaching?
iv. What do coaches currently look for when they go into classrooms?
v. How do teachers get feedback from coaches? What is the focus of the feedback? What do they do with it?
vi. How are coaches currently trained and coached?
Coaches can include individuals with that
title, assistant principals, principals, or
teacher leaders.
The answers to these questions may vary
from school to school.
You can use this exercise as an opportunity
to understand what your teachers believe
the expectations to be and survey them
on what they experience their coaches
and evaluators to be looking for based on
the feedback they receive. The resource
Teacher Survey on Coaching Experience is
a survey that you can send to teachers.
Those who are in coaching roles have a
wide range of responsibilities, and there is
nogivenpathfortrainingandcertification
for these roles. The answers to these
questions may vary from coach to coach.

56
II.4.A: UNDERSTAND YOUR CURRENT COACHING PRACTICES (CONT.)
GUIDING QUESTIONS NOTES
vii. What do we currently observe as part of teacher evaluation?
viii. What do evaluators look for when they go into classrooms?
ix. How do evaluators provide feedback?
x. How are evaluators trained and supported?
Your evaluation instruments will anchor a
significantamountofthefeedbackgiven
to teachers across the year, and it is worth
the time to make sure they support the
vision of instruction in your new materials.
Knowing and naming the potential areas
oftensionarethefirststeps.

57
II.4.B: ESTABLISH YOUR OBSERVATION AND COACHING TOOL
GUIDING QUESTIONS NOTES
i. What about the design of this curriculum matches our coaching and/or evaluation framework?
ii. What about the design of this curriculum does not match our coaching and/or evaluation framework?
iii. Does the curriculum developer make any recommendations for what to look for in observations?
Most coaching and evaluation frameworks
are broad enough to match well with
all curricula, but sometimes features
of a curriculum (the way grouping is
suggested or the way students discover
the meaning rather than the teacher
presenting it) can lean towards or away
from certain indicators. Identifying these
leanings allows coaches and evaluators
to be aware of the design compatibility
and establish a common approach to
the evidence they should look for in
observations. Sharing what you have done
to ensure the coaching framework aligns
with the curriculum will invest teachers;
however, not thinking through these
tensions and sending mixed signals will
disinvest teachers.
The resource Curriculum Walkthrough Toolslinkstocurriculum-specificnotesonobservation tools.

58
II.4.B: ESTABLISH YOUR OBSERVATION AND COACHING TOOL (CONT.)
GUIDING QUESTIONS NOTES
viii. Given our vision and the design of these materials, what do we want to look for in our evaluations (or what evidence do we want to focus on)?
Evaluation instruments can be hard to
change, and it may not be necessary to
do so. Adjusting the evidence look-fors
or clarifying what evaluators should
consider when reviewing indicators can
allow for coherence. Aligning Evaluation and Curriculum gives an overview of how
to ensure that evaluation and curriculum
support each other.
iv. Given our vision and the design of the materials, what do we want coaches to look for in observations?
v. What do we want coaches to do with the feedback?
vi. Who will get coaching? How often?
vii. Who will provide the coaching?
Go back to Key Action I.2: Establish the
vision to return to the vision you wrote and
anchortheserefinementstoyourvision.
See an example coaching model in the
resource Coaching Model Overview, and
then organize your decisions in your
Implementation Plan.

59
II.4.C: DETERMINE HOW YOU WILL SUPPORT THOSE RESPONSIBLE FOR COACHING
GUIDING QUESTIONS NOTES
i. What do coaches need to know about the design of the materials before conducting an observation?
ii. What do coaches need to do after each observation to prepare for the coaching conversation?
iii. What support and feedback will coaches need to do this work well?
iv. Who will provide that support to coaches?
It is pretty impossible to conduct a good
observation of a teacher using strong
materials without studying those materials
prior to the lesson. This is often a change
in habit for coaches and evaluators. Help
launch this practice early. The resource
Coach Curriculum Training outlines topics
for coach training and support.
Coaches will need to think about how
togivecurriculum-specificfeedbackto
teachers. The best way to make sure that
teachers are getting great feedback is to
make sure that your coaches are getting
feedback. Don’t over-complicate this —
and look for ways to bring people together
to learn from each other. Leverage the
capacity you have (or the capacity right
near you). The resource Coaching Support outlines best practices for coaches giving
feedback and support to teachers and for
leaders giving feedback and support to
coaches.

60
II.4.D: ORGANIZE NEXT STEPS AND COMMUNICATE THE PLAN
GUIDING QUESTIONS NOTES
i. What are the next steps that we need to take to set up our coaching work based on the decisions we made together?
ii. What can we add to our roles and responsibilities tracker based on the work we outlined for coaching?
iii. What training or key information will all teachers using this curriculum need prior to launching the materials in order to be ready to engage in coaching?
iv. What training or key information will all coaches and leaders supporting this curriculum need prior to launching the materials to be ready to support coaching?
v. How do we plan to proactively communicate this information? Who will deliver the communication? When?
vi. What questions do we expect we will get? How will we answer them?
Go back to your Implementation Plan to
track your next steps and add to your
roles and responsibilities tracker.
Throughout Phase II, you will track the
training needs at the end of every step,
and in Key Action II.5: Determine the plan
for training teachers and leaders, you will
prioritize and sequence these needs.
Remember to track all of the needs as you
go in your Implementation Plan.
When thinking about communication, many people found it helpful to think about each piece (training, planning, and coaching) together so that stakeholders are getting all the information they need in one communication. See Step II.5.E: Organize next steps and communicate the plan and the resources Email Communicating Support Plan: Training, Planning, and Coaching and PowerPoint Communicating Support Plan: Training, Planning, and Coaching as a starting point to communicate your process.
Continue to add to your key messages in your Implementation Plan.

61
II.5: DETERMINE THE PLAN FOR TRAINING
WHAT IS THE GOAL?The goal of this key action is to provide teachers and leaders with upfront and ongoing
training experiences that deepen their knowledge of how the curriculum works and set the
foundation for strong instruction. This key action completes your planning for professional
learning that you started in Key Actions II.3 and II.4. Your systems for supporting planning,
coaching, and training should align and form coherent supports for teachers.
WHY IS THIS KEY ACTION IMPORTANT?Trainingteachersandleadersonthecurriculumisnecessary,butnotsufficient.Training
is not a discrete step, and checking this box will not lead to home-run implementation.
However, skipping this step is guaranteed to result in problems. You tackle this last so that
youcanincorporateallofthetrainingneedsyouidentifiedacrosstheotherkeyactionsas
you prepare to launch. Remember, you are not training teachers on how to use materials.
You are training them on the vision of great instruction and expectations for students and
how these materials can serve that vision.
Key Action II.1: Set Goals, Roles, and Monitoring Plan
Key Action II.2: Determine the Plan for Assessment and Grading
Key Action II.3: Determine Expectations for Use and the Plan for Collaborative Planning
Key Action II.4: Determine the Plan for Coaching
Key Action II.5: Determine the Plan for Training Teachers and Leaders
Step II.5.A: Understand Available Training Time and Current Plans
Step II.5.B: Study the Training and PD Resources that Come with Your Materials
Step II.5.C: Determine Training Needs for Each Group
Step II.5.D: Determine the Plan and Prepare the Facilitators
Step II.5.E: Organize Next Steps and Communicate the Plan
EXPLANATION OF LANGUAGE
We use the word training even though we know that there are strong opinions about
words like training versus professional development versus professional learning. We
usethewordtrainingbecausethiskeyactionreallyisaboutthespecifictraining(delivery
of knowledge and skill) as opposed to the broad umbrella of professional learning, which
would include coaching and collaborative planning.
Phase II: Prepare

62
II.5.A: UNDERSTAND AVAILABLE TRAINING TIME AND CURRENT PLANS
GUIDING QUESTIONS NOTES
i. What time do we currently have in place for training across the year? Who attends?
ii. How is training time typically split between district-led and school-led?
iii. Do we have additional time for any particular groups of teachers (i.e. new teachers, new to grade, etc.)?
iv. Who decides how to use the time? Who typically facilitates?
v. Do we have additional incentives or point structures that encourage independent study?
Take stock on your current approach so
that you know what time you can leverage.
The answers to these questions may vary
by school.

63
II.5.B: STUDY THE TRAINING AND PD RESOURCES THAT COME WITH YOUR MATERIALS
GUIDING QUESTIONS NOTES
i. What are the built-in training and professional development resources that come with the curriculum?
ii. What recommendations does the developer make about upfront or ongoing training?
iii. What trainings are offered by the developer or other organizations? What would those trainings cover?
iv. Are there educators in our area that have used these materials?
Most materials come with an
overwhelming number of resources
and support tools, which are great (and
they’re what you’re paying for)! However,
implementation leaders often skip right to
spending more money for training before
understanding what they have already
purchased and what they have available
to them.
Don’t forget to explore other options, such
as videos and support tools, that other
groups may have created, especially if you
are using an open source set of materials.
The resource Materials Training Options
provides an overview of common training
options with some pros and cons for each.
You will decide on your training approach
in Step II.5.D: Determine the plan and prepare the facilitators. For now, you are
gathering all options.

64
II.5.C: DETERMINE TRAINING NEEDS FOR EACH GROUP
GUIDING QUESTIONS NOTES
i. What are the key training needs that each group has?
ii. What are the priorities for upfront training? What are the priorities for each group for training over time?
iii. Who are all the groups that need training on the instructional vision, expectations for students, and materials design across our system?
Do not start the training list with the
curriculum demonstration needs. Start
with the vision that led you to select
thesematerialsinthefirstplace.Your
materials are in service of your vision and
expectations for students.
The resource Common Materials and Vision Training Needs lists common
training needs for vision and curriculum
implementation.
Look back at the training needs you
surfaced in all previous steps.
Be sure to include all educators that
support all students that will use these
materials, including a plan for any
teachers that will start the year late.
The resource Groups Who Will Need Training is a list of educator groups that
you can use to make sure you have
thought through all potential groups.

65
II.5.D: DETERMINE THE PLAN AND PREPARE THE FACILITATORS
GUIDING QUESTIONS NOTES
i. What are our options for who facilitates the training?
ii. What is our budget?
iii. What are the overarching priorities for training for each group?
iv. What is our training plan?
v. What is the high-level agenda for each group (upfront and over time)?
Getclearonyourprioritizedneedsfirst(in
the previous step) in order to go into this
step knowing what you need to invest in
most.
The resource Materials Training Options
gives an overview of common training
options.
Consider the key messages that you want
each group to hear during training. Be
sure to include training on the vision for
excellent instruction so that each group is
able to see how the materials support the
vision.

66
II.5.D: DETERMINE THE PLAN AND PREPARE THE FACILITATORS (CONT.)
NOTES
vi. Who is responsible for supporting quality content across all training?
vii. Who is responsible for the logistics?
viii. What is the review process for materials that are created in-house?
ix. What is our agenda for each group?
x. What do all facilitators need to know about our vision and core beliefs in order to reinforce the right messages?
Your culture is a product of cumulative
experience. If every session reinforces
the same vision and core beliefs, they
will be much more likely to add up to a
clear picture of success. The only way to
make this happen is to tell everyone the
vision and core beliefs you want them to
reinforce (and follow up to make sure they
do).
Bookend any trainings you are sending
teams to with opening and closing time to
connect it to the big picture and vision for
excellent instruction.
GUIDING QUESTIONS

67
II.5.D: DETERMINE THE PLAN AND PREPARE THE FACILITATORS (CONT.)
NOTES
xi. What are the objectives of the session?
xii. How will we know if participants have mastered the training objectives?
xiii. What is the learning plan?
xiv. Have we attended to adult learning needs and kept the design engaging?
xv. What materials and technology will we need?
xvi. How will we collect data at the end of the session?
This set of guiding questions should be
considered for each training session.
The resource Email for External Trainers
is a sample email template that you can
adapt and use to give any external trainer
context on your needs and priorities.
Trainings are measured in various ways,
such as survey data, work products (i.e.
student work review or an annotated
lesson), knowledge assessments, or
transference to practice. Be sure to
determine your measures for success
up front and add them to your progress
monitoring notes in your Implementation Plan.
GUIDING QUESTIONS

68
II.5.E: ORGANIZE NEXT STEPS AND COMMUNICATE THE PLAN
GUIDING QUESTIONS NOTES
i. In this key action, we determined our training plan. What are the next steps that we need to take based on the decisions we made together?
ii. What can we add to our roles and responsibilities tracker based on the work we outlined in this key action?
iii. What adjustments do we need to make to our plans for supporting, planning, or coaching based on our training plan?
iv. What will each identified stakeholder group want to know about the training plan?
v. How do we plan to proactively communicate this information? Who will deliver the communication? When?
vi. What questions do we expect we will get? How will we answer them?
Go back to your Implementation Plan
to track your next steps and update the
roles and responsibilities tracker with any
additions.
Nowthatyouhavefinishedyourplansfor
the Three Pillars of Teacher Support, stop
to make sure that the plans are aligned
and provide coherent support for teachers.
Go back to your Implementation Plan to
review your list of stakeholders and key
messages.
As outlined in II.4.D: Organize next steps and communicate the plan,
communicating the plan for training,
planning, and coaching teachers in one
communication can avoid confusion or
redundant communication streams. Use
the resources Email Communicating Support Plan: Training, Planning, and Coaching and PowerPoint Communicating Support Plan: Training, Planning, and Coaching as a starting point to
communicate your process.

69
II.1.D: REVISIT AND SET IMPLEMENTATION GOALS AND DETERMINE HOW YOU WILL MONITOR PROGRESS
GUIDING QUESTIONS
II.1 CONTINUED
NOTES
i. What, if any, adjustments do we need to make to our draft goals for implementation?
ii. How will we know if we reach our goals?
iii. For each goal, when will we know if we are on track?
iv. What data will we review?
v. Operationally, what needs to happen to get this data? Who is responsible?
vi. In addition to monitoring progress, how will we collect stakeholder feedback?
vii. When will we step back to review our progress toward our goals holistically? Who will be part of these stepbacks?
viii. Who should each group of stakeholders go to with questions?
Youfirstestablisheddraftwishesand
goals in Step C: Draft the Goals for
Successful Implementation.
Goals tend to stay fairly stable for the
year, but you will have the opportunity to
evaluate and adjust the measures every
quarter in Phase III, Key Action 2: Step
back and adjust the plan.
The resource Progress Monitoring Plan and Approaches includes common progress
monitoring approaches for the frequently
used goals.
Record your plans for progress monitoring
in your Implementation Plan. There will
likely be both system and school level
progress monitoring needs.
For school level roles and responsibilities,
you can see sample distributions and
guidance in the Roles and Responsibilities Matrix.
The Stakeholder Feedback Survey includes
sample questions that can be asked for
periodic feedback.
Earlyimplementersbenefitedfromregular
opportunities to bring the team together to
look at how things were going and adjust
course. Progress Monitoring Practices
shares some best practices around
progress monitoring and frequency
suggestions, and the resource Challenge Solving Protocolsoutlinessomeeffectiveprotocols to share emerging challenges.

70
II.1.E: REVISIT ROLES AND RESPONSIBILITIES AND SET THE PLAN
GUIDING QUESTIONS NOTES
i. Go back to the roles and responsibilities list. Does anything need to change?
ii. Are the roles and responsibilities clear? Are there places of potential overlap or confusion?
iii. Does any group or one person have an unreasonable workload? What can we do to prioritize and reassign?
iv. For each workstream, what are the key activities and deadlines?
v. How will we check in to ensure that all of the work gets done?
vi. Are our systems for planning, coaching, and training aligned and coherent?
vii. What are we going to do as an Implementation Support Team to celebrate finishing this important planning work?
Your team originally set the roles
and responsibilities in Step A: Identify
Implementation Support Team and Leader
and you have been able to adjust across
Phase II.
Step back from this list and make sure the
distribution of work makes sense.
Just like in Phase I, setting up decision-
making protocols in advance will make
things easier down the road.
Go back to your Implementation Plan and
be sure that everyone involved knows their
key work and deadlines.
Review the plans you developed for
supporting planning, coaching, and
training in Key Actions II.3–II.5. These
represent your Three Pillars of Teacher Support. Make sure that these systems
work together to support teachers and
ensure that teachers are getting consistent
messages and feedback about how to
utilize materials.
You have finished Phase II! You should
now have a clear plan for implementation
support. Next, it is time to launch the work.
Find a list of ways that you can celebrate
in the resource Celebration Ideas!

TEACH AND LEARNPhase III
OVERVIEWThe goal of Phase III is to support teachers as they use the curriculum to inspire great
instruction and increase student learning. At the leadership level, the focus is on listening
to teachers and observing practice with a goal of continuously improving teacher support.
PhaseIIIdoesnotendafterthefirstyear—thisisacontinuousimprovementjourneythat
never ends.
Successful early implementers:
• Had a plan for implementation (see Phase II)
• Followed the plan and did the work
• Listened carefully, with openness to adjusting the plan
• Watched the work in action at every level to understand what was working and what was not
• Gathered together to step back and adjust the plan
• Shared the adjustments transparently in the spirit of continuous improvement

72
III.1: WORK THE PLAN AND GATHER DATA
WHAT IS THE GOAL?The goal of this key action is to enact the plan you developed in Phase II, observe what
works and what does not, and listen to feedback. In particular, this key action is about
effectivelyenactingyourplansforsupportingteachersthatyououtlinedinKeyActions
II.3-II.5.
WHY IS THIS KEY ACTION IMPORTANT?Plans tend to fall along a spectrum. On one end, they are printed documents, put
away in a binder on the shelf and gathering dust, and on the other end, they are living,
breathing drivers of the work that are shared across a team. This key action is where
therubbermeetstheroadandeveryonebeginstoenacttheplan.Itcanbedifficultto
lose momentum or focus when confronted with the daily pulls and pressures of school
life. This key action builds on the plans determined at the end of Phase II for progress
monitoring,andfocusesonconsistentreflection.Oneofthedifferentiatorsbetween
successful implementers and implementers who struggled was their ability to support
teacher practice. The work of the Three Pillars of Teacher Support is challenging because
of the diversity of factors involved such as instructional culture, team expertise, structural
support, etc. As you go through this key action, it can be helpful to return to your plans
in Phase II, Key Actions 3–5 to see where to improve. In the next key action, teams come
togethertocomparenotes,reflect,andadjust.Inthiskeyaction,theteam’schargeisto
do the work, observe the outcome, and listen closely to all involved.
Key Action III.1: Work the Plan and Gather Data
Key Action III.2: Step Back and Adjust the Plan
Key Action III.3: Annually Reset
Step III.1.A: Train, Plan, and Coach Teachers
Step III.1.B: See the Work in Action and Listen to Questions and Concerns
Step III.1.C: Check in to Track the Trends and Solve Quick Problems
EXPLANATION OF LANGUAGE
We use the term check-in to refer to a meeting of the Implementation Support Team
focused on monitoring progress and solving any problems.
Phase III: Learn

73
III.1.A: TRAIN, PLAN, AND COACH TEACHERS
GUIDING QUESTIONS NOTES
i. What is the plan?
ii. What are the key deadlines? Are we on track?
iii. What needs to happen to get the work done at a high level of quality?
iv. What, if anything, is pulling focus? What needs to change to get the work done well?
v. When are we checking in as a team to make sure the plan is on track?
vi. What questions do we need to discuss?
This step hinges on the work of Phase
II—specifically,relyingonyour
Implementation Plan assembled across all
of the key actions in Phase II.
The resource Project Planning Check-In Agenda provides a sample agenda for a
project planning check-in — a dedicated
time to bring the Implementation
Support Team together and allow for
implementation problem solving and day-
to-day discussion in service of the plan.
Training, planning, and coaching is about
1. setting up the structures to ensure
that these supports happen (which you
planned for in Phase II) and 2. making sure
thesesupportsareeffectiveandleading
to growth towards your goals. In Phase II,
Key Action 3, Step E: Determine how you
will support collaborative and individual
planning, you diagnosed your professional
learning system using the Practice What You Teach Checklist for Schools and Systems. Revisit this checklist to guide your
teacher support work.

74
III.1.B: SEE THE WORK IN ACTION AND LISTEN TO QUESTIONS AND CONCERNS
GUIDING QUESTIONS NOTES
i. How is implementation going?
ii. What is going well?
iii. Where are we having challenges?
iv. What else do we need to see?
v. What are we hearing?
vi. What questions are we getting?
vii. What can we answer easily? What questions are more challenging?
viii. How are stakeholders responding to the materials?
ix. What concerns can we address easily? What concerns are more challenging?
Be sure to observe at every level of
implementation to gather a picture. The
resource Implementation Observation Guidance is a list of the key interactions
and look fors that early implementers
benefitedfromobservinginorderto
understand how things were going. Some
early implementers created shared
documents to pool observations and
impressions.
You can use the resource Implementation Observation Log to log questions and
observe trends.
Listen to questions, concerns, and
feedback. Listen for the pattern
underneath the questions and listen for
where the concerns are coming from.
Read the Phase III section of the vignette
for a narrative example of common
challenges that arise and how to respond
to them.

75
III.1.C: CHECK IN TO TRACK THE TRENDS AND SOLVE QUICK PROBLEMS
GUIDING QUESTIONS NOTES
i. How are things going across our implementation plan? What has taken place? How did it go?
ii. What questions are we getting?
iii. What can we celebrate and share?
iv. What can we refine and adjust?
v. What else do we want to observe and listen for before our next meeting?
vi. What is the next set of work coming up?
Teamsbenefitfrommeetingbrieflybut
regularly to support each other in the work
of the plan. These quick check-ins allow for
quick problem solving and adjustments.
Quarterly,theteambenefitsfroma
broader stepback to take stock on the
whole story and make bigger adjustments,
which you will plan in Key Action III.2: Step
backtoreflectonprogressandchallenges.
The Project Planning Check-In Agenda is a
sample agenda for regular team check-
ins, including ones that early implementers
used.

76
III.2: STEP BACK AND ADJUST THE PLAN
WHAT IS THE GOAL?The goal of this key action is to examine progress to goals, identify key successes, and
learnfromandsolveforsignificantchallenges.Afteranalyzingthedataandconsidering
key drivers, the team will adjust the plan for the next chapter of work.
WHY IS THIS KEY ACTION IMPORTANT?While the team meets consistently during the year to monitor progress and keep the
work moving forward, a formal stepback at a larger interval of time allows for deeper
reflectionsandgivestheteamanopportunitytogetoutoftheday-to-daychallengesand
take stock of overall progress to your goals. This is the time to look at the whole picture
anddecidewhattodo.Listeningandadjustingbuildsinvestmentandconfidence,andit
allowseveryoneinvolvedtobemoreefficientinspendingenergyinwaysthatsupport
progress.
Key Action III.1: Work the Plan and Gather Data
Key Action III.2: Step Back and Adjust the Plan
Key Action III.3: Annually Reset
Step III.2.A: Prepare Data for the Stepback
Step III.2.B: Step Back to Reflect on Progress and Challenges
Step III.2.C: Adjust the Plan and Communicate the Changes
EXPLANATION OF LANGUAGE
We use the word stepback as a noun to refer to the actual meeting that takes place with
the Implementation Support Team and step back as a verb describing the collective act of
gaining perspective on the whole story. We use the term quarterly to refer to the practice
of doing these stepbacks each quarter, although we have seen some early implementers
benefitfrommorefrequencyinthefirstthreemonths.Datareferstoquantifiabledata(i.e.
student scores or survey results) as well as qualitative data (i.e. observation notes).
Phase III: Learn

77
III.2.A: PREPARE DATA FOR THE STEPBACK
GUIDING QUESTIONS NOTES
i. What are the goals for the meeting?
ii. What data do we need to gather to report on our progress to goal?
iii. Is there additional stakeholder feedback we need to gather?
iv. What is our agenda? Who will facilitate which portions?
v. What meeting norms do we need in place to create a productive, supportive, and solutions-oriented discussion?
vi. What pre-work, if any, will there be for the meeting?
vii. How will we communicate the agenda, goals, and pre-work?
The resource Quarterly Stepback Agenda and Email is a sample agenda with an
adaptable email that you can send.
You can also use the sample Quarterly Stepback Data Gathering Template to
collect all data and stakeholder feedback
in one place. You can also reference the
notes in the Implementation Observation Log you used in Step III.1.B: See the work in action and listen to questions and concerns.
Sharing and discussing data openly can be
scary and trigger feelings of evaluation for
team members, particularly when looking
at data broken out by any subgroups (i.e.
specificgradelevels,schools,etc.).Setting
team norms around meeting culture can
help make the discussion more productive
for the team. The resource Quarterly Stepback Meeting Norms includes some
sample norms that you can use as a
starting point.
Ensure you are disaggregating the data
where possible to evaluate for equity. Are
all student groups getting access to the
same experience and expectations?

78
III.2.B: STEP BACK TO REFLECT ON PROGRESS AND CHALLENGES
GUIDING QUESTIONS NOTES
i. Where are we on pace to meet our goals?
ii. What are the drivers of success?
iii. How can we best celebrate these successes?
iv. Where are we off track to meet our goals?
v. What is holding us back from meeting those goals?
vi. What are the 2–3 areas we want to improve in next quarter?
Reference your agenda, sample norms,
and templates for organizing data for the
conversation that you laid out in Step A:
Prepare data for the stepback.
If the results are clear about some areas
for improvement, add additional guiding
questions in advance to focus on the root
cause and potential solutions for those
areas.
While it’s tempting to try to solve
everything at once, it can be helpful to
focus on 2–3 improvements and keep the
rest on a running list for potential changes
to revisit.
In the next key action, you will adjust your
plan and determine what you are going to
do in more precision.

79
III.2.B: STEP BACK TO REFLECT ON PROGRESS AND CHALLENGES (CONT.)
GUIDING QUESTIONS NOTES
vii. For each of the 2–3 priorities, what is the root of the problem?
viii. What needs to change?
ix. What are we going to do about it?
x. At our next stepback meeting, how will we know that these adjustments worked?
xi. What do we need to observe and what additional data do we need to collect next quarter to know if it is working?
This step asks you to go back into your
Implementation Plan to adjust the plan, as
opposed to throwing the old plan out and
starting from scratch.
The resource Examples of Mid-Year Adjustments is a set of examples of the
kinds of adjustments that have been made
mid-yeartowardsdifferentgoalareas.
Leverage your bright spots and share
learnings in your game plan.

80
III.2.C: ADJUST THE PLAN AND COMMUNICATE THE CHANGES
GUIDING QUESTIONS NOTES
i. In this key action, we adjusted our plan. What are the next steps that we need to take based on the decisions we made together?
ii. What needs to happen? Who will do it? By when?
iii. What will each identified stakeholder group want to know about the adjustments to the plan?
iv. How do we plan to proactively communicate this information? Who will deliver the communication? When?
v. What questions do we expect we will get? How will we answer them?
Go back to your Implementation Plan to
track your next steps and add to your
roles and responsibilities tracker.
Quarterly communications can be a great
opportunity to celebrate the hard work of
implementationandfuelthefiretokeep
continuously improving.
Listening and adjusting the plan builds
confidenceandtrust,especiallywhen
every member of the team is on the same
page and can describe the rationale in a
way that is connected with the vision and
core beliefs.
The Email Communicating Adjustments After a Stepback resource is a sample
email from a system based on the
adjustments they made.

81
III.3: ANNUALLY RESET
WHAT IS THE GOAL?The goal of this key action is to look back on the year, celebrate successes, name areas of
growth,anddefinethenextlevelofworkforthefollowingschoolyear.
WHY IS THIS KEY ACTION IMPORTANT?After going through multiple cycles of the improvement process throughout the school
year,itisimportanttoreflectontheyearasawhole.Theend-of-yearreflectionis
slightlydifferentthanquarterlystepbacks.Thedataisdifferentsincethereisaccess
to summative data and there’s an opportunity to dig into additional data sources that
mighthavebeenmissedduringtheschoolyear.Also,thecontextisdifferent,withsystem
and school leaders looking ahead to the next school year, particularly with an eye to
changes in workforce. Schools change more dramatically from year to year than within
a given year. The end of the year provides an opportunity to revisit the improvements list
generated throughout the school year and consider which changes to tackle during the
upcomingyearandoverthesummer.It’sachancetoreignitethefirefortheteamaswell
as institutionalize work started this school year.
Key Action III.1: Work the Plan and Gather Data
Key Action III.2: Step Back and Adjust the Plan
Key Action III.3: Annually Reset
Step III.3.A: Prepare Data for the Annual Stepback
Step III.3.B: Step Back as a Team to Reflect on Progress and Challenges
Step III.3.C: Adjust the Goals and Plan for the Coming Year
Step III.3.D: Celebrate Wins and Invest the Team in the Next Level of Work
EXPLANATION OF LANGUAGE
We use the term annual planning to reference end of one school year planning in
preparation for the next year, but this can take place at any point in the spring or in two
parts — once before data is back and again once all data is in.
Phase III: Learn

82
III.3.A: PREPARE DATA FOR THE ANNUAL STEPBACK
GUIDING QUESTIONS NOTES
i. What are the goals of our annual stepback?
ii. How are we going to structure the conversation?
iii. What data do we need to gather to report on our progress towards our goals?
iv. Is there additional stakeholder feedback we need to gather?
v. What is our agenda? Who will facilitate which portions?
vi. What pre-work, if any, will there be for the meeting?
vii. How will we communicate the agenda, goals, and pre-work?
Some leaders opt to do a series of
stepbackmeetingswithdifferentgroups
of stakeholders. The resource End-of-Year Stepback Guidance and Materials provides
an overview of the options with a sample
agenda, including an adaptable email that
you can send. You can also use the End-of-Year Stepback Data Gathering Template to
gather all data and stakeholder feedback
in one place. It might also be helpful to
reference past notes from prior quarterly
stepback meetings.
Ensure that you are disaggregating
the data where possible to evaluate for
equity,specificallyforstudentsinpoverty,
students of color, students with disabilities,
and English language learners.
Sharing and discussing data openly can
trigger feelings of evaluation for team
members. Setting team norms around
meeting culture can help make the
discussion more productive for the team.
The document Quarterly Stepback Meeting Norms includes some sample norms that
you can use as a starting point.
The End-of-Year Stepback Considerations for Staffing resource has additional
considerations for the annual stepback
attending to workforce changes.

83
III.3.B: STEP BACK AS A TEAM TO REFLECT ON PROGRESS AND CHALLENGES
GUIDING QUESTIONS NOTES
i. Where did we meet our goals?
ii. What were the drivers of success?
iii. Where did we miss our goals?
iv. What held us back from meeting those goals?
v. What will be different next year?
vi. What are our goals for next year?
viii. What are the 2–3 focus areas we’ll have as a system next year?
vii. How do we want to continue to manage and support implementation?
Reflectingonthesystemsand
processes that the team used to support
implementation will help surface what
to replicate or adjust for next school
year. It can be helpful to reference old
quarterly stepback notes. The End-of-Year Stepback Agenda is an example for this
conversation.
After year 1, many curriculum leaders tend
to emerge — teachers and leaders who
champion the materials, teachers who
are rock stars at utilizing the materials,
and leaders who are savvy in supporting
teachers. When considering needs for next
year, identify these players to help lead
the work the following school year.
Sometimes questions surface during this
step around the possibility of changing
materials. We have found that most often,
there are challenges with implementation
due to planning issues in Phase II and
recommend starting by revisiting those
plans. Changing materials often has
unintended consequences. It requires
starting this entire change management
processoveragain,whichaffectssystems
and structures and requires a substantial
new set of learnings for all educators in
the system. Changing materials can also
disrupt student learning, particularly if you
areusingasetofmaterialswithaspecific
pedagogical approach. We recommend
proceeding with caution when considering
a materials change if you already have
high-quality, standards-aligned materials
in place. Considerations when Changing Materials outlines factors to consider as
well as the type of criteria that might lead
you to change curriculum.

84
III.3.C: ADJUST THE GOALS AND PLAN FOR THE COMING YEAR
GUIDING QUESTIONS NOTES
i. What are our goals for this next year of implementation?
ii. How will we know that we have been successful?
iii. What changes will we make to our plans for next year?
iv. What work needs to be done this summer to support teachers and leaders that have been using the curriculum to prepare for the next level?
v. What work needs to be done this summer to support new teachers and leaders?
vi. When will we discuss progress across the coming year?
vii. Who will be responsible for what work? When is it due?
The summer can be a critical time
for training new teachers and doing
systems planning for the next year of
implementation. It can be helpful to make
separateorspecificplansforthesummer,
focused on teacher and leader training,
updates to policies, and planning meetings
for structures for supporting teachers and
leaders.
The document Goals for Implementation
shares an example of annual goals used
by early implementers.
Go back through Phase II to rethink any
systems that require adjustment.
Update your Implementation Plan.

85
III.3.D: CELEBRATE WINS AND INVEST THE TEAM IN THE NEXT LEVEL OF WORK
GUIDING QUESTIONS NOTES
i. What information does each stakeholder group need about our successes this year, lessons learned, and areas for focused improvement next year?
ii. Who, how, and when will we share this information?
iii. How do we invest the team in our 2–3 focus areas and keep forward momentum?
Remind everyone that this work is a
journey and rekindle the original dreams
and aspirations for students that led to
this journey and make persisting in it
worthwhile.
Share celebrations and wins across all
stakeholders, naming what worked.
Positive successes will reinvest people in
the next level of work needed.
Find sample communications for the end
of year 1 in the resource Email for End-of-Year Communication.
The resource End-of-Year Celebration Ideasincludesdifferentwaystocelebratewith your team at the end of a big year.

Appendix

87
CURRICULUM SUPPORT GUIDE
Go to Key Action I.4 to see ifyour m
aterials are aligned
Do you have a content specific visionof instruction that guides actions?
Go to Key Action I.2 tocraft your vision
Is everyone in the school & system
clear on roles & responsibilities
in using materials?
Go to Key Action II.3 toplan expectations for use
and planning supportGo to Key Action III.2 to
determine how
to improve
Go to Key Action III.1 tofigure out progress m
onitoring
Do you have a plan forcontinuing to im
prove next year?
Go to Key Action III.3 toplan for next year
Great work! Share w
hat you’ve learnedw
ith us! (insert link to feedback form)
Go to Phase II to plan thelaunch of your m
aterials.
START HEREYES
NO
I DON’T
KNOW
NO
YES
NO
YES
NO
YES
NO
YES
NO
YESI DON
’TKN
OW
NO
YES
YES
NO
Read the first question. If your answer is "no" or "I don't know
" follow the guidance
until your answer is "yes" and then m
ove onto the next step of the flow chart.
Have you selected aligned materials?
Is your school & system
alreadyusing new
materials?
Are teachers & leaders clear on if
& w
hen to modify m
aterials and howto plan &
prepare for teaching?Have teachers &
leaders beentrained on how
to use the materials?
Is curriculum use going w
ell?Is teacher practice and student
learning improving?
Go to Key Action II.1 to set rolesGo to Phase I toselect m
aterials
Go to Key Action II.5 toplan your training
STARTING POINT DIAGNOSTICThis map guides you through yes and no questions, starting at the very beginning of the
process selection, to determine where to begin.

88
REFLECTIVE IMPLEMENTATION CHECKLISTThis tool outlines the framework including the three phases, all key actions, and the steps
within each key action. For each key action, you can indicate the extent to which you’ve
implemented or accomplished the action. This will help you determine where to focus your
effortsandwhereyoushouldbeginyourworkinsupportingmaterials.
PHASE I. SELECT MATERIALS
KEY ACTIONNOT YET IMPLEMENTED
PARTIALLY IMPLEMENTED
FULLY IMPLEMENTED
NOTES DESCRIBE PROGRESS
I.1 Plan your Process• I.1.A Identify the Selection Team and Leader
• I.1.B Determine How the Final Decision Will be Made
• I.1.C Map the Schedule of Events
• I.1.D Form the Review Committee
• I.1.E Organize Next Steps and Communicate a Plan
I.2 Establish the Vision• I.2.A Train the Selection Team and Review
Committee
• I.2.B Articulate the Vision of Instruction and Core Beliefs
I.3 Develop the Rubric and Prepare for Reviews
• I.3.A Solicit Stakeholder Input
• I.3.B Develop the Rubric
• I.3.C Identify the Options You Will Review
• I.3.D Train the Review Committee on the Rubric and Process
I.4 Review, Pilot, and Decide• I.4.A Conduct the Reviews and Gather Feedback
• I.4.B Pilot the Materials
• I.4.C Make the Final Selection Decision
• I.4.D Communicate Decision and Rationale
I.5 Procure and Distribute Materials• I.5.A Understand Your Procurement Options
• I.5.B Place and Track Your Orders
• I.5.C Communicate a Realistic Timeline
• I.5.D Form the Review Committee and Distribute Materials

89
PHASE II. PREPARE TO LAUNCH
KEY ACTIONNOT YET IMPLEMENTED
PARTIALLY IMPLEMENTED
FULLY IMPLEMENTED
NOTES DESCRIBE PROGRESS
II.1 Set Goals, Roles, and Monitoring Plan• II.1.A Identify Implementation Support Team and
Leader
• II.1.B Map out the Implementation Planning Process
• II.1.C Draft the Goals for Successful Implementation
• II.1.D Revisit and Set Implementation Goals and Determine How You Will Monitor Progress
• II.1.E Revisit Roles and Responsibilities and Set the Plan
II.2 Determine the Plan for Assessment and Grading
• II.2.A Study the Assessments in the Curriculum
• II.2.B Inventory All Currently Used Assessments for Purpose, Frequency, and Quality
• II.2.C Determine the Plan for Common Assessment and What You Will Do with the Data
• II.2.D Establish Grading Guidance for the New Materials
• II.2.E Organize Next Steps and Communicate the Plan
II.3 Determine Expectations for Use and the Plan for Collaborative Planning
• II.3.A Study the Design of the Materials
• II.3.B Ensure Every School has Appropriate Time in the Schedule
• II.3.C Determine the Yearlong Pacing Schedule
• II.3.D Establish Guidance for Common Use and Customization
• II.3.E Determine How You will Support Collaborative and Individual Planning
• II.3.F Organize Next Steps and Communicate the Plan
II.4 Determine the Plan for Coaching• II.4.A Understand Your Current Coaching
Practices
• II.4.B Establish Your Observation and Coaching Tool
• II.4.C Determine How You Will Support Those Responsible for Coaching
• II.4.D Organize Next Steps and Communicate the Plan
II.5 Determine the Plan for Training Teachers and Leaders
• II.5.A Understand Available Training Time and Current Plans
• II.5.B Study the Training and PD Resources that Come with Your Materials
• II.5.C Determine Training Needs for Each Group
• II.5.D Determine the Plan and Prepare the Facilitators
• II.5.E Organize Next Steps and Communicate the Plan

90
PHASE III. TEACH AND LEARN
KEY ACTIONNOT YET IMPLEMENTED
PARTIALLY IMPLEMENTED
FULLY IMPLEMENTED
NOTES DESCRIBE PROGRESS
III.1 Work the Plan and Gather Data• III.1.A Train, Plan, and CoachTeachers
• III.1.B See the Work in Action and Listen to Questions and Concerns
• III.1.C Check in to Track the Trends and Solve Quick Problems
III.2 Step Back and Adjust the Plan• III.2.A Prepare Data for the Stepback
• III.2.BStepBacktoReflectonProgressandChallenges
• III.2.C Adjust the Plan and Communicate the Changes
III.3 Annually Reset• III.3.A Prepare Data for the Annual Stepback
• III.3.BStepBackasaTeamtoReflectonProgress and Challenges
• III.3.C Adjust the Goals and Plan for Coming Year
• III.3.D: Celebrate Wins and Invest the Team in the Next Level of Work

91
SELECTION PLANThis template is a place to record projects and tasks that your team will take on during
selection. Modify this to a format that works for your team. At the bottom of the template,
there is a list of sample projects and tasks to help you get started.
Decision-Making (set in Set goals, roles, and monitoring plan, Key Action II.1.E):
KEY DECISIONWHO IS RESPONSIBLE FOR
MAKING IT?WHO WILL CONSULT?
Key Stakeholders and Communications (set at the end of each step in Phase II):
STAKEHOLDER GROUP COMMUNICATION CHANNELS COMMUNICATIONS NEEDED

92
Schedule of Events (set in Map the schedule of events, Key Action I.1.C):
KEY EVENT (INCLUDE IDEAL SELECTION DATE) DATE
Vision (set in Establish the vision, Key Action I.2.B):
Core Beliefs (set in Establish the vision, Key Action I.2.B):

93
Work Plan:
Below are descriptions of some of the terms across the top row.
• Project: describes the bucket of work; many organize projects by key action (i.e. coaching)
• Task: describes an action step in the project (i.e. determine who will lead upfront materials training)
Sample projects and tasks:
Project: Form the Review Committee
• Create role and responsibility doc for Review Committee
• Determine what roles need to be represented on the Review Committee
• Finalize criteria for Review Committee members
• Email committee to determine meeting availability
• Communicate who is serving on the committee to the system and share their role
Project: Leading the Review
• Train all Review Committee members on the rubric and selection process
• Review materials
• Determine plan for pilot
• Makefinalselectiondecision
PROJECT TASK OWNER DEADLINE

94
IMPLEMENTATION PLANThis resource is a template for keeping track of all of the projects and tasks that your
team will take on during implementation. Before the work plan, there is space for
recording major decisions and notes relevant to your work plan from across Phase I
and Phase II: vision, core beliefs, goals, communications, roles and responsibilities, and
decision-making process. This is meant to be a “one-stop shop,” but the format may not
be right for your team. Modify as needed — add or delete sections, adjust tables and rows,
or separate into multiple templates.
Vision (set in Establish the vision, Key Action I.2.B):
Core Beliefs (set in Establish the vision, Key Action I.2.B):
Goals (set in Set goals, roles, and monitoring plan, Key Action II.1.C):
GOAL AREA GOAL(S)MEASURES AND
FREQUENCY
HOW WILL WE COLLECT AND
ANALYZE DATA?
WHEN WILL WE STEP BACK AND
ADJUST?
Teacher and Student Investment
Teacher Practice
Student Outcomes

95
Roles and Responsibilities (set in Set goals, roles, and monitoring plan, Key Action II.1.E):
PERSON / ROLE RESPONSIBILITIES TRAINING AND SUPPORT NEEDS
Key Stakeholders and Communications (set at the end of each step in Phase II):
STAKEHOLDER GROUP COMMUNICATION CHANNELS COMMUNICATIONS NEEDED

96
Work Plan:
Below are descriptions of some of the terms across the top row.
• Project: describes the bucket of work; many organize projects by key action (i.e. coaching)
• Task: describes an action step in the project (i.e. determine who will lead upfront materials training)
PROJECT TASK OWNER DEADLINE
Decision-Making (set in Set goals, roles, and monitoring plan, Key Action II.1.E):
KEY DECISIONWHO IS RESPONSIBLE FOR
MAKING IT?WHO WILL CONSULT?

97
TIMELINE
Curriculum Im
plementation Tim
eline
JANFEB
MAR
APRM
AYJUN
JULAUG
SEPOCT
NOV
DECJAN
FEBM
ARAPR
MAY
JUN
PH 1PH 2
PH 3PH 2
I.1Plan YourProcess
I.2Establishthe Vision
I.3Develop theRubric andPrepare forReview
s
I.4Review
,Pilot,Decide
I.5Procure and Distribute M
aterials
II.1Set Goals,Roles, andM
onitor thePlan
III.1W
ork the Plan and Gather DataIII.3AnnuallyReset
II.1Set Goals,Roles, andM
onitor thePlan
Curriculum Im
plementation Tim
eline (with pilot of new
materials)
AUGSEP
OCTN
OVDEC
JANFEB
MAR
APRM
AYJUN
JULAUG
SEPOCT
NOV
DECJAN
PH 1PH 2
PH 3
I.1Plan YourProcess
I.2Establishthe Vision
I.4Review
, Pilot, Decide
second semester school
first semester school
summ
ersecond sem
ester school
first semester school
second semester school
summ
erfirst sem
ester school
II.5Determ
inethe plan fortrainingteachersand leaders
II.4Determ
inethe plan forcoaching
II.2Determ
inethe plan forassessm
entand grading
II.3Determ
ineexpectationsfor use andthe plan forcollaborativeplanning
III.2Step Backand Adjust
III.2Step Backand Adjust
I.5Procure and Distribute M
aterials
II.1Set Goals,Roles, andM
onitor thePlan
II.2Determ
inethe plan forassessm
entand grading
II.5Determ
inethe plan fortrainingteachersand leaders
II.4Determ
inethe plan forcoaching
II.3Determ
ineexpectationsfor use andthe plan forcollaborativeplanning
I.3Develop theRubric andPrepare forReview
s
III.1W
ork the Plan and Gather Data
III.2Step Backand Adjust
III.2Step Backand Adjust

98
The Curriculum Support Guide was written and designed by Instruction Partners, an
educationnon-profitthatworksshouldertoshoulderwitheducatorstosupportgreat
teaching and accelerate student learning. Our work with schools and systems is grounded
in the instructional core, and we provide coaching, action planning, and professional
development. In the last three years, we have observed hundreds of classrooms and been
fortunate to partner with many schools and school systems. We specialize in supporting
smaller school systems, who may lack capacity but are able to make big changes quickly.
Many thanks to the Bill & Melinda Gates Foundation for their generous support of this work.
About Us

W O R K B O O K
Thank YouF O R U S I N G T H E