Embed Size (px)
Citation preview

WORKAROUNDS AND SPECIAL SITUATIONS FOR CONTRACTORS Trevor Matheson | VP Real World Training
2
Presenter Bio• Has taught and developed QuickBooks training
since 1997 (for RWT-Intuit’s Endorsed Training Partner)
• Taught over 20,000 students in live seminars• Award winning speaker• Written numerous books and CD/DVD training
courses• To learn more visit www.realworldtraining.com

www.realworldtraining.com 800-564-2688
Workarounds and Special Situations for Contractors
JUNE 12- JUNE 14, 2007
Real World Training We Create Confident QuickBooks Users

Real World Training – We Create Confident QuickBooks Users
Workarounds and Special Situations For Contractors
ITEM LIST GUIDELINES.............................................................. 1 ESTIMATING FIXED PRICE JOBS ............................................. 2 DEPOSITS.................................................................................... 3 RETAINAGE................................................................................. 5 TRANSFER CREDITS BETWEEN JOBS.................................... 8 JOB COST SALARIED EMPLOYEE ......................................... 10 COST OWNER TIME.................................................................. 11 ALLOCATING OVERHEAD ....................................................... 13 WORK IN PROCESS ................................................................. 15 NOTES........................................................................................ 20
Real World Training – We Create Confident QuickBooks Users
1
Item List Guidelines
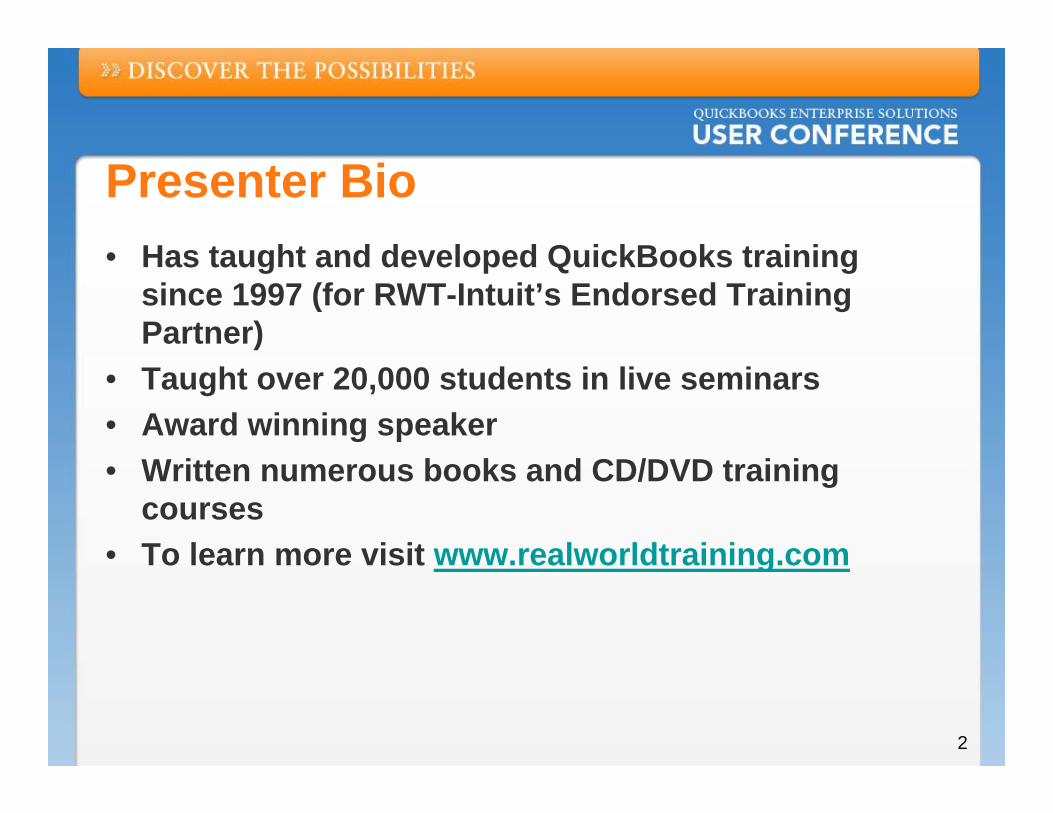
1) Use Parent items to group items of the same phase of the job
2) Make all cost items “service” type (allows you to group sub items within a phase together)
3) Organize the list in the order in which you complete the job
4) Create dummy income account for cost items
5) Only create the level of detail you need and use
6) You may need to create different items for estimating, invoicing, and purchase orders
7) General “catch all” items are good for job costing
8) Specific items are good for purchase orders
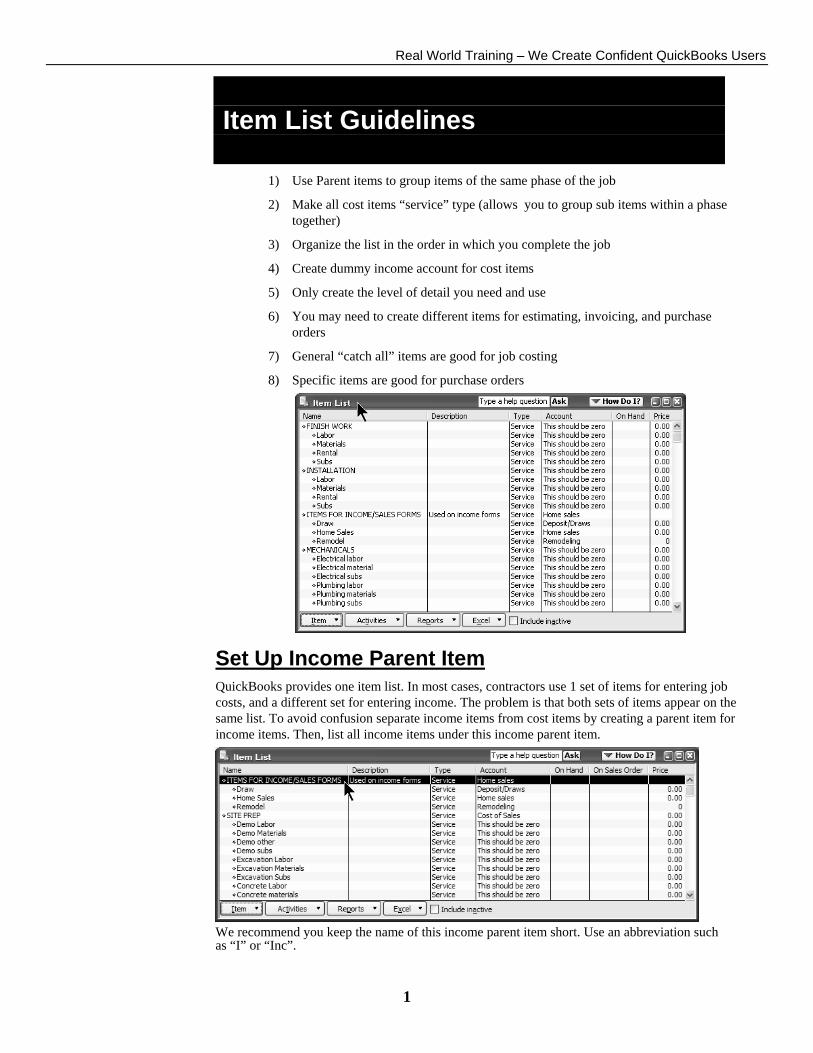
Set Up Income Parent Item QuickBooks provides one item list. In most cases, contractors use 1 set of items for entering job costs, and a different set for entering income. The problem is that both sets of items appear on the same list. To avoid confusion separate income items from cost items by creating a parent item for income items. Then, list all income items under this income parent item.
We recommend you keep the name of this income parent item short. Use an abbreviation such as “I” or “Inc”.

Real World Training – We Create Confident QuickBooks Users
2
Estimating Fixed Price Jobs
An estimate calculates the revenue as a specified markup of costs. This works for many jobs as the sales price is a specified markup over cost. Fixed priced jobs are different. For these jobs, the amount billed to a customer is predetermined and is not based on the actual costs. However, entering the estimate is useful because you can compare actual costs to estimated costs on job cost reports. How can you enter this type of estimate without affecting revenue? Follow these steps.
Prepare Estimate for Fixed Price Job 1) Click the Estimates icon on the Home page. 2) Click the Customer:Job drop-down list and select the appropriate customer and/or job. 3) Enter the estimated costs in the Cost column. 4) Enter a zero for each line item in the Total column. 5) Enter sales items to estimate revenue, with a zero in the Cost column. 6) Click Save & Close.

Real World Training – We Create Confident QuickBooks Users
3
Deposits
There are several ways to handle customer deposits. Real World Training recommends the method shown here because it is the easiest to follow for non-accountants. A journal entry to reclassify unused deposits might be required to prepare year-end financial statements. Consult your accountant regarding this journal entry. To enter customer deposits, follow these steps:
1) Record the deposit as a payment when you receive the money
2) Create an invoice when you provide the products or services
3) Apply the deposit to the invoice
(1) Receive Payment
Receive Customer Deposit 1) Click the Receive Payments icon on the Home page. 2) Click the Received From drop-down list and select the appropriate customer or job. 3) Enter remaining information in the Receive Payments window. 4) Select Leave the credit to be used later. 5) Click Save & Close. 6) Click OK in the Payment Credit window.

Real World Training – We Create Confident QuickBooks Users
4
(2) Invoice Customer and (3) Apply Credits Invoice Customer 1) Click the Invoices icon on the Home page. 2) Click the Customer:Job drop-down list and select the appropriate customer or job. 3) Enter remaining information in the Create Invoices window. 4) Click the Apply Credits button. 5) Click Yes in the Apply Credits window. 6) Make appropriate selections in the Apply Credits window. 7) Click Done. 8) Click Save & Close.
Apply Credits
Invoice with Credits Applied
Real World Training – We Create Confident QuickBooks Users
5
Retainage
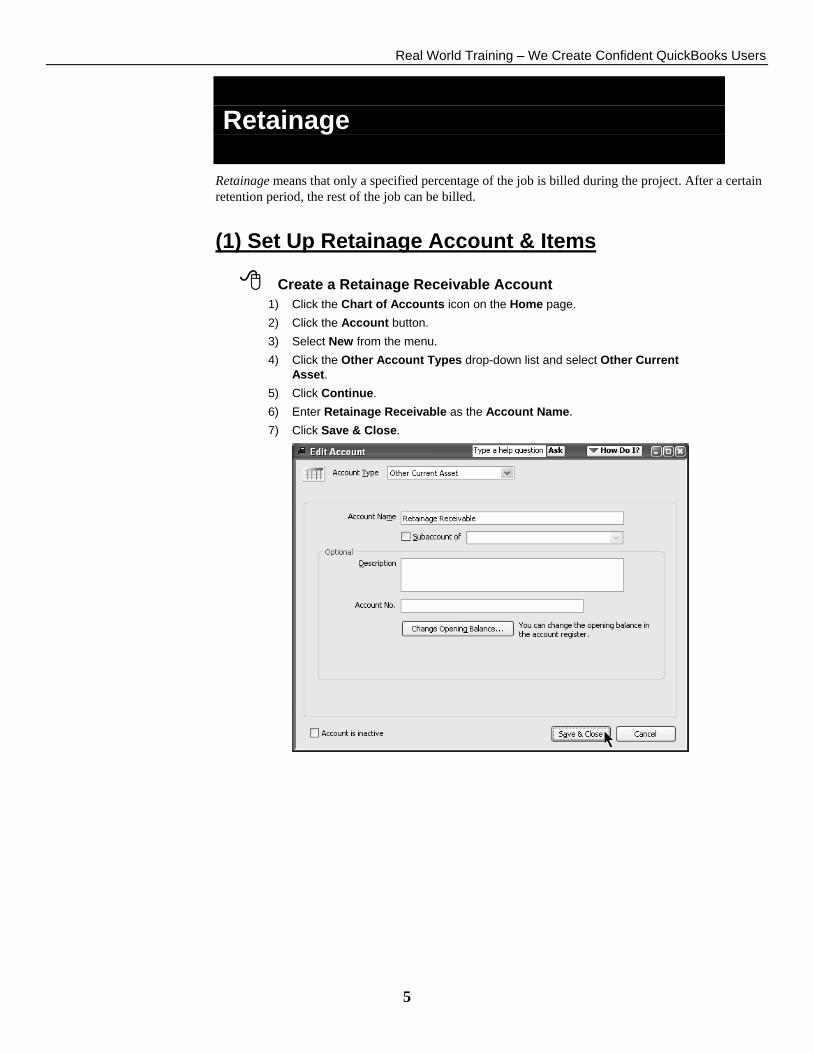
Retainage means that only a specified percentage of the job is billed during the project. After a certain retention period, the rest of the job can be billed.
(1) Set Up Retainage Account & Items
Create a Retainage Receivable Account 1) Click the Chart of Accounts icon on the Home page. 2) Click the Account button. 3) Select New from the menu. 4) Click the Other Account Types drop-down list and select Other Current
Asset. 5) Click Continue. 6) Enter Retainage Receivable as the Account Name. 7) Click Save & Close.

Real World Training – We Create Confident QuickBooks Users
6
Add Item for Retainage Withheld 1) Click the Items & Services icon on the Home page. 2) Click the Item button. 3) Select New from the menu. 4) Click the Type drop-down list and select Other Charge. 5) Enter Retainage Withheld as the Item Name/Number. 6) Click the Account drop-down list and select Retainage Receivable. 7) Enter remaining information in the New Item window. 8) Click OK.
Add Item for Retainage Billed 1) Click the Items & Services icon on the Home page. 2) Click the Item button. 3) Select New from the menu. 4) Click the Type drop-down list and select Other Charge. 5) Enter Retainage Billed as the Item Name/Number. 6) Click the Account drop-down list and select Retainage Receivable. 7) Enter remaining information in the New Item window. 8) Click OK.

Real World Training – We Create Confident QuickBooks Users
7
(2) Withhold Retainage on Invoice
(3) Invoice Retainage
Real World Training – We Create Confident QuickBooks Users
8
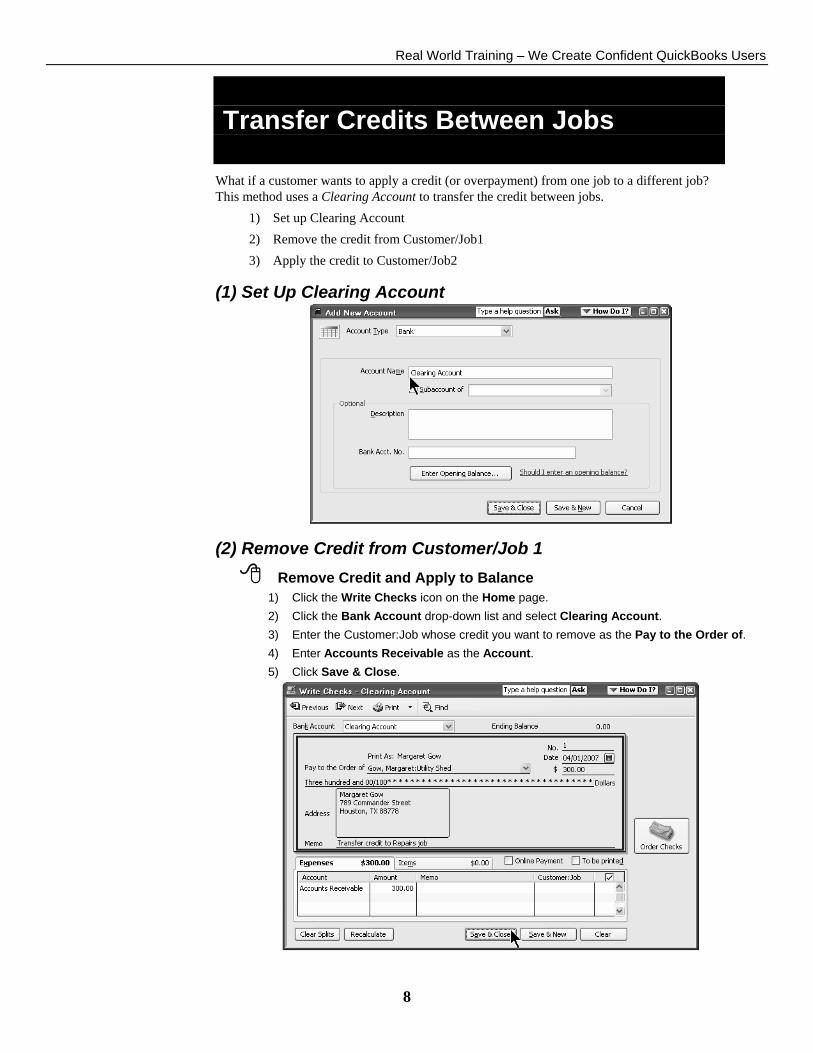
Transfer Credits Between Jobs
What if a customer wants to apply a credit (or overpayment) from one job to a different job? This method uses a Clearing Account to transfer the credit between jobs.
1) Set up Clearing Account 2) Remove the credit from Customer/Job1 3) Apply the credit to Customer/Job2
(1) Set Up Clearing Account
(2) Remove Credit from Customer/Job 1 Remove Credit and Apply to Balance 1) Click the Write Checks icon on the Home page. 2) Click the Bank Account drop-down list and select Clearing Account. 3) Enter the Customer:Job whose credit you want to remove as the Pay to the Order of. 4) Enter Accounts Receivable as the Account. 5) Click Save & Close.

Real World Training – We Create Confident QuickBooks Users
9
(3) Apply Credit to Customer/Job2
Apply Credit to Customer/Job 1) Click the Receive Payments icon on the Home page. 2) Click the Received From drop-down list and select the customer:job that will
receive the credit. 3) Enter the amount of the credit as the Amount. 4) Click on the individual invoices to apply the credit (if appropriate). 5) Click the Deposit to drop-down list and select Clearing Account. 6) Enter remaining information in the Receive Payments window. 7) Click Save & Close.
*The Deposit to option may not be enabled in your QuickBooks. Turn this option on by selecting Edit:Preferences from the menu. Click Sales & Customers in the list to the left. Click the Company Preferences tab. Uncheck the box next to Use Undeposited Funds as a default deposit to account.

Real World Training – We Create Confident QuickBooks Users
10
Job Cost Salaried Employee
What if you need to job cost a salaried employee? This is confusing because the employee is not paid based on the number of hours worked. QuickBooks handles this by automatically allocating the salary based on the number of hours worked on each job. To job cost a salaried employee, do the following:
1) In the Payroll and Compensation Info section of the Edit Employee window, select Use time data to create paychecks
2) Use the Weekly Timesheet or Time/Enter Single Activity windows to enter time for the salaried employee
3) Process the paycheck in the normal fashion
Employee Payroll Info
Job Cost on Paycheck

Real World Training – We Create Confident QuickBooks Users
11
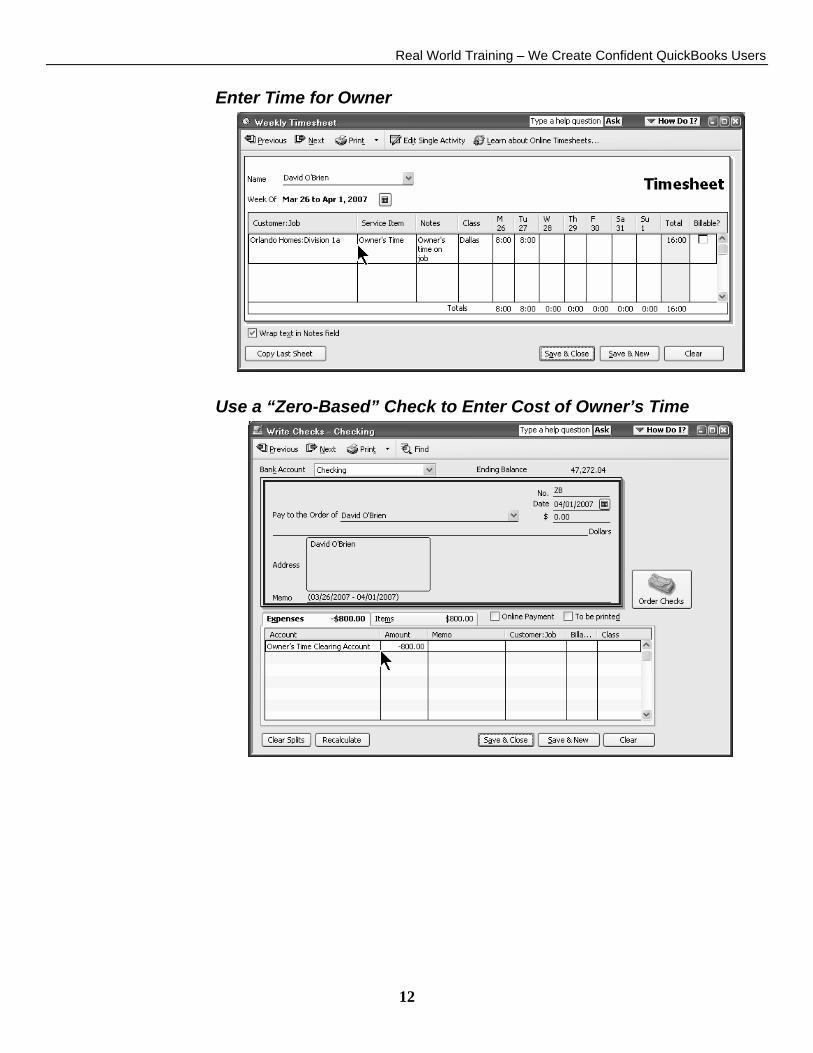
Cost Owner Time
Owners or partners are often not paid directly for their time. Use this workaround to get owner’s time spent on a job onto job cost reports.
Set Up Owner’s Time Clearing Account
Set Up Owner’s Time Service Item
Real World Training – We Create Confident QuickBooks Users
12
Enter Time for Owner
Use a “Zero-Based” Check to Enter Cost of Owner’s Time
Real World Training – We Create Confident QuickBooks Users
13
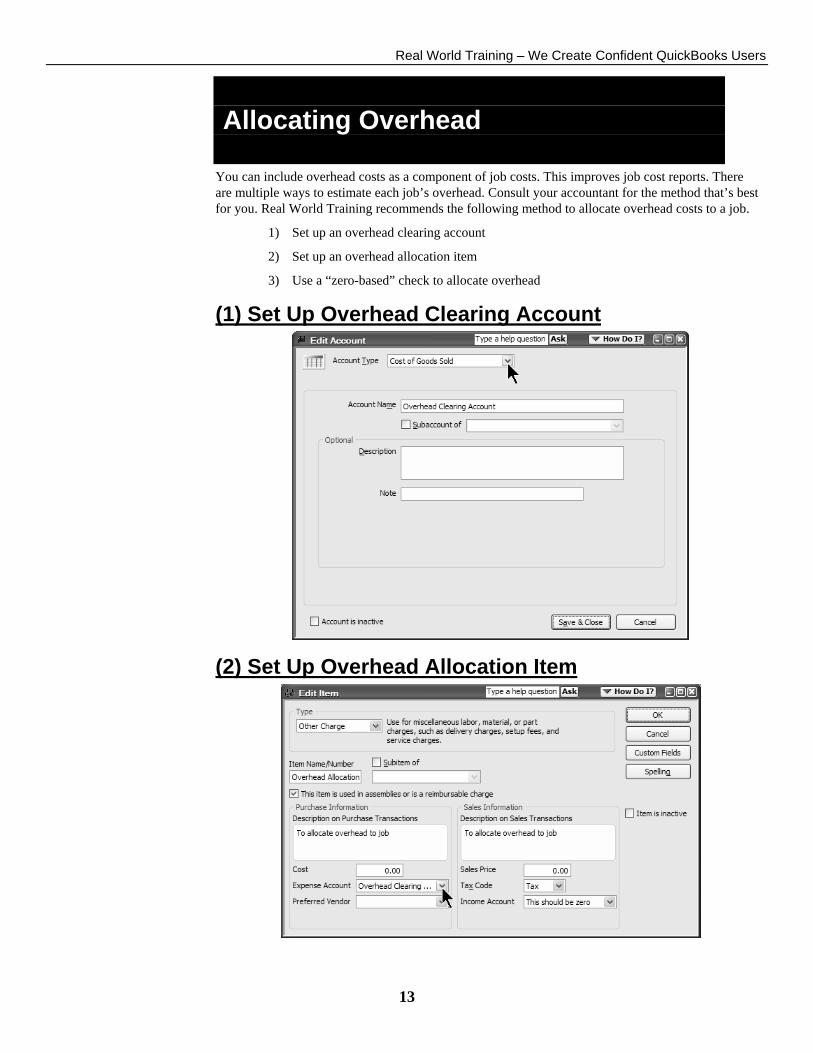
Allocating Overhead
You can include overhead costs as a component of job costs. This improves job cost reports. There are multiple ways to estimate each job’s overhead. Consult your accountant for the method that’s best for you. Real World Training recommends the following method to allocate overhead costs to a job.
1) Set up an overhead clearing account
2) Set up an overhead allocation item
3) Use a “zero-based” check to allocate overhead
(1) Set Up Overhead Clearing Account
(2) Set Up Overhead Allocation Item
Real World Training – We Create Confident QuickBooks Users
14
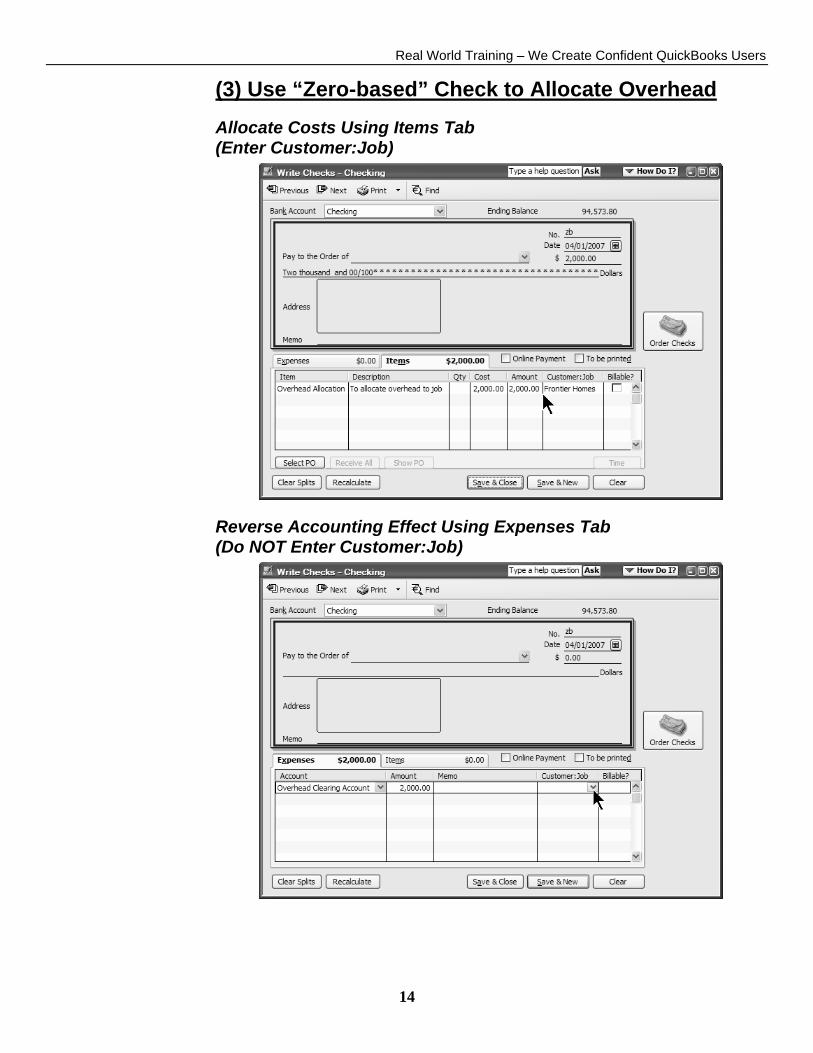
(3) Use “Zero-based” Check to Allocate Overhead
Allocate Costs Using Items Tab (Enter Customer:Job)
Reverse Accounting Effect Using Expenses Tab (Do NOT Enter Customer:Job)

Real World Training – We Create Confident QuickBooks Users
15
Work In Process
If you build new homes or work on big remodel jobs that take months to complete, then you must deal with work in process. When you “build” a home or work on a big job, you should report the costs in the same period the sale is reported. Those costs are not considered expenses UNTIL you’ve sold the house or invoiced for the whole job. Accountants prefer that you track these “building” costs as assets until the job is completed. There are two ways to approach this problem in QuickBooks.
Consult your accountant before deciding which method to use. If your accounting knowledge is not very strong, we recommend using method 1 and placing the responsibility for following proper accounting guidelines with your accountant. If you have a strong accounting background, method 2 allows for more accurate tracking of Work in Process. Please note, these methods for handling WIP do not address the WIP issue associated with “percent completed WIP”
Work In Process-Method 1 Track all costs as cost of goods sold. Then make a journal entry to convert the costs to an asset account when accurate financial statements are required. Advantages of this method include:
• Fewer journal entries required (just one when accurate financial statements are needed. This journal entry should be reversed the next day)
• Easier for non-accountants (your accountant can make the adjustment)
• Cost reports in QuickBooks are designed to show cost of goods sold activity Disadvantages of this method include:
• Financial statements are inaccurate until the adjusting journal entry is entered
• Periodically having to identify what jobs or projects are unfinished (for your accountant)

Real World Training – We Create Confident QuickBooks Users
16
Work In Process-Method 2 To follow proper accounting procedures track all costs in work in process (asset) accounts. Then, when the product is sold, convert those costs into cost of goods sold. Advantages of this method include:
• Follow correct accounting procedures
• Accurate financial statements at any time Disadvantages of this method include:
• More “closing” entries required (every time a job is completed - and these entries can be complicated)
• QuickBooks job cost reports are not designed to show asset accounts
Because method 2 is less intuitive and requires a more complex set up, some guidelines are presented below:
1) Set up a work in process account
2) Create cost items to “point” to the WIP account
3) Use these items to record costs
4) Modify and memorize job reports
5) Transfer WIP into Cost of Goods Sold account when the job is closed
(1) Set Up Work in Process Account

Real World Training – We Create Confident QuickBooks Users
17
(2) Set Up Items
You decide the number of items and detail level. Setup items to get meaningful cost reports.
(3) Record “Building” Costs

Real World Training – We Create Confident QuickBooks Users
18
(4) Modify Reports
Modify Job Profitability Detail Report 1) Click the Report Center icon. 2) Click the Jobs, Time & Mileage group to the left. 3) Click Job Profitability Detail. 4) Click the Customer:Job drop-down list and select the appropriate customer or job. 5) Click OK. 6) Click the Modify Report button. 7) Click the Filters tab. 8) Click Account in the list of Filters. 9) Click the Account drop-down list and select Work in Process.
10) Click OK.
Filter for Work in Process Account
Modified Job Profitability Report
Memorize this report for future reference.
Real World Training – We Create Confident QuickBooks Users
19
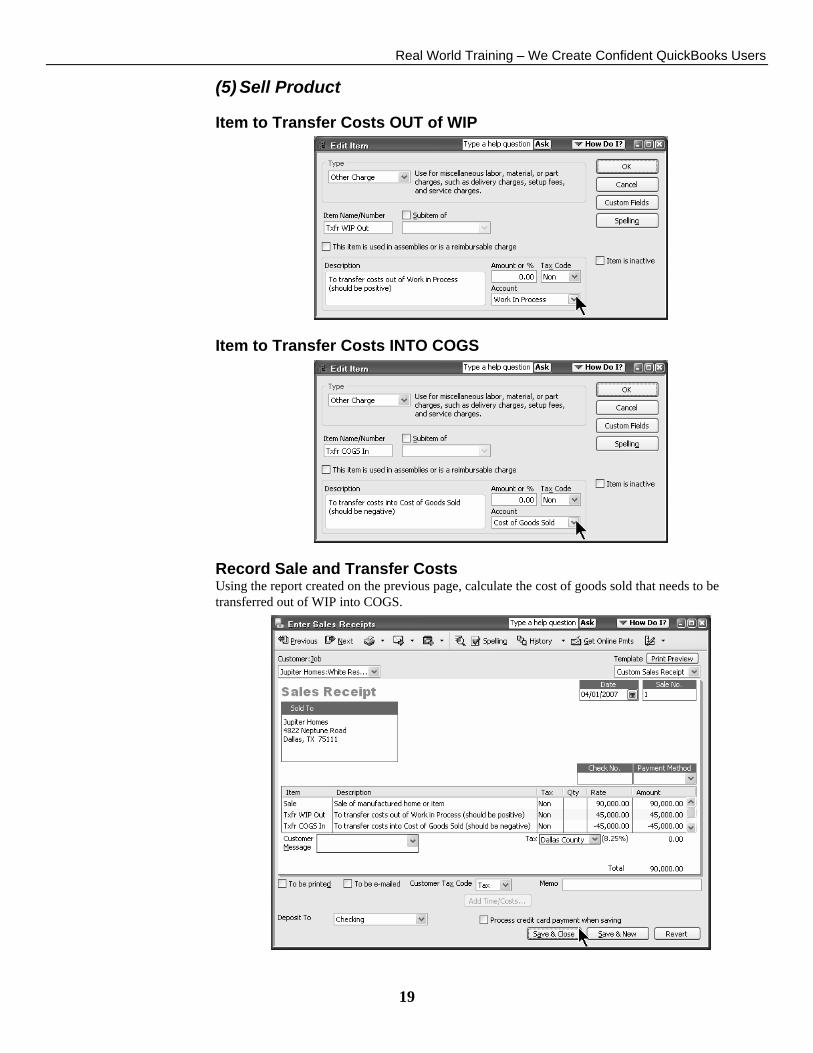
(5) Sell Product
Item to Transfer Costs OUT of WIP
Item to Transfer Costs INTO COGS
Record Sale and Transfer Costs Using the report created on the previous page, calculate the cost of goods sold that needs to be transferred out of WIP into COGS.

Real World Training – We Create Confident QuickBooks Users
20
Notes

Real World Training – We Create Confident QuickBooks Users
21
Notes