Embed Size (px)
Citation preview

MAIL MERGE 2003
Table of ContentsPage
LESSON 1: PREPARE FOR A MAIL MERGE..............................................................1 Why Use a Mail Merge? 1 Terminology 1
LESSON 2: USE THE MAIL MERGE WIZARD TO CREATE LETTERS.................2
Using the Mail Merge Task Pane 2 Identify the Main Document 3 Create a Data Source 5 Write Your Letter 10 Preview Your Letter 15 Complete the Merge 16
LESSON 3: CREATE MAILING LABELS AND ENVELOPES.................................19
Create Mailing Labels 19 Create Envelopes 28
LESSON 4: EDIT EXISTING DATA.............................................................................37
Identify the Mail Merge Toolbar 37 Add Fields in a Data Source 39
LESSON 5: FILTERING AND SORTING....................................................................42
Sort by One Column 42 Create a Filtered List 43 Sort Multiple Columns 45
LESSON 6: DELETING FILES.......................................................................................48
This workbook may be reproduced in whole or in part by an employee of the Department of Health and Human Services. All other reproduction is prohibited unless written permission is obtained from the Training Institute.
Last Updated: January 26, 2006

NOTESLESSON 1: PREPARE FOR A MAIL
MERGE
OBJECTIVES: Identify the reasons to use a mail merge.Define terminology.
Why Use a Mail Merge?
OVERVIEW
When deciding if a mail merge is appropriate you should ask yourself:
How many people will receive this information? What is your time frame? Will you be mailing additional information to these people? Do you need each item to be personalized?
If you are on a tight schedule and the information is going to multiple people, a mail merge is probably a good idea. If you will be using your list to mail additional items in the future and if items will be personalized, this furthers the case to use Mail Merge.
Terminology
Merge: combines the contents of a data source with a main document.
Main Document: a document that contains text, which is constant, and merge fields. For example form letters, mailing labels, and envelopes.
Data Source: a file that contains information broken down into specific pieces, like client and consumer address lists.
Merge Field: a placeholder for text for merged information. For example, «First_Name».
Merged Document: a document that contains the text from the main document and the information inserted into the merge fields.
Word Mail Merge 2003 Page 1

NOTESLESSON 2: USE THE MAIL MERGE
WIZARD TO CREATE LETTERS
OBJECTIVES: Use the mail merge task pane.Identify the main document.Create a data source.Write your letter.Preview your letter.Complete the merge.
Using the Mail Merge Task Pane
OVERVIEW
You will perform the steps necessary to complete a mail merge: identify the main document, create the data source, enter text and fields into the main document for the form letter, and merge the data source with the document to generate and print the form letters.
STEPS:
1. Open Microsoft Word by clicking START, PROGRAMS, MICROSOFT WORD.
2. Click TOOLS, LETTERS AND MAILINGS, MAIL MERGE.
Page 2 Word Mail Merge 2003

NOTES3. The Mail Merge task pane will appear.
Identify the Main Document
OVERVIEW
The first step in the mail merge process is to identify the type of document you are creating for the main document. There are five types of main documents: letters, e-mail messages, envelopes, labels, and directory.
STEPS:
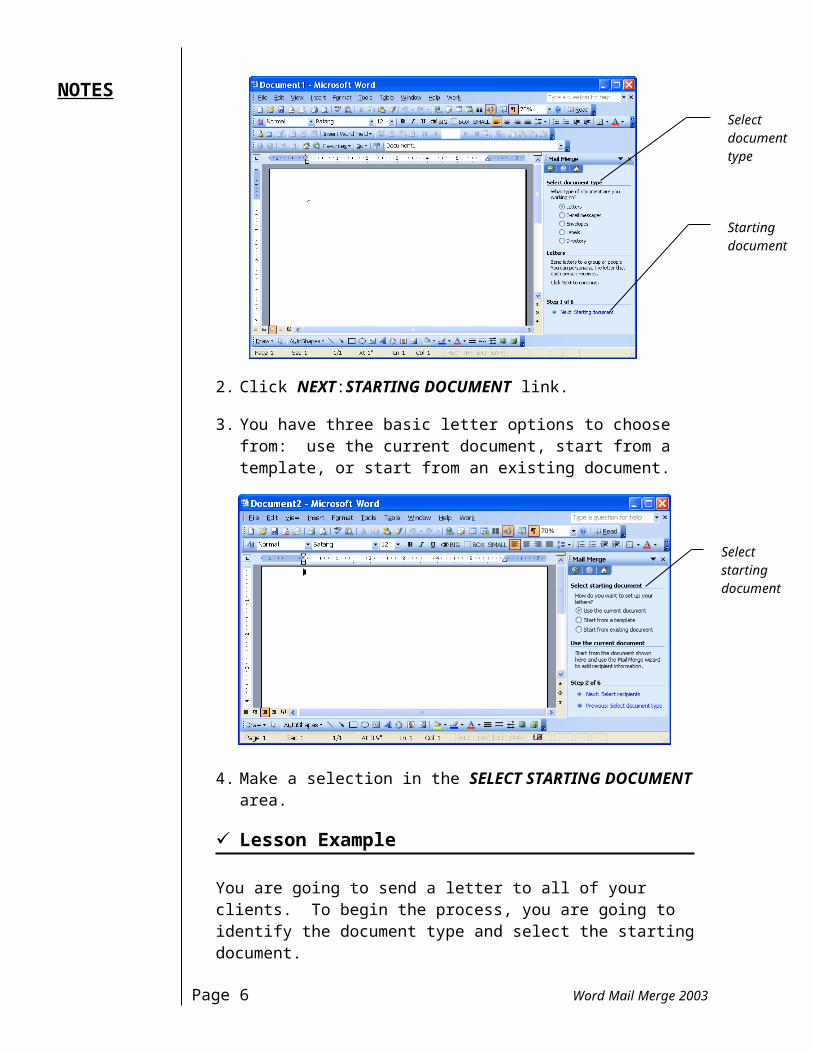
1. Choose what type of document you wish to create in the SELECT DOCUMENT TYPE area.
2. Click NEXT:STARTING DOCUMENT link.
Word Mail Merge 2003 Page 3
Select document type
Starting document
Mail Merge Task Pane

NOTES 3. You have three basic letter options to choose from: use the current document, start from a template, or start from an existing document.
4. Make a selection in the SELECT STARTING DOCUMENT area.
Lesson Example
You are going to send a letter to all of your clients. To begin the process, you are going to identify the document type and select the starting document.
STEPS
1. Open Microsoft Word by clicking START, PROGRAMS, MICROSOFT WORD.
2. Click TOOLS, LETTERS AND MAILINGS, MAIL MERGE.
3. Select LETTERS as the DOCUMENT TYPE.
4. Click the NEXT:STARTING DOCUMENT link.
5. Select USE THE CURRENT DOCUMENT.
Page 4 Word Mail Merge 2003
Select starting document

NOTES Create a Data Source
OVERVIEW
A data source is a file that contains the data that can be used in your different merge documents (for example, names and addresses). Your data source may have already been created, or you may need to create a new one.
STEPS:
1. Click the SELECT RECIPIENTS link.
2. If you have already created a data source, select USE AN EXISTING LIST. Click the BROWSE link, and locate your data source.
3. If you are creating a data source, select TYPE A NEW LIST and click the CREATE link.
Word Mail Merge 2003 Page 5
Type a new list
Create

NOTES 4. The New Address List window will appear. Word provides you with a list of 13 commonly used field names. You can use these field names or create your own.
5. To create your own field names, click the CUSTOMIZE button .
6. You may ADD, DELETE, or RENAME the field names. You may also change the order of the fields by selecting MOVE UP or MOVE DOWN.
7. Click OK when finished customizing your address list.
8. Enter the first person in the New Address List window.
Page 6 Word Mail Merge 2003
Customize
NOTES
9. To enter another person, click the NEW ENTRY button .
10. When your list is complete, click the CLOSE button .
11. You will be directed to save the address list.
12. Select the drive to SAVE IN, enter a FILE NAME, and click SAVE.
13. The Mail Merge Recipients window will appear.
Word Mail Merge 2003 Page 7
Save in
File Name
Save

NOTES
14. Click OK.
Lesson Example
You are going to create a data source for your clients. This data source will include essential information about each client.
STEPS
1. Click the SELECT RECIPIENTS link.
2. Click the TYPE A NEW LIST radio button.
3. Click CREATE.
4. Click the CUSTOMIZE button.
5. Select Title and click the DELETE button.
6. Click YES.
7. Delete Company Name, Address Line 2, Country, Work Phone, and E-Mail Address.
8. Click the ADD button.
9. Type MaritalStatus.
10. Click OK.
11. Click the ADD button.
12. Type DOB.
Page 8 Word Mail Merge 2003

NOTES13. Click OK.
14. Click the ADD button.
15. Type SSN.
16. Click OK twice.
17. Put the cursor in the FIRST NAME field.
18. Type Annie.
19. Press the TAB key and type Andrews.
20. Complete the information for your first client:
101 Water StAugusta ME 04330207 626-5000Married1/1/1965001-11-1111
21. Click the NEW ENTRY button .
22. Add the following records to the new address list.
Betty Baker Carlton Carter202 East River Road 303 Main StWaterville, ME 04901 Sidney, ME 04330207 873-2000 207 547-3000Single Married1/1/1985 1/1/1971002-22-2222 003-33-3333
23. Enter another new record of your choice.
24. Click the CLOSE button .
25. You will be asked to save your Address List. Your instructor will tell you where to save it.
26. Enter Case Load Data as the FILE NAME and click SAVE.
27. Click OK.
Word Mail Merge 2003 Page 9

NOTES Write Your Letter
OVERVIEW
The next step is to enter and format the text and fields in the main document.
STEPS:
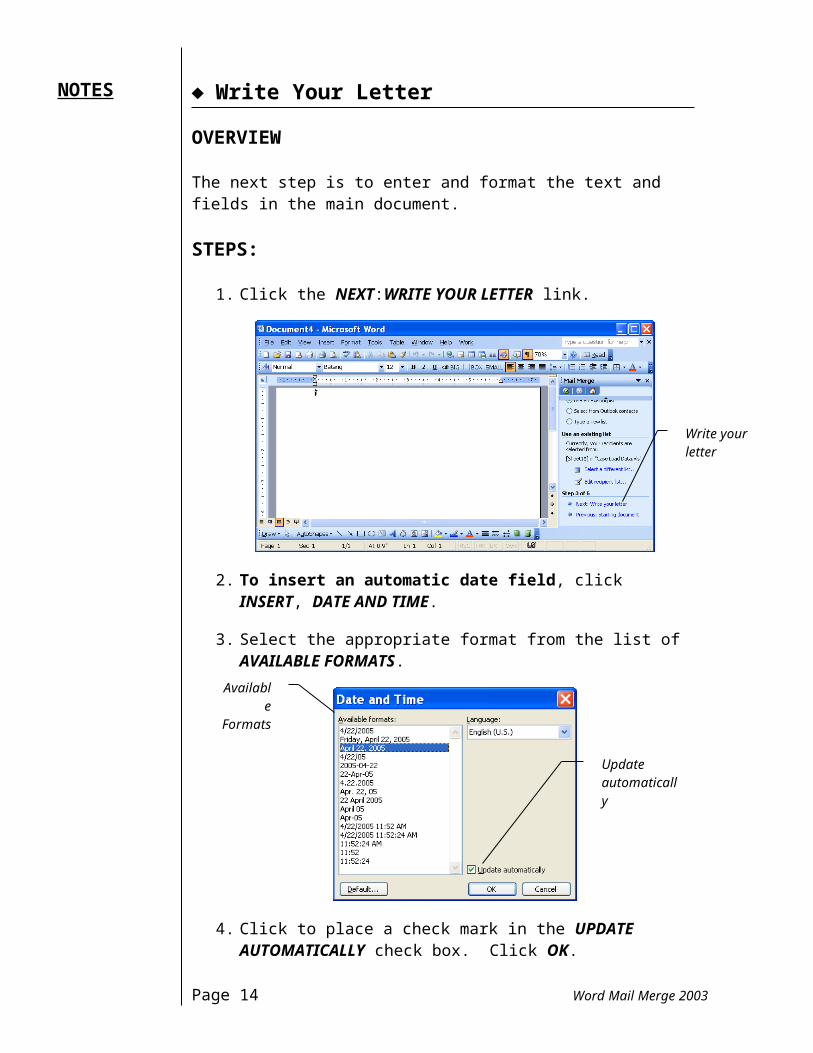
1. Click the NEXT:WRITE YOUR LETTER link.
2. To insert an automatic date field, click INSERT, DATE AND TIME.
3. Select the appropriate format from the list of AVAILABLE FORMATS.
4. Click to place a check mark in the UPDATE AUTOMATICALLY check box. Click OK.
Page 10 Word Mail Merge 2003
Write your letter
Available Formats
Update automatically

NOTES5. To add recipient information to your letter, click a location in your document, and then click one of the following options: address block, greeting line, electronic postage, postal bar code, or more items.
6. To insert a person’s name and address, click the ADDRESS BLOCK link.
7. Select the appropriate choices from the INSERT ADDRESS BLOCK window and click OK.
8. To insert the greeting line for the letter, click the GREETING LINE link.
Word Mail Merge 2003 Page 11
Address block, Greeting line, Electronic postage, Postal bar code, More items

NOTES
9. Select the appropriate choices from the GREETING LINE window and click OK.
10. To insert a field from your data source, click the MORE ITEMS link.
11. Double click the FIELD to be added to the main document or click the INSERT button .
12. Click the CLOSE button .
13. Repeat Steps 10-12 for each field as you continue to complete your letter.
14. Run SPELL CHECK to make sure that you do not have any misspellings.
Page 12 Word Mail Merge 2003

NOTES Lesson Example
You are going to write your letter using the fields from the Case Load Data file.
STEPS
1. Click the NEXT:WRITE YOUR LETTER link.
2. To leave space for pre-printed letterhead, press ENTER on your keyboard 6 times.
3. Insert an automatic date by clicking INSERT, DATE AND TIME.
4. Click the MONTH-DAY-YEAR format from the list.
5. Click in the checkbox to UPDATE AUTOMATICALLY and click OK.
6. Press ENTER four times.
7. Click the ADDRESS BLOCK link.
8. Select the option of Mr. Joshua Randall Jr.
9. Click in the checkbox to remove the check from INSERT COMPANY NAME.
10. Click OK.
11. Press ENTER 2 times.
12. Click the GREETING LINE link.
13. Change the format from MR. RANDALL to JOSHUA RANDALL, JR. (the fifth selection).
14. Change the comma (,) to a colon (:).
15. Click OK.
16. Press ENTER two times.
17. Type the following: I have been assigned as your new Case Manager. Please verify the following information so that I may better serve you.
18. Press ENTER two times and type Date of Birth:.
19. Press the SPACE BAR two times.
Word Mail Merge 2003 Page 13

NOTES 20. Click the MORE ITEMS link.
21. Double click the DOB field.
22. Click the CLOSE button .
23. Press ENTER two times.
24. Type Social Security Number:, and press the SPACE BAR two times.
25. Click the MORE ITEMS link.
26. Double click the SSN field.
27. Click the CLOSE button .
28. Repeat Steps 21-25 for Marital Status.
29. Press ENTER two times and type Respectfully,
30. Press ENTER four times and type in Your Name.
31. Press ENTER two times and type Case Manager.
Page 14 Word Mail Merge 2003
NOTES Preview Your Letter
OVERVIEW
You will want to preview your letters to make any changes before you print them out.
STEPS:
1. Click the NEXT:PREVIEW YOUR LETTERS link.
2. You may preview the letter for each recipient by clicking the
directional buttons .
Word Mail Merge 2003 Page 15
Preview your letters
Preview your letters

NOTES Complete the Merge
OVERVIEW
You may print your letters now or edit individual letters.
STEPS:
1. Click the NEXT:COMPLETE THE MERGE link.
2. Click PRINT to print out the letters or click EDIT INDIVIDUAL LETTERS to merge to a new document.
3. To save your main document, click FILE, SAVE or click the
SAVE button .Page 16 Word Mail Merge 2003Save in:
Edit individual letters
Complete the merge
Did You Know?
Saving individual letters is not required as you have already saved the main document and the data source.

NOTES
4. Click the drop down in the SAVE IN box, and select the drive you will save to.
5. In the FILE NAME dialog box, type a filename for the data source.
6. Click the SAVE button .
Lesson Example
You are going to write your letter using the fields from the Case Load Data address list.
STEPS
1. Click the PREVIEW YOUR LETTERS link.
2. Click the directional arrow to view your individual letters.
3. Click the NEXT:COMPLETE THE MERGE link.
4. Click the EDIT INDIVIDUAL LETTERS link and scroll through your letters to view them.
5. Click OK.
6. Click the CLOSE button to close the file without saving.
7. You will want to save your main document by clicking the SAVE button.
8. Your instructor will tell you which drive to SAVE IN.Word Mail Merge 2003 Page 17
File NameSave

NOTES 9. Enter Case Manager Main Letter as the FILE NAME and click SAVE.
10. Close the Case Manager Main Letter.
Page 18 Word Mail Merge 2003

NOTESLESSON 3: CREATE MAILING LABELS
AND ENVELOPES
OBJECTIVE: Create mailing labels and envelopes.
OVERVIEW
After you have created your form letters, you will probably want to make either mailing labels or envelopes. You follow the same basic steps as outlined in Lesson 2. The major difference is that the data source already exists.
Create Mailing Labels
STEPS
1. Create a new document by clicking the NEW BLANK DOCUMENT
button .
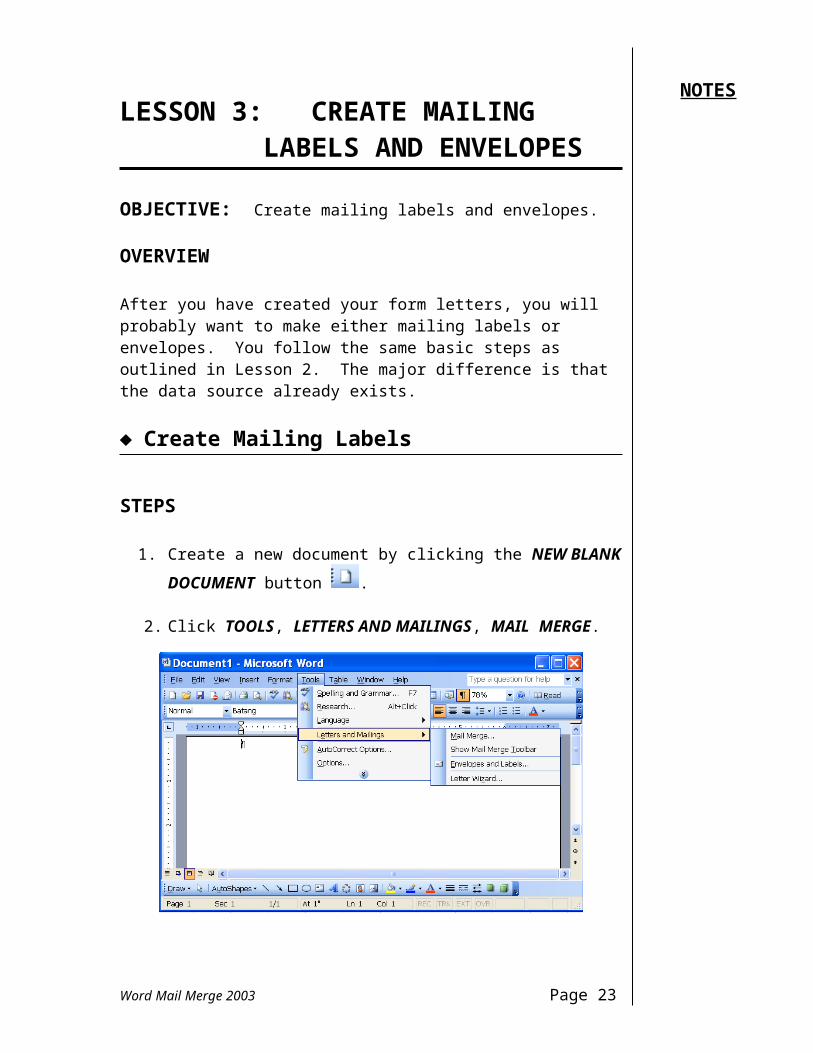
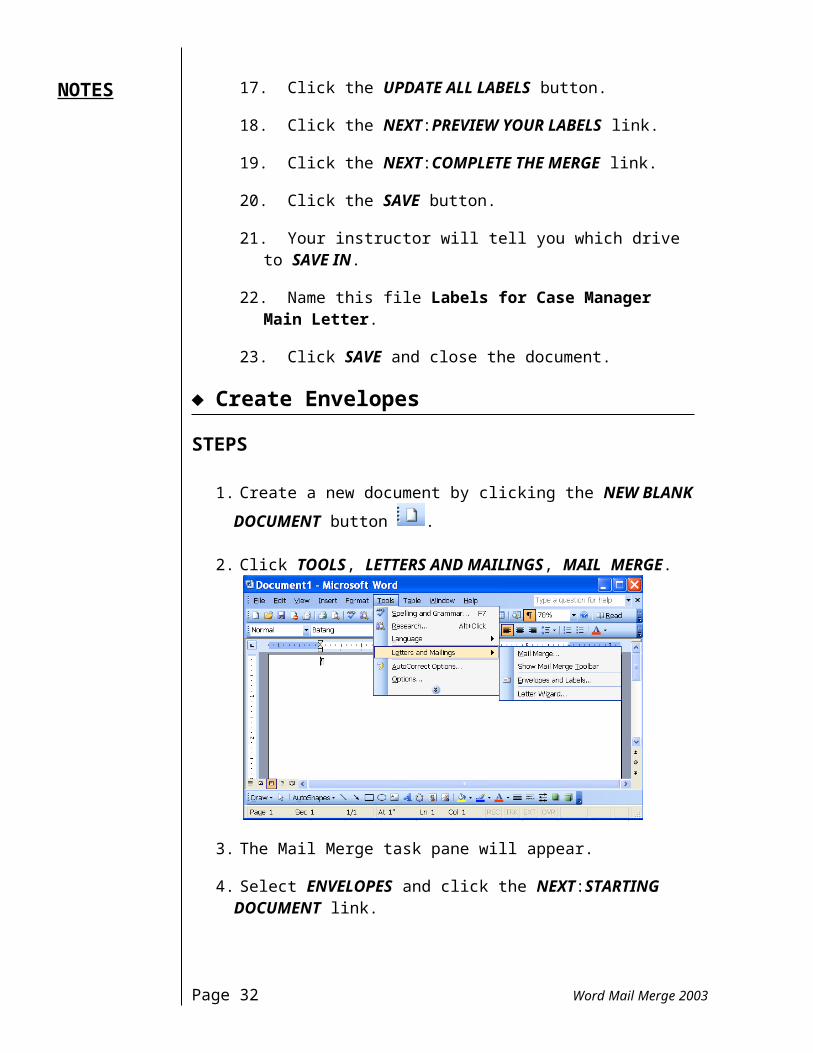
2. Click TOOLS, LETTERS AND MAILINGS, MAIL MERGE.
Word Mail Merge 2003 Page 19

NOTES 3. The Mail Merge task pane will appear.
4. Choose LABELS in the SELECT DOCUMENT TYPE area.
5. Click the NEXT:STARTING DOCUMENT link.
6. Select the LABEL OPTIONS link.
Page 20 Word Mail Merge 2003
Mail Merge Task Pane
Labels
Starting Document
Label Options

NOTES7. You will need to specify the type of labels you intend to use. You will need the manufacturer's name as well as a product number and name. Click OK when finished with these sections.
8. Click the NEXT:SELECT RECIPIENTS link.
Word Mail Merge 2003 Page 21
Select Recipients

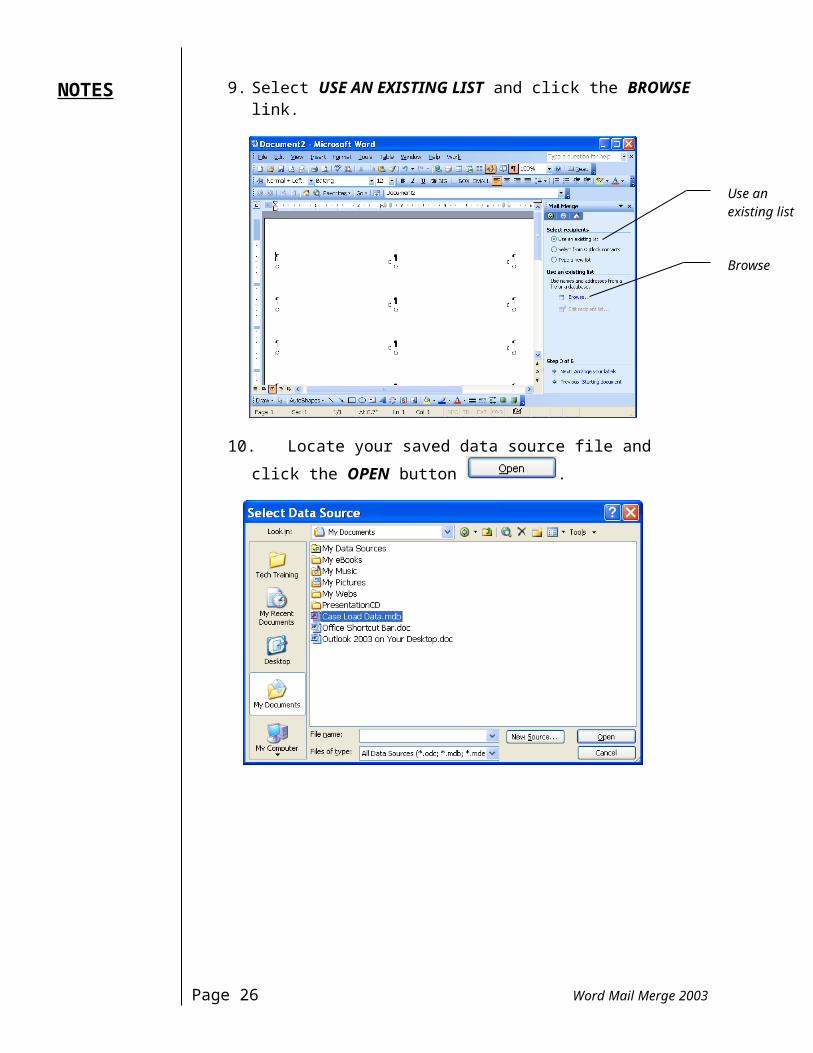
NOTES 9. Select USE AN EXISTING LIST and click the BROWSE link.
10. Locate your saved data source file and click the OPEN button
.
Page 22 Word Mail Merge 2003
Use an existing list
Browse

NOTES11. Click OK.
12. Click the NEXT:ARRANGE YOUR LABELS link.
Word Mail Merge 2003 Page 23
Arrange your labels
NOTES 13. Select the ADDRESS BLOCK link.
14. Make any necessary changes to the INSERT ADDRESS BLOCK window and click OK.
Page 24 Word Mail Merge 2003
Address block

NOTES15. Click the UPDATE ALL LABELS button .
16. Click the NEXT:PREVIEW YOUR LABELS link.
17. Click the NEXT:COMPLETE THE MERGE link.
Word Mail Merge 2003 Page 25
Preview your labels
Complete the merge
Update all labels

NOTES 18. To print the labels, click the PRINT link.
19. Click OK.
20. To edit the labels individually, click the EDIT INDIVIDUAL LABELS link.
21. Click OK.
22. If you are going to use the label document again, click SAVE.
Page 26 Word Mail Merge 2003
Edit individual labels
NOTES Lesson Example
You are going to create mailing labels to go along with your merged letter.
STEPS
1. Create a new document by clicking the NEW BLANK DOCUMENT button.
2. Click TOOLS, LETTERS AND MAILINGS, MAIL MERGE.
3. The Mail Merge task pane will appear.
4. Choose Labels in the SELECT DOCUMENT TYPE area.
5. Click the NEXT:STARTING DOCUMENT link.
6. Select the LABEL OPTIONS link.
7. Select the Avery 5160 label and click OK.
8. Click the NEXT:SELECT RECIPIENTS link.
9. Select USE AN EXISTING LIST and click the BROWSE link.
10. Locate the Case Load Data file and click the OPEN button.
11. Click OK.
12. Click the NEXT:ARRANGE YOUR LABELS link.
13. Select the ADDRESS BLOCK link.
14. Change the format from MR. RANDALL to JOSHUA RANDALL, JR. (the fifth selection).
15. Click in the checkbox to remove the check from INSERT COMPANY NAME.
16. Click OK.
17. Click the UPDATE ALL LABELS button.
18. Click the NEXT:PREVIEW YOUR LABELS link.
19. Click the NEXT:COMPLETE THE MERGE link.
20. Click the SAVE button.
21. Your instructor will tell you which drive to SAVE IN.
Word Mail Merge 2003 Page 27

NOTES 22. Name this file Labels for Case Manager Main Letter.
23. Click SAVE and close the document.
Create Envelopes
STEPS
1. Create a new document by clicking the NEW BLANK DOCUMENT
button .
2. Click TOOLS, LETTERS AND MAILINGS, MAIL MERGE.
3. The Mail Merge task pane will appear.
4. Select ENVELOPES and click the NEXT:STARTING DOCUMENT link.
Page 28 Word Mail Merge 2003
Envelopes
Starting document

NOTES5. Click the ENVELOPE OPTIONS link.
6. Make the necessary changes in the ENVELOPE OPTIONS window and click OK.
Word Mail Merge 2003 Page 29
Envelope options

NOTES 7. Type in a return address and click the NEXT:SELECT RECIPIENTS link.
8. Click the BROWSE link.
Page 30 Word Mail Merge 2003
Select Recipients
Browse
Return Address

NOTES9. Locate the data source and click the OPEN button.
10. Click OK at the MAIL MERGE RECIPIENTS window.
Word Mail Merge 2003 Page 31

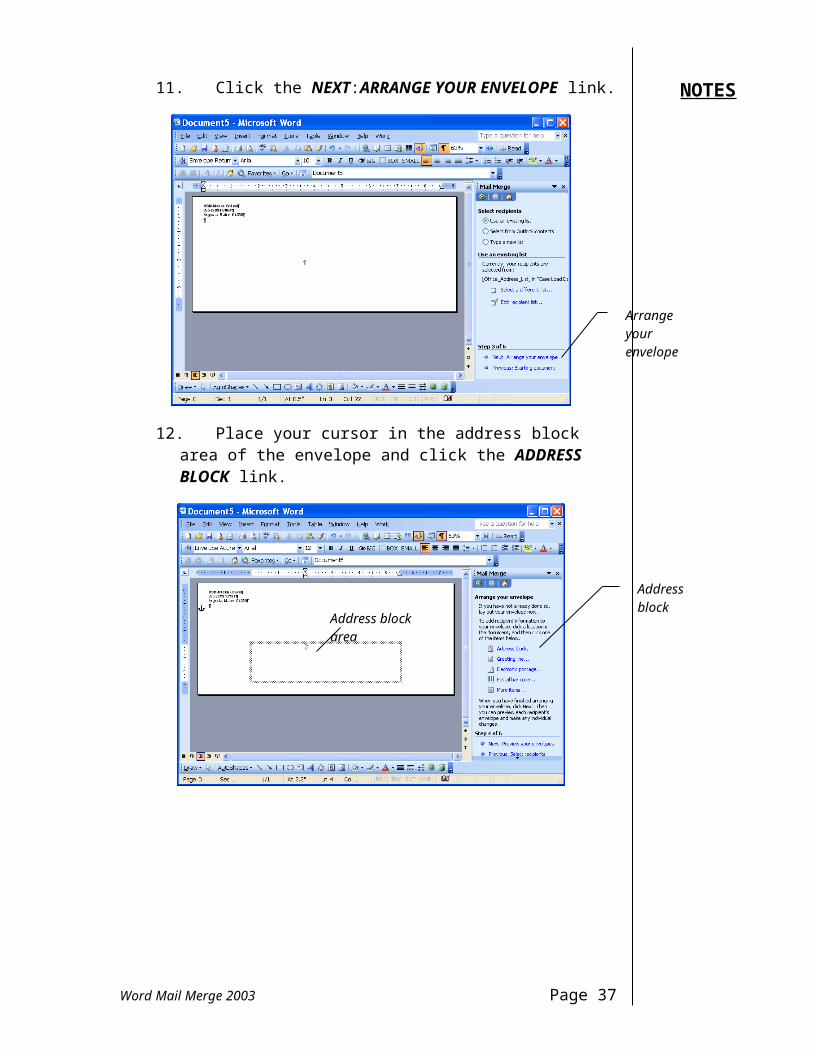
NOTES 11. Click the NEXT:ARRANGE YOUR ENVELOPE link.
12. Place your cursor in the address block area of the envelope and click the ADDRESS BLOCK link.
Page 32 Word Mail Merge 2003
Arrange your envelope
Address block
Address block area
NOTES13. Make any necessary changes in the INSERT ADDRESS BLOCK window and click OK.
14. Click the NEXT:PREVIEW YOUR ENVELOPES link.
Word Mail Merge 2003 Page 33
Preview your envelopes

NOTES 15. You may preview the envelope for each recipient by clicking the
directional buttons .
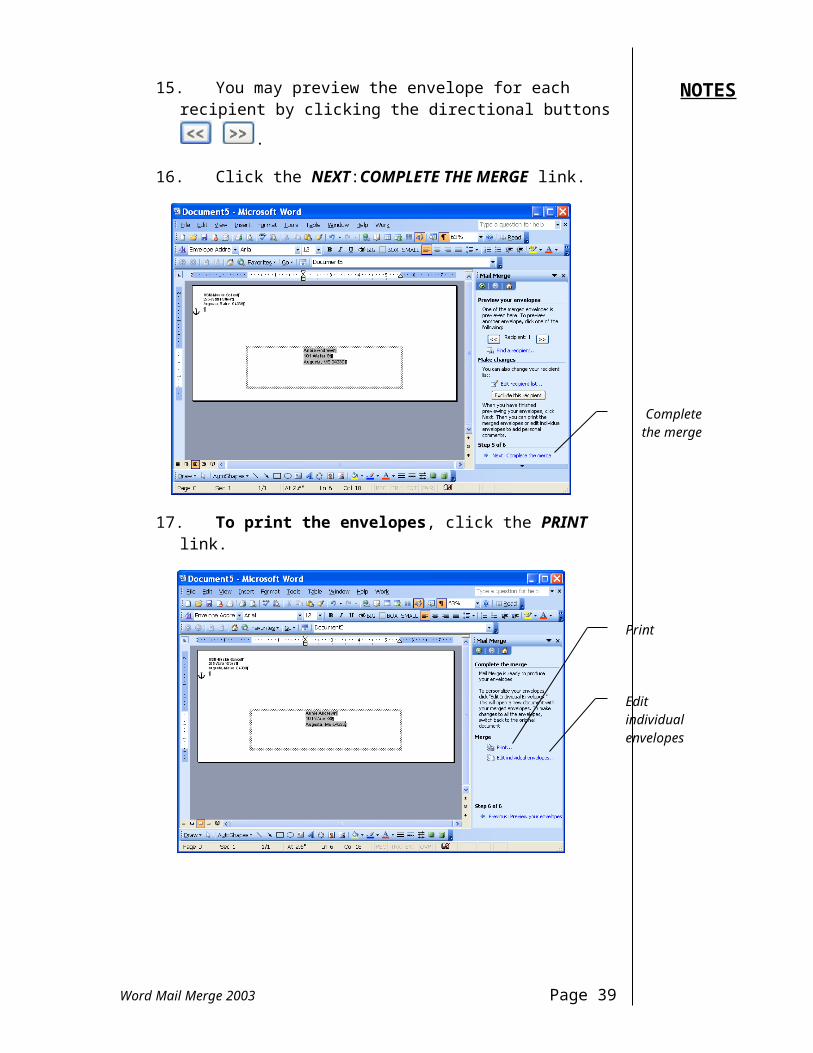
16. Click the NEXT:COMPLETE THE MERGE link.
17. To print the envelopes, click the PRINT link.
Page 34 Word Mail Merge 2003
Complete the merge
Edit individual envelopes

NOTES18. Click OK at the MERGE TO PRINTER window.
19. To edit the envelopes individually, click the EDIT INDIVIDUAL ENVELOPES link.
20. Click OK at the MERGE TO NEW DOCUMENT window.
21. If you are going to use the label document again, click SAVE.
Lesson Example
You are going to create envelopes to go along with your merged letter.
STEPS
1. Create a new document by clicking the NEW BLANK DOCUMENT button.
2. Click TOOLS, LETTERS AND MAILINGS, MAIL MERGE.
3. Select ENVELOPES and click the NEXT:STARTING DOCUMENT link.
4. Click the ENVELOPE OPTIONS link.
5. Click OK.
6. Type in your work return address in the return address area.
7. Click the NEXT:SELECT RECIPIENTS link.
8. Click the BROWSE link.
9. Locate the Case Load Data file and click the OPEN button.
10. Click OK at the MAIL MERGE RECIPIENTS window.
Word Mail Merge 2003 Page 35

NOTES 11. Click the NEXT:ARRANGE YOUR ENVELOPE link.
12. Place your cursor in the address block area of the envelope and click the ADDRESS BLOCK link.
13. Change the format from MR. RANDALL to JOSHUA RANDALL, JR. (the fifth selection).
14. Click in the checkbox to remove the check from INSERT COMPANY NAME.
15. Click OK.
16. Click the NEXT:PREVIEW YOUR ENVELOPES link.
17. You may preview the envelopes for each recipient by clicking the
directional buttons .
18. Click the NEXT:COMPLETE THE MERGE link.
19. Close the document without saving.
Page 36 Word Mail Merge 2003

NOTESLESSON 4: EDIT EXISTING DATA
OBJECTIVES: Identify the mail merge toolbar.Add fields in a data source.
Identify the Mail Merge Toolbar
OVERVIEW
The Mail Merge toolbar will assist you with editing your data source or your main document.
STEPS
1. Click VIEW from the main menu.
2. Select TOOLBAR and check MAIL MERGE.
Main Document Setup – allows you to change your main document.
Open Data Source – enables you to open a different data source than the one you initially identified.
Mail Merge Recipients – gives you the ability to edit your recipients, sort the list, and select specific records.
Insert Address Block – inserts elements of an address such as: title, first name, middle name, last name, suffix, company, street address 1, street address 2, city, state, and zip code. When Word is instructed to use the AddressBlock merge field, it automatically looks for any fields in the data source that are related to an address and then formats the address properly when you merge the data source with the main document.
Insert Greeting Line – contains text and fields related to a salutation. The default greeting is in the format “Dear Mr. Jones,” and can be changed to a more formal greeting.
Word Mail Merge 2003 Page 37
Main Document
Setup
Mail Merge
Recipients
Insert Greeting
Line
Insert Word Field
Highlight Merge Fields
Propagate Labels
Previous Record
Next Record
Find Entry
Merge to New
Document
Merge to E-mail
Open Data
Source
Insert Address Block
Insert Merge Fields
View Merged
Data
Match Fields
First Record
Go to Record
Last Record
Check for Errors
Merge to Printer
Merge to Fax
NOTES Insert Merge Fields – displays a list of field names in the data source file associated with the main document. The field you select will be inserted in the main document at the location of the insertion point.
Insert Word Field – fields designated specifically for a mail merge. An If...Then...Else statement is an example of a Word field. If a condition is true, then perform this action; else perform a different action. For example, if a client lives in Augusta, have the letter say “Please go to the Parking District for a pass”, else have the letter say, “Please park in the main parking lot.”
View Merged Data – allows you to view each individual letter. You can verify the order of the data records without printing them.
Highlight Merge Fields – displays the merge fields differently than the text of the main document.
Match Fields – enables you to make selections from a drop-down list to choose the field from your database that corresponds to the address information that the mail merge expects.
Propagate Labels – updates all labels to replicate the main label you have created.
First Record – displays the values in record one.
Previous Record – displays the values from the previous record number.
Go to Record – displays a specific record after you type in the record number and press the ENTER key.
Next Record – displays the values in the next consecutive record number.
Last Record – displays the values from the last record in the data source.
Find Entry – allows you to find a particular record in your data source.
Check for Errors – simulates the merge and reports errors.
Merge to New Document – merges the data source and the main document into a new Word document.
Merge to Printer – merges the data source and the main document directly to the printer without creating a new Word document.
Merge to E-mail – sends the main document to the recipient via e-mail.
Merge to Fax – sends the main document to the recipient via fax.
Page 38 Word Mail Merge 2003

NOTES Add Fields in a Data Source
OVERVIEW
Once you have created a data source, it is convenient to be able to use it for different merges. To do this, you may have to add additional fields into the data source.
STEPS
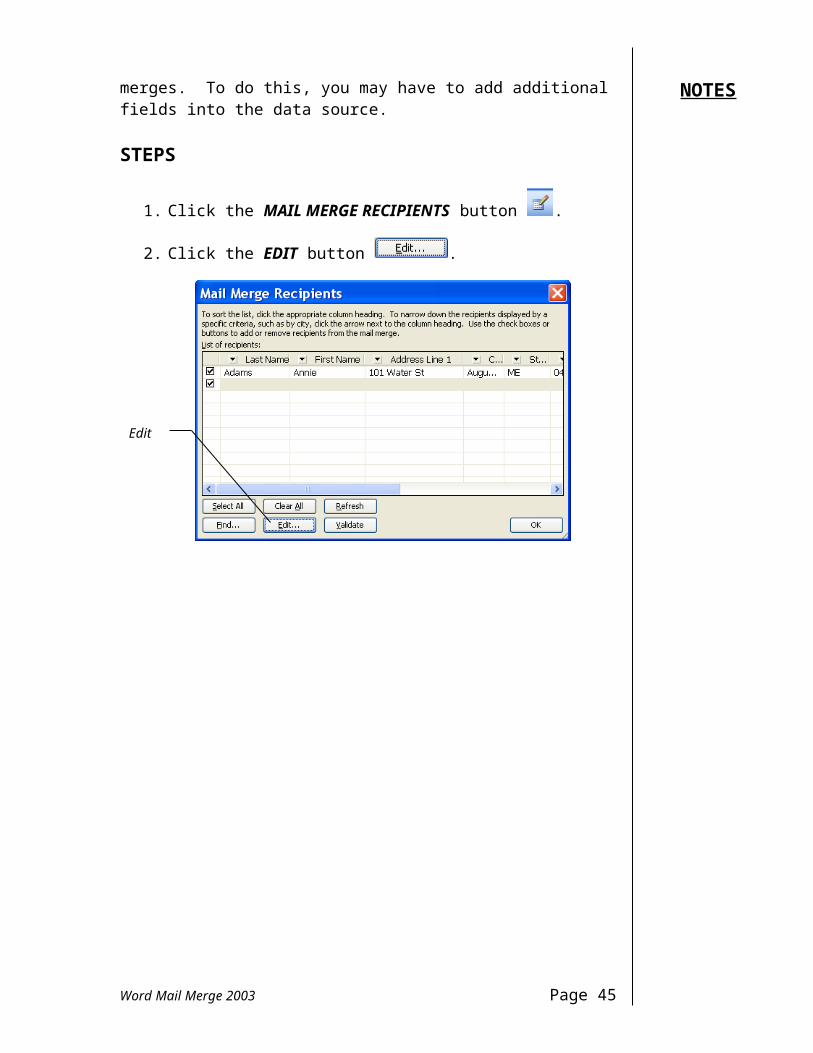
1. Click the MAIL MERGE RECIPIENTS button .
2. Click the EDIT button .
Word Mail Merge 2003 Page 39
Edit
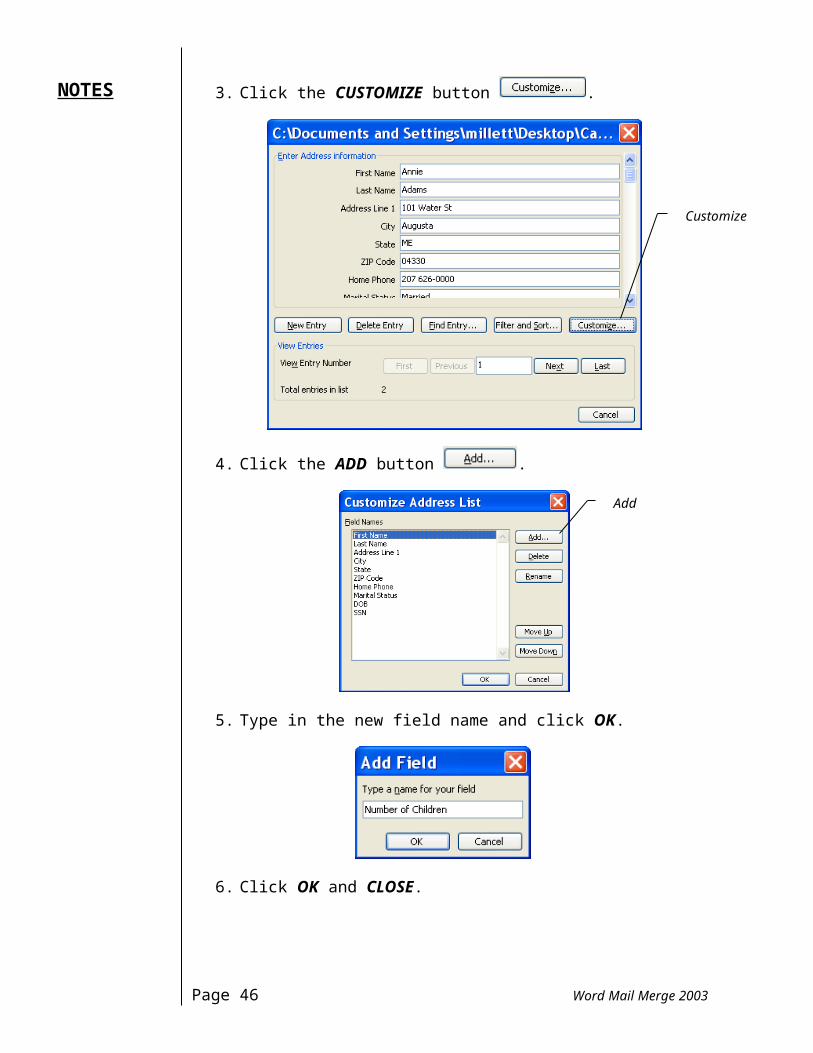
NOTES 3. Click the CUSTOMIZE button .
4. Click the ADD button .
5. Type in the new field name and click OK.
6. Click OK and CLOSE.
Page 40 Word Mail Merge 2003
Customize
Add

NOTES Lesson Example
You are going to use the Mail Merge toolbar to insert a new field name.
STEPS
1. Click VIEW from the main menu.
2. Select TOOLBAR and check MAIL MERGE.
3. Click the MAIL MERGE RECIPIENTS button.
4. Click the EDIT button.
5. Click the CUSTOMIZE button.
6. Click the ADD button.
7. Type NumberofChildren.
8. Move NumberofChildren below Marital Status by clicking the MOVE DOWN button.
9. Click OK.
10. Click OK and CLOSE.
11. Edit your records to add the NumberOfChildren as follows: 1, 3, 2, and 1.
12. Click CLOSE.
13. Click OK.
Word Mail Merge 2003 Page 41

NOTESLESSON 5: FILTERING AND SORTING
OBJECTIVE: Sort by one column heading.Create a filtered list.Sort multiple criteria.
Sort by One Column
OVERVIEW
You have the ability to easily sort by one column. For example, if you are doing a mass mailing and you want to be eligible for the bulk-mailing rate, you must have your letters sorted by zip code. Instead of trying to do this by hand, have Word sort the information.
STEPS
1. Click the appropriate column heading. You may narrow down the sort by clicking on the arrow next to the column heading.
2. Click OK.
Page 42 Word Mail Merge 2003

NOTES Create a Filtered List
When using a merge document, you may choose to print specific records from the Data Source by using a feature called Filter. A filter answers a “question” you ask about your data. For example, how many clients have two or more children.
STEPS
1. Click the MAIL MERGE RECIPIENTS button .
2. Click the EDIT button .
3. Click the FILTER AND SORT button .
Word Mail Merge 2003 Page 43
Edit
Filter and Sort

NOTES 4. Select the FIELD you want to filter.
5. Select a COMPARISON from the drop down list. The options are EQUAL TO, NOT EQUAL TO, LESS THAN, GREATER THAN, LESS THAN OR EQUAL, GREATER THAN OR EQUAL, IS BLANK, or IS NOT BLANK.
6. In the COMPARE TO box type the text you are trying to find (for example, NumberOfChildren is greater than or equal to 2).
7. To set more than one comparison (to find all of the people who work in Augusta OR in Houlton), select AND or OR and then choose another field name and set another comparison.
8. Click OK and CLOSE.
9. Click OK.
10. To remove the filter, click the MAIL MERGE RECIPIENTS
button .
11. Click the EDIT button .
12. Click the FILTER AND SORT button .
Page 44 Word Mail Merge 2003
Did You Know?
You should use AND when something needs to be equal to all of the comparisons, For example they need to work in Augusta AND they need to live in Lewiston. You should use OR when it needs to match one of the constraints, like they need to work in Augusta OR Houlton.

NOTES13. Click the CLEAR ALL button .
14. Click OK and CLOSE.
Sort Multiple Columns
You may want to sort by more than one column. For example, sort by zip code, then by last name.
STEPS
1. Click the MAIL MERGE RECIPIENTS button .
2. Click the EDIT button .
3. Click the FILTER AND SORT button .
Word Mail Merge 2003 Page 45
Edit
Filter and Sort
NOTES 4. Click the SORT RECORDS tab.
5. Select a Field Name in SORT BY and choose either ASCENDING or DESCENDING.
6. Make a second (or third) selection in THEN BY and click OK.
7. Click CLOSE and OK.
8. To clear the sort, click the CLEAR ALL button .
9. Click OK and CLOSE.
Page 46 Word Mail Merge 2003
Sort Records
NOTES Lesson Example
You want to make sure that you are not sending any letters to minors. So you will run a query on the date of birth field.
STEPS
1. Go to your main document by clicking in the taskbar.
2. Click MAIL MERGE HELPER on the Mail Merge Toolbar.
3. Click the QUERY OPTIONS button.
4. Click the down arrow to choose DOB in the FIELD drop down.
5. Select LESS THAN in the COMPARISON field.
6. In the COMPARE TO box type Today’s Date 1985.
7. Click OK.
8. Click the MERGE button.
9. Click the MERGE button again.
10. Close the merged documents without saving.
Word Mail Merge 2003 Page 47

NOTESLESSON 6: DELETING FILES
OBJECTIVE: Maintain organized file directories.
STEPS
1. Close all the open documents.
2. Select OPEN from the FILE MENU.
3. Click once on the name of the file to be deleted. Use the CTRL or SHIFT keys to select multiple files.
4. Press the DELETE key on your keyboard.
5. Click YES to confirm the deletion.
6. Click the CANCEL button to close the dialog box.
Lesson Example
STEPS
1. Close all open documents in Word and do not save them.
2. Select OPEN from the FILE MENU, and delete all the documents you have created today.
3. Close the OPEN dialog box.
Page 48 Word Mail Merge 2003