Embed Size (px)
DESCRIPTION
Wool Fairy tutorial : Waldorf inspired
Citation preview
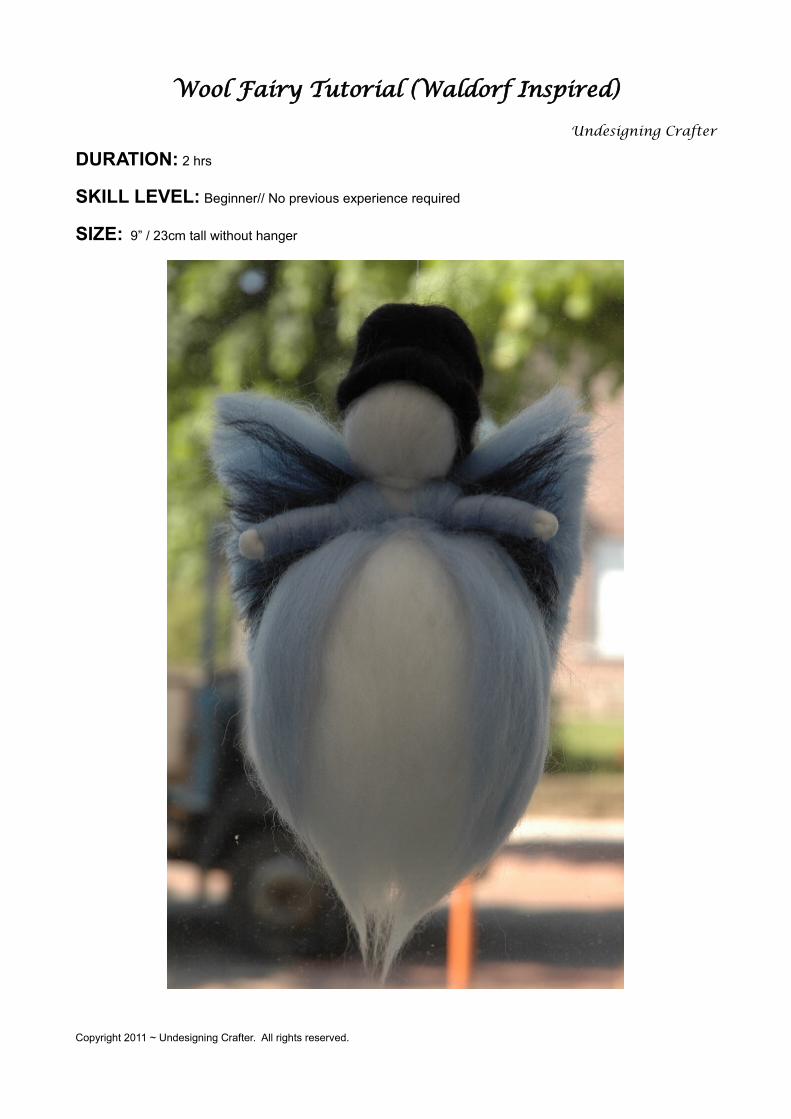
Wool Fairy Tutorial (Waldorf Inspired)
Undesigning Crafter
DURATION: 2 hrs
SKILL LEVEL: Beginner// No previous experience required
SIZE: 9” / 23cm tall without hanger
Copyright 2011 ~ Undesigning Crafter. All rights reserved.
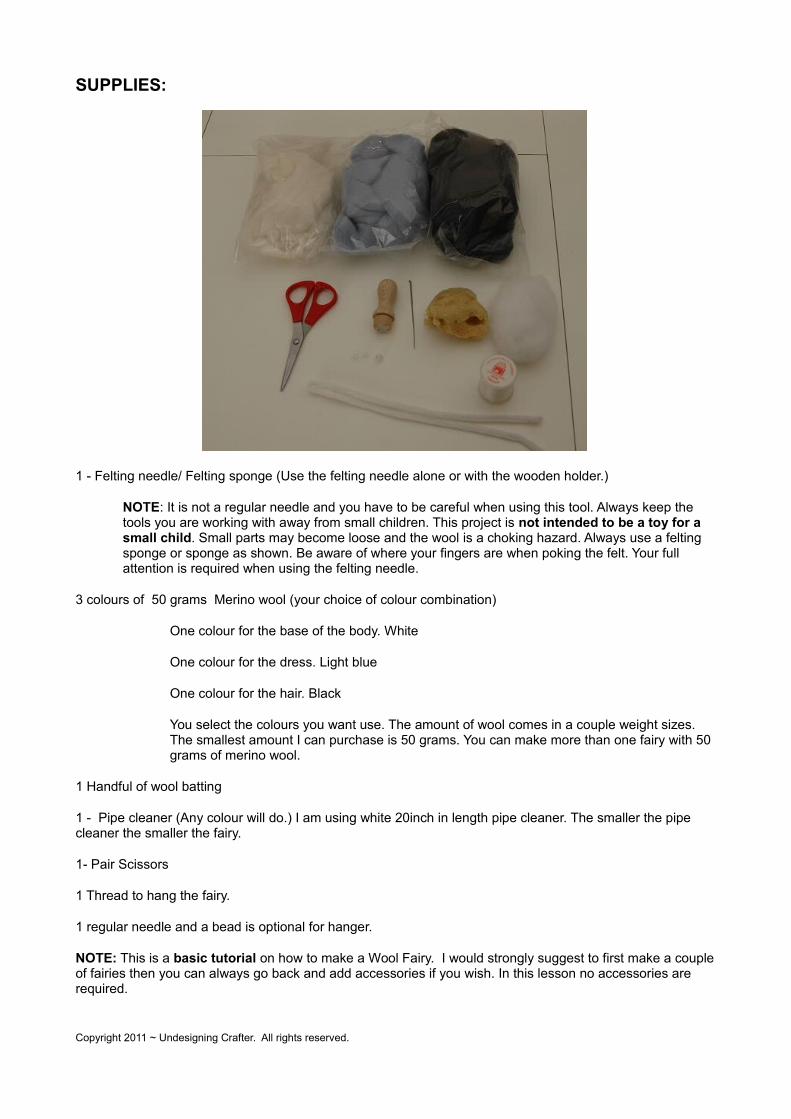
SUPPLIES:
1 - Felting needle/ Felting sponge (Use the felting needle alone or with the wooden holder.)
NOTE: It is not a regular needle and you have to be careful when using this tool. Always keep the tools you are working with away from small children. This project is not intended to be a toy for a small child. Small parts may become loose and the wool is a choking hazard. Always use a felting sponge or sponge as shown. Be aware of where your fingers are when poking the felt. Your full attention is required when using the felting needle.
3 colours of 50 grams Merino wool (your choice of colour combination)
One colour for the base of the body. White
One colour for the dress. Light blue
One colour for the hair. Black
You select the colours you want use. The amount of wool comes in a couple weight sizes. The smallest amount I can purchase is 50 grams. You can make more than one fairy with 50 grams of merino wool.
1 Handful of wool batting
1 - Pipe cleaner (Any colour will do.) I am using white 20inch in length pipe cleaner. The smaller the pipe cleaner the smaller the fairy.
1- Pair Scissors
1 Thread to hang the fairy.
1 regular needle and a bead is optional for hanger.
NOTE: This is a basic tutorial on how to make a Wool Fairy. I would strongly suggest to first make a couple of fairies then you can always go back and add accessories if you wish. In this lesson no accessories are required.
Copyright 2011 ~ Undesigning Crafter. All rights reserved.
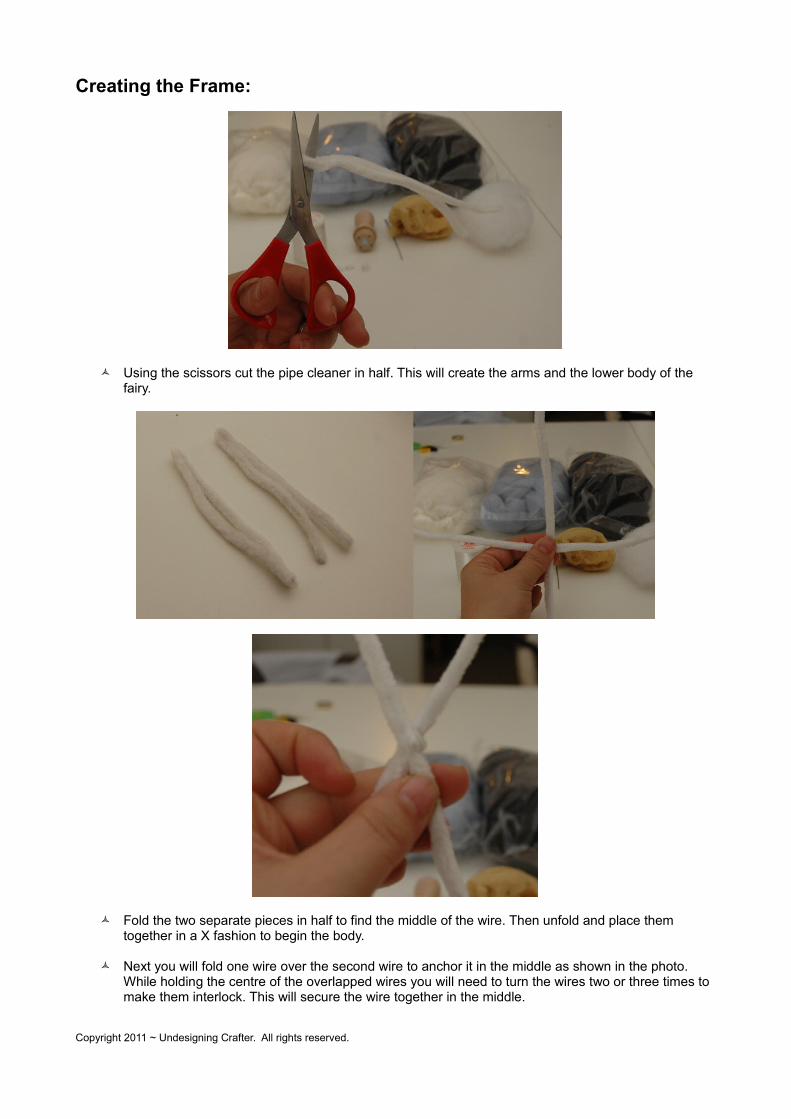
Creating the Frame:
Using the scissors cut the pipe cleaner in half. This will create the arms and the lower body of the fairy.
Fold the two separate pieces in half to find the middle of the wire. Then unfold and place them together in a X fashion to begin the body.
Next you will fold one wire over the second wire to anchor it in the middle as shown in the photo. While holding the centre of the overlapped wires you will need to turn the wires two or three times to make them interlock. This will secure the wire together in the middle.
Copyright 2011 ~ Undesigning Crafter. All rights reserved.
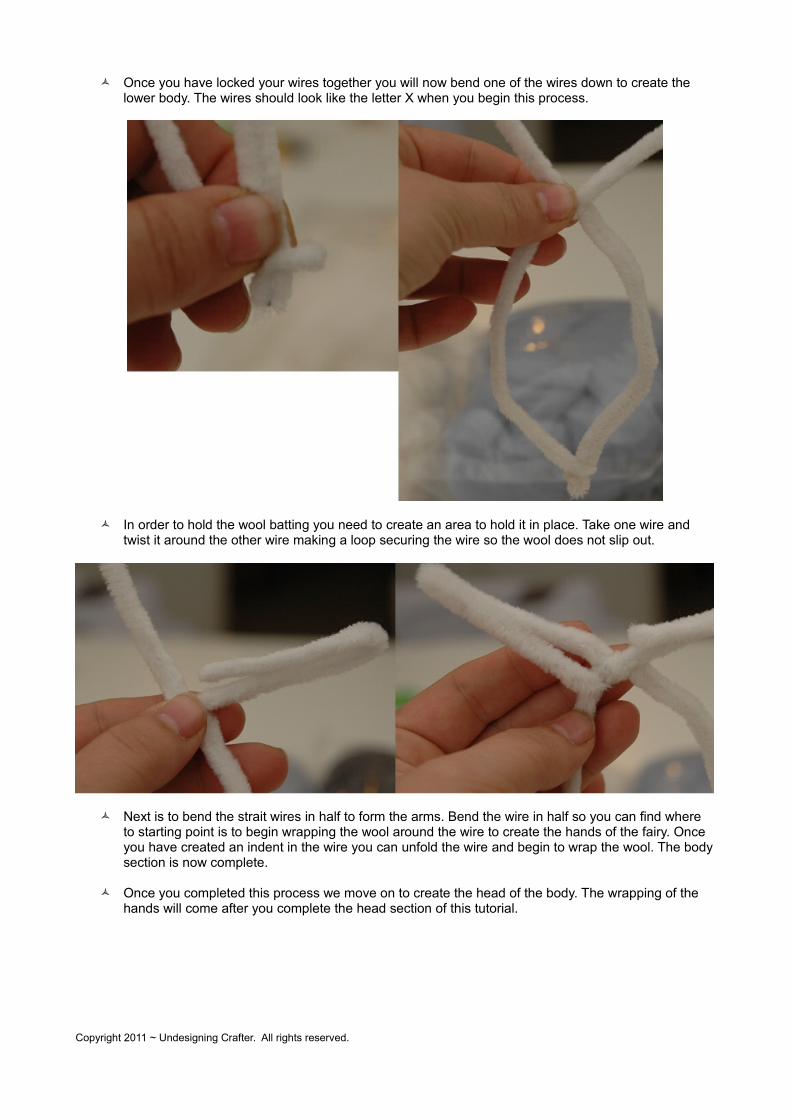
Once you have locked your wires together you will now bend one of the wires down to create the lower body. The wires should look like the letter X when you begin this process.
In order to hold the wool batting you need to create an area to hold it in place. Take one wire and twist it around the other wire making a loop securing the wire so the wool does not slip out.
Next is to bend the strait wires in half to form the arms. Bend the wire in half so you can find where to starting point is to begin wrapping the wool around the wire to create the hands of the fairy. Once you have created an indent in the wire you can unfold the wire and begin to wrap the wool. The body section is now complete.
Once you completed this process we move on to create the head of the body. The wrapping of the hands will come after you complete the head section of this tutorial.
Copyright 2011 ~ Undesigning Crafter. All rights reserved.
Creating the Head:
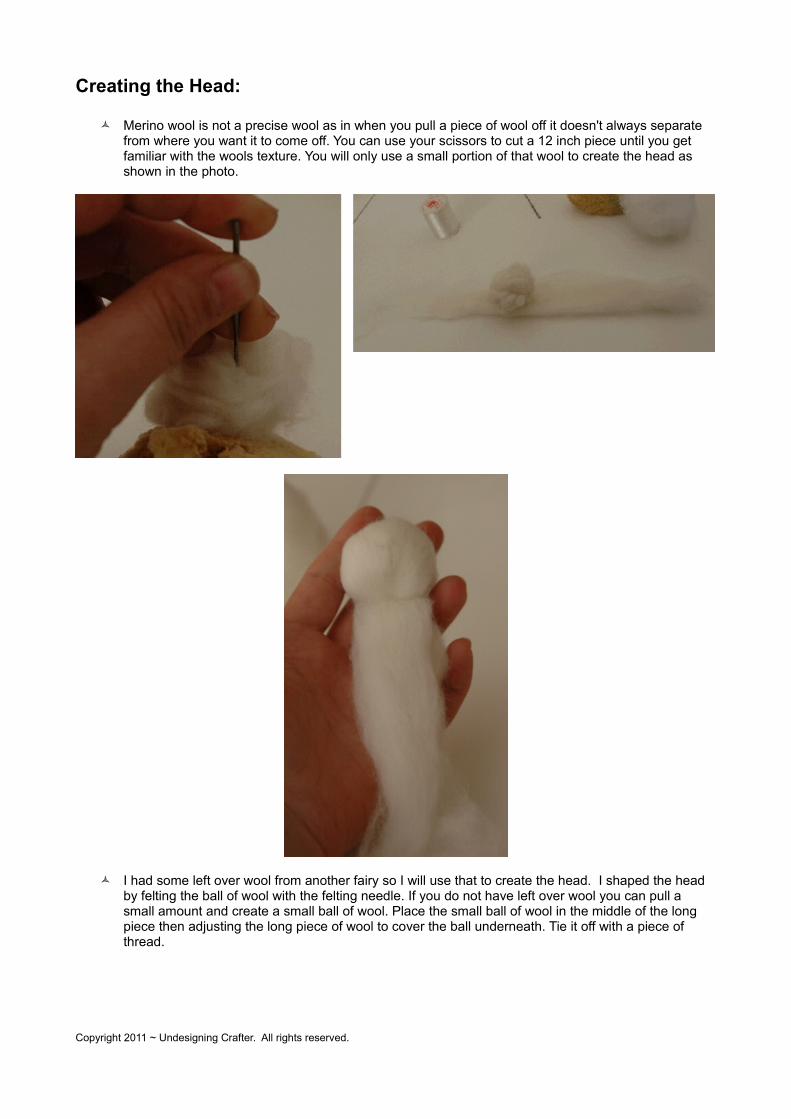
Merino wool is not a precise wool as in when you pull a piece of wool off it doesn't always separate from where you want it to come off. You can use your scissors to cut a 12 inch piece until you get familiar with the wools texture. You will only use a small portion of that wool to create the head as shown in the photo.
I had some left over wool from another fairy so I will use that to create the head. I shaped the head by felting the ball of wool with the felting needle. If you do not have left over wool you can pull a small amount and create a small ball of wool. Place the small ball of wool in the middle of the long piece then adjusting the long piece of wool to cover the ball underneath. Tie it off with a piece of thread.
Copyright 2011 ~ Undesigning Crafter. All rights reserved.

Pull a small piece of wool and wrap it around the base of the head creating a small neck giving the fairy more dimension.
Copyright 2011 ~ Undesigning Crafter. All rights reserved.
Creating the Hands:
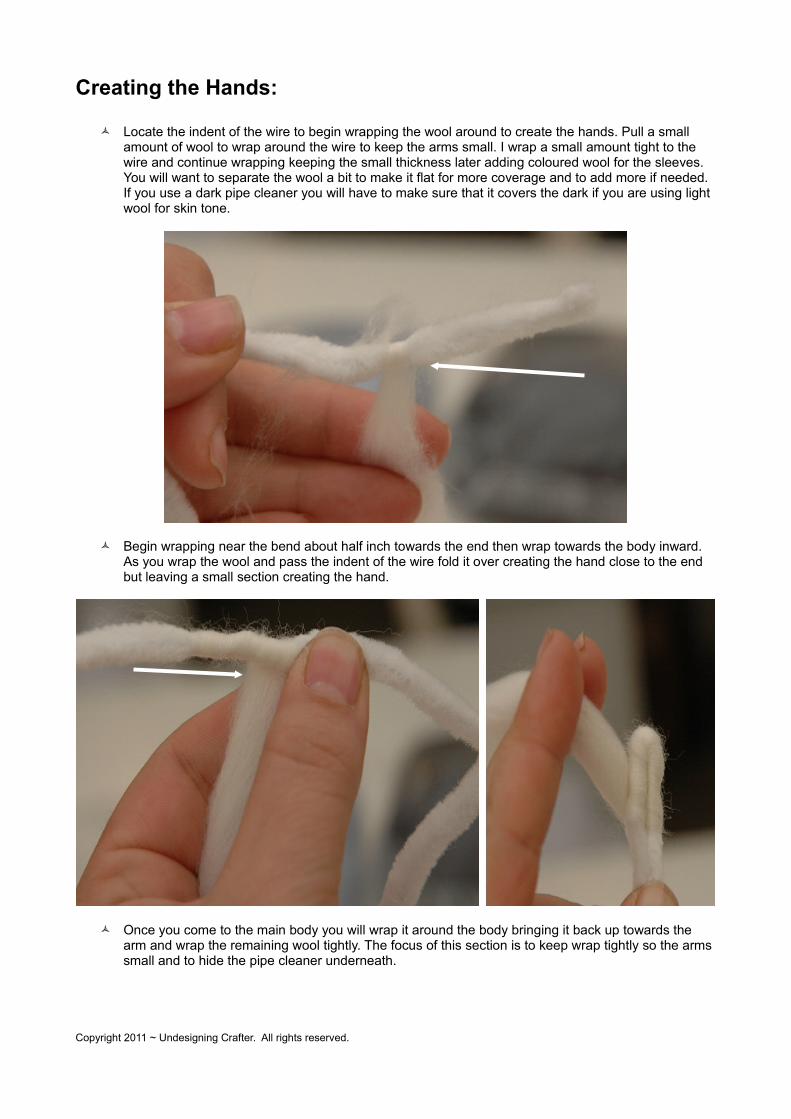
Locate the indent of the wire to begin wrapping the wool around to create the hands. Pull a small amount of wool to wrap around the wire to keep the arms small. I wrap a small amount tight to the wire and continue wrapping keeping the small thickness later adding coloured wool for the sleeves. You will want to separate the wool a bit to make it flat for more coverage and to add more if needed. If you use a dark pipe cleaner you will have to make sure that it covers the dark if you are using light wool for skin tone.
Begin wrapping near the bend about half inch towards the end then wrap towards the body inward. As you wrap the wool and pass the indent of the wire fold it over creating the hand close to the end but leaving a small section creating the hand.
Once you come to the main body you will wrap it around the body bringing it back up towards the arm and wrap the remaining wool tightly. The focus of this section is to keep wrap tightly so the arms small and to hide the pipe cleaner underneath.
Copyright 2011 ~ Undesigning Crafter. All rights reserved.
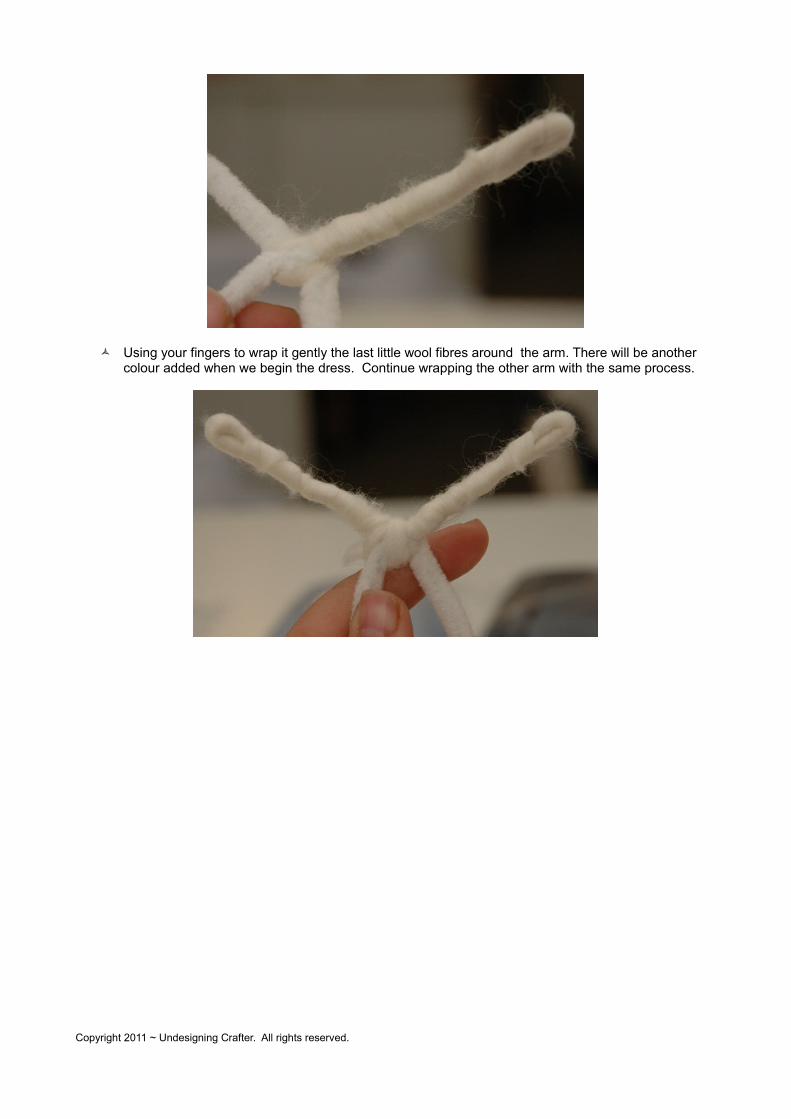
Using your fingers to wrap it gently the last little wool fibres around the arm. There will be another colour added when we begin the dress. Continue wrapping the other arm with the same process.
Copyright 2011 ~ Undesigning Crafter. All rights reserved.
Creating the Body:
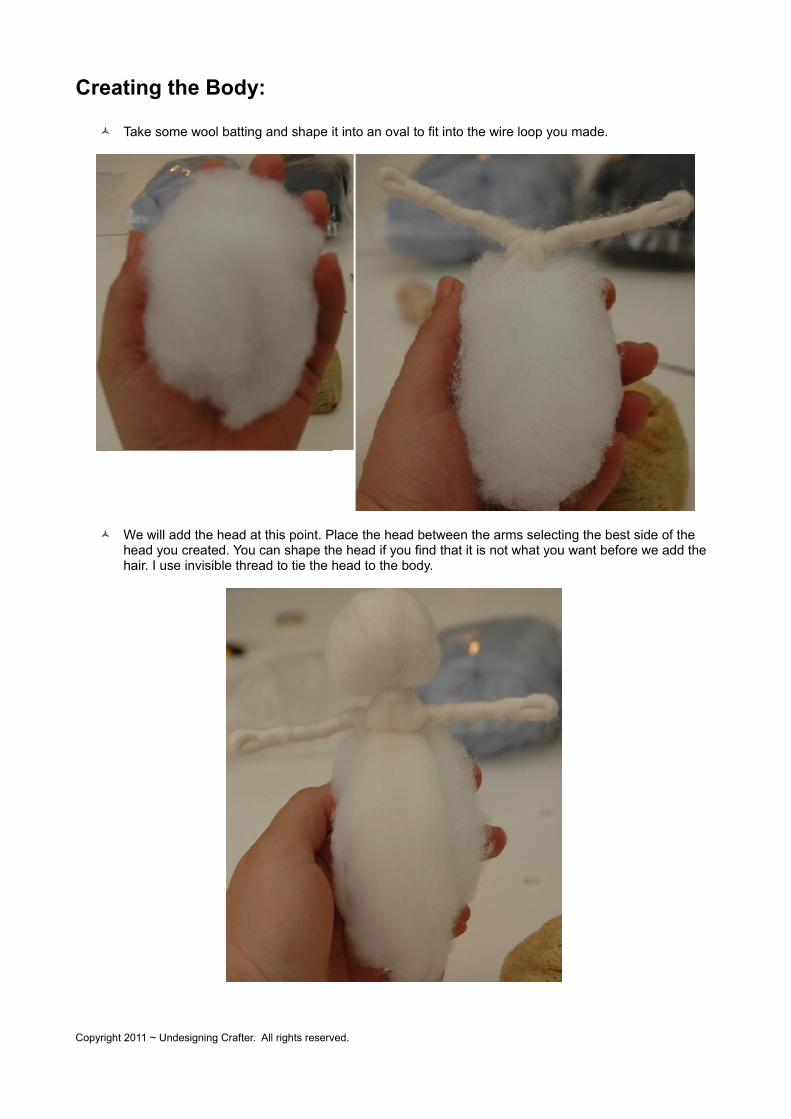
Take some wool batting and shape it into an oval to fit into the wire loop you made.
We will add the head at this point. Place the head between the arms selecting the best side of the head you created. You can shape the head if you find that it is not what you want before we add the hair. I use invisible thread to tie the head to the body.
Copyright 2011 ~ Undesigning Crafter. All rights reserved.
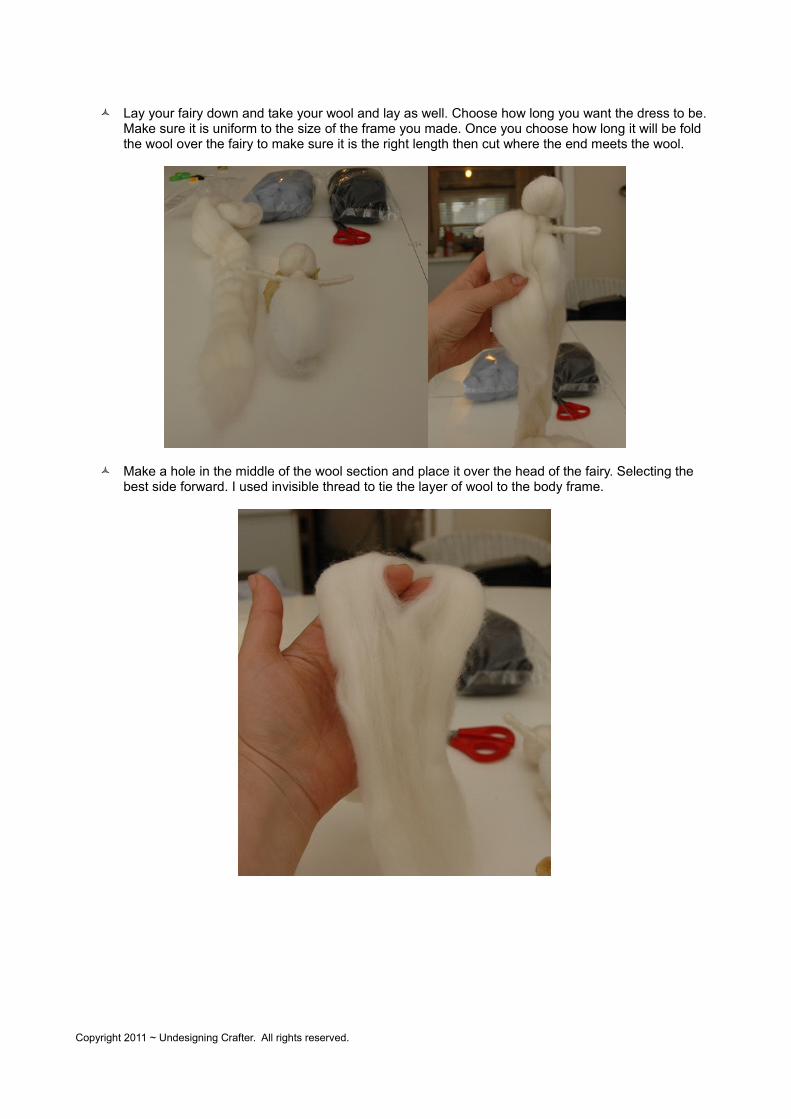
Lay your fairy down and take your wool and lay as well. Choose how long you want the dress to be. Make sure it is uniform to the size of the frame you made. Once you choose how long it will be fold the wool over the fairy to make sure it is the right length then cut where the end meets the wool.
Make a hole in the middle of the wool section and place it over the head of the fairy. Selecting the best side forward. I used invisible thread to tie the layer of wool to the body frame.
Copyright 2011 ~ Undesigning Crafter. All rights reserved.
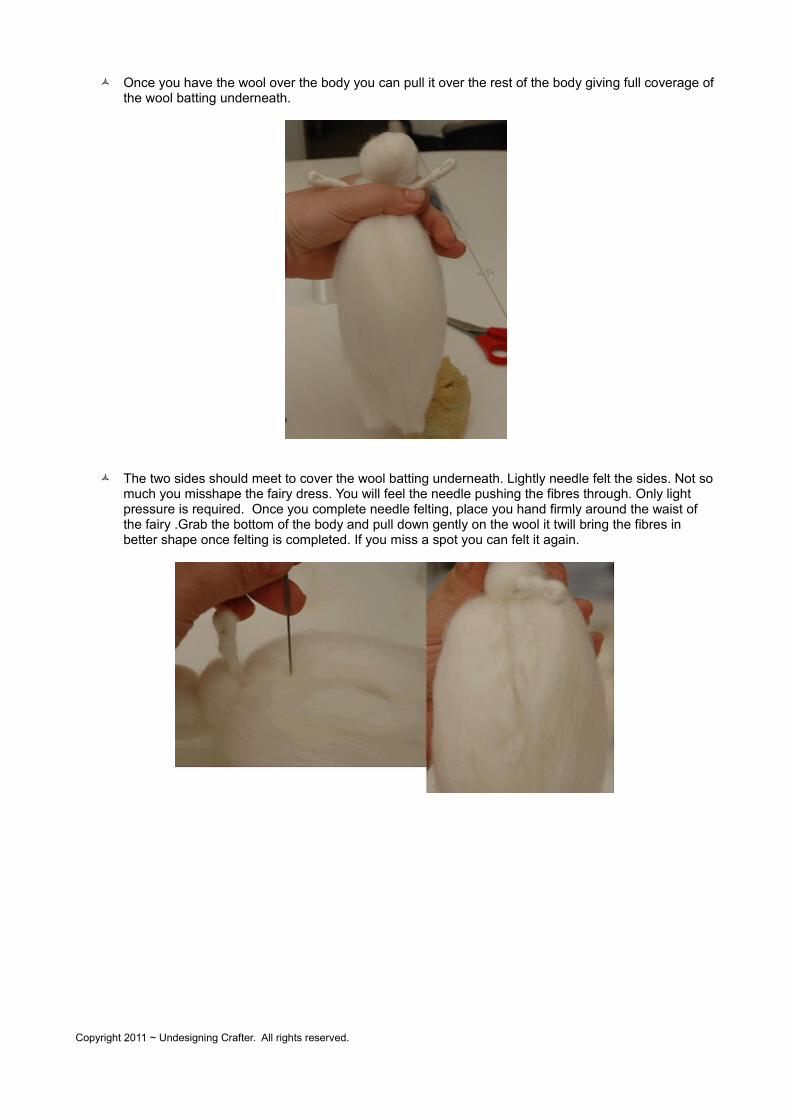
Once you have the wool over the body you can pull it over the rest of the body giving full coverage of the wool batting underneath.
The two sides should meet to cover the wool batting underneath. Lightly needle felt the sides. Not so much you misshape the fairy dress. You will feel the needle pushing the fibres through. Only light pressure is required. Once you complete needle felting, place you hand firmly around the waist of the fairy .Grab the bottom of the body and pull down gently on the wool it twill bring the fibres in better shape once felting is completed. If you miss a spot you can felt it again.
Copyright 2011 ~ Undesigning Crafter. All rights reserved.
Creating the Dress:
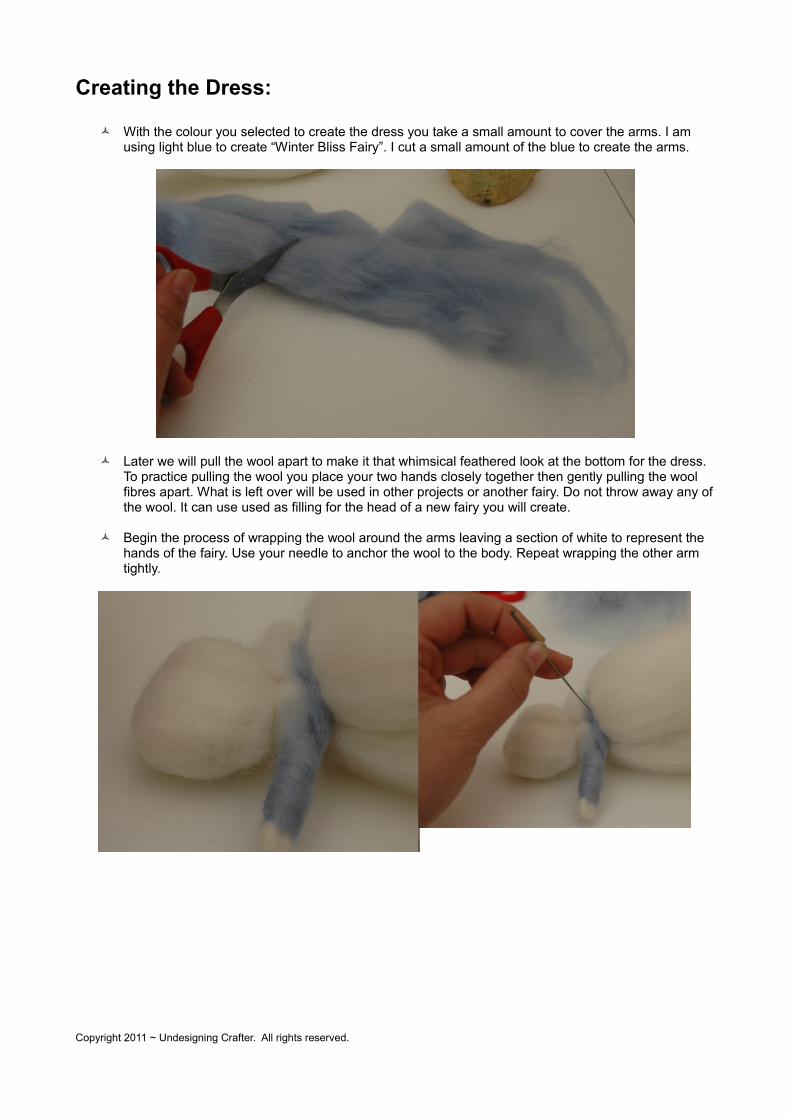
With the colour you selected to create the dress you take a small amount to cover the arms. I am using light blue to create “Winter Bliss Fairy”. I cut a small amount of the blue to create the arms.
Later we will pull the wool apart to make it that whimsical feathered look at the bottom for the dress. To practice pulling the wool you place your two hands closely together then gently pulling the wool fibres apart. What is left over will be used in other projects or another fairy. Do not throw away any of the wool. It can use used as filling for the head of a new fairy you will create.
Begin the process of wrapping the wool around the arms leaving a section of white to represent the hands of the fairy. Use your needle to anchor the wool to the body. Repeat wrapping the other arm tightly.
Copyright 2011 ~ Undesigning Crafter. All rights reserved.
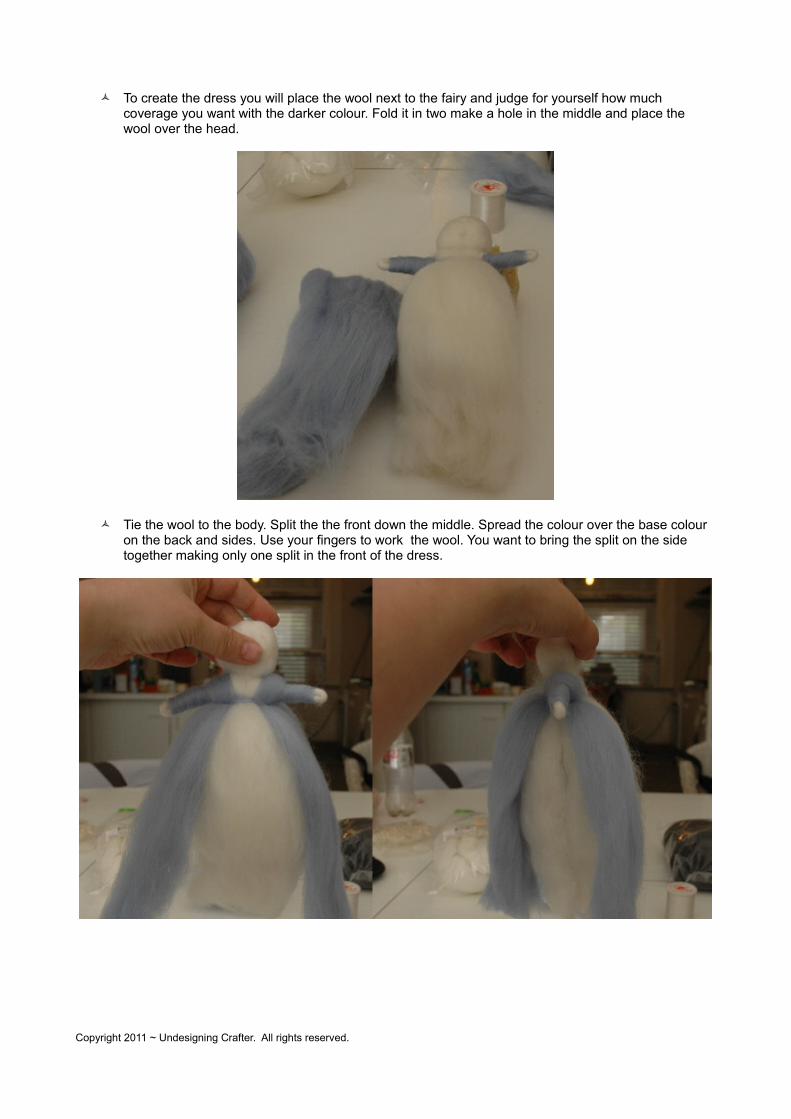
To create the dress you will place the wool next to the fairy and judge for yourself how much coverage you want with the darker colour. Fold it in two make a hole in the middle and place the wool over the head.
Tie the wool to the body. Split the the front down the middle. Spread the colour over the base colour on the back and sides. Use your fingers to work the wool. You want to bring the split on the side together making only one split in the front of the dress.
Copyright 2011 ~ Undesigning Crafter. All rights reserved.
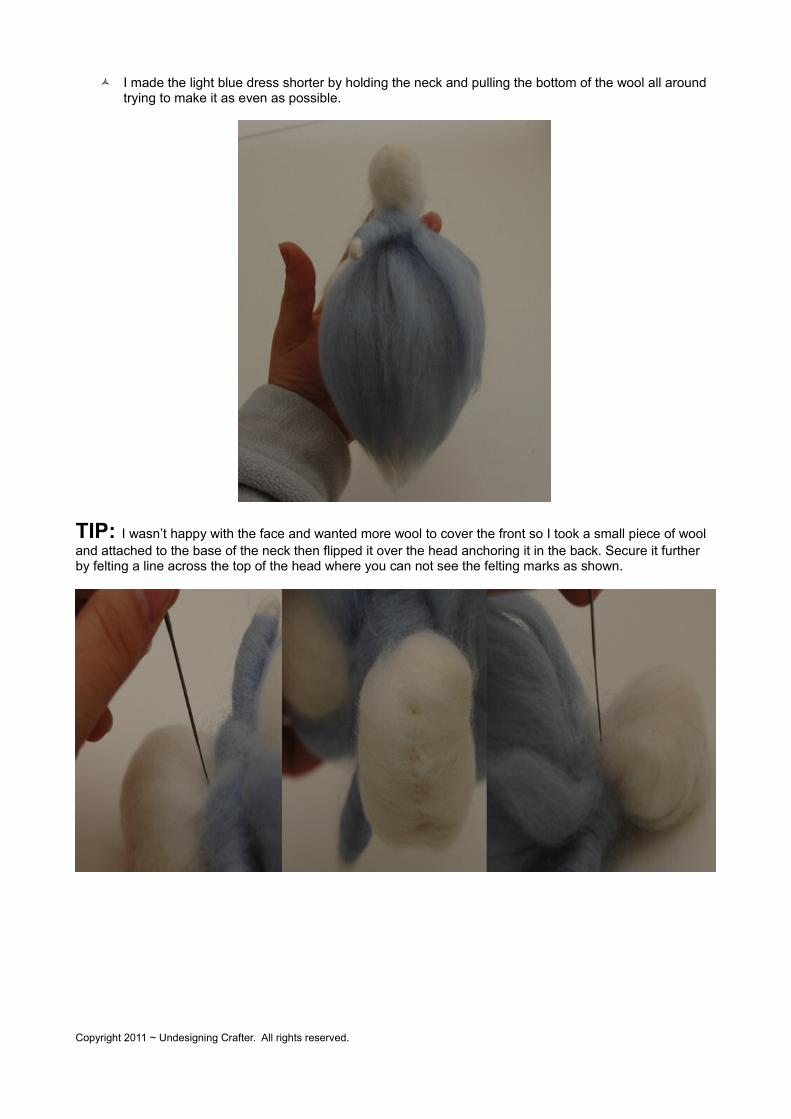
I made the light blue dress shorter by holding the neck and pulling the bottom of the wool all around trying to make it as even as possible.
TIP: I wasn’t happy with the face and wanted more wool to cover the front so I took a small piece of wool and attached to the base of the neck then flipped it over the head anchoring it in the back. Secure it further by felting a line across the top of the head where you can not see the felting marks as shown.
Copyright 2011 ~ Undesigning Crafter. All rights reserved.
Creating the Hair:
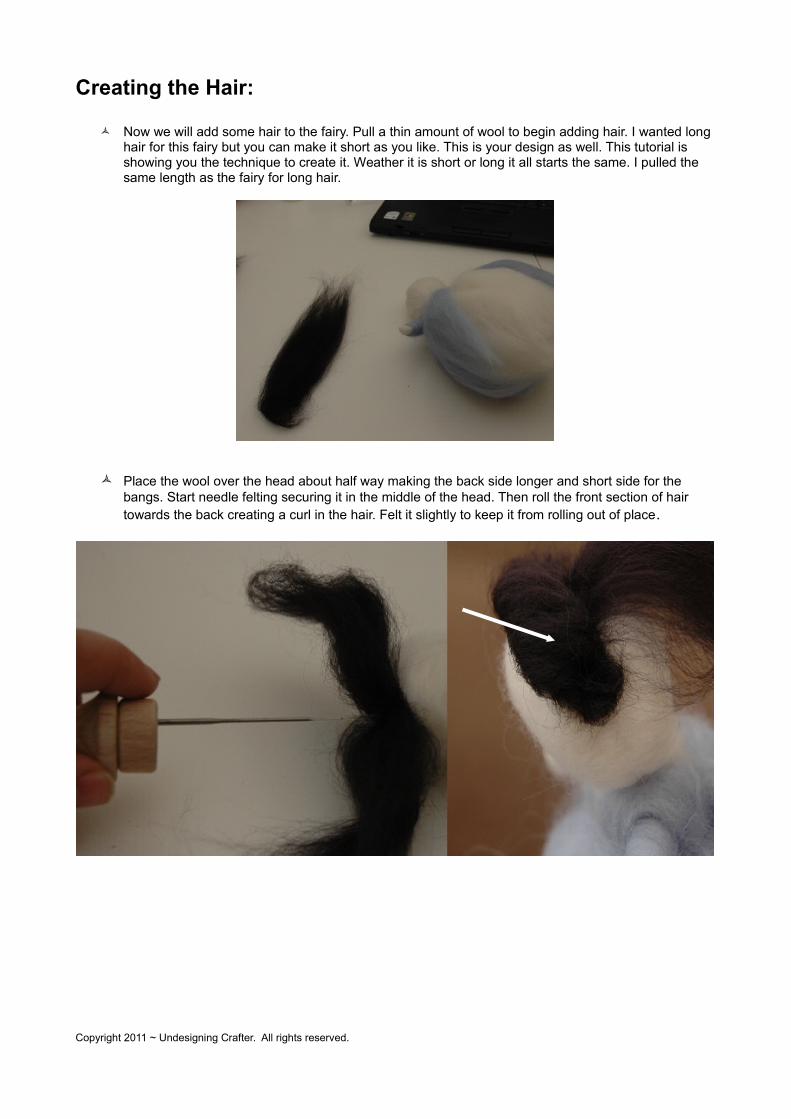
Now we will add some hair to the fairy. Pull a thin amount of wool to begin adding hair. I wanted long hair for this fairy but you can make it short as you like. This is your design as well. This tutorial is showing you the technique to create it. Weather it is short or long it all starts the same. I pulled the same length as the fairy for long hair.
Place the wool over the head about half way making the back side longer and short side for the bangs. Start needle felting securing it in the middle of the head. Then roll the front section of hair towards the back creating a curl in the hair. Felt it slightly to keep it from rolling out of place.
Copyright 2011 ~ Undesigning Crafter. All rights reserved.
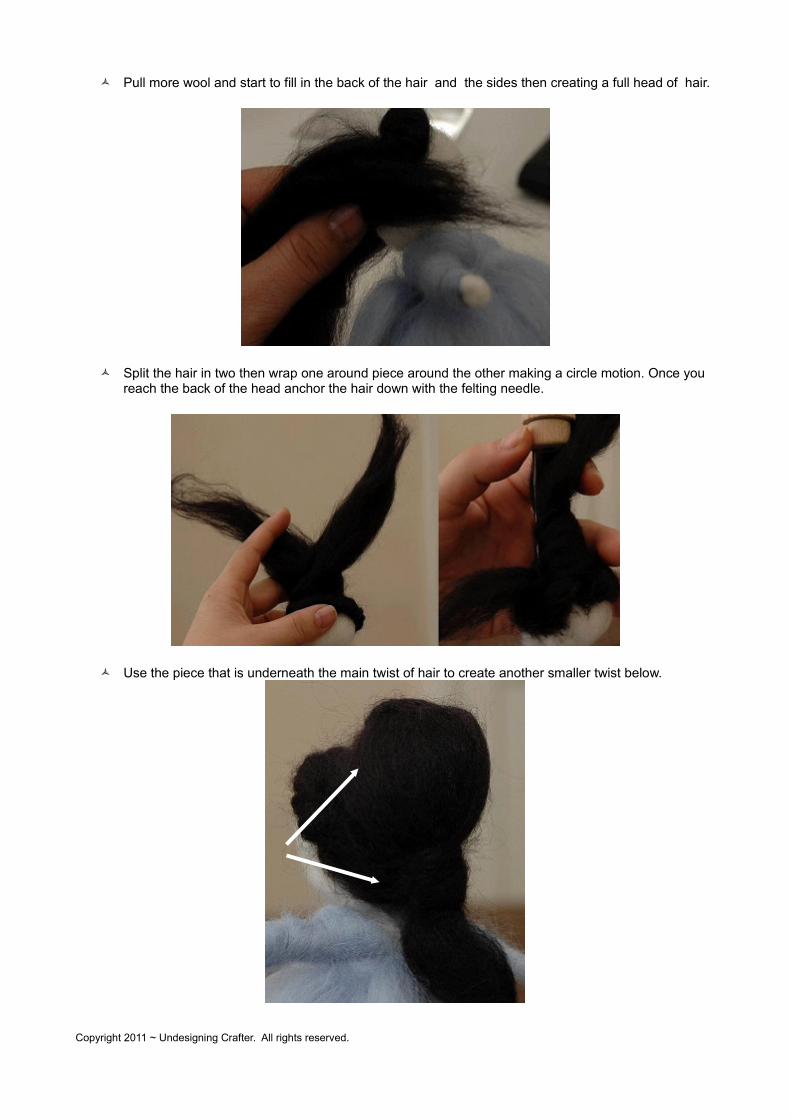
Pull more wool and start to fill in the back of the hair and the sides then creating a full head of hair.
Split the hair in two then wrap one around piece around the other making a circle motion. Once you reach the back of the head anchor the hair down with the felting needle.
Use the piece that is underneath the main twist of hair to create another smaller twist below.
Copyright 2011 ~ Undesigning Crafter. All rights reserved.
Creating the Wings:
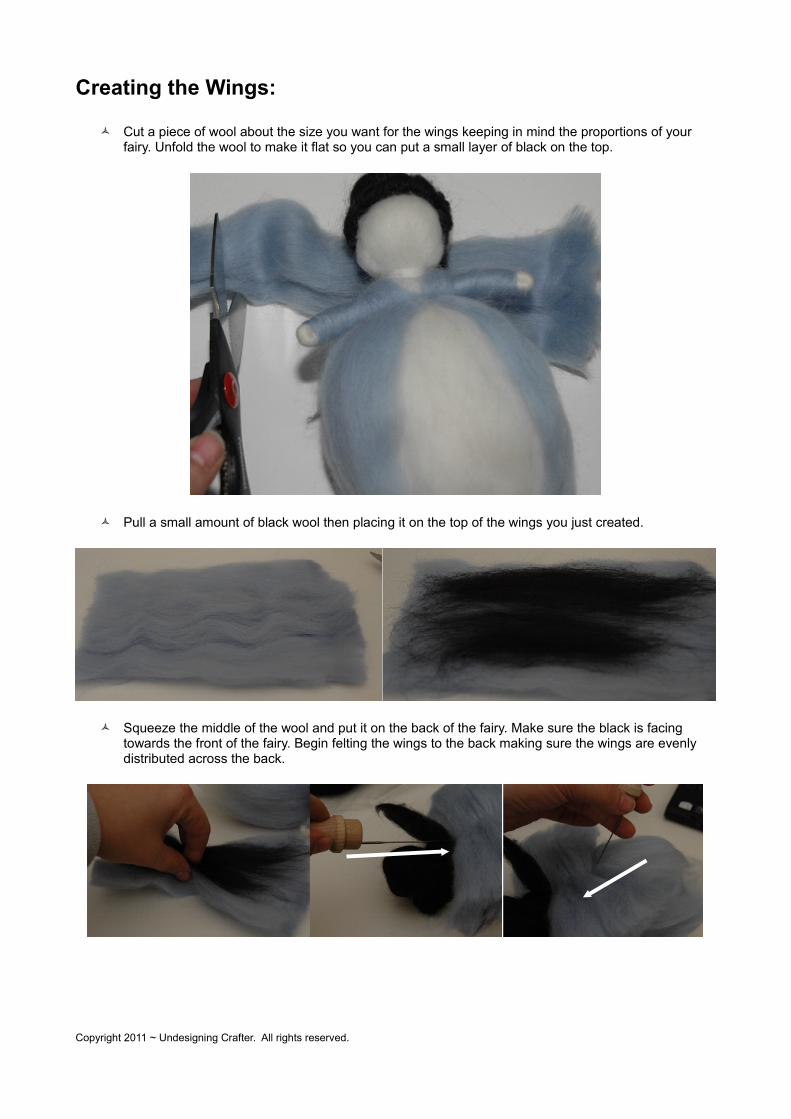
Cut a piece of wool about the size you want for the wings keeping in mind the proportions of your fairy. Unfold the wool to make it flat so you can put a small layer of black on the top.
Pull a small amount of black wool then placing it on the top of the wings you just created.
Squeeze the middle of the wool and put it on the back of the fairy. Make sure the black is facing towards the front of the fairy. Begin felting the wings to the back making sure the wings are evenly distributed across the back.
Copyright 2011 ~ Undesigning Crafter. All rights reserved.
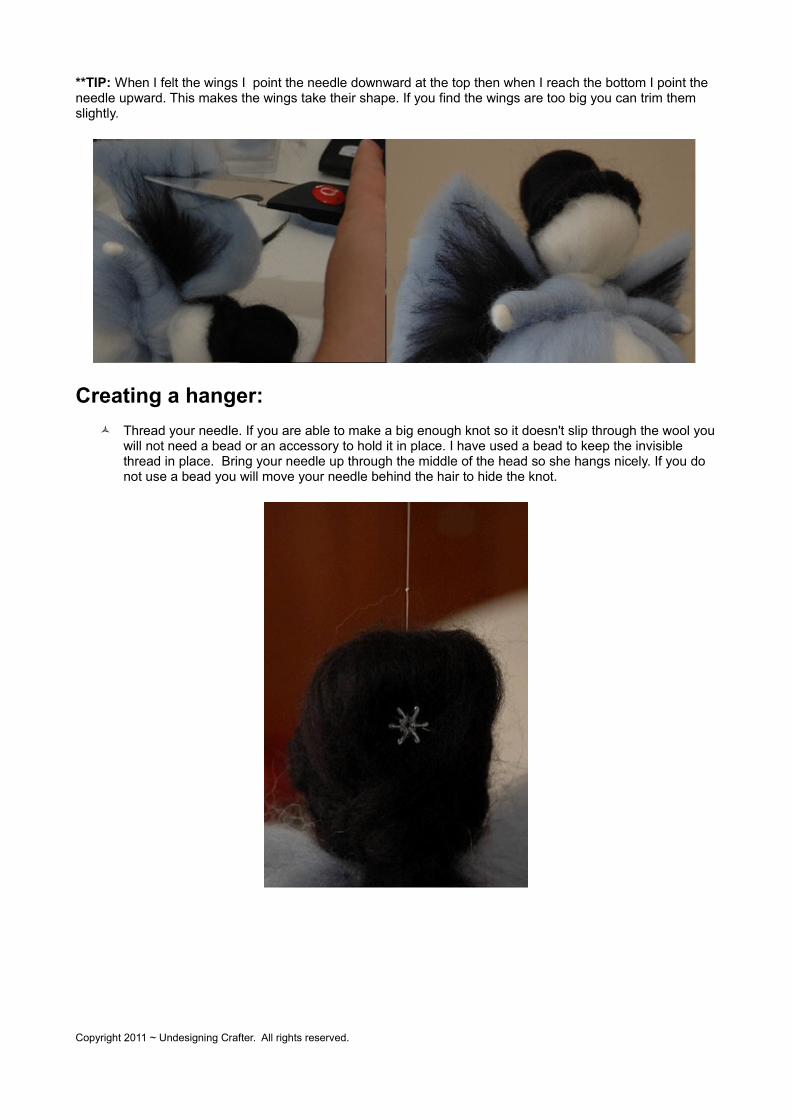
**TIP: When I felt the wings I point the needle downward at the top then when I reach the bottom I point the needle upward. This makes the wings take their shape. If you find the wings are too big you can trim them slightly.
Creating a hanger: Thread your needle. If you are able to make a big enough knot so it doesn't slip through the wool you
will not need a bead or an accessory to hold it in place. I have used a bead to keep the invisible thread in place. Bring your needle up through the middle of the head so she hangs nicely. If you do not use a bead you will move your needle behind the hair to hide the knot.
Copyright 2011 ~ Undesigning Crafter. All rights reserved.
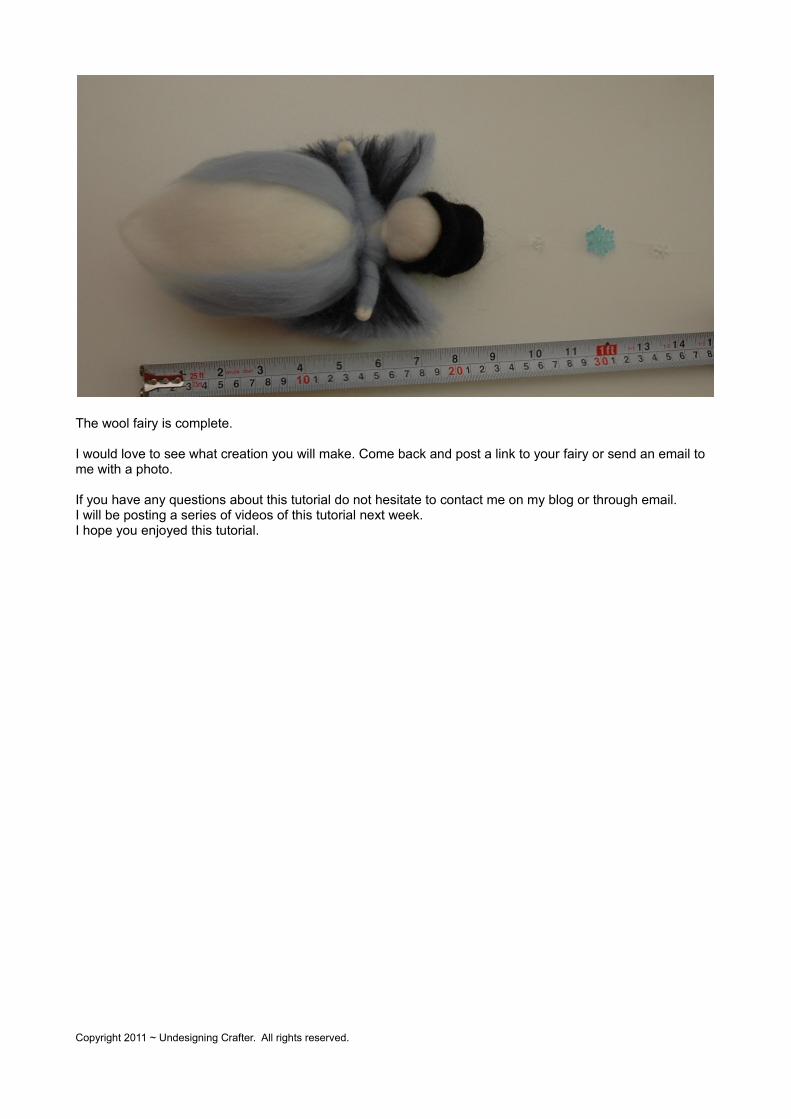
The wool fairy is complete.
I would love to see what creation you will make. Come back and post a link to your fairy or send an email to me with a photo.
If you have any questions about this tutorial do not hesitate to contact me on my blog or through email.I will be posting a series of videos of this tutorial next week.I hope you enjoyed this tutorial.
Copyright 2011 ~ Undesigning Crafter. All rights reserved.
Reference Material: The links listed below are for reference only. Use at own risk. Always remember copyright laws and that information given on these sites are intellectual property. Always follow the the instructions of how to use their information on the site.
Thank you.
Links to blogs: (use a translator to switch the blog to the language you speak)
How to make a fairy figure
Hoe maak je een engel. Tutorial: Angel
Needle Felting 101 Felting Wool & Needle Felting Wool Tutorial
These links above are the links I found most helpful when learning how to do basic felting.
Elfen & Feen aus Märchenwolle
I have not read this book but it was recommended to me by an crafter who has one. I have seen inside the cover through Amazon and it looks really nice.
Copyright 2011 ~ Undesigning Crafter. All rights reserved.