Embed Size (px)
Citation preview

WOOD FRAMING ROOF+
FEATURES
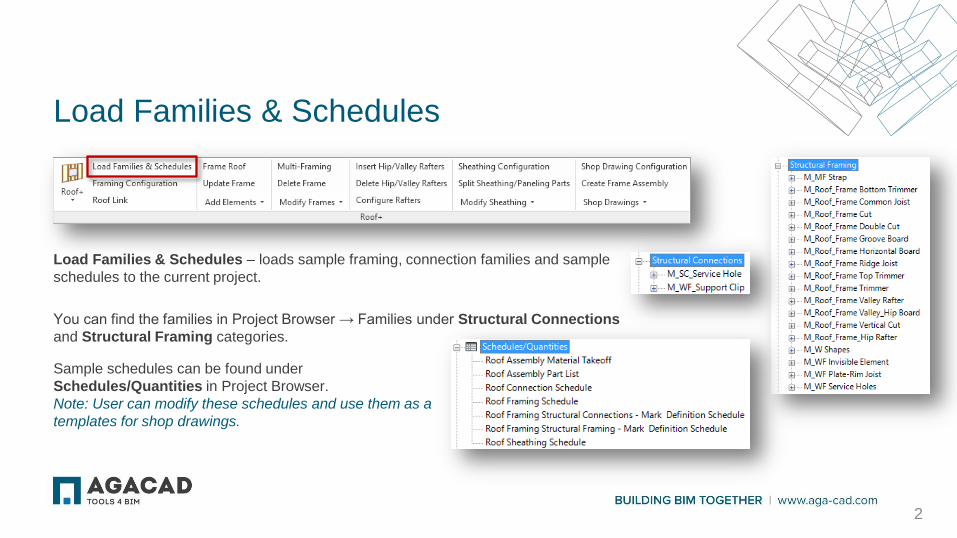
Load Families & Schedules
Load Families & Schedules – loads sample framing, connection families and sample
schedules to the current project.
You can find the families in Project Browser → Families under Structural Connections
and Structural Framing categories.
2
Sample schedules can be found under
Schedules/Quantities in Project Browser.
Note: User can modify these schedules and use them as a
templates for shop drawings.
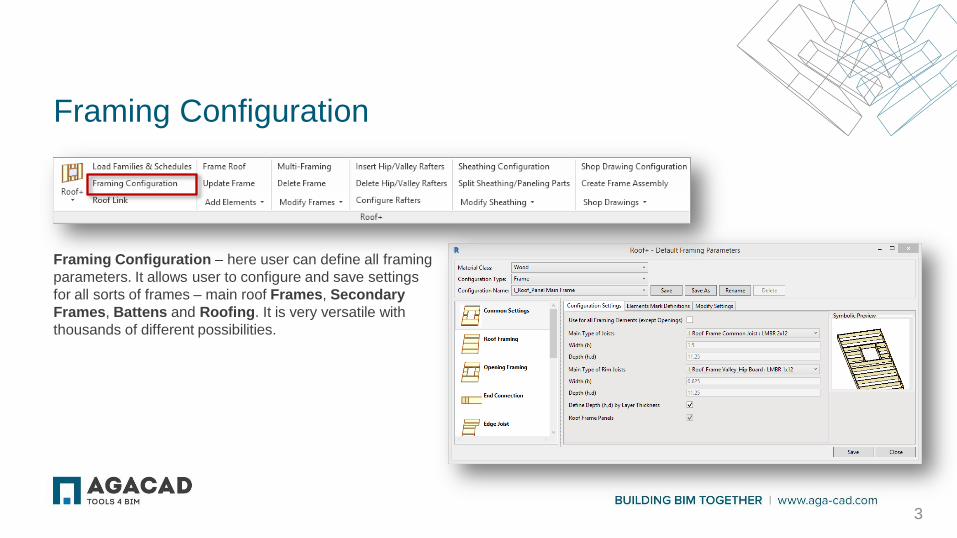
Framing Configuration
Framing Configuration – here user can define all framing
parameters. It allows user to configure and save settings
for all sorts of frames – main roof Frames, Secondary
Frames, Battens and Roofing. It is very versatile with
thousands of different possibilities.
3

Roof Link
Roof Link – makes a link between
roof type from the project and
configuration. Choose the roof type
you want to link and apply framing
configuration for the layers.
4

Frame Roof
Frame Roof – frames selected
roof from the model according
to predefined configuration.
5
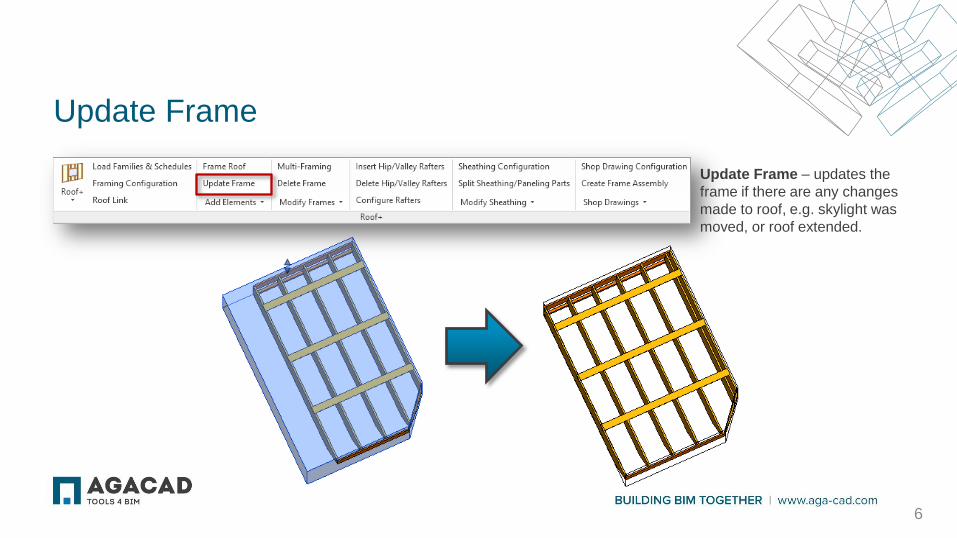
Update Frame
Update Frame – updates the
frame if there are any changes
made to roof, e.g. skylight was
moved, or roof extended.
6
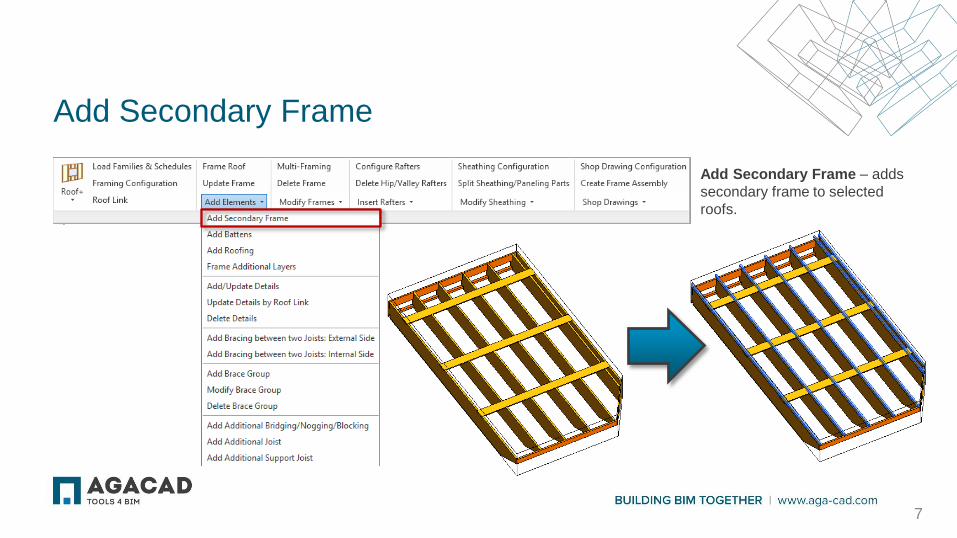
Add Secondary Frame
Add Secondary Frame – adds
secondary frame to selected
roofs.
7
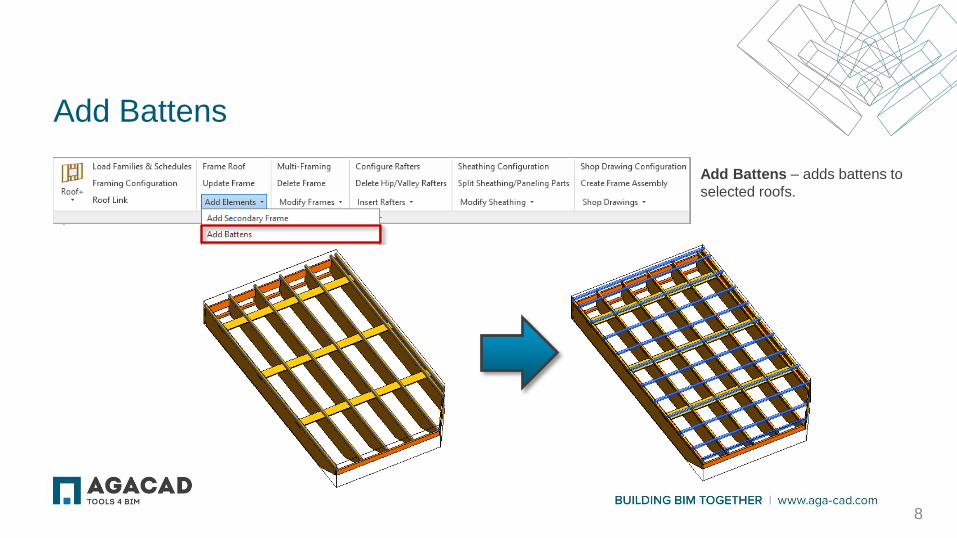
Add Battens
Add Battens – adds battens to
selected roofs.
8
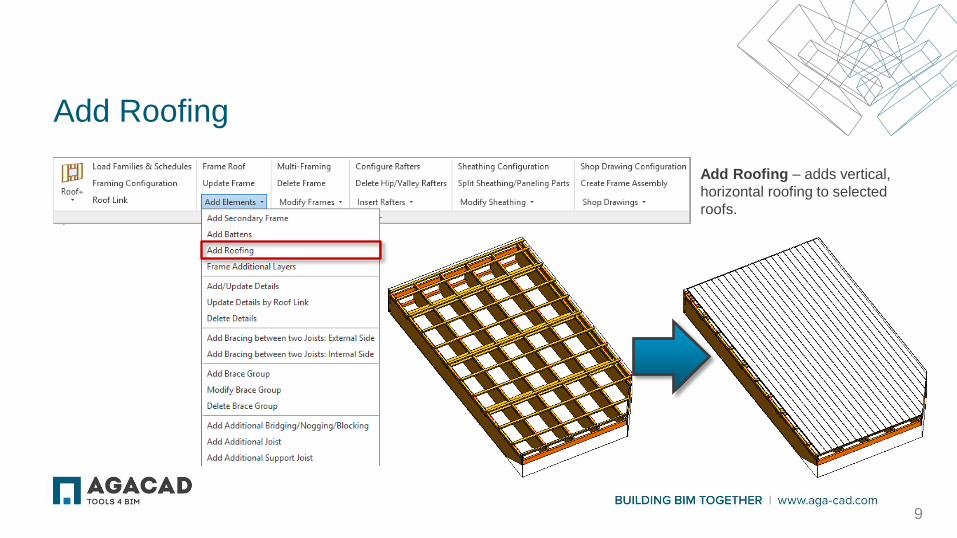
Add Roofing
Add Roofing – adds vertical,
horizontal roofing to selected
roofs.
9
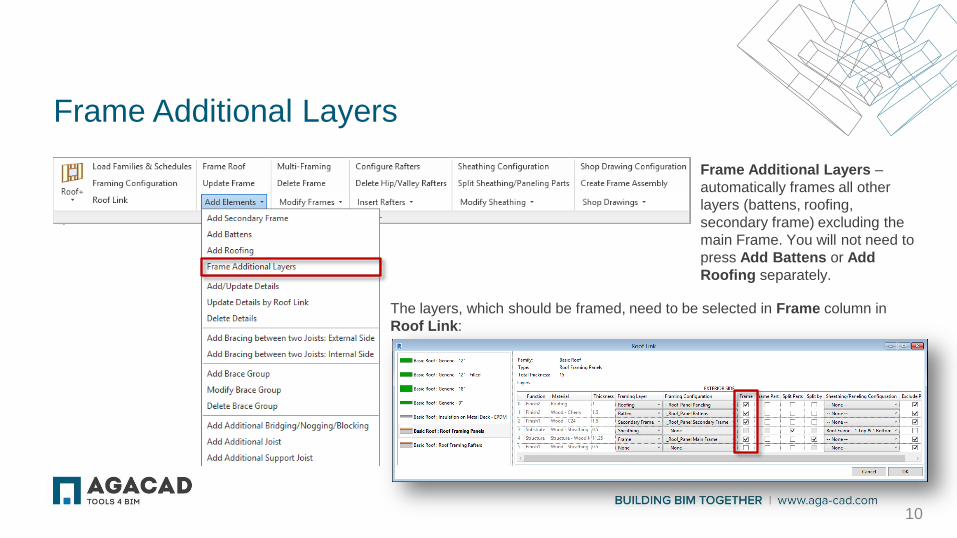
Frame Additional Layers
The layers, which should be framed, need to be selected in Frame column in
Roof Link:
10
Frame Additional Layers –
automatically frames all other
layers (battens, roofing,
secondary frame) excluding the
main Frame. You will not need to
press Add Battens or Add
Roofing separately.
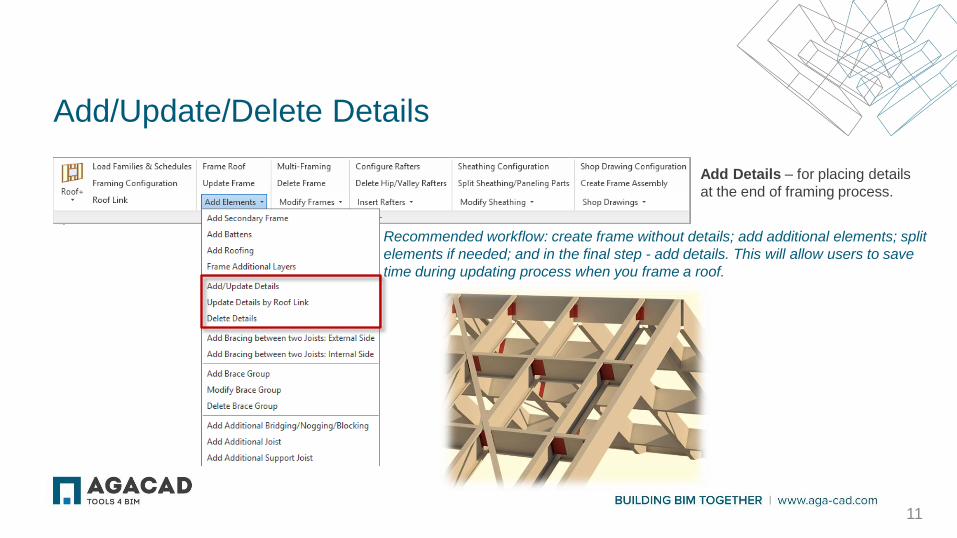
Add/Update/Delete Details
Add Details – for placing details
at the end of framing process.
11
Recommended workflow: create frame without details; add additional elements; split
elements if needed; and in the final step - add details. This will allow users to save
time during updating process when you frame a roof.
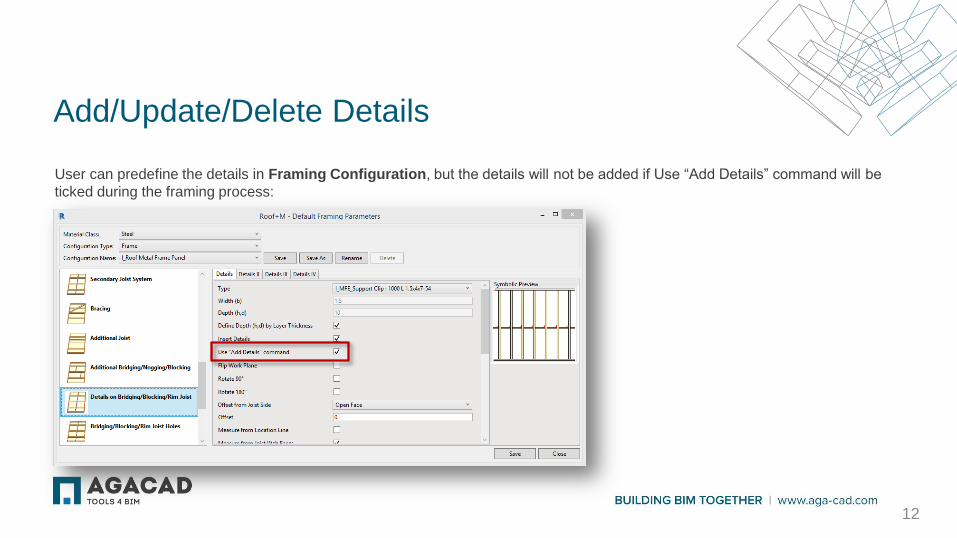
Add/Update/Delete Details
User can predefine the details in Framing Configuration, but the details will not be added if Use “Add Details” command will be
ticked during the framing process:
12
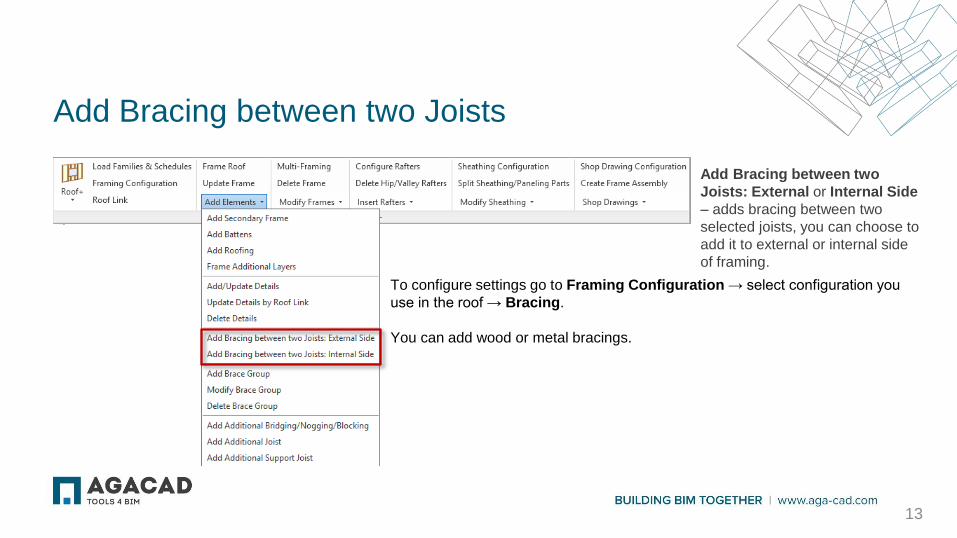
Add Bracing between two Joists
Add Bracing between two
Joists: External or Internal Side
– adds bracing between two
selected joists, you can choose to
add it to external or internal side
of framing.
13
To configure settings go to Framing Configuration → select configuration you
use in the roof → Bracing.
You can add wood or metal bracings.
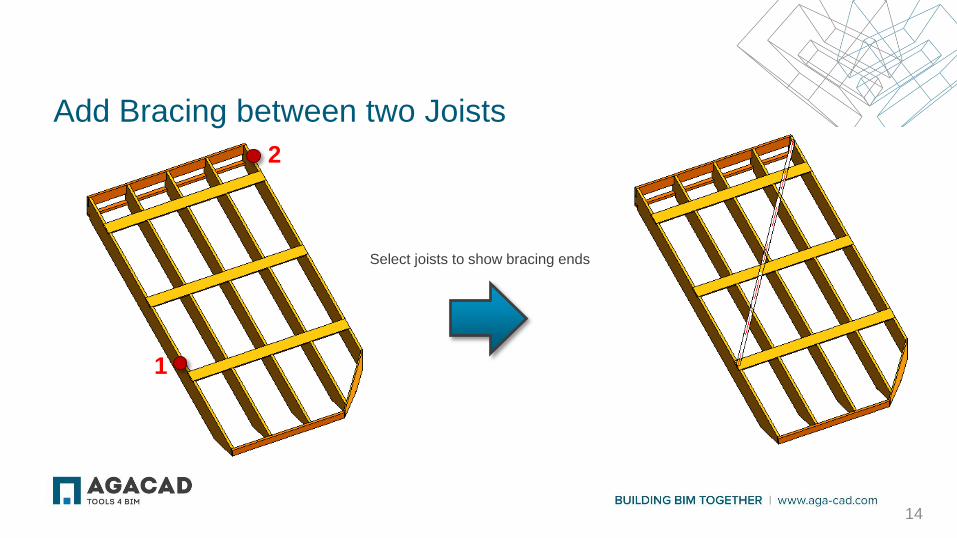
Add Bracing between two Joists
Select joists to show bracing ends
1
2
14
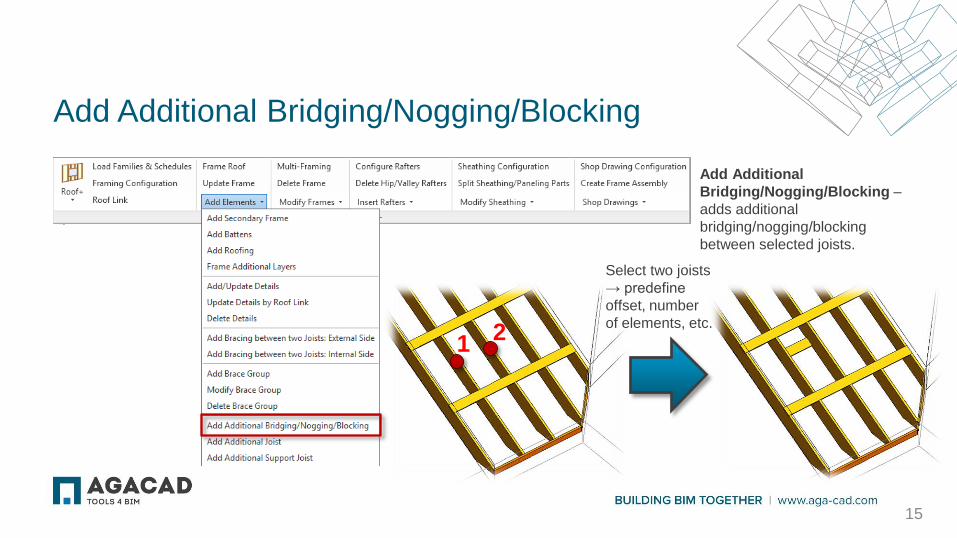
Add Additional Bridging/Nogging/Blocking
Add Additional
Bridging/Nogging/Blocking –
adds additional
bridging/nogging/blocking
between selected joists.
1 2
15
Select two joists
→ predefine
offset, number
of elements, etc.
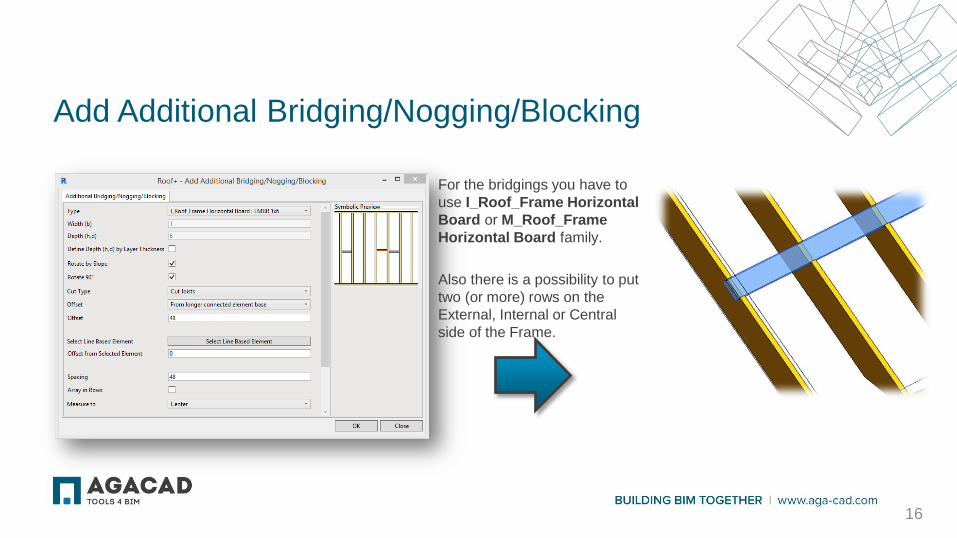
Add Additional Bridging/Nogging/Blocking
For the bridgings you have to
use I_Roof_Frame Horizontal
Board or M_Roof_Frame
Horizontal Board family.
Also there is a possibility to put
two (or more) rows on the
External, Internal or Central
side of the Frame.
16
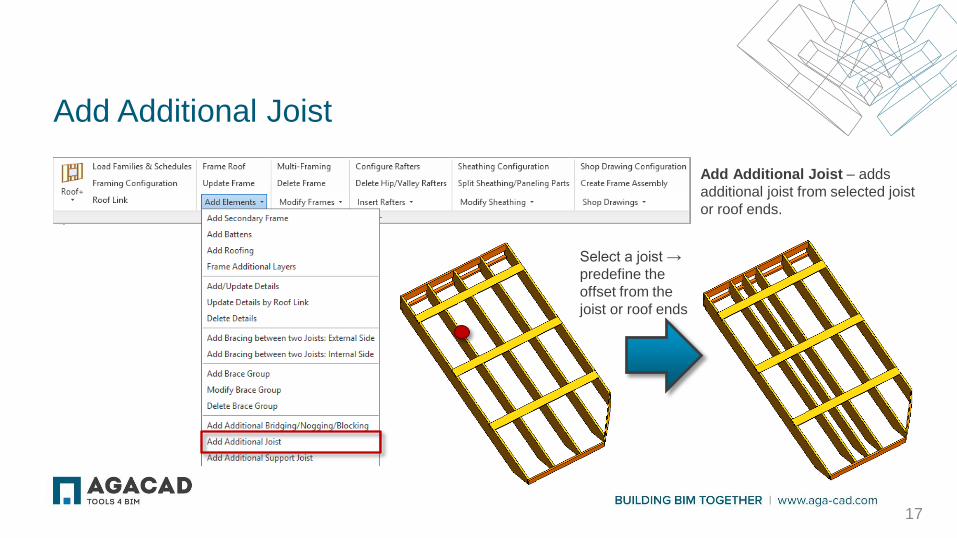
Add Additional Joist
Add Additional Joist – adds
additional joist from selected joist
or roof ends.
Select a joist →
predefine the
offset from the
joist or roof ends
17
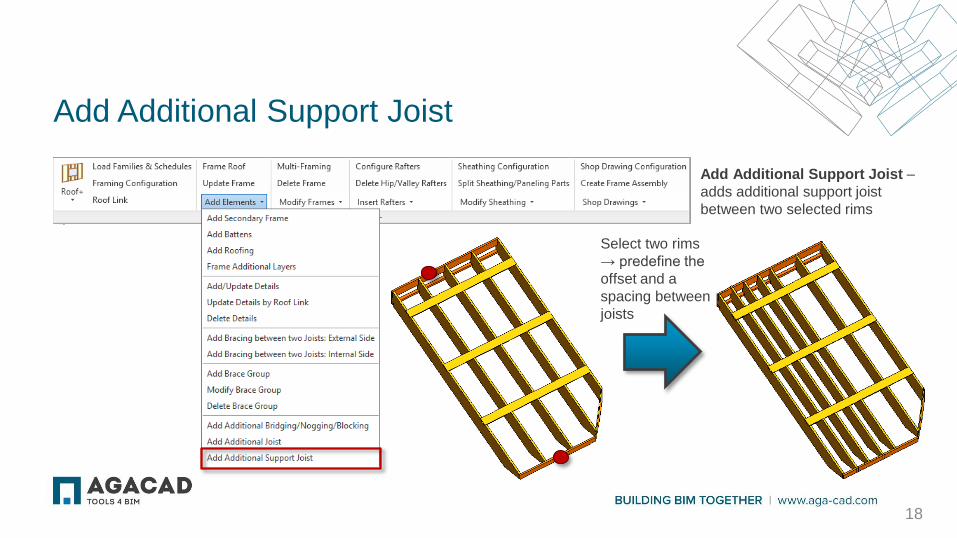
Add Additional Support Joist
Add Additional Support Joist –
adds additional support joist
between two selected rims
18
Select two rims
→ predefine the
offset and a
spacing between
joists
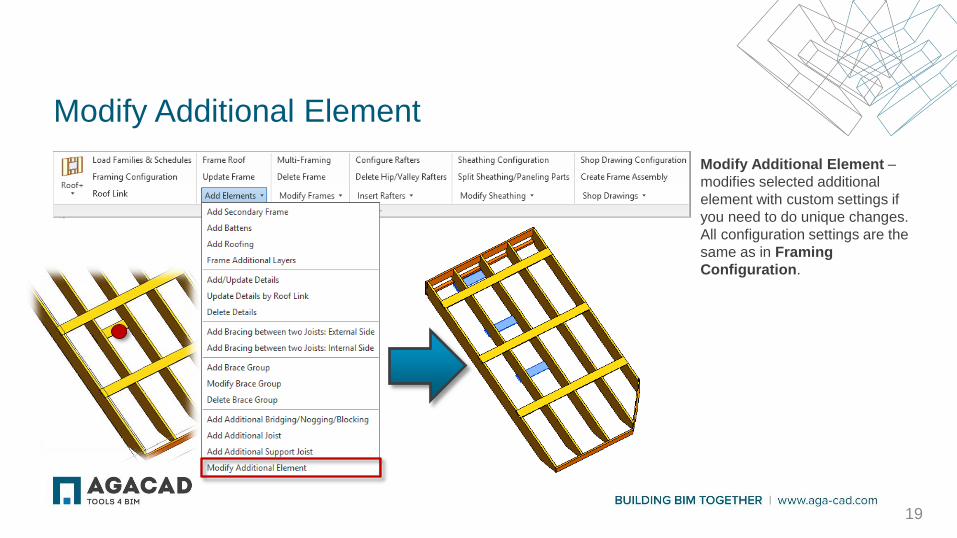
Modify Additional Element
Modify Additional Element –
modifies selected additional
element with custom settings if
you need to do unique changes.
All configuration settings are the
same as in Framing
Configuration.
19
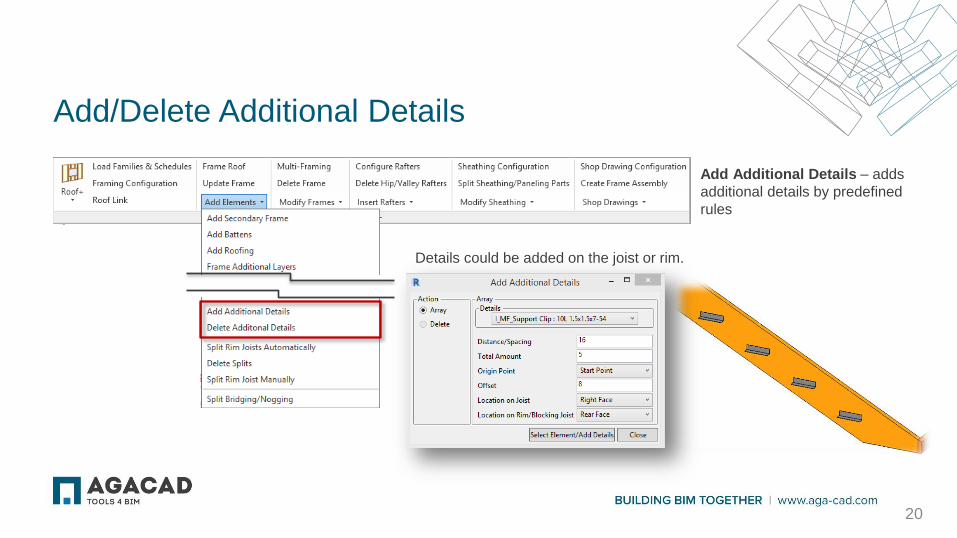
Add/Delete Additional Details
20
Details could be added on the joist or rim.
Add Additional Details – adds
additional details by predefined
rules
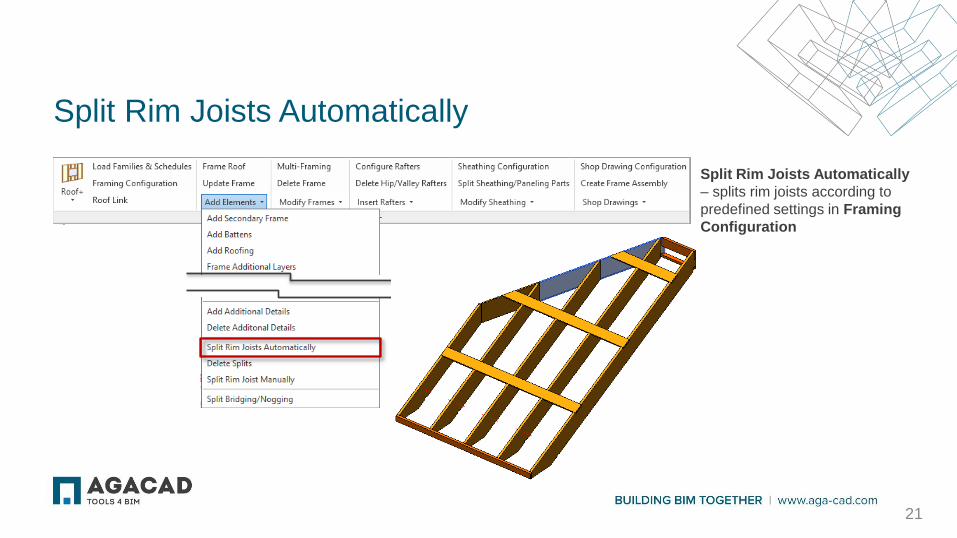
Split Rim Joists Automatically
Split Rim Joists Automatically
– splits rim joists according to
predefined settings in Framing
Configuration
21
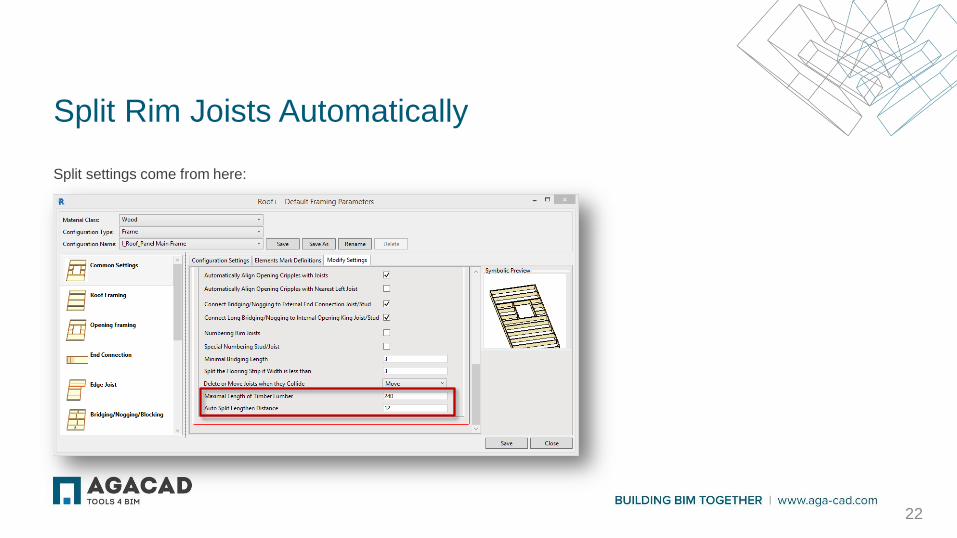
Split Rim Joists Automatically
Split settings come from here:
22
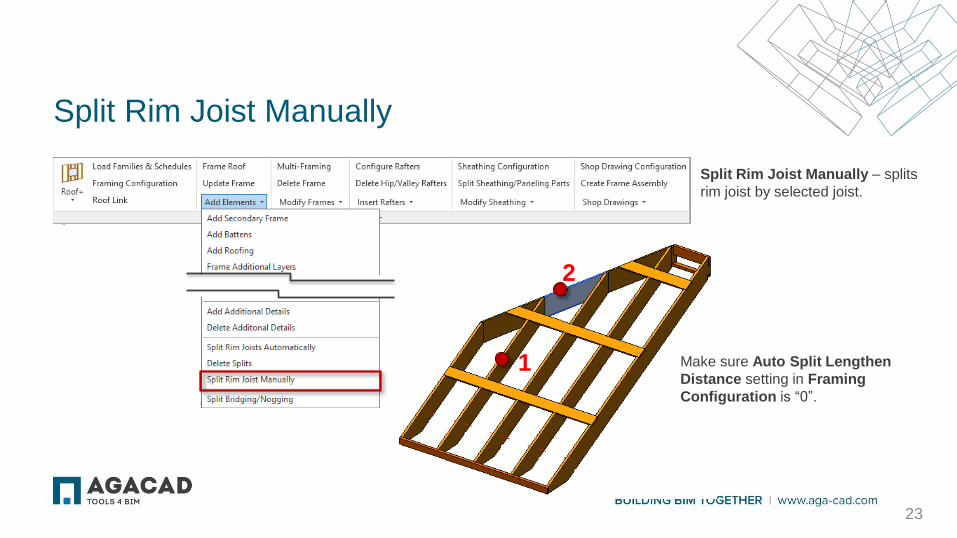
Split Rim Joist Manually – splits
rim joist by selected joist.
Split Rim Joist Manually
23
Make sure Auto Split Lengthen
Distance setting in Framing
Configuration is “0”.
1
2
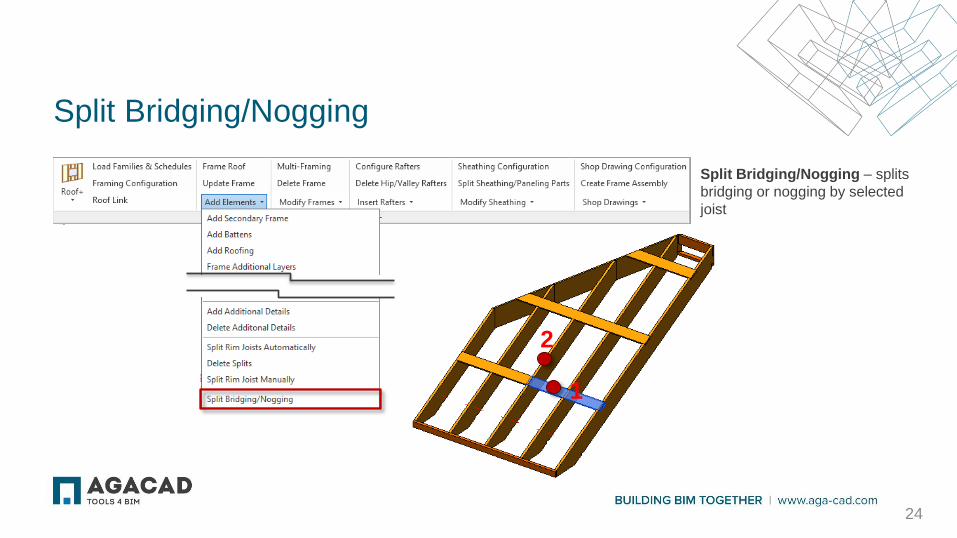
Split Bridging/Nogging – splits
bridging or nogging by selected
joist
Split Bridging/Nogging
24
1
2
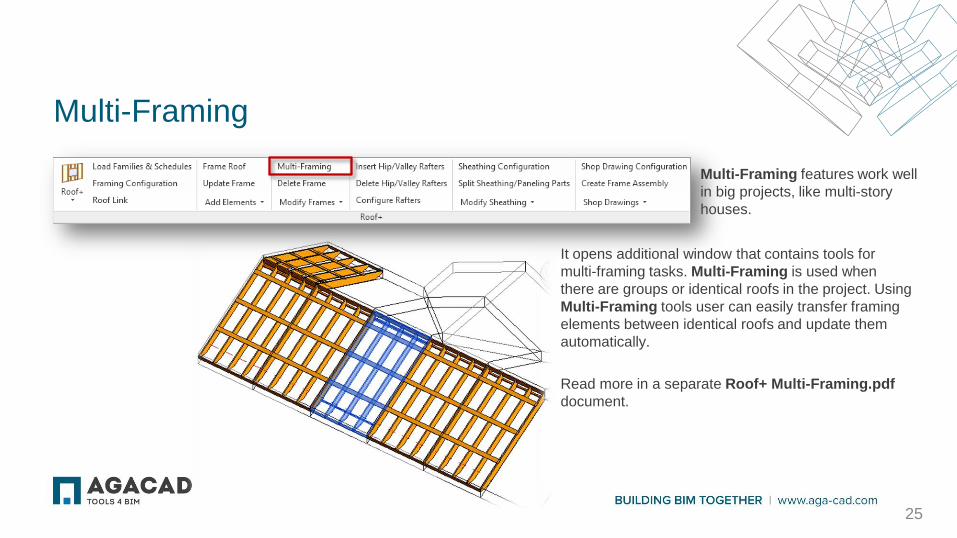
Multi-Framing features work well
in big projects, like multi-story
houses.
Multi-Framing
25
It opens additional window that contains tools for
multi-framing tasks. Multi-Framing is used when
there are groups or identical roofs in the project. Using
Multi-Framing tools user can easily transfer framing
elements between identical roofs and update them
automatically.
Read more in a separate Roof+ Multi-Framing.pdf
document.
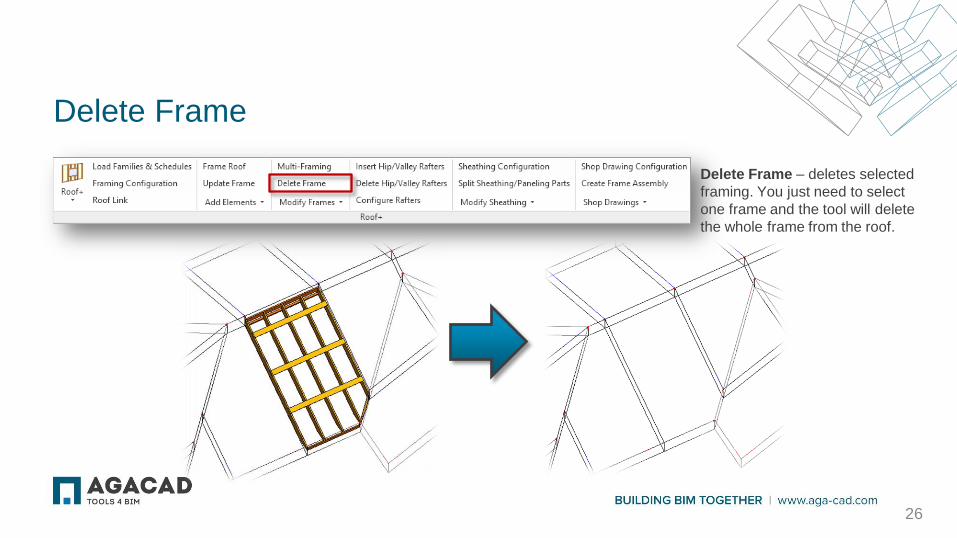
Delete Frame
Delete Frame – deletes selected
framing. You just need to select
one frame and the tool will delete
the whole frame from the roof.
26
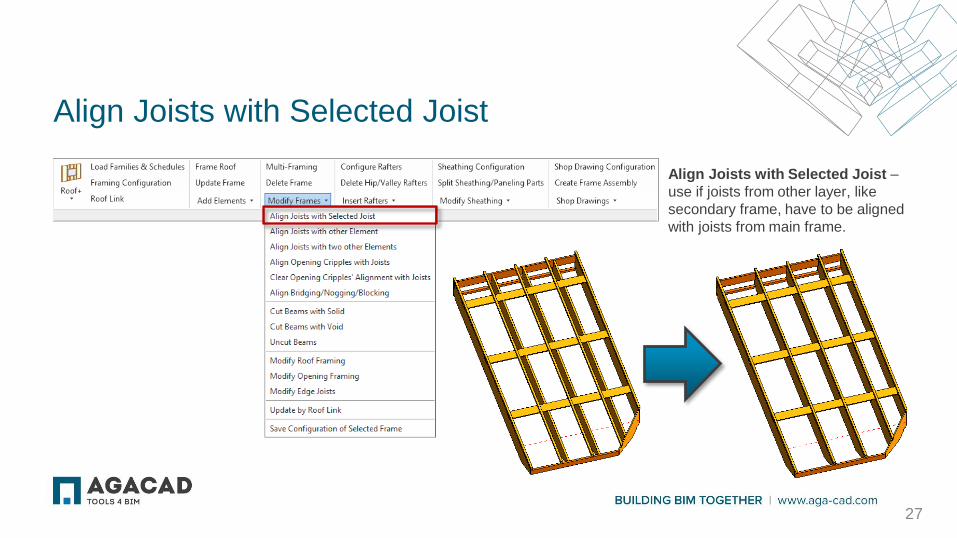
Align Joists with Selected Joist
Align Joists with Selected Joist –
use if joists from other layer, like
secondary frame, have to be aligned
with joists from main frame.
27
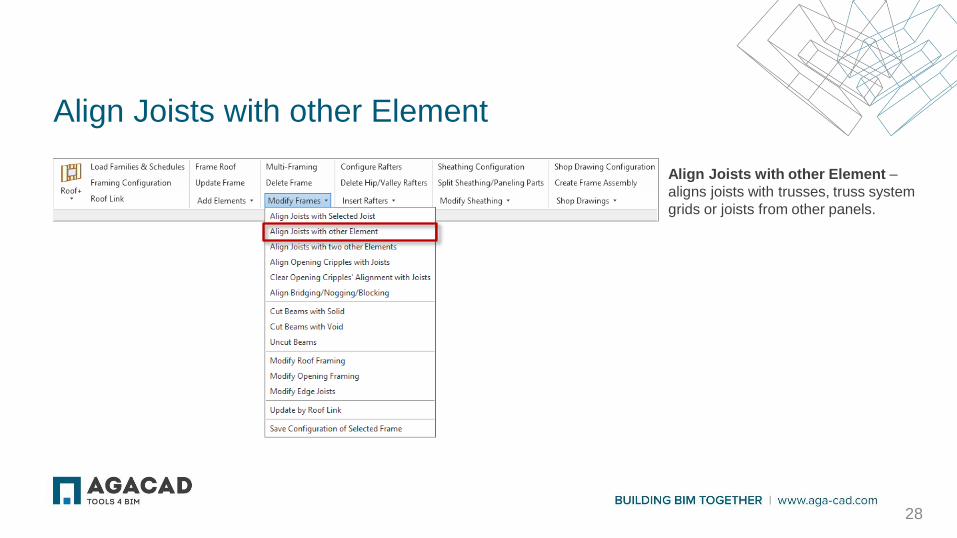
Align Joists with other Element
Align Joists with other Element –
aligns joists with trusses, truss system
grids or joists from other panels.
28
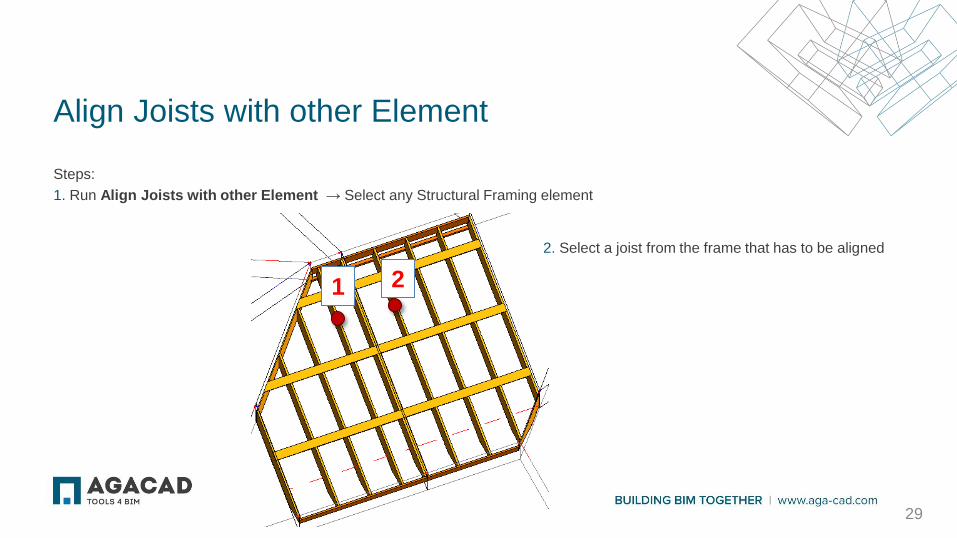
Align Joists with other Element
Steps:
1. Run Align Joists with other Element → Select any Structural Framing element
2. Select a joist from the frame that has to be aligned
1 2
29
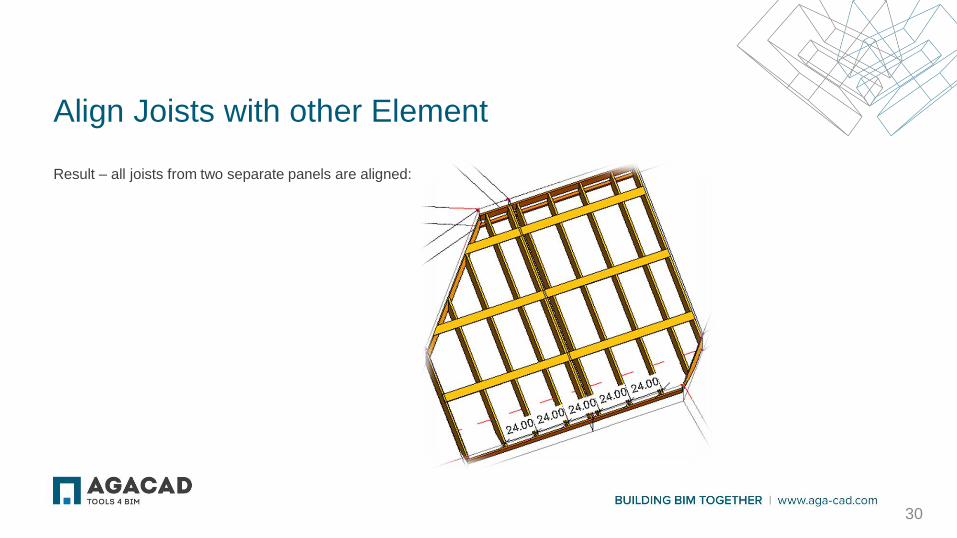
Align Joists with other Element
Result – all joists from two separate panels are aligned:
30
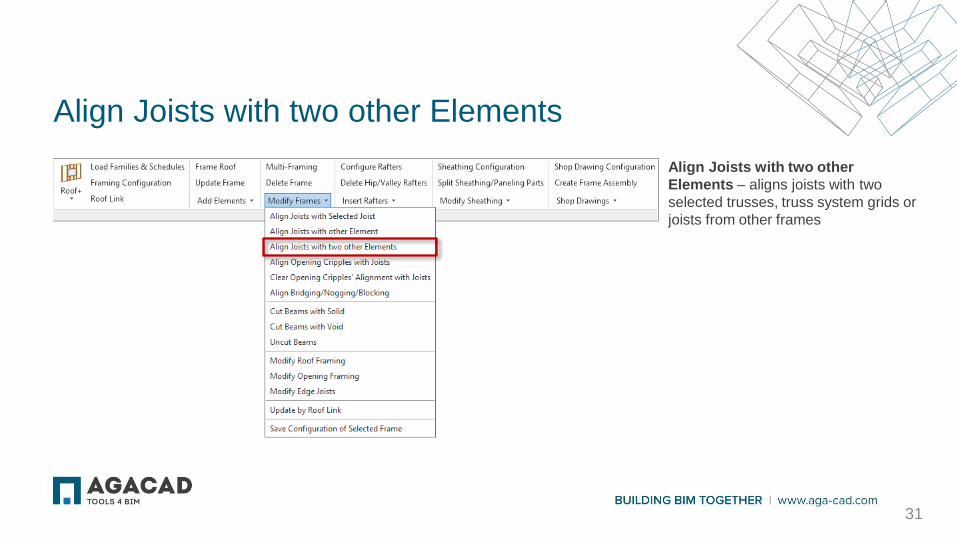
Align Joists with two other Elements
Align Joists with two other
Elements – aligns joists with two
selected trusses, truss system grids or
joists from other frames
31
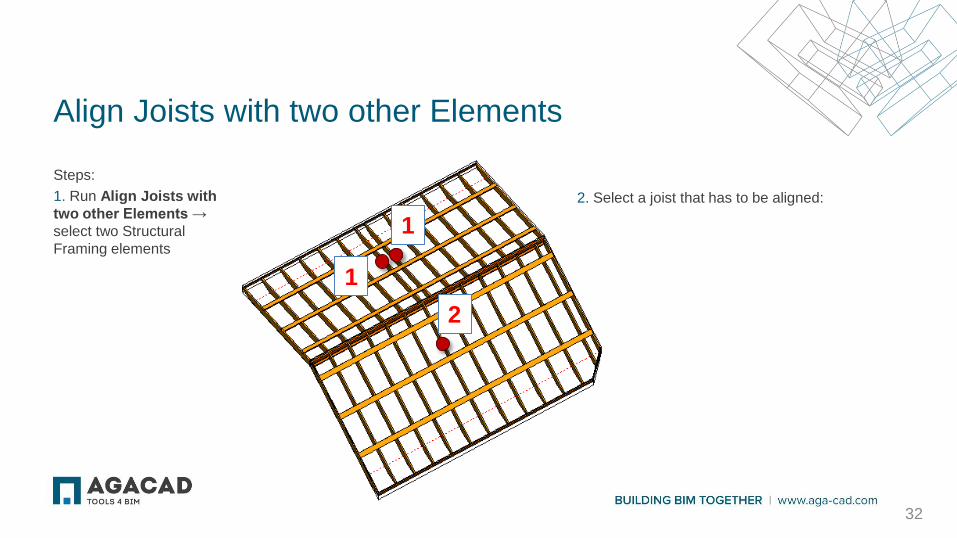
Align Joists with two other Elements
Steps:
1. Run Align Joists with
two other Elements →
select two Structural
Framing elements
2. Select a joist that has to be aligned:
32
1
1
2
Align Joists with two other Elements
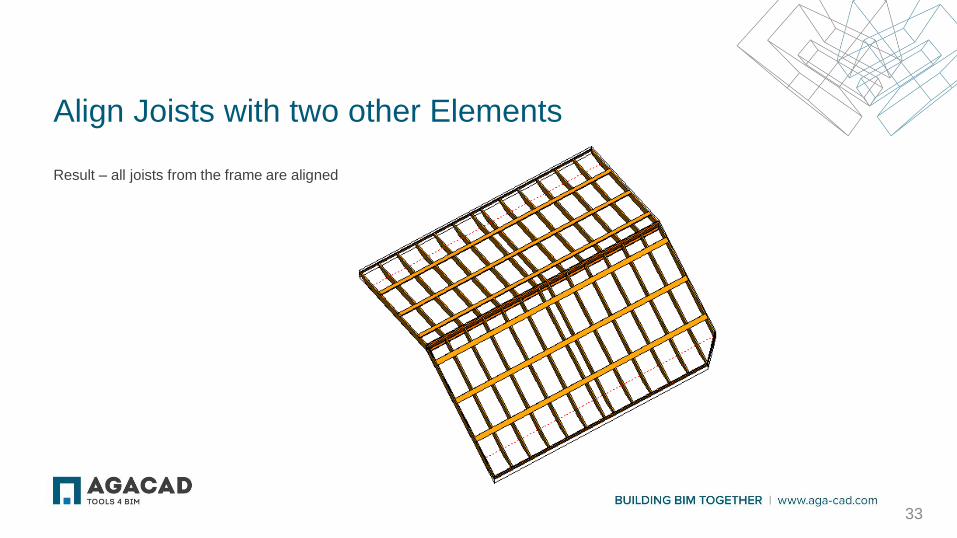
Result – all joists from the frame are aligned
33

Align Opening Cripples with Joists
Align Opening Cripples with
Joists – aligns opening cripples with
joists from same or other frames.
34

Align Opening Cripples with Joists
Steps:
1. Run Align Opening Cripples with Joists
2. Select any cripple above the opening
Result – all cripples
above the opening
are aligned
35

Clear Opening Cripples’ Alignment with Joists
Clear Opening Cripples’
Alignment with Joists – removes
alignment of cripples to default.
36

Align Bridging/Nogging/Blocking
Align Bridging/Nogging/Blocking
– aligns selected bridgings, noggings
or blockings from two separate roof
panels.
37
2
1
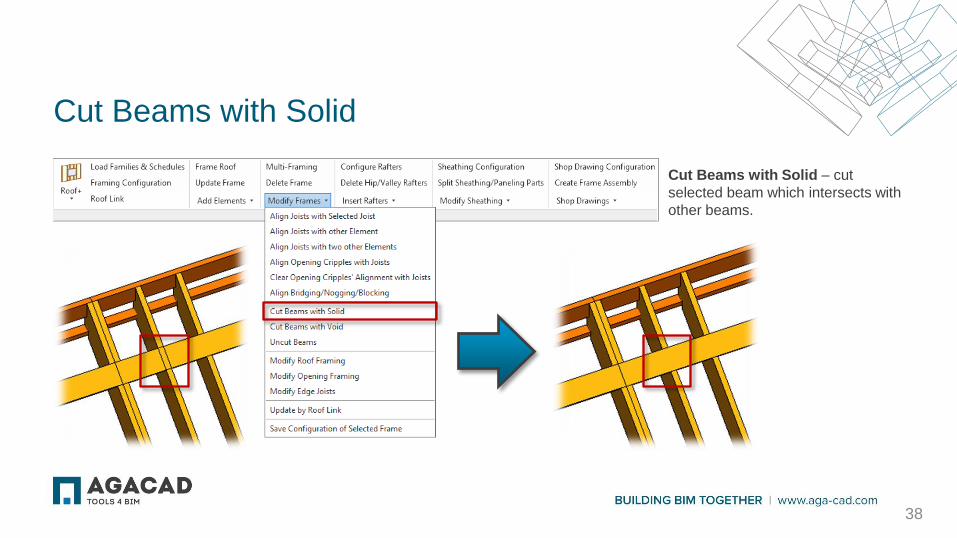
Cut Beams with Solid
Cut Beams with Solid – cut
selected beam which intersects with
other beams.
38
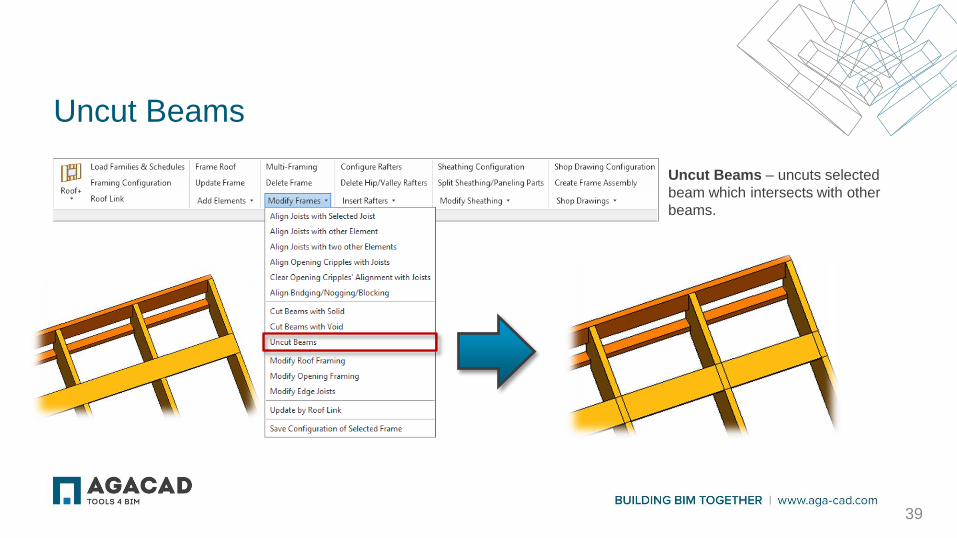
Uncut Beams
Uncut Beams – uncuts selected
beam which intersects with other
beams.
39
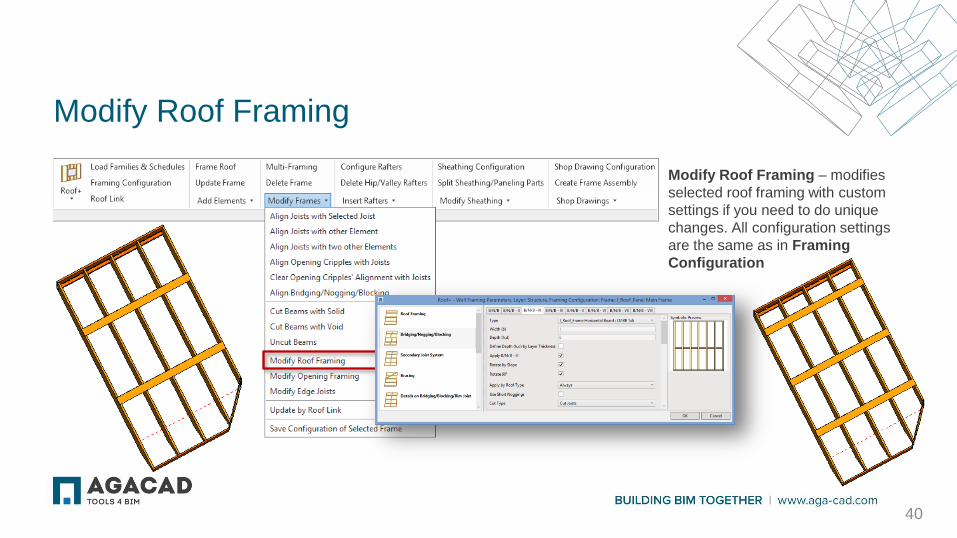
Modify Roof Framing
Modify Roof Framing – modifies
selected roof framing with custom
settings if you need to do unique
changes. All configuration settings
are the same as in Framing
Configuration
40
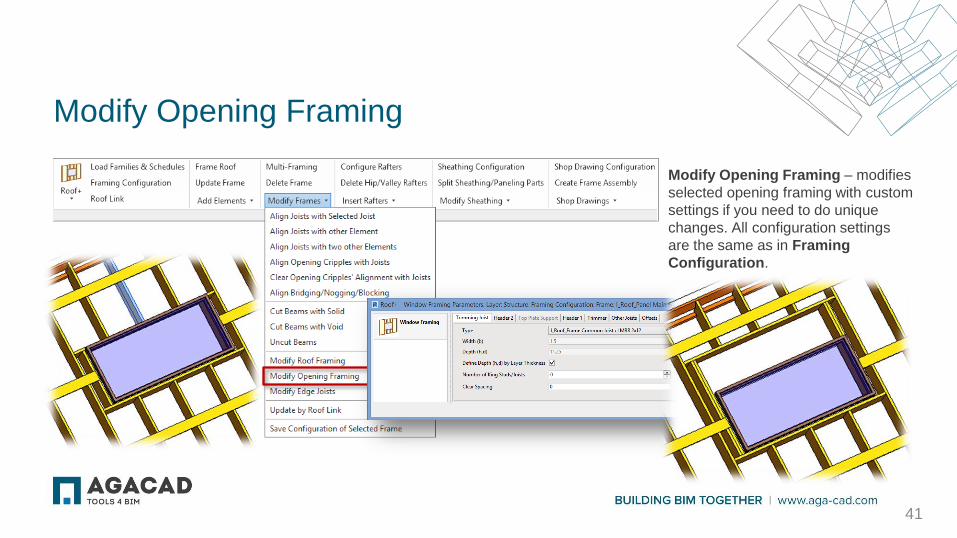
Modify Opening Framing
Modify Opening Framing – modifies
selected opening framing with custom
settings if you need to do unique
changes. All configuration settings
are the same as in Framing
Configuration.
41
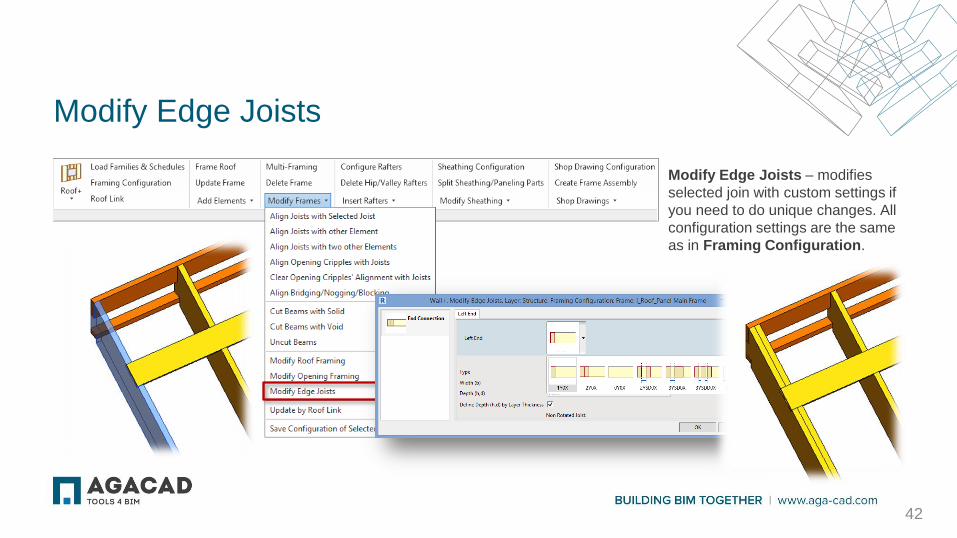
Modify Edge Joists
Modify Edge Joists – modifies
selected join with custom settings if
you need to do unique changes. All
configuration settings are the same
as in Framing Configuration.
42
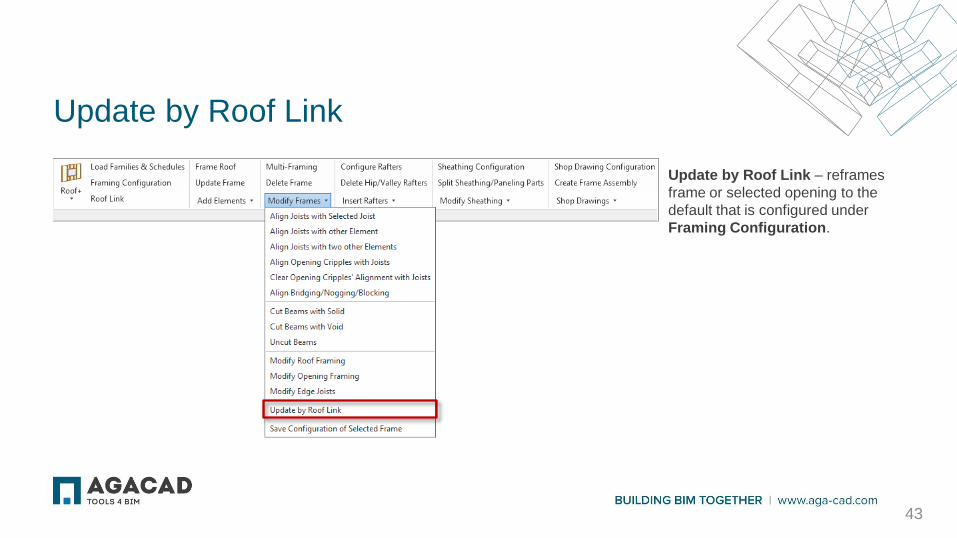
Update by Roof Link
Update by Roof Link – reframes
frame or selected opening to the
default that is configured under
Framing Configuration.
43

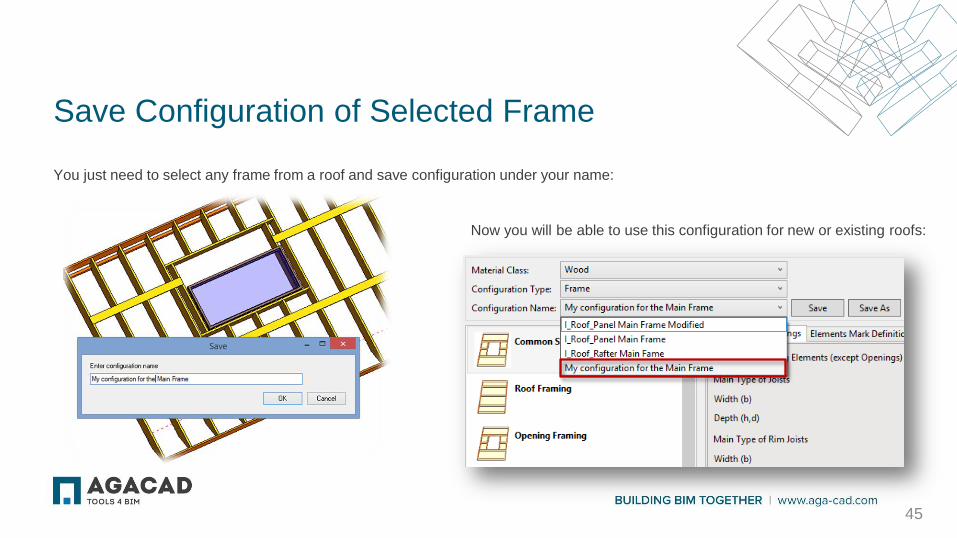
Save Configuration of Selected Frame
Save Configuration of Selected
Frame – saves configuration of
selected frame without settings for
openings. This feature is very useful if
you have already framed roof and
you lost configuration that was used
for this roof. Configuration is needed
to frame new roofs.
44
Save Configuration of Selected Frame
You just need to select any frame from a roof and save configuration under your name:
Now you will be able to use this configuration for new or existing roofs:
45
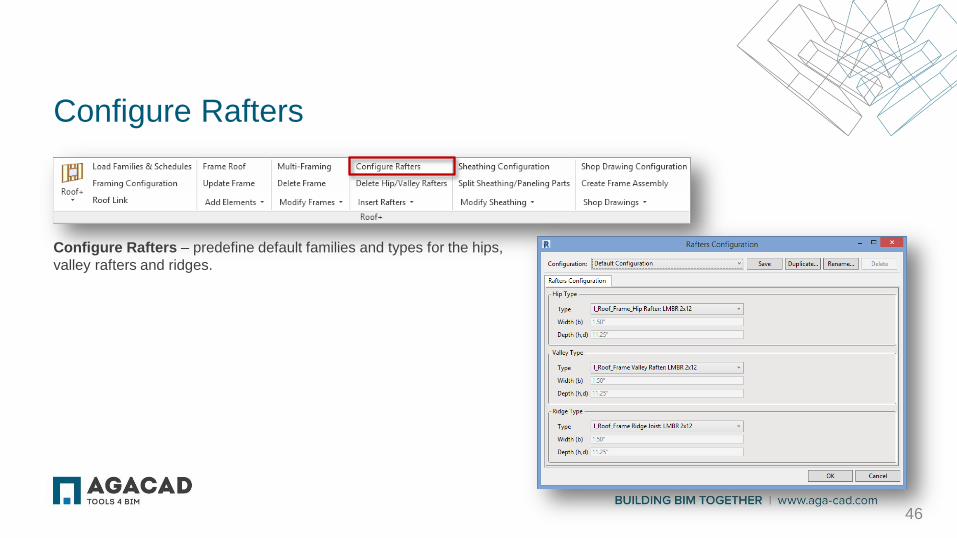
Configure Rafters
Configure Rafters – predefine default families and types for the hips,
valley rafters and ridges.
46
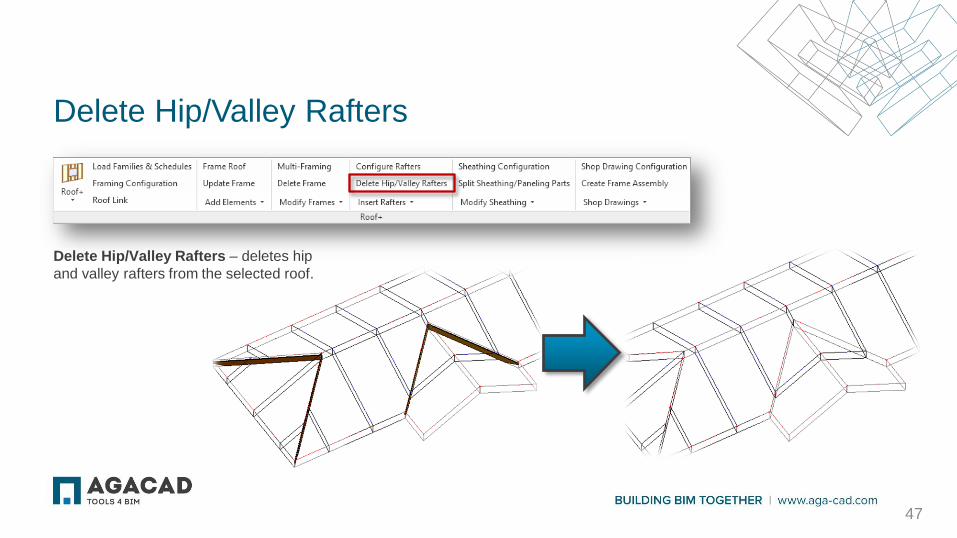
Delete Hip/Valley Rafters
47
Delete Hip/Valley Rafters – deletes hip
and valley rafters from the selected roof.
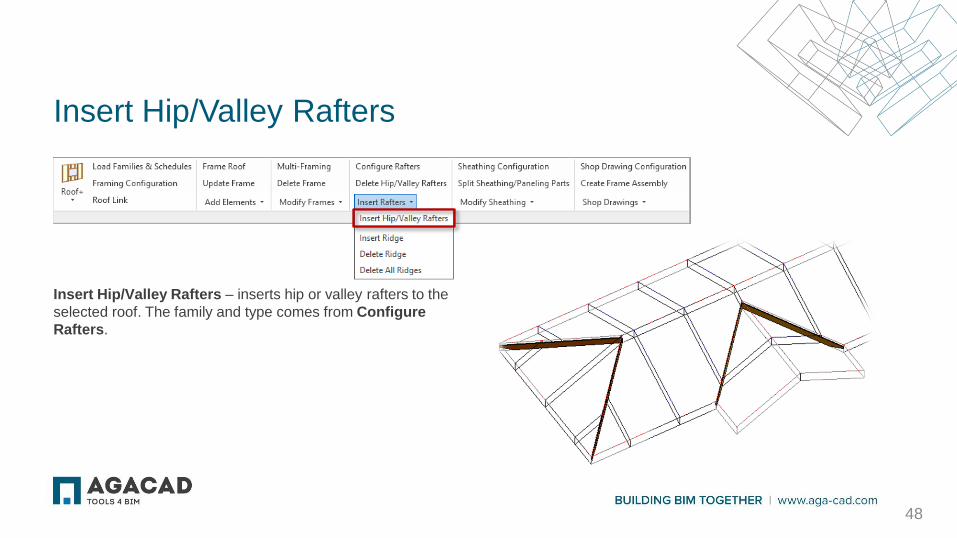
Insert Hip/Valley Rafters
Insert Hip/Valley Rafters – inserts hip or valley rafters to the
selected roof. The family and type comes from Configure
Rafters.
48
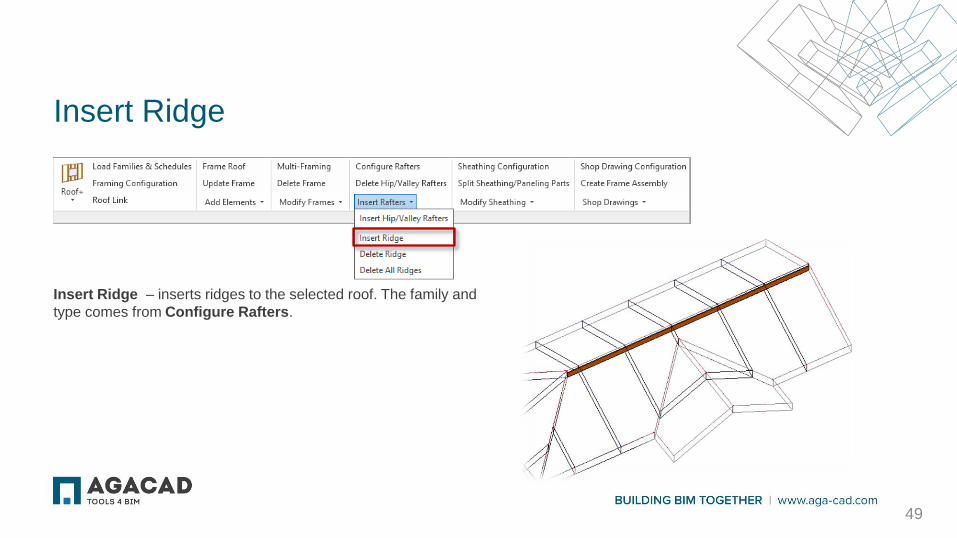
Insert Ridge
Insert Ridge – inserts ridges to the selected roof. The family and
type comes from Configure Rafters.
49
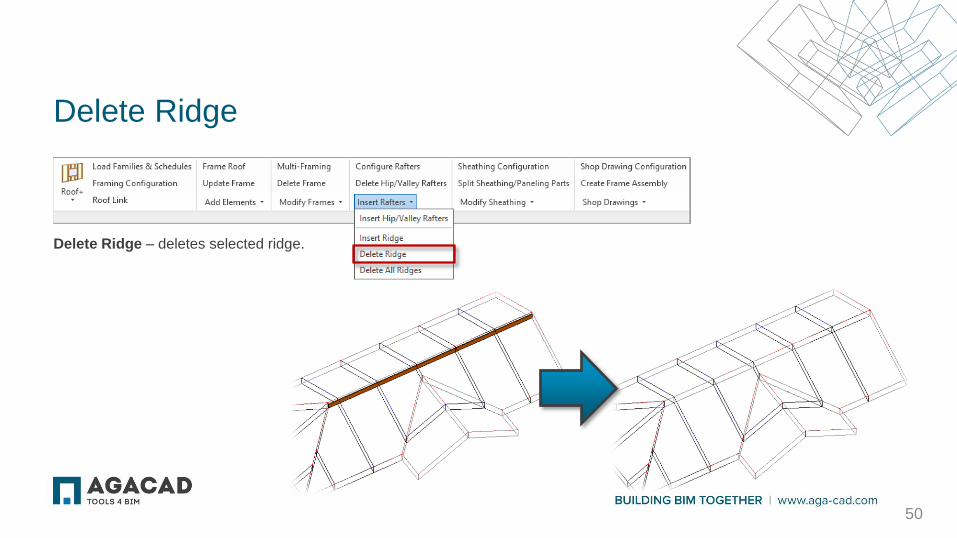
Delete Ridge
Delete Ridge – deletes selected ridge.
50
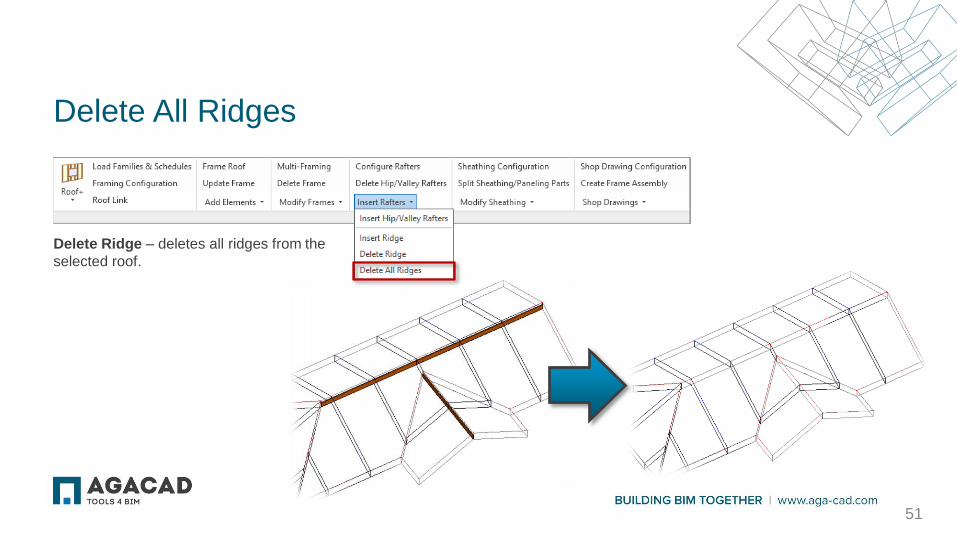
Delete All Ridges
51
Delete Ridge – deletes all ridges from the
selected roof.
AGA CAD Ltd
T: +370 618 55671 | E: [email protected] | W: www.aga-cad.com
ENJOY WORKING WITH OUR PRODUCTS!