Embed Size (px)
DESCRIPTION
http://www.groz-tools.com/pdffiles/WOD-68%20%20waste%20oil%20drain.pdf
Citation preview
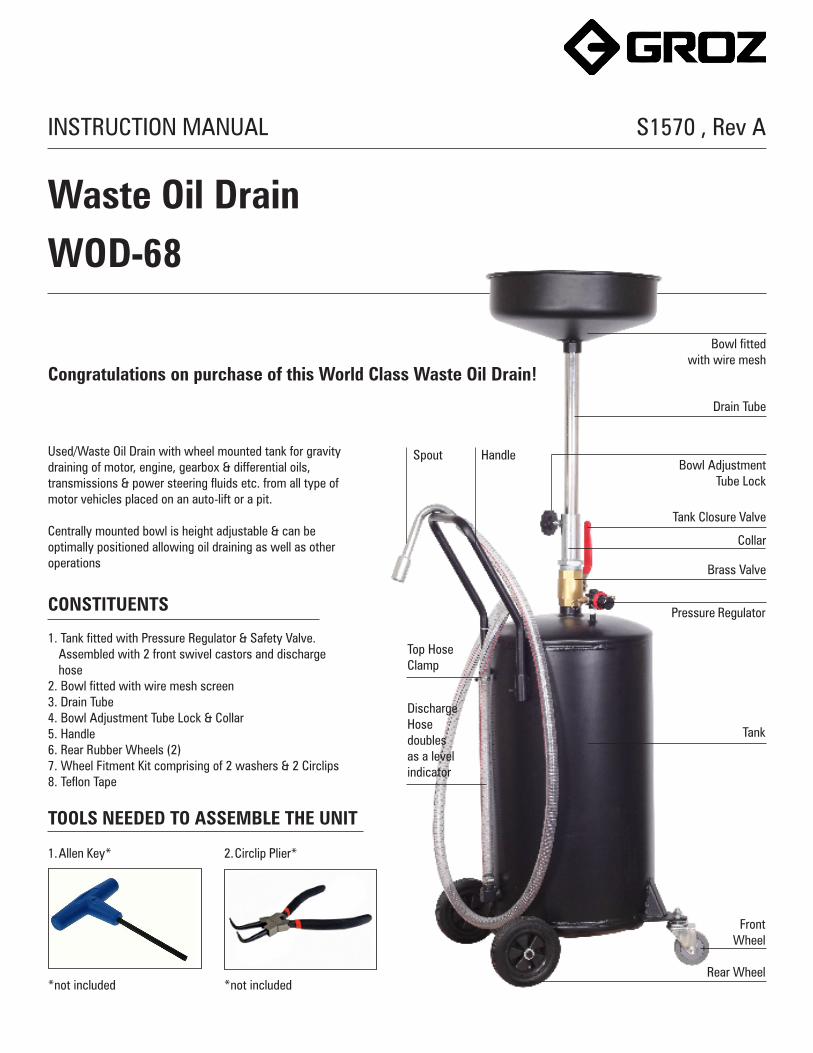
INSTRUCTION MANUAL S1570 , Rev A
Waste Oil DrainWOD-68
Congratulations on purchase of this World Class Waste Oil Drain!
Used/Waste Oil Drain with wheel mounted tank for gravity draining of motor, engine, gearbox & differential oils, transmissions & power steering fluids etc. from all type of motor vehicles placed on an auto-lift or a pit.
Centrally mounted bowl is height adjustable & can be optimally positioned allowing oil draining as well as other operations
CONSTITUENTS
1. Tank fitted with Pressure Regulator & Safety Valve. Assembled with 2 front swivel castors and discharge hose
2. Bowl fitted with wire mesh screen3. Drain Tube4. Bowl Adjustment Tube Lock & Collar5. Handle6. Rear Rubber Wheels (2)7. Wheel Fitment Kit comprising of 2 washers & 2 Circlips8. Teflon Tape
2. Circlip Plier*1. Allen Key*
TOOLS NEEDED TO ASSEMBLE THE UNIT
Bowl fitted with wire mesh
Drain Tube
Bowl Adjustment Tube Lock
Tank Closure Valve
Pressure Regulator
Tank
Front Wheel
Collar
Rear Wheel
Spout Handle
Top Hose Clamp
Discharge Hose doubles as a level indicator
Brass Valve
*not included *not included

ASSEMBLY INSTRUCTIONS
1. Open the Box in which the unit comes safely packed & remove all parts. Be careful as some parts are small & maybe left un noticed
2. Slide the 2 Rubber Wheels onto the Rear Wheel Shaft at the bottom of the tank. Now slide the steel washer. Use a circlip plier to install the circlip. Repeat the same for the 2nd wheel
3. Assemble the Handle using an Allen Key & position it as required using the 2 Allen Bolts
4. The Tank is now ready & fully mobile
5. Take Teflon tape & apply it onto the threaded end of the drain tube
6. Apply Teflon tape onto the threaded end of the Collar that fits into the brass ball valve on top of the tank
7. Assemble the Collar onto the Brass Valve on top of the tank & hand tighten
8. Fasten the threaded end of the Drain Tube into the bowl & hand tighten
9. Open the Tank Closure valve & now slide the Drain tube fitted with the Bowl through it
10. Adjust height as per need & lock it in place using the bowl adjustment tube lock
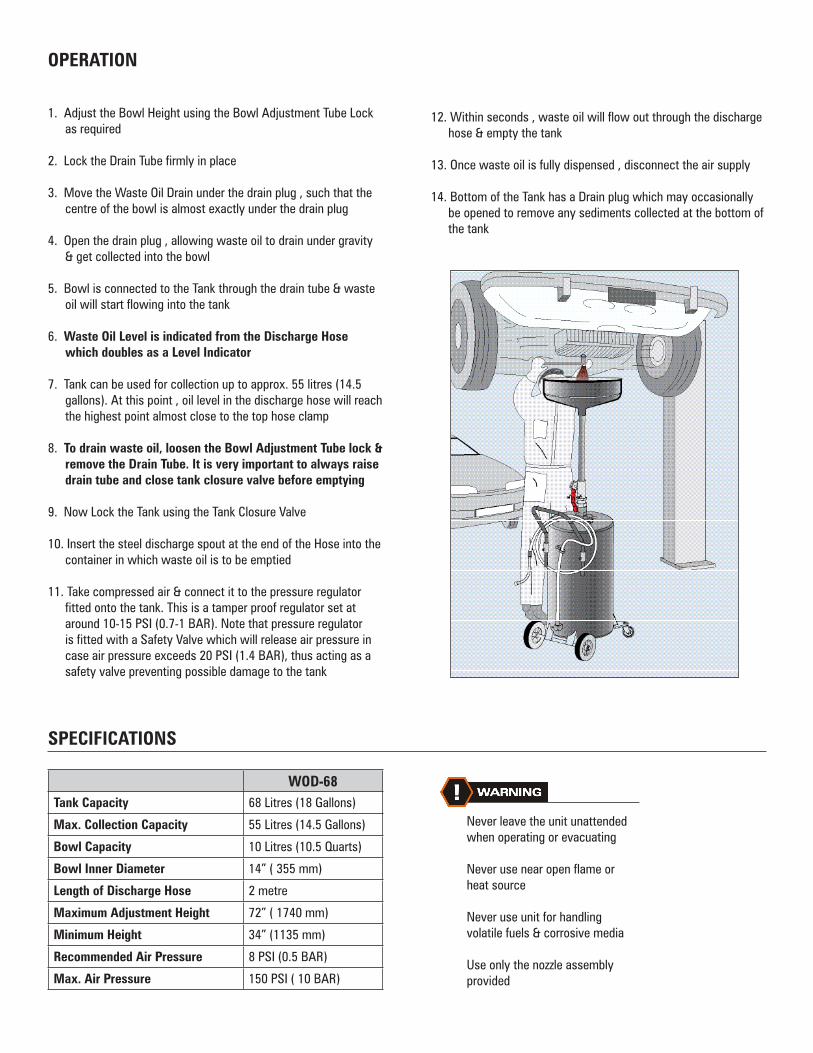
OPERATION
1. Adjust the Bowl Height using the Bowl Adjustment Tube Lock as required
2. Lock the Drain Tube firmly in place
3. Move the Waste Oil Drain under the drain plug , such that the centre of the bowl is almost exactly under the drain plug
4. Open the drain plug , allowing waste oil to drain under gravity & get collected into the bowl
5. Bowl is connected to the Tank through the drain tube & waste oil will start flowing into the tank
6. Waste Oil Level is indicated from the Discharge Hose which doubles as a Level Indicator
7. Tank can be used for collection up to approx. 55 litres (14.5 gallons). At this point , oil level in the discharge hose will reach the highest point almost close to the top hose clamp
8. To drain waste oil, loosen the Bowl Adjustment Tube lock & remove the Drain Tube. It is very important to always raise drain tube and close tank closure valve before emptying
9. Now Lock the Tank using the Tank Closure Valve
10. Insert the steel discharge spout at the end of the Hose into the container in which waste oil is to be emptied
11. Take compressed air & connect it to the pressure regulator fitted onto the tank. This is a tamper proof regulator set at around 10-15 PSI (0.7-1 BAR). Note that pressure regulator is fitted with a Safety Valve which will release air pressure in case air pressure exceeds 20 PSI (1.4 BAR), thus acting as a safety valve preventing possible damage to the tank
SPECIFICATIONS
WOD-68Tank Capacity 68 Litres (18 Gallons)
Max. Collection Capacity 55 Litres (14.5 Gallons)
Bowl Capacity 10 Litres (10.5 Quarts)
Bowl Inner Diameter 14” ( 355 mm)
Length of Discharge Hose 2 metre
Maximum Adjustment Height 72” ( 1740 mm)
Minimum Height 34” (1135 mm)
Recommended Air Pressure 8 PSI (0.5 BAR)
Max. Air Pressure 150 PSI ( 10 BAR)
Never leave the unit unattended when operating or evacuating
Never use near open flame or heat source
Never use unit for handling volatile fuels & corrosive media
Use only the nozzle assembly provided
12. Within seconds , waste oil will flow out through the discharge hose & empty the tank
13. Once waste oil is fully dispensed , disconnect the air supply
14. Bottom of the Tank has a Drain plug which may occasionally be opened to remove any sediments collected at the bottom of the tank
Groz Engineering Tools (P) Ltd.Groz Net Industries
Village Kherki Daula, National Highway-8Gurgaon-122001, Haryana, INDIATEL +91.124.282.7700 / 221.4050FAX +91.124.2827986 / 221.4224FAX (USA) +1.509.271.7848FAX (UK) +44.870.121.1854
E-MAIL [email protected] www.groz-tools.com
The Groz name, Groz logo and the mark are trademarks of Groz Engineering Tools (P) Ltd. India
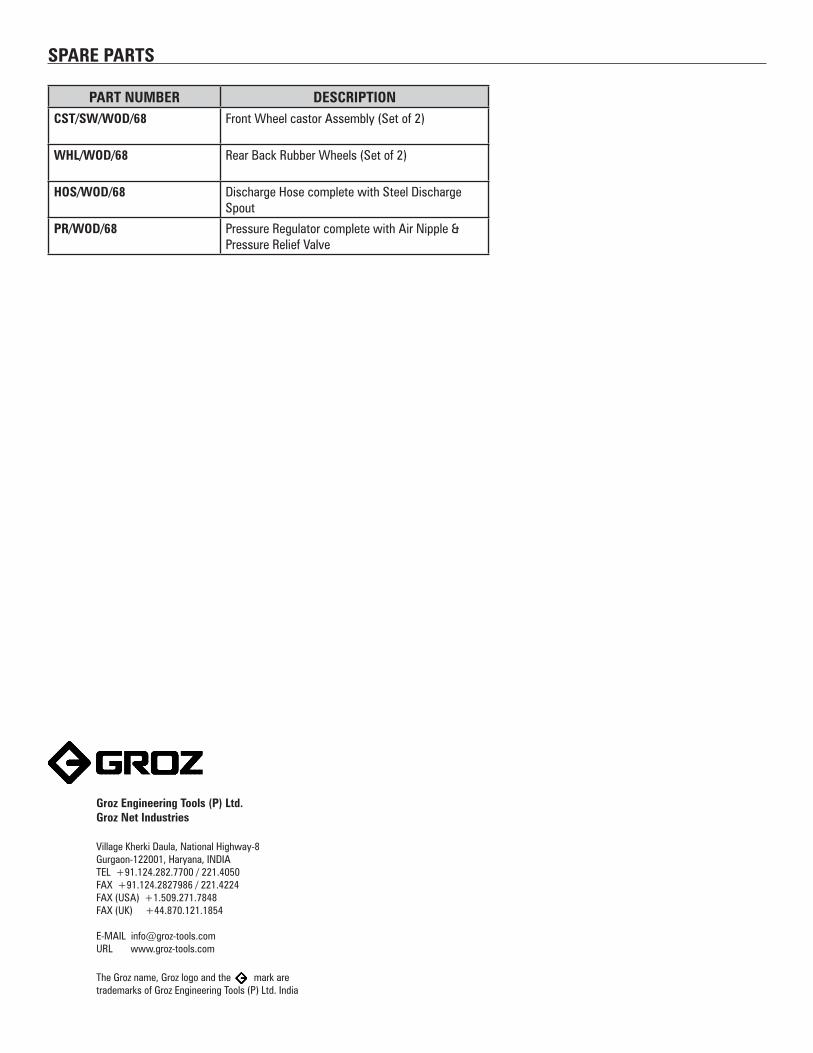
SPARE PARTS
PART NUMBER DESCRIPTIONCST/SW/WOD/68 Front Wheel castor Assembly (Set of 2)
WHL/WOD/68 Rear Back Rubber Wheels (Set of 2)
HOS/WOD/68 Discharge Hose complete with Steel Discharge Spout
PR/WOD/68 Pressure Regulator complete with Air Nipple & Pressure Relief Valve