Embed Size (px)
Citation preview

BOLTEK CORPORATION
Lightning Detection
StormTracker Lightning Detector with PCI style receiver card
Installation/Operators Guide
SEE NOTICES ON REVERSE

B O L T E K L I G H T N I N G D E T E C T I O N
StormTracker Lightning Detector
Disclaimer
StormTracker lightning data is only approximate and should not be used for safety applications. Strike and storm locations indicated and alarm statuses may be erroneous and should not be
used to safeguard personnel, equipment or data.
Neither Boltek Corporation nor its affiliates shall be liable to the purchaser of this product or third parties for damages, losses, costs, or expenses incurred by purchaser or third parties as a
result of use, loss of use, misuse, accident, or abuse.
Notwithstanding the above Boltek Corp’s liability shall not exceed the purchase price of the equipment.
THIS EQUIPMENT IS NOT TO BE USED FOR SAFETY PURPOSES
1996-2014 Boltek Corporation
4 Stonebridge Dr. Unit 2 Port Colborne, ON L3K5V5
Canada
Email: [email protected] Web: www.boltek.com
Phone (905) 734-8045 • Fax (905) 734-9049

TABLE OF CONTENTS
SOFTWARE LICENSE ........................................................................................... IV
LIMITATION OF LIABILITY ............................................................................... IV
WARRANTY ............................................................................................................ IV
INTRODUCTION ...................................................................................................... 1
INSTALLATION ........................................................................................................ 2
STORMTRACKER – PCI INSTALLATION INSTRUCTIONS ............................. 2
INSTALLING THE PCI CARD IN YOUR COMPUTER .......................................... 2 INSTALLING THE WINDOWS DISPLAY SOFTWARE/DEVICE DRIVER .......... 2 INSTALLING THE ANTENNA ......................................................................................... 3
TROUBLESHOOTING ........................................................................................... 10
MAKING AN ANTENNA CABLE ......................................................................... 13

Software License
Boltek grants to customer a non-exclusive, paid-up license to use the Boltek Corp. software on one
computer, subject to the following provisions:
a) Except as otherwise provided in this Software License, applicable copyright laws shall apply to the
software.
b) Title to the medium on which the software is recorded or stored is transferred to customer but not
title to the software.
c) Customer shall not use, make, manufacture or reproduce copies of software except for use on one
computer and as is specifically provided in this Software License. Customer is expressly prohibited
from disassembling the software.
d) Customer is permitted to make additional copies of the software only for backup purposes or if
additional copies are required in the operation of one computer with the software.
e) All copyright notices shall be retained on all copies of the software.
Limitation of Liability Boltek Corp. shall have no liability or responsibility to customer or any other person or entity with
respect to any liability, loss or damage caused or alleged to be caused directly or indirectly by hardware
or software sold, leased, licensed or furnished by Boltek Corp. including, but not limited to, any
interruption of service, loss of business or anticipatory profits or consequential damages resulting from
the use or operation of the hardware or software.
Notwithstanding the above limitations, Boltek Corp.'s liability for damages incurred by customer or
others shall not exceed the amount paid by customer for the particular hardware or software involved.
STORMTRACKER IS NOT BE USED FOR SAFETY PURPOSES.
Warranty
Boltek Corp. warrants each new Boltek StormTracker Lightning Detector delivered to the
customer to be free from defects in material and workmanship for a period of one year.
Should your Boltek StormTracker fail within the warranty period, telephone, fax, or email Boltek
describing the problem you are encountering. If we can't solve the problem for you, we will give
you an R.M.A. number to return the product for repair or replacement.

INTRODUCTION 1
Introduction
Congratulations on your purchase of the StormTracker Lightning Detector. You will find
StormTracker to be a useful tool in determining if there is lightning in your area, finding
the location of storms, and determining whether storms are coming your way.
StormTracker uses a direction-finding antenna to receive and locate the radio signals
produced by lightning. The strength of the received signal is used to calculate
approximately how far the strike is away. The combination of direction and distance
allows the strike to be plotted onto a radar-like screen, the receiver location being the
center of the screen with distance increasing outwards from the center.
As well as showing the current lightning activity, lightning data may be replayed in fast
motion, displaying several hours of storm activity in a few seconds. You can see the
natural progression of storms as they form and later die out.
StormTracker consists of:
PCI style receiver board which you will install in your computer
direction-finding antenna
50 foot antenna cable
software on CD-ROM
manual
You will need to:
install the receiver board in your computer
let Windows load the device drivers for the PCI card
install the display software onto your computer's hard drive
configure the software
route the antenna cable
mount the antenna
wait for a thunderstorm
The installation section of the manual will take you through each of these steps. After
completing these steps your StormTracker lightning detector should be operational. If
you have difficulties getting your detector to work properly the troubleshooting section
will help you determine the cause of the problem.

Installation
1) Installing the receiver board in the computer
2) Installing software onto your hard disk
3) Installing the antenna and routing the cable
StormTracker – PCI Installation Instructions
There are three steps to installing your new PCI StormTracker card:
1. Installing the StormTracker – PCI receiver card in your computer.
2. Installing the lightning display software (NexStorm/Lightning2000).
3. Installing the Windows device driver.
INSTALLING THE PCI CARD IN YOUR COMPUTER
Locate a free PCI card slot on your computer motherboard. PCI connectors are usually white in
color, whereas the older style ISA connectors are usually black. Plug the StormTracker card into the
PCI slot and screw the card down. Make sure the card is fully seated in the PCI connector. Also
make sure the other cards in your computer are fully seated in their connectors as plugging in a new
card can unseat existing cards.
INSTALLING THE WINDOWS DISPLAY SOFTWARE/DEVICE DRIVER
Turn on your computer. When Windows restarts it will detect the new StormTracker card and ask
for a device driver. Click Cancel, then insert display software disc and follow installation instructions
according to software manual. Driver installation will occur during software installation.
Chapter
1
Installation consists of three stages:

TRACKING STORMS 3
Installing the Antenna
The antenna is housed in a small black plastic box that must be mounted vertically on a
non-metallic support. The antenna cable plugs into the bottom of the antenna housing.
When mounting the antenna ensure the correct side of the antenna faces north. The cable
plugs into the bottom of the antenna with the front of the antenna facing north. The front
of the antenna corresponds to the top of the computer screen. If the antenna does not
face north the top of the computer screen will not be north.
North
Antenna
Antenna Cable
Provided there are no large metal objects to block the radio signals, mounting the
antenna 6 feet high is ok. Mounting the antenna 12 feet high is good. 20-25 feet is better.

4 TRACKING STORMS
LIGHTNING
Receiving lightning signals does not cause lightning to strike. Your LD-250
antenna is less likely to be struck by lightning than your anemometer, since the
antenna does not need to be above the roof line. Still though you must exercise
common sense when choosing a location for your antenna. If you mount the
antenna on a ten foot pole on the highest point on your roof, with no trees or
television tower nearby you are asking for lightning to strike.
Your best protection against lightning is to mount the antenna indoors. Radio
waves will pass right through a wood building. Lightning is more likely to strike
a tall tree, television antenna, copper plumbing vent, satellite dish, telephone line,
power lines, or CB antenna. If you do mount the antenna outdoors make sure
there are plenty of ground paths for lightning nearby (such as those just
mentioned), and higher than the antenna.
The StormTracker PCI receiver board has surge suppression in its input to protect against voltages induced into the antenna cable. It is also a good idea to purchase a surge suppressor to plug your computer into. Try to find one that will protect your phone line as well. Lightning often enters through the telephone line. Both your computer and surge suppressor will need to be grounded.
The antenna may be mounted indoors or outdoors. Try to mount the antenna as high as
possible (without making it a lightning rod). Mounting the antenna high will keep it away
from noise sources and will improve the maximum range.
In a wood framed house, the second floor or attic is often a good location for the
antenna. This places the antenna above the most common sources of interference:
televisions, lights and appliances, yet leaves it in a good location to receive lightning
signals. Mount the antenna to the drywall or attic rafter away from screws, nails,
electrical wiring, and other metal objects. If your house has aluminum siding (vinyl siding
is ok), foil-lined insulation, or any other metal coating, you might have problems
receiving with the antenna indoors, as the metal may shield radio waves from the
antenna.
DO NOT MOUNT THE ANTENNA SO AS TO ATTRACT LIGHTNING. The
antenna does not need to be the highest object in the area to receive lightning signals.
DO NOT LOCATE THE ANTENNA NEAR AN OBJECT WHICH IS LIKELY
TO BE STRUCK BY LIGHTNING. Objects such as television antennas, CB
antennas, power lines, phone lines and tall trees are natural targets for lightning. Keep
the antenna and cable away from anything which might be struck by lightning. Lightning
can jump from one object to another in its search for ground.
TRACKING STORMS 5
The antenna may be mounted with nylon cable ties, or with nylon bolts through the
mounting flanges (available at a hardware store). Do not use steel screws to mount your
antenna, as the antenna must not be near any metal objects.
If mounting the antenna outdoors, care must be taken to protect the antenna connector
from moisture. While the antenna is completely waterproof the antenna connector must
be sheltered from rain. Place the antenna inside a non-metal housing such as a length of
ABS or PVC pipe with an end cap covering the top. Keep a small opening on the bottom
to allow condensation to drain out. ABS or PVC pipe, fittings and glue may be
purchased from a hardware store plumbing department. Mark NORTH on the outside of
the pipe to help in orienting the antenna correctly.
Fasten the cable to the wall or support about 6-12" below the antenna. Leave a bit of
slack in the cable near the antenna so that there is no strain on the connector from the
wire.
If you find the 50' antenna cable provided is not long enough you may purchase a Boltek
extension cable. This allows you to locate the antenna up to 200' from your computer.
You may also purchase a replacement cable at any computer store selling network
hardware. Any Category 5 cable up to 200 feet will work. See Appendix C for
information on making your own antenna cable.

6 TRACKING STORMS
Antenna Mounting Suggestion – Outdoor
End Cap
Antenna
ABS or PVC Pipe
Antenna Mounting Suggestion - Outdoor
End Cap
Antenna
ABS or PVC Pipe
Elbow Clamps
Tower
At least 36"

TRACKING STORMS 7
Antenna Mounting Suggestion - Attic
Antenna
Antenna Mounting Examples
Here an antenna is mounted in an attic. PVC plumbing hardware is used to attach the
antenna to the framing. The vertical pipe is not cemented to allow the antenna to be
rotated slightly for fine-tuning direction. The front of the antenna must face exactly
north.
8 TRACKING STORMS
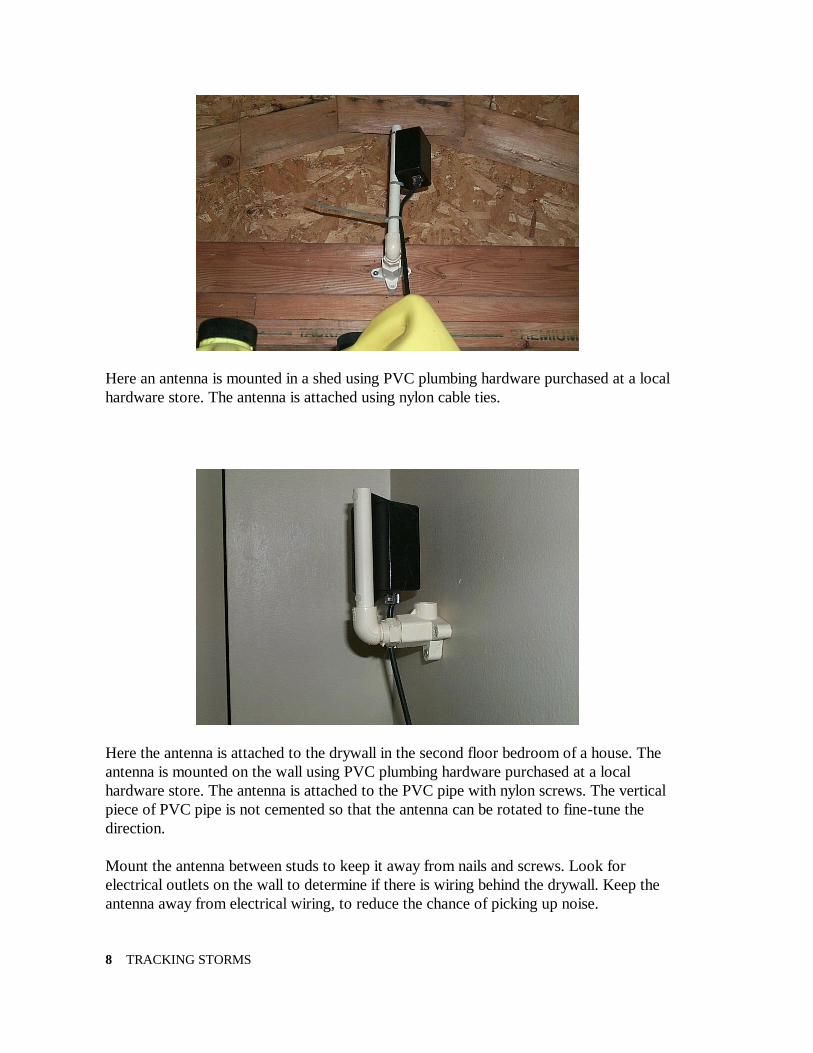
Here an antenna is mounted in a shed using PVC plumbing hardware purchased at a local
hardware store. The antenna is attached using nylon cable ties.
Here the antenna is attached to the drywall in the second floor bedroom of a house. The
antenna is mounted on the wall using PVC plumbing hardware purchased at a local
hardware store. The antenna is attached to the PVC pipe with nylon screws. The vertical
piece of PVC pipe is not cemented so that the antenna can be rotated to fine-tune the
direction.
Mount the antenna between studs to keep it away from nails and screws. Look for
electrical outlets on the wall to determine if there is wiring behind the drywall. Keep the
antenna away from electrical wiring, to reduce the chance of picking up noise.

TRACKING STORMS 9
Here the antenna is mounted to the side of a pole using ABS sewer pipe.
The mast is 1 ½ inch PVC while the container for the detector is 3 inch PVC mounted to
a tripod on the roof.

10 MAKING BACKGROUND MAPS
Troubleshooting
Problem: There is a very high noise count.
Reason: There is something producing noise in the low frequency range StormTracker uses to
detect lightning. It is most likely an electrical device near the antenna.
StormTracker is a radio receiver sensitive to all sources of radio frequency energy. Lightning is
one source but there are many others. Interference can appear as either excessively large number
of noises ( >50 noises/minute) or as a cluster of lightning strikes which appear suddenly and do
not move with time. Interference usually appears as a continuous stream of strikes and/or noises
whereas a thunderstorm tends to produce randomly spaced bursts of strikes.
Solution: First try raising the Receiver Squelch slightly to see if you can make the receiver
ignore the noise. The Squelch control is found on the Configure Processing screen. If you need to
raise the squelch control more than half-way you will be sacrificing some range and should try to
solve the noise problem.
To locate the source of the noise, first confirm the noise is coming in through the antenna. Shield
the antenna from radio waves by placing an empty tin can upside down over the antenna. If the
noise disappears then the antenna is picking up the noise signal. You should either relocate the
antenna farther from the noise source (raising the antenna usually works best), or relocate the
source of the noise. To identify the source of the noise, one by one turn off all electrical devices
(including your computer monitor) until the noise stops.
If the noise does not stop when the antenna is shielded with a tin can the noise is coming in either
through the antenna cable or the receiver board. Try relocating the antenna cable to see if the
noise changes in any way. Try placing both the antenna and antenna cable inside a steel container
close to the computer to see if the noise stops. Slowly remove the cable and begin to run it back
to your desired antenna location. If the noise returns this should provide a clue as to what may be
causing the noise.
If the noise continues despite the shielding, unplug the antenna cable from the receiver board. If
the noise continues the receiver board is picking up noise from other boards in your computer.
Appendix
A

TROUBLESHOOTING 11
You will have to change the position of the board in your computer. Increase the separation
between the StormTracker board and any other board. Or try placing different boards next to the
StormTracker board. Do not place the computer's video board next to the StormTracker board.
Noise can come from:
televisions
computer monitors
lights or appliances turning on or off
light dimmers
electric motors
Each of these can radiate radio signals in the same frequency range that StormTracker uses to
detect lightning.
If you are experiencing noise problems you must take steps to prevent the antenna from receiving
these interfering signals. This usually requires relocating either the antenna or the source of
interference.
Televisions, monitors and light dimmers will produce a continuous stream of strikes and noise.
Lights and appliances turning on and off will produce a single strike or noise as the device turns
on or off.
The best way to prevent interference is to separate the antenna from the source if interference.
The best way to separate the antenna is vertically. It is usually best to mount the antenna as high
as possible. A small amount of vertical separation is equivalent to a larger amount of horizontal
separation.
A portable AM radio tuned between stations can be a useful tool in locating a noise source.
Listen for buzzing and clicking sounds that correspond with a StormTracker noise or strike. An
electrical appliance turning on or off can produce a click or popping sound. Televisions, light
dimmers, arc welders, motors, and computers will make a buzzing sound. If you find something
which you suspect is producing interference to StormTracker, turn off the device to see if the
noise problem is reduced.

12 MAKING BACKGROUND MAPS
Problem: Very few strikes are displaying on the screen even though the
strike count is very high, when in Display Recent Activity or Display
Archived Data.
Reason: You are trying to display strike data faster than your computer is capable, with Skip
Strikes turned on. In an attempt to keep up with the fast display rate the program is skipping over
strike data rather than displaying it. There are so many strikes to display that you are skipping
more strikes than you are displaying.
Solution: Either slow down the playback rate (lower minutes/second rate) or turn off Skip
Strikes in the Configure Screen... menu.
Problem: Lightning strikes are being displayed but the direction is not
correct.
Reason: Your antenna is not correctly oriented.
Solution: Reorient the antenna so that the front faces north. See the Installing the Antenna
section of the manual for more information on antenna orientation and location.
TROUBLESHOOTING 13
Making an Antenna Cable
The Stormtracker PCI uses standard Category 5 (Cat5) 10baseT network cable for the
antenna cable. You can purchase a replacement antenna cable from any computer store
selling network hardware. Antenna cables may be up to 200 feet long.
If you have access to a crimper for RJ-45 connectors and a source of RJ-45 connectors
and Category 5 network cable you can make your own custom antenna cable. Making
your own cable means you are able to pull the cable through conduits, walls, etc. before
you attach the connectors. This lets you drill smaller holes for the cable and protects the
connectors from damage during installation.
If you make your own antenna cable you must ensure that the wire pairing is done
correctly. The connectors must not only be wired straight through (non-reversing), but the
twisted pairs must be located in the correct positions. If the pairing is not done correctly
there will be crosstalk between the different signals on the cable and your unit will not
work properly. The correct pair locations are:
Wire position 12345678
Pair 33211244
What this means is: one pair is in the center (positions 4&5), another pair is split and
surrounds the first (positions 3&6), another pair is on the left (positions 1&2) and another
pair is on the right (positions 7&8).
Appendix
B

14 TROUBLESHOOTING
The actual color positions do not matter as long as you use the same color assignments on
both ends, and you split the pairs correctly.
The wire color assignments we use is
POSITION PAIR COLOR
1 3 White/Green
2 3 Green
3 2 White/Orange
4 1 Blue
5 1 White/Blue
6 2 Orange
7 4 White/Brown
8 4 Brown
You can have up to 200 feet of antenna cable without using a separate antenna power
supply. In special circumstances we have made custom cables up to 500 feet in length that
used a separate 12VDC power supply for the antenna.
Do NOT use the pairing: 11223344. That is, wire pairs placed next to each other.
This will not work.