Embed Size (px)
Citation preview
Guillaume-Jean Herbiet CS 6255 Grégory Nou
Network Management
Final report
Wireless Security Architecture for Campus Network

MAP OF STUDY
WIRELESS SECURITY ARCHITECTURE FOR CAMPUS NETWORK 2/37
Map of study INTRODUCTION ........................................................................................................ 4
Why security?........................................................................................................................................................ 4
The main principles of wireless security ............................................................................................................. 4 Identification ...................................................................................................................................................... 4 Authentication .................................................................................................................................................... 4 Confidentiality.................................................................................................................................................... 4 Data integrity...................................................................................................................................................... 6 Non-repudiation ................................................................................................................................................. 7
BASIC SECURITY POLICIES AND THEIR WEAKNESSES..................................... 8
WEP encryption .................................................................................................................................................... 8
"Seems-like-security-but-isn't" tricks................................................................................................................. 8
IMPROVING SECURITY IN WIRELESS NETWORKS............................................ 10
Security in 802.1x ................................................................................................................................................ 10 Basic description .............................................................................................................................................. 10 Port-based authentication ................................................................................................................................. 10 Authentication process ..................................................................................................................................... 12 802.1X weaknesses .......................................................................................................................................... 13 Conclusion........................................................................................................................................................ 14
Security in 802.11i ............................................................................................................................................... 14 Security Architecture........................................................................................................................................ 14 Radio security protocols................................................................................................................................... 16 Wi-Fi Protected Access (WPA) ....................................................................................................................... 17
Authentication in wireless networks.................................................................................................................. 17 Kerberos ........................................................................................................................................................... 18 RADIUS (Remote Authentication Dial-In User Server) .................................................................................. 18 EAP (Extensible Authentication Protocol)....................................................................................................... 19
Layer 3 security................................................................................................................................................... 20 Level 3 VPN..................................................................................................................................................... 22 Other solutions ................................................................................................................................................. 22
Guillaume-Jean Herbiet – Grégory Nou 3/37
DEPLOYING A SECURED ARCHITECTURE ......................................................... 24
A secure design for campus application............................................................................................................ 24
Installing FreeRADIUS ...................................................................................................................................... 24 Obtaining certificates ....................................................................................................................................... 24 Setting up FreeRadius ...................................................................................................................................... 26 Setting up the access point ............................................................................................................................... 30 Setting up the client.......................................................................................................................................... 31
Interfacing with the LDAP directory ................................................................................................................ 33 Overview.......................................................................................................................................................... 33 Installing and configuring ................................................................................................................................ 33
CONCLUSION ......................................................................................................... 36
REFERENCES......................................................................................................... 37
INTRODUCTION
WIRELESS SECURITY ARCHITECTURE FOR CAMPUS NETWORK 4/37
Introduction Why security? One of the major weaknesses of wireless networks is due to security as all communication signals are broadcasted through the air as radio waves and could be listened to. Therefore, a hacker can hijack a user’s identity and read, copy or modify the transmitted data. Besides, those issues are emphasized by the fact that the first wireless protocols and solutions did not take security into account in their first step of conception. However, several additional solutions have been developed since but their cost is more often more prohibitive than native solutions.
The main principles of wireless security Security is classically defined as the following five basic services: identification, authentication, confidentiality, data integrity and non-repudiation. A secure wireless network should provide technical solution for all those services.
Identification Any user of any resource of a system must have a unique identity which determinates its credentials and what he is entitled to use. This identity has to be verified. Most often this is realized using a username. However, biometrics controls such as fingerprint or voice print or retinal print.
Authentication Authentication aims to check the identity of communicating processes. Several simple solutions are usually provided, such as the use of the traditional pair login/password. More evolved methods are based on a cryptographic method and a shared secret. Authentication can also use a unique user ID, like a number written into a smart card, or a PIN code (personal identification number). Authentication can also be simple or mutual. It basically relies on matching user provided data with information recorded in a protected site. The major weakness of this method makes those sites vulnerable to attacks.
Confidentiality Confidentiality gives the guarantee that the exchanged data is only understandable by the two end points that share the same secret. Therefore, ciphering algorithms should work in flow mode, i.e. byte per byte. Those algorithms transform a clear text message into a coded cryptogram using one or several keys.
The main principles of wireless security
Guillaume-Jean Herbiet – Grégory Nou 5/37
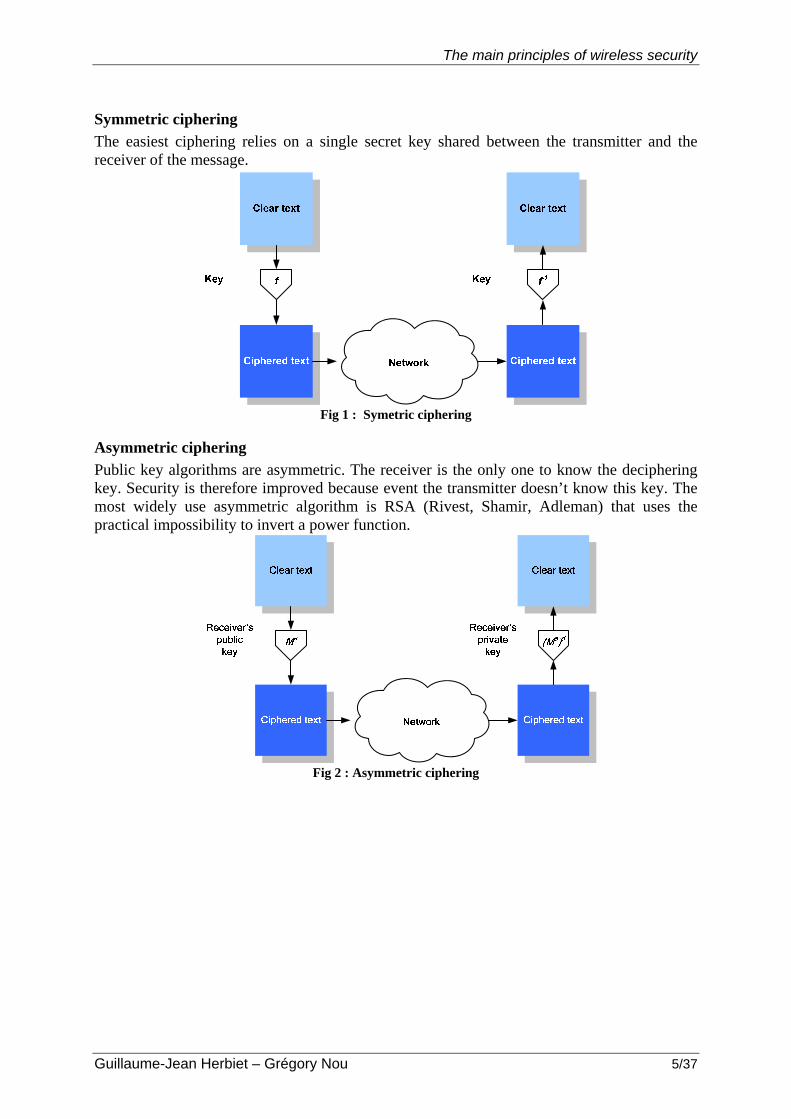
Symmetric ciphering The easiest ciphering relies on a single secret key shared between the transmitter and the receiver of the message.
Fig 1 : Symetric ciphering
Asymmetric ciphering Public key algorithms are asymmetric. The receiver is the only one to know the deciphering key. Security is therefore improved because event the transmitter doesn’t know this key. The most widely use asymmetric algorithm is RSA (Rivest, Shamir, Adleman) that uses the practical impossibility to invert a power function.
Fig 2 : Asymmetric ciphering
INTRODUCTION
WIRELESS SECURITY ARCHITECTURE FOR CAMPUS NETWORK 6/37
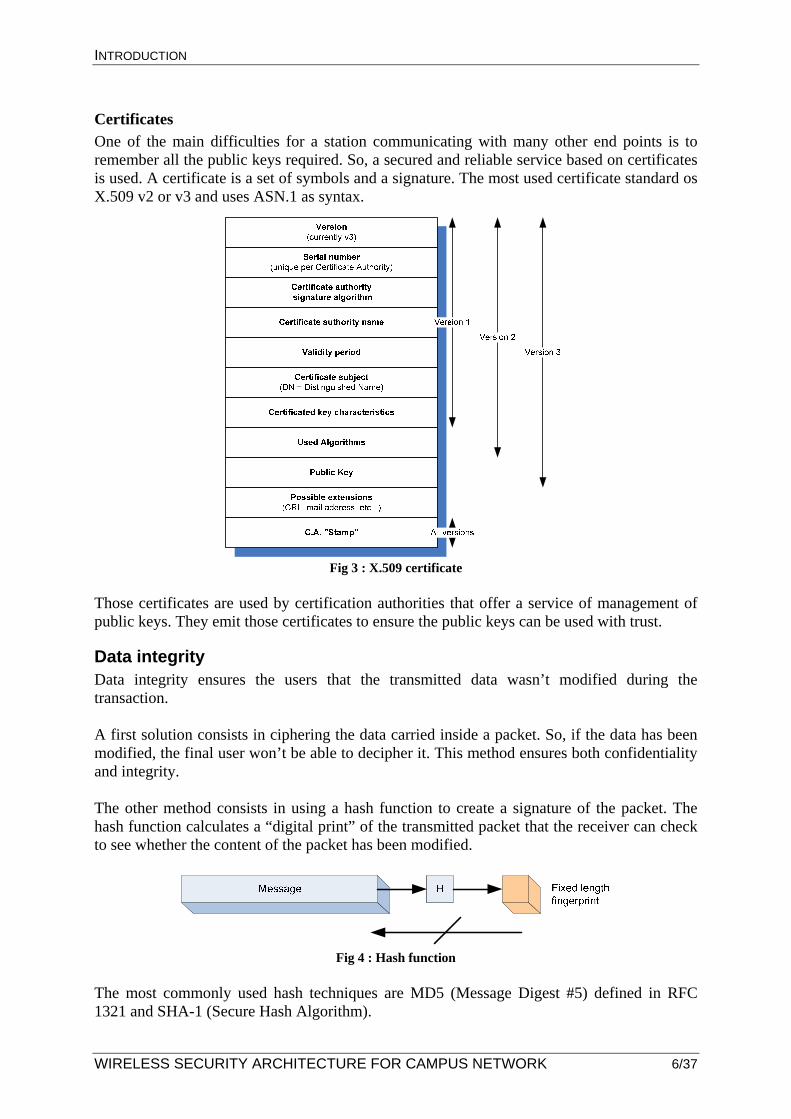
Certificates One of the main difficulties for a station communicating with many other end points is to remember all the public keys required. So, a secured and reliable service based on certificates is used. A certificate is a set of symbols and a signature. The most used certificate standard os X.509 v2 or v3 and uses ASN.1 as syntax.
Fig 3 : X.509 certificate
Those certificates are used by certification authorities that offer a service of management of public keys. They emit those certificates to ensure the public keys can be used with trust.
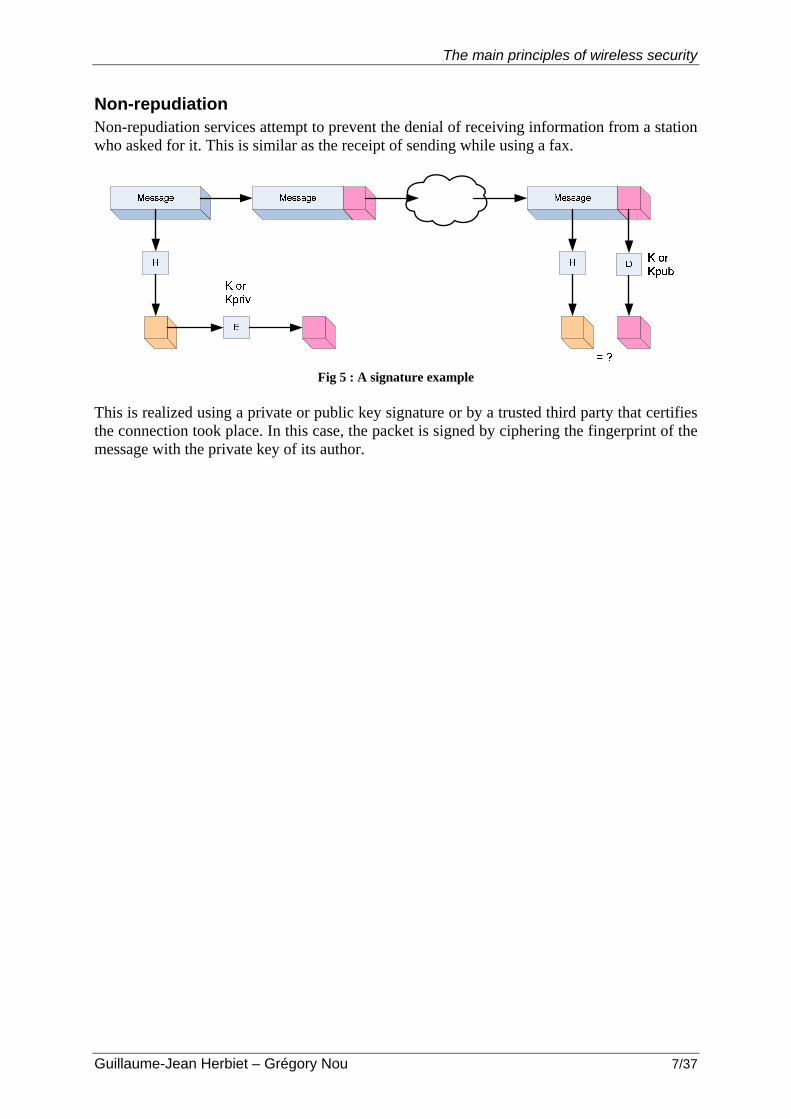
Data integrity Data integrity ensures the users that the transmitted data wasn’t modified during the transaction. A first solution consists in ciphering the data carried inside a packet. So, if the data has been modified, the final user won’t be able to decipher it. This method ensures both confidentiality and integrity. The other method consists in using a hash function to create a signature of the packet. The hash function calculates a “digital print” of the transmitted packet that the receiver can check to see whether the content of the packet has been modified.
Fig 4 : Hash function
The most commonly used hash techniques are MD5 (Message Digest #5) defined in RFC 1321 and SHA-1 (Secure Hash Algorithm).
The main principles of wireless security
Guillaume-Jean Herbiet – Grégory Nou 7/37
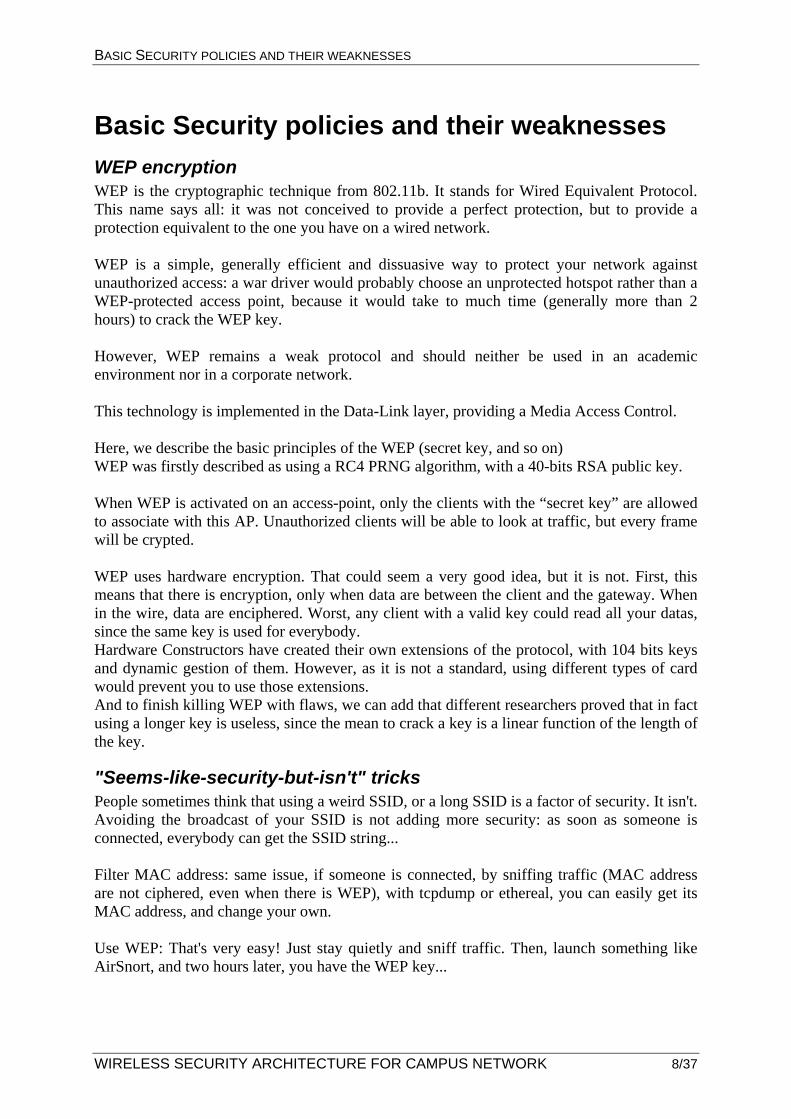
Non-repudiation Non-repudiation services attempt to prevent the denial of receiving information from a station who asked for it. This is similar as the receipt of sending while using a fax.
Fig 5 : A signature example
This is realized using a private or public key signature or by a trusted third party that certifies the connection took place. In this case, the packet is signed by ciphering the fingerprint of the message with the private key of its author.
BASIC SECURITY POLICIES AND THEIR WEAKNESSES
WIRELESS SECURITY ARCHITECTURE FOR CAMPUS NETWORK 8/37
Basic Security policies and their weaknesses WEP encryption WEP is the cryptographic technique from 802.11b. It stands for Wired Equivalent Protocol. This name says all: it was not conceived to provide a perfect protection, but to provide a protection equivalent to the one you have on a wired network. WEP is a simple, generally efficient and dissuasive way to protect your network against unauthorized access: a war driver would probably choose an unprotected hotspot rather than a WEP-protected access point, because it would take to much time (generally more than 2 hours) to crack the WEP key. However, WEP remains a weak protocol and should neither be used in an academic environment nor in a corporate network. This technology is implemented in the Data-Link layer, providing a Media Access Control. Here, we describe the basic principles of the WEP (secret key, and so on) WEP was firstly described as using a RC4 PRNG algorithm, with a 40-bits RSA public key. When WEP is activated on an access-point, only the clients with the “secret key” are allowed to associate with this AP. Unauthorized clients will be able to look at traffic, but every frame will be crypted. WEP uses hardware encryption. That could seem a very good idea, but it is not. First, this means that there is encryption, only when data are between the client and the gateway. When in the wire, data are enciphered. Worst, any client with a valid key could read all your datas, since the same key is used for everybody. Hardware Constructors have created their own extensions of the protocol, with 104 bits keys and dynamic gestion of them. However, as it is not a standard, using different types of card would prevent you to use those extensions. And to finish killing WEP with flaws, we can add that different researchers proved that in fact using a longer key is useless, since the mean to crack a key is a linear function of the length of the key.
"Seems-like-security-but-isn't" tricks People sometimes think that using a weird SSID, or a long SSID is a factor of security. It isn't. Avoiding the broadcast of your SSID is not adding more security: as soon as someone is connected, everybody can get the SSID string... Filter MAC address: same issue, if someone is connected, by sniffing traffic (MAC address are not ciphered, even when there is WEP), with tcpdump or ethereal, you can easily get its MAC address, and change your own. Use WEP: That's very easy! Just stay quietly and sniff traffic. Then, launch something like AirSnort, and two hours later, you have the WEP key...
"Seems-like-security-but-isn't" tricks
Guillaume-Jean Herbiet – Grégory Nou 9/37
Use evident keys, but modified (like i_£0v3_my_c47): totally useless. The best way to secure a WEP key is to use hexadecimal, to have unprintable characters, to take the longer possible, and to change them often. It is not more secure, but may discourage an attacker. Avoid the use DHCP, just configure legitim clients manually. That's totally useless. I just have to sniff the traffic, to know who is connected, and take an unused IP address.
IMPROVING SECURITY IN WIRELESS NETWORKS
WIRELESS SECURITY ARCHITECTURE FOR CAMPUS NETWORK 10/37
Improving security in wireless networks Security in 802.1x
Basic description The architecture compliant to norm 802.1x is using 3 different entities :
- the supplicant - the authenticator - the authentication server
The supplicant is the client which wants to use the resources of the network. To be more precise, the client contains a supplicant, which is responsible for responding to Authenticator data that will establish its credentials. The authenticator is the system which controls the access gate. It may be a switch, in the case of a wired network, or an access point, in the case of Wi-Fi. The same remark applies to the authenticator: in fact, the access point contains an authenticator, but is not an authenticator. Client's data flows can be separated in two classes:
- Authentication frames, using Extensible authentication Protocol (EAP1– RFC 2284) - Other frames are blocked, before authentication. Then, the port on the gate is opened,
and frames can move freely.
The authentication server is generally a RADIUS server (see RFC 2865). During the authentication, the access point behaves like a simple passive relay, and do not interpret dialog between the supplicant and the RADIUS server.
Port-based authentication 802.1x uses what is called “port-based authentication”. As explained by the 802.1X-2001 standard:
Port-based network access control makes use of the physical access characteristics of IEEE 802 LAN infrastructures in order to provide a means of authenticating and authorizing devices attached to a LAN port that has point-to-point connection characteristics, and of preventing access to that port in cases which the authentication and authorization fails. A port in this context is a single point of attachment to the LAN infrastructure.
1EAP was originally used for dial-up connection The identity was the username, and either CHAP or PAP authentication was used to
check user's password. Since the identity is sent in clear, "identity hiding" is used : before sending the real
identity, a encrypted TLS tunnel is set up.
Security in 802.1x
Guillaume-Jean Herbiet – Grégory Nou 11/37
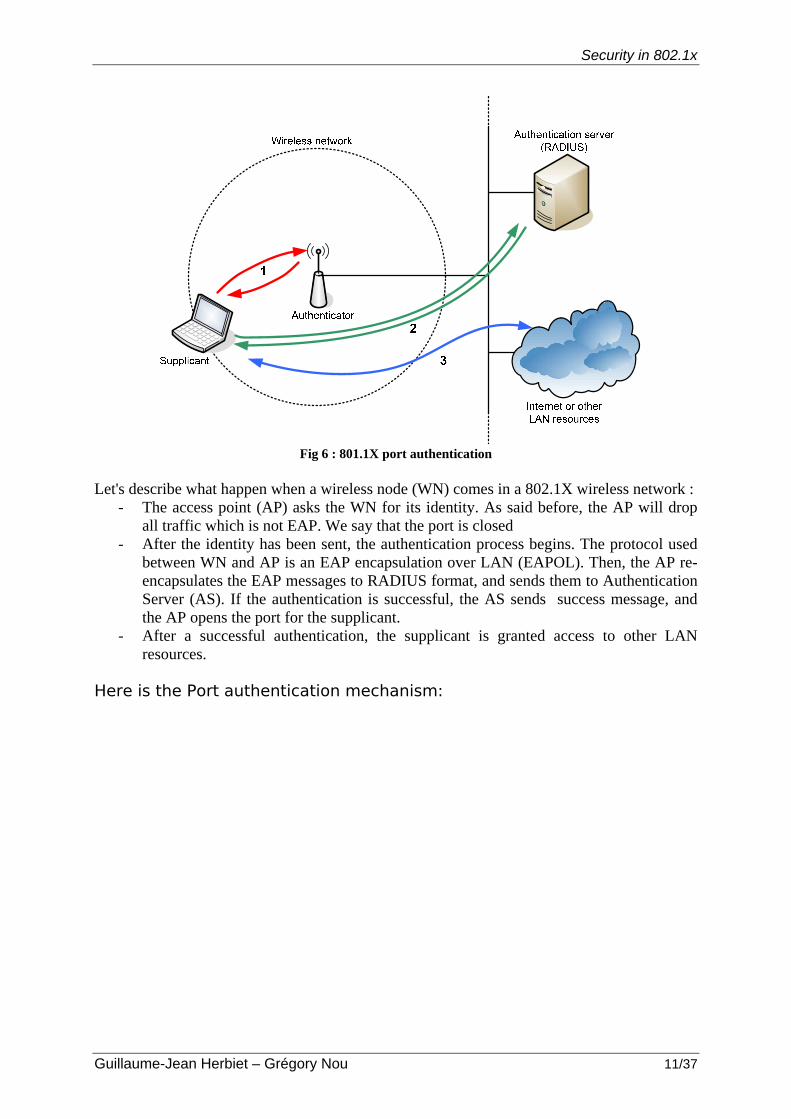
Fig 6 : 801.1X port authentication
Let's describe what happen when a wireless node (WN) comes in a 802.1X wireless network :
- The access point (AP) asks the WN for its identity. As said before, the AP will drop all traffic which is not EAP. We say that the port is closed
- After the identity has been sent, the authentication process begins. The protocol used between WN and AP is an EAP encapsulation over LAN (EAPOL). Then, the AP re-encapsulates the EAP messages to RADIUS format, and sends them to Authentication Server (AS). If the authentication is successful, the AS sends success message, and the AP opens the port for the supplicant.
- After a successful authentication, the supplicant is granted access to other LAN resources.
Here is the Port authentication mechanism:
IMPROVING SECURITY IN WIRELESS NETWORKS
WIRELESS SECURITY ARCHITECTURE FOR CAMPUS NETWORK 12/37
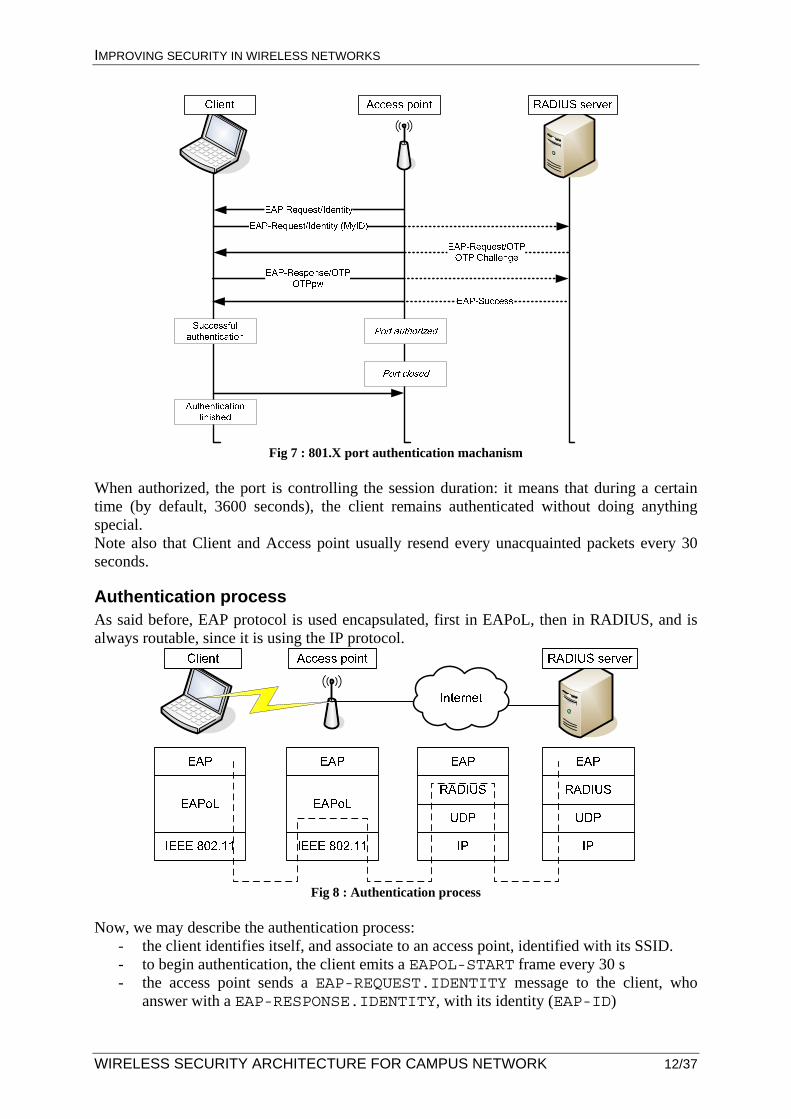
Fig 7 : 801.X port authentication machanism
When authorized, the port is controlling the session duration: it means that during a certain time (by default, 3600 seconds), the client remains authenticated without doing anything special. Note also that Client and Access point usually resend every unacquainted packets every 30 seconds.
Authentication process As said before, EAP protocol is used encapsulated, first in EAPoL, then in RADIUS, and is always routable, since it is using the IP protocol.
Fig 8 : Authentication process
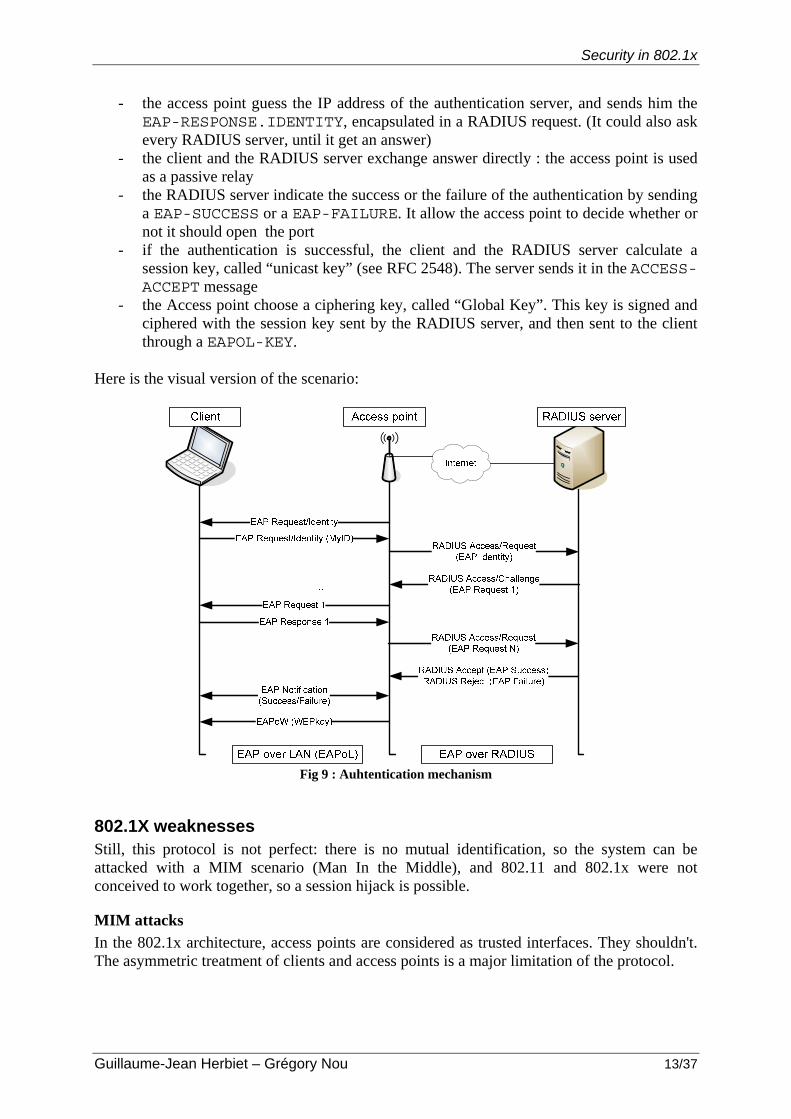
Now, we may describe the authentication process:
- the client identifies itself, and associate to an access point, identified with its SSID. - to begin authentication, the client emits a EAPOL-START frame every 30 s - the access point sends a EAP-REQUEST.IDENTITY message to the client, who
answer with a EAP-RESPONSE.IDENTITY, with its identity (EAP-ID)
Security in 802.1x
Guillaume-Jean Herbiet – Grégory Nou 13/37
- the access point guess the IP address of the authentication server, and sends him the EAP-RESPONSE.IDENTITY, encapsulated in a RADIUS request. (It could also ask every RADIUS server, until it get an answer)
- the client and the RADIUS server exchange answer directly : the access point is used as a passive relay
- the RADIUS server indicate the success or the failure of the authentication by sending a EAP-SUCCESS or a EAP-FAILURE. It allow the access point to decide whether or not it should open the port
- if the authentication is successful, the client and the RADIUS server calculate a session key, called “unicast key” (see RFC 2548). The server sends it in the ACCESS-ACCEPT message
- the Access point choose a ciphering key, called “Global Key”. This key is signed and ciphered with the session key sent by the RADIUS server, and then sent to the client through a EAPOL-KEY.
Here is the visual version of the scenario:
Fig 9 : Auhtentication mechanism
802.1X weaknesses Still, this protocol is not perfect: there is no mutual identification, so the system can be attacked with a MIM scenario (Man In the Middle), and 802.11 and 802.1x were not conceived to work together, so a session hijack is possible.
MIM attacks In the 802.1x architecture, access points are considered as trusted interfaces. They shouldn't. The asymmetric treatment of clients and access points is a major limitation of the protocol.
IMPROVING SECURITY IN WIRELESS NETWORKS
WIRELESS SECURITY ARCHITECTURE FOR CAMPUS NETWORK 14/37
Another vector of MIM attack is the fact that the client can go to the “authorized” state, even if it is already in this state. It is possible for a hacker to forge its own EAP SUCCESS packet, and to make the client think the attacker is the access point. The MIM attack makes useless all authentication mechanism.
Session hijacking attacks In 802.1x, authentication s done after association. Therefore, there are 2 state machines : the RSN one (Robust Security Network) and the one of 802.1x, which can be desynchronized :
1. the legitimate client authenticate 2. the hacker sends to the client a MAC DISASSOCIATE message, using as source
address the access point MAC address 3. the legitimate client is disconnected, but from the access point's point of view, the
client is still authorized 4. using the legitimate client MAC address, the hacker has access to the network.
Conclusion EAP was first used in point to point connexions, which need a physical connexion, but it is not adapted to wireless network specificities. That's why some more work was done...
Security in 802.11i As the 802.11 WEP encryption showed it’s weaknesses and 802.1x was only defining a frame for authentication but didn’t implemented a specific method for sharing keys, IEEE and the Wi-Fi Alliance worked on a new architecture called 802.11i. Edited in April 2003, the WPA (Wi-Fi Protected Access) recommendation is reckoned as the second generation security tool for wireless network and is a subpart of the 802.11i standard. Finalized in June 2004, 802.11i comes with a third generation tool, called WPA2, incompatible with the previous releases as it uses AES algorithm for ciphering. 802.11i relies on both 802.11 and 802.1x for networking and authentication and comes with the following improvements: - Definition of multiple protocols for radio security - New method for distributing keys
Security Architecture 802.11i comes with two new generations of security tools for Wi-Fi networks. The standard starts by defining a network with a high security level called RSN (Robust Security Network).
RSN (Robust Security Network) A RSN relies on 802.1x for authentication and key management. Moreover, it provides an access control built on a strong authentication of the upper layers. The architecture provides a client authentication independent from the fact that he client is in its home network or in a foreign network. To satisfy this requirement, a centralized authentication server is most commonly used (as the client then doesn’t care about which access point he is associated to). In some cases, a distributed or delegated server can be used provided that a global coherence is periodically maintained by synchronizing the different servers.

Security in 802.11i
Guillaume-Jean Herbiet – Grégory Nou 15/37
Fig 10 : Security levels in 802.1x
Each 802.11i access point is an authenticator and establishes a secured exchange channel with the authentication server. As 802.11i doesn’t describe witch method to use to achieve this operation, protocols like RADIUS, IPSec or TLS/SLL are possible solutions.
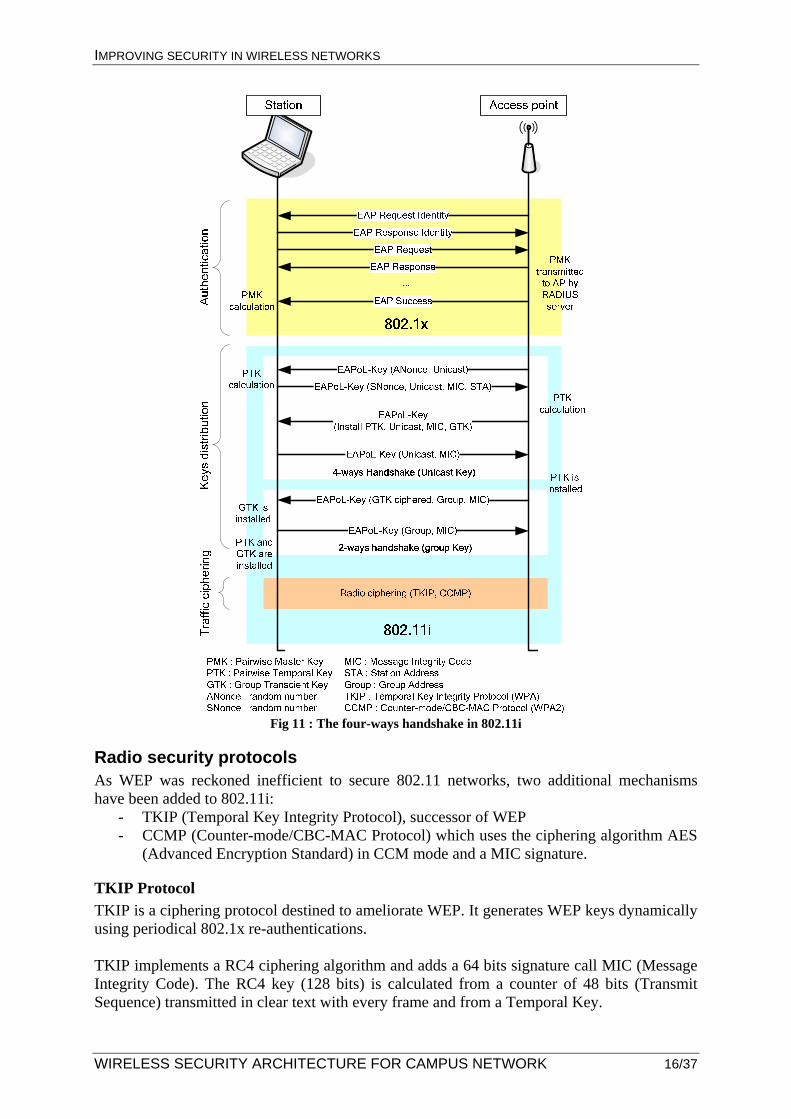
Key exchange using EAP The 802.11i access point and the authentication server perform a mutual authentication using EAP and generate a master key, or PMK (Pairwise Master Key). Elements of this procedure are transmitted through a secured canal with different parameters for every 802.11i client. The PMK Key is then shared between the 802.11i and the access point. For better security, they use a 4-way handshake protocol based on EAPoL (EAP over LAN) to perform the following operations:
- confirm the existence of the PMK - confirm the start of use of the PMK - compute the PTK (Private Transient Key) from the PMK - start using ciphering and integrity keys on 802.11 frames - confirm the use of 802.11 keys
IMPROVING SECURITY IN WIRELESS NETWORKS
WIRELESS SECURITY ARCHITECTURE FOR CAMPUS NETWORK 16/37
Fig 11 : The four-ways handshake in 802.11i
Radio security protocols As WEP was reckoned inefficient to secure 802.11 networks, two additional mechanisms have been added to 802.11i:
- TKIP (Temporal Key Integrity Protocol), successor of WEP - CCMP (Counter-mode/CBC-MAC Protocol) which uses the ciphering algorithm AES
(Advanced Encryption Standard) in CCM mode and a MIC signature.
TKIP Protocol TKIP is a ciphering protocol destined to ameliorate WEP. It generates WEP keys dynamically using periodical 802.1x re-authentications. TKIP implements a RC4 ciphering algorithm and adds a 64 bits signature call MIC (Message Integrity Code). The RC4 key (128 bits) is calculated from a counter of 48 bits (Transmit Sequence) transmitted in clear text with every frame and from a Temporal Key.
Authentication in wireless networks
Guillaume-Jean Herbiet – Grégory Nou 17/37
Fig 12 : TKIP frame
CCMP Protocol CCMP is based on AES (Advanced Encryption Standard) and uses both CCM and CBC-MAC for confidentiality and authentication. CCMP ciphers the payload of an MPDU (MAC Protocol Data Unit) and encapsulates the resulting ciphered text and then increments the packet number (PN) in order to have a different packet number for each MPDU.
RSN Header8 bytes
Data>= 1 byte
MIC8 bytes
Ciphered
Fig 13 : CCMP frame
Wi-Fi Protected Access (WPA) WPA is a subset of the 801.11i standard which includes 802.1x and TKIP and was created to replace WEP and its weaknesses. WPA was a transitional standard and is already being replaced by WPA2.
Fig 14 : WPA RSN frame
The two versions are incompatible since WPA uses RC4 for ciphering and TKIP for radio security and WPA2 implements AES and CCMP. Besides, as no AES algorithm doesn’t exist in 802.11 hardware, the use of WPA2 requires a replacement of the old hardware.
Fig 15 : WPA2 RNS frame in 802.11i
Authentication in wireless networks After detailing several techniques about how authenticate people using 802.1x or 802.11i techniques. But to perform securely this authentication, the use of lower level protocols, able to transport safely data during this process.
IMPROVING SECURITY IN WIRELESS NETWORKS
WIRELESS SECURITY ARCHITECTURE FOR CAMPUS NETWORK 18/37
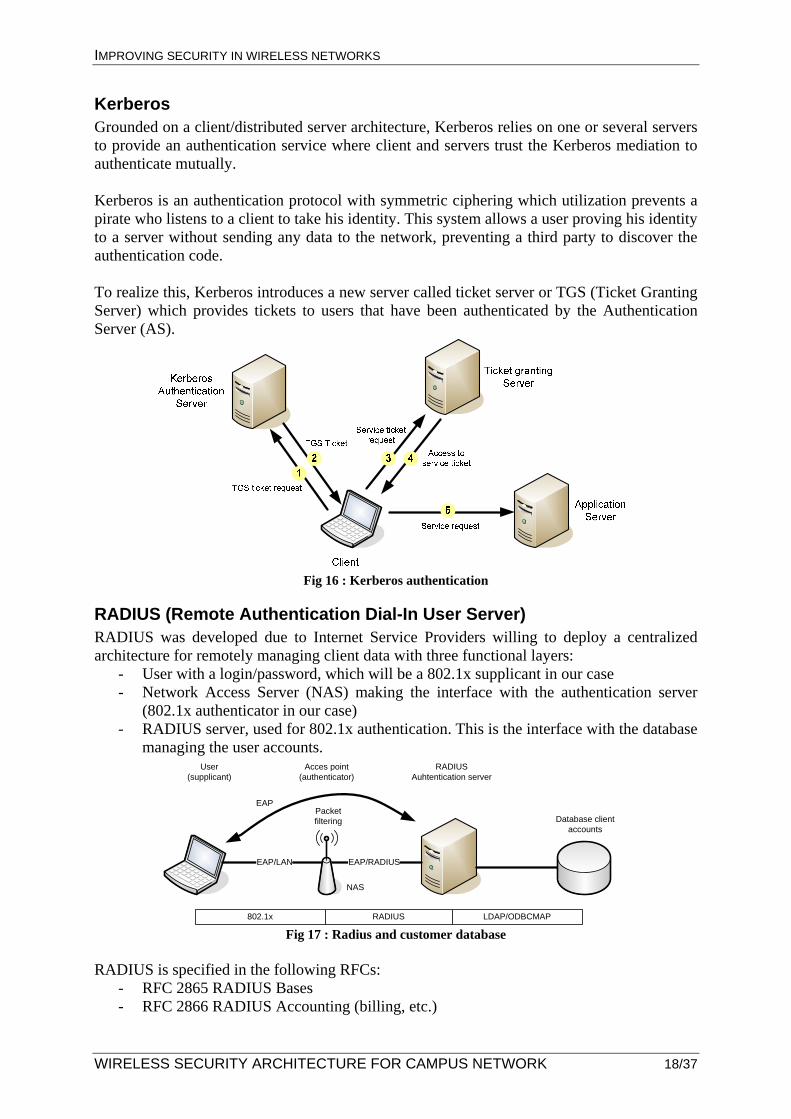
Kerberos Grounded on a client/distributed server architecture, Kerberos relies on one or several servers to provide an authentication service where client and servers trust the Kerberos mediation to authenticate mutually. Kerberos is an authentication protocol with symmetric ciphering which utilization prevents a pirate who listens to a client to take his identity. This system allows a user proving his identity to a server without sending any data to the network, preventing a third party to discover the authentication code. To realize this, Kerberos introduces a new server called ticket server or TGS (Ticket Granting Server) which provides tickets to users that have been authenticated by the Authentication Server (AS).
Fig 16 : Kerberos authentication
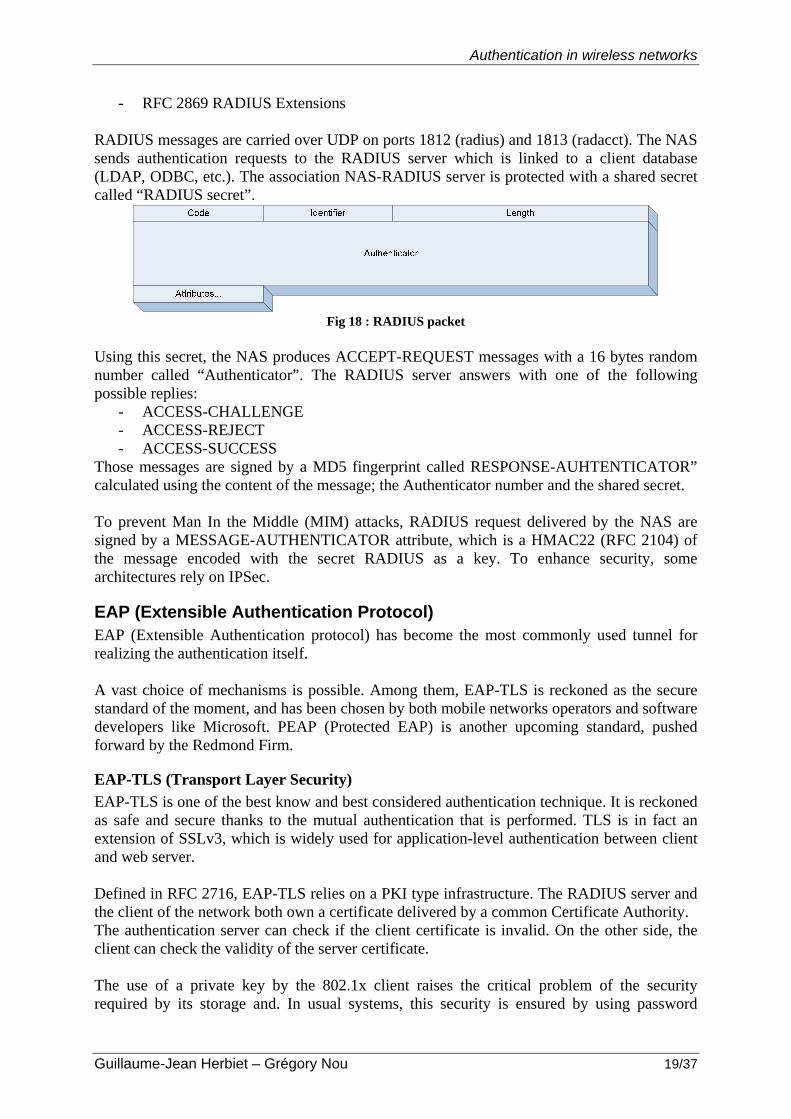
RADIUS (Remote Authentication Dial-In User Server) RADIUS was developed due to Internet Service Providers willing to deploy a centralized architecture for remotely managing client data with three functional layers:
- User with a login/password, which will be a 802.1x supplicant in our case - Network Access Server (NAS) making the interface with the authentication server
(802.1x authenticator in our case) - RADIUS server, used for 802.1x authentication. This is the interface with the database
managing the user accounts.
EAP/LAN EAP/RADIUS
802.1x RADIUS LDAP/ODBCMAP
Packet filtering
NAS
User (supplicant)
Acces point (authenticator)
RADIUS Auhtentication server
Database client accounts
EAP
Fig 17 : Radius and customer database
RADIUS is specified in the following RFCs:
- RFC 2865 RADIUS Bases - RFC 2866 RADIUS Accounting (billing, etc.)
Authentication in wireless networks
Guillaume-Jean Herbiet – Grégory Nou 19/37
- RFC 2869 RADIUS Extensions RADIUS messages are carried over UDP on ports 1812 (radius) and 1813 (radacct). The NAS sends authentication requests to the RADIUS server which is linked to a client database (LDAP, ODBC, etc.). The association NAS-RADIUS server is protected with a shared secret called “RADIUS secret”.
Fig 18 : RADIUS packet
Using this secret, the NAS produces ACCEPT-REQUEST messages with a 16 bytes random number called “Authenticator”. The RADIUS server answers with one of the following possible replies:
- ACCESS-CHALLENGE - ACCESS-REJECT - ACCESS-SUCCESS
Those messages are signed by a MD5 fingerprint called RESPONSE-AUHTENTICATOR” calculated using the content of the message; the Authenticator number and the shared secret. To prevent Man In the Middle (MIM) attacks, RADIUS request delivered by the NAS are signed by a MESSAGE-AUTHENTICATOR attribute, which is a HMAC22 (RFC 2104) of the message encoded with the secret RADIUS as a key. To enhance security, some architectures rely on IPSec.
EAP (Extensible Authentication Protocol) EAP (Extensible Authentication protocol) has become the most commonly used tunnel for realizing the authentication itself. A vast choice of mechanisms is possible. Among them, EAP-TLS is reckoned as the secure standard of the moment, and has been chosen by both mobile networks operators and software developers like Microsoft. PEAP (Protected EAP) is another upcoming standard, pushed forward by the Redmond Firm.
EAP-TLS (Transport Layer Security) EAP-TLS is one of the best know and best considered authentication technique. It is reckoned as safe and secure thanks to the mutual authentication that is performed. TLS is in fact an extension of SSLv3, which is widely used for application-level authentication between client and web server. Defined in RFC 2716, EAP-TLS relies on a PKI type infrastructure. The RADIUS server and the client of the network both own a certificate delivered by a common Certificate Authority. The authentication server can check if the client certificate is invalid. On the other side, the client can check the validity of the server certificate. The use of a private key by the 802.1x client raises the critical problem of the security required by its storage and. In usual systems, this security is ensured by using password
IMPROVING SECURITY IN WIRELESS NETWORKS
WIRELESS SECURITY ARCHITECTURE FOR CAMPUS NETWORK 20/37
allowing deciphering and using the private key. However, the authentication based on certificates requires a strong Public Key Infrastructure (PKI).
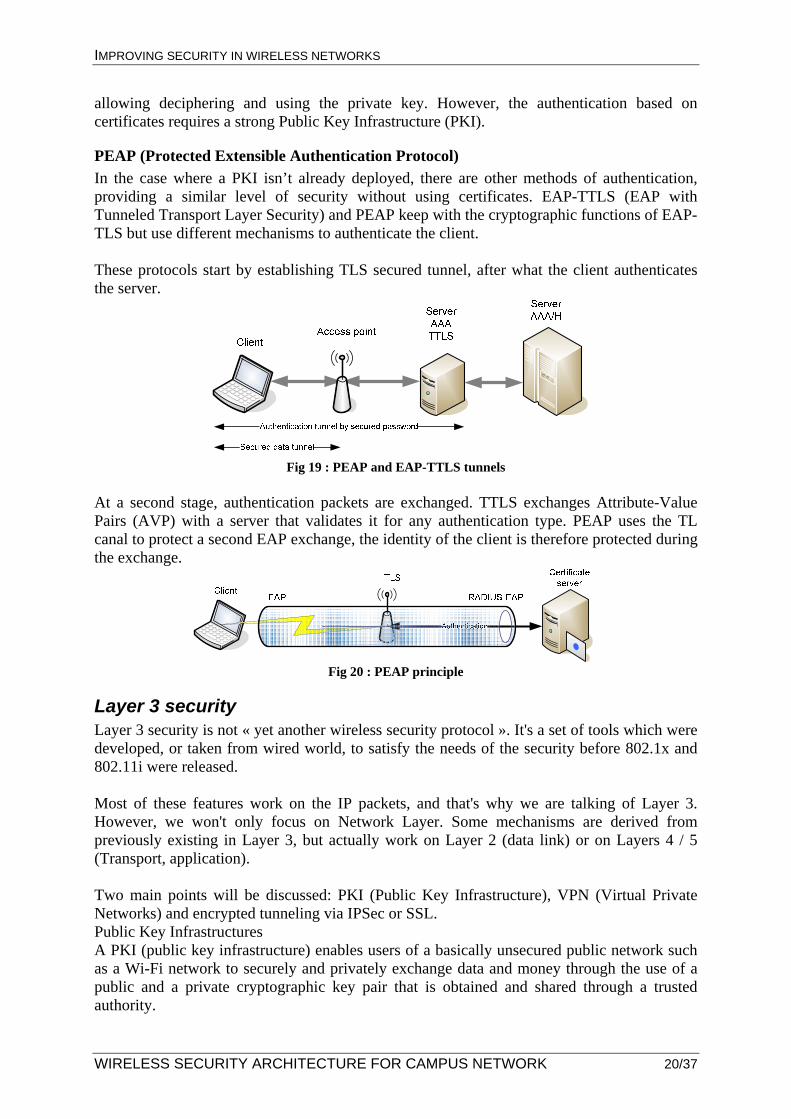
PEAP (Protected Extensible Authentication Protocol) In the case where a PKI isn’t already deployed, there are other methods of authentication, providing a similar level of security without using certificates. EAP-TTLS (EAP with Tunneled Transport Layer Security) and PEAP keep with the cryptographic functions of EAP-TLS but use different mechanisms to authenticate the client. These protocols start by establishing TLS secured tunnel, after what the client authenticates the server.
Fig 19 : PEAP and EAP-TTLS tunnels
At a second stage, authentication packets are exchanged. TTLS exchanges Attribute-Value Pairs (AVP) with a server that validates it for any authentication type. PEAP uses the TL canal to protect a second EAP exchange, the identity of the client is therefore protected during the exchange.
Fig 20 : PEAP principle
Layer 3 security Layer 3 security is not « yet another wireless security protocol ». It's a set of tools which were developed, or taken from wired world, to satisfy the needs of the security before 802.1x and 802.11i were released. Most of these features work on the IP packets, and that's why we are talking of Layer 3. However, we won't only focus on Network Layer. Some mechanisms are derived from previously existing in Layer 3, but actually work on Layer 2 (data link) or on Layers 4 / 5 (Transport, application). Two main points will be discussed: PKI (Public Key Infrastructure), VPN (Virtual Private Networks) and encrypted tunneling via IPSec or SSL. Public Key Infrastructures A PKI (public key infrastructure) enables users of a basically unsecured public network such as a Wi-Fi network to securely and privately exchange data and money through the use of a public and a private cryptographic key pair that is obtained and shared through a trusted authority.
Layer 3 security
Guillaume-Jean Herbiet – Grégory Nou 21/37
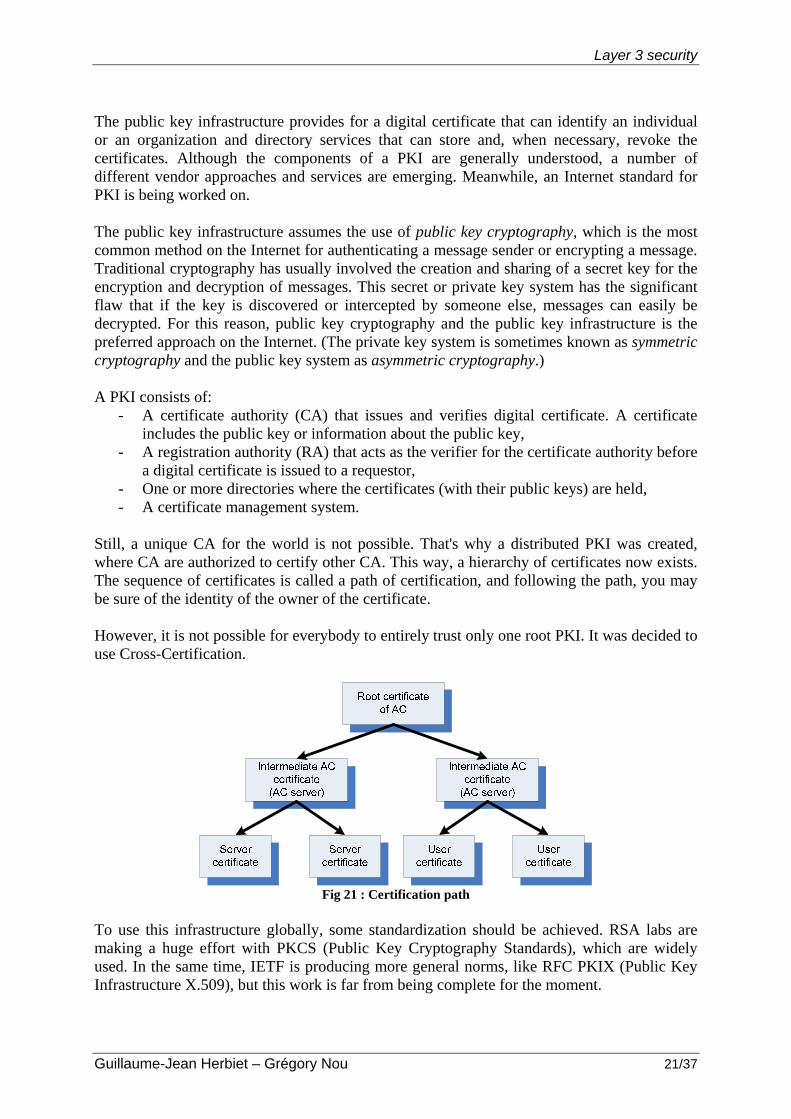
The public key infrastructure provides for a digital certificate that can identify an individual or an organization and directory services that can store and, when necessary, revoke the certificates. Although the components of a PKI are generally understood, a number of different vendor approaches and services are emerging. Meanwhile, an Internet standard for PKI is being worked on. The public key infrastructure assumes the use of public key cryptography, which is the most common method on the Internet for authenticating a message sender or encrypting a message. Traditional cryptography has usually involved the creation and sharing of a secret key for the encryption and decryption of messages. This secret or private key system has the significant flaw that if the key is discovered or intercepted by someone else, messages can easily be decrypted. For this reason, public key cryptography and the public key infrastructure is the preferred approach on the Internet. (The private key system is sometimes known as symmetric cryptography and the public key system as asymmetric cryptography.) A PKI consists of:
- A certificate authority (CA) that issues and verifies digital certificate. A certificate includes the public key or information about the public key,
- A registration authority (RA) that acts as the verifier for the certificate authority before a digital certificate is issued to a requestor,
- One or more directories where the certificates (with their public keys) are held, - A certificate management system.
Still, a unique CA for the world is not possible. That's why a distributed PKI was created, where CA are authorized to certify other CA. This way, a hierarchy of certificates now exists. The sequence of certificates is called a path of certification, and following the path, you may be sure of the identity of the owner of the certificate. However, it is not possible for everybody to entirely trust only one root PKI. It was decided to use Cross-Certification.
Fig 21 : Certification path
To use this infrastructure globally, some standardization should be achieved. RSA labs are making a huge effort with PKCS (Public Key Cryptography Standards), which are widely used. In the same time, IETF is producing more general norms, like RFC PKIX (Public Key Infrastructure X.509), but this work is far from being complete for the moment.
IMPROVING SECURITY IN WIRELESS NETWORKS
WIRELESS SECURITY ARCHITECTURE FOR CAMPUS NETWORK 22/37
Level 3 VPN A virtual private network (VPN) is a network that uses a public telecommunication infrastructure, such as the Internet, to provide remote offices or individual users with secure access to their organization's network. A virtual private network can be contrasted with an expensive system of owned or leased lines that can only be used by one organization. The goal of a VPN is to provide the organization with the same capabilities, but at a much lower cost. A VPN works by using the shared public infrastructure while maintaining privacy through security procedures and tunneling protocols like IPSec. In effect, the protocols, by encrypting data at the sending end and decrypting it at the receiving end, send the data through a "tunnel" that cannot be "entered" by data that is not properly encrypted. An additional level of security involves encrypting not only the data, but also the originating and receiving network addresses. Today, most of VPN are using IPSec or SSL. In a nutshell, IPSec gives some interesting protections:
- confidentiality - integrity - non-repudiation - authentication - protection against traffic analysis
The ESP header (Encapsulated Security Payload) signifies that data in the IPSec tunnel are ciphered. The AH (Authentication Header) signifies that data will be protected against malicious modifications. A protocol named IKE (Internet Key Exchange) is used to exchange secret keys before the tunnel is established. (Also note that IPSec is included in IPv6) SSL-TLS stands for: Secure Sockets Layer - Transport Layer Security. It was developed by Netscape, to provide security with HTTP or FTP. In our five layer model, we would have to add the SSL layer between application and TCP (a kind of layer 4.5) In the case of a Wi-Fi connection, that means that the client will use WEP to connect to the Access Point, and then will establish a tunnel between the gateway and itself.
Other solutions Two other solutions may be proposed to protect a network against unauthorized connection (although they do not provide secure Wi-Fi connection)
Virtual LANs A VLAN can be defined using lots of parameters: port number, used protocol, MAC address, IP address, application. The first use of VLAN in Wi-Fi is that it is a way to force entering flows to go through a Security Server. If we put all access points on the same VLAN, we are quite sure Wi-Fi clients won't be able to connect to protected resources unless they're identified.
Layer 3 security
Guillaume-Jean Herbiet – Grégory Nou 23/37
It is also possible to use VLAN to balance traffic, and to monitor entries on the Wi-Fi network.
Firewalling Basically, a firewall inspects traffic and decides whether it should accept or drop packets, using rules the administrator gave. You may for example decide that everybody can access to the web server, but from the Wi-Fi, you cannot access the internal FTP server.
DEPLOYING A SECURED ARCHITECTURE
WIRELESS SECURITY ARCHITECTURE FOR CAMPUS NETWORK 24/37
Deploying a secured architecture After analyzing several solutions for providing a secure access to a wireless network, we will draw a possible design for a concrete application in the Georgia Tech Lorraine campus. The described solution should be able to meet the requirements detailed in the introduction of this document, i.e. perform a secure Authentication, provide Authorization to the trusted users and realize Accounting of the use made of the network. This section will briefly describe and justify the choice of implementation we have chosen and then describe in details the installation and configuration process of the different tools we selected.
A secure design for campus application As WEP is reckoned not to be secure enough, our wish is to deploy at least WPA (or WPA if most devices are found compatible) over a 802.1x based architecture. This deployment aims to provide a AAA (Authentication, Authorization, Accounting) secure solution, and should be compatible with a much platforms (OSes and material) as possible. Therefore, our architecture will consist of:
- A RADIUS server compatible with several EAP variations - Access points wit 802.1x and WPA activated - TLS tunneled method relying on PEAP.
This architecture was deployed on a testing platform consisting of a virtual machine running CEntOS (Community Enterprise Operation System), a Red Hat based Linux distribution.
Installing FreeRADIUS This section shows how to use open source projects to create a secured infrastructure. There are two reasons for this step. There are two specific projects that we're going to discuss: OpenSSL and FreeRADIUS:
- OpenSSL provides cryptographic primitives as well as some command line tools for creating and manipulating public key certificates. We use OpenSSL to help build a limited PKI.
- We use FreeRADIUS to provide the authentication server using the RADIUS protocol as the central point of our infrastructure.
Obtaining certificates As we are going to be using WPA with server-based keys in a medium to large organization, you'll need a public key infrastructure. Rather than focus on the details of establishing an entire certificate authority, we're going to build self-signed certificates using OpenSSL. This approach is sufficient for testing, or for a small-to-medium-sized network. In a further step, the need of deploying a PKI will be replaced by the use of the LDAP directory to manage identities and certificates.
Installing FreeRADIUS
Guillaume-Jean Herbiet – Grégory Nou 25/37
Downloading and compiling OpenSSL The latest version of OpenSSL can be downloaded from www.openssl.org. At the time of this writing, the most recent version was openssl-0.9.8a. This is the version we'll use in our examples, but you should be able to use later versions when they are released. Before using a newer version, check with the FreeRADIUS site to see whether an older version of OpenSSL is required; the two projects are not well synchronized at the moment. Once you download the file, you need to change your working directory to the location where you place source code, in other words, /usr/local/src, and check the digital signature on the following file and untar it. cd /usr/local/src tar xvfz openssl-0.9.8a.tar.gz The OpenSSL development team has made the compilation of OpenSSL easy and straightforward, as shown in the following syntax under any Linux distribution. However, we need to be careful not to overwrite the current installation of OpenSSL when using any Red Hat based distribution because that will break some of the precompiled programs in your operating system distribution. Therefore, the following commands install OpenSSL in the /usr/local directory so we didn't overwrite the previous installed version. cd openssl-0.9.8a ./config shared --prefix=/usr/local/openssl make make install
Configuring OpenSSL for our needs Once OpenSSL is installed, we need to make some minor changes to the configuration files to make it easier to make certificates. The file that requires editing is /usr/local/openssl/ssl/openssl.cnf. The changes only involve modifying the default values for some of the options in certificate requests. They also allow increasing the length of time a certificate is valid. We provide here and relevant extract of our openssl.cnf file with the modifications we’ve made: # req_extensions = v3_req # The extensions to add to a certificate request [ req_distinguished_name ] countryName = Country Name (2 letter code) countryName_default = FR countryName_min = 2 countryName_max = 2 stateOrProvinceName = State or Province Name (full name) stateOrProvinceName_default = Lorraine localityName = Locality Name (eg, city) localityName_default = Metz
DEPLOYING A SECURED ARCHITECTURE
WIRELESS SECURITY ARCHITECTURE FOR CAMPUS NETWORK 26/37
0.organizationName = Organization Name (eg, company) 0.organizationName_default = Georgia-Tech Lorraine # we can do this but it is not needed normally :-) #1.organizationName = Second Organization Name (eg, company) #1.organizationName_default = World Wide Web Pty Ltd organizationalUnitName = Organizational Unit Name (eg, section) organizationalUnitName_default = College of Computing commonName = Common Name (eg, YOUR name) commonName_max = 64 commonName_default = Test emailAddress = Email Address emailAddress_max = 64 emailAddress_default = [email protected] # SET-ex3 = SET extension number 3 [ req_attributes ] challengePassword = A challenge password challengePassword_min = 4 challengePassword_max = 20 challengePassword_default = whatever unstructuredName = An optional company name
Generating the required certificates There are several steps involved in creating certificates that you can use with 802.1X. First, we need to create a certificate authority certificate. This is self-signed; in other words, the certificate authority attests to the validity of itself. While this might surprise you, it is the commonly accepted method for creating a root certificate. Once the certificate authority, or root, is created, you need to create a server certificate for our RADIUS server. To generate those certificates, we have used two scripts both located in /usr/local/src/scripts and called CA.root, CA.server. They respectively autogenerate the self-signed root and server dedicated certificates using the previously defined openssl.cnf file. The output of those scripts is files with extension .der, .p12 and .pem. As .p12 files are only a temporary format, we copy .der and .pem files for root and server certificates in a separate directory for further use. [root@gtl-dhcp-232 etc]# ls /usr/local/1x/etc/ DH gtl-dhcp-232.der gtl-dhcp-232.pem random root.der root.pem We can now install and set up the FreeRADIUS server.
Setting up FreeRadius The most recent version of FreeRADIUS can be downloaded from the Web site www.freeradius.org/getting.html. The most recent version at the time of writing is 1.0.5. This is the version we used in our tests.
Installing FreeRADIUS
Guillaume-Jean Herbiet – Grégory Nou 27/37
Installation The download of the FreeRADIUS sources can be operated using the following set of commands: cd /usr/local/src wget ftp://ftp.freeradius.org/pub/radius/freeradius-1.0.5.tar.gz tar zxfv freeradius-1.0.5.tar.gz cd freeradius-1.0.5 Compiling FreeRADIUS is also really easy and similar to the installation of OpenSSL except that we have to specify several paths to configure the makefile properly in order to enable SSL support required for PEAP. This is done using the following lines of commands: /configure --with-openssl-includes=/usr/local/openssl/include --with-openssl-libraries=/usr/local/openssl/lib --prefix=/usr/local/radius make && make install The binaries are installed in /usr/local/radius/bin and /usr/local/radius/sbin. The configuration files are found under /usr/local/radius/etc/raddb.
Configuration Now, we are ready to make the changes to the various FreeRADIUS configuration files. There are three files that must be modified. The files are clients.conf, radiusd.conf, and users.
clients.conf The clients.conf file is responsible for determining who/what can connect to the RADIUS server to authenticate users. In our case, we want the access points to be able to connect. There are two ways to enter the access point information. First, list each access point individually. Second, list a subnet. A key point for security here is that if we decide to use the subnet approach, all of the access points will use the same password—not the best idea from the standpoint of security; however, if you have hundreds of access points, a separate password for each becomes a management nightmare. Specifying an access point at a time can be done by using the following template. client <ipaddress> { secret = <password> shortname = <descriptive_name_for_accounting_purposes> }
The second approach is to use a single entry for an entire local area network of access points. This can be realized using the following template.
client <subnet>/<mask> { secret = <password> shortname = LAN }

DEPLOYING A SECURED ARCHITECTURE
WIRELESS SECURITY ARCHITECTURE FOR CAMPUS NETWORK 28/37
As we only had a single access point during our test, we used the first approach by adding the following entry: client 192.93.8.12 { secret = HackMe shortname = TestingAP nastype = cisco }
radiusd.conf This is the big and mighty main configuration file for FreeRADIUS. It's so big that it has been split into several smaller files that are just "included" into the main radius.conf file. Before editing this file, we need to create two new files, /usr/local/radius/etc/raddb/DH and /usr/local/radius/etc/raddb/random, as part of the changes. The contents of both of these files need to be random so you use the Linux random device to create files with the following commands: dd if=/dev/random of=/usr/local/radius/etc/raddb/random count=1 bs=128 dd if=/dev/random of=/usr/local/radius/etc/raddb/DH count=1 bs=128 This creates two files with 128 random bytes each. As this file is really big, we will only provide the important sections that should be enabled to provide PEAP encrypted tunnels with an MS-CHAPv2 authentication mechanism. # under MODULES, make sure mschap is uncommented! mschap { # authtype value, if present, will be used # to overwrite (or add) Auth-Type during # authorization. Normally, should be MS-CHAP authtype = MS-CHAP # if use_mppe is not set to no, mschap will # add MS-CHAP-MPPE-Keys for MS-CHAPv1 and # MS-MPPE-Recv-Key/MS-MPPE-Send-Key for MS-CHAPv2 # use_mppe = yes # if mppe is enabled, require_encryption makes # encryption moderate # require_encryption = yes # require_strong always requires 128 bit key # encryption # require_strong = yes authtype = MS-CHAP # The module can perform authentication itself, OR # use a Windows Domain Controller. See the radius.conf file # for how to do this. }
Installing FreeRADIUS
Guillaume-Jean Herbiet – Grégory Nou 29/37
[...] authorize { preprocess mschap suffix eap files } authenticate { # # MSCHAP authentication. Auth-Type MS-CHAP { mschap } # # Allow EAP authentication. eap }
eap.conf This is one of the file included in radiusd.conf. It is used to specify all the EAP-related configuration. This is where we will specify we want to use PEAP and give the path to the certificates we have generated. eap { default_eap_type = peap [...] tls { private_key_password = whatever private_key_file = /usr/local/1x/etc/gtl-dhcp-232.pem certificate_file = /usr/local/1x/etc/gtl-dhcp-232.pem # Trusted Root CA list CA_file = /usr/local/1x/etc/root.pem dh_file = /usr/local/1x/etc/root.pem random_file = /usr/local/1x/etc/random [...] } [...] peap { default_eap_type = mschapv2 } [...] }
users The user information is stored in a plain text file users. As for the moment we don’t use LDAP to manage credentials, we will directly add some users to this file. We only have to enter their logins and passwords as follows: "test" User-Password == "test" "bob" User-Password == "hello" "guillaume" User-Password == "password"
DEPLOYING A SECURED ARCHITECTURE
WIRELESS SECURITY ARCHITECTURE FOR CAMPUS NETWORK 30/37
Starting the RADIUS server We are now ready to start the server. Because FreeRADIUS may be using a different version of OpenSSL than the one installed on your system, we need to build a custom shell to start the FreeRADIUS daemon in a way that it can find the OpenSSL libraries. We used the run-radiusd script created by Adam Sulmicki, as follows. #!/bin/bash -x export LD_LIBRARY_PATH=/usr/local/openssl/lib export LD_PRELOAD=/usr/local/openssl/lib/libcrypto.so /usr/local/radius/sbin/radiusd $@
Now, FreeRADIUS can be started in debug mode from a shell, as follows:
run-radiusd –X –A The debug mode will allow us to see all RADIUS operation directly in the console. However, a log file (located in /usr/local/radius/var/log/radius/radius.log) stores all this information.
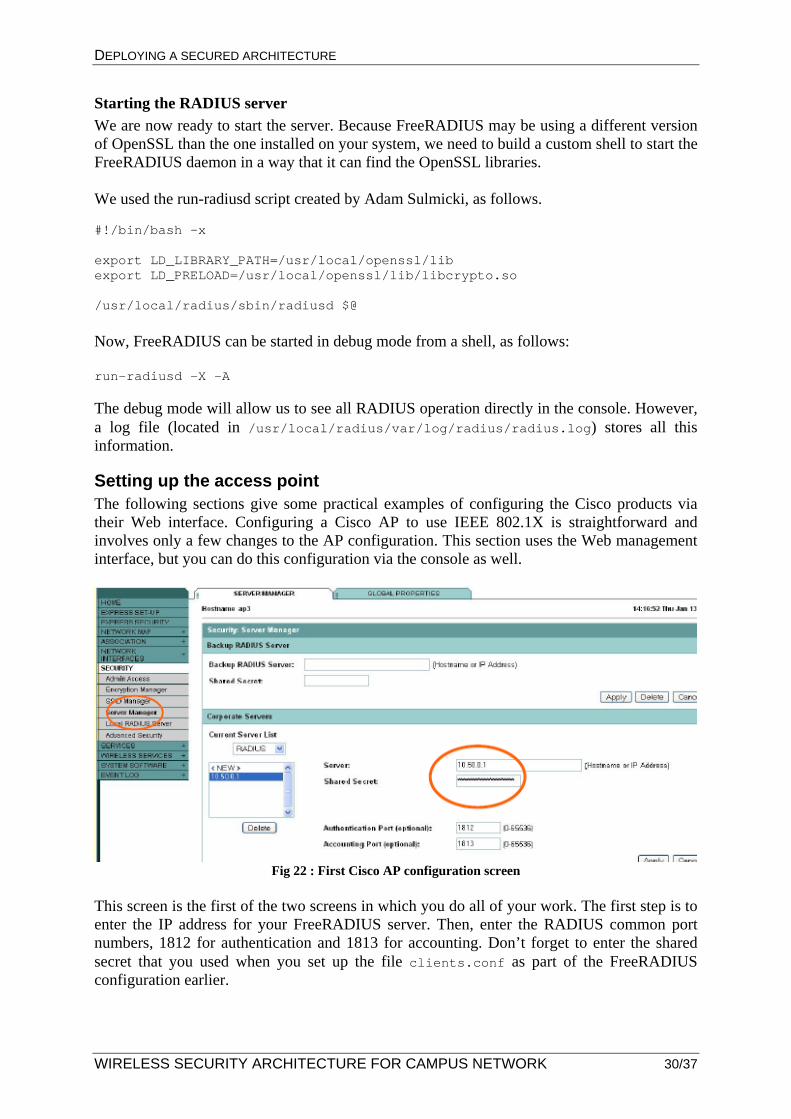
Setting up the access point The following sections give some practical examples of configuring the Cisco products via their Web interface. Configuring a Cisco AP to use IEEE 802.1X is straightforward and involves only a few changes to the AP configuration. This section uses the Web management interface, but you can do this configuration via the console as well.
Fig 22 : First Cisco AP configuration screen
This screen is the first of the two screens in which you do all of your work. The first step is to enter the IP address for your FreeRADIUS server. Then, enter the RADIUS common port numbers, 1812 for authentication and 1813 for accounting. Don’t forget to enter the shared secret that you used when you set up the file clients.conf as part of the FreeRADIUS configuration earlier.
Installing FreeRADIUS
Guillaume-Jean Herbiet – Grégory Nou 31/37
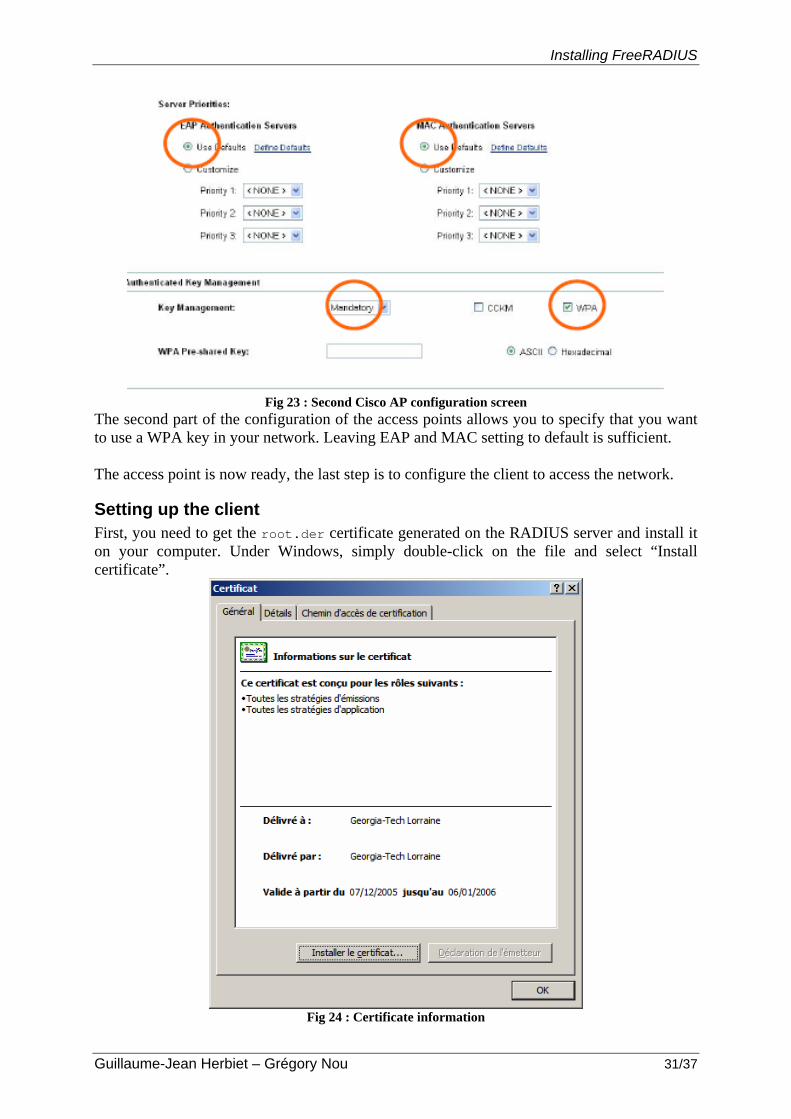
Fig 23 : Second Cisco AP configuration screen
The second part of the configuration of the access points allows you to specify that you want to use a WPA key in your network. Leaving EAP and MAC setting to default is sufficient. The access point is now ready, the last step is to configure the client to access the network.
Setting up the client First, you need to get the root.der certificate generated on the RADIUS server and install it on your computer. Under Windows, simply double-click on the file and select “Install certificate”.
Fig 24 : Certificate information
DEPLOYING A SECURED ARCHITECTURE
WIRELESS SECURITY ARCHITECTURE FOR CAMPUS NETWORK 32/37
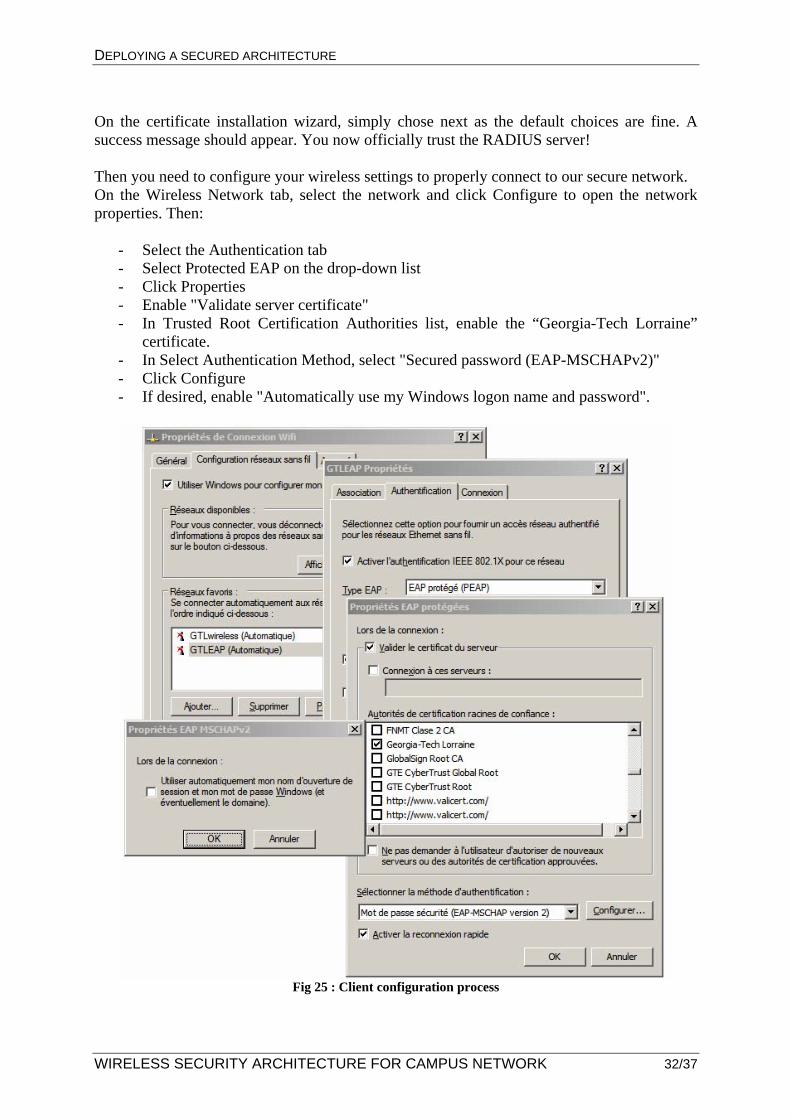
On the certificate installation wizard, simply chose next as the default choices are fine. A success message should appear. You now officially trust the RADIUS server! Then you need to configure your wireless settings to properly connect to our secure network. On the Wireless Network tab, select the network and click Configure to open the network properties. Then:
- Select the Authentication tab - Select Protected EAP on the drop-down list - Click Properties - Enable "Validate server certificate" - In Trusted Root Certification Authorities list, enable the “Georgia-Tech Lorraine”
certificate. - In Select Authentication Method, select "Secured password (EAP-MSCHAPv2)" - Click Configure - If desired, enable "Automatically use my Windows logon name and password".
Fig 25 : Client configuration process

Interfacing with the LDAP directory
Guillaume-Jean Herbiet – Grégory Nou 33/37
Interfacing with the LDAP directory
Overview
What is a Directory Service? A directory is a database structure that is generally optimized for reading, searching, and browsing entries. Directories tend to contain descriptives and attribute-based information, and they usually support filtering capabilities for the purpose of delivering faster and more accurate search results. Directories should be tuned to give a quick response to high-volume lookups. They might have the ability to replicate information between similar servers to increase availability and reliability of the provided service. When database information is replicated between the servers, temporary inconsistencies between the replicas could occur and should be synchronized in a short amount of time to preserve the reliability of information.
What is LDAP? LDAP stands for Lightweight Directory Access Protocol. The LDAP information model contains a number of individual records known as entries, which represent a collection of attributes that has a globally unique distinguished name (DN). Each of the entry's attributes has a type and one or more values. The types are typically strings, like uid for user identification, cn for common name, sn for surname, or mail for e-mail address. The syntax of values depends on the attribute type. For example, a cn attribute might contain the value Gregory Nou, and a mail attribute might contain the value [email protected]. In LDAP, directory entries are arranged in a hierarchical tree-like structure. The next figure shows a directory structure example. Traditionally, this structure reflected geographic or organizational boundaries. Entries representing countries appear at the top of the tree, and below them are entries representing national organizations. Below them might be entries representing organizational units, people, printers, documents, or just about anything else you can think of. Alternatively, the directory structure can be based on domain names, which is becoming increasingly popular. As you can see in the next figure, the directory structure we planned is based on domain name (i.e., dc=georgiatech-metz, dc=fr) instead of o=georgiatech-metz, c=FR, which would represent a geographic location.
How Does LDAP Work? The LDAP directory service is based on a client/server model, where one or more LDAP servers contain the data making up the directory information tree. The client connects to the LDAP server and requests specific information, typically by issuing a search function. The server addresses its database and responds with an appropriate answer or otherwise points to the directory server where the client can get this information. No matter which LDAP server a client connects to, it sees the same view of the directory. Thus, a name presented to one LDAP server references the same entry as another LDAP server, making it an important feature of a global directory service.
Installing and configuring
Installing Installing OpenLDAP is quite easy on redhat... Just type (as root) :
DEPLOYING A SECURED ARCHITECTURE
WIRELESS SECURITY ARCHITECTURE FOR CAMPUS NETWORK 34/37
yum install openldap-servers && yum install openldap-clients Then comes the tricky part :) It's now time to edit slapd.conf, which is the configuration file of ldap server. As we will use LDAP with radius, it could be a good idea to add a new schema : RADIUS-LDAPv3.schema. A schema specifies, among other rules, the types of objects that a directory may have and the mandatory and optional attributes of each object type. The LDAP v3 defines a schema RFC 2252 and 2256) based on the X.500 standard for common objects found in a network, such as countries, localities, organization, users/persons, groups and devices. We will generate a new password using the command slappasswd -h {SSHA} and we should change the access control list, by adding: access to attribute=userPassword by dn="cn=admin,dc=georgiatech-metz,dc=fr" write by anonymous auth by self write by * none access to * by dn="cn=admin,dc=georgiatech-metz,dc=fr" write by users read by * none Now, as root, we can start the LDAP server: # /etc/init.d/slapd start or more easily : slapd Now, we can add our first piece of data in the directory : dn: dc=georgiatech-metz,dc=fr objectClass: organization o: GTL dn: cn=admin,dc=georgiatech-metz,dc=fr objectClass: organizationalRole objectClass: simpleSecurityObject cn: admin description: LDAP administrator userPassword: {SSHA}N95/ff6AEJSDOhmCgjT+vRym7nHAf9bw Putting it in a .ldif file, we then can type : ldapadd -W -x -D cn=root,dc=georgiatech-metz,dc=fr -f initial.ldif Now, let's set up OpenLDAP for 802.1x It would be great to create a separate LDAP subtree for 802.1x devices. This is a good idea to do so, because in our case, we could already have aLDAP directory to identify users on unix machines, without willing to provide to every of them a Wi-Fi access: dn: cn=dot1x,dc=cs,dc=,dc=edu objectClass: container
Interfacing with the LDAP directory
Guillaume-Jean Herbiet – Grégory Nou 35/37
cn: dot1x structuralObjectClass: container Now, we are ready to add 802.1x users : dn: uid=someHost,cn=dot1x,dc=cs,dc=school,dc=edu objectClass: top objectClass: radiusprofile objectClass: inetOrgPerson cn: someHost sn: someHost uid: someHost description: 802.1x user radiusFilterId: "Enterasys:version=1:policy=Student User" userPassword: somePassword This password in userPassword can be encrypted or not. It is not really important, as only the user and the admins may have access to it. Also note the field radiusFilterId, which is an additional piece of information, which can be supplied to the switch. In this example, it it a Enterasys switch, which will assigne a policy "Student User" to the machine that authenticate as someHost Now, we are ready to modify FreeRADIUS configuration file, radiusd.conf : ldap ldap_1x { server = "locahost" identity = "uid=onex,cn=users,dc=georgiatech-metz,dc=fr" password = "password" basedn = "dc=georgiatech-metz,dc=fr" base_filter = "(objectclass=radiusprofile)" # as it is on localhost, we do not use TLS # profile_attribute = "radiusProfileDn" access_attr = "radiusFilterId" dictionary_mapping = ${raddbdir}/ldap.attrmap authtype = ldap ldap_connections_number = 5 timeout = 4 timelimit = 3 net_timeout = 1 } Then, we need to add ldap_1x in the authorize section of radiusd.conf.
Using PEAP with OpenLDAP If we need to use PEAP, we will need to add NT/LM hashes to every user record in the LDAP directory. The easiest thing to do may to set up Samba with LDAP. To make it short, that means adding the samba schema to our LDAP configuration. Another caveat is that we cannot use LDAP bind to authenticate users with PEAP, because it will always do MSCHAPv2 authentication in the inner tunnel and RAIDUS needs access to NT/LM hashes. Therefor, we need another user who will have the right access, and then change the access to userPassword, sambaNTPassword, and sambaLMPassword.
CONCLUSION
WIRELESS SECURITY ARCHITECTURE FOR CAMPUS NETWORK 36/37
Conclusion Today, no major constructor provides an already-made secured wireless network solution, and there is a reason to that: deploying such an infrastructure is complex, and is very time-consuming, because each deployment will ask a different (and fine) tuning of applications to be used. As a matter of fact, our work was essentially about choices, trying to decide what is possible, and what is not, deciding where it is no more security, but paranoia, and how much user-friendly it should be. One of our greatest regret is lacking of time to deploy VPN and VLANs, as well as wireless IDS systems. We believe, from what we could read, that these tools are at least very important (and more often, mandatory) in a corporate network, or in a network with sensitive data, like in GTL, where there is labs.

Guillaume-Jean Herbiet – Grégory Nou 37/37
References
[1] Andrew A. Vladimirov, Konstantin V. Gavrilenko, Andrei A. Mikhailovsky. Wi-Foo : the Secrets of Wireless Hacking. Addison Wesley. June 2004
[2] Jon Edney, William A. Arbaugh. Real 802.11 Security: Wi-Fi Protected Access and 802.11i. Addison Wesley. July 2003
[3] G. Pujolle. Sécurité Wi-Fi. Eyrolles. Oct. 2004
[4] A. Géron. Wi-Fi, déploiement et Sécurité. Dunod. Nov. 2004
[5] Extented EAP for WPA and WPA2, http://www.wifialliance.com/OpenSection/eap.asp
[6] Lars Strand. 802.1X Port-Based Authentication HOWTO, http://www.tldp.org/HOWTO/8021X-HOWTO/index.html
[7] C. Rigney, S. Willens, A. Rubens, W. Simpson. RFC 2865: Remote Authentication Dial In User Service (RADIUS), http://www.ietf.org/rfc/rfc2865.txt [8] B. Aboba, D. Simon. RFC 2716: PPP EAP TLS Authentication Protocol, http://www.ietf.org/rfc/rfc2716.txt
[9] L. Blunk, J. Vollbrecht. RFC 2284: PPP Extensible Authentication Protocol (EAP), http://www.ietf.org/rfc/rfc2284.txt
[10] G. Zorn. RFC 2548 : Microsoft Vendor-specific RADIUS Attributes, http://www.ietf.org/rfc/rfc2548.txt
[11] C. Blancher. La sécurité dans les réseaux 802.11 : quoi de neuf depuis un an ? In MISC #12, April 2004.
[12] Rob Flickenger. Wi-Fi 200%: "wireless hacks". O'Reilly. 2003
[13] P. Roshan, J. Leary. "802.11 Wireless LAN Fundamentals". Cisco Press. 2004


![Wireless Architecture[1]](https://img.pdfslide.us/doc/110x75/577ce4561a28abf1038e1f1b/wireless-architecture1.jpg)