Embed Size (px)
Citation preview
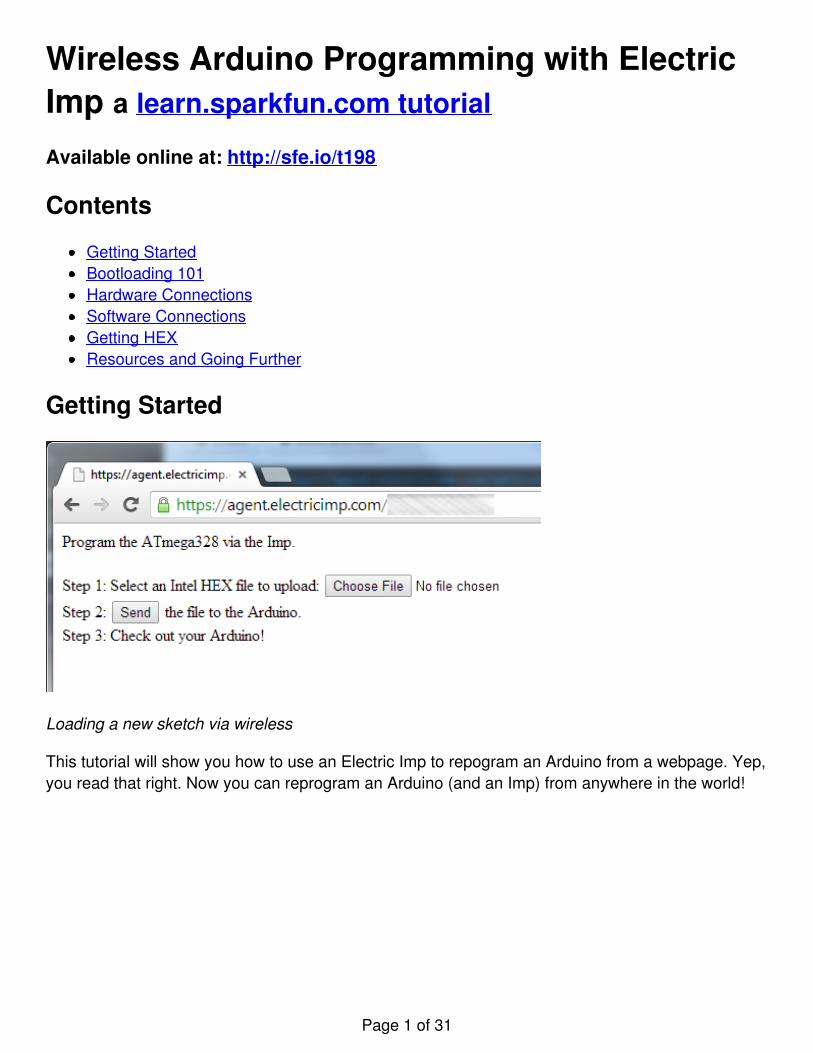
Wireless Arduino Programming with ElectricImp a learn.sparkfun.com tutorial
Available online at: http://sfe.io/t198
Contents
Getting StartedBootloading 101Hardware ConnectionsSoftware ConnectionsGetting HEXResources and Going Further
Getting Started
Loading a new sketch via wireless
This tutorial will show you how to use an Electric Imp to repogram an Arduino from a webpage. Yep,you read that right. Now you can reprogram an Arduino (and an Imp) from anywhere in the world!
Page 1 of 31
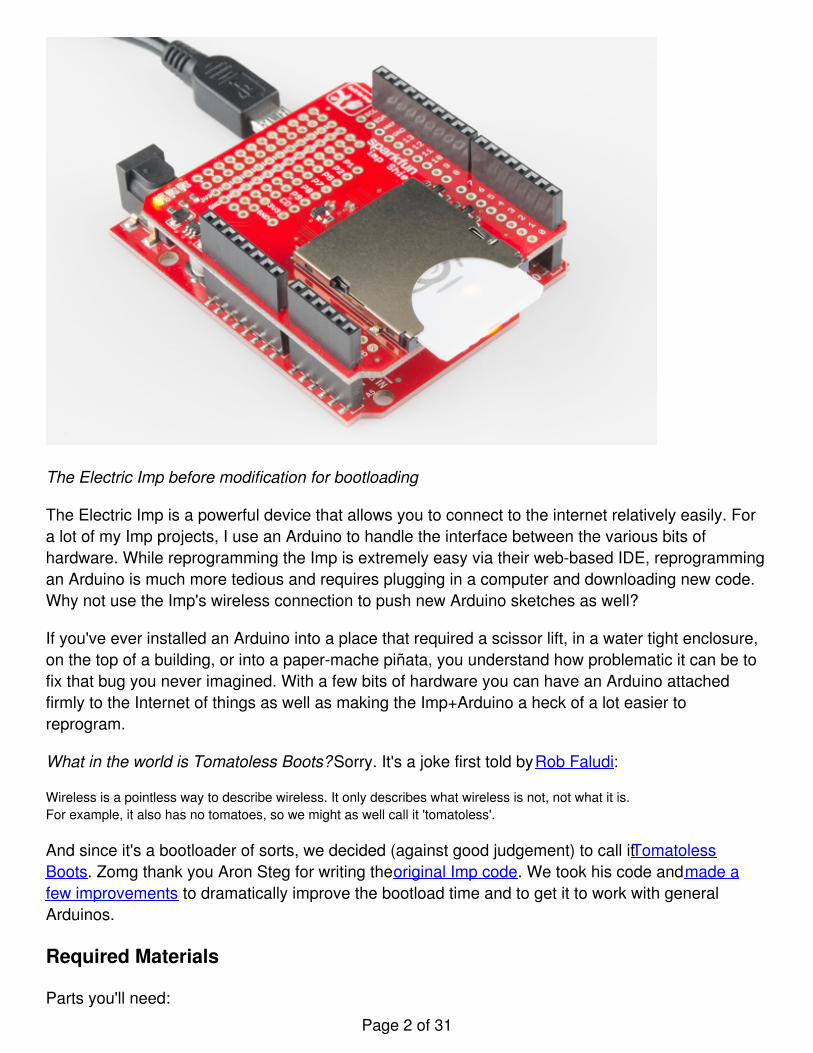
The Electric Imp before modification for bootloading
The Electric Imp is a powerful device that allows you to connect to the internet relatively easily. Fora lot of my Imp projects, I use an Arduino to handle the interface between the various bits ofhardware. While reprogramming the Imp is extremely easy via their web-based IDE, reprogrammingan Arduino is much more tedious and requires plugging in a computer and downloading new code.Why not use the Imp's wireless connection to push new Arduino sketches as well?
If you've ever installed an Arduino into a place that required a scissor lift, in a water tight enclosure,on the top of a building, or into a paper-mache piñata, you understand how problematic it can be tofix that bug you never imagined. With a few bits of hardware you can have an Arduino attachedfirmly to the Internet of things as well as making the Imp+Arduino a heck of a lot easier toreprogram.
What in the world is Tomatoless Boots? Sorry. It's a joke first told by Rob Faludi:
Wireless is a pointless way to describe wireless. It only describes what wireless is not, not what it is. For example, it also has no tomatoes, so we might as well call it 'tomatoless'.
And since it's a bootloader of sorts, we decided (against good judgement) to call it TomatolessBoots. Zomg thank you Aron Steg for writing the original Imp code. We took his code and made afew improvements to dramatically improve the bootload time and to get it to work with generalArduinos.
Required Materials
Parts you'll need:
Page 2 of 31
Imp Arduino Bootloading Wishlist SparkFun Wish
List
Arduino Stackable Header Kit - R3PRT-11417
These headers are made to work with the Arduino Uno R3, Leonardo and new Arduino boards going forward. Th…
SparkFun RedBoard - Programmed with ArduinoDEV-12757
At SparkFun we use many Arduinos and we're always looking for the simplest, most stable one. Each board is a b…
SparkFun Electric Imp ShieldDEV-12887
If you aren't familiar with the Electric Imp, it essentially provides an easy, integrated way to connect almost any ha…
Electric ImpWRL-11395
We know what you're thinking, "What's the big deal? Looks like an SD card..." Well this is no SD card! The Electric…
View Imp Arduino Bootloading Wishlist on SparkFun.com
Along with the above parts, you'll need the following tools.
Exacto KnifeSoldering iron and a bit of wireLocal Wifi access
This reprogramming-over-wifi trick only works with ATmega328 based Arduinos with a serialbootloader such as the Arduino Uno, Fio, LilyPad, Pro, Pro Mini, and RedBoard. This tutorial will notwork with the Due, Leonardo, Micro, Galileo, or Teensy. There are probably some really good waysof getting these other boards to bootload over wifi but their bootloaders are different enough thatthis tutorial doesn't attempt to cover them.
Suggested Reading
Other tutorials you may want to brush up on before diving into this one:
Getting Started with the Electric ImpHow to use a multimeterHow to install and solder Arduino Headers
Bootloading 101
Now for a bit of history and bootloader basics:
Page 3 of 31
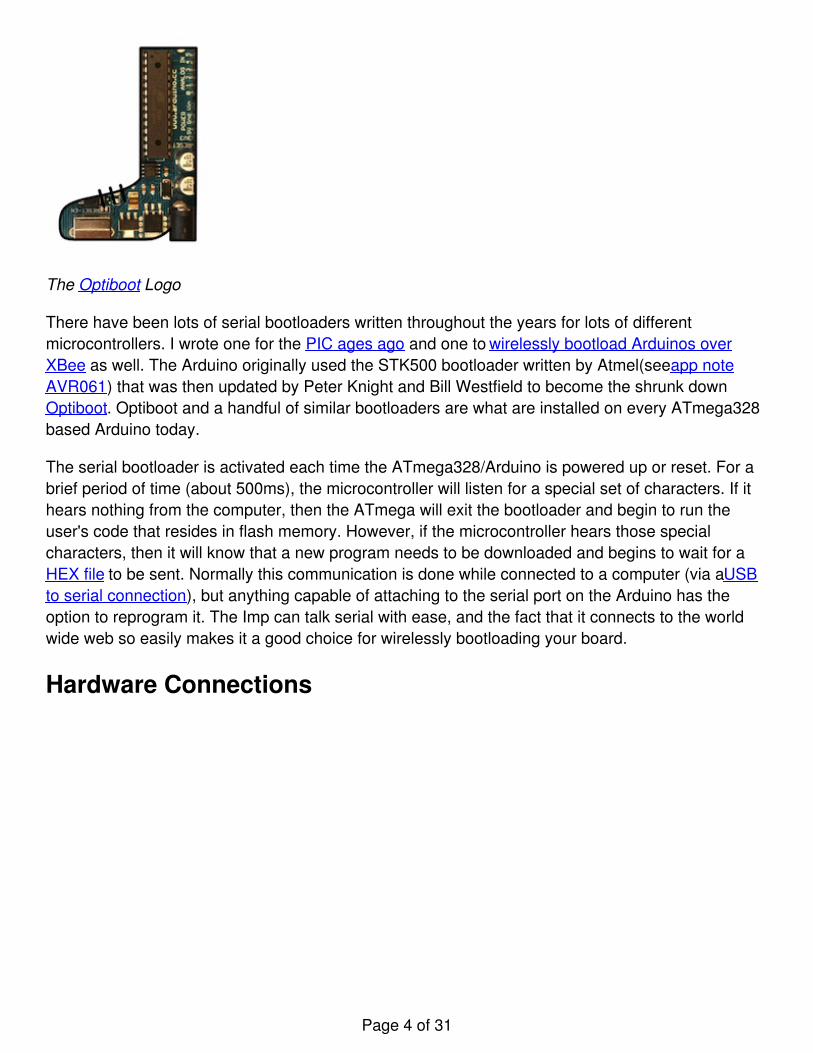
The Optiboot Logo
There have been lots of serial bootloaders written throughout the years for lots of differentmicrocontrollers. I wrote one for the PIC ages ago and one to wirelessly bootload Arduinos overXBee as well. The Arduino originally used the STK500 bootloader written by Atmel(see app noteAVR061) that was then updated by Peter Knight and Bill Westfield to become the shrunk downOptiboot. Optiboot and a handful of similar bootloaders are what are installed on every ATmega328based Arduino today.
The serial bootloader is activated each time the ATmega328/Arduino is powered up or reset. For abrief period of time (about 500ms), the microcontroller will listen for a special set of characters. If ithears nothing from the computer, then the ATmega will exit the bootloader and begin to run theuser's code that resides in flash memory. However, if the microcontroller hears those specialcharacters, then it will know that a new program needs to be downloaded and begins to wait for aHEX file to be sent. Normally this communication is done while connected to a computer (via a USBto serial connection), but anything capable of attaching to the serial port on the Arduino has theoption to reprogram it. The Imp can talk serial with ease, and the fact that it connects to the worldwide web so easily makes it a good choice for wirelessly bootloading your board.
Hardware Connections
Page 4 of 31
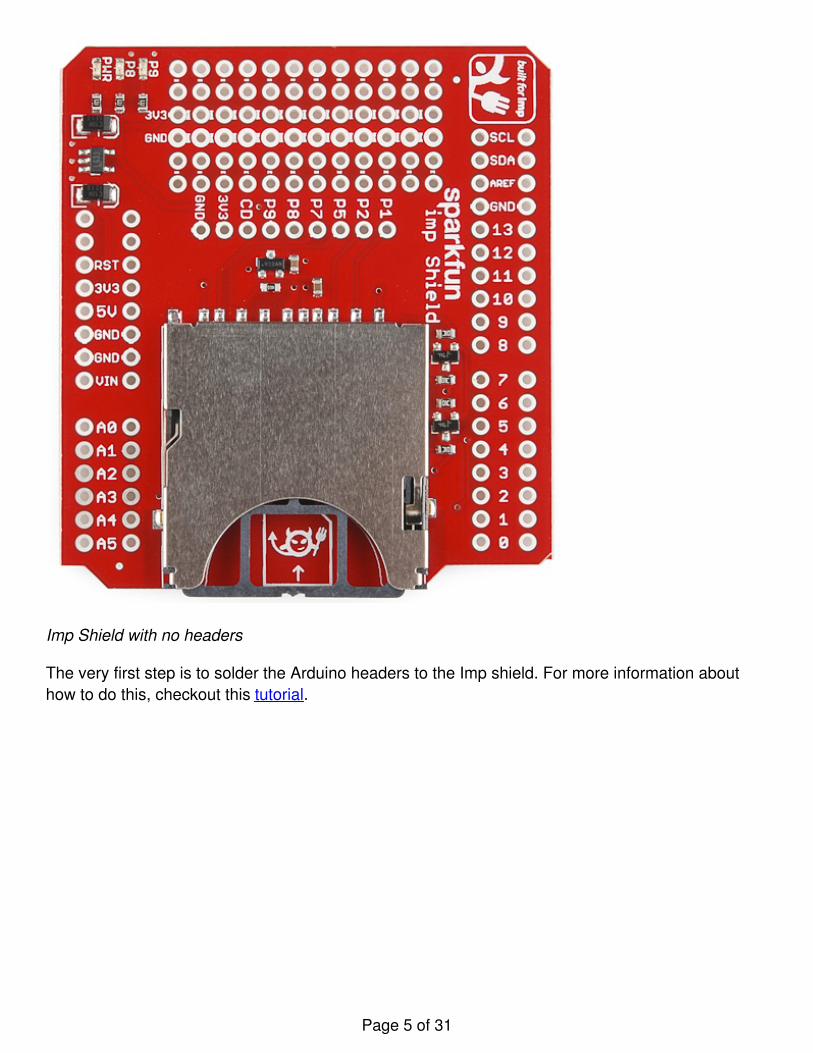
Imp Shield with no headers
The very first step is to solder the Arduino headers to the Imp shield. For more information abouthow to do this, checkout this tutorial.
Page 5 of 31
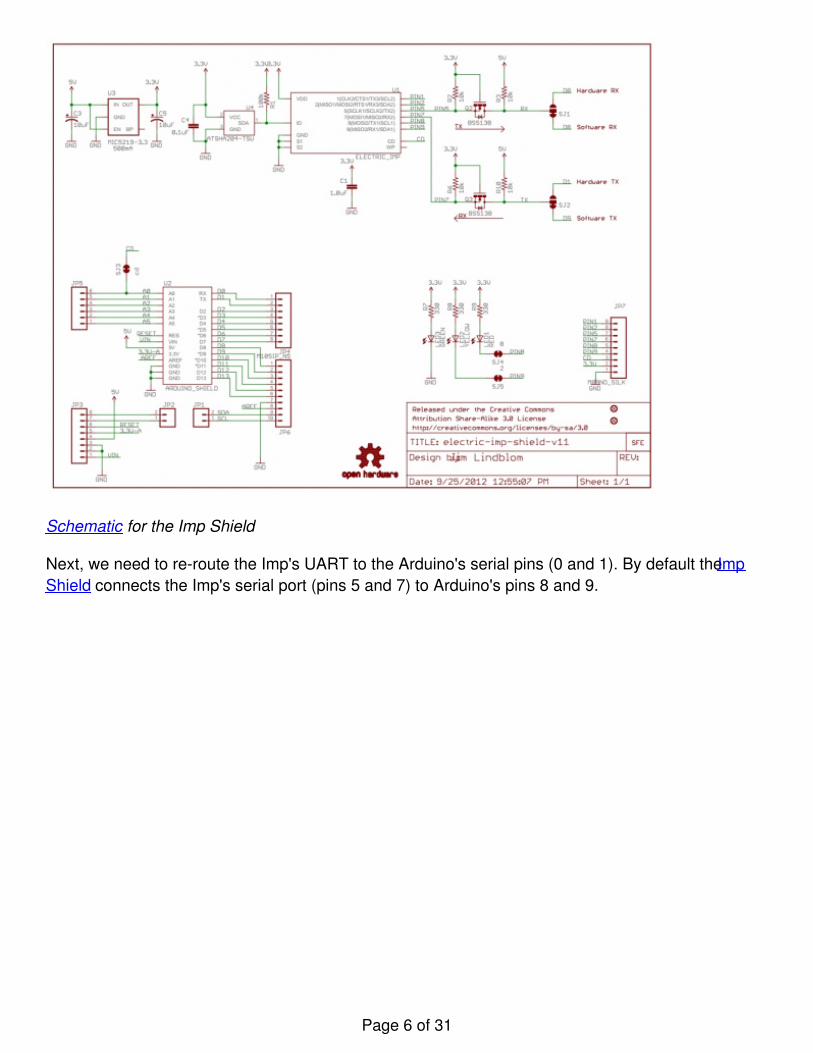
Schematic for the Imp Shield
Next, we need to re-route the Imp's UART to the Arduino's serial pins (0 and 1). By default the ImpShield connects the Imp's serial port (pins 5 and 7) to Arduino's pins 8 and 9.
Page 6 of 31

The TX and RX pads with default trace
Luckily, the genius behind the Imp shield design had the foresight to make it easy to switch pins(Jim is awesome). On the back of the shield, you'll find two jumpers labeled RX and TX. In theimage above, you should see a small trace connecting the TX and RX pins of the Imp to the rightpads labeled 8 and 9.
Page 7 of 31
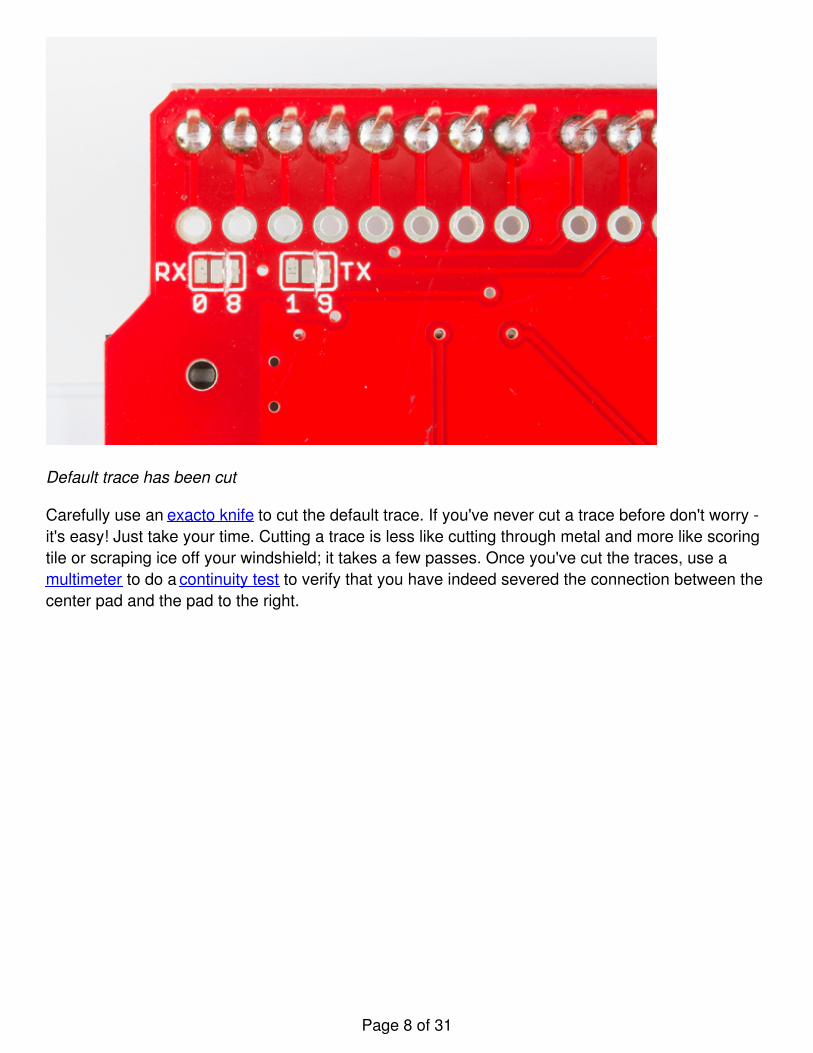
Default trace has been cut
Carefully use an exacto knife to cut the default trace. If you've never cut a trace before don't worry -it's easy! Just take your time. Cutting a trace is less like cutting through metal and more like scoringtile or scraping ice off your windshield; it takes a few passes. Once you've cut the traces, use amultimeter to do a continuity test to verify that you have indeed severed the connection between thecenter pad and the pad to the right.
Page 8 of 31
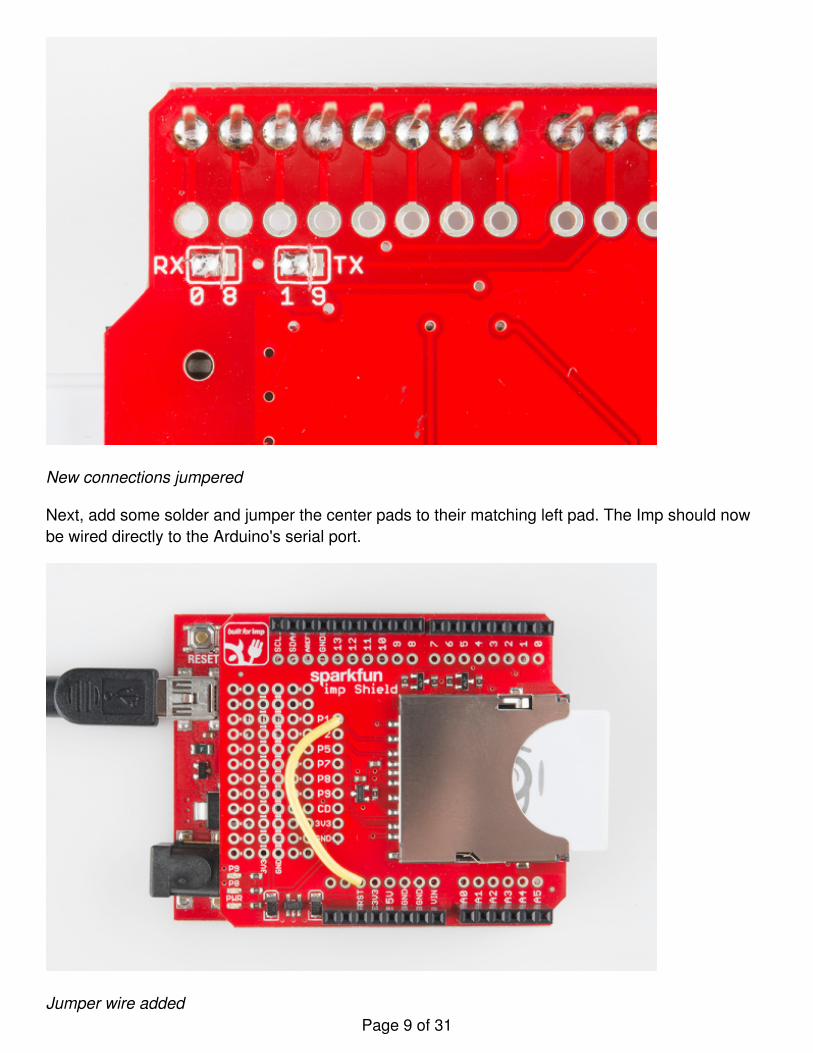
New connections jumpered
Next, add some solder and jumper the center pads to their matching left pad. The Imp should nowbe wired directly to the Arduino's serial port.
Jumper wire addedPage 9 of 31
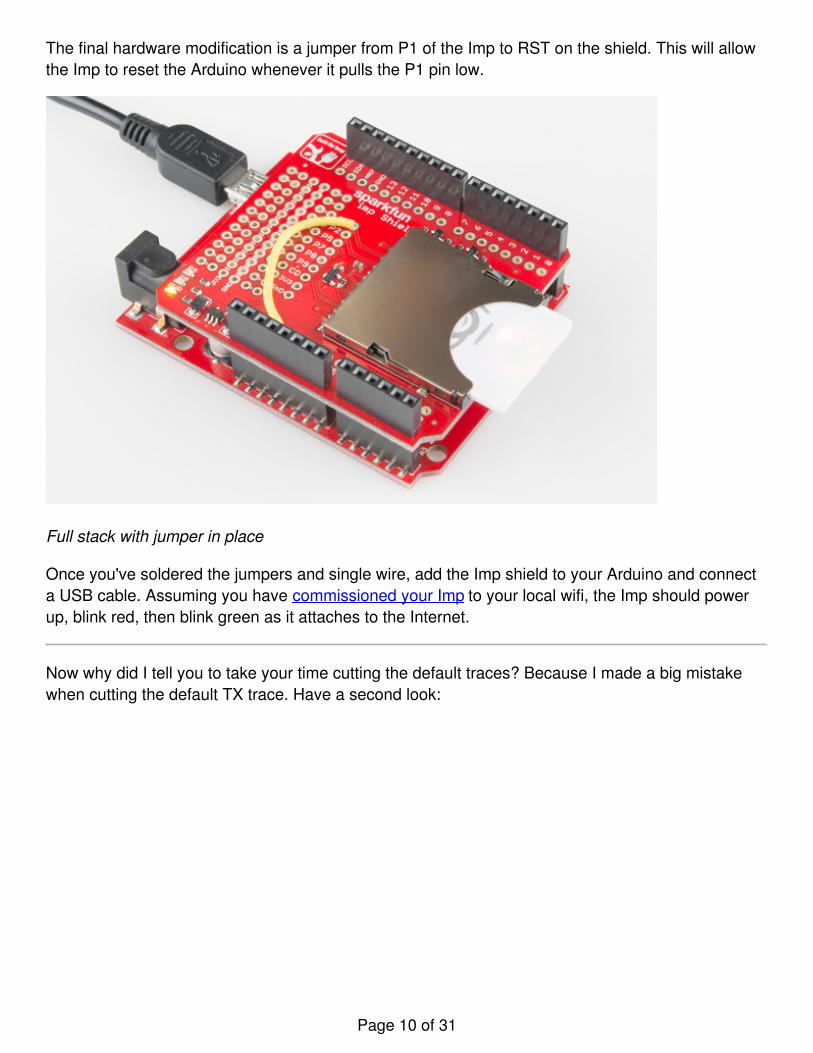
The final hardware modification is a jumper from P1 of the Imp to RST on the shield. This will allowthe Imp to reset the Arduino whenever it pulls the P1 pin low.
Full stack with jumper in place
Once you've soldered the jumpers and single wire, add the Imp shield to your Arduino and connecta USB cable. Assuming you have commissioned your Imp to your local wifi, the Imp should powerup, blink red, then blink green as it attaches to the Internet.
Now why did I tell you to take your time cutting the default traces? Because I made a big mistakewhen cutting the default TX trace. Have a second look:
Page 10 of 31
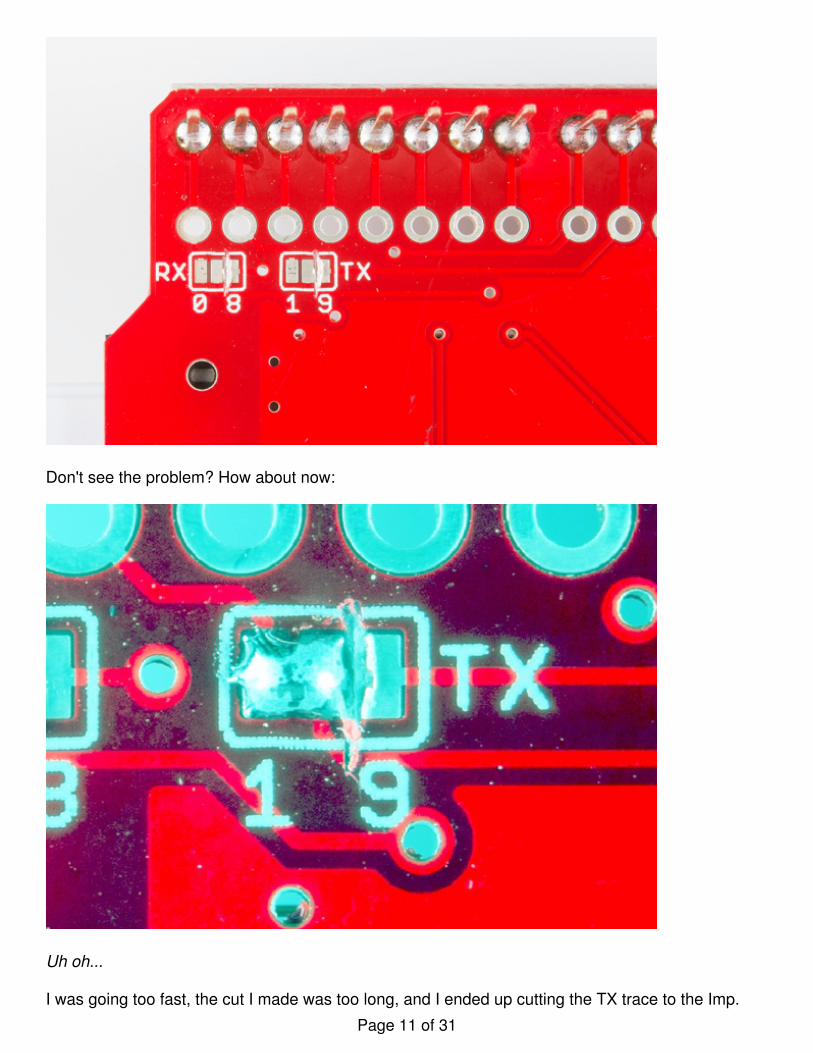
Don't see the problem? How about now:
Uh oh...
I was going too fast, the cut I made was too long, and I ended up cutting the TX trace to the Imp.
Page 11 of 31
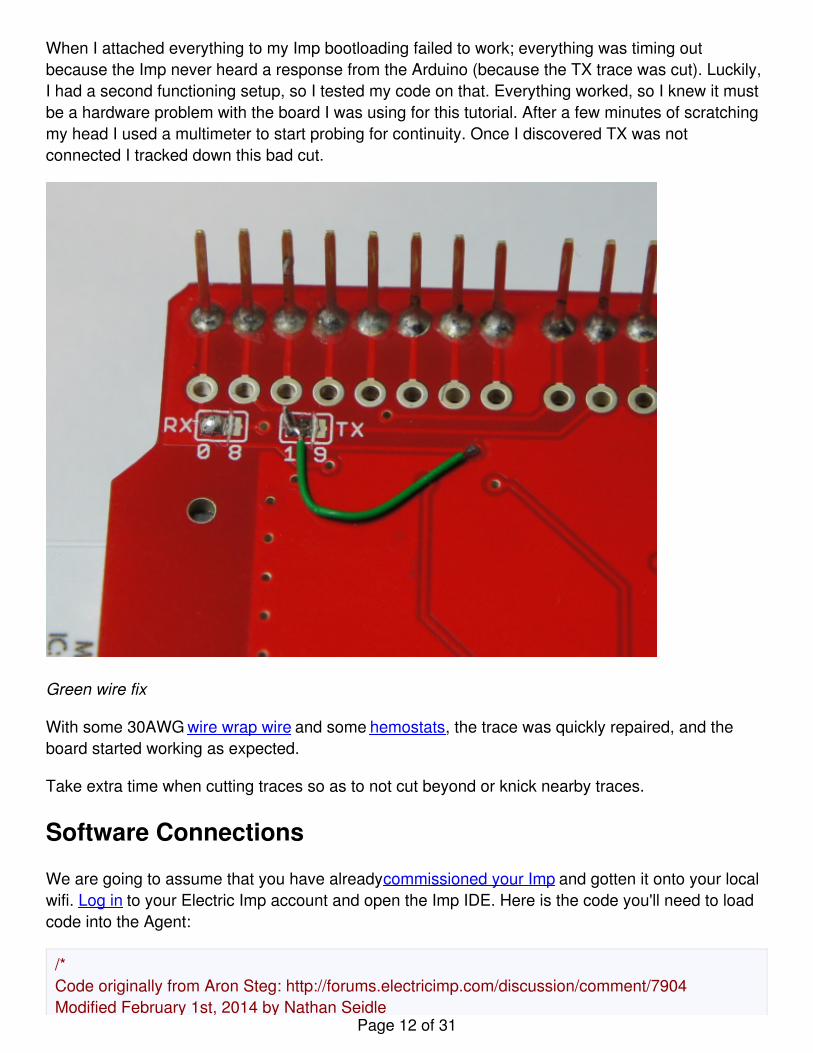
When I attached everything to my Imp bootloading failed to work; everything was timing outbecause the Imp never heard a response from the Arduino (because the TX trace was cut). Luckily,I had a second functioning setup, so I tested my code on that. Everything worked, so I knew it mustbe a hardware problem with the board I was using for this tutorial. After a few minutes of scratchingmy head I used a multimeter to start probing for continuity. Once I discovered TX was notconnected I tracked down this bad cut.
Green wire fix
With some 30AWG wire wrap wire and some hemostats, the trace was quickly repaired, and theboard started working as expected.
Take extra time when cutting traces so as to not cut beyond or knick nearby traces.
Software Connections
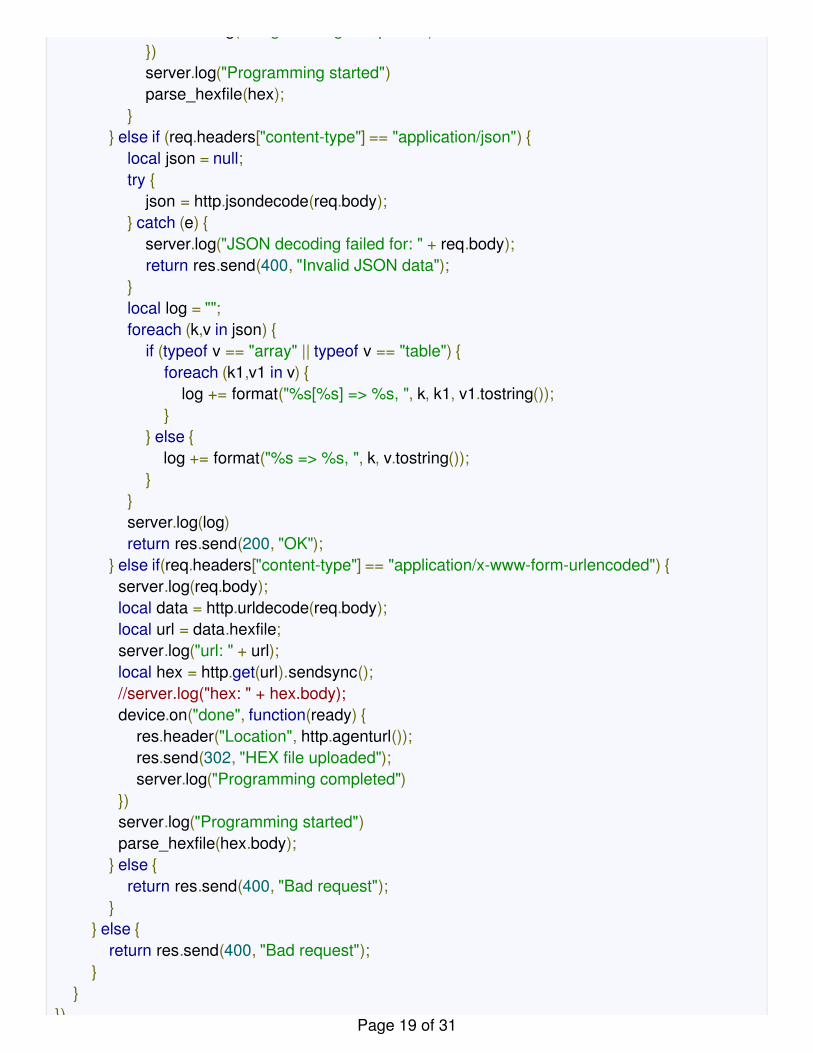
We are going to assume that you have already commissioned your Imp and gotten it onto your localwifi. Log in to your Electric Imp account and open the Imp IDE. Here is the code you'll need to loadcode into the Agent:
/*Code originally from Aron Steg: http://forums.electricimp.com/discussion/comment/7904Modified February 1st, 2014 by Nathan Seidle
Page 12 of 31
Modified February 1st, 2014 by Nathan SeidleMany great fixes were made by Aaron Steg, May 2014.
Currently, the only difference between this code and Aaron's original is we invertthe reset line logic to work with standard Arduinos.
Original license:
Copyright (c) 2014 Electric ImpThe MIT License (MIT)http://opensource.org/licenses/MIT*/
server.log("Agent started, URL is " + http.agenturl());
const MAX_PROGRAM_SIZE = 0x20000;const ARDUINO_BLOB_SIZE = 128;
program <- null;
//------------------------------------------------------------------------------------------------------------------------------html <- @"<!doctype html><HTML lang='en'><head><meta name='viewport' content='width=device-width, initial-scale=1.0'><!-- Bootstrap --><!-- Latest compiled and minified CSS --><link rel='stylesheet' href='//maxcdn.bootstrapcdn.com/bootstrap/3.2.0/css/bootstrap.min.css'><!-- Optional theme --><link rel='stylesheet' href='//maxcdn.bootstrapcdn.com/bootstrap/3.2.0/css/bootstrap-theme.min.css'></head><BODY><div class='container'><h1>Program the ATmega328 via the Imp.</h1><form method='POST' enctype='multipart/form-data'>Step 1: Select an Intel HEX file to upload: <input type=file name=hexfile><br/>Step 2: <input type=submit value=Press> to upload the file.<br/>Step 3: Check out your Arduino<br/></form><form method='POST' id='hex-upload-form'><input type=hidden name=hexfile id='hex-file'></form><h2>OR</h2><div class='panel panel-default'><div class='panel-heading' id='dropbox-button'></div><div class='panel-body'>
Page 13 of 31
<div class='panel-body'><table class='table'><thead><tr><th>#</th><th>File Name</th><th>Action</th></tr></thead><tbody id='link-text'></tbody></table></div></div></div>
<script src='//ajax.googleapis.com/ajax/libs/jquery/1.11.1/jquery.min.js'></script><script src='//maxcdn.bootstrapcdn.com/bootstrap/3.2.0/js/bootstrap.min.js'></script><script type='text/javascript' src='//www.dropbox.com/static/api/2/dropins.js' id='dropboxjs' data-app-key='8jsgtlv8g2xgq9s'></script><script type='text/javascript'>function uploadFile(fileLink) { $('#hex-file').val(fileLink); $('#hex-upload-form').submit();}function buildLinkRow(idx, fileLink) { $('#link-text').append('<tr id=\'link-row-'+idx+'\'><td>'+idx+'</td><td>'+fileLink+'</td><td><button type=button id=upload-button-'+idx+' class=\'btn btn-default\'><span class=\'glyphicon glyphicon-upload\'></span></button><button type=button id=\'remove-button-'+idx+'\' class=\'btn btn-default\'><span class=\'glyphicon glyphicon-remove\'></span></button></td></tr>'); $('#upload-button-'+idx).click({value: fileLink}, function(e) { uploadFile(e.data.value); }); $('#remove-button-'+idx).click({value: idx, link: fileLink}, function(e) { $('#link-row-'+e.data.value).remove(); links.splice(idx - 1, 1); buildLinkTable(); });}function buildLinkTable() { $('#link-text').empty(); if( links.length > 0 ) { for( var i=0; i < links.length; i++ ) { buildLinkRow(i+1, links[i]); } if( window.localStorage ) localStorage['links'] = JSON.stringify(links); } else { $('#link-text').append('<tr id=\'empty-row\'><td colspan=3>Please select a file.</td></tr>'); }}</script> Page 14 of 31
</script><script type='text/javascript'>options = { success: function(files) { links.push(files[0].link); buildLinkTable(); }, cancel: function() {
}, linkType: 'direct', multiselect: false, extensions: ['.hex']};var button = Dropbox.createChooseButton(options);$('#dropbox-button').html(button);
var emptyRow;var links = [];if( window.localStorage ) { var linksStr = localStorage['links']; if( linksStr ) { links = JSON.parse(linksStr); }} else { console.log('local storage not supported...');}buildLinkTable();
</script>
</BODY></HTML>";
//------------------------------------------------------------------------------------------------------------------------------// Parses a HTTP POST in multipart/form-data formatfunction parse_hexpost(req, res) { local boundary = req.headers["content-type"].slice(30); local bindex = req.body.find(boundary); local hstart = bindex + boundary.len(); local bstart = req.body.find("\r\n\r\n", hstart) + 4; local fstart = req.body.find("\r\n\r\n--" + boundary + "--", bstart); return req.body.slice(bstart, fstart);}
Page 15 of 31
//------------------------------------------------------------------------------------------------------------------------------// Parses a hex string and turns it into an integerfunction hextoint(str) { local hex = 0x0000; foreach (ch in str) { local nibble; if (ch >= '0' && ch <= '9') { nibble = (ch - '0'); } else { nibble = (ch - 'A' + 10); } hex = (hex << 4) + nibble; } return hex;}
//------------------------------------------------------------------------------------------------------------------------------// Breaks the program into chunks and sends it to the devicefunction send_program() { if (program != null && program.len() > 0) { local addr = 0; local pline = {}; local max_addr = program.len(); device.send("burn", {first=true}); while (addr < max_addr) { program.seek(addr); pline.data <- program.readblob(ARDUINO_BLOB_SIZE); pline.addr <- addr / 2; // Address space is 16-bit device.send("burn", pline) addr += pline.data.len(); } device.send("burn", {last=true}); }}
//------------------------------------------------------------------------------------------------------------------------------// Parse the hex into an array of blobsfunction parse_hexfile(hex) { try { // Look at this doc to work out what we need and don't. Max is about 122kb. // https://bluegiga.zendesk.com/entries/42713448--REFERENCE-Updating-BLE11x-firmware-using-UART-DFU server.log("Parsing hex file");
Page 16 of 31
server.log("Parsing hex file"); // Create and blank the program blob program = blob(0x20000); // 128k maximum for (local i = 0; i < program.len(); i++) program.writen(0x00, 'b'); program.seek(0); local maxaddress = 0, from = 0, to = 0, line = "", offset = 0x00000000; do { if (to < 0 || to == null || to >= hex.len()) break; from = hex.find(":", to); if (from < 0 || from == null || from+1 >= hex.len()) break; to = hex.find(":", from+1); if (to < 0 || to == null || from >= to || to >= hex.len()) break; line = hex.slice(from+1, to); // server.log(format("[%d,%d] => %s", from, to, line)); if (line.len() > 10) { local len = hextoint(line.slice(0, 2)); local addr = hextoint(line.slice(2, 6)); local type = hextoint(line.slice(6, 8));
// Ignore all record types except 00, which is a data record. // Look out for 02 records which set the high order byte of the address space if (type == 0) { // Normal data record } else if (type == 4 && len == 2 && addr == 0 && line.len() > 12) { // Set the offset offset = hextoint(line.slice(8, 12)) << 16; if (offset != 0) { server.log(format("Set offset to 0x%08X", offset)); } continue; } else { server.log("Skipped: " + line) continue; }
// Read the data from 8 to the end (less the last checksum byte) program.seek(offset + addr) for (local i = 8; i < 8+(len*2); i+=2) { local datum = hextoint(line.slice(i, i+2)); program.writen(datum, 'b') } Page 17 of 31
// Checking the checksum would be a good idea but skipped for now local checksum = hextoint(line.slice(-2)); /// Shift the end point forward if (program.tell() > maxaddress) maxaddress = program.tell(); } } while (from != null && to != null && from < to);
// Crop, save and send the program server.log(format("Max address: 0x%08x", maxaddress)); program.resize(maxaddress); send_program(); server.log("Free RAM: " + (imp.getmemoryfree()/1024) + " kb") return true; } catch (e) { server.log(e) return false; } }
//------------------------------------------------------------------------------------------------------------------------------// Handle the agent requestshttp.onrequest(function (req, res) { // return res.send(400, "Bad request"); // server.log(req.method + " to " + req.path) if (req.method == "GET") { res.send(200, html); } else if (req.method == "POST") {
if ("content-type" in req.headers) { if (req.headers["content-type"].len() >= 19 && req.headers["content-type"].slice(0, 19) == "multipart/form-data") { local hex = parse_hexpost(req, res); if (hex == "") { res.header("Location", http.agenturl()); res.send(302, "HEX file uploaded"); } else { device.on("done", function(ready) { res.header("Location", http.agenturl()); res.send(302, "HEX file uploaded"); server.log("Programming completed")
Page 18 of 31
server.log("Programming completed") }) server.log("Programming started") parse_hexfile(hex); } } else if (req.headers["content-type"] == "application/json") { local json = null; try { json = http.jsondecode(req.body); } catch (e) { server.log("JSON decoding failed for: " + req.body); return res.send(400, "Invalid JSON data"); } local log = ""; foreach (k,v in json) { if (typeof v == "array" || typeof v == "table") { foreach (k1,v1 in v) { log += format("%s[%s] => %s, ", k, k1, v1.tostring()); } } else { log += format("%s => %s, ", k, v.tostring()); } } server.log(log) return res.send(200, "OK"); } else if(req.headers["content-type"] == "application/x-www-form-urlencoded") { server.log(req.body); local data = http.urldecode(req.body); local url = data.hexfile; server.log("url: " + url); local hex = http.get(url).sendsync(); //server.log("hex: " + hex.body); device.on("done", function(ready) { res.header("Location", http.agenturl()); res.send(302, "HEX file uploaded"); server.log("Programming completed") }) server.log("Programming started") parse_hexfile(hex.body); } else { return res.send(400, "Bad request"); } } else { return res.send(400, "Bad request"); } }})
Page 19 of 31
viewraw
tomatoless.agent.nut
})
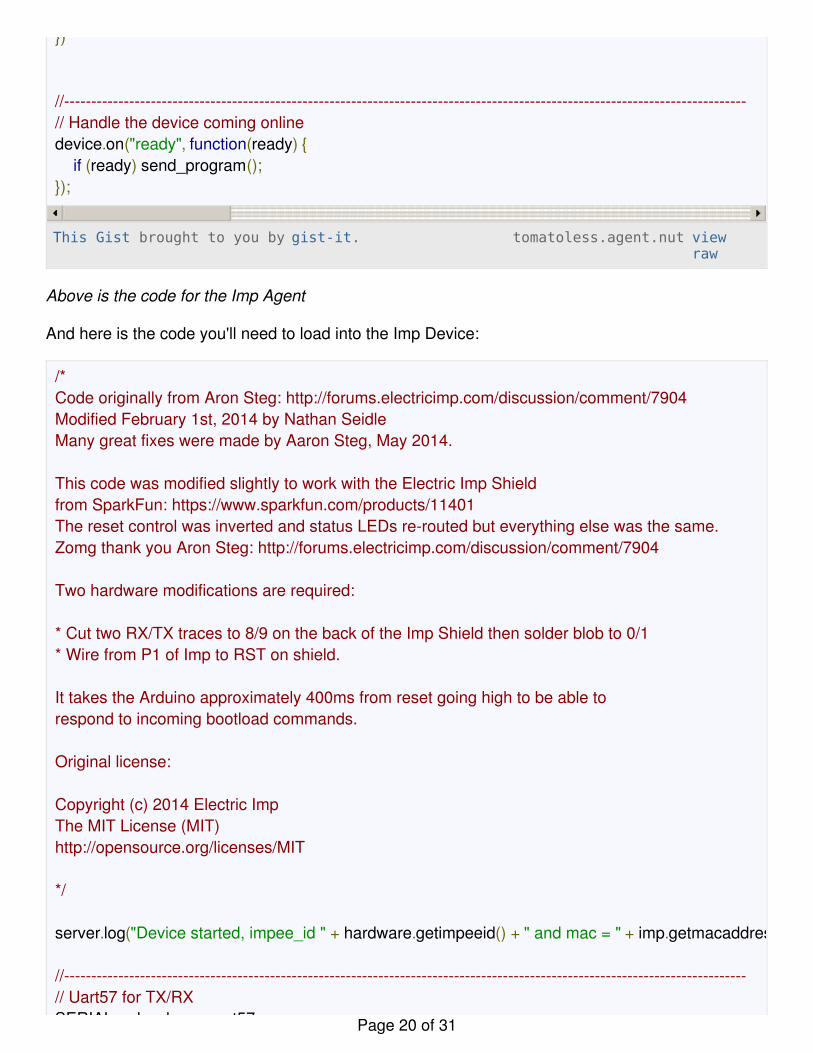
//------------------------------------------------------------------------------------------------------------------------------// Handle the device coming onlinedevice.on("ready", function(ready) { if (ready) send_program();});
This Gist brought to you by gist-it.
Above is the code for the Imp Agent
And here is the code you'll need to load into the Imp Device:
/*Code originally from Aron Steg: http://forums.electricimp.com/discussion/comment/7904Modified February 1st, 2014 by Nathan SeidleMany great fixes were made by Aaron Steg, May 2014.
This code was modified slightly to work with the Electric Imp Shield from SparkFun: https://www.sparkfun.com/products/11401The reset control was inverted and status LEDs re-routed but everything else was the same.Zomg thank you Aron Steg: http://forums.electricimp.com/discussion/comment/7904
Two hardware modifications are required:
* Cut two RX/TX traces to 8/9 on the back of the Imp Shield then solder blob to 0/1* Wire from P1 of Imp to RST on shield.
It takes the Arduino approximately 400ms from reset going high to be able to respond to incoming bootload commands.
Original license:
Copyright (c) 2014 Electric ImpThe MIT License (MIT)http://opensource.org/licenses/MIT
*/
server.log("Device started, impee_id " + hardware.getimpeeid() + " and mac = " + imp.getmacaddress
//------------------------------------------------------------------------------------------------------------------------------// Uart57 for TX/RXSERIAL <- hardware.uart57; Page 20 of 31
SERIAL <- hardware.uart57;SERIAL.configure(19200, 8, PARITY_NONE, 1, NO_CTSRTS);
// Set pin1 high for normal operation// Set pin1 low to reset a standard ArduinoRESET <- hardware.pin1;RESET.configure(DIGITAL_OUT);RESET.write(1); //Leave Arduino in normal (non-reset) state
// Pin 9 is the yellow LED on the Imp ShieldACTIVITY <- hardware.pin9;ACTIVITY.configure(DIGITAL_OUT);ACTIVITY.write(1);
// Pin 8 is the orange LEDLINK <- hardware.pin8;LINK.configure(DIGITAL_OUT);LINK.write(1);
// Sequence number__seq <- 0x28;
//------------------------------------------------------------------------------------------------------------------------------/* STK500 constants list, from AVRDUDE */const MESSAGE_START = 0x1B;const TOKEN = 0x0E;const STK_OK = 0x10;const STK_FAILED = 0x11; // Not usedconst STK_UNKNOWN = 0x12; // Not usedconst STK_NODEVICE = 0x13; // Not usedconst STK_INSYNC = 0x14; // ' 'const STK_NOSYNC = 0x15; // Not usedconst ADC_CHANNEL_ERROR = 0x16; // Not usedconst ADC_MEASURE_OK = 0x17; // Not usedconst PWM_CHANNEL_ERROR = 0x18; // Not usedconst PWM_ADJUST_OK = 0x19; // Not usedconst CRC_EOP = 0x20; // 'SPACE'const STK_GET_SYNC = 0x30; // '0'const STK_GET_SIGN_ON = 0x31; // '1'const STK_SET_PARAMETER = 0x40; // '@'const STK_GET_PARAMETER = 0x41; // 'A'const STK_SET_DEVICE = 0x42; // 'B'const STK_SET_DEVICE_EXT = 0x45; // 'E'const STK_ENTER_PROGMODE = 0x50; // 'P'const STK_LEAVE_PROGMODE = 0x51; // 'Q'
Page 21 of 31
const STK_CHIP_ERASE = 0x52; // 'R'const STK_CHECK_AUTOINC = 0x53; // 'S'const STK_LOAD_ADDRESS = 0x55; // 'U'const STK_UNIVERSAL = 0x56; // 'V'const STK_PROG_FLASH = 0x60; // '`'const STK_PROG_DATA = 0x61; // 'a'const STK_PROG_FUSE = 0x62; // 'b'const STK_PROG_LOCK = 0x63; // 'c'const STK_PROG_PAGE = 0x64; // 'd'const STK_PROG_FUSE_EXT = 0x65; // 'e'const STK_READ_FLASH = 0x70; // 'p'const STK_READ_DATA = 0x71; // 'q'const STK_READ_FUSE = 0x72; // 'r'const STK_READ_LOCK = 0x73; // 's'const STK_READ_PAGE = 0x74; // 't'const STK_READ_SIGN = 0x75; // 'u'const STK_READ_OSCCAL = 0x76; // 'v'const STK_READ_FUSE_EXT = 0x77; // 'w'const STK_READ_OSCCAL_EXT = 0x78; // 'x'
//------------------------------------------------------------------------------------------------------------------------------function HEXDUMP(buf, len = null) { if (buf == null) return "null"; if (len == null) { len = (typeof buf == "blob") ? buf.tell() : buf.len(); } local dbg = ""; for (local i = 0; i < len; i++) { local ch = buf[i]; dbg += format("0x%02X ", ch); } return format("%s (%d bytes)", dbg, len)}
//------------------------------------------------------------------------------------------------------------------------------function SERIAL_READ(len = 100, timeout = 300) { local rxbuf = blob(len); local write = rxbuf.writen.bindenv(rxbuf); local read = SERIAL.read.bindenv(SERIAL); local hw = hardware; local ms = hw.millis.bindenv(hw);
Page 22 of 31
local ms = hw.millis.bindenv(hw); local started = ms();
local charsRead = 0; LINK.write(0); //Turn LED on do { local ch = read(); if (ch != -1) { write(ch, 'b') charsRead++; if(charsRead == len) break; } } while (ms() - started < timeout); LINK.write(1); //Turn LED off
// Clean up any extra bytes while (SERIAL.read() != -1); if (rxbuf.tell() == 0) { return null; } else { return rxbuf; }}
//------------------------------------------------------------------------------------------------------------------------------function execute(command = null, param = null, response_length = 100, response_timeout = 300) { local send_buffer = null; if (command == null) { send_buffer = format("%c", CRC_EOP); } else if (param == null) { send_buffer = format("%c%c", command, CRC_EOP); } else if (typeof param == "array") { send_buffer = format("%c", command); foreach (datum in param) { switch (typeof datum) { case "string": case "blob": case "array": case "table": foreach (adat in datum) { send_buffer += format("%c", adat); } break; default: Page 23 of 31
default: send_buffer += format("%c", datum); } } send_buffer += format("%c", CRC_EOP); } else { send_buffer = format("%c%c%c", command, param, CRC_EOP); } // server.log("Sending: " + HEXDUMP(send_buffer)); SERIAL.write(send_buffer); local resp_buffer = SERIAL_READ(response_length+2, response_timeout); // server.log("Received: " + HEXDUMP(resp_buffer)); assert(resp_buffer != null); assert(resp_buffer.tell() >= 2); assert(resp_buffer[0] == STK_INSYNC); assert(resp_buffer[resp_buffer.tell()-1] == STK_OK); local tell = resp_buffer.tell(); if (tell == 2) return blob(0); resp_buffer.seek(1); return resp_buffer.readblob(tell-2);}
//------------------------------------------------------------------------------------------------------------------------------function check_duino() { // Clear the read buffer SERIAL_READ();
// Check everything we can check to ensure we are speaking to the correct boot loader local major = execute(STK_GET_PARAMETER, 0x81, 1); local minor = execute(STK_GET_PARAMETER, 0x82, 1); local invalid = execute(STK_GET_PARAMETER, 0x83, 1); local signature = execute(STK_READ_SIGN); assert(major.len() == 1 && minor.len() == 1); assert((major[0] >= 5) || (major[0] == 4 && minor[0] >= 4)); assert(invalid.len() == 1 && invalid[0] == 0x03); assert(signature.len() == 3 && signature[0] == 0x1E && signature[1] == 0x95 && signature[2] == 0x0F}
//------------------------------------------------------------------------------------------------------------------------------function program_duino(address16, data) {
Page 24 of 31
local addr8_hi = (address16 >> 8) & 0xFF; local addr8_lo = address16 & 0xFF; local data_len = data.len(); execute(STK_LOAD_ADDRESS, [addr8_lo, addr8_hi], 0); execute(STK_PROG_PAGE, [0x00, data_len, 0x46, data], 0) local data_check = execute(STK_READ_PAGE, [0x00, data_len, 0x46], data_len) assert(data_check.len() == data_len); for (local i = 0; i < data_len; i++) { assert(data_check[i] == data[i]); }
}
//------------------------------------------------------------------------------------------------------------------------------function bounce() { // Bounce the reset pin server.log("Bouncing the Arduino reset pin"); imp.sleep(0.5); ACTIVITY.write(0); //Turn on LED RESET.write(0); //Reset Arduino imp.sleep(0.2); RESET.write(1); //Return reset to high, bootloader on Arduino now begins imp.sleep(0.3); check_duino(); ACTIVITY.write(1); //Turn off LED}
//------------------------------------------------------------------------------------------------------------------------------function scan_serial() { local ch = null; local str = ""; do { ch = SERIAL.read(); if (ch != -1 && ch != 0) { str += format("%c", ch); } } while (ch != -1); if (str.len() > 0) { server.log("Serial: " + str); }
Page 25 of 31

viewraw
tomatoless.device.nut
}}
//------------------------------------------------------------------------------------------------------------------------------function burn(pline) { if ("first" in pline) { server.log("Starting to burn"); SERIAL.configure(115200, 8, PARITY_NONE, 1, NO_CTSRTS); bounce(); } else if ("last" in pline) { server.log("Done!") agent.send("done", true); SERIAL.configure(19200, 8, PARITY_NONE, 1, NO_CTSRTS, scan_serial); } else { program_duino(pline.addr, pline.data); }}
//------------------------------------------------------------------------------------------------------------------------------agent.on("burn", burn);agent.send("ready", true);SERIAL.configure(19200, 8, PARITY_NONE, 1, NO_CTSRTS, scan_serial);
This Gist brought to you by gist-it.
Above is the code for the Imp Device
Once you've successfully loaded both bits of code, find the agent link at the top of the page. Openanother browser tab, and navigate to the agent link. You should be presented with a simple HTMLpage:
Get ready... Go!Page 26 of 31
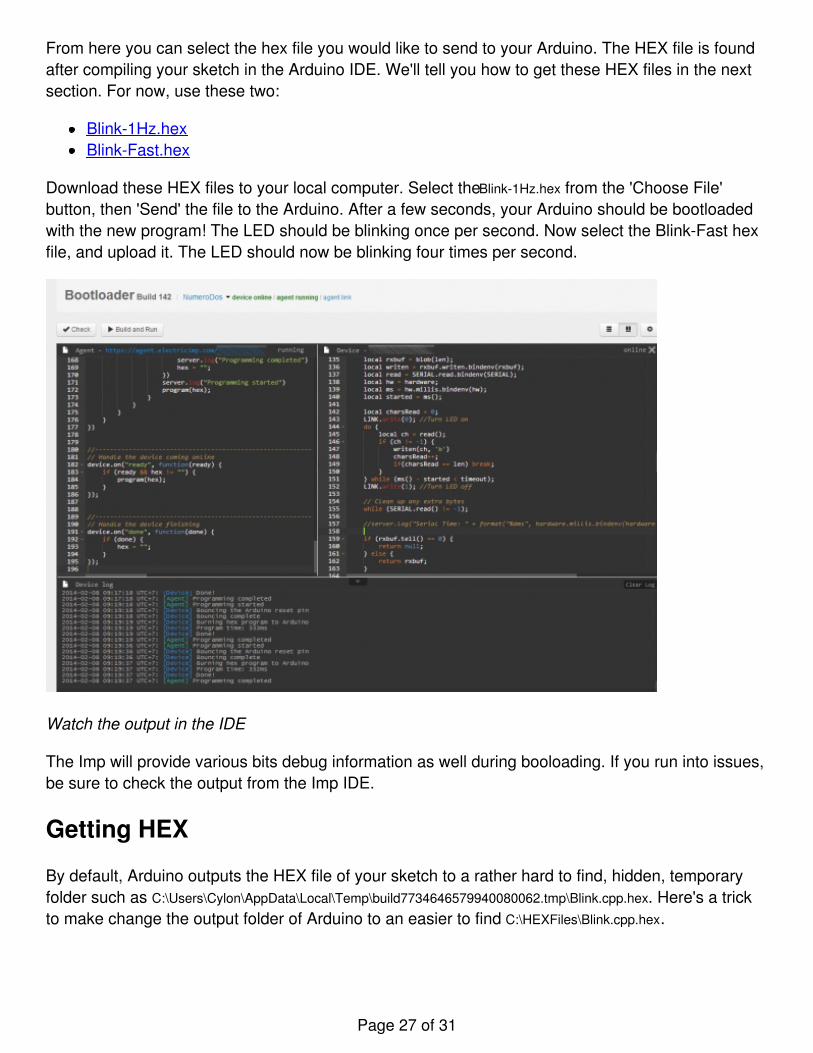
From here you can select the hex file you would like to send to your Arduino. The HEX file is foundafter compiling your sketch in the Arduino IDE. We'll tell you how to get these HEX files in the nextsection. For now, use these two:
Blink-1Hz.hexBlink-Fast.hex
Download these HEX files to your local computer. Select the Blink-1Hz.hex from the 'Choose File'button, then 'Send' the file to the Arduino. After a few seconds, your Arduino should be bootloadedwith the new program! The LED should be blinking once per second. Now select the Blink-Fast hexfile, and upload it. The LED should now be blinking four times per second.
Watch the output in the IDE
The Imp will provide various bits debug information as well during booloading. If you run into issues,be sure to check the output from the Imp IDE.
Getting HEX
By default, Arduino outputs the HEX file of your sketch to a rather hard to find, hidden, temporaryfolder such as C:\Users\Cylon\AppData\Local\Temp\build7734646579940080062.tmp\Blink.cpp.hex. Here's a trickto make change the output folder of Arduino to an easier to find C:\HEXFiles\Blink.cpp.hex.
Page 27 of 31
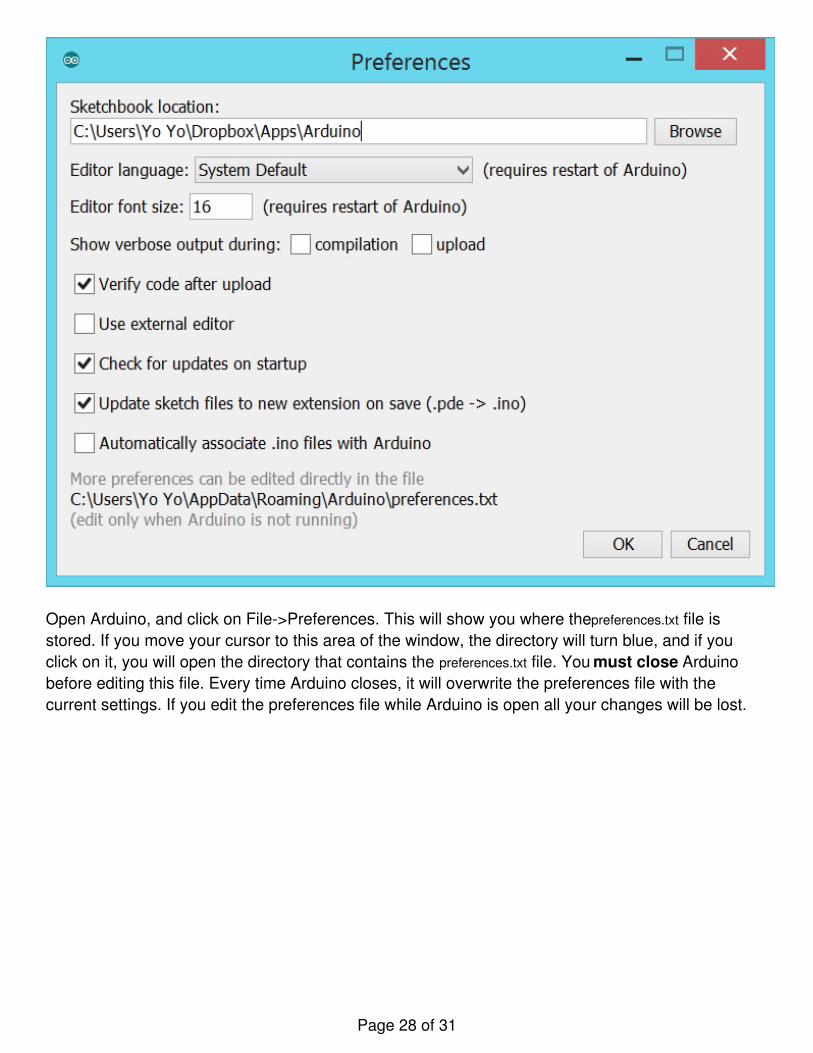
Open Arduino, and click on File->Preferences. This will show you where the preferences.txt file isstored. If you move your cursor to this area of the window, the directory will turn blue, and if youclick on it, you will open the directory that contains the preferences.txt file. You must close Arduinobefore editing this file. Every time Arduino closes, it will overwrite the preferences file with thecurrent settings. If you edit the preferences file while Arduino is open all your changes will be lost.
Page 28 of 31
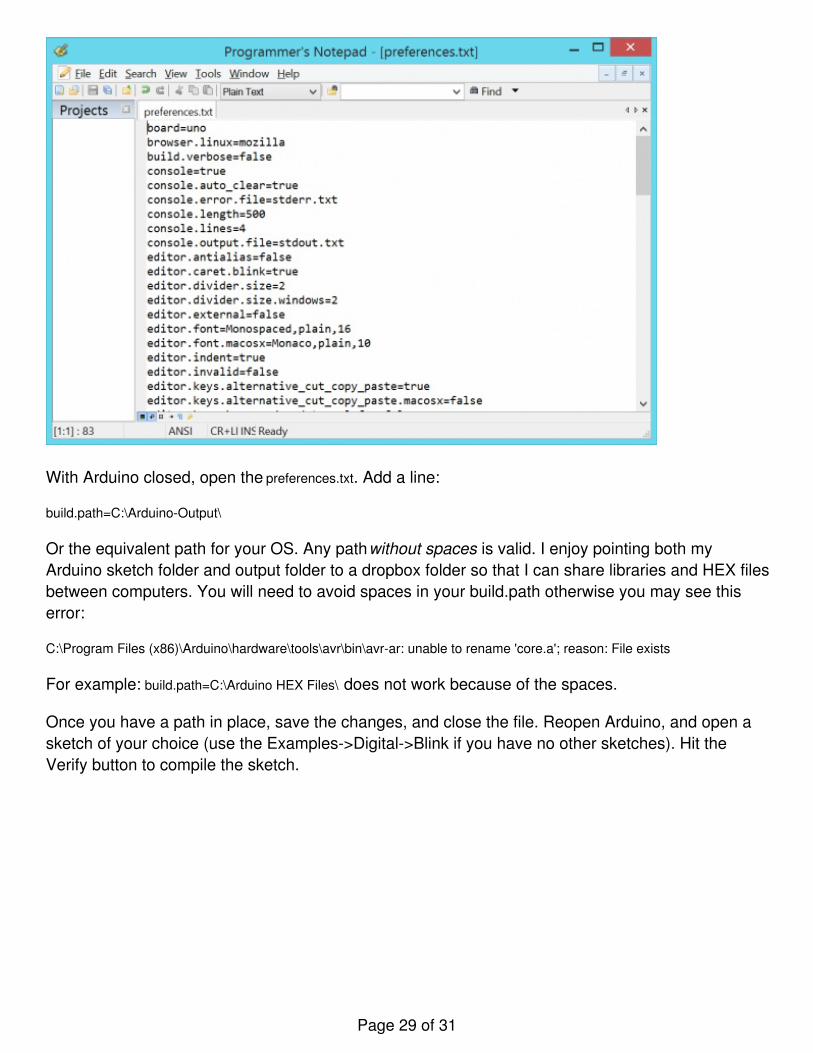
With Arduino closed, open the preferences.txt. Add a line:
build.path=C:\Arduino-Output\
Or the equivalent path for your OS. Any path without spaces is valid. I enjoy pointing both myArduino sketch folder and output folder to a dropbox folder so that I can share libraries and HEX filesbetween computers. You will need to avoid spaces in your build.path otherwise you may see thiserror:
C:\Program Files (x86)\Arduino\hardware\tools\avr\bin\avr-ar: unable to rename 'core.a'; reason: File exists
For example: build.path=C:\Arduino HEX Files\ does not work because of the spaces.
Once you have a path in place, save the changes, and close the file. Reopen Arduino, and open asketch of your choice (use the Examples->Digital->Blink if you have no other sketches). Hit theVerify button to compile the sketch.
Page 29 of 31
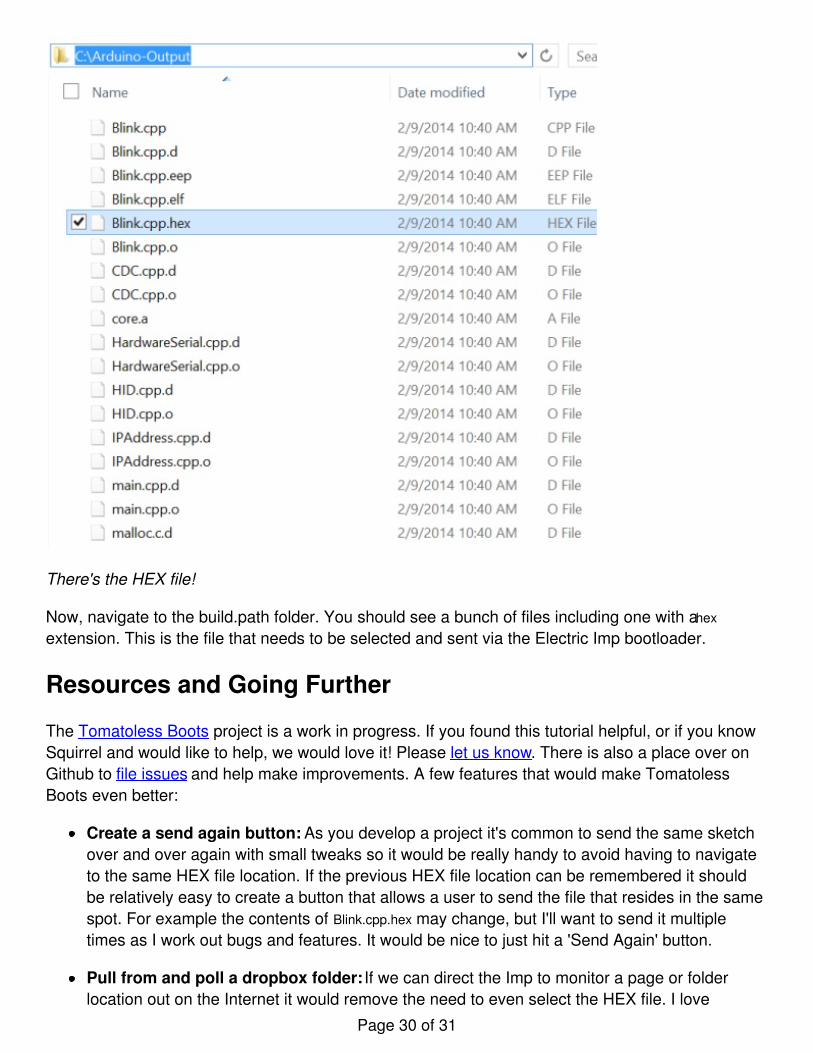
There's the HEX file!
Now, navigate to the build.path folder. You should see a bunch of files including one with a .hex
extension. This is the file that needs to be selected and sent via the Electric Imp bootloader.
Resources and Going Further
The Tomatoless Boots project is a work in progress. If you found this tutorial helpful, or if you knowSquirrel and would like to help, we would love it! Please let us know. There is also a place over onGithub to file issues and help make improvements. A few features that would make TomatolessBoots even better:
Create a send again button: As you develop a project it's common to send the same sketchover and over again with small tweaks so it would be really handy to avoid having to navigateto the same HEX file location. If the previous HEX file location can be remembered it shouldbe relatively easy to create a button that allows a user to send the file that resides in the samespot. For example the contents of Blink.cpp.hex may change, but I'll want to send it multipletimes as I work out bugs and features. It would be nice to just hit a 'Send Again' button.
Pull from and poll a dropbox folder: If we can direct the Imp to monitor a page or folderlocation out on the Internet it would remove the need to even select the HEX file. I love
Page 30 of 31

dropbox, and it's possible to have Arduino export directly to a given folder (see previoussection). Why not have Arduino compile to a shared dropbox folder, and when the Imp detectsa status change (aka /delta), automatically bootload that HEX file to the target Arduino?
For more wireless goodness, check out these other SparkFun tutorials:
Wimp Weather Station combines the bootloader with an active wireless weather stationBluetooth BasicsBlueSMiRF Hookup GuideRN-52 Audio Bluetooth Hookup GuideBC127 Audio Bluetooth Hookup GuideMetaWatch Teardown and HookupWiFly Shield Hookup GuideHacking the MindWave MobileExploring XBees and XCTU
learn.sparkfun.com | CC BY-SA 3.0 | SparkFun Electronics | Niwot, Colorado
Page 31 of 31