Embed Size (px)
Citation preview

© No part or parts of this information may be reproduced, stored in or introduced into a retrieval system, transmitted in any form or by any means (electronic, mechanical, photocopying, or otherwise) without the prior written permission of the copyright owner: Laura Bracken, PO Box 20985; Oakland, CA 94620; Copyright 2005.
Wire-Wrapping: A Few Beginning Techniques
by Laura Bracken
Disclaimer: This is how *I* do it. Doesn't mean it's the only OR the best way to do it… just means this is how *I* do it. ☺ Here are the tools I use:
a. Round (or needle)-nose pliers b. Chain-nose pliers c. Wire-cutter d. Wire (starting with craft wire is a less
expensive way to practice) Let's start off with making a basic "loop"; this is the wire-wrapped used in most of my pieces… earrings, charm bracelets, linked necklaces, etc. I should probably throw another disclaimer in here at this point saying that I tend to prefer working with more than I need… so I cut my wire, my chain, my thread, etc much longer than I need for two reasons. One, I don't like to try fitting a small piece of wire into the final crimp or try grabbing the very tippy tip of a piece of wire that I'm going around a pin with, etc. And two, I HATE actually coming up short and having to start over. So for me, it's worth the waste of having an extra half-inch of silver wire or three inches of thread at the end of my project. 1. So what you're going to do first is take your round nose pliers at about 1-2 inches from the end of
the wire and make a 90-degree angle in your wire.
2. Then you're going to think about what size "eye" or "loop" you want because you want to select a
place on your round-nose pliers and stick with it (or there-abouts)… closer to the tip will create a smaller loop, farther from the tip will create a larger loop.
2
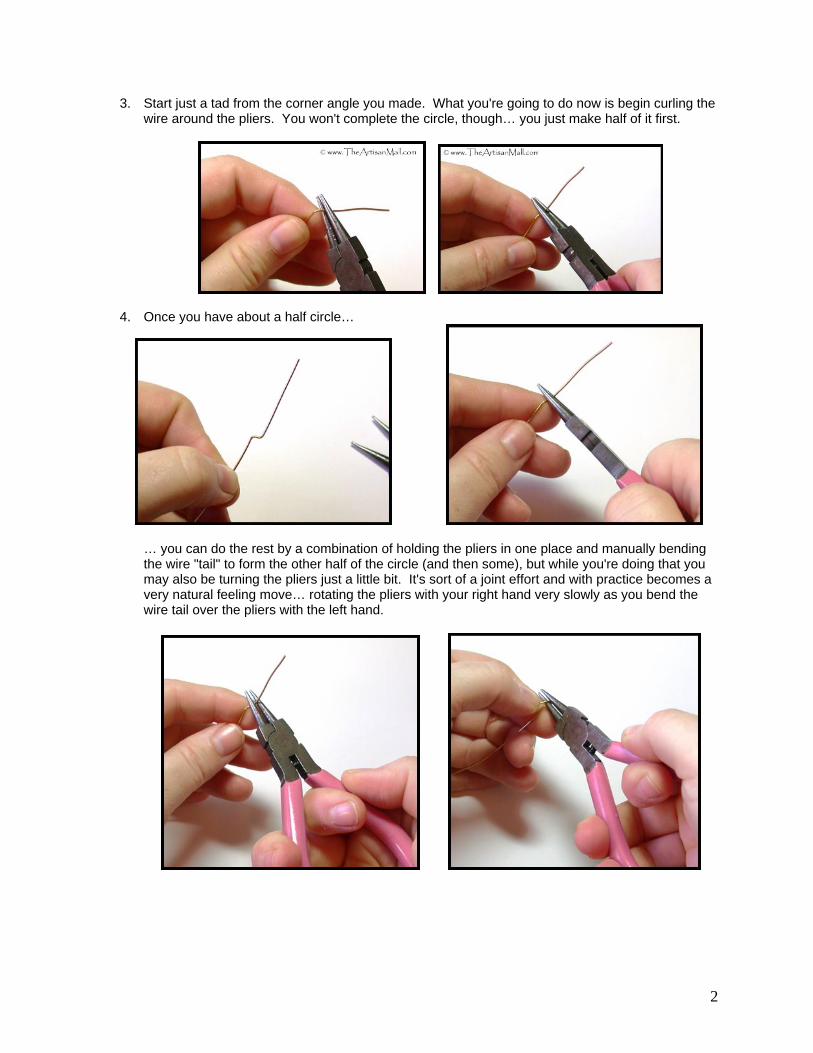
3. Start just a tad from the corner angle you made. What you're going to do now is begin curling the wire around the pliers. You won't complete the circle, though… you just make half of it first.
4. Once you have about a half circle…
… you can do the rest by a combination of holding the pliers in one place and manually bending the wire "tail" to form the other half of the circle (and then some), but while you're doing that you may also be turning the pliers just a little bit. It's sort of a joint effort and with practice becomes a very natural feeling move… rotating the pliers with your right hand very slowly as you bend the wire tail over the pliers with the left hand.
3
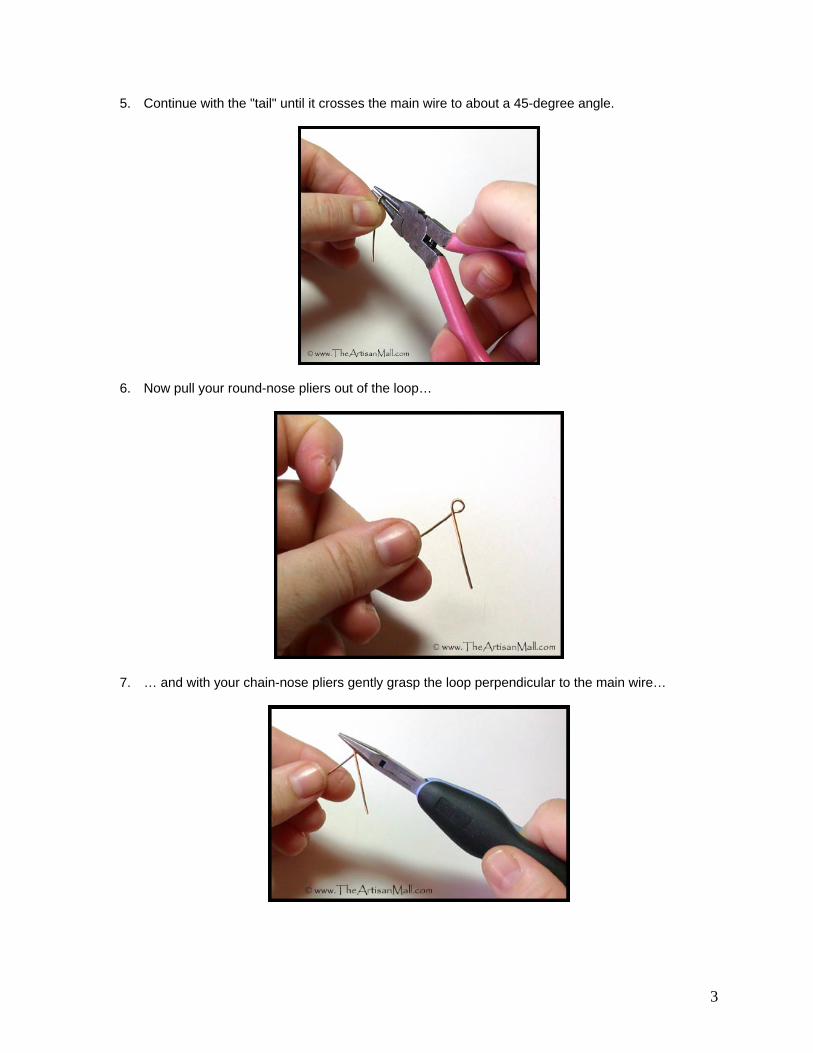
5. Continue with the "tail" until it crosses the main wire to about a 45-degree angle.
6. Now pull your round-nose pliers out of the loop…
7. … and with your chain-nose pliers gently grasp the loop perpendicular to the main wire…
4
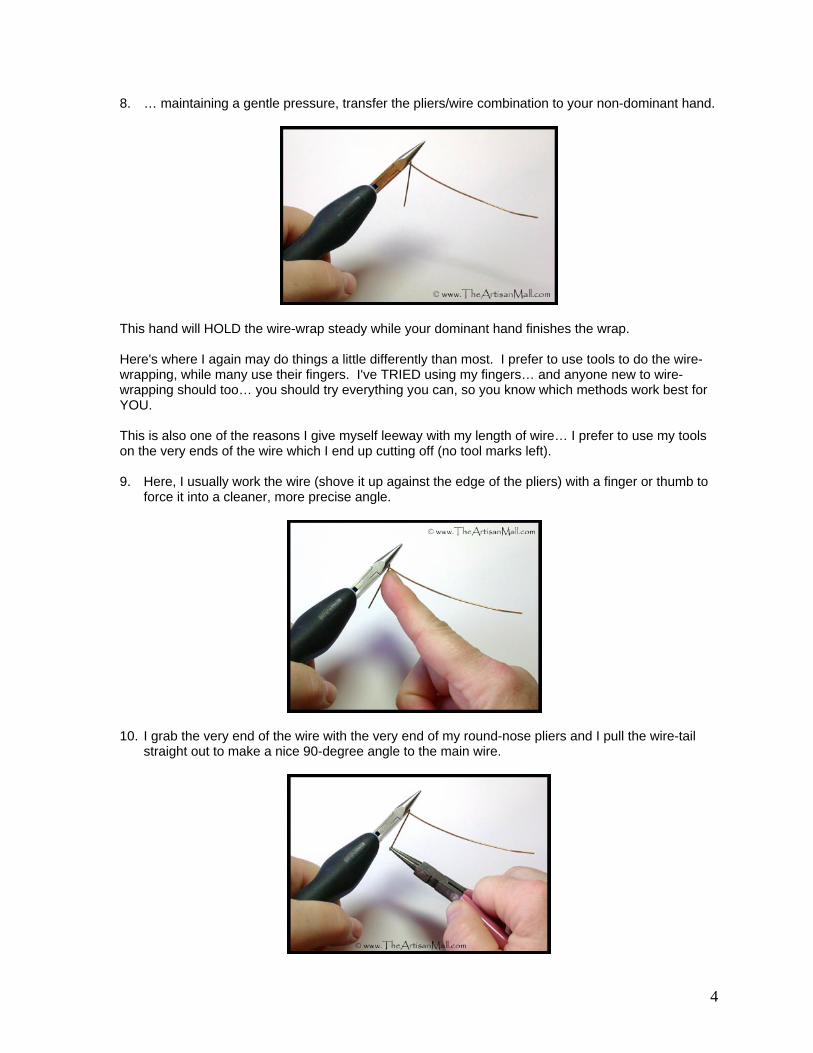
8. … maintaining a gentle pressure, transfer the pliers/wire combination to your non-dominant hand.
This hand will HOLD the wire-wrap steady while your dominant hand finishes the wrap. Here's where I again may do things a little differently than most. I prefer to use tools to do the wire-wrapping, while many use their fingers. I've TRIED using my fingers… and anyone new to wire-wrapping should too… you should try everything you can, so you know which methods work best for YOU. This is also one of the reasons I give myself leeway with my length of wire… I prefer to use my tools on the very ends of the wire which I end up cutting off (no tool marks left). 9. Here, I usually work the wire (shove it up against the edge of the pliers) with a finger or thumb to
force it into a cleaner, more precise angle.
10. I grab the very end of the wire with the very end of my round-nose pliers and I pull the wire-tail straight out to make a nice 90-degree angle to the main wire.

5
11. I take the wire tail and keeping tension at all times I start wrapping tight and close around the main wire.
12. I usually do a 360, then release the end and regrab it for the next 360.
This is because if you just go around and around, you are also ROTATING the wire and that can cause the wire to snap. 13. My preference seems to be about 2½
revolutions. 14. Then tighten up the wraps if necessary…
… this is done by pushing up toward the pliers with a fingernail to close up any spaces or gaps between the wraps.

6
15. Put the pliers down and get your wire-cutters.
16. Make sure you have them in the right direction
(the concave should be facing away from the work you're doing).
17. Clip as closely as you can without messing
everything up.

7
18. Then take your chain-nose pliers (some people prefer to use their crimping pliers for this step) and bend the snipped edge down, very down. I hate jewelry that snags my clothes or continually pokes me while I'm wearing it.
If your edge is particularly sharp, you can also file it.
There! You should have your finished loop now. 19. The last step is to take your fingers and run them at different angles and positions over the end of
the wire-wrap to assure there is NOTHING sticking out that is going to poke the wearer or snag on anything. If you feel ANYTHING, keep filing and/or using the pliers to get that end wire flush with the core wire.
© No part or parts of this information may be reproduced, stored in or introduced into a retrieval system, transmitted in any form or by any means (electronic, mechanical, photocopying, or otherwise) without the prior written permission of the copyright owner: Laura Bracken, PO Box 20985; Oakland, CA 94620; Copyright 2005.