Embed Size (px)
Citation preview

1
2
3
4
WinTask 5
The ultimate automation tool for Windows Server 2003, Windows 7 32 bit. 6 And for Windows 8 64 bit/Windows 2008 R2 64 bit/Windows 2012 with WinTask x64 7
8 9
Tutorial 10
11 12

2
1

3
1
INTRODUCTION 5 2
CHAPTER I: PRINCIPLES 7 3
CHAPTER II: INSTALLATION 9 4
CHAPTER III: FIRST SCRIPT, AUTOMATE NOTEPAD 11 5
Creating the script with the Recording Mode and Your first Script wizard 11 6
Running the script 16 7
Commands generated by the Recording Mode 17 8
CHAPTER IV: SYNCHRONIZE WINTASK WITH THE APPLICATION 21 9
CHAPTER V: SYNCHRONIZATION WITH A TEXT DISPLAYED ON THE SCREEN 25 10
CHAPTER VI: SYNCHRONIZATION WITH A TEXT USING OCR (OPTICAL 11
RECOGNITION CHARACTER) 31 12
CHAPTER VII: AUTOMATE SEVERAL PIECES OF SOFTWARE 39 13
Commands generated by the Recording Mode 43 14
CHAPTER VIII: SPY TOOL – HOW TO FIND WINDOW NAMES, HTML DESCRIPTORS, 15
UI AUTOMATION DESCRIPTORS 45 16
Spy tool to find a window name 45 17
Spy tool to find the HTML descriptor of a Web element 49 18
Spy tool to find the UIA descriptor of any desktop element 51 19
CHAPTER IX: SYNCHRONIZATION WITH A NEW WINDOW DISPLAYED ON THE 20
SCREEN 59 21
CHAPTER X: HOW TO RECORD NAVIGATION WITHIN WEB PAGES 63 22
CHAPTER XI: LAUNCH THE SAME SCRIPT EVERY HOUR 69 23
CHAPTER XII: AUTOMATE IN A WINDOWS DOS BOX 77 24
CHAPTER XIII: HOW TO DEBUG A SCRIPT 81 25
CHAPTER XIV: TIPS 87 26

4
How can I stop a script? 87 1 2
1997-2014 Taskware January 2014 5.0 3 All rights reserved. 4
5

5
INTRODUCTION 1
2 3 4 WinTask is a task automation tool; you can automate all the things you do in Windows 2003 5 Server and Windows 7 32 bit (and for Windows 7 64 bit, Windows 8 64 bit or Windows 2008 R2 6 64 bit or Windows 2012 with WinTask x64). 7 8 9 WinTask is a powerful, flexible platform for building automation solutions on a stand-alone or 10 networked PC. 11 12 You can, for instance, launch an accountancy package, integrate data from other programs, 13 calculate results with this new data and then print them. 14 15 You can also launch a terminal emulation package, type the userid and the password, navigate 16 through the host screens, pick up data in different screens and paste them back on your PC. 17 18 You can navigate on a website, extract prices and retrieve them in an Excel spreadsheet. 19 20 You can create an installation script to automatically install software on thousands of PC’s. 21 WinTask can provide all the user information required to install software without any user 22 interaction. 23 24 25
To summarize: all the tasks you manually do on your PC every day, week, or month can be 26
automated using WinTask. 27 28
29

6
1

7
1
CHAPTER I: PRINCIPLES 2
3 4 5 To create an automation script, you have to: 6 7
1. Launch WinTask. If “Your First Script Wizard” screen comes up, click Cancel button. 8 9
2. From the Start menu in the WinTask Editor window, select Recording after launching an 10
application, or click the button in the WinTask toolbar. 11 12 3. A dialog box will appear asking "What do you want to start before recording?". Choose to 13
launch An application or Internet Explorer or Mozilla Firefox or Google Chrome (NEVER 14 USE "START" Windows menu when you record actions). 15
16
4. If you check An application and click OK button, in the next dialog box "Launching a program", 17
type the name of the application you want to run or Browse for it ; press OK button. The 18 WinTask Editor window is minimized and all your actions will be now recorded to create the 19 script. The small WinTask toolbar is displayed and a flashing icon in Windows system tray 20 (lower-right corner of your desktop) reminds you that Recording mode is active. 21
22
5. If you check Internet Explorer or Mozilla Firefox or Google Chrome, and click OK button, in 23 the next dialog box type the Web URL where you want to start recording your web actions. The 24 WinTask Editor window is minimized and all your actions will be now recorded to create the 25 script. The small WinTask toolbar is displayed and a flashing icon in Windows system tray 26 (lower-right corner of your desktop) reminds you that Recording mode is active. 27
28 6. Do all the actions you want to record, such as running software, typing keystrokes, selecting 29
menu options, clicking links on web pages, filling web forms, etc… 30 31 7. Stop Recording mode by clicking the first icon in the small WinTask toolbar or by clicking the 32
flashing icon. 33 34 8. Review the script which has been automatically generated. 35 36 37 Once your script has been generated, you can launch it immediately, or you can launch it later 38 whenever you want to automate a task instead of doing it yourself. The Wintask Compiler will 39 transform the source script into an executable script. 40 41 42 The commands generated in the WinTask Editor module are written in a Visual Basic-like 43 language. In the script, you can modify, add or delete commands. You can improve the generated 44 script by adding conditions, loops, etc… 45 46 47 Some notions are specific to an automation language. 48 49 For instance, during execution of a script, WinTask must know to which window or which web 50 page the recorded actions must be sent; WinTask uses for that a specific function: UseWindow (or 51 UsePage for web). Those UseWindow/UsePage functions are automatically generated when you 52
record your actions but a WinTask specific module, Spy, can help you too to know the window 53

8
names of each individual window on the desktop or the different HTML objects which are within 1
the web page. With WinTask x64, Spy tool can be used to generate the UIA descriptor of any 2 object supporting UI Automation framework. 3 4 WinTask must simulate how a user interacts with his PC: the human user makes a new action only 5 if the latest action has been finished and done correctly. WinTask includes synchronization tools in 6 order to make the script wait until the latest action is completely done. The script can wait until a 7 specific window appears, or a text, or an image. The script can wait too until a text within an image 8 is seen using our OCR engine (not available in WinTask Lite version). 9 10 11 The following chapters will help you in creating your first automated script. 12
13

9
1
CHAPTER II: INSTALLATION 2
3 4 5 To install the WinTask file that you have downloaded, just launch the exe and installation process 6 starts. 7 8 9
The first InstallShield screen is displayed, click Next on this Welcome screen. 10 11
InstallShield will display the Readme Information screen; click Next. 12 13
The WinTask license agreeement window is displayed. Check I accept the terms in the license 14
agreement if you agree with the terms and click Next. 15 16 The User Information window is displayed showing your name and your company name. (If the 17 installation software does not find this information on your PC, it should be entered manually.) 18
Click Next. 19 20 21 22 23
The window Setup Type is displayed; the default is « Complete ». 24 25 26
Click Next if you agree with this default value; otherwise select another Setup type before clicking 27
Next. The default installation folder is C:\program files\wintask or C:\program files (x86)\wintask 28 under a 64 bit Windows. If you want to change it, check « Custom » installation. 29 30
Click Install to begin the installation. 31 32 Files are copied onto your hard. 33 34
The next window InstallShied Wizard Completed is displayed; click Finish. 35 36 37 38 WinTask is now installed and you can proceed with the exercises described in this manual. 39
40

10
1

11
1
CHAPTER III: First script, AUTOMATE NOTEPAD 2
3 4 5 In this chapter, you will create your first automation script, using Windows Notepad word 6 processor. 7 8 WinTask script will launch Notepad, type some lines inside Notepad and then close the software. 9 10 Close all other open applications. 11 12 13 14
Creating the script with the Recording Mode and Your first Script wizard 15
16 17 If you have just installed WinTask, Your first Script wizard screen is displayed. 18 19
Or launch WinTask by clicking Start, then select All Programs, the group WinTask and then 20
select the program WinTask (Start/All Programs/WinTask/WinTask). Your first Script wizard 21
screen should be now displayed. If not, select in the Editor window the menu Start/New script 22
wizard. 23 24 25
26 27

12
Click Next button. 1 2 3
In the next dialog box Give a name to your script, type “script1” in the field Type a name for your 4
Script and click Next button. 5 6 7 8
9 10 11 12 13
The dialog box Start a Windows application is displayed. 14 15

13
1 2 As we want to launch the application notepad before recording actions in Notepad, type “notepad” 3
in the field Program and click Next button. 4 5
6 7 8 The Record your actions dialog box is displayed. 9

14
1 2
3 4
Click icon to start Recording mode. The Editor window disappears and a small icon of a 5 blinking video camera is displayed in the Windows taskbar on the righthand side: this icon reminds 6
you that all your actions are being recorded. 7 8 The WinTask toolbar is also displayed on top of all applications. 9
10 11
Notead starts and the focus is now on the Notepad window. Type, for instance: 12 13 That’s a demonstration of WinTask 14 15 16
Select the whole text by clicking at the beginning of the line and then press Shift + End (using 17 that way selects all the sentence whatever font it is using). Select in the Notepad menu 18
Format/Font and select Size 12. Click OK; the selected text is now displayed in larger 19 characters. 20
21 22
Quit Notepad by selecting File, then Exit. Click Don’t Save button (or No button if you use 23 Windows 2003) to the question “Do you want to save changes to Untitled?”. The Notepad 24 window is now closed. 25
26 27 Stop the Recording Mode by clicking once on the blinking video camera icon in the system tray, or 28 click the first icon in WinTask toolbar. 29

15
1 2
The Enhance the Script just recorded dialog box is displayed. 3 4
5 6
Click Next button as for now, we do not need to enhance the script. 7 8 9
The Run your script dialog box is displayed. 10 11

16
1 2 3
Click the button to run the script that you have just recorded. 4 5 6
Running the script 7
8
9
Before running the script, the conditions on your desktop must be the same as when you started 10 the Recording Mode. So in this example, Notepad must not be launched before running the script. 11
12 13 You see notepad launched, the small text typed, put in bigger characters, and notepad exits 14 without saving. 15 16 17 18 When the script has finished its execution, the WinTask Editor window is displayed with all your 19 actions recorded in the script. You should have a script that looks like this: 20 21 Shell("notepad",1) 22 23 UseWindow("NOTEPAD.EXE|Edit|Untitled - Notepad|1",1) 24 SendKeys("That's a demonstration of WinTask") 25 ClickMouse(Left,Down,4,11) 26 ClickMouse(Left,Up,4,11) 27
SendKeys("<Shift <End>>") 28 29 UseWindow("NOTEPAD.EXE|Notepad|Untitled - Notepad",1) 30 ChooseMenu(Normal,"F&ormat|&Font...") 31

17
1 UseWindow("NOTEPAD.EXE|#32770|Font",1) 2 ChooseItem(Combo,"3","12",single,left) 3 Click(Button,"OK") 4 5 UseWindow("NOTEPAD.EXE|Notepad|Untitled - Notepad",1) 6 ChooseMenu(Normal,"&File|E&xit") 7 8 UseWindow("NOTEPAD.EXE|CtrlNotifySink|Notepad|8",1) 9 Click(Button," Do&n't Save") 10 11 12
13
14 15 16 17 18 19 We will now explain the commands inserted in that script. 20 21 22 23
Commands generated by the Recording Mode 24
25 26 The script starts with a Shell command: 27 28 Shell("notepad",1) 29
30 The command Shell launches a Windows application. Run always your applications by the Shell 31 command and don’t try to automate the Windows Start menu (Windows Start menu automation is 32 not reliable as this menu changes too often). 33 34 35 The script goes on with a UseWindow command: 36 37

18
UseWindow("NOTEPAD.EXE|Edit|Untitled - Notepad|1",1) 1
2 You will notice a lot of commands like this in a WinTask script. This command tells the program 3 which window to send its actions. The parameters for this command are the window name, its 4 class and the window title. The last number behind the comma is the instance number (this 5 instance number would be different if Notepad had been launched more than once: several 6 Notepad instances would therefore be on the desktop). 7 8 9 The next command, SendKeys, simulates the user typing text inside the window specified by the 10 previous UseWindow command: 11 12 SendKeys("That's a demonstration of WinTask") 13
14 The text is put inside quotation marks. 15 16 17 The next two commands automate mouse clicks: 18 19 ClickMouse(Left,Down,4,11) 20 ClickMouse(Left,Up,4,11) 21
22 The left mouse button (parameters « Left Down ») has been pressed in position 4,11. Then the left 23 mouse button has been released (parameters « Left Up ») in position 4,11 (relative to the Notepad 24 window). 25 26 The next line, SendKeys, simulates the user pressing Shift + End key. Keywords for special keys 27 are surrounded by less than and greater than signs (as in <Enter> for instance, and for a 28 combination of special keys: <Shift <End>>). 29 30 SendKeys("<Shift <End>>") 31
32 33 The next two commands automate a selection in a menu : 34 35 UseWindow("NOTEPAD.EXE|Notepad|Untitled - Notepad",1) 36 ChooseMenu(Normal,"F&ormat|&Font...") 37
38 First, WinTask specifies from which window the selection in a menu must be made, using the 39 UseWindow command. Then the command ChooseMenu automates the selection of the option 40 Format and then the option Font. The ampersand (&) sign just in front of a character signifies that 41 this character is the shortcut for this option. 42 43 44 The next three commands automate the selection of the font size. As usual, 45 the UseWindow command specifies the window where the font size is selected. 46 47 UseWindow("NOTEPAD.EXE|#32770|Font",1) 48 ChooseItem(Combo,"3","12",single,left) 49 Click(Button,"OK") 50
51 The ChooseItem command allows the selection of an item in a ComboBox; in the above 52 parameters, the third Combobox of the Font window is used and the number « 12 » is selected by 53 a single left mouse click. 54 55 The Click (Button, "OK") command automates a mouse-button click. The button name is between 56 the quotation marks. 57
58

19
1 In the last four lines of the script, the menu selection and button click commands are used again: 2 3 UseWindow("NOTEPAD.EXE|Notepad|Untitled - Notepad",1) 4 ChooseMenu(Normal,"&File|E&xit") 5 6 UseWindow("NOTEPAD.EXE|CtrlNotifySink|Notepad|8",1) 7 Click(Button,"Do&n't Save") 8
9 10 Close all open applications before proceeding to the next chapter. 11
12

20
1
21
CHAPTER IV: SYNCHRONIZE WINTASK WITH THE APPLICATION 1
2 3 4 In order to behave like a human operator, WinTask must be able to wait until a certain result is 5 obtained before going onto the next task. 6 7 For instance, in notepad, a second sentence must be typed by WinTask only after someone 8
presses the Enter key. 9 10 11 In the example below, we will make the automate wait for 10 seconds after it has typed the 12
sentence « Repeat this sentence after 10 seconds » in Notepad and after Enter has been 13 pressed. For this we will use the WinTask toolbar which is displayed when you record your 14 actions; it will help you insert a pause in your script when necessary. 15 16 17 Before starting this exercise, verify that no other application is open in the Windows desktop. 18 19 20
Lauch WinTask Editor by clicking Start/All Programs/WinTask/WinTask. If Your first script 21
wizard dialog box is displayed, check “Don’t show this wizard anymore“ and click Close button 22
(you can call back this wizard by selecting Start/New Script wizard in WinTask Editor window). 23 24 25
26 27 28

22
The main WinTask window is displayed with the title « Untitled1 » as shown below: 1 2
3 4 5
In the next example, we will ask for a pause of 10 seconds after Enter has been pressed. 6 7
Start the Recording Mode of WinTask by selecting Start/Recording after launching a program 8
in the WinTask main menu, or click the icon in the toolbar. 9 10
The dialog box Starting recording mode is displayed; as shown below, check An application 11
checkbox and click OK button as we want to launch the notepad application before recording 12 actions in Notepad. 13 14 15
16 17

23
1 2
In the next dialog box Launching a program, type “notepad” in the field Program and click OK 3 button. 4 5 6 7
8 9 10 11 The Editor window disappears and a small icon of the blinking video camera is displayed on the 12
righthand side of the Windows taskbar. This icon reminds you that all your actions are 13 being recorded. Plus the WinTask toolbar is displayed: 14 15
16 17 18 The focus is now on the Notepad window. Type: 19 20 « Repeat this sentence after 10 seconds. » 21 22
Press Enter. 23 24 25
In order to insert a 10 second pause in the script, click the hourglass icon in the WinTask 26 toolbar. 27 28
29 30

24
1
The dialog box Time delay Synchronization is displayed: 2 3
4 5 6
The default time delay value is 10 seconds and it is accepted by clicking Insert and Resume. 7 8 9 Stop the Recording Mode by clicking the blinking icon or by clicking the first icon in the WinTask 10 toolbar. The WinTask main window is displayed: 11 12 Shell("notepad",1) 13 14 UseWindow("NOTEPAD.EXE|Edit|Untitled - Notepad|1",1) 15 SendKeys("Repeat this sentence after 10 seconds<Enter>") 16 17 Pause 10 secs 18 19
The Time delay Synchronization Wizard has written the command “Pause 10 secs” which will 20
make the script wait 10 seconds before going on. 21 22 23
In the Editor window, press Enter to move to the next line. Start the Recording Mode by selecting 24
Recording in the Start menu. As usual, the blinking video icon is displayed on the righthand side 25 of the taskbar, and the WinTask toolbar is displayed. 26 27 28 Using the mouse, select (highlight) the sentence in the notepad window you just typed (“Repeat 29
this sentence after 10 seconds”). In the Edit menu, select Copy; move the cursor beneath the text. 30
Then in the Edit menu again, select Paste. 31 32 33 Stop the Recording Mode by clicking the small blinking video icon or by clicking the first icon in the 34 WinTask toolbar. The WinTask main window is opened and the whole script is displayed. 35 36 37 In order to lauch the script with the same conditions we started with, close the Notepad application 38 without saving the document. 39 40 41
In the WinTask main window, launch the script by selecting Run in the Start menu. The window 42
Save as is displayed. Give the name “Pause” to the script and click Save to run the script 43 immediately. 44 45 You can see the automate type the first sentence, wait for 10 seconds and then do the 46
Copy/Paste routine. Quit Notepad and WinTask before proceeding to the next chapter. 47 48

25
CHAPTER V: SYNCHRONIZATION WITH A TEXT DISPLAYED ON THE 1
SCREEN 2
3 4 5 WinTask automatically waits until the next window is displayed before sending its actions to the 6 new window. This automatic synchronization (through the UseWindow command) cannot be made 7 when the text displayed in a window changes but the name of the window doesn’t change. This 8 typically occurs when a task is automated on a mainframe: the name of the emulator window is 9
always the same, but each time Enter is pressed, the mainframe eventually sends a new screen 10 with the same name but with different text in the window. It occurs too when the window is split 11 into several panes and one pane content is updated while the main window name does not change 12 : the automation script must wait for a specific text in the new content to be sure that the previous 13 action is finished. 14 15 16
We will show this synchronization using a Windows utility, msinfo, in order you can reproduce the 17 described steps whatever application you want to automate. 18 19 20 In this example, we will launch msinfo32 under Windows 7 64 bit, search for the file “explorer.exe” 21 in the System Information window and insert a text synchronization to wait until the “explorer” word 22 appears in the right pane of the System Information window and then close it. 23 24 25
Launch WinTask Editor by clicking Start/Programs/WinTask/WinTask. If Your first script 26
wizard dialog box is displayed, check “Don’t show this wizard anymore” and click Close button 27
(you can call back this wizard by selecting Start/New Script wizard in WinTask Editor window). 28 29 The main WinTask window is displayed with the title “Untitled1” as shown below: 30 31
32 33 34
26
Start the Recording Mode by selecting Start/Recording after launching a program in the 1
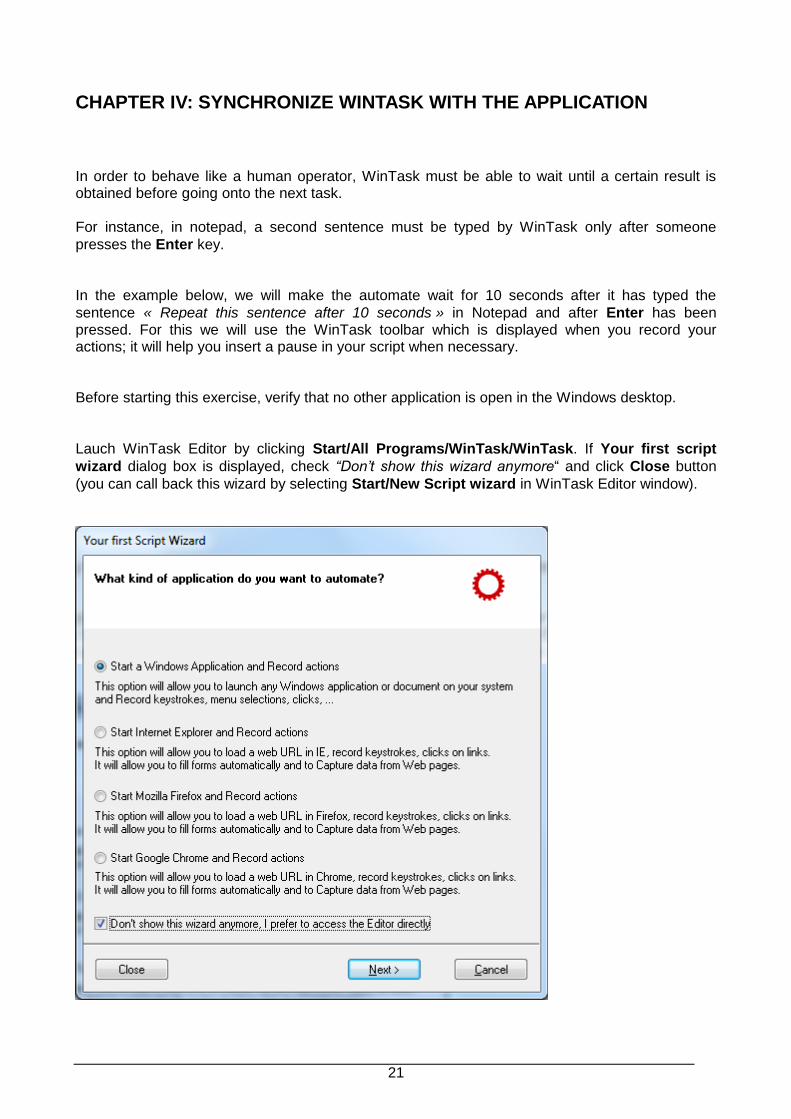
WinTask main window or click the button in the toolbar. 2 3 A new dialog box asks you what you want to launch before starting your recording: 4 5 6
7 8 9
Check An application checkbox as you want to launch explorer, and click OK button. 10 11
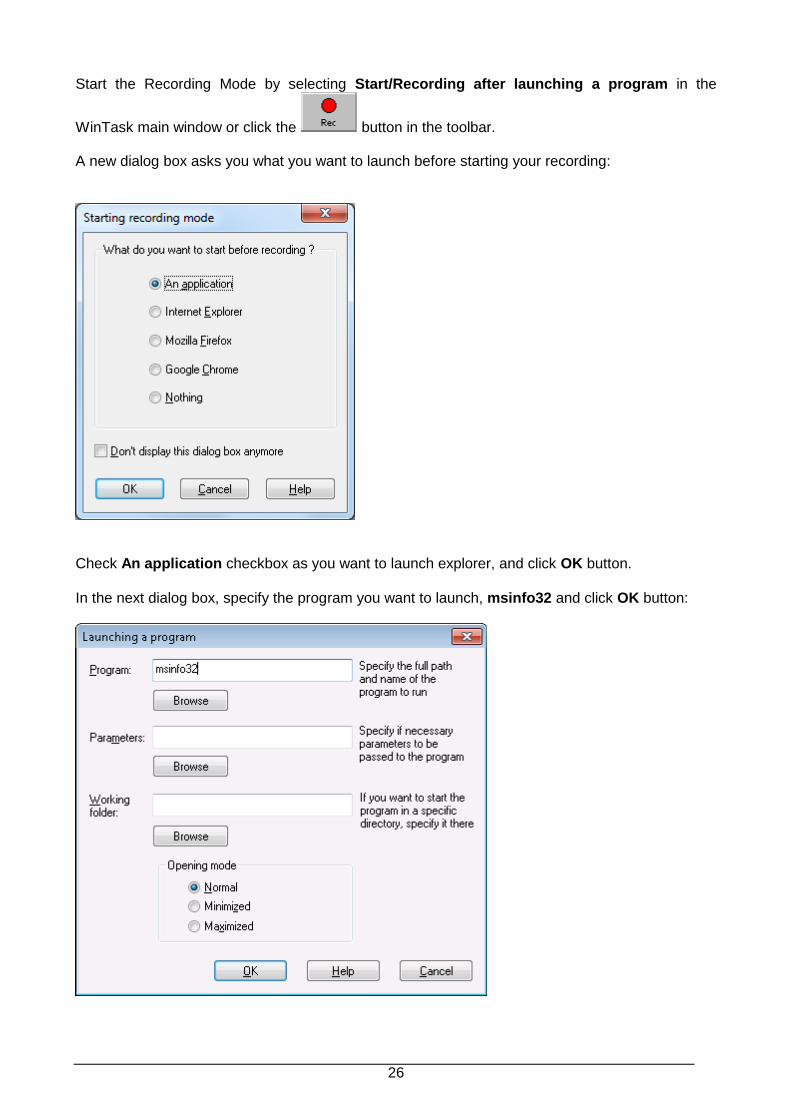
In the next dialog box, specify the program you want to launch, msinfo32 and click OK button: 12 13
14 15 16

27
The Editor window disappears, msinfo utility is launched and a small icon of a blinking video 1
camera is displayed on the righthand side of the Windows taskbar. This icon reminds you 2 that all your actions are being recorded. And the WinTask toolbar is displayed too: 3 4
5 6 7
In the System Information window, in the Find what field, type “explorer.exe”. 8 9
10 11
And click Find button. 12 13 The right pane of the System Information window displays the Searching word while explorer.exe 14 is searched, and we need to make the script wait until the explorer word is displayed in the right 15 pane. This synchronization on text will ensure that the Find action is finished and next step can be 16 then processed. 17 18 19 Click in the WinTask toolbar the fourth icon, Synchronization on Text: 20 21
22 23 24 The next window is displayed: 25 26

28
1 2 3
Click Capture. The mouse pointer changes shape. With the mouse, draw a rectangle around 4 “explorer.exe” text in the right pane. WinTask must wait for this text before going any further. It is 5
now in the field “Text” of the Text Synchronization window, as shown below (uncheck “Only in 6 this area (not in the whole window)” checkbox): 7 8 9
10 11 The “Text” field is now filled with the captured text that the script must wait for before preceeding. 12 13

29
1
Click Insert and Resume. You are still in Recording mode. Close the System Information 2 window by clicking the close button on the top right hand corner of the window. 3 4 5 Finally, stop the Recording Mode by clicking the blinking icon or by clicking the first icon in the 6 WinTask toolbar. The WinTask main window is displayed, you notice this block of lines: 7 8 Pause until 9 Text("explorer.exe") 10 InWindow("MSINFO32.EXE|SysListView32|List1",1) 11 PauseFalse 12 MsgBox("'Wait for' at line " + #ErrorLine$ + " has failed !") 13 End 14 EndPause 15 16 17 A Pause command has been inserted which means : wait until the text “explorer.exe” is displayed 18 in the window specified by the InWindow command. If this text is not found within 120 seconds, 19 the command just after the PauseFalse keyword is executed. This command displays an error 20 message indicating the line in the script where the error has occurred. As soon as the specified 21 text is seen, the lines after the Pause block are executed (it does not wait 120 secs). 22 23 24 25
Run the script by selecting Start/Run. 26 27 28 A dialog box asks you to save the script. Type the name “Script4” and then the script is 29 compiled. There should be no errors and script execution starts immediately. All the recorded 30 actions are replayed and you notice that the System Information window is closed only when the 31 word “explorer.exe” is displayed in the right pane. 32
33

30
1

31
1
CHAPTER VI: SYNCHRONIZATION WITH A TEXT USING OCR (Optical 2
Recognition Character) 3
4 5 6 The text synchronization tool recognizes only a text that uses a standard Windows font. If the text 7 is in fact a bimap, or is a pure web font, or the web page is a Flash page, the synchronization can 8 be done using OCR Text Synchronization tool. Two OCR engines are integrated in WinTask, the 9 own WinTask OCR engine and the MOCI OCR engine provided by Microsoft Office 2003 or Office 10 2007. This last one is the most accurate. If you don’t have Office 2003 or 2007, you can still install 11 for free the MODI OCR engine following the point 2 in this Microsoft article : 12 http://support.microsoft.com/kb/982760. 13 14 15 We will show this OCR Text Synchronization using a demo Web page on 16 www.wintask.com/demos. 17 18 19 In this example, a synchronization on OCR text is used to wait until a Web page has finished 20 loading. Such a synchronization is needed when all the content of a web page stays the same 21 except an updated text within an image. If all the content of the web page is updated, then a 22 UsePage is enough for a smooth synchronization (see chapter X). 23 24 25
Launch WinTask Editor by clicking Start/All Programs/WinTask/WinTask. If Your first script 26
wizard dialog box is displayed, check “Don’t show this wizard anymore” and click Close button 27
(you can call back this wizard by selecting Start/New Script wizard in WinTask Editor window). 28 29 The main WinTask window is displayed with the title “Untitled1” as shown below: 30 31
32 33 34

32
Start the Recording Mode by selecting Start/Recording after launching a program in the 1
WinTask main window or click the button in the toolbar. 2 3 4 A new dialog box asks you what you want to launch before starting your recording: 5 6 7
8 9 10
Check Internet Explorer checkbox as you want to load a Web site within Internet Explorer, and 11
click OK button. 12 13 In the next dialog box, specify the url you want to load, 14
www.wintask.com/demos/identicalpage1.htm and click OK button: 15 16

33
1 2 3
The Editor window disappears, the Web page titled “Page Title” is loaded and a small icon of a 4
blinking video camera is displayed on the righthand side of the Windows taskbar. This 5 icon reminds you that all your actions are being recorded. And the WinTask toolbar is displayed 6 too: 7 8
9 10 11
Click the link here in the sentence Click here to go to the next page with the same title. The 12
Web page titled Page Title loads, it has the same title as the previous one and you need to be 13 sure that the text in the body of the page has finished to load before working on this new page. 14 15 16
Invoke the OCR Text Synchronization wizard by clicking the OCR button , on the WinTask 17 Floating Toolbar and in the sub-menu select OCR Text Synchronization option. Recording mode is 18 suspended and the OCR Text Synchronization screen is displayed: 19 20 21

34
1 2 3
The Select the OCR engine field allows to choose the OCR engine ; choose either the WinTask 4 native OCR engine or the MODI (Microsoft Office Document Imaging) OCR engine. The MODI 5 OCR engine is more accurate but you need to have installed it. 6 7
Click the Capture button on the OCR Text Synchronization wizard. The wizard will be hidden and 8
the cursor will change to a crosshair. Use a drag box to capture the text A text synchronization 9
or an OCR text in the middle of the page. The captured text is now displayed in the Text field of 10 the OCR Text Synchronization dialog box: 11 12

35
1 2 Select some characters which are correctly recognized by the OCR engine (using MODI, the text 3 is perfectly recognized, using WinTask OCR engine, some characters can be incorrect). Take only 4
text word. Select text word, copy it, and paste it into the next field Copy from the "Text" field…. 5 The OCR Text Synchronization dialog box now looks like : 6 7

36
1 2
Click Check button to verify that at replay the text will be recognized correctly. The message OCR 3
text recognized correctly should be displayed. Click Insert and Resume button. Recording 4
mode resumes. Click the link Come back to the previous page and close the Internet Explorer 5 window. 6 7
Click the Stop Recording button on the WinTask Floating Toolbar to stop Recording Mode. 8 9 10 11 The OCR Text Synchronization wizard inserted the following lines of script into the recorded 12 automation script: 13

37
ret = UseOCREngine(1) 1 Pause Until 2
TextOCR("text") 3 InWindow("IEXPLORE.EXE|Internet Explorer_Server| Page Title - Windows Internet 4
Explorer|1 ",2) 5 InArea(164,236,27,248) 6
PauseFalse 7 MsgBox("'Wait for' at line " + #ErrorLine$ + " has failed !") 8 End 9
EndPause 10
11 If this line: 12
InWindow("IEXPLORE.EXE|Internet Explorer_Server|Page Title - Windows Internet Explorer|1 ",2) 13 shows a 2 at the end, replace 2 by 1 as below: 14
InWindow("IEXPLORE.EXE|Internet Explorer_Server|Page Title - Windows Internet Explorer|1 ",1) 15 16 The preceding lines of script instruct WinTask to pause execution of the automation script until the 17 text string text recognized by the OCR engine appears in Internet Explorer window. Once the text 18 appears, execution of the script continues following the EndPause statement. WinTask will wait 19 up to 120 seconds for the text to appear in IE window before executing the error handling script 20 between the PauseFalse and EndPause statements. The user may wish to override the default 21 wait value of 120 seconds to 20 seconds by modifying the first line of the script slightly as shown 22 below. Also note that the error message presented to the user has been changed from a generic 23 automation script error to a system specific error: 24 25
ret = UseOCREngine(1) 26 Pause 20 secs Until 27
TextOCR("How") 28 InWindow("IEXPLORE.EXE|Internet Explorer_Server| Page Title - Windows Internet 29
Explorer|1",1) 30 InArea(164,236,27,248) 31
PauseFalse 32 MsgBox("The page took more than 20 seconds to load!") 33 End 34
EndPause 35
. 36 To be sure that the Text Synchronization did work, add the line msgbox("The text is now 37 displayed") just after the line EndPause. 38 39 Click the Play button on the WinTask Toolbar to replay the actions listed in the script. WinTask 40 will now compile the script before running it. You will be prompted to save the script. Enter the 41 name “script5” when the Save As dialog is displayed. The Compilation results are displayed in the 42 Output window of the Editor and the compiled script starts its execution. The text is seen in the 43 Web page, the dialog box is displayed, click the OK button. 44
45

38
1

39
1
CHAPTER VII: AUTOMATE SEVERAL PIECES OF SOFTWARE 2
3 4 5 In this chapter, we will see how WinTask can go from one application to another and how WinTask 6 can create a macro, not only for one specific piece of software but for different types of software. 7 8 WinTask will launch WordPad, type a sentence in WordPad, then launch Microsoft Word. It will 9
type a sentence in Word, then do a Copy/Paste between WordPad and Word. 10 11 12 Make certain that you have started this chapter without any other application opened in Windows 13 Desktop. Close any other opened application. 14 15 16
Launch WinTask Editor by clicking Start/All Programs/WinTask/WinTask. If Your first script 17
wizard dialog box is displayed, check “Don’t show this wizard anymore” and click Close button. 18
The main WinTask window with the title “Untitled 1” is displayed as shown below: 19 20
21 22
Start recording by selecting Start/Recording after launching a program. 23 24 A new dialog box asks you what you want to launch before starting your recording: 25 26 27

40
1 2 3
Check An application checkbox as you want to launch Wordpad, and click OK button. 4 5
In the next dialog box, specify the program you want to launch, click Browse button for opening 6 Wordpad.exe file which is under Program Files (x86)\Windows NT\Accessories (if you use a 32 bit 7 Windows, the wordpad.exe file is under Program Files\Windows NT\Accessories): 8 9
10 11
And click the OK button. 12 13 14 The Editor window is minimized and the blinking video icon is displayed on the righthand side of 15 the taskbar and the WinTask toolbar is displayed. 16 17

41
The WordPad window is opened. Type the following text in it: 1 2 Text entered in WordPad 3 4 5 In order to launch Word by a specific statement in WinTask (instead of recording menu 6
Start/Programs/Word which is less reliable than as shown here), stop Recording mode by 7 clicking the WinTask icon in the Windows taskbar. WinTask main window is displayed; select 8
Start/Recording after launching a program: 9 10 11 12 A new dialog box asks you what you want to launch before starting your recording: 13 14
15 16
Check An application checkbox as you want to launch Word, and click OK button. 17 18 19
The next dialog box lets you select the program you want to launch. Click Browse button for 20 opening the 32 bit version of the WINWORD.exe file which is under Program Files (x86)\Microsoft 21 Office\Office12 (if you use a Windows 32 bit, the winword.exe file is under Program Files\Microsoft 22 Office\Office 12). Change the number after Office to reflect your Office version. 23 24

42
1 2
Click OK button, Word is launched and you are again recording all your actions. 3 4 In the Word window, type the following text: 5 6 Text entered in Word 7 8 9
In the taskbar, click the application WordPad. Using the mouse, select (highlight) the text that you 10 just typed in the window. 11 12 13 Copy that text by pressing Control + c. 14 15 16
In the taskbar, click the application Word to open its window. The cursor should be at the end of 17
the text you have just entered. Press the Enter key to paste the text from WordPad two lines 18 below. Copy the text by pressing Control +v. 19 20 21 Quit Word by closing the Word window (DO NOT save this document !) 22 23 Quit WordPad by closing the WordPad window (DO NOT save this document !) 24 25 26 You are now in the same place and with the same conditions as when you started this chapter. 27 28 29
Click the WinTask icon in the Windows taskbar to stop the Recording Mode. The WinTask main 30 window is displayed with all the commands inserted in the script : 31 32 Shell(Chr$(34)+"C:\Program Files (x86) \Windows NT\Accessories\wordpad.exe" 33 +Chr$(34),1) 34 35 UseWindow("WORDPAD.EXE|RICHEDIT50W|Document - WordPad|1",1) 36

43
SendKeys("Text entered in WordPad") 1 2 Shell(Chr$(34)+"C:\Program Files (x86)\Microsoft Office\Office12\WINWORD.EXE" 3 +Chr$(34),1) 4 5 UseWindow("WINWORD.EXE|_WwG|Microsoft Word Document|1",1) 6 SendKeys("Text entered in Word") 7 8 UseWindow("WORDPAD.EXE|RICHEDIT50W|Document - WordPad|1",1) 9 ClickMouse(Left,Down,6,14) 10 ClickMouse(Left,Up,6,14) 11 SendKeys("<Ctrl c>") 12 13 UseWindow("WINWORD.EXE|_WwG|Microsoft Word Document|1",1) 14 SendKeys("<Enter>") 15 SendKeys("<Enter>") 16 SendKeys("<Ctrl v>") 17 18 CloseWindow("WINWORD.EXE|OpusApp|Document1 - Microsoft Word",1) 19 20 UseWindow("WINWORD.EXE|#32770|Microsoft Office Word",1) 21 Click(Button,"&No") 22 23 CloseWindow("WORDPAD.EXE|WordPadClass|Document - WordPad",1) 24 25 UseWindow("WORDPAD.EXE|CtrlNotifySink|WordPad|8",1) 26 Click(Button,"Do&n't Save") 27 28 Before explainig all these commands, we will first run the script. 29 30
In the Editor window, select Start/Run. A dialog box asks you to save this script. Type the name 31
“script6” and click Save. The script is now compiled, there should be no compilation errors and 32 script execution starts immediately. 33 34 You can see all your recorded actions being done automatically. 35 36 37 38
Commands generated by the Recording Mode 39
40 41 The script starts by a Shell command which runs the .EXE as specified. 42 43 Shell("Chr$(34)+"C:\Program Files (x86) \Windows NT\Accessories\wordpad.exe" 44 +Chr$(34)",1) 45 46
47 Then a UseWindow command is used : 48 49 UseWindow("WORDPAD.EXE|RICHEDIT50W|Document - WordPad|1",1) 50 SendKeys("Text entered in WordPad") 51
52 You will notice a lot of commands like this in a WinTask script. This command tells the automate 53 which window to send its actions. The parameters for this command are the window name, its 54 class and the window title. The last number behind the comma is the instance number. Don’t 55 worry, WinTask automatically finds these window names. 56 57 In the last line, the SendKeys command simulates the user pressing a key on the keyboard. The 58 simulated keys are typed in the window specified by the previous UseWindow command. The 59 typed text is put between paranthesis and keywords are written by their labels between the two 60 signs less than and greater than (for instance <Enter>, <Control>, etc…) 61

44
1 2 Shell(Chr$(34)+"C:\Program Files (x86)\Microsoft Office\Office12\WINWORD.EXE" 3 +Chr$(34),1) 4 5 UseWindow("WINWORD.EXE|_WwG|Microsoft Word Document|1",1) 6 SendKeys("Text entered in Word") 7 8
9 Again, a Shell command is used to run the program WINWORD. 10 11 A new UseWindow command shows that WinTask actions must now go to a Word window. 12 13 In the last line, the SendKeys command simulates text entered in the Word window. 14 15 16 UseWindow("WORDPAD.EXE|RICHEDIT50W|Document - WordPad|1",1) 17 ClickMouse(Left,Down,6,14) 18 ClickMouse(Left,Up,6,14) 19
SendKeys("<Ctrl c>") 20
21 After having entered text in Word, WinTask must now select the text entered in WordPad. As 22 usual, a UseWindow command shows that the actions must now take place in a WordPad window. 23 24 The next two lines simulate the text selection in the WordPad window and the third one simulates 25 the Control + c for Copy. 26 27 28 UseWindow("WINWORD.EXE|_WwG|Microsoft Word Document|1",1) 29 SendKeys("<Enter>") 30 SendKeys("<Enter>") 31
SendKeys("<Ctrl v>") 32
33 A new UseWindow command makes the automate come back to Word and in the next line, 34
the SendKeys command simulates the Enter key being pressed twice. The last line simulates a 35 Control + v for Paste. 36 37 38 39 40 CloseWindow("WINWORD.EXE|OpusApp|Document1 - Microsoft Word",1) 41 42 UseWindow("WINWORD.EXE|#32770|Microsoft Office Word",1) 43 Click(Button,"&No") 44 45 CloseWindow("WORDPAD.EXE|WordPadClass|Document - WordPad",1) 46 47 UseWindow("WORDPAD.EXE|CtrlNotifySink|WordPad|8",1) 48 Click(Button,"Do&n't Save") 49 50
51 The last lines close WordPad and Word without saving. 52
53

45
1
CHAPTER VIII: SPY TOOL – How to find window names, HTML 2
descriptors, UI Automation descriptors 3
4 5 6 In this chapter, we will study the Spy tool included in Wintask. The Spy tool allows you to find the 7 name of any window on desktop and it returns the parameters needed by the UseWindow function 8 to identify a specific window. On a Web page, it is used too for generating the HTML descriptor of 9 any HTML element displayed on the page. The HTML descriptor identifies uniquely an HTML 10 object on a Web page. On an application using the Microsoft UI Automation framework, Spy tool is 11 used for generating the UIA descriptor of any element within the application. The UIA descriptor 12 identifies uniquely an element on the desktop. 13 14 Recording Mode generates automatically the window names and the HTML descriptors, Spy tool is 15 useful when a window name or HTML element is different at replay. 16 17 18
Launch WinTask by clicking Start/All Programs/WinTask/WinTask. The main WinTask window 19 is displayed with the title “Untitled1”. 20 21 22
Spy tool to find a window name 23
24 As an example, we show Spy tool use on Wordpad application. 25 26
Start recording by selecting Start/Recording after launching a program. 27 28 A new dialog box asks you what you want to launch before starting your recording: 29 30 31
32 33 34
Check An application checkbox as you want to launch Wordpad, and click OK button. 35 36

46
In the next dialog box, specify the program you want to launch, click Browse button for opening the 1 32 bit version of Wordpad.exe file which is under Program Files (x86)\Windows NT\Accessories (if 2 you use a 32 bit Windows, the wordpad.exe file is under Program Files\Windows NT\Accessories): 3 4
5 6
And click the OK button. 7 8 9 The Editor window is minimized and the blinking video icon is displayed on the righthand side of 10 the taskbar and the WinTask toolbar is displayed. 11 12 The WordPad window is opened. Stop Recording mode by clicking the first icon in the WinTask 13 small toolbar. 14 15 16
The Editor window comes up, click the Spy button in the WinTask Editor toolbar: 17 18
19 20

47
1
The Spy window is displayed as shown below: 2 3 4 5 6 7
8 9
Click Spy button. 10 11 Mouse pointer shape changes. When you move the cursor in the different areas of Wordpad, you 12
see different information in the Spy window. 13 14 15 The Spy tool provides the different names of the windows inside WordPad. For instance, if you put 16 the mouse pointer on the Edit zone of WordPad (where you type your text) and click, you get the 17 following information: 18 19

48
1 2 If you put the mouse pointer on the Wordpad toolbar, you will see under Windows 7: 3 4
5 6 7 And so on .... 8 9 10 The field « UseWindow » contains the argument for the UseWindow command and you can 11
directly paste this argument into your script. Click Paste and you will paste the following line into 12 the Editor window: 13 14 "WORDPAD.EXE|RICHEDIT50W|Document - WordPad|1" 15
16

49
You only have to add the word « UseWindow » before the paranthesis and to surround the 1 paranthesis with two brackets and your UseWindow command is generated: 2 3 UseWindow("WORDPAD.EXE|RICHEDIT50W|Document - WordPad|1") 4 5 6
Spy tool to find the HTML descriptor of a Web element 7
8 Spy tool gives more information in the frame “Web information” when it is used on a browser 9 window. 10 11 12 For example, go to www.wintask.com using Internet Explorer (under a x64 version of Windows, do 13 not use Internet Explorer (64-bit) but use Internet Explorer). The IE window is displayed: 14 15
16 17 18
Launch Spy tool from WinTask Editor window. The Spy window is displayed as shown below: 19 20

50
1 2
Click Spy button. Mouse pointer shape changes. For instance, if you put the mouse pointer on the 3 red button DOWNLOAD your 30-day trial now!, you get the following information: 4 5

51
1 2 The frame “Window Information” gives the browser window information and the frame “Web 3 Information” tells on which HTML tag the mouse is pointed, what are the mouse coordinates and 4 what is the HTML Descriptor for the pointed HTML element. 5 6
Click Paste button if you want to paste the HTML descriptor into the WinTask script. 7 8 9
Spy tool to find the UIA descriptor of any desktop element 10
11 If Spy tool is used on a window belonging to an application supporting the Microsoft UI Automation 12 framework, the “UI Automation information” frame is filled in the Spy screen. 13 14 For example, go to www.wintask.com/demos using Internet Explorer (under a x64 version of 15 Windows, do not use Internet Explorer (64-bit) but use Internet Explorer). The WinTask web 16 demonstration site is displayed: 17 18

52
1 2
Click File link in the web page, this link downloads a test file. The IE Download small window 3 appears at the bottom: 4 5
6 7 These objects, such as Open, Save buttons in this small window can be accessed only through 8 their UIA descriptor and can be clicked only by the ClickUIA WinTask function. So for example we 9 will use Spy tool to find the UIA descriptor for the Save button and use this UIA descriptor to 10 generate the ClickUIA syntax. 11

53
1
Launch Spy tool from WinTask Editor window. The Spy window is displayed as shown below: 2 3
4 5
Click Spy button. Mouse pointer shape changes. Move the mouse pointer on the Save button in 6 the Download small window at the bottom of the IE window, you get the following information: 7 8 9

54
1 2
The UIA descriptor for the Save button is generated in the UIA descriptor field, click Paste UIA 3
descriptor button to paste it into the script. Here is the code pasted into the Editor window: 4 5 "[APP='iexplore.exe',CLASS='DirectUIHWND',AUTOID='IENotificationBar'][NAME='Save6 ',ROLE='split button']" 7
8 You only have to add the word « ClickUIA » before the UIA descriptor and add the necessary 9 parenthesis to generate the ClickUIA statement which at replay will click the Save button: 10 11 ClickUIA("[APP='iexplore.exe',CLASS='DirectUIHWND',AUTOID='IENotificationBar'][N12 AME='Save',ROLE='split button']") 13
14
Click Play icon to test this one-line script, you see the Save button clicked and the test file is now 15 saved. 16 17 18 If now you want to select Save as in this small Download window, the script must first click the 19 small arrow at the right of the Save button to open the context menu, and then select the Save as 20 option. Spy tool must be used twice and two ClickUIA statements must be used for those two 21 clicks. 22 23
Click Spy button. Mouse pointer shape changes. Move the mouse pointer on the small arrow at 24 the right of the Save button, Spy screen shows this information: 25 26

55
1 2
Click Paste UIA descriptor to paste the generated UIA descriptor into the script. The pasted line 3 is: 4 5 "[APP='iexplore.exe',CLASS='DirectUIHWND',AUTOID='IENotificationBar'][NAME='Save6 ',ROLE='split button'][ROLE='split button']" 7
8 Add the word « ClickUIA » before the UIA descriptor and add the necessary parenthesis to 9 generate the ClickUIA statement which at replay will click the arrow and so open the Context 10 menu: 11 12 ClickUIA("[APP='iexplore.exe',CLASS='DirectUIHWND',AUTOID='IENotificationBar'][N13 AME='Save',ROLE='split button'][ROLE='split button']") 14
15 Now Spy tool needs to be used again to find the UIA descriptor for the Save as menu option. 16 17
Call Spy again. As you need to click the arrow to make display the Save as button, check Delay 18
the selection for 3 seconds checkbox in order you have some time to click the arrow and move 19 the mouse on the Save as button which appears when the arrow is clicked: 20 21

56
1 2
Click Spy button, click the small arrow and when the context menu is displayed move the mouse 3
on the Save as button, click once the mouse left button to generate the UIA descriptor: 4 5

57
1 2 Click Paste UIA descriptor button, this line is pasted into the script: 3 4 "[APP='iexplore.exe'][NAME='Save as',ROLE='menu item']" 5
6 Add the word « ClickUIA » before the UIA descriptor and add the necessary parenthesis to 7 generate the ClickUIA statement which at replay will click the Save as button: 8 9 ClickUIA("[APP='iexplore.exe'][NAME='Save as',ROLE='menu item']") 10
11
Click the Play icon to replay the two lines script, you see the arrow clicked and the Save as option 12 clicked. 13
14

58
1 2

59
1
CHAPTER IX: SYNCHRONIZATION WITH A NEW WINDOW DISPLAYED 2
ON THE SCREEN 3
4 5 6 WinTask automatically waits until the next window is displayed before sending its actions to the 7 new window. Sometimes this automatic synchronization (through the UseWindow command) is not 8 enough as a long process is run before the window showing results is displayed. Window 9 synchronization will force the script to wait until a specific window is displayed (or disappears). 10 11 12 We will show this synchronization on appearance of window Do you want to save in Notepad when 13 menu File/Exit is selected. In this simple example, the UseWindow would be enough to ensure a 14 correct synchronization ; this simple example is just for demonstrating how to insert a window 15 synchronization when needed. 16 17 18 19
Launch WinTask Editor by clicking Start/All Programs/WinTask/WinTask. The main WinTask 20 window is displayed with the title “Untitled1” as shown below: 21 22
23 24 25
Start the Recording Mode by selecting Start/Recording after launching a program in the 26
WinTask main window or click the button in the toolbar. 27 28 29 A new dialog box asks you what you want to launch before starting your recording: 30 31 32

60
1 2 3
Check An application checkbox as you want to launch notepad, and click OK button. 4 5 6 In the next dialog box, specify the program you want to launch, notepad: 7 8
9 10
And click the OK button. 11 12 13 The Editor window is minimized and the blinking video icon is displayed on the righthand side of 14 the taskbar. The WinTask toolbar is displayed too. 15 16 The Notepad window is opened. Type the following text in it: 17

61
1 Text entered in Notepad 2 3
Select menu File/Exit. The Do you want to save dialog box is displayed; WinTask will wait until 4 this window appears. 5 6
For inserting this window synchronization, click the seventh icon in the WinTask toolbar , 7 Synchronization on window: 8 9
10 11 12 13 The next window is displayed: 14 15
16 17
Click Spy. The mouse pointer changes shape. Click the window Save As and the dialog box 18 Window synchronization is now filled with the proper window name you want WinTask waits for: 19 20 21

62
1 2
Click Insert and Resume. The WinTask toolbar is displayed which means that you are still in 3
Recording mode. Click Don’t save button (or No button under XP or 2003) in the Do you want to 4 save dialog box. And stop Recording mode by clicking the first icon in the WinTask toolbar. 5 6 The Pause block of lines has been automatically inserted in the script : 7 8 Pause until 9 WinStatus(Active) 10 InWindow("NOTEPAD.EXE|#32770|Notepad",1) 11 PauseFalse 12 MsgBox("Wait for at line " + #ErrorLine$ + " has failed 13 !",16,"Runtime error") 14 End 15 EndPause 16 17 The Pause command means: wait until the window named NOTEPAD.EXE|#32770|Notepad of 18
Notepad is displayed. If the specified window is not found after a Timeout, the command just after 19 the PauseFalse keyword is executed. This command displays an error message indicating the line 20 in the script where the error has occurred. 21 22 23 24
Run the script by selecting Start/Run. A dialog box asks you to save the script. Type the name 25 “Script7” and then the script is compiled. There should be no errors and script execution starts 26 immedaitely. 27 28 29
Note for WinTask users (not available in WinTask Lite): this synchronization method combined 30 with OnAction statement (see help on OnAction statement) allows you to create scripts doing 31 actions as soon as a specific window (an error window for instance) is detected on the screen. 32
33

63
1 2
CHAPTER X: HOW TO RECORD NAVIGATION WITHIN WEB PAGES 3
4
User actions on Web pages can too be recorded as seen in chapter VI. The Web pages must be 5 loaded using Internet Explorer or Mozilla Firefox or Google Chrome (under a x64 version of 6 Windows, do not use Internet Explorer 64 bit). This chapter shows how it works on a sample web 7 site, www.wintask.com/demos. 8 9 10
Launch WinTask Editor by clicking Start/All Programs/WinTask/WinTask. The main WinTask 11 window is displayed with the title “Untitled1” as shown below: 12 13
14 15
Start the Recording Mode by selecting Start/Recording after launching a program in the 16
WinTask main window or click the button in the toolbar. 17 18 A new dialog box asks you what you want to launch before starting your recording: 19

64
1 2 3
Check Internet Explorer checkbox or Mozilla Firefox checkbox or Google Chrome as you want 4
to launch your browser, and click OK button. 5 6 7 If you have checked Internet Explorer, in the next dialog box as below, type the Web site address: 8 9
10

65
1 leave unchecked the checkbox “A new window prompts for a userid and password when the URL 2
loads” as the website wintask.com is not password protected and click OK button. 3 4 The browser is opened, www.wintask.com/demos is loaded and the Recording mode is active. 5
6 7
click Form link. When the Form page is loaded, type your name in the Name field and check the 8
Urgent request checkbox. 9 10

66
1 2 Close the Internet Explorer window. Stop the Recording mode by clicking the red flashing icon in 3 the taskbar. The script is automatically generated as below: 4 5
6 7 The first statement StartBrowser launches Internet Explorer and opens www.wintask.com/demos. 8 9 The second statement UsePage specified the Web page where the next actions must be sent. 10 11 The third statement ClickHTMLElement simulates a click on an HTML element, here the HTML 12 element is a link (the HTML tag for a link is A). The parameters for the ClickHTMLElement function 13 use the HTML official model but you don’t have to know it as the Recording mode creates them 14 automatically. 15 16

67
The next UsePage waits until the page titled Form is loaded. 1 2 The WriteHTML line types the specified text in the form field called name. 3 4 The ClickHTMLElement on a checkbox checks the Urgent request checkbox. 5 6 The last statement closes the Internet Explorer window. 7 8 9
Launch the script by selecting Run in the Start menu or click the Play icon in the WinTask Editor 10 toolbar. 11 12
Because the script has not been saved, the Save as window is displayed. Type the name “web 13
automation” and click Save. 14 15 You can see the Web navigation done automatically. 16
17
18
WinTask includes too Web functions which capture data from a Web site, fill forms, retrieve data 19 into Excel. A specific manual is dedicated to WinTask Web scripts, you can download it from 20 http://www.wintask.com/wintaskwebbook.pdf. 21
22

68
1

69
1
CHAPTER XI: LAUNCH THE SAME SCRIPT EVERY HOUR 2
3 4 5 In this chapter, we will learn how to create a script doing the same actions (in our example, a 6 simple wordpad script will be started) every hour without any user intervention. 7 8 9 WinTask (not WinTask Lite) includes its own Scheduler with automatic login under Windows 2003. 10 11 WinTask x64 includes its own Scheduler with automatic login under Windows 7 64 bit, Windows 8 12 64 bit and Windows 2008 R2 64 bit, It includes too the Send a mail feature. You can download the 13 WinTask x64 Scheduler manual from http://www.wintask.com/schedulerx64.pdf. 14 15 WinTask Scheduler is a service and can be used even if no user is logged in. WinTask Scheduler, 16 at the specified time, will open a desktop, run the task and close again the desktop. 17 18 19
If Scheduler is not yet started, you can start it by selecting Start/Scheduler in WinTask: 20 21 22
23 24 25 WinTask Scheduler window is displayed: 26 27

70
1 2 3 and you can create a new task. 4 5
Click New task button, The Task Properties dialog box is displayed: 6 7
8 9 Give a name to the task in Task name field, for example “wordpad launch” and in Command line 10
field, click Browse for selecting an existing .ROB file (an already compiled script, so ready for 11
execution). In the list of available .ROB files, select script1.rob and click Open. The dialog box 12 should now look like: 13 14

71
1 2
You need now to specify at what time WinTask Scheduler must launch this task. Click Schedule 3 Tab, the screen below is displayed: 4
5 6
To schedule the task every hour, check Repeat every radio button, in d field, type 0 and in h field, 7
type 1. In Starting group, specify the Date and Time when the task starts for the first time. In 8
Exclusions group, you can prevent the task to be launched some days or at some holidays. The 9 screen looks like: 10 11

72
1 2
Click Security Tab if Scheduler needs to launch the task even if no user is logged, or if Screen 3 Saver with a password has been set up in Windows parameters. 4 5 In the Security dialog box: 6 7
8 9
Force a new desktop with this account will force a logoff and then a login with the specified 10
credentials when the task starts at scheduled time. If Force a new desktop is not checked, if a 11 user is already logged, the task will start using the desktop of this already logged user – if a user is 12 not already logged, the specified credentials are used to login, launch the task and then logoff. 13 14

73
Click OK button to finish. 1 2
You can request that Scheduler sends an email after a task has been executed. Click Email 3
Notification Tab, the screen below is displayed: 4 5
6 7
In SMTP Outgoing mail server, type the name of your outgoing mail server – you can find it in 8 your existing account (in Outlook, Tools/Accounts menu, select one account, and in Server Tab for 9 this account, the name is in Outgoing mail (SMTP)). 10 11
Do not check User authentication unless your Outgoing Mail Server requires authentication (My 12 server requires authentication checkbox in Outlook). 13 14
In Send an email groupbox, specify when you want to receive an email, let’s check For every 15
task failing. The Email notification dialog box should look like: 16 17

74
1 2
Define now what to include in the mail. Click Define email template button. 3 4
Fill the different fields. If Include Event log information is checked, the mail will include the 5 date/time when the task started, when the task ended, and if there is an error, the error code with 6 the line number where the error occurred, and the error message. See below the Email Template 7 dialog box filled: 8 9

75
1 2 Click OK to finish and you can close Scheduler window. 3 4 5 If the task could not start for any reason, Event log reports an error code under WTScheduler line 6 and the possible error codes are listed in WinTask help, Scheduler chapter, Scheduler error codes 7 topic. 8 9 If the task does not complete it execution, an execution error code is listed in Event log and it tells 10 which script line is in error. 11
12
13

76
1

77
1
CHAPTER XII: AUTOMATE IN A WINDOWS DOS BOX 2
3 4 5 WinTask can automate tasks in a Dos box of Windows. 6 7 There is a limitation using a Dos box which makes creating this automation a bit more difficult than 8 usual: the Recording Mode will not record the keystrokes you enter in a Dos box which means you 9 have to create your script manually. 10 11 In the following example, we will create a script launching a Dos box, typing the Dir command and 12 exiting the Dos box with the Exit command. 13 14
Lauch WinTask Editor by clicking Start/All Programs/WinTask/WinTask. 15 16 The Editor window is displayed with the title “Untitled1” as shown below: 17 18
19 20
Start the Recording Mode by selecting Start/Recording after launching a program in the 21
WinTask main window or click the button in the toolbar. 22 23 24 A new dialog box asks you what you want to launch before starting your recording: 25 26 27

78
1 2 3
Check An application checkbox as you want to launch command.com to open a Dos box, and 4
click OK button. 5 6 7 In the next dialog box, specify the program you want to launch, “cmd”. 8 9
10 11
And click the OK button. 12 13
The Editor window is minimized and the blinking video icon is displayed on the right handside of 14 the taskbar. All your actions will now be recorded. 15 16 17

79
The Dos box is now opened. Type “Dir” and press Enter. The file list is displayed. Then type “Exit” 1
and press Enter. You will then come back to the Windows environment. 2 3 Click the small blinking video icon to stop the Recording Mode. The main Editor window is 4 displayed with the generated commands: 5 6
7 8
You can see that the generated commands stop at « Shell ». None of your actions in the Dos box 9 were recorded. 10 11 12 We will manually add these commands in the script. 13 14 In the Editor main window, go to the first line immediately following all the generated commands by 15
pressing the Enter key. 16 17 To use the Spy tool to find the name of the Dos box window, run the just created script: Click 18
Start/Run or click the Play icon in the WinTask Editor toolbar. Name the script « dosbox » and 19 then run it. The Dos box is now opened. 20 21 We will now find the name of this window using the Spy tool. 22 23 Click the minimized WinTask window in the taskbar to put the focus on the Editor window and 24
select Start/Spy or click the Spy icon in the WinTask Editor toolbar. 25 26 27
Click Find Window in the Spy window. Move the cursor to the Dos window. Paste the name of 28
this window in the script by clicking Paste. The following line is inserted in the script: 29 30 "CMD.EXE|ConsoleWindowClass|C:\Windows\System32\cmd.exe" 31
32 To make certain that WinTask sends all the actions to this window, you must include a 33 UseWindow command in front of this window name. 34 35 The command should be : 36 37 UseWindow("CMD.EXE|ConsoleWindowClass|C:\Windows\System32\cmd.exe") 38
39
Two commands must be added to simulate the action of typing the Dir command and Enter, plus 40
the Exit command and Enter. 41 42

80
SendKeys("Dir<Enter>") 1 SendKeys("Exit<Enter>") 2
3 The Dos box script should now look like : 4 5 Shell("cmd",1) 6 7 UseWindow("CMD.EXE|ConsoleWindowClass|C:\Windows\System32\cmd.exe") 8 SendKeys("Dir<Enter>") 9 SendKeys("Exit<Enter>") 10
11 Before launching this script, close the still-opened Dos box (type “Exit” in the Dos box and press 12
Enter). 13 14
Run the script by clicking Start/Run in the Editor window or click the Play icon. There should be 15 no compilation errors and the script should start immediately. 16
17

81
CHAPTER XIII: HOW TO DEBUG A SCRIPT 1
2 3 4 WinTask provides a script debugger as an aid in developing scripts. Using WinTask Debug mode, 5 you can halt the script execution at a certain line, with the WinTask Editor window showing the line 6 in question, display the value of variables and then resume execution till the next line you have 7 specified. 8 9
All the features of WinTask debugger can be accessed from the Debug main menu option in the 10 WinTask Editor window. A Debug toolbar is also provided that you can display selecting 11
View/Debug toolbar menu option. 12 13
14 15 16 The Editor window with the Debug toolbar displayed : 17 18
19 20 21 To demonstrate how to use Debug mode, create this small script as written below – note that if 22 you are under 2003, the last two lines are 23 UseWindow("NOTEPAD.EXE|#32770|Notepad",1) 24 Click(Button,"&No") 25 26

82
1 2 The script saved under the name « debugnotepad » launches notepad (if you use a x64 version of 3 Windows, change the first Shell line to call the notepad.exe file which is under 4 c:\windows\SysWOW64). Then in a loop, it types into notepad Hello1, then Hello2 and so on until 5 the index i equals 10. The index j is not used, it is there only for a tutorial purpose. After the loop, 6 notepad window is closed and the document is not saved. 7 8 The easiest way to use Debug mode is to put the cursor just in front of the line where the 9 execution must stop and then watch the value of the desires variables. So put the cursor in front 10
of line 8 (line i=i+1) and select Debug/Run to cursor or click the Run to cursor icon in 11 the Debug toolbar. 12 13 The Editor window with the cursor on line 8 looks like : 14 15
16 17 And after you select Run to cursor, the Editor window is minimized, notepad is launched, Hello1 is 18 typed in notepad, the script stops its execution and the Editor window comes back to focus. The 19

83
Editor window looks now like (note the green arrow on line 8 telling on which line script execution 1 has stopped, the pointed line is not yet executed) : 2 3
4 5 Before going on with execution, you want to know the value of the variable i. 6 7
In the Output window (the one in the bottom), click Add new variable in the Watch Tab : 8 9
10 11 As you want to watch the content of the variable i, type in <name> i and press Enter, the value of 12 the variable i is now displayed : 13 14

84
1 2
To resume script execution, select Debug/Start/Continue debugging menu option or click the 3
Start/Continue debugging icon in the Debug toolbar. 4 5
To stop script execution, select Debug/Stop debugging or click the Stop Debug icon in 6 the Debug toolbar. 7 8 9 10 If you need multiple script execution stops, use breakpoints. For example, insert a breakpoint in 11
front of line 9: put the cursor in front of line 9 (j=j-1) select Debug/Toggle breakpoint or click the 12
Breakpoint icon in the Debug toolbar. The Editor window looks like : 13 14

85
1 2 3 Now start Execution in Debug mode, the script execution stops at the breakpoint (it does not 4
execute line where the breakpoint is) : select Debug/Start/Continue debugging menu options or 5
click the Start Debug icon in the Debug toolbar. 6 7 8 The Editor window is minimized, notepad is launched, Hello1 is typed in notepad, the script stops 9 its execution and the Editor window comes back to focus : 10 11
12 13 The green arrow is now on line 9, where you have inserted the breakpoint. Not the value of the 14 variable i which now displays the value 2. You can watch the variable j by clicking Add new 15 variable in the Output window as below : 16

86
1
2 3 You can now go on with execution with still the breakpoint : at each iteration, on the line where the 4 breakpoint is, the Editor window comes back to focus and in the Output window, you can look at 5
the contents of the variables i and j. Click Debug icon in the Debug toolbar to iterate and 6 stop at the breakpoint for each iteration. 7 8 9
If you want to remove the breakpoint, just put the cursor on the line and select Debug/Toggle 10
breakpoint or click the Breakpoint icon in the Debug toolbar. 11 12
To stop script execution, select Debug/Stop debugging or click the Stop Debug icon in 13 the Debug toolbar. 14 15 16 17
18

87
CHAPTER XIV: TIPS 1
2
How can I stop a script? 3
4 Click the right mouse button when the name of the script is highlighted in the taskbar and select 5
Close. 6 7 or 8 9
Simultaneously press the keys Shift, Ctrl and Pause OR Shift, Ctrl and ScrollLock (Note: this 10 stops ALL scripts). 11 12 13 14 15 16 17 18 19 20 21 22 23 24 25 26 27 28 29 30 31 32 33 34 35 36 37 38 39 40 41 42 43 44 45 46 47 48 49 50 51 52 53 54

88
1 2

89
APPENDIX 1
2
List of all the functions in WinTask that can be used to automate tasks. 3
4
5 WinTask includes a powerful programming language similar to Visual Basic. We have listed all the 6 functions in that language below with a brief description. You can see how comprehensive they 7 are - practically any repetitive task can be accomplished. 8 9 When you use the Recording Mode, these functions are automatically generated by WinTask and 10 compiled into a complete Script. Advanced users can modify or create Scripts directly in the 11 programming language using these functions. 12 13 The functions marked with an asterisk are not available in WinTask Lite. WinTask Scheduler is 14 available under 2003 (not available in WinTask Lite). WinTask x64 includes a Scheduler for 15 Windows 7 64 bit, Windows 8 64 bit and Windows 2008 R2 64 bit. It supports automatic login and 16 includes the Send a mail feature. 17
18
Window management functions 19
20
#ActionTimeout - Specifies the number of seconds that WinTask should wait before reporting an 21 error 22
#ExecuteDelay - Inserts a wait for n ticks between every statement of the script 23
# IgnoreErrors - Manages errors 24
#SendkeysDelay - Slows down keystrokes 25
#UseExact - Controls the way WinTask sends its commands to the proper Window 26
CheckedW* - Tells if the specified checkbox/radio button is checked or not 27
ChooseItem - Selects an item in a combobox or a listbox 28
ChooseMenu - Selects a menu item 29
Click - Clicks mouse on a button 30
ClickMouse - Clicks mouse button 31
ClickOnBitmap - Clicks mouse button on an image inside a window 32
ClickOnText - Clicks mouse button on a text inside a window 33
ClickOnTextOCR* - Clicks mouse button on a text recognized by the OCR engine inside a 34 window 35
ClickScrollBar et WinScrollBar - Scrolls inside a window 36
ClickSpin - Clicks a spin control 37
CloseWindow - Closes the specified window 38
CloseWindowRegEx* - Closes the window whose name is specified by a Regular Expression 39
CursorX, CursorY - Returns the position ot the cursor 40
EnabledW - Tests if the specified window is active and can receive actions 41
ExistW - Tells if the specified window exists 42
Focus$ - Returns window name which is in focus 43
GetFocusWindowHandle - Returns the handle of focused window 44
GetTopWindowHandle - Returns the handle of the window on top 45
GetWindowHandle - Returns the handle of specified window 46
GetWindowName$ - Returns the name of the window specified by its handle 47
ListItem$ - Returns the specified item in the listbox or combobox 48
MaximizeWindow - Maximizes the specified window 49
MinimizeWindow - Minimizes the specified window 50
MouseShape - Returns the mouse cursor shape as an integer 51
MouseX , MouseY - Returns the X,Y position of the mouse 52
MoveMouse - Moves the mouse to the specified X 53
MoveWindow - Moves the specified window 54
90
RestoreWindow - Restores the specified window 1
SelectedItem$* - Returns the item selected in the specified listbox or combobox 2
SendKeys - Sends keystrokes to the window specified by the last UseWindow 3
SendKeysEncrypted* - Sends encrypted keystrokes to the window specified by the last 4 UseWindow 5
SizeWindow - Modifies the size of the specified window 6
Top$ - Returns the name of the main window which has focus 7
TopInstance - Returns the instance number of the main window in focus 8
UseWindow - Specifies the window where the script will now send its keystrokes 9
UseWindowHandle - Specifies the window (through the window handle) to which subsequent 10 keyboard, mouse and menu actions are directed 11
UseWindowRegEx* - Using a Regular Expression, specifies the window where the script sends 12 keys 13
WinScrollBar et ClickScrollBar - Scrolls inside a window 14
WriteCombo - Writes text in the edit zone of a listbox 15
WriteEdit - Writes text in the specified edit zone 16
WriteEditEncrypted* - Writes encrypted text in the specified edit zone 17 18 19
Capture functions 20
21
#BitmapPrecision* - Specifies how closely the found image must match the input image in Pause 22 on Bitmap and ClickOnBitmap functions. 23
#UsePageExact - Controls the html pages finding method 24
Capture$ - Captures the text in the specified window 25
CaptureArea$ - Captures the text in the specified window area 26
CaptureAreaOCR$* - Using OCR, captures the text in the specified window area 27
CaptureBitmap - Captures an image and stores it in a .BMP file 28
CaptureHTML - Captures the text of a specified html element 29
CaptureOCR$* - Using OCR, captures the text in the specified window 30
CaptureTableHTML - Captures a range of cells in a specified html table 31
CopyLink* – Copies the link associated with the specified html element into a string 32
GetHTMLEditText - Captures the text of the specified html Edit element 33
HardCopy* - Saves a screenshot 34
UseOCREngine* - Specifies the OCR engine to use (WinTask or MODI OCR engine) 35 36 37
Synchronization functions 38
39
#ErrorCode$* - Gives the error code for the error that triggered OnAction Error procedure 40
#ErrorFunction$* - Gives the function where the error triggering OnAction Error procedure 41 occurred 42
#ErrorLine$ - Gives the script line where the timeout has occured 43
#ErrorMsg$* - Gives the error message for the error that triggered OnAction Error prcedure 44
#ErrorScript$* - Gives script name where the error triggering OnAction Error procedure occurred 45
#PauseTimeout - Specifies the maximum delay for a Pause statement 46
#TextlookFrequency - Defines the frequency of scrutation of window where texts are watched for 47
Disable* - Disables the management of a specified event 48
Enable* - Reactivates the management of a specified event 49
OnAction ... EndAction* - Manages events 50
OnAction Error … EndAction* - Inserts and manages error events 51
Pause - Waits for a specified amount of time 52
Pause ... Until - Waits for an action 53
Sleep* - Makes the current script sleep whereas the events are still managed 54 55

91
1
User dialog 2
3
BeginDialog...EndDialog* - Defines a dialog box with its controls 4
CallDialog* - Displays a dialog box defined previously 5
Inputbox$ - Displays a simple dialog box where the user can type a value 6
InputboxSecret$* - Displays a simple dialog box where the user can type a hidden value 7
MsgBox - Displays a Windows standard message box 8
MsgFrame - Displays a message 9
MsgFrameTitle - Displays a message with a title 10
RemoveFrame - Removes the message displayed by MsgFrame 11
SelectDir* - Returns the name of the directory selected by the user in the standard Browse 12 for Folder dialog 13
SelectFile* - Returns the name of the file selected by the user in the standard dialog box File 14 Open 15
SelectMultipleFile* - Returns the name of the files selected in the standard dialog box File Open 16 17 18
File management functions 19
20
AppendXMLNode* - Adds a node in the specified XML file 21
ChDir - Sets the current working directory 22
CloseExcelCom – Closes the background Excel instance loaded by WriteExcel or ReadExcel 23
Create - Creates a file 24
CreateExcelFile - Creates an Excel worksheet 25
CreateUnicodeFile - Creates a Unicode file 26
CurDir$ - Returns the current working directory 27
DelTree – Deletes all the files and sub-directories below the specified directory 28
Dir - Puts file names from a directory into arrays 29
DiskFree - Returns the available space on the specified resource 30
EnumXMLAttributes* - Retrieves the attribute names and values for the specified XML node 31
EnumXMLChildren* - Enumerates the child node descriptors for the specified XML node 32
Eof - End of file 33
Exist - Tells if specified file exists 34
ExistDir - Checks for the existence of the specified directory 35
FileAttr$ - Gives the attributes of the specified file 36
FileCopy - Copies a file to an other file 37
FileDate$ - Date of last modification of the specified file 38
FileSize - Size of the specified file 39
FileTime$ - Time of last modification of the specified file 40
FileVersion$ - Version number of the specified file 41
GetReadPos - Value of the reading pointer of the specified file 42
GetXMLAttribute* - Retrieves the content of an attribute in the specified XML file 43
Kill - Deletes one or several files 44
MkDir - Creates a directory 45
Name - Renames or moves one or several files 46
Read - Reads data from a file 47
ReadExcel - Reads a range from an Excel workbook 48
ReadIni$* - Reads a parameter in the specified INI file 49
RmDir - Deletes a directory 50
SetAttr - Sets the attributes of one or several files 51
SetReadPos - Sets the reading pointer to the specified value 52
SetXMLAttribute* - Modifies or adds an attribute in the specified XML file 53
WinDir$ - Returns the name of the directory where Windows is installed 54
Write - Writes data in a file 55

92
WriteExcel - Writes in an Excel workbook 1
WriteIni* - Writes to the specified INI file 2 3 4
Flow control functions 5
6
#ErrorLine$ - Gives the script line where the timeout has occured 7
#ExecTimeout – Sets the maximum delay before stopping script execution 8
#ExecuteDelay - Slows down a running script by inserting a wait for n ticks between 9 every statement 10
#IgnoreErrors - Manages errors 11
#LastErrorLine* - Gives the line number where the error triggering OnAction Error procedure 12 occured 13
#ScriptAfterTimeout* - Specifies the script to run after execution timeout has elapsed 14
Command$ - Allows a calling script to use the parameters from the called script 15
End - Stops the current running script 16
Function ... ExitFunction ... EndFunction - Defines a function 17
Goto ou Go to - Makes the execution of the script continue at another line 18
If ... Then ... Else ... Endif - Decision making statement 19
Repeat ... until ... - Loop wtih test at the end of the loop 20
Run - Launches a compiled script as a sub-program 21
Select Case ... EndSelect - Multiple decision making statement 22
Shell - Executes a program (.exe, .com, .bat, .doc, .txt, ...) 23
Stop - Stops all the scripts 24
Sub ... Exitsub ... EndSub - Defines a procedure 25
While ... Wend - Loop statement with test at the beginning 26 27 28
String management functions 29
30
Asc - Returns the numeric ASCII code of the first character in a specified string 31
Chr$ - Converts an ASCII value in its equivalent ASCII character 32
Encrypt* - Encrypts the specified string 33
ExtractBetween$ - Extracts a string between two strings 34
Instr - Returns the position of one string within another 35
InstrRev - Returns the position of one string within another, searching backward through the 36 string 37
Lcase$ - Converts all uppercase characters in the specified string to lowercase 38
Left$ - Extracts the specified number of characters from the left hand portion of the specified 39 string 40
Len - Returns the length of the specified string 41
Ltrim$ - Returns the specified string minus its leading spaces and tabulations 42
Mid$ - Retrieves a substring from the specified string 43
Replace$ - Finds and replaces some or all occurrences of a substring within the specified string 44
Right$ - Returns the rightmost portion of the specified string for the numbers of characters 45 specified 46
Rtrim$ - Returns the specified string minus its trailing spaces and tabulations 47
SplitIntoArray* – Converts the specified string into an array of strings 48
Str$ - Transforms the specified numeric value in a string 49
Trim$ - Returns the specified string minus its trailing spaces and leading spaces 50
Ucase$ - Converts all lowercase characters in the specified string to uppercase 51
Val - Returns the numeric value of a string 52 53 54
Date/time functions 55

93
1
Date$ - Returns the current date 2
DateBetween$ - Returns the number of specified time intervals between two dates 3
DateToDate$ - Returns a new datetime based on adding an interval to the specified date 4
Day$ - Returns the current day number within the current month 5
Hour$ - Returns the current hour as a two-character string 6
Hundreds$ - Returns hundredth seconds of sytem time as an integer from 0 to 99 7
Min$ - Returns the minutes of the current hour as a two character string 8
Month$ - Number of the current month as a string 9
Sec$ - Returns the seconds of the current hour as a two character string 10
Time$ - Returns the system clock as a string 11
WeekDay - Returns the current day of the week 12
Year$ - Returns the current year as a string 13 14 15
System functions 16
17
#HideIcon - Hides the WinTask icon in the taskbar 18
#HideTrayIcon - Hides the WinTask icon in the system tray 19
#IgnoreErrors - Manages errors 20
Allocate* - Reserves a memory area for data used by external DLL 21
Beep - Forces the PC to emit a sound through the PC speaker 22
CapsLock - Forces the capslock key to the specified state 23
ChDir - Specifies the current working directory 24
Curdir$ - Returns the current working directory 25
DeleteRegKey* - Deletes the specified key in Registry 26
DeleteRegValue* - Deletes a value in Registry 27
Dir - Puts in arrays all or some files present in a directory 28
DirTree - Puts file names and directory names into arrays 29
DiskFree - Returns the available space on the specified resource 30
Envir$ - Returns the value of an environment variable 31
ExecExcelMacro – Executes an Excel macro in the specified Excel book 32
Exist - Checks for the existence of the specified file 33
External* - Calls an external DLL 34
External$* - Calls a Windows DLL 35
GetCpuLoad* - Returns the CPU load percentage 36
GetMemUsage* - Returns the memory used percentage 37
GetProcessCpuLoad* - Returns the CPU percentage used by a process 38
GetProcessList* - Gives the list of active process and their attributes 39
GetWindowsList* - Gives the list of parent window names present on desktop 40
IsRunning - Tells whether a program is loaded in memory or not 41
KillApp* - Kills the specified application 42
KillAppChildren* - Kills the specified application and its associated children 43
KillProcess* - Kills the specified process 44
LockKbd - Locks the keyboard 45
LockMouse - Locks the mouse 46
MkDir - Creates a directory 47
NumLock - Forces the numlock key to the specified state 48
OsVersion$ - Returns Windows version 49
PeekInteger* - Reads one or several bytes in memory and returns an integer 50
PeekString$* - Reads a string in memory 51
PokeInteger* - Writes in memory a value of type integer or Unsigned 52
PokeString* - Writes in memory a string 53
Random - Returns a random integer 54
ReadIni$* - Reads a parameter in the specified .INI file 55

94
ReadReg* - Reads an integer or a string from Registry 1
Reboot - Reboots the PC or Windows 2
RmDir - Deletes a directory 3
SendEmail* – Sends an email using the SMTP outgoing mail server defined in WinTask 4 Scheduler 5
Shell - Executes a program 6
ShellWait - Executes a program (.exe, .com, .bat, .doc, .txt, ...) and waits for its 7 termination before running next statement 8
UnlockKbd - Unlocks the keyboard 9
UnlockMouse - Unlocks the mouse 10
WinDir$ - Returns the directory where Windows is installed 11
WriteIni* - Writes in the specified .INI file 12
WriteReg* - Creates or modifies a string or numeric value in Registry 13 14 15
Clipboard and log functions 16
17
#Current line - Returns the current executed line in the script 18
Comment* - Writes a comment in the log file 19
GetClipboard$ - Returns the text contained in Clipboard 20
LogFile* - Forces the script to log its actions in the specified logfile 21
SetClipboard - Puts the specified string into the Clipboard 22
StopLog* - Stops recording in the logfile 23 24 25
Compilation 26
27
Dim - Defines an array 28
Include - Includes the specified source file in the current script 29
Local - Defines a local variable 30
Rem - Inserts a comment 31
Unsigned - Defines an Unsigned variable 32 33 34
Services management * 35
36
IsServiceStarted* - Tells if the specified service is started or not 37
StartService* - Starts the specified service 38
StopService* - Stops the specified service 39 40 41
Web functions 42
43
#HTMLBrowser$ - Specifies the browser to use in subsequent Web functions 44
#HTMLPosRetry - Controls the way HTML element coordinates are found 45
#IgnoreHTMLCase – Enables/disables character case in HTML descriptors 46
#PageSynchroLevel – Allows a more loose synchronization for Web functions 47
#UsePageExact - Controls the html pages finding method 48
CaptureHTML - Captures the text of a specified html element 49
CaptureIE$ - Captures in text mode what appears in a HTML window 50
CaptureTableHTML - Captures a range of cells in a specified html table 51
CheckedHTML* – Gives the check state of an HTML check box or radio button 52
ClickHTMLElement - Clicks the specified html element in the current page 53
CloseBrowser - Closes the opened instance of Internet Explorer browser 54

95
CopyLink* - Copies the link associated with the specified html element into a string 1
CurrentPage$ - Gives the title of the current Web page 2
EnabledHTMLElement* - Checks if the specified HTML element is enabled 3
ExistHTMLElement* – Checks for the existence of the specified html element 4
ExtractLink* - Returns all the links of the child elements of the specified html element 5
GetFrameSource$ - Returns the source code of the specified frame in the current Web page 6
GetHTMLEditText – Captures the content of an html Edit field within a Web form 7
GetPageSource$* - Returns the source of the current Web page 8
ListHTMLItem$ - Returns the specified item from the specified html listbox or combobox 9
Navigate - Navigates to the specified url 10
OverHTMLElement – Moves the mouse over the specified html element 11
PreviousPage – Clicks the Back button in the current browser window 12
SavePictureAs – Saves an html element referring to a picture 13
SaveTargetAs – Simulates a right click on an html element and selection of Save Target As 14 option 15
SelectedHTMLItem$* - Returns the item selected in the specified combobox/listbox html element 16
SelectHTMLItem – Selects an item in a combobox/listbox within a Web page 17
StartBrowser - Starts Internet Explorer browser 18
UsePage - Specifies the html page used by web functions 19
WriteHTML – Types a string in a html edit zone 20
WriteHTMLPaste – Pastes a string in a html edit zone 21
WriteHTMLEncrypted* - Types an encrypted string in a html edit zone 22 23 24
FTP functions 25
26
#FTPTimeout - Specifies the number of seconds which WinTask should wait before reporting a 27 runtime error when it tries to execute a FTP function 28
FTPChDir - Specifies the new FTP current folder 29
FTPConnect - Makes a connection to the specified FTP server 30
FTPCurrentDir - Returns the FTP current folder 31
FTPDisconnect - Terminates the connection to a FTP server 32
FTPExistDir - Checks if the specified FTP folder exists or not 33
FTPExistFile - Checks if the specified FTP file exists or not 34
FTPGetFile - Downloads one or several files to the local PC from the FTP server 35
FTPKill - Deletes one or several files from the FTP server 36
FTPMkDir – Creates a folder on the FTP server 37
FTPName - Renames one or several files in the FTP server 38
FTPPutFile - Uploads one or several files from the local PC to a FTP folder 39
FTPRmDir - Deletes a folder and its contents on the FTP server 40 41 42
Real calculation functions 43
44
#DecimalSeparator - Specifies the decimal separator character used for floating point 45 numbers 46
#Precision - Specifies the number of decimal places for floating point calculation 47 functions 48
Add$ - Adds two strings representing floating point numbers 49
Divide$ - Divides two strings representing floating point numbers 50
Multiply$ - Multiplies two strings representing floating point numbers 51
Subtract$ - Subtracts two strings representing floating point numbers 52 53 54
Response time* functions 55

96
1
ResetTimer* - Resets the specified clock 2
StartTimer* - Starts the specified clock 3
StopTimer* - Stops the specified clock 4
Timer* - Returns the value of the specified clock 5 6 7
ODBC* functions 8
9
#DbDateFormat* - Controls the date fields format 10
DbBof* - Tells if recordset contains no records 11
DbClose* - Closes the recordset 12
DbConnect* - Establishes the data source connection through the odbc driver 13
DbDisconnect* - Closes the data source connection 14
DbEof* - Tells if pointer is at the end of the recordset 15
DbExecute* - Executes a sql command on the opened data source 16
DbGetFieldNumeric* - Retrieves the value of a numeric field in a recordset 17
DbGetfieldString* - Retrieves the value of a string field in a recordset 18
DbMove* - Moves the current record pointer within the recordset at specified position 19
DbMoveFirst* - Positions the current record on the first record in the recordset 20
DbMoveLast* - Positions the current record on the last record in the recordset 21
DbMoveNext* - Positions the current record on the next record in the recordset 22
DbMovePrev* - Positions the current record on the previous record in the recordset 23
DbRecordCount* - Returns the number or records in the recordset 24
DbSelect* - Fills the recordset by retrieving in the table the records matching the sql query 25 26 27
UI Automation functions 28
29
ClickUIA* - Waits until the specified uia element is ready and clicks it 30
GetUIAProperty* - Returns the content of the specified property for the specified UIA descriptor 31
WriteUIA* - Waits until the field specified by its UIA descriptor is ready for use and then writes 32 text into 33