Embed Size (px)
Citation preview

Software Testing
Winrunner
________________________________________________________________________Confidential Document 1

Software Testing
CONTENTSUnit I:
What is Winrunner? - Benefits of Automation Testing -Winrunner Testing Process-
Exploring Winrunner Window-Addins-Understanding GUI Map-Spying on GUI
Objects- Choosing a GUI Map Mode-Using Rapid Test Script Wizard-Learning
Virtual Objects.
Unit II:
Recording Test-Choosing a Record Mode-Recording a Context Sensitive Test-
Understanding the Test Script – Recording in Analog Mode – Running the Test –
Analyzing Test Result – Recording Tips
Unit III:
Synchronizing Test – When Should synchronize- Waiting for Objects and Windows -
Waiting for Property Values of Objects and Windows - Waiting for Bitmaps of
Objects and Windows - Waiting for Bitmaps of Screen Areas - Creating a Test –
Changing Synchronization Setting – Identifying a synchronization problem -
Synchronizing the Test – Running the Synchronized Set - Tips for Synchronizing
Tests
Unit IV
Checking GUI Objects- How to check GUI objects - Adding GUI Checkpoints to a
Test Script - Running the Test - Running the Test on a New Version - GUI
Checkpoint tips
Checking Bitmaps – How to check bitmap - Adding Bitmap Checkpoints to a Test
Script - Viewing Expected Results- Running the Test on a New Version-Bitmap
Checkpoint Tips
Unit V
Programming with TSL –Enhancing the Test Script with Programming –Adding
logic to Test Script-Understanding tl_step –Debugging the Test Script -Creating
________________________________________________________________________Confidential Document 2

Software Testing
Data Driven Test-How to create data-driven Test-Converting Test to Data Driven
Test-Adding the data to data table – Data Driven Testing Tips
Unit VI
Advance Concepts of Winrunner-Regular Expression - Calling Test-Creating User
Defined Function – Creating Compiled module – More on TSL Functions –
Creating Dialog box– Running Batch Test – Debugging Test – Using TestDirector –
Using Load Runner
Unit I
1.1. What is Winrunner?
Welcome to WinRunner, Mercury Interactive enterprise functional testing
tool for Microsoft Windows applications. Recent advances in client/server
software tools enable developers to build applications quickly and with increased
functionality. Quality Assurance departments must cope with software that has
dramatically improved, but is increasingly complex to test. Each code change,
enhancement, defect fix, or platform port necessitates retesting the entire
application to ensure a quality release. Manual testing can no longer keep pace in
this dynamic development environment.
WinRunner helps you automate the testing process, from test development
to execution. You create adaptable and reusable test scripts that challenge the
functionality of your application. Prior to a software release, you can run these
tests in a single overnight run—enabling you to detect defects and ensure
superior software quality.
1.2. Benefits of Automation Testing
________________________________________________________________________Confidential Document 3
Software Testing
If you have ever tested software manually, you are aware of its drawbacks. Manual testing is
time-consuming and tedious, requiring a heavy investment in human resources. Worst of all, time
constraints often make it impossible to manually test every feature thoroughly before the software is
released. This leaves you wondering whether serious bugs have gone undetected. Automated testing
with WinRunner addresses these problems by dramatically speeding up the testing process. You can
create test scripts that check all aspects of your application, and then run these tests on each new build.
As WinRunner runs tests, it simulates a human user by moving the mouse cursor over the application,
clicking Graphical User Interface (GUI) objects, and entering keyboard input—but WinRunner does this
faster than any human user. With WinRunner you can also save time by running batch tests overnight.
Benefits of Automated Testing
Fast WinRunner runs tests significantly faster
than human users
Reliable
Tests perform precisely the same
operations each time they are run,
thereby eliminating human error.
Repeatable
You can test how the software reacts
under repeated execution of the same
operations.
Programmable
You can program sophisticated tests that
bring out hidden information from the
application.
Comprehensive You can build a suite of tests that covers
every feature in your application
Reusable You can reuse tests on different versions
of an application, even if the user
interface changes.
1.3. Winrunner Testing Process
Testing with winrunner involves six main stages
________________________________________________________________________Confidential Document 4

Software Testing
1.3.1. Create the GUI Map
The first stage is to create the GUI map so WinRunner can recognize the
GUI objects in the application being tested. Use the RapidTest Script wizard to
review the user interface of your application and systematically add descriptions
of every GUI object to the GUI map. Alternatively, you can add descriptions of
individual objects to the GUI map by clicking objects while recording a test.
1.3.2. Create Tests
Next, you create test scripts by recording, programming, or a combination
of both. While recording tests, insert checkpoints where you want to check the
response of the application being tested. You can insert checkpoints that check
GUI objects, bitmaps, and databases. During this process, WinRunner captures
data and saves it as expected results—the expected response of the application
being tested.
1.3.3. Debug Tests
________________________________________________________________________Confidential Document
Create GUI Map
Create Tests
Debug Tests
Run Tests
Report Defect
View Results
5

Software Testing
You run tests in Debug mode to make sure they run smoothly. You can set
breakpoints, monitor variables, and control how tests are run to identify and
isolate defects. Test results are saved in the debug folder, which you can discard
once you’ve finished debugging the test.
1.3.4. Run Tests
You run tests in Verify mode to test your application. Each time WinRunner
encounters a checkpoint in the test script, it compares the current data of the
application being tested to the expected data captured earlier. If any mismatches
are found, WinRunner captures them as actual results.
1.3.5. View Results
You determine the success or failure of the tests. Following each test run,
WinRunner displays the results in a report. The report details all the major events
that occurred during the run, such as checkpoints, error messages, system
messages, or user messages. If mismatches are detected at checkpoints during
the test run, you can view the expected results and the actual results from the
Test Results window. In cases of bitmap is matches, you can also view a bitmap
that displays only the difference between the expected and actual results.
1.3.6. Report Defects
If a test run fails due to a defect in the application being tested, you can
report information about the defect directly from the Test Results window. This
information is sent via e-mail to the quality assurance manager, who tracks the
defect until it is fixed.
1.4. Exploring Winrunner Window
Before you begin creating tests, you should familiarize yourself with the
WinRunner main window.
________________________________________________________________________Confidential Document 6

Software Testing
1.4.1. To start WinRunner:
Choose Programs > WinRunner > WinRunner on the Start menu.
The first time you start WinRunner, the Welcome to WinRunner window and
the “What’s New in WinRunner” help open. From the Welcome window you can
create a new test, open an existing test, or view an overview of WinRunner in
your default browser.
If you do not want this window to appear the next time you start
WinRunner, clear the Show on Startup check box. To show the Welcome to
WinRunner window upon startup from within WinRunner, choose Settings >
General Options, click the Environment tab, and select the Show Welcome
screen check box.
1.4.2. The Main WinRunner Window
The main WinRunner window contains the following key elements:
WinRunner title bar
Menu bar, with drop-down menus of WinRunner commands
________________________________________________________________________Confidential Document 7

Software Testing
Standard toolbar, with buttons of commands commonly used when running
a test
User toolbar, with commands commonly used while creating a test
Status bar, with information on the current command, the line number of
the insertion point and the name of the current results folder
The Standard toolbar provides easy access to frequently performed tasks,
such as opening, executing, and saving tests, and viewing test results.
The User toolbar displays the tools you frequently use to create test scripts.
By default, the User toolbar is hidden. To display the User toolbar, choose
________________________________________________________________________Confidential Document 8

Software Testing
Window > User Toolbar. When you create tests, you can minimize the
WinRunner window and work exclusively from the toolbar.
The User toolbar is customizable. You choose to add or remove buttons
using the Settings > Customize User Toolbar menu option. When you re-open
WinRunner, the User toolbar appears as it was when you last closed it.
The commands on the Standard toolbar and the User toolbar are described
in detail in subsequent lessons.
Note that you can also execute many commands using softkeys. Softkeys
are keyboard shortcuts for carrying out menu commands. You can configure the
softkey combinations for your keyboard using the Softkey Configuration utility in
your WinRunner program group. For more information, see the “WinRunner at a
Glance” chapter in your WinRunner User’s Guide.
________________________________________________________________________Confidential Document 9

Software Testing
Now that you are familiar with the main WinRunner window, take a few
minutes to explore these window components before proceeding to the next
lesson.
1.4.3. The Test Window
You create and run WinRunner tests in the test window. It contains the
following
key elements:
Test window title bar, with the name of the open test
Test script, with statements generated by recording and/or programming in
TSL, Mercury Interactive’s Test Script Language
Execution arrow, which indicates the line of the test script being executed
during a test run, or the line that will next run if you select the Run from
arrow option
Insertion point, which indicates where you can insert or edit text
1.5. Addins
If you installed add-ins such as Web Test (support for Web sites), support
for Visual Basic, PowerBuilder, or ActiveX controls while installing WinRunner or
afterward, you can specify which add-ins to load at the beginning of each
WinRunner session.
________________________________________________________________________Confidential Document 10

Software Testing
When you start WinRunner, the Add-In Manager dialog box opens. It
displays a list of all installed add-ins for WinRunner. You can select which add-ins
to load for the current session of WinRunner. If you do not make a change within
a certain amount of time, the window closes. The progress bar displays how much
time is left before the window closes.
The first time WinRunner is started, by default, no add-ins are selected. At
the beginning of each subsequent WinRunner session, your selection from the
previous session is the default setting. Once you make a change to the list, the
timer stops running, and you must click OK to close the dialog box. You can
determine whether to display the Add-In Manager dialog box and, if so, for how
long using the Display the Add-In Manager dialog option in the Environment
tab of the General Options dialog box.
1.6. Understanding GUI Map
How Does WinRunner Identify GUI Objects?
GUI applications are made up of GUI objects such as windows, buttons,
lists, and menus.
When WinRunner learns the description of a GUI object, it looks at the
object’s physical properties. Each GUI object has many physical properties such
as “class,” “label,” “width,” “height”, “handle,” and “enabled” to name a few.
________________________________________________________________________Confidential Document 11

Software Testing
WinRunner only learns the properties it needs to uniquely distinguish an object
from all other objects in the application.
For example, when WinRunner looks at an OK button, it might recognize
that the button is located in an Open window, belongs to the push-button object
class, and has the text label “OK.”
1.7. Spying on GUI Objects
To help you understand how WinRunner identifies GUI objects, examine the
objects in the sample Flight Reservation application.
1.7.1. Start the Flight Reservation application.
Choose Programs > WinRunner > Sample Applications > Flight 1A
on the
Start menu. The Login window opens.
1.7.2. Start WinRunner.
Choose Programs > WinRunner > WinRunner on the Start menu. In
the Welcome window, click the New Test button. If the Welcome window does
not open,
Choose File> New.
1.7.3. Open the GUI Spy. This tool lets you “spy” on the properties of GUI
objects.
Choose Tools > GUI Spy. The GUI Spy opens. Select Hide WinRunner.
________________________________________________________________________Confidential Document 12

Software Testing
1.7.4. View the properties that provide a unique description of the OK
button.
In the GUI Spy, click the Spy button. WinRunner is minimized so that you
can see the Login window. Move the pointer over objects in the Login window.
Notice that each object flashes as you move the pointer over it, and the GUI Spy
displays its properties. Place the pointer over the OK button and press Left Ctrl
+ F3. This freezes the OK button’s description in the GUI Spy.
________________________________________________________________________Confidential Document 13

Software Testing
1.7.5. Examine the properties of the OK button.
At the top of the dialog box, the GUI Spy displays the name of the window in
which the object is located and the object’s logical name.
In the Recorded tab, the property names and values that would be recorded
are listed. For example, “label OK” indicates that the button has the text label
“OK”, and “class push-button” indicates that the button belongs to the push
button object class.
As you can see, WinRunner needs only a few properties to uniquely identify the
object.
1.7.6. Take a few minutes to view the properties of other GUI objects in
the Login Window.
________________________________________________________________________Confidential Document 14

Software Testing
Click the Spy button and move the pointer over other GUI objects in the
Login window.
If you would like to view an expanded list of properties for an object, press
Left Ctrl + F3 to stop the current Spy, and then click the All Standard tab.
1.7.7. Exit the GUI Spy.
Click Close.
1.8. Choosing a GUI Map Mode
Before you start teaching WinRunner the GUI of an application, you should
consider whether you want to organize your GUI map files in the GUI Map File
per Test mode or the Global GUI Map File mode.
1.8.1. The GUI Map File per Test Mode
In the GUI Map File per Test mode, WinRunner automatically creates a new
GUI map file for every new test you create. WinRunner automatically saves the
GUI map file with your test and automatically opens it when you open test.
If you are new to WinRunner or to testing, you may want to consider
working in the GUI Map File per Test mode. In this mode, a GUI map file is
created automatically every time you create a new test. The GUI map file that
corresponds to your test is automatically saved whenever you save your test and
automatically loaded whenever you open your test. This is the simplest mode for
inexperienced testers and for ensuring that updated GUI map files are saved and
loaded.
1.8.2. The Global GUI Map File Mode
In the Global GUI Map File mode, you can use a single GUI map for a group
of tests. When you work in the Global GUI Map File mode, you need to save the
information that WinRunner learns about the properties into a GUI map file.
When you run a test, you must load the appropriate GUI map file. If you are
________________________________________________________________________Confidential Document 15

Software Testing
familiar with WinRunner or with testing, it is probably most efficient to work in
the Global GUI Map File mode.
1.8.3. Setting Your Preferred GUI Map File Mode
By default, WinRunner is set to the Global GUI Map File mode. To change
the mode to the GUI Map File per Test mode choose Settings > General
Options, click the Environment tab, and select GUI Map File per Test. Click
OK to close the dialog box.
Note: If you change the GUI Map File mode, you must restart WinRunner for the
changes to take effect.
1.9. Using Rapid Test Script Wizard
If you choose the Global GUI Map File mode, the RapidTest Script wizard is
usually the easiest and quickest way to start the testing process.
Note: The RapidTest Script wizard is not available when you work in the GUI
Map File per Test mode.
The RapidTest Script wizard systematically opens the windows in your
application and learns the description of every GUI object. The wizard stores this
information in a GUI map file. To observe WinRunner’s learning process, use the
RapidTest Script wizard on the Flight Reservation application.
Note: The RapidTest Script wizard is not available when the Terminal Emulator,
the Web Test or the Java add-in is loaded. Therefore, if you are using one or more
of this add-ins, skip the remaining sections of this lesson, or close and reopen
WinRunner without loading this add-ins.
________________________________________________________________________Confidential Document 16

Software Testing
1.9.1. Log in to the Flight Reservation application.
If the Login window is not already open on your desktop, choose
Programs > WinRunner > Sample Applications > Flight 1A on the
Start menu. Type your name (at least four characters) in the Agent
Name field, and mercury in the Password field and click OK. The Flight
Reservation application opens.
1.9.2. Start WinRunner.
If WinRunner is not already open, choose Programs > WinRunner >
WinRunner on the Start menu.
1.9.3. Open a new test.
If the Welcome window is open, click the New Test button. Otherwise,
choose File > New. A new test window opens in WinRunner.
1.9.4. Start the RapidTest Script wizard.
Choose Create > RapidTest Script Wizard. Click Next in the wizard’s
Welcome screen to advance to the next screen.
1.9.5. Point to the application you want to test.
________________________________________________________________________Confidential Document 17

Software Testing
Click the button and then click anywhere in the Flight Reservation
application. The application’s window name appears in the wizard’s Window
Name box. Click Next.
1.9.6. Make sure that all the check boxes are cleared.
For the purposes of this exercise, confirm that all the check boxes are
cleared. You will use the wizard only to learn the GUI of the Flight Reservation
application. Click Next.
Note: A regression test is performed when the tester wishes to see the
progress of the testing process by performing identical tests before and after a
bug has been fixed. A regression test allows the tester to compare expected test
results with the actual results.
1.9.7. Accept the default navigation controls.
Navigation controls tell WinRunner which GUI objects are used to open
windows. The Flight Reservation application uses the default navigation controls
(.. and > >) so you do not need to define additional controls. Click Next.
1.9.8. Set the learning flow to “Express.”
The learning flow determines how WinRunner walks through your
application. Two modes are available: Express and Comprehensive.
Comprehensive mode lets you customize how the wizard learns GUI object
descriptions. First-time WinRunner users should use Express mode.
Click the Learn button. The wizard begins walking through the
application, pulling down menus, opening windows, and learning object
descriptions. This process takes a few minutes.
________________________________________________________________________Confidential Document 18

Software Testing
If a pop-up message notifies you that an interface element is disabled, click
the Continue button in the message box.
If the wizard cannot close a window, it will ask you to show it how to close
the window. Follow the directions on the screen.
1.9.9. Accept “No” in the Start Application screen.
You can choose to have WinRunner automatically open the Flight
Reservation application each time you start WinRunner. Accept the default “No.”
Click Next.
1.9.10. Save the GUI information and a startup script.
The wizard saves the GUI information it learned in a GUI map file. The
wizard also creates a startup script. This script runs automatically each time you
start WinRunner. It contains a command which loads the GUI map file so that
WinRunner will be ready to test your application.
Accept the default paths for the files or define different ones. Accept the
default GUI map file name: flight1.gui. Make sure that you have write permission
for the selected folders. Click Next.
1.9.11. Click OK in the Congratulations screen.
The information WinRunner learned about the application is stored in a GUI
map file.
1.10. Learning Virtual Objects
You can teach WinRunner to recognize any bitmap in a window as a GUI
object by defining the bitmap as a virtual object.
1.10.1. About Learning Virtual Objects
________________________________________________________________________Confidential Document 19

Software Testing
Your application may contain bitmaps that look and behave like GUI objects.
WinRunner records operations on these bitmaps using win_mouse_click
statements. By defining a bitmap as a virtual object, you can instruct WinRunner
to treat it like a GUI object such as a push button, when you record and run tests.
This makes your test scripts easier to read and understand. For example, suppose
you record a test on the Windows 95/Windows NT Calculator application in which
you click buttons to perform a calculation. Since WinRunner cannot recognize the
calculator buttons as GUI objects, by default it creates a test script similar to the
following:
set_window ("Calculator");
win_mouse_click ("Calculator", 87, 175);
win_mouse_click ("Calculator", 204, 200);
win_mouse_click ("Calculator", 121, 163);
win_mouse_click ("Calculator", 242, 201);
This test script is difficult to understand. If, instead, you define the calculator
buttons as virtual objects and associate them with the push button class,
WinRunner records a script similar to the following:
set_window ("Calculator");
button_press ("seven");
button_press ("plus");
button_press ("four");
button_press ("equal");
You can create virtual push buttons, radio buttons, check buttons, lists, or
tables, according to the bitmap’s behavior in your application. If none of these is
suitable, you can map a virtual object to the general object class. You define a
bitmap as a virtual object using the Virtual Object wizard. The wizard prompts
you to select the standard class with which you want to associate the new object.
Then you use a crosshairs pointer to define the area of the object. Finally, you
________________________________________________________________________Confidential Document 20

Software Testing
choose a logical name for the object. WinRunner adds the virtual object’s logical
name and physical description to the GUI map.
1.10.2. Defining a Virtual Object
Using the Virtual Object wizard, you can assign a bitmap to a standard
object class, define the coordinates of that object, and assign it a logical name.
1.10.3. To define a virtual object using the Virtual Object wizard:
1. Choose Tools > Virtual Object Wizard. The Virtual Object wizard
opens. Click
Next.
2. In the Class list, select a class for the new virtual object.
If you select the list class, select the number of visible rows that are
displayed in the window. For a table class, select the number of visible rows and
columns. Click Next.
________________________________________________________________________Confidential Document 21

Software Testing
3. Click Mark Object. Use the crosshairs pointer to select the area of the virtual
object. You can use the arrow keys to make precise adjustments to the area you
define with the crosshairs.
Note: The virtual object should not overlap GUI objects in your application
(except for those belonging to the generic “object” class, or to a class configured
to be recorded as “object”). If a virtual object overlaps a GUI object, WinRunner
may not record or execute tests properly on the GUI object.
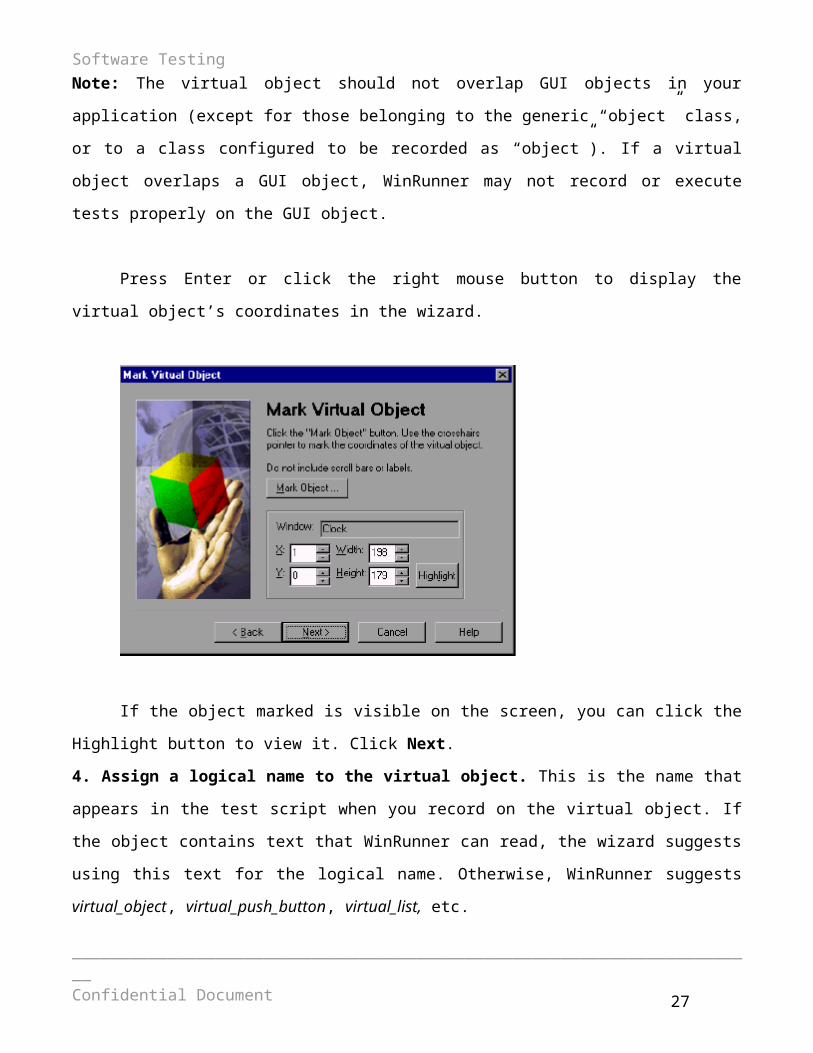
Press Enter or click the right mouse button to display the virtual object’s
coordinates in the wizard.
If the object marked is visible on the screen, you can click the Highlight
button to view it. Click Next.
4. Assign a logical name to the virtual object. This is the name that appears
in the test script when you record on the virtual object. If the object contains text
that WinRunner can read, the wizard suggests using this text for the logical
name. Otherwise, WinRunner suggests virtual_object, virtual_push_button,
virtual_list, etc.
________________________________________________________________________Confidential Document 22

Software Testing
You can accept the wizard’s suggestion or type in a different name.
WinRunner checks that there are no other objects in the GUI map with the same
name before confirming your choice. Click Next.
5 Finish learning the virtual object:
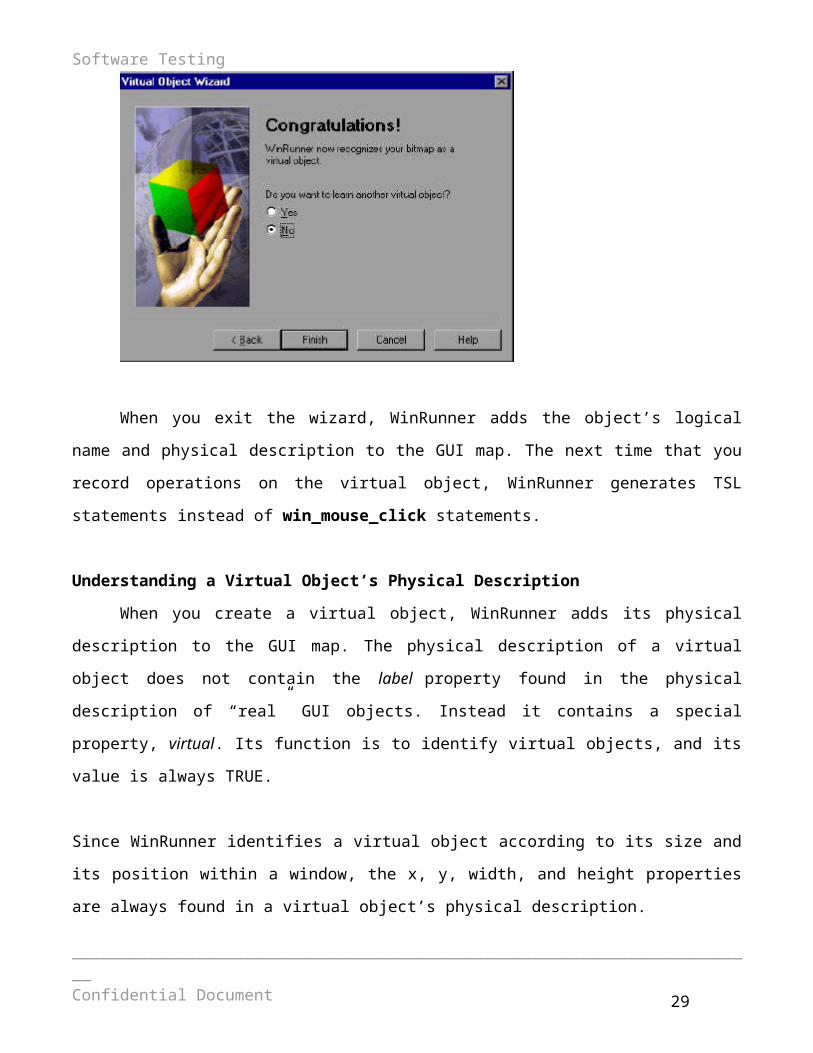
If you want to learn another virtual object, click Yes. Click Next.
To close the wizard, click Finish.
________________________________________________________________________Confidential Document 23

Software Testing
When you exit the wizard, WinRunner adds the object’s logical name and
physical description to the GUI map. The next time that you record operations on
the virtual object, WinRunner generates TSL statements instead of
win_mouse_click statements.
Understanding a Virtual Object’s Physical Description
When you create a virtual object, WinRunner adds its physical description
to the GUI map. The physical description of a virtual object does not contain the
label property found in the physical description of “real” GUI objects. Instead it
contains a special property, virtual. Its function is to identify virtual objects, and
its value is always TRUE.
Since WinRunner identifies a virtual object according to its size and its position
within a window, the x, y, width, and height properties are always found in a
virtual object’s physical description.
For example, the physical description of a virtual_push_button includes the
following properties:
{
class: push_button,
________________________________________________________________________Confidential Document 24

Software Testing
virtual: TRUE,
x: 82,
y: 121,
width: 48,
height: 28,
}
If these properties are changed or deleted, WinRunner cannot recognize the
virtual object. If you move or resize an object, you must use the wizard to create a
new virtual object.
Unit II
2.1. Recording Test
2.1.1. Choosing a Record Mode
By recording, you can quickly create automated test scripts. You work with
your application as usual, clicking objects with the mouse and entering keyboard
input. WinRunner records your operations and generates statements in TSL,
Mercury Interactive’s Test Script Language. These statements appear as a script
in a WinRunner test window.
Before you begin recording a test, you should plan the main stages of the
test and select the appropriate record mode. Two record modes are available:
Context Sensitive and Analog.
2.1.2. Context Sensitive
________________________________________________________________________Confidential Document 25

Software Testing
Context Sensitive mode records your operations in terms of the GUI objects
in your application. WinRunner identifies each object you click (such as a window,
menu, list, or button), and the type of operation you perform (such as press,
enable, move, or select).
For example, if you record a mouse click on the OK button in the Flight
Reservation Login window, WinRunner records the following TSL statement in
your test script:
button_press ("OK");
When you run the script, WinRunner reads the command, looks for the OK
button, and presses it.
2.1.3. Analog
In Analog mode, WinRunner records the exact coordinates traveled by the
mouse, as well as mouse clicks and keyboard input. For example, if you click the
OK button in the Login window, WinRunner records statements that look like
this:
When this statement is recorded.. it really means:
move_locator_track (1); mouse track
mtype ("<T110><kLeft>-"); left mouse button press
mtype ("<kLeft>+"); left mouse button release
When you run the test, WinRunner retraces the recorded movements using
absolute screen coordinates. If your application is located in a different position
on the desktop, or the user interface has changed, WinRunner is not able to
execute the test correctly.
Note: You should record in Analog mode only when exact mouse movements are
an important part of your test, for example, when recreating a drawing.
________________________________________________________________________Confidential Document 26
Software Testing
When choosing a record mode, consider the following points:
Choose Context Sensitive if.. Choose Analog if..
The application contains GUI
objects
The application contains
bitmap areas
(such as a drawing area).
Exact mouse movements are
not required.
Exact mouse movements are
required.
You plan to reuse the test in
different versions of the
application.
If you are testing an application that contains both GUI objects and bitmap
areas, you can switch between modes as you record.
2.2. Recording a Context Sensitive Test
In this exercise you will create a script that tests the process of opening an
order in the Flight Reservation application. You will create the script by recording
in Context Sensitive mode.
2.2.1. Start WinRunner and load the GUI map.
If WinRunner is not already open, choose Programs > WinRunner >
WinRunner on the Start menu.
________________________________________________________________________Confidential Document 27

Software Testing
If you are working in the Global GUI Map File mode, confirm that the GUI
map is loaded: choose Tools > GUI Map Editor. In the GUI Map Editor choose
View > GUI Files and confirm that flight1.GUI is contained in the GUI File list.
2.2.2. Open a new test.
If the Welcome window is open, click the New Test button. Otherwise,
choose File > New. A new test window opens in WinRunner.
2.2.3. Start the Flight Reservation application and log in.
Choose Programs > WinRunner > Sample Applications > Flight 1A on
the Start menu. In the Login window, type your name and the password mercury,
and click OK. The name you type must be at least four characters long. Position
the Flight Reservation application and WinRunner so that they are both clearly
visible on your desktop.
2.2.4. Start recording in Context Sensitive mode.
In WinRunner, choose Create > Record—Context Sensitive or click
the Record button on the toolbar. From this point on, WinRunner records
all mouse clicks and keyboard input. Note that the text, “Rec” appears in
________________________________________________________________________Confidential Document 28
Software Testing
blue above the recording button. This indicates that you are recording in
Context Sensitive mode. The status bar also informs you of your current
recording mode.
2.2.5. Open order #3.
In the Flight Reservation application, choose File > Open Order. In the
Open Order dialog box, select the Order No. check box. Type 3 in the
adjacent box, and click OK. Watch how WinRunner generates a test script
in the test window as you work.
2.2.6. Stop recording.
In WinRunner, choose Create > Stop Recording or click the Stop
button on the toolbar.
2.2.7. Save the test.
Choose File > Save or click the Save button on the toolbar. Save the
test as lesson3 in a convenient location on your hard drive.
Note that WinRunner saves the lesson3 test in the file system as a folder,
and not as an individual file. This folder contains the test script and the
results that are generated when you run the test.
2.3. Understanding the Test Script
In the previous exercise, you recorded the process of opening a flight order
in the Flight Reservation application. As you worked, WinRunner generated a test
script similar to the following:
# Flight Reservation
set_window ("Flight Reservation", 3);
menu_select_item ("File;Open Order..");
# Open Order________________________________________________________________________Confidential Document 29

Software Testing
set_window ("Open Order", 10);
button_set ("Order No.", ON);
edit_set ("Edit", "3");
button_press ("OK");
As you can see, the recorded TSL statements describe the objects you
selected and the actions you performed. For example, when you selected a menu
item, WinRunner generated a menu_select_item statement.
The following points will help you understand your test script:
When you click an object, WinRunner assigns the object a logical name, which
is usually the object’s text label. The logical name makes it easy for you to read
the test script. For example, when you selected the Order No. check box,
WinRunner recorded the following statement:
button_set ("Order No.", ON);
“Order No.” is the object’s logical name.
By default, WinRunner automatically adds a comment line each time you begin
working in a new window so that your script is easier to read. For example,
when you clicked on the Flight Reservation window, WinRunner generated the
following comment line:
# Flight Reservation
WinRunner generates a set_window statement each time you begin working in
a new window. The statements following a set_window statement perform
operations on objects within that window. For example, when you opened the
Open Order dialog box, WinRunner generated the following statement:
set_window ("Open Order", 10);
________________________________________________________________________Confidential Document 30

Software Testing
When you enter keyboard input, WinRunner generates a type, an obj_type, or
an edit_set statement in the test script. For example, when you typed 3 in the
Order Number box, WinRunner generated the following statement:
edit_set ("Edit", "3");
2.4. Recording in Analog Mode
In this exercise you will test the process of sending a fax. You will start
recording in Context Sensitive mode, switch to Analog mode in order to add a
signature to the fax, and then switch back to Context Sensitive mode.
2.4.1. In the lesson 3 test, place the cursor below the last line of the
script.
You will add the new test segment to the lesson3 test. If the test is not already
open, choose File > Open and select the test. In the lesson3 test window, place
the cursor below the last line of the test.
2.4.2. Start Recording in Context Sensitive mode.
Choose Create > Record—Context Sensitive or click the Record button
on the toolbar.
2.4.3. Open the Fax Order form and fill in a fax number.
In the Flight Reservation application, choose File > Fax Order. In the Fax
Number box, type “4155551234”.
________________________________________________________________________Confidential Document 31

Software Testing
2.4.4. Select the Send Signature with order check box.
2.4.5. Sign the fax in Context Sensitive mode.
Use the mouse to sign your name in the Agent Signature box.
Watch how WinRunner records your signature.
2.4.6. Clear the signature.
Click the Clear Signature button.
2.4.7. Move the Fax Order window to a different position on your desktop.
Before switching to Analog mode, reposition the window in which you are
working.
2.4.8. Sign the fax again in Analog mode.
Press F2 on your keyboard or click the Record button again to switch to
Analog mode. Note that the text, “Rec” appears in red above the recording
button. This indicates that you are recording in Analog mode. Sign your name in
the Agent Signature box.
Watch how WinRunner records your signature.
2.4.9. Switch back to Context Sensitive mode and send the fax.
Press F2 or click the Record button to switch back to Context Sensitive mode.
Click Send. The application will simulate the process of sending the fax.
2.4.10. Stop Recording.
Choose Create > Stop Recording or click the Stop button.
________________________________________________________________________Confidential Document 32

Software Testing
2.4.11. Save the test.
Choose File > Save or click the Save button.
2.4.12. If you are working in the Global GUI Map File mode, save the new
objects to the GUI map.
When you ran the RapidTest Script wizard in the previous lesson, it learned
all the windows and objects it was able to access. The fax order dialog box,
however, can be open only when an order has already been opened, as you did in
step 5 of Recording a Context Sensitive Test on page 39. Therefore, when you
opened the fax order dialog box in step 3 above, WinRunner added the new
window, and the objects you recorded within that window, to the temporary GUI
map. The temporary GUI map is discarded whenever you close WinRunner, so it is
important to save new windows and objects to the GUI map file that your test
uses.
Choose Tools > GUI Map Editor. Choose View > GUI Files. Note that the
Fax Order No. 3 window is displayed in the L0 <Temporary> GUI map file.
Choose File > Save. The New Windows dialog box opens. Confirm that the
flight1.GUI file is displayed in the Loaded GUI Files box. Click OK. The Fax
Order No. 3 window and all objects under that window are moved from the
temporary GUI map to the flight1.GUI map file. Choose File > Exit to close the
GUI Map Editor.
2.5. Running the Test
You are now ready to run your recorded test script and to analyze the test
results. WinRunner provides three modes for running tests. You select a mode
from the toolbar.
Use Verify mode when running a test to check the behavior of your application,
and when you want to save the test results.
________________________________________________________________________Confidential Document 33

Software Testing
Use Debug mode when you want to check that the test script runs smoothly
without errors in syntax. See Lesson 7 for more information.
Use Update mode when you want to create new expected results for a GUI
checkpoint or bitmap checkpoint.
.
To run the test:
2.5.1. Check that WinRunner and the main window of the Flight
Reservation application are open on your desktop.
2.5.2. Make sure that the lesson3 test window is active in WinRunner.
Click the title bar of the lesson3 test window. If the test is not already open,
choose File > Open and select the test.
2.5.3. Make sure the main window of the Flight Reservation application is
active.
If any dialog boxes are open, close them.
2.5.4. Make sure that Verify mode is selected in the toolbar.
2.5.5. Choose Run from Top.
Choose Run > Run from Top or click the Run from Top button. The Run
Test dialog box opens.
2.5.6 Choose a Test Run name.
________________________________________________________________________Confidential Document 34

Software Testing
Define the name of the folder in which WinRunner will store the results of
the test. Accept the default folder name “res1.” The results folder will be stored
within the test’s folder.
Note the Display test results at end of run check box at the bottom of
the dialog box. When this check box is selected, WinRunner automatically
displays the test results when the test run is completed. Make sure that this check
box is selected.
2.5.7 Run the test.
Click OK in the Run Test dialog box. WinRunner immediately begins
running the test.
Watch how WinRunner opens each window in the Flight Reservation application.
2.5.8 Review the test results.
When the test run is completed, the test results automatically appear in the
WinRunner Test Results window. See the next section to learn how to analyze the
test results.
2.6. Analyzing Test Results
Once a test run is completed, you can immediately review the test results in
the WinRunner Test Results window. WinRunner color-codes results (green
indicates passed and red indicates failed) so that you can quickly draw
conclusions about the success or failure of the test.
2.6.1. Make sure that the WinRunner Test Results window is open and
displays the test results.
If the WinRunner Test Results window is not currently open, first click the
test window to activate it, and then choose Tools > Test Results or click the
Test Results button.
________________________________________________________________________Confidential Document 35

Software Testing
2.6.2. Review the results.
2.6.3. Close the Test Results window.
Choose File > Exit in the WinRunner Test Results window.
2.6.4. Close the test.
Choose File > Close.
2.6.5. Close the Flight Reservation application.
Choose File > Exit.
2.7. Recording Tips
Before starting to record, you should close applications that are not
required for the test.
Create the test so that it ends where it started. For example, if the test
opens an application, make sure that it also closes the application at the end
of the test run. This ensures that WinRunner is prepared to run repeated
executions of the same test.
When recording in Analog mode, avoid holding down the mouse button if
this results in a repeated action. For example, do not hold down the mouse
________________________________________________________________________Confidential Document 36

Software Testing
button to scroll a window. Instead, scroll by clicking the scrollbar arrow
repeatedly. This enables WinRunner to accurately run the test.
Before switching from Context Sensitive mode to Analog mode during a
recording session, always move the current window to a new position on the
desktop. This ensures that when you run the test, the mouse pointer will
reach the correct areas of the window during the Analog portion of the test.
When recording, if you click a non-standard GUI object, WinRunner
generates a generic obj_mouse_click statement in the test script. For
example, if you click a graph object, it records something similar to the
following:
obj_mouse_click (GS_Drawing, 8, 53, LEFT);
If your application contains a non-standard GUI object that behaves like a
standard GUI object, you can map this object to a standard object class so
that WinRunner will record more intuitive statements in the test script.
When working in the Global GUI Map File mode, if you click an object
whose description was not previously learned, WinRunner learns a
description of the object and adds it to a temporary GUI map file.
To easily switch between Context Sensitive and Analog modes, press F2.
If you are working in the Global GUI Map File mode, always check whether
new windows or objects have been added to the temporary GUI map before
you close WinRunner. If new objects have been added, save them to the
appropriate GUI map file for your test.
________________________________________________________________________Confidential Document 37

Software Testing
Unit III:
3.1. Synchronizing Test:
When should synchronize:
Applications do not always respond to user input at the same speed from
one test run to another. This is particularly common when testing applications
that run over a network. A synchronization point in your test script instructs
WinRunner to suspend running the test until the application being tested is ready,
and then to continue the test.
There are three kinds of synchronization points:
object/window synchronization points
property value synchronization points
bitmap synchronization points.
When you want WinRunner to wait for an object or a window to appear, you
create an object/window synchronization point.
When you want WinRunner to wait for an object or a window to have a
specified property, you create a property value synchronization point.
When you want WinRunner to wait for a visual cue to be displayed, you create
a bitmap synchronization point. In a bitmap synchronization point, WinRunner
waits for the bitmap of an object, a window, or an area of the screen to appear.
WinRunner waits a set time interval for an application to respond to input. The
default wait interval is up to 10 seconds. If the application responds slowly during
a test run, WinRunner’s default wait time may not be sufficient, and the test run
may unexpectedly fail.
If you discover a synchronization problem between the test and your
application, you can either:
________________________________________________________________________Confidential Document 38

Software Testing
Increase the default time that WinRunner waits. To do so, you change the
value of the Timeout for checkpoints and CS statements option in the Run
tab of the General Options dialog box (Settings > General Options). This
method affects all your tests and slows down many other Context Sensitive
operations.
Insert a synchronization point into the test script at the exact point where the
problem occurs. A synchronization point tells WinRunner to pause the test run in
order to wait for a specified response in the application. This is the recommended
method for synchronizing a test with your application.
3.2. Waiting for Objects and Windows
You can create a synchronization point that instructs WinRunner to wait for
a specified object or window to appear. For example, you can tell WinRunner to
wait for a window to open before performing an operation within that window, or
you may want WinRunner to wait for an object to appear in order to perform an
operation on that object.
WinRunner waits no longer than the default timeout setting before
executing the subsequent statement in a test script. You can set this default
timeout setting in a test script by using the timeout_msec testing option with the
setvar function.
You can also set this default timeout setting globally using the Timeout for
Checkpoints and CS Statements box in the Run tab of the General Options
dialog box.
You use the obj_exists function to create an object synchronization point,
and you use the win_exists function to create a window synchronization point.
These functions have the following
Syntax:
obj_exists (object [, time]);
________________________________________________________________________Confidential Document 39

Software Testing
win_exists (window [, time]);
The object is the logical name of the object. The object may belong to any
class. The window is the logical name of the window. The time is the amount of
time (in seconds) that is added to the default timeout setting, yielding a new
maximum wait time before the subsequent statement is executed.
You can use the Function Generator to insert this function into your test
script or you can insert it manually.
3.3. Waiting for Property Values of Objects and Windows
You can create a property value synchronization point, which instructs
WinRunner to wait for a specified property value to appear in a GUI object. For
example, you can tell WinRunner to wait for a button to become enabled or for an
item to be selected from a list.
The method for synchronizing a test is identical for property values of
objects and windows. You start by choosing Create > Synchronization Point > For
Object/Window Property. As you pass the mouse pointer over your application,
objects and windows flash. To select a window, you click the title bar or the menu
bar of the desired window. To select an object, you click the object. A dialog box
opens containing the name of the selected window or object. You can specify
which property of the window or object to check, the expected value of that
property, and the amount of time that WinRunner waits at the synchronization
point.
A statement with one of the following functions is added to the test script, depending on which
GUI object you selected:
GUI Object TSL Function
button button_wait_info
________________________________________________________________________Confidential Document 40

Software Testing
edit field edit_wait_info
list list_wait_info
menu menu_wait_info
an object mapped to
the generic “object”
class
obj_wait_info
scroll bar scroll_wait_info
spin box spin_wait_info
static text static_wait_info
status barstatusbar_wait_inf
o
tab tab_wait_info
3.4. Waiting for Bitmaps of Objects and Windows
You can create a bitmap synchronization point that waits for the bitmap of
an object or a window to appear in the application being tested. The method for
synchronizing a test is identical for bitmaps of objects and windows.
You start by choosing Create > Synchronization Point > For
Object/Window Bitmap. As you pass the mouse pointer over your application,
objects and windows flash. To select the bitmap of an entire window, you click the
window’s title bar or menu bar. To select the bitmap of an object, you click the
object.
During a test run, WinRunner suspends test execution until the specified
bitmap is redrawn, and then compares the current bitmap with the expected one
captured earlier. If the bitmaps match, then WinRunner continues the test. In the
________________________________________________________________________Confidential Document 41

Software Testing
event of a mismatch, WinRunner displays an error message, when the
mismatch_break testing option is on.
You can also set this testing option globally using the corresponding Break
when
Verification Fails option in the Run tab of the General Options dialog box.
If the window or object you capture has a name that varies from run to run,
you can define a regular expression in its physical description in the GUI map.
This instructs WinRunner to ignore all or part of the name.
During recording, when you capture an object in a window other than the
active window, WinRunner automatically generates a set_window statement.
3.5. Waiting for Bitmaps of Screen Areas
You can create a bitmap synchronization point that waits for a bitmap of a
selected area in your application. You can define any rectangular area of the
screen and capture it as a bitmap for a synchronization point.
You start by choosing Create > Synchronization Point > For Screen Area
Bitmap. As you pass the mouse pointer over your application, it becomes a
crosshairs pointer, and a help window opens in the top left corner of your screen.
You use the crosshairs pointer to outline a rectangle around the area. The area
can be any size: it can be part of a single window, or it can intersect several
windows.
WinRunner defines the rectangle using the coordinates of its upper left and
lower right corners. These coordinates are relative to the upper left corner of the
object or window in which the area is located. If the area intersects several
objects in a window, the coordinates are relative to the window. If the selected
area intersects several windows, or is part of a window with no title (a popup
________________________________________________________________________Confidential Document 42

Software Testing
menu, for example), the coordinates are relative to the entire screen (the root
window).
During a test run, WinRunner suspends test execution until the specified
bitmap is displayed. It then compares the current bitmap with the expected
bitmap. If the bitmaps match, then WinRunner continues the test.
In the event of a mismatch, WinRunner displays an error message, when the
mismatch_break testing option is on. For information about the mismatch_break
testing option,
You may also set this option using the corresponding Break when
Verification Fails check box in the Run tab of the General Options dialog box.
In the following exercises you will:
Create a test that opens a new order in the Flight Reservation application
and inserts the order into the database
Change the synchronization settings
Identify a synchronization problem
Synchronize the test
Run the synchronized test
3.6. Creating a Test
In this first exercise you will create a test that opens a new order in the
Flight Reservation application and inserts the order into a database.
3.6.1. Start WinRunner and load the GUI map.
If WinRunner is not already open, choose Programs > WinRunner >
WinRunner on the Start menu.
________________________________________________________________________Confidential Document 43

Software Testing
If you are working in the Global GUI Map File mode, confirm that the GUI
map is loaded: choose Tools > GUI Map Editor. In the GUI Map Editor choose
View > GUI Files and confirm that flight1.GUI is contained in the GUI File list.
3.6.2. Start the Flight Reservation application and log in.
Choose Programs > WinRunner > Sample Applications > Flight 1A on
the Start menu. In the Login window, type your name and the password mercury,
and click OK. Reposition the Flight Reservation application and WinRunner so
that they are both clearly visible on your desktop.
3.6.3. Start recording in Context Sensitive mode.
Choose Create > Record—Context Sensitive or click the Record button
on the toolbar. WinRunner will start recording the test.
3.6.4. Create a new order.
Choose File > New Order in the Flight Reservation application.
3.6.5. Fill in flight and passenger information.
________________________________________________________________________Confidential Document 44

Software Testing
3.6.6. Insert the order into the database.
Click the Insert Order button. When the insertion is complete, the “Insert
Done” message appears in the status bar.
3.6.7. Delete the order.
Click the Delete Order button and click Yes in the message window to
confirm the deletion.
3.6.8. Stop recording.
Choose Create > Stop Recording or click the Stop button.
3.6.9. Save the test.
Choose File > Save. Save the test as lesson4 in a convenient location on
your hard drive.
3.7. Changing the Synchronization Setting
The default interval that WinRunner waits for an application to respond to
input is 10 seconds. In the next exercise you will identify a synchronization
problem and add a synchronization point to solve it. To run the test you have just
recorded with a synchronization problem, you need to change the default
synchronization setting.
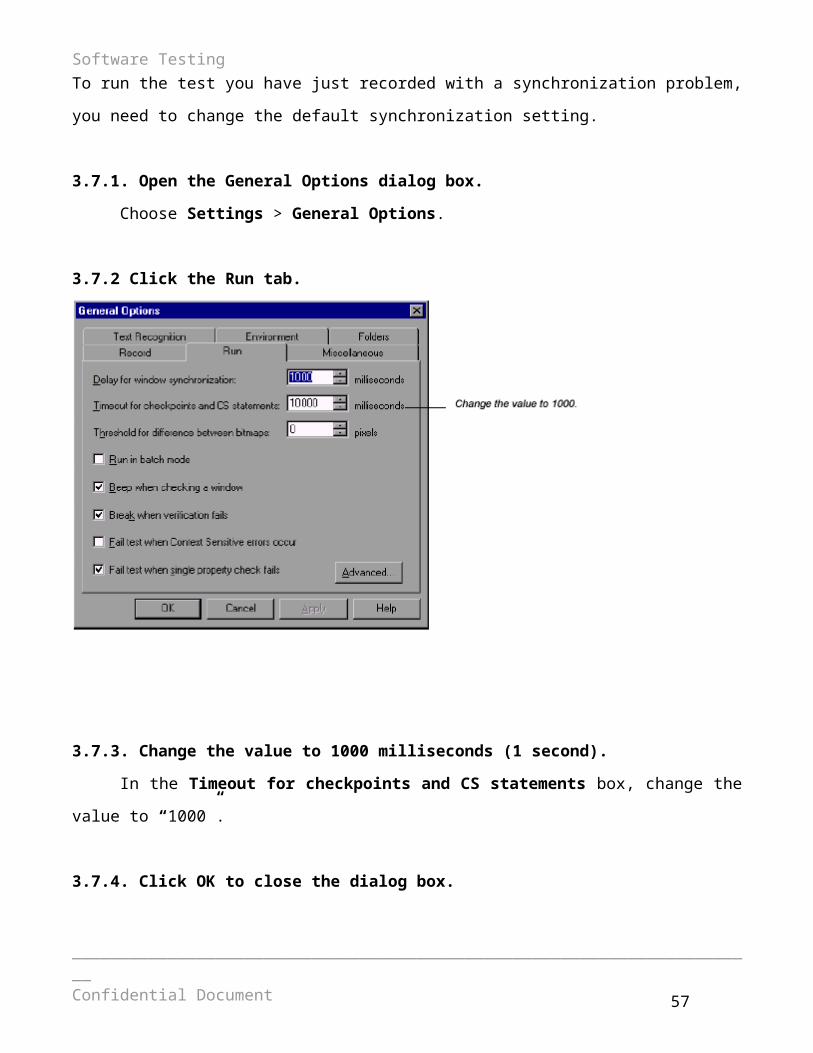
3.7.1. Open the General Options dialog box.
Choose Settings > General Options.
________________________________________________________________________Confidential Document 45

Software Testing
3.7.2 Click the Run tab.
3.7.3. Change the value to 1000 milliseconds (1 second).
In the Timeout for checkpoints and CS statements box, change the
value to “1000”.
3.7.4. Click OK to close the dialog box.
3.8. Identifying a Synchronization Problem:
You are now ready to run the lesson4 test. As the test runs, look for a
synchronization problem.
3.8.1. Make sure that the lesson4 test window is active in WinRunner.
Click the title bar of the lesson4 test window.
________________________________________________________________________Confidential Document 46

Software Testing
3.8.2. Choose Run from Top.
Choose Run > Run from Top or click the Run from Top button. The Run
Test dialog box opens. Accept the default test run name “res1.” Make sure that
the Display test results at end of run check box is selected.
3.8.3. Run the test.
Click OK in the Run Test dialog box. WinRunner starts running the test.
Watch what happens when WinRunner attempts to click the Delete button.
3.8.4 Click Pause in the WinRunner message window.
WinRunner fails to click the Delete Order button because the button is still
disabled. This error occurred because WinRunner did not wait until the Insert
Order operation was completed. Note that the execution arrow has paused
opposite the command to click the Delete Order button.
3.9. Synchronizing the Test
In this exercise you will insert a synchronization point into the lesson4 test
script. The synchronization point will capture a bitmap image of the “Insert Done”
message in the status bar. Later on when you run the test, WinRunner will wait
for the “Insert Done” message to appear before it attempts to click the Delete
Order button.
3.9.1. Make sure that the lesson4 test window is active in WinRunner.
________________________________________________________________________Confidential Document 47

Software Testing
Click the title bar of the lesson4 test window.
3.9.2. Place the cursor at the point where you want to synchronize the
test.
Add a blank line below the button_press ("Insert Order"); statement. Place
the cursor at the beginning of the blank line.
3.9.3. Synchronize the test so that it waits for the “Insert Done” message
to appear in the status bar.
Choose Create > Synchronization Point > For Object/Window Bitmap
or click the Synchronization Point for Object/Window Bitmap button on the
User toolbar.
Use the pointer to click the message “Insert Done” in the Flight Reservation
window. WinRunner automatically inserts an obj_wait_bitmap synchronization
point into the test script. This statement instructs WinRunner to wait 1 second for
the “Insert Done” message to appear in the status bar.
3.9.4. Manually change the 1 second wait in the script to a 10 second wait.
The one-second wait that was inserted in the previous step is not long
enough. Find the statement:
obj_wait_bitmap("Insert Done..", "Img1", 1);
and change the 1 at the end of the statement to a 10, to indicate a 10 second wait.
3.9.5. Save the test.
Choose File > Save or click the Save button.
________________________________________________________________________Confidential Document 48

Software Testing
3.9.6. If you are working in the Global GUI Map File mode, save the new
objects to the GUI map.
During this test you recorded an object in the Flight Reservation window
(the Insert Done bitmap). You should save this object in your GUI map. To save a
new object from a window that already exists in your GUI map, choose Tools >
GUI Map Editor. Choose View > GUI Files. Note that the new object is
displayed in the L0 <Temporary> GUI map file. Choose File > Save. A
WinRunner message informs you that the new objects from the existing window
will be added to the flight1.gui map that contains this window.
The New Windows dialog prompts you to save the new window to the
existing map file or to a new one. Click OK to add the new window to your GUI
map. Choose File > Exit to close the GUI Map Editor.
Note:
A synchronization point appears as obj_wait_bitmap or win_wait_bitmap
statements in the test script.
For example: obj_wait_bitmap ("Insert Done..", "Img1", 10);
Insert Done.. is the object’s logical name. lmg1 is the file containing a
captured image of the object. 10 is the time (in seconds) that WinRunner waits for
the image to appear in the application. This time is added to the default time
defined by the timeout-msec testing option. (In the above exercise, WinRunner
waits a total of 11 seconds).
3.10. Running the Synchronized Test
In this exercise you will run the synchronized test script and examine the
test results.________________________________________________________________________Confidential Document 49

Software Testing
3.10.1. Confirm that the lesson4 test window is active in WinRunner.
Click the title bar of the lesson4 test window.
3.10.2. Confirm that Verify mode is selected in the Standard toolbar.
Verify mode will stay in effect until you choose a different mode.
3.10.3. Choose Run from Top.
Choose Run > Run from Top or click the Run from Top button. The Run
Test dialog box opens. Accept the default name “res2.” Make sure that the
Display test results at end of run check box is selected.
3.10.4. Run the test.
Click OK in the Run Test dialog box. WinRunner starts running the test
from the first line in the script.
Watch how WinRunner waits for the “Insert Done” message to appear in the
status bar.
3.10.5. Review the results.
When the test run is completed, the test results appear in the WinRunner
Test Results window. Note that a “wait for bitmap” event appears in green in the
test log section. This indicates that synchronization was performed successfully.
You can double-click this event to see a bitmap image of the status bar displaying
the “Insert Done” message.
________________________________________________________________________Confidential Document 50

Software Testing
3.10.6. Close the Test Results window.
Choose File > Exit.
3.10.7. Close the lesson4 test.
Choose File > Close in WinRunner.
3.10.8. Close the Flight Reservation application.
Choose File > Exit.
3.10.9. Change the timeout value back to 10000 milliseconds (10
seconds).
Choose Settings > General Options to open the General Options dialog
box. Click the Run tab. In the Timeout for checkpoints and CS statements
box, change the current value to “10000”. Click OK to close the dialog box.
3.11. Tips for Synchronizing Tests
13.11.1. Stopping or pausing a test: You can stop or pause a test that is
waiting for a synchronization statement by using the PAUSE or STOP softkeys.
3.11.2. Recording in Analog mode:
When recording a test in Analog mode, you should press the
SYNCHRONIZE BITMAP OF OBJECT/WINDOW or the SYNCHRONIZE BITMAP
OF SCREEN AREA softkey to create a bitmap synchronization point. This
prevents WinRunner from recording extraneous mouse movements. If you are
________________________________________________________________________Confidential Document 51

Software Testing
programming a test, you can use the Analog TSL function wait_window to wait
for a bitmap.
3.11.3. Data-driven testing:
In order to use bitmap synchronization points in datadriven tests, you must
parameterize the statements in your test script that contain them. For information
on using bitmap synchronization points in datadriven tests.
________________________________________________________________________Confidential Document 52

Software Testing
Unit IV
4.1. Checking GUI Objects
About Checking GUI Objects
You can use GUI checkpoints in your test scripts to help you examine GUI
objects in your application and detect defects. For example, you can check that
when a specific dialog box opens, the OK, Cancel, and Help buttons are enabled.
You point to GUI objects and choose the properties you want WinRunner to
check. You can check the default properties recommended by WinRunner, or you
can specify which properties to check. Information about the GUI objects and the
selected properties is saved in a checklist. WinRunner then captures the current
property values for the GUI objects and saves this information as expected
results. A GUI checkpoint is automatically inserted into the test script. This
checkpoint appears in your test script as an obj_check_gui or a win_check_gui
statement.
4.2. How to check GUI objects:
4.2.1. Checking a Single Property Value
You can check a single property of a GUI object. For example, you can
check whether a button is enabled or disabled or whether an item in a list is
selected. To create a GUI checkpoint for a property value, use the Check Property
dialog box to add one of the following functions to the test script:
button_check_info scroll_check_info
________________________________________________________________________Confidential Document 53

Software Testing
edit_check_info static_check_info
list_check_info win_check_info
obj_check_info
4.2.2. To create a GUI checkpoint for a property value:
1. Choose Create > GUI Checkpoint > For Single Property. If you are
recording in Analog mode, press the CHECK GUI FOR SINGLE PROPERTY
softkey in order to avoid extraneous mouse movements.
The WinRunner window is minimized, the mouse pointer becomes a
pointing hand, and a help window opens on the screen.
2. Click an object.
The Check Property dialog box opens and shows the default function
for the selected object. WinRunner automatically assigns argument values
to the function.
3. You can modify the arguments for the property check.
To modify assigned argument values, choose a value from the Attribute
list. The expected value is updated in the Expected text box.
________________________________________________________________________Confidential Document 54

Software Testing
To choose a different object, click the pointing hand and then click an object
in your application. WinRunner automatically assigns new argument values to the
function.
Note that if you click an object that is not compatible with the selected
function, a message states that the current function cannot be applied to the
selected object. Click OK to clear the message, and then click Close to close the
Check Property dialog box. Repeat steps 1 and 2.
4. Click Paste to paste the statement into your test script.
The function is pasted into the script at the insertion point. The Check
Property dialog box closes.
4.2.3. Checking a Single Object
You can create a GUI checkpoint to check a single object in the application
being tested. You can either check the object with its default properties or you
can specify which properties to check.
Each standard object class has a set of default checks. For a complete list of
standard objects, the properties you can check and default checks.
4.2.4. Creating a GUI Checkpoint using the Default Checks
You can create a GUI checkpoint that performs a default check on the
property recommended by WinRunner. For example, if you create a GUI
checkpoint that checks a push button, the default check verifies that the push
button is enabled.
4.2.5. Checking Two or More Objects in a Window
________________________________________________________________________Confidential Document 55

Software Testing
You can use a GUI checkpoint to check two or more objects in a window.
4.2.6. To create a GUI checkpoint for two or more objects:
1. Choose Create > GUI Checkpoint > For Multiple Objects or click the
GUI Checkpoint for Multiple Objects button on the User toolbar. If you
are recording in Analog mode, press the CHECK GUI FOR MULTIPLE
OBJECTS softkey in order to avoid extraneous mouse movements. The
Create GUI Checkpoint dialog box opens.
2. Click the Add button. The mouse pointer becomes a pointing hand and a
help window opens.
3. To add an object, click it once. If you click a window title bar or menu bar,
a help window prompts you to check all the objects in the window.
4. The pointing hand remains active. You can continue to choose objects by
repeating step 3 above for each object you want to check.
5. Click the right mouse button to stop the selection process and to restore
the mouse pointer to its original shape. The Create GUI Checkpoint dialog
box reopens.
________________________________________________________________________Confidential Document 56
Software Testing
6. The Objects pane contains the name of the window and objects included in
the GUI checkpoint. To specify which objects to check, click an object name
in the Objects pane.
The Properties pane lists all the properties of the object. The default
properties are selected.
To edit the expected value of a property, first select it. Next, either click the
Edit Expected Value button, or double-click the value in the Expected Value
column to edit it.
To add a check in which you specify arguments, first select the property for
which you want to specify arguments. Next, either click the Specify Arguments
button, or double-click in the Arguments column.
Note that if an ellipsis appears in the Arguments column, then you must
specify arguments for a check on this property. (You do not need to specify an
argument if a default argument is specified.) When checking standard objects,
you only specify arguments for certain properties of edit and static text objects.
You also specify arguments for checks on certain properties of nonstandard
objects.
________________________________________________________________________Confidential Document 57

Software Testing
To change the viewing options for the properties of an object, use the Show
Properties buttons.
7. To save the checklist and close the Create GUI Checkpoint dialog box, click
OK. WinRunner captures the current property values of the selected GUI objects
and stores it in the expected results folder. A win_check_gui statement is
inserted in the test script.
4.2.7. Checking All Objects in a Window
You can create a GUI checkpoint to perform default checks on all GUI
objects in a window. Alternatively, you can specify which checks to perform on all
GUI objects in a window. Each standard object class has a set of default checks.
4.2.8. Checking All Objects in a Window using Default Checks
You can create a GUI checkpoint that checks the default property of every
GUI object in a window.
4.2.9. To create a GUI checkpoint that performs a default check on every
GUI object in a window:
1. Choose Create > GUI Checkpoint > For Object/Window, or click the GUI
Checkpoint for Object/Window button on the User toolbar. If you are recording
in Analog mode, press the CHECK GUI FOR OBJECT/WINDOW softkey in order to
avoid extraneous mouse movements. Note that you can press the CHECK GUI
FOR OBJECT/WINDOW softkey in Context Sensitive mode as well. The
________________________________________________________________________Confidential Document 58

Software Testing
WinRunner window is minimized, the mouse pointer turns into a pointing hand,
and a help window opens.
2. Click the title bar or the menu bar of the window you want to check.
The Add All dialog box opens.
3. Select Objects or Menus or both to indicate the types of objects to include in
the checklist. When you select only Objects (the default setting), all objects in the
window except for menus are included in the checklist. To include menus in the
checklist, select Menus.
5. Click OK to close the dialog box.
WinRunner captures the expected property values of the GUI objects and/or
menu items and stores this information in the test’s expected results folder. The
WinRunner window is restored and a win_check_gui statement is inserted in the
test script.
4.2.10. Specifying which Checks to Perform on All Objects in a Window
You can use a GUI checkpoint to specify which checks to perform on all GUI
objects in a window.
________________________________________________________________________Confidential Document 59

Software Testing
4.2.11. To create a GUI checkpoint in which you specify which checks to
perform
on all GUI objects in a window:
1 Choose Create > GUI Checkpoint > For Object/Window, or click the
GUI Checkpoint for Object/Window button on the User toolbar. If you
are recording in Analog mode, press the CHECK GUI FOR
OBJECT/WINDOW softkey in order to avoid extraneous mouse movements.
Note that you can press the CHECK GUI FOR OBJECT/WINDOW softkey in
Context Sensitive mode as well. The WinRunner window is minimized, the
mouse pointer turns into a pointing hand, and a help window opens.
2 Double-click the title bar or the menu bar of the window you want to check.
WinRunner generates a new checklist containing all the objects in the
window. This may take a few seconds.
The Check GUI dialog box opens.
3 Specify which checks to perform, and click OK to close the dialog box.
WinRunner captures the GUI information and stores it in the test’s expected
results folder. The WinRunner window is restored and a win_check_gui
statement is inserted in the test script.
Exercise
4.3. Adding GUI Checkpoints to a Test Script
In this exercise you will check that objects in the Flight Reservation Open
Order dialog box function properly when you open an existing order.
4.3.1. Start WinRunner and load the GUI map.
If WinRunner is not already open, choose Programs > WinRunner >
WinRunner on the Start menu. If you are working in the Global GUI Map File
mode, confirm that the GUI map is loaded: choose Tools > GUI Map Editor. In
________________________________________________________________________Confidential Document 60

Software Testing
the GUI Map Editor choose View > GUI Files and confirm that flight1.GUI is
contained in the GUI File list.
4.3.2. Start the Flight Reservation application and log in.
Choose Programs > WinRunner > Sample Applications > Flight 1A on
the Start menu. In the Login window, type your name and the password mercury,
and click OK. Reposition the Flight Reservation application and WinRunner so
that they are both clearly visible on your desktop.
4.3.3. Start recording in Context Sensitive mode.
Choose Create > Record—Context Sensitive or click the Record button
on the toolbar.
4.3.4. Open the Open Order dialog box.
Choose File > Open Order in the Flight Reservation application.
4.3.5. Create a GUI checkpoint for the Order No. check box.
Choose Create > GUI Checkpoint > For Object/Window, or click the
GUI Checkpoint for Object/Window button on the User toolbar.
Use the pointer to double-click the Order No. check box. The Check GUI
dialog box opens and displays the available checks. Note that this dialog box does
not open if you only single-clicked the Order No. check box. Accept the default
check, “State.” This check captures the current state (off) of the check box and
stores it as expected results.
Click OK in the Check GUI dialog box to insert the checkpoint into the test
script. The checkpoint appears as an obj_check_gui statement.
4.3.6. Enter “4” as the Order No.
Select the Order No. check box and type in 4 in the Order No. text box.
________________________________________________________________________Confidential Document 61

Software Testing
4.3.7. Create another GUI checkpoint for the Order No. check box.
Choose Create > GUI Checkpoint > For Object/Window or click the GUI
Checkpoint for Object/Window button on the User toolbar. Use the pointer
to single-click the Order No. check box. WinRunner immediately inserts a
checkpoint into the test script (an obj_check_gui statement) that checks the
default check “State.” (Use the single-click option when you want to use only the
default check for an object.) This check captures the current state (on) of the
check box and stores it as expected results.
4.3.8. Create a GUI checkpoint for the Customer Name check box.
Choose Create > GUI Checkpoint > For Object/Window or click the GUI
Checkpoint for Object/Window button on the User toolbar. Use the pointer
to double-click the Customer Name check box. The Check GUI dialog box opens
and displays the available checks. Accept the default check “State” and select
“Enabled” as an additional check. The State check
captures the current state (off) of the check box; the Enabled check captures the
current condition (off) of the check box.
Click OK in the Check GUI dialog box to insert the checkpoint into the test
script. The checkpoint appears as an obj_check_gui statement.
4.3.9. Click OK in the Open Order dialog box to open the order.
4.3.10. Stop recording
Choose Create > Stop Recording or click the Stop button.
4.3.11. Save the test.
________________________________________________________________________Confidential Document 62

Software Testing
Choose File > Save or click the Save button. Save the test as lesson5 in a
convenient location on your hard drive.
4.3.12. If you are working in the Global GUI Map File mode, save the new
objects to the GUI map.
Choose Tools > GUI Map Editor. Choose View > GUI Files. Choose File
>
Save. Click Yes and/or OK to add the new object and/or new window to your
GUI map. Choose File > Exit to close the GUI Map Editor.
Note:
GUI checkpoints appear as obj_check_gui or win_check_gui statements in the test
script.
For example:
obj_check_gui("Order No.", "list1.ckl", "gui1", 1)
Order No. is the object’s logical name.
list1.ckl is the checklist containing the checks you selected.
gui1 is the file containing the captured GUI data.
1 is the time (in seconds) needed to perform the check. Thistime is added to the
value of the timeout_msec test option.
4.4. Running the Test:
You will now run the lesson5 test in order to verify that the test runs
smoothly.
4.4.1. Make sure that the Flight Reservation application is open on your
desktop.
________________________________________________________________________Confidential Document 63

Software Testing
4.4.2. In WinRunner, check that Verify mode is selected in the Standard
toolbar.
4.4.3. Choose Run from Top.
Choose Run > Run from Top, or click the Run from Top button. The Run
Test dialog box opens. Accept the default test run name “res1.” Make sure that
the Display test results at end of run check box is selected.
4.4.4. Run the test.
Click OK in the Run Test dialog box.
4.4.5. Review the results.
When the test run is completed, the test results appear in the WinRunner
Test Results window. In the test log section all “end GUI checkpoint” events
should appear in green (indicating success).
Double-click at the last end GUI checkpoint event to view detailed results of
that GUI checkpoint. The GUI Checkpoint Results dialog box opens. Select
Customer Name to display the dialog box as follows:
________________________________________________________________________Confidential Document 64

Software Testing
4.4.6. Close the test results.
Click OK to close the GUI Checkpoint Results dialog box. Then choose File
>
Exit to close the Test Results window.
4.4.7. Close the Flight Reservation application.
Choose File > Exit.
4.5. Running the Test on a New Version
________________________________________________________________________Confidential Document 65

Software Testing
In this exercise you will run the lesson5 test on a new version of the Flight
Reservation application in order to check the behavior of its GUI objects.
4.5.1. Open version 1B of the Flight Reservation application.
Choose Programs > WinRunner > Sample Applications > Flight 1B on
the Start menu. In the Login window, type your name and the password mercury,
and click OK. Position the Flight Reservation application and WinRunner so that
they are both clearly visible on your desktop.
4.5.2. Make sure that lesson5 is the active test.
Click in the lesson5 test window in WinRunner.
4.5.3. Check that Verify mode is selected in the toolbar.
4.5.4. Choose Run from Top.
Choose Run > Run from Top, or click the Run from Top button. The Run
Test dialog box opens. Accept the default test run name “res2.” Make sure that
the Display test results at end of run check box is selected.
4.5.5. Run the test.
Click OK. The test run begins. This process might take a while. If a
mismatch is detected at a GUI checkpoint, click Continue in the message
window.
4.5.6. Review the results.
When the test run is completed, the test results appear in the WinRunner
Test Results window. In the test log section, one “end GUI checkpoint” statement
appears in red and its Result field lists “mismatch.” This indicates that one or
more of the checks performed on the object failed. Double-click the red “end GUI
checkpoint” event to view detailed results of the failed check. The GUI
Checkpoint Results dialog box opens. Select Customer Name to display the dialog
box as follows:
________________________________________________________________________Confidential Document 66

Software Testing
4.5.7. Close the Test Results window.
Click OK in the GUI Checkpoint Results dialog box and then choose File >
Exit
to close the Test Results window.
4.5.8. Close the lesson5 test.
Choose File > Close.
4.5.9. Close version 1B of the Flight Reservation application.
Choose File > Exit.
4.6. GUI Checkpoint Tips
You can create a single GUI checkpoint in your test that checks several or
all objects in a window. Choose Create > GUI Checkpoint > For Multiple
________________________________________________________________________Confidential Document 67

Software Testing
Objects. (To see this menu command, a test must be open. Otherwise it is
inactive.) The Create GUI Checkpoint dialog box opens, which enables you to add
objects to the GUI checkpoint and to specify the checks you want to perform on
those objects. When you finish creating the checkpoint, WinRunner inserts a
win_check_gui statement into the test script, which includes a checklist for the
selected objects. For overnight test runs, you can instruct WinRunner not to
display a message when a GUI mismatch is detected. Choose Settings > General
Options. In the General Options dialog box, click the Run tab, and clear the
Break when verification fails check box. This enables the test to run without
interruption.
4.7. Checking Bitmaps
How Do You Check a Bitmap?
If your application contains bitmap areas, such as drawings or graphs, you
can check these areas using a bitmap checkpoint. A bitmap checkpoint compares
captured bitmap images pixel by pixel.
To create a bitmap checkpoint, you indicate an area, window, or object that
you want to check.
For example:
]
WinRunner captures a bitmap image and saves it as expected results. It
then inserts an obj_check_bitmap statement into the test script if it captures an
object, or a win_check_bitmap statement if it captures an area or window. When
you run the test on a new version of the application, WinRunner compares the
________________________________________________________________________Confidential Document 68

Software Testing
expected bitmap with the actual bitmap in the application. If any differences are
detected, you can view a picture of the differences from the Test Results window.
Exercise
4.8. Adding Bitmap Checkpoints to a Test Script
In this exercise you will test the Agent Signature box in the Fax Order
dialog box. You will use a bitmap checkpoint to check that you can sign your
name in the box. Then you will use another bitmap checkpoint to check that the
box clears when you click the Clear Signature button.
4.8.1. Start WinRunner, open a new test and load the GUI map.
If WinRunner is not already open, choose Programs > WinRunner >
WinRunner on the Start menu. If the Welcome window is open, click the New
Test button. Otherwise, choose File > New. A new test window opens. If you are
working in the Global GUI Map File mode, confirm that the GUI map is loaded:
choose Tools > GUI Map Editor. In the GUI Map Editor choose View > GUI
Files and confirm that flight1.GUI is contained in the GUI File list.
4.8.2. Start the Flight Reservation application and log in.
Choose Programs > WinRunner > Sample Applications > Flight 1A on
the Start menu. In the Login window, type your name and the password mercury,
and click OK. Reposition the Flight Reservation application and WinRunner so
that they are both clearly visible on your desktop.
4.8.3. Start recording in Context Sensitive mode.
Choose Create > Record—Context Sensitive or click the Record button
on the toolbar.
4.8.4. Open order #6.
________________________________________________________________________Confidential Document 69

Software Testing
In the Flight Reservation application, choose File > Open Order. In the
Open
Order dialog box, select the Order No. check box and type “6” in the adjacent
box. Click OK to open the order.
4.8.5. Open the Fax Order dialog box.
Choose File > Fax Order.
4.8.6 Enter a 10-digit fax number in the Fax Number box.
You do not need to type in parentheses or dashes.
4.8.7. Move the Fax Order dialog box.
Position the dialog box so that it least obscures the Flight Reservation
window.
4.8.8. Switch to Analog mode.
Press F2 on your keyboard or click the Record button to switch to Analog
mode.
4.8.9. Sign your name in the Agent Signature box.
10. Switch back to Context Sensitive mode.
Press F2 on your keyboard or click the Record button to switch back to
Context
Sensitive mode.
4.8.11. Insert a bitmap checkpoint that checks your signature.
Choose Create > Bitmap Checkpoint > For Object/Window or click the
Bitmap Checkpoint for Object/Window button on the User toolbar.
________________________________________________________________________Confidential Document 70
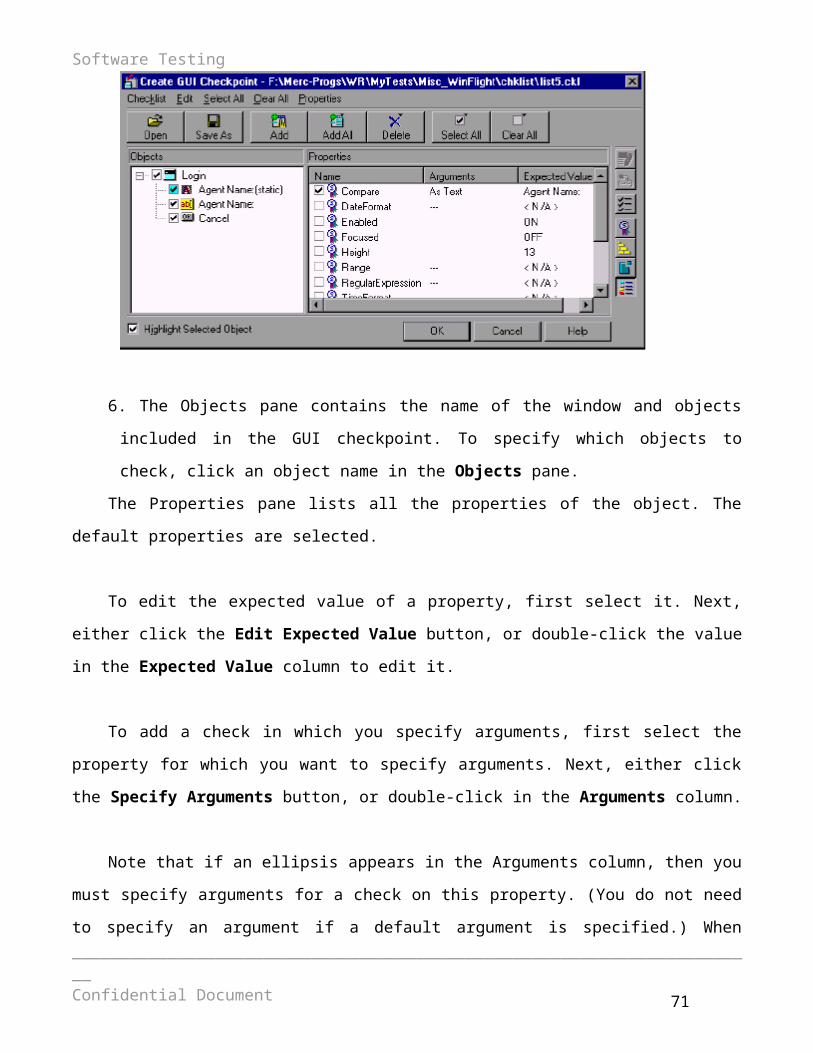
Software Testing
Use the pointer to click the Agent Signature box. WinRunner captures
the bitmap and inserts an obj_check_bitmap statement into the test script.
4.8.12. Click the Clear Signature button.
The signature is cleared from the Agent Signature box.
4.8.13. Insert another bitmap checkpoint that checks the Agent Signature
box.
Choose Create > Bitmap Checkpoint > For Object/Window or click the
Bitmap Checkpoint for Object/Window button on the User toolbar. Use the
pointer to click the Agent Signature box. WinRunner captures a bitmap and
inserts an obj_check_bitmap statement into the test script.
4.8.14. Click the Cancel button on the Fax Order dialog box.
4.8.15. Stop recording.
Choose Create > Stop Recording or click the Stop button.
4.8.16. Save the test.
Choose File > Save or click the Save button. Save the test as lesson6 in a
convenient location on your hard drive.
4.8.17. If you are working in the Global GUI Map File mode, save the new
objects to the GUI map.
Choose Tools > GUI Map Editor. Choose View > GUI Files. Choose File
> Save. Click Yes and/or OK to add the new object and/or new window to your
GUI map. Choose File > Exit to close the GUI Map Editor.
NOTE:
Bitmap checkpoints appear as obj_check_bitmap or win_check_bitmap
statements in the test script. For example:
________________________________________________________________________Confidential Document 71

Software Testing
obj_check_bitmap("(static)", "Img1", 1);
static is the object or area’s logical name. Img1 is the file containing the captured
bitmap.
1 is the time (in seconds) needed to perform the check. This time is added to the
value of the timeout_msec test option. See Lesson 4 for more information.
4.9. Viewing Expected Results
You can now view the expected results of the lesson6 test.
4.9.1. Open the WinRunner Test Results window.
Choose Tools > Test Results or click the Test Results button. The Test
Results window opens.
4.9.2. View the captured bitmaps.
In the test log section, double-click the first “capture bitmap” event, or
select it and click the Display toolbar button.
Next, double-click the second “capture bitmap” event, or select it and click
the
Display toolbar button.
4.9.3. Close the Test Results window.
Close the bitmaps and choose File > Exit to close the Test Results window.
4.10. Running the Test on a New Version
________________________________________________________________________Confidential Document 72

Software Testing
You can now run the test on a new version of the Flight Reservation
application.
4.10.1. Close Flight Reservation 1A.
Choose File > Exit.
4.10.2 Start Flight Reservation 1B.
Choose Programs > WinRunner > Sample Applications > Flight 1B on
the Start menu. In the Login window, type your name and the password mercury,
and click OK. Reposition the Flight Reservation application and WinRunner so
that they are both clearly visible on your desktop.
4.10.3. Make sure that lesson6 is the active test.
Click in the lesson6 test window.
4.10.4. Check that Verify mode is selected in the Standard toolbar.
4.10.5. Choose Run from Top.
Choose Run > Run from Top, or click the Run from Top button. The Run
Test dialog box opens. Accept the default test run name “res1.” Make sure that
the Display test results at end of run check box is selected.
4.10.6. Run the test.
Click OK. The test run begins.
If a mismatch is detected at a bitmap checkpoint, click Continue in the message
window.
4.10.7. Review the results.
When the test run is completed, the test results appear in the WinRunner
Test Results window.________________________________________________________________________Confidential Document 73

Software Testing
4.10.8. Close the Test Results window.
Choose File > Exit to close the Test Results window.
4.10.9. Close the lesson6 test.
Choose File > Close.
4.10.10. Close version 1B of the Flight Reservation application.
Choose File > Exit.
4.11. Bitmap Checkpoint Tips
To capture an area, choose Create > Bitmap Checkpoint > For Screen
Area or click the Bitmap Checkpoint for Screen Area button on the User
toolbar. (To see this menu command, a test must be open. Otherwise it is
inactive.) Use the crosshairs pointer to mark the area that you want WinRunner to
capture. WinRunner inserts a win_check_bitmap statement into your test script.
This statement includes additional parameters that define the position (x- and y
coordinates) and size (width and height) of the area.
For overnight test runs, you can instruct WinRunner not to display a
message when a bitmap mismatch is detected. Choose Settings > General ________________________________________________________________________Confidential Document 74
Software Testing
Options. In the General Options dialog box, click the Run tab and clear the
Break when verification fails check box. This enables the test to run
unattended.
When running a test that includes bitmap checkpoints, make sure that the
screen display settings and display driver are the same as when the test script
was created. If the display settings are different, WinRunner may report a bitmap
mismatch.
If you want to create new expected results for a bitmap checkpoint, run the
test in Update mode. WinRunner overwrites the existing expected bitmaps with
new expected bitmaps captured during the Update run.
________________________________________________________________________Confidential Document 75

Software Testing
Unit V
5.1. Programming with TSL –Enhancing the Test Script with
Programming
5.1.1. Test Scripts with Programming
WinRunner test scripts are composed of statements coded in Mercury
Interactive’s Test Script Language (TSL). This chapter provides a brief
introduction to TSL and shows you how to enhance your test scripts using a few
simple programming techniques.
In this section you will learn the following :
Using Descriptive Programming
Adding Comments and White Space
Understanding Constants and Variables
Performing Calculations
Creating Stress Conditions
Incorporating Decision-Making Statements
Sending Messages to the Test Results Window
Starting Applications from a Test Script
Defining Test Steps
Comparing Two Files
5.1.2. About Enhancing Your Test Scripts with Programming
When you record a test, a test script is generated in Mercury Interactive’s
Test Script Language (TSL). Each line WinRunner generates in the test script is a
statement. A statement is any expression that is followed by a semicolon. Each
TSL statement in the test script represents keyboard and/or mouse input to the ________________________________________________________________________Confidential Document 76

Software Testing
application being tested. A single statement may be longer than one line in the
test script.
For example:
if (button_check_state("Underline", OFF) == E_OK)
report_msg("Underline check box is unavailable.");
TSL is a C-like programming language designed for creating test scripts. It
combines functions developed specifically for testing with general purpose
programming language features such as variables, control-flow statements,
arrays, and user-defined functions. You enhance a recorded test script simply by
typing programming elements into the test window, If you program a test script
by typing directly into the test window, remember to include a semicolon at the
end of each statement.
TSL is easy to use because you do not have to compile. You simply record or
type in the test script and immediately execute the test.
5.1.3. TSL includes four types of functions:
Context Sensitive functions perform specific tasks on GUI objects, such as
clicking a button or selecting an item from a list. Function names, such as
button_press and list_select_item, reflect the function’s purpose.
Analog functions depict mouse clicks, keyboard input, and the exact
coordinates traveled by the mouse.
Standard functions perform general purpose programming tasks, such as
sending messages to a report or performing calculations.
Customization functions allow you to adapt WinRunner to your testing
environment.
________________________________________________________________________Confidential Document 77

Software Testing
WinRunner includes a visual programming tool which helps you to quickly
and easily add TSL functions to your tests.
This section introduces some basic programming concepts and shows you
how to use a few simple programming techniques in order to create more
powerful tests.
5.1.4. Using Descriptive Programming
When you add an object to the GUI Map, WinRunner assigns it a logical
name. Once an object exists in the GUI Map, you can add statements to your test
that perform functions on that object. To add these statements, you usually enter
the logical name of the object as the object description.
For example, in the statements below, Flight Reservation is the logical
name of a window, and File;Open Order is the logical name of the menu.
set_window ("Flight Reservation", 5);
menu_select_item ("File;Open Order..");
Because each object in the GUI Map has a unique logical name, this is all
you need to describe the object. During the test run, WinRunner finds the object
in the GUI Map based on its logical name and uses the other property values
stored for that object to identify the object in your application.
You can also add statements to perform functions on objects without
referring to the GUI Map. To do this, you need to enter more information in the
description of the object in order to uniquely describe the object so that
WinRunner can identify the object during the test run. This is known as:
descriptive programming.
________________________________________________________________________Confidential Document 78

Software Testing
For example, suppose you recorded a purchase order in a flight reservation
application. Then, after you created your test, an additional radio button group
was added to the purchase order. Rather than recording a new step in your
existing test in order to add to the object to the GUI Map, you can add a
statement to the script that describes the radio button you want to select, and
sets the radio button state to ON.
You describe the object by defining the object class, the MSW_class, and as
many additional property:value pairs as necessary to uniquely identify the object.
The general syntax is:
function_name("{ class: class_value , MSW_class: MSW_value , property3:
value , .. , propertyX: value }" , other_function_parameters) ;
function_name: The function you want to perform on the object.
property:value: The object property and its value. Each property:value pair
should be separated by commas.
other_function_parameters:
You enter other required or optional function parameters in the statement
just as you would when using the logical name for the object parameter. The
entire
object description should surrounded by curly brackets and quotes:
“{description}”.
For example, the statement below performs a button_set function on a
radio button to select a business class airline seat. When the test runs,
WinRunner finds the radio button object with matching property values and
selects it”.
________________________________________________________________________Confidential Document 79

Software Testing
set_window ("Flight Reservation", 3);
button_set ("{class: radio_button, MSW_class: Button, label: Business}", ON);
If you are not sure which properties and values you can use to identify an
object,
use the GUI Spy to view the current properties and values of the object.
5.1.5. Using Comments
When programming, you can add comments and white space to your test
scripts to make them easier to read and understand.
A comment is a line or part of a line in a test script that is preceded by a
pound sign (#). When you run a test, the TSL interpreter does not process
comments.
Use comments to explain sections of a test script in order to improve
readability and to make tests easier to update.
For example:
# Open the Open Order window in Flight Reservation application
set_window ("Flight Reservation", 10);
menu_select_item ("File;Open Order..");
# Select the reservation for James Brown
set_window ("Open Order_1");
button_set ("Customer Name", ON);
edit_set ("Value", "James Brown"); # Type James Brown
button_press ("OK");
You can use the Insert comments and indent statements option in the
Record tab of the General Options dialog box to have WinRunner automatically
________________________________________________________________________Confidential Document 80

Software Testing
divide your test script into sections while you record based on window focus
changes.
When you choose this option, WinRunner automatically inserts a comment
at the beginning of each section with the name of the window and indents the
statements under each comment.
5.1.6. Understanding Constants and Variables
Constants and variables are used in TSL to manipulate data. A constant is a
value that never changes. It can be a number, character, or a string. A variable, in
contrast, can change its value each time you run a test.
For example, the following statement uses a variable to store text that
appears in a text box.
edit_get_text ("Name:", text);
report_msg ("The Customer Name is " & text);
WinRunner reads the value that appears in the File Name text box and
stores it in the text variable. A report_msg statement is used to display the value
of the text variable in a report.
5.1.7. Performing Calculations
You can create tests that perform simple calculations using mathematical
operators. For example, you can use a multiplication operator to multiply the
values displayed in two text boxes in your application. TSL supports the following
mathematical operators:
+ addition
- subtraction
________________________________________________________________________Confidential Document 81

Software Testing
- negation (a negative number – unary operator)
* multiplication
/ division
% modulus
^ or ** exponent
++ increment (adds 1 to its operand - unary operator)
-- decrement (subtracts 1 from its operand – unary operator)
5.1.8. Creating Stress Conditions
You can create stress conditions in test scripts that are designed to
determine the limits of your application. You create stress conditions by defining
a loop which executes a block of statements in the test script a specified number
of times. TSL provides three statements that enable looping: for, while, and
do/while. Note that you cannot define a constant within a loop.
For Loop
A for loop instructs WinRunner to execute one or more statements a
specified number of times. It has the following syntax:
for ( [ expression1 ]; [ expression2 ]; [ expression3 ] )
statement
First, expression1 is executed. Next, expression2 is evaluated. If
expression2 is true, statement is executed and expression3 is executed. The cycle
is repeated as long as expression2 remains true. If expression2 is false, the for
statement terminates and execution passes to the first statement immediately
following. For example, the for loop below selects the file UI_TEST from the File
Name list in the Open window. It selects this file five times and then stops.
set_window ("Open")
for (i=0; i<5; i++)
________________________________________________________________________Confidential Document 82

Software Testing
list_select_item ("File Name:_1", "UI_TEST"); # Item Number 2
While Loop
A while loop executes a block of statements for as long as a specified
condition is true. It has the following syntax:
while ( expression )
statement ;
While expression is true, the statement is executed. The loop ends when the
expression is false.
For example, the while statement below performs the same function as the for
loop above.
set_window ("Open");
i=0;
while (i<5)
{
i++;
list_select_item ("File Name:_1", "UI_TEST"); # Item Number 2
}
5.1.9. Incorporating Decision-Making Statements
You can incorporate decision-making into your test scripts using if/else or
switch statements.
If/Else Statement
An if/else statement executes a statement if a condition is true; otherwise, it
executes another statement. It has the following syntax:
if ( expression )
________________________________________________________________________Confidential Document 83

Software Testing
statement1;
[ else
statement2; ]
expression is evaluated. If expression is true, statement1 is executed. If
expression1 is false, statement2 is executed.
Switch Statement
A switch statement enables WinRunner to make a decision based on an
expression that can have more than two values. It has the following syntax:
switch (expression )
{
case case_1:
statements
case case_2:
statements
case case_n:
statements
default: statement(s)
}
The switch statement consecutively evaluates each case expression until
one is found that equals the initial expression. If no case is equal to the
expression, then the default statements are executed. The default statements are
optional.
5.1.10. Sending Messages to the Test Results Window
You can define a message in your test script and have WinRunner send it to
the test results window. To send a message to a test results window, add a
report_msg statement to your test script. The function has the following syntax:
report_msg ( message );
________________________________________________________________________Confidential Document 84

Software Testing
The message can be a string, a variable, or a combination of both. In the
following example, WinRunner gets the value of the label property in the Flight
Reservation window and enters a statement in the test results containing the
message and the label value.
win_get_info("Flight Reservation", "label", value);
report_msg("The label of the window is " & value);
5.1.11. Starting Applications from a Test Script
You can start an application from a WinRunner test script using the
invoke_application function. For example, you can open the application being
tested every time you start WinRunner by adding an invoke_application
statement to a startup test.
Note: You can also use the Run tab of the Test Properties dialog box to open an
application at the beginning of a test run.
The invoke_application function has the following syntax:
invoke_application ( file, command_option, working_dir, show );
The file designates the full path of the application to invoke. The
command_option parameter designates the command line options to apply. The
work_dir designates the working directory for the application and show specifies
how the application’s main window appears when open.
For example, the statement:
invoke_application("c:\\flight1a.exe", "", "", SW_MINIMIZED);
starts the Flight Reservation application and displays it as an icon.
________________________________________________________________________Confidential Document 85

Software Testing
5.1.12. Defining Test Steps
After you run a test, WinRunner displays the overall result of the test
(pass/fail) in the Report form. To determine whether sections of a test pass or fail,
add tl_step statements to the test script.
The tl_step function has the following syntax:
tl_step ( step_name, status, description );
The step_name is the name of the test step. The status determines whether
the step passed (0), or failed (any value except 0). The description describes the
step.
For example, in the following test script segment, WinRunner reads text
from Notepad. The tl_step function is used to determine whether the correct text
is read.
win_get_text("Document - Notepad", text, 247, 309, 427, 329);
if (text=="100-Percent Compatible")
tl_step("Verify Text", 0, "Correct text was found in Notepad");
else
tl_step("Verify Text", 1,"Wrong text was found in Notepad");
When the test run is complete, you can view the test results in the
WinRunner Report. The report displays a result (pass/fail) for each step you
defined with tl_step.
Note that if you are using TestDirector to plan and design tests, you should
use tl_step to create test steps in your automated test scripts.
Exercise:
________________________________________________________________________Confidential Document 86

Software Testing
5.1.13. Recording a Basic Test Script
Start by recording the process of opening an order in the Flight Reservation
application and opening the Fax Order dialog box.
1. Start WinRunner, open a new test and load the GUI map.
If WinRunner is not already open, choose Programs > WinRunner >
WinRunner on the Start menu. If the Welcome window is open, click the New
Test button. Otherwise, choose File > New. A new test window opens.
If you are working in the Global GUI Map File mode, confirm that the GUI
map is loaded: choose Tools > GUI Map Editor. In the GUI Map Editor choose
View > GUI Files and confirm that flight1.GUI is contained in the GUI File list.
2. Start the Flight Reservation application and log in.
Choose Programs > WinRunner > Sample Applications > Flight 1A on
the Start menu. In the Login window, type your name and the password mercury,
and click OK. Reposition the Flight Reservation application and WinRunner so
that they are both clearly visible on your desktop.
3. Start recording in Context Sensitive mode.
Choose Create > Record—Context Sensitive or click the Record button
on the toolbar.
4. Open order #3.
In the Flight Reservation application, choose File > Open Order. In the
Open Order dialog box, select the Order No. check box and type “3” in the
adjacent box. Click OK to open the order.
________________________________________________________________________Confidential Document 87

Software Testing
5. Open the Fax Order dialog box.
Choose File > Fax Order.
6 Click Cancel to close the dialog box.
7 Stop recording.
Choose Create > Stop Recording or click the Stop button.
8 Save the test.
Choose File > Save or click the Save button. Save the test as lesson7 in a
convenient location on your hard drive.
9 If you are working in the Global GUI Map File mode, save the new
objects to the GUI map.
Choose Tools > GUI Map Editor. Choose View > GUI Files. Choose File
> Save. Click Yes and/or OK to add the new object and/or new window to your
GUI map. Choose File > Exit to close the GUI Map Editor.
5.1.14. Using the Function Generator to Insert Functions
You are now ready to add functions to the test script which queries the #
Tickets, Ticket Price, and Total fields in the Fax Order dialog box.
1. Insert a blank line above the button_press ("Cancel"); statement and place
the cursor at the beginning of this line.
2. Open the Fax Order dialog box.
________________________________________________________________________Confidential Document 88

Software Testing
Choose File > Fax Order in the Flight Reservation application.
3. Query the # Tickets field.
Choose Create > Insert Function > For Object/Window or click the
Insert Function for Object/Window button on the User toolbar. Use the pointer
to click the # Tickets field. The Function Generator opens and suggests the
edit_get_text function.
This function reads the text in the # Tickets field and assigns it to a
variable. The default variable name is text. Change the variable name, text, to
tickets by typing in the field:
edit_get_text("# Tickets:",tickets);
Click Paste to add the function to the test script.
4. Query the Ticket Price field.
Choose Create > Insert Function > For Object/Window or click the
Insert Function for Object/Window button on the User toolbar. Use the pointer
to click the Ticket Price field.
The Function Generator opens and suggests the edit_get_text function.
Change the name of the text variable to price:
edit_get_text("Ticket Price:",price);
________________________________________________________________________Confidential Document 89

Software Testing
Click Paste to add the function to the test script.
5. Query the Total field.
Choose Create > Insert Function > For Object/Window or click the
Insert Function For Object/Window button on the User toolbar. Use the
pointer to click the Total field.
The Function Generator opens and suggests the edit_get_text function.
Change the name of the text variable to total:
edit_get_text("Total:",total);
Click Paste to add the function to the test script.
6. Close the Fax Order dialog box.
Click Cancel to close the dialog box in the Flight Reservation application.
7. Save the test.
Choose File > Save or click the Save button.
8. If you are working in the Global GUI Map File mode, save the new
objects to the GUI map.
Choose Tools > GUI Map Editor. Choose View > GUI Files. Choose File
> Save. Click Yes and/or OK to add the new objects and/or new windows to your
GUI map. Choose File > Exit to close the GUI Map Editor.
5.2. Adding Logic to the Test Script
________________________________________________________________________Confidential Document 90

Software Testing
In this exercise you will program decision-making logic into the test script
using an if/else statement. This enables the test to:
Check that the total is equal to the number of tickets ordered multiplied by
the price per ticket report whether the total is correct or incorrect
1. Place the cursor below the last edit_get_text statement in the lesson7
script.
2. Add the following statements to the test script exactly as they appear
below. Note that the tabs or spaces at the beginning of the second and
fourth lines are optional.
if (tickets*price == total)
tl_step ("total", 0, "Total is correct.");
else
tl_step ("total", 1, "Total is incorrect.");
In plain English these statements mean: “If tickets multiplied by price
equals total, report that the total is correct, otherwise (else) report that the total
is incorrect.”
3. Add a comment to describe what this section of the script will do.
Place the cursor above the if statement you added in the previous step.
Choose Edit > Comment. After the # sign, type: check that the total ticket price
is calculated correctly.
4. Save the test.
Choose File > Save or click the Save button.
________________________________________________________________________Confidential Document 91

Software Testing
5.3. Debugging the Test Script
After enhancing a test with programming elements, you should check that
the test runs smoothly, without errors in syntax and logic. WinRunner provides
debugging tools which make this process quick and easy.
You can:
Run the test line by line using the Step commands
Define breakpoints that enable you to stop running the test at a specified
line or function in the test script
Monitor the values of variables and expressions using the Watch List When
you debug a test script, you should run your test in Debug mode. (To run a test in
Debug mode, select Debug from the Run Mode list on the Standard toolbar.) The
test results are saved in a debug directory. Each time you run the test in Debug
mode, WinRunner overwrites the previous debug results.
Exercise
In this exercise you will control the test run using the Step command. If any
error
messages appear, examine the test script and try to fix the problem.
5.3.1. Select Debug mode from the Run Mode list on the Standard toolbar.
Debug mode will remain in effect until you select a different mode.
5.3.2. Place the execution marker –> next to the first line in the test
script.
Click in the left margin, next to the first line in the test script.
________________________________________________________________________Confidential Document 92

Software Testing
5.3.3. Choose Run > Step or click the Step button to run the first line in
the test script.
WinRunner runs the first line of the test.
5.3.4. Use the Step button to run the entire test, line by line.
Click the Step button to run each line of the test script. Note that your
mouse pointer may sometimes move to the flight application as it clicks on objects
during the test run.
5.3.5. Click Stop.
Click the Stop button to tell WinRunner that you have completed the Debug
test run.
5.3.6. Review the test results in the WinRunner Test Results window.
When you run the test in Debug mode, the test results do not open
automatically. Choose Tools > Test Results or click the Test Results button.
The WinRunner Test Results window displays the results of the Debug test run.
5.3.7. Close the Test Results window.
Choose File > Exit.
5.3.8. Exit the Flight Reservation application.
Choose File > Exit.
5.4. Running the Test on a New Version
________________________________________________________________________Confidential Document 93

Software Testing
Once the test script is debugged, you can run it on a new version of the
Flight Reservation application.
5.4.1. Open version 1B of the Flight Reservation application.
Choose Programs > WinRunner > Sample Applications > Flight 1B on
the Start menu. In the Login window, type your name and the password mercury,
and click OK. Reposition the Flight Reservation application and WinRunner so
that they are both clearly visible on your desktop.
5.4.2. Select Verify mode from the Run Mode list on the Standard toolbar.
Verify mode will remain in effect until you select a different mode.
5.4.3. Choose Run from Top.
Choose Run > Run from Top, or click the Run from Top button. The Run
Test dialog box opens. Accept the default test run name “res1.” Make sure that
the Display test results at end of run check box is selected.
5.4.4. Run the test.
Click OK in the Run Test dialog box. The test run begins.
5.4.5. Review the test results.
When the test run is completed, the test results appear in the WinRunner
Test Results window.
________________________________________________________________________Confidential Document 94

Software Testing
You can double-click the tl_step statement in the test log to view the full
details:
Notice that the message, “Total is correct”, is the same message you wrote
in the test script. Click OK to close the message.
5.4.6. Close the test results.
Choose File > Exit to close the Test Results window.
5.4.7. Close the lesson7 test.
Choose File > Close.
5.4.8. Close version 1B of the Flight Reservation application.
Choose File > Exit.________________________________________________________________________Confidential Document 95

Software Testing
5.5. Creating Data Driven Test
How to create data-driven Test
Once you have successfully debugged and run your test, you may want to see
how the same test performs with multiple sets of data. To do this, you convert
your test to a data-driven test and create a corresponding data table with the sets
of data you want to test. Converting your test to a data-driven test involves the
following steps:
Adding statements to your script that open and close the data table.
Adding statements and functions to your test so that it will read from the data
table and run in a loop while it applies each set of data.
Replacing fixed values in recorded statements and checkpoint statements with
parameters, known as parameterizing the test.
You can convert your test to a data-driven test using the DataDriver Wizard or
you can modify your script manually.
When you run your data-driven test, WinRunner runs the parameterized part(s)
of the test one time (called an iteration) for each set of data in the data table, and
then displays the results for all of the iterations in a single Test Results window.
In Lesson 7 you created a test that opened a specific flight order and read the
number of tickets, price per ticket, and total price from a fax order dialog box in
order to check that the total price was correct. In this lesson you will create a test
that performs the same check on several flight orders in order to check that your
application computes the correct price for various quantities and prices of tickets.
________________________________________________________________________Confidential Document 96

Software Testing
5.6. Converting Your Test to a Data-Driven Test
Start by opening the test you created in Lesson 7 and using the DataDriver
Wizard to parameterize the test.
5.6.1. Create a new test from the lesson7 test and load the GUI map.
If WinRunner is not already open, choose Programs > WinRunner >
WinRunner on the Start menu. If the Welcome window is open, click the Open
Test button. Otherwise, choose File > Open and select the test you created in
Lesson 7. The lesson7 test opens.
Choose File > Save As and save the test as lesson8 in a convenient
location on your hard drive.
If you are working in the Global GUI Map File mode, confirm that the GUI
map is loaded: choose Tools > GUI Map Editor. In the GUI Map Editor choose
View > GUI Files and confirm that flight1.GUI is contained in the GUI File list.
5.6.2. Run the DataDriver Wizard.
Choose Tools > DataDriver Wizard. The DataDriver Wizard welcome
window opens. Click Next to begin the parameterization process.
5.6.3. Create a data table for the test.
In the Use a new or existing Excel table box, type “lesson8”. The
DataDriver Wizard creates an Excel table with this name and saves it the test
folder.
________________________________________________________________________Confidential Document 97

Software Testing
5.6.4. Assign a table variable name.
Accept the default table variable name, “table”. At the beginning of a data-
driven test, the Excel data table you wish to use is assigned as the value of the
table variable. Throughout the script, only the table variable name is used. This
makes it easy for you to assign a different data table to the script at a later time
without making changes throughout the script.
5.6.5. Select global parameterization options.
Select Add statements to create a data-driven test. This adds TSL
statements to the test that define the table variable name, open and close the data
table, and run the appropriate script selection in a loop for each row in the data
table.
Select Parameterize the test and choose the Line by line option. When
you select Parameterize the test, you instruct WinRunner to find fixed values in
recorded statements and selected checkpoints and to replace them with
parameters. The Line by line option instructs the wizard to open a screen for each
line of the selected test that can be parameterized so that you can choose
whether or not to parameterize that line.
________________________________________________________________________Confidential Document 98

Software Testing
Click Next.
5.6.6. Select the data to parameterize.
The first line-by-line screen opens. It refers to the Order Number radio
button.
In this test you are going to open a different fax order in each iteration and
the Order Number radio button must be selected each time. Thus, for this script
line, keep the selection, Do not replace this data, and click Next. The next line
by line screen refers to the Order Number edit field. This is the field you want to
change for each iteration. Note that the value, “3” is highlighted and listed in the
Argument to be replaced box to indicate that this is the value selected for
parameterization.
Select A new column under “Replace the selected value with data from:”
and type: Order_Num in the adjacent edit field. The new column option creates a
column titled "Order_Num" in the lesson8.xls table, and enters the value “3” in
the first row of the column.
________________________________________________________________________Confidential Document 99
Software Testing
Click Next and then click Finish. Your test is parameterized.
NOTE:
The following elements are added or modified in your parameterized test:
The table = line defines the table variable.
The ddt_open statement opens the table, and the subsequent lines confirm that
the data-driven test opens successfully.
The ddt_get_row_count statement checks how many rows are in the table,
and therefore, how many iterations of the parameterized section of the test to
perform.
The for statement sets up the iteration loop.
The ddt_set_row statement tells the test which row of the table to use on
each iteration.
In the edit_set statement, the value, “3” is replaced with a ddt_val
statement.
________________________________________________________________________Confidential Document 100

Software Testing
5.7. Adding Data to the Data Table
Now that you have parameterized your test, you are ready to add the data
that the parameterized test will use.
5.7.1. Open the data table.
Choose Tools > Data Table. The lesson8.xls table opens. Note that there is
one column named “Order_Num”, and that the first row in the column contains
the value “3”.
5.7.2. Add data to the table.
In rows 2, 3, 4, and 5 of the Order_Num column, enter the values, “1”, “6”,
“8”, and “10” respectively.
5.7.3. Save and close the table.
Click an empty cell and choose File > Save from the data table menu. Then
choose File > Close to close the table.
5.7.4. Save the test.________________________________________________________________________Confidential Document 101

Software Testing
Choose File > Save or click the Save button.
5.7.5. Adjusting the Script with Regular Expressions
Your test is almost finished. Before running the test you should look through
it to see if there are any elements that may cause a conflict in a data-driven test.
The DataDriver wizard finds all fixed values in selected checkpoints and recorded
statements, but it does not check for things such as object labels that also may
vary based on external input.
In the flight application, the name of the Fax Order window changes to
reflect the fax order number. If you run the test as it is, the test will fail on the
second iteration, because the Flight Application will open a window labeled, “Fax
Order No. 1”, but the script tells it to make the window labeled, “Fax Order No.
3” active. WinRunner will be unable to find this window.
To solve this problem, you can use a regular expression. A regular
expression is a string that specifies a complex search phrase in order to enable
WinRunner to identify objects with varying names or titles.
In this exercise you will use a regular expression in the physical description
of the Fax Order window so that WinRunner can ignore variations in the window’s
label.
1. Locate the Fax Order window in the flight1.GUI GUI map file.
Choose Tools > GUI Map Editor. Choose View > GUI Files. Select
flight1.GUI in the GUI file box. Select the Fax Order No. 3 window icon.
2. Modify the window label with a regular expression.
________________________________________________________________________Confidential Document 102

Software Testing
Select Modify. The Modify window opens. In the Physical Description label
line, add an “!” immediately following the opening quotes to indicate that this is a
regular expression. Delete the period, space and the number “3” at the end of the
line and replace this text with “.*” to indicate that the text following this phrase
can vary.
3. Close the Modify dialog box.
Click OK to close the Modify window
4. Save the GUI map (only if you are working in the Global GUI Map File
mode) and close the GUI Map Editor.
If you are working in the Global GUI Map File mode, choose File > Save to
save your changes and choose File > Exit to close the GUI Map Editor. If you are
working in the GUI Map File per Test mode, choose File > Exit to exit the GUI
Map Editor.
5.7.6. Customizing the Results Information
________________________________________________________________________Confidential Document 103

Software Testing
You could run the test now, but it may be difficult for you to interpret the
results for each iteration. You can add iteration-specific information to the
reporting statements in your script so that you can see which data is the basis for
each result.
1. Modify the tl_step statements.
Locate the first tl_step statement in your script. Delete the words “total is
correct.” and replace them with, “Correct. "tickets" tickets at $"price" cost
$"total".”
tl_step("total",0, "Correct. "tickets" tickets at $"price" cost $"total".");
Use the same logic to modify the next tl_step statement to report an
incorrect result. For example:
tl_step("total", 1, "Error! "tickets" tickets at $"price" does not equal $"total". ");
Now you will be able to see which data is used in each iteration when you
view the results.
2. Save the test.
Choose File > Save or click the Save button.
5.7.7. Running the Test and Analyzing Results
You run the data-driven test just like any other test in WinRunner. When the
test run is completed, the results for all iterations are included in a single Test
Results window.
________________________________________________________________________Confidential Document 104

Software Testing
1. Make sure that the Flight 1A Flight Reservation application is open on
your desktop.
2. In WinRunner, check that Verify mode is selected in the Standard
toolbar.
3. Choose Run from Top.
Choose Run > Run from Top, or click the Run from Top button. The Run
Test dialog box opens. Accept the default test run name. Make sure that the
Display test results at end of run check box is selected.
4. Run the test.
Click OK in the Run Test dialog box. The test will run through the
parameterized section of the script five times, once for each row in the data table.
5. Review the results.
When the test run is completed, the test results appear in the WinRunner
Test Results window.
________________________________________________________________________Confidential Document 105

Software Testing
Note that the tl_step event is listed five times and that the details for each
iteration include the actual number of tickets, price and total cost that was
checked.
6. Close the test results.
Choose File > Exit to close the Test Results window.
7. Close the Flight Reservation application.
Choose File > Exit.
8. Close the lesson8 test.
Choose File > Close.
5.8. Data-Driven Testing Tips
You can parameterize only part of your test script or a loop within it, and a
single data-driven test can contain more than one parameterized loop.
You can open and save data tables other than the default.xls data table. This
enables you to use several different data tables in one test script.
You can parameterize statements containing GUI checkpoints, bitmap
checkpoints, and bitmap synchronization points, and constants.
You can use the data table in the same way as an Excel spreadsheet,
including inserting formulas into cells.
________________________________________________________________________Confidential Document 106

Software Testing
Before you run a data-driven test, you should look through it to see if there
are any elements that may cause a conflict in a data-driven test. There are
two ways to solve most of these conflicts:
Use a regular expression to enable WinRunner to recognize objects based
on a portion of its physical description.
Use the GUI Map Configuration dialog box to change the physical
properties that WinRunner uses to recognize the problematic object.
You can change the active row, or read from a non-active row during the
test run by using TSL statements
It is not necessary for the data table viewer to be open when you run a test.
________________________________________________________________________Confidential Document 107

Software Testing
UNIT VI
6.1. Advance Concepts of Winrunner:
6.1.1. Regular Expression
About Regular Expressions
Regular expressions enable WinRunner to identify objects with varying
names or titles. You can use regular expressions in TSL statements or in object
descriptions in the GUI map. For example, you can define a regular expression in
the physical description of a push button so that WinRunner can locate the push
button if its label changes.
A regular expression is a string that specifies a complex search phrase. In
most cases the string is preceded by an exclamation point (!). (In descriptions or
arguments of functions where a string is expected, such as the match function,
the exclamation point is not required.) By using special characters such as a
period (.), asterisk (*), caret (^), and brackets ([ ]), you define the conditions of
the search. For example, the string “!windo.*” matches both “window” and
“windows”.
6.1.2. When to Use Regular Expressions
Use a regular expression when the name of a GUI object can vary each time
you run a test. For example, you can use a regular expression in the following
instances:
The physical description of an object in the GUI map
A GUI checkpoint, when evaluating the contents of an edit object or static
text object with a varying name
A text checkpoint, to locate a varying text string using win_find_text or
object_find_text
________________________________________________________________________Confidential Document 108

Software Testing
6.1.3. Using a Regular Expression in an Object’s Physical Description in
the GUI Map
You can use a regular expression in the physical description of an object in
the GUI map, so that WinRunner can ignore variations in the object’s label. For
example, the physical description:
{
class: push_button
label: "!St.*"
}
enables WinRunner to identify a push button if its label toggles from “Start” to
“Stop”.
6.1.4. Using a Regular Expression in a GUI Checkpoint
You can use a regular expression in a GUI checkpoint, when evaluating the
contents of an edit object or a static text object with a varying name. You define
the regular expression by creating a GUI checkpoint on the object in which you
specify the checks. The example below illustrates how to use a regular expression
if you choose Create > GUI Checkpoint > For Object/Window and
double-click a static text object. Note that you can also use a regular expression
with the Create > GUI Checkpoint > For Multiple Objects command.
Exercise
6.1.5. To define a regular expression in a GUI checkpoint:
1. Create a GUI checkpoint for an object in which you specify the checks. In this
example, choose Create > GUI Checkpoint > For Object/Window.
The WinRunner window is minimized, the mouse pointer becomes a pointing
hand, and a help window opens on the screen.
2. Double-click a static text object.
________________________________________________________________________Confidential Document 109

Software Testing
3. The Check GUI dialog box opens:
4. In the Properties pane, highlight the “Regular Expression” property check
and then click the Specify Arguments button.
The Check Arguments dialog box opens:
5. Enter the regular expression in the Regular Expression box, and then click
OK.
6. If desired, specify any additional checks to perform, and then click OK to close
the Check GUI dialog box. An obj_check_gui statement is inserted into your test
script.
6.1.6. Using a Regular Expression in a Text Checkpoint
________________________________________________________________________Confidential Document 110

Software Testing
You can use a regular expression in a text checkpoint, to locate a varying
text string using win_find_text or object_find_text. For example, the statement:
obj_find_text ("Edit", "win.*", coord_array, 640, 480, 366, 284);
enables WinRunner to find any text in the object named “Edit” that begins with
“win”.
Since windows often have varying labels, WinRunner defines a regular
expression in the physical description of a window.
6.1.7. Regular Expression Syntax
Regular expressions must begin with an exclamation point (!), except when
defined in a Check GUI dialog box, a text checkpoint, or a match, obj_find_text,
or win_find_text statement. All characters in a regular expression are searched
for literally, except for a period (.), asterisk (*), caret (^), and brackets ([ ]), as
described below. When one of these special characters is preceded by a backslash
(\), WinRunner searches for the literal character. For example, if you
are using a win_find_text statement to search for a phrase beginning with “Sign
up now!”, then you should use the following regular expression: “Sign up now\!*”.
The following options can be used to create regular expressions:
6.1.8. Matching Any Single Character
A period (.) instructs WinRunner to search for any single character. For
example, welcome.
matches welcomes, welcomed, or welcome followed by a space or any other single
character. A series of periods indicates a range of unspecified characters.
6.1.9. Matching Any Single Character within a Range
In order to match a single character within a range, you can use brackets
([ ]). For example, to search for a date that is either 1968 or 1969, write:
________________________________________________________________________Confidential Document 111

Software Testing
196[89]
You can use a hyphen (-) to indicate an actual range. For instance, to match
any year in the 1960s, write: 196[0-9]
Brackets can be used in a physical description to specify the label of a static
text object that may vary:
{
class: static_text,
label: "!Quantity[0-9]"
}
In the above example, WinRunner can identify the static_text object with the
label “Quantity” when the quantity number varies.
A hyphen does not signify a range if it appears as the first or last character
within brackets, or after a caret (^).
A caret (^) instructs WinRunner to match any character except for the ones
specified in the string.
For example:
[^A-Za-z]
matches any non-alphabetic character. The caret has this special meaning
only when it appears first within the brackets.
Note that within brackets, the characters “.”, “*”, “[“ and “\” are literal. If
the right bracket is the first character in the range, it is also literal.
For example:
[]g-m]
________________________________________________________________________Confidential Document 112

Software Testing
matches the “]“ and g through m.
6.1.0. Matching Specific Characters
An asterisk (*) instructs WinRunner to match one or more occurrences of
the preceding character.
For example:
Q*
causes WinRunner to match Q, QQ, QQQ, etc.
A period “.” followed by an asterisk “*” instructs WinRunner to locate the
preceding characters followed by any combination of characters. For example, in
the following physical description, the regular expression enables WinRunner to
locate any push button that starts with “O” (for example, On or Off).
{
class: push_button
label: "!O.*"
}
You can also use a combination of brackets and an asterisk to limit the label
to a combination of non-numeric characters. For example:
{
class: push_button
label: "!O[a-zA-Z]*"
}
6.2. Calling Test
________________________________________________________________________Confidential Document 113

Software Testing
6.2.1. About Calling Tests
By adding call statements to test scripts, you can create a modular test tree
structure containing an entire test suite. A modular test tree consists of a main
test that calls other tests, passes parameter values, and controls test execution.
When WinRunner interprets a call statement in a test script, it opens and
runs the called test. Parameter values may be passed to this test from the calling
test. When the called test is completed, WinRunner returns to the calling test and
continues the test run. Note that a called test may also call other tests.
By adding decision-making statements to the test script, you can use a main
test to determine the conditions that enable a called test to run. For example:
rc= call login ("Jonathan", "Mercury");
if (rc == E_OK)
{
call insert_order();
}
else
{
tl_step ("Call Login", 1, "Login test failed");
call open_order ();
}
This test calls the login test. If login is executed successfully, WinRunner
calls the insert_order test. If the login test fails, the open_order test runs.
You commonly use call statements in a batch test. A batch test allows you
to call a group of tests and run them unattended. It suppresses messages that are
usually displayed during execution, such as one reporting a bitmap mismatch.
6.2.2. Using the Call Statement
________________________________________________________________________Confidential Document 114
Software Testing
You can use two types of call statements to invoke one test from another:
A call statement invokes a test from within another test.
A call_close statement invokes a test from within a script and closes the
test when the test is completed.
The call statement has the following syntax:
call test_name ( [ parameter1, parameter2, ..parametern ] );
The call_close statement has the following syntax:
call_close test_name ( [ parameter1, parameter2, .. parametern ] );
The test_name is the name of the test to invoke. The parameters are the
parameters defined for the called test.
The parameters are optional. However, when one test calls another, the call
statement should designate a value for each parameter defined for the called test.
If no parameters are defined for the called test, the call statement must contain
an empty set of parentheses.
Any called test must be stored in a folder specified in the search path, or
else be called with the full pathname enclosed within quotation marks.
For example:
call "w:\\tests\\my_test" ();
While running a called test, you can pause execution and view the current
call chain. To do so, choose Debug > Calls.
6.2.3. Returning to the Calling Test
________________________________________________________________________Confidential Document 115

Software Testing
The treturn and texit statements are used to stop execution of called tests.
The treturn statement stops the current test and returns control to the
calling test.
The texit statement stops test execution entirely, unless tests are being
called from a batch test.
In this case, control is returned to the main batch test. Both functions provide
a return value for the called test.
treturn
The treturn statement terminates execution of the called test and returns
control to the calling test. The syntax is:
treturn [( expression )];
The optional expression is the value returned to the call statement used to
invoke the test.
For example:
# test a
if (call test b() == "success")
report_msg("test b succeeded");
# test b
if
(win_check_bitmap ("Paintbrush - SQUARES.BMP", "Img_2", 1))
treturn("success");
else
treturn("failure");
________________________________________________________________________Confidential Document 116

Software Testing
In the above example, test_a calls test_b. If the bitmap comparison in test_b
is successful, then the string “success” is returned to the calling test, test_a. If
there is a mismatch, then test_b returns the string “failure” to test_a.
texit
When tests are run interactively, the texit statement discontinues test
execution. However, when tests are called from a batch test, texit ends execution
of the current test only; control is then returned to the calling batch test. The
syntax is:
texit [( expression )];
The optional expression is the value returned to the call statement that
invokes the test.
For example:
# batch test
return val = call help_test();
report msg("help returned the value" return val);
# help test
call select menu(help, index);
msg = get text(4,30,12,100);
if (msg == "Index help is not yet implemented")
texit("index failure");
..
In the above example, batch_test calls help_test. In help_test, if a particular
message appears on the screen, execution is stopped and control is returned to
the batch test. Note that the return value of the help_test is also returned to the
batch test, and is assigned to the variable return_val.
________________________________________________________________________Confidential Document 117

Software Testing
6.2.4. Setting the Search Path
The search path determines the directories that WinRunner will search for a
called test.
To set the search path, choose Settings > General Options. The General
Options dialog box opens. Click the Folders tab and choose a search path in the
Search Path for Called Tests box. WinRunner searches the directories in the
order in which they are listed in the box. Note that the search paths you define
remain active in future testing sessions.
To add a folder to the search path, type in the folder name in the text box.
Use the Add, Up, and Down buttons to position this folder in the list.
To delete a search path, select its name from the list and click Delete.
You can also set a search path by adding a setvar statement to a test script. A
search path set using setvar is valid for the current test run only.
For example:
setvar ("searchpath", "<c:\\ui_tests>");
________________________________________________________________________Confidential Document 118

Software Testing
This statement tells WinRunner to search the c:\ui_tests folder for called tests.
6.2.5. Replacing Data from the Test with Parameters
If you pass parameters to a called test using call or call_close, the parameters
must be declared in the called test. Otherwise, a warning message will be
displayed ("Warning: Test <path to test>: too many arguments").
A parameter is a variable that is assigned a value from outside the test in which it
is defined. You can define one or more parameters for a test; any calling test must
then supply values for these parameters.
For example, suppose you define two parameters, starting_x and starting_y for a
test. The purpose of these parameters is to assign a value to the initial mouse
pointer position when the test is called. Subsequently, two values supplied by a
calling test will supply the x- and y-coordinates of the mouse pointer.
You can define parameters in a test in the Parameters tab of the Test
Properties dialog box, or in the Parameterize Data dialog box.
________________________________________________________________________Confidential Document 119

Software Testing
Use the Parameters tab of the Test Properties dialog box when you want to
manage the parameters of the test including adding, modifying, and
deleting the parameters list for the test.
Use the Parameterize Data dialog box when you want to replace data from
the test with existing parameters. You can also create new parameters from
this dialog box.
6.2.6. Defining Test Parameters in the Parameterize Data Dialog Box
You can replace a selected value in your test script with an existing or new
parameter using the Parameterize Data dialog box.
6.2.7. To parameterize statements using test parameters:
1. In your test script, select the first instance in which you have data that
you want to parameterize.
2. Choose Tools > Parameterize Data. The Parameterize Data dialog box
opens.
3. In the Parameterize using box, select “Test parameters”.
________________________________________________________________________Confidential Document 120

Software Testing
4. In the Replace value with box, select An existing parameter or A New
parameter.
If you select An existing parameter, select the parameter you want to use.
Note that the parameters listed here are the same as those listed in the
Parameters tab of the Test Properties dialog box.
If you select A new parameter, click the Add button. The Parameter
Properties dialog box opens. Add a new parameter as described. The new
parameter is displayed in the new parameter field. The new parameter is
also added to the Parameters tab of the Test Properties dialog box.
5. Click OK.
The data selected in the test script is replaced with the parameter you
created or selected. When the test is called by the calling test, the parameter is
replaced by the value defined in the calling test.
6. Repeat steps 1 to 5 for each argument you want to parameterize.
6.2.8. Test Parameter Scope
________________________________________________________________________Confidential Document 121
Software Testing
The parameter defined in the called test is known as a formal parameter.
Test parameters can be constants, variables, expressions, array elements, or
complete arrays.
Parameters that are expressions, variables, or array elements are evaluated and
then passed to the called test. This means that a copy is passed to the called test.
This copy is local; if its value is changed in the called test, the original value in
the calling test is not affected. For example:
# test_1 (calling_test)
i = 5;
call test_2(i);
print(i); # prints "5"
# test_2 (called test), with formal parameter x
x = 8;
print(x); # prints "8"
In the calling test (test_1), the variable i is assigned the value 5. This value
is passed to the called test (test_2) as the value for the formal parameter x. Note
that when a new value (8) is assigned to x in test_2, this change does not affect
the value of i in test_1.
Complete arrays are passed by reference. This means that, unlike array
elements, variables, or expressions, they are not copied. Any change made to the
array in the called test affects the corresponding array in the calling test.
For example:
# test_q
a[1] = 17;
call test_r(a);
print(a[1]); # prints "104"
# test_r, with parameter x
x[1] = 104;
________________________________________________________________________Confidential Document 122

Software Testing
In the calling test (test_q), element 1 of array a is assigned the value 17.
Array a is then passed to the called test (test_r), which has a formal parameter x.
In test_r, the first element of array x is assigned the value 104. Unlike the
previous example, this change to the parameter in the called test does affect the
value of the parameter in the calling test, because the parameter is an array.
All undeclared variables that are not on the formal parameter list of a called
test are global; they may be accessed from another called or calling test, and
altered. If a parameter list is defined for a test, and that test is not called but is
run directly, then the parameters function as global variables for the test run.
The test segments below illustrates the use of global variables. Note that
test_a is not called, but is run directly.
# test_a, with parameter k
# Note that the ampersand (&) is a bitwise AND operator. It signifies
concatenation.
i = 1;
j = 2;
k = 3;
call test_b(i);
print(j & k & l); # prints '256'
# test_b, with parameter j
# Note that the ampersand (&) is a bitwise AND operator. It signifies
concatenation.
j = 4;
k = 5;
l = 6;
print(i & j & k); # prints '145'
6.3. Creating User Defined Function
________________________________________________________________________Confidential Document 123

Software Testing
6.3.1. About Creating User-Defined Functions
In addition to providing built-in functions, TSL allows you to design and
implement your own functions. You can:
Create user-defined functions in a test script. You define the function once,
and then you call it from anywhere in the test (including called tests).
Create user-defined functions in a compiled module. Once you load the
module, you can call the functions from any test.
Call functions from the Microsoft Windows API or any other external
functions stored in a DLL.
User-defined functions are convenient when you want to perform the same
operation several times in a test script. Instead of repeating the code, you can
write a single function that performs the operation. This makes your test scripts
modular, more readable, and easier to debug and maintain. For example, you
could create a function called open_flight that loads a GUI map file, starts the
Flight Reservation application, and logs into the system, or resets the main
window if the application is already open.
A function can be called from anywhere in a test script. Since it is already
compiled, execution time is accelerated. For instance, suppose you create a test
that opens a number of files and checks their contents. Instead of recording or
programming the sequence that opens the file several times, you can write a
function and call it each time you want to open a file.
6.3.2. Function Syntax
A user-defined function has the following structure:
[class] function name ([mode] parameter..)
{
________________________________________________________________________Confidential Document 124

Software Testing
declarations;
statements;
}
6.3.3. Class
The class of a function can be either static or public. A static function is
available only to the test or module within which the function was defined. Once
you execute a public function, it is available to all tests, for as long as the test
containing the function remains open. This is convenient when you want the
function to be accessible from called tests. However, if you want to create a
function that will be available to many tests, you should place it in a compiled
module. The functions in a compiled module are available for the duration of the
testing session.
If no class is explicitly declared, the function is assigned the default class,
public.
6.3.4. Parameters
Parameters need not be explicitly declared. They can be of mode in, out, or
inout. For all non-array parameters, the default mode is in. For array parameters,
the default is inout. The significance of each of these parameter types is as
follows: in: A parameter that is assigned a value from outside the function. out: A
parameter that is assigned a value from inside the function. inout: A parameter
that can be assigned a value from outside or inside the function. A parameter
designated as out or inout must be a variable name, not an expression. When you
call a function containing an out or an inout parameter, the argument
corresponding to that parameter must be a variable, and not an expression. For
example, consider a user-defined function with the following
syntax:
function get_date (out todays_date) { .. }
________________________________________________________________________Confidential Document 125

Software Testing
Proper usage of the function call would be
get_date (todays_date);
Illegal usage of the function call would be
get_date (date[i]); or get_date ("Today’s date is"& todays_date);
because both contain expressions.
Array parameters are designated by square brackets. For example, the
following parameter list in a user-defined function indicates that variable a is an
array:
function my_func (a[], b, c){ .. }
Array parameters can be either mode out or inout. If no class is specified, the
default mode inout is assumed.
6.3.5. Return Statements
The return statement is used exclusively in functions.
The syntax is:
return [( expression )];
This statement passes control back to the calling function or test. It also
returns the value of the evaluated expression to the calling function or test. If no
expression is assigned to the return statement, an empty string is returned.
6.3.6. Variable, Constant, and Array Declarations
Declaration is usually optional in TSL. In functions, however, variables,
constants, and arrays must all be declared. The declaration can be within the
function itself, or anywhere else within the test script or compiled module
containing the function.
________________________________________________________________________Confidential Document 126

Software Testing
Variables
Variable declarations have the following syntax:
class variable [= init_expression];
The init_expression assigned to a declared variable can be any valid
expression. If an init_expression is not set, the variable is assigned an empty
string. The class defines the scope of the variable. It can be one of the following:
auto: An auto variable can be declared only within a function and is local to that
function. It exists only for as long as the function is running. A new copy of the
variable is created each time the function is called.
static: A static variable is local to the function, test, or compiled module in which
it is declared. The variable retains its value until the test is terminated by an
Abort command. This variable is initialized each time the definition of the function
is executed.
public: A public variable can be declared only within a test or module, and is
available for all functions, tests, and compiled modules. extern: An extern
declaration indicates a reference to a public variable declared outside of the
current test or module.
Remember that you must declare all variables used in a function within the
function itself, or within the test or module that contains the function. If you wish
to use a public variable that is declared outside of the relevant test or module,
you must declare it again as extern. The extern declaration must appear within a
test or module, before the function code. An extern declaration cannot initialize a
variable.
For example, suppose that in Test 1 you declare a variable as follows:
________________________________________________________________________Confidential Document 127

Software Testing
public window_color=green;
In Test 2, you write a user-defined function that accesses the variable
window_color. Within the test or module containing the function, you declare
window_color as follows:
extern window_color;
With the exception of the auto variable, all variables continue to exist until
the Stop command is executed.
The following table summarizes the scope, lifetime, and availability (where
the declaration can appear) of each type of variable:
Declarat
ion
Scope Lifetime Declare the Variable in..
Auto local end of function function
Static local until abort function, test, or module
Public global until abort Test or module
Extern global until abort function, test, or module
Constants
The const specifier indicates that the declared value cannot be modified.
The syntax of this declaration is:
[class] const name [= expression];
The class of a constant may be either public or static. If no class is explicitly
declared, the constant is assigned the default class public. Once a constant is
________________________________________________________________________Confidential Document 128

Software Testing
defined, it remains in existence until you exit WinRunner. For example, defining
the constant TMP_DIR using the declaration:
const TMP_DIR = "/tmp"; means that the assigned value /tmp cannot be modified.
(This value can only be changed by explicitly making a new constant declaration
for TMP_DIR.)
Arrays
The following syntax is used to define the class and the initial expression of
an
array. Array size need not be defined in TSL.
class array_name [ ] [=init_expression]
The array class may be any of the classes used for variable declarations
(auto, static, public, extern). An array can be initialized using the C language
syntax. For example:
public hosts [ ] = {"lithium", "silver", "bronze"};
This statement creates an array with the following elements:
hosts[0]="lithium"
hosts[1]="silver"
hosts[2]="bronze"
Note that arrays with the class auto cannot be initialized.
In addition, an array can be initialized using a string subscript for each
element. The string subscript may be any legal TSL expression. Its value is
evaluated during compilation. For example:
static gui_item [ ]={
"class"="push_button",
"label"="OK",
"X_class"="XmPushButtonGadget",
"X"=10,
"Y"=60
________________________________________________________________________Confidential Document 129

Software Testing
};
creates the following array elements:
gui_item ["class"]="push_button"
gui_item ["label"]="OK"
gui_item ["X_class"]="XmPushButtonGadget"
gui_item ["X"]=10
gui_item ["Y"]=60
6.3.7. Statements
Any valid statement used within a TSL test script can be used within a
function, except for the treturn statement.
Example of a User-Defined Function
The following user-defined function opens the specified text file in an editor.
It assumes that the necessary GUI map file is loaded. The function verifies that
the file was actually opened by comparing the name of the file with the label that
appears in the window title bar after the operation is completed.
function open_file (file)
{
auto lbl;
set_window ("Editor");
# Open the Open form
menu_select_item ("File;Open..");
# Insert file name in the proper field and click OK to confirm
set_window ("Open");
edit_set(“Open Edit”, file);
button_press ("OK");
# Read window banner label
win_get_info("Editor","label",lbl);
#Compare label to file name
if ( file != lbl)
________________________________________________________________________Confidential Document 130

Software Testing
return 1;
else
return 0;
}
rc=open_file("c:\\dash\\readme.tx");
pause(rc);
6.4. Creating Compiled module
6.4.1. About Creating Compiled Modules
A compiled module is a script containing a library of user-defined functions
that you want to call frequently from other tests. When you load a compiled
module, its functions are automatically compiled and remain in memory. You can
call them directly from within any test.
For instance, you can create a compiled module containing functions that:
Compare the size of two files
Check your system’s current memory resources
Compiled modules can improve the organization and performance of your
tests. Since you debug compiled modules before using them, your tests will
require less error-checking. In addition, calling a function that is already
compiled is significantly faster than interpreting a function in a test script.
You can compile a module in one of two ways:
Run the module script using the WinRunner Run commands.
Load the module from a test script using the TSL load function.
________________________________________________________________________Confidential Document 131

Software Testing
If you need to debug a module or make changes, you can use the Step
command to perform incremental compilation. You only need to run the part of
the module that was changed in order to update the entire module.
You can add load statements to your startup test. This ensures that the
functions in your compiled modules are automatically compiled each time you
start WinRunner.
6.4.2. Contents of a Compiled Module
A compiled module, like a regular test you create in TSL, can be opened,
edited, and saved. You indicate that a test is a compiled module in the General tab
of the Test Properties dialog box, by selecting Compiled Module in the Test
Type box.
The content of a compiled module differs from that of an ordinary test: it
cannot include checkpoints or any analog input such as mouse tracking. The
purpose of a compiled module is not to perform a test, but to store functions you
use most frequently so that they can be quickly and conveniently accessed from
other tests.
Unlike an ordinary test, all data objects (variables, constants, arrays) in a
compiled module must be declared before use. The structure of a compiled
module is similar to a C program file, in that it may contain the following
elements:
Function definitions and declarations for variables, constants and arrays.
Prototypes of external functions.
Load statements to other modules
________________________________________________________________________Confidential Document 132

Software Testing
Note that when user-defined functions appear in compiled modules:
A public function is available to all modules and tests, while a static function
is available only to the module within which it was defined.
The loaded module remains resident in memory even when test execution is
aborted. However, all variables defined within the module (whether static or
public) are initialized.
6.4.3. Creating a Compiled Module
Creating a compiled module is similar to creating a regular test script.
To create a compiled module:
1. Choose File > Open to open a new test.
2. Write the user-defined functions.
3. Choose File > Test Properties and click the General tab.
4. In the Test Type list, choose “Compiled Module” and then click OK.
________________________________________________________________________Confidential Document 133

Software Testing
5. Choose File > Save.
Save your modules in a location that is readily available to all your tests.
When a module is loaded, WinRunner locates it according to the search path you
define.
6. Compile the module using the load function.
6.4.4. Loading and Unloading a Compiled Module
In order to access the functions in a compiled module you need to load the
module. You can load it from within any test script using the load command; all
tests will then be able to access the function until you quit WinRunner or unload
the compiled module.
________________________________________________________________________Confidential Document 134

Software Testing
If you create a compiled module that contains frequently-used functions,
you can load it from your startup test.
You can load a module either as a system module or as a user module. A
system module is generally a closed module that is “invisible” to the tester. It is
not displayed when it is loaded, cannot be stepped into, and is not stopped by a
pause command. A system module is not unloaded when you execute an unload
statement with no parameters (global unload).
A user module is the opposite of a system module in these respects.
Generally, a user module is one that is still being developed. In such a module you
might want to make changes and compile them incrementally.
load
The load function has the following syntax:
load (module_name [,1|0] [,1|0] );
The module_name is the name of an existing compiled module. Two
additional, optional parameters indicate the type of module. The first parameter
indicates whether the function module is a system module or a user module: 1
indicates a system module; 0 indicates a user module.
(Default = 0)
The second optional parameter indicates whether a user module will remain
open in the WinRunner window or will close automatically after it is loaded: 1
indicates that the module will close automatically; 0 indicates that the module will
remain open.
(Default = 0)
________________________________________________________________________Confidential Document 135

Software Testing
When the load function is executed for the first time, the module is
compiled and stored in memory. This module is ready for use by any test and does
not need to be reinterpreted.
A loaded module remains resident in memory even when test execution is
aborted. All variables defined within the module (whether static or public) are still
initialized.
unload
The unload function removes a loaded module or selected functions from
memory. It has the following
syntax:
unload ( [ module_name | test_name [ , "function_name" ] ] );
For example, the following statement removes all functions loaded within
the
compiled module named mem_test.
unload ("mem_test");
An unload statement with empty parentheses removes all modules loaded
within all tests during the current session, except for system modules.
reload
If you make changes in a module, you should reload it. The reload function
removes a loaded module from memory and reloads it (combining the functions of
unload and load).
The syntax of the reload function is:
reload ( module_name [ ,1|0 ] [ ,1|0 ] );
________________________________________________________________________Confidential Document 136

Software Testing
The module_name is the name of an existing compiled module. Two
additional optional parameters indicate the type of module. The first parameter
indicates whether the module is a system module or a user module: 1 indicates a
system module; 0 indicates a user module.
(Default = 0)
The second optional parameter indiates whether a user module will remain
open in the WinRunner window or will close automatically after it is loaded. 1
indicates that the module will close automatically. 0 indicates that the module will
remain open.
(Default = 0)
6.4.5. Example of a Compiled Module
The following module contains two simple, all-purpose functions that you
can call from any test. The first function receives a pair of numbers and returns
the number with the higher value. The second function receives a pair of numbers
and returns the one with the lower value.
# return maximum of two values
function max (x,y)
{
if (x>=y)
return x;
else
return y;
}
# return minimum of two values
function min (x,y)
{
if (x>=y)
return y;
else
________________________________________________________________________Confidential Document 137

Software Testing
return x;
}
6.5. More on TSL Functions
This section lists all TSL functions according to the type of tasks they
perform. Functions are arranged alphabetically within each category, and a very
brief description of each function is included. Where appropriate, functions
appear in more than one category.
There are four types of functions:
Analog Functions
Context Sensitive Functions
Customization Functions
Standard Functions
6.5.1. Analog Functions
Analog functions record and run operations at specified screen coordinates.
When you record in Analog mode, these functions are used to depict mouse clicks,
keyboard input, and the exact coordinates traveled by the mouse. When you run a
test, Analog functions retrace the mouse tracks and exactly resubmit the input
you recorded. Analog functions also support test operations such as
synchronization, verification, and text manipulation.
Analog functions are divided into the following categories:
Bitmap Checkpoint Function
Input Device Functions
Synchronization Function
Table Functions
Text Checkpoint Functions
1. Bitmap Checkpoint Function
________________________________________________________________________Confidential Document 138

Software Testing
Function Description
check_window
compares a bitmap of an
AUT window to an
expected bitmap
2. Input Device Functions
Function Description
click clicks a mouse button
click_on_textclicks a mouse button on a
string
dbl_clickdouble-clicks a mouse
button
get_x
returns the current x-
coordinate of the mouse
pointer
get_y
returns the current y-
coordinate of the mouse
pointer
move_locator_a
bs
moves the mouse to a new
absolute position
move_locator_r
el
moves the mouse to a new
relative position
move_locator_t
ext
moves the mouse to a
string
move_locator_t
rack
moves the mouse along a
prerecorded track
mtypeclicks one or more mouse
buttons
type specifies keyboard input
________________________________________________________________________Confidential Document 139

Software Testing
3. Synchronization Function
Function Description
wait_window
waits for a window bitmap
to appear in
order to synchronize test
execution
4. Table Functions
Function Description
tbl_click_cellclicks in a cell in a JFC
JTable object
tbl_dbl_click_c
ell
double-clicks in a cell in a
JFC JTable object
tbl_drag
drags a cell to a different
location within a JFC
JTable object
5. Text Checkpoint Functions
Function Description
click_on_text clicks on a string
find_text searches for a string
get_text reads text from the screen
move_locator_t
ext
moves the mouse to a
string
6.5.2. Context Sensitive Functions
Context Sensitive functions depict actions on the application under test in
terms of GUI objects, ignoring the physical location of an object on the screen.
________________________________________________________________________Confidential Document 140

Software Testing
When you record in Context Sensitive mode, a TSL statement, which describes
the object selected and the action performed, is generated in the test script.
Context Sensitive functions are divided into the following categories:
ActiveBar Functions
ActiveX/Visual Basic Functions
Bitmap Checkpoint Functions
Button Object Functions
Calendar Functions
Database Functions
Data-Driven Test Functions
Date Operation Functions
Delphi Functions
Edit Object Functions
EURO Functions
GUI Checkpoint Functions
GUI Map Configuration Functions
GUI Map Editor Functions
Icon Object Functions
Java Functions
List Object Functions
Menu Object Functions
Object Functions
Oracle Functions
PowerBuilder Functions
Scroll Object Functions
Siebel Functions
Spin Object Functions
Static Text Object Functions
Statusbar Functions
Synchronization Functions
________________________________________________________________________Confidential Document 141

Software Testing
Tab Object Functions
Table Functions
Terminal Emulator Functions
Text Checkpoint Functions
Toolbar Object Functions
WAP Functions
Web Functions
Table Functions for WebTest
Window Object Functions
1. ActiveBar Functions
Function Description
ActiveBar_combo_sele
ct_item
selects an item in a
ComboBox
tool
ActiveBar_dump
Stores information about
ActiveBar bands and tools.
This information includes
captions,
names, types and IDs
ActiveBar_select_men
u
selects a menu item in a
toolbar
ActiveBar_select_tool selects a tool in the toolbar
2. ActiveX/Visual Basic Functions
The following functions are available only when the ActiveX or the Visual
Basic Add-in is installed and loaded:
________________________________________________________________________Confidential Document 142

Software Testing
Function Description
ActiveX_activate_m
ethod
invokes an ActiveX method of an
ActiveX control
ActiveX_get_info
returns the value of an
ActiveX/Visual Basic control
property
ActiveX_set_infosets the value of a property in an
ActiveX/Visual Basic control
optionset_select
Selects one of the option buttons
in the Option Set Sheridan Data
Widgets control.
vb_get_label_names
Retrieves the names of all label
controls in the given form
window. The names are stored
as subscripts of an array
3. Bitmap Checkpoint Functions
Function Description
obj_check_bitma
p
compares a current object bitmap
to an
expected bitmap
win_check_bitma
p
compares a current window bitmap
to an
expected bitmap
________________________________________________________________________Confidential Document 143

Software Testing
4. Button Object Functions
Function Description
button_check_inf
o
checks the value of a button
property
button_check_st
ate
checks the state of a radio or check
button
button_get_inforeturns the value of a button
property
button_get_statereturns the state of a radio or
check button
button_press clicks a push button
button_setsets the state of a radio or check
button
button_wait_infowaits for the value of a button
property
5. Calendar Functions
The following functions are available for calendars included in Visual Studio
Version 6 and higher and in Internet Explorer Active Desktop Version 4 and
higher:
Function Description
calendar_activate_d
ate
double clicks the specified date
in the calendar
calendar_get_select
ed
retrieves and counts the
selected dates in a calendar
calendar_get_statu
s
returns the status validity of the
date
calendar_get_valid_
rangereturns the date range
________________________________________________________________________Confidential Document 144
Software Testing
calendar_select_dat
e
clicks the specified date in a
calendar
calendar_select_ra
nge
clicks the specified date in a
calendar
calendar_select_ti
me
selects a time in the HH:MM:SS
format
calendar_set_statussets the selection status to valid
or invalid
6. Database Functions
Function Description
db_check compares current database data to
expected
database data
db_connect creates a new database session and
establishes a connection to an
ODBC database
db_disconnect disconnects from the database and
ends the
database session
db_execute_quer
y
executes the query based on the
SQL
statement and creates a record se
db_get_field_valu
e
returns the value of a single field in
the
database
db_get_headers returns the number of column
________________________________________________________________________Confidential Document 145

Software Testing
headers in a
query and the content of the
column
headers, concatenated and
delimited by tabs
db_get_last_error returns the last error message of
the last
ODBC or Data Junction operation
db_get_row returns the content of the row,
concatenated
and delimited by tabs
db_record_check compares information that appears
in the application under test during
a test run with the current values
in the corresponding record(s) in
your database
db_write_records writes the record set into a text file
delimited by tabs
7. Database Function for Working with Data Junction
Function Description
db_dj_convertruns a Data Junction export file
(.djs file)
8. Data-Driven Test Functions
________________________________________________________________________Confidential Document 146

Software Testing
Function Description
ddt_close closes a data table file
ddt_export exports the information of one
table file into a different table file
ddt_get_current_
row
retrieves the active row in a data
table
ddt_get_paramet
ers
returns a list of all the parameters
in a data table
ddt_get_row_cou
nt
retrieves the number of rows in a
data table
ddt_is_parameter returns whether a parameter in a
data table is valid
ddt_next_row changes the active row in a data
table to the next row
ddt_open creates or opens a data table file so
that WinRunner can access it
ddt_report_row reports the active row in a data
table to the test results
ddt_save saves the information in a data
table
ddt_set_row sets the active row in a data table
ddt_set_val sets a value in the current row
ofthe data table
ddt_set_val_by_ro
w
sets a value in the specified row of
the data table
________________________________________________________________________Confidential Document 147

Software Testing
ddt_show shows or hides the table editor of a
specified data table
ddt_update_from
_db
imports data from a database into a
data table
ddt_val returns the value of a parameter in
the active row in a data table
ddt_val_by_row returns the value of a parameter in
the specified row in a data table
9. Date Operation Functions
Function Description
date_age_stringages date string and returns
the aged date
date_align_dayages dates to a business day or
to the same day of the week
date_calc_days_in_fi
eld
calculates the number of days
between two dates
date_calc_days_in_st
ring
calculates the number of days
between two numeric strings
date_change_field_a
ging
overrides aging on a specified
date object
date_change_origina
l_new_formats
overrides automatic date
recognition for a specified
object
date_disable_format disables a date format
date_enable_format Enables a date format
date_field_to_Juliantranslates a date field to a
Julian number
date_is_fielddetermines whether a field
contains a valid date
date_is_leap_year determines whether a year is a
________________________________________________________________________Confidential Document 148

Software Testing
leap year
date_is_stringdetermines whether a numeric
string contains a valid date
date_leading_zero
determines whether to add a
zero before singledigit numbers
when aging and translating
dates
date_month_langua
ge
sets the language used for
month names
date_set_aging sets aging in a test script
date_set_run_modechanges the Date Operations
run mode in the test script
date_set_system_dat
e
changes the system date and
time
date_set_year_limits
sets the minimum and
maximum years valid for
date verification and aging
date_set_year_thres
hold sets the year threshold
date_string_to_Julia
n
translates a numeric string
to a Julian number
date_type_mode
disables overriding of
automatic date recognition for
all date objects in a GUI
application
10. Edit Object Functions
Function Description
edit_check_info checks the value of an edit object
________________________________________________________________________Confidential Document 149

Software Testing
property
edit_check_selec
tionchecks that a string is selected
edit_check_textchecks the contents of an edit
object
edit_deletedeletes the contents of an edit
object
edit_delete_blockdeletes a text block from an edit
object
edit_get_blockreturns a block of text from an edit
object
edit_get_inforeturns the value of an edit object
property
edit_get_row_len
gth
returns the length of a row in an
edit object
edit_get_rows_co
unt
returns the number of rows written
in an edit object
edit_get_selectio
n
returns the selected string in an
edit object
edit_get_selectio
n_pos
returns the position at which the
selected
block starts and ends
edit_get_text returns the text in an edit object
edit_insert inserts text in an edit object
edit_insert_blockinserts text in a multi-line edit
object
edit_replacereplaces part of the contents of an
edit object
edit_replace_bloc replaces a block of text in a multi-
________________________________________________________________________Confidential Document 150

Software Testing
k line edit object
edit_setreplaces the entire contents of an
edit object
edit_set_insert_p
os
places the cursor at the specified
point in an edit object
edit_set_selectio
nselects text in an edit object
edit_type types a string in an edit object
edit_wait_infowaits for the value of an edit object
property
11. GUI Map Editor Functions
Function Description
GUI_addadds an object to a GUI map
file
GUI_buf_get_desc
returns the physical
description of an object in a
GUI map file
GUI_buf_get_desc_att
r
returns the value of an object
property in a GUI map file
GUI_buf_get_logical_
name
returns the logical name of an
object in a GUI map file
GUI_buf_new creates a new GUI map file
GUI_buf_set_desc_att
r
sets the value of a property in
a GUI map file
GUI_close closes a GUI map file
GUI_close_all closes all GUI map files
GUI_deletedeletes an object from a GUI
map file________________________________________________________________________Confidential Document 151

Software Testing
GUI_desc_comparecompares two physical
descriptions
GUI_desc_get_attrgets the value of a property
from a physical description
GUI_desc_set_attr sets the value of a property
GUI_get_namereturns the type of GUI for the
application under test
GUI_get_windowreturns the active window in
the GUI map
GUI_list_buf_windowslists all windows in a GUI map
file
GUI_list_buffers lists all open GUI map files
GUI_list_desc_attrsreturns a list of all property
values for an object
GUI_list_map_buffers lists all loaded GUI map files
GUI_list_win_objects lists all objects in a window
GUI_load loads a GUI map file
GUI_map_get_descreturns the description of an
object in the GUI map
GUI_map_get_logical_
name
returns the logical name of an
object in the GUI map
GUI_open opens a GUI map file
GUI_save saves a GUI map file
GUI_save_assaves a GUI map file under a
new name
GUI_set_windowsets the scope for identifying
objects in the GUI map
GUI_unload unloads a GUI map file
GUI_unload_allunloads all loaded GUI map
files________________________________________________________________________Confidential Document 152

Software Testing
12. Java Functions
The following functions are available only when WinRunner support for
Java is installed and loaded:
Function Description
java_activate_met
hod
invokes the requested Java method
for the given object
jco_create
creates a Java object within your
application or applet, or within the
context of an existing object in
our application or applet
jco_freefrees the specified jco object from
memory
jco_free_all frees all jco objects from memory
java_fire_eventsimulates an event on a Java
object
jdc_aut_connect
establishes a connection between
WinRunner and Java applications
method_wizard
launches the Java Method wizard,
which enables you to view the
methods associated with any jco
object in your application or
applet and to generate the
appropriate
java_activate_method statement
for one of the displayed methods
obj_key_typesends KeyEvents to a Java
component
________________________________________________________________________Confidential Document 153

Software Testing
obj_set_infosets the value of an object
property
popup_select_ite
m
selects an item from a Java popup
menu.
13. List Object Functions
Function Description
list_activate_item activates an item
list_check_info checks the value of a list property
list_check_itemchecks the content of an item in a
list
list_check_selecte
d
checks that the specified item is
selected
list_collapse_item hides items in a tree view object
list_deselect_item deselects an item
list_deselect_rang
e
deselects all items between two
specified items
list_drag_item drags an item from a source list
list_drop_on itemdrops an object onto a target list
item
list_expand_item
displays hidden items in a tree
view object
list_extend_itemadds an item to the items already
selected
list_extend_multi_
items
adds multiple items to the items
already selected
list_extend_range selects a range of items and adds
________________________________________________________________________Confidential Document 154

Software Testing
them to the items currently
selected
list_get_checked_i
tems
returns the value of items marked
as checked
list_get_column_h
eader
returns the value of a ListView
column header
list_get_info returns the value of a list property
list_get_item returns the contents of an item
list_get_item_coor
dreturns the dimensions and
list_get_item_info coordinates of the list item
list_get_item_num returns the state of a list item
list_get_selected returns the position of an item
list_get_subitem
returns the value of the ListView
subitem
list_rename_itemactivates an item’s edit mode in
order to rename it
list_select_item selects an item in a list
list_select_multi_i
tems
selects items in a multiple-
selection container object
list_select_rangeselects all items between two
specified items
list_set_item_stat
e
sets the state of an icon of the
specified ListView or TreeView
list_wait_infowaits for the value of a list
property
14. Menu Object Functions
________________________________________________________________________Confidential Document 155

Software Testing
Function Description
menu_get_descreturns the physical description of
a menu
menu_get_inforeturns the value of a menu
property
menu_get_item returns the contents of an item
menu_get_item_n
umreturns the position of an item
menu_select_item selects an item
menu_wait_infowaits for the value of a menu
property
15. Object Functions
Function Description
obj_check_bitmap
compares a current object bitmap
to an
expected bitmap
obj_check_gui
compares current GUI data to
expected
GUI data
obj_check_infochecks the value of an object
property
obj_click_on_text clicks on text in an object
obj_drag begins dragging an object
obj_drop ends dragging an object
obj_exists checks if an object is displayed
obj_find_text returns the location of a string
________________________________________________________________________Confidential Document 156

Software Testing
within an
object
obj_get_descreturns an object’s physical
description
obj_get_inforeturns the value of an object
property
obj_get_text reads text from an object
obj_highlight highlights an object
obj_mouse_click clicks on an object
obj_mouse_dbl_cli
ckdouble-clicks on an object
obj_mouse_drag drags the mouse within an object
obj_mouse_move moves the mouse within an object
obj_move_locator
_text
moves the mouse to a string in an
object
obj_type sends keyboard input to an object
obj_wait_bitmap waits for an object bitmap
obj_wait_infowaits for the value of an object
property
16. Oracle Functions
The following functions are available only when WinRunner support for
Oracle is installed and loaded:
Function Description
edit_activate
double-clicks an object in an
Oracle
application
edit_set_focusfocuses on an object in an Oracle
application
________________________________________________________________________Confidential Document 157

Software Testing
lov_get_item
retrieves an item from a list of
values in an
Oracle application
lov_select_item
selects an item from a list of
values in an
Oracle application
ora_obj_get_inforetrieves the value of the specified
item
17. PowerBuilder Functions
The following functions are available only when WinRunner support for
PowerBuilder is installed and loaded:
Function Description
datawindow_button_
press
presses a button in the
specified DataWindow.
datawindow_get_inforetrieves the value of a
DataWindow object property
datawindow_text_cli
ck
clicks a DataWindow text
object
datawindow_text_dbl
_click
double-clicks a DataWindow
text object
18. Static Text Object Functions
Function Description
static_check_infochecks the value of a static text
object property
static_check_text checks the contents of a static text ________________________________________________________________________Confidential Document 158

Software Testing
object
static_get_inforeturns the value of a static text
property
static_get_textreturns the contents of a static
text object
static_wait_infowaits for the value of a static text
property
19. Synchronization Functions
Function Description
button_wait_infowaits for the value of a button
property
edit_wait_infowaits for the value of an edit
property
list_wait_infowaits for the value of a list
property
menu_wait_infowaits for the value of a menu
property
obj_wait_infowaits for the value of an object
property
scroll_wait_infowaits for the value of a scroll
property
spin_wait_infowaits for the value of a spin
property
static_wait_infowaits for a the value of a static
text property
statusbar_wait_in
fo
waits for the value of a status bar
property
tab_wait_info waits for the value of a tab
________________________________________________________________________Confidential Document 159

Software Testing
property
win_wait_infowaits for the value of a window
property
20. Text Checkpoint Functions
Function Description
obj_click_on_text clicks on text in an object
obj_find_text returns the location of a string in
an object
obj_get_text reads text from an object
obj_move_locator
_text
moves the mouse to a string in an
object
win_find_text returns the location of a string in a
window
win_click_on_text clicks on text in a window
win_get_text reads text from a window
win_move_locator
_textmoves the mouse to a string in a
window
21. Web Functions
Function Description
web_browser_invokeinvokes the browser and
opens a specified site
web_cursor_to_imagemoves the cursor to an
image on a page.
web_cursor_to_labelmoves the cursor to a label
on a page________________________________________________________________________Confidential Document 160

Software Testing
web_cursor_to_linkmoves the cursor to a link
on a page
web_cursor_to_objmoves the cursor to an
object on a page
web_eventruns an event on the
specified object
web_file_browse clicks a browse button
web_file_setsets the text value in a file-
type object
web_find_textreturns the location of text
within a page
web_frame_get_textretrieves the text content of
a page
web_frame_get_text_cou
nt
returns the number of
occurrences of a regular
expression in a page
web_frame_text_existsreturns a text value if it is
found in a frame
web_get_run_event_mod
e
returns the current run
mode
web_get_timeout
returns the maximum time
that WinRunner waits for
response from the web
web_image_clickclicks a hypergraphic link
or an image
web_label_click clicks the specified label
web_link_click clicks a hypertext link
web_link_valid
checks whether a URL
name of a link is valid (not
broken)
________________________________________________________________________Confidential Document 161

Software Testing
web_obj_clickclicks an object in a frame
web_obj_get_child_itemreturns the description of
the children in an object
web_obj_get_child_item_
count
returns the count of the
children in an object
web_obj_get_inforeturns the value of an
object property
web_obj_get_textreturns a text string from
an object
web_obj_get_text_count
returns the number of
occurrences of a regular
expression string in an
object
web_obj_text_existsreturns a text value if it is
found in an object
web_password_encryptencrypts a password on a
Web page.
web_refreshresets all events to their
default settings.
web_restore_event_defa
ult
resets all events to their
default settings
web_set_event sets the event status
web_set_run_event_mod
esets the event run mode
web_set_timeout
sets the maximum time
WinRunner waits for a
response from the Web
web_set_tooltip_colorsets the colors for the
WebTest ToolTip
web_sync waits for the navigation of a
________________________________________________________________________Confidential Document 162

Software Testing
frame to be completed
web_tbl_get_cell_data
retrieves the contents of
the specified cell from a
Web table, starting from
the specified character
web_url_valid checks whether a URL is
valid
22. Table Functions for WebTest
Function Description
tbl_get_cell_dataretrieves the contents of the
specified cell from a table
tbl_get_cols_coun
t
retrieves the number of columns
in a table
tbl_get_column_n
ame
retrieves the column header name
of the specified column
tbl_get_rows_cou
ntretrieves the number of rows in
the specified table
23. Window Object Functions
Function Description
set_window
specifies the window to receive
input, according to the window’s
logical name
_set_window
specifies a window to receive
input, according to the window’s
physical description
win_activate activates a window
________________________________________________________________________Confidential Document 163

Software Testing
win_check_bitma
p
compares a current window
bitmap to an expected bitmap
win_check_guicompares current GUI data to
expected GUI data
win_check_infochecks the requested window
property
win_click_helpclicks the help button in a window
title bar
win_click_on_text clicks on text in a window
win_close closes a window
win_dragdrags an object from a source
window
win_dropdrops an object on a target
window
win_existschecks whether a window is
displayed
win_find_textreturns the location of a string in a
window
win_get_descreturns the physical description of
a window
win_get_inforeturns the value of a window
property
win_get_text reads text from a window
win_highlight highlights a window
win_max maximizes a window
win_min minimizes a window to an icon
win_mouse_click clicks in a window
win_mouse_dbl_cl
ickdouble-clicks in a window
________________________________________________________________________Confidential Document 164

Software Testing
win_mouse_drag drags the mouse in a window
win_mouse_move moves the mouse in a window
win_movemoves a window to a new absolute
location
win_move_locator
_text
moves the mouse to a string in a
window
win_open opens a window
win_resize resizes a window
win_restore
restores a window from a
minimized or maximized state to
its previous size
win_type sends keyboard input to a window
win_wait_bitmap waits for a window bitmap
win_wait_infowaits for the value of a window
property
6.6. Creating Dialog box
6.6.1. About Creating Dialog Boxes for Interactive Input
You can create dialog boxes that pop up during an interactive test run,
prompting the user to perform an action—such as typing in text or selecting an
item from list. This is useful when the user must make a decision based on the
behavior the application under test (AUT) during runtime, and then enter input
accordingly.
For example, you can instruct WinRunner to execute a particular group of
tests according to the user name that is typed into the dialog box.
________________________________________________________________________Confidential Document 165

Software Testing
To create the dialog box, you enter a TSL statement in the appropriate
location your test script. During an interactive test run, the dialog box opens
when the statement is executed. By using control flow statements, you can
determine how WinRunner responds to the user input in each case.
There are five different types of dialog boxes that you can create using the
following TSL functions:
create_input_dialog creates a dialog box with any message you specify,
and an edit field. The function returns a string containing whatever you type into
the edit field, during an interactive run.
create_list_dialog creates a dialog box with a list of items, and your
message. The function returns a string containing the item that you select during
an interactive run.
create_custom_dialog creates a dialog box with edit fields, check boxes,
an “execute” button, and a Cancel button. When the “execute” button is clicked,
the create_custom_dialog function executes a specified function.
create_browse_file_dialog displays a browse dialog box from which the
user selects a file. During an interactive run, the function returns a string
containing the name of the selected file.
create_password_dialog creates a dialog box with two edit fields, one for
login name input, and one for password input. You use a password dialog box to
limit user access to tests or parts of tests.
Each dialog box opens when the statement that creates it is executed
during a test run, and closes when one of the buttons inside it is clicked.
________________________________________________________________________Confidential Document 166

Software Testing
6.6.2. Creating an Input Dialog Box
An input dialog box contains a custom one-line message, an edit field, and
OK and Cancel buttons. The text that the user types into the edit field during a
test run is returned as a string.
You use the TSL function create_input_dialog to create an input dialog
box. This function has the following syntax:
create_input_dialog ( message );
The message can be any expression. The text appears as a single line in the
dialog box.
For example, you could create an input dialog box that asks for a user name. This
name is returned to a variable and is used in an if statement in order to call a
specific test suite for any of several users.
To create such a dialog box, you would program the following statement:
name = create_input_dialog ("Please type in your name.");
The input that is typed into the dialog box during a test run is passed to the
variable name when the OK button is clicked. If the Cancel button is clicked, an
empty string (empty quotation marks) is passed to the variable name.
6.6.3. Creating a List Dialog Box
________________________________________________________________________Confidential Document 167

Software Testing
A list dialog box has a title and a list of items that can be selected. The item
selected by the user from the list is passed as a string to a variable. You use the
TSL function create_list_dialog to create a list dialog box.
This function has the following syntax:
create_list_dialog ( title, message, list_items );
title is an expression that appears in the window banner of the dialog box.
message is one line of text that appear in the dialog box.
list_items contains the options that appear in the dialog box. Items are
separated by commas, and the entire list is considered a single string.
For example, you can create a dialog box that allows the user to select a
test to open. To do so, you could enter the following statement:
filename = create_list_dialog ("Select an Input File", "Please select one of the
following tests as input", "Batch_1, clock_2, Main_test, Flights_3, Batch_2");
________________________________________________________________________Confidential Document 168

Software Testing
The item that is selected from the list during a test run is passed to the
variable filename when the OK button is clicked. If the Cancel button is clicked,
an empty string (empty quotation marks) is passed to the variable filename.
6.6.4. Creating a Custom Dialog Box
A custom dialog box has a custom title, up to ten edit fields, up to ten check
boxes, an “execute” button, and a Cancel button. You specify the label for the
“execute” button. When you click the “execute” button, a specified function is
executed. The function can be either a TSL function or a user-defined function.
You use the TSL function create_custom_dialog to create a custom dialog
box.
This function has the following syntax:
create_custom_dialog ( function_name, title, button_name, edit_name1-n,
check_name1-m );
function_name is the name of the function that is executed when you click
the “execute” button.
title is an expression that appears in the title bar of the dialog box.
button_name is the label that will appear on the “execute” button. You
click this button to execute the contained function.
edit_name contains the labels of the edit field(s) of the dialog box. Multiple
edit field labels are separated by commas, and all the labels together are
considered a single string. If the dialog box has no edit fields, this parameter
must be an empty string (empty quotation marks).
________________________________________________________________________Confidential Document 169

Software Testing
check_name contains the labels of the check boxes in the dialog box.
Multiple check box labels are separated by commas, and all the labels together
are considered a single string. If the dialog box has no check boxes, this
parameter must be an empty string (empty quotation marks).
When the “execute” button is clicked, the values that the user enters are
passed as parameters to the specified function, in the following order:
edit_name1,.. edit_namen ,check_name1,.. check_namem
In the following example, the custom dialog box allows the user to specify
startup parameters for an application. When the user clicks the Run button, the
userdefined function, run_application1, invokes the specified Windows application
with the initial conditions that the user supplied.
res = create_custom_dialog ("run_application1", "Initial Conditions", "Run",
"Application:, Geometry:, Background:, Foreground:, Font:", "Sound, Speed");
If the specified function returns a value, this value is passed to the variable
res. If the Cancel button is clicked, an empty string (empty quotation marks) is
passed to the variable res.
________________________________________________________________________Confidential Document 170

Software Testing
Note that you can precede any edit field label with an exclamation mark.
When the user types input into the edit field, each character entered is
represented by an asterisk. You use an exclamation mark to prevent others from
seeing confidential information, such as a password.
6.6.5. Creating a Browse Dialog Box
A browse dialog box allows you to select a file from a list of files, and
returns the name of the selected file as a string.
You use the TSL function create_browse_file_dialog to create a browse
dialog box. This function has the following syntax:
create_browse_file_dialog ( filter );
where filter sets a filter for the files to display in the Browse dialog box. You
can use wildcards to display all files (*.*) or only selected files (*.exe or *.txt etc.).
In the following example, the browse dialog box displays all files with
extensions .dll or .exe.
filename = create_browse_file_dialog( "*.dll;*.exe" );
________________________________________________________________________Confidential Document 171

Software Testing
When the OK button is clicked, the name and path of the selected file is
passed to the variable filename. If the Cancel button is clicked, an empty string
(empty quotation marks) is passed to the variable filename.
6.6.6. Creating a Password Dialog Box
A password dialog box has two edit fields, an OK button, and a Cancel
button. You supply the labels for the edit fields. The text that the user types into
the edit fields during the interactive test run is saved to variables for analysis.
You use the TSL function create_password_dialog to create a password dialog
box. This function has the following syntax:
create_password_dialog ( login, password, login_out, password_out );
login is the label of the first edit field, used for user-name input. If you
specify an empty string (empty quotation marks), the default label “Login” is
displayed.
password is the label of the second edit field, used for password input. If you
specify an empty string (empty quotation marks), the default label “Password” is
displayed. When the user enters input into this edit field, the characters do not
appear on the screen, but are represented by asterisks.
________________________________________________________________________Confidential Document 172

Software Testing
login_out is the name the parameter to which the contents of the first edit
field (login) are passed. Use this parameter to verify the contents of the login edit
field.
password_out is the name the parameter to which the contents of the
second edit field (password) are passed. Use this parameter to verify the contents
of the password edit field.
The following example shows a password dialog box created using the
default edit field labels.
status = create_password_dialog ("", "", user_name, password);
If the OK button is clicked, the value 1 is passed to the variable status. If
the Cancel button is clicked, the value 0 is passed to the variable status and the
login_out and password_out parameters are assigned empty strings.
6.7. Running Batch Test
6.7.1. What is a Batch Test?
________________________________________________________________________Confidential Document 173

Software Testing
Imagine that you have revised your application and you want to run old test
scripts on the revised product. Instead of running each test individually, you can
use a batch test to run several tests, leave for lunch, and see the results of all
your tests on your screen when you get back. A batch test looks and behaves like
a regular test script, except for two main differences:
It contains call statements, which open other tests. For example:
call "c:\\qa\\flights\\lesson9"();
During a test run, WinRunner interprets a call statement, and then opens
and runs the “called” test. When the called test is done, WinRunner returns to the
batch test and continues the run.
You choose the Run in batch mode option on the Run tab of the General
Options dialog box (Settings > General Options) before running the test. This
option instructs WinRunner to suppress messages that would otherwise interrupt
the test. For example, if WinRunner detects a bitmap mismatch, it does not
prompt you to pause the test run.
When you review the results of a batch test run, you can see the overall
results of the batch test (pass or fail), as well as the results of each test called by
the batch test.
6.7.2. Programming a Batch Test
Exercise
calls tests that you created in earlier lessons (lesson5, lesson6, and lesson7)
runs each called test 3 times in order to check how the Flight Reservation
application handles the stress of repeated execution
________________________________________________________________________Confidential Document 174

Software Testing
1. Start WinRunner, open a new test and load the GUI map.
If WinRunner is not already open, choose Programs > WinRunner >
WinRunner on the Start menu. If the Welcome window is open, click the New
Test button. Otherwise, choose File > New. A new test window opens. If you are
working in the Global GUI Map File mode, confirm that the GUI map is loaded:
choose Tools > GUI Map Editor. In the GUI Map Editor choose View >
GUI Files and confirm that flight1.GUI is contained in the GUI File list.
2. Program call statements in the test script that call lesson5, lesson6,
and lesson7.
Type the call statements into the new test window in the following format:
call "c:\\qa\\flights\\lesson5"();
call "c:\\qa\\flights\\lesson6"();
call "c:\\qa\\flights\\lesson7"();
In your test script, replace c:\\qa\\flights with the directory path that
contains your tests. When you type in the path, use double backslashes between
the directory names.
3. Define a loop that calls each test 3 times.
Add a loop around the call statements so that the test script looks like this:
for (i=0; i<3; i++)
{
call "c:\\qa\\flights\\lesson5"();
call "c:\\qa\\flights\\lesson6"();
call "c:\\qa\\flights\\lesson7"();
}
________________________________________________________________________Confidential Document 175

Software Testing
In plain English, this means “Run lesson5, lesson6, and lesson7, and then
loop back and run each test again. Repeat this process until each test runs 3
times.” Note that the brackets { } define which statements are included in the
loop.
4. Choose the Batch Run option in the General Options dialog box.
Choose Settings > General Options. In the General Options dialog box,
click the Run tab. Select the Run in batch mode check box and click OK to
close the General Options dialog box.
5. Save the batch test.
Choose File > Save or click the Save button. Name the test batch.
6.7.3. Running the Batch Test on Version 1B
You are now ready to run the batch test in order to check the Flight
Reservation application. When you run the test, WinRunner will compare the
expected results of each test to the actual results in the application. It uses the
expected results stored when you created the tests in earlier lessons.
1. Open version 1B of the Flight Reservation application and log in.
Choose Programs > WinRunner > Sample Applications > Flight 1B on
the Start menu. In the Login window, type your name and the password
mercury, and click OK. Reposition the Flight Reservation application and
WinRunner so that they are both clearly visible on your desktop.
2. In WinRunner, select Verify mode from the Run Mode list on the
Standard toolbar.
________________________________________________________________________Confidential Document 176

Software Testing
3. Choose Run from Top.
Choose Run > Run from Top, or click the Run from Top button. The Run
Test dialog box opens. Accept the default test run name “res1.” Make sure that
the Display test results at end of run check box is selected.
4. Run the test.
Click OK in the Run Test dialog box. The test run begins. The test run
consists of nine different test executions and may take some time.
Watch how WinRunner opens and runs each called test, and loops back to
run the tests again (for a total of 3 times).
6.7.4. Analyzing the Batch Test Results
Once the batch test run is completed, you can analyze the results in the
WinRunner Test Results window. The Test Results window displays the overall
result (pass or fail) of the batch test, as well as a result for each called test. The
batch test fails if any of the called tests failed.
1. Open the WinRunner Test Results window and display the res1 results
of the batch test.
If the WinRunner Test Results window is not currently open, click in the
batch test window and choose Tools > Test Results, or click the Test Results
button.
________________________________________________________________________Confidential Document 177

Software Testing
2. View the results of the batch test.
The batch test failed because one or more of the called tests failed. As you
have seen in earlier lessons, version 1B contains some bugs.
3. View the results of the called tests.
Click a test name in the test tree to view the results of a called test.
________________________________________________________________________Confidential Document 178

Software Testing
Recall that lesson6 uses a bitmap checkpoint to check that the Agent
Signature field in the Fax Order dialog box clears after WinRunner clicks the
Clear Signature button. Since the field did not clear, the bitmap checkpoint
detected a mismatch. You can double-click the failed event to display the
expected, actual, and difference results.
4. Close the Test Results window.
Choose File > Exit.
5 .Close the batch test.
Choose File > Close for each open test. That is, the batch test and the
three tests that were called by the batch.
6. Clear the Batch Run option in the General Options dialog box.
Once you are finished running the batch test, clear the Batch Run option.
Choose Settings > General Options. In the General Options dialog box, click
the Run tab. Clear the Run in batch mode check box and click OK.
7 Close version 1B of the Flight Reservation application.
________________________________________________________________________Confidential Document 179

Software Testing
Choose File > Exit.
6.7.5. Batch Test Tips
By defining search paths, you can instruct WinRunner to search for called
tests in certain directories. Choose Settings > General Options. In the General
Options dialog box, click the Folders tab. In the Search path for called tests
box, simply define the paths in which the tests are located. This enables you to
specify a relative path, such as just the test name in a call statement. For
example:
call "lesson6"();
You can pass parameter values from the batch test to a called test.
Parameter values are defined within the parentheses of a call statement.
call test_name ([parameter1, parameter2, ..]);
Remember that you must select the Run in batch mode option in the Run
tab of the General Options dialog box in order for the batch test to run
unattended. Otherwise, the test will stop running to display an error message if
any errors occur.
6.8. Debugging Test:
Using Load Runner
6.8.1. Under Load
Today’s applications are run by multiple users over complex architectures.
With LoadRunner, TestSuite’s load testing tool, you can test the performance and
reliability of an entire system.
________________________________________________________________________Confidential Document 180

Software Testing
This section describes:
Emulating Multiple Users
Virtual User (Vuser) Technology
Developing and Running Scenarios
Creating GUI Vuser Scripts
Measuring Server Performance
Synchronizing Virtual User Transactions
Creating a Rendezvous Point
A Sample Vuser Script
6.8.2. About Load Testing Systems
Software testing is no longer confined to testing applications that run on a
single, standalone PC. Applications are run in network environments where
multiple client PCs or UNIX workstations interact with a central server. Web-
based applications are also common.
Modern architectures are complex. While they provide an unprecedented
degree of power and flexibility, these systems are difficult to test. LoadRunner
emulates load and then accurately measures and analyzes performance and
functionality. This chapter provides an overview of how to use WinRunner
together with LoadRunner to test your system.
6.8.3. Emulating Multiple Users
With LoadRunner, you emulate the interaction of multiple users by creating
scenarios. A scenario defines the events that occur during each load testing
session, such as the number of users, the actions they perform, and the machines
they use.
In the scenario, LoadRunner replaces the human user with a virtual user or
Vuser. A Vuser emulates the actions of a human user working with your
application. A scenario can contain tens, hundreds, or thousands of Vusers.
6.8.4. Virtual User (Vuser) Technology
________________________________________________________________________Confidential Document 181

Software Testing
LoadRunner provides a variety of Vuser technologies that enable you to
generate load when using different types of system architectures. Each Vuser
technology is suited to a particular architecture, and results in a specific type of
Vuser. For example, you use GUI Vusers to operate graphical user interface
applications in environments such as Microsoft Windows; Web Vusers to emulate
users operating Web browsers; RTE Vusers to operate terminal emulators;
Database Vusers to emulate database clients communicating with a database
application server.
The various Vuser technologies can be used alone or together, to create
effective load testing scenarios.
6.8.5. GUI Vusers
GUI Vusers operate graphical user interface applications in environments
such as Microsoft Windows. Each GUI Vuser emulates a real user submitting
input to and receiving output from a client application.
A GUI Vuser consists of a copy of WinRunner and a client application. The
client application can be any application used to access the server, such as a
database client. WinRunner replaces the human user and operates the client
application. Each GUI Vuser executes a Vuser script. This is a WinRunner test
that describes the actions that the Vuser will perform during the scenario. It
includes statements that measure and record the performance of the server.
6.8.6. Developing and Running Scenarios
You use the LoadRunner Controller to develop and run scenarios. The
Controller is an application that runs on any network PC.
________________________________________________________________________Confidential Document 182
Software Testing
The following procedure outlines how to use the LoadRunner Controller to
create, run, and analyze a scenario. For more information, refer to the
6.8.7. LoadRunner Controller User’s Guide.
1. Invoke the Controller.
2. Create the scenario.
A scenario describes the events that occur during each load testing session,
such as the participating Vusers, the scripts they run, and the machines the
Vusers use to run the scripts (load generating machines).
3. Run the scenario.
________________________________________________________________________Confidential Document 183

Software Testing
When you run the scenario, LoadRunner distributes the Vusers to their
designated load generating machines. When the load generating machines are
ready, they begin executing the scripts. During the scenario run, LoadRunner
measures and records server performance data, and provides online network and
server monitoring.
4. Analyze server performance.
After the scenario run, you can use LoadRunner’s graphs and reports to
analyze server performance data captured during the scenario run. The rest of
this chapter describes how to create GUI Vuser scripts. These scripts describe the
actions of a human user accessing a server from an application running on a
client PC.
Exercise
6.8.8. Creating GUI Vuser Scripts
A GUI Vuser script describes the actions a GUI Vuser performs during a
LoadRunner scenario. You use WinRunner to create GUI Vuser scripts. The
following procedure outlines the process of creating a basic script.
1. Start WinRunner.
2. Start the client application.
3. Record operations on the client application.
4. Edit the Vuser script using WinRunner, and program additional TSL
statements.
Add control-flow structures as needed.
________________________________________________________________________Confidential Document 184

Software Testing
5. Define actions within the script as transactions to measure server
performance.
6. Add synchronization points to the script.
7. Add rendezvous points to the script to coordinate the actions of multiple
Vusers.
8. Save the script and exit WinRunner.
6.8.9. Measuring Server Performance
Transactions measure how your server performs under the load of many
users. A transaction may be a simple task, such as entering text into a text field,
or it may be an entire test that includes multiple tasks. LoadRunner measures the
performance of a transaction under different loads. You can measure the time it
takes a single user or a hundred users to perform the same transaction.
The first stage of creating a transaction is to declare its name at the start of
the Vuser script. When you assign the Vuser script to a Vuser, the Controller
scans the Vuser script for transaction declaration statements. If the script
contains a transaction declaration, LoadRunner reads the name of the transaction
and displays it in the Transactions window.
To declare a transaction, you use the declare_transaction function. The
syntax of this function is:
declare_transaction ( "transaction_name" );
________________________________________________________________________Confidential Document 185

Software Testing
The transaction_name must be a string constant, not a variable or an
expression. This string can contain up to 128 characters. No spaces are
permitted.
Next, mark the point where LoadRunner will start to measure the
transaction. Insert a start_transaction statement into the Vuser script
immediately before the action you want to measure. The syntax of this function is:
start_transaction ( "transaction_name" );
The transaction_name is the name you defined in the declare_transaction
statement.
Insert an end_transaction statement into the Vuser script to indicate the end of
the transaction. If the entire test is a single transaction, then insert this statement
in the last line of the script. The syntax of this function is:
end_transaction ( "transaction_name" [, status ] );
The transaction_name is the name you defined in the declare_transaction
statement. The status tells LoadRunner to end the transaction only if the
transaction passed (PASS) or failed (FAIL).
6.8.10. Synchronizing Virtual User Transactions
For transactions to accurately measure server performance, they must
reflect the time the server takes to respond to user requests. A human user knows
that the server has completed processing a task when a visual cue, such as a
message, appears. For instance, suppose you want to measure the time it takes
for a database server to respond to user queries. You know that the server
completed processing a database query when the answer to the query is displayed
on the screen. In Vuser scripts, you instruct the Vusers to wait for a cue by
inserting synchronization points.
________________________________________________________________________Confidential Document 186

Software Testing
Synchronization points tell the Vuser to wait for a specific event to occur,
such as the appearance of a message in an object, and then resume script
execution. If the object does not appear, the Vuser continues to wait until the
object appears or a time limit expires. You can synchronize transactions by using
any of WinRunner’s synchronization or object functions.
6.8.11. Creating a Rendezvous Point
During the scenario run, you instruct multiple Vusers to perform tasks
simultaneously by creating a rendezvous point. This ensures that:
intense user load is emulated
transactions are measured under the load of multiple Vusers A rendezvous
point is a meeting place for Vusers. To designate the meeting place, you insert
rendezvous statements into your Vuser scripts. When the rendezvous statement is
interpreted, the Vuser is held by the Controller until all the members of the
rendezvous arrive. When all the Vusers have arrived (or a time limit is reached),
they are released together and perform the next task in their Vuser scripts. The
first stage of creating a rendezvous point is to declare its name at the start of the
Vuser script. When you assign the Vuser script to a Vuser, LoadRunner scans the
script for rendezvous declaration statements. If the script contains a rendezvous
declaration, LoadRunner reads the rendezvous name and creates a rendezvous. If
you create another Vuser that runs the same script, the Controller will add the
Vuser to the rendezvous.
To declare a rendezvous, you use the declare_rendezvous function. The
syntax of this function is:
declare_rendezvous ( "rendezvous_name" );
________________________________________________________________________Confidential Document 187

Software Testing
where rendezvous_name is the name of the rendezvous. The
rendezvous_name must be a string constant, not a variable or an expression. This
string can contain up to 128 characters. No spaces are permitted.
Next, you indicate the point in the Vuser script where the rendezvous will
occur by inserting a rendezvous statement. This tells LoadRunner to hold the
Vuser at the rendezvous until all the other Vusers arrive. The function has the
following syntax:
rendezvous ( "rendezvous_name" );
The rendezvous_name is the name of the rendezvous.
6.8.12. A Sample Vuser Script
In the following sample Vuser script, the “Ready” transaction measures how
long it takes for the server to respond to a request from a user. The user enters
the request and then clicks OK. The user knows that the request has been
processed when the word “Ready” appears in the client application’s Status text
box. In the first part of the Vuser script, the declare_transaction and
declare_rendezvous functions declare the names of the transaction and
rendezvous points in the Vuser script. In this script, the transaction “Ready” and
the rendezvous “wait” are declared. The declaration statements enable the
LoadRunner Controller to display transaction and rendezvous information.
# Declare the transaction name
declare_transaction ("Ready");
# Define the rendezvous name
declare_rendezvous ("wait");
Next, a rendezvous statement ensures that all Vusers click OK at the same
time, in order to create heavy load on the server.
________________________________________________________________________Confidential Document 188
Software Testing
# Define rendezvous points
rendezvous ("wait");
In the following section, a start_transaction statement is inserted just
before the Vuser clicks OK. This instructs LoadRunner to start recording the
“Ready” transaction. The “Ready” transaction measures the time it takes for the
server to process the request sent by the Vuser.
# Deposit transaction
start_transaction ( "Ready" );
button_press ( "OK" );
Before LoadRunner can measure the transaction time, it must wait for a cue
that the server has finished processing the request. A human user knows that the
request has been processed when the “Ready” message appears under Status; in
the Vuser script, an obj_wait_info statement waits for the message. Setting the
timeout to thirty seconds ensures that the Vuser waits up to thirty seconds for the
message to appear before continuing test execution.
# Wait for the message to appear
rc = obj_wait_info("Status","value","Ready.",30);
The final section of the test measures the duration of the transaction. An if
statement is defined to process the results of the obj_wait_info statement. If the
message appears in the field within the timeout, the first end_transaction
statement records the duration of the transaction and that it passed. If the
timeout expires before the message appears, the transaction fails.
# End transaction.
if (rc == 0)
end_transaction ( "OK", PASS );
else
________________________________________________________________________Confidential Document 189

Software Testing
end_transaction ( "OK" , FAIL );
6.9. Reporting Defect in TestDirector
6.9.1. About Reporting Defects
Locating and repairing software defects efficiently is essential to the
development process. Software developers, testers, and end users in all stages of
the testing process can detect defects and add them to the defects project. Using
the Add Defect dialog box (TestDirector 7.x), or the Web Defect Manager or the
Remote Defect Reporter (TestDirector 6.0), you can report design flaws in your
application, and track data derived from defect reports.
For example, suppose you are testing a flight reservation application. You
discover that errors occur when you try to order an airline ticket. You open and
report the defect. This includes a summary and detailed description of the defect,
where it was discovered, and if you are able to reproduce it. The report can also
include screen captures, Web pages, text documents, and other files relevant to
understanding and repairing the problem.
If you are using TestDirector 7.x, the Add Defect dialog box opens directly
from the WinRunner Test Results window. If you are using TestDirector 6.0 and
the TestDirector Web Defect Manager is installed on your machine, then it opens
directly from the WinRunner Test Results window. Otherwise, the Remote Defect
Reporter opens directly from the WinRunner Test Results window.
6.9.2. Using the Add Defect Dialog Box (TestDirector 7.x)
The Add Defect dialog box is a defect tracking component of Test Director’s,
Mercury Interactive’s Web-based test management tool. You can report
application defects directly to a TestDirector project. You can then track defects
until the application’s developers and software testers determine that they are
resolved.
________________________________________________________________________Confidential Document 190

Software Testing
6.9.3. Setting Up the Add Defect Dialog Box
Before you can launch the Add Defect dialog box, you must ensure that
TestDirector 7.x is installed on your computer. You must also ensure that
WinRunner is connected to a TestDirector server and project. The connection
process has two stages. First, you connect WinRunner to the server. This server
handles the connections between WinRunner and the TestDirector project. Next,
you choose the project you want WinRunner to access. The project stores tests,
test run information, and defects information for the application you are testing.
6.10. Reporting Defects with the Add Defect Dialog Box
You can report defects detected in your application directly from the
WinRunner Test Results window.
To report a defect with the Add Defect dialog box:
1. Make sure that the Test Results window is open. If necessary, choose
Tools > Test Results or click the Test Results button to open it.
2. If applicable, select the line in the Test Results that corresponds to the
bug you want to report.
3. Choose Tools > Report Bug or click the Report Bug button. The Add
Defect dialog box opens.
________________________________________________________________________Confidential Document 191

Software Testing
Information about the selected line in the Test Results is automatically
included in the description.
4. Type a short description of the defect in Summary.
5. Enter information in the rest of the defect text boxes. Note that you must enter
information in all the text boxes with red labels.
6. Select the Reproducible check box if the defect can be recreated under the
same conditions by which it was detected.
7. Type a more in-depth description of the defect in Description.If you want to
clear the data in the Add Defect dialog box, click the Clear button.
8. You can add an attachment to your defect report:
Click the Attach File button to attach a file to the defect.
Click the Attach Web Page button to attach a Web page to the defect.
Click the Snapshot button to capture an image and attach it to the defect.
________________________________________________________________________Confidential Document 192

Software Testing
9. Click the Find Similar Defects button to compare your defect to the existing
defects in the TestDirector project. This lets you know if similar defect records
already exist, and helps you to avoid duplicating them. If similar defects are
found, they are displayed in the Similar Defects dialog box.
10. Click the Submit button to add the defect to the database. TestDirector
assigns the new defect a Defect ID.
11. Click Close.
________________________________________________________________________Confidential Document 193


![Mercurry WinRunner for Beginners - Kamran Khan [chromeis.com]](https://img.pdfslide.us/doc/110x75/54c88cd64a7959e6718b45c0/mercurry-winrunner-for-beginners-kamran-khan-chromeiscom.jpg)