Embed Size (px)
Citation preview
Installation Reference
Windows Sever 2008: 32Bit For ADC Device Server and File Server Implementations Release: 9-February-2012 Rebrand: 30-April-2014
Windows Sever 2008: 32Bit
Installation Reference
Publication Information 2014 Imagine Communications Corp. Proprietary and Confidential. Imagine Communications considers this document and its contents to be proprietary and confidential. Except for making a reasonable number of copies for your own internal use, you may not reproduce this publication, or any part thereof, in any form, by any method, for any purpose, or in any language other than English without the written consent of Imagine Communications. All others uses are illegal. This publication is designed to assist in the use of the product as it exists on the date of publication of this manual, and may not reflect the product at the current time or an unknown time in the future. This publication does not in any way warrant description accuracy or guarantee the use for the product to which it refers. Imagine Communications reserves the right, without notice to make such changes in equipment, design, specifications, components, or documentation as progress may warrant to improve the performance of the product.
Trademarks Product names and other brands (such as ADC™, D-Series™, Nexio®, Nexio® Insight, Nexio® Motion, PowerSmart®, Versio™) are trademarks or trade names of Imagine Communications or its subsidiaries. Microsoft® and Windows® are registered trademarks of Microsoft Corporation. All other trademarks and trade names are the property of their respective companies.
Contact Information Imagine Communications has office locations around the world. For domestic and international location and contact information see: http://www.imaginecommunications.com/contact-us/
Support Contact Information For domestic and international support contact information see:
Support Contacts: http://www.imaginecommunications.com/services/technical-support/
eCustomer Portal: http://support.imaginecommunications.com
2014 Imagine Communications Corp. Proprietary and Confidential 30-April-2014 | Page 2 of 41
Windows Sever 2008: 32Bit
Installation Reference Contents
Contents About this Document................................................................................... 5
Summary ................................................................................................................................................... 5 Before You Start ....................................................................................................................................... 5
Clarification of Terms............................................................................................................................ 5 File Server Limitation ............................................................................................................................ 5
References ................................................................................................................................................ 6 Hardware Requirements ........................................................................................................................... 6
Windows Server 2008 ................................................................................. 7 Installing Windows Server 2008 - Part 1 .................................................................................................. 7
To Install Windows Server 2008 - Part 1 .............................................................................................. 7 Installing Windows Server 2008 - Part 2 .................................................................................................. 8
To Install Windows Server 2008 - Part 2 .............................................................................................. 8
Managing the Windows Server 2008 Firewall ........................................... 10 Disabling the Windows Firewall .............................................................................................................. 10
To Disable the Windows Firewall ....................................................................................................... 10
Windows Server 2008 Service Packs and Updates .................................. 11 Installing Windows Server 2008 Service Packs and/or Updates ............................................................ 11
To Install Windows Server 2008 Service Packs and/or Updates ....................................................... 11
NIC Configurations ................................................................................... 15 Configuring NIC Power Management ..................................................................................................... 15
To Configure NIC Power Management .............................................................................................. 15 Configuring Network Communications ................................................................................................... 16
ADC v11: To Configure Network Communications ............................................................................ 16 ADC v12: To Configure Network Communications ............................................................................ 18
Additional Server Configurations ............................................................... 20 Configuring a Server Password to Not Expire ........................................................................................ 20
To Configure a Server Passwords to Not Expire ............................................................................... 20 Disabling Server Password Complexity Requirements .......................................................................... 21
To Disable Server Password Complexity Requirements ................................................................... 21 Configuring the Server for Auto Login .................................................................................................... 21
To Configure the Server for Auto Login ............................................................................................. 22 Creating a Software Install Folder .......................................................................................................... 23
To Create a Software Install Folder .................................................................................................... 23 Configuring Computer Power Management ........................................................................................... 23
To Configure Computer Power Management .................................................................................... 23 Configuring File and Folder Sharing ....................................................................................................... 24
To Configure File and Folder Sharing ................................................................................................ 24 Configuring Folder Display Options ........................................................................................................ 25
To Configure Folder Display Options ................................................................................................. 26 Renaming the Start Menu Computer Name ........................................................................................... 26
To Rename the Start Menu Computer Name .................................................................................... 27
Device Server Drivers (for ADC Device Server v11/v12 only) ................... 28 Installing the Timecode/V-sync Driver .................................................................................................... 28
2014 Imagine Communications Corp. Proprietary and Confidential 30-April-2014 | Page 3 of 41
Windows Sever 2008: 32Bit
Installation Reference Contents
To Install the Timecode/V-sync Driver ............................................................................................... 28 Installing the GPI Driver .......................................................................................................................... 29
To Install the GPI Driver ..................................................................................................................... 29 Installing the RS422 Driver ..................................................................................................................... 29
To Install the RS422 Driver ................................................................................................................ 30
Device Server v12 Installation ................................................................... 31 Installing the Device Server v12 Application .......................................................................................... 31
To Install the ADC v12 Device Server Application ............................................................................. 31
ADC v11 Specific Requirements ............................................................... 35 Lana Number Configuration (for ADC Device Server v11 only) ............................................................. 35
Install LanaConfig on a 32-Bit System ............................................................................................... 35 Run LanaConfig .................................................................................................................................. 35
Installing the ADC v11 Device Server Application .................................................................................. 37 To Install the ADC v11 Device Server Application ............................................................................. 37
2014 Imagine Communications Corp. Proprietary and Confidential 30-April-2014 | Page 4 of 41
Windows Sever 2008: 32Bit
Installation Reference About this Document
About this Document
Summary This document presents the procedures and processes necessary to install Windows Server 2008 Standard- 32-bit on a base ADCv11 or ADCv12 Device Server computer or a File Server computer.
Note: This document also includes configurations necessary for an ADCv11 or ADCv12 Device Server computer.
Before You Start This Installation Reference was created for installing Windows Server 2008 on a computer that will be used as an ADC Device Server or a File Server. (See below: “Clarification of Terms”.)
This guide was written for Windows Server 2008 Standard- 32-bit. The Windows Server 2008 CHP Device Controller computer had all available Windows
Updates installed.
It is recommended that the NIC Driver be updated to the most recent version.
Clarification of Terms ADC Device Server refers to a CHP Device Controller computer that is loaded with the Windows operating system and the ADC Device Server application software. For information on the Device Server, see “ADC Device Server and ConfigManager Install and Operations Reference”.
ADC File Server refers to a third-party computer that is loaded with the Windows operating system and the SQL Server Database application. For information on SQL Server database, reference the appropriate documentation: “ADC SQL Server 2008 Express Installation Guide”, “ADC SQL Server 2008 Installation Guide”.
File Server Limitation The pre-R2 MS SQL Server 2008 database and MS SQL Server 2008 R2 database can be run on the pre-R2 version of Windows Server 2008 operating system.
However, this changes when upgrading to Windows Server 2008 R2 operating system:
The pre-R2 MS SQL Server 2008 database cannot be run on Windows Server 2008 R2 operating system.
MS SQL Server 2008 R2 database must be run when using Windows Server 2008 R2 operating system.
2014 Imagine Communications Corp. Proprietary and Confidential 30-April-2014 | Page 5 of 41
Windows Sever 2008: 32Bit
Installation Reference About this Document
References http://technet.microsoft.com/en-us/windowsserver/cc304052.aspx
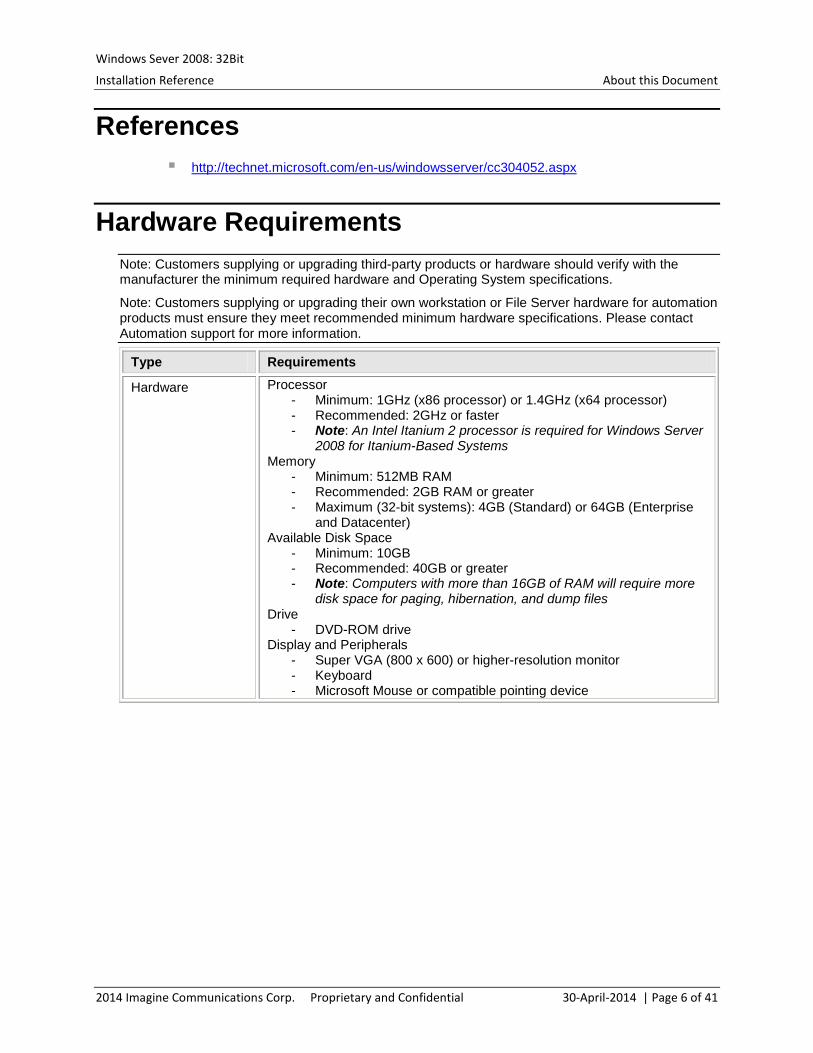
Hardware Requirements Note: Customers supplying or upgrading third-party products or hardware should verify with the manufacturer the minimum required hardware and Operating System specifications.
Note: Customers supplying or upgrading their own workstation or File Server hardware for automation products must ensure they meet recommended minimum hardware specifications. Please contact Automation support for more information.
Type Requirements
Hardware Processor - Minimum: 1GHz (x86 processor) or 1.4GHz (x64 processor) - Recommended: 2GHz or faster - Note: An Intel Itanium 2 processor is required for Windows Server
2008 for Itanium-Based Systems Memory
- Minimum: 512MB RAM - Recommended: 2GB RAM or greater - Maximum (32-bit systems): 4GB (Standard) or 64GB (Enterprise
and Datacenter) Available Disk Space
- Minimum: 10GB - Recommended: 40GB or greater - Note: Computers with more than 16GB of RAM will require more
disk space for paging, hibernation, and dump files Drive
- DVD-ROM drive Display and Peripherals
- Super VGA (800 x 600) or higher-resolution monitor - Keyboard - Microsoft Mouse or compatible pointing device
2014 Imagine Communications Corp. Proprietary and Confidential 30-April-2014 | Page 6 of 41
Windows Sever 2008: 32Bit
Installation Reference Windows Server 2008
Windows Server 2008
Installing Windows Server 2008 - Part 1 Follow these steps to complete part one of the Windows Server 2008 installation.
To Install Windows Server 2008 - Part 1 1. Put the Windows Server 2008 disk into the DVD Drive.
2. Restart the computer.
3. Press any key on the keyboard when Press any key to boot from CD or DVD is displayed.
4. In the first Install Windows screen verify that:
English is entered for Language to install
English (United States) is entered for Time and currency format
US is entered for Keyboard or input method 5. Click Next.
6. In the next Install Windows screen click Install now.
7. Enter the Product Key in the next Install Windows screen, disable (un-check) Automatically activate Windows when I’m online, and click Next.
8. In the next Install Windows screen select Windows Server 2008 Standard (Full Installation) and click Next.
9. Accept the license terms and click Next.
10. Select Custom (advanced) in the next Install Windows screen.
Note: If this is a new Disk Drive, do not perform Steps 10 – 12. Just click Next in this Install Windows screen.
11. Select Disk 0 Partition 1 (the top one), click Drive options (advanced), select Delete, click OK in the pop up warning window, and if this is the only partition on the Drive; click Next.
12. Select the next disk partition (if there is one), select Delete, click OK in the pop up warning window, and if this is the last partition on the Drive; click Next.
13. Repeat Step 10 for any other remaining disk partitions (if there are any) on this disk, and then click Next.
14. The computer will now start expanding files and installing Windows Server 2008. You can move on to Part 2 of the Windows Server 2008 installation after the computer has restarted.
Note: There is nothing to do after “Copying Files” is displayed until the Windows Server 2008 login screen is displayed in approximately 15 minutes.
2014 Imagine Communications Corp. Proprietary and Confidential 30-April-2014 | Page 7 of 41
Windows Sever 2008: 32Bit
Installation Reference Windows Server 2008
Installing Windows Server 2008 - Part 2 Now that the computer has restarted you can use the following steps to complete part two of the Windows Server 2008 installation.
To Install Windows Server 2008 - Part 2 1. Remove the Windows Server 2008 install disk.
2. Click OK to set a password.
3. Enter 1harrisDS for password, enter the 1harrisDS for confirm password, and click the arrow to the right of the confirm password field or press Enter on the keyboard.
4. Click OK on the Your password has been changed screen.
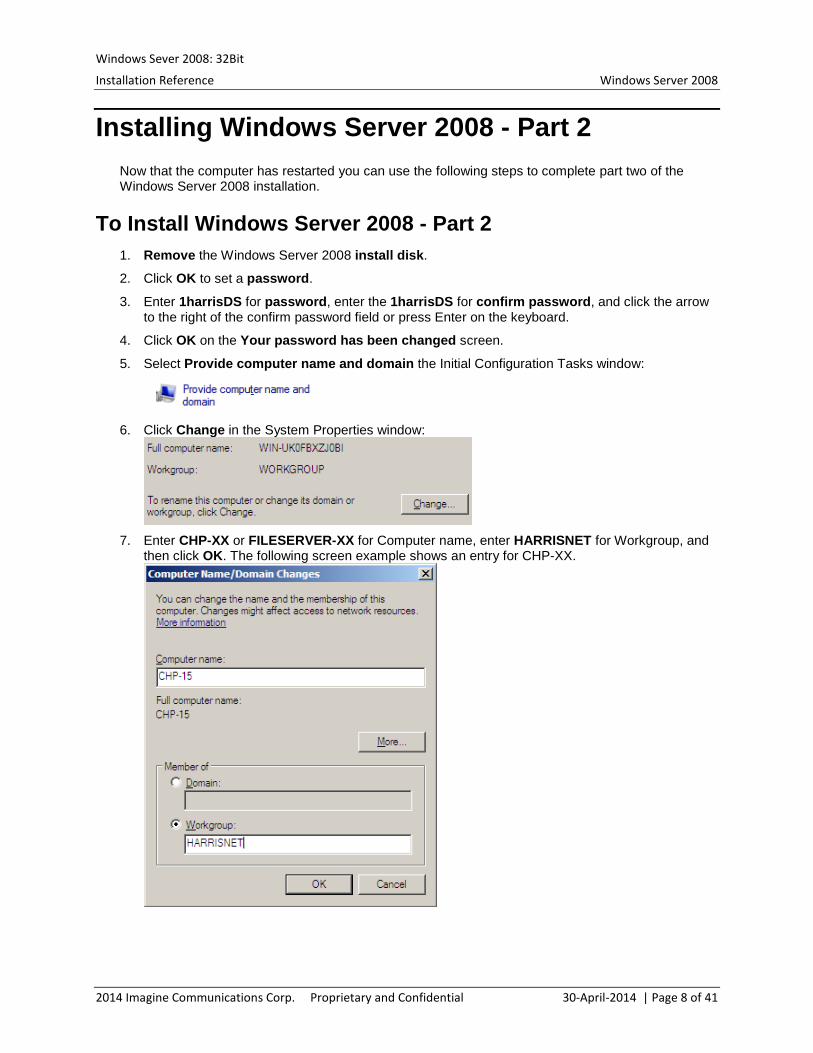
5. Select Provide computer name and domain the Initial Configuration Tasks window:
6. Click Change in the System Properties window:
7. Enter CHP-XX or FILESERVER-XX for Computer name, enter HARRISNET for Workgroup, and
then click OK. The following screen example shows an entry for CHP-XX.
2014 Imagine Communications Corp. Proprietary and Confidential 30-April-2014 | Page 8 of 41
Windows Sever 2008: 32Bit
Installation Reference Windows Server 2008
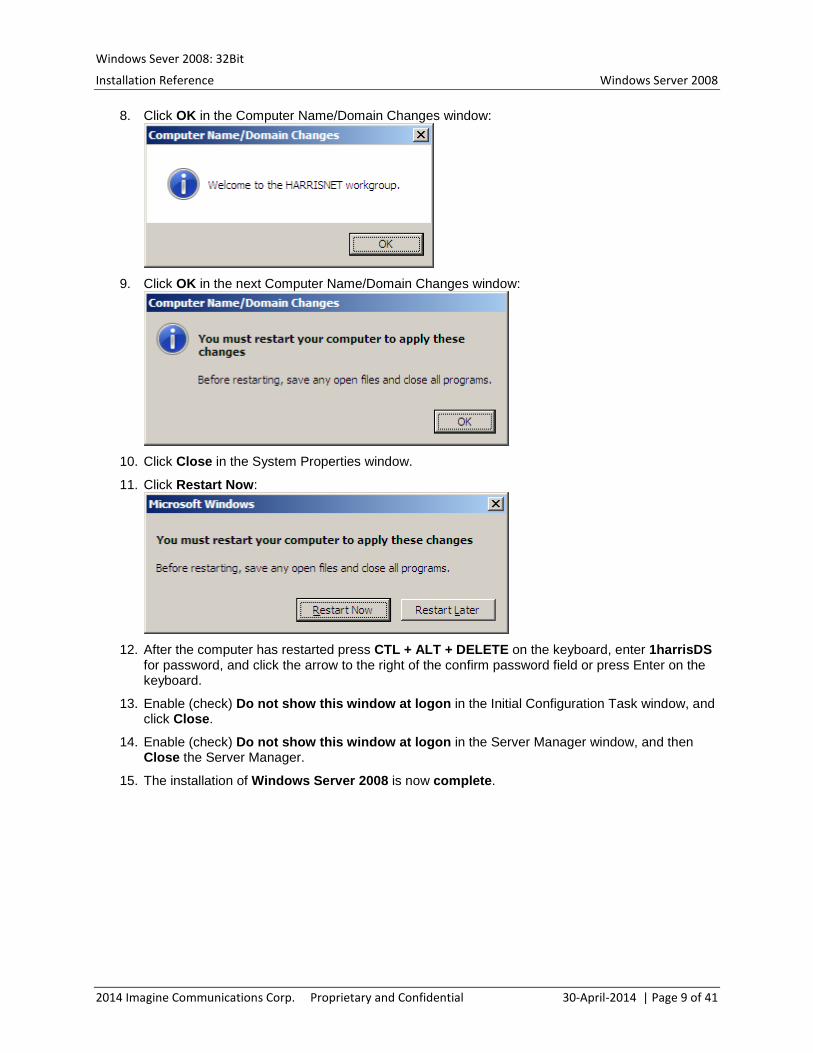
8. Click OK in the Computer Name/Domain Changes window:
9. Click OK in the next Computer Name/Domain Changes window:
10. Click Close in the System Properties window.
11. Click Restart Now:
12. After the computer has restarted press CTL + ALT + DELETE on the keyboard, enter 1harrisDS
for password, and click the arrow to the right of the confirm password field or press Enter on the keyboard.
13. Enable (check) Do not show this window at logon in the Initial Configuration Task window, and click Close.
14. Enable (check) Do not show this window at logon in the Server Manager window, and then Close the Server Manager.
15. The installation of Windows Server 2008 is now complete.
2014 Imagine Communications Corp. Proprietary and Confidential 30-April-2014 | Page 9 of 41
Windows Sever 2008: 32Bit
Installation Reference Managing the Windows Server 2008 Firewall
Managing the Windows Server 2008 Firewall
The Firewall for Private Networks in Windows Server 2008 needs to be disabled on the computer for it to work correctly in the ADC system, and for the installation of Windows Service Packs and\or Updates. This chapter covers configuration of the Firewall in Windows Server 2008.
Disabling the Windows Firewall Use the following steps to disable the Windows Firewall.
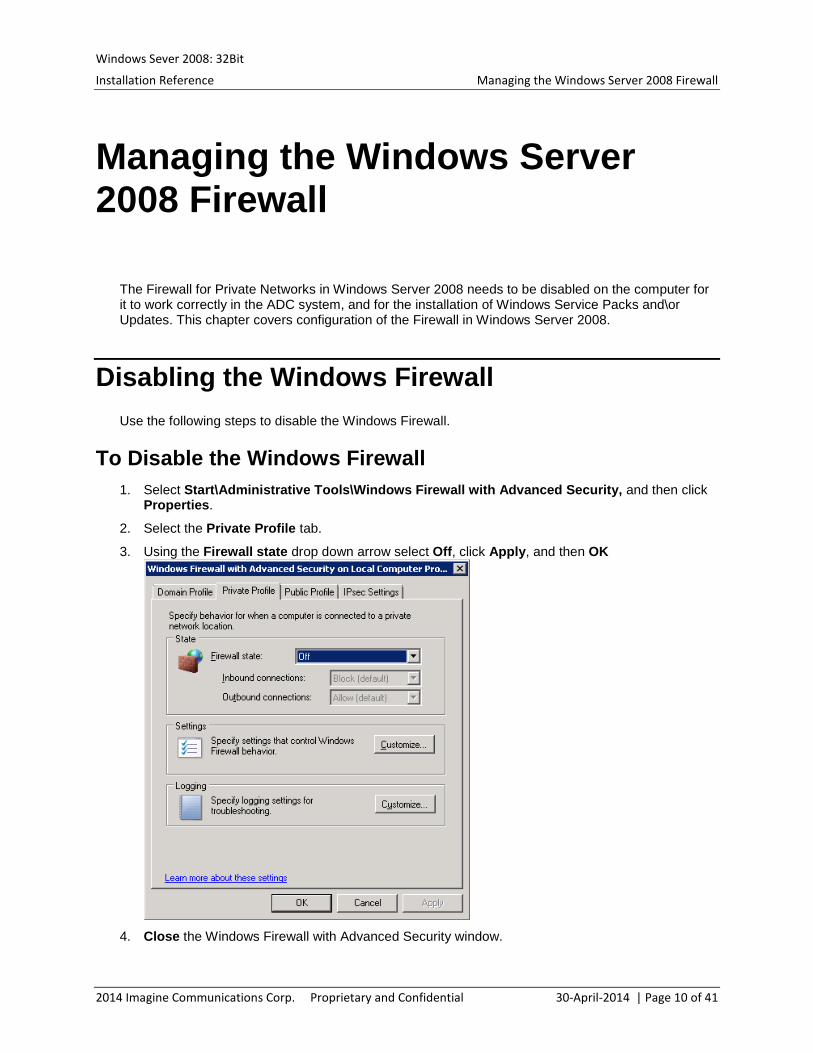
To Disable the Windows Firewall 1. Select Start\Administrative Tools\Windows Firewall with Advanced Security, and then click
Properties.
2. Select the Private Profile tab.
3. Using the Firewall state drop down arrow select Off, click Apply, and then OK
4. Close the Windows Firewall with Advanced Security window.
2014 Imagine Communications Corp. Proprietary and Confidential 30-April-2014 | Page 10 of 41
Windows Sever 2008: 32Bit
Installation Reference Windows Server 2008 Service Packs and Updates
Windows Server 2008 Service Packs and Updates
This chapter describes how to install any Windows Service Packs and/or Updates that are available for Windows Server 2008.
Installing Windows Server 2008 Service Packs and/or Updates
Use the following steps to install Windows Server 2008 Service Packs and/or Updates.
To Install Windows Server 2008 Service Packs and/or Updates
Note: An internet connection is required to install Service Packs and/or Updates. The Server’s default DHCP NIC setting should allow for this. An internet connection is not required if the Service Packs and/or Updates are available on other storage devices or media.
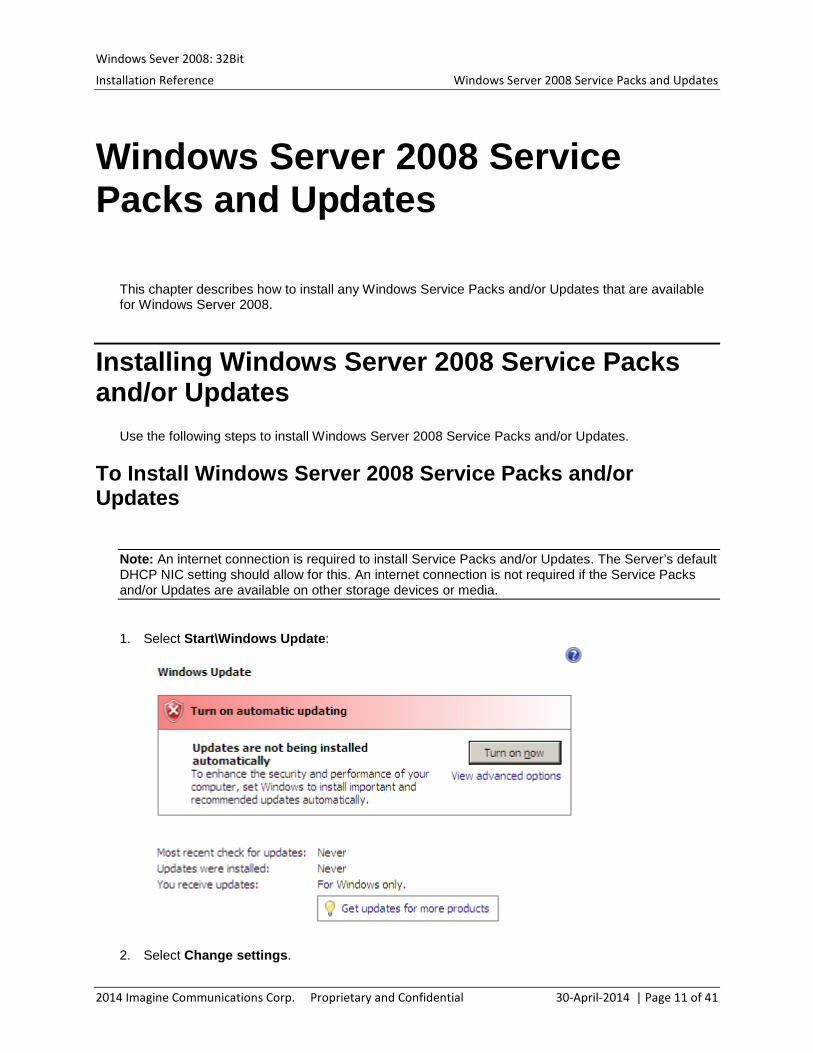
1. Select Start\Windows Update:
2. Select Change settings.
2014 Imagine Communications Corp. Proprietary and Confidential 30-April-2014 | Page 11 of 41
Windows Sever 2008: 32Bit
Installation Reference Windows Server 2008 Service Packs and Updates
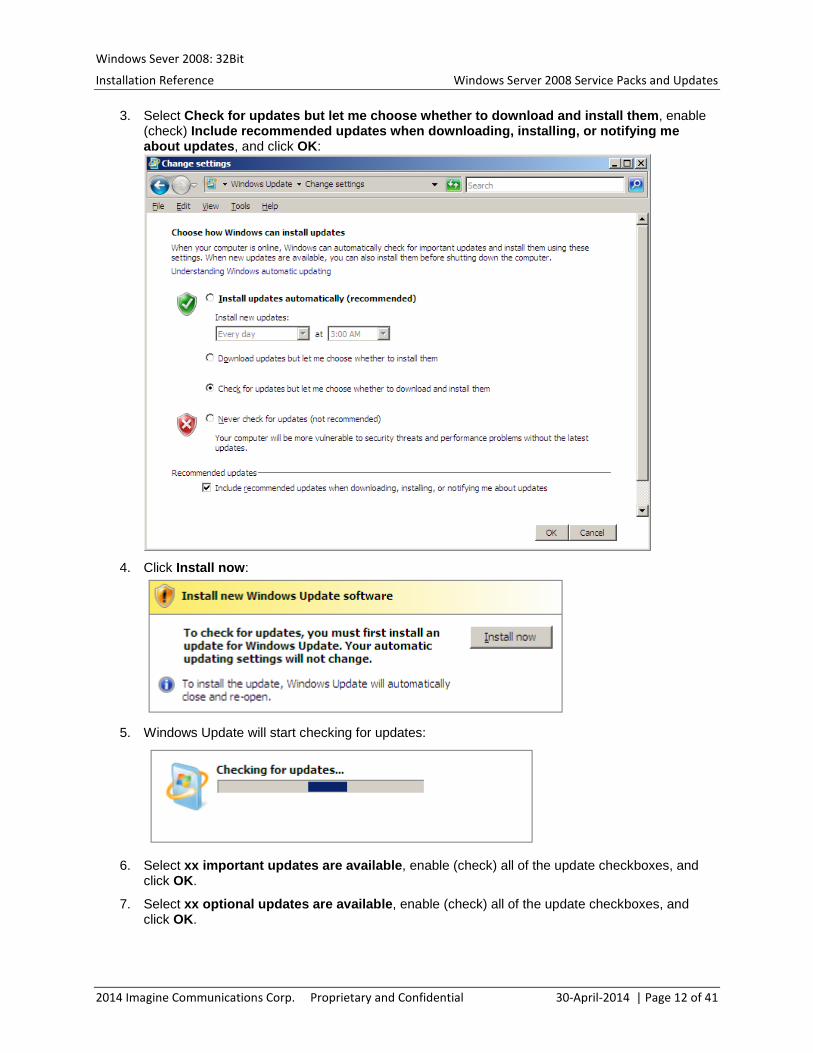
3. Select Check for updates but let me choose whether to download and install them, enable (check) Include recommended updates when downloading, installing, or notifying me about updates, and click OK:
4. Click Install now:
5. Windows Update will start checking for updates:
6. Select xx important updates are available, enable (check) all of the update checkboxes, and
click OK.
7. Select xx optional updates are available, enable (check) all of the update checkboxes, and click OK.
2014 Imagine Communications Corp. Proprietary and Confidential 30-April-2014 | Page 12 of 41
Windows Sever 2008: 32Bit
Installation Reference Windows Server 2008 Service Packs and Updates
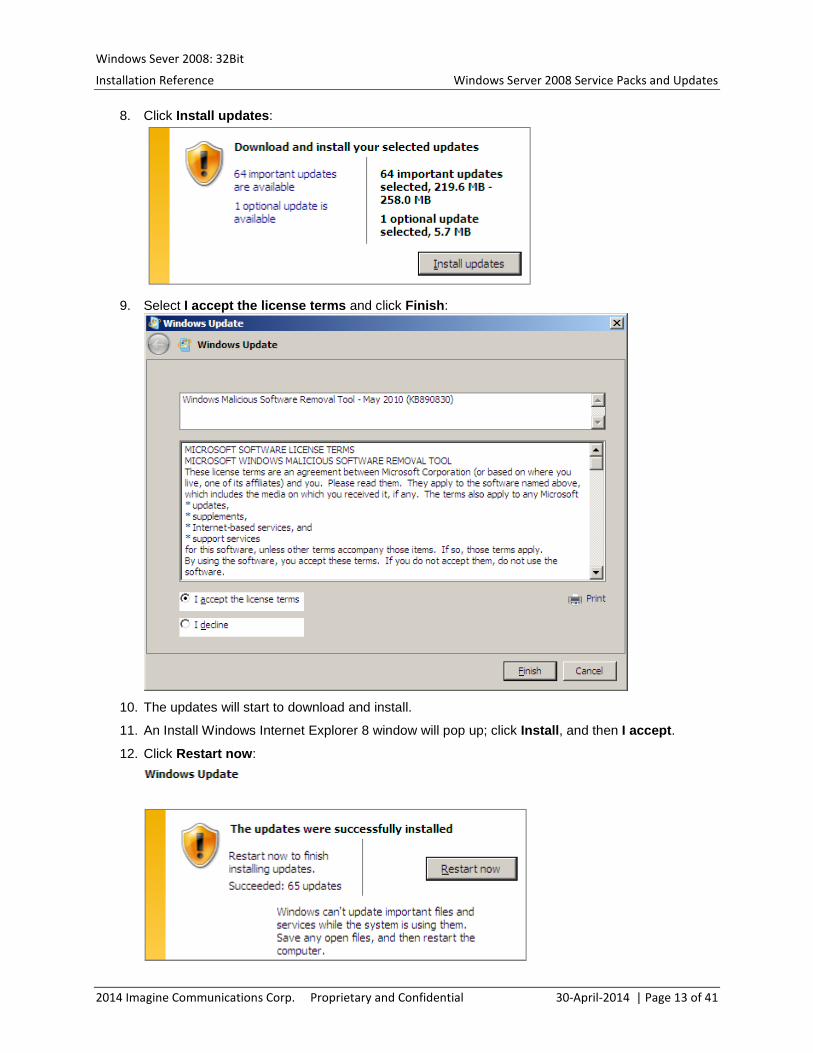
8. Click Install updates:
9. Select I accept the license terms and click Finish:
10. The updates will start to download and install.
11. An Install Windows Internet Explorer 8 window will pop up; click Install, and then I accept.
12. Click Restart now:
2014 Imagine Communications Corp. Proprietary and Confidential 30-April-2014 | Page 13 of 41
Windows Sever 2008: 32Bit
Installation Reference Windows Server 2008 Service Packs and Updates
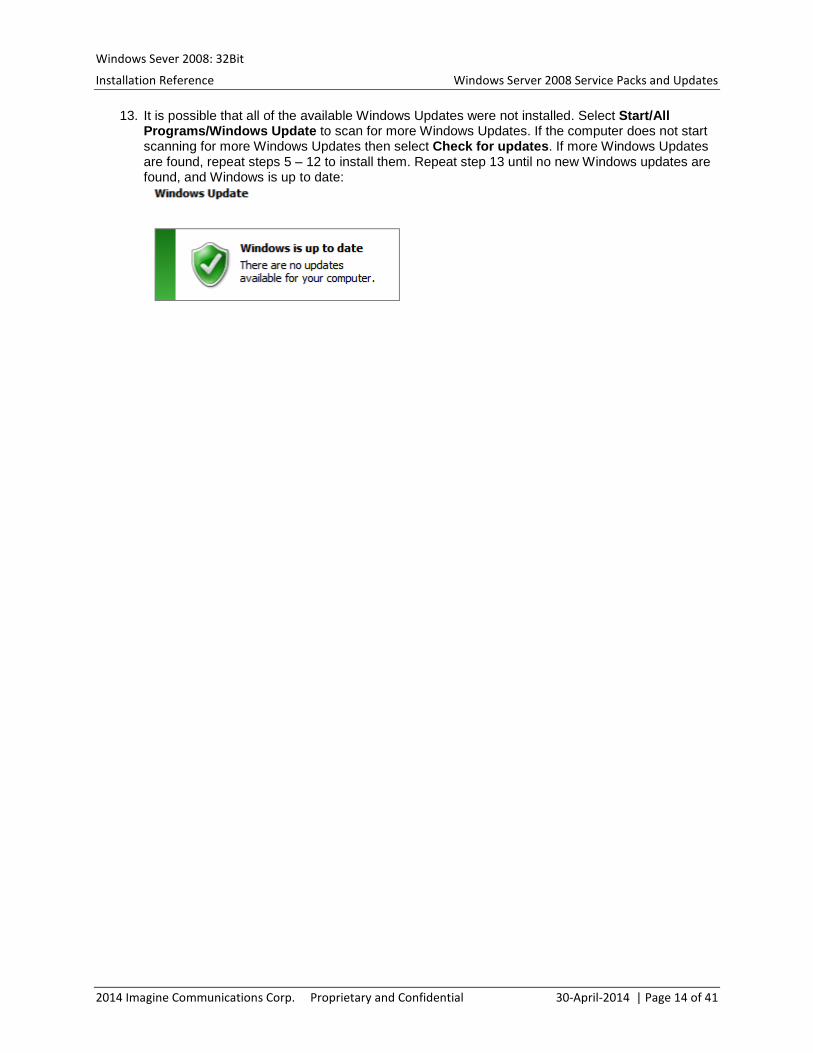
13. It is possible that all of the available Windows Updates were not installed. Select Start/All Programs/Windows Update to scan for more Windows Updates. If the computer does not start scanning for more Windows Updates then select Check for updates. If more Windows Updates are found, repeat steps 5 – 12 to install them. Repeat step 13 until no new Windows updates are found, and Windows is up to date:
2014 Imagine Communications Corp. Proprietary and Confidential 30-April-2014 | Page 14 of 41
Windows Sever 2008: 32Bit
Installation Reference NIC Configurations
NIC Configurations
The NIC in the computer must be configured specifically for ADC System communications. Power management is disabled on the ADC Automation NIC to assure that it is always available. This chapter includes sections on Power Management and Network configurations.
Note: You will need to be provided with an IP address for this Server. Please consult with the local IT person to obtain the ADC Automation Network IP information for this computer.
Configuring NIC Power Management Use this procedure for disabling Power Management on the Automation NIC.
To Configure NIC Power Management 1. Select Start\Control Panel\Network and Sharing Center.
2. Select Manage network connections.
3. Select the NIC, right click, and select Properties. For ADC v11, the selected NIC is the NIC that will be configured to Lana 0. For details see Lana Number Configurations (for ADC Device Server v11 only).
4. Select Configure… in the Local Area Connection Properties window.
2014 Imagine Communications Corp. Proprietary and Confidential 30-April-2014 | Page 15 of 41
Windows Sever 2008: 32Bit
Installation Reference NIC Configurations
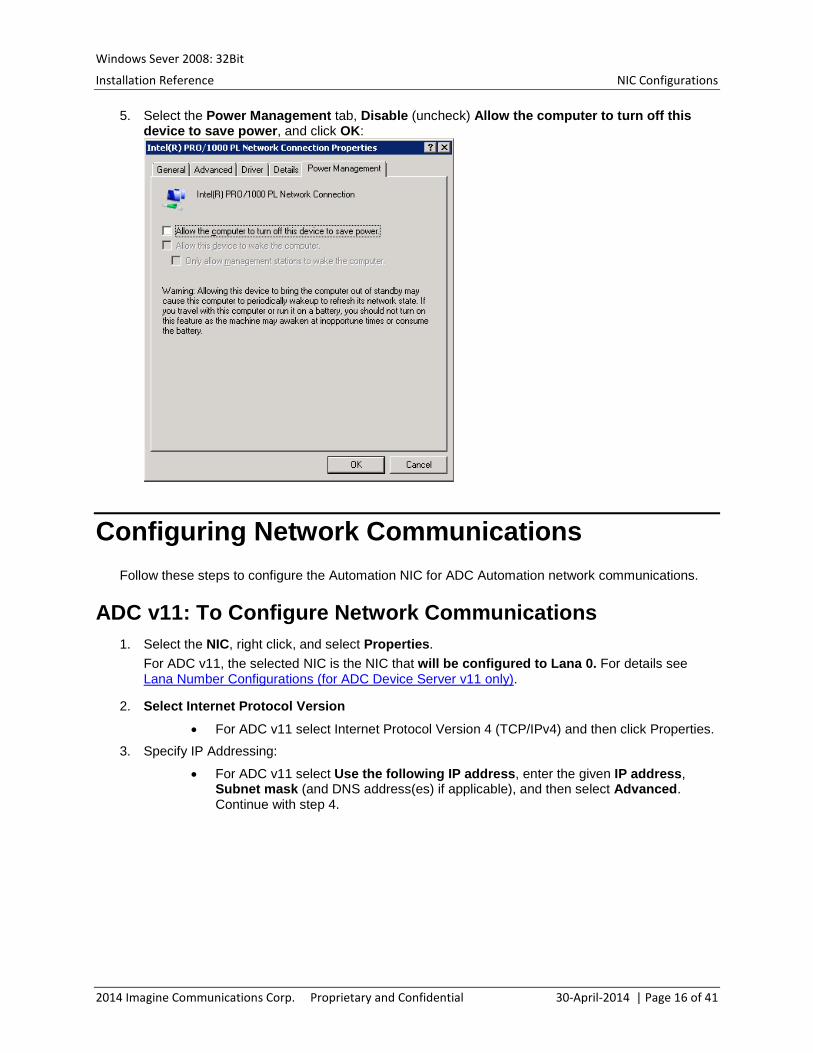
5. Select the Power Management tab, Disable (uncheck) Allow the computer to turn off this device to save power, and click OK:
Configuring Network Communications Follow these steps to configure the Automation NIC for ADC Automation network communications.
ADC v11: To Configure Network Communications 1. Select the NIC, right click, and select Properties.
For ADC v11, the selected NIC is the NIC that will be configured to Lana 0. For details see Lana Number Configurations (for ADC Device Server v11 only).
2. Select Internet Protocol Version
• For ADC v11 select Internet Protocol Version 4 (TCP/IPv4) and then click Properties. 3. Specify IP Addressing:
• For ADC v11 select Use the following IP address, enter the given IP address, Subnet mask (and DNS address(es) if applicable), and then select Advanced. Continue with step 4.
2014 Imagine Communications Corp. Proprietary and Confidential 30-April-2014 | Page 16 of 41
Windows Sever 2008: 32Bit
Installation Reference NIC Configurations
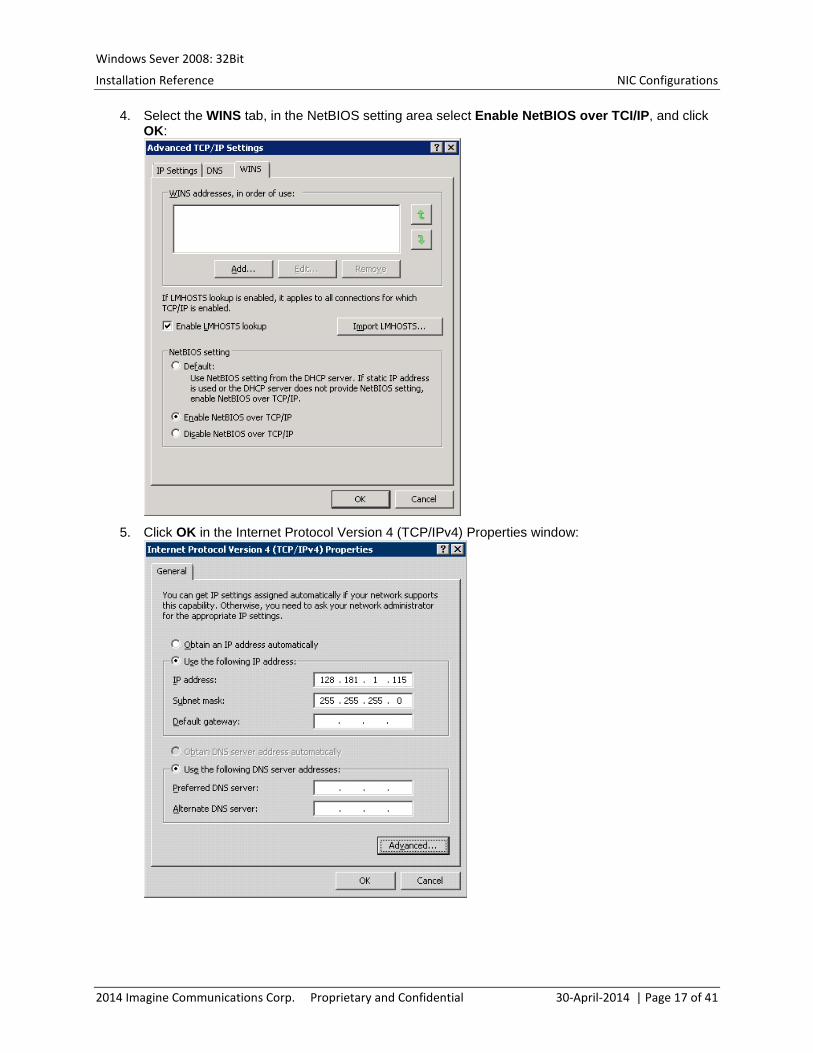
4. Select the WINS tab, in the NetBIOS setting area select Enable NetBIOS over TCI/IP, and click OK:
5. Click OK in the Internet Protocol Version 4 (TCP/IPv4) Properties window:
2014 Imagine Communications Corp. Proprietary and Confidential 30-April-2014 | Page 17 of 41
Windows Sever 2008: 32Bit
Installation Reference NIC Configurations
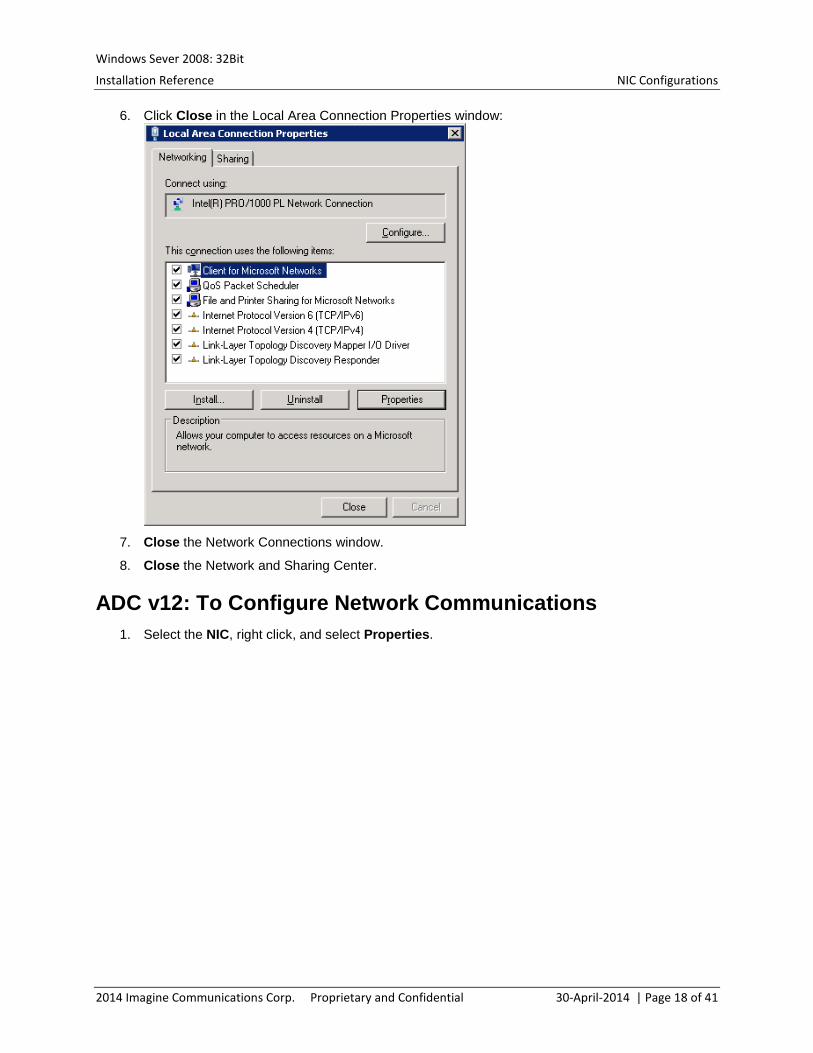
6. Click Close in the Local Area Connection Properties window:
7. Close the Network Connections window.
8. Close the Network and Sharing Center.
ADC v12: To Configure Network Communications 1. Select the NIC, right click, and select Properties.
2014 Imagine Communications Corp. Proprietary and Confidential 30-April-2014 | Page 18 of 41
Windows Sever 2008: 32Bit
Installation Reference NIC Configurations
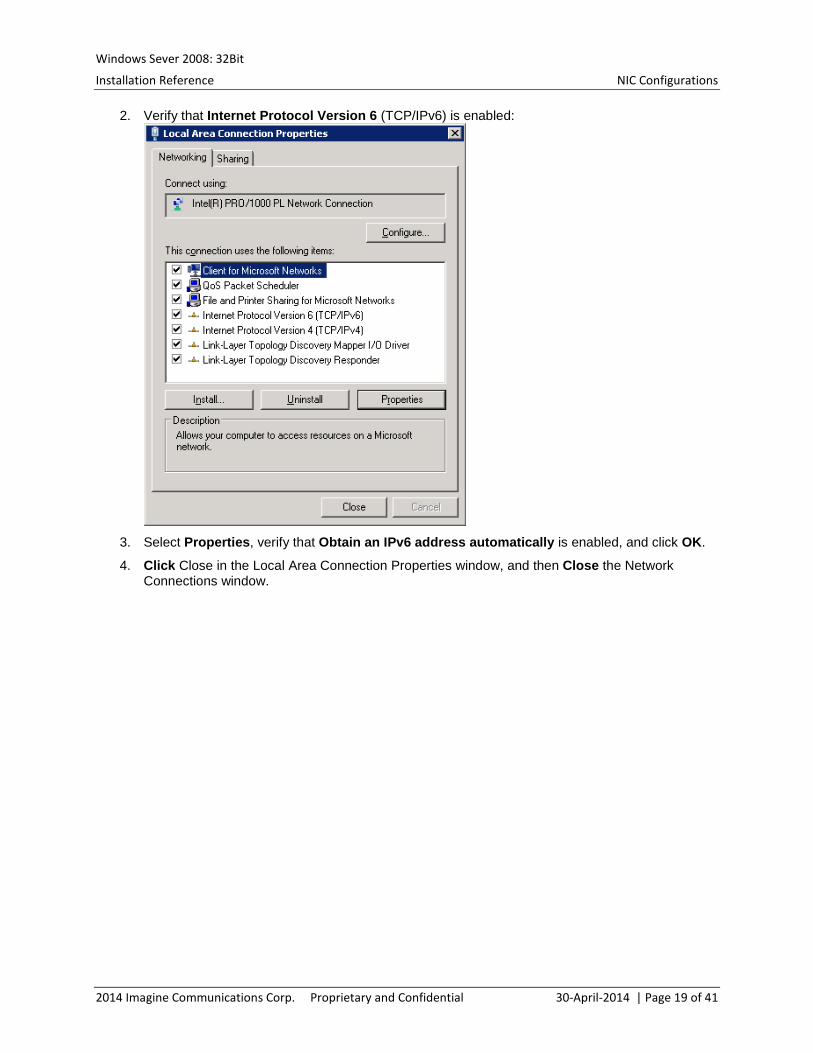
2. Verify that Internet Protocol Version 6 (TCP/IPv6) is enabled:
3. Select Properties, verify that Obtain an IPv6 address automatically is enabled, and click OK.
4. Click Close in the Local Area Connection Properties window, and then Close the Network Connections window.
2014 Imagine Communications Corp. Proprietary and Confidential 30-April-2014 | Page 19 of 41
Windows Sever 2008: 32Bit
Installation Reference Additional Server Configurations
Additional Server Configurations
This chapter includes some more procedures for the Server computer. There are sections for password configurations, configuring the Server for Auto Login, creating a folder for holding different software versions, configuring computer Power Management, configuring File and Folder sharing, enhancing Folder views, and renaming the computer name on the Start Menu.
Configuring a Server Password to Not Expire Because all Automation computers are configured to use the default password “harris”, it is desirable that it not expire. Use this procedure to configure the Server password to not expire.
To Configure a Server Passwords to Not Expire 1. Select Start\Administrative Tools\Local Security Policy.
2. Open Account Policies, and then Password Policy.
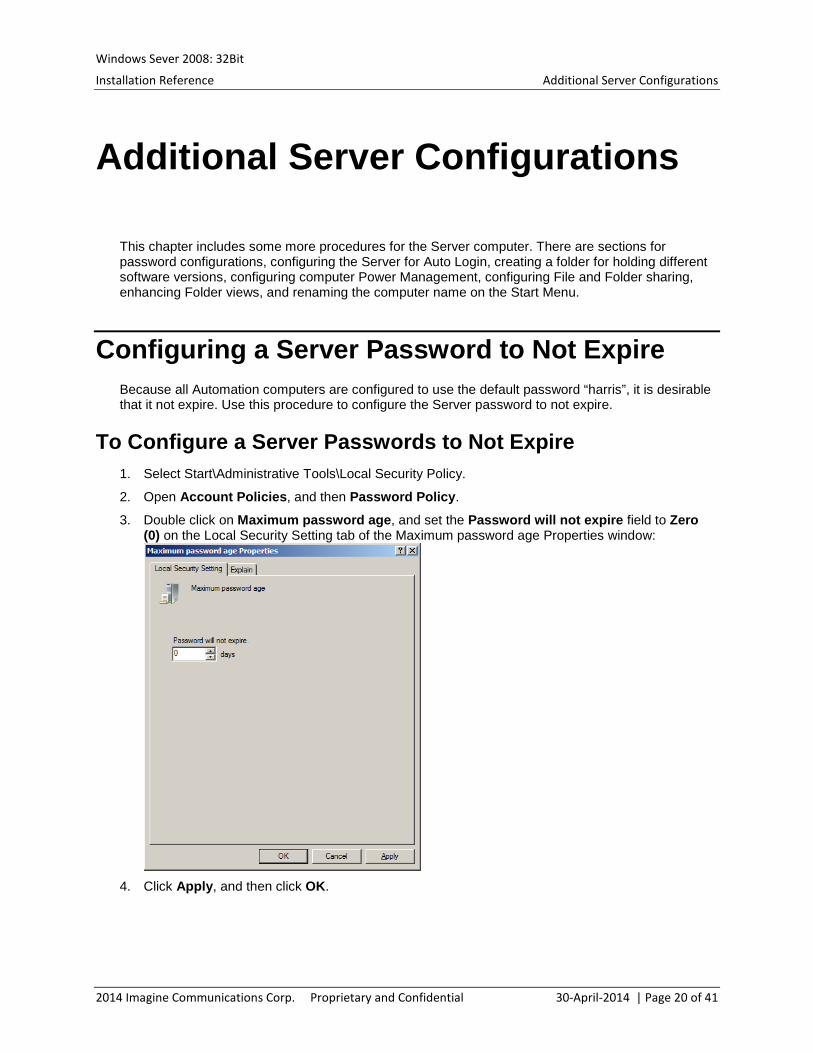
3. Double click on Maximum password age, and set the Password will not expire field to Zero (0) on the Local Security Setting tab of the Maximum password age Properties window:
4. Click Apply, and then click OK.
2014 Imagine Communications Corp. Proprietary and Confidential 30-April-2014 | Page 20 of 41
Windows Sever 2008: 32Bit
Installation Reference Additional Server Configurations
Disabling Server Password Complexity Requirements
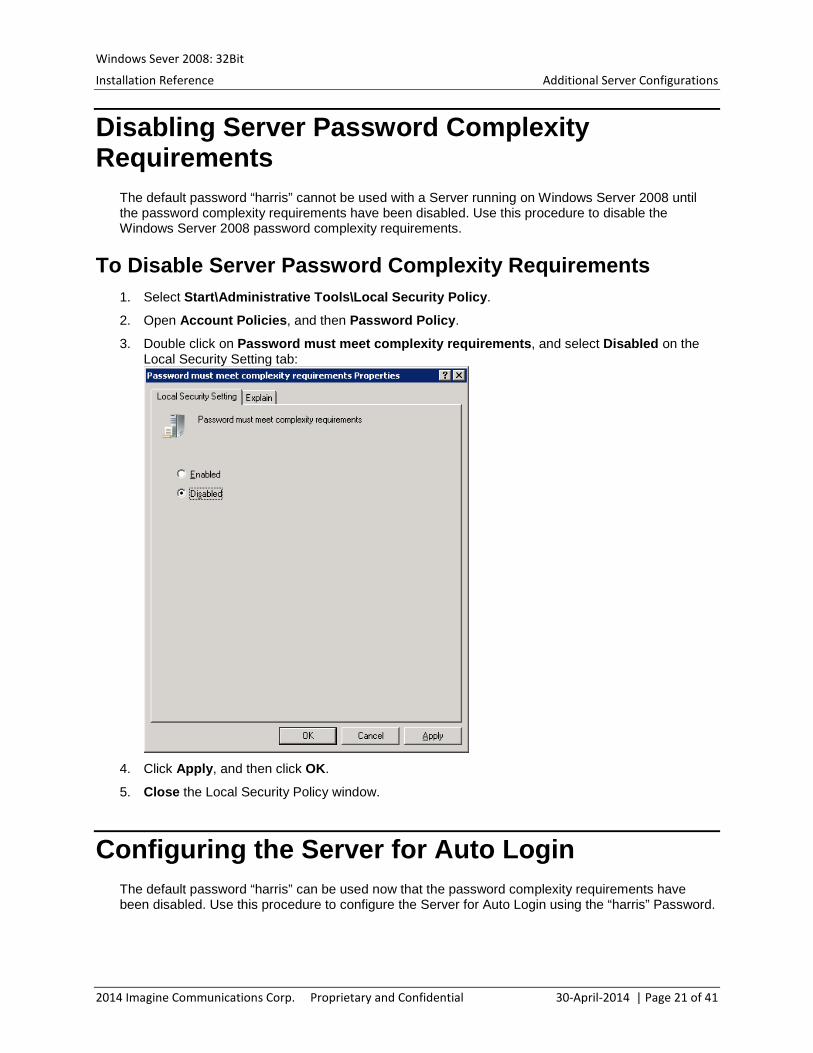
The default password “harris” cannot be used with a Server running on Windows Server 2008 until the password complexity requirements have been disabled. Use this procedure to disable the Windows Server 2008 password complexity requirements.
To Disable Server Password Complexity Requirements 1. Select Start\Administrative Tools\Local Security Policy.
2. Open Account Policies, and then Password Policy.
3. Double click on Password must meet complexity requirements, and select Disabled on the Local Security Setting tab:
4. Click Apply, and then click OK.
5. Close the Local Security Policy window.
Configuring the Server for Auto Login The default password “harris” can be used now that the password complexity requirements have been disabled. Use this procedure to configure the Server for Auto Login using the “harris” Password.
2014 Imagine Communications Corp. Proprietary and Confidential 30-April-2014 | Page 21 of 41
Windows Sever 2008: 32Bit
Installation Reference Additional Server Configurations
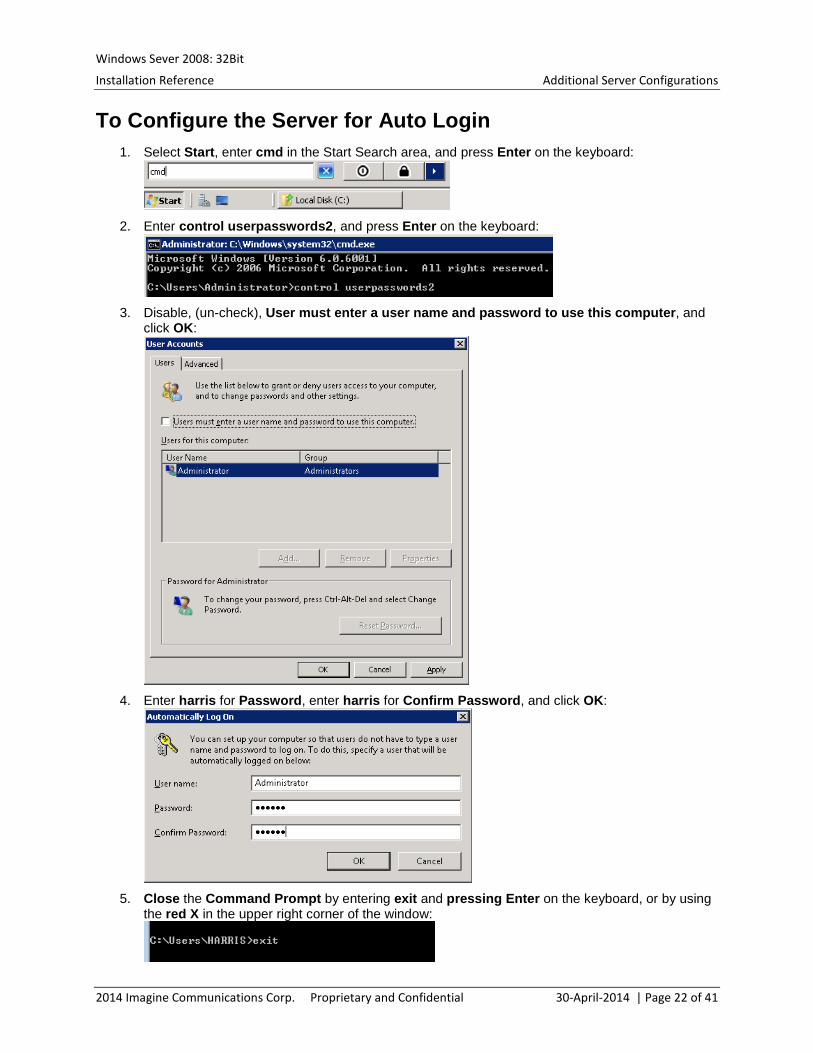
To Configure the Server for Auto Login 1. Select Start, enter cmd in the Start Search area, and press Enter on the keyboard:
2. Enter control userpasswords2, and press Enter on the keyboard:
3. Disable, (un-check), User must enter a user name and password to use this computer, and
click OK:
4. Enter harris for Password, enter harris for Confirm Password, and click OK:
5. Close the Command Prompt by entering exit and pressing Enter on the keyboard, or by using
the red X in the upper right corner of the window:
2014 Imagine Communications Corp. Proprietary and Confidential 30-April-2014 | Page 22 of 41
Windows Sever 2008: 32Bit
Installation Reference Additional Server Configurations
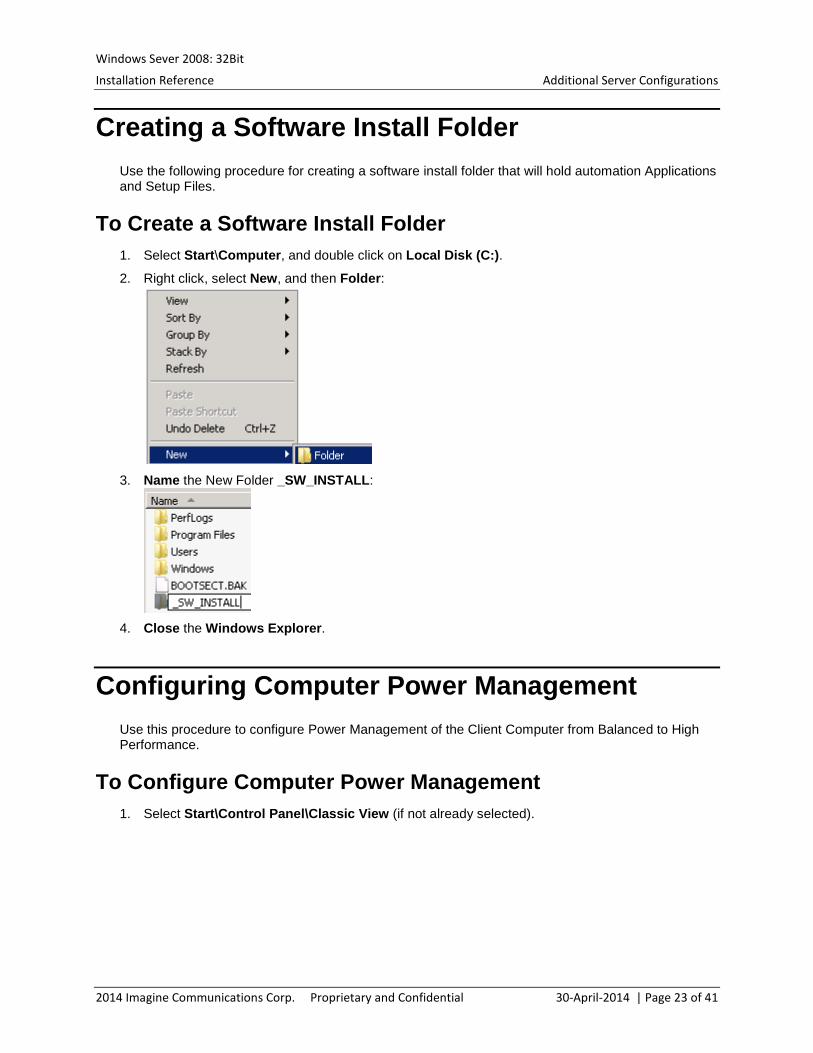
Creating a Software Install Folder Use the following procedure for creating a software install folder that will hold automation Applications and Setup Files.
To Create a Software Install Folder 1. Select Start\Computer, and double click on Local Disk (C:).
2. Right click, select New, and then Folder:
3. Name the New Folder _SW_INSTALL:
4. Close the Windows Explorer.
Configuring Computer Power Management Use this procedure to configure Power Management of the Client Computer from Balanced to High Performance.
To Configure Computer Power Management 1. Select Start\Control Panel\Classic View (if not already selected).
2014 Imagine Communications Corp. Proprietary and Confidential 30-April-2014 | Page 23 of 41

Windows Sever 2008: 32Bit
Installation Reference Additional Server Configurations
2. Select Power Options, and then High Performance:
3. Close the Power Options window.
Configuring File and Folder Sharing Use the following procedure to allow File and Folder Sharing on the Server computer.
To Configure File and Folder Sharing 1. Select Start\Control Panel\Network and Sharing Center.
2. Expand File sharing, enable Turn on file sharing, and click Apply:
2014 Imagine Communications Corp. Proprietary and Confidential 30-April-2014 | Page 24 of 41
Windows Sever 2008: 32Bit
Installation Reference Additional Server Configurations
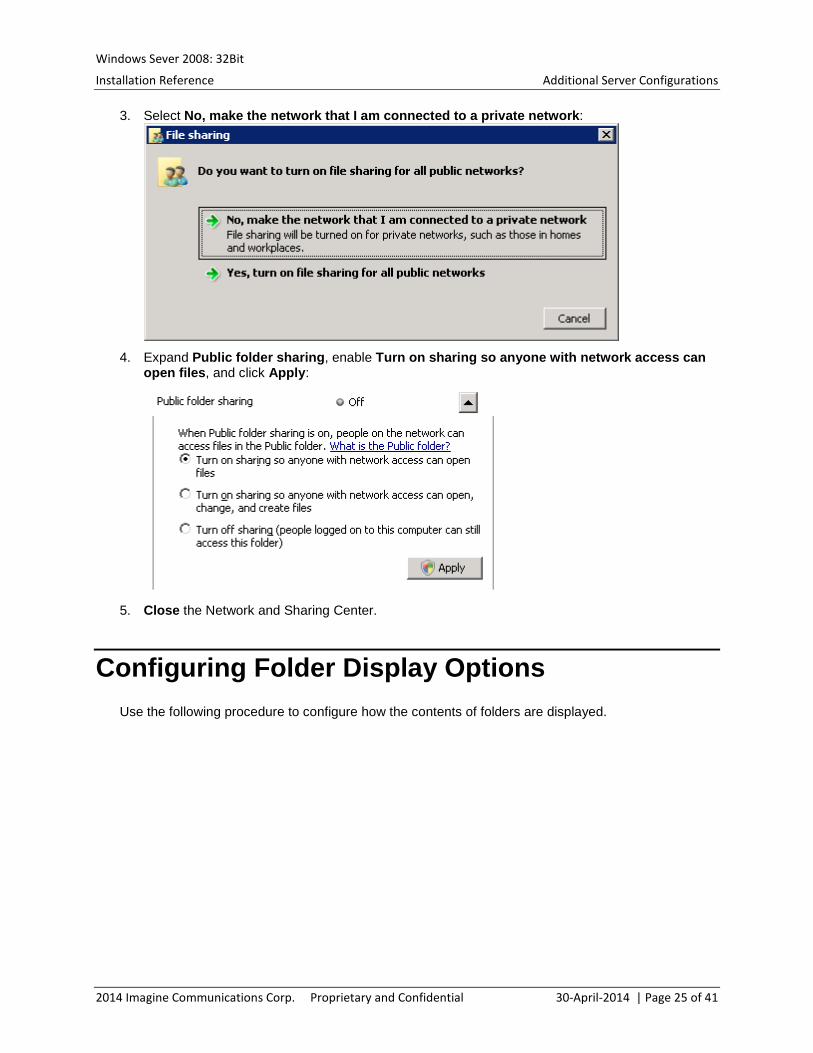
3. Select No, make the network that I am connected to a private network:
4. Expand Public folder sharing, enable Turn on sharing so anyone with network access can
open files, and click Apply:
5. Close the Network and Sharing Center.
Configuring Folder Display Options Use the following procedure to configure how the contents of folders are displayed.
2014 Imagine Communications Corp. Proprietary and Confidential 30-April-2014 | Page 25 of 41

Windows Sever 2008: 32Bit
Installation Reference Additional Server Configurations
To Configure Folder Display Options 1. Select Start\Computer\Organize, and then Folder and search options:
2. Select the View tab, select Show hidden files, folders, and drives, disable (uncheck) Hide
extensions for known file types, click Apply, and then OK:
3. Close the Windows Explorer.
Renaming the Start Menu Computer Name The following procedure explains how to rename the computer name on the Start Menu.
2014 Imagine Communications Corp. Proprietary and Confidential 30-April-2014 | Page 26 of 41
Windows Sever 2008: 32Bit
Installation Reference Additional Server Configurations
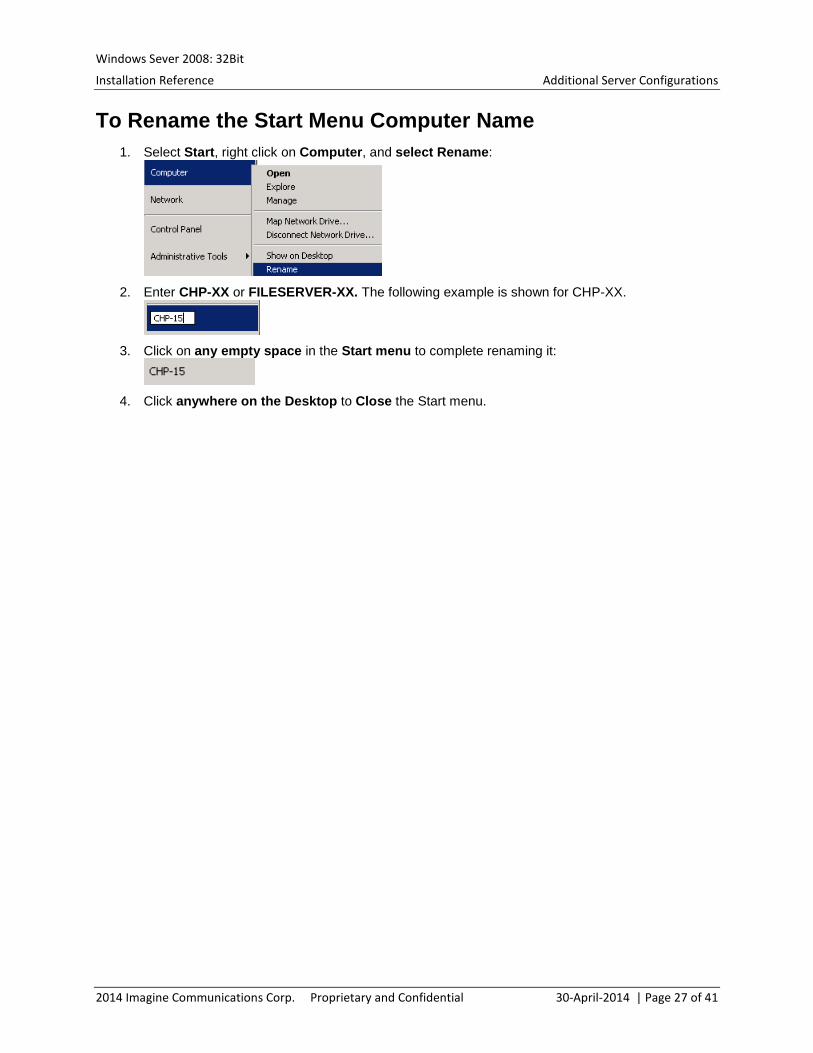
To Rename the Start Menu Computer Name 1. Select Start, right click on Computer, and select Rename:
2. Enter CHP-XX or FILESERVER-XX. The following example is shown for CHP-XX.
3. Click on any empty space in the Start menu to complete renaming it:
4. Click anywhere on the Desktop to Close the Start menu.
2014 Imagine Communications Corp. Proprietary and Confidential 30-April-2014 | Page 27 of 41
Windows Sever 2008: 32Bit
Installation Reference Device Server Drivers (for ADC Device Server v11/v12 only)
Device Server Drivers (for ADC Device Server v11/v12 only)
This chapter includes sections on installing automation Drivers for the Timecode/V-sync, GPI, and RS422 PCI cards. It is assumed that all of the drivers will be in one folder; with each driver and its .sys file in its own sub-folder.
Installing the Timecode/V-sync Driver Follow these Steps when installing the Timecode/V-sync Driver.
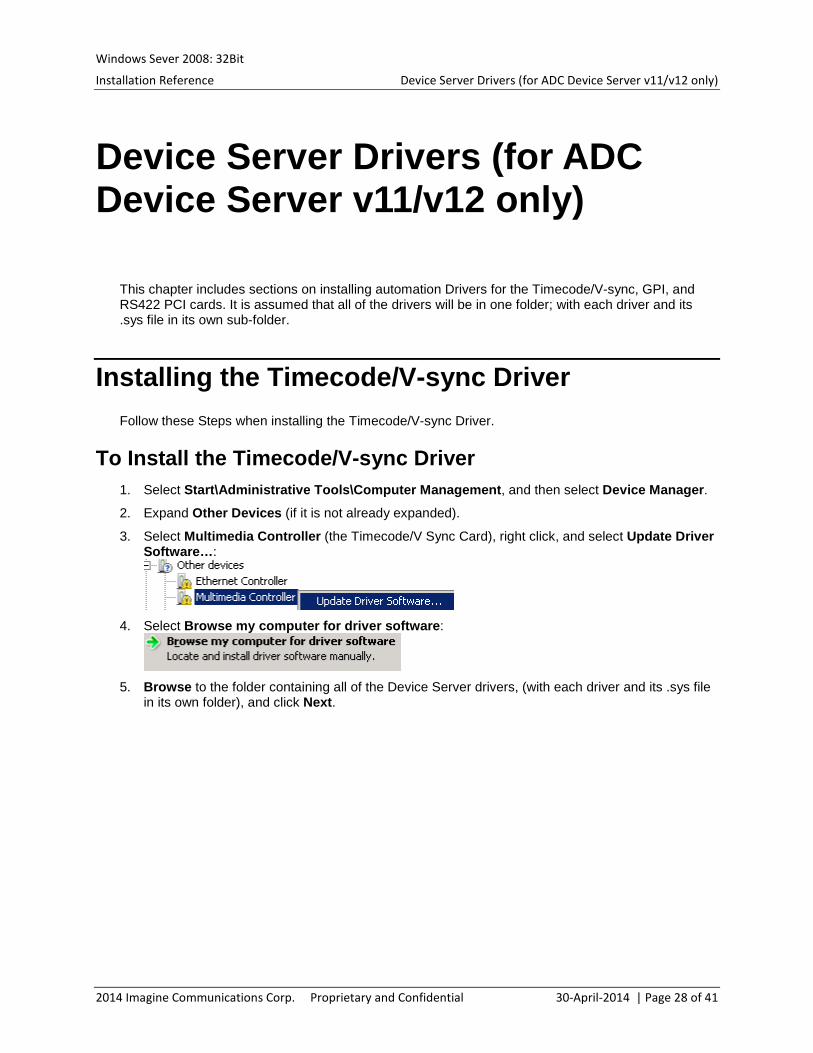
To Install the Timecode/V-sync Driver 1. Select Start\Administrative Tools\Computer Management, and then select Device Manager.
2. Expand Other Devices (if it is not already expanded).
3. Select Multimedia Controller (the Timecode/V Sync Card), right click, and select Update Driver Software…:
4. Select Browse my computer for driver software:
5. Browse to the folder containing all of the Device Server drivers, (with each driver and its .sys file
in its own folder), and click Next.
2014 Imagine Communications Corp. Proprietary and Confidential 30-April-2014 | Page 28 of 41
Windows Sever 2008: 32Bit
Installation Reference Device Server Drivers (for ADC Device Server v11/v12 only)
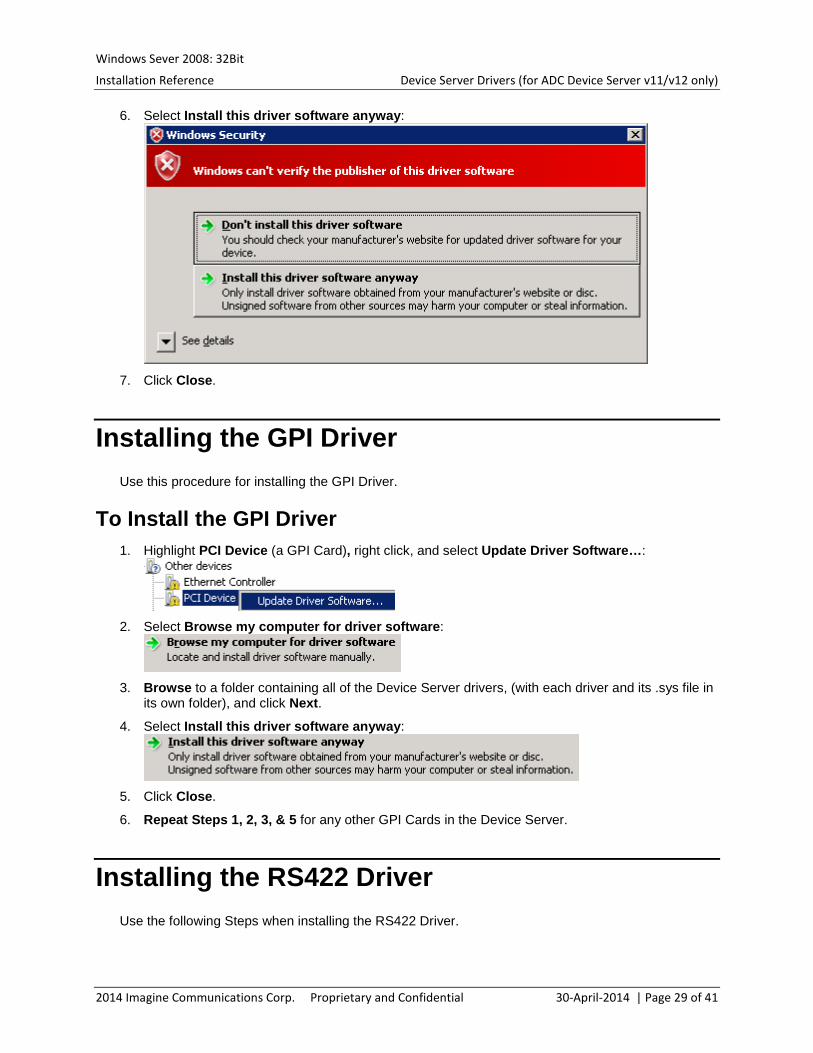
6. Select Install this driver software anyway:
7. Click Close.
Installing the GPI Driver Use this procedure for installing the GPI Driver.
To Install the GPI Driver 1. Highlight PCI Device (a GPI Card), right click, and select Update Driver Software…:
2. Select Browse my computer for driver software:
3. Browse to a folder containing all of the Device Server drivers, (with each driver and its .sys file in
its own folder), and click Next.
4. Select Install this driver software anyway:
5. Click Close.
6. Repeat Steps 1, 2, 3, & 5 for any other GPI Cards in the Device Server.
Installing the RS422 Driver Use the following Steps when installing the RS422 Driver.
2014 Imagine Communications Corp. Proprietary and Confidential 30-April-2014 | Page 29 of 41

Windows Sever 2008: 32Bit
Installation Reference Device Server Drivers (for ADC Device Server v11/v12 only)
To Install the RS422 Driver 1. Highlight the top PCI Multiport Serial Controller (a 422 Card), right click, and select Update
Driver Software…:
2. Select Browse my computer for driver software.
3. Browse to a folder containing all of the Device Server drivers, (with each driver and its .sys file in its own folder), and click Next.
4. Select Install this driver software anyway.
5. Click Close.
6. Repeat Steps 1, 2, 3, & 5 for any other 422 Cards in the Device Server.
7. Close the Device Manager.
2014 Imagine Communications Corp. Proprietary and Confidential 30-April-2014 | Page 30 of 41
Windows Sever 2008: 32Bit
Installation Reference Device Server v12 Installation
Device Server v12 Installation
This section presents the procedure for installing the Device Server v12 application. The installation of the Device Server on a new CHP computer, or a CHP computer with a new OS will change its Node Type from Peer to Peer to Mixed.
Installing the Device Server v12 Application Use the following procedure to install the Device Server Application onto a CHP Device Server.
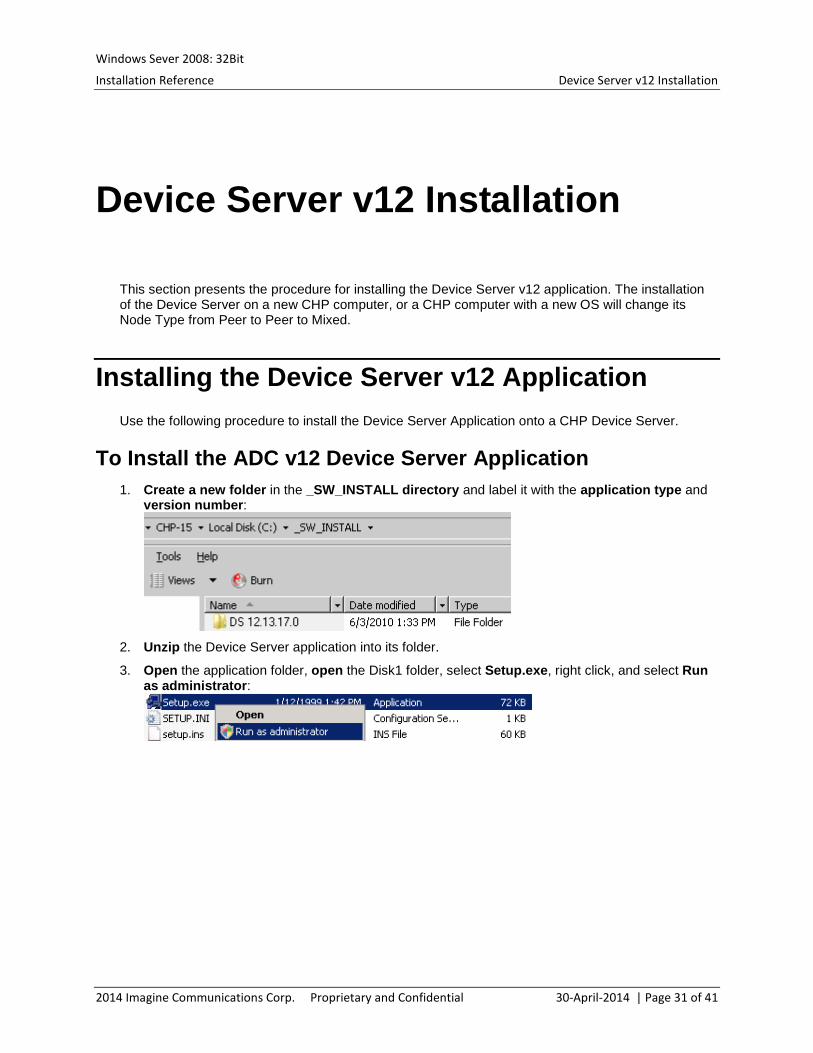
To Install the ADC v12 Device Server Application 1. Create a new folder in the _SW_INSTALL directory and label it with the application type and
version number:
2. Unzip the Device Server application into its folder.
3. Open the application folder, open the Disk1 folder, select Setup.exe, right click, and select Run as administrator:
2014 Imagine Communications Corp. Proprietary and Confidential 30-April-2014 | Page 31 of 41
Windows Sever 2008: 32Bit
Installation Reference Device Server v12 Installation
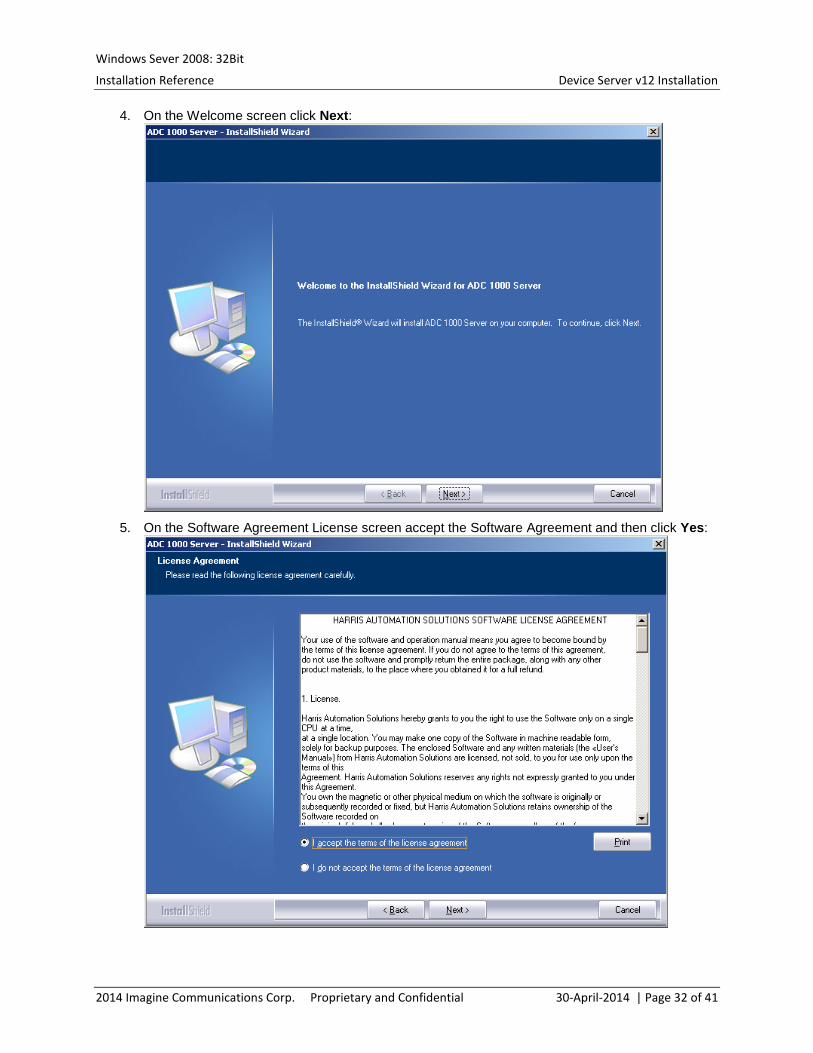
4. On the Welcome screen click Next:
5. On the Software Agreement License screen accept the Software Agreement and then click Yes:
2014 Imagine Communications Corp. Proprietary and Confidential 30-April-2014 | Page 32 of 41
Windows Sever 2008: 32Bit
Installation Reference Device Server v12 Installation
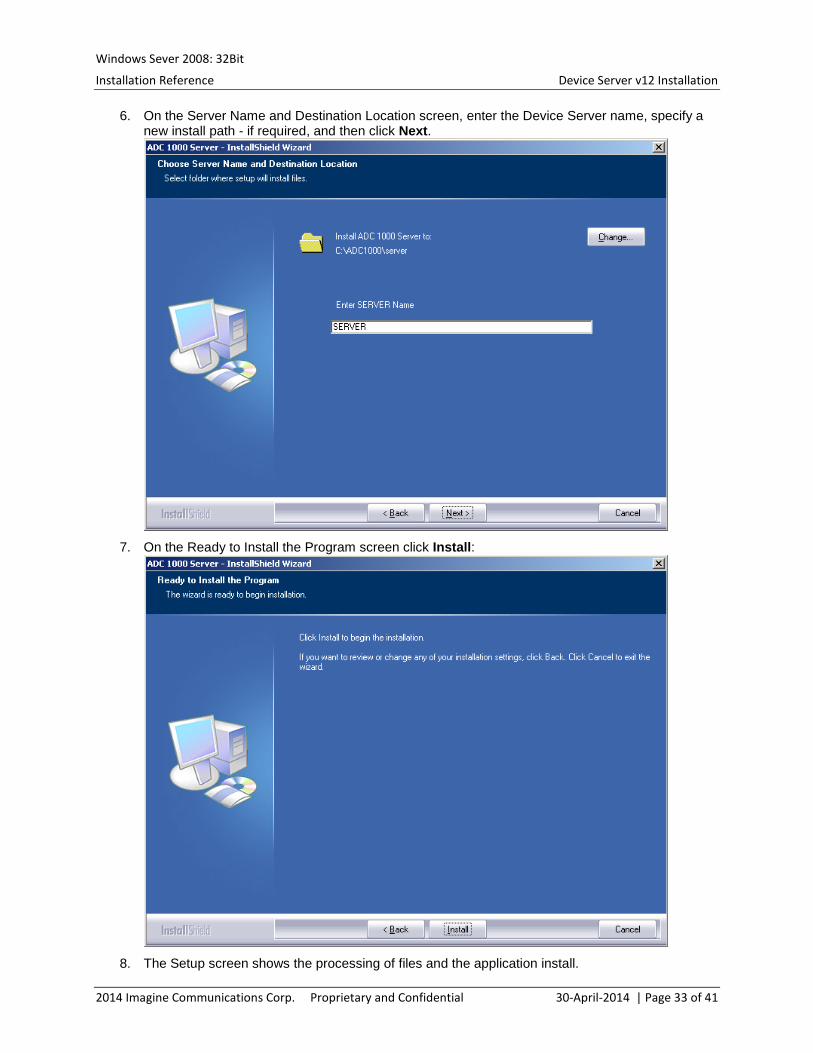
6. On the Server Name and Destination Location screen, enter the Device Server name, specify a new install path - if required, and then click Next.
7. On the Ready to Install the Program screen click Install:
8. The Setup screen shows the processing of files and the application install.
2014 Imagine Communications Corp. Proprietary and Confidential 30-April-2014 | Page 33 of 41
Windows Sever 2008: 32Bit
Installation Reference Device Server v12 Installation
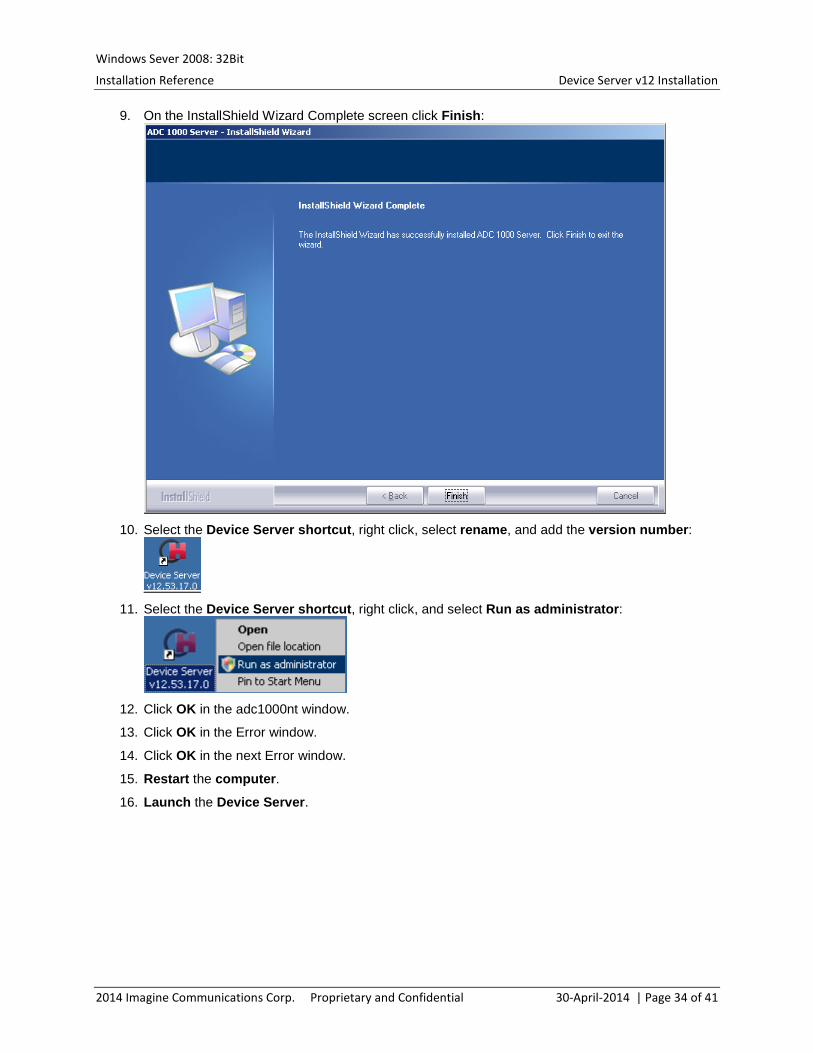
9. On the InstallShield Wizard Complete screen click Finish:
10. Select the Device Server shortcut, right click, select rename, and add the version number:
11. Select the Device Server shortcut, right click, and select Run as administrator:
12. Click OK in the adc1000nt window.
13. Click OK in the Error window.
14. Click OK in the next Error window.
15. Restart the computer.
16. Launch the Device Server.
2014 Imagine Communications Corp. Proprietary and Confidential 30-April-2014 | Page 34 of 41
Windows Sever 2008: 32Bit
Installation Reference ADC v11 Specific Requirements
ADC v11 Specific Requirements
Lana Number Configuration (for ADC Device Server v11 only)
ADC v11 Automation Device Servers and Client computers communicate via NetBIOS over TCP/IP, (NBT). For these computers to work together on this protocol they need to be configured to Lana number 0.
Important: This section applies to ADC v11 and earlier only. It is not required for ADC v12 and higher.
Install LanaConfig on a 32-Bit System 1. Locate Lanacfg.exe, highlight it, right click, and select Copy.
2. Browse to C:\Windows\System32, right click, and select Paste.
3. Close the Windows Explorer.
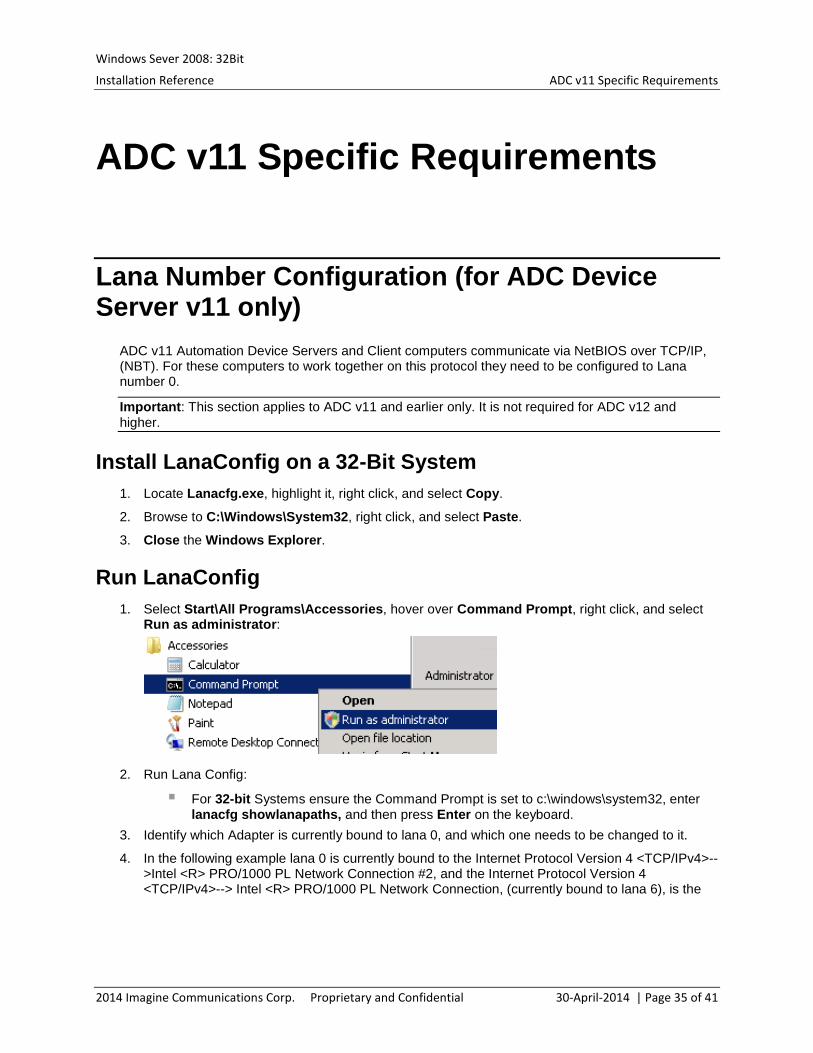
Run LanaConfig 1. Select Start\All Programs\Accessories, hover over Command Prompt, right click, and select
Run as administrator:
2. Run Lana Config:
For 32-bit Systems ensure the Command Prompt is set to c:\windows\system32, enter lanacfg showlanapaths, and then press Enter on the keyboard.
3. Identify which Adapter is currently bound to lana 0, and which one needs to be changed to it.
4. In the following example lana 0 is currently bound to the Internet Protocol Version 4 <TCP/IPv4>-->Intel <R> PRO/1000 PL Network Connection #2, and the Internet Protocol Version 4 <TCP/IPv4>--> Intel <R> PRO/1000 PL Network Connection, (currently bound to lana 6), is the
2014 Imagine Communications Corp. Proprietary and Confidential 30-April-2014 | Page 35 of 41
Windows Sever 2008: 32Bit
Installation Reference ADC v11 Specific Requirements
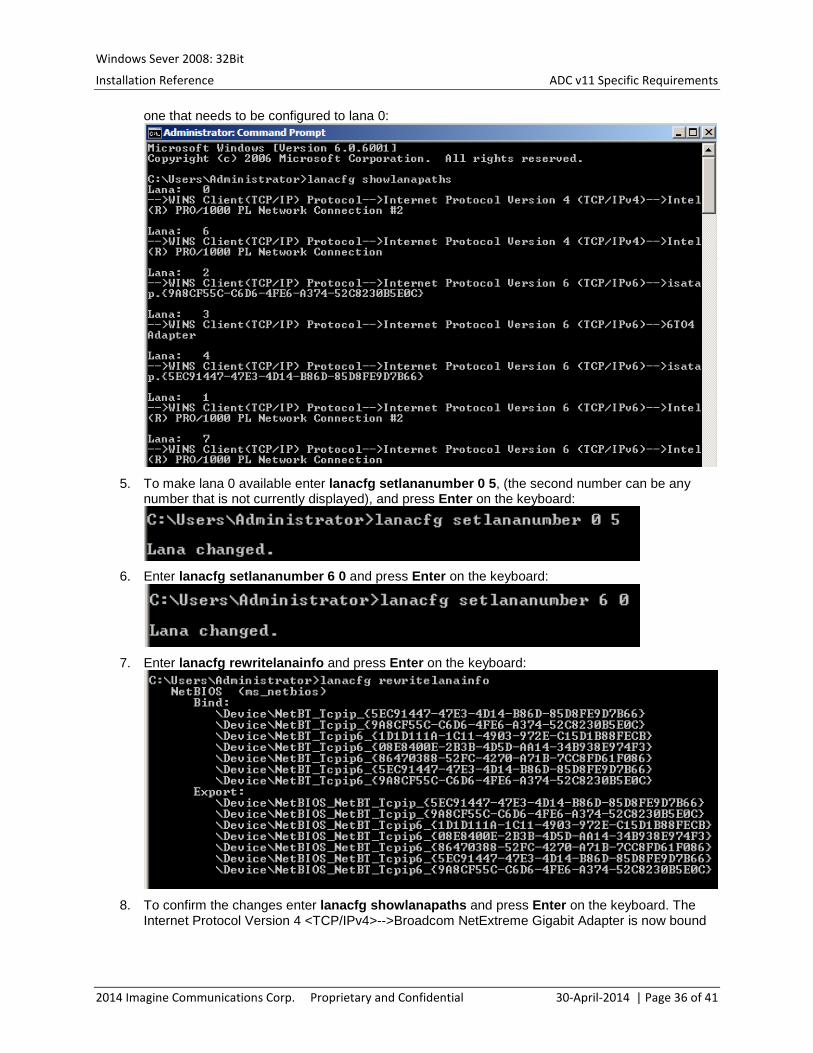
one that needs to be configured to lana 0:
5. To make lana 0 available enter lanacfg setlananumber 0 5, (the second number can be any
number that is not currently displayed), and press Enter on the keyboard:
6. Enter lanacfg setlananumber 6 0 and press Enter on the keyboard:
7. Enter lanacfg rewritelanainfo and press Enter on the keyboard:
8. To confirm the changes enter lanacfg showlanapaths and press Enter on the keyboard. The
Internet Protocol Version 4 <TCP/IPv4>-->Broadcom NetExtreme Gigabit Adapter is now bound
2014 Imagine Communications Corp. Proprietary and Confidential 30-April-2014 | Page 36 of 41

Windows Sever 2008: 32Bit
Installation Reference ADC v11 Specific Requirements
to lana 0:
9. Close the Command Prompt by entering exit and pressing Enter on the keyboard, or by using
the red X in the upper right corner of the window:
Installing the ADC v11 Device Server Application This section presents the procedure for installing the Device Server v11 application. The installation of the Device Server on a new CHP computer, or a CHP computer with a new OS will change its Node Type from Peer to Peer to Mixed.
To Install the ADC v11 Device Server Application 1. Create a new folder in the _SW_INSTALL directory and label it with the application type and
version number:
2. Unzip the Device Server application into its folder.
2014 Imagine Communications Corp. Proprietary and Confidential 30-April-2014 | Page 37 of 41
Windows Sever 2008: 32Bit
Installation Reference ADC v11 Specific Requirements
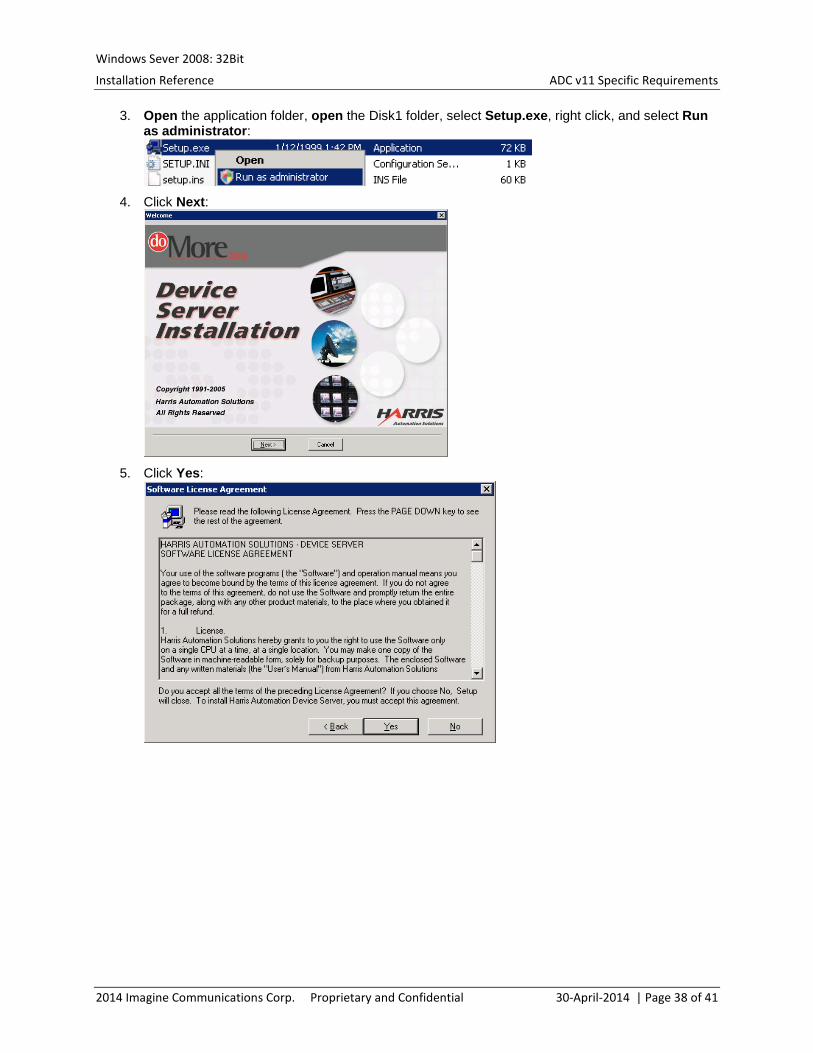
3. Open the application folder, open the Disk1 folder, select Setup.exe, right click, and select Run as administrator:
4. Click Next:
5. Click Yes:
2014 Imagine Communications Corp. Proprietary and Confidential 30-April-2014 | Page 38 of 41
Windows Sever 2008: 32Bit
Installation Reference ADC v11 Specific Requirements
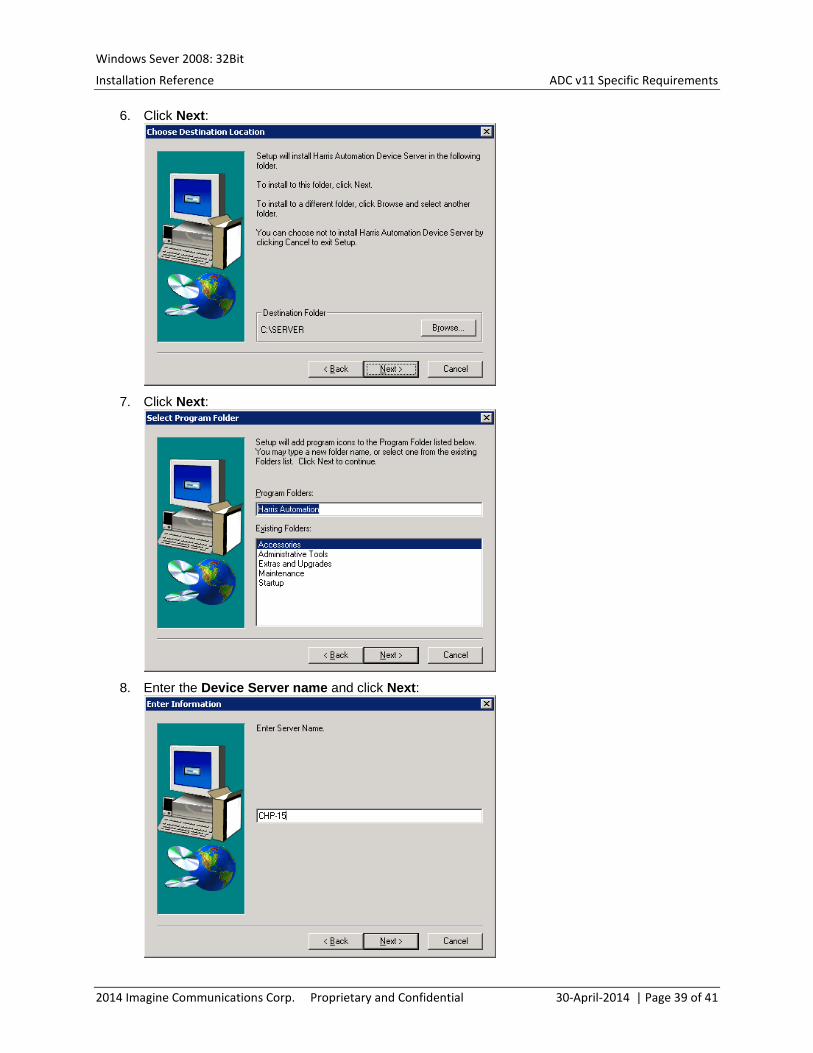
6. Click Next:
7. Click Next:
8. Enter the Device Server name and click Next:
2014 Imagine Communications Corp. Proprietary and Confidential 30-April-2014 | Page 39 of 41

Windows Sever 2008: 32Bit
Installation Reference ADC v11 Specific Requirements
9. Click Next:
10. Select No, I will restart my computer later, and then click Finish:
11. Select the Device Server shortcut, right click, select rename, and add the version number:
12. Select the Device Server shortcut, right click, and select Run as administrator:
2014 Imagine Communications Corp. Proprietary and Confidential 30-April-2014 | Page 40 of 41
Windows Sever 2008: 32Bit
Installation Reference ADC v11 Specific Requirements
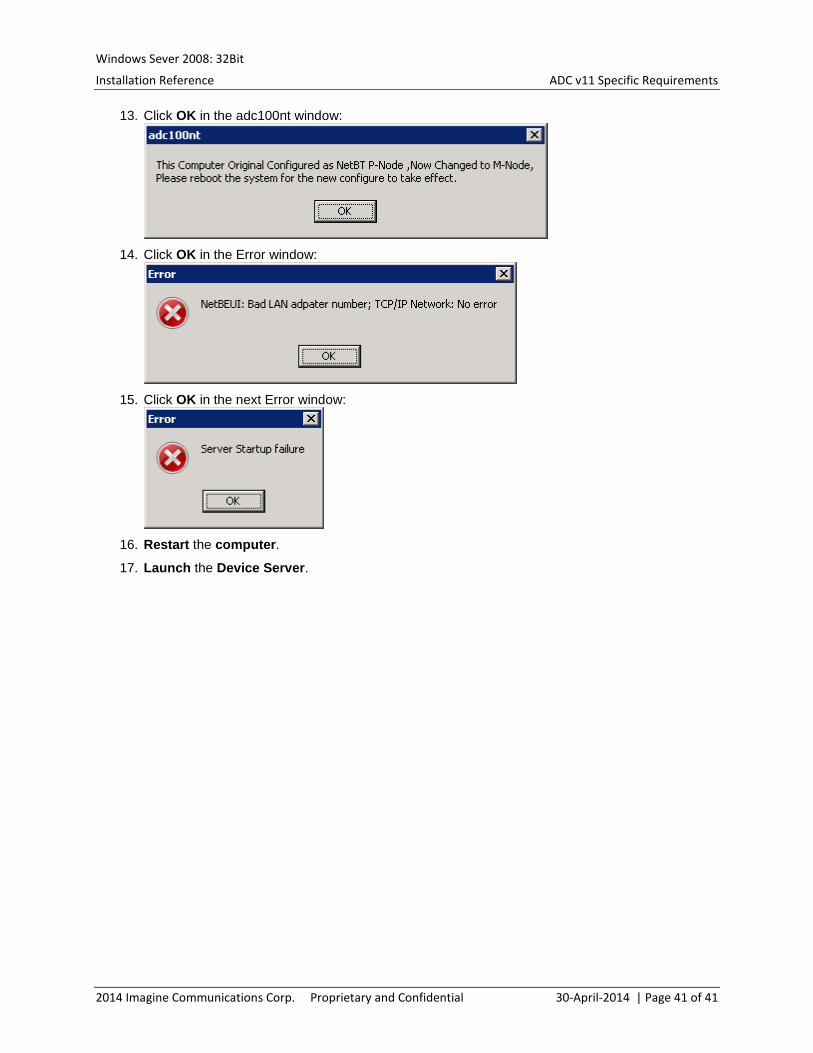
13. Click OK in the adc100nt window:
14. Click OK in the Error window:
15. Click OK in the next Error window:
16. Restart the computer.
17. Launch the Device Server.
2014 Imagine Communications Corp. Proprietary and Confidential 30-April-2014 | Page 41 of 41