Embed Size (px)
Citation preview
1
T E C H N I C A L N O T E S
Table of ContentsOverview . . . . . . . . . . . . . . . . . . . . . . . . . . . . . . . . . . . . . . . . . . . . . . . . . . . . . . . . . 2Installing Windows Server Backup . . . . . . . . . . . . . . . . . . . . . . . . . . . . . . . . . . 3Creating a Windows Server Backup image for system disaster recovery . 4Backup image files produced by Windows Server Backup . . . . . . . . . . . . . . 8Backing up the WSB image to a NetWorker Server. . . . . . . . . . . . . . . . . . . . 9System recovery for Windows 2008 from a WSB backup . . . . . . . . . . . . . 13
WINDOWS SERVER 2008 OFFLINESYSTEM RECOVERY USING WINDOWS
SERVER BACKUP WITH NETWORKERNETWORKER RELEASE 7.4 SERVICE PACK 2 AND LATER
TECHNICAL NOTEP/N 300-010-339
REV A02
Overview
WINDOWS SERVER 2008 OFFLINE SYSTEM RECOVERY USING WINDOWS SERVER BACKUP WITH NET- 2
OverviewThis document describes how to use NetWorker in combination with Microsoft® Windows® Server Backup (WSB) to perform backup and offline disaster recovery of Windows Server 2008 operating systems.
This document includes the following procedures to be done in preparation for the event of a disaster:
�• Installing the Windows Server Backup (WSB) feature.�• Creating a backup image of WSB for system disaster recovery on Windows
Server 2008.�• Backing up of the WSB image to a NetWorker server through the NetWorker
client for Windows.
Additionally, this document includes the following procedures in the event that a disaster has occurred:
�• Using NetWorker to recover this WSB image to a staging area on a network share.
�• Recovering the new machine by booting via a Windows Server 2008 bootable DVD which is then configured to install the OS from the WSB backup image.
Installing Windows Server Backup
WINDOWS SERVER 2008 OFFLINE SYSTEM RECOVERY USING WINDOWS SERVER BACKUP WITH NET- 3
Installing Windows Server Backup Windows Server Backup is not a part of the default Windows operating system installation and must be installed as an optional feature. This can be done through the command line or the Windows Server Manager Add Features Wizard.
Installing Windows Server Backup from command lineTo install Windows Server Backup from the command line:
1. Login to the Windows 2008 server as an account with Administrators group privileges.
2. Select Start > Programs > Accessories, right-click Command Prompt, and then click Run as Administrator.
3. At the command prompt, type the following command:
servermanagercmd -install Backup-Features
Installing Windows Server Backup using the Windows Server ManagerTo install Windows Server Backup using the Windows Server Manager:
1. Login to the Windows 2008 server as an account with Administrators group privileges.
2. Select Start > Programs > Server Manager, or right-click My Computer on the Desktop and select Manage.
3. Click Features in the left navigation pane.
4. If WSB is not listed in the Features Summary window, select Add Features.
The Add Features Wizard displays.
5. In the Select Features window, select Windows Server Backup Features. Click Next.
6. Click Install. Close the window when the installation completes.
Creating a Windows Server Backup image for system disaster recovery
WINDOWS SERVER 2008 OFFLINE SYSTEM RECOVERY USING WINDOWS SERVER BACKUP WITH NET- 4
Creating a Windows Server Backup image for system disaster recovery
A backup image for system disaster recovery can be created through the WSB command line tool wbadmin.exe or the WSB wizard.
NOTE: Microsoft documentation provides more details onusing WSB.
The Windows Server Backup can be stored on either a local volume or a remote shared folder. Note the following considerations:
Local volume considerationsThe following lists considerations for local volumes:
�• The volume cannot be a critical volume and cannot be included in the backup.
A critical volume is defined as any volume that has System States, or any part of them, installed, as well as any volume that has Windows services installed.
�• Identify an account that is a member of the Administrators or Backup Operators group for the backup computer.
�• It is recommended that the volume is dedicated to the snapshot, or backup performance might be severely degraded.
�• The local volume must be NTFS formatted.�• Do not store backups on USB flash or pen drives.�• Multiple versions of the backups will be stored on the local volume, depending
on the size of drive.
Remote shared folder considerationsThe following lists remote shared folder considerations:
�• Backups are overwritten each time there is a new backup.�• Identify an account that is a member of the Administrators or Backup
Operators group for the backup computer, and has write access to the remote shared folder.
�• The server with the shared folder must be in the same domain as the NetWorker client.
If a remote share will be used to backup the WSB image and this share is on a Windows 2003 server:
1. In Windows Explorer on the computer with the local share, right-click the folder, and select Share.
2. In Sharing, enable Share this folder and click Permissions.
3. Click Add.
4. In the Select Users, Computers or Groups windows, click Object Types.
5. In the Object Types window, select Computers to include entries in the search.
Creating a Windows Server Backup image for system disaster recovery
WINDOWS SERVER 2008 OFFLINE SYSTEM RECOVERY USING WINDOWS SERVER BACKUP WITH NET- 5
6. Click Ok.
7. Type the name of the NetWorker client that will backup the WSB client in the Enter the object names to select field.
8. Click Check Names.
9. Click Ok.
10. In the list of accounts with access to the share, click the newly added account, and set the permission level to Contributor.
11.Click Share.
If a remote share will be used to backup the WSB image and this share is on a Windows 2008 server:
1. In Windows Explorer on the local share, right-click the folder, and select Share.
2. Select Find�… from the drop down menu in the Choose people on your network to share with window.
3. Click Customize on the left of the window.
4. In Enter the object names to select, type a user account which is a member of the Administrator group on the NetWorker client . This user account is what will be used to create the WSB backup.
NOTE: On the NetWorker client, the account for backupsmust be a member of the Administrator group.
5. Click Check Names.
6. Click Ok.
7. In the list of accounts with access to the share, click the newly added account, and set the permission level to Contributor.
8. Click Share.
Creating a Windows Server Backup image from the command line (for client-initiated manual backups)You can create a backup image from the command prompt using either a local drive or a UNC format remote drive. In both cases, the volume must have enough disk space for the sum of all the space used on the critical volumes. If a remote drive is used, you must supply the username and password at the command line.
Creating a backup image on a local drive from the command lineTo create a backup image from the command line, type the following command:
wbadmin start backup -backupTarget:<drive letter> -allCritical -quiet
For example:
wbadmin start backup -backupTarget:E: -allCritical -quiet
Creating a Windows Server Backup image for system disaster recovery
WINDOWS SERVER 2008 OFFLINE SYSTEM RECOVERY USING WINDOWS SERVER BACKUP WITH NET- 6
NOTE: <drive letter> cannot be a locally-mapped networkshare. -allCritical instructs the vbadmin.exe command toback up all critical volumes of the system. -quiet is requiredto run in non-interactive mode.
Creating a backup image on a remote shared folder from the command lineTo create a backup image from the command line, type the following command:
wbadmin start backup -backupTarget:<target name> -allCritical -user:<user name> -password:<password> -quiet
For example:
wbadmin start backup -backupTarget:\\10.0.0.1\WSBShare -allCritical -user:administrator -password:password -quiet
NOTE: <target name> cannot be a locally-mapped net-work share. -allCritical instructs the vbadmin.exe commandto back up all critical volumes of the system. A critical vol-ume is defined as any volume that has System States, orany part of them, installed, as well as any volume that hasWindows services installed. -quiet is required to run in non-interactive mode.
Creating a Windows Server Backup image from the Windows Server Backup wizard (for client initiated manual backups)To create a backup image from the Windows Server Backup wizard:
1. Start the WSB console by selecting Start > Programs > Administrative Tools > Windows Server Backup.
2. From the Action menu of the WSB wizard, select Backup Once to start the Backup Once Wizard.
3. In the Backup Once Wizard, select Different Options, then click Next.
4. In the Select Backup Configuration window:
�• To back up to a remote share, accept the Full server (recommended) option.
�• To backup to a local share, select Custom, then select all volumes except the volume used for backups. Ensure that the Enable System Recovery checkbox is selected.
Click Next.
5. In the Specify Destination Type window:
�• Check the Local drives radio button if you have a local drive that is a non-critical volume with enough disk space for the sum of all the space used on the critical volumes.
Creating a Windows Server Backup image for system disaster recovery
WINDOWS SERVER 2008 OFFLINE SYSTEM RECOVERY USING WINDOWS SERVER BACKUP WITH NET- 7
�• Check the Remote shared folder radio button if you have a remote shared folder that has enough disk space for the sum of all the space used on the critical volumes.
Click Next.
6. Perform one of the following based on the option selected in Step 5:
�• If Local drives was selected, in the Select backup destination page, choose the desired local drive from the Backup Destination drop-down list, and click Next.
�• If Remote shared folder was selected, in the Specify remote folder page, specify the path of the remote shared folder, using the format \\<server>\<sharefoldername>. In Access Control, select Inherit, then click Next.
In the Provide User Credentials for backup pop-up, provide the username and password of an account which has write access to the remote share and click Ok.
7. In the Specify Advanced option window, select VSS copy backup (recommended) and click Next.
8. In the Confirmation page, click Backup to start the backup.
9. When the backup completes, the backup status is displayed in the Backup progress window. Click Close.
Backup image files produced by Windows Server Backup
WINDOWS SERVER 2008 OFFLINE SYSTEM RECOVERY USING WINDOWS SERVER BACKUP WITH NET- 8
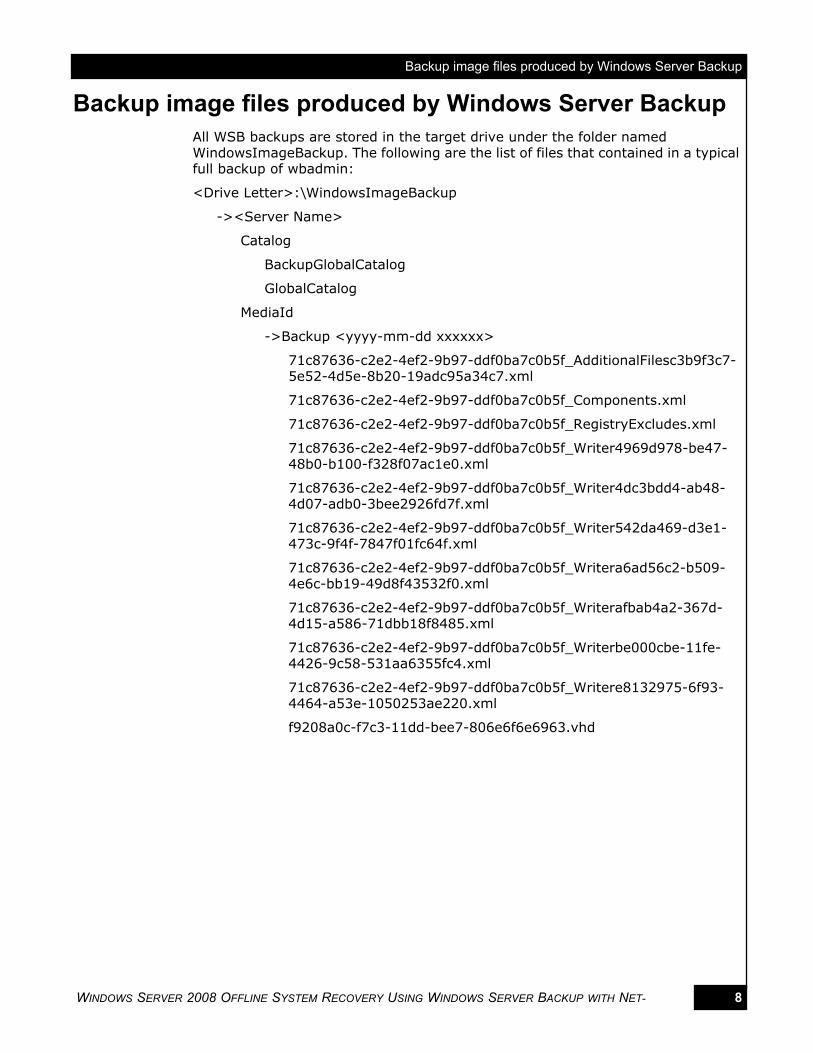
Backup image files produced by Windows Server BackupAll WSB backups are stored in the target drive under the folder named WindowsImageBackup. The following are the list of files that contained in a typical full backup of wbadmin:
<Drive Letter>:\WindowsImageBackup
-><Server Name>
Catalog
BackupGlobalCatalog
GlobalCatalog
MediaId
->Backup <yyyy-mm-dd xxxxxx>
71c87636-c2e2-4ef2-9b97-ddf0ba7c0b5f_AdditionalFilesc3b9f3c7-5e52-4d5e-8b20-19adc95a34c7.xml
71c87636-c2e2-4ef2-9b97-ddf0ba7c0b5f_Components.xml
71c87636-c2e2-4ef2-9b97-ddf0ba7c0b5f_RegistryExcludes.xml
71c87636-c2e2-4ef2-9b97-ddf0ba7c0b5f_Writer4969d978-be47-48b0-b100-f328f07ac1e0.xml
71c87636-c2e2-4ef2-9b97-ddf0ba7c0b5f_Writer4dc3bdd4-ab48-4d07-adb0-3bee2926fd7f.xml
71c87636-c2e2-4ef2-9b97-ddf0ba7c0b5f_Writer542da469-d3e1-473c-9f4f-7847f01fc64f.xml
71c87636-c2e2-4ef2-9b97-ddf0ba7c0b5f_Writera6ad56c2-b509-4e6c-bb19-49d8f43532f0.xml
71c87636-c2e2-4ef2-9b97-ddf0ba7c0b5f_Writerafbab4a2-367d-4d15-a586-71dbb18f8485.xml
71c87636-c2e2-4ef2-9b97-ddf0ba7c0b5f_Writerbe000cbe-11fe-4426-9c58-531aa6355fc4.xml
71c87636-c2e2-4ef2-9b97-ddf0ba7c0b5f_Writere8132975-6f93-4464-a53e-1050253ae220.xml
f9208a0c-f7c3-11dd-bee7-806e6f6e6963.vhd
Backing up the WSB image to a NetWorker Server
WINDOWS SERVER 2008 OFFLINE SYSTEM RECOVERY USING WINDOWS SERVER BACKUP WITH NET- 9
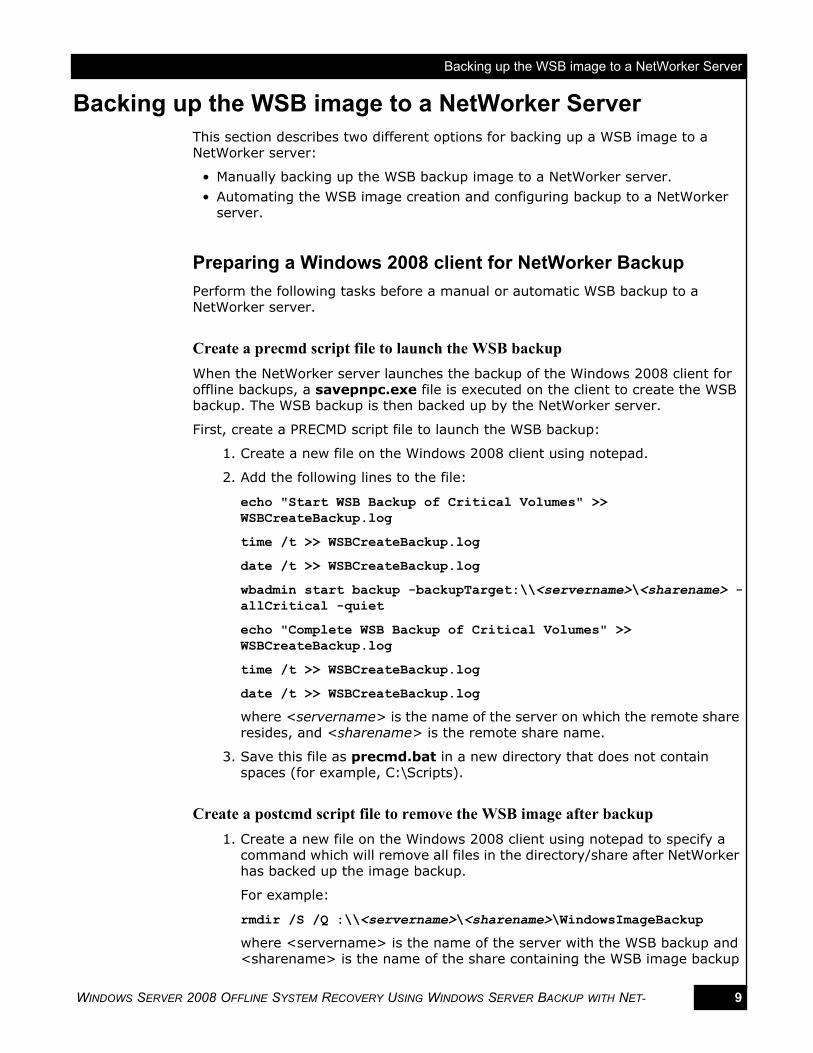
Backing up the WSB image to a NetWorker ServerThis section describes two different options for backing up a WSB image to a NetWorker server:
�• Manually backing up the WSB backup image to a NetWorker server.�• Automating the WSB image creation and configuring backup to a NetWorker
server.
Preparing a Windows 2008 client for NetWorker BackupPerform the following tasks before a manual or automatic WSB backup to a NetWorker server.
Create a precmd script file to launch the WSB backupWhen the NetWorker server launches the backup of the Windows 2008 client for offline backups, a savepnpc.exe file is executed on the client to create the WSB backup. The WSB backup is then backed up by the NetWorker server.
First, create a PRECMD script file to launch the WSB backup:
1. Create a new file on the Windows 2008 client using notepad.
2. Add the following lines to the file:
echo "Start WSB Backup of Critical Volumes" >> WSBCreateBackup.log
time /t >> WSBCreateBackup.log
date /t >> WSBCreateBackup.log
wbadmin start backup -backupTarget:\\<servername>\<sharename> -allCritical -quiet
echo "Complete WSB Backup of Critical Volumes" >> WSBCreateBackup.log
time /t >> WSBCreateBackup.log
date /t >> WSBCreateBackup.log
where <servername> is the name of the server on which the remote share resides, and <sharename> is the remote share name.
3. Save this file as precmd.bat in a new directory that does not contain spaces (for example, C:\Scripts).
Create a postcmd script file to remove the WSB image after backup1. Create a new file on the Windows 2008 client using notepad to specify a
command which will remove all files in the directory/share after NetWorker has backed up the image backup.
For example:
rmdir /S /Q :\\<servername>\<sharename>\WindowsImageBackup
where <servername> is the name of the server with the WSB backup and <sharename> is the name of the share containing the WSB image backup
Backing up the WSB image to a NetWorker Server
WINDOWS SERVER 2008 OFFLINE SYSTEM RECOVERY USING WINDOWS SERVER BACKUP WITH NET- 10
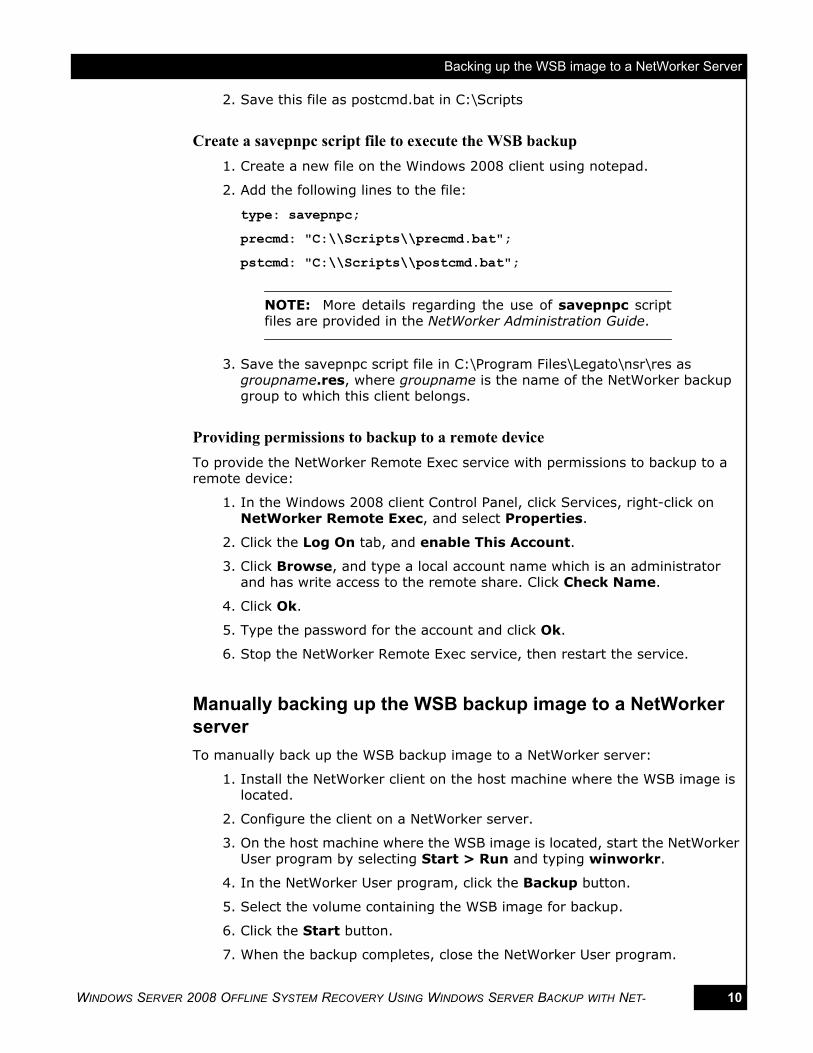
2. Save this file as postcmd.bat in C:\Scripts
Create a savepnpc script file to execute the WSB backup1. Create a new file on the Windows 2008 client using notepad.
2. Add the following lines to the file:
type: savepnpc;
precmd: "C:\\Scripts\\precmd.bat";
pstcmd: "C:\\Scripts\\postcmd.bat";
NOTE: More details regarding the use of savepnpc scriptfiles are provided in the NetWorker Administration Guide.
3. Save the savepnpc script file in C:\Program Files\Legato\nsr\res as groupname.res, where groupname is the name of the NetWorker backup group to which this client belongs.
Providing permissions to backup to a remote deviceTo provide the NetWorker Remote Exec service with permissions to backup to a remote device:
1. In the Windows 2008 client Control Panel, click Services, right-click on NetWorker Remote Exec, and select Properties.
2. Click the Log On tab, and enable This Account.
3. Click Browse, and type a local account name which is an administrator and has write access to the remote share. Click Check Name.
4. Click Ok.
5. Type the password for the account and click Ok.
6. Stop the NetWorker Remote Exec service, then restart the service.
Manually backing up the WSB backup image to a NetWorker serverTo manually back up the WSB backup image to a NetWorker server:
1. Install the NetWorker client on the host machine where the WSB image is located.
2. Configure the client on a NetWorker server.
3. On the host machine where the WSB image is located, start the NetWorker User program by selecting Start > Run and typing winworkr.
4. In the NetWorker User program, click the Backup button.
5. Select the volume containing the WSB image for backup.
6. Click the Start button.
7. When the backup completes, close the NetWorker User program.
Backing up the WSB image to a NetWorker Server
WINDOWS SERVER 2008 OFFLINE SYSTEM RECOVERY USING WINDOWS SERVER BACKUP WITH NET- 11
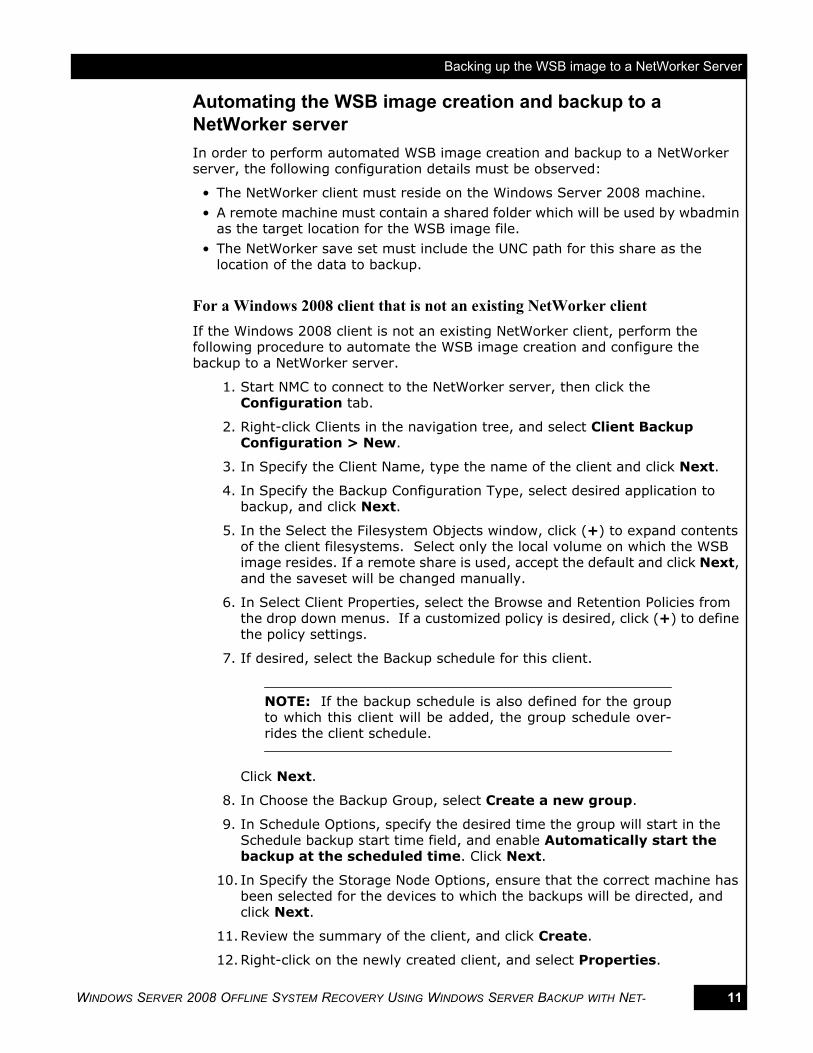
Automating the WSB image creation and backup to a NetWorker serverIn order to perform automated WSB image creation and backup to a NetWorker server, the following configuration details must be observed:
�• The NetWorker client must reside on the Windows Server 2008 machine.�• A remote machine must contain a shared folder which will be used by wbadmin
as the target location for the WSB image file.�• The NetWorker save set must include the UNC path for this share as the
location of the data to backup.
For a Windows 2008 client that is not an existing NetWorker clientIf the Windows 2008 client is not an existing NetWorker client, perform the following procedure to automate the WSB image creation and configure the backup to a NetWorker server.
1. Start NMC to connect to the NetWorker server, then click the Configuration tab.
2. Right-click Clients in the navigation tree, and select Client Backup Configuration > New.
3. In Specify the Client Name, type the name of the client and click Next.
4. In Specify the Backup Configuration Type, select desired application to backup, and click Next.
5. In the Select the Filesystem Objects window, click (+) to expand contents of the client filesystems. Select only the local volume on which the WSB image resides. If a remote share is used, accept the default and click Next, and the saveset will be changed manually.
6. In Select Client Properties, select the Browse and Retention Policies from the drop down menus. If a customized policy is desired, click (+) to define the policy settings.
7. If desired, select the Backup schedule for this client.
NOTE: If the backup schedule is also defined for the groupto which this client will be added, the group schedule over-rides the client schedule.
Click Next.
8. In Choose the Backup Group, select Create a new group.
9. In Schedule Options, specify the desired time the group will start in the Schedule backup start time field, and enable Automatically start the backup at the scheduled time. Click Next.
10. In Specify the Storage Node Options, ensure that the correct machine has been selected for the devices to which the backups will be directed, and click Next.
11.Review the summary of the client, and click Create.
12.Right-click on the newly created client, and select Properties.
Backing up the WSB image to a NetWorker Server
WINDOWS SERVER 2008 OFFLINE SYSTEM RECOVERY USING WINDOWS SERVER BACKUP WITH NET- 12
13. If the WSB image will be saved to a remote share, in the Save Set field, specify the remote share to which the WSB snapshot is to be backed up.
NOTE: For remote shares, specify the save set in the format\\servername\sharename.
14.Make note of the group to which this client is a member.
15.Click the Apps and Modules tab.
16. In the Backup Command field, specify savepnpc.
17.Click Ok.
For a Windows 2008 client that is an existing NetWorker clientIf the Windows 2008 client is an existing NetWorker client, perform the following procedure to automate the WSB image creation and configure the backup to a NetWorker server.
1. Start NMC to connect to the NetWorker server.
2. Click Clients in the navigation tree, right-click the Windows 2008 client, and select Properties.
3. In the Save Set field type the name of the volume or remote share to which the WSB snapshot was backed up.
NOTE: For remote shares, specify the save set in the format\\servername\sharename.
4. Make note of the group to which this client is a member.
5. Click the Apps and Modules tab.
6. In the Backup Command field, type savepnpc.
7. Click Ok.
System recovery for Windows 2008 from a WSB backup
WINDOWS SERVER 2008 OFFLINE SYSTEM RECOVERY USING WINDOWS SERVER BACKUP WITH NET- 13
System recovery for Windows 2008 from a WSB backupThis section describes how to perform a system disaster recovery for Windows Server 2008 from a WSB backup image.
Requirements�• Microsoft requires that the hardware being used to restore the system after a
disaster is identical to the machine where the backups were performed. Microsoft KB249694 at http://support.microsoft.com/kb/249694 provides more details on hardware requirements for recovery.
�• Prior to using WSB to perform the disaster recovery, use the NetWorker server/client to restore the WSB backup to a network share that will be accessible from the new system.
Performing a directed recovery of a WSB image backup1. Log in to the Administrative NetWorker client that will be restoring the
data.
2. Select Start > Programs > EMC Networker to launch the NetWorker User program.
3. In the Change Server window, enter the name of the NetWorker server.
4. Click the Recover button.
5. In the Source client window, select the Windows 2008 client for the WSB Image that will be restored.
6. In the Destination client window, select the NetWorker client where the WSB Image will be restored to.
7. Mark the directory containing the Windows 2008 WSB image.
8. From the Options menu, select Recover Options.
9. In the Recover Options dialog, define the relocation path to be the directory the WSB Image will be restored to (and which has been shared).
10.Click Ok
11.Click the Run button.
12.When the restore completes, close the NetWorker User application.
Performing a system recovery for Windows 2008 from a WSB backupPrior to using WSB to perform the disaster recovery, use the NetWorker Server or Client to restore the WSB backup to a network share that will be accessible from the new system. Then perform the following steps:
1. Configure the new machine to be bootable from a DVD by changing the BIOS setting, if necessary.
2. Boot the machine into installation mode using a Windows 2008 boot DVD.
System recovery for Windows 2008 from a WSB backup
WINDOWS SERVER 2008 OFFLINE SYSTEM RECOVERY USING WINDOWS SERVER BACKUP WITH NET- 14
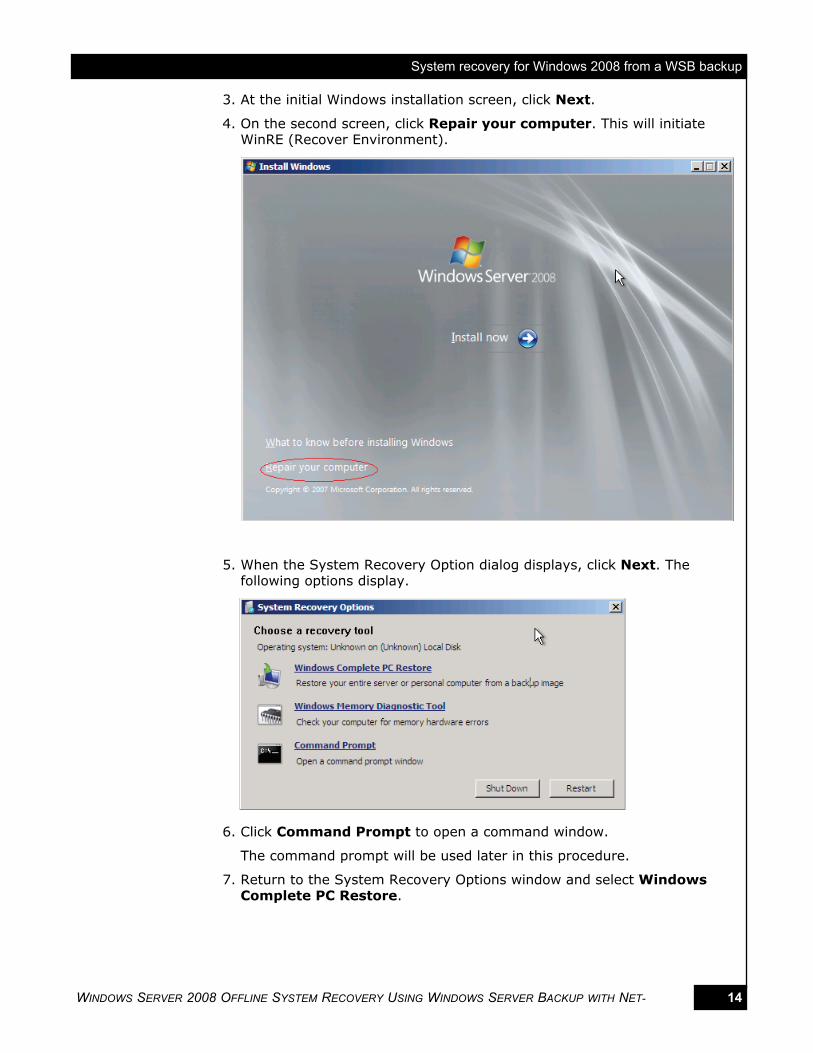
3. At the initial Windows installation screen, click Next.
4. On the second screen, click Repair your computer. This will initiate WinRE (Recover Environment).
5. When the System Recovery Option dialog displays, click Next. The following options display.
6. Click Command Prompt to open a command window.
The command prompt will be used later in this procedure.
7. Return to the System Recovery Options window and select Windows Complete PC Restore.
System recovery for Windows 2008 from a WSB backup
WINDOWS SERVER 2008 OFFLINE SYSTEM RECOVERY USING WINDOWS SERVER BACKUP WITH NET- 15
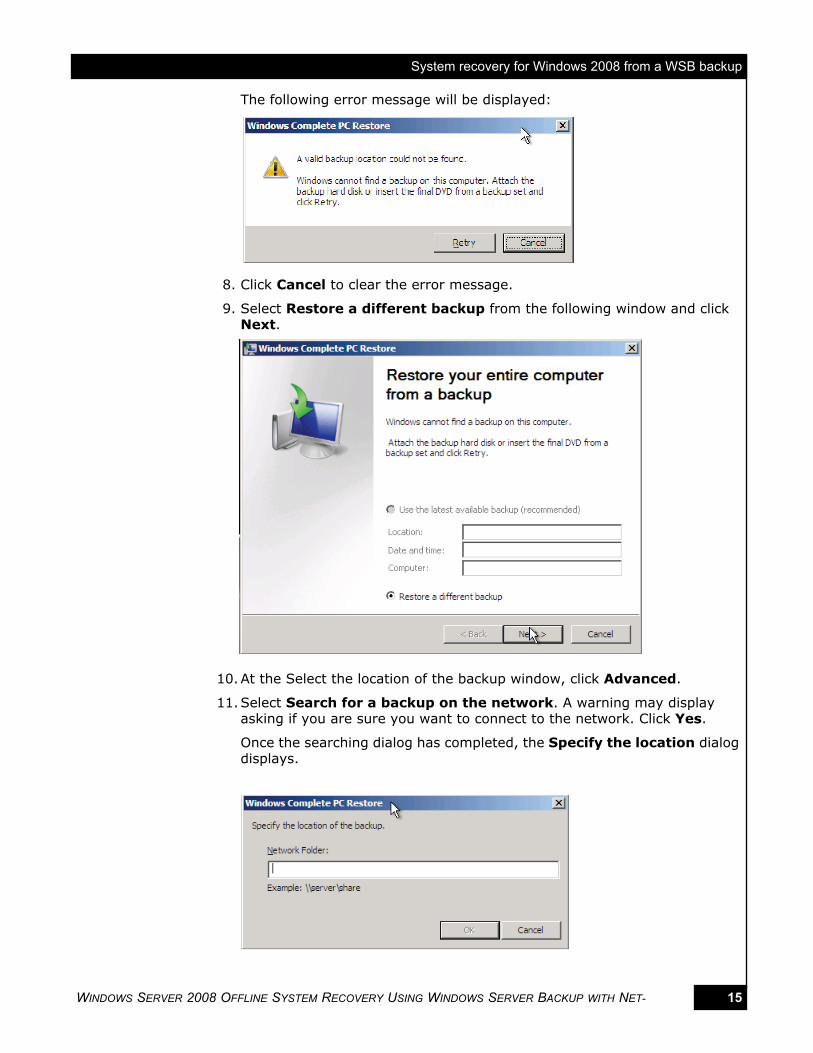
The following error message will be displayed:
8. Click Cancel to clear the error message.
9. Select Restore a different backup from the following window and click Next.
10.At the Select the location of the backup window, click Advanced.
11.Select Search for a backup on the network. A warning may display asking if you are sure you want to connect to the network. Click Yes.
Once the searching dialog has completed, the Specify the location dialog displays.
System recovery for Windows 2008 from a WSB backup
WINDOWS SERVER 2008 OFFLINE SYSTEM RECOVERY USING WINDOWS SERVER BACKUP WITH NET- 16
12.Click Cancel to clear the Specify the location dialog.
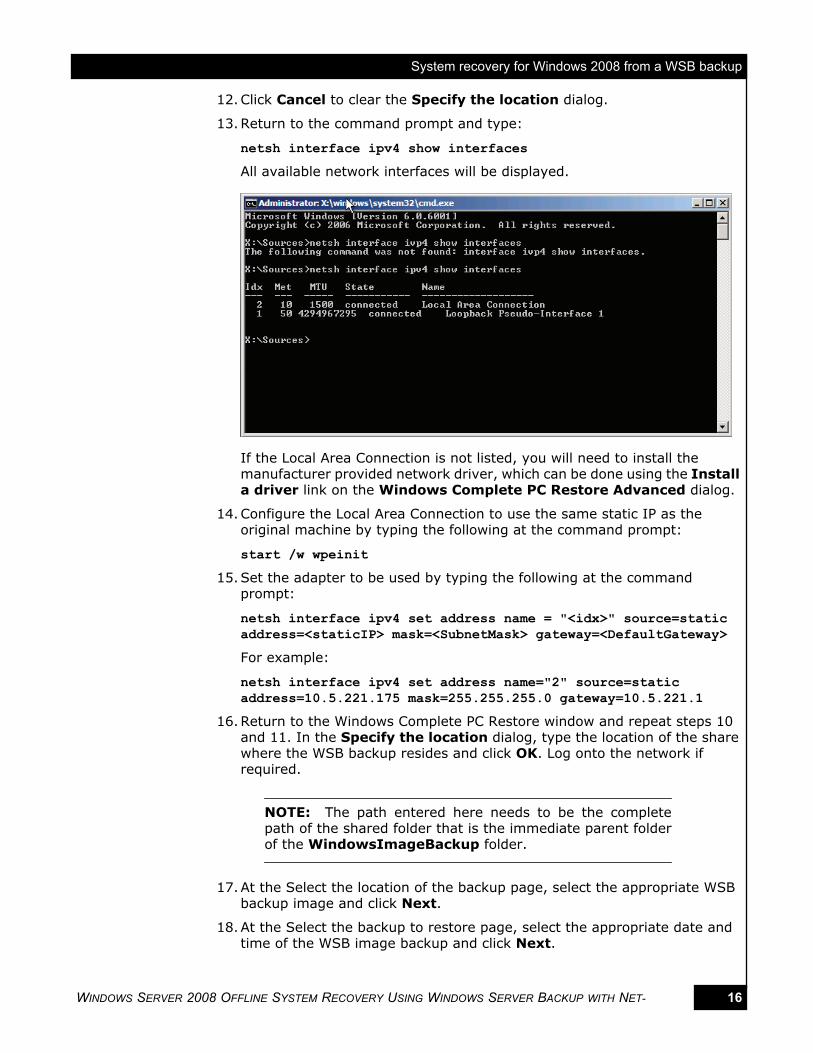
13.Return to the command prompt and type:
netsh interface ipv4 show interfaces
All available network interfaces will be displayed.
If the Local Area Connection is not listed, you will need to install the manufacturer provided network driver, which can be done using the Install a driver link on the Windows Complete PC Restore Advanced dialog.
14.Configure the Local Area Connection to use the same static IP as the original machine by typing the following at the command prompt:
start /w wpeinit
15.Set the adapter to be used by typing the following at the command prompt:
netsh interface ipv4 set address name = "<idx>" source=static address=<staticIP> mask=<SubnetMask> gateway=<DefaultGateway>
For example:
netsh interface ipv4 set address name="2" source=static address=10.5.221.175 mask=255.255.255.0 gateway=10.5.221.1
16.Return to the Windows Complete PC Restore window and repeat steps 10 and 11. In the Specify the location dialog, type the location of the share where the WSB backup resides and click OK. Log onto the network if required.
NOTE: The path entered here needs to be the completepath of the shared folder that is the immediate parent folderof the WindowsImageBackup folder.
17.At the Select the location of the backup page, select the appropriate WSB backup image and click Next.
18.At the Select the backup to restore page, select the appropriate date and time of the WSB image backup and click Next.
System recovery for Windows 2008 from a WSB backup
WINDOWS SERVER 2008 OFFLINE SYSTEM RECOVERY USING WINDOWS SERVER BACKUP WITH NET- 17
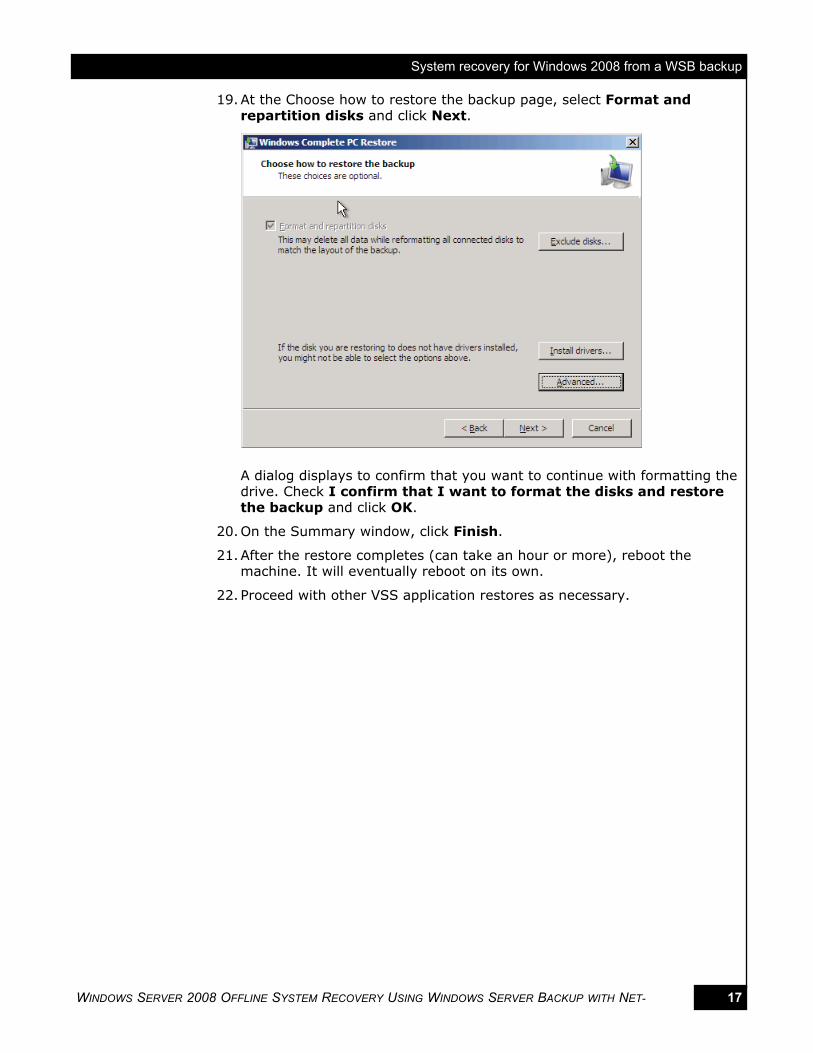
19.At the Choose how to restore the backup page, select Format and repartition disks and click Next.
A dialog displays to confirm that you want to continue with formatting the drive. Check I confirm that I want to format the disks and restore the backup and click OK.
20.On the Summary window, click Finish.
21.After the restore completes (can take an hour or more), reboot the machine. It will eventually reboot on its own.
22. Proceed with other VSS application restores as necessary.
WINDOWS SERVER 2008 OFFLINE SYSTEM RECOVERY USING WINDOWS SERVER BACKUP WITH NET- 18
Copyright © 2009 EMC Corporation. All rights reserved.
EMC believes the information in this publication is accurate as of its publication date. The information is subject to change without notice.
THE INFORMATION IN THIS PUBLICATION IS PROVIDED "AS IS." EMC CORPORATION MAKES NO REPRESENTATIONS OR WARRANTIES OF ANY KIND WITH RESPECT TO THE INFORMATION IN THISPUBLICATION, AND SPECIFICALLY DISCLAIMS IMPLIED WARRANTIES OF MERCHANTABILITY OR FITNESS FOR A PARTICULAR PURPOSE.
Use, copying, and distribution of any EMC software described in this publication requires an applicable software license.
For the most up-to-date listing of EMC product names, see EMC Corporation Trademarks on EMC.com.
All other trademarks used herein are the property of their respective owners.