Embed Size (px)
Citation preview
Windows PowerShell: Batch Files on Steroids
Doug Hennig Stonefield Software Inc.
Email: [email protected] Corporate Web sites: www.stonefieldquery.com
and www.stonefieldsoftware.com Personal Web site : www.DougHennig.com
Blog: DougHennig.BlogSpot.com Twitter: DougHennig
Windows PowerShell has been included with the operating system since Windows 7 and is available for download for older systems. What is PowerShell? It's Microsoft's task automation scripting framework. PowerShell isn’t just a replacement for batch files; it can do a lot more than batch files ever could. This session looks at PowerShell, including why you should start using it and how to create PowerShell scripts.

Windows PowerShell: Batch Files on Steroids
Copyright 2014, Doug Hennig Page 2 of 36
Introduction While having a graphical user interface like Microsoft Windows is great for both ease-of-use and productivity, nothing beats commands for performing repetitive tasks. After all, a single command can replace clicking buttons, choosing menu items, and selecting choices in dialogs. Microsoft has provided a command-line interface ever since the first release of DOS. It also provided a way to put multiple commands into a text file with a “bat” extension (a “batch” file) and have one command execute all of the commands in the file.
If you’ve ever used batch files to automate system tasks, you know they have numerous shortcomings. Error handling is rudimentary and the list of commands is short, so there’s really only a small set of things you can do with batch files, like copying or moving files.
Although the command shell (cmd.exe) and batch files are still available in Windows, they’ve been supplanted in functionality by Windows PowerShell. PowerShell has been around for several years. Starting with Windows 7, it ships with the operating system and is available for download for older systems. The latest version is 4.0, which comes with Windows 8.1 and Windows Server 2012 R2 and can be installed on older systems.
The key things to know about PowerShell are:
It’s built on the .NET framework, so it has full access to .NET’s extensive class library.
It also has full access to COM and WMI, so it can do just about any system administrative task.
PowerShell statements are interpreted rather than compiled, so they can be executed interactively in PowerShell’s console window.
PowerShell is dynamically rather than statically typed, so it works more like VFP than like .NET for data typing.
Like .NET, everything in PowerShell is an object.
What is PowerShell good for? In a word, everything:
Server administration: restart or shutdown servers, change passwords, restart services, terminate processes, or just about any other task you can think of.
Web server administration: manage web sites, application pools, and virtual directories.
Workstation administration: perform backups, create user accounts, set or determine configuration settings, kill processes, and so on.
Application administration: many tasks you would perform using a GUI to manage tools like SQL Server and Exchange Server are available as PowerShell commands.

Windows PowerShell: Batch Files on Steroids
Copyright 2014, Doug Hennig Page 3 of 36
Anything else you want to automate. Later in this document, we’ll look at automating deploying VFP applications.
Here’s a simple example: suppose you want to document the values of system environment variables. Here’s how you do it using the Windows 8.1 GUI:
Right-click the Windows Start button and choose System.
Click the Advanced system settings link.
Click the Environment Variables button.
For each one, click the Edit button, copy the name and the values, and paste them into the documentation.
Here’s how to do it using PowerShell:
Launch PowerShell; the next section discusses several ways to do that.
Type the following:
dir env: | select key, value | export-csv result.csv
Not only does this one statement save time, it can also be automated, which the GUI steps cannot.
Starting with PowerShell The easiest way to starting playing with PowerShell is to open a console window. There are several ways you can do that:
Windows 8
Open File Explorer, choose the File tab, and select either Open Windows PowerShell or Open Windows PowerShell as administrator to open a window in the current folder.
Press Windows-S to open Search, type “PowerShell,” and select Windows PowerShell from the list of matches. Right-click it and choose Run as administrator if necessary.
Older operating systems
Click the Start button, choose All Programs, Accessories, Windows PowerShell, and select Windows PowerShell. Right-click it and choose Run as administrator if necessary.
Click the Start button, type “PowerShell” in the search box, and select Windows PowerShell. Right-click it and choose Run as administrator if necessary.
From a Windows Explorer window, type “powershell” in the address bar.
Windows PowerShell: Batch Files on Steroids
Copyright 2014, Doug Hennig Page 4 of 36
PowerShell is located in C:\Windows\System32\WindowsPowerShell\v1.0, so you can also run PowerShell.exe in that folder.
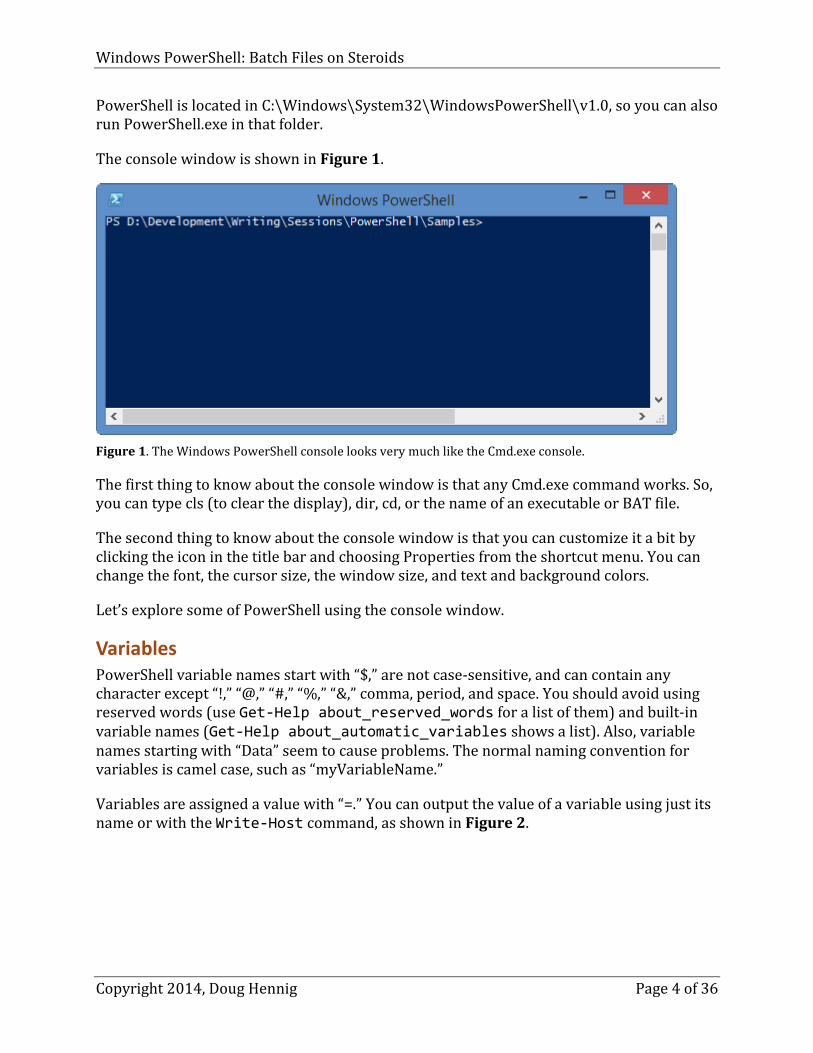
The console window is shown in Figure 1.
Figure 1. The Windows PowerShell console looks very much like the Cmd.exe console.
The first thing to know about the console window is that any Cmd.exe command works. So, you can type cls (to clear the display), dir, cd, or the name of an executable or BAT file.
The second thing to know about the console window is that you can customize it a bit by clicking the icon in the title bar and choosing Properties from the shortcut menu. You can change the font, the cursor size, the window size, and text and background colors.
Let’s explore some of PowerShell using the console window.
Variables PowerShell variable names start with “$,” are not case-sensitive, and can contain any character except “!,” “@,” “#,” “%,” “&,” comma, period, and space. You should avoid using reserved words (use Get-Help about_reserved_words for a list of them) and built-in variable names (Get-Help about_automatic_variables shows a list). Also, variable names starting with “Data” seem to cause problems. The normal naming convention for variables is camel case, such as “myVariableName.”
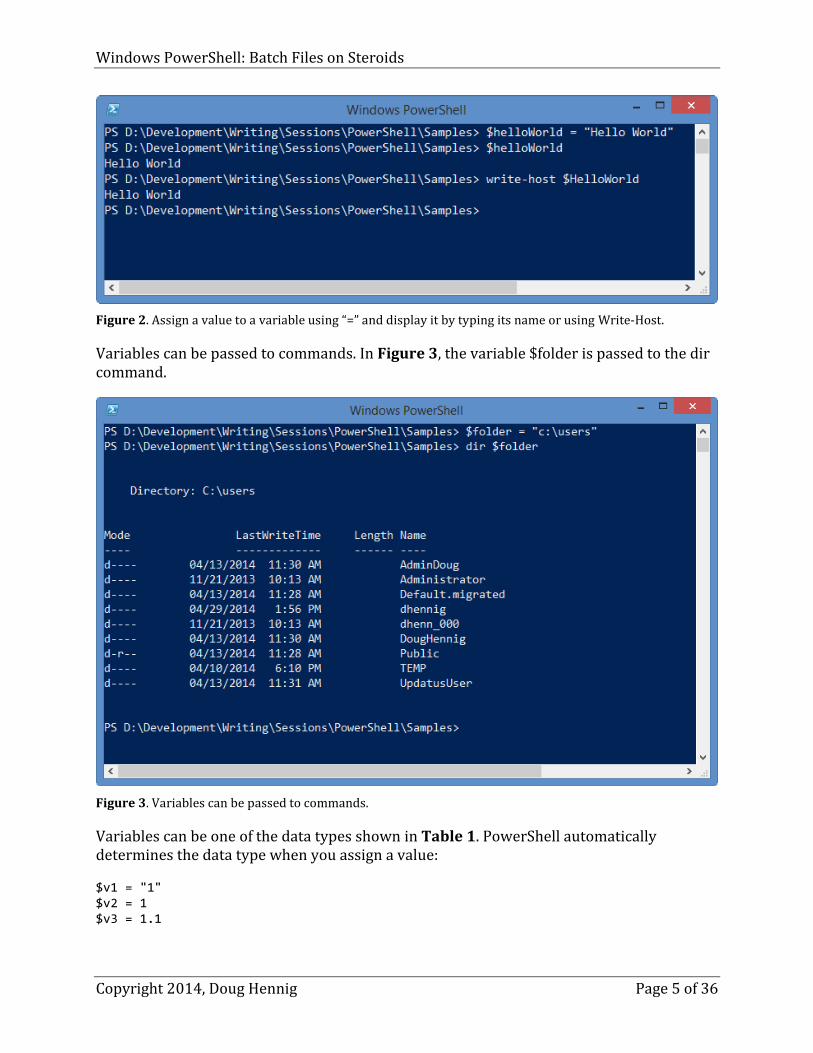
Variables are assigned a value with “=.” You can output the value of a variable using just its name or with the Write-Host command, as shown in Figure 2.
Windows PowerShell: Batch Files on Steroids
Copyright 2014, Doug Hennig Page 5 of 36
Figure 2. Assign a value to a variable using “=” and display it by typing its name or using Write-Host.
Variables can be passed to commands. In Figure 3, the variable $folder is passed to the dir command.
Figure 3. Variables can be passed to commands.
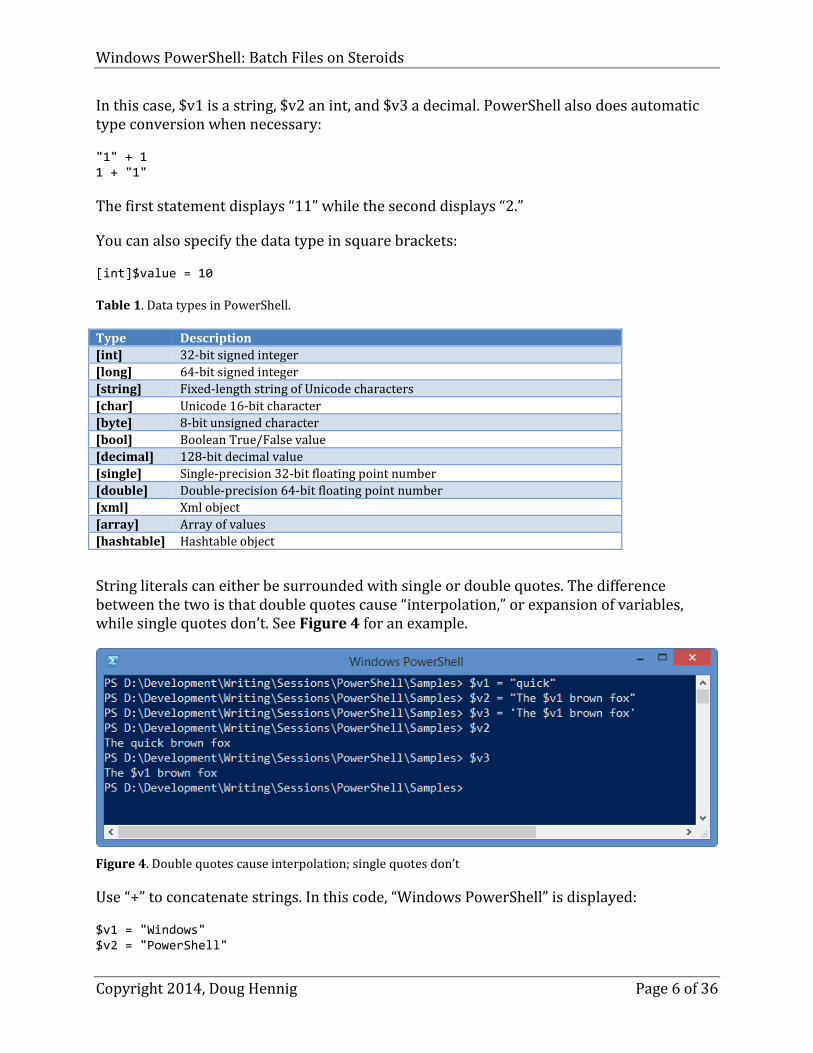
Variables can be one of the data types shown in Table 1. PowerShell automatically determines the data type when you assign a value:
$v1 = "1" $v2 = 1 $v3 = 1.1
Windows PowerShell: Batch Files on Steroids
Copyright 2014, Doug Hennig Page 6 of 36
In this case, $v1 is a string, $v2 an int, and $v3 a decimal. PowerShell also does automatic type conversion when necessary:
"1" + 1 1 + "1"
The first statement displays “11” while the second displays “2.”
You can also specify the data type in square brackets:
[int]$value = 10
Table 1. Data types in PowerShell.
Type Description
[int] 32-bit signed integer
[long] 64-bit signed integer
[string] Fixed-length string of Unicode characters
[char] Unicode 16-bit character
[byte] 8-bit unsigned character
[bool] Boolean True/False value
[decimal] 128-bit decimal value
[single] Single-precision 32-bit floating point number
[double] Double-precision 64-bit floating point number
[xml] Xml object
[array] Array of values
[hashtable] Hashtable object
String literals can either be surrounded with single or double quotes. The difference between the two is that double quotes cause “interpolation,” or expansion of variables, while single quotes don’t. See Figure 4 for an example.
Figure 4. Double quotes cause interpolation; single quotes don’t
Use “+” to concatenate strings. In this code, “Windows PowerShell” is displayed:
$v1 = "Windows" $v2 = "PowerShell"

Windows PowerShell: Batch Files on Steroids
Copyright 2014, Doug Hennig Page 7 of 36
$v1 + ' ' + $v2
Like VFP macros, a period ends a variable in evaluation:
$here = get-item . "Hello $here.Name"
This displays “Hello path.Name” rather than the expected “Hello pathname,” where path is the current folder. That happens because the period terminates the variable name rather than being used as the dot between the object and member names. In VFP, we’d handle this by using two periods, one to terminate the variable name and one for the dot notation. In PowerShell, use:
"Hello $($here.Name)"
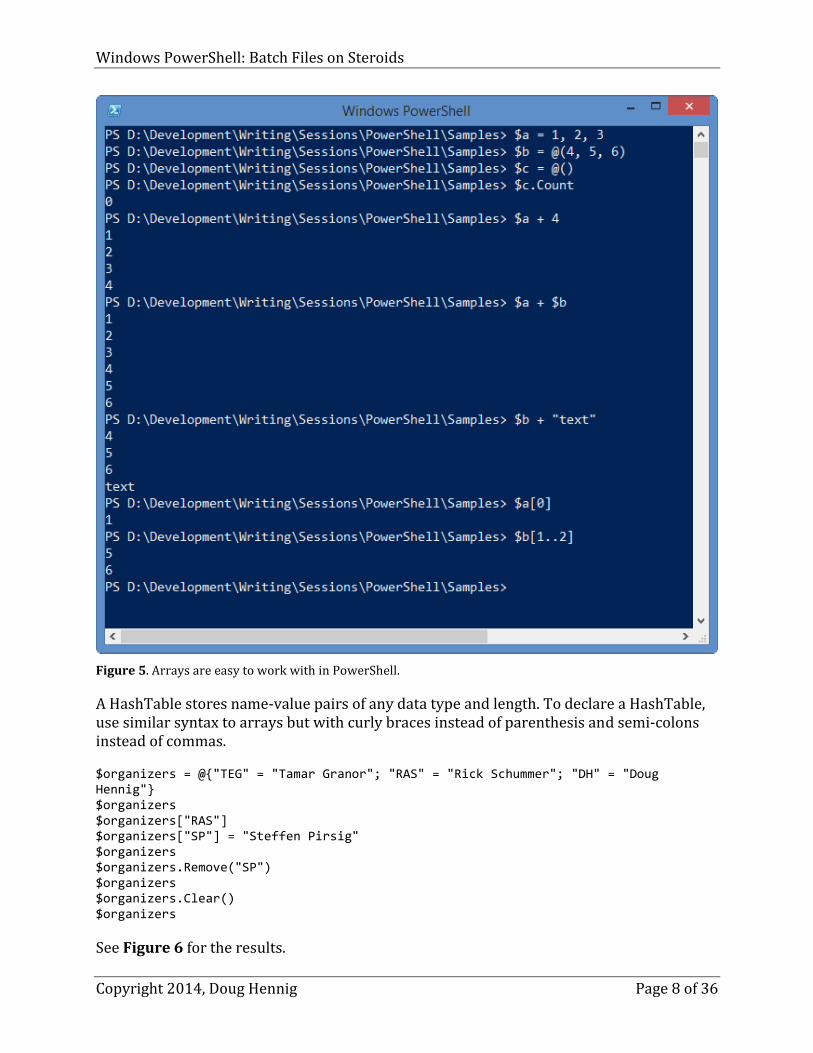
Arrays are zero-based indexed lists of variables. You can specify an array using a comma-delimited list of values using one of the following ways:
$a = 1, 2, 3 $b = @(4, 5, 6)
Use “@()” for an empty array:
$c = @() $c.Count
“+” adds an element to an array or can even combine arrays:
$a + 4 $a + $b
Arrays can be mixed data types:
$b + "text"
Use “array[index]” to access individual elements or “startIndex..EndIndex” for a range of values:
$a[0] $b[1..2]
See Figure 5 for the results of these operations.
Windows PowerShell: Batch Files on Steroids
Copyright 2014, Doug Hennig Page 8 of 36
Figure 5. Arrays are easy to work with in PowerShell.
A HashTable stores name-value pairs of any data type and length. To declare a HashTable, use similar syntax to arrays but with curly braces instead of parenthesis and semi-colons instead of commas.
$organizers = @{"TEG" = "Tamar Granor"; "RAS" = "Rick Schummer"; "DH" = "Doug Hennig"} $organizers $organizers["RAS"] $organizers["SP"] = "Steffen Pirsig" $organizers $organizers.Remove("SP") $organizers $organizers.Clear() $organizers
See Figure 6 for the results.

Windows PowerShell: Batch Files on Steroids
Copyright 2014, Doug Hennig Page 9 of 36
Figure 6. A HashTable is a list of name-value pairs that can be accessed by name or index.
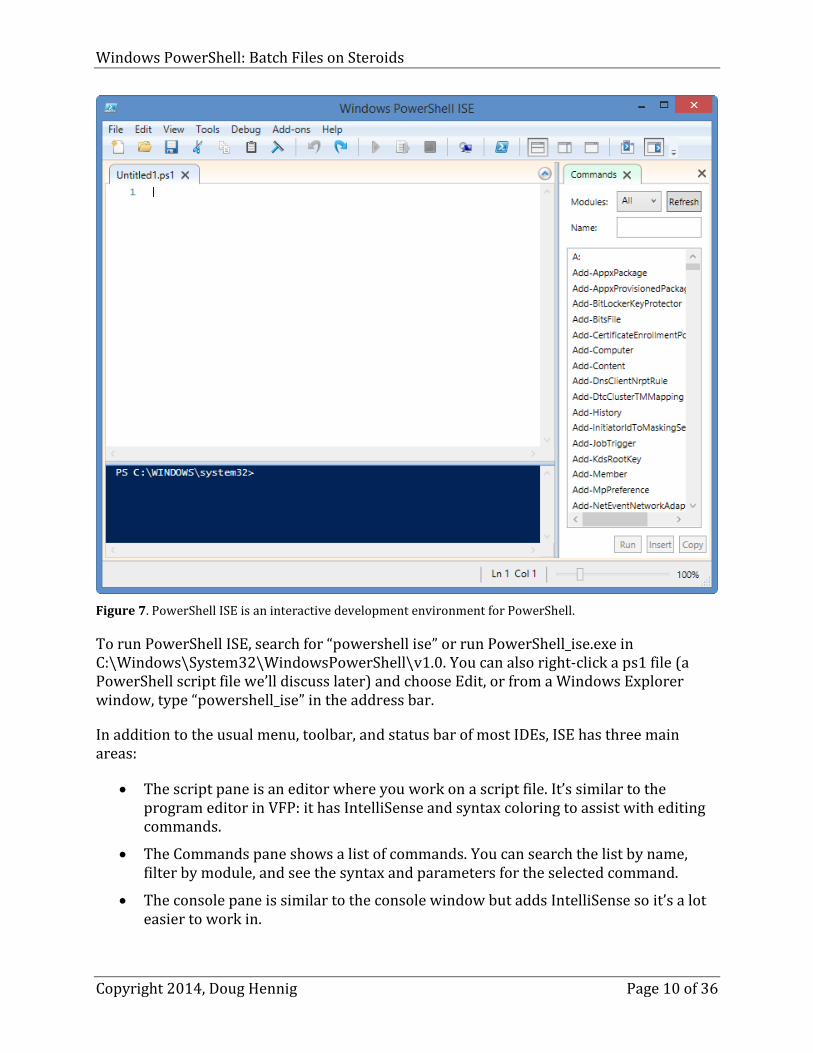
PowerShell ISE While the PowerShell console window is fine for playing around, eventually you’ll want a better environment to work in. That environment is PowerShell ISE (interactive scripting environment). ISE has a built-in console window, a script editor, an integrated debugger, and IntelliSense for commands, so like the VFP or Visual Studio interactive development environments (IDEs), it’s a better environment to work in. See Figure 7 to see what ISE looks like.
Windows PowerShell: Batch Files on Steroids
Copyright 2014, Doug Hennig Page 10 of 36
Figure 7. PowerShell ISE is an interactive development environment for PowerShell.
To run PowerShell ISE, search for “powershell ise” or run PowerShell_ise.exe in C:\Windows\System32\WindowsPowerShell\v1.0. You can also right-click a ps1 file (a PowerShell script file we’ll discuss later) and choose Edit, or from a Windows Explorer window, type “powershell_ise” in the address bar.
In addition to the usual menu, toolbar, and status bar of most IDEs, ISE has three main areas:
The script pane is an editor where you work on a script file. It’s similar to the program editor in VFP: it has IntelliSense and syntax coloring to assist with editing commands.
The Commands pane shows a list of commands. You can search the list by name, filter by module, and see the syntax and parameters for the selected command.
The console pane is similar to the console window but adds IntelliSense so it’s a lot easier to work in.

Windows PowerShell: Batch Files on Steroids
Copyright 2014, Doug Hennig Page 11 of 36
In both the script and console panes, command completion makes it easy to enter a command. Type the first part of the command and, as you can see in Figure 8, IntelliSense lists matching commands. Hit Tab for command completion; that is, inserting the selected item into the text. This even works for non-command things like “CD .\;” a list of directories pops up and you can press Tab to enter the selected one.
Figure 8. The console pane in ISE includes IntelliSense.
Commands There are four types of commands in PowerShell:
Native commands
Cmdlets
Scripts
Functions
I discussed native commands earlier so let’s look at the others.
Cmdlets
Cmdlets are commands built into PowerShell. Their names are standardized to use verb-noun syntax. For example, Get-Item displays information about the specified folder:
Get-item . $here = get-item . $here.Name
Windows PowerShell: Batch Files on Steroids
Copyright 2014, Doug Hennig Page 12 of 36
$here.GetType()
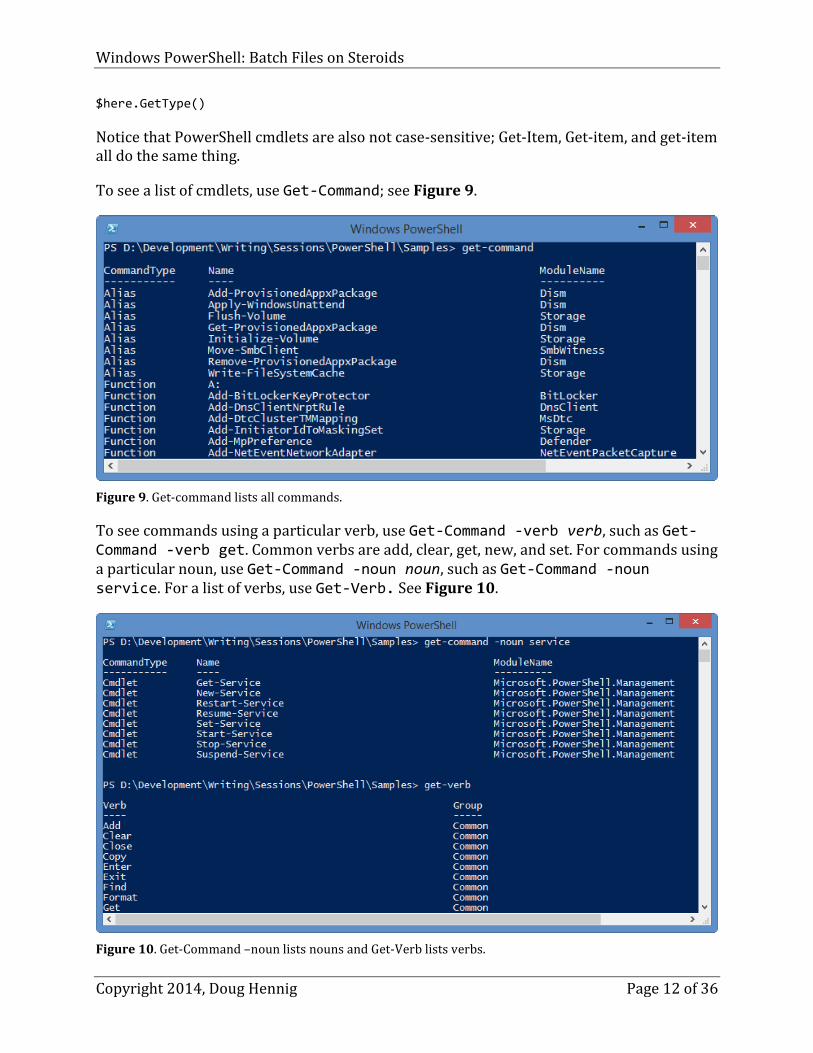
Notice that PowerShell cmdlets are also not case-sensitive; Get-Item, Get-item, and get-item all do the same thing.
To see a list of cmdlets, use Get-Command; see Figure 9.
Figure 9. Get-command lists all commands.
To see commands using a particular verb, use Get-Command -verb verb, such as Get-Command -verb get. Common verbs are add, clear, get, new, and set. For commands using a particular noun, use Get-Command -noun noun, such as Get-Command -noun service. For a list of verbs, use Get-Verb. See Figure 10.
Figure 10. Get-Command –noun lists nouns and Get-Verb lists verbs.

Windows PowerShell: Batch Files on Steroids
Copyright 2014, Doug Hennig Page 13 of 36
Get-Help is a great command because it gives you help about PowerShell. Get-Help cmdlet displays help about the specified cmdlet (see Figure 11). Interestingly, the text displayed by Get-Help isn’t built into PowerShell but is instead in the scripts that create the cmdlet; we’ll see that later in the “Documenting your scripts” section. Get-Help cmdlet -examples shows examples of the command.
Figure 11. Get-help is a great way to see information about a specific item.
Many cmdlets have abbreviated names, known as aliases. For example, “gi” is the alias for Get-Item. Helpfully, some well-known DOS commands, like cd and dir, are just abbreviations for PowerShell commands (Set-Location and Get-ChildItem, in this case). Use Get-Alias or its alias gal to see a list of aliases. See Figure 12.
You can create your own aliases using Set-Alias alias command. However, user-defined aliases are only in effect for that PowerShell session and are forgotten once you’ve closed it. If you want to use a certain set of aliases regularly, use the Export-Alias and Import-Aliases commands to write to and read from text files of aliases.
Like FoxPro commands and functions, which in general can be abbreviated to the first four letters of the name, abbreviations are fine for use at the command line but I don’t recommend using them in scripts for reasons of clarity.

Windows PowerShell: Batch Files on Steroids
Copyright 2014, Doug Hennig Page 14 of 36
Figure 12. Aliases, such as “gi” for “get-item,” make typing in the command window easier.
Table 2 lists some commonly used cmdlets.
Table 2. Commonly used cmdlets.
Name Description
Add-Content Writes to a file. Similar to the VFP STRTOFILE() function.
Get-ChildItem Gets the items in the specified path. Similar to the VFP ADIR() function but can work with other things such as environment variables and the Windows Registry, and has a lot of flexibility including recursively reading subdirectories.
Get-Content Reads the content of a file. Similar to the VFP FILETOSTR() function.
Get-Date Gets the current date. Similar to the VFP DATE() function.
Get-ItemProperty Gets the properties of the specified item. Often used to get values from the Registry.
Get-Location Gets the current location. Similar to the VFP CURDIR() function.
Get-Member Displays a list of the members of the specified object (remember that everything in PowerShell is an object). Similar to the VFP AMEMBERS() function.
Get-Variable Lists variables. Similar to the VFP DISPLAY MEMORY command.
New-Object Instantiates the specified class. Similar to the VFP NEWOBJECT() function.
Remove-Item Removes the specified item. Similar to the VFP ERASE and RD commands but can be recursive and can handle non-empty folders.
Test-Path Determines if the specified path exists. Similar to the VFP FILE() and DIRECTORY() functions, although it works on any path, including Registry entries.
Write-Host Outputs to the console. Similar to the VFP ? command.

Windows PowerShell: Batch Files on Steroids
Copyright 2014, Doug Hennig Page 15 of 36
Scripts
A PowerShell script is a text file with a “ps1” extension that contains PowerShell statements. Although you can use any text editor to create a script, as we saw earlier, using PowerShell ISE is the preferred editing environment. You can type the statements in a new script or open and edit an existing script file
To run a script, click the green arrow in the toolbar or press F5. One thing you’ll quickly find is that by default, PowerShell execution policy prevents running scripts (Figure 13).
Figure 13. By default, running PowerShell scripts is disabled.
To allow script execution, use Set-ExecutionPolicy level, where level is one of the levels shown in Table 3. Note that you either need to run PowerShell as administrator or add -scope currentuser to the command.
Table 3. Use one of these settings with Set-ExecutionPolicy to control script execution.
Type Description
Restricted Scripts cannot be executed.
AllSigned All scripts must be signed by a trusted publisher.
RemoteSigned Scripts downloaded from the Internet must be signed by a trusted publisher.
Unrestricted Scripts can be executed. You are prompted for permissions before running scripts downloaded from the Internet.
Interestingly, although you can run a script in ISE by simply typing its name in the console pane, that doesn’t quite work in the console window; see Figure 14 for an example.

Windows PowerShell: Batch Files on Steroids
Copyright 2014, Doug Hennig Page 16 of 36
Figure 14. Running a script in the console window gives an error unless you prefix it with “.\.”
As the hint suggests, prefix the script name with .\ to run it as an “encapsulated” script; that is, like a separate application. This is sometimes called “dot source running.” You can also run a script using . .\script (that is, a period, a space, a period, a backslash, then the script name), which runs the script as part of the command session, which mean variables can overwrite each other. This probably isn’t practical in a production environment but is handy for testing and debugging.
Speaking of debugging, debugging PowerShell scripts is very much like debugging in other IDEs. Set or clear a breakpoint on a statement by choosing Toggle Breakpoint from the Debug menu or pressing F9. Start running a script or continue to the next breakpoint using Run/Continue in the Debug menu or F5. Step through code using the Step Over, Step Into, and Step Out items in the Debug menu (F10, F11, and Shift-F11, respectively). Stop debugging using Stop Debugger in the Debug menu or Shift-F5. The console pane acts like the VFP Command window in that you can change the values of variables, execute other commands while execution is paused, and so on.
Some other things to know about scripts:
“#” is the comment begin character, similar to “*” in VFP:
# Get the current folder. $currFolder = Get-Location
“&” runs an executable program, similar to “!” in VFP. For example, this code runs VFP with a parameter:
$VFPexe = "C:\Program Files (x86)\Microsoft Visual FoxPro 9\vfp9.exe" $buildConfig = "-c$currFolder\Build.fpw" & $VFPexe $buildConfig
PowerShell profile
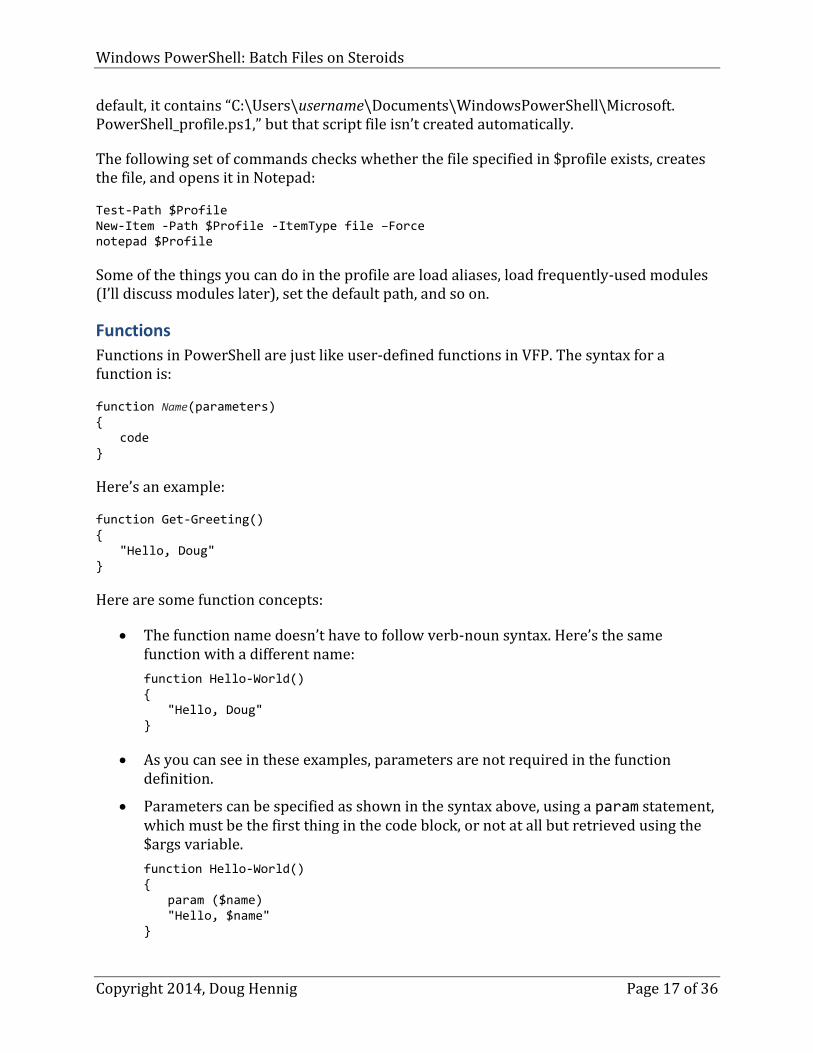
A profile is a script that runs when PowerShell starts, similar to the Startup Program setting in VFP. The path of the profile is contained in the built-in variable $profile; by
Windows PowerShell: Batch Files on Steroids
Copyright 2014, Doug Hennig Page 17 of 36
default, it contains “C:\Users\username\Documents\WindowsPowerShell\Microsoft. PowerShell_profile.ps1,” but that script file isn’t created automatically.
The following set of commands checks whether the file specified in $profile exists, creates the file, and opens it in Notepad:
Test-Path $Profile New-Item -Path $Profile -ItemType file –Force notepad $Profile
Some of the things you can do in the profile are load aliases, load frequently-used modules (I’ll discuss modules later), set the default path, and so on.
Functions
Functions in PowerShell are just like user-defined functions in VFP. The syntax for a function is:
function Name(parameters) { code }
Here’s an example:
function Get-Greeting() { "Hello, Doug" }
Here are some function concepts:
The function name doesn’t have to follow verb-noun syntax. Here’s the same function with a different name:
function Hello-World() { "Hello, Doug" }
As you can see in these examples, parameters are not required in the function definition.
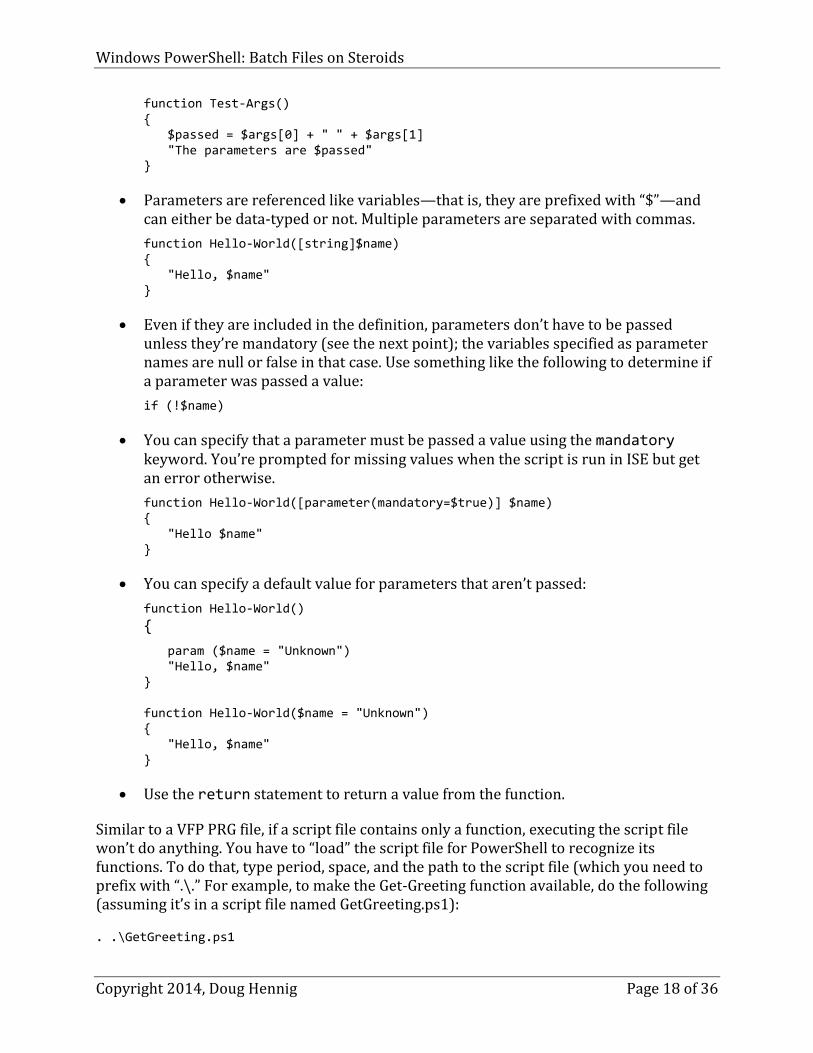
Parameters can be specified as shown in the syntax above, using a param statement, which must be the first thing in the code block, or not at all but retrieved using the $args variable.
function Hello-World() { param ($name) "Hello, $name" }
Windows PowerShell: Batch Files on Steroids
Copyright 2014, Doug Hennig Page 18 of 36
function Test-Args() { $passed = $args[0] + " " + $args[1] "The parameters are $passed" }
Parameters are referenced like variables—that is, they are prefixed with “$”—and can either be data-typed or not. Multiple parameters are separated with commas.
function Hello-World([string]$name) { "Hello, $name" }
Even if they are included in the definition, parameters don’t have to be passed unless they’re mandatory (see the next point); the variables specified as parameter names are null or false in that case. Use something like the following to determine if a parameter was passed a value:
if (!$name)
You can specify that a parameter must be passed a value using the mandatory keyword. You’re prompted for missing values when the script is run in ISE but get an error otherwise.
function Hello-World([parameter(mandatory=$true)] $name) { "Hello $name" }
You can specify a default value for parameters that aren’t passed:
function Hello-World()
{
param ($name = "Unknown") "Hello, $name" } function Hello-World($name = "Unknown") { "Hello, $name" }
Use the return statement to return a value from the function.
Similar to a VFP PRG file, if a script file contains only a function, executing the script file won’t do anything. You have to “load” the script file for PowerShell to recognize its functions. To do that, type period, space, and the path to the script file (which you need to prefix with “.\.” For example, to make the Get-Greeting function available, do the following (assuming it’s in a script file named GetGreeting.ps1):
. .\GetGreeting.ps1

Windows PowerShell: Batch Files on Steroids
Copyright 2014, Doug Hennig Page 19 of 36
Now you can type “Get-”and see “Get-Greeting” in the IntelliSense list.
Note that if you name the script file and the function the same, PowerShell gets a little confused and sometimes lists both. For that reason, I suggest using a different script file name.
To avoid having to do this every time you start ISE, you can load your functions at startup by adding the appropriate commands to your profile.
Documenting your scripts
As I mentioned earlier, Get-Help doesn’t display hard-coded text but instead reads the help information from the script file. This is called “comment-based help.” To add documentation to your own script files, use syntax like the following:
function MyFunction($someParameter) { <# .Synopsis This describes what the function does. .Description This is a longer description of the function. .Example Show the syntax here Describe what happens here. You can have multiple .Example sections. .Parameter someParameter Discuss the parameter. .Notes Anything you want, such as your name. .Link The URL for documentation, your web site, etc. #> # Code for the function }
Other keywords are available; see http://tinyurl.com/orlvxte for more information on comment-based help.
To display help for the function, use Get-Help function or Get-Help function –full, where function is the function name.
Modules A module is a PowerShell script with a “psm1” extension. Modules usually consist of functions so they don’t execute when loaded but simply make those functions available to

Windows PowerShell: Batch Files on Steroids
Copyright 2014, Doug Hennig Page 20 of 36
other scripts. The environment variable psModulePath, which you can see in PowerShell using $env:psModulePath, contains the paths for modules. To load a module, use Import-Module moduleName. The Get-Module command lists loaded modules.
You can create your own module by creating a script with a “psm1” extension rather than “ps1.” Putting your psm1 file into one of the folders in the modules path, usually C:\Users\UserName\Documents\WindowsPowerShell\Modules, makes it available to be imported into any script.
Lots of modules are available for PowerShell. Some popular ones are:
PSCX (PowerShell Community Extensions; http://pscx.codeplex.com) provides features like SQL queries against databases, zipping and unzipping files, reading from and writing to the clipboard, and so on.
PsGet (http://psget.net) makes it easy to find and install other modules.
Posh-Hg and Posh-Git (available using PsGet) provide PowerShell integration with the Mercurial and Git version control systems.
The popular application installer Chocolatey (https://chocolatey.org) is actually a PowerShell module that supports downloading and installing thousands of applications using a single command. We’ll see this in the “Automating application installation” section of this document.
Operators PowerShell uses the comparison operators shown in Table 4. Note that comparisons are case-insensitive; use a prefix of “c” (such as “-ceq”) for a case-sensitive comparison. If the item being compared is a scalar value, the result of the comparison is true or false. If the item is a collection or array, the result is any matching values.
Table 4. PowerShell comparison operators.
Operator Description
-eq Equals
-ne Not equals
-gt Greater than
-lt Less than
-ge Greater than or equals
-le Less than or equal
-like Like; you can use “*” as a wildcard character.
-notlike Not like
-contains Contains
-notcontains Does not contain
-in In a list
-notin Not in a list
PowerShell has three logical operators: “-not” (or its abbreviation “!”), “-and,” and “-or.”

Windows PowerShell: Batch Files on Steroids
Copyright 2014, Doug Hennig Page 21 of 36
PowerShell has several assignment operators. “++” is the increment operator; “$i++” is the equivalent of “$i = $i + 1.” Similarly, “--” is the decrement operator. “+=” adds the specified value; “$x += $y” is the equivalent of “$x = $x + $y.”
Branching code Like VFP, PowerShell has an if statement that allows conditional branches. Here’s the syntax:
if (some condition) { statement(s) }
The condition must be in parentheses and be an expression that returns a Boolean value and the statements must be surrounded by curly braces. Typically, you’ll compare one value to another using one of the comparison operators listed in Table 4. You can combine expressions using logical operators discussed earlier.
The else and elseif statements provide alternate execution paths:
if (some condition) { statement(s) } elseif { statement(s) } elseif { statement(s) } else { statement(s) }
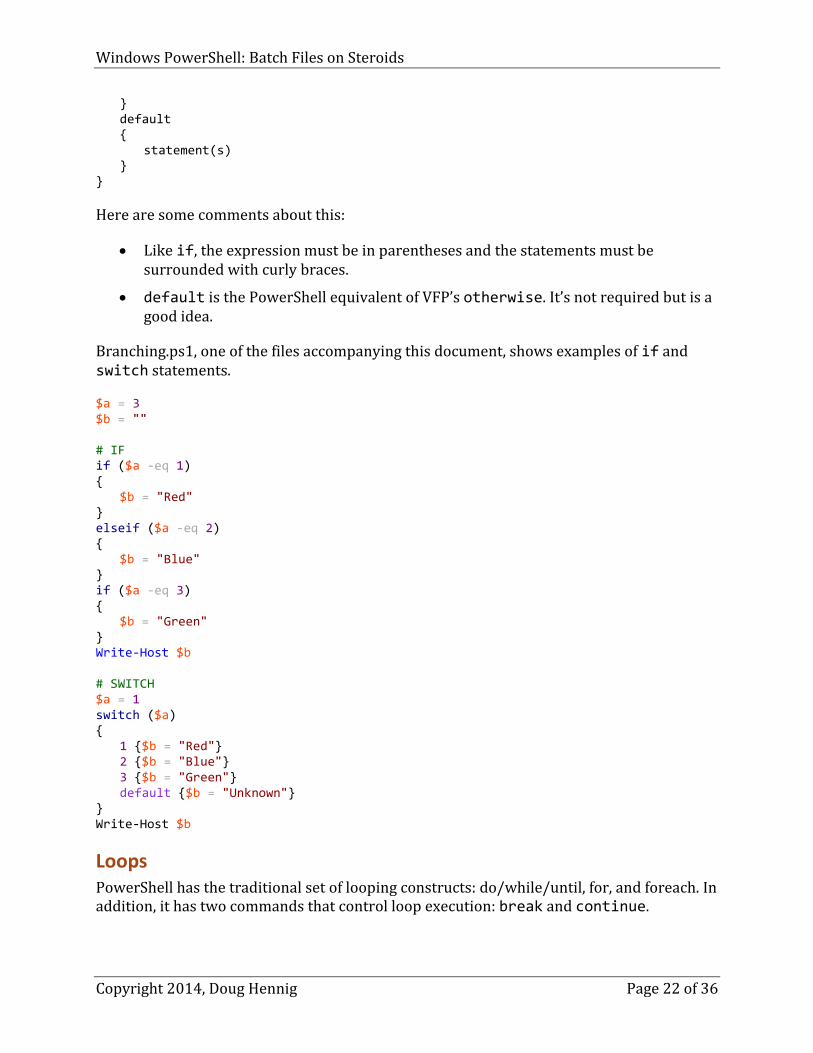
The PowerShell switch statement is similar to the VFP DO CASE structure, but not as flexible: rather than each CASE statement being a complete Boolean expression, including function and method calls, switch only allows you to test the various possible values of a single expression (although it doesn’t have to be, and is rarely, Boolean). Here’s the syntax:
switch (expression) { value1 { statement(s) } value2 { statement(s)
Windows PowerShell: Batch Files on Steroids
Copyright 2014, Doug Hennig Page 22 of 36
} default { statement(s) } }
Here are some comments about this:
Like if, the expression must be in parentheses and the statements must be surrounded with curly braces.
default is the PowerShell equivalent of VFP’s otherwise. It’s not required but is a good idea.
Branching.ps1, one of the files accompanying this document, shows examples of if and switch statements.
$a = 3 $b = "" # IF if ($a -eq 1) { $b = "Red" } elseif ($a -eq 2) { $b = "Blue" } if ($a -eq 3) { $b = "Green" } Write-Host $b # SWITCH $a = 1 switch ($a) { 1 {$b = "Red"} 2 {$b = "Blue"} 3 {$b = "Green"} default {$b = "Unknown"} } Write-Host $b
Loops PowerShell has the traditional set of looping constructs: do/while/until, for, and foreach. In addition, it has two commands that control loop execution: break and continue.
Windows PowerShell: Batch Files on Steroids
Copyright 2014, Doug Hennig Page 23 of 36
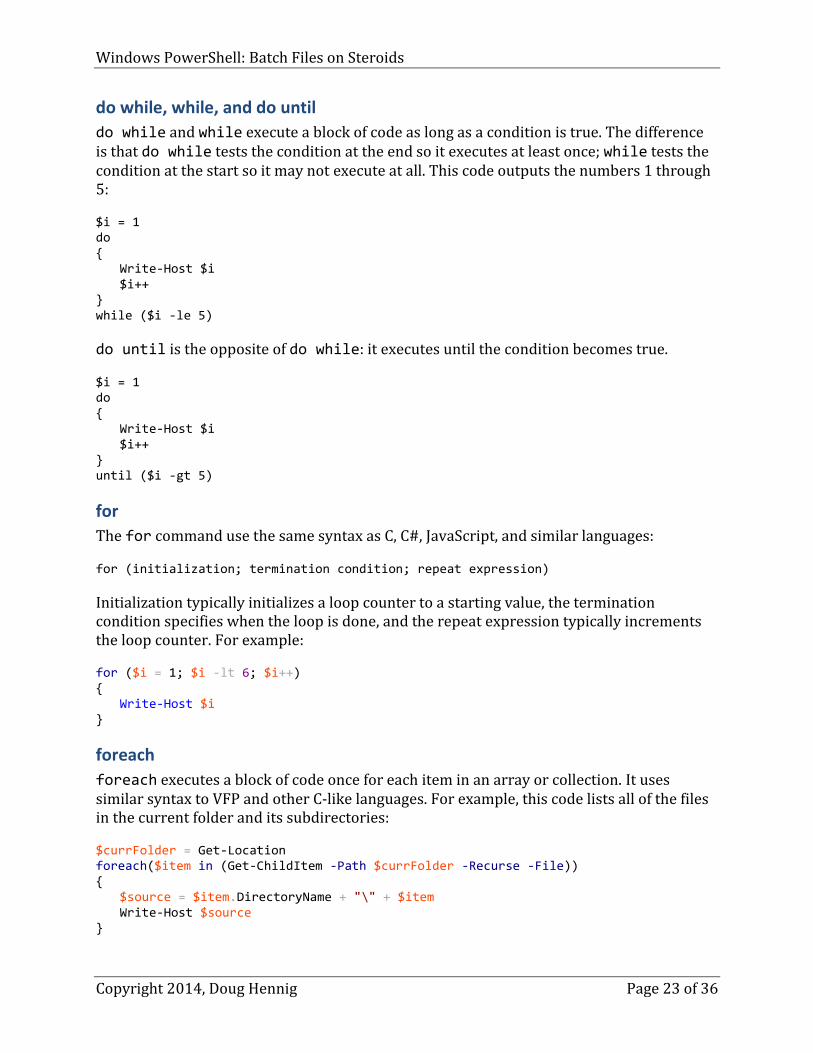
do while, while, and do until
do while and while execute a block of code as long as a condition is true. The difference is that do while tests the condition at the end so it executes at least once; while tests the condition at the start so it may not execute at all. This code outputs the numbers 1 through 5:
$i = 1 do { Write-Host $i $i++ } while ($i -le 5)
do until is the opposite of do while: it executes until the condition becomes true.
$i = 1 do { Write-Host $i $i++ } until ($i -gt 5)
for
The for command use the same syntax as C, C#, JavaScript, and similar languages:
for (initialization; termination condition; repeat expression)
Initialization typically initializes a loop counter to a starting value, the termination condition specifies when the loop is done, and the repeat expression typically increments the loop counter. For example:
for ($i = 1; $i -lt 6; $i++) { Write-Host $i }
foreach
foreach executes a block of code once for each item in an array or collection. It uses similar syntax to VFP and other C-like languages. For example, this code lists all of the files in the current folder and its subdirectories:
$currFolder = Get-Location foreach($item in (Get-ChildItem -Path $currFolder -Recurse -File)) { $source = $item.DirectoryName + "\" + $item Write-Host $source }

Windows PowerShell: Batch Files on Steroids
Copyright 2014, Doug Hennig Page 24 of 36
break and continue
In VFP, if you need to break out of a loop early, you use the exit command. In PowerShell use break instead. The PowerShell equivalent of VFP’s loop command, which skips to the next iteration, is continue.
Error handling PowerShell has the familiar try/catch/finally construct for handling errors. You can even throw an exception. See the code in the “Backing up files” section of this document for an example.
“$?” is a built-in variable containing the status of the last statement. If it’s true, the statement succeeded. It can be used, for example, in branching code to do different things based on whether the code was successful or not.
If an error occurred, the built-in variable $Error can be used to retrieve the error information. The “Backing up files” section of this document also has an example.
Pipelining Pipelining means sending the output of one command to the input of another. For example, Get-ChildItem lists the files in the current folder while Sort-Object sorts a collection by some attribute. What happens if we send the output of Get-ChildItem to Sort-Object? See Figure 15 for the results. The pipe (“|”) character causes the pipelining to occur.
Figure 15. The result of piping the output of Get-ChildItem to Sort-Object.
Windows PowerShell: Batch Files on Steroids
Copyright 2014, Doug Hennig Page 25 of 36
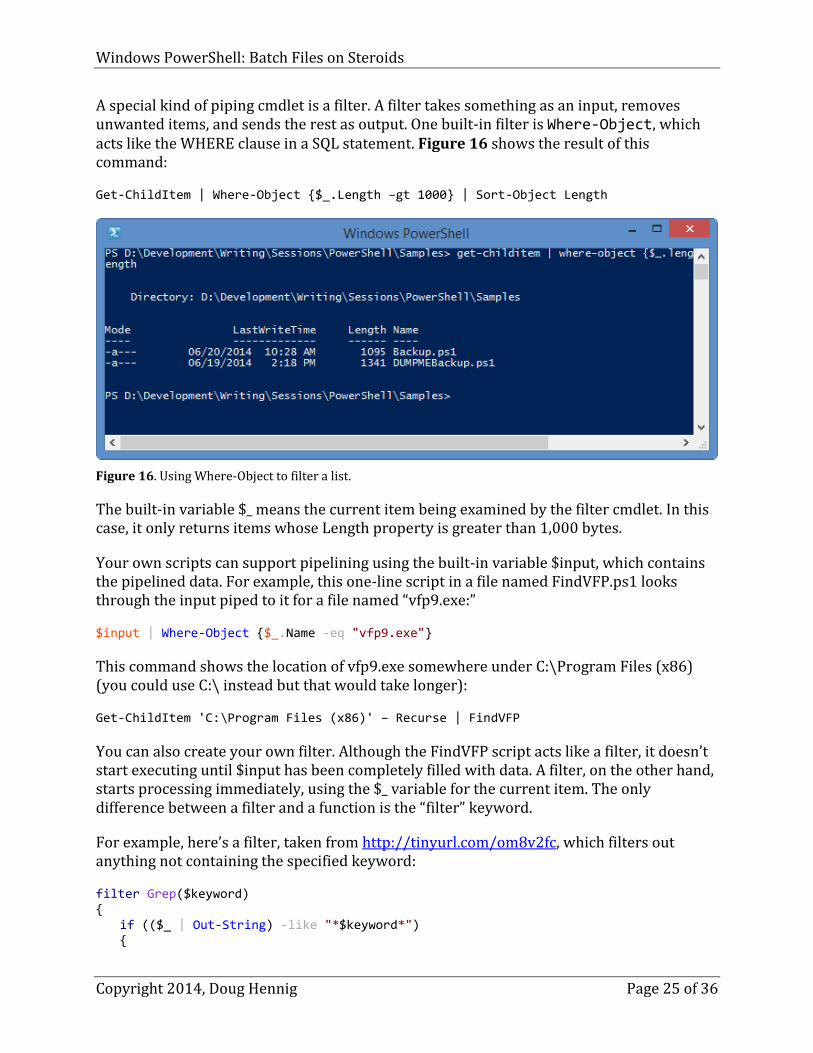
A special kind of piping cmdlet is a filter. A filter takes something as an input, removes unwanted items, and sends the rest as output. One built-in filter is Where-Object, which acts like the WHERE clause in a SQL statement. Figure 16 shows the result of this command:
Get-ChildItem | Where-Object {$_.Length –gt 1000} | Sort-Object Length
Figure 16. Using Where-Object to filter a list.
The built-in variable $_ means the current item being examined by the filter cmdlet. In this case, it only returns items whose Length property is greater than 1,000 bytes.
Your own scripts can support pipelining using the built-in variable $input, which contains the pipelined data. For example, this one-line script in a file named FindVFP.ps1 looks through the input piped to it for a file named “vfp9.exe:”
$input | Where-Object {$_.Name -eq "vfp9.exe"}
This command shows the location of vfp9.exe somewhere under C:\Program Files (x86) (you could use C:\ instead but that would take longer):
Get-ChildItem 'C:\Program Files (x86)' – Recurse | FindVFP
You can also create your own filter. Although the FindVFP script acts like a filter, it doesn’t start executing until $input has been completely filled with data. A filter, on the other hand, starts processing immediately, using the $_ variable for the current item. The only difference between a filter and a function is the “filter” keyword.
For example, here’s a filter, taken from http://tinyurl.com/om8v2fc, which filters out anything not containing the specified keyword:
filter Grep($keyword) { if (($_ | Out-String) -like "*$keyword*") {

Windows PowerShell: Batch Files on Steroids
Copyright 2014, Doug Hennig Page 26 of 36
$_ } }
The following command lists all PRG files in the current folder and all subdirectories:
Get-ChildItem –Recurse | Grep .prg
Working with .NET Since PowerShell is based on the .NET framework, it’s easy to use .NET classes in PowerShell statements. The new-object cmdlet instantiates the specified class; “System” is inferred so you don’t have to specify that namespace. For example:
$web = New-Object Net.WebClient $web.DownloadFile("http://www.swfox.net/speakers/doughennig.jpg", "$((Get-Location).Path)\Doug.jpg")
instantiates the System.Net.WebClient class and downloads a file. You can use Get-Member to see a list of the members of the instantiated object.
To call a static member of a class, use the syntax [Class]::Member. For example, this gets a new Guid:
$guid = [Guid]::NewGuid()
Script examples Let’s look at some examples of scripts to learn more about how they work.
Automating application installation
Chocolatey is a PowerShell utility that automates the installation of Windows applications. It saves you having to manually navigate to the publisher’s web site, finding the correct download link, and downloading and installing the application. As of this writing, nearly 2,000 applications can be installed using Chocolatey, including Google Chrome, Firefox, Microsoft SQL Server Express, Microsoft Visual Studio, Notepad++, Filezilla, Git, Mercurial, Skype, Dropbox, and so on (obviously, you’ll need valid license keys for some applications). You can read more about Chocolatey and see a list of the available applications at http://chocolatey.org. Scott Hanselman also had an informative blog post about it at http://tinyurl.com/pmdhfv5.
You can install Chocolatey with a single, albeit complex, command:
@powershell -NoProfile -ExecutionPolicy unrestricted –Command "iex ((new-object net.webclient) .DownloadString('https://chocolatey.org/install.ps1'))" &&
SET PATH=%PATH%;%systemdrive%\chocolatey\bin
This is actually three statements in one:

Windows PowerShell: Batch Files on Steroids
Copyright 2014, Doug Hennig Page 27 of 36
@powershell invokes PowerShell from any command window, and the statement prior to “-Command” tells PowerShell to allow unrestricted script execution.
The text between “-Command” and “&&” instantiates the .NET WebClient class, tells it to download Install.ps1 from chocolatey.org, and runs it.
The SET PATH statement adds Chocolatey to your path so it can be executed from anywhere.
Using Chocolatey to install an application is as easy as typing cinst appName in a command window. https://chocolatey.org/packages lists the applications and their installation command lines.
Of course, you can even automate Chocolatey itself. Here’s an example of a simple script that installs Chocolatey and then uses it to download and install Filezilla, Google Chrome, and Notepad++. Think about how quickly such a script could set up a new machine for you, whether a physical or virtual machine, whether local, remote, or in the cloud.
# Allow scripts to run; this needs to be executed in the console pane. #Set-ExecutionPolicy unrestricted -Scope CurrentUser # Download and install Chocolatey Invoke-Expression ((new-object net.webclient) .DownloadString('https://chocolatey.org/install.ps1')) # Add Chocolatey to the path so we can run it from anywhere set PATH=%PATH%;%systemdrive%\chocolatey\bin # Start installing apps cinst Filezilla cinst GoogleChrome cinst NotepadPlusPlus
For even more automation, take a look at Boxstarter (http://boxstarter.org). It can perform completely unattended installs of Windows boxes, including installing the latest Windows updates.
Backing up files
Backup.ps1 performs a backup by zipping files, including those in subdirectories, into a file named Backup_date.zip, where date is the date the backup was made.
The script starts by ensuring a string parameter named $sourceFolder was passed and that it’s not null or empty. It then imports the PSCX PowerShell module discussed earlier. After assigning the name of the zip file to the $zipFileName variable and setting the current folder to the source folder, the script gets a list of all of the files in the folder and its subdirectories and pipes them to the Write-Zip cmdlet to add them to the zip file. “$?” is a built-in variable containing the status of the last statement, so it’s used to write the appropriate message. If an error occurred, the built-in variable $Error is used to retrieve the error information.

Windows PowerShell: Batch Files on Steroids
Copyright 2014, Doug Hennig Page 28 of 36
Param( [parameter(Mandatory = $true)] [ValidateNotNullOrEmpty()] [string]$sourceFolder ) # Import the Powershell Community Extensions add-on module. Import-Module PSCX # Get the name of the zip file. $zipFileName = $sourceFolder + "\Backup\Backup_$(Get-Date -f yyyy-MM-dd)" + '.zip' try { # Set the current folder to the specified location. Set-Location $sourceFolder # Create the Backup folder if it doesn't exist. $exists = Test-Path ($sourceFolder + "\Backup") if (-not $exists) { md ($sourceFolder + "\Backup") } # Loop through all the files in the folder and add them to a zip file. Get-ChildItem $sourceFolder -Recurse -File | Write-Zip -OutputPath $zipFileName # Check for errors if ($?) { Write-Host "Backup successful" } else { Write-Host "Backup failed" } } catch { Write-Host "Error occurred at $(Get-Date): $($Error[0].Exception.Message)" } finally { Write-Host "Backup finished at $(Get-Date)" }
To see this script in action, pass it the name of a folder to backup:
Backup (Get-Location)
Windows PowerShell: Batch Files on Steroids
Copyright 2014, Doug Hennig Page 29 of 36
Automating application deployment
Deployment of an application is a very important step. After all, if you can’t install the application on someone’s system, there’s no point in writing it. Deployment is often a complex job involving many steps. If any of those steps are forgotten or done incorrectly, the user may end up with a faulty installer. That leads to extra support work and even mistrust of your abilities. Getting this part of the application lifecycle right is crucial.
I use a carefully crafted checklist to make sure I do all of the steps necessary to deploy my applications. As they got more complicated, the list got longer and longer and therefore more likely to be error-prone. Automating as many tasks as possible helps to ensure the deployment process is both accurate and efficient.
Many of the tasks involved in deployment involve files: copying, moving, deleting, creating, changing, digitally signing, and so on. Sounds like a perfect job for PowerShell.
BuildSetup.ps1, included with the sample files accompanying this document, is a stripped-down version of an actual script we use to deploy Stonefield Query Enterprise. Let’s look at it one section at a time.
The script starts with some helper functions. RemoveFile removes the specified file if it exists. The script uses this instead of the built-in Remove-Item because that cmdlet throws an exception if the file doesn’t exist.
function RemoveFile([string]$path) { If (Test-Path $path) { Remove-Item $path } }
Pause waits for a keypress.
function Pause { Write-Host "Press any key to continue ..." $x = $host.UI.RawUI.ReadKey("NoEcho,IncludeKeyDown") }
As its name suggests, FTPUpload uploads the files in the specified folder, including those in subdirectories, to the specified FTP path. Note that the FTP server name, user name, and password are read from a file (ftp.txt) so they aren’t exposed in the script.
function FTPUpload($sourceFolder, $targetFolder) { # Get the FTP server settings. $settings = Get-Content DontDeploy\ftp.txt $ftp = $settings[0] $user = $settings[1] $pass = $settings[2]
Windows PowerShell: Batch Files on Steroids
Copyright 2014, Doug Hennig Page 30 of 36
# Create a WebClient object. $webclient = New-Object System.Net.WebClient $webclient.Credentials = New-Object System.Net.NetworkCredential($user, $pass) # Upload all files in all subdirectories of the folder. foreach($item in (Get-ChildItem -Path $sourceFolder -Recurse -File)) { try { # Get the source file. $source = $item.DirectoryName + "\" + $item; # Get the directory on the FTP site. $directory = ""; if ($item.DirectoryName.Length -gt 0) { $directory = $item.DirectoryName.Replace($sourceFolder, "") $directory = $directory.Replace("\", "/") } $directory += "/" # Create the complete target path and upload it. $target = $ftp + $targetFolder + $directory + $item Write-Host Uploading $item.FullName to $target $uri = New-Object System.Uri($target) $webclient.UploadFile($uri, $item.FullName) } catch [Exception] { # Log if something failed. Write-Host $_.Exception.Message; $content = "`r`nFile " + $item.FullName + "`r`n" + $_.Exception.Message + "`r`n" Add-Content BuildLog.txt $content } } }
The body of the script starts by deleting BuildLog.txt if it exists and getting the current path:
# Erase the log file. RemoveFile BuildLog.txt # Get the current folder. $currFolder = Get-Location
The next step requires some explanation. We want to automate the building of our application’s executable, so BuildProject.prg takes care of that. This code opens MyApp.pjx, sets its version number to “1.0.” plus the number of days after 01/01/2000 (for example, building the EXE on June 19, 2014 results in a version number of “1.0.5283”), adjusts the

Windows PowerShell: Batch Files on Steroids
Copyright 2014, Doug Hennig Page 31 of 36
copyright to use the current year, and builds MyApp.exe. Any errors are logged to BuildLog.txt.
local lcVersion, ; loProject, ; lcCopyRight, ; llReturn, ; laError[1] lcVersion = GetVersionNumber() modify project MyApp\MyApp noshow nowait loProject = _vfp.ActiveProject loProject.VersionNumber = lcVersion lcCopyRight = loProject.VersionCopyright if not empty(lcCopyRight) loProject.VersionCopyright = stuff(lcCopyright, at('-', lcCopyright) + 1, ; 4, transform(year(date()))) endif not empty(lcCopyRight) llReturn = loProject.Build('MyApp\MyApp.exe', 3, .F., .T.) loProject.Close() if not llReturn aerror(laError) strtofile(transform(datetime()) + ': building MyApp failed: ' + ; laError[2] + chr(13) + chr(10), 'BuildLog.txt', .T.) endif llReturn quit * Get the version number: 1.0. + the number of days after 01/01/2000. function GetVersionNumber local lnJulian, ; lcJulian, ; lcVersion lnJulian = val(sys(11, date())) - val(sys(11, {^2000-01-01})) lcJulian = padl(transform(lnJulian), 4, '0') lcVersion = '1.0.' + lcJulian return lcVersion
To execute this code from PowerShell, we have to run VFP and tell it to use Build.fpw as the configuration file because that file tells VFP to execute BuildProject.prg using this command:
command = do BuildProject.prg
Here’s the part of the PowerShell script that finds where VFP is located by looking in the Windows Registry (I could have hard-coded the path but this is more flexible) and running it. Note that output is piped to Out-Null, which forces PowerShell to wait until BuildProject.prg is done and VFP terminates.
$regEntry = Get-ItemProperty –Path Registry::HKEY_CLASSES_ROOT\Visual.FoxPro.Application.9\shell\open\command $value = $regEntry.'(default)' $file = $value.Substring(1, $value.IndexOf('"', 2) - 1) $VFPexe = Get-ChildItem $file

Windows PowerShell: Batch Files on Steroids
Copyright 2014, Doug Hennig Page 32 of 36
$buildConfig = "-c$currFolder\Build.fpw" & $VFPexe –t $buildConfig | Out-Null
Now that the executable is built, the next job is to digitally sign it. First, we find the location of SignTool.exe using similar code to how we found VFP, then we read the password for the certificate from a file (CertPW.txt), and finally sign MyApp.exe.
$regEntry = Get-ItemProperty -Path "Registry::HKEY_LOCAL_MACHINE\SOFTWARE\Microsoft\Microsoft SDKs\Windows\v7.1A" $value = $regEntry.'InstallationFolder' $file = $value + "Bin\signtool.exe" $signTool = Get-ChildItem $file # Get the password for the certificate. $password = Get-Content DontDeploy\certpw.txt $parms = 'sign', '/f', "$currFolder\DontDeploy\mycert.pfx", '/p', $password # Sign the exe. Write-Host "Signing executable" $signParms = $parms + '/d', 'My Application', 'MyApp\myapp.exe' & $signTool $signParms
The next step is building Setup.exe using Inno Setup. As before, we look in the Windows Registry to find out the location of the Inno compiler and have it run MyApp.iss.
$regEntry = Get-ItemProperty -Path Registry::HKEY_CLASSES_ROOT\InnoSetupScriptFile\Shell\Compile\Command $value = $regEntry.'(default)' $file = $value.Substring(1, $value.IndexOf('"', 2) - 1) $exe = Get-ChildItem $file $innoCompiler = $exe.DirectoryName + "\iscc" # Build Setup.exe. $signParms = "/sStandard=$signTool $parms $" + "p" & $innoCompiler $signParms myapp.iss
The last major task is uploading Setup.exe to the FTP site using the FTPUpload function we saw earlier.
Write-host "============ Uploading Setup.exe" $sourcePath = Join-Path $currFolder "Output" FTPUpload $sourcePath "httpdocs/Downloads/Sample"
Finally, if anything went wrong, display a message.
If (Test-Path BuildLog.txt) { Write-Host "See BuildLog.txt for a list of errors in the process." Pause }
Windows PowerShell: Batch Files on Steroids
Copyright 2014, Doug Hennig Page 33 of 36
Now, when I’m finished coding and testing my application, I simply run BuildSetup.ps1 and when the smoke clears, I have a digitally signed setup executable sitting on my FTP site ready for my users to download and install.
Calling PowerShell from VFP Executing PowerShell commands and scripts from a VFP application is a little tricky but doable. The secret is to use Rick Strahl’s wwDotNetBridge (http://tinyurl.com/l8axhx2) to talk to classes in the .NET System.Management.Automation assembly. RunningPSFromVFP.PRG, included with the downloads for this document, shows how to do it. This example displays the running processes.
* Instantiate wwDotNetBridge. set procedure to wwDotNetBridge loBridge = createobject('wwDotNetBridge', 'V4') * Load the PowerShell assembly. Get the location using * [psobject].assembly.location in PowerShell. llReturn = loBridge.LoadAssembly('C:\Windows\Microsoft.Net\assembly\' + ; 'GAC_MSIL\System.Management.Automation\v4.0_3.0.0.0__31bf3856ad364e35' + ; '\System.Management.Automation.dll') if not llReturn messagebox(loBridge.cErrorMsg) return endif not llReturn * Create a PowerShell object. loPS = loBridge.InvokeStaticMethod('System.Management.Automation.PowerShell', ; 'Create') * Add a command to execute. You can also call AddScript to add a script. loBridge.InvokeMethod(loPS, 'AddCommand', 'Get-Process') * We want to call the Invoke method of the PowerShell object but the following * statement gives an "ambigous match found" error because there are two * overloads of Invoke that accept no parameters but with different return * values and wwDotNetBridge can't tell which to call. * * loResult = oBridge.InvokeMethod(loPS, 'Invoke') * * Instead, we'll go through the methods of the PowerShell object, look for the * first Invoke method, and call it. It returns Collection<PSObject>. Note that * we need an empty array for the second parameter of Invoke. loType = loBridge.InvokeMethod(loPS, 'GetType') loMethods = loBridge.InvokeMethod(loType, 'GetMethods') loArray = loBridge.CreateArray() for lnI = 0 to loMethods.Count - 1 loMethod = loMethods.Item(lnI)
Windows PowerShell: Batch Files on Steroids
Copyright 2014, Doug Hennig Page 34 of 36
if loMethod.Name = 'Invoke' loResult = loBridge.InvokeMethod(loMethod, 'Invoke', loPS, loArray) exit endif loMethod.Name = 'Invoke' next lnI * Create a cursor to hold the process information. create cursor Processes (Name C(50), ID I) * Copy the result collection to an array and process each entry. loArray.FromEnumerable(loResult) for lnI = 0 to loArray.Count - 1 loItem = loArray.Item(lnI) * We want to get the ProcessName member of the object but this doesn't work: * Members is a PSMemberInfoCollection<PSMemberInfo> but accessing it like this * gives the collection, not the PSPropertyInfo object. * * loName = loBridge.GetPropertyEx(loProcess, 'Members["ProcessName"]') * * Instead, get the Members collection and go through it, looking for the * members we're interested in. loMemb = loBridge.GetPropertyEx(loItem, 'Members') loMembers = loBridge.CreateArray() loMembers .FromEnumerable(loMemb) append blank for lnJ = 0 to loMembers .Count loMember = loMembers.Item(lnJ) try lcName = loBridge.GetPropertyEx(loMember, 'Name') do case case lcName = 'ProcessName' replace Name with loBridge.GetPropertyEx(loMember, 'Value') case lcName = 'Id' replace ID with loBridge.GetPropertyEx(loMember, 'Value') endcase catch endtry next lnJ next lnI * Display the processes. go top browse
For more information on calling PowerShell from applications (specifically .NET applications), see http://tinyurl.com/mdutq5t and http://tinyurl.com/kmqfwzl.
Windows PowerShell: Batch Files on Steroids
Copyright 2014, Doug Hennig Page 35 of 36
Resources There are a ton of resources available for all things PowerShell; simply Google “powershell” and be prepared to be overwhelmed! Some good places to start, though, are:
http://www.powershellpro.com provides many tutorials and scripts that cover a wide range of topics.
http://technet.microsoft.com/en-us/scriptcenter/powershell.aspx is Microsoft’s PowerShell center. It has links for webcasts, downloads, blogs, scripts, tutorials, and more.
Summary Windows PowerShell is a relatively new tool that allows you to automate just about any task you can think of. It’s relatively easy to learn, is very powerful, and once you’ve created a script, can save you a lot of time doing tasks the manual way.
Biography Doug Hennig is a partner with Stonefield Software Inc. He is the author of the award-winning Stonefield Database Toolkit (SDT); the award-winning Stonefield Query; the MemberData Editor, Anchor Editor, and CursorAdapter and DataEnvironment builders that come with Microsoft Visual FoxPro; and the My namespace and updated Upsizing Wizard in Sedna.
Doug is co-author of VFPX: Open Source Treasure for the VFP Developer, Making Sense of Sedna and SP2, the What’s New in Visual FoxPro series, Visual FoxPro Best Practices For The Next Ten Years, and The Hacker’s Guide to Visual FoxPro 7.0. He was the technical editor of The Hacker’s Guide to Visual FoxPro 6.0 and The Fundamentals. All of these books are from Hentzenwerke Publishing (http://www.hentzenwerke.com). He wrote over 100 articles in 10 years for FoxTalk and has written numerous articles in FoxPro Advisor, Advisor Guide to Visual FoxPro, and CoDe. He currently writes for FoxRockX (http://www.foxrockx.com).
Doug spoke at every Microsoft FoxPro Developers Conference (DevCon) starting in 1997 and at user groups and developer conferences all over the world. He is one of the organizers of the annual Southwest Fox and Southwest Xbase++ conferences (http://www.swfox.net). He is one of the administrators for the VFPX VFP community extensions Web site (http://vfpx.codeplex.com). He was a Microsoft Most Valuable Professional (MVP) from 1996 through 2011. Doug was awarded the 2006 FoxPro Community Lifetime Achievement Award (http://tinyurl.com/ygnk73h).

Windows PowerShell: Batch Files on Steroids
Copyright 2014, Doug Hennig Page 36 of 36


![[Webinar] PowerShell Series 2 - Using PowerShell to manage Group Policy](https://img.pdfslide.us/doc/110x75/559b62721a28ab025f8b482f/webinar-powershell-series-2-using-powershell-to-manage-group-policy.jpg)


![[Webinar] PowerShell series part 3 – PowerShell and WMI](https://img.pdfslide.us/doc/110x75/559b61c31a28ab125f8b47a2/webinar-powershell-series-part-3-powershell-and-wmi.jpg)