Embed Size (px)
Citation preview
Introducing Windows Azure Pack
Windows Azure
Pack
Hands-on lab
Windows Azure Pack (WAP) is a collection of Windows
technologies available at no cost that enables the delivery of
Windows Azure-style cloud services to external customers and
to internal consumers. With Windows Azure Pack,
organizations can offer a self-service, multi-tenant cloud that
provides an administrative and end-user experience that is
consistent with Windows Azure.
In the first exercise, you will learn about the architecture and
components that comprise Windows Azure Pack. You will then
examine the configuration of System Center 2012 R2 Virtual
Machine Manager to show the integration with Windows
Azure Pack. Next, you will explore the features, configurations,
and capabilities available to Service Administrators. Finally, you
will explore the features, configurations, and capabilities
available to service administrators.
Produced by HynesITe, Inc
Version 1.1
1/27/2014
This document supports a preliminary release of a software product that may be changed substantially prior to final commercial
release. This document is provided for informational purposes only and Microsoft makes no warranties, either express or implied, in
this document. Information in this document, including URL and other Internet Web site references, is subject to change without
notice. The entire risk of the use or the results from the use of this document remains with the user. Unless otherwise noted, the
companies, organizations, products, domain names, e-mail addresses, logos, people, places, and events depicted in examples herein
are fictitious. No association with any real company, organization, product, domain name, e-mail address, logo, person, place, or
event is intended or should be inferred. Complying with all applicable copyright laws is the responsibility of the user. Without
limiting the rights under copyright, no part of this document may be reproduced, stored in or introduced into a retrieval system, or
transmitted in any form or by any means (electronic, mechanical, photocopying, recording, or otherwise), or for any purpose, without
the express written permission of Microsoft Corporation.
Microsoft may have patents, patent applications, trademarks, copyrights, or other intellectual property rights covering subject matter
in this document. Except as expressly provided in any written license agreement from Microsoft, the furnishing of this document
does not give you any license to these patents, trademarks, copyrights, or other intellectual property.
Copyright 2014 © Microsoft Corporation. All rights reserved.
Microsoft, Active Directory, Hyper-V, Internet Explorer, SQL Server, System Center, Windows, Windows Azure, and Windows Server
2012 are trademarks of the Microsoft group of companies.
All other trademarks are property of their respective owners.
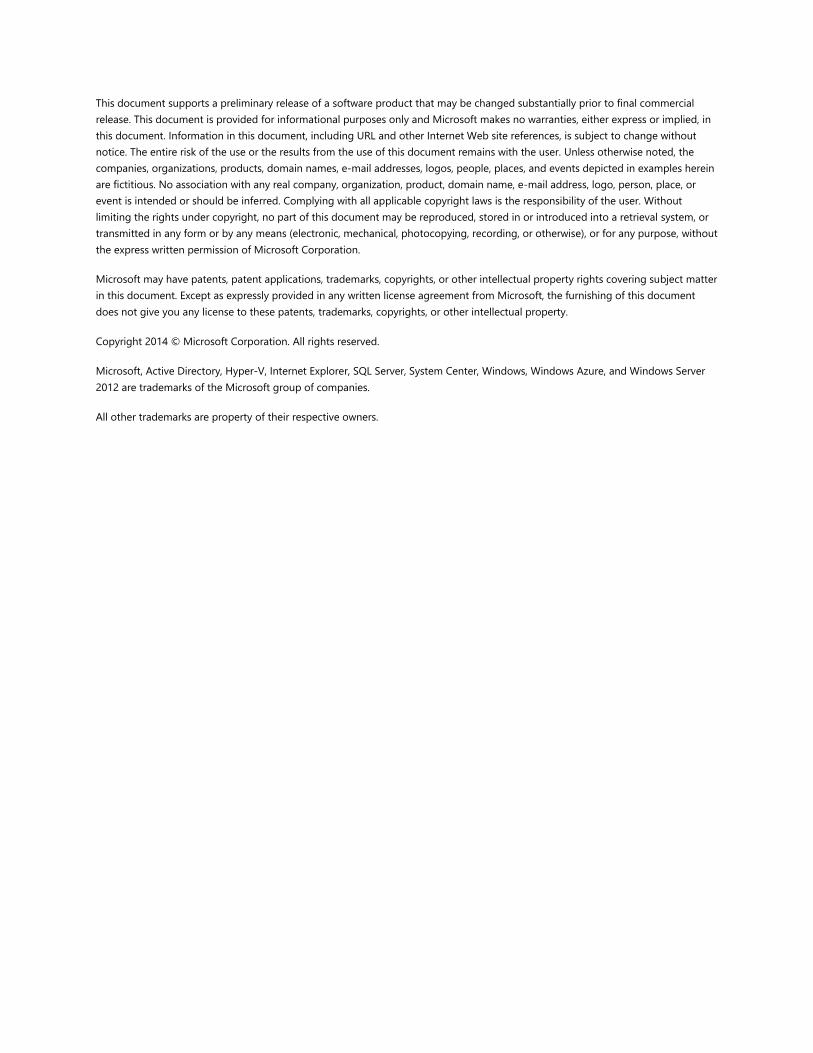
Windows Azure Pack – Overview
Lab created by HynesITe, Inc. For questions or comments, send an e-mail message to [email protected] Page | 3
Introduction
Estimated time to complete this lab
60 minutes
Objectives
After completing this lab, you will be able to:
Install the Windows Azure Pack roles.
Perform Windows Azure Pack initial configuration.
Create cloud objects including tenants and users.
Create subscriptions and create cloud resources.
Prerequisites
Before working on this lab, you must have:
An understanding of cloud technologies especially Windows Azure.
An understanding of basic database and website creation concepts.
Overview of the lab
Windows Azure Pack (WAP) is a collection of Windows technologies available at no cost that enables the
delivery of Windows Azure-style cloud services to external customers and to internal consumers. With
Windows Azure Pack, organizations can offer a self-service, multi-tenant cloud that provides an
administrative and end-user experience that is consistent with Windows Azure.
In the first exercise, you will learn about the architecture and components that comprise Windows Azure
Pack. You will then examine the configuration of System Center 2012 R2 Virtual Machine Manager to
show the integration with Windows Azure Pack. Next, you will explore the features, configurations, and
capabilities available to Service Administrators. Finally, you will explore the features, configurations, and
capabilities available to Service Administrators.
Virtual machine technology
This lab is completed using virtual machines that run on Windows Server 2012 Hyper-V technology. To
log on to the virtual machines, press CTRL+ALT+END and enter your logon credentials.
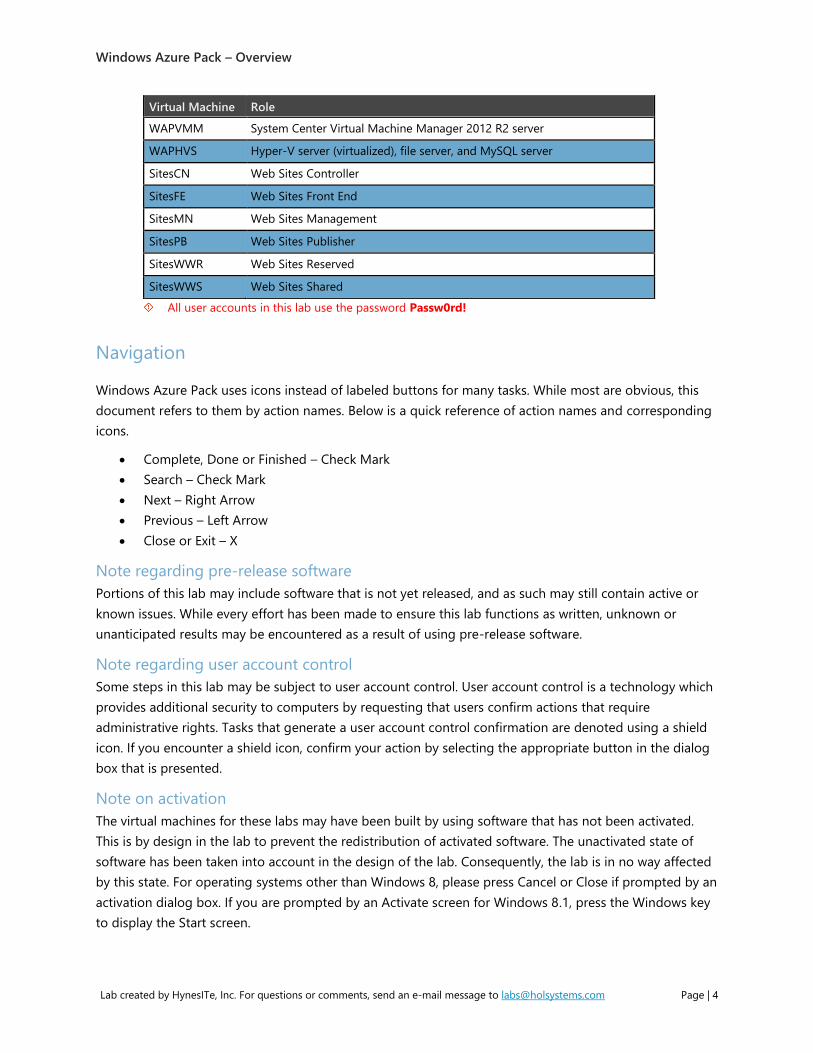
Computers in this lab
This lab uses computers as described in the following table. Before you begin the lab, you must ensure
that the virtual machines are started and then log on to the computers.
Virtual Machine Role
WAPSQL SQL Server database and Active Directory domain controller for WAP.Local
domain
WAPPortal Express installation of Windows Azure Pack Portal and Web App Gallery.
Configured as an access point for service and tenant admin websites.
WAPSMA Service Management Automation and Service Bus
WAPSPF Service Provider Foundation
Windows Azure Pack – Overview
Lab created by HynesITe, Inc. For questions or comments, send an e-mail message to [email protected] Page | 4
Virtual Machine Role
WAPVMM System Center Virtual Machine Manager 2012 R2 server
WAPHVS Hyper-V server (virtualized), file server, and MySQL server
SitesCN Web Sites Controller
SitesFE Web Sites Front End
SitesMN Web Sites Management
SitesPB Web Sites Publisher
SitesWWR Web Sites Reserved
SitesWWS Web Sites Shared
All user accounts in this lab use the password Passw0rd!
Navigation
Windows Azure Pack uses icons instead of labeled buttons for many tasks. While most are obvious, this
document refers to them by action names. Below is a quick reference of action names and corresponding
icons.
Complete, Done or Finished – Check Mark
Search – Check Mark
Next – Right Arrow
Previous – Left Arrow
Close or Exit – X
Note regarding pre-release software
Portions of this lab may include software that is not yet released, and as such may still contain active or
known issues. While every effort has been made to ensure this lab functions as written, unknown or
unanticipated results may be encountered as a result of using pre-release software.
Note regarding user account control
Some steps in this lab may be subject to user account control. User account control is a technology which
provides additional security to computers by requesting that users confirm actions that require
administrative rights. Tasks that generate a user account control confirmation are denoted using a shield
icon. If you encounter a shield icon, confirm your action by selecting the appropriate button in the dialog
box that is presented.
Note on activation
The virtual machines for these labs may have been built by using software that has not been activated.
This is by design in the lab to prevent the redistribution of activated software. The unactivated state of
software has been taken into account in the design of the lab. Consequently, the lab is in no way affected
by this state. For operating systems other than Windows 8, please press Cancel or Close if prompted by an
activation dialog box. If you are prompted by an Activate screen for Windows 8.1, press the Windows key
to display the Start screen.
Windows Azure Pack – Overview
Lab created by HynesITe, Inc. For questions or comments, send an e-mail message to [email protected] Page | 5
Exercise 1: Understanding Windows Azure Pack
Components and Architecture
In this exercise, you will not perform any tasks. You will be provided with an overview of the Windows
Azure Pack and how it is deployed in this lab environment. Understanding this environment and
deployment is the key to understanding the steps preformed in the lab exercises.
Important: If you already have a good understanding of the Windows Azure Pack and this environment,
proceed to Exercise 2.
This lab initially configures the following components:
Web Sites
Infrastructure as a Service (IaaS)
Service Bus
Automation
Databases
Windows Azure Pack components: Web Sites
The Windows Azure Pack: Web Sites service uses a minimum of 6 server roles: Controller, Management
Server, Front End, Web Worker, File Server, and Publisher. Also required is a server running SQL Server for
the Web Sites runtime database. These roles are separate from, and in addition to, the servers that form
an express or distributed installation of the Service Management API. The roles can be installed on
physical servers or virtual machines.
1. Web Sites Controller - The controller provisions and manages the other Web Sites roles. This
role is installed first. This role is installed on the SitesCN virtual machine.
2. Management Server - This server exposes a REST endpoint that handles management traffic to
the Windows Azure Pack Web Sites Management API. This role is installed on the SitesMN virtual
machine.
3. Web Workers - These are web servers that process client web requests. Web workers are either
Shared or Reserved (at minimum, one of each is required) to provide differentiated levels of
service to customers. Reserved workers are categorized into small, medium, and large sizes. The
SitesWWR is the reserved worker server, and SitesWWS is the shared worker server.
Important: Because web workers run customer code, they represent a potential risk to the Web Sites
infrastructure. After installation, you should configure IP filtering from the Management Portal for
Administrators to reduce the risk. For more information, see Configure IP filtering.
Windows Azure Pack – Overview
Lab created by HynesITe, Inc. For questions or comments, send an e-mail message to [email protected] Page | 6
4. Front End - Accepts web requests from clients, routes requests to web workers, and returns web
worker responses to clients. Front end servers are responsible for load balancing and SSL
termination. This role is provided by the SitesFE server.
5. File Server - Provides file services for hosting web site content. The file server houses all of the
application files for every web site that runs on the Web Sites cloud. The file server in this
environment is WAPHVS. This is a general purpose server that provides several roles.
6. Publisher - Provides content publishing to the Web Sites farm for FTP clients, Visual Studio, and
WebMatrix through the Web Deploy and FTP protocols. The publishing server is SitesPB.
In addition, up to three database servers are required. Note that in this environment, all SQL Server
databases are located on WAPSQL. There is also a MySQL database instance on WAPHVS.
1. Service Management API database - The core installation of the Windows Azure Pack Service
Management API uses a SQL Server server to store its configuration data. This database is
configured as part of the overall Windows Azure Pack installation and is not specific to web sites.
2. Web Sites runtime database - Prior to installing Windows Azure Pack: Web Sites, you will need
to prepare a SQL Server server to contain the runtime database that Web Sites uses for its
operations.
3. Application databases - If your usage scenario includes providing database functionality for the
tenant web sites, you will need to install separate SQL Server and/or MySQL databases to provide
this service.
Windows Azure Pack components: Virtual Machines
Virtual Machines leverage several components to provide tenant based access to virtual machines hosted
in a System Center Virtual Machine Manager (VMM) infrastructure.
1. Service Provider Foundation - Service Provider Foundation (SPF) is provided with
System Center 2012 R2 Orchestrator (and System Center 2012 SP1 - Orchestrator). Service
Provider Foundation exposes an extensible OData web service that interacts with Virtual Machine
Manager (VMM). This enables service providers and hosters to design and implement multi-
tenant self-service portals that integrate IaaS capabilities available on System Center 2012 R2.
Service Provider Foundation is installed on WAPSPF.
2. Virtual Machine Manager – VMM-specific objects such as clouds, virtual machine templates,
hardware profiles, networks, and gallery items are exposed as artifacts which can be used to
Windows Azure Pack – Overview
Lab created by HynesITe, Inc. For questions or comments, send an e-mail message to [email protected] Page | 7
create virtual machine services. In this environment VMM is deployed on WAPVMM and the VMM
environment has been populated with objects.
Windows Azure Pack components: Databases
You can add one or more Microsoft SQL Server or MySQL server instances for tenants to deploy and use.
Tenants also use these databases with the Web Sites service.
Microsoft SQL Server databases can range from simple stand-alone databases to highly available, always-
on databases. You should rely on your SQL Server database administrator to install and configure SQL
Server for you, ensuing that both Windows and SQL Server authentication are available.
In this environment, SQL Server is deployed on WAPSQL. MySQL is deployed on WAPHVS. Both are very
simple installations. The complexity of the SQL implementation is hidden by Windows Azure Pack, so you
manage all types the same way, regardless of the underlying infrastructure.
Windows Azure Pack components: Service Bus
Service Bus for Windows Server is a set of installable components that provides the messaging capabilities
of Windows Azure Service Bus on Windows Server. Service Bus for Windows Server enables you to build,
test, and run loosely-coupled, message-driven applications in self-managed environments and on
developer computers.
The purpose of Service Bus for Windows Server is to provide similar capabilities across Windows Azure
and Windows Server, and to enable flexibility in developing and deploying applications. It is built on the
same architecture as the Service Bus cloud service and provides scale and resiliency capabilities. The
programming model, Visual Studio support, and APIs exposed for developing applications are symmetric
to that for the cloud service making it easier to develop applications for either, and switch between the
two. Going forward, the experience for managing entities on the Windows Azure Management Portal will
be consistent across the on-premises and cloud versions.
Service Bus is installed on WAPSPF.
Windows Azure Pack components: Service Management Automation
Service Management Automation is a workflow management solution for Windows Azure Pack for
Windows Server. It enables you to automate the creation, monitoring, and deployment of resources in
your environment.
Service Management Automation can be used to leverage existing System Center infrastructure and
automation, including System Center Orchestrator runbooks.
Service Management Automation is installed on WAPSMA.
Windows Azure Pack – Overview
Lab created by HynesITe, Inc. For questions or comments, send an e-mail message to [email protected] Page | 8
Exercise 2: Overview of VMM Configuration
In this exercise, you will examine the configuration of System Center 2012 R2 Virtual Machine Manager,
which provides the underlying Infrastructure-as-a-service (IaaS) capabilities for Windows Azure Pack. In
later exercises, you will see the integration of these objects with Windows Azure Pack.
Virtual Machine Manager Configuration
The Service Provider Foundation (SPF) provides an integration path between Windows Azure Pack and
System Center Virtual Machine Manager, allowing Windows Azure Pack to request and then deploy new
virtual machines based on System Center Virtual Machine Manager library objects
In this task, you will explore and make note of the configuration of objects within System Center 2012 R2
Virtual Manager that are leveraged by Windows Azure Pack in this lab environment.
IMPORTANT: Please note that these configuration objects represent the minimum configurations that
are required this lab environment. For a production environment, additional configuration of these and
other objects would be required.
Begin this task logged on to WAPVMM as WAP\Administrator using the password Passw0rd!
1. On the desktop, double-click Virtual Machine Manager.
2. In the Connect to Service dialog box, click Connect.
3. In the workspace, click Fabric.
4. In the Fabric workspace, under Storage, click File Servers.
The details pane shows the storage details for the certificates, VMs and web sites that are used by the
tenants.
5. In the details pane, right-click TenantVMs, and then click Properties.
The details pane indicates that the file share is managed by Virtual Machine Manager and that the
classification for the storage is defined as SMB storage and can be made available to clouds defined
within VMM. The full range of storage options available in VMM can be integrated with the Windows
Azure Pack.
6. In the TenantVM Properties dialog box, click Cancel.
7. In the Fabric workspace, under Networking, click Logical Networks.
The details pane shows one logical network, Tenant Virtual Machines, with a single IP address pool.
Logical networks are an abstraction of the underlying physical network and are used to organize and
simplify the network assignments for hosts, virtual machines, and services. Virtual machines connect to
virtual machine networks, which are assigned to logical networks.
8. In the workspace, click VMs and Services.
Windows Azure Pack – Overview
Lab created by HynesITe, Inc. For questions or comments, send an e-mail message to [email protected] Page | 9
9. In the VMs and Services workspace, click VM Networks.
10. In the details pane, right-click Tenant WAP Network, and then click Properties.
All virtual machines must be connected to a VM network that is assigned to a logical network in order to
gain access to the physical network resources. Within the logical network settings, network virtualization
can be enabled, allowing multiple VM networks to be assigned to the same logical network. Each of
these VM networks is isolated from the other VM networks, allowing multiple tenants to share the same
logical network without being aware of each other.
11. In the Tenant WAP Network Properties dialog box, click Cancel.
12. In the VMs and Services workspace, under Clouds, right-click Silver Tenant Cloud, and then click
Properties.
In SCVMM 2012, a cloud is a way to organize delegated resources that can be scoped to meet
administrative or business requirements.
13. In the Silver Tenant Cloud Properties dialog box, click Logical Networks.
The logical network shown here is the same as the one you viewed in an earlier step.
14. In the SilverTenant Cloud Properties dialog box, click Capacity.
Each cloud has a defined capacity that can be enlarged or reduced as determined by the needs of the
consumers of the cloud or by administrative requirements.
A subsequent lab exercise will refer to the values displayed, so please note them.
15. In the Silver Tenant Cloud Properties dialog box, click Cancel.
16. In the workspace, click Library.
The library is the repository of re-usable objects and configuration settings that are used to quickly
deploy virtual machines and applications.
17. In the Library workspace, under Templates, click VM Templates.
A virtual machine template contains reusable settings to deploy virtual machines using System Center
Virtual Machine Manager 2012. The virtual machine templates shown in the details pane were created
for this lab environment.
18. In the Library workspace, under Profiles, click Hardware Profiles.
These hardware profiles contain reusable hardware configurations that can be applied to virtual
machines or virtual machine templates. The 4 hardware profiles were created as a demonstration for this
lab environment.
Windows Azure Pack – Overview
Lab created by HynesITe, Inc. For questions or comments, send an e-mail message to [email protected] Page | 10
Exercise 3: Windows Azure Pack Service Administration
In this exercise, you will learn about the capabilities provided to administrators in the Service
Administrator portal. At the end of the exercise, you will create a user account and a plan to demonstrate
the end user experience using the Tenant Administration portal in a subsequent exercise.
Log on to Service Administration portal
In this task, you will log on to the Service Administration portal.
Begin this task on WAPPortal logged on as WAP\Administrator using the password Passw0rd!
1. On the desktop, double-click WAP-Admin.
2. Click Continue to this website (not recommended).
You see this error because the lab environment is using self-signed certificates.
3. In the Windows Security dialog box, enter Administrator as the user name and Passw0rd! as the
password, and click OK.
The Service Manager Portal opens. Note that the UI has the same look and feel as Windows Azure.
Wait a few moments until all the objects listed under all items show as Ready, or Public in the case of
the Contoso Dev plan.
Examine and configure web sites cloud
In this task, you will look at some of the configuration elements of the web sites cloud, explore some of
the administrative options, and add a role.
Begin this task on WAPPortal logged on as WAP\Administrator using the password Passw0rd!
1. In the left navigation bar, click WEB SITE CLOUDS.
The web sites clouds provide the service for creating scalable web sites for PaaS (Platform as a Service).
2. In web site clouds, click SETTINGS.
Windows Azure Pack includes a customizable web application gallery of popular open source web
applications. The web sites service includes support for ASP.NET, PHP, and Node.js web applications.
3. Click SOURCE CONTROL.
4. Scroll down the page to view the source control options that are available.
The web sites service provides integration with source control systems such as BitBucket and GitHub.
5. In web site clouds, click CLOUDS.
6. Click WAP Web Sites Cloud.
The dashboard view provides an overview of recent and current activity.
Windows Azure Pack – Overview
Lab created by HynesITe, Inc. For questions or comments, send an e-mail message to [email protected] Page | 11
7. Click ROLES.
This page provides information on the roles that are required for the web sites service. As you learned in
Exercise 1, the web sites role requires a minimum of 6 server roles: Controller, Management Server,
Front End, Web Worker, File Server, and Publisher. These role servers and their respective status are
shown on this page.
8. On ROLES page, select SitesCN.WAP.local, and then note the administrative options that are
available on the taskbar.
9. Select WAPHVS.
The available options on the taskbar change to now include ROLE LOG.
10. On the taskbar, click CLOUD LOG, and then spend a few moments examining the content of the
log.
11. Click Complete (check mark).
12. On the taskbar, click ROLE LOG, and then spend a few moments examining the content of the
log.
13. Click Complete.
14. Click SitesFE.
The view changes to show the dashboard and a subset of administrative options relevant to the role.
15. Click Previous (left arrow).
16. On the taskbar, click ADD ROLE.
You have the option to add 3 cloud server roles: Web Worker, Front End, and Publisher.
17. Click ADD NEW WEB WORKER.
18. On the Setup a new Web Worker page, read the descriptions, and then click in the WORKER
TYPE drop-down box.
19. In WORKER TYPE, select Reserved – Small, and then read the description.
20. Click Close (the “x” in the upper-right hand corner).
You will not adding any additional role servers.
21. On the wap web sites cloud page, click Previous.
Examine and configure VM clouds
In this task, you will look at some of the configuration elements of the VM clouds and explore some of the
administrative options.
Begin this task on WAPPortal logged on as WAP\Administrator using the password Passw0rd!
Windows Azure Pack – Overview
Lab created by HynesITe, Inc. For questions or comments, send an e-mail message to [email protected] Page | 12
1. In the left navigation bar, click VM CLOUDS.
The VM clouds provide the Infrastructure-as-a-Service (IaaS) capability.
2. On the VM clouds page, click the small cloud icon on the left-hand side of the page.
The page provides information on the components that provide the integration between VMM and
Windows Azure Pack, the Service Provider Foundation, and also provide Service Manager automation.
3. Click CLOUDS.
4. Expand wapvmm.wap.local to display the clouds.
TIP: Click the greater than sign to expand the element in the UI.
These are the same clouds you saw earlier in Virtual Machine Manager.
5. Click Silver Tenant Cloud.
The values you see displayed on this page are the same as those you made note of in VMM in an earlier
exercise.
6. Click Previous.
7. On the VM clouds page, click VIRTUAL MACHINES.
8. Click Search (the check mark).
No virtual machines have been provisioned at this point in the lab for end users of the portal. This is
expected. Objects will be displayed here after a subsequent exercise.
9. On the VM clouds page, click NETWORKS.
10. Click Search.
No virtual machine networks have been configured for virtual machines. This is expected. Objects will be
displayed here after a subsequent exercise.
11. On the VM clouds page, click GALLERY.
A list of available VM templates is displayed.
Examine service bus clouds
The service bus provides messaging between distributed applications.
Begin this task on WAPPortal logged on as WAP\Administrator using the password Passw0rd!
1. In the left navigation bar, click SERVICE BUS CLOUDS.
2. On the service bus clouds page, click Service Bus.
You can view the health of the service bus (see if the related services are running) and the configuration
settings that were used during the installation and configuration of the service bus.
3. Click DATABASES to view information on the databases in use for the service bus.

Windows Azure Pack – Overview
Lab created by HynesITe, Inc. For questions or comments, send an e-mail message to [email protected] Page | 13
4. Click SETTINGS.
Here you can see configuration settings information.
5. Click Previous.
Examine SQL Server and MySQL servers
You can configure either SQL Server or MySQL databases for tenant use.
In this task, you will examine the current SQL Server configuration and the options for creating a new SQL
Server group. You will then examine the settings for the My SQL server to provide a point of comparison.
Begin this task on WAPPortal logged on as WAP\Administrator using the password Passw0rd!
1. In the left navigation bar, click SQL SERVERS.
2. Click wapsql.
This causes the dashboard to display.
3. Click Previous.
4. Back on the SQL Servers page, click GROUPS.
5. On the taskbar, click CREATE GROUP.
6. On the NEW page, click in the GROUP TYPE drop-down box.
To increase fault tolerance and availability of tenant databases, you can enable SQL AlwaysOn
availability groups, if you have first configured SQL AlwaysOn availability as part of your infrastructure.
7. Click Close without making any changes.
8. In the left navigation bar, click MYSQL SERVERS.
9. In the left navigation bar, click WAPHVS.
10. On mysql servers, click WAPHVS.
As was the case with the SQL Server node, this action causes the dashboard to display.
11. Click Previous.
12. Back on the mysql servers page, click GROUPS.
13. On the taskbar, click CREATE GROUP.
While you can create additional MySQL groups, you are not able to provide the additional fault
tolerance and availability that would be possible using AlwaysOn availability.
14. Click Close.
Windows Azure Pack – Overview
Lab created by HynesITe, Inc. For questions or comments, send an e-mail message to [email protected] Page | 14
Examine automation configuration settings
Service Management Automation is a workflow management solution available in Windows Azure Pack
that enables you to automate the creation, deployment, and monitoring of resources. In this task, you will
examine the administrative options available for automation in the Service Administration portal.
Begin this task on WAPPortal logged on as WAP\Administrator using the password Passw0rd!
1. In the left navigation bar , click AUTOMATION.
The dashboard displays the current runbook and job status.
2. On the automation page, click RUNBOOKS.
Windows Azure Pack provides a number of sample runbooks that can be used as a starting point to
introduce additional automation into your environment. Also note that you can select and, from the
taskbar, start runbooks.
3. Click Sample-Using-VMCloud-Automation.
4. On the sample-using-vmcloud-automation page, note the menu options, and then click
AUTHOR.
A Windows PowerShell script that provides instructions for use appears.
5. Click DRAFT.
This action allows you to edit the runbook.
6. Click EDIT RUNBOOK.
The color changes to indicate you are in editing mode. A number of additional administrative options
appear on the taskbar.
7. On the taskbar, click DISCARD DRAFT, and then click YES.
8. Minimize the activities notice that appears.
9. Click Previous.
10. On the automation page, click ASSETS.
A number of Windows PowerShell modules are listed. On the taskbar, you have the option to import
modules.
11. Click iSCSI, and then scroll down the page to examine the module details.
12. Click Previous.
Examine user settings and create a user
In this task, you will look at the settings for a portal administrative account, and then create a new admin
account.
Windows Azure Pack – Overview
Lab created by HynesITe, Inc. For questions or comments, send an e-mail message to [email protected] Page | 15
Begin this task on WAPPortal logged on as WAP\Administrator using the password Passw0rd!
1. In the left navigation bar , click USER ACCOUNTS.
2. Click [email protected].
The account is associated with a subscription.
3. Click Previous.
4. On the taskbar, click NEW.
5. On the NEW page, click QUICK CREATE.
6. In ENTER EMAIL ADDRESS, type [email protected].
7. In the PASSWORD and CONFIRM PASSWORD boxes, type Passw0rd!
8. Note that Contoso Dev (public) is selected as the default plan, and then click CREATE.
The account needs to be synchronized. After a few moments, it will appear with a status of Active.
9. Click NOTIFICATIONS.
In the notifications area, you can configure rules for sending links for password resets and so on. No
SMTP server is available in this lab environment, and as a result, the rules and settings cannot be
enabled.
10. Click CONFIGURE, and then spend a few moments examining the configuration settings.
Here you can view settings related to password strength, whether account validation is required, and so
on.
Create a plan
In this task, you will examine the plan settings for the current default plan, and then create a plan you will
use in the subsequent exercise.
Begin this task on WAPPortal logged on as WAP\Administrator using the password Passw0rd!
1. In the left navigation bar , click PLANS.
2. Click Contoso Dev.
The dashboard view appears showing the daily and total sign-up counts for the plan. Note that the plan
is public. Unless the plan access is designated as public, it cannot be consumed by self-service tenants.
3. Click SUBSCRIPTIONS.
The two admin accounts from the previous task are subscribed to the plan.
4. Click SETTINGS.
Here you can configure an invitation code and the maximum number of subscriptions per account.
5. Click ADVERTISE.
Windows Azure Pack – Overview
Lab created by HynesITe, Inc. For questions or comments, send an e-mail message to [email protected] Page | 16
You can publish plan details in Microsoft’s Web Hosting Gallery.
6. Click Previous.
7. On the taskbar, click NEW.
8. Click CREATE PLAN.
9. On the Let’s Create a Hosting Plan page, in the PLEASE SELECT A FRIENDLY NAME FOR YOUR
PLAN box, type Fabrikam Corp, and then click Next.
10. On the Select services for a Hosting Plan page, select all the services, and then click Next.
11. On the Select add-ons for the plan page, leave the HIGH AVAILABILITY checkbox clear, and then
click Done.
The status of the plan is Private. In order for it to be consumed by end users, it needs to be made public.
12. Click Fabrikam Corp.
You receive a notification that one or more services is not configured. The Virtual Machine Clouds
configuration needs to be completed. This is an expected result.
13. Under plan services, click Virtual Machine Clouds.
14. In VMM MANAGEMENT SERVER, select wapvmm.wap.local.
15. In VIRTUAL MACHINE CLOUD, select Silver Tenant Cloud.
The usage settings that are associated with the Silver Tenant Cloud in VMM, and which you noted in an
earlier exercise, are present on this page. Note that you can further limit these settings if you desire.
16. Scroll down the page, and then click Add networks.
17. On the Select networks to add to this plan page, check Tenant WAP Network, and then click
Done.
As you saw in an earlier exercise, this network is defined in VMM.
18. Click Add hardware profiles.
19. On the Select hardware profiles to add to this plan, check SELECT ALL, and then click Done.
As you saw in an earlier exercise, these hardware profiles are defined in VMM.
20. Under templates, click Add templates.
21. On the Select templates to add to this plan, check SELECT ALL, and then click Done.
As you saw in an earlier exercise, these templates are defined in VMM.
22. Under gallery, click Add gallery items.
23. On the Select gallery items to add to this plan, check SELECT ALL, and then click Done.
24. Under additional settings, select all the check boxes.
Windows Azure Pack – Overview
Lab created by HynesITe, Inc. For questions or comments, send an e-mail message to [email protected] Page | 17
In a production environment, depending on the plan, you would likely select only a subset of these
settings.
25. On the taskbar, click SAVE.
26. Click Previous.
27. On the taskbar, click CHANGE ACCESS, click Public, and then click Yes.
28. Stay logged on and leave Internet Explorer open for the next exercise.
Windows Azure Pack – Overview
Lab created by HynesITe, Inc. For questions or comments, send an e-mail message to [email protected] Page | 18
Exercise 4: Windows Azure Pack Tenant Administration
In this exercise, you will sign up for a self-service end user and then use the newly created account to log
on to the tenant portal to create a hosted environment.
Sign up for tenant admin account and create subscription
In this task, you will sign up for a tenant admin account that will allow you to create a hosted
environment. You will also add a subscription and choose a public plan.
Begin this task on WAPPortal logged on as WAP\Administrator using the password Passw0rd!
1. In Internet Explorer, open a new tab so that the Service Admin portal tab will be unaffected.
2. In the new tab, on the favorites bar, click WAP-Tenant.
3. Click SIGN UP.
4. In Email Address, type [email protected].
5. In Password and Re-enter Password, type Passw0rd!
6. Click Sign up.
7. On the Welcome page, click Next.
8. On the Main Menu page, read the description, and then click Next.
9. On the Create New page, read the description, and then click Next.
10. On the Commands page, read the description, and then click Next.
11. On the Notifications page, read the description, and then click Done.
12. Click MY ACCOUNT.
13. Click ADD SUBSCRIPTION.
14. On the Choose a plan page, select Fabrikam Corp, and then click Done.
It will take a few minutes for the subscription to be created. Once it is created, you will be presented
with a UI admin that is identical to the one you would see if you were using Windows Azure.
If, after a few minutes, you receive an alert indicating that the process is taking too long, press F5 to
refresh the page.
Configure web sites
In this task, you will configure web sites in the hosted environment.
Begin this task on WAPPortal logged on as WAP\Administrator using the password Passw0rd!
1. In the left navigation bar, click WEB SITES.
2. Click CREATE A WEB SITE.
Windows Azure Pack – Overview
Lab created by HynesITe, Inc. For questions or comments, send an e-mail message to [email protected] Page | 19
You have three methods available for creating a web site: quick create, custom create, or from a gallery.
3. Ensure QUICK CREATE is selected, and then in URL, type FabrikamSales, and then click CREATE
WEB SITE.
4. Once the web site is created, click FabrikamSales.
A quick start page appears showing the option to install WebMatrix (a free, lightweight web
development tool), publish your application, and integrate your application with source control.
5. On the Your site has been created! page, click Set up deployment from source control.
You have the option to store your source code in a Local GIT repository or an External GIT or Mercurial
repository.
6. Click Close.
7. Click DASHBOARD.
Here you can get an overview of usage, errors, and settings.
8. Click MONITOR.
Here you can view more detailed information.
9. Click CONFIGURE.
10. Spend a few moments looking at the configuration options, and then click SCALE.
11. Under general, click RESERVED.
An instance size drop-down field appears.
12. In INSTANCE SIZE, select Medium.
13. In INSTANCE COUNT, move the slider bar to the right.
It is easy for end users to scale up instances.
14. Click DISCARD.
You are not going to scale up the web site.
15. Click Previous.
Configure virtual machines
In this task, you will configure virtual machines in the hosted environment.
Begin this task on WAPPortal logged on as WAP\Administrator using the password Passw0rd!
1. In the left navigation bar, click VIRTUAL MACHINES.
2. Click CREATE A VIRTUAL MACHINE ROLE.
3. Click FROM GALLERY.
4. Click Windows Server 2012 R2, and then click the Next icon.
Windows Azure Pack – Overview
Lab created by HynesITe, Inc. For questions or comments, send an e-mail message to [email protected] Page | 20
5. In NAME, type Server1, and then click the Next icon.
6. Review the VIRTUAL MACHINE SETTINGS, and then click the Cancel icon.
7. Click CREATE A VIRTUAL MACHINE ROLE.
8. Click FROM GALLERY.
9. Click Microsoft SQL Server 2012 - Workgroup, and then click the Next icon.
10. In NAME, type SQL1, and then click the Next icon.
11. In VM SETTINGS, in COMPUTER SIZE, select Medium.
12. In PASSWORD and CONFIRM, type Passw0rd!, and then click the Next icon.
13. In SQL SERVER 2012 PRODUCT KEY, type 11111-22222-33333-44444-55555.
14. In INITIAL SQL SERVER SYSADMIN type SQLAdmin.
15. In SQL SERVER SA PASSWORD and CONFIRM, type Passw0rd!
16. Click the Done icon.
17. Switch to the WAPVMM Virtual Machine, and then log on as WAP/Administrator using the
password Passw0rd!
18. On the desktop, double-click Virtual Machine Manager Console.
19. Click Use current Microsoft Windows session identity, and then click Connect.
20. In the Virtual Machine Manager console, click Jobs.
The failed job is the provisioning job you started in Windows Azure Pack. The job cannot complete
because you are using a virtualized Hyper-V server.
Configure Networks
In this task, you will work with virtualized networks.
Begin this task on WAPPortal logged on as WAP\Administrator using the password Passw0rd!
1. In the left navigation bar, click Networks.
2. Click CREATE A VIRTUAL NETWORK.
3. Click CUSTOM CREATE.
4. In NAME, type Fabrikam Network.
5. In DNS SERVERS, type 4.2.2.1.
6. Check Enable direct internet access using NAT, and then click the Next icon.
7. Click the Done icon.
8. Optionally, switch to WAPVMM, and then review the VM Networks node in Clouds and Services
to see the new network object created.
Windows Azure Pack – Overview
Lab created by HynesITe, Inc. For questions or comments, send an e-mail message to [email protected] Page | 21
Configure Service Bus
In this task, you will create a new Service Bus entry.
Begin this task on WAPPortal logged on as WAP\Administrator using the password Passw0rd!
1. In the left navigation bar, click SERVICE BUS, and then click CREATE A NEW NAMESPACE.
2. In NAMESPACE NAME, type FabrikamSB.
3. Click the Done icon.
Wait for the status to be Ready before proceeding.
4. Click FabrikamSB, and then click QUEUES.
5. Click CREATE A NEW QUEUE.
6. Click QUEUE, and then click CUSTOM CREATE.
7. In QUEUE NAME, type Fabrikam-Q, and then click Next.
8. Review the default settings, and then click the Done icon.
Wait for the status to be Active before proceeding.
9. Click NEW.
10. Click TOPIC, and then click CUSTOM CREATE.
11. In TOPIC NAME, type Fabrikam-Topic, and then click the Next icon.
12. Review the default settings, and then click the Done icon.
Configure SQL Server databases
In this task, you will create a new SQL Server database. You can also use this process to create MySQL
databases; however you will not perform that process in this task.
Begin this task on WAPPortal logged on as WAP\Administrator using the password Passw0rd!
1. In the left navigation bar, click SQL SERVER DATABASES.
2. Click ADD A NEW DATABASE.
3. In NAME, type FabrikamDB, and then click the Next icon.
4. In ADMIN NAME, type DBAdmin.
5. In PASSWORD and PASSWORD CONFIRMATION, type Passw0rd!
6. Click the Done icon.
This is the end of the lab.