Embed Size (px)
Citation preview
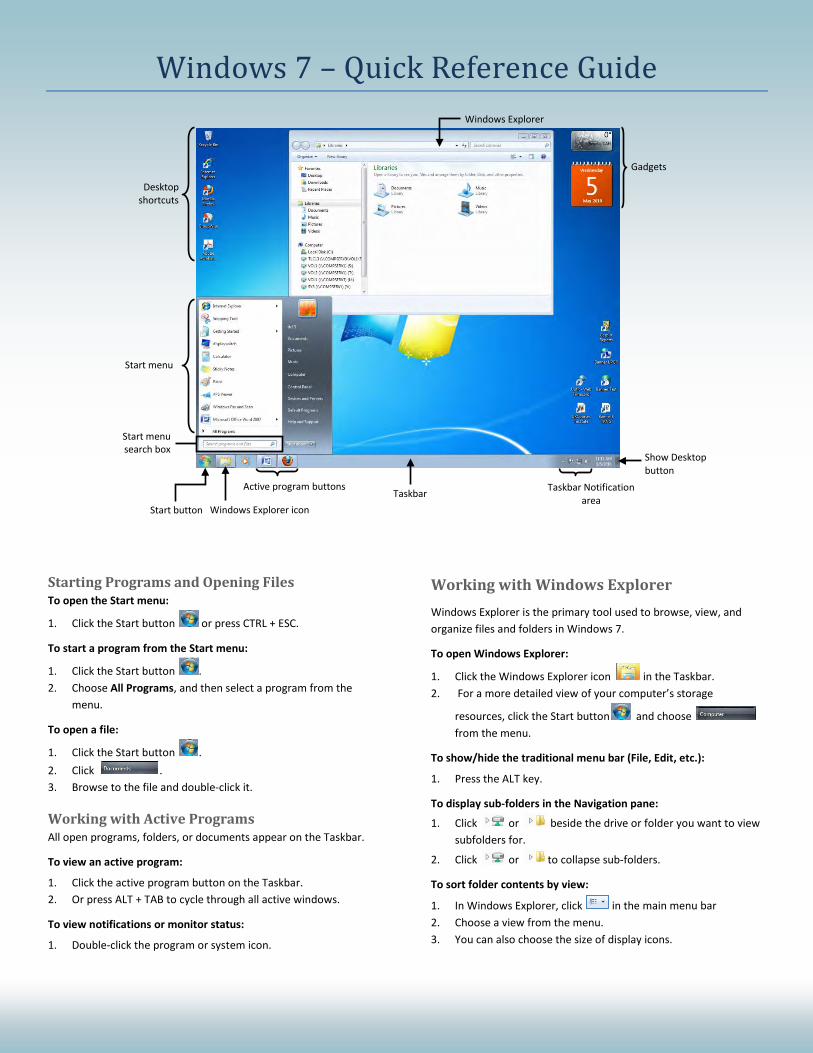
Windows 7 – Quick Reference Guide
Starting Programs and Opening Files To open the Start menu:
1. Click the Start button or press CTRL + ESC.
To start a program from the Start menu:
1. Click the Start button . 2. Choose All Programs, and then select a program from the
menu.
To open a file:
1. Click the Start button . 2. Click . 3. Browse to the file and double-click it.
Working with Active Programs All open programs, folders, or documents appear on the Taskbar.
To view an active program:
1. Click the active program button on the Taskbar. 2. Or press ALT + TAB to cycle through all active windows.
To view notifications or monitor status:
1. Double-click the program or system icon.
Working with Windows Explorer Windows Explorer is the primary tool used to browse, view, and organize files and folders in Windows 7.
To open Windows Explorer:
1. Click the Windows Explorer icon in the Taskbar. 2. For a more detailed view of your computer’s storage
resources, click the Start button and choose from the menu.
To show/hide the traditional menu bar (File, Edit, etc.):
1. Press the ALT key.
To display sub-folders in the Navigation pane: 1. Click or beside the drive or folder you want to view
subfolders for.
2. Click or to collapse sub-folders.
To sort folder contents by view:
1. In Windows Explorer, click in the main menu bar 2. Choose a view from the menu. 3. You can also choose the size of display icons.
Gadgets
Show Desktop button
Taskbar Notification area
Active program buttons
Windows Explorer icon Start button
Start menu search box
Start menu
Desktop shortcuts
Windows Explorer
Taskbar
Using Libraries New in Windows 7, libraries are collections of similar files that may be stored in different folder locations on your networks or computer, but are grouped together in a single centralized place for easy browsing and access. Default libraries enable you to collect media files, but can create custom libraries as needed.
To view libraries:
1. In Windows Explorer, click in the Navigation pane. 2. Double-click a library to open it.
To add a folder to a library:
1. Right-click the folder containing the files you want to include in a library.
2. From the menu, choose Include in Library and select an appropriate library to add the contents of the folder to.
To remove a folder from a library:
1. In Windows Explorer, click and navigate to the folder you want to remove from a library.
2. Right-click the folder and choose Remove location from library from the menu.
To view and customize library properties:
1. In Windows Explorer, right-click the library and choose Properties from the menu.
2. Use the available options to quickly add or remove folders from the library, or choose to optimize the library for certain types of content.
3. Click Ok when finished.
To sort items in a library:
1. Double-click the library to open it 2. Next to the library title at the top of the screen, click the
Arrange by drop-down menu and choose a sorting option.
To create a new library:
1. In Windows Explorer, click 2. In the main menu bar, click New Library. 3. Type a name for the library and press ENTER.
To delete a library:
1. Right-click the library and choose Delete from the menu. 2. Click Yes.
To restore default libraries:
1. In Windows Explorer, right-click
2. Choose Restore default libraries from the menu.
Working with Files and Folders To open a file or folder:
1. Double-click the item.
To create a new folder:
1. Right-click in the place where you want to create a new folder. 2. Choose New » Folder 3. Type a name for the folder and press ENTER.
To rename a file or folder:
1. Right-click the item and choose Rename.
To delete a file or folder:
1. Right-click the item and choose Delete. 2. OR Select the item and press the DELETE key, the click Yes.
Searching for Files and Folders
Using Instant Search Use the search box located at the bottom of the Start menu to quickly locate files, folders, and programs on your computer.
To locate files, folders, and programs with Instant Search:
1. Click the Start button . 2. In the search box, begin typing keywords. 3. As you type, files and folders that match your criteria are
displayed. 4. Click an item to open or display it. 5. If you can’t find the item you are looking for, click See more
results to open a Search Results window.
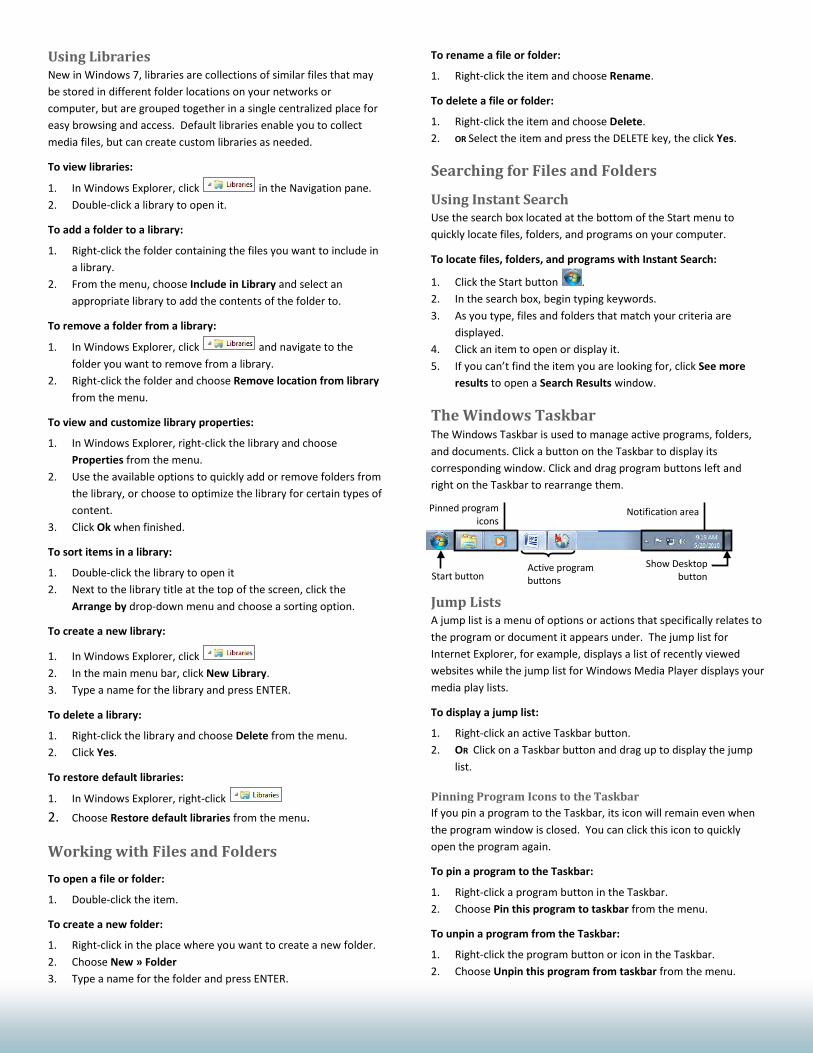
The Windows Taskbar The Windows Taskbar is used to manage active programs, folders, and documents. Click a button on the Taskbar to display its corresponding window. Click and drag program buttons left and right on the Taskbar to rearrange them.
Jump Lists A jump list is a menu of options or actions that specifically relates to the program or document it appears under. The jump list for Internet Explorer, for example, displays a list of recently viewed websites while the jump list for Windows Media Player displays your media play lists.
To display a jump list:
1. Right-click an active Taskbar button. 2. OR Click on a Taskbar button and drag up to display the jump
list.
Pinning Program Icons to the Taskbar If you pin a program to the Taskbar, its icon will remain even when the program window is closed. You can click this icon to quickly open the program again.
To pin a program to the Taskbar:
1. Right-click a program button in the Taskbar. 2. Choose Pin this program to taskbar from the menu.
To unpin a program from the Taskbar:
1. Right-click the program button or icon in the Taskbar. 2. Choose Unpin this program from taskbar from the menu.
Start button
Pinned program icons
Active program buttons
Notification area
Show Desktop button
Displaying and Arranging Windows
To minimize all windows and show the desktop:
1. Click on the Show Desktop button at the right hand side of the Taskbar.
2. OR press the + D key on your keyboard. 3. OR right-click the Taskbar and choose Show the desktop.
To choose how windows are arranged:
1. Right-click the Taskbar and choose an option (eg. Cascade windows, Show windows stacked).
To configure the taskbar:
1. Right-click the Taskbar and choose Properties from the menu. 2. In the Taskbar and Start Menu Properties dialog box, click the
Taskbar tab and choose from the available options.
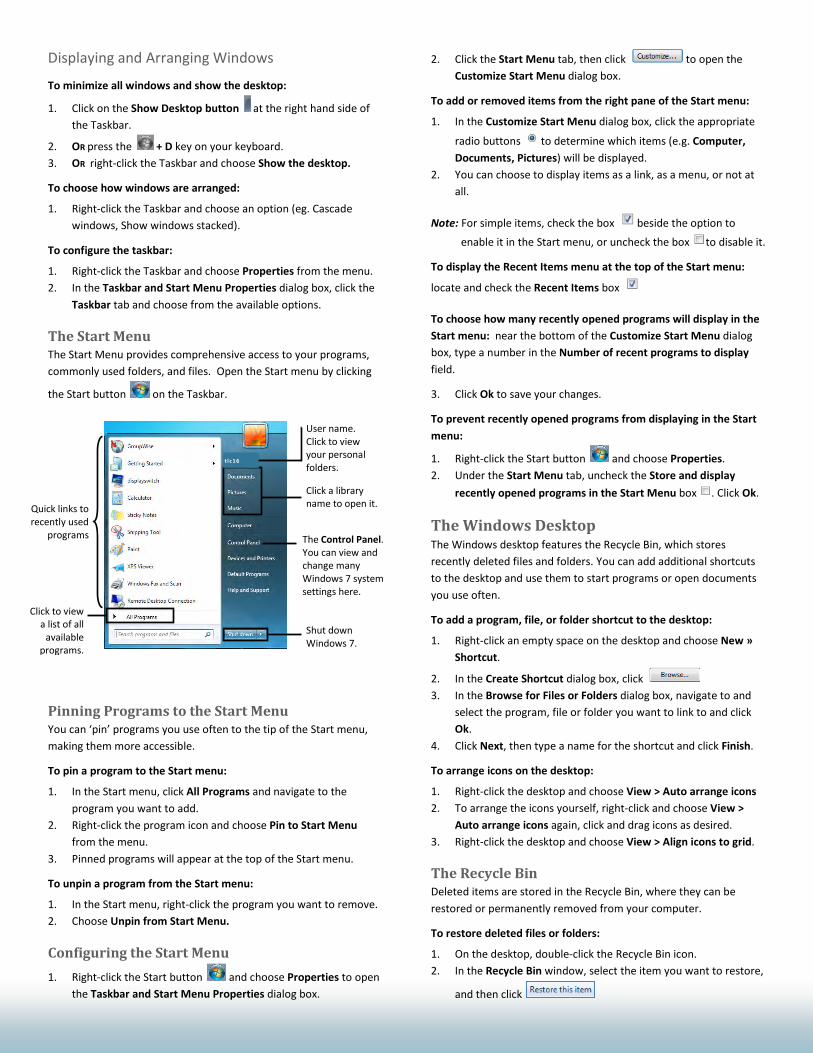
The Start Menu The Start Menu provides comprehensive access to your programs, commonly used folders, and files. Open the Start menu by clicking
the Start button on the Taskbar.
Pinning Programs to the Start Menu You can ‘pin’ programs you use often to the tip of the Start menu, making them more accessible.
To pin a program to the Start menu:
1. In the Start menu, click All Programs and navigate to the program you want to add.
2. Right-click the program icon and choose Pin to Start Menu from the menu.
3. Pinned programs will appear at the top of the Start menu.
To unpin a program from the Start menu:
1. In the Start menu, right-click the program you want to remove. 2. Choose Unpin from Start Menu.
Configuring the Start Menu 1. Right-click the Start button and choose Properties to open
the Taskbar and Start Menu Properties dialog box.
2. Click the Start Menu tab, then click to open the Customize Start Menu dialog box.
To add or removed items from the right pane of the Start menu:
1. In the Customize Start Menu dialog box, click the appropriate
radio buttons to determine which items (e.g. Computer, Documents, Pictures) will be displayed.
2. You can choose to display items as a link, as a menu, or not at all.
Note: For simple items, check the box beside the option to
enable it in the Start menu, or uncheck the box to disable it.
To display the Recent Items menu at the top of the Start menu:
locate and check the Recent Items box To choose how many recently opened programs will display in the Start menu: near the bottom of the Customize Start Menu dialog box, type a number in the Number of recent programs to display field.
3. Click Ok to save your changes.
To prevent recently opened programs from displaying in the Start menu:
1. Right-click the Start button and choose Properties. 2. Under the Start Menu tab, uncheck the Store and display
recently opened programs in the Start Menu box . Click Ok.
The Windows Desktop The Windows desktop features the Recycle Bin, which stores recently deleted files and folders. You can add additional shortcuts to the desktop and use them to start programs or open documents you use often.
To add a program, file, or folder shortcut to the desktop:
1. Right-click an empty space on the desktop and choose New » Shortcut.
2. In the Create Shortcut dialog box, click 3. In the Browse for Files or Folders dialog box, navigate to and
select the program, file or folder you want to link to and click Ok.
4. Click Next, then type a name for the shortcut and click Finish.
To arrange icons on the desktop:
1. Right-click the desktop and choose View > Auto arrange icons 2. To arrange the icons yourself, right-click and choose View >
Auto arrange icons again, click and drag icons as desired. 3. Right-click the desktop and choose View > Align icons to grid.
The Recycle Bin Deleted items are stored in the Recycle Bin, where they can be restored or permanently removed from your computer.
To restore deleted files or folders:
1. On the desktop, double-click the Recycle Bin icon. 2. In the Recycle Bin window, select the item you want to restore,
and then click
Quick links to recently used
programs
Click to view a list of all
available programs.
Shut down Windows 7.
The Control Panel. You can view and change many Windows 7 system settings here.
Click a library name to open it.
t lc16
User name. Click to view your personal folders.
To empty the Recycle Bin:
1. On the desktop, right-click the Recycle Bin icon 2. Choose Empty Recycle Bin from the menu, and click Yes.
Windows Aero Desktop Features Computers that meet Windows Aero desktop specifications can use several handy new desktop tools, such as animated thumbnail previews and Aero Snap.
Resizing and Organizing Windows with Aero Snap & Aero Shake
To maximize all windows except the one you are working with:
1. Drag the title bar to the top of the desktop screen until the window’s outline expands to fill the screen.
2. Release the mouse button to maximize the window. 3. Drag the title bar away from the top of the screen to return the
window to the previous state.
To minimize all windows except the one you are working with:
1. Click and ‘shake’ the title bar of the window you are working with to minimize all windows.
2. Shake the title bar of the main window again to return other windows to their previous state.
To arrange two windows side-by-side using Aero Snap:
1. Click to select the first window.
2. Press the Windows Key + ← to expand it to the left.
3. Now click to select the second window and press + → 4. The two windows should fill the two halves of your screen.
Using Aero Flip 3D With Windows 7’s Aero Flip 3D, you can preview all windows quickly in a 3D stack, and then quickly flip through the windows to choose the one you want.
To view windows using Aero Flip:
1. Press CTRL + Windows Key + TAB. 2. Press TAB to cycle through all open windows, and press ENTER
to open the window you want. 3. You can click any window to open it. 4. Press the Escape key to close Aero Flip 3D at any time.
View Taskbar Thumbnails Taskbar thumbnails show you the contents of the windows you have minimized on the Taskbar. You can quickly preview the contents of windows without actually opening them and bringing them to the foreground. Taskbar thumbnails are also live, which means they display video and other real-time changes.
To preview windows using Taskbar thumbnails:
1. Place your mouse cursor over an active program button on the Taskbar.
2. The thumbnail appears directly above the Taskbar. 3. Move your mouse cursor over the thumbnail to view a full-
screen preview of the window, or click on the thumbnail to work with the reviewed program.
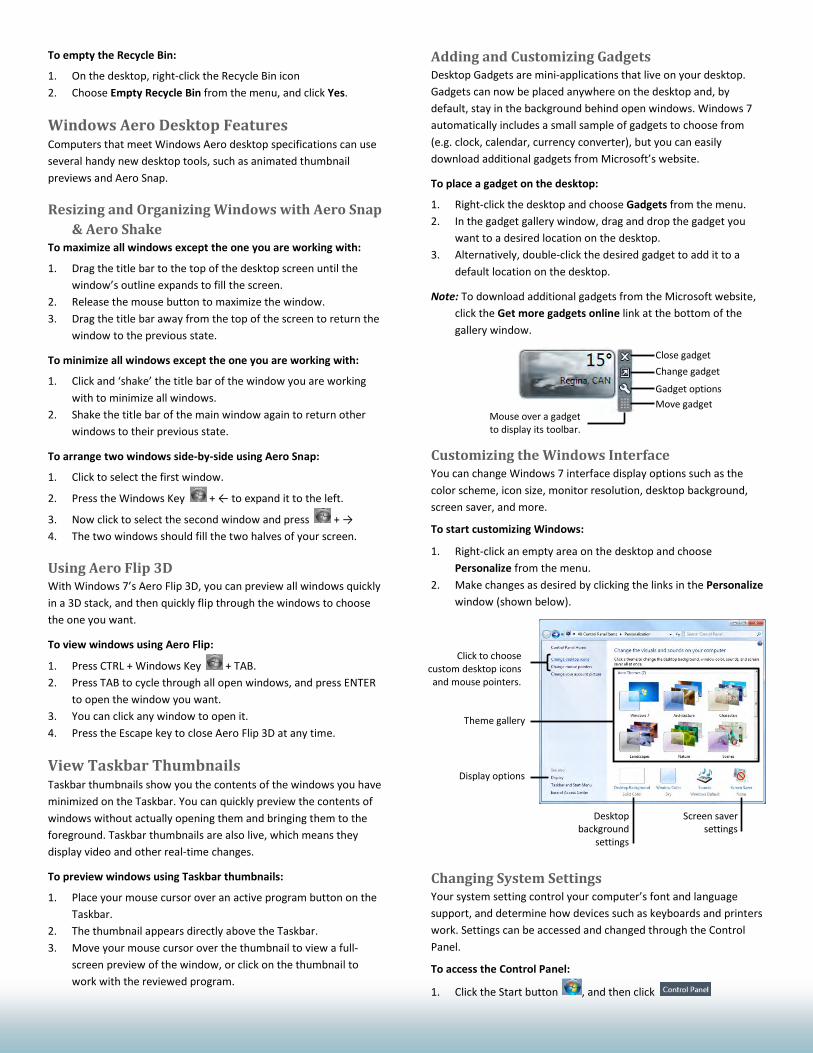
Adding and Customizing Gadgets Desktop Gadgets are mini-applications that live on your desktop. Gadgets can now be placed anywhere on the desktop and, by default, stay in the background behind open windows. Windows 7 automatically includes a small sample of gadgets to choose from (e.g. clock, calendar, currency converter), but you can easily download additional gadgets from Microsoft’s website.
To place a gadget on the desktop:
1. Right-click the desktop and choose Gadgets from the menu. 2. In the gadget gallery window, drag and drop the gadget you
want to a desired location on the desktop. 3. Alternatively, double-click the desired gadget to add it to a
default location on the desktop.
Note: To download additional gadgets from the Microsoft website, click the Get more gadgets online link at the bottom of the gallery window.
Customizing the Windows Interface You can change Windows 7 interface display options such as the color scheme, icon size, monitor resolution, desktop background, screen saver, and more.
To start customizing Windows:
1. Right-click an empty area on the desktop and choose Personalize from the menu.
2. Make changes as desired by clicking the links in the Personalize window (shown below).
Changing System Settings Your system setting control your computer’s font and language support, and determine how devices such as keyboards and printers work. Settings can be accessed and changed through the Control Panel.
To access the Control Panel:
1. Click the Start button , and then click
Close gadget Change gadget
Gadget options Move gadget
Mouse over a gadget to display its toolbar.
Click to choose custom desktop icons and mouse pointers.
Theme gallery
Display options
Desktop background
settings
Screen saver settings