Embed Size (px)
Citation preview

Window-Generator Manual
WindowGenerator&
PlacementToolby
DNS-Plugins
last update, 23.03.11
1 / 28

Window-Generator Manual
My thanks go to the following people, who contributed considerably to the development of this plugin:
Gorski Zoran www.arscom.hr
Concept & Beta-Testing
Holger Schömannwww.schoemann-unna.de
Concept & Beta-Testing
René Rijkwww.c4dlounge.eu
Beta-Testing
Oliver Heckewww.oliverhecke.de
Beta-Test & Modelling
Christoph Pieperwww.3dportfolio.de
Presets & Modelling
John Zapf www.piratedesign.com
Concept & Beta-Testing
Ansgar Ramacherwww.rahmacher-media.de
Tutorials
Disclaimer:
Use of this software happens solely on your own risk. Neither DNS-Plugins nor Daniel Schild may be held responsible for any loss of data or damage caused by the use of the plugin.
Copyright 2011 by DNS-PluginsNeither this document nor parts of it may be distributed without prior written permission.
2 / 28

Window-Generator Manual
Table of Contents
0. Requirements / Limitations............................................................................................................4
1. Installation & User License..............................................................................................................4
2. Quickstart.........................................................................................................................................5
3. Introduction.....................................................................................................................................6
4. Placement-Tool................................................................................................................................74.1 Basic-Tab....................................................................................................................................74.2 Guides........................................................................................................................................94.3 randomize all............................................................................................................................11
5. Window-Generator........................................................................................................................125.1 Object-Tab.................................................................................................................................125.2 Window Frame.........................................................................................................................155.3 Sash..........................................................................................................................................165.4 Open/Close..............................................................................................................................185.5 Handles....................................................................................................................................205.6 Shutters....................................................................................................................................215.7 Sub-Windows...........................................................................................................................215.8 Window-Sill and Trim..............................................................................................................225.9 Shades.....................................................................................................................................235.10 Glazing Bars............................................................................................................................235.11 Details.....................................................................................................................................245.12 Materials.................................................................................................................................255.13 Randomize.............................................................................................................................255.14 Compositing...........................................................................................................................25
6. The Preset Browser......................................................................................................................266.1 Load / save windows...............................................................................................................266.2 Manage profiles and objects..................................................................................................26
7. Example Pictures ......................................................................................................................27
3 / 28

Window-Generator Manual
0. Requirements / Limitations
Windows 32Bit : Cinema 4D R9.6 or better
Windows 64Bit : Cinema 4D R9.6 or better
Macintosh 32Bit : Cinema 4D R9.6 or better
Macintosh 64Bit : Cinema 4D R11 or better
The plugin is fully compatible with Cinema 4D R12 !
The Placement-Tool only works in certain viewports, which must also be maximized!
Following views are supported:perspective,left,front,right,back.
Following views are NOT supported:top, bottom, parallel, military, gentleman, isometric,dimetric,frog,bird.
Further Limitations:1. The PlacementTool can create Windows only on flat surfaces, not onto curved ones.2. The PlacementTool cannot paint windows on surfaces that are parallel to the ground (flat roof window).
In future versions of the plugin some of these limitations will probably be illiminated.
1. Installation & User License
To install this plugin, extract and copy it into the 'plugins' folder of your Cinema 4D directory.Also make sure to copy your user.lic file, that you received after buying the plugin, into the plugin folder.
The plugin will authorize itself with this license file when cinema is started, it is not neccessary anymore to enter serials to activate the plugin.
Once the plugin is installed, you can call it via Cinema's plugins menu. There you will find two icons, one to call the PlacementTool, and the other for the Window-Generator object.
4 / 28

Window-Generator Manual
2. Quickstart
If you are in a hurry, here are the 3 basic steps for creating and placing a window:
1. Select Object that you want to paint the window on (e.g. House-Wall). The object to paint on needs not neccessarily be converted to polygons, you can directly paint windows on an Extrude-NURBS for example.
2. Select the Placement-Tool and draw a rectangle in the maximized viewport onto the Wall, to set the windows position and size.
3.Change the Window Look if needed, by selecting another preset from the Preset Browser, or by changing the Attributes of the Generator Object.
5 / 28

Window-Generator Manual
3. Introduction
While developing the Window-Generator, I had the following goals in mind: The creation and positioning of windows should be extremely fast, and the generator should be flexible enough to depict a broad variety of different window types. Also created windows should saveable for later re-use.
Thus the plugin is made up of three different parts:
The Placement-Tool is responsible for creating, placing ans scaling windows.It's as easy as drawing a rectangle where the window should appear, and automatically the window will be created at the right position, orientation and scale. This process can be repeated at any time to re-translate or rescale a window. Furthermore there are various options for snapping and randomisation of the windows in your scene.
The Window-Generator is the actual Window-Object which is responsible for the Appearance of the Your Windows. There are many settings to tweak the look and complexity of your windows. You can adjust the layout of the window, size,shape and position of the frame-elements, the look of the window glass, add details, and much more.
The Preset-Browser will manage your window prestes, frame profiles and detail objects, like for example window boards, handles and shades. You can create new Presets,delete them, or load them into the current window. Preview Images will be created automatically and can be refreshed any time.
6 / 28
Window-Generator Manual
4. Placement-Tool
With the Placement-Tool you can position windows on other objects like walls or houses, just by drawing a rectangle on the currently active object. If there's a Window-Generator currently selected in the Object-Manager, you can re-translate and rescale that window by drawing a rectangle again, or by dragging the edges or corners of the rectangle.
While dragging a rectangle, you can use the following hotkeys :
no key: The currently selected window wil be re-translated and re-scaled. Or, if no window is selected, a new window will be created on the surface of the currently active object.
shift+drag: Moves the whole window without changing its size. Shift-dragging an adge or corner of the rectangle will re-translate the window with the selected edge/corner as anchor point.
Ctrl-drag: Will create a new window. The window look is determined by the selected preset in the PlacementTool.
ctrl+shift–drag: Creates a new window which has the same settings as the currently selected window. This way you can actually clone windows very fast and re-position them.
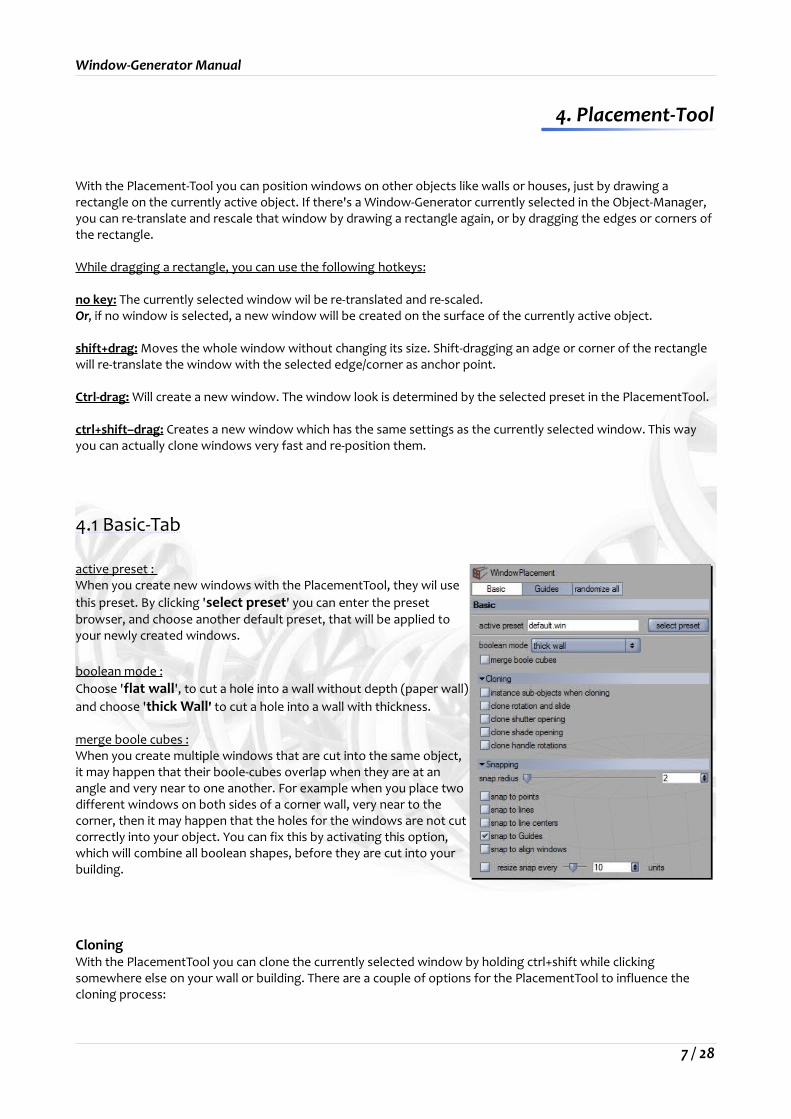
4.1 Basic-Tab
active preset : When you create new windows with the PlacementTool, they wil use this preset. By clicking 'select preset' you can enter the preset browser, and choose another default preset, that will be applied to your newly created windows.
boolean mode :Choose 'flat wall', to cut a hole into a wall without depth (paper wall) and choose 'thick Wall' to cut a hole into a wall with thickness.
merge boole cubes :When you create multiple windows that are cut into the same object, it may happen that their boole-cubes overlap when they are at an angle and very near to one another. For example when you place two different windows on both sides of a corner wall, very near to the corner, then it may happen that the holes for the windows are not cut correctly into your object. You can fix this by activating this option, which will combine all boolean shapes, before they are cut into your building.
CloningWith the PlacementTool you can clone the currently selected window by holding ctrl+shift while clicking somewhere else on your wall or building. There are a couple of options for the PlacementTool to influence the cloning process:
7 / 28

Window-Generator Manual
instance sub-objects when cloning :When you clone a window that has sub-objects like handles, shutters and / or shades, this options determines if those objects are cloned as instances, or as copies.
clone rotation and slide :Turn this options on to keep rotation / slide, when cloning the window.
clone shutter opening :Turn this options on to keep shutter rotation, when cloning the window.
clone shade opening :Turn this options on to keep shade opening, when cloning the window.
clone handle rotations :Turn this options on to keep handle rotations, when cloning the window.
SnappingWhen you create or move a window with the PlacementTool, you usually do so by moving one of the window edges or corners. There are several snapping options you can use when moving and/or rescaling your windows with the PlacementTool.
Snap-radius:Radius within which the mouse will look for snapping candidates.
Snap to points:Turn this option on to make the PlacementTool snap to points.
Snap to lines:Turn this option on to make the PlacementTool snap to edges.
Snap to line centers:Turn this option on to make the PlacementTool snap to edge-centers.
Snap to guides:Turn this option on to make the PlacementTool snap to Guide-Lines created with the PlacementTool.
Snap to align windows:If you have more then one window painted on the same object, you can check this option to align the windows with each other.
Resize every XX units:When this option is enabled, the rectangle will snap every XX units in size.So for example if you set it to snap every 10 units, you can easily create a window which's dimensions will be divisible by 10, like 100 x 100, 210 x 340, 120 x 180 and so on.
8 / 28
Window-Generator Manual
4.2 Guides
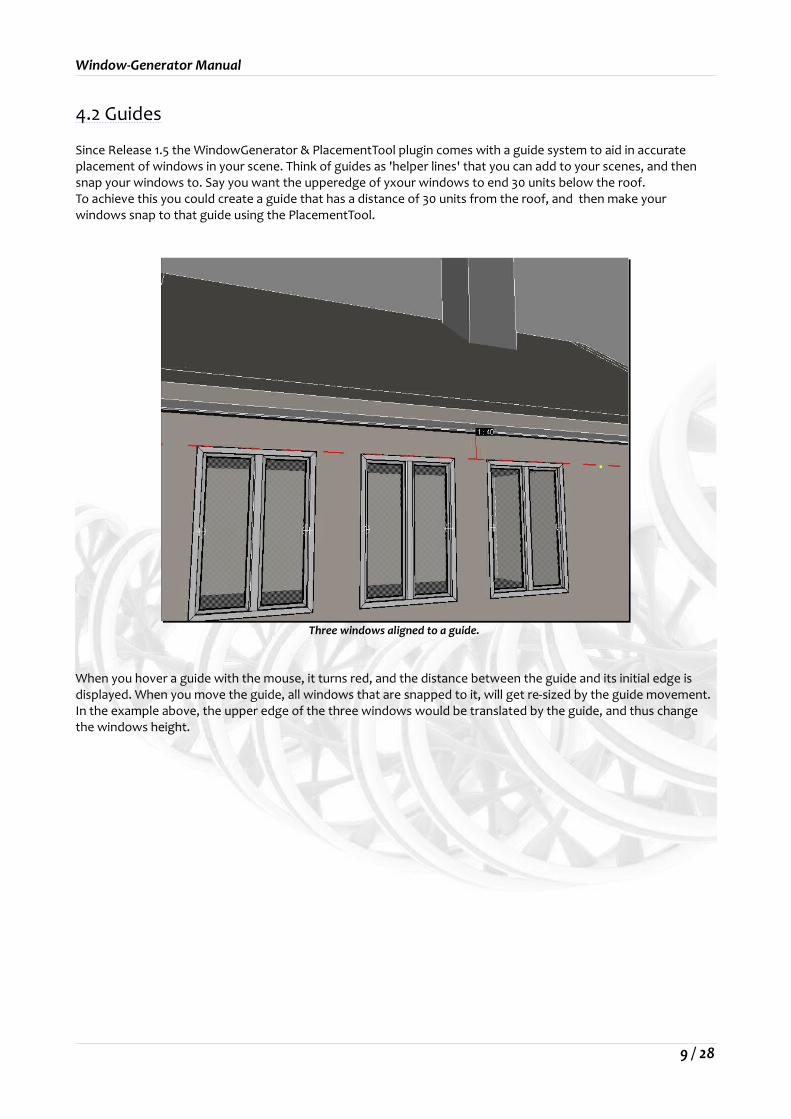
Since Release 1.5 the WindowGenerator & PlacementTool plugin comes with a guide system to aid in accurate placement of windows in your scene. Think of guides as 'helper lines' that you can add to your scenes, and then snap your windows to. Say you want the upperedge of yxour windows to end 30 units below the roof.To achieve this you could create a guide that has a distance of 30 units from the roof, and then make your windows snap to that guide using the PlacementTool.
Three windows aligned to a guide.
When you hover a guide with the mouse, it turns red, and the distance between the guide and its initial edge is displayed. When you move the guide, all windows that are snapped to it, will get re-sized by the guide movement. In the example above, the upper edge of the three windows would be translated by the guide, and thus change the windows height.
9 / 28

Window-Generator Manual
new guide:Press this button to add a new guide. Guides are defined by their distance from the borders of your house/wall object. So to create a guide, you 'pull' it from an edge of your house.
These are the steps to creating a guide:
1. press the 'new guide' button
2. Hover an edge of your house object, that you want to create the guide from.
new guide, step 2
3. 'pull' away from that edge to create the guide. While pulling, you can hold 'ctrl' to snap the distance to multiples of the amount of units, set in the snapping tab.
new guide, step 3
remove last guide:Pressing this button will remove the last guide in the guide list.
guide color:Here you can set a custom color, that will be used to display the guides in the viewport.
fix guides:While this option is turned on, you cannot move the guides with the mouse, they will stay fixed where they are. You might want to enable this option from time to time to avoid accidentally moving your guides, when moving around windows in your scene.
Remove Guide x:Will remove the corresponding guide. You can find out a guides number by hovering it with the mouse.It will be displayed in the viewport along withs its distance from its initial edge.
disable:Disabling a guide will turn it invisible in the viewport, and disable snapping of windows against it.
10 / 28

Window-Generator Manual
4.3 randomize all
In this tab you can randomise several settings for all windows in your scene at once, in cotrast to the randomize tab in a WindowGenerator-Object, which will allow you to randomize a Window individually.For example, to open every window in the scene by a random amount between 10 and 30 Degrees, you would 10 for the min rotations and 30 for the max rotations and hit the Randomize Button.
As a window can be made of up up to 6 different glass frames, if it has one horizontal and 2 vertical dividers, you can enter ranges for each of these 6 parts.
The following can be randomized at the moment:
Rotation or Slide of the Window Frames, opening angle of shades and rotation of shutters.
Each time you hit the Randomize! button, a new random values will be generated within the given ranges.
If you want to reset all randomize values in this tab, you can press the Reset All button.
11 / 28

Window-Generator Manual
5. Window-Generator
5.1 Object-Tab
Interface complexity:The Window-Generator has lots of Tabs for adjusting the look of your windows. To simplify the interface a little, you can choose between several different interface modes, which in turn will display only a selection of all available tabs.
simple: shows only the most common settings
medium: mix between simple and complete
complete: shows all tabs
Window Shape:Before version 1.5 of the plugin, you could only create rectangular windows. Since version 1.5 you can choose between :
RectangleThe default and most common window type, a Rectabgle.
Segmental ArchThe segmental-Arch Window shape is an arched Window with a variable arch curvature.You can specify the curvature of the arch via a slider, while 0% curvature equals a rectangle window and 100% curvature equals a roundarch window. Check the picture below for some example segmental arch windows.
Examples of the Segmental-Arch Window Shape, with varying Arch curvatures.
CircleSets a Circle-Shape for the window.
12 / 28
Window-Generator Manual
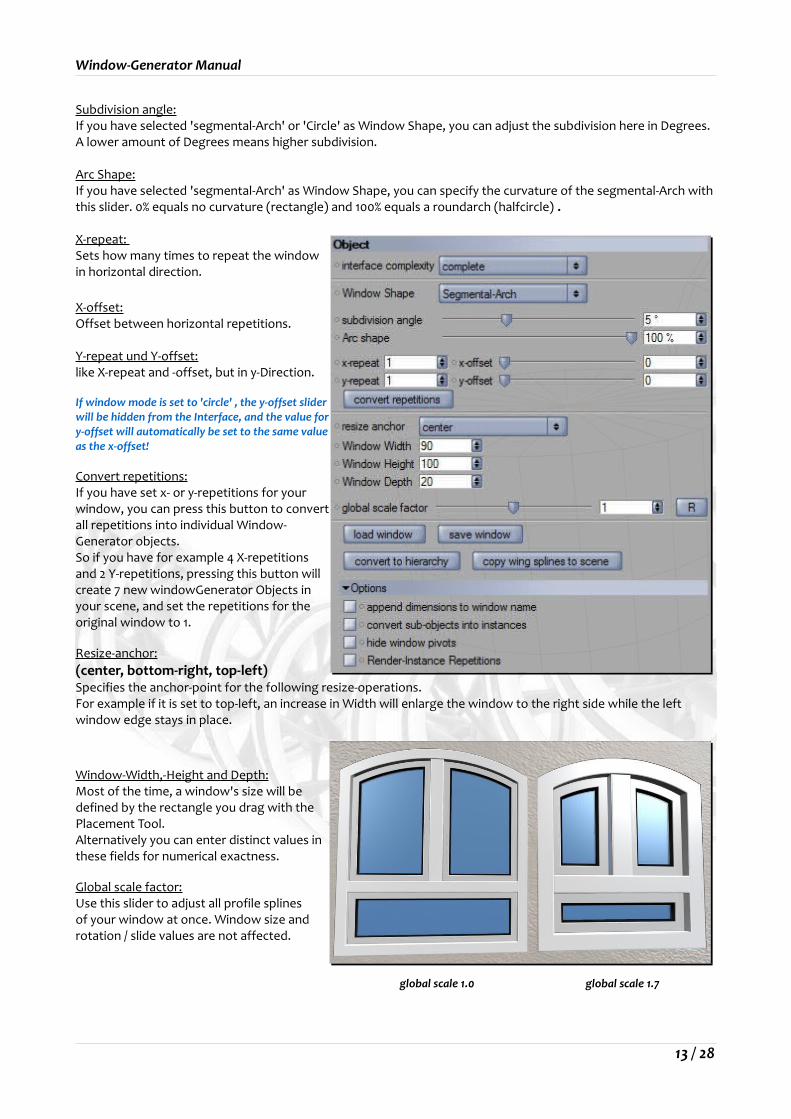
Subdivision angle:If you have selected 'segmental-Arch' or 'Circle' as Window Shape, you can adjust the subdivision here in Degrees.A lower amount of Degrees means higher subdivision.
Arc Shape:If you have selected 'segmental-Arch' as Window Shape, you can specify the curvature of the segmental-Arch with this slider. 0% equals no curvature (rectangle) and 100% equals a roundarch (halfcircle) .
X-repeat: Sets how many times to repeat the window in horizontal direction.
X-offset:Offset between horizontal repetitions.
Y-repeat und Y-offset: like X-repeat and -offset, but in y-Direction.
If window mode is set to 'circle' , the y-offset slider will be hidden from the Interface, and the value for y-offset will automatically be set to the same value as the x-offset!
Convert repetitions:If you have set x- or y-repetitions for your window, you can press this button to convert all repetitions into individual Window-Generator objects. So if you have for example 4 X-repetitions and 2 Y-repetitions, pressing this button will create 7 new windowGenerator Objects in your scene, and set the repetitions for the original window to 1.
Resize-anchor: (center, bottom-right, top-left)Specifies the anchor-point for the following resize-operations.For example if it is set to top-left, an increase in Width will enlarge the window to the right side while the left window edge stays in place.
Window-Width,-Height and Depth:Most of the time, a window's size will be defined by the rectangle you drag with the Placement Tool.Alternatively you can enter distinct values in these fields for numerical exactness.
Global scale factor:Use this slider to adjust all profile splines of your window at once. Window size and rotation / slide values are not affected.
global scale 1.0 global scale 1.7
13 / 28

Window-Generator Manual
Load window & save window:All current settings of the Window, including possibly used profile splines and detail objects can be stored as a preset for later re-use, by pressing the 'save window' button.A typical save-as dialog will appear, where you can enter a name for your new window-preset.Optionally you can choose to have a preview image rendered automatically for the preset.
By clicking 'load window' you can choose a stored preset to be applied to the currently selected window.
Convert to hierarchy:By pressing this button, you can convert the window into an object-hierarchy that consists of all the single elements that the window is made from (sweep-NURBS, profile-splines, detail-objects and so on).
Copy wing splines to scene :This function will make a copy of the window-wing frame-splines and insert them into the scene.You might want to use these splines these as a starting point, for example when you want to build your own custom shutters.
append dimensions to window nameEnable this option to have the window dimensions appended to the name of this WindowGenerator-object in the Object-Manager.
convert sub-objects into instancesIf this option is enabled, converting a window to hierarchy (see above) will convert all sub-objects of that window like frame-profiles, handles, shutters and shades , to instances of the original objects.If this option is turned off, the conversion will make copies of the sub-objects instead of instances.
'Sub-objects' are all those objects of a window, that are used in the link-fields of the WindowGenerator-object. These objects are also grouped in the preset-null below the window-object.
hide window-pivotsFor each rotateable element of your window, a pivot is displayed. You might want to hide these pivots to improve visibility in the viewport.
render-instance repetitionsSince Release 11.5, cinema4D is able to use Render-Instances, which greatly reduces memory consumption of identical objects in a scene. Enable this option to make the WindowGenerator plugin use render-instances internally, when window repetitions are used.
So if you have for example a window facade with 10x10 repetitions, and this option is enabled, memory consumption of the window object will roughly be about one hundredth as much as if the option was turned off.Of course this only works with Cinema4DR11.5 and higher versions.
14 / 28

Window-Generator Manual
5.2 Window Frame
Frame profile:Profile-Spline for the window frame. Can be choosen from the PresetBrowser by pressing the 'browse' button.
If there's no material specified for the window frame in the materials tab, the frame will be displayed in the chosen color.
Frame width:Width of the window frame.
Frame depth:Depth of the window frame.
Frame offset:Offset for the window Frame. You can push the frame further into the wall or away from it.
Pressing the 'R' button wll reset the offset to zero.
Divider layout:This is one of the most important settings of the Window.Generator as it will define the basic-layout of your window, together with the divider positions.
'Cross' will make all divider elements go alogn the whole frame width/height.
'Cut top' and 'Cut bottom' will cause the vertical elements to stop once they hit a horizontal element. This way you can realize a 'T' or 'pi' sort of divider layout.
To get a visual impression of all possible combinations, check the following layouts overview picture please.Window 4 and 8 in the picture use 'cut top', 5 and 9 use 'cut bottom'.
The individual positions of the horizontal and vertical divider elements are freely adjustable and dividers can be used in the same way with the other window shapes like circle and segmental Arch.
15 / 28

Window-Generator Manual
Horz divider position:Position of the horizontal divider element.0% corresponds to the upper end of the window, and 100% to the lower end.
Vert divider 1 position:Position of the first vertical divider element.0% corresponds to the left side of the window, and 100% to the right side.
Vert divider 2 position:Position of the second vertical divider element.0% corresponds to the left side of the window, and 100% to the right side.
Furthermore you can adjust the following settings for the horizontal and vertical divider elements:
Divider profile:Profile Spline for the divider element.
Divider width:Width of the divider element.
Divider depth:Depth of the divider element.
Divider offset:Offset of the divider element.
Link divider depth to frame depth:If this option is checked, the divider element depth will automatically be adjusted to match the depth of the window frame.
5.3 Sash
sash profile: Spline Profile for the window sash.
sash width:Width of the glass frame.
sash depth:Depth of the glass frame.
sash overlap:Will increase the width and height of the sash frame uniformly, such that it overlaps into the window frame. You may want to use this setting when working with advanced/high detail frame profiles.
sash offset:Offset for the glass frame.
Glass type:The Glass can be displayed in different ways:
16 / 28
Window-Generator Manual
plane: a simple plane, like a sheet of papersingle-cube: Depicts the Glass as a cube, giving it depth.double-cube: The Glass is made of two glass cubes.none: Dont display the glass at all.Glass depth:Thickness of the glass. This option is not visible if 'plane' was chosen for glass type.
Glass spacing:If 'double cube' was chosen for glass type, you can set here the distance between the two cubes.
Glass offset:Offset the glass relative to the glass frame.
Glass overlap:This will increase the width and height of the glass frame uniformly, such that it overlaps into the window sash.
Additionally you can apply a rubber isolation to the borders of the glass panes, using the following options:
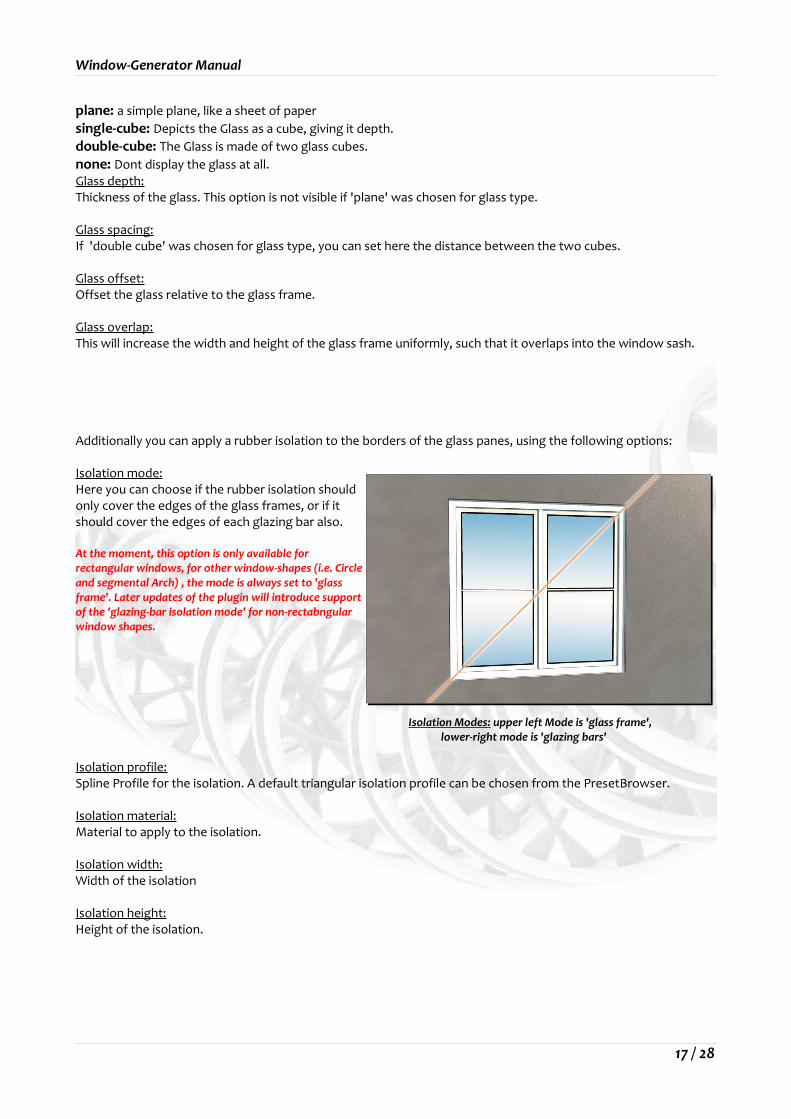
Isolation mode:Here you can choose if the rubber isolation should only cover the edges of the glass frames, or if it should cover the edges of each glazing bar also.
At the moment, this option is only available for rectangular windows, for other window-shapes (i.e. Circle and segmental Arch) , the mode is always set to 'glass frame'. Later updates of the plugin will introduce support of the 'glazing-bar isolation mode' for non-rectabngular window shapes.
Isolation Modes: upper left Mode is 'glass frame', lower-right mode is 'glazing bars'
Isolation profile:Spline Profile for the isolation. A default triangular isolation profile can be chosen from the PresetBrowser.
Isolation material:Material to apply to the isolation.
Isolation width:Width of the isolation
Isolation height:Height of the isolation.
17 / 28
Window-Generator Manual
5.4 Open/Close
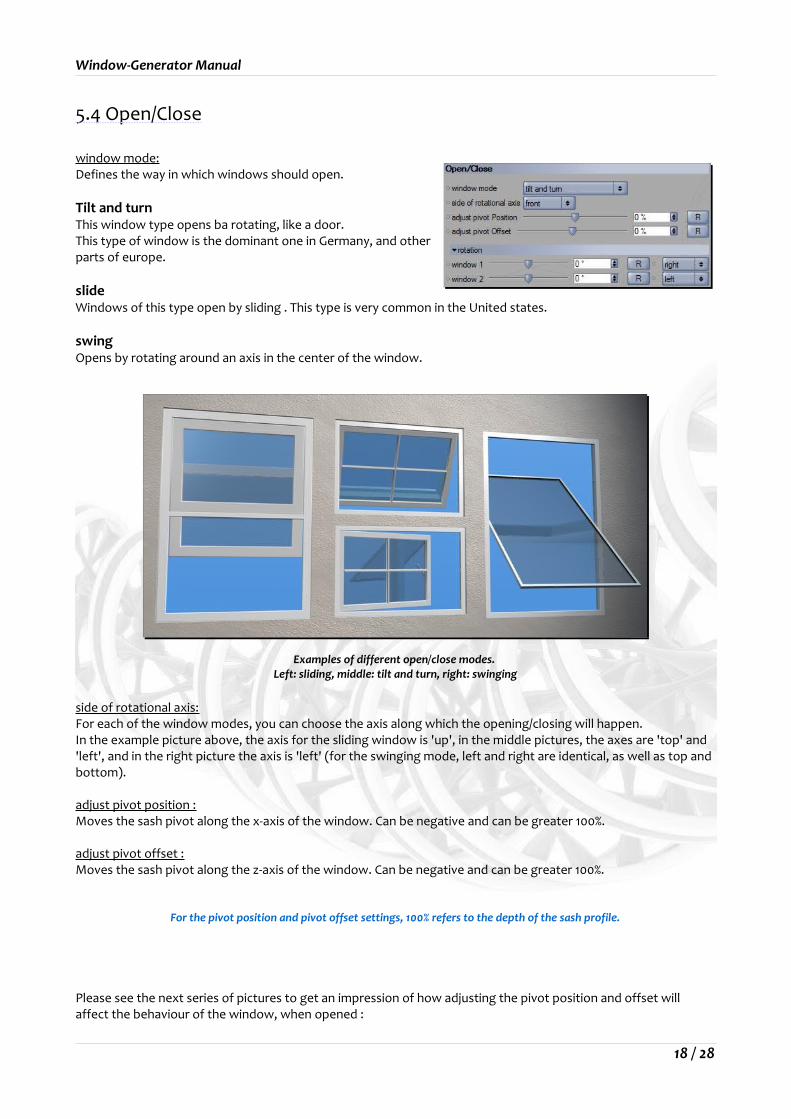
window mode:Defines the way in which windows should open.
Tilt and turnThis window type opens ba rotating, like a door.This type of window is the dominant one in Germany, and other parts of europe.
slide Windows of this type open by sliding . This type is very common in the United states.
swingOpens by rotating around an axis in the center of the window.
Examples of different open/close modes. Left: sliding, middle: tilt and turn, right: swinging
side of rotational axis:For each of the window modes, you can choose the axis along which the opening/closing will happen.In the example picture above, the axis for the sliding window is 'up', in the middle pictures, the axes are 'top' and 'left', and in the right picture the axis is 'left' (for the swinging mode, left and right are identical, as well as top and bottom).
adjust pivot position :Moves the sash pivot along the x-axis of the window. Can be negative and can be greater 100%.
adjust pivot offset :Moves the sash pivot along the z-axis of the window. Can be negative and can be greater 100%.
For the pivot position and pivot offset settings, 100% refers to the depth of the sash profile.
Please see the next series of pictures to get an impression of how adjusting the pivot position and offset will affect the behaviour of the window, when opened :
18 / 28

Window-Generator Manual
pivot offset: 0%, pivot position 0%, rotation 0° pivot offset: 0%, pivot position 0%, rotation 45°
pivot offset: 0%, pivot position 100%, rotation 0° pivot offset: 0%, pivot position 100%, rotation 45°
pivot offset: 100%, pivot position 0%, rotation 0° pivot offset: 100%, pivot position 0%, rotation 45°
pivot offset: 100%, pivot position 100%, rotation 0° pivot offset: 100%, pivot position 100%, rotation 45°
Offset & Slide:If 'slide' was chosen as 'window mode', you can choose for every window, how far, and in which direction it should be opened.
Rotation:Similarily you can specify the rotation amount and direction for 'tilt and turn' and 'swing' window modes.
With these settings you can also rotate subWindows!If for example there was a door mesh dragged into a subWindow link, you can rotate it here to open the door.This is so because subWindows replace Glass Frames in the internal WindowGenerator Hierarchy.
19 / 28

Window-Generator Manual
5.5 Handles
enable:Enable display of window handles.
shape:Mesh for the window handles. You can drag an object here from the Object Manager or choose one from the PresetBrowser by pressing 'browse'.
subdivision:Will smooth the handle accordingly with a HyperNURBS if set to a value greater then zero.
scale relative to:You can scale window handles in different ways, relative to their original mesh size, or relative to the window frame size. If you choose the latter option, rescaling the whole window will automatically cause the handle to adjust its size accordingly.
scale:Adjust the handle size. If 'scale relative to' is set to 'window frame size', 100% handle scale means that the handle gets scaled such that it is as wide as the profile width of the window frame. If it is set to 'original size' 100% means that the handle will be as big as it was modelled originally (you can check the handle model in the preset-null-object, which is a child of the WindowGenerator-object).
side:Specifies the side of the window where the handle should appear (interior / exterior)
flip x,y,z:Mirrors the handle mesh along the chosen axis.
Additionally the following settings can be tweaked for each handle individually:
disable:Disables this individual handle. The handle will not be generated and is not visible anymore.
handle position:The side of the frame where the handle should be positioned at. You can choose between right, left, top and bottom.
offset x,y,z:The individual handle positions can be fine-tuned with these sliders, offsetting them in the respective direction.
rotate:Individually rotate this handle.
20 / 28

Window-Generator Manual
5.6 Shutters
Right & left shutter:Drag your shutter meshes here, or choose one from the PresetBrowser by pressing 'browse'.
subdivision:If you set a value greater then zero here, the shutter mesh will be smoothed by a HyperNURBS accordingly.
resize: Scales the shutters along the respective axis.
offset: Offset the shutters in the respectrive direction.
Open right & left:Here you can individually change the rotation for each shutter, to open or close it.
5.7 Sub-Windows
Depending on which layout was chosen in the Window-Frame Tab, and how the divider elements were positioned, a window can consist of up to 6 individual Sashes.( see 'Divider Layout' with the overview picture of alle possible basic layouts)
Each of these areas can be repaced by another WindowGenerator Object, which may itself consist of up to 6 areas again. This opens many possibilities for the layout design of your windows. Every WindowGenerator can be used as a subWindow only one time though. So you can not have the same WindowGenerator be subWindow_1 AND be subWindow_2 of another WindowGenerator at the same time.
The Subwindow-Feature can at the moment only be used with rectangular window shapes!Future updates may introduce support of sub-windows for circle and segmental-arch windows types.
Example of a nested window, that consists of 6 different Window-Generators.This window can be re-translated and rescaled with the PlacementTool , and be saved as a preset in the PresetBrowser.
21 / 28
Window-Generator Manual
A subWindow needs not neccessarily be another WindowGenerator, arbitrary objects are possible here. You could for example drag a cube primitive into a subWindow link field, which would then be positioned and scaled automatically. That way the door preset in the presetBrowser was realized, a simple door mesh was dragged into the subWindow link field of the WindowGenerator.Naturally settings like frame depth would not have an effect on such replacement meshes anymore, but, as subWindows replace glassFrames, you can rotate/slide whole subWindws using the 'open/close' tab.
5.8 Window-Sill and Trim
Enable / link-field:Mesh for the window sill. Can be loaded from the PresetBrowser by clocking 'browse'.
subdivision:If set to a value greater zero, will smooth the model with a HyperNURBS accordingly.
resize: Scale the window sill in the respective dimension.
offset: Offsets the sill in the respective dimension.
dont repeat sill:If you have enabled repetitions for the window, you can check this option to prevent the board from being repeated for each window repetition. If you leave it off, you will have one window sill for each window repetition.
Trim profile:Profile for the window trim. Can be loaded from the PresetBrowser by clocking 'browse'.
Trim width:Width of the window trim.
Trim depth:Depth of the window trim.
Trim offset:Offset for the window trim
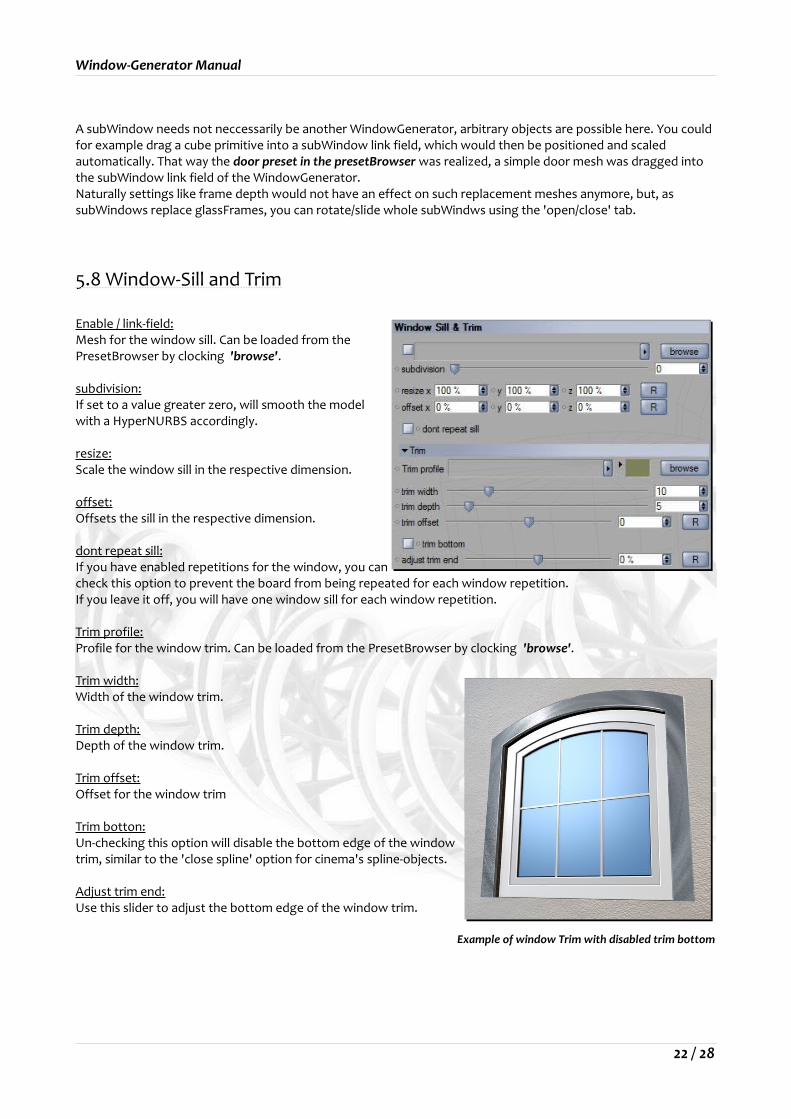
Trim botton:Un-checking this option will disable the bottom edge of the window trim, similar to the 'close spline' option for cinema's spline-objects.
Adjust trim end:Use this slider to adjust the bottom edge of the window trim.
Example of window Trim with disabled trim bottom
22 / 28
Window-Generator Manual
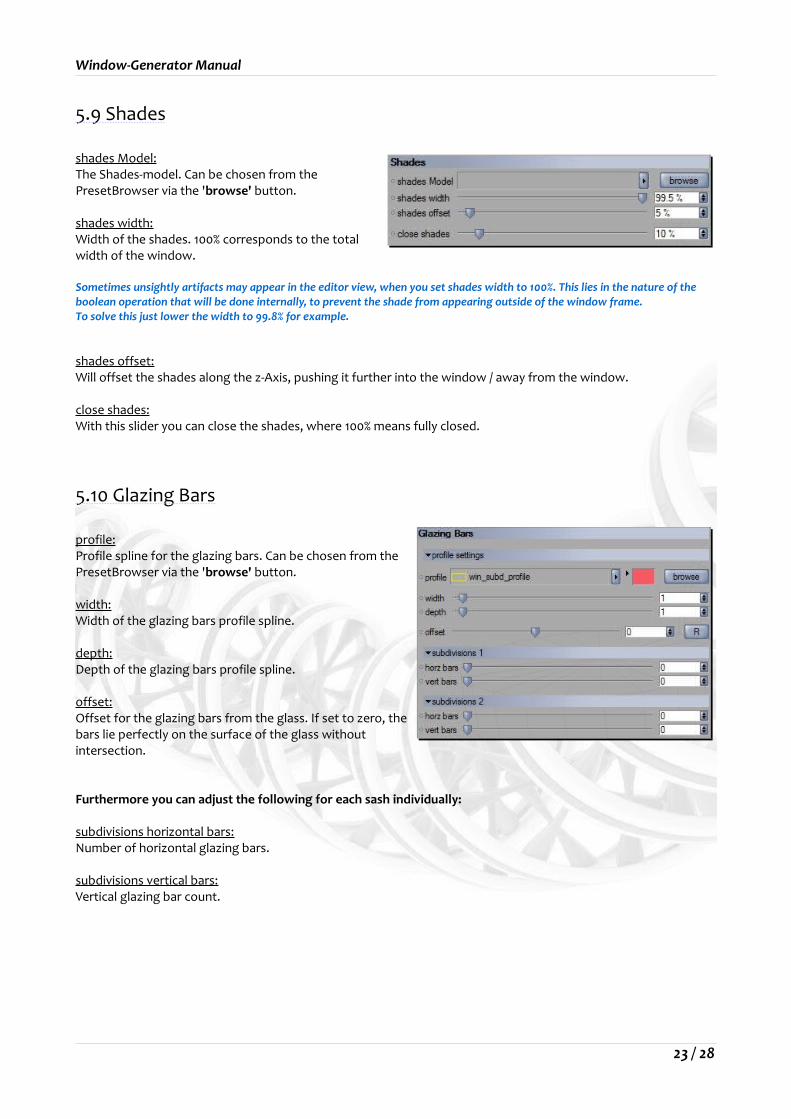
5.9 Shades
shades Model:The Shades-model. Can be chosen from the PresetBrowser via the 'browse' button.
shades width:Width of the shades. 100% corresponds to the total width of the window.
Sometimes unsightly artifacts may appear in the editor view, when you set shades width to 100%. This lies in the nature of the boolean operation that will be done internally, to prevent the shade from appearing outside of the window frame. To solve this just lower the width to 99.8% for example.
shades offset:Will offset the shades along the z-Axis, pushing it further into the window / away from the window.
close shades:With this slider you can close the shades, where 100% means fully closed.
5.10 Glazing Bars
profile:Profile spline for the glazing bars. Can be chosen from the PresetBrowser via the 'browse' button.
width:Width of the glazing bars profile spline.
depth:Depth of the glazing bars profile spline.
offset:Offset for the glazing bars from the glass. If set to zero, the bars lie perfectly on the surface of the glass without intersection.
Furthermore you can adjust the following for each sash individually:
subdivisions horizontal bars: Number of horizontal glazing bars.
subdivisions vertical bars: Vertical glazing bar count.
23 / 28

Window-Generator Manual
5.11 Details
For the most common window details like handles, shutters, shades and window boards, there are seperate tabs as described above.
In the Details-Tab you can add arbitrary additional details toyou window.Dor example you could add a window grid that would atumatically rescale itself to match the window size, add a flower pot on top of you window board, add drapes, or even a complete balcony in front of your window. Possibilities are manifold here, and mostly restricted by your imagination only ;-)
By pressing 'add detail' you can create a new detail, 'sub detail' will remove the last created detail respectively.
If you added a Detail by pressing the 'add-detail' -button, you have the following options: A switch to activate/deactive display of the detail.
A Link field for the Detail Object. You can drag an object in here from the Object Manager or choose one from the Preset Browser by clicking the 'browse' button.
subdivision:If you set a value greater zero here, the object will be smoothed accordingly by a HyperNURBS.
parent element:Specifies o which window element the detail will be added.
whole window: the object will be added once for the whole window. This mode is reccomended for window grids that span the whole window, or a balcony maybe.If repetitions were enabled for this window, the detail object will still be displayed only one time!'Whole window' actually refers here to the rectangle that you initially drew to define the window.
Window-frame: This is the same as 'whole window', with the exception that the detail will be placed once for each repetition. This mode might be used to add drapes behind every window, for example.
Sash: Depending on your window layout, a window can be made up of up to 6 different sashes.If 'sash' was chosen as parent mode for the detail object, the detail will be added once for each sash.
Resize width and height relative to: see 'resize' bolow.
side: Window side on which the detail object should appear.
resize: Scales the object in the respective direction. Depending on what option was chosen for the 'resize width and height relative to' – settings, 100% here refers to the window size, the original size of the model, or the size of the respective parent element.
offset: Offsets the object respectively.
flip x, y, z: Mirror the Object across the chosen axis.
24 / 28

Window-Generator Manual
5.12 Materials
For each window element, you can adjust the settings for its material projection: the type of mapping, x- and y-repetitions, x-and y-offset, tiling and seamless mode.
These settings are identical with their corresponding options in cinema's Material Tag.
5.13 Randomize
Randomize:never: The window will never be randomized.
globally: The window will be randomized according to the settings in the 'randomize all'-tab of the Placement Tool.
locally: The window will be randomized according to its own individual randomize settings in this tab.
This way you can have several windows in the scene get randomized by the PlacementTool at onece, and have individual selected windows use different randomize settings.
5.14 Compositing
Here you can enter Object buffer ids for each window element, to have them appear on seperate multipass layers.
25 / 28

Window-Generator Manual
6. The Preset Browser
6.1 Load / save windows
In the Preset Browser you can save complete window presets, detail objects and profiles for future use.Window Presets can be saved by pressing the 'save window' button in the Basics Tab of the Window Generator, and loaded by pressing 'load window' respectively.
Once the Preset Browser is open, you can double click a window preset to apply it to the currently selected window.
6.2 Manage profiles and objects
Elements like profile splines and detail objects like shutters or handles can be accessed in their particular tab by pressing the 'browse' button. The plugin will automatically differentiate between models and splines, so that after pressing the 'browse'-button, you will only see presets of the selected type.
When the Browser window is open, you can drag objects like Detail-Objects and splines directly into it to save them as presets. A preview-image can be generated automatically for new presets.
Presets will be saved as .c4d files in a sub-folder of the plugin, so that these files may be individually tweaked inside cinema. These files should always consist of one object only (which may have child-objects) as the preset browser will always load the first object it finds in a preset scene.
When you tweak preset-files by hand, you might have to refresh the preview image. You can do that by pressing one of the 'render preview' buttons, which will autmatically create a new preview render for the currently selected preset.
26 / 28

Window-Generator Manual
7. Example Pictures
27 / 28

Window-Generator Manual
28 / 28