Embed Size (px)
Citation preview
Installation • Operation • Care
Window ShadingsRemoteLift System
Window Shadings
CONTENTS
Getting Started:Product View ................................................................ 1Tools and Fasteners Needed .......................................... 2
Installation:Installation Overview ..................................................... 3STEP 1 — Install the Brackets ....................................... 3STEP 2 — Install the Shading ........................................ 9STEP 3 — Connect the Power Source .......................... 12Attach Magnetic Hold-Down Brackets (Optional) ........... 16
Operation:Operate the Shading ................................................... 17Resetting the Shading ................................................. 19Troubleshooting .......................................................... 20
Care:Removing the Shading................................................. 24Cleaning Procedures ................................................... 24
Radio Frequency FCC Compliance:This device complies with Part 15 of the FCC Rules. Operation is subject to the following two conditions: (1) This device may not cause harmful interference, and (2) This device must accept any interference received, including interference that may cause undesired operation.
This equipment has been tested and found to comply with the limits for a Class B digital device, pursuant to Part 15 of the FCC Rules. These limits are designed to provide reasonable protection against harmful interference in a residential installation. This equipment generates, uses and can radiate radio frequency energy and, if not installed and used in accordance with the instructions, may cause harmful interference to radio communications. However, there is no guarantee that interference will not occur in a particular installation. If this equipment does cause harmful interference to radio or television reception, which can be determined by turning the equipment off and on, the user is encouraged to try to correct the interference by one or more of the following measures:
■ Reorient or relocate the receiving antenna. ■ Increase the separation between the equipment and receiver. ■ Connect the equipment into an outlet on a circuit different from that to which the receiver is connected. ■ Consult the dealer or an experienced radio/TV technician for help.
Any changes or modifications not expressly approved by the party responsible for compliance could void the user’s authority to operate the equipment.
© 2012
GETTING STARTED
1
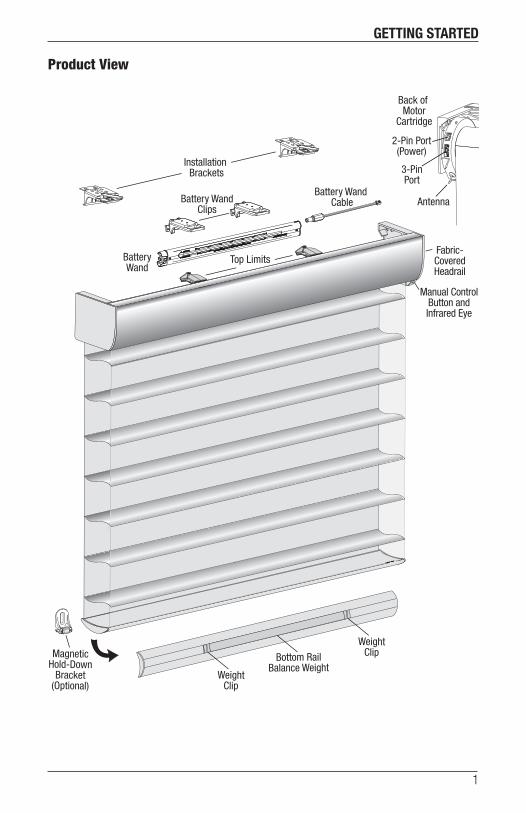
Product View
Back of Motor
Cartridge
2-Pin Port(Power)
3-PinPort
Antenna
Bottom RailBalance Weight
WeightClip
MagneticHold-Down
Bracket(Optional)
BatteryWand
Manual ControlButton andInfrared Eye
Fabric-CoveredHeadrail
Installation Brackets
Top Limits
Battery WandClips
Battery Wand Cable
WeightClip
2
GETTING STARTED
Thank you for purchasing window shadings with the RemoteLift system. With proper installation, operation, and care, your new shadings will provide years of beauty and performance.
Please thoroughly review this instruction booklet and the packing list before beginning the installation. For information regarding operation and programming, refer to the guide included with your remote control.
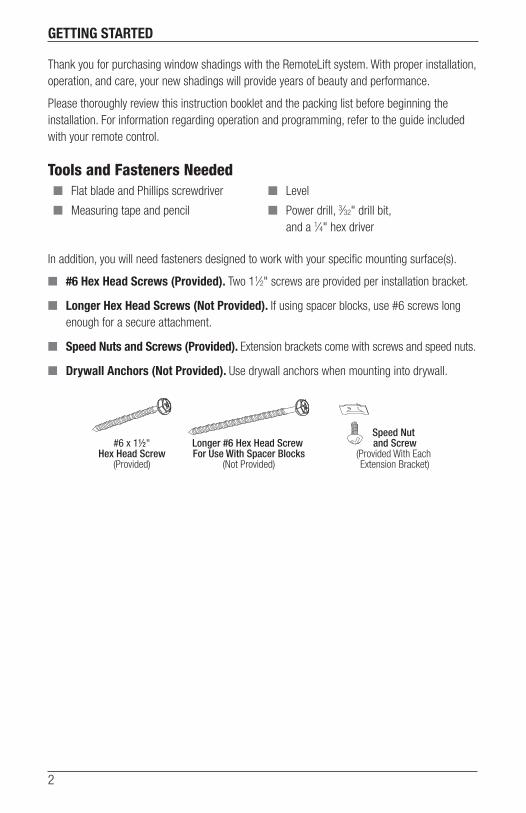
Tools and Fasteners Needed ■ Flat blade and Phillips screwdriver ■ Level
■ Measuring tape and pencil ■ Power drill, 3∕32" drill bit, and a 1∕4" hex driver
In addition, you will need fasteners designed to work with your specific mounting surface(s).
■ #6 Hex Head Screws (Provided). Two 11∕2" screws are provided per installation bracket.
■ Longer Hex Head Screws (Not Provided). If using spacer blocks, use #6 screws long enough for a secure attachment.
■ Speed Nuts and Screws (Provided). Extension brackets come with screws and speed nuts.
■ Drywall Anchors (Not Provided). Use drywall anchors when mounting into drywall.
#6 x 1½"Hex Head Screw
(Provided)
Longer #6 Hex Head Screw For Use With Spacer Blocks
(Not Provided)
Speed Nut and Screw
(Provided With Each Extension Bracket)
INSTALLATION
3
Installation OverviewTo install your shading, you will need to perform the following three easy steps:
STEP 1: Install the Brackets
STEP 2: Install the Shading
STEP 3: Connect the Power Source
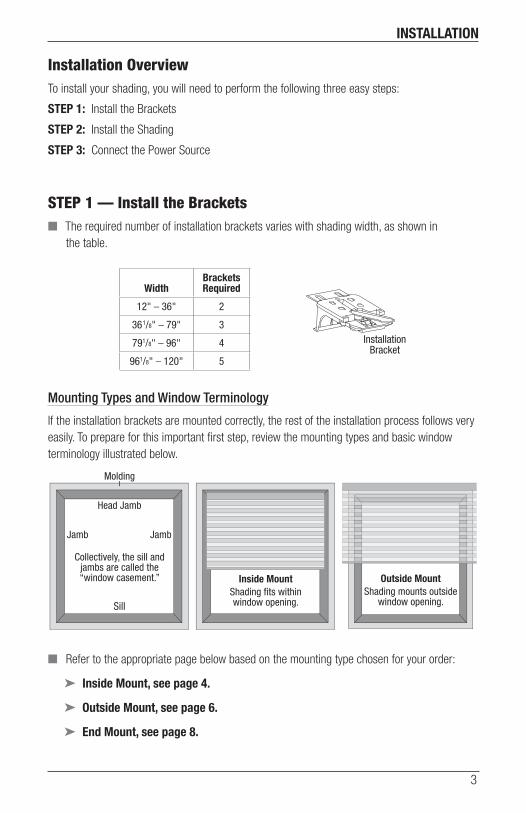
STEP 1 — Install the Brackets ■ The required number of installation brackets varies with shading width, as shown in
the table.
Mounting Types and Window Terminology
If the installation brackets are mounted correctly, the rest of the installation process follows very easily. To prepare for this important first step, review the mounting types and basic window terminology illustrated below.
■ Refer to the appropriate page below based on the mounting type chosen for your order:
➤ Inside Mount, see page 4.
➤ Outside Mount, see page 6.
➤ End Mount, see page 8.
InstallationBracket
WidthBrackets Required
12" – 36" 2
361/8" – 79" 3
791/8" – 96" 4
961/8" – 120" 5
Inside MountShading fits withinwindow opening.
Collectively, the sill andjambs are called the“window casement.”
Molding
Head Jamb
Sill
Jamb Jamb
Outside MountShading mounts outside
window opening.
INSTALLATION
4
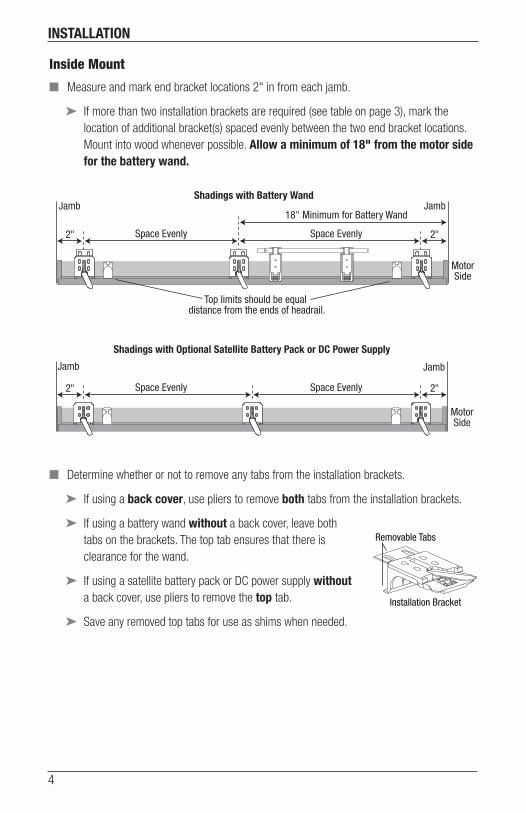
Inside Mount
■ Measure and mark end bracket locations 2" in from each jamb.
➤ If more than two installation brackets are required (see table on page 3), mark the location of additional bracket(s) spaced evenly between the two end bracket locations. Mount into wood whenever possible. Allow a minimum of 18" from the motor side for the battery wand.
■ Determine whether or not to remove any tabs from the installation brackets.
➤ If using a back cover, use pliers to remove both tabs from the installation brackets.
➤ If using a battery wand without a back cover, leave both tabs on the brackets. The top tab ensures that there is clearance for the wand.
➤ If using a satellite battery pack or DC power supply without a back cover, use pliers to remove the top tab.
➤ Save any removed top tabs for use as shims when needed.
Shadings with Battery Wand
MotorSide
JambJamb
Top limits should be equal distance from the ends of headrail.
18" Minimum for Battery Wand
Shadings with Optional Satellite Battery Pack or DC Power Supply
MotorSide
Jamb Jamb
2"Space Evenly Space Evenly2"
2"Space Evenly Space Evenly2"
½" ¼"Spacer Blocks
(Outside Mount) Installation Bracket
Removable Tabs

INSTALLATION
5
■ Choose which set of holes works best in your application. Mark the screw holes.
➤ The minimum depth required for mounting is 2" with a battery wand and a back cover.
➤ Minimum depth is 11∕4" with a satellite battery pack and back cover.
➤ The depth required for fully recessed mounting will vary depending on the type of headrail and vane size. Refer to the chart below for depth requirements.
Important: The front edges of the installation brackets must be level and aligned.
WarnIng: Failure to properly align the brackets could result in the headrail releasing from the brackets.
■ Drill the screw holes using a 3∕32" drill bit.
Important: Use drywall anchors when mounting into drywall. Drywall anchors are not provided.
■ Use a level to check that the mounting surface is level. If necessary, you can shim the brackets using the top tabs that were removed from the brackets.
■ If you ordered a back cover, attach the back cover brackets to the installation brackets.
➤ If a satellite battery pack or DC power supply is used, first remove the top tab from the back cover bracket.
➤ Snap the prongs on the back cover brackets into the holes on the back of the installation brackets.
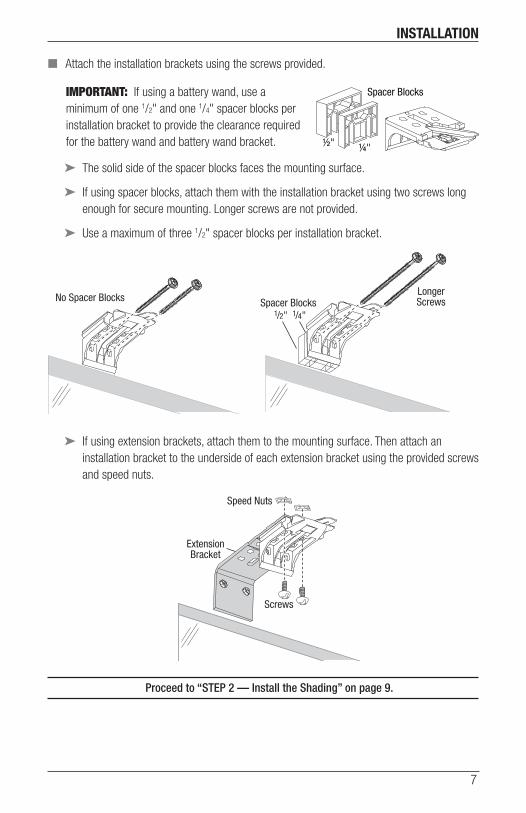
■ Attach the installation brackets using the screws provided.
Important: Do not over tighten the screws. After mounting the installation brackets, check that the bracket release lever can be moved easily side to side. If it does not move easily, loosen the screws 1∕8 turn and check again. Repeat until the lever moves easily.
Proceed to “STEP 2 — Install the Shading” on page 9.
MinimumDepth
2" Battery Wand11/4" Battery Pack or
DC Power Supply
2"
Fully Recessed Mounting Depths
Oversized Headrail
Battery Wand & Back Cover 4"
Satellite Battery Pack or DC Power Supply & Back Cover 31/2"
InstallationBracket
Back Cover
Bracket
Remove tab if using a satellite battery pack or DC power supply.
INSTALLATION
6
Outside Mount
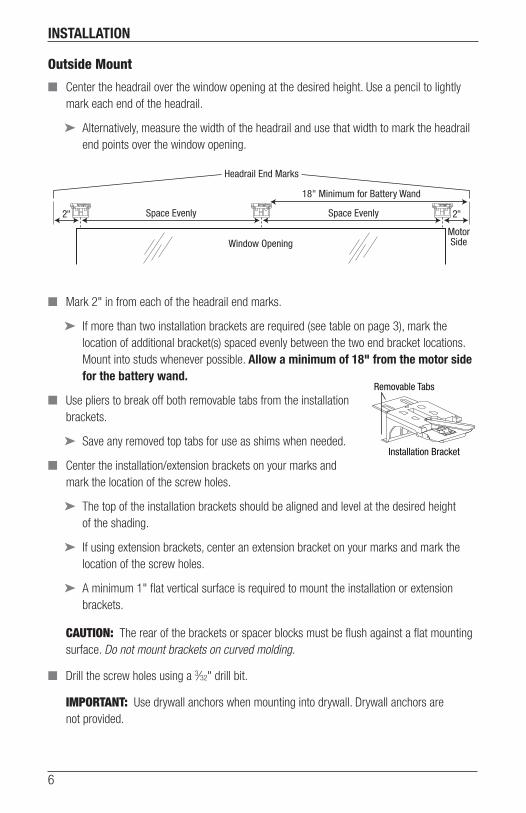
■ Center the headrail over the window opening at the desired height. Use a pencil to lightly mark each end of the headrail.
➤ Alternatively, measure the width of the headrail and use that width to mark the headrail end points over the window opening.
■ Mark 2" in from each of the headrail end marks.
➤ If more than two installation brackets are required (see table on page 3), mark the location of additional bracket(s) spaced evenly between the two end bracket locations. Mount into studs whenever possible. Allow a minimum of 18" from the motor side for the battery wand.
■ Use pliers to break off both removable tabs from the installation brackets.
➤ Save any removed top tabs for use as shims when needed.
■ Center the installation/extension brackets on your marks and mark the location of the screw holes.
➤ The top of the installation brackets should be aligned and level at the desired height of the shading.
➤ If using extension brackets, center an extension bracket on your marks and mark the location of the screw holes.
➤ A minimum 1" flat vertical surface is required to mount the installation or extension brackets.
CaUtIon: The rear of the brackets or spacer blocks must be flush against a flat mounting surface. Do not mount brackets on curved molding.
■ Drill the screw holes using a 3∕32" drill bit.
Important: Use drywall anchors when mounting into drywall. Drywall anchors are not provided.
Headrail End Marks
Window OpeningMotorSide
18" Minimum for Battery Wand
Space EvenlySpace Evenly2" 2"
½" ¼"Spacer Blocks
(Outside Mount) Installation Bracket
Removable Tabs
INSTALLATION
7
■ Attach the installation brackets using the screws provided.
Important: If using a battery wand, use a minimum of one 1/2" and one 1/4" spacer blocks per installation bracket to provide the clearance required for the battery wand and battery wand bracket.
➤ The solid side of the spacer blocks faces the mounting surface.
➤ If using spacer blocks, attach them with the installation bracket using two screws long enough for secure mounting. Longer screws are not provided.
➤ Use a maximum of three 1/2" spacer blocks per installation bracket.
➤ If using extension brackets, attach them to the mounting surface. Then attach an installation bracket to the underside of each extension bracket using the provided screws and speed nuts.
Proceed to “STEP 2 — Install the Shading” on page 9.
½" ¼"
Spacer Blocks
No Spacer Blocks Spacer BlocksLongerScrews
1/4"1/2"
Speed Nuts
Screws
ExtensionBracket
INSTALLATION
8
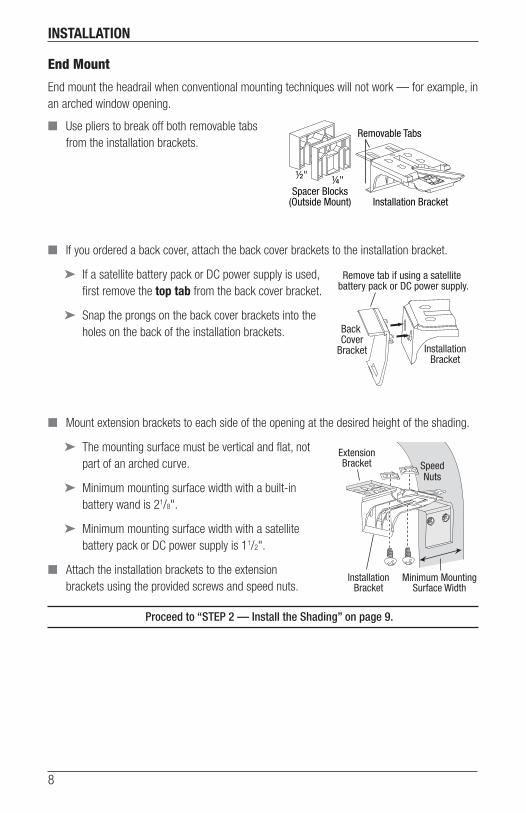
End Mount
End mount the headrail when conventional mounting techniques will not work — for example, in an arched window opening.
■ Use pliers to break off both removable tabs from the installation brackets.
■ If you ordered a back cover, attach the back cover brackets to the installation bracket.
➤ If a satellite battery pack or DC power supply is used, first remove the top tab from the back cover bracket.
➤ Snap the prongs on the back cover brackets into the holes on the back of the installation brackets.
■ Mount extension brackets to each side of the opening at the desired height of the shading.
➤ The mounting surface must be vertical and flat, not part of an arched curve.
➤ Minimum mounting surface width with a built-in battery wand is 21/8".
➤ Minimum mounting surface width with a satellite battery pack or DC power supply is 11/2".
■ Attach the installation brackets to the extension brackets using the provided screws and speed nuts.
Proceed to “STEP 2 — Install the Shading” on page 9.
½" ¼"Spacer Blocks
(Outside Mount) Installation Bracket
Removable Tabs
InstallationBracket
Back Cover
Bracket
Remove tab if using a satellite battery pack or DC power supply.
ExtensionBracket Speed
Nuts
Minimum MountingSurface Width
InstallationBracket

INSTALLATION
9
STEP 2 — Install the Shading
CaUtIon: Take care when handling the antenna wire attached to the motor cartridge. Do not cut or remove this antenna.
■ If you have an external eye, plug it into the 3-pin port on the back of the shading. Be sure the plug is oriented correctly. Do not force the connection.
■ Peel back the protective covering from the top of the fabric-covered headrail. Leave the rest of the protective covering on the front of the headrail.
■ Position the shading so that the front (colored fabric) faces you.
■ Slide the headrail into the installation brackets so the edge of the headrail is between the lever and the bracket, as shown.
■ Firmly push the headrail into each bracket until it clicks and the lever snaps to the right side of the bracket.
Important: Carefully pull on the headrail at each bracket to ensure it is installed securely.
■ Completely remove the protective covering from the fabric-covered headrail.
Enhance the Antenna Reception
■ Carefully unsnap the antenna from its storage position on the motor cartridge and form it to hang straight down from the shading. This helps increase the signal range for the remote.
3-Pin Port
Antenna
Back of Shading
Headrail
InstallationBracket
Lever
Slide the HeadrailBetween the Lever and the Bracket
INSTALLATION
10
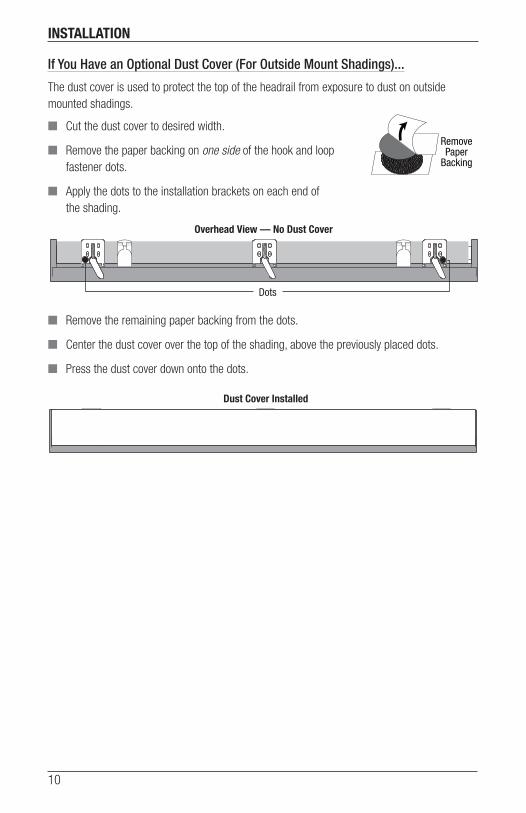
If You Have an Optional Dust Cover (For Outside Mount Shadings)...
The dust cover is used to protect the top of the headrail from exposure to dust on outside mounted shadings.
■ Cut the dust cover to desired width.
■ Remove the paper backing on one side of the hook and loop fastener dots.
■ Apply the dots to the installation brackets on each end of the shading.
■ Remove the remaining paper backing from the dots.
■ Center the dust cover over the top of the shading, above the previously placed dots.
■ Press the dust cover down onto the dots.
RemovePaper
Backing
Overhead View — No Dust Cover
Dots
Dust Cover Installed
Overhead View — No Dust Cover
Dots
Dust Cover Installed
INSTALLATION
11
STEP 3 — Connect the Power Source ■ Refer to the appropriate page based on your order.
➤ For a battery wand or satellite battery pack, see below.
➤ For an optional DC power supply, see page 13.
➤ For an optional DC power supply with daisy-chain connections, see page 14.
If You Have a Battery Wand or Satellite Battery Pack...
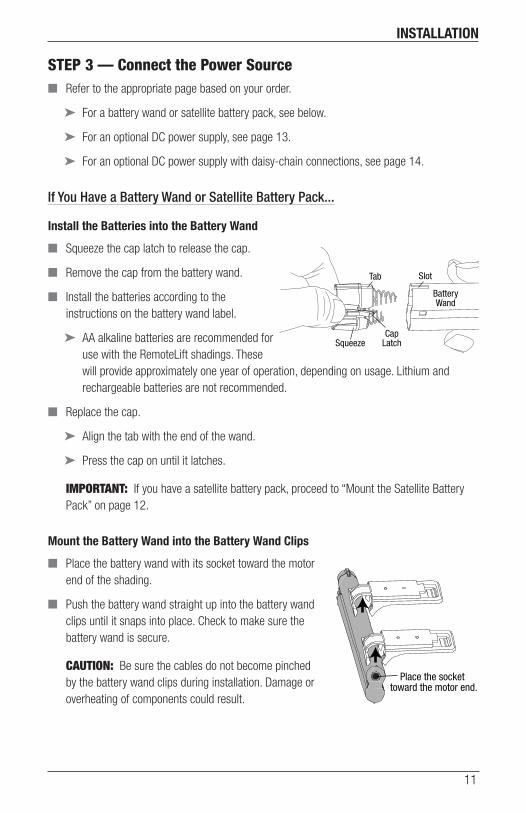
Install the Batteries into the Battery Wand
■ Squeeze the cap latch to release the cap.
■ Remove the cap from the battery wand.
■ Install the batteries according to the instructions on the battery wand label.
➤ AA alkaline batteries are recommended for use with the RemoteLift shadings. These will provide approximately one year of operation, depending on usage. Lithium and rechargeable batteries are not recommended.
■ Replace the cap.
➤ Align the tab with the end of the wand.
➤ Press the cap on until it latches.
Important: If you have a satellite battery pack, proceed to “Mount the Satellite Battery Pack” on page 12.
Mount the Battery Wand into the Battery Wand Clips
■ Place the battery wand with its socket toward the motor end of the shading.
■ Push the battery wand straight up into the battery wand clips until it snaps into place. Check to make sure the battery wand is secure.
CaUtIon: Be sure the cables do not become pinched by the battery wand clips during installation. Damage or overheating of components could result.
Tab Slot
CapLatch
BatteryWand
Squeeze
Place the socket toward the motor end.
INSTALLATION
12
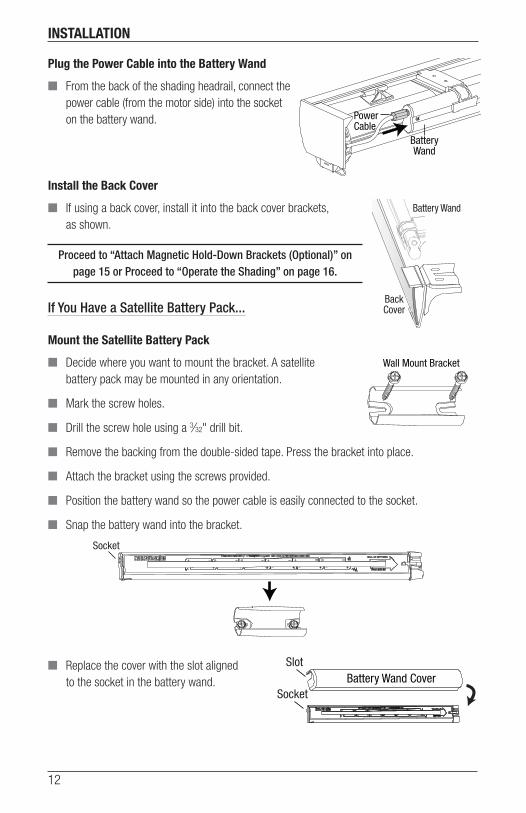
Plug the Power Cable into the Battery Wand
■ From the back of the shading headrail, connect the power cable (from the motor side) into the socket on the battery wand.
Install the Back Cover
■ If using a back cover, install it into the back cover brackets, as shown.
Proceed to “Attach Magnetic Hold-Down Brackets (Optional)” on page 15 or Proceed to “Operate the Shading” on page 16.
If You Have a Satellite Battery Pack...
Mount the Satellite Battery Pack
■ Decide where you want to mount the bracket. A satellite battery pack may be mounted in any orientation.
■ Mark the screw holes.
■ Drill the screw hole using a 3∕32" drill bit.
■ Remove the backing from the double-sided tape. Press the bracket into place.
■ Attach the bracket using the screws provided.
■ Position the battery wand so the power cable is easily connected to the socket.
■ Snap the battery wand into the bracket.
■ Replace the cover with the slot aligned to the socket in the battery wand.
PowerCable
BatteryWand
BackCover
BackCover
Satellite Battery Packor DC Power Supply
Battery Wand
Wall Mount Bracket
Socket
Battery Wand CoverSocket
Slot
INSTALLATION
13
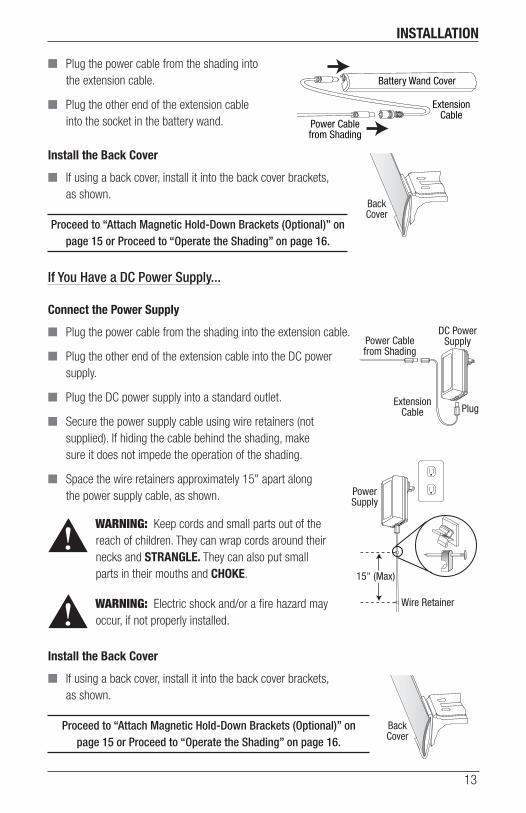
■ Plug the power cable from the shading into the extension cable.
■ Plug the other end of the extension cable into the socket in the battery wand.
Install the Back Cover
■ If using a back cover, install it into the back cover brackets, as shown.
Proceed to “Attach Magnetic Hold-Down Brackets (Optional)” on page 15 or Proceed to “Operate the Shading” on page 16.
If You Have a DC Power Supply...
Connect the Power Supply
■ Plug the power cable from the shading into the extension cable.
■ Plug the other end of the extension cable into the DC power supply.
■ Plug the DC power supply into a standard outlet.
■ Secure the power supply cable using wire retainers (not supplied). If hiding the cable behind the shading, make sure it does not impede the operation of the shading.
■ Space the wire retainers approximately 15" apart along the power supply cable, as shown.
WarnIng: Keep cords and small parts out of the reach of children. They can wrap cords around their necks and STRANGLE. They can also put small parts in their mouths and CHOKE.
WarnIng: Electric shock and/or a fire hazard may occur, if not properly installed.
Install the Back Cover
■ If using a back cover, install it into the back cover brackets, as shown.
Proceed to “Attach Magnetic Hold-Down Brackets (Optional)” on page 15 or Proceed to “Operate the Shading” on page 16.
Battery Wand Cover
ExtensionCable
Power Cablefrom Shading
BackCover
BackCover
Satellite Battery Packor DC Power Supply
Battery Wand
Power Cablefrom Shading
ExtensionCable
DC PowerSupply
Plug
15" (Max)
PowerSupply
Wire Retainer
BackCover
BackCover
Satellite Battery Packor DC Power Supply
Battery Wand
INSTALLATION
14
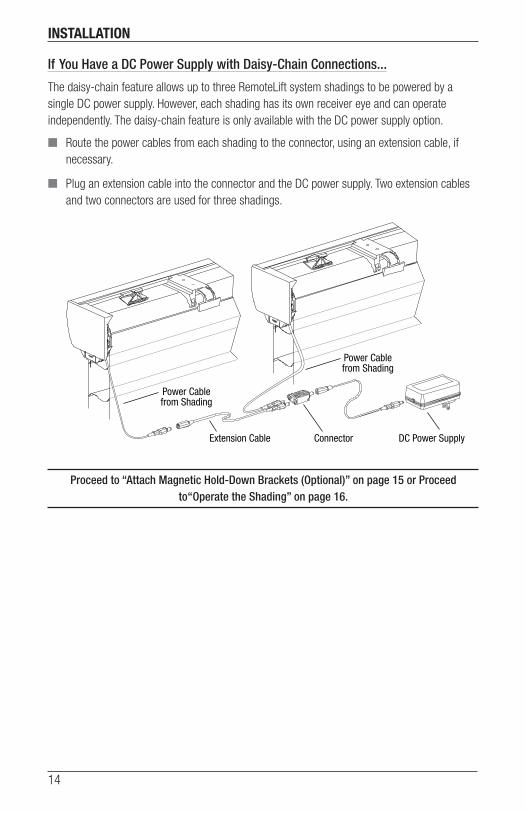
If You Have a DC Power Supply with Daisy-Chain Connections...
The daisy-chain feature allows up to three RemoteLift system shadings to be powered by a single DC power supply. However, each shading has its own receiver eye and can operate independently. The daisy-chain feature is only available with the DC power supply option.
■ Route the power cables from each shading to the connector, using an extension cable, if necessary.
■ Plug an extension cable into the connector and the DC power supply. Two extension cables and two connectors are used for three shadings.
Proceed to “Attach Magnetic Hold-Down Brackets (Optional)” on page 15 or Proceed to“Operate the Shading” on page 16.
Power Cablefrom Shading
Power Cablefrom Shading
Extension Cable Connector DC Power Supply
INSTALLATION
15
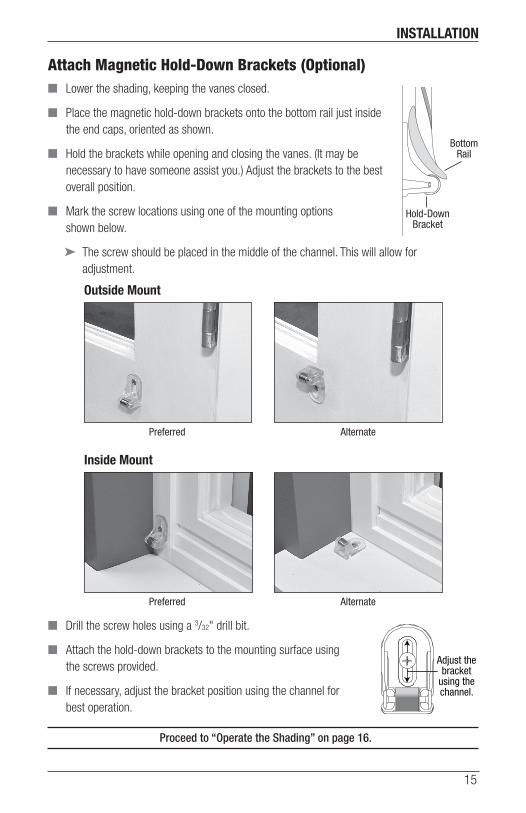
Attach Magnetic Hold-Down Brackets (Optional) ■ Lower the shading, keeping the vanes closed.
■ Place the magnetic hold-down brackets onto the bottom rail just inside the end caps, oriented as shown.
■ Hold the brackets while opening and closing the vanes. (It may be necessary to have someone assist you.) Adjust the brackets to the best overall position.
■ Mark the screw locations using one of the mounting options shown below.
➤ The screw should be placed in the middle of the channel. This will allow for adjustment.
■ Drill the screw holes using a 3/32" drill bit.
■ Attach the hold-down brackets to the mounting surface using the screws provided.
■ If necessary, adjust the bracket position using the channel for best operation.
Proceed to “Operate the Shading” on page 16.
Hold-DownBracket
BottomRail
Outside Mount
Preferred Alternate
Inside Mount
Preferred Alternate
Adjust the bracket
using the channel.
INSTALLATION
16
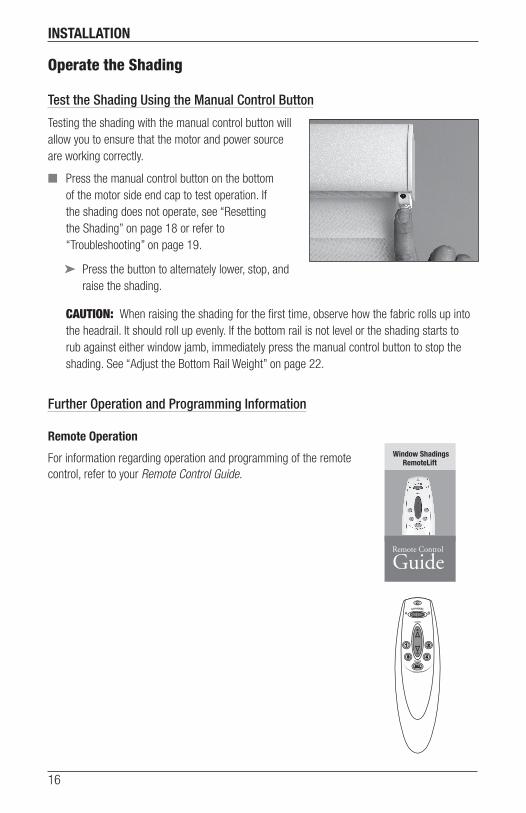
Operate the Shading
Test the Shading Using the Manual Control Button
Testing the shading with the manual control button will allow you to ensure that the motor and power source are working correctly.
■ Press the manual control button on the bottom of the motor side end cap to test operation. If the shading does not operate, see “Resetting the Shading” on page 18 or refer to “Troubleshooting” on page 19.
➤ Press the button to alternately lower, stop, and raise the shading.
CaUtIon: When raising the shading for the first time, observe how the fabric rolls up into the headrail. It should roll up evenly. If the bottom rail is not level or the shading starts to rub against either window jamb, immediately press the manual control button to stop the shading. See “Adjust the Bottom Rail Weight” on page 22.
Further Operation and Programming Information
Remote Operation
For information regarding operation and programming of the remote control, refer to your Remote Control Guide.
Remote Control
Window ShadingsRemoteLift
Guide
OPERATION
17
Alternate Push-Button Programming Method (Professional Installation Only)
To Add a Shading to a Group:
■ Press and hold the manual control button located at the window covering or on the external eye.
■ While continuing to press the manual control button, press the desired group number button, then press the OPEN button on the remote.
■ The window covering will move slightly to indicate it has been assigned to a group.
To Remove a Shading from a Group:
■ Press and hold the manual control button located at the window covering or on the external eye.
■ While continuing to press the manual control button, press the desired group number button, then press the CLOSE button on the remote.
■ The window covering will move slightly to indicate it has been removed from that group.
OPERATION
18
Resetting the ShadingIf you need to reset the limits:
Basic Reset
■ Press and hold the manual control button for 6+ seconds. The shading moves slightly up and down once to indicate that it has been reset. Release the button.
■ Press and release the manual control button to close the shading completely. This sets the lower motor limit.
■ Press and release the manual control button again to open the shading completely. This sets the upper motor limit.
Factory Reset (Professional Installation Only)
To clear all stops, erase all radio frequency (RF) programming, and reset the shading to factory default:
■ Press and hold the manual control button for 12+ seconds. The shading moves slightly up and down twice to indicate that it has been reset. Release the button.
■ Press and release the manual control button to close the shading completely. This sets the lower motor limit.
■ Press and release the manual control button again to open the shading completely. This sets the upper motor limit.
notE: Both upper and lower motor limits have been reset. However, any intermediate stop position is still cleared; and all RF programming has been erased and will need to be set up again.

OPERATION
19
TroubleshootingIf your shading is not operating correctly:
■ First review the guide that came with your remote control.
■ Refer to the following troubleshooting procedures for specific solutions for your shading.
Problem The shading will not fit into the installation brackets
Solution Check that the installation brackets are level and aligned. Adjust and/or shim to level, if necessary.
Be sure the heads of the mounting screws are flush against the installation bracket.
Make sure that the shading fabric is not caught between the installation bracket and the headrail.
Check that the headrail is completely inserted into the installation brackets. See “STEP 2 — Install the Shading” on page 9.
Problem The shading is not responding to the remote or the wireless wall switch
Solution. Check that the batteries in the wand or satellite battery pack are correctly inserted and are fresh.
Check that the battery wand, satellite battery pack, or DC power supply is securely connected to the power cable and the cables are not pinched or caught in the headrail or installation brackets.
Reset the shading. See “Resetting the Shading” on page 18.
See the Remote Control Guide for operating or programming troubleshooting solutions.
Problem The vanes do not open when the shading is first operated.
Solution Open and close the shading several times to help open the vanes. If necessary, gently pull down on the bottom rail.
OPERATION
20
Problem The bottom rail does not raise or lower completely, or its location when fully lowered has changed over time.
Solution The batteries may be low in the wand or satellite battery pack. Replace the batteries.
Check that the battery wand, satellite battery pack, or DC power supply is securely connected to the power cable and the cables are not pinched or caught in the headrail or installation brackets.
Check that there is clearance between the ends of the shading and the window casement on inside mounts.
Check if the fabric rolls up evenly into the headrail. If not, see “Adjust the Bottom Rail Weight” on page 22.
Reset the stop positions. See “Resetting the Shading” on page 18.
See the Remote Control Guide for operating or programming troubleshooting solutions.
Problem Adjacent shadings do not roll up evenly.
Solution It is considered normal if the roll-up on both shadings is within 5/16" of each other. If one shading rolls up tighter than another, lower and raise both shadings several times.
Reset the shading. See “Resetting the Shading” on page 18.
Check that the shading fabric is not catching on any brackets or components.
Check that the fabric winds evenly and does not rub against the headrail. If uneven, see “Adjust the Bottom Rail Weight” on page 22.
For a more exact roll-up, use the intermediate stop feature to set a specific height. See the Remote Control Guide for operating or programming troubleshooting solutions.
Problem The shading raises or lowers unevenly or the bottom rail is uneven when fully raised.
Solution Check that the headrail and installation brackets are level and aligned in the window. Level the headrail by shimming the installation brackets, if necessary.
Make sure that the shading fabric is not caught between the installation bracket and the headrail.
Adjust the bottom rail weight. See “Adjust the Bottom Rail Weight” on page 22.
OPERATION
21
Problem The vanes do not close fully when the shading stops in the lowest position.
Solution The shading should be programmed to stop in its lowest position with the vanes closed. A small distance between the front and back fabric facings in the fully closed position is normal.
■ If this distance is excessive or moves over time, open the shading to its full “vane open” position and try again. If this does not correct the problem, reset the bottom limit.
■ Reset the shading. See “Resetting the Shading” on page 18.
■ See the Remote Control Guide for operating or programming troubleshooting solutions.
Problem The front fabric appears to cling to the back fabric
Solution Lightly apply a static spray for home furnishings. Follow the manufacturer’s directions.
Allow the shading to dry in the fully lowered position.
If necessary, reapply the static spray each time the shading is professionally cleaned.
Problem The shading raises from the sill when the vanes are closed.
Solution A small gap between the sill and the bottom of the shading is normal in the fully lowered “vane closed” position. The gap is necessary to allow for the unimpeded movement of the bottom rail.
■ If this gap is excessive or moves over time, open the shading to its full “vane open” position and try again. If this does not correct the problem, reset the bottom limit. See the Remote Control Guide for operating or programming troubleshooting solutions.
OPERATION
22
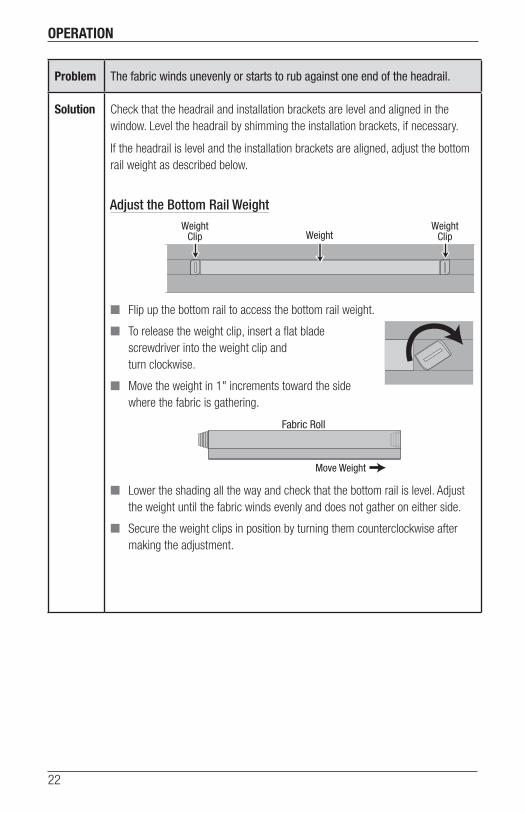
Problem The fabric winds unevenly or starts to rub against one end of the headrail.
Solution Check that the headrail and installation brackets are level and aligned in the window. Level the headrail by shimming the installation brackets, if necessary.
If the headrail is level and the installation brackets are aligned, adjust the bottom rail weight as described below.
Adjust the Bottom Rail Weight
■ Flip up the bottom rail to access the bottom rail weight.
■ To release the weight clip, insert a flat blade screwdriver into the weight clip and turn clockwise.
■ Move the weight in 1" increments toward the side where the fabric is gathering.
■ Lower the shading all the way and check that the bottom rail is level. Adjust the weight until the fabric winds evenly and does not gather on either side.
■ Secure the weight clips in position by turning them counterclockwise after making the adjustment.
WeightWeight
ClipWeight
Clip
Fabric Roll
Move Weight
OPERATION
23
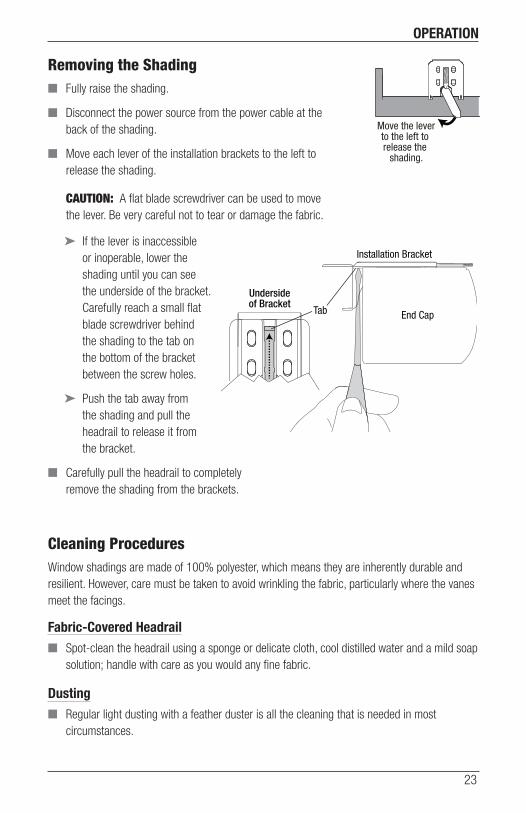
Removing the Shading ■ Fully raise the shading.
■ Disconnect the power source from the power cable at the back of the shading.
■ Move each lever of the installation brackets to the left to release the shading.
CaUtIon: A flat blade screwdriver can be used to move the lever. Be very careful not to tear or damage the fabric.
➤ If the lever is inaccessible or inoperable, lower the shading until you can see the underside of the bracket. Carefully reach a small flat blade screwdriver behind the shading to the tab on the bottom of the bracket between the screw holes.
➤ Push the tab away from the shading and pull the headrail to release it from the bracket.
■ Carefully pull the headrail to completely remove the shading from the brackets.
Cleaning ProceduresWindow shadings are made of 100% polyester, which means they are inherently durable and resilient. However, care must be taken to avoid wrinkling the fabric, particularly where the vanes meet the facings.
Fabric-Covered Headrail ■ Spot-clean the headrail using a sponge or delicate cloth, cool distilled water and a mild soap
solution; handle with care as you would any fine fabric.
Dusting ■ Regular light dusting with a feather duster is all the cleaning that is needed in most
circumstances.
Move the leverto the left to release the
shading.
Tab
Installation Bracket
End Cap
Undersideof Bracket

CARE
24
Vacuuming ■ Use a low suction, hand-held vacuum for more thorough dust removal.
Compressed Air/Hair Dryer (Cool Setting) ■ Blow dirt and debris from within the fabric folds using clean, compressed air or a hair dryer
set on a cool setting.
Spot-Cleaning
Important: Do not spot-clean anything other than the fabric-covered headrail on the window shadings.
■ Prepare a solution of warm water and mild detergent.
■ Dampen a clean cloth in the solution and wring it out.
■ Dab the spot with the dampened cloth until the spot is gone.
■ Allow the fabric-covered headrail to dry.
Ultrasonic CleaningWindow shadings can be ultrasonically cleaned by a professional.
■ Specify that a mild detergent solution be used.
■ Never immerse the headrail in the solution.
■ Dry the shading completely in the lowered position.
Injection/ExtractionWindow shadings can be professionally cleaned using the injection/extraction method.
■ A dry method of injection/extraction is required for all fabrics.
■ Never immerse the headrail in the solution.
Electrostatic CleaningDo not use electrostatic cleaning wipes on any window shadings.
A Note About FabricsAs with all textiles, fabrics are subject to some variations. Slight wrinkling, puckering, or bowing is inherent to this textile product and should be considered normal, acceptable quality. These characteristics are not usually visible from the front or rear but may be visible from a side angle.
Precautions should be taken to reduce exposure to harsh environmental elements, such as salt air. Continuous exposure through open windows and doors will accelerate fabric deterioration.
WARRANTY
25
LIMITED LIFETIME WARRANTYCongratulations on Your Selection of a Custom Window Covering.
Because we take pride in our workmanship and quality that goes into every one of our products, we back our products with this:
Limited Lifetime Warranty Covering Our Custom Made Window Coverings
We extend this limited lifetime warranty to the original purchaser. This warranty applies only to manually operated Custom Products properly installed in the window, door or interior area for which they were intended.
Installation of the product must be in accordance with the accompanying instructions. The product cannot be modified. It is the purchaser’s responsibility to maintain and clean the product in compliance with the instructions provided. The product must be used only in the window for which it was purchased.
This warranty covers our product for defects in materials, mechanisms, workmanship, or failure to operate properly. Operational cords are warranted for 5 years from the date of purchase.
Any conditions caused by damage to the product resulting from misuse, abuse, direct exposure to salty air or discoloration due to sunlight or the passage of time are NOT covered by this warranty.
This warranty does not apply to conditions caused by normal wear and tear upon this product.
This warranty is exclusive and in lieu of all other obligations, liabilities or warranties. In no event shall we be liable for INCIDENTAL or CONSEQUENTIAL DAMAGES or any other direct or indirect damage, loss, cost, expense or fee. Some states do not allow the exclusion or limitation of incidental or consequential damages, so this exclusion or limitation may not apply to you.
In the event of a defect under this warranty, we will repair or replace the product, at our option, provided it is returned to an authorized dealer.
Our warranty excludes shipping charges and labor costs for removal, measuring and installation. Repairs will be made with like or similar parts.
This warranty gives you specific legal rights, and you may also have other rights, which may vary from state to state.
notEs: Specialty Shades are warranted for one year from the date of purchase. Motorized Systems are warranted for five years from the date of purchase.
This warranty does not apply to commercial orders.

5107375000 9/12

GuideRemote Control
Window ShadingsRemoteLift
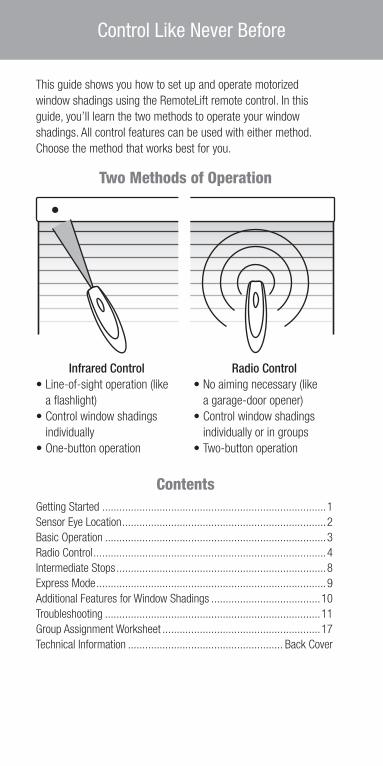
Control Like Never Before
This guide shows you how to set up and operate motorized
window shadings using the RemoteLift remote control. In this
guide, you’ll learn the two methods to operate your window
shadings. All control features can be used with either method.
Choose the method that works best for you.
Two Methods of Operation
ContentsGetting Started ..............................................................................1
Sensor Eye Location .......................................................................2
Basic Operation .............................................................................3
Radio Control .................................................................................4
Intermediate Stops .........................................................................8
Express Mode ................................................................................9
Additional Features for Window Shadings ......................................10
Troubleshooting ...........................................................................11
Group Assignment Worksheet .......................................................17
Technical Information ...................................................... Back Cover
Infrared Control• Line-of-sight operation (like
a fl ashlight)
• Control window shadings
individually
• One-button operation
Radio Control• No aiming necessary (like
a garage-door opener)
• Control window shadings
individually or in groups
• Two-button operation
1
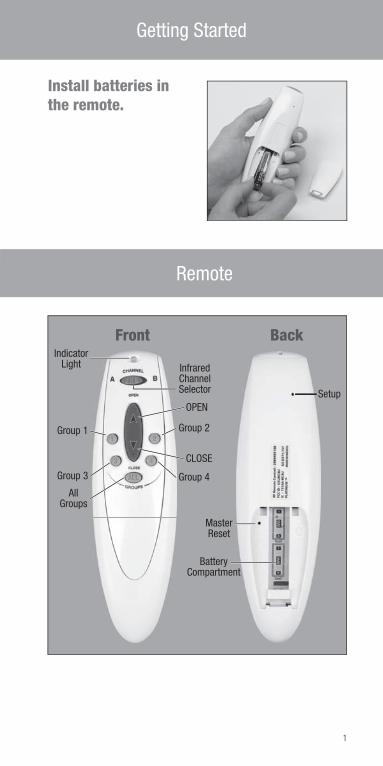
Getting Started
Remote
Install batteries in the remote.
Group 1
Group 3
AllGroups
IndicatorLight
Group 2
InfraredChannelSelector
Group 4
OPEN
CLOSE
MasterReset
Setup
BatteryCompartment
Front Back
2
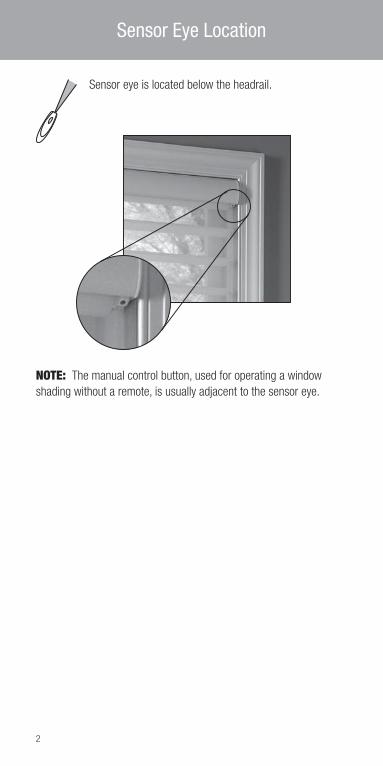
Sensor Eye Location
Sensor eye is located below the headrail.
NOTE: The manual control button, used for operating a window
shading without a remote, is usually adjacent to the sensor eye.
3
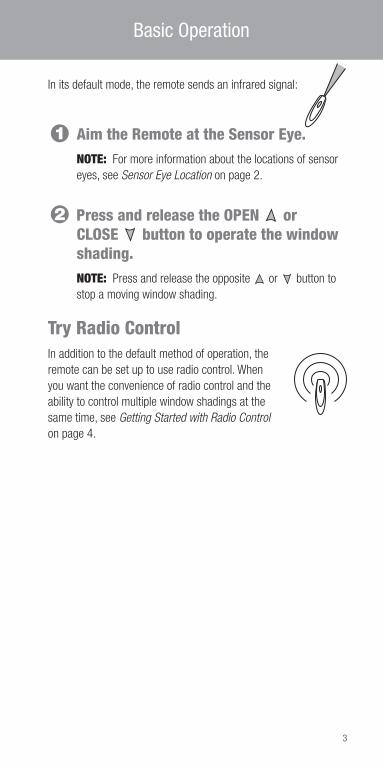
Basic Operation
In its default mode, the remote sends an infrared signal:
1 Aim the Remote at the Sensor Eye.NOTE: For more information about the locations of sensor
eyes, see Sensor Eye Location on page 2.
2 Press and release the OPEN or CLOSE button to operate the window shading.NOTE: Press and release the opposite or button to
stop a moving window shading.
Try Radio ControlIn addition to the default method of operation, the
remote can be set up to use radio control. When
you want the convenience of radio control and the
ability to control multiple window shadings at the
same time, see Getting Started with Radio Control on page 4.

4
Radio Control
Getting Started with Radio ControlRadio control gives you the ability to control individual
window shadings or multiple window shadings at the
same time, even if they are in another room.
Group AssignmentTo use radio control, each window shading must fi rst be assigned
to a group. (Note that a window shading can be a member of more
than one group.)
NOTE: If your remote has already been set up, skip to the Radio Control Operation section on page 6.
There are four unique assignable groups to use. A group can be a
single window shading or multiple window shadings.
Before beginning, think about how you will group your window
shadings. For example, you might create a group for all window
shadings in a single room or a group for all window shadings on
one wall. You can use the Group Assignment Worksheet on
page 17 to help you plan.
5
Radio Control
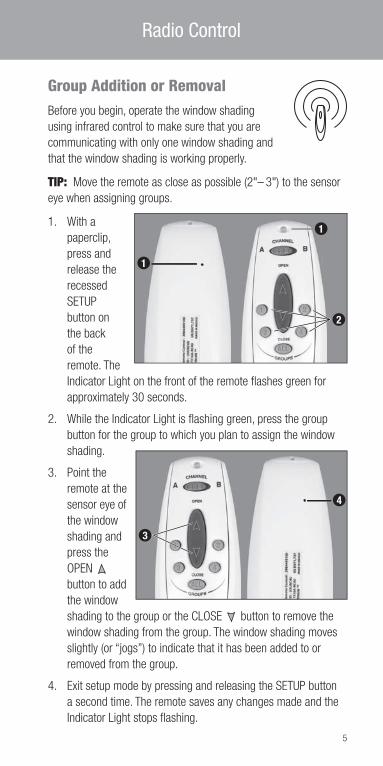
Group Addition or RemovalBefore you begin, operate the window shading
using infrared control to make sure that you are
communicating with only one window shading and
that the window shading is working properly.
TIP: Move the remote as close as possible (2"– 3") to the sensor
eye when assigning groups.
1. With a
paperclip,
press and
release the
recessed
SETUP
button on
the back
of the
remote. The
Indicator Light on the front of the remote fl ashes green for
approximately 30 seconds.
2. While the Indicator Light is fl ashing green, press the group
button for the group to which you plan to assign the window
shading.
3. Point the
remote at the
sensor eye of
the window
shading and
press the
OPEN
button to add
the window
shading to the group or the CLOSE button to remove the
window shading from the group. The window shading moves
slightly (or “jogs”) to indicate that it has been added to or
removed from the group.
4. Exit setup mode by pressing and releasing the SETUP button
a second time. The remote saves any changes made and the
Indicator Light stops fl ashing.
1
2
1
4
3
6
Radio Control
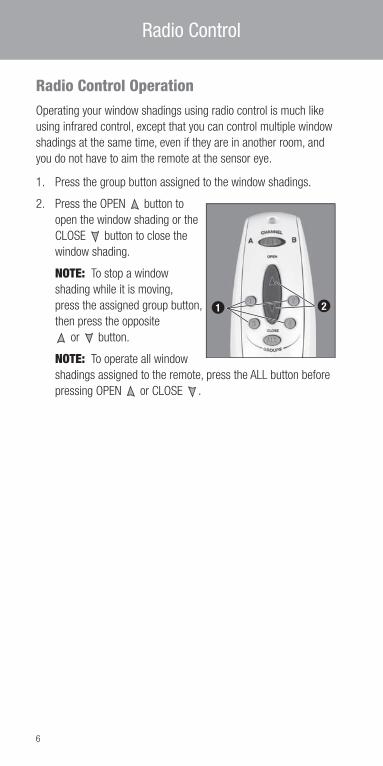
Radio Control OperationOperating your window shadings using radio control is much like
using infrared control, except that you can control multiple window
shadings at the same time, even if they are in another room, and
you do not have to aim the remote at the sensor eye.
1. Press the group button assigned to the window shadings.
2. Press the OPEN button to
open the window shading or the
CLOSE button to close the
window shading.
NOTE: To stop a window
shading while it is moving,
press the assigned group button,
then press the opposite
or button.
NOTE: To operate all window
shadings assigned to the remote, press the ALL button before
pressing OPEN or CLOSE .
1 2
7
Radio Control
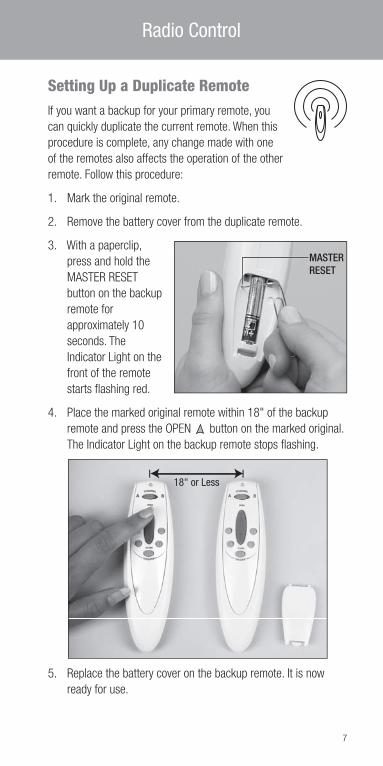
Setting Up a Duplicate RemoteIf you want a backup for your primary remote, you
can quickly duplicate the current remote. When this
procedure is complete, any change made with one
of the remotes also affects the operation of the other
remote. Follow this procedure:
1. Mark the original remote.
2. Remove the battery cover from the duplicate remote.
3. With a paperclip,
press and hold the
MASTER RESET
button on the backup
remote for
approximately 10
seconds. The
Indicator Light on the
front of the remote
starts fl ashing red.
4. Place the marked original remote within 18" of the backup
remote and press the OPEN button on the marked original.
The Indicator Light on the backup remote stops fl ashing.
5. Replace the battery cover on the backup remote. It is now
ready for use.
MASTERRESET
18" or Less
8
Intermediate Stops
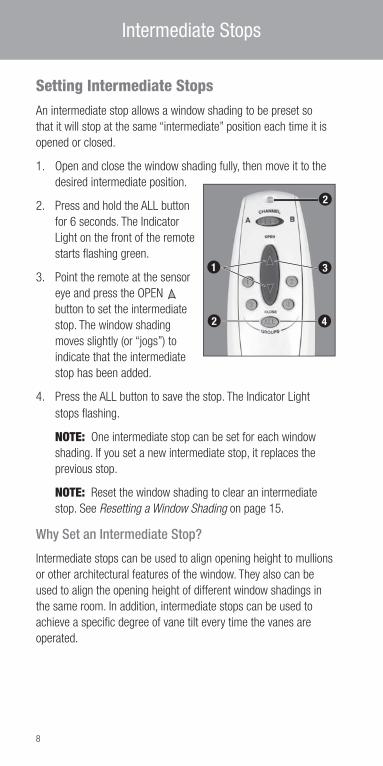
Setting Intermediate StopsAn intermediate stop allows a window shading to be preset so
that it will stop at the same “intermediate” position each time it is
opened or closed.
1. Open and close the window shading fully, then move it to the
desired intermediate position.
2. Press and hold the ALL button
for 6 seconds. The Indicator
Light on the front of the remote
starts fl ashing green.
3. Point the remote at the sensor
eye and press the OPEN
button to set the intermediate
stop. The window shading
moves slightly (or “jogs”) to
indicate that the intermediate
stop has been added.
4. Press the ALL button to save the stop. The Indicator Light
stops fl ashing.
NOTE: One intermediate stop can be set for each window
shading. If you set a new intermediate stop, it replaces the
previous stop.
NOTE: Reset the window shading to clear an intermediate
stop. See Resetting a Window Shading on page 15.
Why Set an Intermediate Stop?
Intermediate stops can be used to align opening height to mullions
or other architectural features of the window. They also can be
used to align the opening height of different window shadings in
the same room. In addition, intermediate stops can be used to
achieve a specifi c degree of vane tilt every time the vanes are
operated.
1
2 4
3
2

9
Express Mode
Express ModeWhen the window shading is in any
position, you can open or close it fully
(bypassing the intermediate stop) as
follows:
1. Press the appropriate group
button.
2. Press and hold the OPEN or
CLOSE button for 2 seconds.
The window shading opens or
closes fully.
NOTE: In addition to bypassing the intermediate stop, the
express mode also bypasses the shading’s “transition point.”
The transition point is where the shading is fully lowered
with the vanes fully closed. Normally, the shading stops
automatically at this position; but with express mode, when
the shading is lowered, the vanes open all the way before the
motor stops.
The express mode can be used to bypass the shading’s
transition point even if no intermediate stop has been set.
1 2
10
Opening Vanes1. When the shading is in the fully closed position with the vanes
closed, press and release the assigned group button.
2. Press and release the CLOSE button. The shading remains
closed while the vanes open to allow more light.
Closing Vanes1. When the shading is in the fully closed position with the vanes
open, press and release the assigned group button.
2. Press and release the OPEN button. The shading remains
closed while the vanes close for increased privacy.
Adjusting Vanes1. Press the assigned group button.
2. Press the OPEN or CLOSE button to start adjusting
the vanes.
3. Press the opposite or button to stop the vanes in the
desired position.
NOTE: Vane alignment between shadings may not be exact.
Additional Features
11
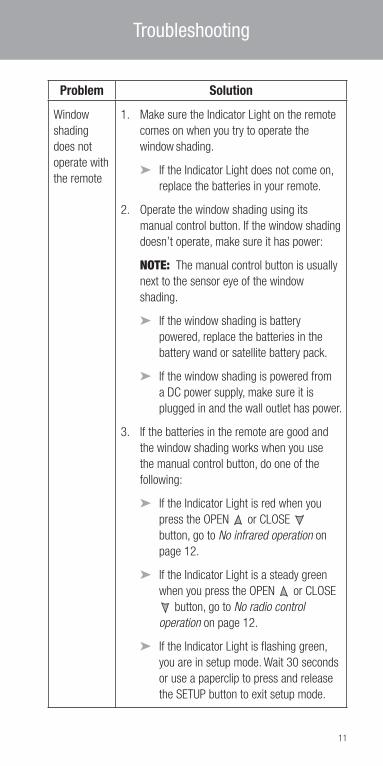
Troubleshooting
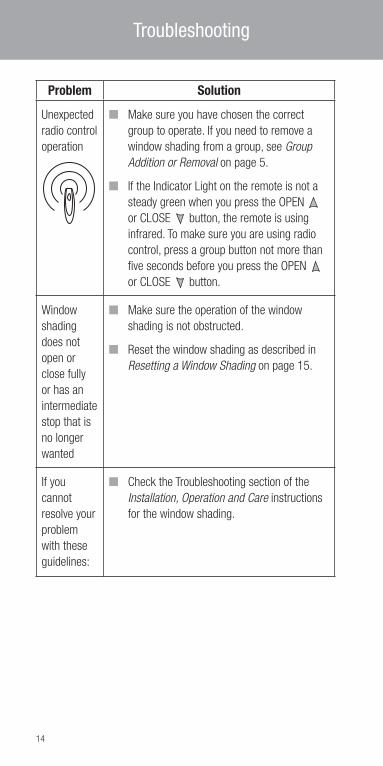
Problem Solution
Window
shading
does not
operate with
the remote
1. Make sure the Indicator Light on the remote
comes on when you try to operate the
window shading.
➤ If the Indicator Light does not come on,
replace the batteries in your remote.
2. Operate the window shading using its
manual control button. If the window shading
doesn’t operate, make sure it has power:
NOTE: The manual control button is usually
next to the sensor eye of the window
shading.
➤ If the window shading is battery
powered, replace the batteries in the
battery wand or satellite battery pack.
➤ If the window shading is powered from
a DC power supply, make sure it is
plugged in and the wall outlet has power.
3. If the batteries in the remote are good and
the window shading works when you use
the manual control button, do one of the
following:
➤ If the Indicator Light is red when you
press the OPEN or CLOSE
button, go to No infrared operation on
page 12.
➤ If the Indicator Light is a steady green
when you press the OPEN or CLOSE
button, go to No radio control operation on page 12.
➤ If the Indicator Light is fl ashing green,
you are in setup mode. Wait 30 seconds
or use a paperclip to press and release
the SETUP button to exit setup mode.
12
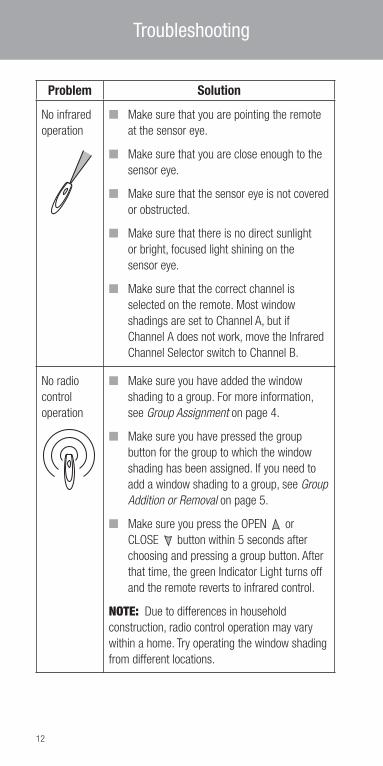
Troubleshooting
Problem Solution
No infrared
operation
■ Make sure that you are pointing the remote
at the sensor eye.
■ Make sure that you are close enough to the
sensor eye.
■ Make sure that the sensor eye is not covered
or obstructed.
■ Make sure that there is no direct sunlight
or bright, focused light shining on the
sensor eye.
■ Make sure that the correct channel is
selected on the remote. Most window
shadings are set to Channel A, but if
Channel A does not work, move the Infrared
Channel Selector switch to Channel B.
No radio
control
operation
■ Make sure you have added the window
shading to a group. For more information,
see Group Assignment on page 4.
■ Make sure you have pressed the group
button for the group to which the window
shading has been assigned. If you need to
add a window shading to a group, see Group Addition or Removal on page 5.
■ Make sure you press the OPEN or
CLOSE button within 5 seconds after
choosing and pressing a group button. After
that time, the green Indicator Light turns off
and the remote reverts to infrared control.
NOTE: Due to differences in household
construction, radio control operation may vary
within a home. Try operating the window shading
from different locations.
13
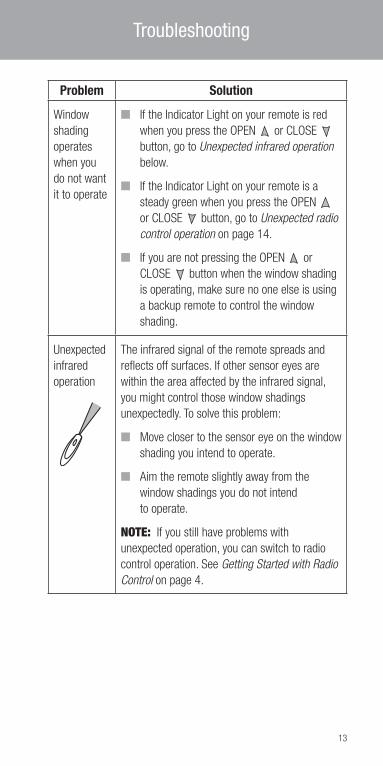
Troubleshooting
Problem Solution
Window
shading
operates
when you
do not want
it to operate
■ If the Indicator Light on your remote is red
when you press the OPEN or CLOSE
button, go to Unexpected infrared operation
below.
■ If the Indicator Light on your remote is a
steady green when you press the OPEN
or CLOSE button, go to Unexpected radio control operation on page 14.
■ If you are not pressing the OPEN or
CLOSE button when the window shading
is operating, make sure no one else is using
a backup remote to control the window
shading.
Unexpected
infrared
operation
The infrared signal of the remote spreads and
refl ects off surfaces. If other sensor eyes are
within the area affected by the infrared signal,
you might control those window shadings
unexpectedly. To solve this problem:
■ Move closer to the sensor eye on the window
shading you intend to operate.
■ Aim the remote slightly away from the
window shadings you do not intend
to operate.
NOTE: If you still have problems with
unexpected operation, you can switch to radio
control operation. See Getting Started with Radio Control on page 4.
14
Troubleshooting
Problem Solution
Unexpected
radio control
operation
■ Make sure you have chosen the correct
group to operate. If you need to remove a
window shading from a group, see Group Addition or Removal on page 5.
■ If the Indicator Light on the remote is not a
steady green when you press the OPEN
or CLOSE button, the remote is using
infrared. To make sure you are using radio
control, press a group button not more than
fi ve seconds before you press the OPEN
or CLOSE button.
Window
shading
does not
open or
close fully
or has an
intermediate
stop that is
no longer
wanted
■ Make sure the operation of the window
shading is not obstructed.
■ Reset the window shading as described in
Resetting a Window Shading on page 15.
If you
cannot
resolve your
problem
with these
guidelines:
■ Check the Troubleshooting section of the
Installation, Operation and Care instructions
for the window shading.
15
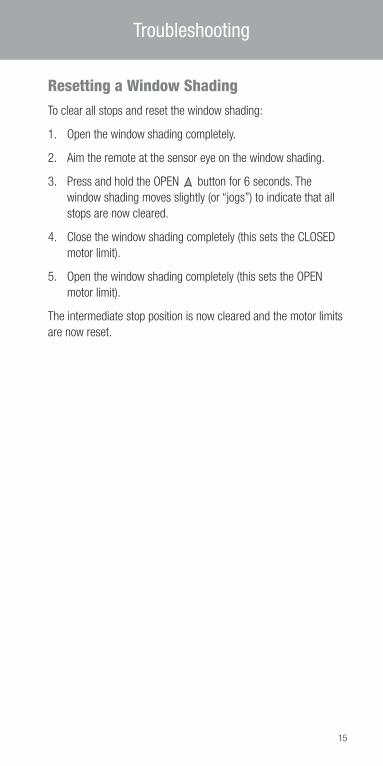
Troubleshooting
Resetting a Window ShadingTo clear all stops and reset the window shading:
1. Open the window shading completely.
2. Aim the remote at the sensor eye on the window shading.
3. Press and hold the OPEN button for 6 seconds. The
window shading moves slightly (or “jogs”) to indicate that all
stops are now cleared.
4. Close the window shading completely (this sets the CLOSED
motor limit).
5. Open the window shading completely (this sets the OPEN
motor limit).
The intermediate stop position is now cleared and the motor limits
are now reset.
16
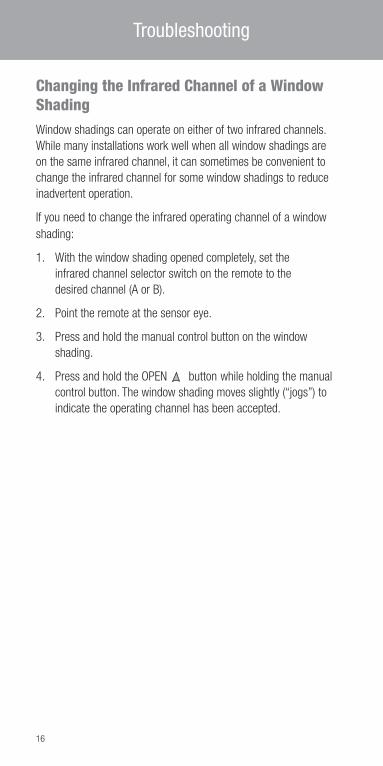
Troubleshooting
Changing the Infrared Channel of a Window ShadingWindow shadings can operate on either of two infrared channels.
While many installations work well when all window shadings are
on the same infrared channel, it can sometimes be convenient to
change the infrared channel for some window shadings to reduce
inadvertent operation.
If you need to change the infrared operating channel of a window
shading:
1. With the window shading opened completely, set the
infrared channel selector switch on the remote to the
desired channel (A or B).
2. Point the remote at the sensor eye.
3. Press and hold the manual control button on the window
shading.
4. Press and hold the OPEN button while holding the manual
control button. The window shading moves slightly (“jogs”) to
indicate the operating channel has been accepted.
17
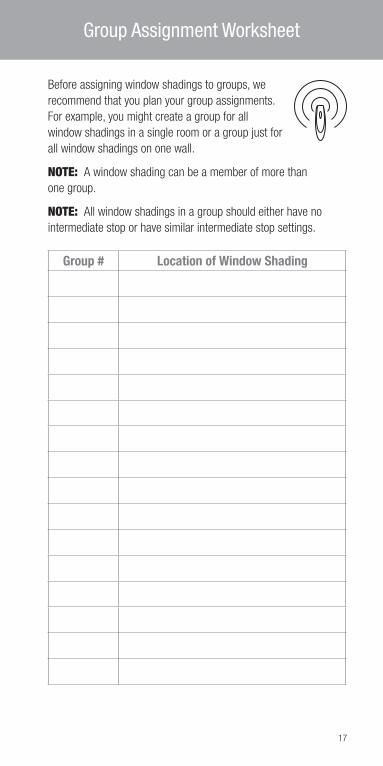
Group Assignment Worksheet
Before assigning window shadings to groups, we
recommend that you plan your group assignments.
For example, you might create a group for all
window shadings in a single room or a group just for
all window shadings on one wall.
NOTE: A window shading can be a member of more than
one group.
NOTE: All window shadings in a group should either have no
intermediate stop or have similar intermediate stop settings.
Group # Location of Window Shading

Technical Information
Radio Frequency FCC ComplianceThis device complies with Part 15 of the FCC Rules. Operation is subject to the following two
any interference received, including interference that may cause undesired operation.
This equipment has been tested and found to comply with the limits for Class B Digital Device, pursuant to Part 15 of the FCC Rules. These limits are designed to provide reasonable protection against harmful interference in a residential installation. This equipment generates and can radiate radio frequency energy and, if not installed and used in accordance with the instructions, may cause harmful interference to radio communications. However, there is no guarantee that interference will not occur in a particular installation. If this equipment does cause harmful interference to radio or television reception, which can be determined by turning the equipment off and on, the user is encouraged to try to correct the interference by one or more of the following measures.
• Reorient or relocate the receiving antenna.• Increase the separation between the equipment and receiver.• Connect the equipment into an outlet on a circuit different from that to which the receiver is connected.• Consult the dealer or an experienced radio/TV technician for help.
Any changes or modifications not expressly approved by the party responsible for compliance could void the user’s authority to operate the equipment.
Industry CanadaUnder Industry Canada regulations, this radio transmitter may only operate using an antenna of a type and maximum (or lesser) gain approved for the transmitter by Industry Canada. To reduce potential radio interference to other users, the antenna type and its gain should be so chosen that the equivalent isotropically radiated power (e.i.r.p.) is not more than that necessary for successful communication.
This device complies with Industry Canada licence-exempt RSS standard(s). Operation is subject to the following two conditions: (1) this device may not cause interference, and (2) this device must accept any interference, including interference that may cause undesired operation of the device.
9/12
Remote Control Batteries: 2 AAA Operating Frequencies:
IR: 40 kHz RF: 2.4 GHz