Embed Size (px)
Citation preview

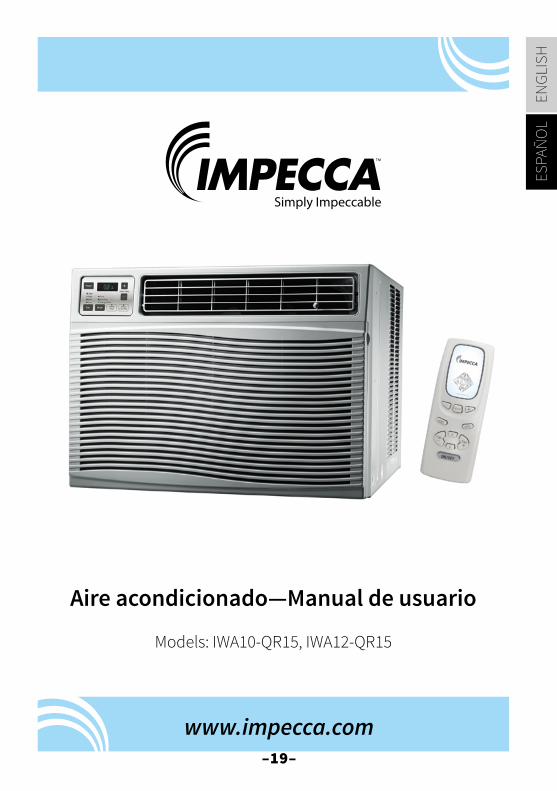
Window Air Conditioner—User ManualAire acondicionado—Manual de usuario
Models: IWA10-QR15, IWA12-QR15
www.impecca.com
Read the following notices and information carefully to ensure proper operation of your air conditioner unit.
This manual is solely provided for informational purposes and in no way constitutes a legally binding document between the manufacturer, distributor, and end consumer. Exact appear-ance of your unit may differ from the pictures and diagrams enclosed.
Lea las siguientes indicaciones cuidadosamente para asegurar el correcto funcionamiento de su unidad de aire acondicionado.
Este manual se proporciona únicamente con fines informativos y de ninguna manera constituye un documento jurídicamente vinculante entre el fabricante, distribuidor y consumidor final. apariencia exacta de su unidad puede diferir de las imágenes y esque-mas adjuntos.
WARNING:To avoid permanent damage to unit:Ensure it is in the upright position for a MINIMUM of 6hours and a RECOMMENDED time of 24 hours before pow-ering on the first time.
ADVERTENCIA: Para evitar daños permanentes a la unidad:Asegúrese de que está en la posición vertical duranteun mínimo de 6 horas y un tiempo recomendado de 24 horas antes de encender la primera vez.

ENGL
ISH
ESPA
ÑO
L
–iii–
TABLE OF CONTENTS
Important Safety Notices 4-5
Introduction 6
Getting to Know Your Air Conditioner 7
Using your Air Conditioner 8
Remote Control 9-11
Pre-Installation Instructions 11
Installing Your Unit 12
Cleaning & Maintenance 15
Troubleshooting 16
Unit Error Codes 18
Technical Support 18

ENGLISH
ESPAÑO
L
–4–
Plug in power plug completely. Do not start or stop the unit by inserting or pulling out the power plug.
Do not damage power cord or replace with a non-original power cord.
• Otherwise, it may cause electric shock or fire due to potential short circuit. • It may cause electric shock or fire.
• It may cause electric shock or fire. • If the power cord is damaged, it must
be replaced by the manufacturer or an authorized service center or a similarly qualified person to avoid hazard.
Do not modify power cord length. Do not operate with wet hands or in a damp environment.
Do not direct airflow directly at room occupants.
• It may cause electric shock or fire. • It may cause electric shock. • This could be harmful to their health.
Always ensure effective grounding/earthing.
Do not allow water into or onto the front of cabinet, control panel or power cord.
Always use dedicated power outlet and circuit breaker.
• Incorrect or missing grounding may lead to electric shock.
• It may cause failure of unit or electric shock. • Sharing a circuit can lead to fire.
Unplug the unit if it emits strange sounds, smells or smoke.
Do not plug unit into an electrical socket that is loose or damaged.
Do not operate the unit while the chassis is open or removed.
• Unit may need repair. • It may cause fire and electric shock. • It may cause electric shock.
Ensure the power cord is kept away from any heating sources. Do not disassemble or modify unit.
Do not use the power cord near flam-mable gas or combustibles, such as gasoline, benzene, paint thinner, etc.
• It may cause fire and electric shock. • It may cause failure and electric shock. • It may cause an explosion or fire.
Ventilate room before operating air conditioner if there was a gas leakage.
• It may cause explosion, fire, and burns.
WARNING
READ THESE NOTICES CAREFULLY—THEY ARE IMPORTANT!
When the air filter is removed for clean-ing, avoid touching the internal metal parts of the unit.
Do not clean the air conditioner with water.
Ventilate the room well when used together with a stove, etc.
• It may cause an personal injury and/or damage to the unit.
• Water may enter the unit and degrade the insulation. It may cause an electric shock.
• An oxygen shortage may occur when using a stove in a room with closed windows.
When the unit is to be cleaned, power off the unit and circuit breaker.
Do not put a pet or house plant where it will be exposed to direct air flow. Do not use for specialized purposes.
• Do not clean unit when power is on as it may cause fire and electric shock and/or personal injury.
• This could injure or be harmful to your pet or plants.
• Do not use this air conditioner to preserve precision devices, food, pets, plants, and art objects.
• It may cause deterioration, etc.
CAUTION

ENGL
ISH
ESPA
ÑO
L
–5–
CAUTION ELECTRICAL INFORMATION• Be sure your electrical wiring is adequate for the model you have chosen. This information can be found on
the rating label, a silver-colored sticker generally located on the right side of the cabinet. • Be sure the air conditioner is properly grounded. To minimize shock and fire hazards, proper grounding is
important. The power cord is equipped with a three-prong grounding plug for protection against shock hazards.
• Your air conditioner must be connected to a properly ground-ed wall receptacle. If the wall receptacle you intend to use is not adequately grounded or protected by a time delay fuse or circuit breaker, have a qualified electrician install the proper receptacle.
• Ensure the receptacle is accessible after the unit installation.
Stop operation and remove unit from window in severe storm or hurricane.
Hold the plug by the head of the power plug when unplugging unit.
Unplug the power cord when not using the unit for extended periods of time.
• Operation during a severe storm may allow a significant amount of water to enter the indoors.
• Pulling from the wire can cause wire to fray leading to electric shock or fire. • Will prevent damage to the unit.
Do not place obstacles around air-intake vents or inside cool air outlet.
If unit is equipped with an outdoor instal-lation bracket, periodically ensure that it has not become damaged.
Always insert the filters securely. Clean filter at least once per month.
• It may cause failure of appliance.• If bracket is damaged, the unit can fall
and cause damage, personal injury or death.
• Operation with dirty filters (or without filters) will effect performance and may cause damage to the unit.
Do not use strong detergent such as wax or paint thinner to clean the unit. Use a damp, soft cloth.
Do not place heavy objects on the power cord and ensure that the cord is not pinched or stressed.
Do not place this window-type air conditioner through a wall.
• Appearance may deteriorate due to change of product color or scratching of its surface.
• There is danger of fire or electric shock. • This will block the side vents and pre-vent the unit from cooling properly.
CAUTION
NOTE: The power supply cord with this air conditioner contains a current detection device designed to reduce the risk of fire. In the event that the power supply cord is damaged, it cannot be repaired -- it must be replaced with a cord from the Product Manufacturer.
The power supply cord contains a current device that senses damage to the power cord and excess current draw from the unit. To test your current device do the following:1. Plug in the Air Conditioner.2. Press the TEST button. You will hear a click as the RESET button
pops out within the rubber housing and the LED will turn off.3. Press the RESET button. You will hear a click as the button
engages and the LED will illuminate.4. The power supply cord is now supplying electricity to the unit.
Note: Your model may have the TEST and RESET buttons on the side or the front of the plug head.
NOTES: • Do not use the TEST and RESET buttons to turn the unit on or off.• If the current device fails the test or the power cord becomes dam-aged, the entire power cord must be replaced with an equivalent power cord and current device by a licensed electrician.
Side button version
ENGLISH
ESPAÑO
L
–6–
INTRODUCTION
Thank you for purchasing this quality Impecca window air conditioner unit. To ensure the longest life and highest energy efficiency of your unit, please carefully follow these operating instructions. Keep these instructions in a safe place and consult them as needed. Please note that constant enhancement and improvements to our air conditioning units may mean that your model will slightly differ in appearance from the model pictured in this manual, but the actual operation and installation of the unit remains unchanged. This manual is solely provid-ed for informational purposes and does not constitute a binding, legal contract.
SAFETY NOTICE:This appliance should not be used by children or mentally/physically disabled persons with-out strict, direct supervision by a responsible adult. Never play with or around the appliance.
SAFETY INFORMATION• Before operation, ensure your electrical installation (outlets and circuits) complies
with the power specifications found on the unit.• Before cleaning or maintaining the air conditioner, please turn off air conditioner
and unplug the unit.• Make sure the power cord isn’t kinked, bent, or under the weight of sharp or heavy
objects.• Do not pull or yank the power cord to unplug the unit or move the air conditioner.• Do not insert or unplug the power plug with wet hands.• Only use a grounded power outlet. Make sure the grounding is functional.• If the power cord is damaged, it must be replaced by the manufacturer or a quali-
fied technician in order to avoid fire and electrical hazards.• Should abnormal operation occur (such as a burning smell), please disconnect
power cord immediately and contact your local dealer.• If nobody is present to monitor the operation of the unit, please turn it off and
disconnect the power cord.• Do not splash or pour water on air conditioner to avoid causing a short circuit or
damage to the unit.• Do not put or hang dripping objects above the air conditioner.• Ensure the ambient temperature remains well above freezing (32°F or 0°C) to
avoid cracking or damaging the unit.• Keep heat sources away from the air conditioner.• Ensure the unit is far away from fire, inflammable, or explosive objects.• Never allow children or persons with reduced physical, sensory, or mental capabil-
ities to operate or play around the air conditioner without direct adult supervision.• Never allow children to perform cleaning or other user-maintenance operations
without direct adult supervision.• Never attempt to repair or disassemble the air conditioner by yourself.• Never insert objects into the air conditioner.

ENGL
ISH
ESPA
ÑO
L
–7–
OPERATING CONDITIONS• The air conditioner must be operated within the temperature range of 62°F to 95°F
(16°C to 35°C).• A perimeter of 12′′(30cm) around the air conditioner should be free of all objects.• Do not operate the air conditioner in humid environments.• Keep air inlet and air outlet clean and free of obstructing objects.• During operation, close doors and windows to improve cooling effect.• Please put the air conditioner at smooth and flat ground for operation to avoid
noise and vibration.• Do not tilt or turn over the air conditioner. If there’s problem, please disconnect
the power supply immediately and contact your local dealer or technical support.
GETTING TO KNOW YOUR AIR CONDITIONER
1. Upper rail2. Cool air outlet3. Cool air directional lever4. Warm air intake5. Power cord6. Side guide rail7. Control Panel
1
2
3
4
5
7
6
ENGLISH
ESPAÑO
L
–8–
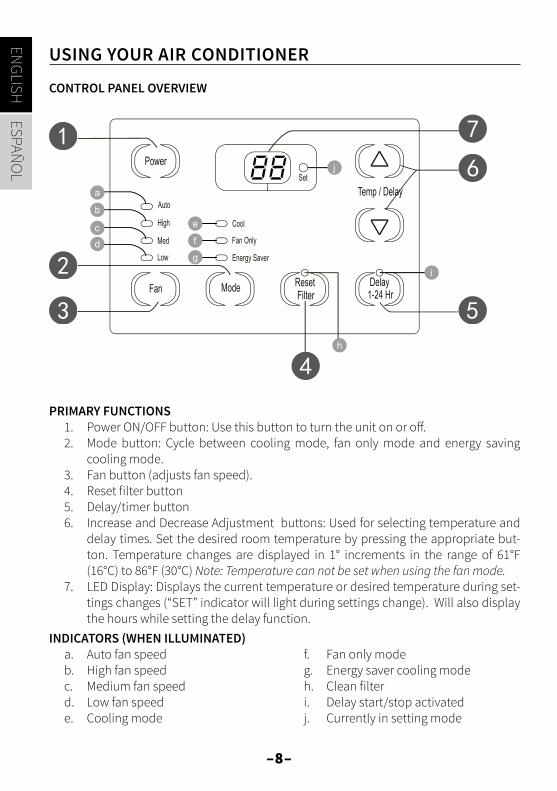
USING YOUR AIR CONDITIONER
CONTROL PANEL OVERVIEW
h
g
f
e
i
a
b
cd
j
PRIMARY FUNCTIONS1. Power ON/OFF button: Use this button to turn the unit on or off.2. Mode button: Cycle between cooling mode, fan only mode and energy saving
cooling mode.3. Fan button (adjusts fan speed).4. Reset filter button5. Delay/timer button6. Increase and Decrease Adjustment buttons: Used for selecting temperature and
delay times. Set the desired room temperature by pressing the appropriate but-ton. Temperature changes are displayed in 1° increments in the range of 61°F (16°C) to 86°F (30°C) Note: Temperature can not be set when using the fan mode.
7. LED Display: Displays the current temperature or desired temperature during set-tings changes (“SET” indicator will light during settings change). Will also display the hours while setting the delay function.
INDICATORS (WHEN ILLUMINATED)a. Auto fan speedb. High fan speed c. Medium fan speedd. Low fan speede. Cooling mode
f. Fan only modeg. Energy saver cooling modeh. Clean filteri. Delay start/stop activatedj. Currently in setting mode

ENGL
ISH
ESPA
ÑO
L
–9–
REMOTE CONTROL
1. Power ON/OFF button2. Fan speed increase ()/decrease ()3. Temperature increase ()/decrease()4. Mode selector5. Auto fan speed6. Delay (Timer) button7. Delay increase ()/decrease ()
USING THE REMOTE CONTROL
ON/OFF BUTTONPress the ON/OFF button to power the unit on or off.
FAN / BUTTONSPress the respective button to increase () or decrease ( ) fan speed.
AUTO BUTTONPress this button for an automatically adjusting fan speed based on ambient room tem-perature. Note: To exit the AUTO function, press the FAN button.
TEMPERATURE / BUTTONSSet the desired room temperature by pressing the appropriate button. Temperature changes are displayed in 1° increments in the range of 64°F (18°C) and 86°F (30°C)Note: Temperature cannot be set when using the fan mode.
MODE BUTTONCycle between cooling mode, fan mode, and energy saving cooling mode.
ENGLISH
ESPAÑO
L
–10–
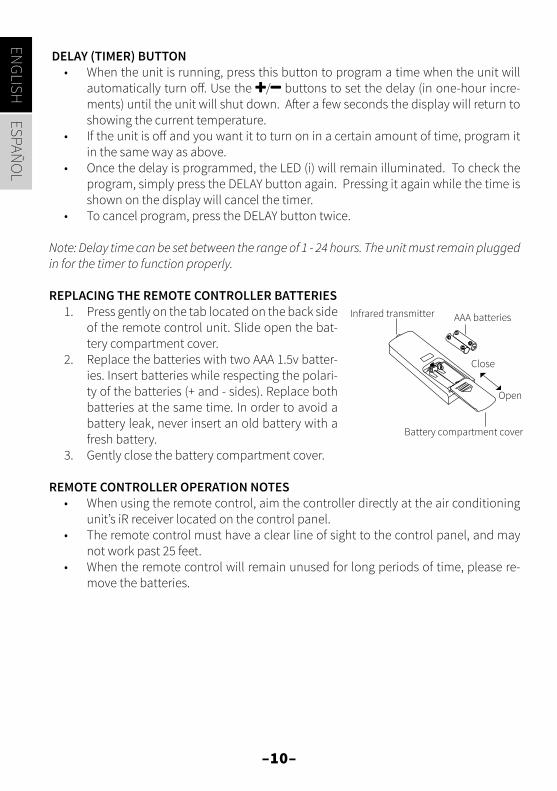
DELAY (TIMER) BUTTON• When the unit is running, press this button to program a time when the unit will
automatically turn off. Use the / buttons to set the delay (in one-hour incre-ments) until the unit will shut down. After a few seconds the display will return to showing the current temperature.
• If the unit is off and you want it to turn on in a certain amount of time, program it in the same way as above.
• Once the delay is programmed, the LED (i) will remain illuminated. To check the program, simply press the DELAY button again. Pressing it again while the time is shown on the display will cancel the timer.
• To cancel program, press the DELAY button twice.
Note: Delay time can be set between the range of 1 - 24 hours. The unit must remain plugged in for the timer to function properly.
REPLACING THE REMOTE CONTROLLER BATTERIES1. Press gently on the tab located on the back side
of the remote control unit. Slide open the bat-tery compartment cover.
2. Replace the batteries with two AAA 1.5v batter-ies. Insert batteries while respecting the polari-ty of the batteries (+ and - sides). Replace both batteries at the same time. In order to avoid a battery leak, never insert an old battery with a fresh battery.
3. Gently close the battery compartment cover.
REMOTE CONTROLLER OPERATION NOTES• When using the remote control, aim the controller directly at the air conditioning
unit’s iR receiver located on the control panel.• The remote control must have a clear line of sight to the control panel, and may
not work past 25 feet.• When the remote control will remain unused for long periods of time, please re-
move the batteries.
Infrared transmitter AAA batteries
Close
Open
Battery compartment cover

ENGL
ISH
ESPA
ÑO
L
–11–
PRE-INSTALLATION INSTRUCTIONS
INCLUDED PARTS & ACCESSORIES*1. Air conditioning unit2. Flexible window filler panels3. Foam sash seal (no adhesive)4. Foam seal (with adhesive)5. Screws (x6)
6. Frame lock7. Window security bracket8. Remote control9. Remote control batteries (2x AAA)10. User’s manual
1 2
3
5 6 7
8 9 10
4
*Note: The parts included with your unit may vary.
REQUIRED TOOLS (NOT INCLUDED)
Phillips Screwdriver Flat-head Screwdriver
Level Scissors Pencil Tape Measure

ENGLISH
ESPAÑO
L
–12–
STORM WINDOW MODIFICATIONSIf you have storm windows, the exterior window frame will be slightly higher than the windowsill, which results in an air conditioning unit that is slanted inward and will not properly drain. Perform these modifications to ensure proper operation of your unit. If you have a standard window, skip this step:
1. Cut a 2” thick piece of wood to the length of the interior window width. 2. Verify that the wood is level with or up to 0.5” (1cm) higher than the exterior
storm-window frame.3. Fasten the wood with screws to the windowsill and proceed with mounting.
INSTALLING YOUR UNIT Use caution when unpacking and installing. Sharp edges can cause injury.
STEP 1: MOUNTING THE FLEXIBLE FILLER PANELS1. Note the “Left” and “Right” markings on the panels.2. Extend the flexible part of the filler panel past the filler panel’s frame3. Slide the T-section into the side guide rails on the left and right of the unit.4. Gently insert the upper and lower ends of the panel frame into the upper and low-
er rail channels on the air conditioning unit.
1
2T-section
Upper Rail
Lower Rail
STEP 2: FOAM SEAL ON WINDOW FRAME1. Affix the foam seal (with adhesive) to the bottom of the window sash.

ENGL
ISH
ESPA
ÑO
L
–13–
STEP 3: MOUNT THE UNIT IN THE WINDOW FRAME 1. With the help of another person, center the unit on
the windowsill. The lower rail should be completely flush with the windowsill. Gently lower the window until it holds the upper rail in place. The chassis is configured to allow for a natural pitch towards the outside of about 3-5°.
2. Extend the window fillers to the right and left edge of the window.
3. Fasten the upper rail and top corners of the window filler frames to the window frame with screws. Use the frame locks to attach the bottom corners to the win-dowsill.

ENGLISH
ESPAÑO
L
–14–
STEP 4: SECURING THE WINDOW• To keep the window from being unintentionally opened and risk damaging the
unit or injuring passersby, use one type C screw to fasten the security bracket to the window. If your window frame is plastic (PVC), fasten the bracket to the side of the window frame (Detail 1)If your window is made of wood, fasten the bracket into the closed upper window sash (Detail 2).
STEP 5: INSULATING FOAM SEAL• Prevent warm or cold air from entering in between the partially opened window
and the closed upper window by placing the non-adhesive foam sash seal in be-tween the window sash and the glass pane.
1
2

ENGL
ISH
ESPA
ÑO
L
–15–
CLEANING & MAINTENANCESAFETY WARNINGTo avoid electric shock, fire, damage, or injury while performing maintenance on your unit:
• Always turn off and disconnect the air conditioner from electric power.• Never submerge the unit in water or spray liquids directly on the unit.• Never use solvents or other flammable or volatile liquids (examples: paint thinner,
acetone, gasoline, etc.) to clean the air conditioner.PRE-COOLING SEASON UNIT CHECKBefore using your air conditioner in the warm summer months, always perform the fol-lowing verifications to ensure reliable, efficient operation:
• Check the air inlets and outlets for any foreign objects (example: leaves, sticks, small toys, etc.)
• Check that the electrical cord and socket are not damaged, bent, or fraying.• Check the filter and clean if necessary.• Check the remote controller; insert or replace batteries if needed.
POST-COOLING SEASON UNIT CHECKAfter using your air conditioner in the warm summer months, always perform the follow-ing verifications:
• Disconnect the unit electrical power.• Clean the filter and unit casing.• Remove dust and other objects on the unit.• Discard any accumulated water inside the unit (see section about drainage).• Remove batteries from the remote controller to prevent corrosion.
LONG-TERM STORAGEShould you place your unit in long-term storage, perform all of the post-season checks listed above and perform the following additional steps:
• Wrap the electrical cord loosely around the unit.• Cover the unit with a sheet or cloth to prevent dust buildup inside during storage.• WARNING: Never store the unit up-side down or on its side. This can permanently
damage the compressor.DISPOSAL INFORMATION
• Most unit packaging materials are recyclable. Please dispose of them according to local recycling guidelines.
• If you wish to discard the unit, contact your local authorities for specific appliance disposal instructions. If the unit is functional and in good repair, but you wish to dispose of it, consider donating it to a local charity.
CLEANING THE OUTER HOUSING AND INTAKE GRILLEIf dust has accumulated on the unit, use a soft, dry dusting cloth to wipe it off. If grease or other harder to remove substances is on the unit, use a wrung-out cloth dampened with warm, soapy water. Use a soft brush to clean off the grille.
ENGLISH
ESPAÑO
L
–16–
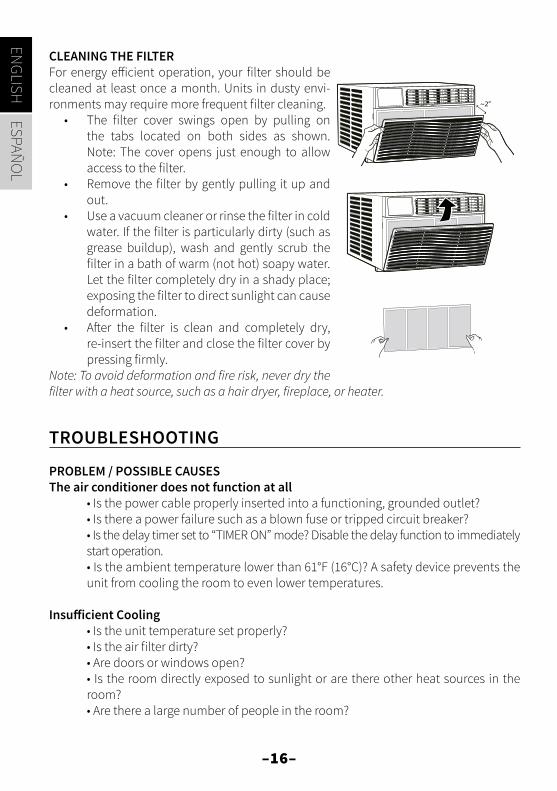
CLEANING THE FILTERFor energy efficient operation, your filter should be cleaned at least once a month. Units in dusty envi-ronments may require more frequent filter cleaning.
• The filter cover swings open by pulling on the tabs located on both sides as shown. Note: The cover opens just enough to allow access to the filter.
• Remove the filter by gently pulling it up and out.
• Use a vacuum cleaner or rinse the filter in cold water. If the filter is particularly dirty (such as grease buildup), wash and gently scrub the filter in a bath of warm (not hot) soapy water. Let the filter completely dry in a shady place; exposing the filter to direct sunlight can cause deformation.
• After the filter is clean and completely dry, re-insert the filter and close the filter cover by pressing firmly.
Note: To avoid deformation and fire risk, never dry the filter with a heat source, such as a hair dryer, fireplace, or heater.
TROUBLESHOOTING
PROBLEM / POSSIBLE CAUSESThe air conditioner does not function at all
• Is the power cable properly inserted into a functioning, grounded outlet?• Is there a power failure such as a blown fuse or tripped circuit breaker?• Is the delay timer set to “TIMER ON” mode? Disable the delay function to immediately start operation.• Is the ambient temperature lower than 61°F (16°C)? A safety device prevents the unit from cooling the room to even lower temperatures.
Insufficient Cooling• Is the unit temperature set properly?• Is the air filter dirty?• Are doors or windows open?• Is the room directly exposed to sunlight or are there other heat sources in the room?• Are there a large number of people in the room?
~2”
ENGL
ISH
ESPA
ÑO
L
–17–
The air conditioner’s compressor does not immediately restart.• The unit has a built-in safety feature to prevent damage to the compressor. If you attempt to turn the unit on within three minutes of powering it off, the compressor will not resume operation until three minutes have elapsed.
The air conditioner unit starts and stops frequently.• Verify the rating of your electrical system and outlets. You may need a qualified electrician to troubleshoot and upgrade your electrical circuits if your air condi-tioner unit exceeds the rated capacity.
Fog blows out during cooling• In warm, high humidity environments this may naturally occur. Continued cool-ing will remove excess humidity from the room and the fog will disappear.
The unit emits a strange smell• This may be caused by residue from cooking and cigarette smoke, etc. that re-main in the air conditioning unit. Eliminated the source of the smell and clean the filter.
The unit makes loud or unusual noises and vibrations• Ensure that the unit is installed according to the installation instructions above.
There is a “squealing” noise• The cycling of the refrigerant inside the unit can temporarily cause this noise.
There is a “patting” noise• This is often caused by heat expansion in the plastic parts.
The remote controller doesn’t work• Ensure the remote controller has a clear line-of-sight to the unit’s control panel. • Ensure the sensors are not obstructed by curtains or other objects. • Ensure the remote controller has fresh, working batteries.
Condensation forms at the Cool Air Outlet• High humidity environments may cause condensation at the air flow output. Wipe the condensation off with a sponge or dry cloth.
ENGLISH
ESPAÑO
L
–18–
IF ANY OF THE FOLLOWING PHENOMENA OCCUR DESPITE THE ABOVE TROUBLESHOOT-ING TECHNIQUES, PLEASE TURN OFF THE UNIT AND DISCONNECT THE POWER CORD IMMEDIATELY AND CONTACT TECHNICAL SUPPORT OR A QUALIFIED TECHNICIAN:
• The fuse blows or circuit breaker trips frequently.• The power cable is abnormally hot.• The insulation of the power cable is ripped, shred or torn.• The unit controls do not work.• The unit produces abnormal noises.
UNIT ERROR CODES
When the air conditioner status is abnormal, the indicator display on the indoor unit will display an appropriate error code. Refer to the below table for specific and immediate ac-tion.E5: Over-current protection. Unplug and restart your unit to clear the error. If the error persists, contact a qualified service technician.
E6: Unplug and restart your unit to clear the error. If the error persists, contact a qualified service technician.
F1: Unit failure. Contact a qualified service technician.
F2: Unit failure. Contact a qualified service technician.
H1: Defrosting status; a natural phenomenon. The error will automatically clear after the cooling coils are sufficiently defrosted.
H6: Unplug and restart your unit to clear the error. If the error persists, contact a qualified service technician.
OTHER ERROR CODES: Contact a qualified service technician.
TECHNICAL SUPPORTFor additional assistance, please visit our website or contact technical support.
Web: www.impecca.com
Phone: +1 866–954–4440
Email: [email protected]
.
ENGL
ISH
ESPA
ÑO
L
–19–
Aire acondicionado—Manual de usuario
Models: IWA10-QR15, IWA12-QR15
www.impecca.com

ENGLISH
ESPAÑO
L
–20–
TABLA DE CONTENIDO
INTRODUCCIÓN 21
FAMILIARIZÁNDOSE CON SU UNIDAD DE AIRE ACONDICIONADO 23
USANDO SU UNIDAD DE AIRE ACONDICIONADO 24
CONTROL REMOTO 25-26
INSTRUCCIONES DE PRE-INSTALACIÓN 27
INSTALANDO SU UNIDAD 28
LIMPIEZA Y MANTENIMIENTO 31
SOLUCIÓN DE PROBLEMAS 33
CÓDIGOS DE ERROR DE LA UNIDAD 35
SOPORTE TÉCNICO 35
ENGL
ISH
ESPA
ÑO
L
–21–
INTRODUCCIÓN
Gracias por comprar esta unidad de aire acondicionado para ventana de calidad Impecca. Para asegurar una larga vida útil y la más alta eficiencia de energía de su unidad, siga cuida-dosamente estas instrucciones. Mantenga estas instrucciones en un lugar seguro y consúl-telas cuando lo requiera. Tome en cuenta que las mejoras constantes a nuestras unidades de aire acondicionado significan que su modelo puede variar ligeramente en apariencia al compararlo con el modelo en la imagen, pero la operación actual y el proceso de instalación permanecen sin cambios. Este manual se proporciona únicamente con fines informativos y de ninguna manera constituye un documento legal vinculante.
AVISO DE SEGURIDAD:Este electrodoméstico no debe ser utilizado por niños o por personas que tienen una disca-pacidad mental o física sin la supervisión estricta y directa de un adulto responsable. Nunca juegue con o cerca de la unidad.
INFORMACIÓN DE SEGURIDAD • Antes de la operación, asegúrese que su instalación eléctrica (tomacorrientes y
circuitos) cumplan con las especificaciones de energía y potencia señaladas en la unidad
• Antes de limpiar o darle mantenimiento a la unidad de aire acondicionado, apá-guelo y desconéctelo
• Asegúrese que el cable de suministro de energía no esté torcido, doblado, u opri-mido bajo objetos pesados o filosos.
• Para desconectar la unidad o moverla de lugar no jale el cable de suministro de energía.
• No conecte o desconecte la unidad con las manos mojadas. • Utilice solamente un tomacorrientes aterrizado. Asegúrese que la conexión a tie-
rra es la adecuada y funciona. • Si el cable de suministro de energía está dañado, debe ser reemplazado por el
fabricante o por un técnico calificado para evitar incendios y peligros eléctricos. • En caso de que ocurra una operación anormal (como puede ser olor a quemado)
desconecte de inmediato la unidad y entre en contacto con su distribuidor local. • Si nadie se encuentra presente para supervisar la operación de la unidad, por fa-
vor apáguela y desconéctela. • No salpique o vierta agua en la unidad de aire acondicionado para evitar daños a
la unidad o un corto circuito. • No coloque o cuelgue objetos que puedan gotear encima de la unidad. • Asegúrese que la temperatura ambiente permanezca por encima del punto de
congelación (32°F o 0°C) para evitar que la unidad se agriete o se dañe. • Mantenga las fuentes de calor lejos de la unidad de aire acondicionado.• Asegúrese que la unidad se encuentra lejos del fuego y objetos inflamables o ex-
plosivos.

ENGLISH
ESPAÑO
L
–22–
• No permita que niños o personas con capacidades físicas, sensoriales o mentales disminuidas operen o estén cerca de la unidad sin la supervisión directa de un adulto.
• No permita que los niños realicen la limpieza u otras operaciones de manteni-miento sin la supervisión directa de un adulto.
• No intente reparar o desarmar usted mismo la unidad de aire acondicionado. • Nunca inserte objetos en la unidad de aire acondicionado.
CONDICIONES DE OPERACIÓN • La unidad de aire acondicionado debe ser operada dentro de un rango de tempe-
ratura de 62°F a 95°F (16°C a 35°C). • Se debe dejar un perímetro de 12′′ (30 cm) libre de objetos alrededor del aire
acondicionado. • No opere el aire acondicionado en climas húmedos. • Mantenga la entrada y salida de aire limpias y libres de obstáculos. • Durante la operación, cierre las puertas y ventanas para mejorar el efecto de en-
friamiento. • Coloque el aire acondicionado sobre una superficie plana y suave para evitar el
ruido y la vibración al estar operando. • No incline o ponga de cabeza la unidad de aire acondicionado. Si hay algún pro-
blema desconecte de inmediato y entre en contacto con su distribuidor local o soporte técnico.

ENGL
ISH
ESPA
ÑO
L
–23–
FAMILIARIZÁNDOSE CON SU UNIDAD DE AIRE ACONDICIONADO
1
2
3
4
5
7
6
1. Guía superior2. Salida del aire frío3. Cuchillas direccionales de aire frío4. Entrada de aire cálido5. Cable de suministro de energía6. Panel de control

ENGLISH
ESPAÑO
L
–24–
USANDO SU UNIDAD DE AIRE ACONDICIONADO
DESCRIPCIÓN GENERAL DEL PANEL DE CONTROL
h
g
f
e
i
a
b
cd
j
NCIONES PRINCIPALES1. Botón POWER: use este botón para encender y apagar su unidad de aire acondicionado2. Botón MODE: Con este botón puede recorrer los diferentes modos de funciona-
miento: modo de enfriamiento (cooling), modo de deshumidificador (dehumidi-fier), y ventilador (fan)
3. Botón FAN4. Botón RESET FILTER 5. Botón DELAY/TIMER 6. Botón TEMPERATURE +/-: permite ajustar la temperatura deseada en la habita-
ción al presionar el botón adecuado (▲/ ▼). Los cambios de temperatura se reali-zan en pasos de 1° en el rango de 61°F (16°C) a 86°F (30°C). NOTA: no es posible fijar la temperatura en los modos de deshumidificador o ventilador.
7. Pantalla LED de Temperatura: En el modo de enfriamiento muestra la tempera-tura deseada en la habitación. En los otros modos la pantalla estará en blanco.
INDICATORS (WHEN ILLUMINATED)a. Velocidad automática del ventiladorb. High: velocidad alta del ventilador c. Med: velocidad media del ventilador d. Low: velocidad baja del ventilador
e. Cool: modo de enfriamiento f. Energy saver: modo de ahorro de energíag. Limpie y reemplace el filtroh. Temporizador activado
ENGL
ISH
ESPA
ÑO
L
–25–
CONTROL REMOTO
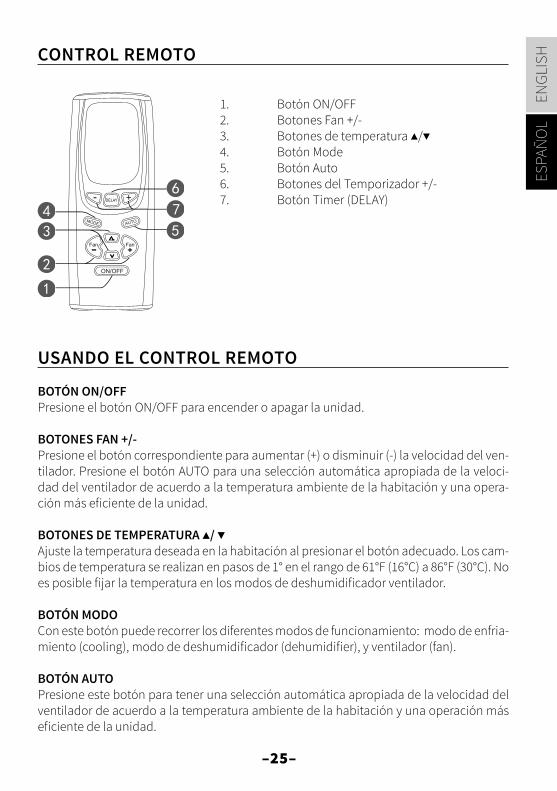
1. Botón ON/OFF 2. Botones Fan +/- 3. Botones de temperatura ▲/▼ 4. Botón Mode 5. Botón Auto 6. Botones del Temporizador +/- 7. Botón Timer (DELAY)
USANDO EL CONTROL REMOTO
BOTÓN ON/OFF Presione el botón ON/OFF para encender o apagar la unidad.
BOTONES FAN +/- Presione el botón correspondiente para aumentar (+) o disminuir (-) la velocidad del ven-tilador. Presione el botón AUTO para una selección automática apropiada de la veloci-dad del ventilador de acuerdo a la temperatura ambiente de la habitación y una opera-ción más eficiente de la unidad.
BOTONES DE TEMPERATURA ▲/ ▼ Ajuste la temperatura deseada en la habitación al presionar el botón adecuado. Los cam-bios de temperatura se realizan en pasos de 1° en el rango de 61°F (16°C) a 86°F (30°C). No es posible fijar la temperatura en los modos de deshumidificador ventilador.
BOTÓN MODOCon este botón puede recorrer los diferentes modos de funcionamiento: modo de enfria-miento (cooling), modo de deshumidificador (dehumidifier), y ventilador (fan).
BOTÓN AUTOPresione este botón para tener una selección automática apropiada de la velocidad del ventilador de acuerdo a la temperatura ambiente de la habitación y una operación más eficiente de la unidad.

ENGLISH
ESPAÑO
L
–26–
BOTÓN TIMER (DELAY) • Cuando la unidad está funcionando, presione este botón para programar el tiem-
po en que la unidad se ha de apagar. Use los botones +/- para cambiar la pantalla del aire acondicionado para ajusta el tiempo (en horas, en incrementos de 1 hora) en que la unidad ha de apagarse. Presione nuevamente el botón DELAY para con-firmar la orden de apagado.
• Cuando la unidad está apagada pero quiere prenderla en cierto tiempo, programe de la misma forma descrita anteriormente.
• Para cancelar una programación de tiempo, presione el botón DELAY para ver el tiempo restante antes de que el temporizador se active. Presione el botón DELAY nuevamente para cancelar el temporizador.
Nota: el temporizador puede fijarse en un rango de 1 a 24 horas. La unidad debe permane-cer conectada para que el temporizador pueda funcionar adecuadamente.
BLOQUEO DEL CONTROL REMOTO 8. Presione y sostenga los botones + y – simultáneamente para activar el bloqueo
para niños del control remoto y evitar que se hagan cambios inadvertidos en los ajustes de la unidad
1. Presione los botones + y – simultáneamente para desactivar el bloqueo del con-trol remoto.
CAMBIO EN LA UNIDAD DE LA TEMPERATURA (°C O °F)1. Cuando la unidad esté apagada, presione simultáneamente el botón – y el botón
MODE para cambiar la unidad de despliegue de la temperatura de grados Centí-grados o Celsius (°C) a grados Fahrenheit (°F) y viceversa.
REEMPLAZANDO LAS BATERÍAS DEL CONTROL REMOTO1. Presione suavemente la tapa localizada en la parte posterior del control remoto.
Levante la tapa del compartimento de baterías. 2. Reemplace las baterías con dos baterías AAA de 1.5 v. Inserte las baterías respe-
tando la polaridad (extremos + y -). Reemplace ambas baterías al mismo tiempo; nunca inserte baterías nuevas y viejas para evitar que se chorreen.
3. Reinserte suavemente la cubierta o tapa del compartimento de las baterías.
NOTAS ACERCA DE LA OPERACIÓN DEL CONTROL REMOTO• Cuando utilice el control remoto, diríjalo directamente al receptor IR de la unidad
de aire acondicionado el cual se encuentra en el panel de control. • El control remoto debe tener una línea de visión libre de obstáculos hacia el panel de control. • Puede ocurrir interferencia en la operación del control remoto cuando están pre-
sentes ya sea luz fluorescente o teléfonos inalámbricos. • Cuando el control remoto permanezca sin usar por largos periodos de tiempo,
retire las baterías.
ENGL
ISH
ESPA
ÑO
L
–27–
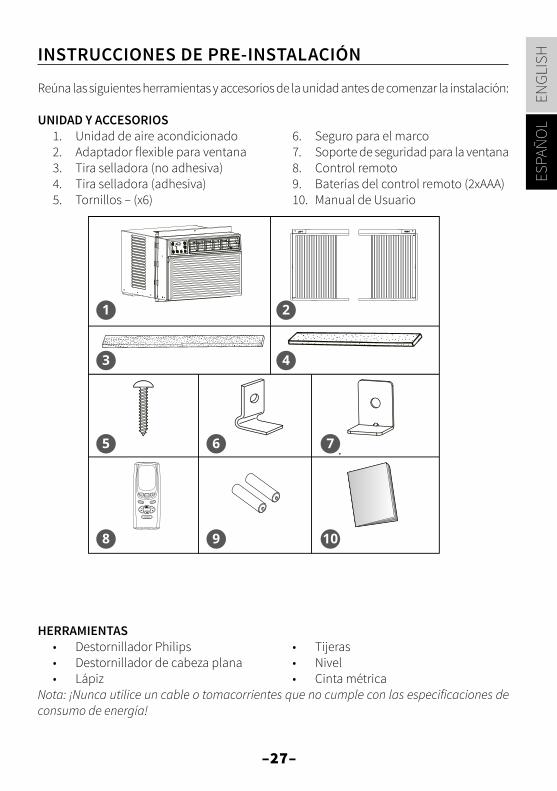
INSTRUCCIONES DE PRE-INSTALACIÓN
Reúna las siguientes herramientas y accesorios de la unidad antes de comenzar la instalación:
UNIDAD Y ACCESORIOS1. Unidad de aire acondicionado2. Adaptador flexible para ventana3. Tira selladora (no adhesiva)4. Tira selladora (adhesiva)5. Tornillos – (x6)
6. Seguro para el marco7. Soporte de seguridad para la ventana8. Control remoto9. Baterías del control remoto (2xAAA)10. Manual de Usuario
1 2
3
5 6 7
8 9 10
4
HERRAMIENTAS• Destornillador Philips• Destornillador de cabeza plana• Lápiz
• Tijeras• Nivel• Cinta métrica
Nota: ¡Nunca utilice un cable o tomacorrientes que no cumple con las especificaciones de consumo de energía!
ENGLISH
ESPAÑO
L
–28–
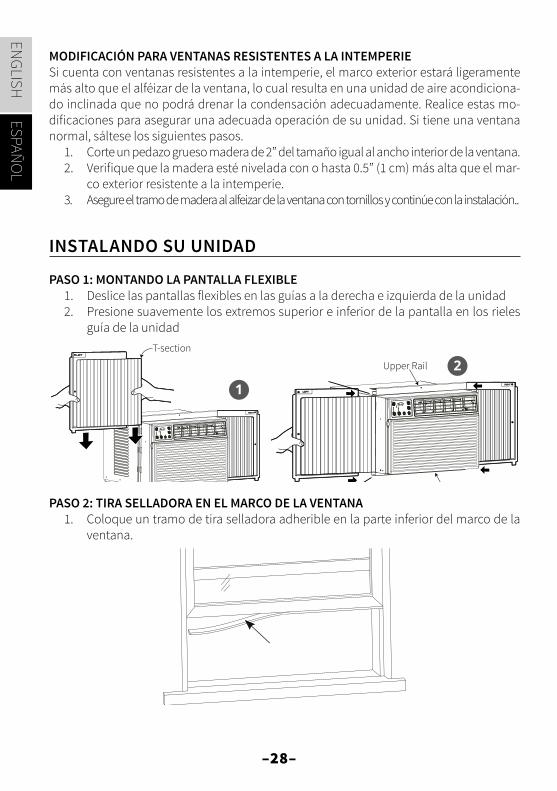
MODIFICACIÓN PARA VENTANAS RESISTENTES A LA INTEMPERIE Si cuenta con ventanas resistentes a la intemperie, el marco exterior estará ligeramente más alto que el alféizar de la ventana, lo cual resulta en una unidad de aire acondiciona-do inclinada que no podrá drenar la condensación adecuadamente. Realice estas mo-dificaciones para asegurar una adecuada operación de su unidad. Si tiene una ventana normal, sáltese los siguientes pasos.
1. Corte un pedazo grueso madera de 2” del tamaño igual al ancho interior de la ventana. 2. Verifique que la madera esté nivelada con o hasta 0.5” (1 cm) más alta que el mar-
co exterior resistente a la intemperie.3. Asegure el tramo de madera al alfeizar de la ventana con tornillos y continúe con la instalación..
INSTALANDO SU UNIDAD
PASO 1: MONTANDO LA PANTALLA FLEXIBLE1. Deslice las pantallas flexibles en las guías a la derecha e izquierda de la unidad2. Presione suavemente los extremos superior e inferior de la pantalla en los rieles
guía de la unidad
1
2T-section
Upper Rail
Lower Rail
PASO 2: TIRA SELLADORA EN EL MARCO DE LA VENTANA 1. Coloque un tramo de tira selladora adherible en la parte inferior del marco de la
ventana.

ENGL
ISH
ESPA
ÑO
L
–29–
PASO 3: MONTANDO EL CHASIS DE LA UNIDAD EN EL MARCO DE LA VENTANA 1. Con la ayuda de otra persona, centre la unidad en el alfeizar de la ventana. La guía
inferior debe estar completamente a ras con el alféizar de la ventana. Baje sua-vemente la ventana hasta que se acople perfectamente con el riel guía superior. Permita un ángulo de inclinación ligeramente hacia abajo y atrás de aproxima-damente 5.3°, para que pueda drenar la condensación que se forma durante el funcionamiento del aire acondicionado.
2. Extienda las pantallas flexibles hasta la derecha e izquierda de los laterales de la ventana. Asegure con tornillos la guía superior y las esquinas superiores al marco de la ventana. Utilice los seguros para el marco de la ventana para asegurar las esquinas inferiores al alféizar de la ventana.

ENGLISH
ESPAÑO
L
–30–
PASO 4: ASEGURANDO LA VENTANA1. Para evitar que la ventana sea abierta de forma involuntaria y que la unidad se
dañe o llegue a causar algún accidente a quien esté pasando por debajo de la ventana, utilice un tornillo tipo C para colocar el seguro a la ventana. Si su marco de la ventana está echo de madera, coloque el seguro a la ventana (Detalle 1). Si el marco de la ventana es de plástico (PVC) coloque el seguro a un lado del marco de la ventana (Detalle 2).
1
2
PASO 5: TIRA SELLADORA AISLANTE1. Evite que el aire caliente o frío entre por la ventana parcialmente abierta colocan-
do la tira selladora no adhesiva entre el bastidor de la ventana y el panel de vidrio.

ENGL
ISH
ESPA
ÑO
L
–31–
LIMPIEZA Y MANTENIMIENTO
ADVERTENCIAS DE SEGURIDADPara evitar descargas eléctricas, incendios, daños y lesiones al realizar el mantenimiento de su unidad:
• Siempre apague y desconecte del tomacorrientes la unidad de aire acondicionado• Nunca sumerja la unidad en agua o rocíe líquidos directamente sobre ella• Nunca utilice solventes u otros líquidos inflamables o volátiles (ejemplos: pintura,
solventes, acetona, gasolina, etc.).
REVISIÓN DE LA UNIDAD PREVIA A LA TEMPORADA DE CALOR Antes de utilizar su unidad de aire acondicionado en los cálidos meses del verano, siem-pre realice las siguientes verificaciones para asegurar una operación confiable y eficiente:
• Revise que en las entradas y salidas de aire no haya objetos extraños (ejemplo: hojas, pelusas, palitos, juguetes pequeños, etc.)
• Revise que el cable de suministro eléctrico y el enchufe no estén dañados dobla-dos o rasgados
• Revise el fitro y límpielos si es necesario • Revise las baterías del control remoto y reemplácelas de ser necesario • Revise que los conectores, el ducto de escape de calor y el soporte de la ventana
estén firmemente ensamblados y en su lugar • Verifique que el ducto de escape de calor no tenga grietas, daños u otros signos
de debilidad.
ENGLISH
ESPAÑO
L
–32–
REVISIÓN DE LA UNIDAD EN LA POST TEMPORADA DE CALORDespués de utilizar su unidad de aire acondicionado en los cálidos meses del verano, siempre realice las siguientes revisiones:
• Desconecte la unidad del tomacorrientes• Limpie el filtro y el chasis de la unidad• Retire polvo y otros objetos de la unidad• Descarte cualquier acumulación de agua dentro de la unidad (vea la sección acerca del
drenado)• Revise que los conectores, el ducto de escape de calor y el soporte de la ventana están
firmemente ensamblados y en su lugar.
ALMACENAMIENTO POR LARGO TIEMPO Si va a guardar su unidad por un largo plazo, realice todos los pasos post-temporada de la sección anterior y además los siguientes pasos:
• Enrolle alrededor de la unidad el cable de suministro eléctrico de manera suelta• Cubra la unidad con una sábana o tela para prevenir la acumulación de polvo
dentro de la unidad durante el tiempo de almacenamiento.
INFORMACIÓN PARA EL DESHECHO DE SU UNIDAD• La mayoría de los materiales son reciclables. Deséchelos de acuerdo a las direc-
trices locales de reciclado. • Si desea deshacerse su unidad, entre en contacto con las autoridades locales para
obtener las instrucciones específicas de desecho de aparatos electrodomésticos. Si su unidad aún funciona y está en buen estado, en lugar de deshacerse de ella, dónela a alguna institución de caridad.
LIMPIANDO EL CHASIS EXTERIOR Y LA REJILLA DE TOMA DE AIRE Si se ha acumulado polvo en la unidad, utilice un paño suave y seco de sacudir para limpiarlo. Si hay grasa u otras substancias más duras de eliminar, use un paño suave hu-medecido con agua tibia y jabonosa. Utilice un cepillo suave para limpiar la rejilla.
LIMPIANDO EL FILTROPara una operación de energía eficiente, su filtro debe ser limpiado cada 3 meses. Las unidades en ambientes polvosos requieren una limpieza del filtro más frecuente.
• Retire el fitro al tirar suavemente de ellos• Utilice una aspiradora o póngalos bajo el chorro de agua fría para limpiarlos. Si el filtro está
particularmente sucio (con formación de grasa, por ejemplo), lave y talle suavemente el filtro en un baño de agua tibia jabonosa. Deje el filtro secar totalmente en un lugar con sombra. La exposición del filtro a la luz directa del sol puede causar que este se tuerza.
• Después de que el filtro esté limpio y completamente seco, reinsértelo en la uni-dad presionando firmemente sin forzarlo.
Nota: Para evitar la deformación y el riesgo de incendio nunca seque el filtro con una fuente de calor como es una secadora del cabello, calentador o chimenea.

ENGL
ISH
ESPA
ÑO
L
–33–
SOLUCIÓN DE PROBLEMAS
El aire acondicionada no funciona para nada• ¿El cable de suministro de energía esta adecuadamente conectado en un toma-corrientes que funciona y está aterrizado?• ¿Existe alguna falla como un fusible quemado o se disparó el cortacircuitos?• ¿El temporizador está ajustado al modo de “TIMER ON”? Deshabilite el tempori-zador para iniciar de inmediato con la operación.• ¿La temperatura ambiente es menor a los 61°F (16°C)? Un dispositivo de seguri-dad evita que una habitación se enfríe a temperaturas más bajas que esto.
La calefacción o enfriamiento es insuficiente • ¿La temperatura de la habitación es la adecuada?• ¿Está sucio el filtro de aire?• ¿Están las puertas y ventanas abiertas?• ¿La habitación está expuesta a la luz directa del sol o hay otras fuentes de calor dentro de la habitación?• ¿Hay un gran número de personas en la habitación?
El aire acondicionado no se reinicia de inmediato después de apagarlo • La unidad no puede reiniciar sino hasta después de 3 minutos de que ha sido apagada para permitir que el condensador se enfríe y evitar el riesgo de incendio. Espere unos cuantos minutos antes de reiniciar la unidad.
La unidad de aire acondicionado se enciende y apaga frecuentemente• Verifique que la capacidad de su instalación eléctrica cumpla con las especifi-caciones requeridas. Necesitará de un electricista para revisar su instalación si es que su aire acondicionada excede la capacidad instalada. • Asegúrese que el sistema de escape está bien conectado y no está doblado o torcido. Mantenga la manguera lo más corta posible cortando el exceso conforme se requiera.
Sale neblina al estar enfriando • Esto puede ocurrir normalmente en ambientes cálidos con alta humedad. El enfriamiento continuo retirará el exceso de humedad en la habitación y eventual-mente la neblina desaparecerá.
La unidad emite un olor extraño• Esto puede deberse al humo del cigarro u otros residuos por cocinar u otras actividades que permanecen en la unidad de aire acondicionado. Limpie el filtro.

ENGLISH
ESPAÑO
L
–34–
La unidad emite un sonido fuerte o inusual y vibraciones• Coloque la unidad en una superficie nivelada
Se escucha un sonido de “chillidos” • Ocasionalmente la circulación del refrigerante dentro de la unidad puede cau-sar este ruido.
Se escucha un sonido como de “palmaditas” • Esto es usualmente causado por la expansión por calor de las partes de plástico
El control remoto no trabaja• Asegúrese que el control remoto tiene una línea de visión sin obstáculos directa a la unidad y además verifique que los sensores en la unidad no están siendo obs-truidos por cortinas ni otros objetos. Asegúrese que el control remoto cuenta con pilas útiles y frescas.
Hay humedad en la salida de aire • Los ambientes de alta humedad pueden causar condensación en la salida del flujo de aire. Con una esponja limpie la condensación.
SI CUALQUIERA DE LOS SIGUIENTES FENÓMENOS LLEGARA A OCURRIR A PESAR DE LAS TÉCNICAS DE SOLUCIÓN DE PROBLEMAS ANTES DESCRITAS, APAGUE SU UNIDAD DE AIRE ACONDICIONADO Y DESCONECTE EL CABLE DE SUMINISTRO ELÉC-TRICO DE INMEDIATO Y ENTRE EN CONTACTO CON SOPORTE TÉCNICO O CON UN TÉCNICO ESPECIALIZADO:
• Se quema el fusible o el cortacircuitos se dispara frecuentemente• El cable de suministro eléctrico está inusualmente caliente• El aislante del cable de suministro de energía está rasgado, destrozado o desga-rrado• Los controles de la unidad no funcionan• La unidad produce ruidos anormales
ENGL
ISH
ESPA
ÑO
L
–35–
CÓDIGOS DE ERROR DE LA UNIDAD
Cuando el estado de la unidad de aire acondicionado es anormal, la pantalla indicadora en la unidad desplegará el código de error adecuado. Refiérase a la siguiente tabla para una acción específica e inmediata.
E5: PROTECCIÓN DE SOBRECORRIENTE Desconecte y reinicie la unidad para borrar el error. Si el error persiste, contacte a un técnico de servicio calificado.
E6: Desconecte y reinicie la unidad para borrar el error. Si el error persiste, contacte a un técnico de servicio calificado.
F1: Falla de la unidad. Contacte a un técnico de servicio calificado.
F2: Falla de la unidad. Contacte a un técnico de servicio calificado.
H1: Estado de descongelamiento; un fenómeno natural. El error se borrará hasta que el serpentín de enfriamiento se descongele lo suficiente.
H6: Desconecte y reinicie la unidad para borrar el error. Si el error persiste, contacte a un técnico de servicio calificado.
OTROS CÓDIGOS DE ERROR: Contacte a un técnico de servicio calificado.
SOPORTE TÉCHNICO Para mayor ayuda, visite nuestro sitio web o contacte a soporte técnico.
Sitio Web: www.impecca.com
Teléfono: +1 866–954–4440
Email: [email protected]

© 2016 Impecca, a division of LT Inc., Wilkes Barre, PA


![Room Air Conditioner Aire Acondicionado para Habitaciones · miral° Room Air Conditioner Aire Acondicionado para Habitaciones t] i i i i t] }]][]][]][][Use an Care Manual Manual](https://img.pdfslide.us/doc/110x75/5ba2667d09d3f221368bd0b0/room-air-conditioner-aire-acondicionado-para-habitaciones-miral-room-air-conditioner.jpg)