Embed Size (px)
Citation preview

WinAlloy
International Translator of Non-Ferrous Metals and Alloys
version 7.0
Quantor-Soft Metal Ltd.

License Agreement
This is a legal agreement between you, the end User, and Quantor-Soft Metal Ltd. (Quantor). WinAlloy software program (Software) is licensed by Quantor to the original customer and any subsequent transferee on the product for use only on the terms set forth here.
Grant of License
• Quantor grants to you the right to use one copy of the enclosed Software on a single computer at any given time. This Software may be transferred for use in a different machine; however, it must be removed from the computer on which it was originally installed.
• You may not transfer this Software, in any form, to an unlicensed User. You cannot make any changes of the Software and develop of any other software program based on this Software.
• You may duplicate the software reference materials (User's Guide) only for your purposes not for commercial realization.
Copyright
• The Software is owned by Quantor and is protected by Russian Federation copyright laws and international treaty provisions.
• Quantor retains all rights not expressly granted in this License Agreement. Nothing in this agreement constitutes any waiver of Quantor rights under the copyright laws of Russian Federation.
Software Limited Warranty
• Quantor warrants that:
1) The CD-ROM, reference materials (User's Guide) and Security Device are not defective.
2) The reference materials (User's Guide) are complete and contain all the information that Quantor deems necessary for use of the Software.
3) The Software program functions substantially as described in the reference materials (User's Guide), provided that the Software program is used on the computer hardware and operating system for which they were designed.
• If the CD-ROM on which the program are furnished and Security Device are defective, return
them to Quantor for replacement during the warranty period. This Limited Warranty is for 12 month from delivery, as evidenced by your receipt. Defective CD-ROMs and Security Devices will be replaced at no charge; damaged Security Devices will be replaced at EUR40 per Device, upon return of the damaged Device.
Quantor will not replace the lost Security Devices.
• Quantor does not warrant that the functions contained in the Software program will meet your requirements or that the operation of the programs will be uninterrupted or error-free. Quantor does warrant that every effort will be made to correct Software program defects, provided said defects are reported in a responsible and timely manner and with substantial documentation for diagnosis of the defects.
LIMITATION OF REMEDIES
In no events will Quantor be liable to you for any lost profits, lost savings, or other incidental or consequential damages arising out of the use or inability to use the Software program; even Quantor has been advised of the possibility of such damages, or for any claims by any other party.

TABLE OF CONTENTS 1
Table of Contents
1. Introduction ________________________________________________________________ 2
2. Software Installation _________________________________________________________ 3
2.1. Installation of WinAlloy 7 - CD _____________________________________________ 3
2.1.1. Installation Process _________________________________________________ 5
2.1.2. Validation of Installation______________________________________________ 7
2.2. Installation of WinAlloy 7 - Subscription ____________________________________ 8
2.2.1. Installation Process _________________________________________________ 9
2.2.2. Software Activation ________________________________________________ 10
2.2.3. Validation of Installation ____________________________________________ 11
3. User's Manual _____________________________________________________________ 12
3.1. How to Run the Software and Call It's Main Procedures _______________________ 12
3.2. Operation with List of Alloys _____________________________________________ 13
3.2.1. How to Find an Alloy in the Database __________________________________ 13
3.2.2. How to Get Information on the Selected Alloy ___________________________ 15
3.2.3. How to Get Information on Foreign Equivalents of the Selected Alloy _________ 15
3.2.4. Search by Comparison of Chemical Compositions ________________________ 17
3.3. Operation with List of Standard ___________________________________________ 22
3.3.1. How to Find the Required Standard in the Database ______________________ 22
3.3.2. How to Find an Alloy in the Standard and Get Information about It ___________ 22
3.4. Search by Chemical Composition _________________________________________ 24
3.4.1. The Search Setup _________________________________________________ 24
3.4.2. The Search Results ________________________________________________ 26

2 WinAlloy 7 software
1. Introduction
International Translator of Non-Ferrous Metals and Alloys WinAlloy 7 is original user-friendly software that helps you to find the correspondence between non-ferrous alloys used in your country and the alloys of the other industrial countries. The database of the software contains information on more than 40,000 alloys worldwide. We collected information on chemical compositions of alloys and the correspondence among them from national standards, various reference books as well as brochures provided to us by world metal companies.
WinAlloy 7 software will help you:
• to get information on chemical composition of alloy of your interest in any country;
• to find equivalents of the alloy in another country (countries);
• to learn the designation of alloy (and find its equivalents) if you know only its chemical composition.
The present User's Guide consists of the following parts:
Part 2 Software installation describes the procedure of installation of WinAlloy 7 on the User’s PC and its preparation for operation.
As the installation and preparation for the operation of the CD-version of the software and its Subscription version differ from each other the Part consists of the two separate chapters, each dedicated to the installation and preparation of the above versions for the operation.
Part 3 User’s Manual. In this Part we described how to run the software, general principles of its operation and gave a detailed description of the main software features and procedures.
In the Part you will learn how to find required alloy in the database and to get information on it and its foreign equivalents, and also what to do in cases, when no equivalents exist. Besides in the Part algorithms and a sequence for the search for an alloy in the database by known chemical composition are described.
The authors reserve the right
to introduce amendments into the software in the process of operating the program. That is why, before you start working, it is so important to get acquainted with the Read Me file where we specified the differences of the version purchased by you from the basic version described in the User's Guide.
You can easily contact us by:
Phone / fax: (+7 495) 989 7021
E-mail: [email protected]
Internet: http://www.metaldata.info
We would ask you to return completed registration forms to the following address:
Quantor-Soft Metal, 235-2, Zelenograd, 124498 Moscow, Russia
or to sent them us by fax or e-mail.

SOFTWARE INSTALLATION 3
2. Software Installation
WinAlloy 7 installation on User’s PC is easy and can be accomplished by a User without our assistance.
WinAlloy 7 operates under Windows XP, Windows Vista and Windows 7, as well as under Linux (Wine). It will take about 35 Мb on the hard disk of your PC after installation.
WinAlloy 7 is supplied in two configurations:
• WinAlloy 7 - CD;
• WinAlloy 7 - Subscription.
The both configurations are completely identical in their features; the distinctions consist only in different ways of the software protection for illegal copy.
2.1. Installation of WinAlloy 7 - CD
To install WinAlloy 7 - CD Administrator’s privileges are required.
The software is installed from supplied CD-ROM. For the installation the Autorun program is applied, which starts running automatically after the CD-ROM has been inserted into the drive of your PC.
Fig. 2.1. Autorun program. Main window
In the case of the Autorun program has not started running in your PC due to any reason you can run it manually:
1. Click the Start button.
2. In the pull-down menu select the Run… item. The Run window will be displayed.
3. Enter in the Open: string: [name:]\autorun.exe,
where [name:] is a name of your СD-ROM read driver (usually D:).
4. Click the Ok button to run the Autorun program.
4 WinAlloy 7 software
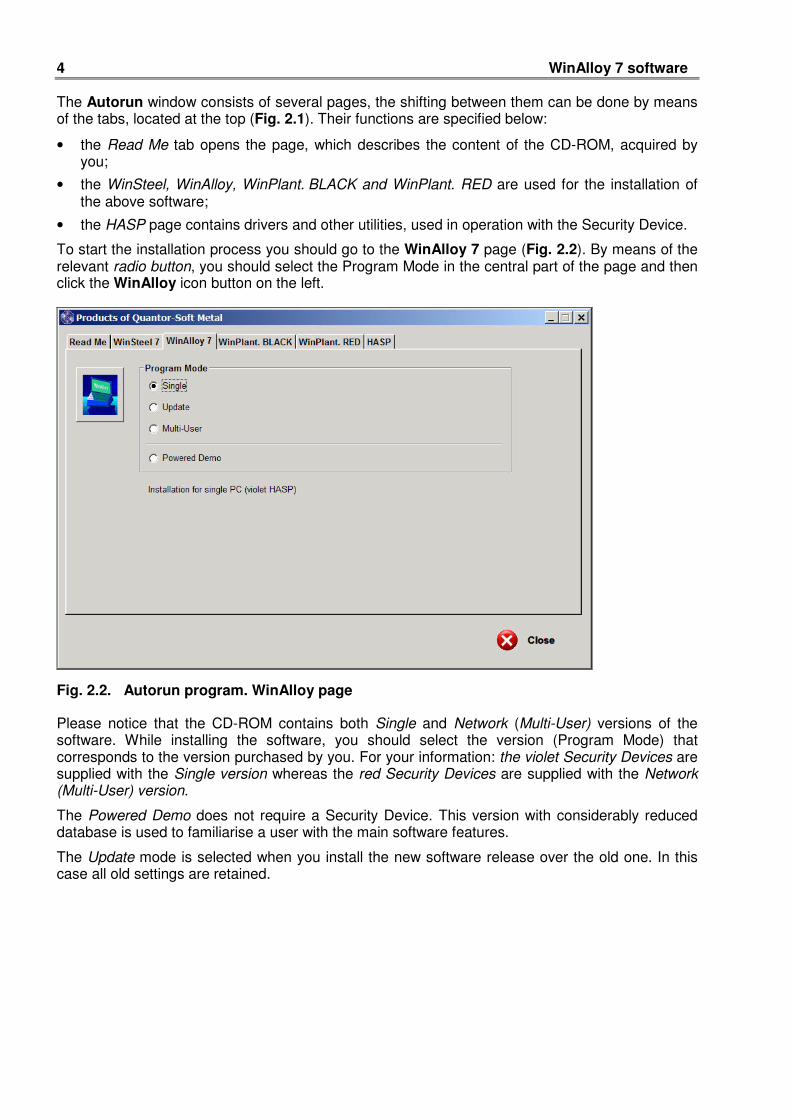
The Autorun window consists of several pages, the shifting between them can be done by means of the tabs, located at the top (Fig. 2.1). Their functions are specified below:
• the Read Me tab opens the page, which describes the content of the CD-ROM, acquired by you;
• the WinSteel, WinAlloy, WinPlant. BLACK and WinPlant. RED are used for the installation of the above software;
• the HASP page contains drivers and other utilities, used in operation with the Security Device.
To start the installation process you should go to the WinAlloy 7 page (Fig. 2.2). By means of the relevant radio button, you should select the Program Mode in the central part of the page and then click the WinAlloy icon button on the left.
Fig. 2.2. Autorun program. WinAlloy page
Please notice that the CD-ROM contains both Single and Network (Multi-User) versions of the software. While installing the software, you should select the version (Program Mode) that corresponds to the version purchased by you. For your information: the violet Security Devices are supplied with the Single version whereas the red Security Devices are supplied with the Network (Multi-User) version.
The Powered Demo does not require a Security Device. This version with considerably reduced database is used to familiarise a user with the main software features.
The Update mode is selected when you install the new software release over the old one. In this case all old settings are retained.

SOFTWARE INSTALLATION 5
2.1.1. Installation Process
On clicking the WinAlloy icon button the main window of WinAlloy 7 Setup Wizard will be displayed on the screen (Fig. 2.3). After reading information in the window, please click the Next > button to go to the next page.
Fig. 2.3. WinAlloy 7 Setup Wizard. Main window
By default WinAlloy 7 software is installed in C:\Program Files\MetalData.info\WinAlloy7Base directory. If you wish to install the software in another directory, click the Browse… button (Fig. 2.4) and select another path in the appeared window.
Fig. 2.4. WinAlloy 7 Setup Wizard. Select a directory for installation
When the directory has been selected to continue click the Next > button.

6 WinAlloy 7 software
On the next page you should confirm the Program Mode selected in the WinAlloy 7 page of the Autorun program window (see Fig. 2.2). To confirm use the pull-down list-box in the central part of the window (Fig. 2.5).
Fig. 2.5. WinAlloy 7 Setup Wizard. Select the Program Mode
When you click the Next > button you’ll pass to the page (Fig. 2.6), which is the final one prior to the installation. Using the < Back button you will still have an opportunity to return to the previous pages to correct installation options.
Fig. 2.6. WinAlloy 7 Setup Wizard. All is ready for the installation
The installation process will start after clicking the Install button. It is visualized on the screen by means of a Progress Bar, which shows processes of unpacking the software files and their copying to the hard disk of your PC.

SOFTWARE INSTALLATION 7
When the installation is completed the final window of WinAlloy 7 Setup Wizard (Fig. 2.7) will be shown on the screen. To exit the Wizard you should click the Finish button.
Fig. 2.7. WinAlloy 7 Setup Wizard. Completion of the installation process
As a result of the installation you will have the WinAlloy 7 Base - CD icon on the Desktop of your PC, which is used for the software run.
In addition in the Program Files menu a pull-down Metal.Data.info / WinAlloy 7 Base - CD submenu containing three items in it will also be displayed:
• the WinAlloy 7 Base - CD menu item is used to run the software;
• the WinAlloy 7 Base - CD Help item is intended to activate the Help topics;
• the Read Me item opens the Read Me file where we specified the differences of the software version purchased by you from the basic version described in the User's Guide.
2.1.2. Validation of Installation
Make sure of the presence of the WinAlloy 7 Base - CD icon on the Desk Top of your PC. Then connect the USB Security Device supplied with the software to your PC. We remind that the Security Devices are of the two types: a violet one is intended for the Single software version whereas a red one is used with the Network (multi-user) version.
Then you can try to run the software by double-clicking the WinAlloy 7 Base - CD icon. If you have successfully completed the installation and correctly inserted the Security Device, the software will start running: its main picture and a Progress Bar under it will appear on the screen.
In case you:
• installed the software in wrong mode (Single / Network / Update), • forgot to insert the Security Device,
• inserted it to a disabled port,
• inserted not the device that was supplied to you with the software,
WinAlloy 7 would not run, and an appropriate message will be displayed.

8 WinAlloy 7 software
If the software does not run, then do the following:
1. First check is the Security Device connected to your PC. If the Security Device connected correctly and your PC sees it, you will find red light inside the HASP.
2. If there is no light, then check the port, to which you connected the Security Device. For this you may use, for instance, a flash memory stick: if the PC sees it, the port functions properly.
3. If the port is functioning but the software does not run, try to re-install it. By doing so pay special attention to your selection of the Program Mode (Fig. 2.2 and 2.5). It must be in strict compliance with the software version purchased by you.
4. If after the re-installation of the software there is still no light or the light is activated, but the software does not run again, please e-mail our Technical Support Service – [email protected] or call us by hot line phone +7 495 989 7021.
We draw your attention that after you have installed the software and it proved to be workable, you will have to fill in the attached Registration Form and send it us by post, fax or e-mail (you’ll find our contact data on p.2 and p.28 of this Manual).
Otherwise you would be deprived of our Annual Support Service, namely:
• the possibility to use consultations of our Support Team;
• to receive new software updates quarterly during the warranty period of 12 months.
2.2. Installation of WinAlloy 7 - Subscription
To install WinAlloy 7 - Subscription you should download the software from our web-site. The link for downloading of the software as well as step-by-step instructions you’ll find on:
http://www.metaldata.info/eng/subsdownload.htm
To start the download process, please click the diskette icon in the corresponding cell of the table in the lower part of this page.
Fig. 2.8. WinAlloy 7 Setup Wizard. Main window
Then a standard Windows window will be displayed, which will offer you either to save the software on hard disc of your PC or to run WinAlloy 7 - Subscription Setup Wizard. In our opinion it is better to save the software executive file (its name is subswa7e.exe) first on your PC, and then to run the installation process. However you may start running the Setup Wizard at once.

SOFTWARE INSTALLATION 9
We would like to pay your attention to the fact that WinAlloy 7 - Subscription exists in a Single mode only. So if you have purchased the multi-user software version for 2-5 or 6-10 users you will have to install the software on each PC separately.
2.2.1. Installation Process
After the subswa7e.exe file has started running the main window of WinAlloy 7 Setup Wizard will be displayed (Fig. 2.8). To go to the next page click the Next > button.
Fig. 2.9. WinAlloy 7 Setup Wizard. Select a directory for installation
WinAlloy 7 software by default is installed in the C:\Program Files\MetalData.info\WinAlloy7Base directory. If you wish to install the software in another directory, click the Browse... button (Fig. 2.9) and select another path in the appeared window. After the directory has been selected, click the Next > button to continue the installation process.
Fig. 2.10. WinAlloy 7 Wizard. All is ready for the installation

10 WinAlloy 7 software
The next page (Fig. 2.10) is the final one prior to the installation. Using the < Back button you will still have an opportunity to return to the previous pages to correct installation options.
The installation process will start after clicking the Install button. It is visualized on the screen by means of a Progress Bar, which shows processes of unpacking the software files and their copying to the hard disk of your PC.
When the installation is completed the final window of WinAlloy 7 Setup Wizard (Fig. 2.11) will be shown on the screen. To exit the Wizard you should click the Finish button.
Fig. 2.11. WinAlloy 7 Wizard. Completion of the installation process
As a result of the installation you will have the WinAlloy 7 Base - Subscription icon on the Desktop of your PC, which is used for the software run.
In addition in the Program Files menu a pull-down Metal.Data.info / WinAlloy 7 Base - Subscription submenu containing three items in it will also be displayed:
• the WinAlloy 7 Base - Subscription menu item is used to run the software;
• the WinAlloy 7 Base - Subscription Help item is intended to activate the Help topics;
• the Read Me item opens the Read Me file where we specified the differences of the software version purchased by you from the basic version described in the User's Guide.
2.2.2. Software Activation
To run WinAlloy 7 - Subscription software Activation Code is reqiued. The Activation Code is created individually for each user and is unique for each PC.
We pay your attention that the activation needs to be done on the same PC and under the same account, on which you will operate with the software.
If you purchased a multi-user software license (for 2-5 or 6-10 users), the activation process has to be done on each PC.
To create the Activation Code for your PC we need its unique code. The unique code of your PC is determined by the Activation utility. You can run it, using the main Windows menu.
Start / Programs / MetalData.info / Activation / Activation

SOFTWARE INSTALLATION 11
You will find the unique code of your PC in the third paragraph of the Activation utility window (Fig. 2.12).
We offer you two ways to send us the unique code of you PC: via Internet or by fax/e-mail.
If the first way is preferable to you, please click the Internet button at the bottom of the Activation utility window and fill in the form on our web-site. In this case your PC should be connected to the Internet. While completing the form do not forget to indicate your Customer ID, received by you from us, or just input your company name.
Fig. 2.12. Activation utility
If you have selected the second way, click the Fax / E-mail button and fill in the form on your PC. Then you should send us this form (RTF file) by the fax or e-mail.
When we receive information we need from you, we will create and e-mail you your User Name and Activation Code.
2.2.1. Validation of Installation
When you receive a e-mail message with your Activation Code from us you can try to run the software by double clicking the WinAlloy 7 Base - Subscription icon on the Desktop of your PC. Before the first run of the software a window will be dislayed, where you will need to input your User Name and Activation Code.
If the installation and activation processes have been executed properly, the software will start operating, its main picture and Progress Bar under it will be displayed on the screen.
In case the software does not run, please contact our Support Team by e-mail or phones, given in the present Manual (see page 2 or 28).

12 WinAlloy 7 software
3. User’s Manual
3.1. How to Run the Software and Call It’s Main Procedures
Operation with WinAlloy 7 - CD software is possible only in case the USB Security Device, supplied with the software, has been connected to the PC. So make sure of its availability before starting the operation.
Operation with WinAlloy 7 - Subscription software doesn’t require the Security Device. If you input correct User Name and Activation Code before first run of the software, WinAlloy 7 - Subscription will be run on this PC within the whole period of license validity.
Fig. 3.1. The main window of the software
To run the software you may use the icons, placed during installation on the Desktop of your PC (WinAlloy 7 Base - CD or WinAlloy 7 Base - Subscription) or use the Windows main menu:
Start / Programs / MetalData.info / WinAlloy 7 Base - CD / WinAlloy 7 Base - CD
or
Start / Programs / MetalData.info / WinAlloy 7 Base - Subscription / WinAlloy 7 Base - Subscription
When the software starts operation you’ll see its main picture and Progress bar under it. The Progress Bar illustrates the software loading in memory of your PC. On completion of the loading process, you will see main WinAlloy 7 window (see Fig. 3.1).

USER’S MANUAL 13
To call the main software procedures you should use buttons with icons on the left.
1. The button displays on the screen list of alloys, included into the software database. Here you may also get detailed information on the alloys and their foreign equivalents.
It should be noted, that the List of alloys window, which is called by clicking the button, will be automatically displayed on the screen upon running of the software.
2. The button calls procedure, which shows list of standards, which have referenced in the software database. Besides the list of standards you can also get information on alloys covered by the standards, and their foreign equivalents.
3. The button is used to call procedure, which will enable you to find an alloy specification by known chemical composition.
Apart from the above-mentioned main buttons you can also use the following service buttons:
4. - this button is used for selection and setup of printer;
5. - this button calls HTML Help;
6. - this button allows you to get information on the current software version and our contact data; you can also find there a copy of the Registration Form, which you need to complete and send us to receive our support.
3.2. Operation with List of Alloys
3.2.1. How to Find an Alloy in the Database
Non-ferrous metals and alloys, included in the software database, are classified by countries and standards. Meanwhile it is assumed that one and the same grade may have several designations (e.g.: CuZn41Pb2 or 2.0406, 204.0 or A 02040, AD31 or 1310, etc.).
To search for a grade you need in the software database in accordance with any of its designations two list-boxes are used: the main one at the left (see Fig. 3.2), and the dynamically changed second one, located on the top right. The left list-box completely excludes repeated grade designations, despite the fact that the alloys with one and the same name may be used in various countries (e.g., alloy designated 4004 is used in USA, China, Sweden as well as in Europe) or may be included in different standards within one country.
When you highlight an alloy of designation you need in the left list-box, the top right list-box will show you a list of all grades worldwide of the selected designation with references to countries and standards. For some alloys you will see "included in 2 (3, 4, …) standards" inscription instead of standard abbreviation and number. This means that in accordance with all these standards the alloy has the same composition.
Another variant is possible, when you will see several alloys of the highlighted designation in the list with a reference to the same standard. It may be possible in cases, when the chemistry of alloy, determined by the standard, depends on additional parameters (e.g., dimensions of rolled products or alloy applications).
By default the left list-box contains information about all alloys included in the software database. In the Country string at the bottom you may select name of the required country to show in the list-box only alloys of the specified country.

14 WinAlloy 7 software
Besides you may search for required alloy among alloys of the selected group. To select a group you need, use the pop-up list-box in the Group string under the list-box of alloys. Notice that it is accepted in the software that an alloy is included in this or that group if content of base element of the group in its composition more than 25%. So it is easy to understand why C 22000 brass (Cu - near 90%, Zn - near 10%) is included in the "Copper and alloys" group only, whereas C 27000 brass (Cu - near 63%, Zn - near 37%) is included in two groups "Copper and alloys" and "Zinc and alloys" simultaneously.
Fig. 3.2. List of alloys
To search for a required alloy designation it is most convenient to use locator. For this purpose you need to type character by character designation of the required alloy in the locator field under the list-box. When you enter the first character, the first grade in the list-box whose designation starts with the entered character will be highlighted. When you type the next character, the grade whose designation starts with the combination of the two typed characters will be highlighted, and so on. Usually, it is sufficient to type 3-4 characters to find the necessary alloy in the list-box.
Besides the search for a grade in the database by its full designation described above, the software provides a possibility of search for a grade by a part of its designation or short name. The possibility is convenient to use, when the exact designation of the required alloy is not known. To find a grade by its short name you should click the By part of name tab in the upper part of the list of alloys.
The short name of a grade is a combination of letters and figures without blanks or any other symbols, excluding ? and * signs. These two symbols are used to substitute unknown characters in a grade designation. The ? sign is used for substitution of only one character whereas the * symbol is used to substitute a group of characters. The short name is typed in the locator field under the
list-box. When you input the grade short name you should click the button at the right to start the search for a grade in the database. As a result all the grades are selected, which contain the input combination of characters in their designations.
USER’S MANUAL 15
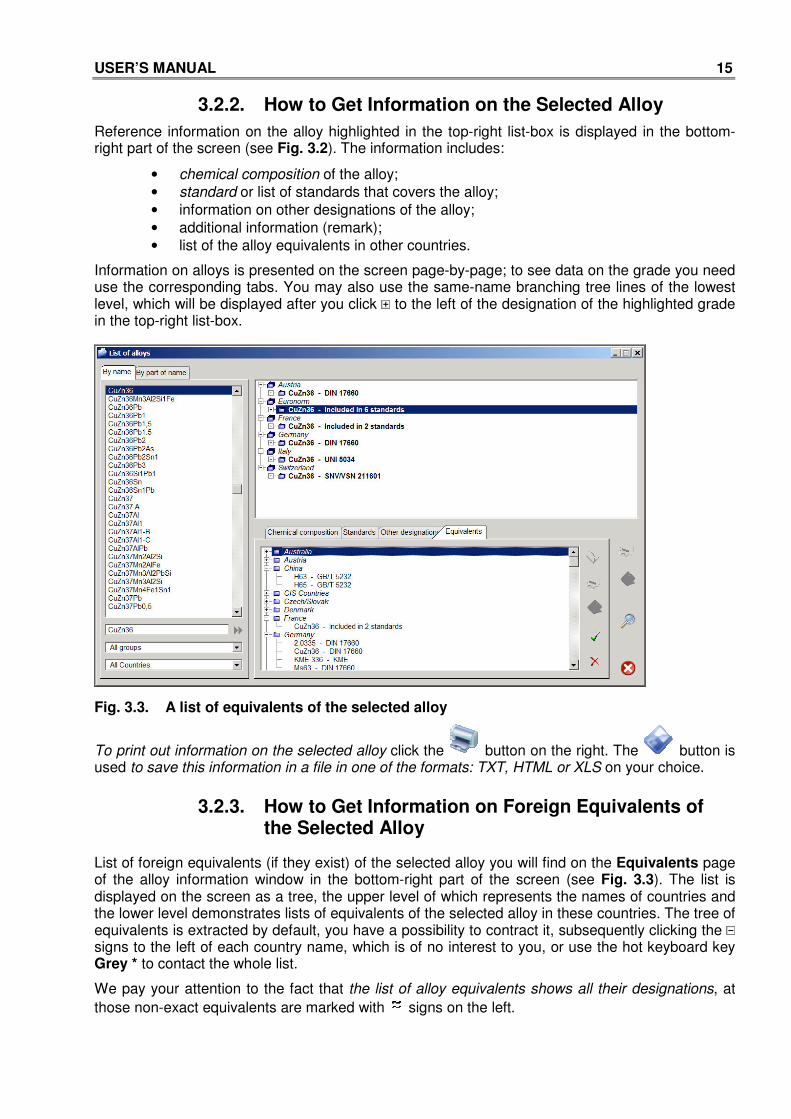
3.2.2. How to Get Information on the Selected Alloy
Reference information on the alloy highlighted in the top-right list-box is displayed in the bottom-right part of the screen (see Fig. 3.2). The information includes:
• chemical composition of the alloy;
• standard or list of standards that covers the alloy;
• information on other designations of the alloy;
• additional information (remark);
• list of the alloy equivalents in other countries.
Information on alloys is presented on the screen page-by-page; to see data on the grade you need use the corresponding tabs. You may also use the same-name branching tree lines of the lowest level, which will be displayed after you click to the left of the designation of the highlighted grade in the top-right list-box.
Fig. 3.3. A list of equivalents of the selected alloy
To print out information on the selected alloy click the button on the right. The button is used to save this information in a file in one of the formats: TXT, HTML or XLS on your choice.
3.2.3. How to Get Information on Foreign Equivalents of the Selected Alloy
List of foreign equivalents (if they exist) of the selected alloy you will find on the Equivalents page of the alloy information window in the bottom-right part of the screen (see Fig. 3.3). The list is displayed on the screen as a tree, the upper level of which represents the names of countries and the lower level demonstrates lists of equivalents of the selected alloy in these countries. The tree of equivalents is extracted by default, you have a possibility to contract it, subsequently clicking the signs to the left of each country name, which is of no interest to you, or use the hot keyboard key Grey * to contact the whole list.
We pay your attention to the fact that the list of alloy equivalents shows all their designations, at
those non-exact equivalents are marked with signs on the left.

16 WinAlloy 7 software
The button at the right of the list of equivalents is used to get comparative information on the required alloy and its highlighted equivalent. This information is displayed in a separate window (see Fig. 3.4). Information on the sample alloy is located in the upper part of this window, and information on the highlighted equivalent is in its lower part.
Besides the table form you have a possibility to compare alloys compositions in a graphical form
also. For this purpose click the button at the right.
Those equivalents in the list-box (see Fig. 3.3), which are of interest to you, may be selected by
clicking the button. At that the selected equivalent becomes bold. To remove the selection
use the button. These operations can be also done with the help of keyboard hot keys Grey + (selects the equivalent) and Grey - (cancels selection).
Fig. 3.4. Comparison of alloys
To print comparative information on the required alloy and its equivalents click the button. When you click the button the pop-up menu will appear. Use one of its items to print out information on the highlighted equivalent only or on all bold selected equivalents.
The button is used to save comparative information about the alloy and its equivalents in a file of one of the following formats of your choice: TXT, HTML or XLS. For saving of the information the same rules as for printing are applied.
If the required alloy has no equivalents the software will offer you to find close grades by
comparison of chemical compositions. Click the button at the right if you want to use this type of search.

USER’S MANUAL 17
3.2.4. Search by Comparison of Chemical Compositions
The search by comparison of chemical compositions can be conducted in Automatic or Expert mode.
Automatic Mode
The Automatic mode is selected by default; this type of search is based on a special algorithm, developed by the authors. All chemical elements, which compose the chemistry of the selected alloy, participate in the search. The list of the elements in tree form and their content values you can see in the central part of the window (Fig. 3.5).
Fig. 3.5. The search by comparison of compositions. The Automatic mode
The search by comparison of chemical compositions can be conducted throughout the total software database or among the alloys of the selected country. To select the country use the corresponding string at the bottom of the tree of elements.
To start the search, click the button.
Expert Mode
Use the button at the right (see Fig. 3.5) to select the Expert search mode. On clicking the button window with the alloy composition will be expanded (Fig. 3.6), and you will see parameters of the search setup for the first element in the list. This is an element, which content is marked in the alloy composition as "Rest" (in the most cases this element is a base of the alloy).
The Expert mode assumes that you setup the search parameters individually for each element. At that the search may be executed not only by the elements, included in the alloy composition (they are located in the upper part of the tree of elements) but by additional elements from the lower part of the tree also.

18 WinAlloy 7 software
During the search by comparison of chemical compositions in the Expert mode you may select the individual mode of processing for each element, using the corresponding radio buttons, i.e.
• the search may be performed by the Range of content of an element in the alloy composition;
• an element can be considered as base of alloy - Rest;
• an element can be considered as Admixture during the search.
Fig. 3.6. The search by comparison of compositions. The Expert mode.
Notice that content of elements marked as Rest is taken up as 30 - 100% during the search by comparison of chemical compositions, irrespective of contents of other elements in the alloy composition.
The processing algorithm for elements marked as Admixtures during the search consists in the following. The correspondence between the contents of such elements is considered to be established, if
• the said element is absent in the sample alloy or an equivalent
or
• its content fits into the range 0 - x%, where x is the upper limit that can be set by a User.
On default the upper limit of the admixture content is equal to 1.0%. It should be noted that the left 0 is obligatory in this case. Therefore elements with content e.g. < 0.3%, are considered as admixtures during the search, but elements with content of 0.1 - 0.3% are not.
Only one element, which is marked as Rest, is included in the search by default. To include other elements in the search it is necessary:
• to highlight the required element in the composition tree;
• to select the mode of its processing (Search by range, Base - Rest or Admixture);
• if necessary, to correct the element content range in the alloy and/or additional search settings;
• to click the Input button at the bottom to save individual settings for the element.

USER’S MANUAL 19
After the element has been selected for the search, the sign will be displayed to the left of its designation, and the element will be moved to the upper part of the tree.
You can exclude from the search the pre-included elements in the following way:
• the required element is highlighted in the composition tree;
• the Exclude from the search radio button is selected;
• the Input button is clicked to save changes made.
The element, excluded from the search, can be kept by your choice in the upper part of the tree or moved to its lower part. The show in the upper tree check box is used for this selection.
Additional settings
In selection of individual setting for an element you will be also able to make changes in the general settings, used in the search algorithm, namely:
• to correct values of coincidence and discrepancy of ranges;
• to adjust minimum and maximum contents respectively for elements presented as El ≤ ≤ ≤ ≤ х% or
El ≥ ≥ ≥ ≥ x% in the composition,
• to change the upper limit admixture content in alloy.
Fig. 3.7. Values of coincidence and discrepancy of ranges
Values of coincidence and discrepancy of ranges are used for the tightening of search conditions. There are two such values (see Fig. 3.7):
• the first of them (marked with 1 in the picture) defines minimum possible percentage of ranges coincidence,
• the second one (marked with 2) – maximum admissible percentage of ranges discrepancy.
The both above values are calculated from an element content in the sample alloy (the indicated range is taken as 100%) and can be corrected by a User. By default the value of coincidence of ranges is taken as equal to 50%, and the value of discrepancy of ranges is taken as 200%.
To process during the search contents of elements, presented in alloy compositions as
El ≤ ≤ ≤ ≤ х% or El ≥ ≥ ≥ ≥ x%, the following algorithm is used:
1. For elements whose content in alloy is entered as El ≤≤≤≤ x%, their maximum value is assumed to be equal to x%, and minimum value is a * x%, where a is a ratio that can be changed by a User. By default, it is equal to 0.5.
2. For elements whose content in alloy is entered as El ≥≥≥≥ x%, their minimum value is assumed to be equal to x%, and maximum value is b * x%, but less than 100%. Here also, b is a ratio that can be corrected by a User. By default, it is equal to 1.5.

20 WinAlloy 7 software
We would like to note, that the above ratios (a and b) are input in the software in percent. By default the a coefficient, which is equal to 0.5, corresponds to the value 50% = 0.5 * 100%, and the b coefficient, which is equal to 1.5, corresponds to the value 150% = 1.5 * 100%.
Thus, depending on the selected processing mode, you will be able to make the following corrections of element processing settings.
If the “Search by range” mode is selected
In this mode you are able:
• to correct the range of content of the element in alloy – done in the upper part of the window (from and to fields are used);
• to input values of coincidence and discrepancy of ranges, which differ from the standard ones – the possibility becomes accessible when you click the Additional parameters check box;
• to change minimum and maximum values for the elements, presented in alloy composition as
El ≤ ≤ ≤ ≤ х% or El ≥ ≥ ≥ ≥ x%, – you can use the Deviation for no less case and Deviation for no more case fields respectively.
If the “Base” mode is selected
In this mode you will have an opportunity to correct minimum and maximum content values for the
elements, presented in alloy composition as El ≤ ≤ ≤ ≤ х% or El ≥ ≥ ≥ ≥ x%.
If the “Admixture” mode is selected
For the elements, which are marked as admixtures, the software gives an opportunity to correct the upper limit of their content in alloy. The Admixture content, no more field is used for this purpose.
If during the setup process you corrected ranges of elements content in the alloy, we advise you to
save the changed composition by clicking the button to the right of the composition tree. The
button is used to restore the pre-saved composition.
The search in the Expert mode as well as in the Automatic mode can be conducted throughout the total software database or among the alloys of the selected country. To select the country use the corresponding string at the bottom of the tree of elements.
The search starts by clicking the button. After its completion you will be able to look through results of the search and return to this procedure with the aim of correcting the search parameters, if you are not satisfied with the search results.
Results of the search by comparison of chemical compositions
List of the equivalents, found in result of the search, is presented in the list-box in the left part of the screen in tree form. The upper level of the tree shows the names of countries, and the lower one demonstrates found equivalents in these countries. By default the tree of equivalents is expanded; however you have a possibility to contract it by step-by-step clicking of the signs to the left of the names of countries, which are of no interest to you. The right part of the screen will represent you comparative information on the alloy, which equivalent you have searched for and it’s highlighted in the left list-box equivalent. Using the corresponding tabs you will be able to compare the following data on the alloys:

USER’S MANUAL 21
• their chemical compositions;
• lists of standards, that cover the sample alloy and its highlighted equivalent;
• information on other designations of the alloys;
• additional information on the alloys (remark).
Besides the table form you have a possibility to compare compositions of the alloys in a graphic
form also. To call the procedure of creating of comparative histograms you should click the button located at the right.
Those equivalents in the list-box, which are of interest to you, may be selected by clicking the
button. At that the selected equivalent becomes bold. To remove the selection use the button. These operations can be also done with the help of keyboard hot keys Grey + (selects the equivalent) and Grey - (cancels selection).
Fig. 3.8. Search results by comparison of chemical compositions
To print comparative information on the required alloy and its equivalents click the button. When you click the button the pop-up menu will appear. Use one of its items to print out information on the highlighted equivalent only or on all bold selected equivalents.
The button is used to save comparative information about the alloy and its equivalents in a file of one of the following formats of your choice: TXT, HTML or XLS. For saving of the information the same rules as for printing are applied.
In case the results of the search are of no satisfaction to you, you can return to the procedure of
setup of search parameters with the aim of their correction by clicking the button.
To cancel the search, use the button.

22 WinAlloy 7 software
3.3. Operation with List of Standards
3.3.1. How to Find the Required Standard in the Database
To obtain information about standards, which are referenced in the software database and alloys
covered by them, you need to click the button at the left.
List of all standards, which are referenced in the software database you’ll see in the left list-box (see Fig. 3.9). The standards in the list are in the alphabetical order. By default the list-box includes numbers and designations of all national and international standards, which are referenced in the software database.
Fig. 3.9. List of standards
If desired you may leave in the list-box standards of the required country only. To select the country you need, use the Country string, located in the bottom part of the list-box.
To search for the required standard in the database it is most convenient to use locator. At that the full name of the highlighted standard you’ll find on the top-right part of the window.
3.3.2. How to Find an Alloy in the Standard and Get Information about It
List of alloys, included in the highlighted standard will be displayed in the middle-right list-box under the name of the standard. At that in the bottom-right part of the window you’ll see information about the highlighted in this list-box alloy. We would like to remind that the information includes:
• chemical composition of the alloy;
• standard or list of standards that covers the alloy;
• information on other designations of the alloy;

USER’S MANUAL 23
• additional information (remark);
• list of the alloy equivalents in other countries.
Information on alloys is presented on the screen page-by-page; to see data on the grade you need use the corresponding tabs. You may also use the same-name branching tree lines of the lowest level, which will be displayed after you click to the left of the designation of the highlighted alloy in the middle-right list-box.
To print out information on the selected alloy, click the button on the right. The button is used to save this information in a file in one of the formats: TXT, HTML or XLS on your choice.
List of foreign equivalents of the selected alloy you will find on the Equivalents page of the alloy information window. The list is displayed on the screen as a tree, the upper level of which represents the names of countries and the lower level demonstrates lists of equivalents of the selected alloy in these countries. The tree of equivalents is extracted by default, you have a possibility to contract it, subsequently clicking the signs to the left of each country name, which is of no interest to you, or use the hot keyboard key Grey * to contact the whole list.
The button at the right is used to get comparative information on the required alloy and its highlighted equivalent. We would like to remind that the comparison can be done both in the table and in the graphic form.
The button is used to select equivalents of interest in the list-box. At that the selected
equivalent becomes bold. To remove the selection, use the button. These operations can be also done with the help of keyboard hot keys Grey + (selects the equivalent) and Grey - (cancels selection).
To print comparative information on the required alloy and its equivalents click the button.
The button is used to save this information in a file of TXT, HTML or XLS format. At that you have opportunity to print or save information on one highlighted equivalent only or on all bold-selected equivalents.
In case, when the required alloy doesn’t have exact equivalents, the button will enable you to find close grades by comparison of chemical compositions. We would like to remind that this search can be conducted both in the Automatic and Expert modes.
The Automatic mode is selected by default; this type of search is based on a special algorithm, developed by the authors. All chemical elements, which compose the chemistry of the selected alloy, participate in the search.
The Expert mode assumes that you setup the search parameters individually for each element. At that you can select the individual mode of processing for each element, i.e.
• the search may be performed by the Range of content of an element in the alloy composition;
• an element can be considered as base of alloy - Rest;
• an element can be considered as Admixture during the search.
The details of the search by comparison of chemical compositions are described by us above in Section 3.2.4.

24 WinAlloy 7 software
3.4. Search by Chemical Composition
The search for an alloy by the known chemical composition consists in the following: you know chemical composition of alloy and you want to find out its designation. During the search grades with the same or similar compositions are selected in the whole database or among the grades of any country.
3.4.1. The Search Setup
To call the search setup procedure the button on the left panel is used.
List of chemical elements, which can compose chemistry of an alloy you are searching for, is located in the left part of the window (Fig. 3.10); at that individual setup parameters for the highlighted chemical element are displayed at the right.
Fig. 3.10. Search by chemical composition. Setup
The search by the chemical composition is based on the same principles as the search by alloy grade by comparison of chemical compositions (see 3.2.4). The only difference is that you should enter the chemical composition of the sample alloy from the keyboard.
To include an element in the search it is necessary to do the following:
• to highlight the required element in the list (composition tree);
• to select the mode of its processing (Search by range, Base - Rest or Admixture);
• to input minimum and maximum values of the element content in the alloy (for elements marked as Rest and Admixture it is not required);
• if necessary, to correct additional search settings for the element;
• to click the Input button at the bottom to save individual settings for the element.
After the element has been selected for the search, the sign will be displayed to the left of its designation, and the element will be moved to the upper part of the tree.

USER’S MANUAL 25
You can exclude from the search the pre-included elements in the following way:
• the required element is highlighted in the composition tree;
• the Exclude from the search radio button is selected;
• the Input button is clicked to save changes made.
The element, excluded from the search, can be kept by your choice in the upper part of the tree or moved to its lower part. The show in the upper tree check box is used for this selection.
Additional settings
In selection of individual setting for an element you will be also able to make changes in the general settings, used in the search algorithm, namely:
• to correct values of coincidence and discrepancy of ranges;
• to adjust minimum and maximum contents respectively for elements presented as El ≤ ≤ ≤ ≤ х% or
El ≥ ≥ ≥ ≥ x% in the composition,
• to change the upper limit admixture content in alloy.
The said parameters are completely identical to the corresponding parameters used in the search by comparison of chemical compositions and are described in detail on Pages 19 - 20.
Thus, depending on the selected processing mode, you will be able to make the following corrections of element processing settings.
If the “Search by range” mode is selected
In this mode you are able:
• to input values of coincidence and discrepancy of ranges, which differ from the standard ones – the possibility becomes accessible when you click the Additional parameters check box;
• to change minimum and maximum values for the elements, presented in alloy composition as
El ≤ ≤ ≤ ≤ х% or El ≥ ≥ ≥ ≥ x%, – you can use the Deviation for no less case and Deviation for no more case fields respectively.
If the “Base” mode is selected
In this mode you will have an opportunity to correct minimum and maximum content values for the
elements, presented in alloy composition as El ≤ ≤ ≤ ≤ х% or El ≥ ≥ ≥ ≥ x%.
If the “Admixture” mode is selected
For the elements, which are marked as admixtures, the software gives an opportunity to correct the upper limit of their content in alloy. The Admixture content, no more field is used for this purpose.
We advise you to save input composition by clicking the button to the right of the composition tree. This will enable you to easily restore the initial composition in case, if you make any changes
in it during the search setup. To restore the pre-saved composition the button is used.
The search by chemical composition can be conducted throughout the total software database or among the alloys of the selected country. To select the country use the corresponding string at the bottom of the tree of elements.

26 WinAlloy 7 software
The search starts by clicking the button. After its completion you will be able to look through results of the search and return to this procedure with the aim of correcting the search parameters, if you are not satisfied with the search results.
3.4.2. Search Results
List of the alloys, found in result of the search, is presented in the list-box in the left part of the screen in tree form (Fig 3.11). The upper level of the tree shows the names of countries, and the lower one demonstrates found grades in these countries. By default the tree of equivalents is expanded; however you have a possibility to contract it by step-by-step clicking of the signs to the left of the names of countries, which are of no interest to you.
Fig. 3.11. The search by chemical composition. Results
In the right part of the screen you can compare the chemical composition you have input with the chemical composition of the highlighted alloy. In addition using the corresponding tabs you will be able to know the following information on the highlighted alloy, i.e.:
• lists of standards, that covers the alloy;
• information on other designations of the alloy;
• additional information on the alloy (remark).
Besides the table form you have a possibility to compare composition you have input with composition of the highlighted alloy in a graphic form also. To call the procedure of creating of
comparative histograms you should click the button located at the right.
Those alloys in the list-box, which are of interest to you, may be selected by clicking the
button. At that the selected grade becomes bold. To remove the selection, use the button. These operations can be also done with the help of keyboard hot keys Grey + (selects an alloy) and Grey - (cancels selection).

USER’S MANUAL 27
To print comparative information on the composition you have input and compositions of the alloys
of your interest click the button. When you click the button the pop-up menu will appear. Use one of its items to print out information on the highlighted alloy only or on all bold selected alloys.
The button is used for saving comparative information on the input composition and compositions of the found alloys in one of the following formats of your choice: TXT, HTML or XLS. For saving of the information the same rules as for printing are applied.
In case the results of the search are of no satisfaction to you, you can return to the procedure of
setup of search parameters with the aim of their correction by clicking the button.
To cancel the search, use the button.

28 WinAlloy 7 software
COPYRIGHT 1992 - 2011 Quantor-Soft Metal Ltd. All rights reserved Authors: Victor N. Gudkov, Igor M. Gubin
Phone / fax: (+7 495) 989 70 21
Office: Ostapovsky proezd 3, build. 26, Moscow, Russia
Post Address: Quantor-Soft Metal, 235-2, Zelenograd, 124498 Moscow, Russia
E-mail: [email protected]
WWW: http://www.metaldata.info