Embed Size (px)
Citation preview
WILSONART® QUARTZ FABRICATION AND INSTALLATION GUIDELINES
QZ0200 – 8/2015 Rev. 01 Copyright Wilsonart, LLC.
CONTENTS
CHAPTER I Product Information 2
CHAPTER II General Safety 3
CHAPTER III Material Handling 4
CHAPTER IV Inspection 6
CHAPTER V Tooling 7
CHAPTER VI Adhesives 8
CHAPTER VII Countertop Layout & Measuring 9
CHAPTER VIII Fabrication 10
CHAPTER IX Commercial Hot/Cold Well Cutouts 14
CHAPTER X Backsplash 15
CHAPTER XI Finishing 16
CHAPTER XII Installation 17
CHAPTER XIII Care & Maintenance 19
CHAPTER XIV Wall Cladding 20
CHAPTER XV Translucent / Back-Lighting 21
2
PRODUCT INFORMATION
Wilsonart® Quartz is manufactured with high quality natural quartz stone, high performance polymer resin binders, and proprietary coloring agents that are homogeneous, with uniform color throughout their thickness.
BASIC LIMITATIONS
Wilsonart® Quartz is designed for interior use only, ideal for residential and commercial applications. Wilsonart® Quartz is a solid, non-porous, highly durable surface and resistant to scratching, staining, and water absorption and is virtually maintenance free.
COLORS AND FINISHES Wilsonart Quartz is a surfacing product made mostly of natural quartz materials available in a polished finish. It is important to remember that variation in the natural stones that makes up Wilsonart Quartz is to be expected and are not considered to be defects. This includes variations in shade, shape, size, color and pattern of quartz aggregate within each design. Equally important is that these variations will have no impact on product performance.
Wilsonart Quartz comes in many types of designs. These designs require a random distribution of quartz throughout the slab to achieve the desired looks. The nature of random distribution is such that sometimes particles may over congregate in one area and under congregate in another. This is normal and to be expected from a natural product like quartz.
In addition to distribution of quartz particulate, there is potential for variation of random distribution of color in a slab. This is also normal and to be expected from a natural product like quartz
Samples are very small select cuts from a slab. They do not represent all the attributes of a design and cannot be fully representative of any final installation. If there is any concern of a difference between sample and slab, a full slab should be inspected to fully visualize a design.
Slabs should always be inspected for visual capability before fabrication. If there is any question about the suitableness of a slab, action such as exchange must be taken before any part of the slab has been fabricated or responsibility for repair or replacement will fall solely on the purchaser of the slab.
For detailed information on physical or visual properties of Wilsonart Quartz, please refer to the “Technical Data Sheet” available at www.wilsonart.com or click here.
3
GENERAL SAFETYSafety is a critical concern for any shop and key to a successful business. The following safety rules should be incorporated into your safety program to help prevent an accident. Safety training, knowledge, product use and environment are the responsibility of the facility owner and the shop employees.
SAFELY GUIDELINES
• Dust mask must be worn at all times and always follow U.S. regulations for proper ventilation – Wilsonart Quartz dust contains silica which can be hazardous to one’s health. Always shape and cut material with wet tools, reducing the amount of airborne particles to be inhaled
PROTECTIVE WEAR
• Wearing an approved face mask is recommended when fabricating Wilsonart Quartz. Wilsonart Quartz dust contains silica, which is dangerous when inhaled. Always cut and polish Wilsonart Quartz with wet diamond tools and take appropriate measures to provide efficient ventilation in the work area
CAUTION:• Read Wilsonart Quartz Installation Guide carefully before fabricating or installing Wilsonart Quartz• Refer to Wilsonart Quartz SDS sheet at www.wilsonart.com or click here for detailed information
regarding material composition, precautions and other critical safety information before handling or fabricating Wilsonart Quartz
• Always use safety glasses or approved eye protection and/or face shield, ear/noise protectors, and protective work gloves
• Dust mask must be worn at all times and always follow U.S. Regulations for proper ventilation• Wet fabrication process must be used when cutting, routing, and finishing Wilsonart Quartz. Tools should
be used with wet fabrication processes at all times• Always use safety toe work shoes• Always follow product, equipment and/or tool manufacturer’s recommendations and instructions
carefully. Please refer to detailed tooling section on page 7• Keep all guards in place and in working order• Insure all tools are properly grounded, don’t use tools in dangerous environments. Never remove the
third prong and be cautious with tools exposed to water and moisture• Keep work area clean, uncluttered and well lit• Use proper power tools designed for a damp or wet work area. Follow tool manufacturer’s operating
guidelines• Keep visitors at a safe distance from the work area at all times when fabricating Wilsonart Quartz• Use the right tools. Don’t force a tool or attachment to do a job it was not designed to perform• Wear the proper apparel, no loose clothing or jewelry• Maintain tools in top condition. Disconnect tools before servicing and when changing accessories such
as blades, bits, cutters, etc…• Secure all material with the proper clamp or vise to a stable work surface• Don’t overreach. Keep proper footing and balance at all times• Keep and use denatured alcohol, adhesives and materials in a safe, ventilated place
HAZARDS IDENTIFICATION:
Potential Health Effects Include• Acute Eye: Product in finished form does not present a health hazard via this route of entry. Dust and
flying particles generated during cutting, grinding and forming may cause irritation and injury• Acute Skin: Dust generated from this product may cause skin irritation• Acute Inhalation: Dust from product may cause irritation to respiratory tract, nose, throat and lungs. • Acute Ingestion: Not considered a potential health hazard via this route of entry. This product may cause
gastrointestinal irritation if dust is swallowed.• Chronic exposure: The adverse health effects from crystalline silica exposure – silicosis, cancer,
scleroderma, tuberculosis, and nephrotoxicity are chronic conditions• Aggravation of Pre-existing Conditions Not Determined
4
MATERIAL HANDLING
While storing and handling Wilsonart Quartz please insure the following recommendations and procedures are followed.
• Inspect slab boom and lift prior to use to ensure the safe operation of equipment• Have two operators to ensure optimal safe handling of slabs: - One operator will operate the forklift and one operator managing the slab movement• Wear proper personal protective equipment (PPE) at all times• Slabs are very heavy and awkward to handle. When moving a slab, avoid lifting the slab higher
than necessary• Be aware of the “fall shadow”, defined as the area on both sides of the slab where the slab could
land and topple if it were to fall• Always stand in a position out of the fall shadow and away from any position where the slab could
potentially fall which includes directly under, in front of, or between slabs• Keep hands away from moving slabs to avoid crushing injuries• Use safety wedge when separating slabs from A-frame
A-FRAMES AND SLABS
• A-Frames used for storage or transport must be constructed in such a way to have sufficient strength and capacity to handle up to 7500 lbs. maximum (10 slabs of 3cm or 16 slabs of 2cm)
• For day to day handling, it is recommended to only put a maximum of 6 slabs of 3cm or 8 slabs of 2cm on any single A-Frame
• The number of slabs on either side of the A-frame should be balanced to make the A-frame more stable
• Slabs should be kept flat against each other with no gaps to prevent sagging. Slabs should always be strapped onto A-Frames to prevent flexing
• A-frames are intended to be moved only when slabs are secured to the A-frame. Secure the slabs to the A-frame with banding/straps. Never attempt to move an A-frame that is not banded/ strapped
• Slabs should not be stored on A-frames without banding or strapping the slabs to the A-frame• Place individual slabs face-to-face and back-to-back to avoid damaging the face of the material• The A-frame should be protected from any impact that may tip a slab or the entire A-frame• Proper hoist equipment, forklift and lifting device/clasp/sling straps capable of lifting a minimum
of 2000 lbs. (900kg)• Wilsonart Quartz recommends handling slab singularly, if handling multiples of two be sure to
follow handling equipment guidelines• All racking should have protective covering between the racks and the slabs• There should be no more than 20 slabs on each inventory rack• It is recommended to keep the outside slab on each rack with backside facing out to prevent
prolonged exposure to the sun• Straps should be taken care of and protected always from being damaged or cut by the edge of
the slab. Always protect slab(s) from possible strap damage or frame/rack damage• Secure slabs and take caution when loading and unloading material outdoors, pay attention to
weather conditions; wind, rain, etc… Wilsonart Quartz should not be loaded and unloaded in rain or when wet
5
TRANSPORTING
• Do not transport Wilsonart Quartz slabs horizontally• Always use proper A-Frames for transporting Wilsonart Quartz slabs• Horizontal storage, handling, and transport can put stress on material and cause breakage• It is the responsibility of the driver to insure the load is within legal requirements and
capacity of the vehicle• It is the responsibility of the driver to insure the load is fully supported and safely secured
to the vehicle• Carts and dollies should be used when transporting slab around the shop• Straps and/or clamps should always be used when transporting slabs on A-frames, carts or
dollies• Make certain A-frame and slabs are secure to avoid any shifting that may occur during
transit
STORAGE
• Slabs should always be stored vertically on a 105°/slight angle with secure poles on both sides of slabs
• A-frames are intended to be moved only when slabs are secured to the A-frame. Secure the slabs to the A-frame with banding/straps. Never attempt to move an A-frame that is not banded/strapped
• Slabs should not be stored on A-frames without banding or strapping the slabs to the A-frame
• The A-frame should be protected from any impact that may tip a slab or the entire A-frame• The number of slabs on either side of the A-frame should be balanced to make the A-frame
more stable
MATERIAL HANDLING
6
Every effort has been made to supply high quality materials, free of defects. However, you the fabricator must always conduct a final inspection of a slab for correct pattern/color, transportation damage and/or manufacturing defects to continue the quality process prior to fabrication.
Fabricator is responsible and has discretion for identifying any pattern discrepancies, slab dimension tolerances, warpage, and/or any other defects that deems the slab unacceptable. If deemed unacceptable, contact your local Wilsonart Quartz sales representative for complete guidance on return policy. Once a slab is cut or machined in any method, that slab cannot be exchanged.
EXAMPLES:
• Slab to slab color consistency, slight color variations are inherent of the manufacturing process
• Color consistency within the slab• Wilsonart Quartz pattern/color irregularities - Resin pooling or blotch look - Pitting/Voids - Surface Imperfections• Wilsonart Quartz labels containing slab information are adhered to edge of slab(s)• Wilsonart requires the homeowner to register product on Wilsonart Quartz website
and/or provide proof of purchase to validate the 10 – year limited warranty
INSPECTION
TOOLING
7
The following suggested tool list is only a minimum requirement for professional and successful Wilsonart Quartz fabrication and installation.
Various hard surface fabrication tools and equipment are available in the market today. Wilsonart recommends wet fabrication to minimize airborne dust, ensure quality and safe fabrication, and a quality installed application.
STATIONARY TOOLS
• Bridge Saws• Water Jet • CNC• Automated Profiler• A-frame & Storage Racks• Tilt/Lift Tables
BASIC TOOLS
• Air Compressor• C-clamps / bar clamps• Circular saw• Circular Miter saw• Core Bits• Diamond Contour Blades• Diamond Grinding Wheels & Polishing Pads• Edge Profile Machine (wet)• Edge Polisher• Fabrication Stands• 4” – 5” Variable Speed Grinder (2,000 – 11,000 rpm)• Heavy-duty Carts and Dollies• Heavy-duty Drill• Seaming Clamps – Parallign Gorilla Grips or equivalent
For specific fabrication and installation equipment, tooling, and other support materials, please contact the Wilsonart Technical and Fabrication Services Group at 1-800-433-3222.
8
Wilsonart Quartz recommends the use of polyester resin knife grade adhesive as well as Wilsonart Hard Surface Adhesive. Always follow the individual manufacturer’s recommendations and instructions carefully.
Warning: Wilsonart Hard Surface seam kit contains the following hazardous ingredients: Methyl Methacrylate, Benzoyl Peroxide, and Dibutyl Pathlate.
CAUTION:• Avoid prolonged breathing of vapors • Use only in a well ventilated area • Keep out of reach of children • Eye protection is always recommended • Motors and other equipment used in the fabrication and installation process must be UL
labeled explosion proof
For further information refer to Wilsonart Hard Surface Adhesive Material Safety Data Sheet available on request. Contact your local distributor or call 1-800-433-3222 for immediate response to a question concerning Wilsonart Hard Surface Adhesive.
ADHESIVES
9
LAYOUT & MEASURING
Wilsonart recommends precise and detailed pre-fabrication measuring and templating to be conducted on site and is essential for an efficient and quality Wilsonart Quartz application. Digital measuring and templating is highly recommended, other methods such as luan strips, cardboard and job drawings can also be utilized. Job drawings with specific job information is important and supports actual template, the following is detailed information that should be noted during measuring and templating:
• 2cm or 3cm product• Design selection/color• Finished or Unfinished Edges• Profile option(s) at all edge locations• Width of stacked edge to accommodate cabinet support and edge profile (2cm)• Overhangs and distance of overhang• Outside corners – identify if larger radius is required• Inside corners – square (two piece seam) or if radius required (offset seam minimum 1”
(25.4mm)• Seam location – recommend 3” (76.2mm) away from dishwasher, cooktops and
minimum 1” (25.4mm) from inside corners• Sink location (undermount/drop-in) – Use both 100% silicone and clips to secure• Appliance locations – dishwasher, refrigerator, cooktop/range (type), etc...• Backsplash – dimensions, profile, finished edges, cutout location, etc...• Faucet/Plumbing locations• Web supports/Build-up required or not• Identify high strength support areas – seam locations, appliance locations (support
required on 3 sides of opening and within 3” (76.2mm). Additional support is required on spans of 36” (914.4mm) or greater
Detailed information is recommended to be identified on job drawings and can be used with digital template and/or physical template, but information may also be scribed on the actual template or digital file itself.
10
QUICK FABRICATION DO’S & DON’TS
• Fabricator is responsible and must inspect slab(s) to identify any pattern discrepancies, slab dimension tolerances, warpage, and/or any other defects that deems the slab unacceptable
• Once a slab is cut or machined in any method, that slab cannot be exchanged• Do not alter or change the original factory finish by re-polishing, honing, or sealing Wilsonart
Quartz material• Always use cool water during cutting, drilling, profiling, and polishing Wilsonart Quartz• Do not cut square corners. Always apply radius corners using a core bit• Minimum ¼” (6.35mm) radius is required at all inside corners of cutouts• Seamed corners are not required to have a radius• Corners fabricated from a single slab must have a minimum ¼” (6.35mm) radius, a larger
radius is better• All edges should be machined smooth and free of sharp corners and kerf marks which result
in stress points• Do not use lacquer thinner, acetone or other solvents on Wilsonart Quartz material• Colored or printed towels can leave a residue which will contaminate the seam material and
cause a weak or stained bond line
CUTTING
• First cut should always be along the longest part of the slab and then the shortest part of the slab
- No plunge cutting - Relief cut should be performed• Wilsonart Quartz should always be kept cool with enough water while using the appropriate
diamond tooling or high pressure cutting jets• Double cutting, first cutting the material to half the thickness of the slab can be used with
thick slabs and slightly warped slabs• Cuts should never cross in the corners; this will introduce stress into the area and cause
breakage later in the process, installation, or during the application• Do not cut square corners. Always apply radius corners using a core bit• All internal cutout corners must have a minimum ¼” (6.35mm) radius• Corners fabricated from a single slab must have a minimum 1/16” (1.58mm) radius• Top and bottom of edge profiles and cutouts are recommended to have a minimum 1/16”
(1.58mm) radius or chamfer• Always avoid creating excessive heat when cutting cutouts
FABRICATION

11
FABRICATION
SEAMS
• Seams are NOT recommended over the dishwasher area, if a seam must go over dishwasher area a full underlayment is mandatory to support area 1/8” (3.175mm) gap on both sides of dishwasher area in substrate underlayment must be present and separate area from the rest of the substrate and/or web underlayment
• Cut/fabricate both edges to be seamed in order to achieve a minimal visible seam. Factory edges are not recommended to be seamed
• Notches or grinder grooves along the edge of slab parts or laminated edges to be seamed may be used to enhance adhesion
• Always dry fit your seams, they should fit tightly, be level across and lengthwise of the seam from front to back and across. Shimming may be required at seam area as well as other areas of the countertop in order to level the seam area
• Prepare clamping materials, quality vacuum seam clamping systems are recommended to provide a quality seam, (Parallign Gorilla Seam Grips).
• Verify a level seam by running utility knife blade edge across the seam area, adjust accordingly by making adjusts to the Parallign Gorilla Seam Grips and/or apply shims as needed. Be careful and insure miter seam and profile areas are level, flush and tight fitting
• Place a release material (such as clear packing tape) under the seam to prevent contamination of deck seam and cabinet
• Thoroughly clean areas to be seamed with denatured alcohol using clean white shop rag• Apply tape to face of Wilsonart Quartz at seam areas on both parts• Position slabs/cut parts to be seamed 3/16” (4.76mm) to 1/4” (6.35mm) apart• Prepare Wilsonart Hard Surface Seam kits and/or polyester knife grade adhesives.
Wilsonart recommends that fabricators always follow the individual adhesive manufacturer’s recommendations for the use of their adhesives with Wilsonart Quartz material
• Purge Wilsonart Hard Surface Adhesive cartridge & tip to ensure proper mixture of adhesive prior to using for seaming
• Mix polyester knife grade adhesive manually to proper color needed for job• Apply adhesive with Wilsonart seam kit cartridge system or putty knife for polyester knife
grade adhesive or use manufacturer’s recommendations. Recommend to apply adhesive to both sides of slab/parts
• Apply adhesive the entire length and thickness of the seam area• Slightly move the slabs/parts together leaving a slight gap and then allow clamping
system, (Parallign Gorilla Grips) to pull together by activating. Make sure there is adhesive squeeze out along entire seam
• It is also acceptable to clamp seam together using bar clamps• DO NOT OVERTIGHTEN clamps. Leave a slight gap, thickness of utility knife blade is
adequate. This will prevent from starving the seam of adhesive• Verify slabs/parts are level and seam is flush by using utility knife blade edge and make
adjustments to clamping system or slabs/parts. Also, verify front and back edges, miter areas, and profiles are level and flush
• Clamping system should be kept in place for a minimum of 30 minutes, until adhesive has hardened completely across the entire seam length, or per manufacturer’s recommendations
• Remove seam clamping system, only after adhesive has fully cured along the entire length of the seam
• Scrape/cut excess adhesive using a razor blade from the seam area per manufacturer’s recommendation. Always take care not to scratch material with razor blade; material is scratch resistant, not scratch proof

12
FABRICATION
• Be sure to remove adhesive residue with razor blade and then by wiping with denatured alcohol
• Based on visual appearance of seam, a topcoat of adhesive may be applied within the seam. Followed by repeating cure and removal procedures of seam adhesive
• Wilsonart Quartz seams should not exceed 1/16” (1.58mm) in width, 1/32” (0.79mm) is preferred and provides a preferred visual quality seam
• All seams must be reinforced with proper cabinet seam support affixed to the cabinet within 18” (457.2mm) on both sides of seam or with full underlayment material
• Do Not machine or polish seams to make them even or improve seam appearance• Properly clean all seam areas with denatured alcohol
EDGES
Three basic types of fabricating edge options:• Miter Edge Profiles
- Miter fold should be completed at true 45° angle for quality seam and to ensure maximum strength
- Improper machined 45° parts can increase edge seam visibility especially when larger profiles expose the seam area. Chipping of edges during profiling is also created from improper preparation of edge parts to be seamed
- Proper distribution of adhesive is important to visual quality and strength of seam
• Stacked Method Profile- Notches or grinder grooves along the edge and countertop slab to be seamed may be used to enhance adhesion- Proper distribution of adhesive is important to visual quality and strength of seam - Proper clamping is recommended every 3”- 4” (76.2mm - 101.6mm)
• Natural Edge Profile (using slab as self-edge)- Ease and polish the edge of the Wilsonart Quartz throughout the thickness of the slab- Improper cutting can lead to imperfections to the quality of the final edge
Blending of seam edges is very important• Ease and polish the edge of the Wilsonart Quartz throughout the thickness of the countertop• Being level and flush at seam areas is critical at the profile edge, inadequate seam
preparations can lead to imperfections in the final edge quality• Once adhesive is fully cured, blending and polishing of the edge profile may begin. Based on
quality of seam profile prep, will dictate the length and quality of blending process. Wilsonart requires a minimum of 12” (304.8mm) span of blending, approximately 6” (152.4mm) on each side of the seam profile location
• Follow finishing guidelines as noted in the Finishing section
13
FABRICATION
SINKS
Various types of sinks may be used with Wilsonart Quartz. Following are basic recommendations for sink installations with Wilsonart Quartz.
• Undermount sinks must be fastened to Wilsonart Quartz with both 100% silicone and sink fasteners/clips
• Additional support may be required, please follow sink manufacturer’s recommendations• Sink support systems, such as sink setters, rails, or cradles are approved and are
recommended, if required by sink manufacturer• Thoroughly clean areas to be adhered on sink and underside of Wilsonart Quartz with
denatured alcohol• Apply ample amount and consistent bead of 100% silicone to the flange of the sink rim to
be adhered• Clamp in place with adequate pressure and secure with properly spaced sink clips• Remove excess or residue of silicone immediately with denatured alcohol from sink and
Wilsonart Quartz
CUTOUTS
• All cutouts must have a minimum radius of ¼” (6.35mm). A larger radius is preferred• Do NOT cut square corners / Do NOT cross corners at corner locations of cutouts• Ease all cutout edges top and bottom to a minimum of 1/16” (1.58mm)• Allow a minimum of 1/8” (3.18mm) clearance on all sides of cutout between drop-in sinks,
cook-tops, hot wells, outlets, slide-in ranges, etc… and Wilsonart Quartz material• All cutouts require additional high strength web support within 3” (76.2mm), but no closer
than 1” (25.4mm) from the edge of the cutout under the Wilsonart Quartz countertop• Use of Wilsonart® 9 mil heat tape is recommended for any extreme heat conditions (see
commercial hot well for application of heat tape)
14
COMMERCIAL HOT/COLD WELL CUTOUTS
CUTOUTS
• The use of z-trim/mantle independent flanges, metal frame, angle iron, and/or square tubing is highly recommended around the perimeter of cutout areas. This will assist in extending heated appliances away from Wilsonart Quartz and minimizing the transfer of heat to the countertop
• Block up sneeze guard, rails, heat lamp post with wood-blocking, and allow for expansion and contraction. Seal area with 100% silicone
• For additional information and layout of sub-frame or cabinet for commercial applications, please contact Wilsonart Technical & Fabrication Group – 800-322-4333
• All cutouts must have a minimum ¼” (6.35mm) radius, 1½” - 2” (38.1mm - 50.8mm) or larger is preferred
• Minimum ½” (12.7mm) clearance/air space is recommended between Hot Well and Wilsonart Quartz
• Do NOT cut square corners / Do NOT cross corners at corner locations of cutouts• Ease all cutout edges top and bottom to a minimum of 1/16” (1.58mm)• Silicone seams are recommended, based on expansion and contraction between hot and cold
cutouts• Apply 1-layer Nomex® insulation tape and 2-layers Wilsonart® 9 mil heat reflective tape• Nomex® and heat tape must hang straight down and not be folded• Wilsonart 9 mil heat tape must extend past flange on top surface and be trimmed to the flange• Apply a third layer of Wilsonart 9 mil heat tape at all corners, extended out 3” (76.2mm) on
each side of corner• Additional layers of Nomex® may be used, if required• Wilsonart Quartz must be adhered with a continuous bead of 100% silicone to the high
strength support material around the perimeter of the cutout• Stainless flange must be adhered with a continuous bead of 100% silicone to Wilsonart Quartz• All cutouts require additional high strength web support within 3” (76.2mm), but no closer
than 1” (25.4mm) from the edge of the cutout under the Wilsonart Quartz countertop• All heat lamp frames, sneeze guard, railing or other appliance fixtures must be attached
to high strength sub frame or cabinet support structure independent of countertop and not directly to Wilsonart Quartz. Heat source such as heat lamps must be a minimum 18” (457.2mm) from Quartz Surface
• Minimum 1/8” (3.18mm) clearance around all frames or fasteners attached our pass through Wilsonart Quartz
• Contact Wilsonart Technical & Fabrication Group for additional support and information

15
BACKSPLASH
INSTALLATION
• Use 100% silicone to adhere cut strips and/or full height backsplash to countertop and wall• Apply continuous bead at bottom of backsplash, to be adhered to countertop surface• Apply continuous 1/8” (3.18mm) beads to backsplash horizontally at bottom, center, and top of
backsplash, for full height apply every 8” (203.2mm)• Dabs of hot melt adhesive can be used to secure backsplash to the wall while silicone cures• Do not hard seam backsplash to countertop• All cutouts must have a minimum ¼” (6.35mm)radius• Do NOT cut square corners / Do NOT cross corners at corner locations of cutouts• Apply 100% silicone around entire perimeter of cutouts on backside to adhere to wall • Make sure there is adequate glue squeeze out along entire seam - Check carefully for voids
16
FINISHING
POLISHING
• Dust mask must be worn at all times and fabrication facilities must follow U.S. regulations for proper ventilation
• Wet fabrication process must be used when cutting, routing, and finishing Wilsonart Quartz. Tools should be used with wet fabrication processes at all times
• Do not attempt to alter, change, or polish the original factory finish by re-polishing, honing, or sealing Wilsonart Quartz material. Wilsonart does not recommend attempting to remove scratches or other blemishes from the top surface, any attempt will void the warranty
• Always profile and polish edges with plenty of water to keep material surface cool• Adequate water usage will also reduce dust formation• Over polishing edges in excess of factory finish is not recommended• Always polish edges in sequence beginning with rough grinding then following with sequenced
finishing pads to the finest grit pads until the preferred finish is completed. The following are recommended polishing guidelines for Wilsonart Quartz:
- Polished Finish – 100, 200, 400, 500-800, 1500-2000, 2000-3000 grit diamond pads• Type of tools, pads, techniques, and sequences of pads can influence the quality of the finish• The use of water is always recommended in order to decrease possible over-heating of material• Wilsonart recommends using lower RPM on polishers, especially on higher grit diamond
polishing pads• Darker colors/designs will require more attention to obtain the desired final finish
17
INSTALLATION
RECOMMENDATIONS
• Cabinets and/or support framework must be level• Supports are required every 24” (609.6mm)• Certain unsupported areas are in need of stronger frame material, such as: - Inside corner cabinets - Lazy susans - Dishwasher - Sink base fronts - Desk - Any other areas cabinet is weaker• High strength support such as 2”X 4” may also be affixed to wall (i.e. lazy susan, desk, etc...)• Place high strength support at both sides of all cutouts and around entire perimeter, if
applicable• Place high strength supports no closer than 1” (25.4mm) and no further than 3” (76.2mm)
from sides of countertop• Supports must rest on cabinet or be affixed to cabinet base to alleviate flexing• Free standing or slide in rages must be installed a minimum of 1/16” (1.58mm) higher than
surface of countertop• Use only 100% Silicone in bead format approximately 1/8” (3.16mm) wide around the entire
perimeter of countertop to secure countertop to the cabinet or substrate - No construction mastic - Secure all inside and outside corners - Secure perimeters of cooktops, sinks, and outlet cutouts • If web support is required, Wilsonart recommends: medium density fiberboard (MDF),
plywood, hardboard, etc…• No mechanical fasteners should be used to fasten the countertop. Never screw, staple, or
nail into Wilsonart Quartz
FITTING THE COUNTERTOP
Provide minimum 1/8” (3.16mm) gap at all walls for every 12’ (3657.6mm) of countertop. • Maximum 1/16” (1.58mm) gap between countertop and wall can be visible
18
INSTALLATION
OVERHANGS
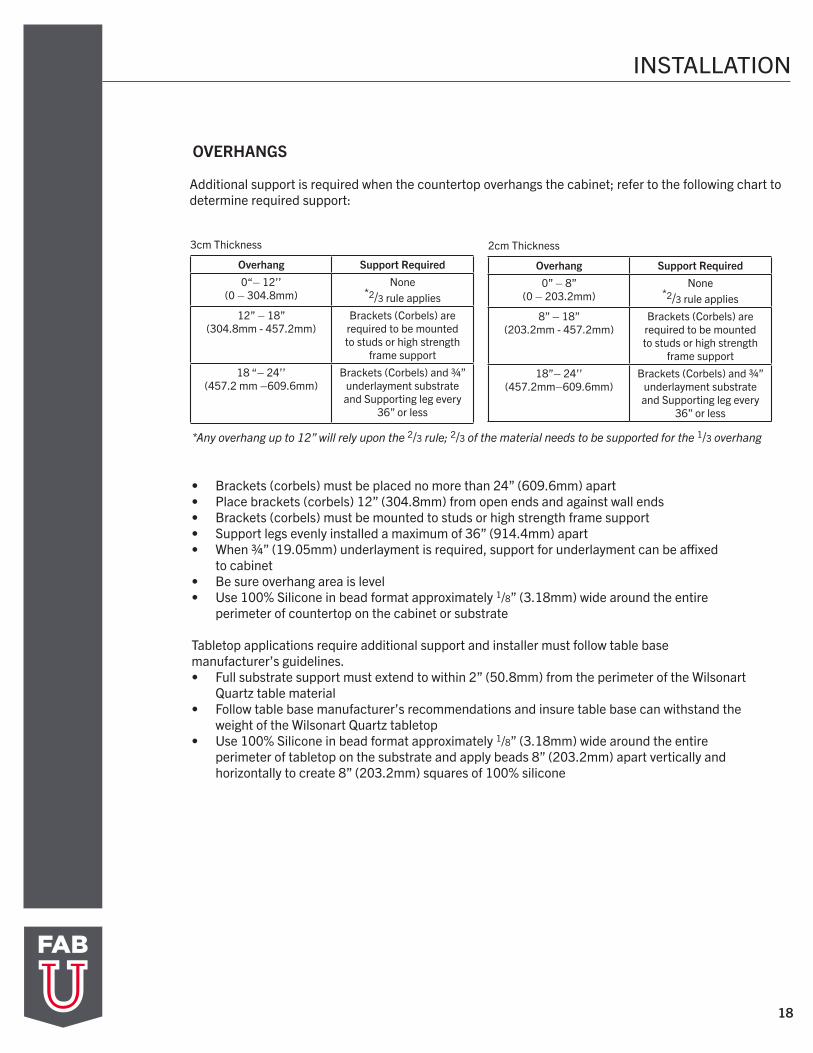
Additional support is required when the countertop overhangs the cabinet; refer to the following chart to determine required support:
Overhang Support Required
0“– 12’’(0 – 304.8mm)
None*2/3 rule applies
12” – 18”(304.8mm - 457.2mm)
Brackets (Corbels) are required to be mounted to studs or high strength
frame support18 “– 24’’
(457.2 mm –609.6mm)Brackets (Corbels) and ¾”
underlayment substrate and Supporting leg every
36” or less
3cm Thickness
Overhang Support Required
0” – 8”(0 – 203.2mm)
None*2/3 rule applies
8” – 18”(203.2mm - 457.2mm)
Brackets (Corbels) are required to be mounted to studs or high strength
frame support18”– 24’’
(457.2mm–609.6mm)Brackets (Corbels) and ¾”
underlayment substrate and Supporting leg every
36” or less
2cm Thickness
*Any overhang up to 12” will rely upon the 2/3 rule; 2/3 of the material needs to be supported for the 1/3 overhang
• Brackets (corbels) must be placed no more than 24” (609.6mm) apart• Place brackets (corbels) 12” (304.8mm) from open ends and against wall ends• Brackets (corbels) must be mounted to studs or high strength frame support• Support legs evenly installed a maximum of 36” (914.4mm) apart• When ¾” (19.05mm) underlayment is required, support for underlayment can be affixed
to cabinet• Be sure overhang area is level • Use 100% Silicone in bead format approximately 1/8” (3.18mm) wide around the entire
perimeter of countertop on the cabinet or substrate
Tabletop applications require additional support and installer must follow table base manufacturer’s guidelines.• Full substrate support must extend to within 2” (50.8mm) from the perimeter of the Wilsonart
Quartz table material• Follow table base manufacturer’s recommendations and insure table base can withstand the
weight of the Wilsonart Quartz tabletop • Use 100% Silicone in bead format approximately 1/8” (3.18mm) wide around the entire
perimeter of tabletop on the substrate and apply beads 8” (203.2mm) apart vertically and horizontally to create 8” (203.2mm) squares of 100% silicone
19
CARE AND MAINTENANCE
Wilsonart® Quartz surfaces are non-porous, formulated to stand up to the harshest environments and do not require sealing. They are highly resistant to chemicals, stains, heat and moisture. For everyday cleaning, simply wipe your Wilsonart Quartz countertop with a soft cloth, soap and water. A mild household cleaner such as Windex®, Green Works® or 409® are acceptable. After cleaning, wipe the surface completely dry to avoid streaks. Spills should be wiped up immediately. Abrasive pads and powders can damage the finish of the surface. To avoid dulling the Wilsonart Quartz surface, use non-abrasive cleaners, pads and sponges. DO NOT USE: bleach, oven cleaners and abrasive pads or powders (i.e. Ajax®, Comet®, etc.).
Wilsonart Quartz is extremely heat resistant and can take temperature changes that most other surfaces cannot. However, all surfacing can be damaged by extreme temperature changes, both prolonged and sudden. Wilsonart recommends the use of trivets or hot pads when placing hot skillets, pans or other heat generating kitchenware on the surface. DO NOT place hot cookware directly on any Wilsonart Quartz surface.
Wilsonart Quartz surfaces are very stain resistant. However, we recommend avoiding high pH cleaning products as they can damage the sheen of the surface. If your surface happens to be exposed to any potentially damaging products, rinse with water immediately to mitigate the effects of any strong chemical or solvent.
Wilsonart Quartz surfaces are more durable than most surfaces available today. These surfaces are very resistant to cracks, scratches, impact and stains. But they are not scratch-proof so take care when using sharp objects near the countertop. Like any surface, excessive pressure on the surface with a sharp object can damage it. Cutting boards are always recommended when preparing food.
Care and Maintenance information may be obtained by visiting www.wilsonart.com or clicking here.
CUSTOMER SATISFACTION
Customer satisfaction is achieved by using common sense approach, treat your customer fairly. Word of mouth is the best and least expensive form of advertising. Quality assurance in fabrication and installation is of the upmost importance.• Provide Care and Maintenance information and guidance to end user. Information can
be found at www.wilsonart.com, or clicking here.• Warranty Registration information provided to end user. Information can be found at
www.wilsonart.com or clicking here.
20
WALL CLADDINGInstructions for 2cm Only
SUBSTRATES
Cement Board (Durock or equivalent) is the only substrate allowed to be used as proper support of Wilsonart Quartz wall cladding.• Substrate surface must be sound, flat, smooth and free of dust or other contaminates during
installation• Sub-wall must be sound and able to support the weight of the Wilsonart Quartz wall application
RECOMMENDED ADHESIVE
• 100% Silicone – Use 100% Silicone in bead format approximately ¼”(6.35mm) wide around the entire perimeter of Wilsonart Quartz panel/tile while adhering to substrate and apply ¼” (6.35mm) beads 8” (203.2mm) apart vertically and horizontally to create 8” (203.2mm) squares of 100% silicone
• Wilsonart Hard Surface Seam adhesives and/or polyester knife grade adhesives can be used for seams. Wilsonart recommends that fabricators always follow the individual adhesive manufacturer’s recommendations for the use of their adhesives with Wilsonart Quartz material
• Use 100% Silicone in bead format approximately ¼” (6.35mm) wide should be used on both sides of a seam, approximately 2” (50.8mm) away
• Wilsonart Quartz fabricated ceiling and base molding can be used and adhered with 100% silicone, apply quarter size dabs every 16” to 18” (406.4mm – 457.2mm) and along the entire length of the seam between the wall and molding
GENERAL INSTALLATION REQUIREMENTS • Minimum 1/8” (3.18mm) silicone filled expansion gaps are required at: - All inside corners - Between finished floor and ceiling on full height wall cladding - Every 10’-12’ (3048mm – 3657.6mm) of wall length/height• Wilsonart Quartz application consisting of panels or tile application must have a full length support
system (angle iron, substrate, etc…) running the entire length at the bottom of application to fully support Wilsonart Quartz wall panels or tiles, if not resting on the floor
• Support system (angle iron, substrate, etc…) must be sound and/or affixed to sub-wall, the bottom support must be able to bear the weight associated to the complete Wilsonart Quartz wall application
• Floor or support system (angle iron, substrate, etc…) must be level• A minimum of 2/3” (16.93mm) the thickness of the Wilsonart Quartz 2cm panels or tiles must be
sitting on the support • A combination of hard seams and silicone seams can be used for wall cladding installations• All seams must be flat/level and well supported by a sound substrate• All cutout corners must have a ¼” (6.35mm) radius• Allow minimum 1/8” (3.18mm) expansion gap around entire cutout• Ease edges of all cutouts• Accessories like hand rails, grab bars, seats, etc., must be supported by wall framing• Oversize all holes for accessories 1/8” (3.18mm) larger than attaching hardware to be used• Do not over tighten• All accessories applied to the face of the Wilsonart Quartz must allow for expansion and contraction• Wilsonart Quartz must have bracing/support every 36” (914.4mm) of length and height with
maintained support for a minimum of 24 hours until silicone has cured significantly to hold material in place
• Remove all excess silicone immediately with denatured alcohol• Grouting of Wilsonart Quartz tiles must be done at least 24 hours after installing tiles• Use of plastic or rubber trowels is recommended• Remove all excess of grout material from Wilsonart Quartz• Please contact Wilsonart Technical & Fabrication Group for additional support and information in
regards to Wilsonart Quartz at 800-433-3222 or visit us at www.wilsonart.com or clicking here.
21
TRANSLUCENT / BACK-LIGHTING
RECOMMENDED FOR 2CM ONLY
PRODUCT
Wilsonart Quartz offers various designs with versatile aesthetics by formulating specific raw materials and introducing precise manufacturing techniques. Wilsonart Quartz offers designs that provide a translucent surface opportunity and designs which can be backlit to give unlimited mesmerizing opportunities to our customers.
• Thickness of slabs is important, 2cm is recommended and provides the best opportunity for translucency
• Specific matrix of designs will provide a more attractive and translucent opportunity• Contact your Wilsonart Representative for design specifics in relation to translucency
SUBSTRATES
Marine plywood and moisture resistant plywood are the only substrates recommended to be used as proper support of Wilsonart Quartz when backlighting countertops. • Substrate should be installed with appropriate support and distance• Substrate surface must be sound, flat, smooth and free of dust or other contaminates during
installation• Follow lighting manufacturer’s guidelines • Rebates / dado’s can be routed into the substrate to create wiring locations for the installation
process
EDGES
Miter Edge Preferred• Miter Edge Profiles are recommended and provide more translucency• Miter fold should be completed at true 45° angle for quality seam and to ensure maximum
strength and translucency• Improper machined 45° parts can increase edge seam visibility especially when larger profiles
expose the seam area. Chipping of edges during profiling is also created from improper preparation of edge parts to be seamed
• Stacked edge can be used but will be more limited on translucency
ADHESIVES
• A clear or translucent Wilsonart Hard Surface Seam adhesives and/or polyester knife grade adhesives are recommended. Proper distribution of adhesive is important to visual quality, strength of seam, and translucency
• 100% clear silicone can also be used for commercial seams• 100% clear silicone should be used to adhere countertop to the cabinet/frame support around
the perimeter only• Excessive adhesive must be removed from surface or backside of countertop to prevent
shadowing
22
TRANSLUCENT / BACK-LIGHTING
RECOMMENDED FOR 2CM ONLY
LIGHTING
• LED (light emitting diode) lighting is recommended to provide the most advanced and efficient lighting application
• LED will be sandwiched between a full substrate and the bottom of the countertop• Flat panel LED’s which have to be wired together and sandwiched, can be cut to size on the job
site as well• For best results when backlighting, panels should be trimmed to fit to the entire configuration• Always test light panels prior to securing to the substrate• Even lighting across the countertop is important for best visual quality of lighting• Various types of lighting create heat, ventilation or removal of excess heat must be addressed • Brighter light sources will produce a greater amount of translucency but create more heat.
Light sources providing minimal hot spots of light and overheating are be preferred• Thermal expansion of Wilsonart Quartz will be reduced with proper lighting and ventilation• Always follow manufacturers recommendations for flat panel LED lighting
GENERAL INFORMATION
• Proper cleaning of surfaces on front and back is highly recommended• Labels, writing, and any other markings should be removed• Dry fit countertop and lighting prior to complete installation
Please contact Wilsonart Technical & Fabrication Group for additional support and information in regards to Wilsonart Quartz at 800-433-3222 or visit us at www.wilsonart.com or clicking here.