Embed Size (px)
Citation preview
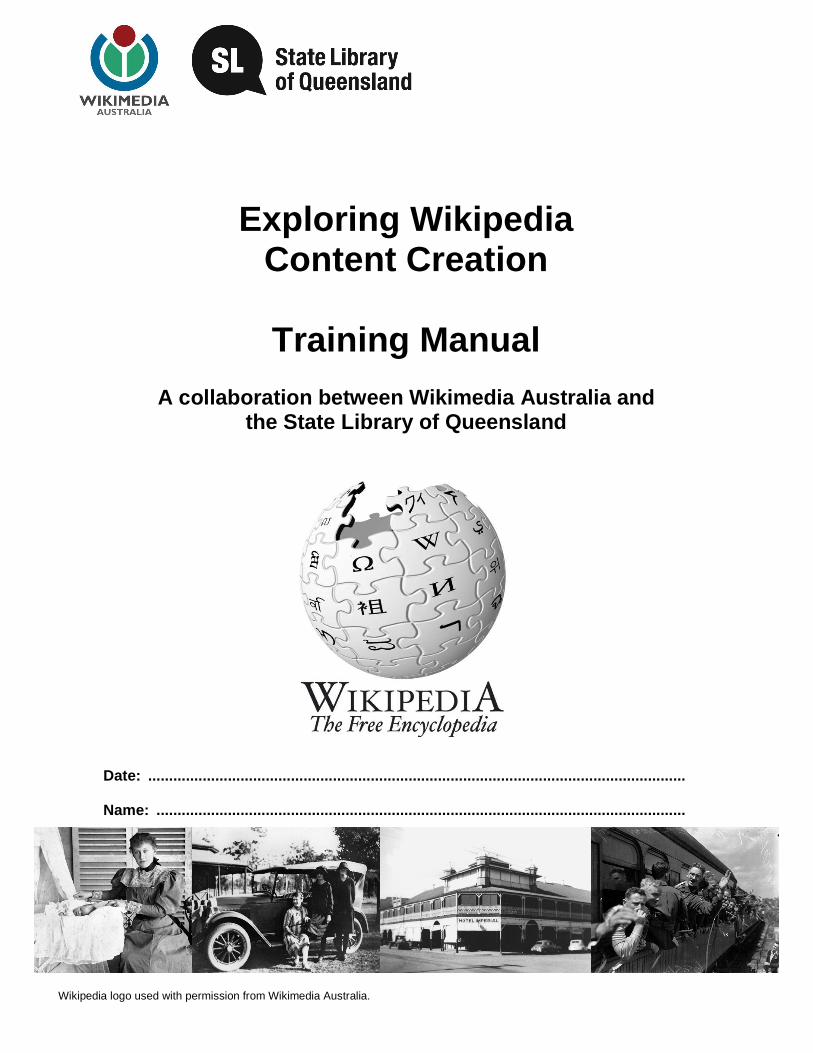
Exploring Wikipedia Content Creation
Training Manual
A collaboration between Wikimedia Australia and
the State Library of Queensland
Date: ............................................. ................................................................................... Name: ............................................. .................................................................................
Wikipedia logo used with permission from Wikimedia Australia.
Wikipedia Training Manual 2
© State of Queensland (State Library of Queensland) 2013
This manual is licensed under a Creative Commons Attribution 3.0 Australia licence. You are free to copy, communicate and adapt this work, so long as you attribute the State Library of Queensland.
For more information see http://creativecommons.org/licenses/by/3.0/au
Version 3.0 Updated 01/02/2013
Wikipedia Training Manual 3
Contents Background Information
• 1 - About the collaboration between Wikimedia and S LQ ...................................... 4
• 2 - Wikipedia: the benefits for your Community..... ................................................. 4
• 3 - The World of Wiki.............................. ................................................................... 5
o Wikimedia Australia
o Wikipedia, Wikimedia Commons, Wiktionary, Wikisourc e, Wikibooks
o Other Wiki projects
• 4 – Wikipedia and its reliability.................. ............................................................... 6
Step-by-step Procedures for using Wikipedia
• 1 - Creating an account............................ ................................................................. 7 • 2 - My Wiki Account – Some special features ........ ................................................. 9
o My Preferences o My Watchlist o My Contributions
• 3 - Creating a new article ......................... ................................................................. 11
• 4 - Editing an article ............................. ..................................................................... 15 • 5 – View Article’s History and Reverting an Edit... .................................................. 16 • 6 - Formatting, writing using a Wiki ............... .......................................................... 18
• 7 – Adding Categories .............................. ................................................................ 20
• 8 – Submitting your draft article.................. ............................................................. 21
• 9 – Cross Linking – Getting online traffic to your page .......................................... 23
• 10 – Statistics – How many people are looking at yo ur article? ............................ 23
• 11 - Wikimedia Commons – Uploading Images to use fo r Wikipedia Articles ...... 24 • 12 - Useful links to more information.............. ......................................................... 29
Wikipedia Training Manual 4
Background Information
1 - About the collaboration between Wikimedia and t he State Library of Queensland In 2010 Wikimedia Australia approached the State Library of Queensland (SLQ) to work collaboratively to build content in Wikimedia Commons (http://commons.wikimedia.org), the repository of images and resources that Wikipedia authors use to support their articles. The State Library agreed to share 50,000 Queensland images from its copyright free collections and as a result Wikimedia are now actively seeking content from other libraries, galleries, museums and archives, especially content from regional communities. The State Library has a leading role in ensuring that Queensland’s documentary heritage is made accessible to all communities throughout Queensland and that each community has the opportunity to engage with its collections and create their own content. Having SLQ images on Wikipedia increases the State Library’s potential engagement on a global scale. To put this in perspective, the State Library’s images are accessible via the State Library website which received 16 million page requests in 2010-11. In comparison, Wikipedia gets an average of 300 million hits per day. In addition to wider community exposure, the Wikipedia community uses State Library’s images to illustrate their articles, their captions and article content, these are reported on to actively help describe and identify SLQ images, and this enhanced metadata will be incorporated back into the record for the item. Wikimedia Australia benefits from the partnership by gaining access to new, reputable content through libraries and the ability to utilise this content to enhance their current articles and create new ones. Through working with Queensland’s public libraries Wikimedia Australia will get the chance to promote their product throughout the state and gain access to local knowledge and content creators, living and working in regional communities. 2 – Wikipedia: the benefits for your community Wikimedia Australia is committed to growing regional Australian content within Wikipedia, and recognises that public libraries have the local knowledge and contacts required to generate the articles needed to enhance the Queensland subject coverage of Wikipedia. This approach also supports the State Library’s goal of creating a statewide distributed collection of Queensland Memory and gives regional Queensland communities a practical way of to promoting their own local history and showcasing their collections online. By creating Wikipedia articles on your local community’s stories, people and places, you have the opportunity for your content to be searchable and linked into other articles on Wikipedia, the worlds 5th most searched website. Wikipedia will also give your public library and its community the ability to promote itself on the world stage with a website that has a well known international reputation. By creating content you will also get the opportunity to partner with other similar organisations both locally and further afield. (E.g. Local museums, historical societies etc) This training manual will give you the skills to create new articles for Wikipedia (http://www.wikipedia.org) and enhance existing articles using images from your local collections as well as from the 50,000 images available from State Library. By learning how to use Wikipedia you can then transfer these skills to other interested people in you’re community such as; local historians, museums, art galleries, family history groups, public librarians, teachers or anyone who has knowledge of the local community and wants to be part of one of the most searched encyclopedias in the world.
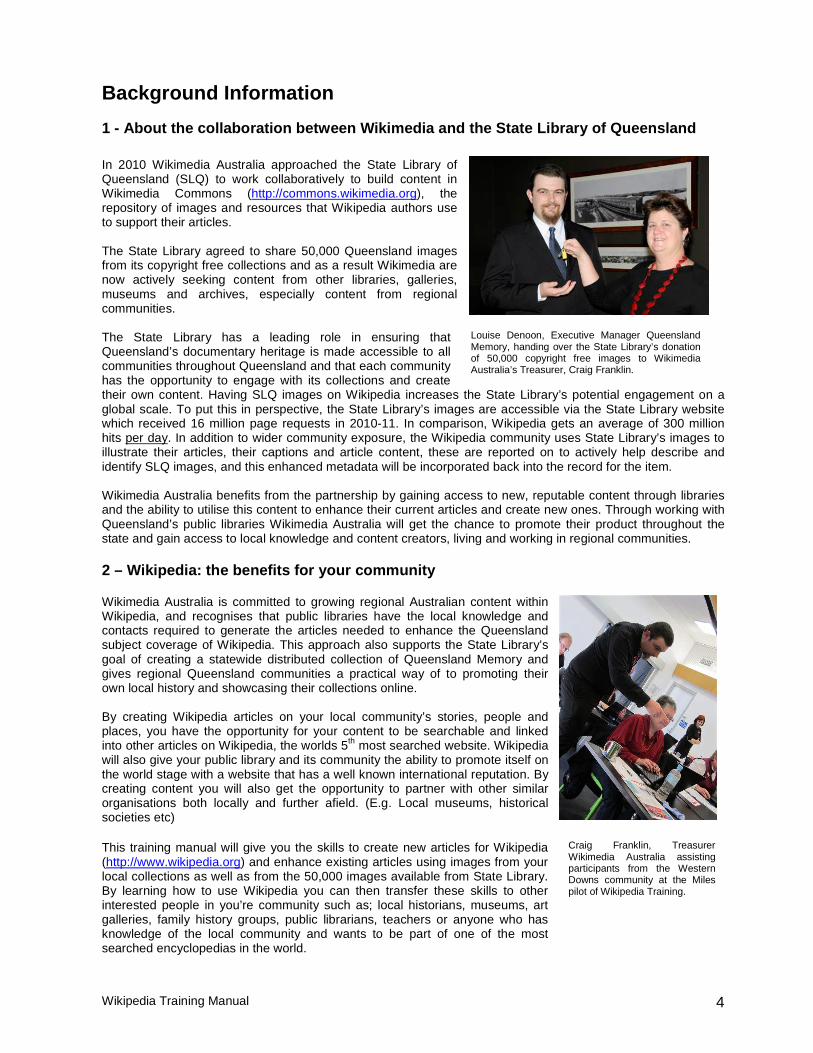
Louise Denoon, Executive Manager Queensland Memory, handing over the State Library’s donation of 50,000 copyright free images to Wikimedia Australia’s Treasurer, Craig Franklin.
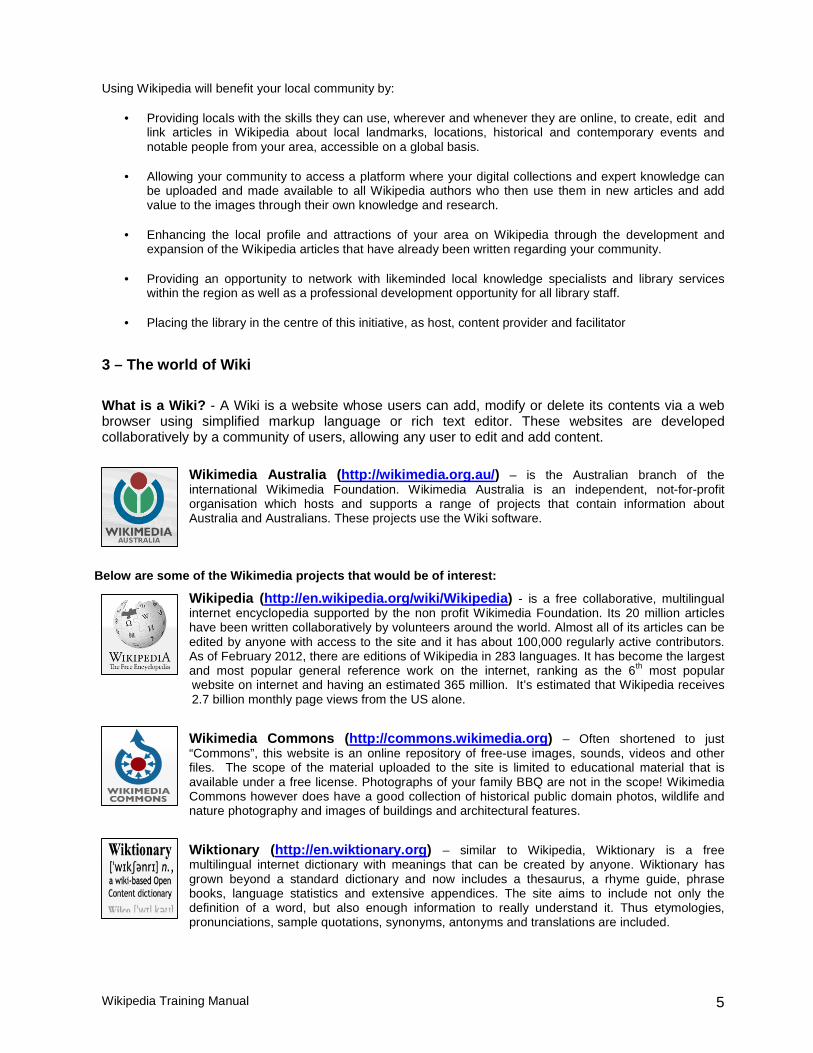
Craig Franklin, Treasurer Wikimedia Australia assisting participants from the Western Downs community at the Miles pilot of Wikipedia Training.
Wikipedia Training Manual 5
Using Wikipedia will benefit your local community by:
• Providing locals with the skills they can use, wherever and whenever they are online, to create, edit and link articles in Wikipedia about local landmarks, locations, historical and contemporary events and notable people from your area, accessible on a global basis.
• Allowing your community to access a platform where your digital collections and expert knowledge can
be uploaded and made available to all Wikipedia authors who then use them in new articles and add value to the images through their own knowledge and research.
• Enhancing the local profile and attractions of your area on Wikipedia through the development and
expansion of the Wikipedia articles that have already been written regarding your community.
• Providing an opportunity to network with likeminded local knowledge specialists and library services within the region as well as a professional development opportunity for all library staff.
• Placing the library in the centre of this initiative, as host, content provider and facilitator
3 – The world of Wiki
What is a Wiki? - A Wiki is a website whose users can add, modify or delete its contents via a web browser using simplified markup language or rich text editor. These websites are developed collaboratively by a community of users, allowing any user to edit and add content.
Wikimedia Australia ( http://wikimedia.org.au/ ) – is the Australian branch of the international Wikimedia Foundation. Wikimedia Australia is an independent, not-for-profit organisation which hosts and supports a range of projects that contain information about Australia and Australians. These projects use the Wiki software.
Below are some of the Wikimedia projects that would be of interest:
Wikipedia ( http://en.wikipedia.org/wiki/Wikipedia ) - is a free collaborative, multilingual internet encyclopedia supported by the non profit Wikimedia Foundation. Its 20 million articles have been written collaboratively by volunteers around the world. Almost all of its articles can be edited by anyone with access to the site and it has about 100,000 regularly active contributors. As of February 2012, there are editions of Wikipedia in 283 languages. It has become the largest and most popular general reference work on the internet, ranking as the 6th most popular website on internet and having an estimated 365 million. It’s estimated that Wikipedia receives 2.7 billion monthly page views from the US alone.
Wikimedia Commons ( http://commons.wikimedia.org ) – Often shortened to just “Commons”, this website is an online repository of free-use images, sounds, videos and other files. The scope of the material uploaded to the site is limited to educational material that is available under a free license. Photographs of your family BBQ are not in the scope! Wikimedia Commons however does have a good collection of historical public domain photos, wildlife and nature photography and images of buildings and architectural features.
Wiktionary ( http://en.wiktionary.org ) – similar to Wikipedia, Wiktionary is a free multilingual internet dictionary with meanings that can be created by anyone. Wiktionary has grown beyond a standard dictionary and now includes a thesaurus, a rhyme guide, phrase books, language statistics and extensive appendices. The site aims to include not only the definition of a word, but also enough information to really understand it. Thus etymologies, pronunciations, sample quotations, synonyms, antonyms and translations are included.
Wikipedia Training Manual 6
Wikisource ( http://en.wikisource.org ) – The free library – is a growing free content library of source texts, as well as translations of source texts in any language. Wikisource is material not published by the Wiki project and can be viewed as a library of public domain works.
Wikibooks ( http://en.wikibooks.org ) – While Wikisource focuses on collecting material published outside of the Wiki projects, Wikibooks is a collection of open content text books, annotated texts, instructional guides, and manuals written by the projects contributors themselves. These materials can be used in a traditional classroom, an accredited or respected institution, a home-school environment, as part of a Wikiversity (http://en.wikiversity.org/wiki/Wikiversity:Main_Page) course or for self-learning.
Other Wikimedia projects include
• Wikispecies – ( http://species.wikimedia.org ) – Info on all forms of species, animals, plants, fungi,
bacteria etc
• Wikinews – ( http://en.wikinews.org ) – News written by Wiki Authors
• Wikiquote - ( http://en.wikiquote.org ) – Quotes
• Wikiversity – ( http://en.wikiversity.org ) – Self learning tools and courses
4 – Wikipedia and its reliability
Wikipedia has the reputation of being an un-reliable source for information. However when referencing, research students should never use information on Wikipedia (or any other online encyclopedia) for formal purposes (such as school essays) until they have verified and evaluated the referenced sources. For this reason, Wikipedia, like any encyclopedia, is a great starting place for research but not always a great source for information itself. The reliability of a Wikipedia article is dependant on its external references. As you will learn though this manual only new Wikipedia articles with well sourced, reliable references get approved to go live. There are also multiple ways Wikipedia editors can monitor articles and revert edits which helps remove vandalism quickly. Having the ability to be edit articles also makes Wikipedia’s content as up to date as it can be, especially compared to published sources of information. This project is another example of how Wikipedia is trying to make its content more reliable by encouraging subject specialist and those with local knowledge to become Wikipedia authors and contribute information and external sources to articles. More information, including results of studies done on Wikipedia’s reliability can be found at http://en.wikipedia.org/wiki/Reliability_of_Wikipedia and http://en.wikipedia.org/wiki/Wikipedia:FAQ/Schools.
Wikipedia Training Manual 7
Step-by-step Procedures for using Wikipedia
1. - Creating an Account
1.1 - Steps for creating your Wiki Account
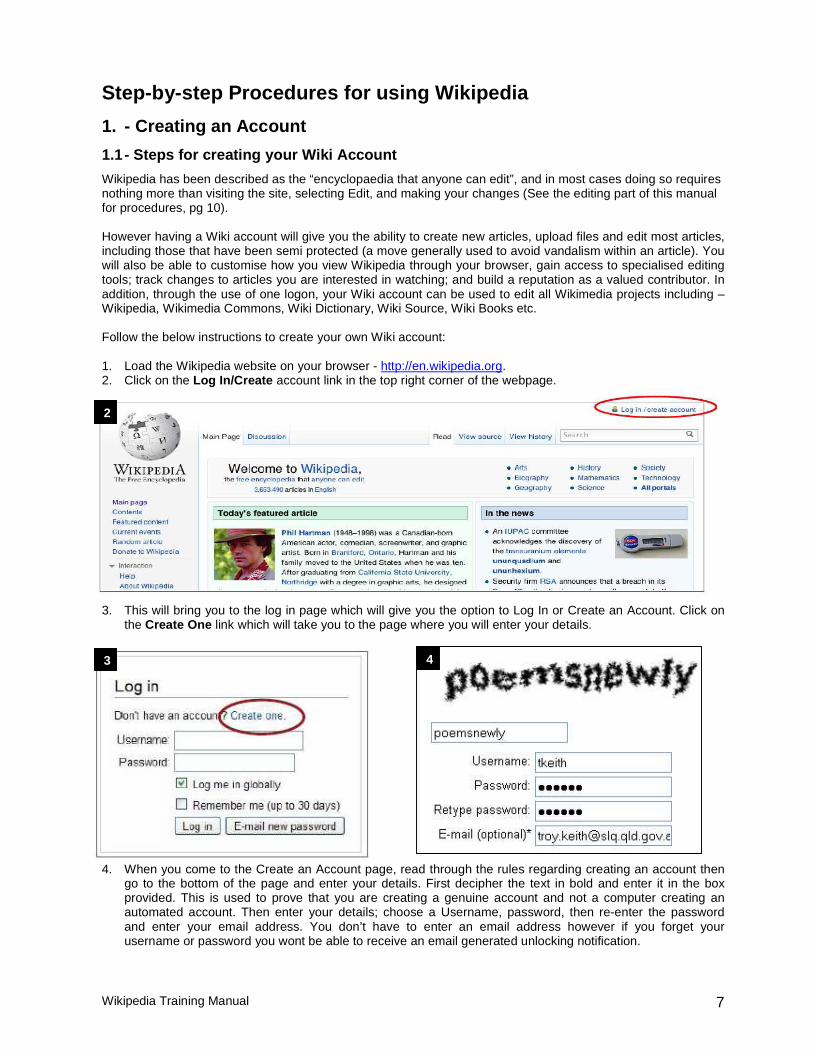
Wikipedia has been described as the “encyclopaedia that anyone can edit”, and in most cases doing so requires nothing more than visiting the site, selecting Edit, and making your changes (See the editing part of this manual for procedures, pg 10). However having a Wiki account will give you the ability to create new articles, upload files and edit most articles, including those that have been semi protected (a move generally used to avoid vandalism within an article). You will also be able to customise how you view Wikipedia through your browser, gain access to specialised editing tools; track changes to articles you are interested in watching; and build a reputation as a valued contributor. In addition, through the use of one logon, your Wiki account can be used to edit all Wikimedia projects including – Wikipedia, Wikimedia Commons, Wiki Dictionary, Wiki Source, Wiki Books etc. Follow the below instructions to create your own Wiki account: 1. Load the Wikipedia website on your browser - http://en.wikipedia.org. 2. Click on the Log In/Create account link in the top right corner of the webpage.
3. This will bring you to the log in page which will give you the option to Log In or Create an Account. Click on the Create One link which will take you to the page where you will enter your details.
4. When you come to the Create an Account page, read through the rules regarding creating an account then go to the bottom of the page and enter your details. First decipher the text in bold and enter it in the box provided. This is used to prove that you are creating a genuine account and not a computer creating an automated account. Then enter your details; choose a Username, password, then re-enter the password and enter your email address. You don’t have to enter an email address however if you forget your username or password you wont be able to receive an email generated unlocking notification.
2
3 4
Wikipedia Training Manual 8
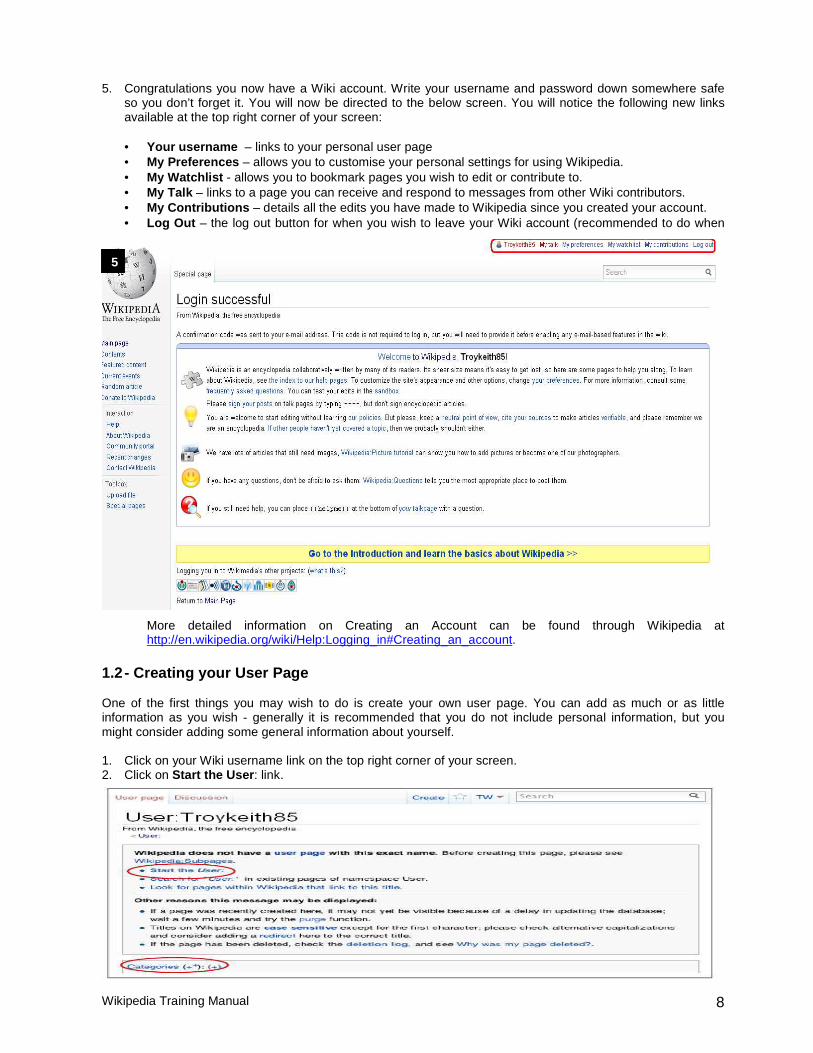
5. Congratulations you now have a Wiki account. Write your username and password down somewhere safe so you don’t forget it. You will now be directed to the below screen. You will notice the following new links available at the top right corner of your screen:
• Your username – links to your personal user page • My Preferences – allows you to customise your personal settings for using Wikipedia. • My Watchlist - allows you to bookmark pages you wish to edit or contribute to. • My Talk – links to a page you can receive and respond to messages from other Wiki contributors. • My Contributions – details all the edits you have made to Wikipedia since you created your account. • Log Out – the log out button for when you wish to leave your Wiki account (recommended to do when
More detailed information on Creating an Account can be found through Wikipedia at http://en.wikipedia.org/wiki/Help:Logging_in#Creating_an_account.
1.2 - Creating your User Page One of the first things you may wish to do is create your own user page. You can add as much or as little information as you wish - generally it is recommended that you do not include personal information, but you might consider adding some general information about yourself. 1. Click on your Wiki username link on the top right corner of your screen. 2. Click on Start the User : link.
5
Wikipedia Training Manual 9
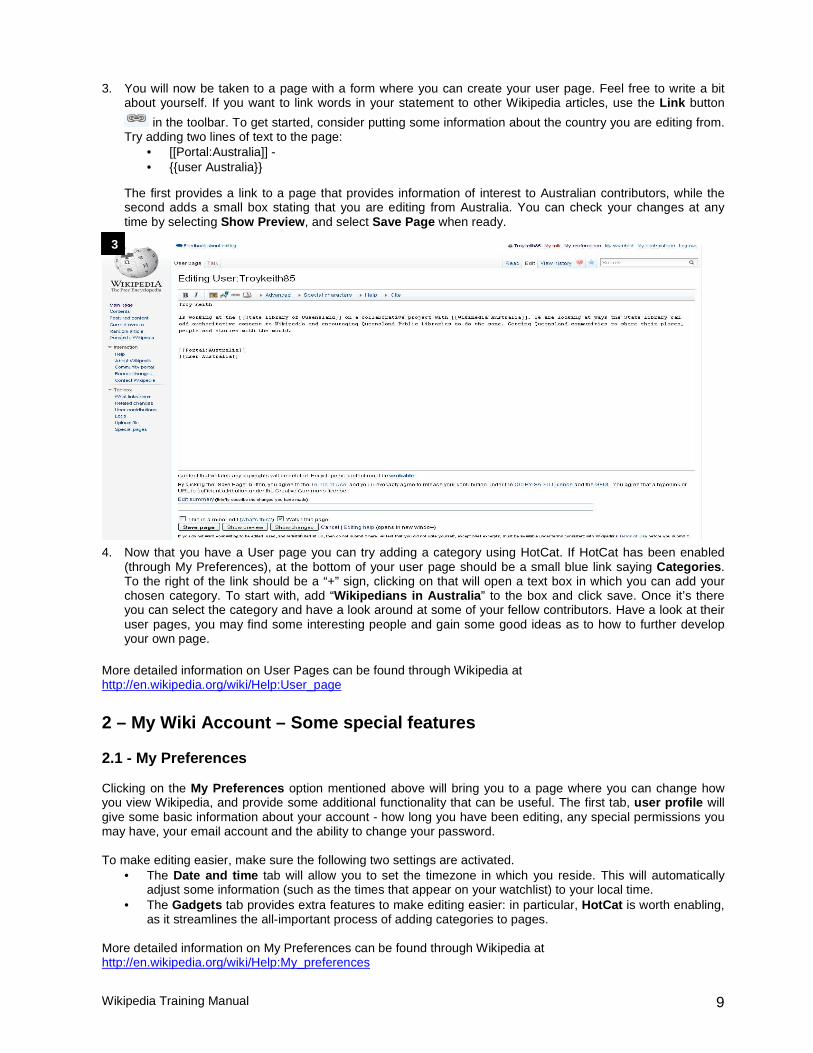
3. You will now be taken to a page with a form where you can create your user page. Feel free to write a bit about yourself. If you want to link words in your statement to other Wikipedia articles, use the Link button
in the toolbar. To get started, consider putting some information about the country you are editing from. Try adding two lines of text to the page:
• [[Portal:Australia]] - • {{user Australia}}
The first provides a link to a page that provides information of interest to Australian contributors, while the second adds a small box stating that you are editing from Australia. You can check your changes at any time by selecting Show Preview , and select Save Page when ready.
4. Now that you have a User page you can try adding a category using HotCat. If HotCat has been enabled (through My Preferences), at the bottom of your user page should be a small blue link saying Categories . To the right of the link should be a “+” sign, clicking on that will open a text box in which you can add your chosen category. To start with, add “Wikipedians in Australia ” to the box and click save. Once it’s there you can select the category and have a look around at some of your fellow contributors. Have a look at their user pages, you may find some interesting people and gain some good ideas as to how to further develop your own page.
More detailed information on User Pages can be found through Wikipedia at http://en.wikipedia.org/wiki/Help:User_page 2 – My Wiki Account – Some special features 2.1 - My Preferences
Clicking on the My Preferences option mentioned above will bring you to a page where you can change how you view Wikipedia, and provide some additional functionality that can be useful. The first tab, user profile will give some basic information about your account - how long you have been editing, any special permissions you may have, your email account and the ability to change your password. To make editing easier, make sure the following two settings are activated.
• The Date and time tab will allow you to set the timezone in which you reside. This will automatically adjust some information (such as the times that appear on your watchlist) to your local time.
• The Gadgets tab provides extra features to make editing easier: in particular, HotCat is worth enabling, as it streamlines the all-important process of adding categories to pages.
More detailed information on My Preferences can be found through Wikipedia at http://en.wikipedia.org/wiki/Help:My_preferences
3
Wikipedia Training Manual 10
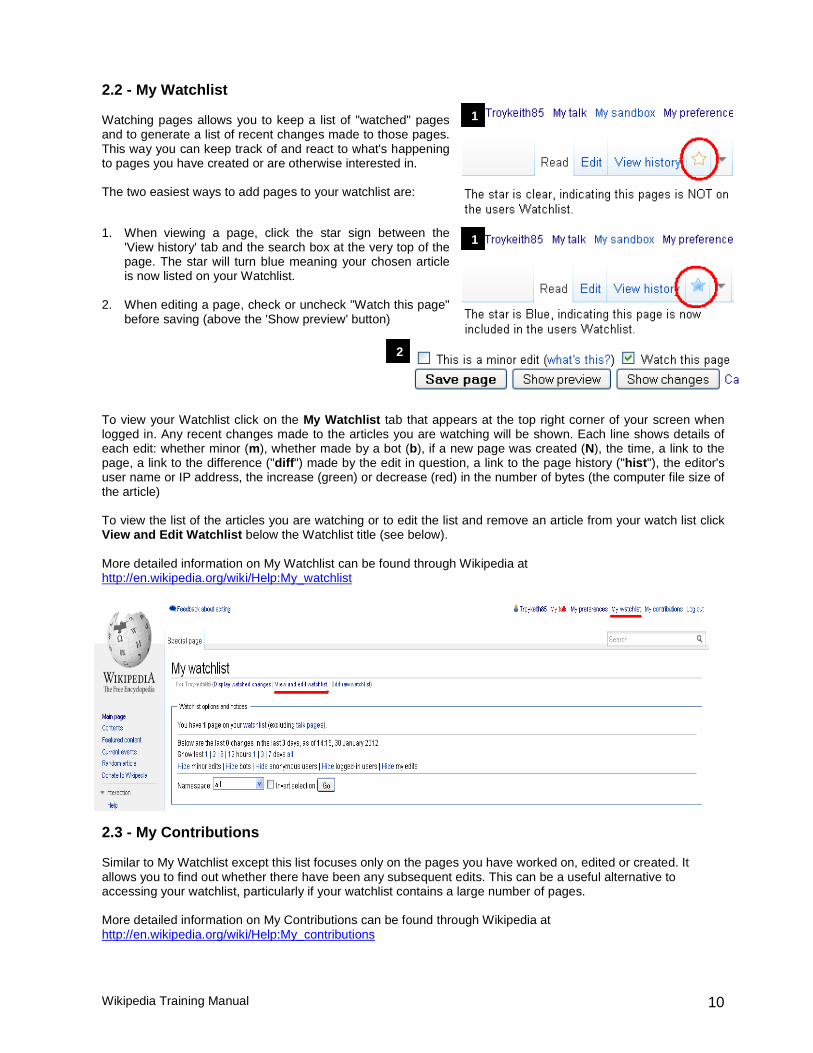
2.2 - My Watchlist Watching pages allows you to keep a list of "watched" pages and to generate a list of recent changes made to those pages. This way you can keep track of and react to what's happening to pages you have created or are otherwise interested in. The two easiest ways to add pages to your watchlist are:
1. When viewing a page, click the star sign between the 'View history' tab and the search box at the very top of the page. The star will turn blue meaning your chosen article is now listed on your Watchlist.
2. When editing a page, check or uncheck "Watch this page"
before saving (above the 'Show preview' button) To view your Watchlist click on the My Watchlist tab that appears at the top right corner of your screen when logged in. Any recent changes made to the articles you are watching will be shown. Each line shows details of each edit: whether minor (m), whether made by a bot (b), if a new page was created (N), the time, a link to the page, a link to the difference ("diff ") made by the edit in question, a link to the page history ("hist "), the editor's user name or IP address, the increase (green) or decrease (red) in the number of bytes (the computer file size of the article) To view the list of the articles you are watching or to edit the list and remove an article from your watch list click View and Edit Watchlist below the Watchlist title (see below). More detailed information on My Watchlist can be found through Wikipedia at http://en.wikipedia.org/wiki/Help:My_watchlist
2.3 - My Contributions Similar to My Watchlist except this list focuses only on the pages you have worked on, edited or created. It allows you to find out whether there have been any subsequent edits. This can be a useful alternative to accessing your watchlist, particularly if your watchlist contains a large number of pages. More detailed information on My Contributions can be found through Wikipedia at http://en.wikipedia.org/wiki/Help:My_contributions
1
2
1
Wikipedia Training Manual 11
3 - Creating a new article 1. The first step is to decide what you want to write an article about. Research your topic, and check that it
is not already on Wikipedia! Ensure that you have online references, so that the authenticity of the article can be verified. Books can also be used as a reference, with the usual bibliographic details including the ISBN. Choose very specific topics, not general. For example, an article on frogs in Queensland is considered too broad, but an article on the green tree frog (Litoria caerulea) is acceptable. When putting together the structure of your article remember the following writing style points: • NPOV – Neutral point of view – write you article in a factual, informative way and not promotional. • NOR – No original research – All the content in your article should be referenced and the
information should come from valid sources. 2. Wikipedia already has a lot of articles. Before creating an article, you should search to check that there
is no similar article that already exists. If there isn’t continue to Step 3.
If there is an article on the topic you want to create, you can add your content by editing the current article. For instructions on editing an article see the Editing part of this manual pg 10. If there is an article similar to yours and, it’s just under a different name or spelling, create a Redirect page. A Redirect page can be created like any other page, following these instructions except in Step 4. When the editing box is displayed don’t write any text about your topic, instead just type #REDIRECT [[xxx]] , replacing "xxx" with the title of the target page you want to redirect too. Make sure there is no text before the #REDIRECT keyword, or the redirect will not work. The edit summary box can be left blank; the summary will then be automatically generated stating that the page has been redirected to the given target. Click Save As . More detailed information on Redirecting can be found through Wikipedia at http://en.wikipedia.org/wiki/Help:Redirect
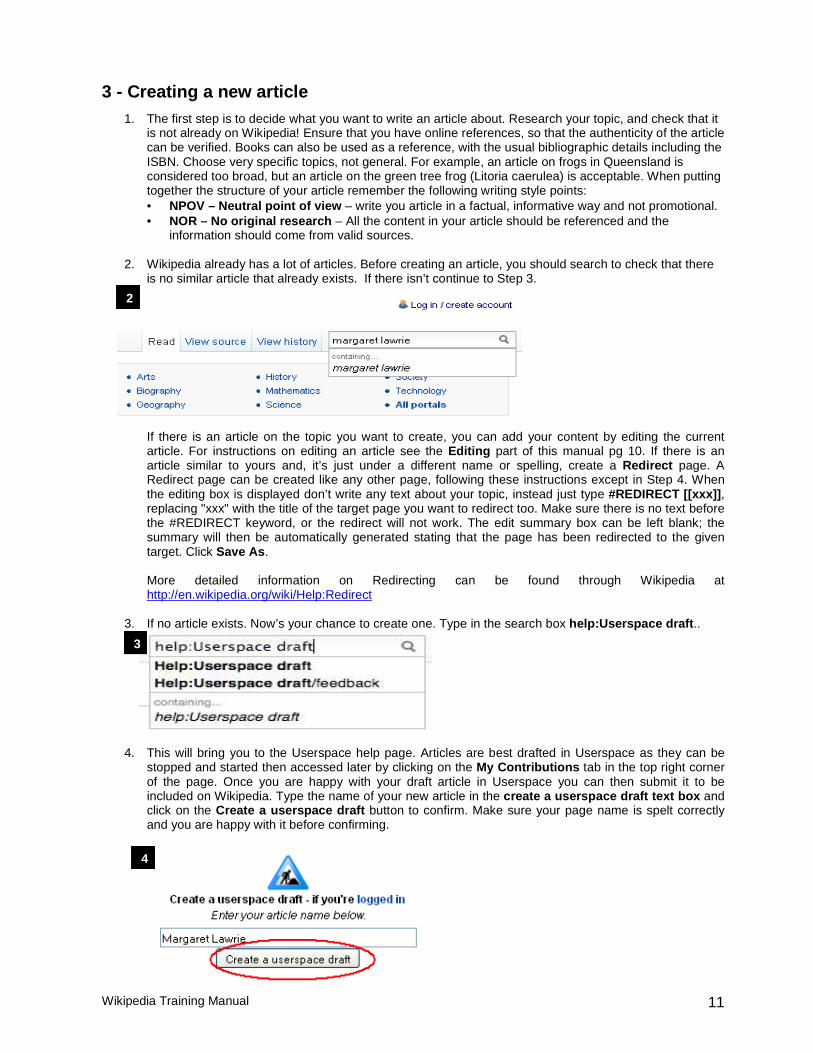
3. If no article exists. Now’s your chance to create one. Type in the search box help:Userspace draft ..
4. This will bring you to the Userspace help page. Articles are best drafted in Userspace as they can be
stopped and started then accessed later by clicking on the My Contributions tab in the top right corner of the page. Once you are happy with your draft article in Userspace you can then submit it to be included on Wikipedia. Type the name of your new article in the create a userspace draft text box and click on the Create a userspace draft button to confirm. Make sure your page name is spelt correctly and you are happy with it before confirming.
2
3
4
Wikipedia Training Manual 12
5. Scroll down to the edit box and follow the instructions of the Userspace draft page. There will already be
text in the edit box, as mentioned previously in Formatting pg 13, this is the Mark Up language of Wikipedia which creates the title and headers for the article. If you want to have a look what the page will look like in the real Wikipedia click Show Preview . Start by placing the name of your article in the '''New article name goes here'' text box and then start writing the content of your story, immediately after this where it says “New article content”. This is standard formatting for Wikipedia articles, the first mention of the title of your article should be in bold.
Alternatively you can highlight a word, click the bold button in the tool bar and it will add the ‘’’ ‘’’ Mark Up to the word you have highlighted. Eg -‘’’Margaret Lawrie’’’ was a respected anthropologist of the Torres Strait. – As shown in the edit box - Margaret Lawrie was a respected anthropologist of the Torres Strait. – As shown in Preview If you want to use any formatting that doesn’t have a quick use button in the tool bar (such as Bold, Italics, Links) refer to the formatting table mentioned previously, pg 13 to find out the Mark Up code to use. Have a look at other similar Wikipedia pages for guidance on layout, style and type of content.
6. Linking: When you have your content written down go through your article and look for possible
subjects to create links to so people will be able to go from your article to other articles on related topics.
Highlight the related topics in your text and click on the link button in the tool bar. A pop up box will appear letting you know if an article exists in Wikipedia. If it does you can link to it by clicking insert link . The link button will add [[ ]] to your highlighted subject in the Wiki edit box e.g. [[Torres Strait]]. You can also link to external websites by doing the same steps, placing the URL of the site you want to link to in the text box under Target page or URL, click on the To an external web page tick box and click Insert Link . If you have any related links to external web pages also list them under == External links == at the end of your article. Use the mark up text [URL Name of Website]. Eg. [http://www.slq.qld.gov.au State Library of Queensland]. Internal Wikipedia Link External Website Link
More detailed information on Linking can be found through Wikipedia at http://en.wikipedia.org/wiki/Help:Linking
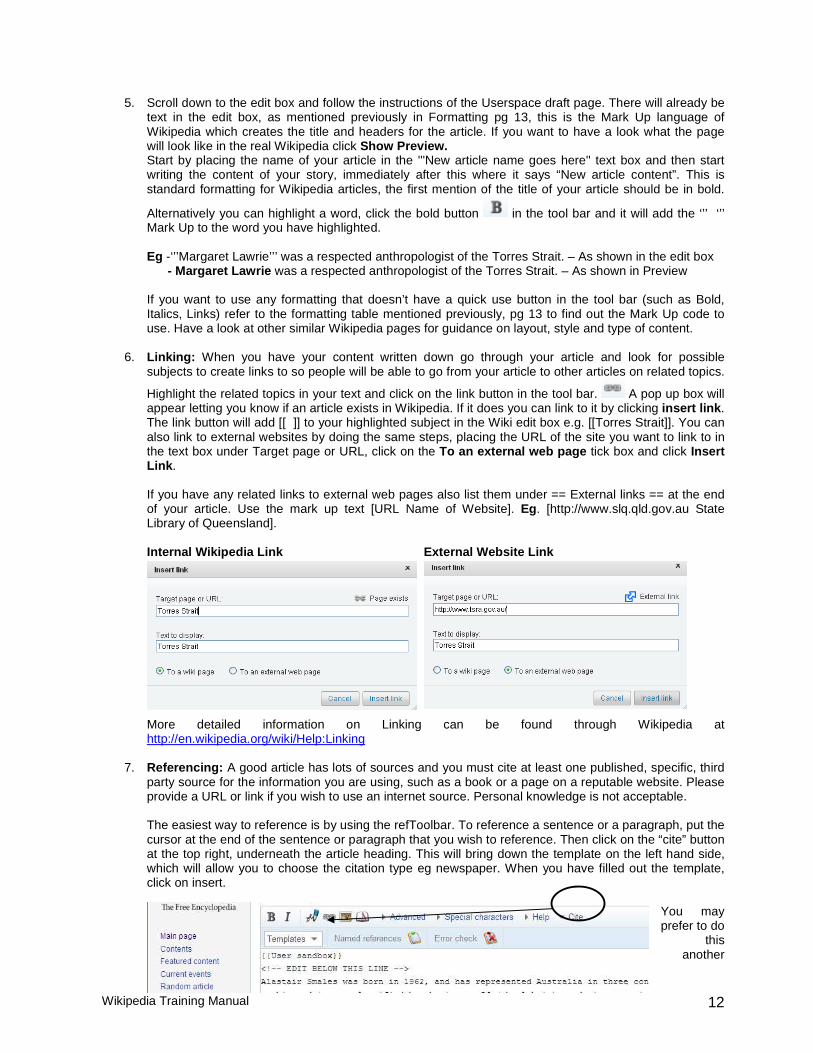
7. Referencing: A good article has lots of sources and you must cite at least one published, specific, third party source for the information you are using, such as a book or a page on a reputable website. Please provide a URL or link if you wish to use an internet source. Personal knowledge is not acceptable.
The easiest way to reference is by using the refToolbar. To reference a sentence or a paragraph, put the cursor at the end of the sentence or paragraph that you wish to reference. Then click on the “cite” button at the top right, underneath the article heading. This will bring down the template on the left hand side, which will allow you to choose the citation type eg newspaper. When you have filled out the template, click on insert.
You may prefer to do
this another
Wikipedia Training Manual 13
way. At the end of the sentence or paragraph you are referencing use the Mark Up signs <ref>....</ref> (E.g. <ref>Lawrie, Margaret, (1970), Myths and Legends of the Torres Strait, ''University Queensland Press'', pg 2</ref>) When you click on Show Preview you will see a number (E.g [1], [2]) has been placed at the end of the sentence which links to the Reference sub heading of your article where you will find the material you referenced listed. A reference can also be made by typing a standard bibliographical citation in the area under the == References == part of your edit box. Use the Mark Up signs <ref>....</ref> before and after your citation. E.g. <ref>Lawrie, Margaret, (1970), Myths and Legends of the Torres Strait, ''University Queensland Press'', pg 2</ref>.
If you are referencing a book, please add the ISBN number at the end of the reference. Wikipedia will automatically add a link from the ISBN number to a search page where the viewer can do a library catalogue search to find a copy of the book nearest them. More detailed information on Referencing can be found through Wikipedia at http://en.wikipedia.org/wiki/Help:Referencing. Information on Footnotes can be found at http://en.wikipedia.org/wiki/Wikipedia:Footnotes.
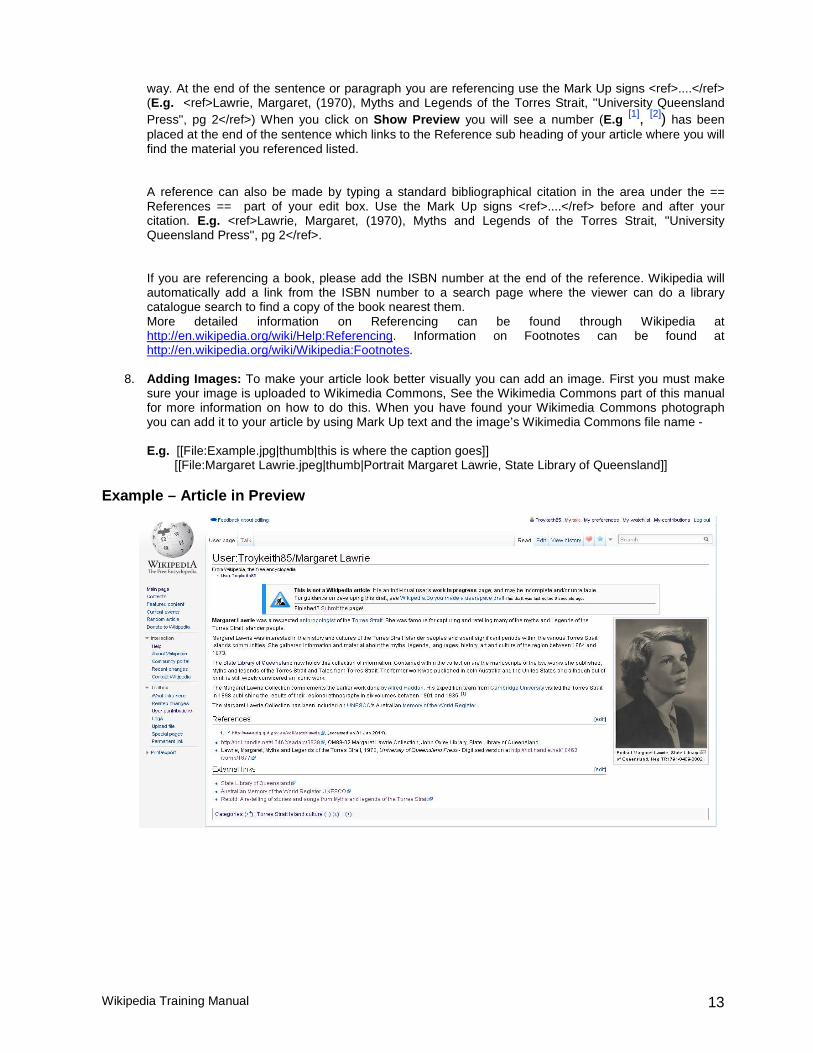
8. Adding Images: To make your article look better visually you can add an image. First you must make sure your image is uploaded to Wikimedia Commons, See the Wikimedia Commons part of this manual for more information on how to do this. When you have found your Wikimedia Commons photograph you can add it to your article by using Mark Up text and the image’s Wikimedia Commons file name -
E.g. [[File:Example.jpg|thumb|this is where the caption goes]] [[File:Margaret Lawrie.jpeg|thumb|Portrait Margaret Lawrie, State Library of Queensland]]
Example – Article in Preview
Wikipedia Training Manual 14
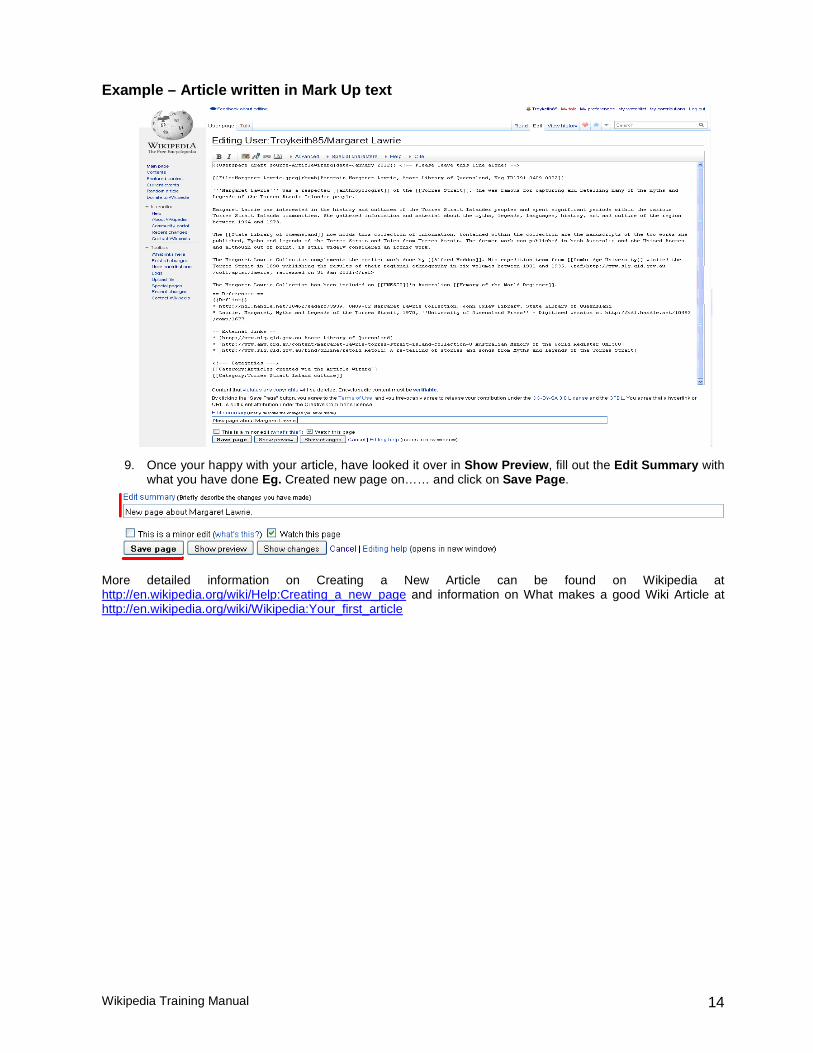
Example – Article written in Mark Up text
9. Once your happy with your article, have looked it over in Show Preview , fill out the Edit Summary with what you have done Eg. Created new page on…… and click on Save Page .
More detailed information on Creating a New Article can be found on Wikipedia at http://en.wikipedia.org/wiki/Help:Creating_a_new_page and information on What makes a good Wiki Article at http://en.wikipedia.org/wiki/Wikipedia:Your_first_article
Wikipedia Training Manual 15
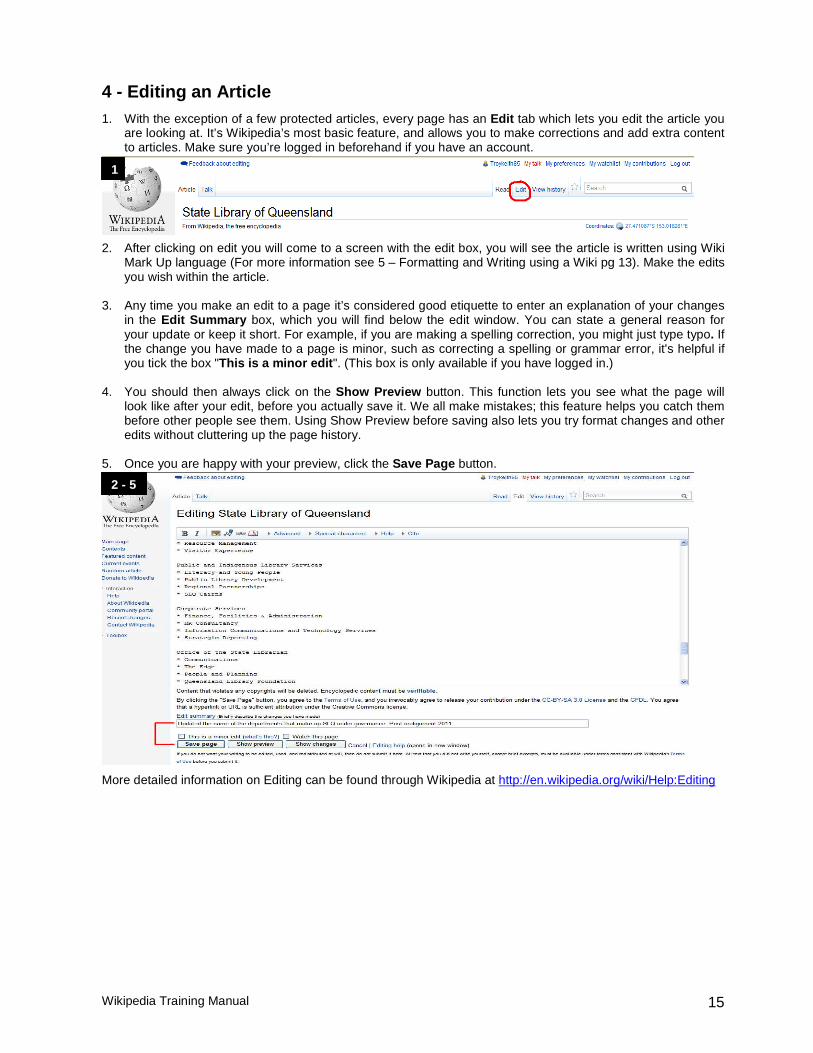
4 - Editing an Article 1. With the exception of a few protected articles, every page has an Edit tab which lets you edit the article you
are looking at. It’s Wikipedia’s most basic feature, and allows you to make corrections and add extra content to articles. Make sure you’re logged in beforehand if you have an account.
2. After clicking on edit you will come to a screen with the edit box, you will see the article is written using Wiki Mark Up language (For more information see 5 – Formatting and Writing using a Wiki pg 13). Make the edits you wish within the article.
3. Any time you make an edit to a page it’s considered good etiquette to enter an explanation of your changes
in the Edit Summary box, which you will find below the edit window. You can state a general reason for your update or keep it short. For example, if you are making a spelling correction, you might just type typo. If the change you have made to a page is minor, such as correcting a spelling or grammar error, it's helpful if you tick the box "This is a minor edit ". (This box is only available if you have logged in.)
4. You should then always click on the Show Preview button. This function lets you see what the page will
look like after your edit, before you actually save it. We all make mistakes; this feature helps you catch them before other people see them. Using Show Preview before saving also lets you try format changes and other edits without cluttering up the page history.
5. Once you are happy with your preview, click the Save Page button.
More detailed information on Editing can be found through Wikipedia at http://en.wikipedia.org/wiki/Help:Editing
1
2 - 5
Wikipedia Training Manual 16
5 – View an Article’s History and Reverting an Edit
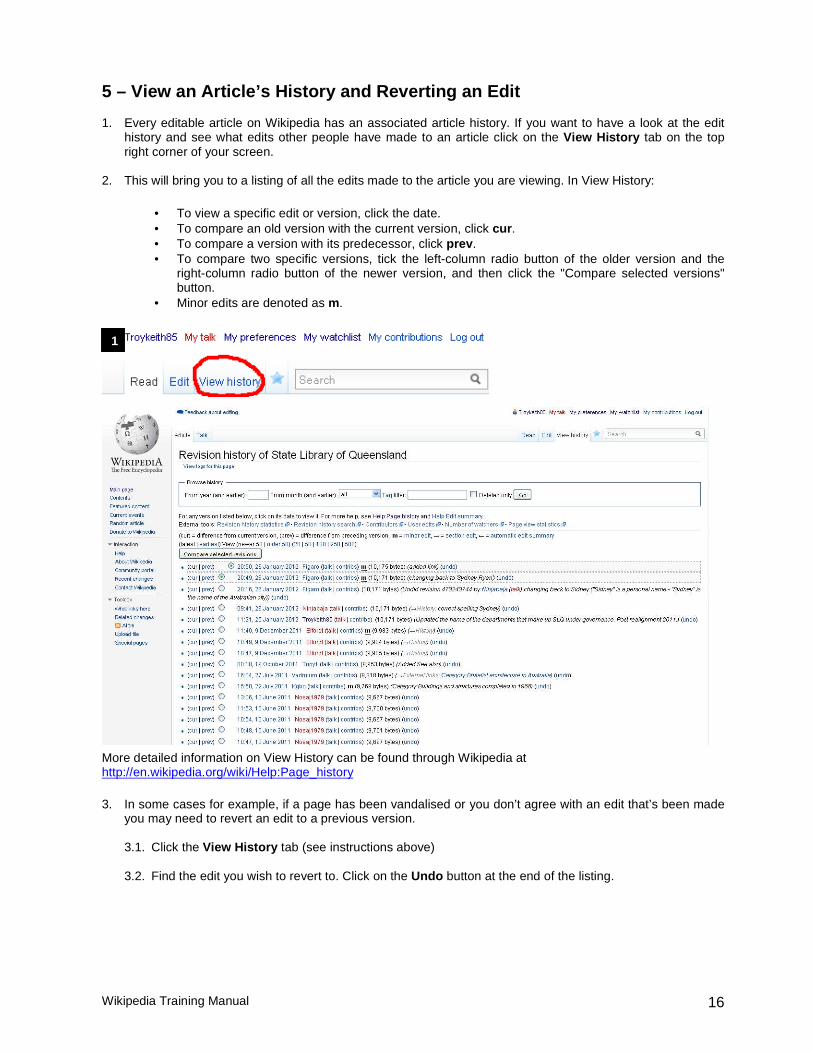
1. Every editable article on Wikipedia has an associated article history. If you want to have a look at the edit history and see what edits other people have made to an article click on the View History tab on the top right corner of your screen.
2. This will bring you to a listing of all the edits made to the article you are viewing. In View History:
• To view a specific edit or version, click the date. • To compare an old version with the current version, click cur . • To compare a version with its predecessor, click prev . • To compare two specific versions, tick the left-column radio button of the older version and the
right-column radio button of the newer version, and then click the "Compare selected versions" button.
• Minor edits are denoted as m.
More detailed information on View History can be found through Wikipedia at http://en.wikipedia.org/wiki/Help:Page_history
3. In some cases for example, if a page has been vandalised or you don’t agree with an edit that’s been made you may need to revert an edit to a previous version.
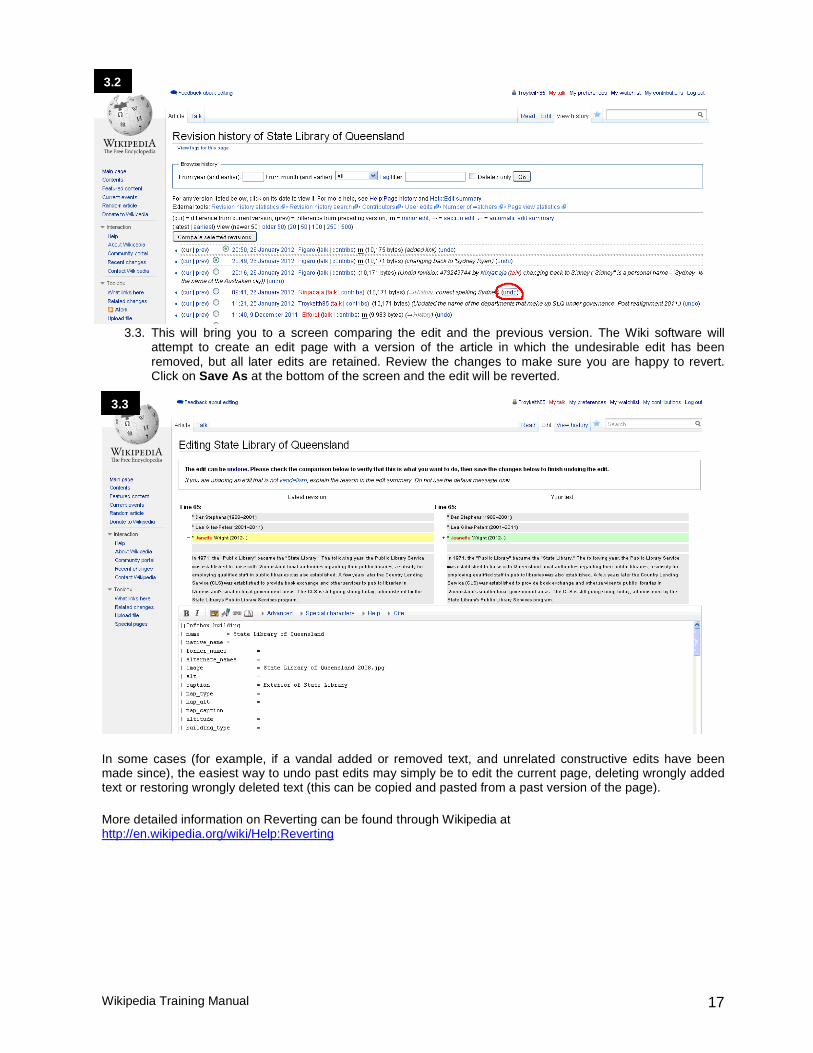
3.1. Click the View History tab (see instructions above) 3.2. Find the edit you wish to revert to. Click on the Undo button at the end of the listing.
1
Wikipedia Training Manual 17
3.3. This will bring you to a screen comparing the edit and the previous version. The Wiki software will attempt to create an edit page with a version of the article in which the undesirable edit has been removed, but all later edits are retained. Review the changes to make sure you are happy to revert. Click on Save As at the bottom of the screen and the edit will be reverted.
In some cases (for example, if a vandal added or removed text, and unrelated constructive edits have been made since), the easiest way to undo past edits may simply be to edit the current page, deleting wrongly added text or restoring wrongly deleted text (this can be copied and pasted from a past version of the page).
More detailed information on Reverting can be found through Wikipedia at http://en.wikipedia.org/wiki/Help:Reverting
3.3
3.2
Wikipedia Training Manual 18
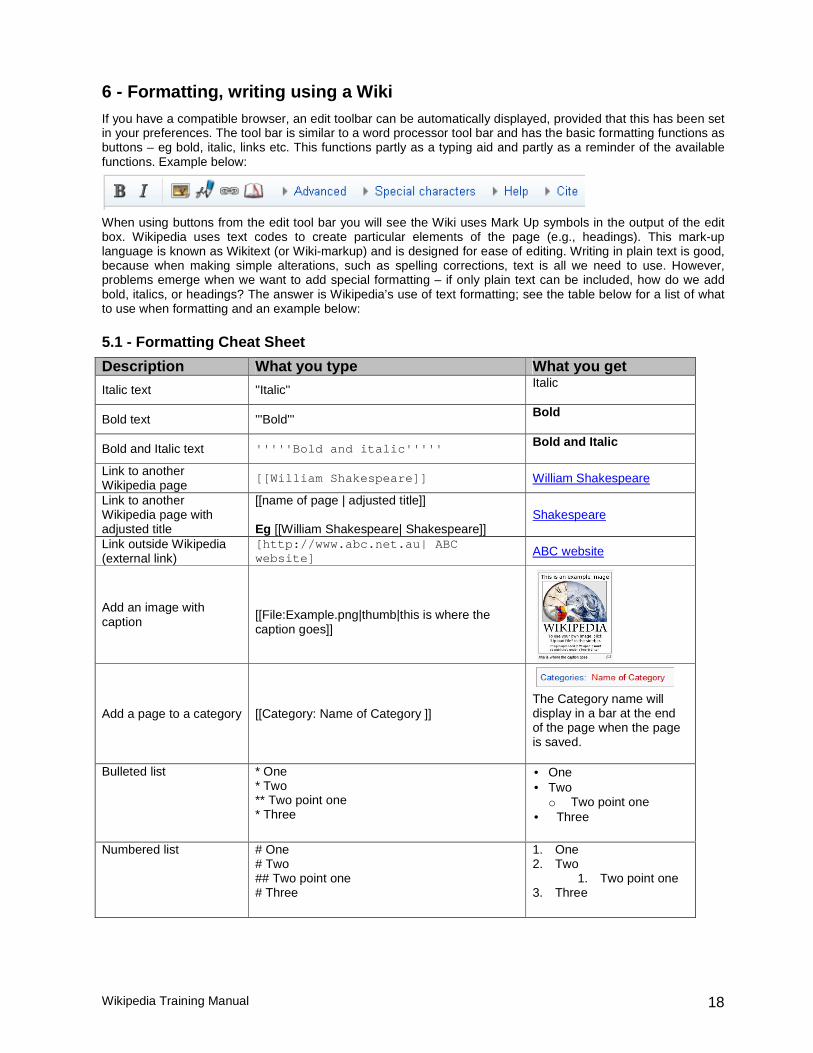
6 - Formatting, writing using a Wiki If you have a compatible browser, an edit toolbar can be automatically displayed, provided that this has been set in your preferences. The tool bar is similar to a word processor tool bar and has the basic formatting functions as buttons – eg bold, italic, links etc. This functions partly as a typing aid and partly as a reminder of the available functions. Example below:
When using buttons from the edit tool bar you will see the Wiki uses Mark Up symbols in the output of the edit box. Wikipedia uses text codes to create particular elements of the page (e.g., headings). This mark-up language is known as Wikitext (or Wiki-markup) and is designed for ease of editing. Writing in plain text is good, because when making simple alterations, such as spelling corrections, text is all we need to use. However, problems emerge when we want to add special formatting – if only plain text can be included, how do we add bold, italics, or headings? The answer is Wikipedia’s use of text formatting; see the table below for a list of what to use when formatting and an example below:
5.1 - Formatting Cheat Sheet
Description What you type What you get
Italic text ''Italic'' Italic
Bold text '''Bold''' Bold
Bold and Italic text '''''Bold and italic''''' Bold and Italic
Link to another Wikipedia page
[[William Shakespeare]] William Shakespeare
Link to another Wikipedia page with adjusted title
[[name of page | adjusted title]] Eg [[William Shakespeare| Shakespeare]]
Shakespeare
Link outside Wikipedia (external link)
[http://www.abc.net.au| ABC website] ABC website
Add an image with caption
[[File:Example.png|thumb|this is where the caption goes]]
Add a page to a category [[Category: Name of Category ]]
The Category name will display in a bar at the end of the page when the page is saved.
Bulleted list * One * Two ** Two point one * Three
• One • Two
o Two point one • Three
Numbered list # One # Two ## Two point one # Three
1. One 2. Two
1. Two point one 3. Three
Wikipedia Training Manual 19
5.2 - Example of Text (Mark Up)
More detailed information on Formatting and Wiki Mark Up can be found through Wikipedia at http://en.wikipedia.org/wiki/Help:Wiki_markup More detailed information on the Edit Toolbar can be found through Wikipedia at http://en.wikipedia.org/wiki/Help:Edit_toolbar
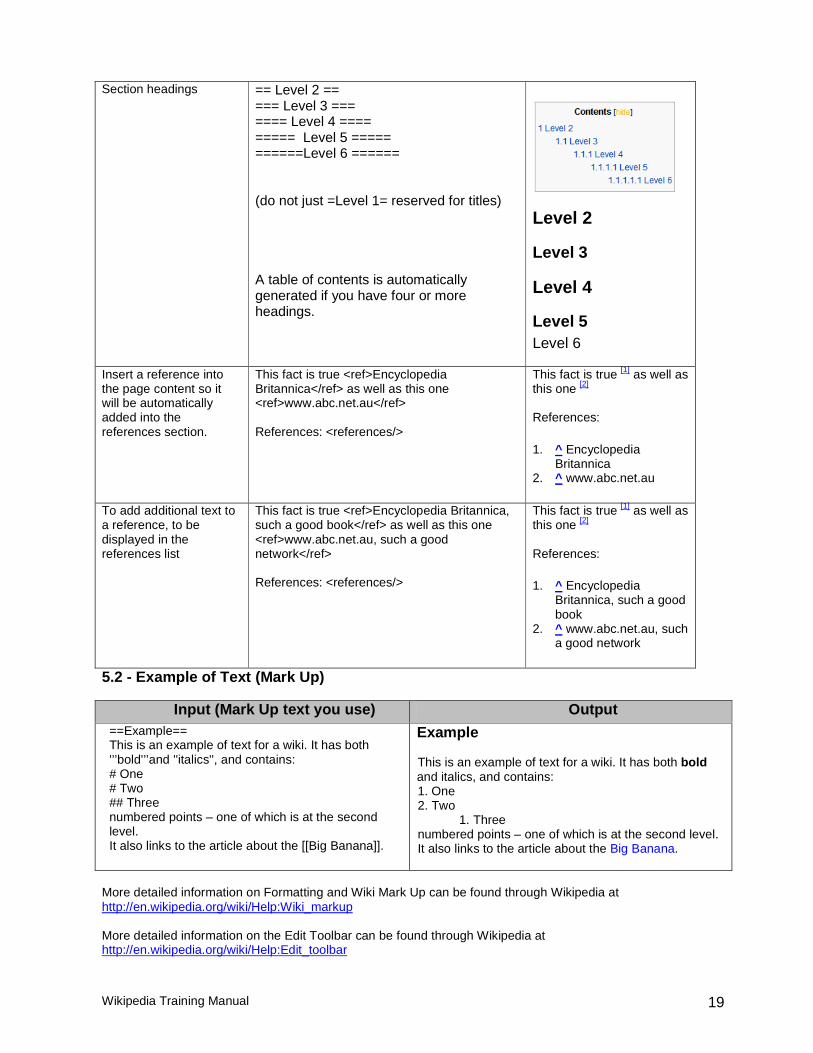
Section headings == Level 2 == === Level 3 === ==== Level 4 ==== ===== Level 5 ===== ======Level 6 ====== (do not just =Level 1= reserved for titles) A table of contents is automatically generated if you have four or more headings.
Level 2
Level 3
Level 4
Level 5 Level 6
Insert a reference into the page content so it will be automatically added into the references section.
This fact is true <ref>Encyclopedia Britannica</ref> as well as this one <ref>www.abc.net.au</ref> References: <references/>
This fact is true [1] as well as this one [2]
References:
1. ^ Encyclopedia Britannica
2. ^ www.abc.net.au
To add additional text to a reference, to be displayed in the references list
This fact is true <ref>Encyclopedia Britannica, such a good book</ref> as well as this one <ref>www.abc.net.au, such a good network</ref> References: <references/>
This fact is true [1] as well as this one [2] References:
1. ^ Encyclopedia Britannica, such a good book
2. ^ www.abc.net.au, such a good network
Input (Mark Up text you use) Output ==Example== This is an example of text for a wiki. It has both '’’bold'’’and ''italics'', and contains: # One # Two ## Three numbered points – one of which is at the second level. It also links to the article about the [[Big Banana]].
Example This is an example of text for a wiki. It has both bold and italics, and contains: 1. One 2. Two 1. Three numbered points – one of which is at the second level. It also links to the article about the Big Banana.
Wikipedia Training Manual 20
7 – Adding Categories to your article Categories are intended to group together pages on similar subjects. Categories are normally found at the bottom of an article page. Clicking the category name brings up a category page listing the articles (or other pages) that have been added to that particular category. To help guide traffic to your page add some categories to your article, it’s similar to adding metadata to a webpage.
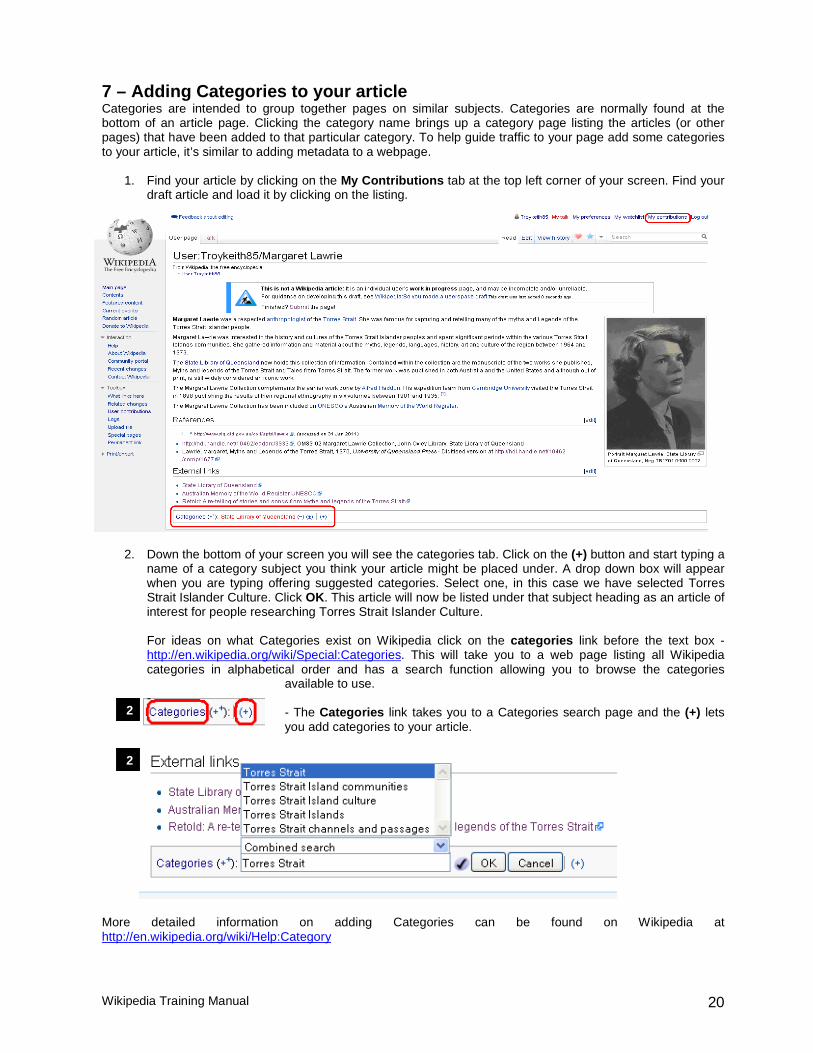
1. Find your article by clicking on the My Contributions tab at the top left corner of your screen. Find your draft article and load it by clicking on the listing.
2. Down the bottom of your screen you will see the categories tab. Click on the (+) button and start typing a
name of a category subject you think your article might be placed under. A drop down box will appear when you are typing offering suggested categories. Select one, in this case we have selected Torres Strait Islander Culture. Click OK. This article will now be listed under that subject heading as an article of interest for people researching Torres Strait Islander Culture.
For ideas on what Categories exist on Wikipedia click on the categories link before the text box -http://en.wikipedia.org/wiki/Special:Categories. This will take you to a web page listing all Wikipedia categories in alphabetical order and has a search function allowing you to browse the categories
available to use. -
- The Categories link takes you to a Categories search page and the (+) lets you add categories to your article.
More detailed information on adding Categories can be found on Wikipedia at http://en.wikipedia.org/wiki/Help:Category
2
2
Wikipedia Training Manual 21
8 – Submitting your draft article So you’re happy with your Wikipedia draft article. It has lots of internal Wiki links, the content has been referenced, you have external links for people who want more information, it has a picture and the article has been given categories. It’s now time to submit the article to be reviewed by the Wiki community and if it’s approved the article will become live.
1. Find your article by clicking on the My Contributions tab at the top left corner of your screen. Find your draft article and load it by clicking on the listing.
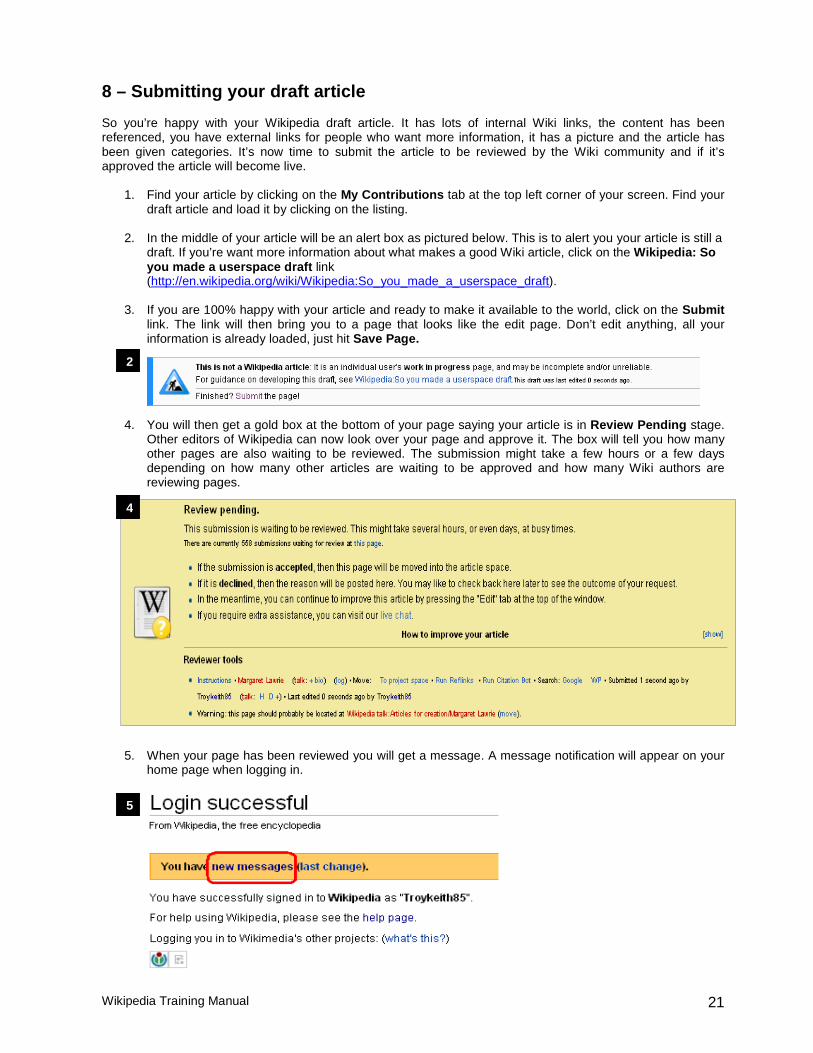
2. In the middle of your article will be an alert box as pictured below. This is to alert you your article is still a
draft. If you’re want more information about what makes a good Wiki article, click on the Wikipedia: So you made a userspace draft link (http://en.wikipedia.org/wiki/Wikipedia:So_you_made_a_userspace_draft).
3. If you are 100% happy with your article and ready to make it available to the world, click on the Submit
link. The link will then bring you to a page that looks like the edit page. Don’t edit anything, all your information is already loaded, just hit Save Page.
4. You will then get a gold box at the bottom of your page saying your article is in Review Pending stage. Other editors of Wikipedia can now look over your page and approve it. The box will tell you how many other pages are also waiting to be reviewed. The submission might take a few hours or a few days depending on how many other articles are waiting to be approved and how many Wiki authors are reviewing pages.
5. When your page has been reviewed you will get a message. A message notification will appear on your
home page when logging in.
2
4
5
Wikipedia Training Manual 22
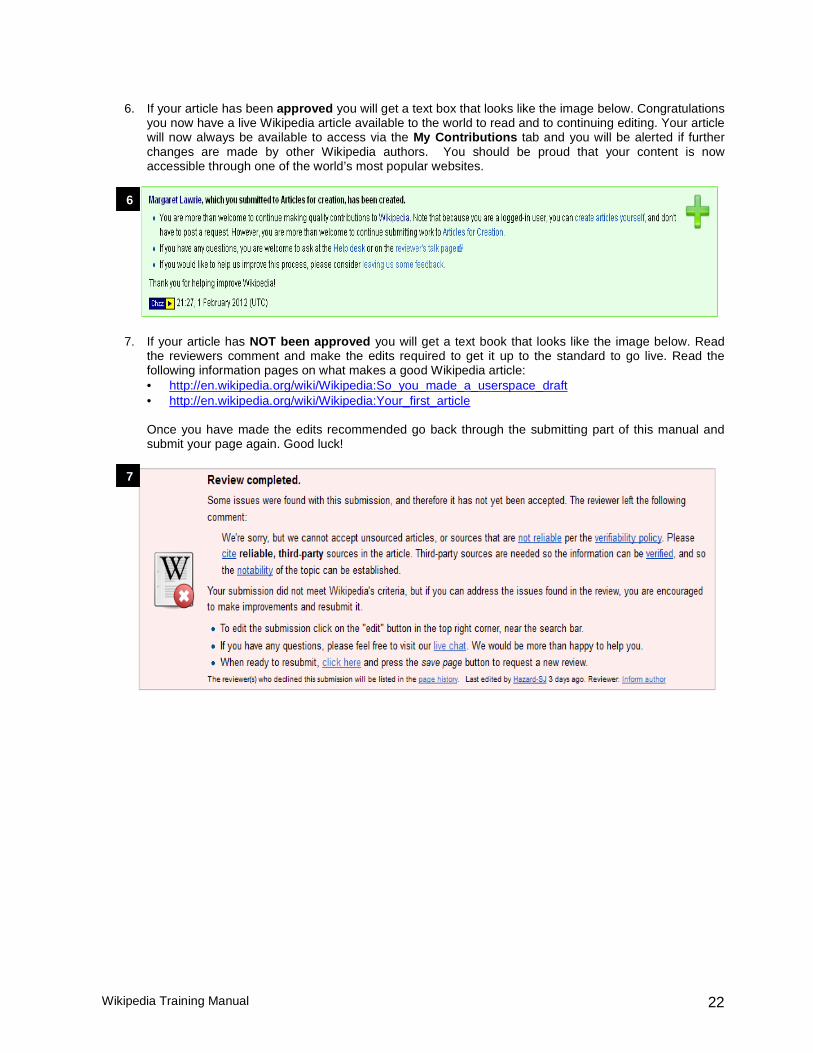
6. If your article has been approved you will get a text box that looks like the image below. Congratulations
you now have a live Wikipedia article available to the world to read and to continuing editing. Your article will now always be available to access via the My Contributions tab and you will be alerted if further changes are made by other Wikipedia authors. You should be proud that your content is now accessible through one of the world’s most popular websites.
7. If your article has NOT been approved you will get a text book that looks like the image below. Read the reviewers comment and make the edits required to get it up to the standard to go live. Read the following information pages on what makes a good Wikipedia article: • http://en.wikipedia.org/wiki/Wikipedia:So_you_made_a_userspace_draft • http://en.wikipedia.org/wiki/Wikipedia:Your_first_article Once you have made the edits recommended go back through the submitting part of this manual and submit your page again. Good luck!
6
7
Wikipedia Training Manual 23
9 – Cross Linking – Getting online traffic to your page To get Wikipedia online traffic reading your article why not create a link to your article from another related article. Click edit, add a sentence about your article, then create an internal link. You don’t want an orphaned article. If you want to see what articles are linking to your article click on the side tool bar What links here link. More information about lonely pages can be found http://en.wikipedia.org/wiki/Wikipedia_talk:Special:LonelyPages
10 – Statistics – How many people are looking at yo ur
article? So you have made a Wikipedia article, aren’t you interested to see how many people have read your article?
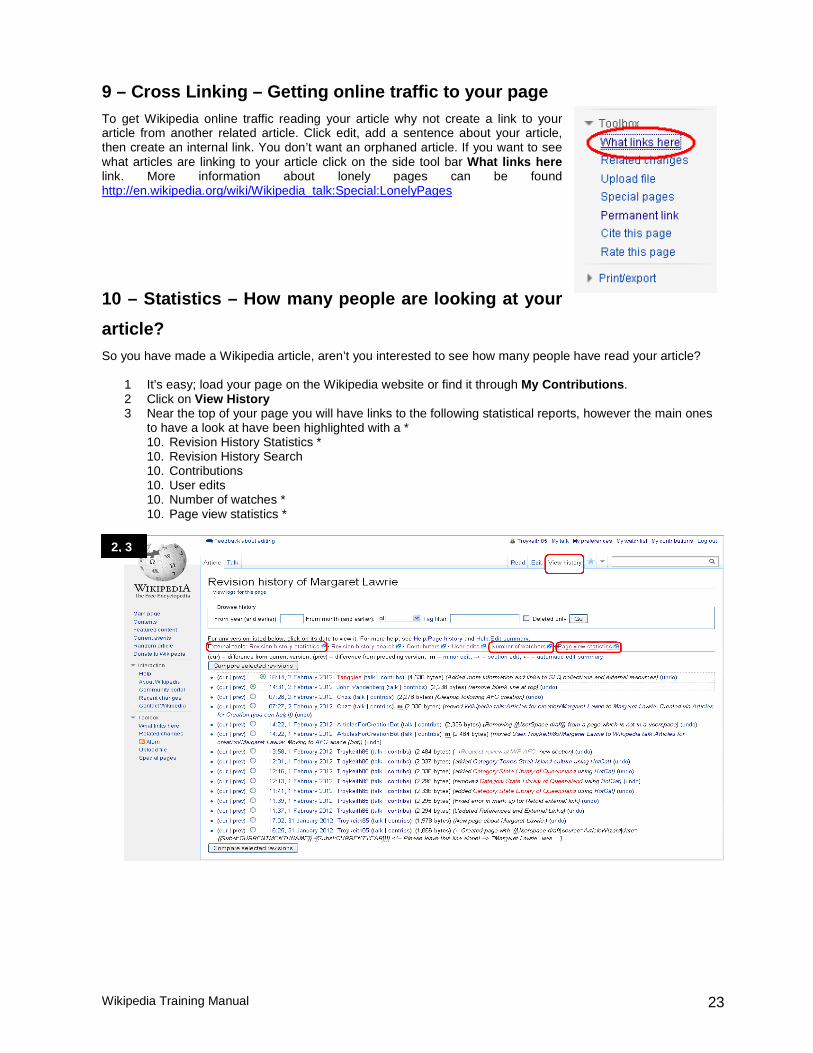
1 It’s easy; load your page on the Wikipedia website or find it through My Contributions . 2 Click on View History 3 Near the top of your page you will have links to the following statistical reports, however the main ones
to have a look at have been highlighted with a * 10. Revision History Statistics * 10. Revision History Search 10. Contributions 10. User edits 10. Number of watches * 10. Page view statistics *
2, 3
Wikipedia Training Manual 24
11 – Wikimedia Commons Wikimedia Commons (http://commons.wikimedia.org) is a media file repository making available public domain and freely-licensed educational media content (images, sound and video clips) to everyone. It allows contributors to freely upload and share media works that have educational value with the wider community. As of February 2012, Wikimedia Commons has over 12 millions media files uploaded. All media uploaded to Wikimedia Commons must be available under a free licence. This means that each and every file can be used by anybody, for any purpose (including “commercial” use). Wikimedia Commons encourages copyright holders to licence their files under the ‘Creative Commons’ licences and does not use “non-commercial” and “no-derivative” Creative Commons clauses as they are too restrictive and files under these licences are not permitted. Images that are in the Public Domain, and have not owner are very welcome! Using files from Wikimedia Commons can visually enhance the content in your Wikipedia article. See 6 – Creating a new article , step 8 pg 17 for instructions for adding a media file to your Wikipedia article. Steps for uploading a media file to Wikimedia Commo ns. Uploading single images or small batches of images is very simple using the Commons’ “upload wizard”, however uploading lots of images is complicated. The following instructions focus on uploading images, however uploading other sorts of files (audio, video, etc) follows much the same procedure.
1. Log into Wikimedia Commons using your Wiki account. (http://commons.wikimedia.org) 2. Click on the Upload File link on the left hand tool bar.
1, 2
Wikipedia Training Manual 25
3. Read the information provided to see if your media files complies with the Wikimedia Commons guidelines. Go to the bottom of the screen and click on next .
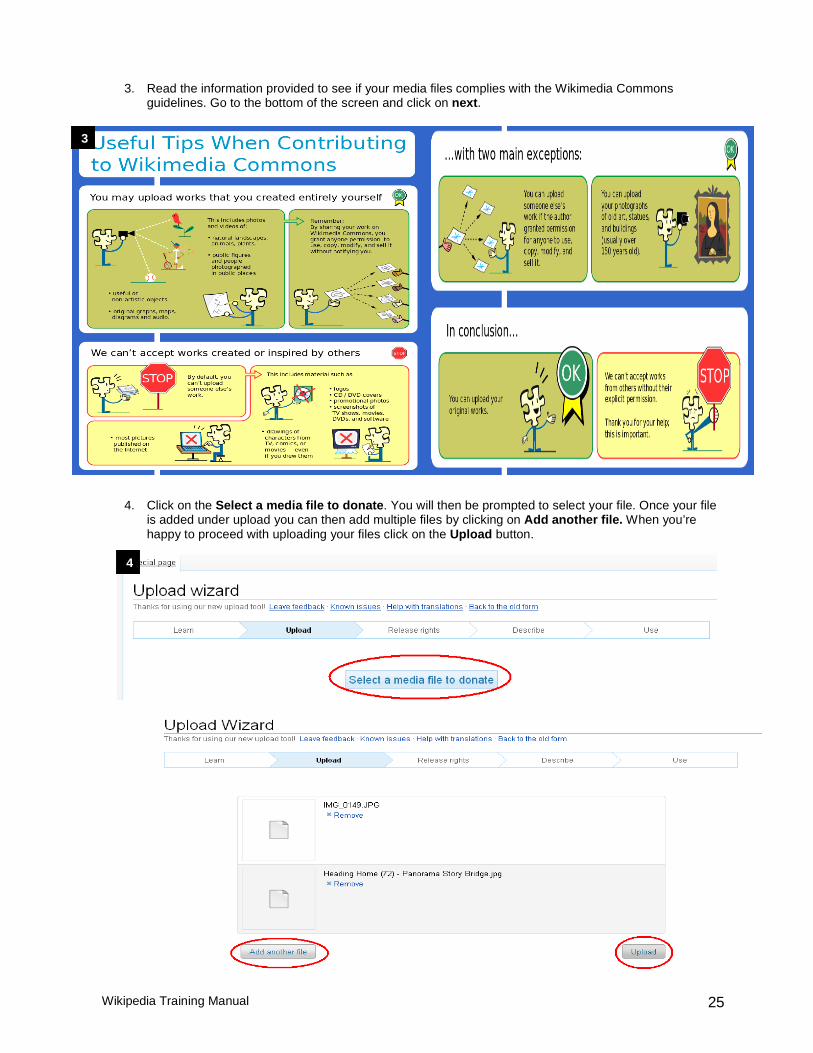
4. Click on the Select a media file to donate . You will then be prompted to select your file. Once your file
is added under upload you can then add multiple files by clicking on Add another file. When you’re happy to proceed with uploading your files click on the Upload button.
3
4
Wikipedia Training Manual 26
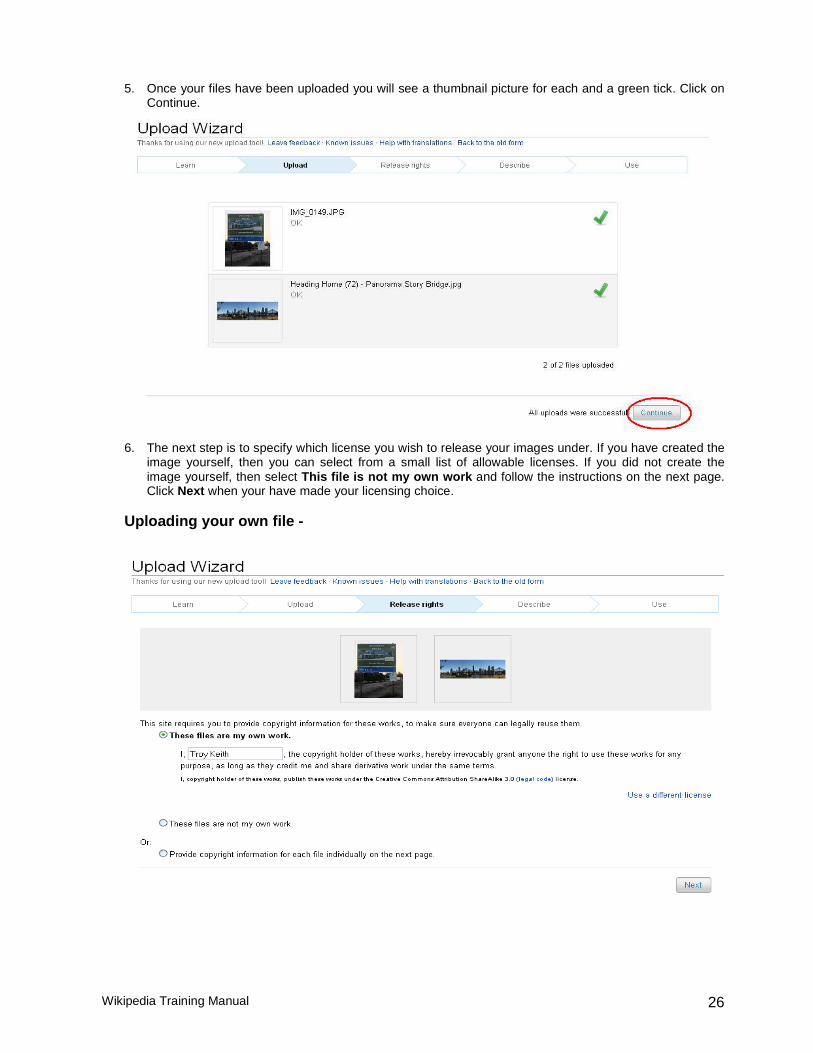
5. Once your files have been uploaded you will see a thumbnail picture for each and a green tick. Click on Continue.
6. The next step is to specify which license you wish to release your images under. If you have created the image yourself, then you can select from a small list of allowable licenses. If you did not create the image yourself, then select This file is not my own work and follow the instructions on the next page. Click Next when your have made your licensing choice.
Uploading your own file -
Wikipedia Training Manual 27
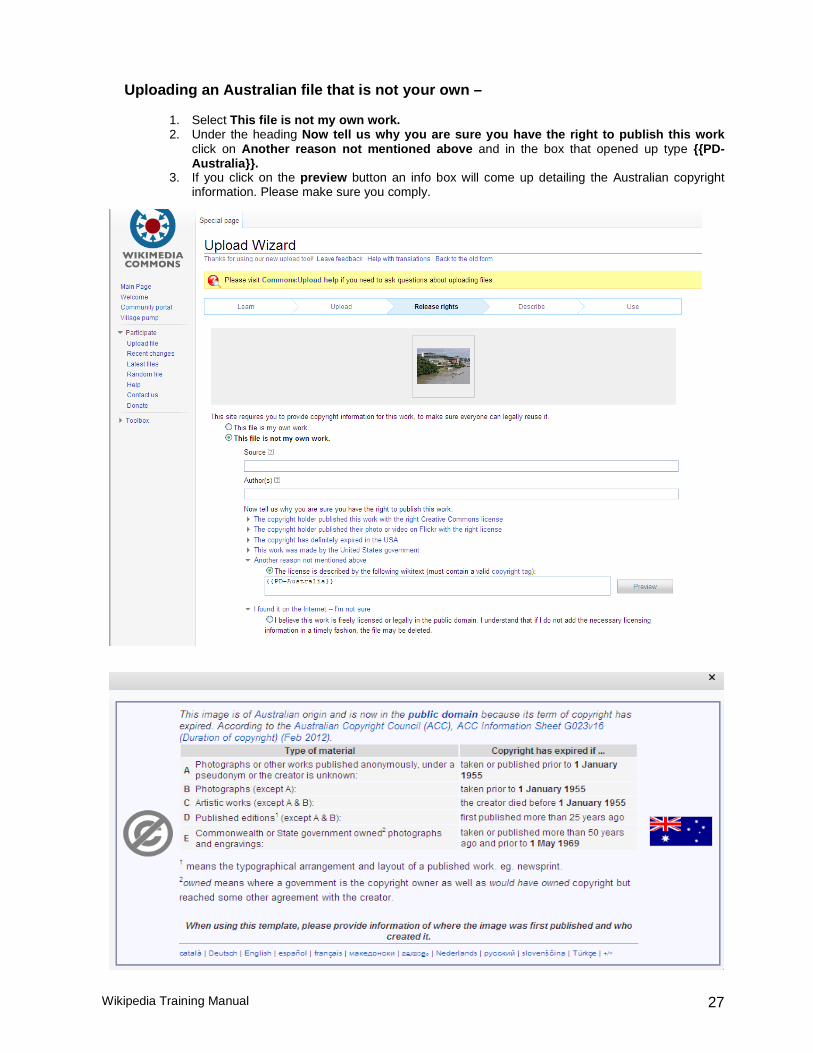
Uploading an Australian file that is not your own –
1. Select This file is not my own work. 2. Under the heading Now tell us why you are sure you have the right to publish this work
click on Another reason not mentioned above and in the box that opened up type {{PD-Australia}}.
3. If you click on the preview button an info box will come up detailing the Australian copyright information. Please make sure you comply.
Wikipedia Training Manual 28
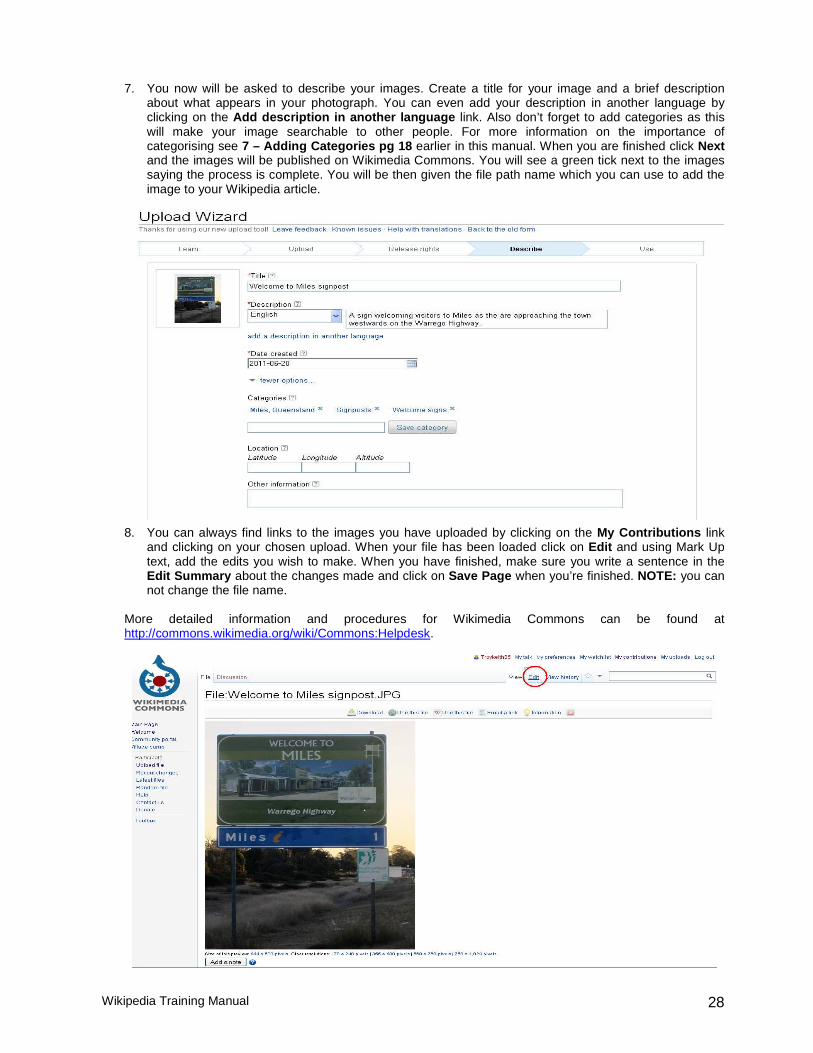
7. You now will be asked to describe your images. Create a title for your image and a brief description about what appears in your photograph. You can even add your description in another language by clicking on the Add description in another language link. Also don’t forget to add categories as this will make your image searchable to other people. For more information on the importance of categorising see 7 – Adding Categories pg 18 earlier in this manual. When you are finished click Next and the images will be published on Wikimedia Commons. You will see a green tick next to the images saying the process is complete. You will be then given the file path name which you can use to add the image to your Wikipedia article.
8. You can always find links to the images you have uploaded by clicking on the My Contributions link and clicking on your chosen upload. When your file has been loaded click on Edit and using Mark Up text, add the edits you wish to make. When you have finished, make sure you write a sentence in the Edit Summary about the changes made and click on Save Page when you’re finished. NOTE: you can not change the file name.
More detailed information and procedures for Wikimedia Commons can be found at http://commons.wikimedia.org/wiki/Commons:Helpdesk.
Wikipedia Training Manual 29
11 – Useful Links to more information
Wikipedia – Background information – What it is, ho w it works? • http://upload.wikimedia.org/wikipedia/commons/f/f0/Welcome2WP_English_082310.pdf • http://en.wikipedia.org/wiki/File:Wikipedia_video_tutorial-1-Editing-en.ogv • http://commons.wikimedia.org/wiki/File:Wikipedia_video_tutorial-2-Reliability-en.ogv
Wikipedia Help Pages mentioned throughout this manu al
• http://en.wikipedia.org/wiki/Help:Contents – Contents of Help articles • http://en.wikipedia.org/wiki/Help:Logging_in#Creating_an_account – Creating an Account • http://en.wikipedia.org/wiki/Help:My_preferences – My Preferences • http://en.wikipedia.org/wiki/Help:My_watchlist – My Watchlist • http://en.wikipedia.org/wiki/Help:My_contributions – My Contributions • http://en.wikipedia.org/wiki/Help:User_page – My User Page • http://en.wikipedia.org/wiki/Help:Editing – Editing an article • http://en.wikipedia.org/wiki/Help:Page_history – View History • http://en.wikipedia.org/wiki/Help:Reverting – Reverting and Edit • http://en.wikipedia.org/wiki/Help:Wiki_markup – Wikipedia Mark Up • http://en.wikipedia.org/wiki/Help:Edit_toolbar – Edit tool bar • http://en.wikipedia.org/wiki/Help:Redirect – Redirecting a page • http://en.wikipedia.org/wiki/Help:Linking – Making links within an article • http://en.wikipedia.org/wiki/Help:Referencing - Referencing • http://en.wikipedia.org/wiki/Wikipedia:Footnotes – Making footnote referencing • http://en.wikipedia.org/wiki/Help:Creating_a_new_page – Info on creating a new page • http://en.wikipedia.org/wiki/Wikipedia:Your_first_article – Info what makes a good article • http://en.wikipedia.org/wiki/Special:Categories - Categories • http://en.wikipedia.org/wiki/Wikipedia:So_you_made_a_userspace_draft –Info on a draft Userspace
Helpful online Tutorials and Manuals
• http://en.wikipedia.org/wiki/Wikipedia:Tutorial – Overall Wikipedia tutorial • http://en.wikipedia.org/wiki/Wikipedia:Article_wizard – Article Wizard tutorial • http://en.wikipedia.org/wiki/Help:Wikipedia:_The_Missing_Manual – An overall Wikipedia help manual • http://en.wikipedia.org/wiki/Wikipedia:Manual_of_Style – Wikipedia Style Manual
Wikimedia Australia Fact Sheets • http://wikimedia.org.au/wiki/File:Creating_an_Account.pdf – Creating an account • http://wikimedia.org.au/wiki/File:Editing_Wikis_large_text.pdf – Editing Wiki’s • http://wikimedia.org.au/wiki/File:Wikimedia_Commons_for_photographers.pdf – Wikimedia Commons
Wikipedia Training Manual 30
12 – Notes Page ________________________________________________________________________
________________________________________________________________________
________________________________________________________________________
________________________________________________________________________
________________________________________________________________________
________________________________________________________________________
________________________________________________________________________
________________________________________________________________________
________________________________________________________________________
________________________________________________________________________
________________________________________________________________________
________________________________________________________________________
________________________________________________________________________
________________________________________________________________________
________________________________________________________________________
________________________________________________________________________