Embed Size (px)
Citation preview

WORTH A THOUSAND WORDS
To learn more about painting and using tools and to pick up a multitude of tricks and techniques, check out the Formula P3 hobby DVD Modeling & Painting, Vol. 1: Core Techniques. It provides a solid visual databank of useful information for both new and experienced hobbyists.
Painting board game miniatures can be great way to improve how your game looks as well as to practice your painting skills. When working with board game miniatures, I like to choose a couple I really like and paint them to a decent standard. I then speed-paint all of the monsters and minions. This gets the job done quickly so you can start playing your game. You’ll be surprised by how good it all looks together—the board and all of its components laid out as one. If you feel overwhelmed by the number of miniatures, you can always break it up into what you will need for each individual scenario.
For this tutorial, I have chosen three miniatures from Widower’s Wood: the blackclad to demonstrate a hero paint job, a bog trog spearman to demonstrate quick batch painting, and the tatzylwurm, which is a larger model.
If you are new to miniatures painting, this may seem a little overwhelming, so I would like to briefly introduce you to some techniques and ideas. These are not hard and fast rules but more information I wish I’d had when I started painting that will hopefully help you speed up your own learning process. If this piques your interest in painting, there are tons of resources out there to help you continue growing your skill.
To give yourself better control when you are painting a model, it helps to mount it onto something so you hold it comfortably without touching it too much. I use corks, but you can also use old paint pots or pill bottles. You can adhere the model to the tops of these with double-sided tape or sticky tack, or you can even light glue it down.
I almost always add a little water to my paint before I apply it to the model. It is also important to not have too much paint on your brush when you apply it to your model or else you will lose some of your control. To avoid too much paint, it’s a good idea to have a paper towel handy to wipe your brush on before you apply it to your model. When applying paint, you want to be able to paint nice thin lines.
It also helps to have a palette where you can mix paint. This can be anything from an old lid to a yogurt container to something more “official” that you buy in an art store.
When starting out, you want two nice brushes with good tips on them. One should be larger (for basecoating and layering), and the other should be your smaller one for clean up and details. When painting, you want to clean your brush regularly and avoid letting paint dry on it or in the well, which is where the bristles meet the handle.
If you are just starting out painting, the most important thing is…to paint! Don’t allow yourself to be stressed out or down on yourself. The more you paint, the better you’ll get, and the more you will understand
Formula P3 Hobby Tool and Paint Racks
Formula P3 Paints
Formula P3 Super Glue
Formula P3 Paint Brushes
WIDOWER'S WOOD PAINT GUIDEthe process. This may seem simple, but it’s important to keep in mind throughout the sometimes-challenging painting process. Painting board game miniatures can be a great starting place because the figures are inexpensive and there are a lot of them to practice on. I know from personal experience that there’s nothing like sitting down to a fully painted board game with a group of friends. Painted miniatures add a lot to the experience and can make you feel attached to the game because you feel you had a part in creating the overall experience.
By: Michael Archer
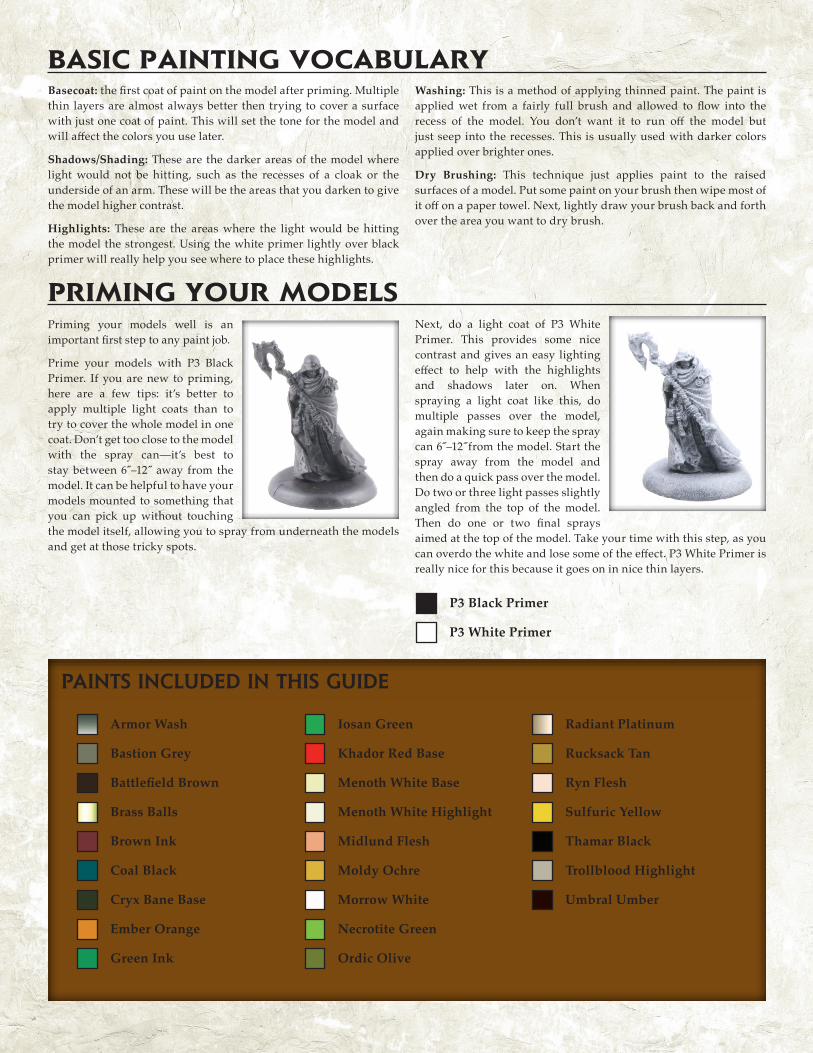
Priming your models well is an important first step to any paint job.
Prime your models with P3 Black Primer. If you are new to priming, here are a few tips: it’s better to apply multiple light coats than to try to cover the whole model in one coat. Don’t get too close to the model with the spray can—it’s best to stay between 6˝–12˝ away from the model. It can be helpful to have your models mounted to something that you can pick up without touching the model itself, allowing you to spray from underneath the models and get at those tricky spots.
Basecoat: the first coat of paint on the model after priming. Multiple thin layers are almost always better then trying to cover a surface with just one coat of paint. This will set the tone for the model and will affect the colors you use later.
Shadows/Shading: These are the darker areas of the model where light would not be hitting, such as the recesses of a cloak or the underside of an arm. These will be the areas that you darken to give the model higher contrast.
Highlights: These are the areas where the light would be hitting the model the strongest. Using the white primer lightly over black primer will really help you see where to place these highlights.
BASIC PAINTING VOCABULARY
PRIMING YOUR MODELS
P3 Black Primer
P3 White Primer
Washing: This is a method of applying thinned paint. The paint is applied wet from a fairly full brush and allowed to flow into the recess of the model. You don’t want it to run off the model but just seep into the recesses. This is usually used with darker colors applied over brighter ones.
Dry Brushing: This technique just applies paint to the raised surfaces of a model. Put some paint on your brush then wipe most of it off on a paper towel. Next, lightly draw your brush back and forth over the area you want to dry brush.
Next, do a light coat of P3 White Primer. This provides some nice contrast and gives an easy lighting effect to help with the highlights and shadows later on. When spraying a light coat like this, do multiple passes over the model, again making sure to keep the spray can 6˝–12˝from the model. Start the spray away from the model and then do a quick pass over the model. Do two or three light passes slightly angled from the top of the model. Then do one or two final sprays aimed at the top of the model. Take your time with this step, as you can overdo the white and lose some of the effect. P3 White Primer is really nice for this because it goes on in nice thin layers.
PAINTS INCLUDED IN THIS GUIDE
Armor Wash
Bastion Grey
BattlefieldBrown
Brass Balls
Brown Ink
Coal Black
Cryx Bane Base
Ember Orange
Green Ink
Iosan Green
Khador Red Base
Menoth White Base
Menoth White Highlight
Midlund Flesh
Moldy Ochre
Morrow White
Necrotite Green
Ordic Olive
Radiant Platinum
Rucksack Tan
Ryn Flesh
Sulfuric Yellow
Thamar Black
Trollblood Highlight
Umbral Umber
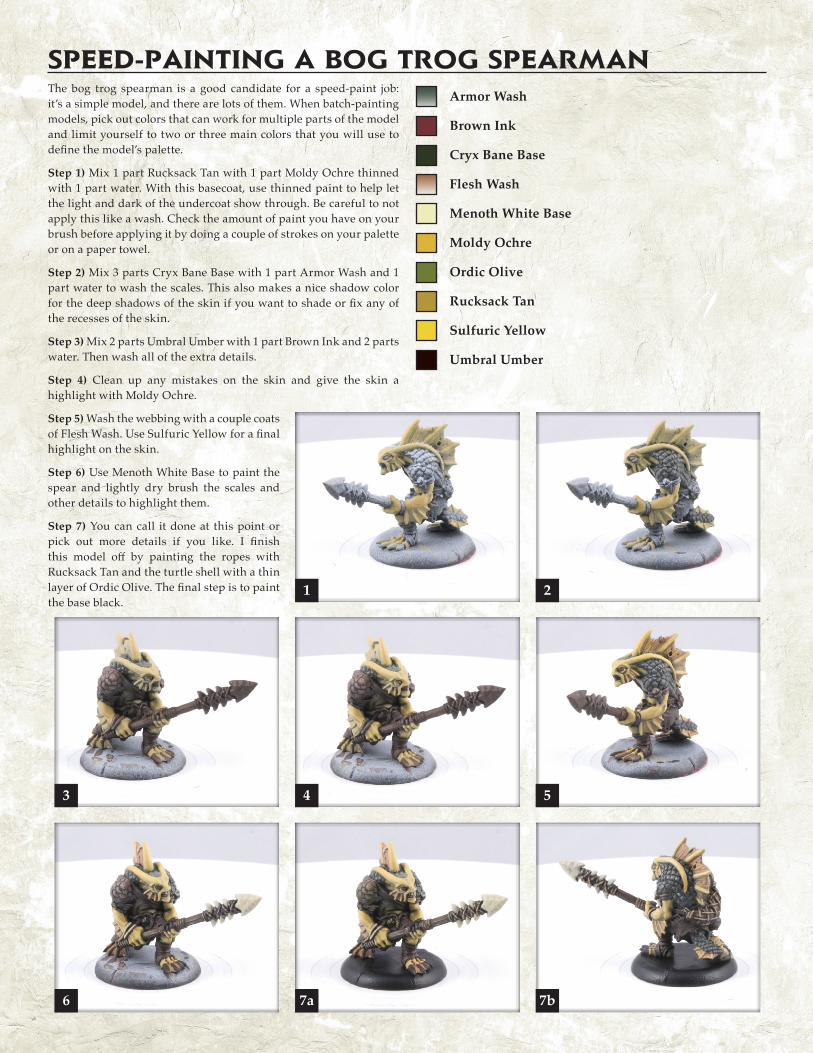
The bog trog spearman is a good candidate for a speed-paint job: it’s a simple model, and there are lots of them. When batch-painting models, pick out colors that can work for multiple parts of the model and limit yourself to two or three main colors that you will use to define the model’s palette.
Step 1) Mix 1 part Rucksack Tan with 1 part Moldy Ochre thinned with 1 part water. With this basecoat, use thinned paint to help let the light and dark of the undercoat show through. Be careful to not apply this like a wash. Check the amount of paint you have on your brush before applying it by doing a couple of strokes on your palette or on a paper towel.
Step 2) Mix 3 parts Cryx Bane Base with 1 part Armor Wash and 1 part water to wash the scales. This also makes a nice shadow color for the deep shadows of the skin if you want to shade or fix any of the recesses of the skin.
Step 3) Mix 2 parts Umbral Umber with 1 part Brown Ink and 2 parts water. Then wash all of the extra details.
Step 4) Clean up any mistakes on the skin and give the skin a highlight with Moldy Ochre.
Step 5) Wash the webbing with a couple coats of Flesh Wash. Use Sulfuric Yellow for a final highlight on the skin.
Step 6) Use Menoth White Base to paint the spear and lightly dry brush the scales and other details to highlight them.
Step 7) You can call it done at this point or pick out more details if you like. I finish this model off by painting the ropes with Rucksack Tan and the turtle shell with a thin layer of Ordic Olive. The final step is to paint the base black.
SPEED-PAINTING A BOG TROG SPEARMAN Armor Wash
Brown Ink
Cryx Bane Base
Flesh Wash
Menoth White Base
Moldy Ochre
Ordic Olive
Rucksack Tan
Sulfuric Yellow
Umbral Umber
1 2
3 4 5
6 7a 7b
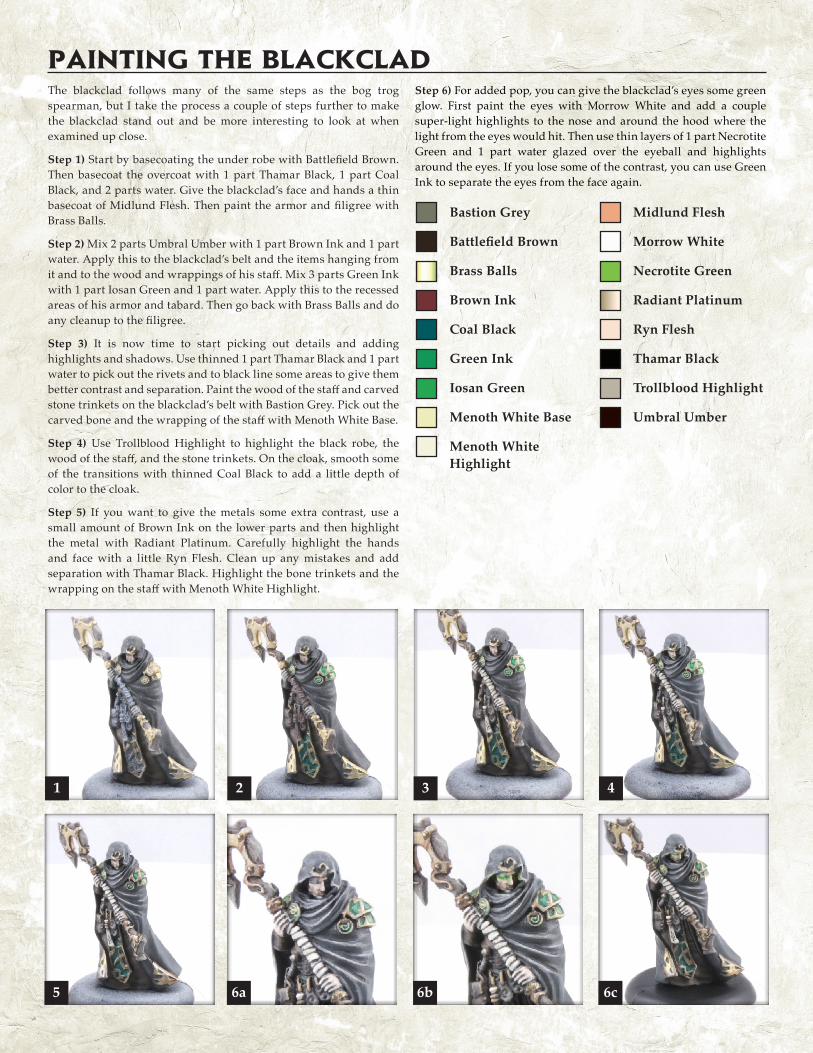
The blackclad follows many of the same steps as the bog trog spearman, but I take the process a couple of steps further to make the blackclad stand out and be more interesting to look at when examined up close.
Step 1) Start by basecoating the under robe with Battlefield Brown. Then basecoat the overcoat with 1 part Thamar Black, 1 part Coal Black, and 2 parts water. Give the blackclad’s face and hands a thin basecoat of Midlund Flesh. Then paint the armor and filigree with Brass Balls.
Step 2) Mix 2 parts Umbral Umber with 1 part Brown Ink and 1 part water. Apply this to the blackclad’s belt and the items hanging from it and to the wood and wrappings of his staff. Mix 3 parts Green Ink with 1 part Iosan Green and 1 part water. Apply this to the recessed areas of his armor and tabard. Then go back with Brass Balls and do any cleanup to the filigree.
Step 3) It is now time to start picking out details and adding highlights and shadows. Use thinned 1 part Thamar Black and 1 part water to pick out the rivets and to black line some areas to give them better contrast and separation. Paint the wood of the staff and carved stone trinkets on the blackclad’s belt with Bastion Grey. Pick out the carved bone and the wrapping of the staff with Menoth White Base.
Step 4) Use Trollblood Highlight to highlight the black robe, the wood of the staff, and the stone trinkets. On the cloak, smooth some of the transitions with thinned Coal Black to add a little depth of color to the cloak.
Step 5) If you want to give the metals some extra contrast, use a small amount of Brown Ink on the lower parts and then highlight the metal with Radiant Platinum. Carefully highlight the hands and face with a little Ryn Flesh. Clean up any mistakes and add separation with Thamar Black. Highlight the bone trinkets and the wrapping on the staff with Menoth White Highlight.
PAINTING THE BLACKCLAD
1 2 3 4
5 6a 6b 6c
Bastion Grey
BattlefieldBrown
Brass Balls
Brown Ink
Coal Black
Green Ink
Iosan Green
Menoth White Base
Menoth White Highlight
Midlund Flesh
Morrow White
Necrotite Green
Radiant Platinum
Ryn Flesh
Thamar Black
Trollblood Highlight
Umbral Umber
Step 6) For added pop, you can give the blackclad’s eyes some green glow. First paint the eyes with Morrow White and add a couple super-light highlights to the nose and around the hood where the light from the eyes would hit. Then use thin layers of 1 part Necrotite Green and 1 part water glazed over the eyeball and highlights around the eyes. If you lose some of the contrast, you can use Green Ink to separate the eyes from the face again.
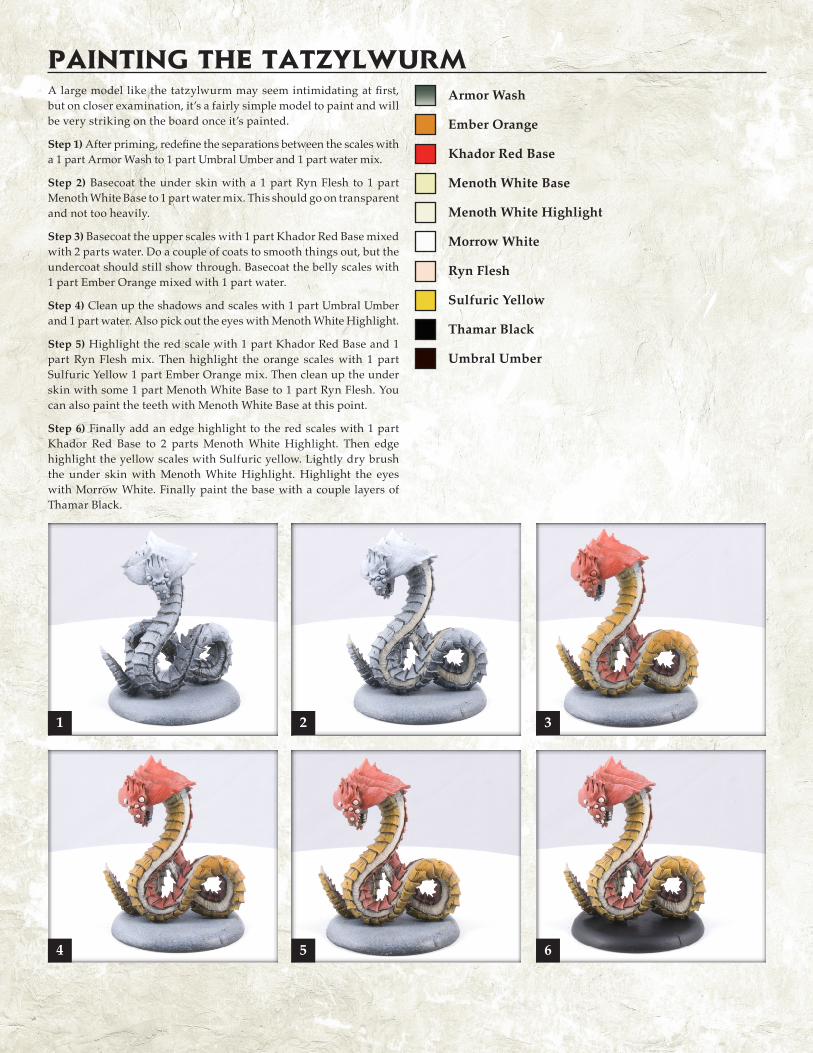
A large model like the tatzylwurm may seem intimidating at first, but on closer examination, it’s a fairly simple model to paint and will be very striking on the board once it’s painted.
Step 1) After priming, redefine the separations between the scales with a 1 part Armor Wash to 1 part Umbral Umber and 1 part water mix.
Step 2) Basecoat the under skin with a 1 part Ryn Flesh to 1 part Menoth White Base to 1 part water mix. This should go on transparent and not too heavily.
Step 3) Basecoat the upper scales with 1 part Khador Red Base mixed with 2 parts water. Do a couple of coats to smooth things out, but the undercoat should still show through. Basecoat the belly scales with 1 part Ember Orange mixed with 1 part water.
Step 4) Clean up the shadows and scales with 1 part Umbral Umber and 1 part water. Also pick out the eyes with Menoth White Highlight.
Step 5) Highlight the red scale with 1 part Khador Red Base and 1 part Ryn Flesh mix. Then highlight the orange scales with 1 part Sulfuric Yellow 1 part Ember Orange mix. Then clean up the under skin with some 1 part Menoth White Base to 1 part Ryn Flesh. You can also paint the teeth with Menoth White Base at this point.
Step 6) Finally add an edge highlight to the red scales with 1 part Khador Red Base to 2 parts Menoth White Highlight. Then edge highlight the yellow scales with Sulfuric yellow. Lightly dry brush the under skin with Menoth White Highlight. Highlight the eyes with Morrow White. Finally paint the base with a couple layers of Thamar Black.
PAINTING THE TATZYLWURM Armor Wash
Ember Orange
Khador Red Base
Menoth White Base
Menoth White Highlight
Morrow White
Ryn Flesh
Sulfuric Yellow
Thamar Black
Umbral Umber
1 2 3
4 5 6
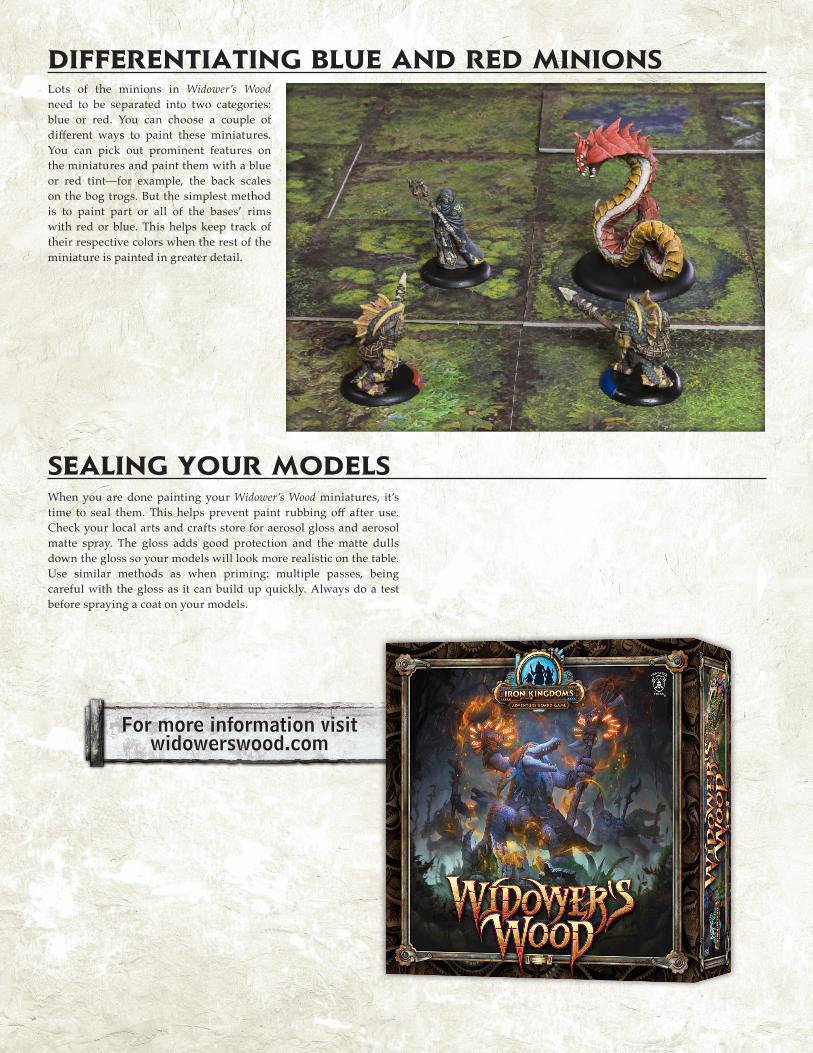
Lots of the minions in Widower’s Wood need to be separated into two categories: blue or red. You can choose a couple of different ways to paint these miniatures. You can pick out prominent features on the miniatures and paint them with a blue or red tint—for example, the back scales on the bog trogs. But the simplest method is to paint part or all of the bases’ rims with red or blue. This helps keep track of their respective colors when the rest of the miniature is painted in greater detail.
DIFFERENTIATING BLUE AND RED MINIONS
SEALING YOUR MODELSWhen you are done painting your Widower’s Wood miniatures, it’s time to seal them. This helps prevent paint rubbing off after use. Check your local arts and crafts store for aerosol gloss and aerosol matte spray. The gloss adds good protection and the matte dulls down the gloss so your models will look more realistic on the table. Use similar methods as when priming: multiple passes, being careful with the gloss as it can build up quickly. Always do a test before spraying a coat on your models.
For more information visit widowerswood.com


![ERRATA - Privateer Pressfiles.privateerpress.com/level7/docs/LEVEL_7_[ESCAPE]_Errata.pdf · ERRATA Rulebook p. 4, teRRoR In the last sentence, replace “lower” with “higher.”](https://img.pdfslide.us/doc/110x75/5e168058bd1ff26da4095ed7/errata-privateer-escapeerratapdf-errata-rulebook-p-4-terror-in-the-last.jpg)