Embed Size (px)
Citation preview
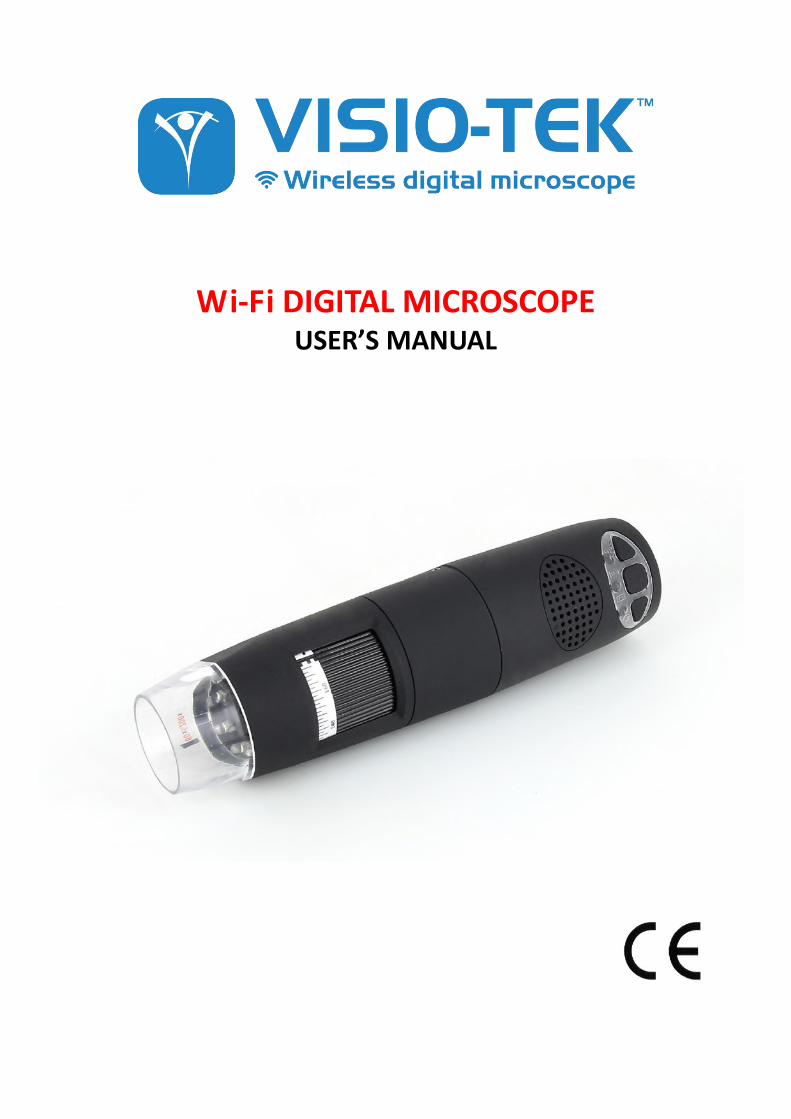
Wi-Fi DIGITAL MICROSCOPE USER’S MANUAL

Visio-tek Wi-Fi Microscope User’s Manual
2
WARNING! READ MANUAL CAREFULLY BEFORE USING THE DEVICE.
2017
Visio-tek Wi-Fi Microscope User’s Manual
3
Summary
1. UNPACKING ........................................................................................................................................... 4
2. PACKAGING CONTENTS ......................................................................................................................... 4
3. SYMBOLS ................................................................................................................................................ 5
4. WARNINGS............................................................................................................................................. 7
5. GENERAL GUIDELINES FOR HANDLING.................................................................................................. 7
6. GENERAL MAINTENANCE ...................................................................................................................... 8
7. CLEANING THE DEVICE .......................................................................................................................... 8
8. DISPOSAL ............................................................................................................................................... 9
9. WARRANTY .......................................................................................................................................... 10
Visio-tek Wi-Fi Microscope User’s Manual
4
Welcome Visio-tek™ is a line of versatile and portable, digital microscopes that utilize both Wi-Fi and USB transmission. Visio-tek can be connected to iOS and Android smartphones or tablets via the Visio-tek App, as well as through a WiFi/USB connection to Windows and Mac computers or laptops. Using Visio-tek dedicated software, you can capture pictures, shoot videos, and take measurements. This is the state-of-the-art way to observe the micro-world!
Fields of Application
• Industrial and Electronic Inspection/QC• Education• Research and Scientific Analysis• Forensics · Print inspection• Textile inspection• Trichology• Entomology• Botany• Mineralogy• Collectibles• Jewelry and Watch Repair• Reading assistance• And more ...
Please read this manual carefully before using Visio-tek Wi-Fi digital microscope!
1. UNPACKING
Use caution when opening your Visio-tek packaging with a sharp objective to avoid damaging the instrument and personal injury. Confirm all contents are in working order.
2. PACKAGING CONTENTS
All Visio-tek packaging contains:
• Visio-tek Wi-Fi digital Microscope• USB AC adapter• USB cable• Plastic Stand• Calibration Ruler• Focus Caps (according to the models)
Additional accessories will vary according to model
Visio-tek Wi-Fi Microscope User’s Manual
5
3. SYMBOLS
NOTE: The following symbols may be used be on the Visio-tek device, packaging, box or in this manual.
WARNING SYMBOLS
WARNING This symbol indicates there is a problem which may present risk to the patient or damage the instrument. Cease using the instrument and refer operations manual.
WARNING Read the instructions
SYMBOLS FOR MAINTENANCE, TRANSPORT AND ENVIRONMENT
High
Fragile Keep dry
CERTIFICATION SYMBOLS
Indicates that the product meets the essential requirements of the EU directive for medical devices 93/42/CEE
Indicates the name of the manufacturer.
Visio-tek
Visio-tek Wi-Fi Microscope User’s Manual
6
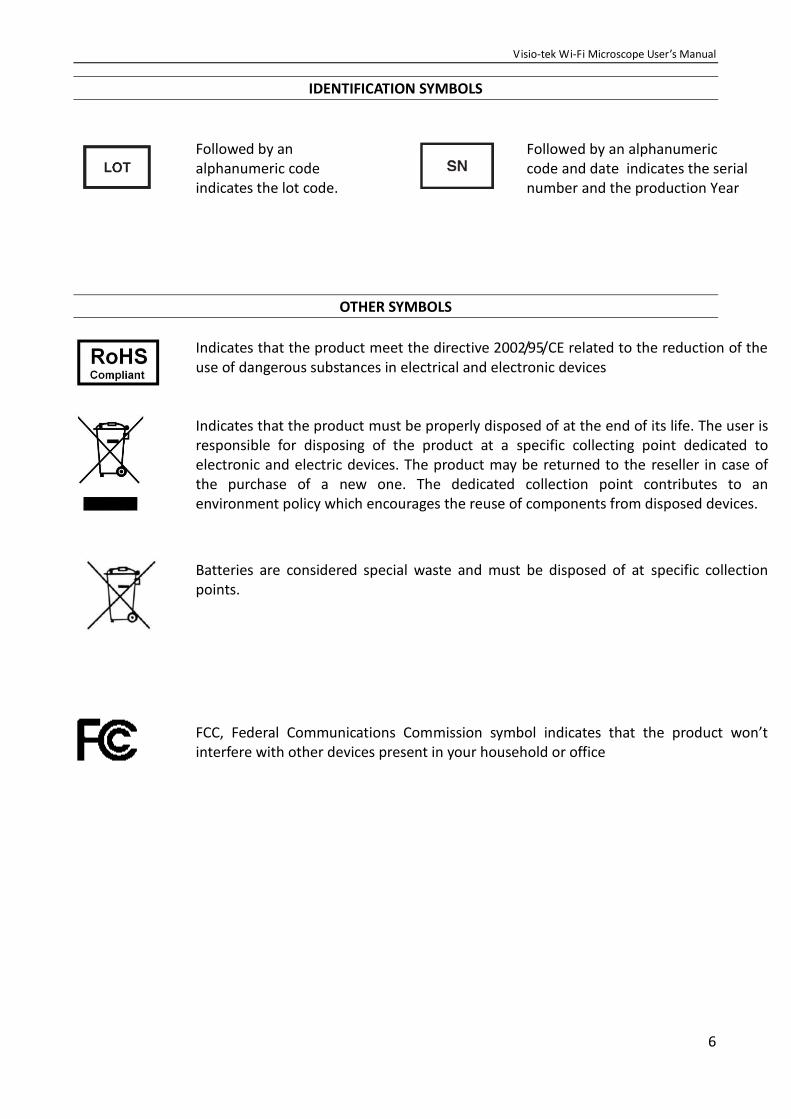
IDENTIFICATION SYMBOLS
Followed by an alphanumeric code indicates the lot code.
Followed by an alphanumeric code and date indicates the serial number and the production Year
OTHER SYMBOLS
Indicates that the product meet the directive 2002/95/CE related to the reduction of the use of dangerous substances in electrical and electronic devices
Indicates that the product must be properly disposed of at the end of its life. The user is responsible for disposing of the product at a specific collecting point dedicated to electronic and electric devices. The product may be returned to the reseller in case of the purchase of a new one. The dedicated collection point contributes to an environment policy which encourages the reuse of components from disposed devices.
Batteries are considered special waste and must be disposed of at specific collection points.
FCC, Federal Communications Commission symbol indicates that the product won’t interfere with other devices present in your household or office
Visio-tek Wi-Fi Microscope User’s Manual
7
4. WARNINGS
Need to read Wi-Fi digital microscope User’s Manual before using and storing it. Distributor will not be held responsible in case of damages or injuries due to an illegal or improper use of the product resulting from failure to follow instructions, warnings, notices or indications for use published in this book.
• Avoid touching the lens• Keep out of reach of children• Do not direct the beam of light toward the eyes (not for Iridoscope)• Protect the product from electrostatic damage• Do not attempt to disassembly any part of this product• Do not attempt to service this product yourself. Opening the covers may expose you to
dangerous voltage points or other risks• Store and operate Wi-Fi Microscope at Temp: -20 ~ 45°C, Humidity: 45% ~ 85%, storing and
operating outside these limits may reduce the life of the product• Do not expose this product to water or other liquids. If water or other liquids enter the product,
immediately power off the product. Continued use of the product may result in fire or anelectrical shock
• Do not use any detergent or volatile solution, as this will damage the camera case, paintedsurfaces and lens. To clean the product uses only a soft cleaning cloth
• Do not place this product near a heat source or expose direct flame, avoid the lens damaged byhigh temperature or humidity
• If the lens is dirty, please use a kens brush on soft cloth to wipe clean. Avoid touching it withyour fingers. Exercise care to avoid scratching the lens
• To avoid electric shock, remove all electricity source before removing PC
5. GENERAL GUIDELINES FOR HANDLING
Do not use the device with wet hands
Do not use the device if damaged or not in proper working order
Do not subject the Visio-tek device to sudden shocks
Visio-tek Wi-Fi Microscope User’s Manual
8
6. GENERAL MAINTENANCE
Check the device and accessories before each use. The product is made of materials resistant to corrosion and environmental conditions under normal use. When not In use, store device in a closed, clean and dry storage container or drawer.
Do not place the device and accessories in direct sunlight, high temperatures or in humid or dusty places
Do not immerse the device in liquids
DO NOT ATTEMPT TO DISASSEMBLE THE DEVICE
7. CLEANING THE DEVICE
IMPORTANT: Avoid touching the lens of the device as this can cause permanent damage. Store device properly when not in use to keep lens free of dust and particulate. Avoid using any other objects or liquids that could easily scratch or damage the surface of the lens or the sensor. To clean the body of the device, use a slightly dampened soft cloth. The device is designed is resistant to most cleaning products. AVOID ketones MEK, and harsh solvents.
DO NOT USE the device for at least 15 minutes after cleaning
Avoid touching the surface of the lenses when cleaning. Use short blasts of dry compressed air to remove dust from lens if necessary.
Visio-tek Wi-Fi Microscope User’s Manual
9
8. DISPOSAL
Indicates that the product must be properly disposed of at the end of its life. The user is responsible for disposing of the product at a specific collecting point dedicated to electronic and electric devices. The product may be returned to the reseller in case of the purchase of a new one. The dedicated collection point contributes to an environment policy which encourages the reuse of components from disposed devices. It has to be disposed of in accordance with local WEEE regulations.
Visio-tek Wi-Fi Microscope User’s Manual
10
9. WARRANTY
Congratulations for purchasing our product. This product HAS BEEN MANUFACTURED TO THE HIGHEST QUALITY AND STANDARDS. Distributor guarantees this product against any defects due to materials or workmanship for a period of 1 year from the date of original purchase. To take advantage of the guarantee, you have to retain your purchase invoice. If the product show any defects within the warranty time it has to be returned to the selling agent with proof of purchase. The warranty is null and void if the damage is resulting from carelessness or misuse. No compensation will be given by the distributor and its distributors if the product is returned during the warranty period. In addition, any replacement or repair carried out during the warranty time will not prolong the duration of the guarantee. The warranty lapses in the following cases:
The product has been tampered with or the label placed on the USB cable bearing the serial number has been removed, damaged or rendered unreadable
The product has been damaged or has been misused
The product has been opened or repaired by unauthorised personnel
The product has been damaged due to non-compliance with the instruction manual Products considered to be defective should be returned only to the dealer from which it was purchased accompanied by the invoice. The product will be repaired or replaced, under our sole discretion.
CONTENTS
1. Use of the Microscope .....................................................................................................................................2
1.1 Charging Instructions ................................................................................................................................................... 2 2. Working in Wi-Fi Mode ....................................................................................................................................3
2.1 Simultaneous Use of Internet and Microscope Wi-Fi Connections ............................................................................. 3 2.2 Wi-Fi Security Setup ..................................................................................................................................................... 4
3. ”Visio-tek” on iPad/iPhone .............................................................................................................................4 3.1 Installation on iPhone / iPad ........................................................................................................................................ 4 3.2 Calibration on iPhone / iPad ........................................................................................................................................ 5 3.3 Measurement on iPhone / iPad ................................................................................................................................... 6
4. “Visio-tek” on Android Tablet /Phone ...........................................................................................................6 4.1 Installation on Android Tablet / SmartPhone .............................................................................................................. 6 4.2 Calibration on Android Tablet / Phone ........................................................................................................................ 9 4.3 Measurement on Android Tablet / Phone ................................................................................................................. 10
5. “WiFi Visio-tek” on Windows Computers ...................................................................................................11 5.1 Menu .......................................................................................................................................................................... 11
5.1.1 File ...................................................................................................................................................................... 11 5.1.2 Setting ................................................................................................................................................................ 12 5.1.3 Capture............................................................................................................................................................... 12 5.1.4 Help .................................................................................................................................................................... 13 5.1.5 Video Processing ................................................................................................................................................ 13
5.2 Images on Windows ................................................................................................................................................... 14 5.3 Calibration on Windows Systems ............................................................................................................................... 14 5.4 Measurement on Windows Systems ......................................................................................................................... 15
6. “Visio-tek” on Mac Computers .....................................................................................................................17 6.1 Installation on Mac Computers .................................................................................................................................. 17 6.2 Images on MAC Computers ....................................................................................................................................... 19 6.3 Calibration on Mac Computers .................................................................................................................................. 19 6.4 Measurement on MAC Computers ............................................................................................................................ 20
6.4.1 Line Measurement ............................................................................................................................................. 20 6.4.2 Circle Measurement ........................................................................................................................................... 21 6.4.3 Area Measurement ............................................................................................................................................ 21 6.4.4 Circle Measurement ........................................................................................................................................... 21 6.4.5 Keys .................................................................................................................................................................... 22
7. Working in Wired USB Mode ........................................................................................................................24 8. “USB Visio-tek” on Windows ........................................................................................................................24
8.1 System Requirements ................................................................................................................................................ 24 8.2 Running “USB Visio-tek” ............................................................................................................................................ 24 8.3 Menu .......................................................................................................................................................................... 24
8.3.1 File ...................................................................................................................................................................... 25 8.3.2 Setting ................................................................................................................................................................ 25 8.3.3 Capture............................................................................................................................................................... 27 8.3.4 Help .................................................................................................................................................................... 28 8.3.5 Video Process Tool Bar ....................................................................................................................................... 28
8.4 Calibration on Windows ............................................................................................................................................. 28 8.5 Measurement on Windows ....................................................................................................................................... 28
9. “USB Visio-tek” on MAC OS .........................................................................................................................28 9.1 System Requirements ................................................................................................................................................ 28 9.2 Running “USB Visio-tek” ............................................................................................................................................ 28 9.3 Setting ........................................................................................................................................................................ 29
Video Resolution Setting ............................................................................................................................................29 9.4 Capturing Image ......................................................................................................................................................... 30 9.5 Creating Video ............................................................................................................................................................ 30 9.6 Calibration .................................................................................................................................................................. 31 9.7 Measurement ............................................................................................................................................................. 31
10. Product Specifications ..................................................................................................................................31 11. Troubleshooting .............................................................................................................................................32
Visio-tek Wi-Fi Microscope User’s manual
page 2
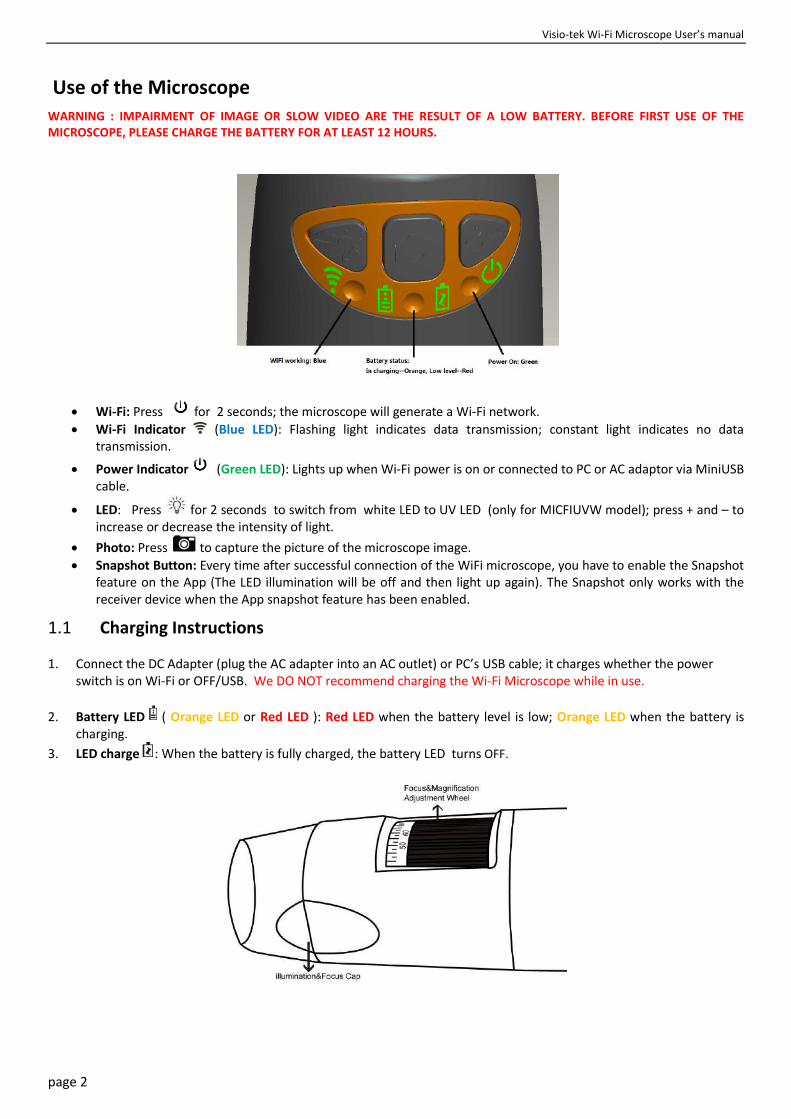
Use of the Microscope WARNING : IMPAIRMENT OF IMAGE OR SLOW VIDEO ARE THE RESULT OF A LOW BATTERY. BEFORE FIRST USE OF THE MICROSCOPE, PLEASE CHARGE THE BATTERY FOR AT LEAST 12 HOURS.
Wi-Fi: Press for 2 seconds; the microscope will generate a Wi-Fi network.
Wi-Fi Indicator (Blue LED): Flashing light indicates data transmission; constant light indicates no data transmission.
Power Indicator (Green LED): Lights up when Wi-Fi power is on or connected to PC or AC adaptor via MiniUSB cable.
LED: Press for 2 seconds to switch from white LED to UV LED (only for MICFIUVW model); press + and – to increase or decrease the intensity of light.
Photo: Press to capture the picture of the microscope image.
Snapshot Button: Every time after successful connection of the WiFi microscope, you have to enable the Snapshot feature on the App (The LED illumination will be off and then light up again). The Snapshot only works with the receiver device when the App snapshot feature has been enabled.
1.1 Charging Instructions
1. Connect the DC Adapter (plug the AC adapter into an AC outlet) or PC’s USB cable; it charges whether the power switch is on Wi-Fi or OFF/USB. We DO NOT recommend charging the Wi-Fi Microscope while in use.
2. Battery LED ( Orange LED or Red LED ): Red LED when the battery level is low; Orange LED when the battery is charging.
3. LED charge : When the battery is fully charged, the battery LED turns OFF.
Visio-tek Wi-Fi Microscope User’s Manual
page 3
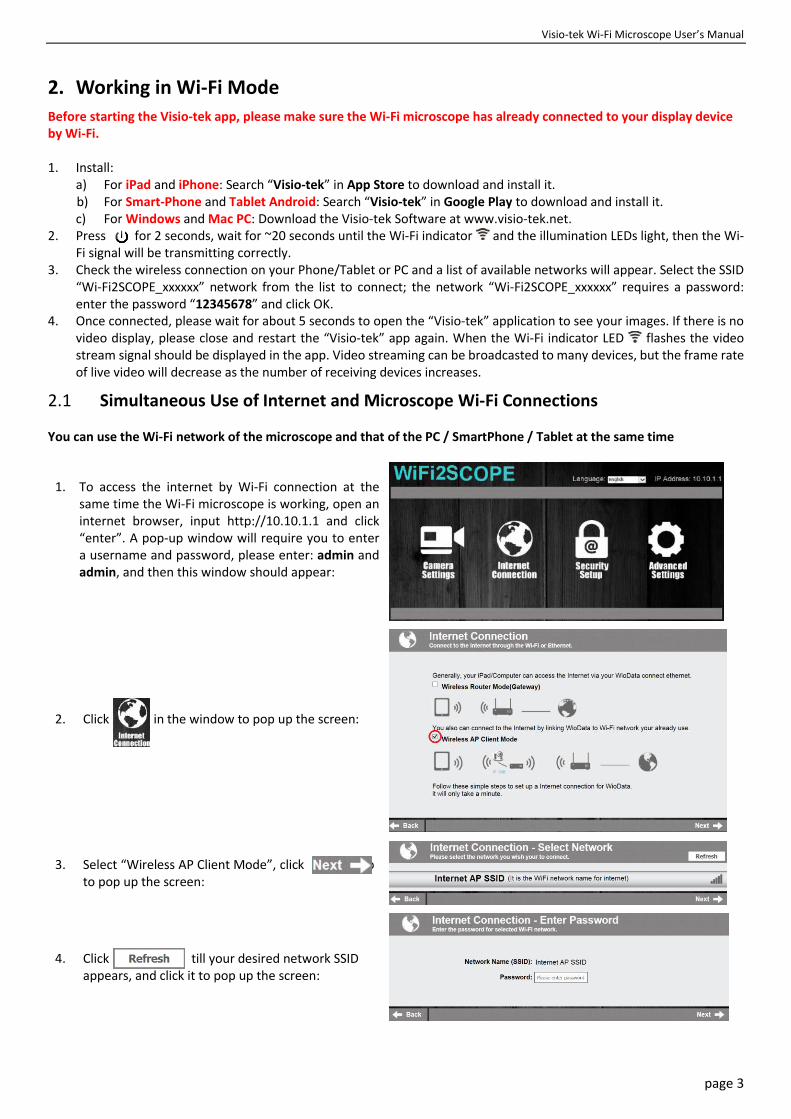
2. Working in Wi-Fi Mode
Before starting the Visio-tek app, please make sure the Wi-Fi microscope has already connected to your display device by Wi-Fi.
1. Install:a) For iPad and iPhone: Search “Visio-tek” in App Store to download and install it.b) For Smart-Phone and Tablet Android: Search “Visio-tek” in Google Play to download and install it.c) For Windows and Mac PC: Download the Visio-tek Software at www.visio-tek.net.
2. Press for 2 seconds, wait for ~20 seconds until the Wi-Fi indicator and the illumination LEDs light, then the Wi-Fi signal will be transmitting correctly.
3. Check the wireless connection on your Phone/Tablet or PC and a list of available networks will appear. Select the SSID“Wi-Fi2SCOPE_xxxxxx” network from the list to connect; the network “Wi-Fi2SCOPE_xxxxxx” requires a password:enter the password “12345678” and click OK.
4. Once connected, please wait for about 5 seconds to open the “Visio-tek” application to see your images. If there is novideo display, please close and restart the “Visio-tek” app again. When the Wi-Fi indicator LED flashes the videostream signal should be displayed in the app. Video streaming can be broadcasted to many devices, but the frame rateof live video will decrease as the number of receiving devices increases.
2.1 Simultaneous Use of Internet and Microscope Wi-Fi Connections
You can use the Wi-Fi network of the microscope and that of the PC / SmartPhone / Tablet at the same time
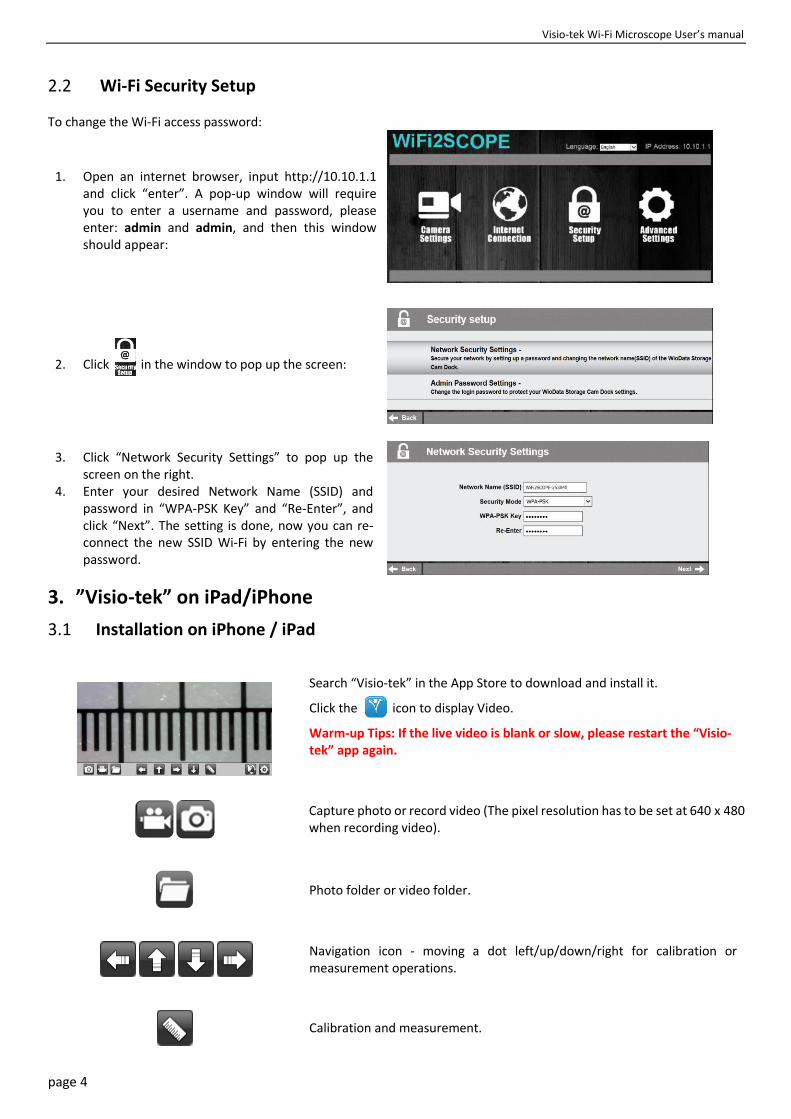
1. To access the internet by Wi-Fi connection at the same time the Wi-Fi microscope is working, open an internet browser, input http://10.10.1.1 and click “enter”. A pop-up window will require you to enter a username and password, please enter: admin and admin, and then this window should appear:
2. Click in the window to pop up the screen:
3. Select “Wireless AP Client Mode”, click to to pop up the screen:
4. Click till your desired network SSID appears, and click it to pop up the screen:
Visio-tek Wi-Fi Microscope User’s manual
page 4
2.2 Wi-Fi Security Setup
To change the Wi-Fi access password:
1. Open an internet browser, input http://10.10.1.1 and click “enter”. A pop-up window will require you to enter a username and password, please enter: admin and admin, and then this window should appear:
2. Click in the window to pop up the screen:
3. Click “Network Security Settings” to pop up thescreen on the right.
4. Enter your desired Network Name (SSID) andpassword in “WPA-PSK Key” and “Re-Enter”, andclick “Next”. The setting is done, now you can re-connect the new SSID Wi-Fi by entering the newpassword.
3. ”Visio-tek” on iPad/iPhone
3.1 Installation on iPhone / iPad
Search “Visio-tek” in the App Store to download and install it.
Click the icon to display Video.
Warm-up Tips: If the live video is blank or slow, please restart the “Visio-tek” app again.
Capture photo or record video (The pixel resolution has to be set at 640 x 480 when recording video).
Photo folder or video folder.
Navigation icon - moving a dot left/up/down/right for calibration or measurement operations.
Calibration and measurement.
Visio-tek Wi-Fi Microscope User’s Manual
page 5
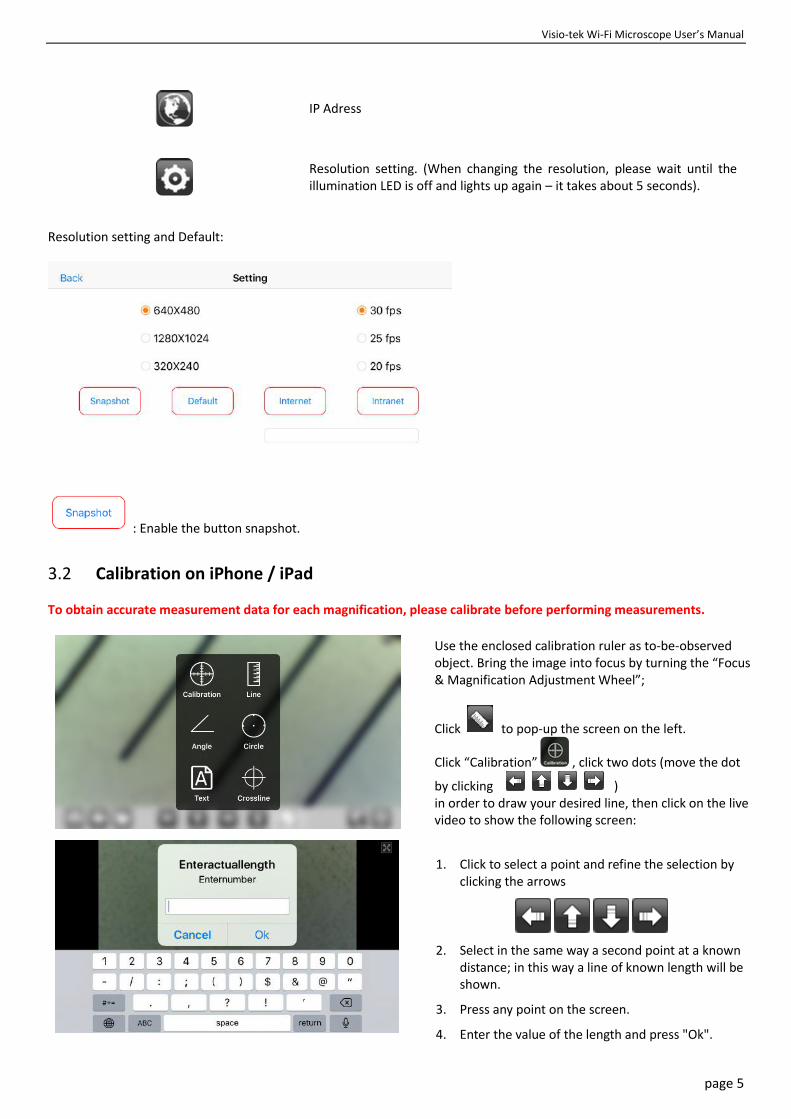
IP Adress
Resolution setting. (When changing the resolution, please wait until the illumination LED is off and lights up again – it takes about 5 seconds).
Resolution setting and Default:
: Enable the button snapshot.
3.2 Calibration on iPhone / iPad
To obtain accurate measurement data for each magnification, please calibrate before performing measurements.
Use the enclosed calibration ruler as to-be-observed object. Bring the image into focus by turning the “Focus & Magnification Adjustment Wheel”;
Click to pop-up the screen on the left.
Click “Calibration” , click two dots (move the dot
by clicking ) in order to draw your desired line, then click on the live video to show the following screen:
1. Click to select a point and refine the selection byclicking the arrows
2. Select in the same way a second point at a knowndistance; in this way a line of known length will beshown.
3. Press any point on the screen.
4. Enter the value of the length and press "Ok".
Visio-tek Wi-Fi Microscope User’s manual
page 6
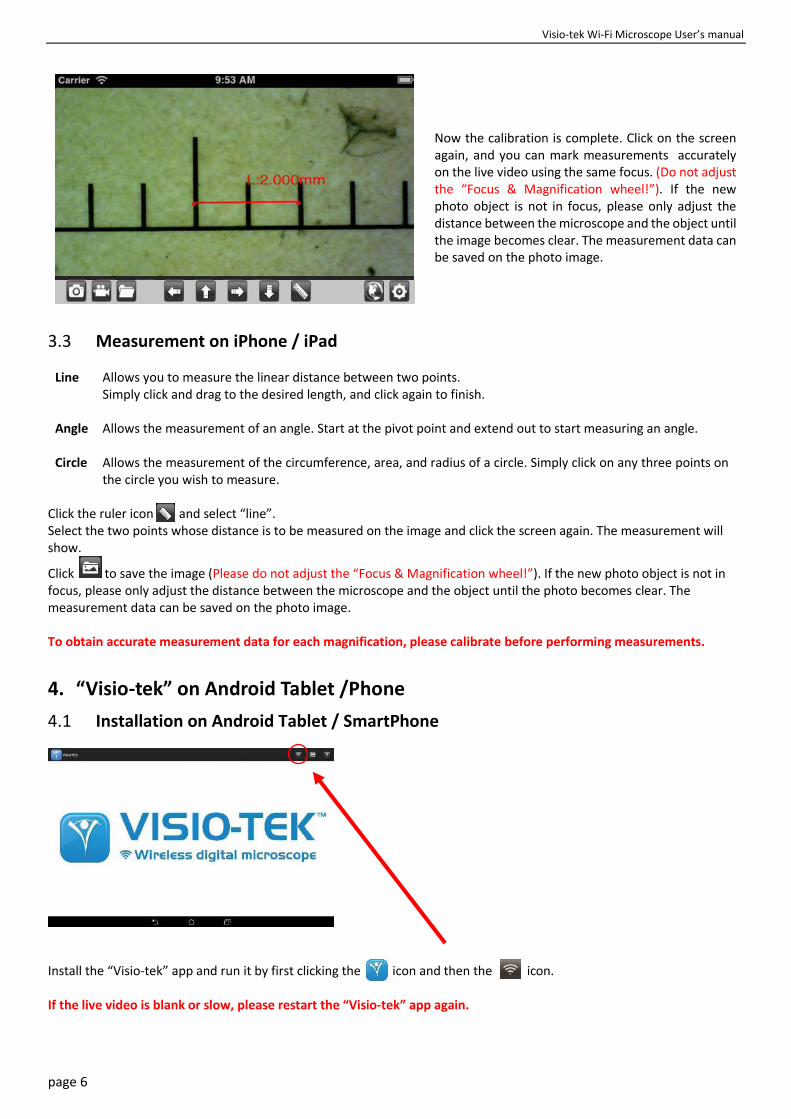
Now the calibration is complete. Click on the screen again, and you can mark measurements accurately on the live video using the same focus. (Do not adjust the “Focus & Magnification wheel!”). If the new photo object is not in focus, please only adjust the distance between the microscope and the object until the image becomes clear. The measurement data can be saved on the photo image.
3.3 Measurement on iPhone / iPad
Line Allows you to measure the linear distance between two points. Simply click and drag to the desired length, and click again to finish.
Angle Allows the measurement of an angle. Start at the pivot point and extend out to start measuring an angle.
Circle Allows the measurement of the circumference, area, and radius of a circle. Simply click on any three points on the circle you wish to measure.
Click the ruler icon and select “line”. Select the two points whose distance is to be measured on the image and click the screen again. The measurement will show.
Click to save the image (Please do not adjust the “Focus & Magnification wheel!”). If the new photo object is not in focus, please only adjust the distance between the microscope and the object until the photo becomes clear. The measurement data can be saved on the photo image. To obtain accurate measurement data for each magnification, please calibrate before performing measurements.
4. “Visio-tek” on Android Tablet /Phone
4.1 Installation on Android Tablet / SmartPhone
Install the “Visio-tek” app and run it by first clicking the icon and then the icon. If the live video is blank or slow, please restart the “Visio-tek” app again.

Visio-tek Wi-Fi Microscope User’s Manual
page 7
Capture photo
Navigation icon—moving a dot left/up/down/right for calibration or measurement operation
Photos folder
Calibration and measurement
Cross guides Reset sketches
Setting menu
Setting Menu
1. Resolution Setting (when changing the resolution, please wait until the illumination LED is off and lights up again – it takes about 5 seconds).
: Enable the snapshot button.
: Rename the photo.
: Default setting.
Visio-tek Wi-Fi Microscope User’s manual
page 8
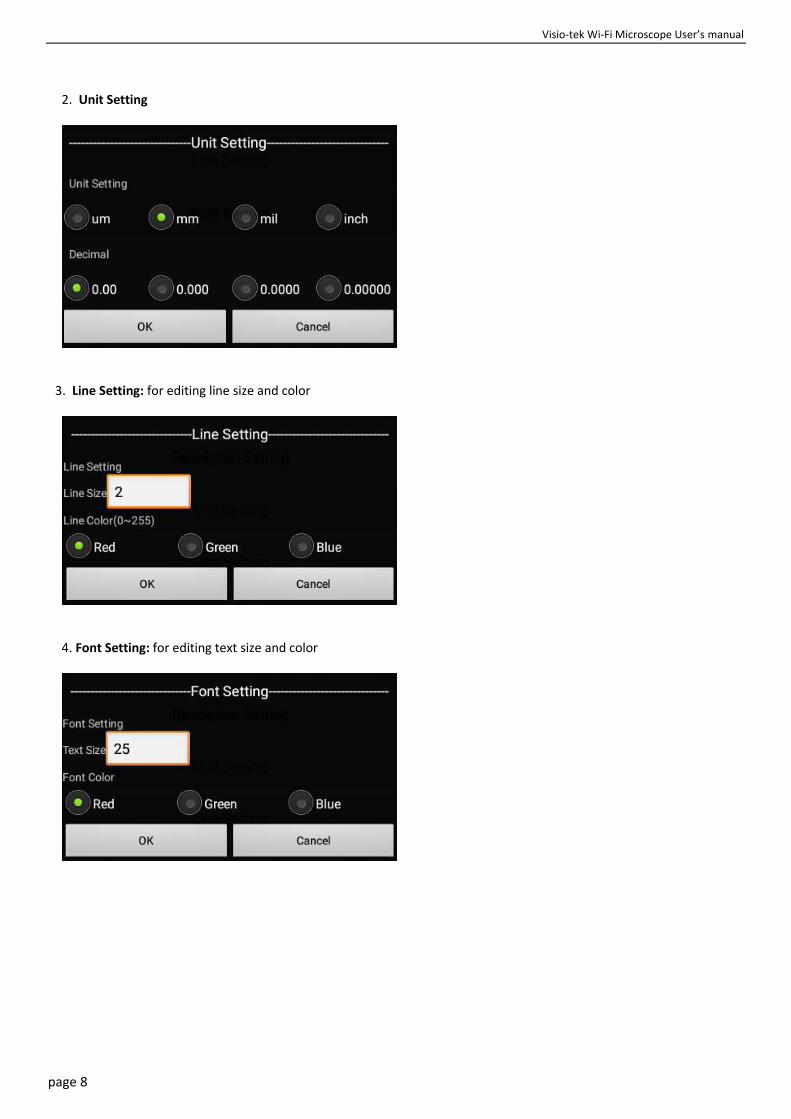
2. Unit Setting
3. Line Setting: for editing line size and color
4. Font Setting: for editing text size and color
Visio-tek Wi-Fi Microscope User’s Manual
page 9
4.2 Calibration on Android Tablet / Phone
To obtain accurate measurement data for each magnification, please calibrate before performing measurements.
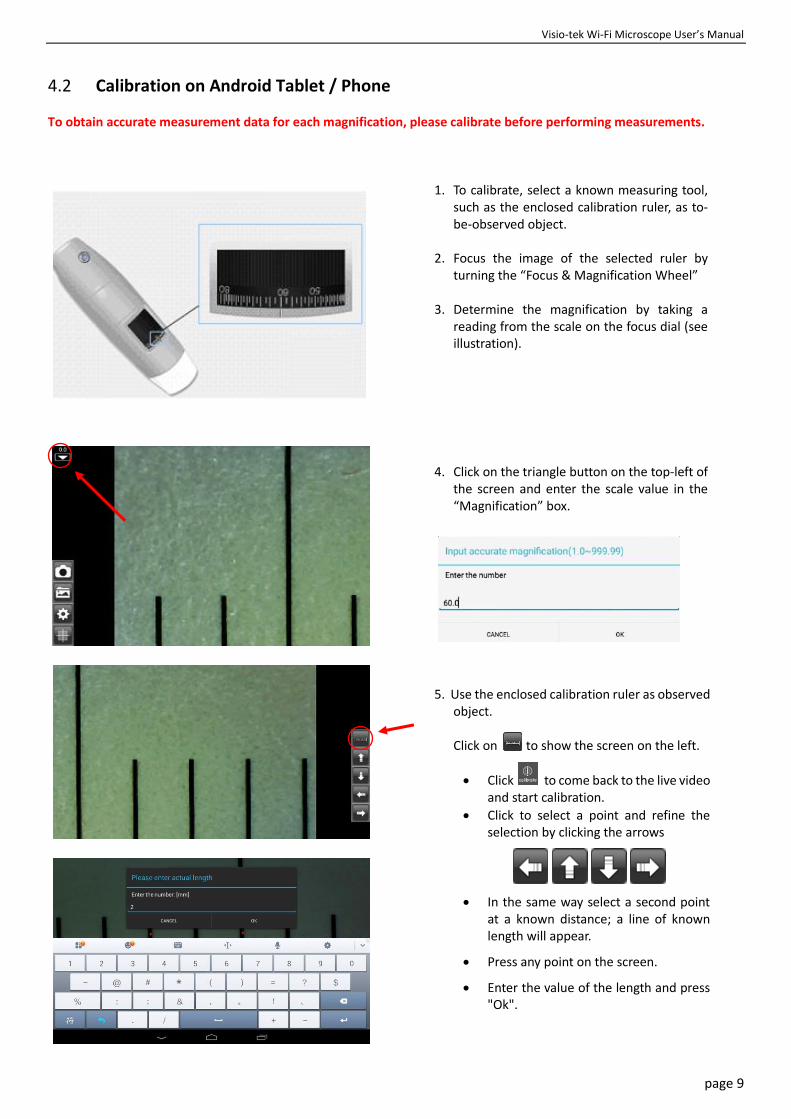
1. To calibrate, select a known measuring tool,
such as the enclosed calibration ruler, as to-be-observed object.
2. Focus the image of the selected ruler by
turning the “Focus & Magnification Wheel”
3. Determine the magnification by taking a reading from the scale on the focus dial (see illustration).
4. Click on the triangle button on the top-left of the screen and enter the scale value in the “Magnification” box.
5. Use the enclosed calibration ruler as observed
object. Click on to show the screen on the left.
Click to come back to the live video and start calibration.
Click to select a point and refine the selection by clicking the arrows
In the same way select a second point at a known distance; a line of known length will appear.
Press any point on the screen.
Enter the value of the length and press "Ok".
Visio-tek Wi-Fi Microscope User’s manual
page 10
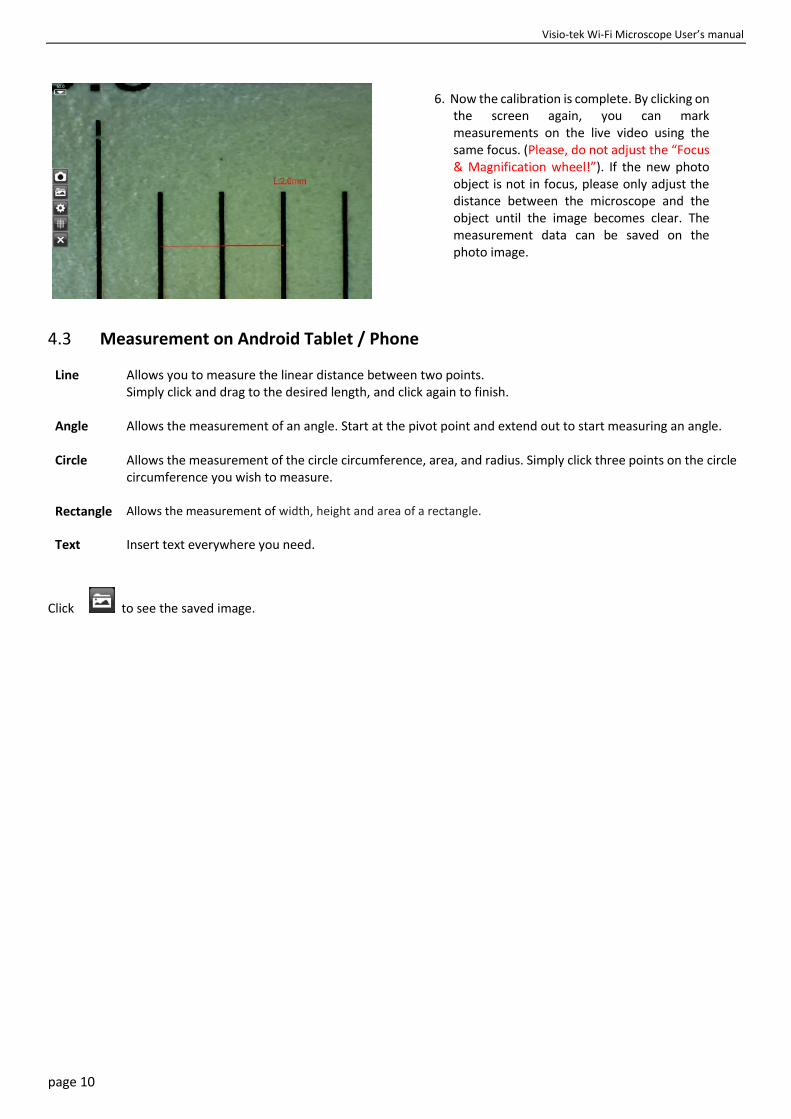
6. Now the calibration is complete. By clicking on the screen again, you can mark measurements on the live video using the same focus. (Please, do not adjust the “Focus & Magnification wheel!”). If the new photo object is not in focus, please only adjust the distance between the microscope and the object until the image becomes clear. The measurement data can be saved on the photo image.
4.3 Measurement on Android Tablet / Phone
Line Allows you to measure the linear distance between two points. Simply click and drag to the desired length, and click again to finish.
Angle Allows the measurement of an angle. Start at the pivot point and extend out to start measuring an angle.
Circle Allows the measurement of the circle circumference, area, and radius. Simply click three points on the circle circumference you wish to measure.
Rectangle Allows the measurement of width, height and area of a rectangle.
Text Insert text everywhere you need.
Click to see the saved image.
Visio-tek Wi-Fi Microscope User’s Manual
page 11
5. “WiFi Visio-tek” on Windows Computers
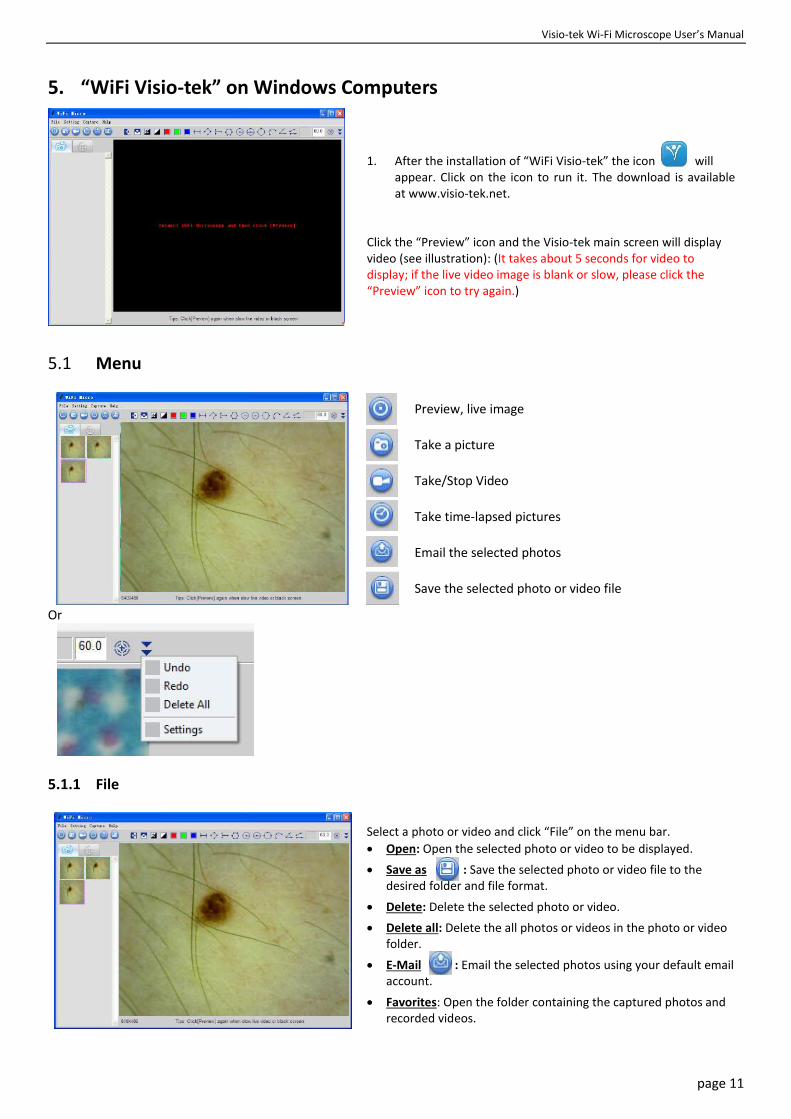
1. After the installation of “WiFi Visio-tek” the icon will appear. Click on the icon to run it. The download is available at www.visio-tek.net.
Click the “Preview” icon and the Visio-tek main screen will display video (see illustration): (It takes about 5 seconds for video to display; if the live video image is blank or slow, please click the “Preview” icon to try again.)
5.1 Menu
Preview, live image
Take a picture
Take/Stop Video
Take time-lapsed pictures
Email the selected photos
Save the selected photo or video file
Or
5.1.1 File
Select a photo or video and click “File” on the menu bar.
Open: Open the selected photo or video to be displayed.
Save as : Save the selected photo or video file to the desired folder and file format.
Delete: Delete the selected photo or video.
Delete all: Delete the all photos or videos in the photo or videofolder.
E-Mail : Email the selected photos using your default email account.
Favorites: Open the folder containing the captured photos andrecorded videos.
Visio-tek Wi-Fi Microscope User’s manual
page 12
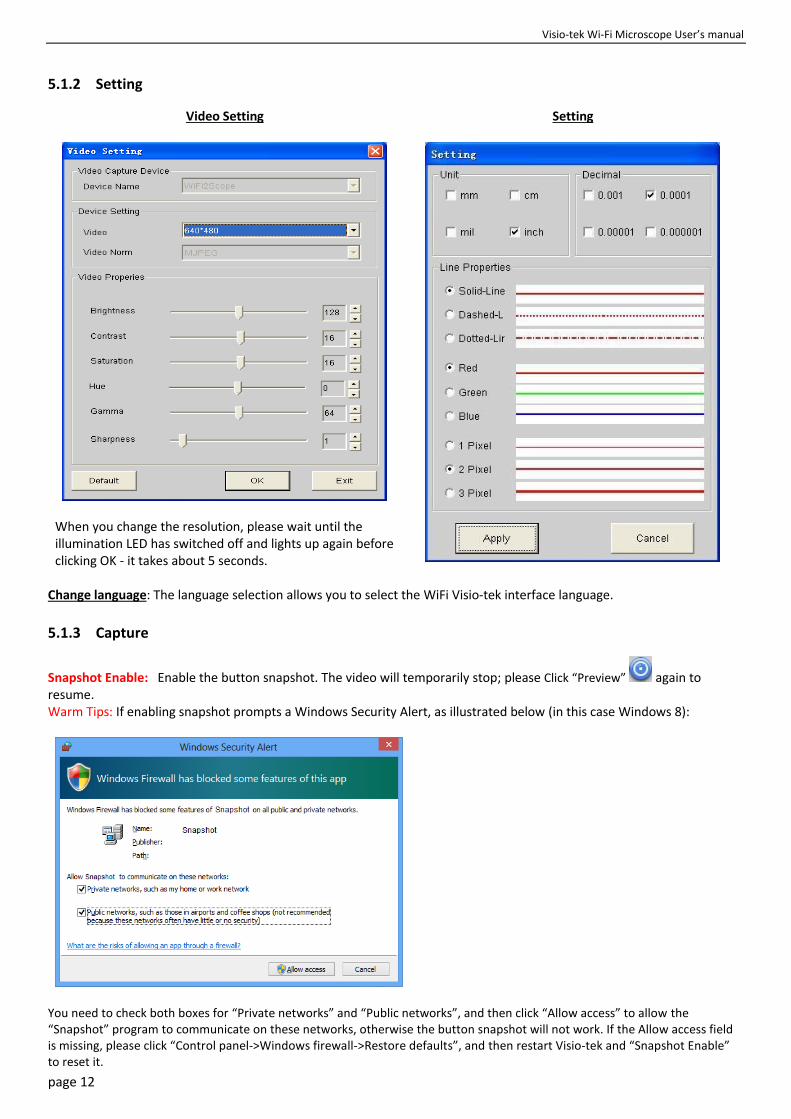
5.1.2 Setting
Video Setting
When you change the resolution, please wait until the illumination LED has switched off and lights up again before clicking OK - it takes about 5 seconds.
Setting
Change language: The language selection allows you to select the WiFi Visio-tek interface language.
5.1.3 Capture
Snapshot Enable: Enable the button snapshot. The video will temporarily stop; please Click “Preview” again to resume. Warm Tips: If enabling snapshot prompts a Windows Security Alert, as illustrated below (in this case Windows 8):
You need to check both boxes for “Private networks” and “Public networks”, and then click “Allow access” to allow the “Snapshot” program to communicate on these networks, otherwise the button snapshot will not work. If the Allow access field is missing, please click “Control panel->Windows firewall->Restore defaults”, and then restart Visio-tek and “Snapshot Enable” to reset it.
Visio-tek Wi-Fi Microscope User’s Manual
page 13
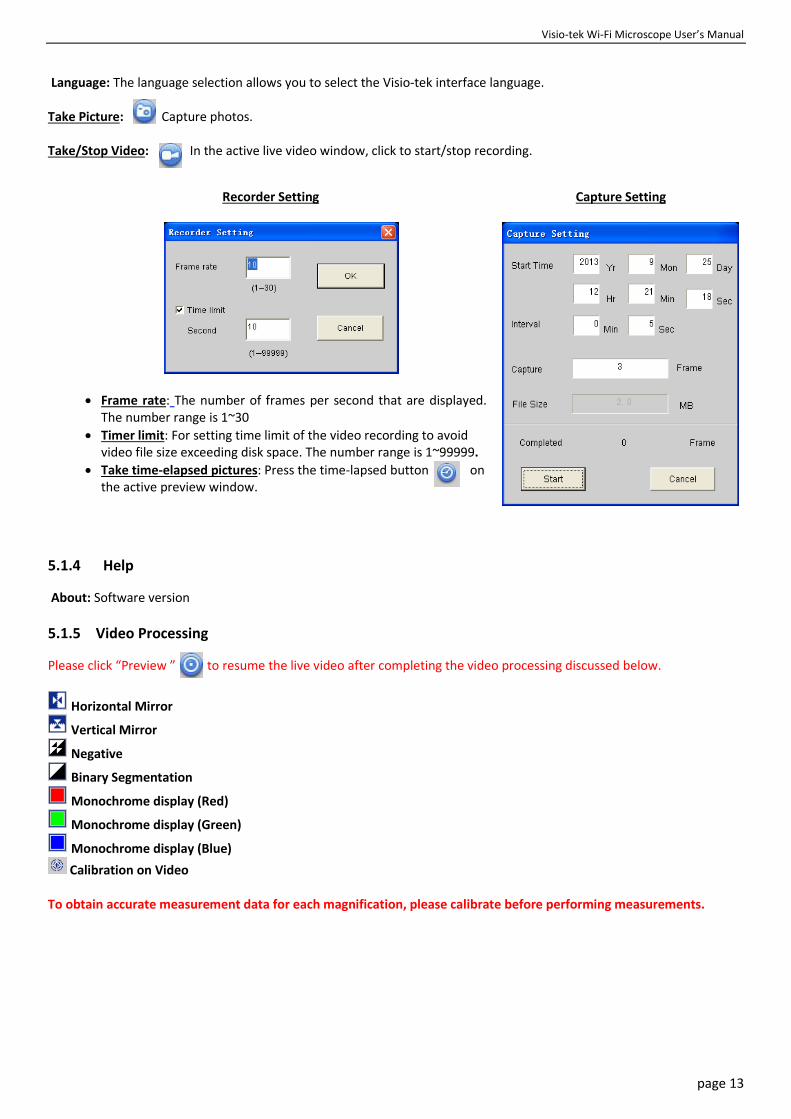
Language: The language selection allows you to select the Visio-tek interface language. Take Picture: Capture photos. Take/Stop Video: In the active live video window, click to start/stop recording.
Recorder Setting
Frame rate: The number of frames per second that are displayed. The number range is 1~30
Timer limit: For setting time limit of the video recording to avoid video file size exceeding disk space. The number range is 1~99999.
Take time-elapsed pictures: Press the time-lapsed button on the active preview window.
Capture Setting
5.1.4 Help
About: Software version
5.1.5 Video Processing
Please click “Preview ” to resume the live video after completing the video processing discussed below.
Horizontal Mirror
Vertical Mirror
Negative
Binary Segmentation
Monochrome display (Red)
Monochrome display (Green)
Monochrome display (Blue)
Calibration on Video To obtain accurate measurement data for each magnification, please calibrate before performing measurements.
Visio-tek Wi-Fi Microscope User’s manual
page 14
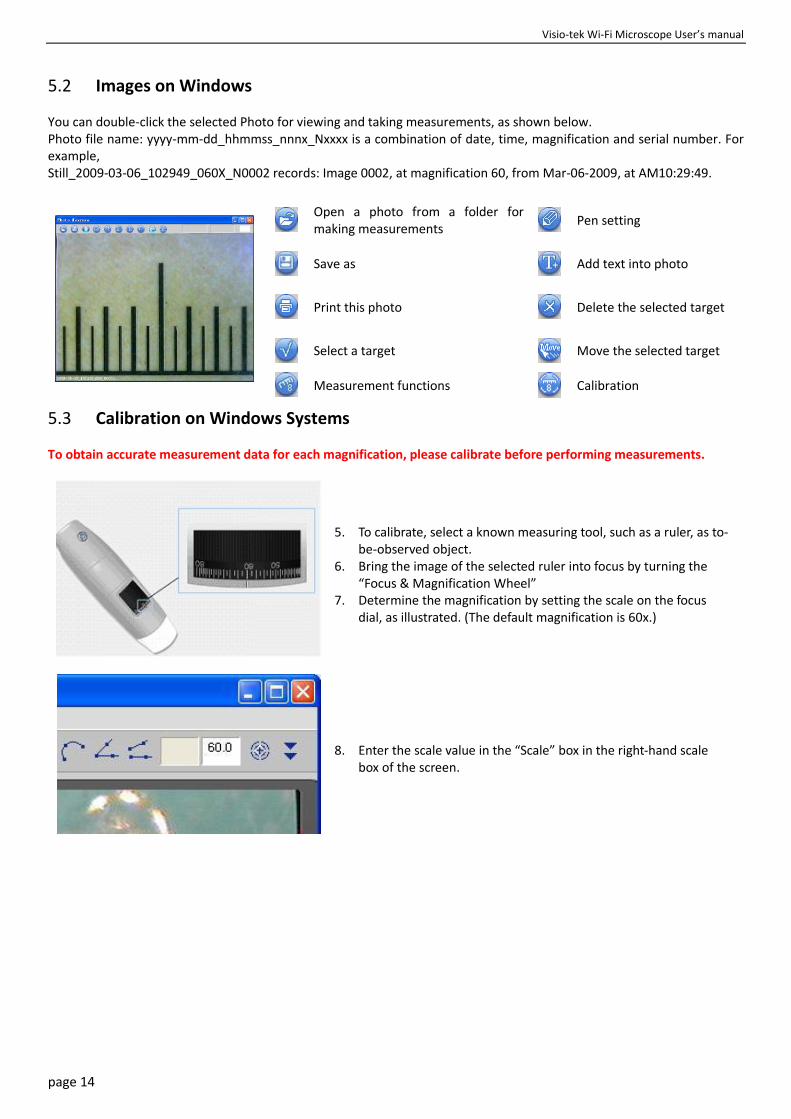
5.2 Images on Windows
You can double-click the selected Photo for viewing and taking measurements, as shown below. Photo file name: yyyy-mm-dd_hhmmss_nnnx_Nxxxx is a combination of date, time, magnification and serial number. For example, Still_2009-03-06_102949_060X_N0002 records: Image 0002, at magnification 60, from Mar-06-2009, at AM10:29:49.
Open a photo from a folder for making measurements
Pen setting
Save as
Add text into photo
Print this photo
Delete the selected target
Select a target
Move the selected target
Measurement functions
Calibration
5.3 Calibration on Windows Systems
To obtain accurate measurement data for each magnification, please calibrate before performing measurements.
5. To calibrate, select a known measuring tool, such as a ruler, as to-be-observed object.
6. Bring the image of the selected ruler into focus by turning the “Focus & Magnification Wheel”
7. Determine the magnification by setting the scale on the focus dial, as illustrated. (The default magnification is 60x.)
8. Enter the scale value in the “Scale” box in the right-hand scale box of the screen.

Visio-tek Wi-Fi Microscope User’s Manual
page 15
9. In the live video window click on the calibration button ,and then click and extend to a specific length; a small windowwill pop up.
10. Enter the actual length (in the example, 2mm) and click the “OK”button.
The software will automatically calibrate the scale of magnification, which will show on the right-hand box of the calibration button.
The calibration is complete; you can now mark accurate measurements on photos or real-time video at this focus level. (Please, do not adjust the “Focus & Magnification Wheel”).
If the new object is not in focus, please only adjust the distance between the microscope and the object until the image becomes clear, and then take the photo and make the necessary measurements.
5.4 Measurement on Windows Systems
Line measurement Allows you to measure the linear distance between two points. Simply click and drag to the desired length, and click again to finish.
Point to Line Measurement
Allows measurement of a line 90 degrees from a certain line. Simply create a line to represent the base by clicking once to start, drag, and then click again to set the endpoint. Branch off from the base line to start measuring the line that is 90 degrees from the base line and make a final click to finish the measurement.
Continuous Line Measurement
Allows measurement of the distance between multiple connecting lines. Simply click and drag to form one section of distance, click again to start another section. Continue until the total desired distance is measured. Double-click to finish.
Polygon Measurement Allows measurement of a polygon. Simply click and drag to form the desired length, and click again to start the next section, double-click to finish the polygon measurement.
Radius of Circle Measurement Allows you to measure the circumference, area, and radius of a circle. Simply click and extend out to the desired radius.
Diameter of Circle Measurement Allows you to measure the circumference, area, and radius of a circle. Simply click and extend out to the desired diameter.
Visio-tek Wi-Fi Microscope User’s manual
page 16
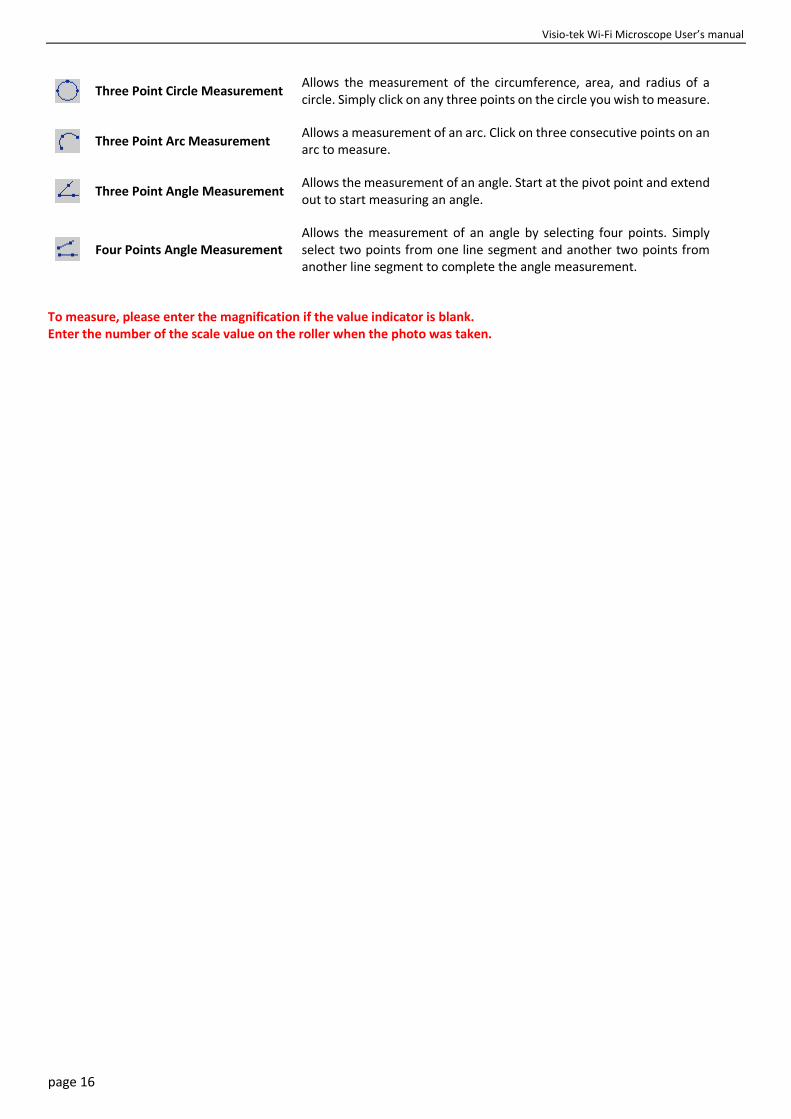
Three Point Circle Measurement
Allows the measurement of the circumference, area, and radius of a circle. Simply click on any three points on the circle you wish to measure.
Three Point Arc Measurement
Allows a measurement of an arc. Click on three consecutive points on an arc to measure.
Three Point Angle Measurement
Allows the measurement of an angle. Start at the pivot point and extend out to start measuring an angle.
Four Points Angle Measurement
Allows the measurement of an angle by selecting four points. Simply select two points from one line segment and another two points from another line segment to complete the angle measurement.
To measure, please enter the magnification if the value indicator is blank. Enter the number of the scale value on the roller when the photo was taken.
Visio-tek Wi-Fi Microscope User’s Manual
page 17
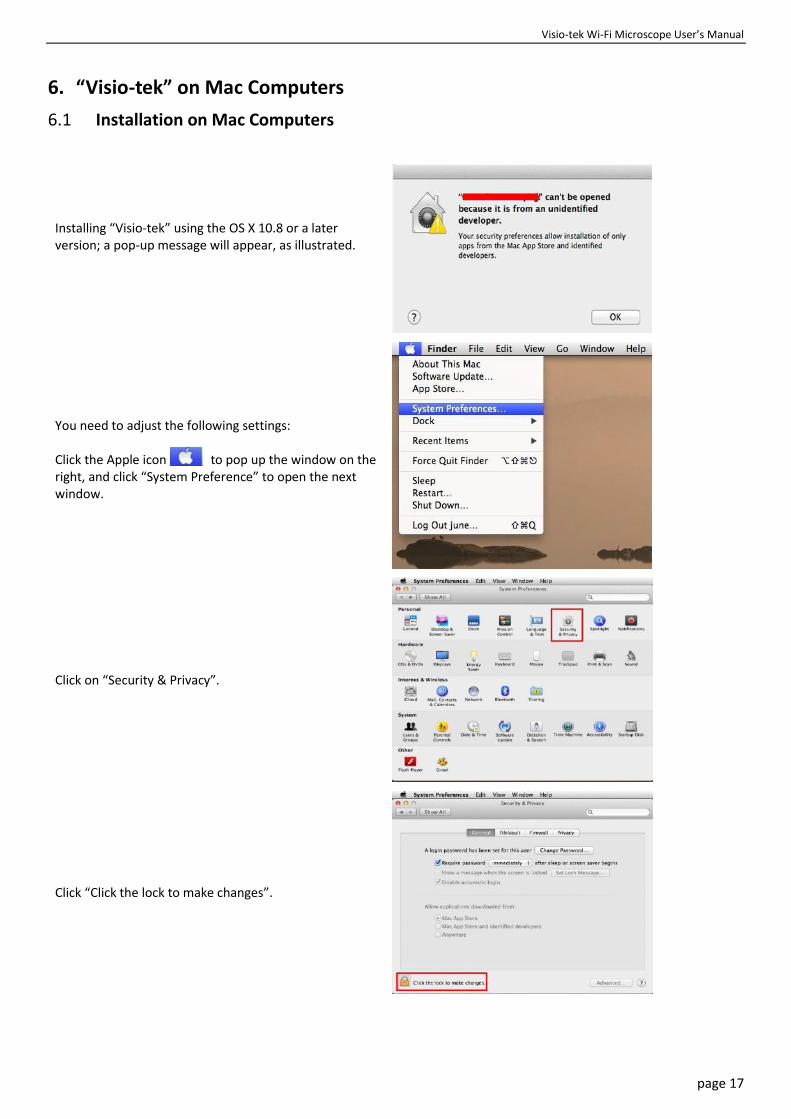
6. “Visio-tek” on Mac Computers
6.1 Installation on Mac Computers
Installing “Visio-tek” using the OS X 10.8 or a later version; a pop-up message will appear, as illustrated.
You need to adjust the following settings:
Click the Apple icon to pop up the window on the right, and click “System Preference” to open the next window.
Click on “Security & Privacy”.
Click “Click the lock to make changes”.
Visio-tek Wi-Fi Microscope User’s manual
page 18
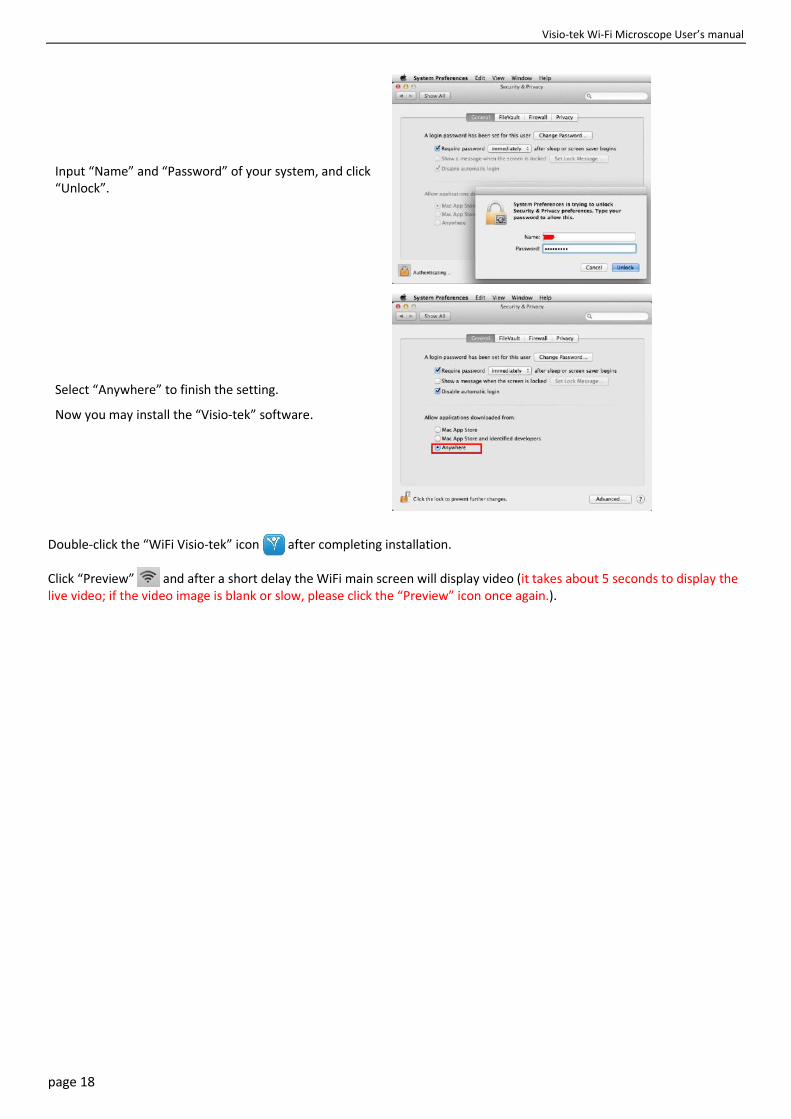
Input “Name” and “Password” of your system, and click “Unlock”.
Select “Anywhere” to finish the setting.
Now you may install the “Visio-tek” software.
Double-click the “WiFi Visio-tek” icon after completing installation. Click “Preview” and after a short delay the WiFi main screen will display video (it takes about 5 seconds to display the live video; if the video image is blank or slow, please click the “Preview” icon once again.).
Visio-tek Wi-Fi Microscope User’s Manual
page 19
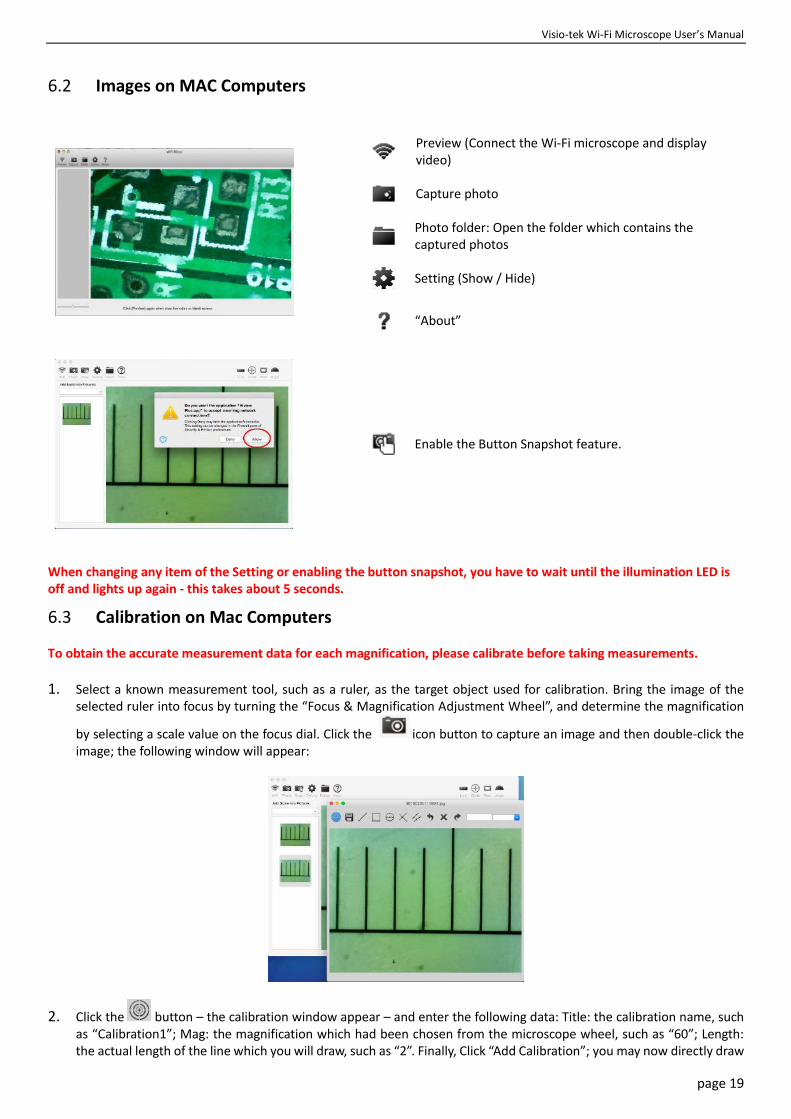
6.2 Images on MAC Computers
Preview (Connect the Wi-Fi microscope and display video)
Capture photo
Photo folder: Open the folder which contains the captured photos
Setting (Show / Hide)
“About”
Enable the Button Snapshot feature.
When changing any item of the Setting or enabling the button snapshot, you have to wait until the illumination LED is off and lights up again - this takes about 5 seconds.
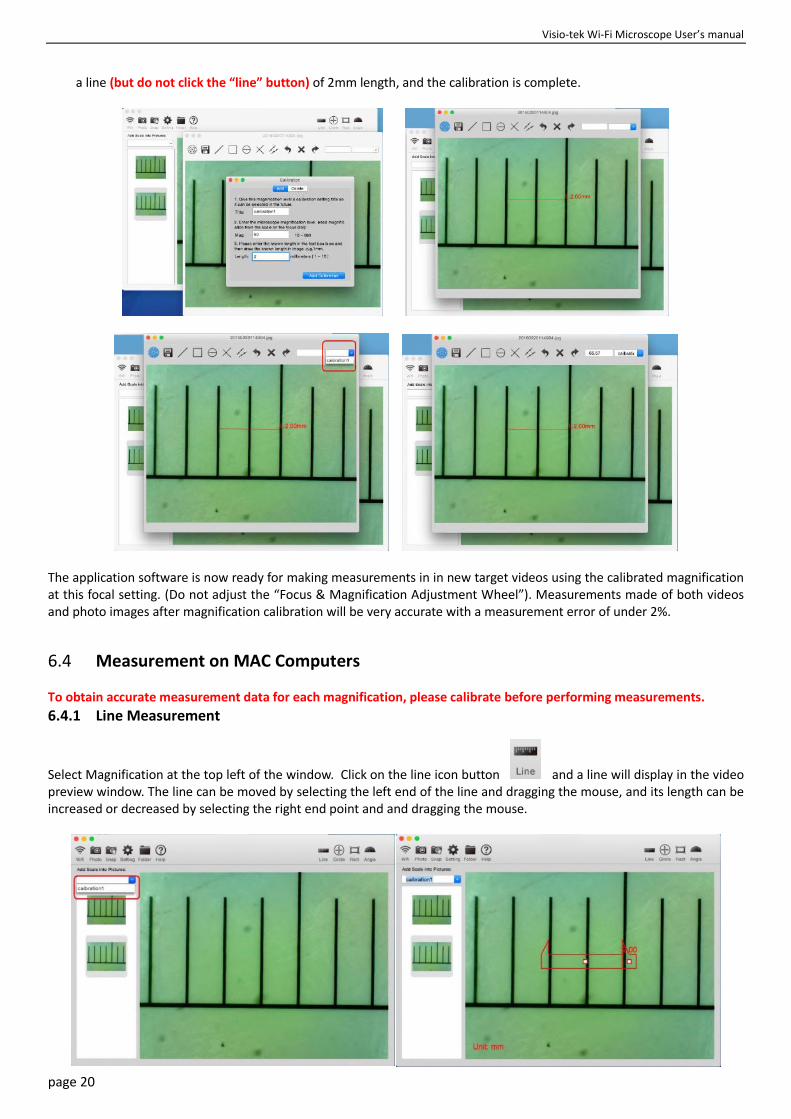
6.3 Calibration on Mac Computers
To obtain the accurate measurement data for each magnification, please calibrate before taking measurements.
1. Select a known measurement tool, such as a ruler, as the target object used for calibration. Bring the image of the selected ruler into focus by turning the “Focus & Magnification Adjustment Wheel”, and determine the magnification
by selecting a scale value on the focus dial. Click the icon button to capture an image and then double-click the image; the following window will appear:
2. Click the button – the calibration window appear – and enter the following data: Title: the calibration name, such as “Calibration1”; Mag: the magnification which had been chosen from the microscope wheel, such as “60”; Length: the actual length of the line which you will draw, such as “2”. Finally, Click “Add Calibration”; you may now directly draw
Visio-tek Wi-Fi Microscope User’s manual
page 20
a line (but do not click the “line” button) of 2mm length, and the calibration is complete.
The application software is now ready for making measurements in in new target videos using the calibrated magnification at this focal setting. (Do not adjust the “Focus & Magnification Adjustment Wheel”). Measurements made of both videos and photo images after magnification calibration will be very accurate with a measurement error of under 2%.
6.4 Measurement on MAC Computers
To obtain accurate measurement data for each magnification, please calibrate before performing measurements.
6.4.1 Line Measurement
Select Magnification at the top left of the window. Click on the line icon button and a line will display in the video preview window. The line can be moved by selecting the left end of the line and dragging the mouse, and its length can be increased or decreased by selecting the right end point and and dragging the mouse.
Visio-tek Wi-Fi Microscope User’s Manual
page 21
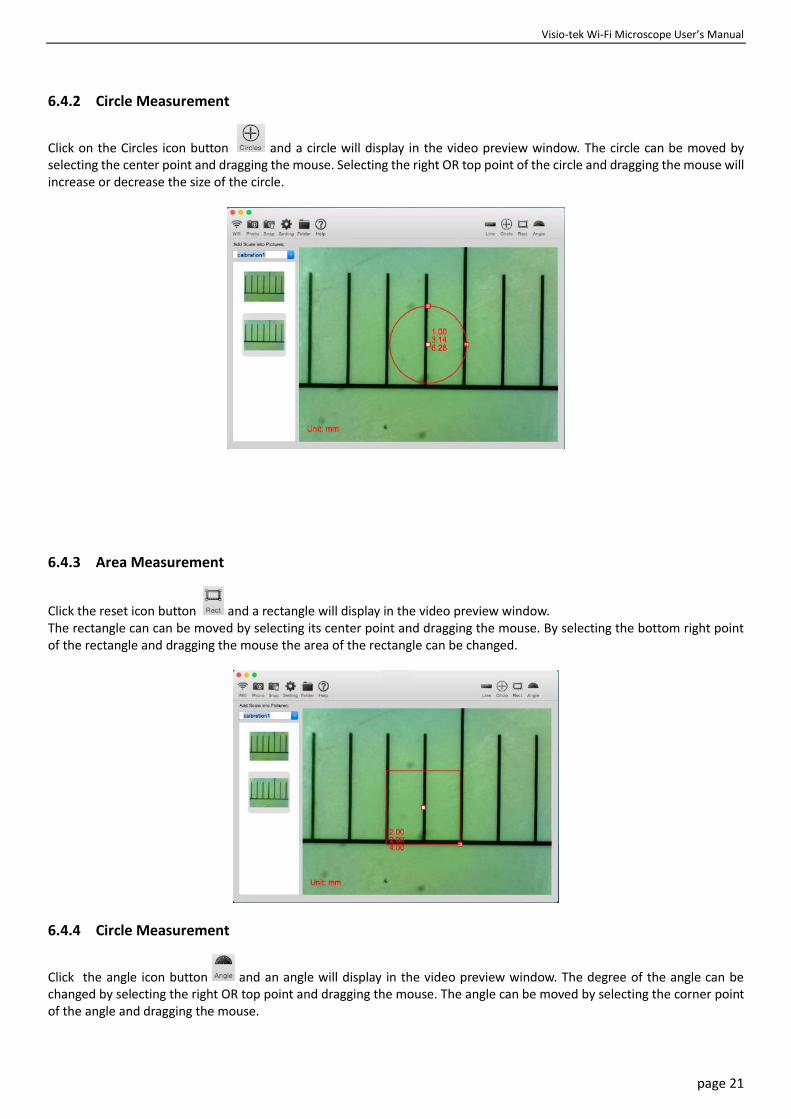
6.4.2 Circle Measurement
Click on the Circles icon button and a circle will display in the video preview window. The circle can be moved by selecting the center point and dragging the mouse. Selecting the right OR top point of the circle and dragging the mouse will increase or decrease the size of the circle.
6.4.3 Area Measurement
Click the reset icon button and a rectangle will display in the video preview window. The rectangle can can be moved by selecting its center point and dragging the mouse. By selecting the bottom right point of the rectangle and dragging the mouse the area of the rectangle can be changed.
6.4.4 Circle Measurement
Click the angle icon button and an angle will display in the video preview window. The degree of the angle can be changed by selecting the right OR top point and dragging the mouse. The angle can be moved by selecting the corner point of the angle and dragging the mouse.
Visio-tek Wi-Fi Microscope User’s manual
page 22
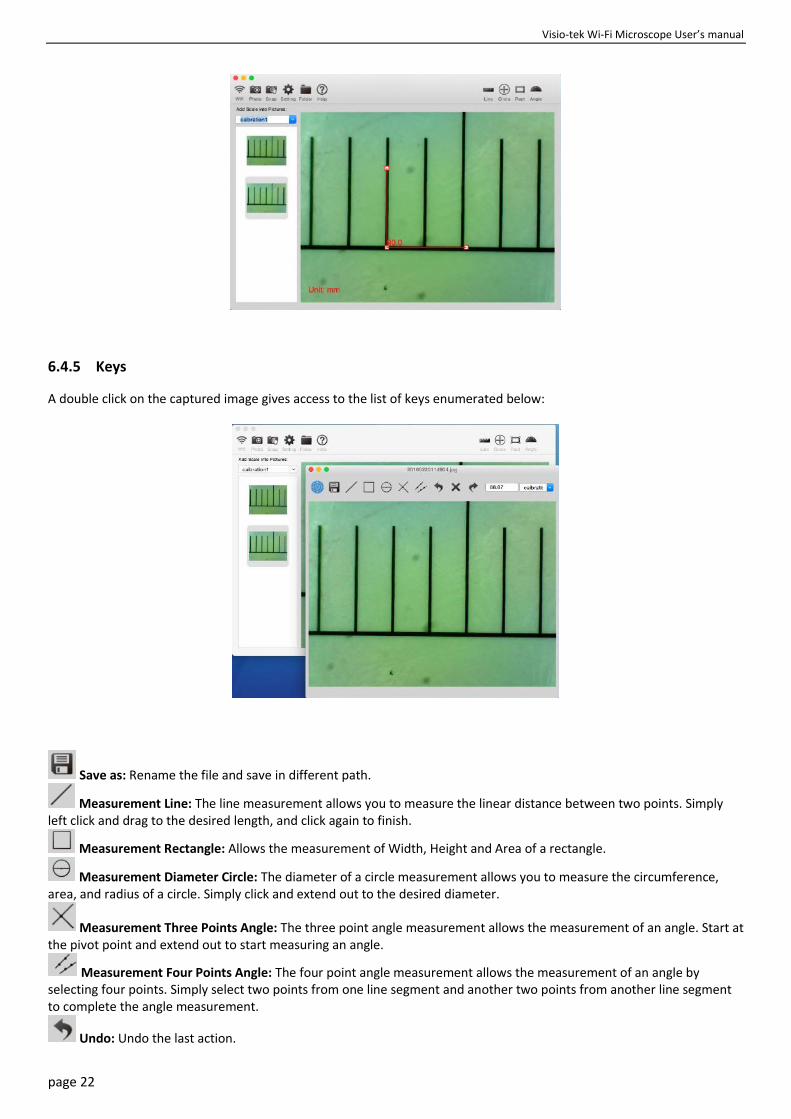
6.4.5 Keys
A double click on the captured image gives access to the list of keys enumerated below:
Save as: Rename the file and save in different path.
Measurement Line: The line measurement allows you to measure the linear distance between two points. Simply left click and drag to the desired length, and click again to finish.
Measurement Rectangle: Allows the measurement of Width, Height and Area of a rectangle.
Measurement Diameter Circle: The diameter of a circle measurement allows you to measure the circumference, area, and radius of a circle. Simply click and extend out to the desired diameter.
Measurement Three Points Angle: The three point angle measurement allows the measurement of an angle. Start at the pivot point and extend out to start measuring an angle.
Measurement Four Points Angle: The four point angle measurement allows the measurement of an angle by selecting four points. Simply select two points from one line segment and another two points from another line segment to complete the angle measurement.
Undo: Undo the last action.
Visio-tek Wi-Fi Microscope User’s Manual
page 23
Delete: Delete all measurement.
Redo: Redo the previous action.
Visio-tek Wi-Fi Microscope User’s manual
page 24
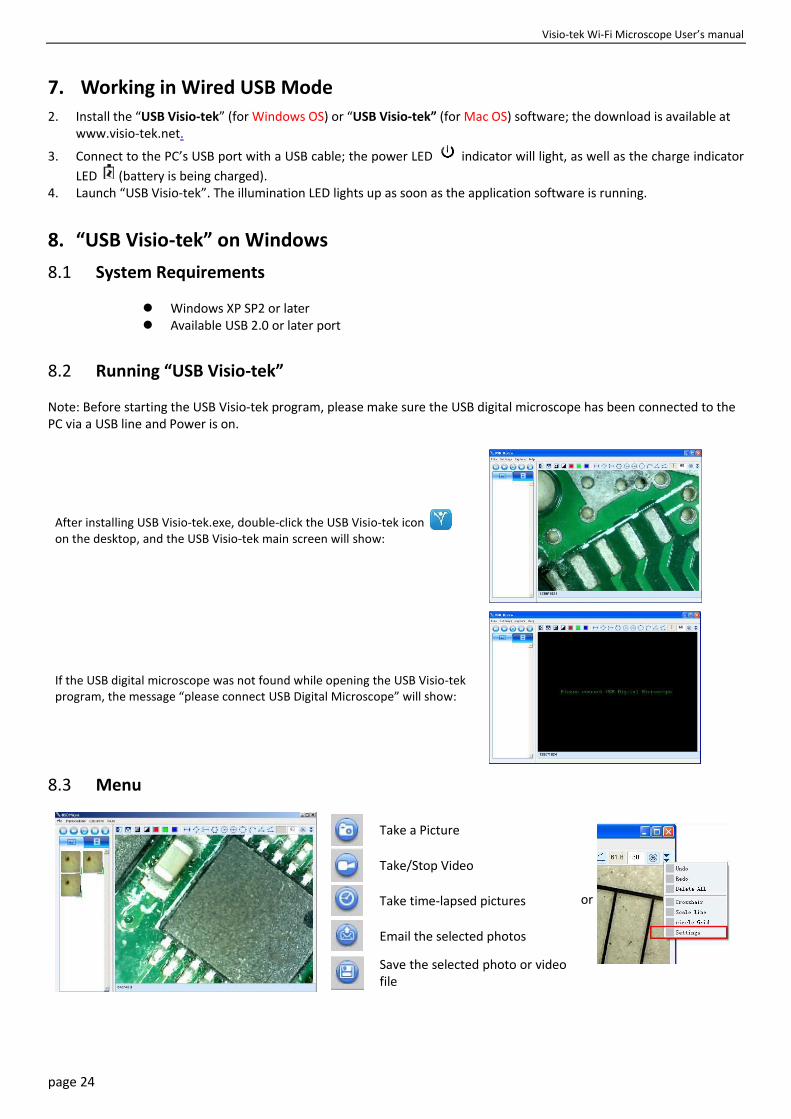
7. Working in Wired USB Mode
2. Install the “USB Visio-tek” (for Windows OS) or “USB Visio-tek” (for Mac OS) software; the download is available at www.visio-tek.net.
3. Connect to the PC’s USB port with a USB cable; the power LED indicator will light, as well as the charge indicator
LED (battery is being charged).4. Launch “USB Visio-tek”. The illumination LED lights up as soon as the application software is running.
8. “USB Visio-tek” on Windows
8.1 System Requirements
Windows XP SP2 or later Available USB 2.0 or later port
8.2 Running “USB Visio-tek”
Note: Before starting the USB Visio-tek program, please make sure the USB digital microscope has been connected to the PC via a USB line and Power is on.
After installing USB Visio-tek.exe, double-click the USB Visio-tek icon on the desktop, and the USB Visio-tek main screen will show:
If the USB digital microscope was not found while opening the USB Visio-tek program, the message “please connect USB Digital Microscope” will show:
8.3 Menu
Take a Picture
or
Take/Stop Video
Take time-lapsed pictures
Email the selected photos
Save the selected photo or video file
Visio-tek Wi-Fi Microscope User’s Manual
page 25
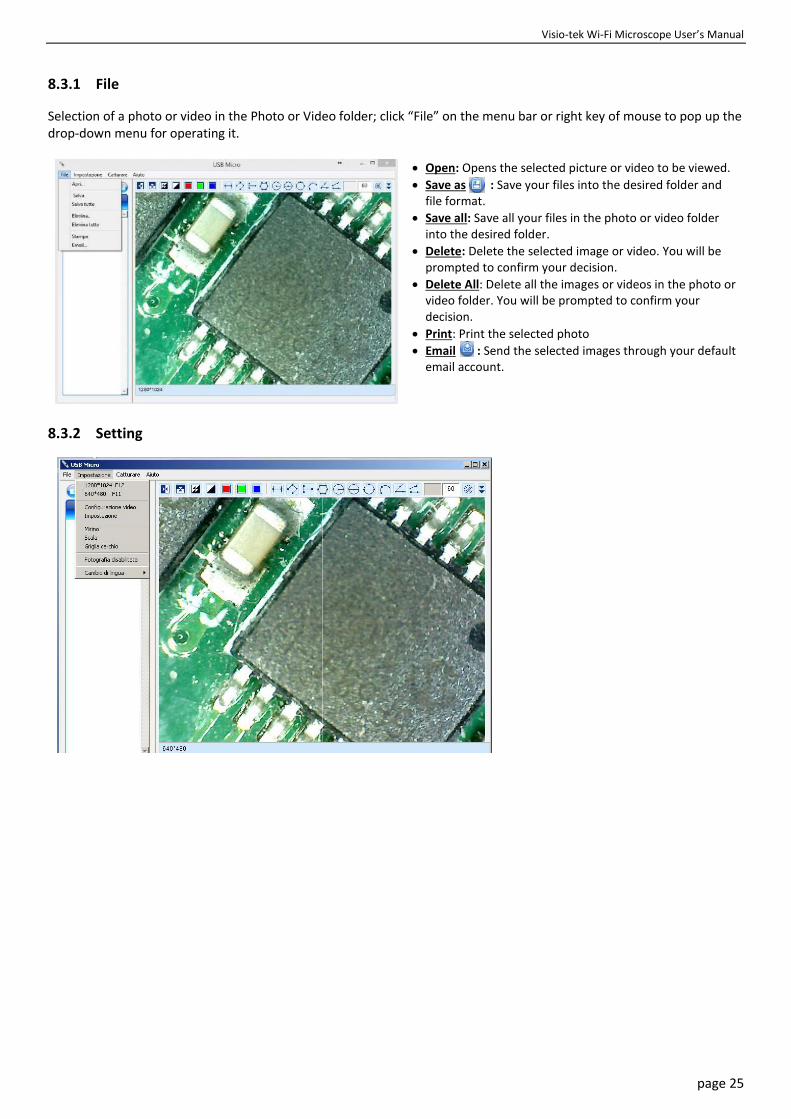
8.3.1 File
Selection of a photo or video in the Photo or Video folder; click “File” on the menu bar or right key of mouse to pop up the drop-down menu for operating it.
Open: Opens the selected picture or video to be viewed.
Save as : Save your files into the desired folder and file format.
Save all: Save all your files in the photo or video folder into the desired folder.
Delete: Delete the selected image or video. You will be prompted to confirm your decision.
Delete All: Delete all the images or videos in the photo or video folder. You will be prompted to confirm your decision.
Print: Print the selected photo
Email : Send the selected images through your default email account.
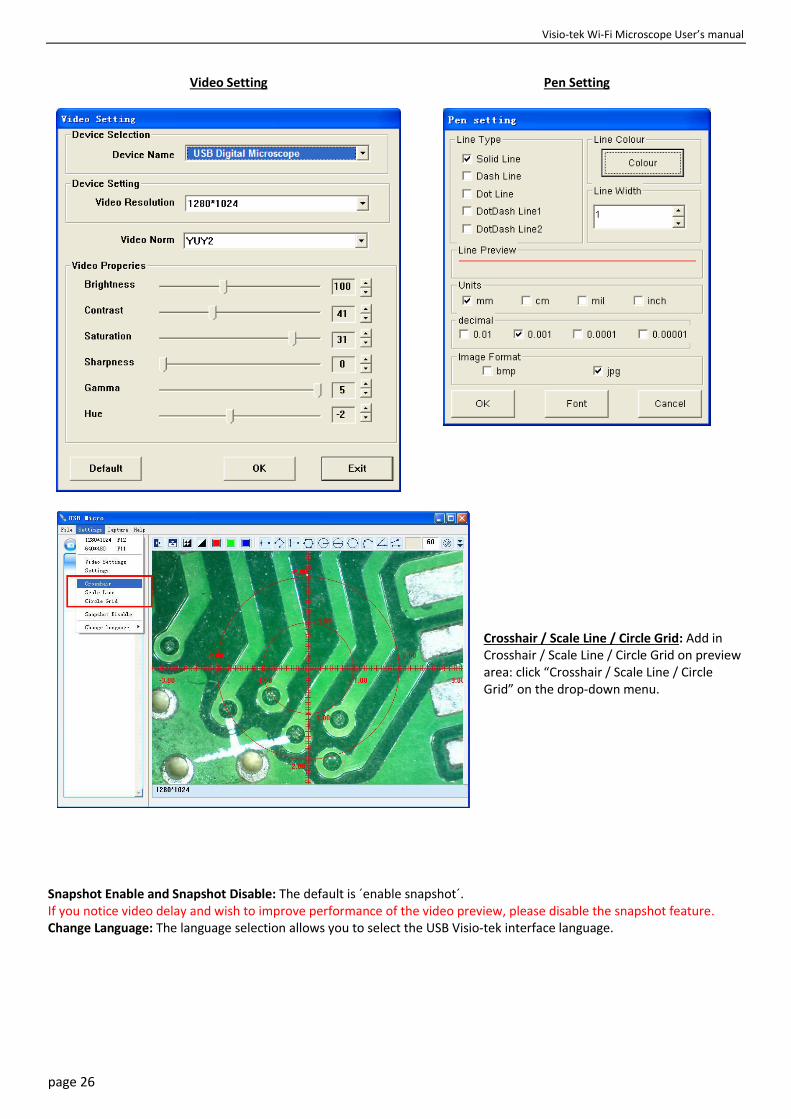
8.3.2 Setting
Visio-tek Wi-Fi Microscope User’s manual
page 26
Video Setting
Pen Setting
Crosshair / Scale Line / Circle Grid: Add in Crosshair / Scale Line / Circle Grid on preview area: click “Crosshair / Scale Line / Circle Grid” on the drop-down menu.
Snapshot Enable and Snapshot Disable: The default is ´enable snapshot´. If you notice video delay and wish to improve performance of the video preview, please disable the snapshot feature. Change Language: The language selection allows you to select the USB Visio-tek interface language.
Visio-tek Wi-Fi Microscope User’s Manual
page 27
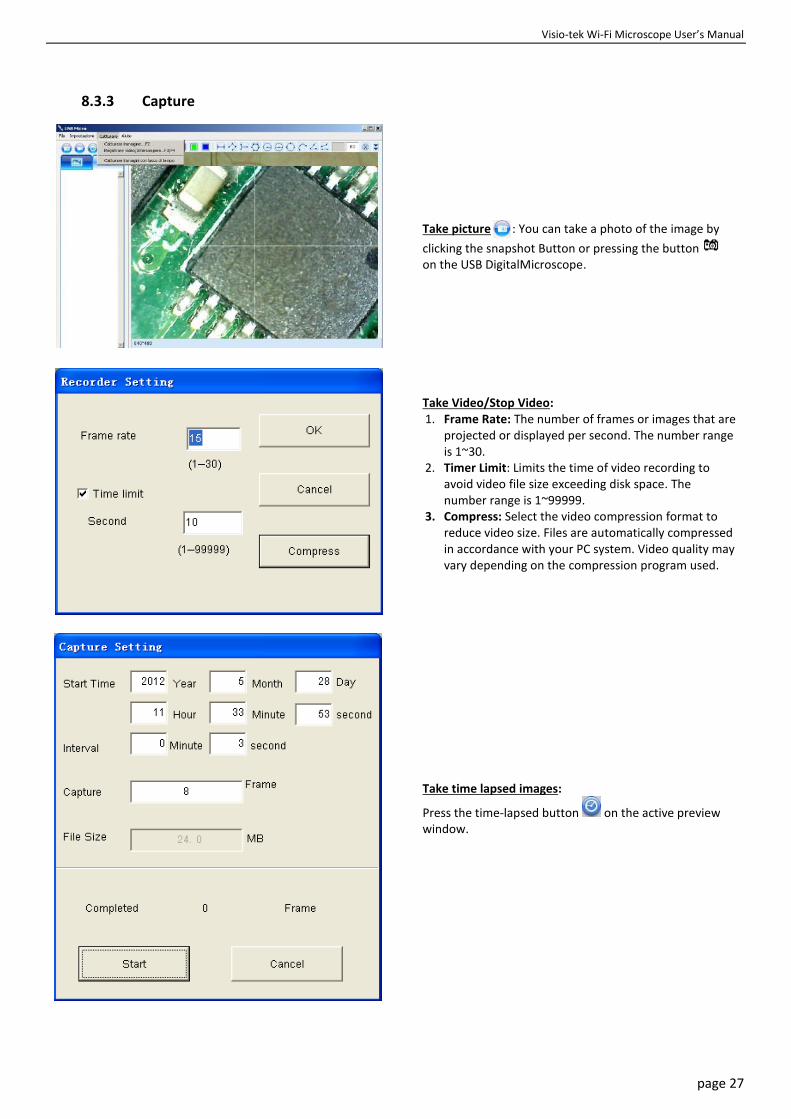
8.3.3 Capture
Take picture : You can take a photo of the image by
clicking the snapshot Button or pressing the button on the USB DigitalMicroscope.
Take Video/Stop Video: 1. Frame Rate: The number of frames or images that are
projected or displayed per second. The number range is 1~30.
2. Timer Limit: Limits the time of video recording to avoid video file size exceeding disk space. The number range is 1~99999.
3. Compress: Select the video compression format to reduce video size. Files are automatically compressed in accordance with your PC system. Video quality may vary depending on the compression program used.
Take time lapsed images:
Press the time-lapsed button on the active preview window.
Visio-tek Wi-Fi Microscope User’s manual
page 28
8.3.4 Help
About USB Visio-tek: you can check your present version.
8.3.5 Video Process Tool Bar
Horizontal Mirror
Vertical Mirror
Negative
Binary Segmentation
Monochrome display (Red)
Monochrome display (Green)
Monochrome display (Blue)
Calibration
8.4 Calibration on Windows
See Chapter 5.3
8.5 Measurement on Windows
See Chapter 7.4
To obtain accurate measurement data for each magnification, please calibrate before taking measurements.
9. “USB Visio-tek” on MAC OS
9.1 System Requirements
MAC OS X 10.8 or later QuickTime 7.0 or later
Please drag the “Visio-tek” software to the “Applications” folder to complete installation.
9.2 Running “USB Visio-tek”
Install the “USB Visio-tek” software from www.visio-tek.net. Once the USB Visio-tek installation is completed, please plug the microscope into an available USB port on your Mac OSX PC, and turn the microscope on with the switch on the side. The system will automatically search and install the driver. When the software installation is complete you will see a transmission from the microscope on
your screen, as shown below. If it does not show, please read the following instructions. After installation of USBVisio-tek.dmg, double-Click the USB Visio-tek icon, the USB Visio-tek main screen will display:

Visio-tek Wi-Fi Microscope User’s Manual
page 29
If images from the microscope camera are not being transmitted and display is still showing the “Please connect USB Microscope, then click Preview…” on the screen and change the resolution “Controls Format-> 320 x 240”, as illustrated below.
9.3 Setting
Note: When you are planning to use the microscope in the future, be sure to plug it in and turn it on before opening Visio-tek.
Video Resolution Setting Click “Controls->Format” to select your desired resolution as shown on the screen shot below. The default resolution is 640 x 480. If your Visio-tek screen freezes on an image, this may be because capture resolution was set too high. Set it back to Medium and the video display will return.
Visio-tek Wi-Fi Microscope User’s manual
page 30
9.4 Capturing Image
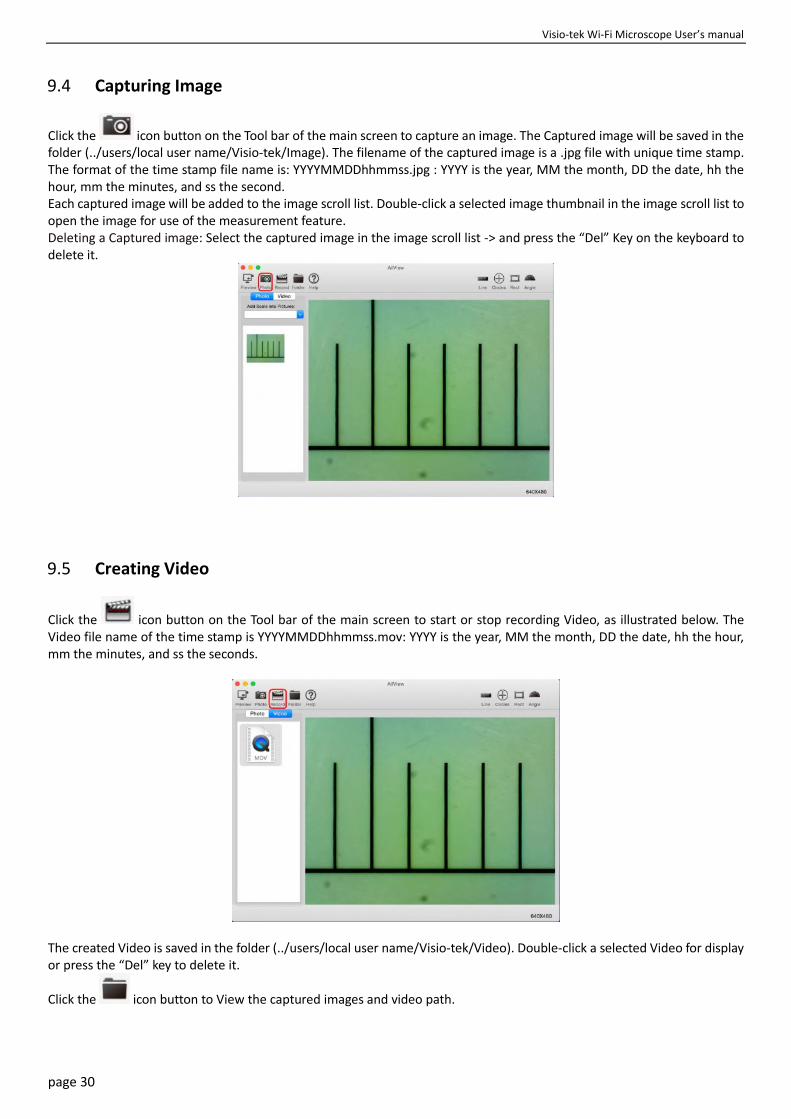
Click the icon button on the Tool bar of the main screen to capture an image. The Captured image will be saved in the folder (../users/local user name/Visio-tek/Image). The filename of the captured image is a .jpg file with unique time stamp. The format of the time stamp file name is: YYYYMMDDhhmmss.jpg : YYYY is the year, MM the month, DD the date, hh the hour, mm the minutes, and ss the second. Each captured image will be added to the image scroll list. Double-click a selected image thumbnail in the image scroll list to open the image for use of the measurement feature. Deleting a Captured image: Select the captured image in the image scroll list -> and press the “Del” Key on the keyboard to delete it.
9.5 Creating Video
Click the icon button on the Tool bar of the main screen to start or stop recording Video, as illustrated below. The Video file name of the time stamp is YYYYMMDDhhmmss.mov: YYYY is the year, MM the month, DD the date, hh the hour, mm the minutes, and ss the seconds.
The created Video is saved in the folder (../users/local user name/Visio-tek/Video). Double-click a selected Video for display or press the “Del” key to delete it.
Click the icon button to View the captured images and video path.
Visio-tek Wi-Fi Microscope User’s Manual
page 31
9.6 Calibration
See Chapter 8.3
9.7 Measurement
See Chapter 8.4
10. Product Specifications
Operation system:Windows /Mac/IOS and Android
Wi-Fi Spec: Photo and Video Resolution: 1.3MPixel-- 1280 x 1024(MJPG),640 x 480(MJPG), 320 x 240
Frame Rate:15fps@1280 x 1024,30fps@640 x 480, 320 x 240 IEEE 802.11 b/g/n standards compliant
Wireless Transmission Distance: up to 5m
Transmit Power:o 11n HT40 MCS7: +13 dBmo 11b CCK: +18 dBmo 11g OFDM: +15 dBm
Data Rate:o 802.11n: up to 150Mbpso 802.11b: 1, 2, 5,5, 11Mbpso 802.11g: 6, 9, 12, 18, 24, 36, 48, 54 mp
The Temperature: ≤60 °C (Celsius degree) with full speed running.
Frequency Range: 2.400 ~ 2.4835GHz
Power Consumption: Max 2.5W
Frame Rate: 10fps~30fps
Li-ion Battery: Continuous Working Time—Appx. 2 Hours, Full Charging Time—Appx. 4 Hours
Power Source: DC5.0V/1A
Camera Spec: Camera Sensor: CMOS 1/4”
Optical features:Exposure, Gamma Correction, Numerical Aperture, White Balance, Black Reference, Flicker Avoidance,Defect Identification, Color Saturation: Auto
Microscope Spec: Adjustable Magnification: According to the model
The Object Distance: According to the model
Focus Range: According to the model
Light Source: According to the model
Lens: High Definition Microscopy Lens
Dimension: 36mm (Diameter) x 142mm (Length)
Weight: ~88g
Wired USB Spec: Photo and Video Resolution: 1.30 mp—1280 x 1024, 640 x 480, 320 x 240
Frame Rate:15fps@1280 x 1024, 30fps@640 x 480, 320 x 240 PC interface: USB 2. 0
MiniUSB Cable: 1.2m
Visio-tek Wi-Fi Microscope User’s manual
page 32
11. Troubleshooting
11.1 Wi-Fi Mode
1. There is no video display after changing the resolution to 1280 x 1024, but it works well at 640 x 480:
a)Low battery, please charge your microscope.
2. The microscope video stops after working for a long time:
a)Check if low battery or the battery is exhausted.
b)Power off Wi-Fi microscope and close Visio-tek app, then restart it again.
3. The live video‘s frame rate of Wi-Fi microscope is slow:
a)Click the “Preview” icon again on “WiFi Visio-tek” SW when using on Window PC or Mac PC. Close and restart “Visio-tek” app again for Smart-Phone or Tablet.
b)Set the video resolution to 640 x 480 if the current resolution is 1280 x 1024.
c)Check if low battery or there are many other Wi-Fi networks interference around.
d)Power off WiF-i microscope and close the SW to restart it again.
4. There is no video display or slow video after successful Wi-Fi connection:
a)Smart-Phone or Tablet: if the illumination LEDs don’t light up, please power off Wi-Fi microscope and close “Visio-tek” app to restart it.
b)Smart-Phone or Tablet: if the illumination LEDs light up, restart “Visio-tek” app
c)Windows PC or Mac PC: click the “Preview” icon again on “WiFi Visio-tek”, or power off Wi-Fi microscope and close “WiFi Visio-tek” to restart it.
5. Why does the screen stop video displaying after changing the resolution?
a)When changing the resolution, please wait until the illumination LED is off and lights up again before clicking OK - it takes about 5 seconds. Please restart “Visio-tek” app.
6. Why does the device feel rather warm after Wi-Fi microscope has been working for some time?
a)The Power dissipation of Wi-Fi microscope is about 2.5W, so the highest internal temperature of the device can reach about 60°C.
7. Hong long can the Wi-Fi microscope works for after the battery is full charged?
a)It is about 2 hours at 640 x 480 resolution. Full charging time is about 2 hours.
8. How do I use the wired set-up?
a)Please refer to the USB Mode chapters of this manual for wired USB Visio-tek scope usage.
9. Why Wi-Fi Microscope may encounter some interferences?Interference will occur if there are some other wireless sources, for example, analog 2.4GHz FM wireless, Wi-Fi, cordless phone and Bluetooth etc., please keep away from these wireless sources, and then operate the Wi-Fi Microscope.
11.2 USB Mode
1. The USB Digital Microscope and the USB Visio-tek software were working, but suddenly stop working properly. Pleasetry the following:
a)Unplug or Power off USB DigitalMicro from PC, close USB Visio-tek program.
b)After waiting for 1 minute, plug and power on USB Digital Microscope and open USB Visio-tek program to try.
2. After PC resume from standby or hibernate, maybe USB Visio-tek will not work properly, please close it and re-opento try.
3. If USB Digital microscope driver can not be installed completely, maybe your pc OS is not XP SP2 or above, pleaseupdate it. If you installed the driver and application completely, but there is a tips: please connect USB DigitalMicroscope after running the program, please uninstall USB Visio-tek and reboot PC, then re-install USB Visio-tek totry again.