Embed Size (px)
Citation preview

MIKE LAVERICK Limited Edition
1.0 IntroductionIn 2007, like others in the global VMware community,
Xtravirt developed a common methodology to install
and run VMware ESX 3.x on VMware Workstation 6
together with a shared storage solution based upon
an iSCSI software target. We called it ‘VI3 in a box’.
This allowed users and professionals in the IT
community to create simple and cost effective VI3
infrastructures to test, learn about and demonstrate
these environments.
Upon the release of VMware ESX 3.5 we found that this
methodology did not continue to hold true. Although
still possible to install ESX 3.5, when attempting to start
a nested Virtual Machine on the ESX VM, the ESX VM
panics, and a stop message similar to the one below
generated by Workstation appears.
However, with the release of VMware Workstation 6.5,
Build 118166, a revised solution exists.
This white paper documents the process to install and
configure ‘VI3.5 in a box’.
www.xtravirt.com © 2009 | 1
Fig 1-1: Solution Overview
white paper
XD10004: How to Install VMware ESX Server 3.5 on VMware Workstation 6.5 as a VM‘VI in a Box’ - the portable virtual infrastructure
Title: How to Install VMware ESX Server 3.5 on VMware Workstation 6.5
as a VM
Author(s): Xtravirt (Paul Davey)
Target Audience: Technical - Novice
Current Revision: 1.12 (Feb 2009)
First Published: Sep 2008
Vendor(s): VMware
Product(s): ESX Server 3.5 U3 (tested), Workstation Build 118166 (tested)
UID: XD10004
Content Overview:
• Step by step install guide for VMware ESX Server 3.5 as a virtual machine
within VMware Workstation 6.5
• Why this is useful as a portable demo or training environment

MIKE LAVERICK Limited Edition
If you want the best result for your next virtualization project, contact [email protected]
*UK and Ireland only
www.xtravirt.com © 2009 | 2
2.0 Pre-RequisitesThe following software is required:
• VMware Workstation 6.5 Build 118166
• ESX 3.5 Update 3
Note: earlier and later point revisions of both Workstation and ESX may
also work; this document covers Xtravirt field tested versions only.
We tested this installation on a Lenovo T60 laptop
computer with the following specification:
• Intel Mobile Core 2 Duo T5600 1.83GHz CPU
• 2GB Ram
• CPU virtualization extensions enabled in the BIOS
Note: the minimum CPU requirement is a multi-core processor with
either Intel-VT or AMD-V extensions.
Quote from jmattson (VMware): “Intel VT-x is supported on all VT-capable
EM64T processors (e.g. late model P4, recent Xeons, Core 2 or Core i7). In
particular, it is not supported on 32-bit Core processors.
AMD-V is supported on all AMD64 Family 10H or greater processors (e.g.
Phenom or Barcelona). It is not supported on Family 0FH processors.
To run ESX in a Workstation 6.5 VM, you need a supported VT-x or AMD-V
processor.”
The PC was running Windows XP Professional with SP3
installed to current Microsoft patch levels
3.0 Install VMware Workstation 6.5
Close all running applications. Double click the
installer program to launch setup. Each of the
following steps represents a screen in the installation
wizard.
1. Welcome. Click Next2. Setup Type. Select Typical. Click Next3. Destination Folder. Click Next4. Configure Shortcuts. Select shortcut preference.
Click Next5. Ready to Install the Program. Click Install6. VMware Workstation will now install
7. Installation Wizard Completed. Click Finish8. At the prompt click Yes to restart your computer
4.0 Create ESX 3.5 VM1. Start VMware Workstation. Start the New Virtual Machine wizard. Select the Custom radio button and
click Next
2. Choose the Virtual Machine Hardware Compatibility.
Ensure that Workstation 6.5 is selected in the
Hardware Compatibility field. Click Next
3. Guest Operating System Installation. Select ‘I will install the operating system later’ option. Click
Next
4. Select a Guest Operating System. Select Linux, then
in the Version field select Red Hat Enterprise Linux 4 64-bit. Click Next
Blue sky innovation meets Rock solid experience
Xtravirt Services UK

MIKE LAVERICK Limited Edition
5. Name the Virtual Machine. Enter a VM name and
specify a location to store VM files. Click Next
6. Processor Configuration. Select One. Click Next
7. Memory for the Virtual Machine. Select at least
1024MB. Click Next.
8. Network Type. For this example the Use bridged networking option was selected. Click Next
9. Select I/O Adapter Types. Select LSI Logic. Click
Next
www.xtravirt.com © 2009 | 3
MIKE LAVERICK Limited Edition
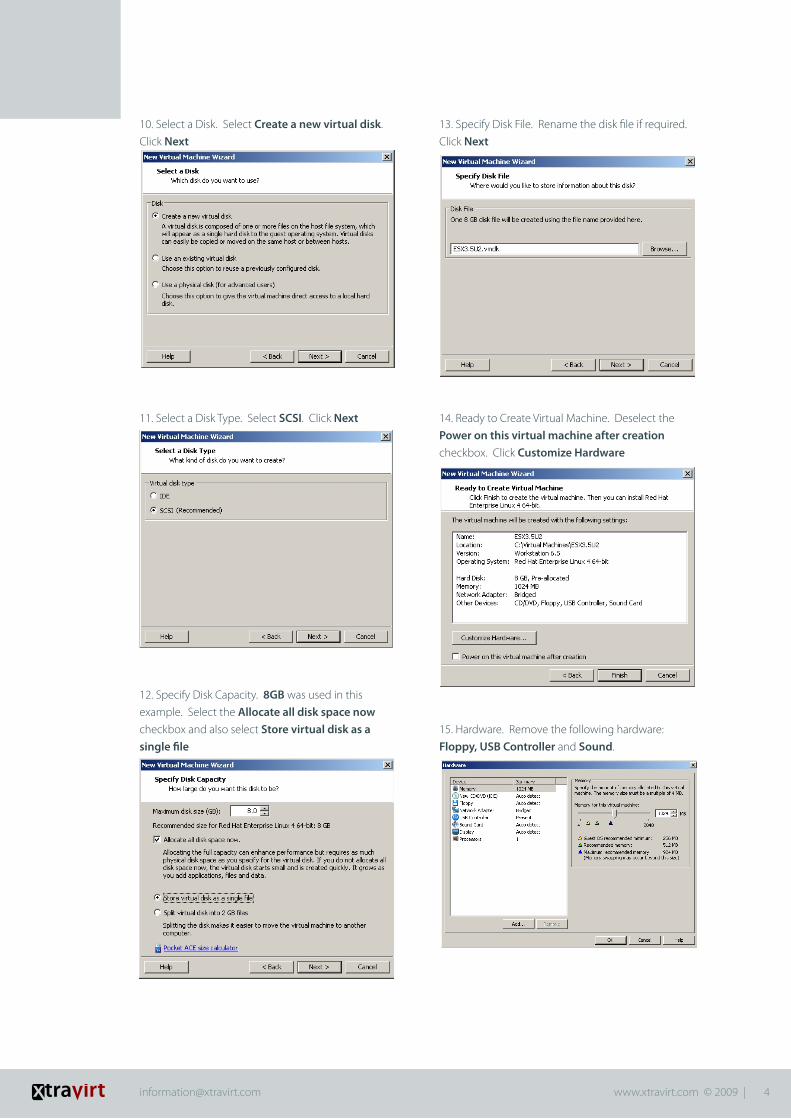
10. Select a Disk. Select Create a new virtual disk.
Click Next
11. Select a Disk Type. Select SCSI. Click Next
12. Specify Disk Capacity. 8GB was used in this
example. Select the Allocate all disk space now
checkbox and also select Store virtual disk as a single file
13. Specify Disk File. Rename the disk file if required.
Click Next
14. Ready to Create Virtual Machine. Deselect the
Power on this virtual machine after creation
checkbox. Click Customize Hardware
15. Hardware. Remove the following hardware:
Floppy, USB Controller and Sound.
www.xtravirt.com © 2009 | 4

MIKE LAVERICK Limited Edition
16. Hardware. Select Network. Tick Replicate physical network connection state
17. Hardware. Select Display. Deselect the
Accelerate 3D graphics checkbox.
18. Select Processors. In the Preferred Mode field
select the Intel-VTx or AMD-V option. Click OK
19. Click Finish
20. The virtual disk will be allocated. This step may
take some time.
21. Once complete, double-click the CD/DVD (IDE) option to open the customisation menu
22. CD/DVD. Select Use ISO image file. Browse to
the location of the ESX 3.5 Update 3 ISO previously
downloaded. Click OK
www.xtravirt.com © 2009 | 5

MIKE LAVERICK Limited Edition
23. A line needs to be added into the .vmx file for
this virtual machine. Navigate to the Windows folder
where the VM is stored. The location of the .vmx file is
shown in the Workstation GUI
24. Edit the .vmx file using Windows notepad. Add the
following line, monitor_control.restrict_backdoor = true to the file as shown. Save the file and close
Note: Alternatives to this .vmx file configuration can be found here:
http://sanbarrow.com/vmx/vmx-examples.html
5.0 Install VMware ESX 3.51. Within Workstation power on the VM.
The ESX boot loader screen will appear. Press the Enter
key to continue. The following is a default GUI install
of ESX; modify as required.
Each of the following steps represents a screen in the
installation wizard.
1. CD Media Test. Select Skip2. Welcome to the ESX Server 3.5 Installer. Click
Next3. Select Keyboard. Select your keyboard layout.
Click Next4. Mouse Configuration. Click Next5. Warning - Initialize Drive. Click Yes6. End User License Agreement. Select I accept the
terms of the license agreement. Click Next7. Partitioning Options. Accept defaults or modify
accordingly. Click Next8. Warning - remove partitions. Click Yes9. Partition Disks. Modify as required. For this
configuration we made the VMFS partition
smaller and ensured that the SWAP partition was
equal to the amount of configured memory in
the ESX VM. Click Next10. Advanced Options. Click Next11. Network Configuration. Configure networking as
required. Click Next12. Time Zone Selection. Configure time zone, UTC
offset and location. Click Next13. Account Configuration. Set root password. Click
Next14. About to Install. Click Next15. ESX Server will now install. Once complete
click Finish. ESX server will reboot and start to
load. The ESX iso can now be unmounted. Once
the splash screen appears it may take a few
minutes for ESX to complete loading. Check by
pressing ALT-F1 - if you see a login then ESX has
completed booting.
www.xtravirt.com © 2009 | 6

MIKE LAVERICK Limited Edition
16. Using your Internet browser (IE7 in this case),
navigate to the IP address of your ESX VM, eg:
http://192.168.15.49. If using DHCP, press ALT-F11
to show the assigned IP address.
17. Accept any website certificate warnings, eg:
Continue to this website
18. Click Download VMware Infrastructure Client
19. Follow the installation prompts to install the VI
Client. Once complete launch the VI Client.
20. Enter the ESX VM IP address, root username
and its password. Click Login. Click Ignore at
the Security Warning prompt and the client will
continue to load.
21. The VI client interface for the ESX Server VM will
be presented.
At this point you can continue to configure the ESX
server from the VI client. Optionally, create additional
ESX Server VM’s, create a VM to run VirtualCenter and
fully configure a ‘VI3.5 in a box’ infrastructure.
6.0 Create a Nested VMAs mentioned at the start of this paper, the primary
issue with ESX 3.5 until this release of Workstation
is that although ESX could be installed, any VM’s
deployed on the ESX VM would crash Workstation
when attempting to power on. This severely limited
the use of the solution as it could not be used to
demonstrate key functions such as VMotion, DRS and
HA.
To illustrate that this release has resolved this issue, the
next steps show the ability to create and power on
VM’s.
From the VI Client go File -> Virtual Appliance ->
Import. Select the Import from VMware Virtual Appliance Marketplace and select a VM. Nostalgia
was selected as it is only a small 6MB VM. Follow the
import wizard and the VM will download and register
with the ESX VM. Power on the VM. The screenshot
below shows the VM having started up.
And lastly, a game in progress.
www.xtravirt.com © 2009 | 7

MIKE LAVERICK Limited Edition
This concludes the ‘VI3.5 in a box’ white paper based
upon ESX Server 3.5 Update 3 on VMware Workstation
6.5 (Build 118166).
The information in this document has been
developed by Xtravirt in conjunction with the VMware
community. This document is a culmination of
the combined effort. Xtravirt wish to acknowledge
and thank everyone in the community for their
contributions.
References1. Ulli Hankeln, http://sanbarrow.com/vmx/vmx-examples.html
Useful Links1. Xtravirt Document, http://knowledge.xtravirt.com/white-
papers/esx-3x.html “Guide to installing IET Virtual Shared
Storage”
2. esxpress Virtual SAN, PHD Software, http://engineering.xtravirt.
com/products/phd-technologies/xtravirt-virtual-san.html
3. VSA, LeftHand Networks, http://lefthandnetworks.com/
vsa_eval.aspx
Tags
VMware, ESX, Workstation, Intel VT, AMD-V, VI in a box, install, VM,
demo, training, ks.cfg, vmx, install
www.xtravirt.com © 2009 | 8