Embed Size (px)
Citation preview
66
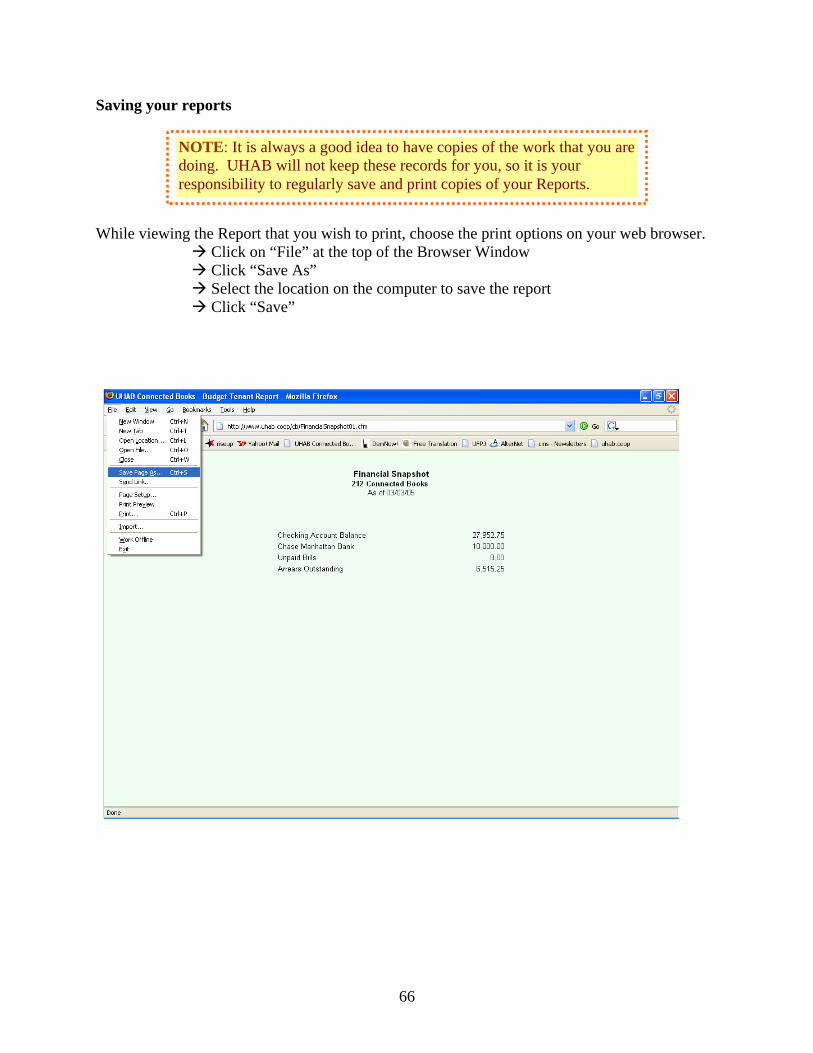
Saving your reports While viewing the Report that you wish to print, choose the print options on your web browser. Click on “File” at the top of the Browser Window Click “Save As” Select the location on the computer to save the report Click “Save”
NOTE: It is always a good idea to have copies of the work that you are doing. UHAB will not keep these records for you, so it is your responsibility to regularly save and print copies of your Reports.
67
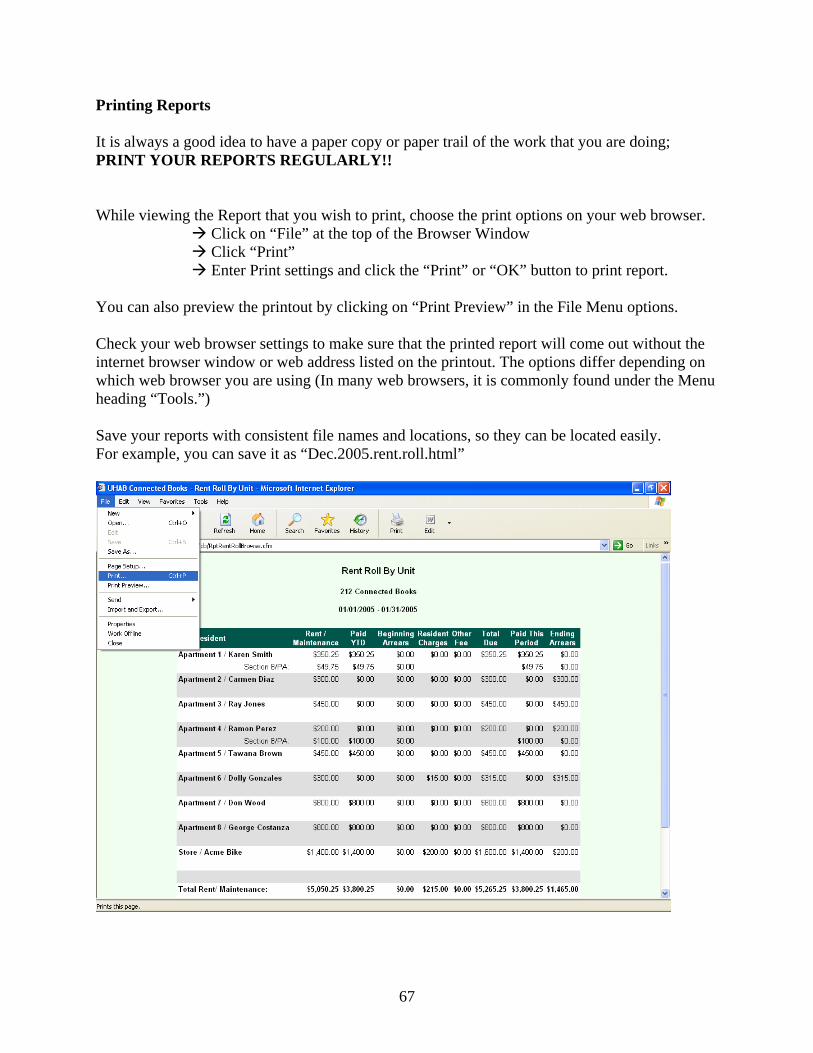
Printing Reports It is always a good idea to have a paper copy or paper trail of the work that you are doing; PRINT YOUR REPORTS REGULARLY!! While viewing the Report that you wish to print, choose the print options on your web browser. Click on “File” at the top of the Browser Window Click “Print” Enter Print settings and click the “Print” or “OK” button to print report. You can also preview the printout by clicking on “Print Preview” in the File Menu options. Check your web browser settings to make sure that the printed report will come out without the internet browser window or web address listed on the printout. The options differ depending on which web browser you are using (In many web browsers, it is commonly found under the Menu heading “Tools.”) Save your reports with consistent file names and locations, so they can be located easily. For example, you can save it as “Dec.2005.rent.roll.html”
68
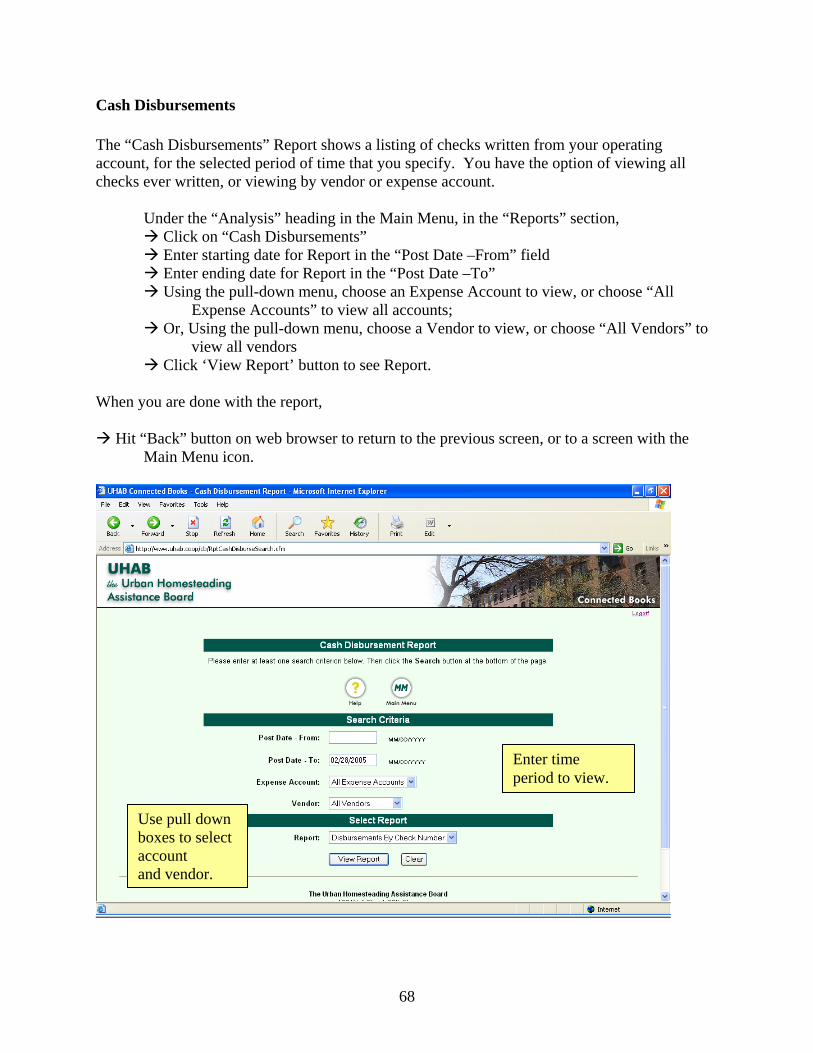
Cash Disbursements The “Cash Disbursements” Report shows a listing of checks written from your operating account, for the selected period of time that you specify. You have the option of viewing all checks ever written, or viewing by vendor or expense account. Under the “Analysis” heading in the Main Menu, in the “Reports” section, Click on “Cash Disbursements” Enter starting date for Report in the “Post Date –From” field Enter ending date for Report in the “Post Date –To” Using the pull-down menu, choose an Expense Account to view, or choose “All Expense Accounts” to view all accounts; Or, Using the pull-down menu, choose a Vendor to view, or choose “All Vendors” to view all vendors Click ‘View Report’ button to see Report. When you are done with the report,
Hit “Back” button on web browser to return to the previous screen, or to a screen with the Main Menu icon.
Enter time period to view.
Use pull down boxes to select account and vendor.
69
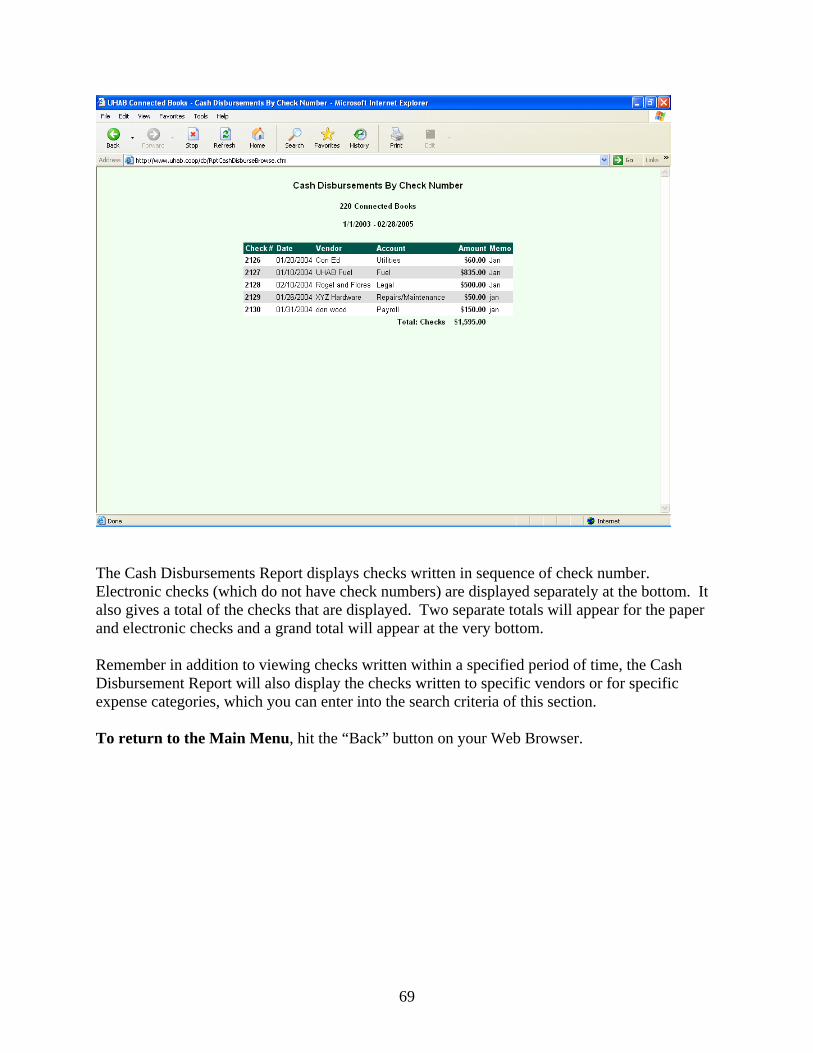
The Cash Disbursements Report displays checks written in sequence of check number. Electronic checks (which do not have check numbers) are displayed separately at the bottom. It also gives a total of the checks that are displayed. Two separate totals will appear for the paper and electronic checks and a grand total will appear at the very bottom. Remember in addition to viewing checks written within a specified period of time, the Cash Disbursement Report will also display the checks written to specific vendors or for specific expense categories, which you can enter into the search criteria of this section. To return to the Main Menu, hit the “Back” button on your Web Browser.
70
Rent Roll
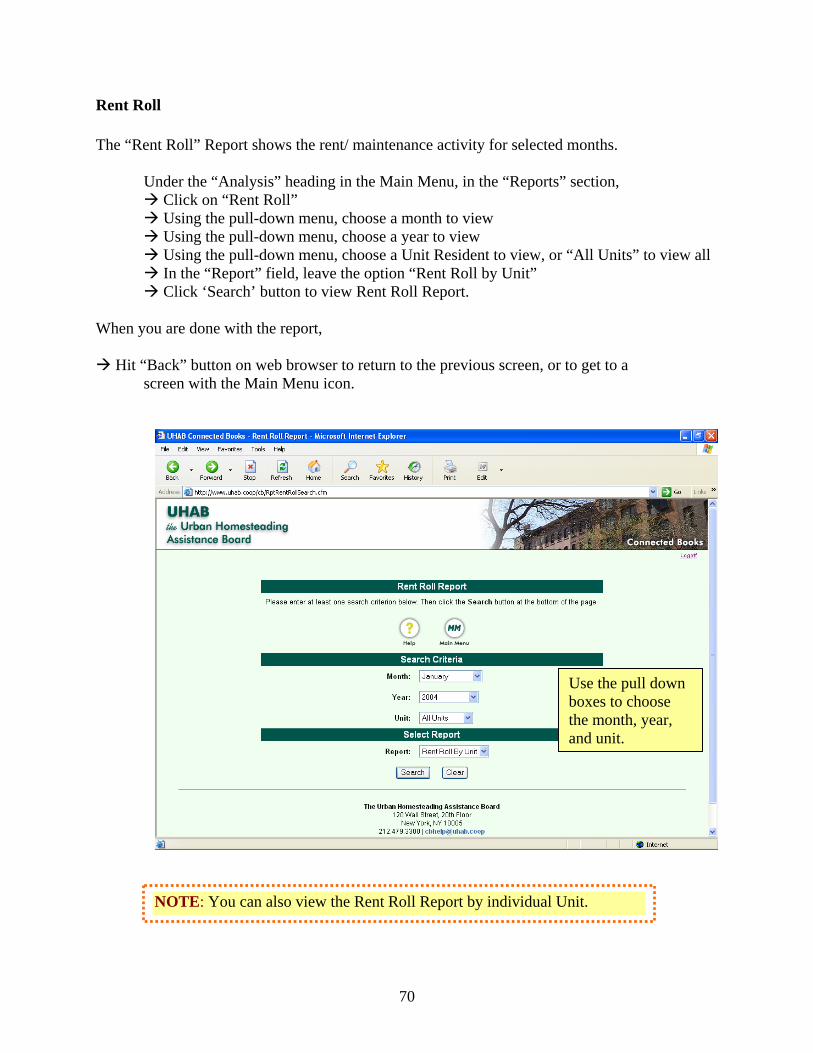
The “Rent Roll” Report shows the rent/ maintenance activity for selected months. Under the “Analysis” heading in the Main Menu, in the “Reports” section, Click on “Rent Roll” Using the pull-down menu, choose a month to view Using the pull-down menu, choose a year to view Using the pull-down menu, choose a Unit Resident to view, or “All Units” to view all In the “Report” field, leave the option “Rent Roll by Unit” Click ‘Search’ button to view Rent Roll Report. When you are done with the report,
Hit “Back” button on web browser to return to the previous screen, or to get to a screen with the Main Menu icon.
Use the pull down boxes to choose the month, year, and unit.
NOTE: You can also view the Rent Roll Report by individual Unit.
71
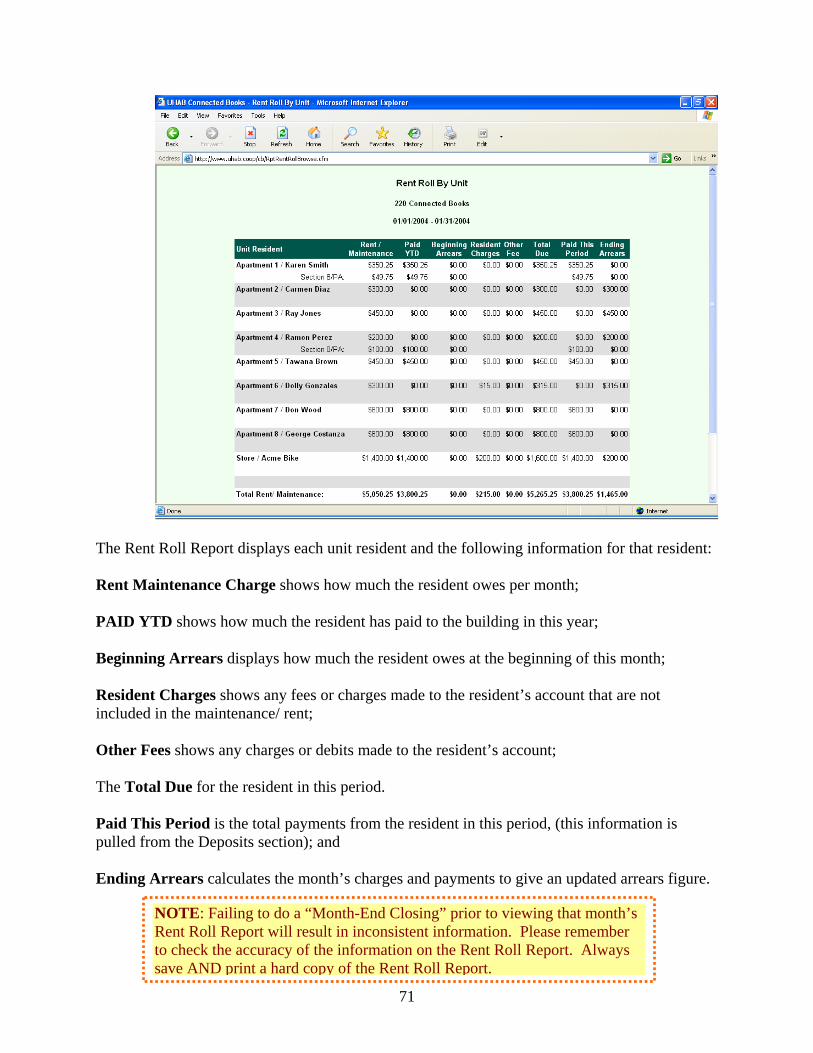
The Rent Roll Report displays each unit resident and the following information for that resident: Rent Maintenance Charge shows how much the resident owes per month; PAID YTD shows how much the resident has paid to the building in this year; Beginning Arrears displays how much the resident owes at the beginning of this month; Resident Charges shows any fees or charges made to the resident’s account that are not included in the maintenance/ rent; Other Fees shows any charges or debits made to the resident’s account; The Total Due for the resident in this period. Paid This Period is the total payments from the resident in this period, (this information is pulled from the Deposits section); and Ending Arrears calculates the month’s charges and payments to give an updated arrears figure.
NOTE: Failing to do a “Month-End Closing” prior to viewing that month’s Rent Roll Report will result in inconsistent information. Please remember to check the accuracy of the information on the Rent Roll Report. Always save AND print a hard copy of the Rent Roll Report.
72
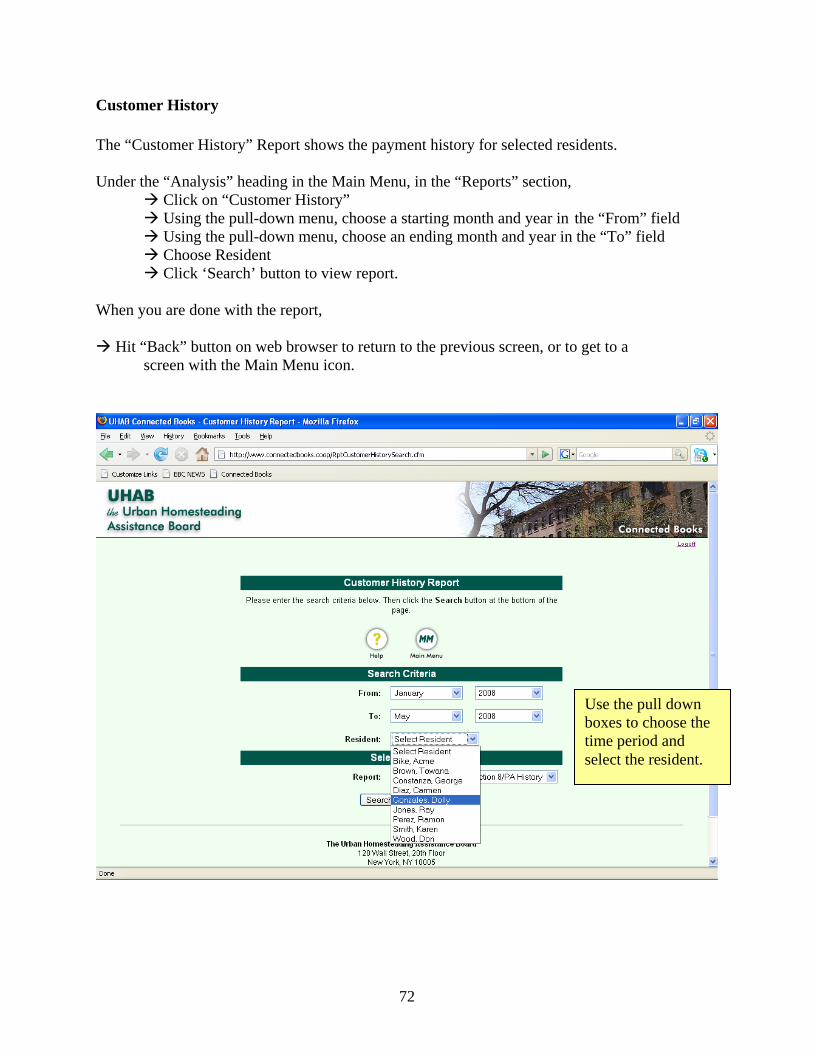
Customer History The “Customer History” Report shows the payment history for selected residents. Under the “Analysis” heading in the Main Menu, in the “Reports” section, Click on “Customer History” Using the pull-down menu, choose a starting month and year in the “From” field Using the pull-down menu, choose an ending month and year in the “To” field Choose Resident Click ‘Search’ button to view report. When you are done with the report,
Hit “Back” button on web browser to return to the previous screen, or to get to a screen with the Main Menu icon.
Use the pull down boxes to choose the time period and select the resident.
73
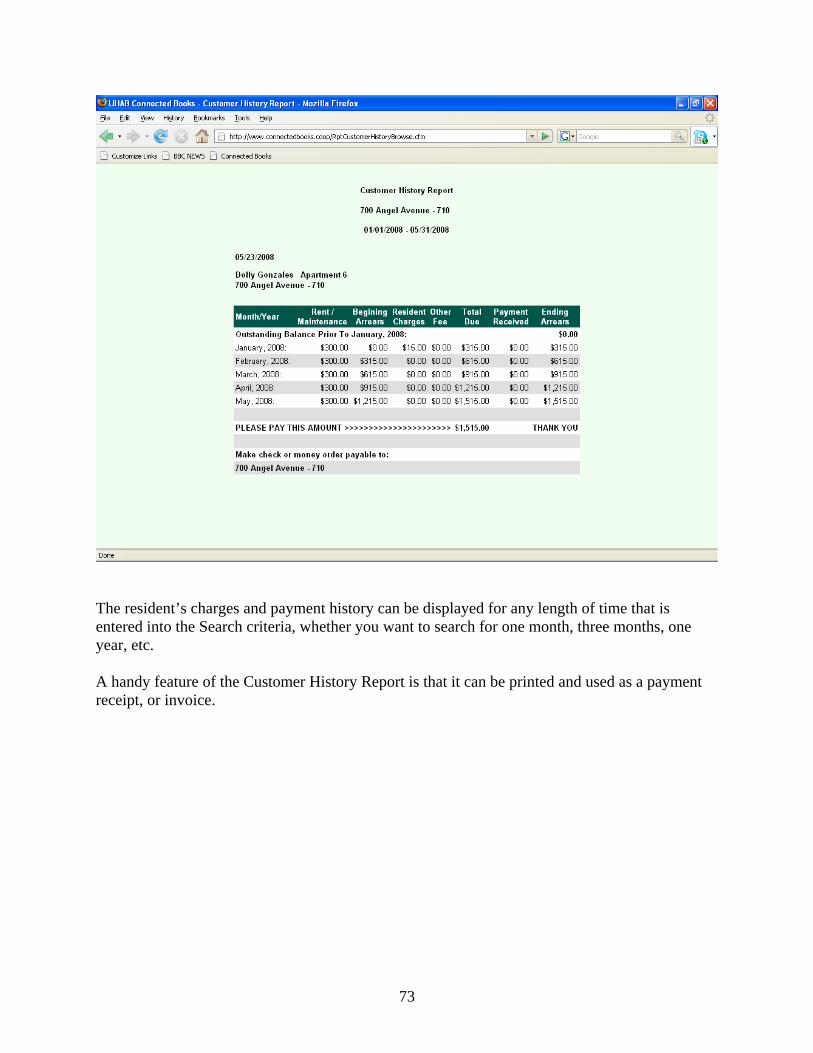
The resident’s charges and payment history can be displayed for any length of time that is entered into the Search criteria, whether you want to search for one month, three months, one year, etc. A handy feature of the Customer History Report is that it can be printed and used as a payment receipt, or invoice.
74
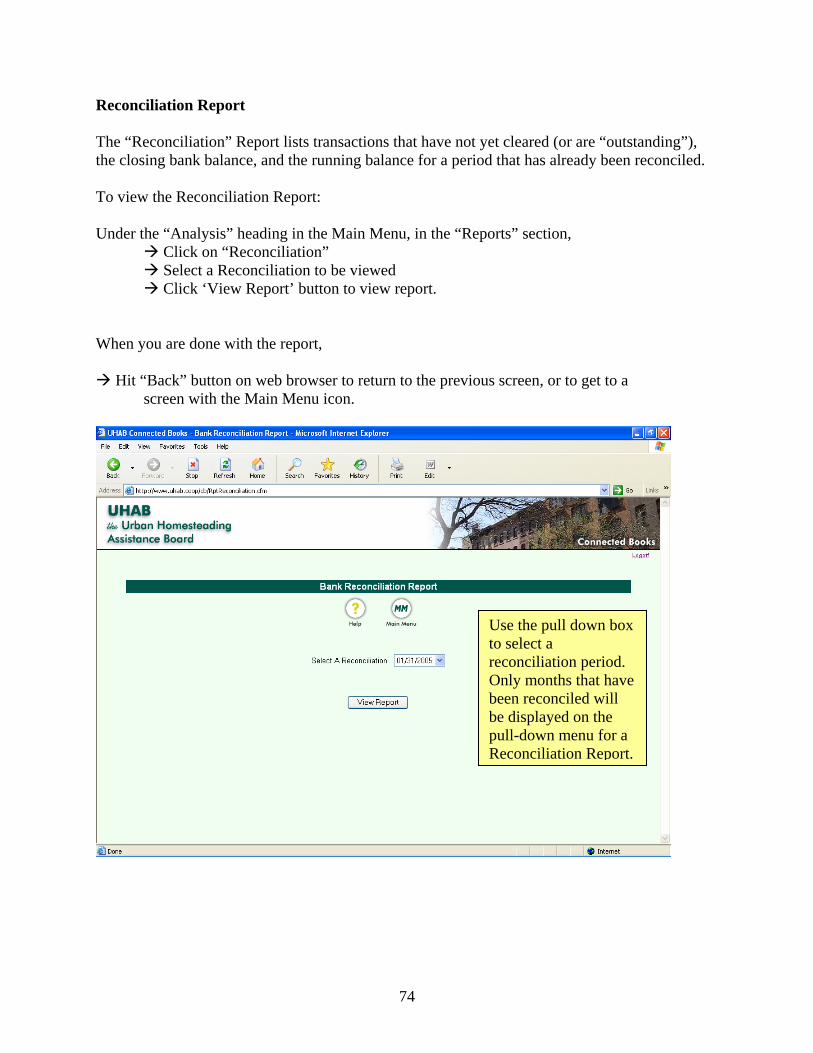
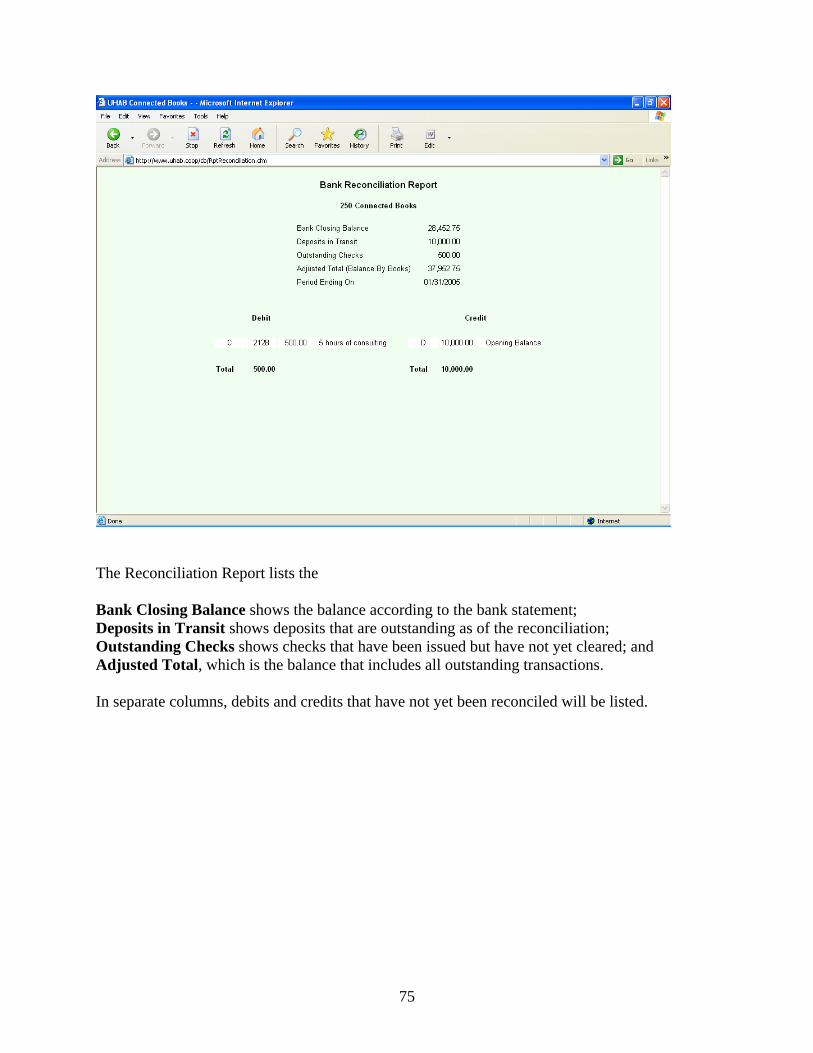
Reconciliation Report The “Reconciliation” Report lists transactions that have not yet cleared (or are “outstanding”), the closing bank balance, and the running balance for a period that has already been reconciled. To view the Reconciliation Report: Under the “Analysis” heading in the Main Menu, in the “Reports” section, Click on “Reconciliation” Select a Reconciliation to be viewed Click ‘View Report’ button to view report. When you are done with the report,
Hit “Back” button on web browser to return to the previous screen, or to get to a screen with the Main Menu icon.
Use the pull down box to select a reconciliation period. Only months that have been reconciled will be displayed on the pull-down menu for a Reconciliation Report.
75
The Reconciliation Report lists the Bank Closing Balance shows the balance according to the bank statement; Deposits in Transit shows deposits that are outstanding as of the reconciliation; Outstanding Checks shows checks that have been issued but have not yet cleared; and Adjusted Total, which is the balance that includes all outstanding transactions. In separate columns, debits and credits that have not yet been reconciled will be listed.
76
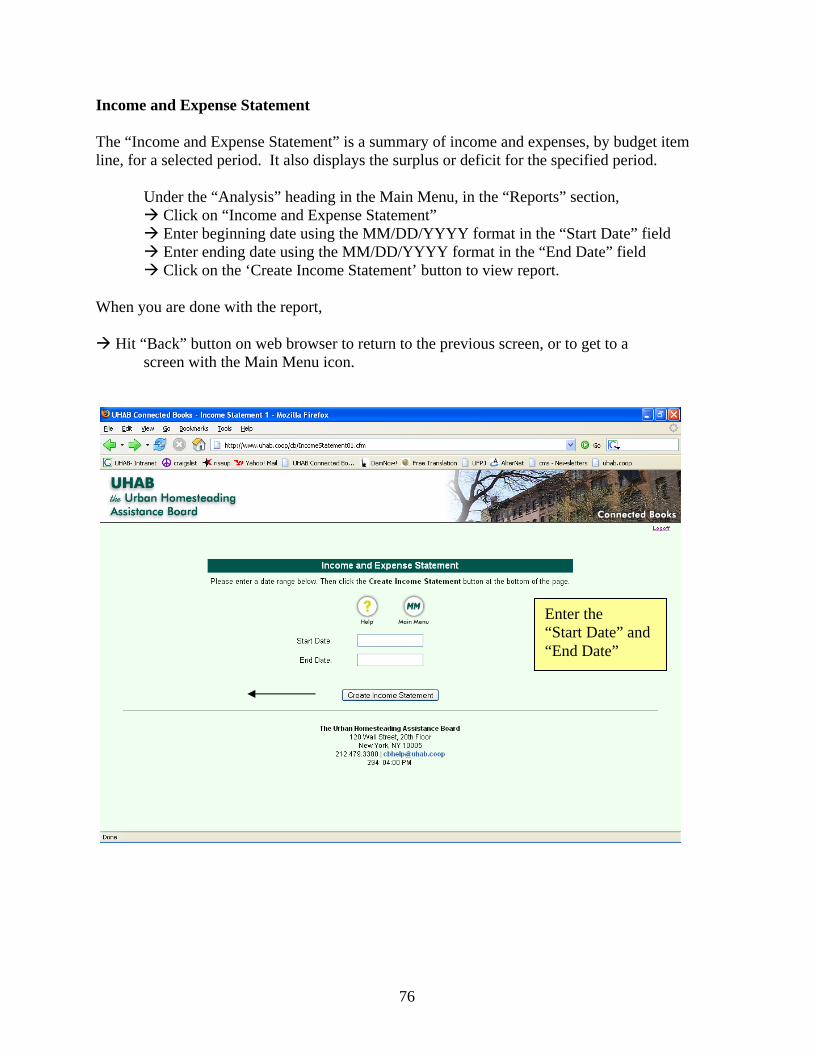
Income and Expense Statement The “Income and Expense Statement” is a summary of income and expenses, by budget item line, for a selected period. It also displays the surplus or deficit for the specified period. Under the “Analysis” heading in the Main Menu, in the “Reports” section, Click on “Income and Expense Statement” Enter beginning date using the MM/DD/YYYY format in the “Start Date” field Enter ending date using the MM/DD/YYYY format in the “End Date” field Click on the ‘Create Income Statement’ button to view report. When you are done with the report,
Hit “Back” button on web browser to return to the previous screen, or to get to a screen with the Main Menu icon.
Enter the “Start Date” and “End Date”
77
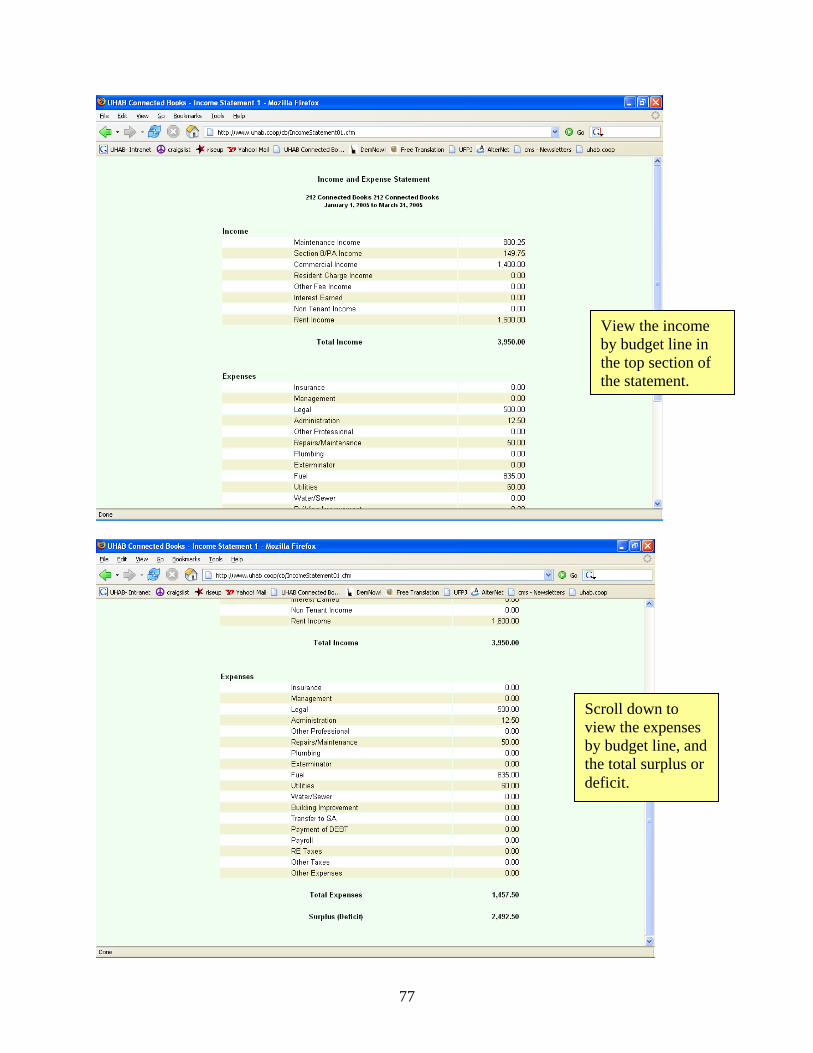
View the income by budget line in the top section of the statement.
Scroll down to view the expenses by budget line, and the total surplus or deficit.
78
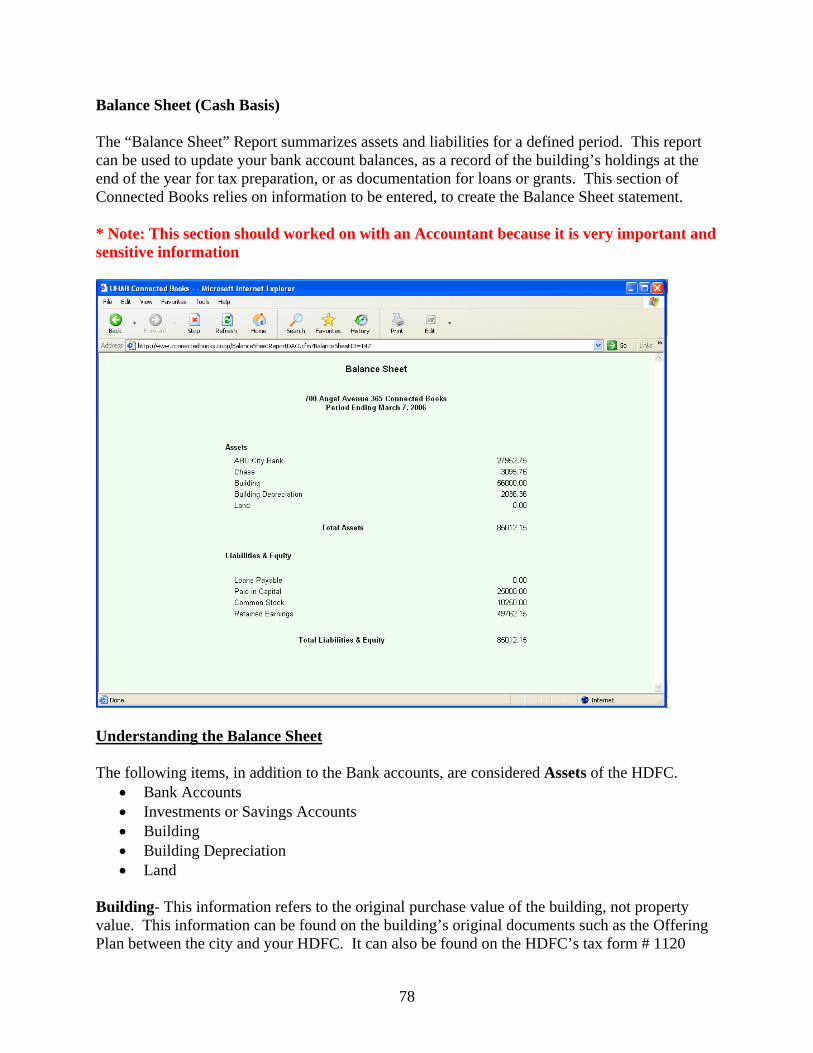
Balance Sheet (Cash Basis) The “Balance Sheet” Report summarizes assets and liabilities for a defined period. This report can be used to update your bank account balances, as a record of the building’s holdings at the end of the year for tax preparation, or as documentation for loans or grants. This section of Connected Books relies on information to be entered, to create the Balance Sheet statement. * Note: This section should worked on with an Accountant because it is very important and sensitive information
Understanding the Balance Sheet The following items, in addition to the Bank accounts, are considered Assets of the HDFC.
• Bank Accounts • Investments or Savings Accounts • Building • Building Depreciation • Land
Building- This information refers to the original purchase value of the building, not property value. This information can be found on the building’s original documents such as the Offering Plan between the city and your HDFC. It can also be found on the HDFC’s tax form # 1120
79
Corporate Income Tax Form, Page 4 Line 10a, the Balance Sheet Statement. In most cases, the Building’s original purchase price would be 250 times the number of units (where 250 is the amount for which the shares were sold). Building Depreciation- Property and equipment are being depreciated over their estimated useful lives using the straight-line method. The building depreciation is determined based on a formula, where Building Depreciation = [Building Value] divided by [27.5 years] This information can be found on the HDFC’s Corporate Tax Form #1120, Page 1 Line 20a, or on Form #4562 (the specific line where you can find this information may vary between HDFC, so look closely on the form). Land- This does not apply to most HDFCs; leave it blank. The following items are considered Liabilities of the HDFC.
• Loans Payable • Paid-in Capital • Common Stocks • Retained Earnings
Loans Payable- This refers to any (short-term or long-term) loans, mortgages, or other forms of payment of debt that the HDFC is responsible for. This information can be found on the HDFC’s Corporate Tax Form #1120, Page 4 Line 17 or Line 20, HDFC documents or bank statements. Paid-in Capital- HDFCs received additional capital contributed when it was incorporated. This was the result of rental income, city funds, and expenses incurred prior to the Corporation purchasing the property. This information can be found on the original bank statement on Day 1 of the life of the building or the HDFC. If capital improvements have been made over time to change the value of paid-in capital, the information can be found on the HDFC’s Corporate Tax Form #1120, Page 4 Line 23 on the most recently filed tax forms. Common Stock- This refers to how many shares were sold at the time of HDFC incorporation, and the value of the shares, and is also known as Shareholders Equity. To determine the common stock, multiply 250 times the number of units in the building (if your building’s shares were sold for $250). Retained Earnings- This refers to accumulated income or accumulated losses. Any holdings made by the HDFC should be kept and applied to the next fiscal year’s operation. At the bottom of the Assets section, you will see the Total Assets. At the bottom of the Liabilities section, you will see the Total Liabilities and Equity. These amounts will always equal one another, because the retained earnings of the corporation will be applied to the following year’s business and operation. NOTE: The Balance Sheet requires information from other sources, such as previously filed tax
forms. Neglecting to enter the required information may result in an incomplete Balance Sheet.
80
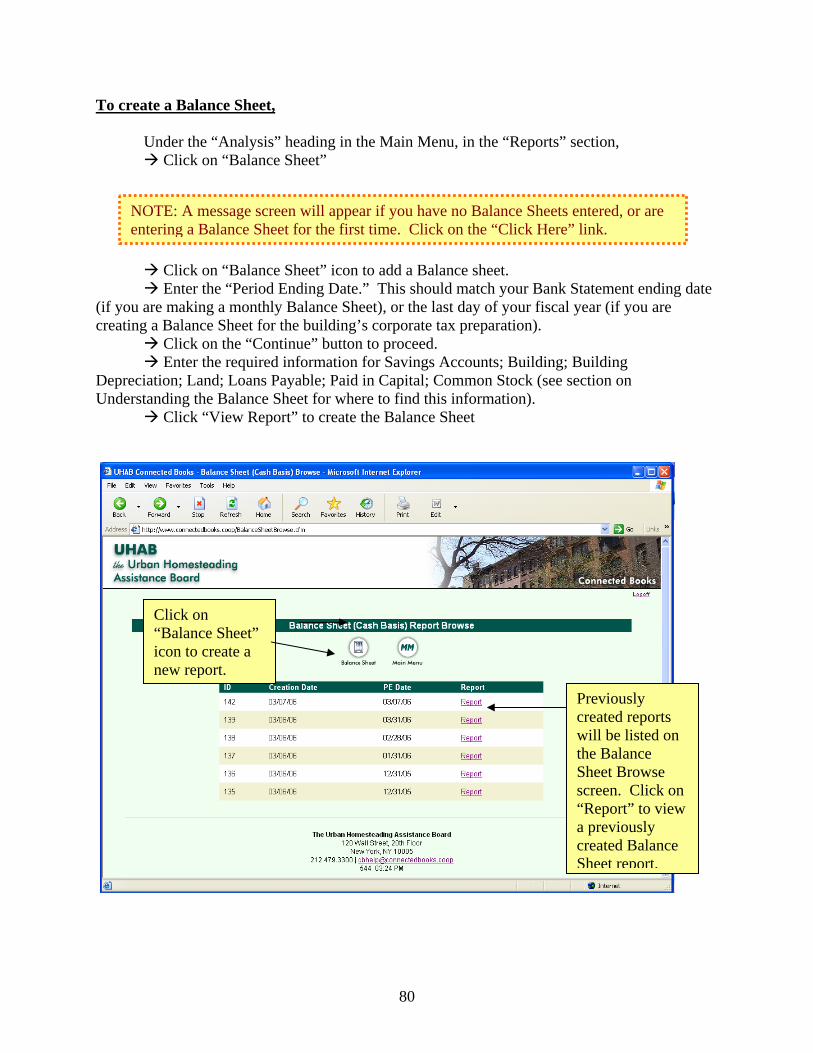
To create a Balance Sheet, Under the “Analysis” heading in the Main Menu, in the “Reports” section, Click on “Balance Sheet” Click on “Balance Sheet” icon to add a Balance sheet. Enter the “Period Ending Date.” This should match your Bank Statement ending date (if you are making a monthly Balance Sheet), or the last day of your fiscal year (if you are creating a Balance Sheet for the building’s corporate tax preparation). Click on the “Continue” button to proceed. Enter the required information for Savings Accounts; Building; Building Depreciation; Land; Loans Payable; Paid in Capital; Common Stock (see section on Understanding the Balance Sheet for where to find this information). Click “View Report” to create the Balance Sheet
Click on “Balance Sheet” icon to create a new report.
NOTE: A message screen will appear if you have no Balance Sheets entered, or are entering a Balance Sheet for the first time. Click on the “Click Here” link.
Previously created reports will be listed on the Balance Sheet Browse screen. Click on “Report” to view a previously created Balance Sheet report.
81
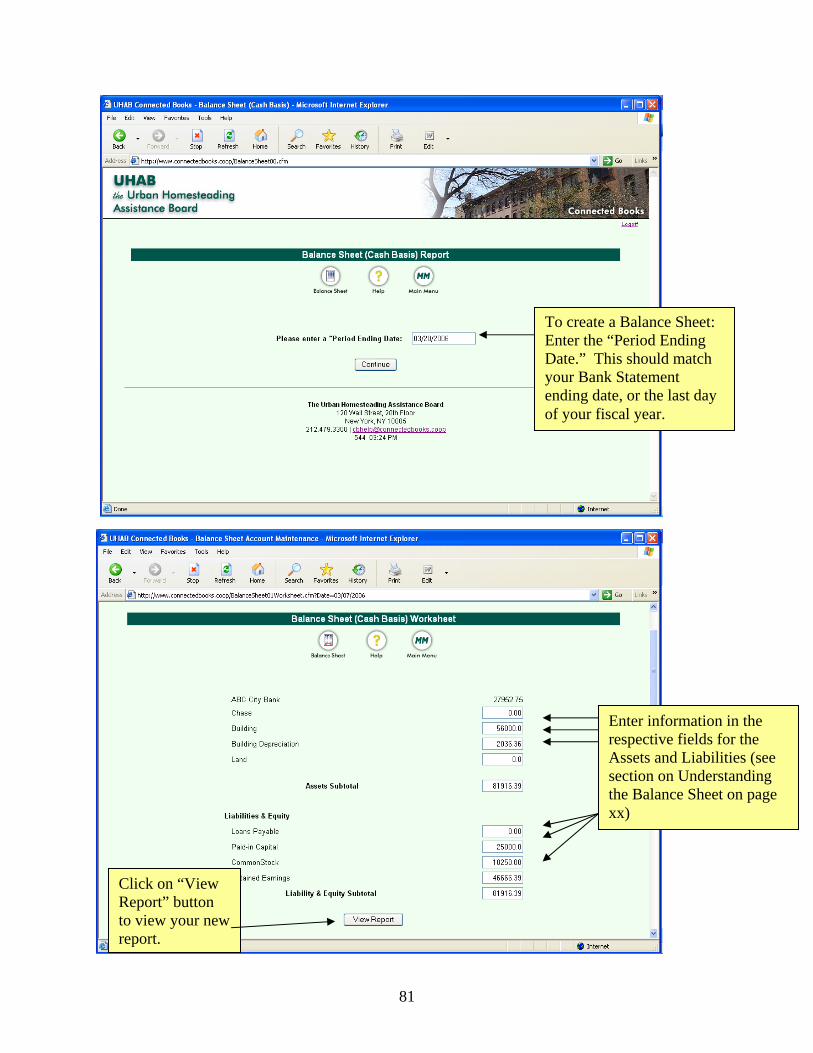
To create a Balance Sheet: Enter the “Period Ending Date.” This should match your Bank Statement ending date, or the last day of your fiscal year.
Enter information in the respective fields for the Assets and Liabilities (see section on Understanding the Balance Sheet on page xx)
Click on “View Report” button to view your new report.
82
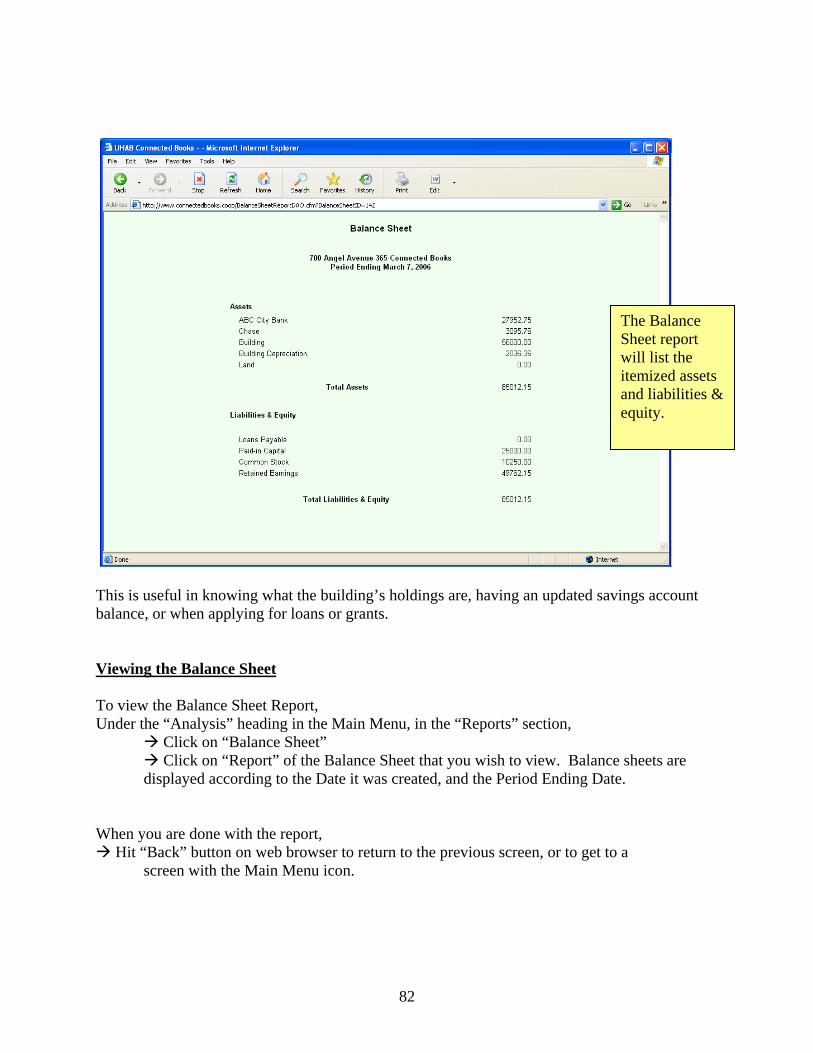
This is useful in knowing what the building’s holdings are, having an updated savings account balance, or when applying for loans or grants. Viewing the Balance Sheet To view the Balance Sheet Report, Under the “Analysis” heading in the Main Menu, in the “Reports” section, Click on “Balance Sheet” Click on “Report” of the Balance Sheet that you wish to view. Balance sheets are displayed according to the Date it was created, and the Period Ending Date. When you are done with the report,
Hit “Back” button on web browser to return to the previous screen, or to get to a screen with the Main Menu icon.
The Balance Sheet report will list the itemized assets and liabilities & equity.