Embed Size (px)
Citation preview

Home
Gallery
Tools
Working Tips
Parts
Template
Reference
Construction
- Tubes
- Emitter
- Clamp
- Finish
- Assembly
Thanks
Links
PLEASE READ THE DISCLAIMER AT THE BOTTOM OF THIS PAGE
Where to Begin ....So you always wanted to have your very own Lightsaber. When I was a kid the best yougot was a torch as a hilt with a plastic tube on it which lit up (not believable from less thana hundred yards). Now you can get much better but still not what you'd call a replica.
Many of the props used in the original Star Wars movies (especially A New Hope) wereput together the old fashioned way. Not by CGI, not by first going through a design teambut by the prop guys looking around for inspiration. They found inspiration for Luke andVader's Lightsabers in 1940's press camera flashes.
So, easy, just go to an antiques market and get one then customise it to look just like .....and there's the problem, you see you can't. Well not over here in Britain anyway, theGraflex 3 cell camera flash was made in Rochester in the US and I've only seen one, in aspecialist camera shop off New Bond St attached to a camera and selling for £500. In theStates it's not that much easier unless you're prepared to pay through the nose.
The only alternative is to make one and believe it or not this is not as hard as it sounds.It's difficult but it can be done and the purpose of this site is to show you how.
DISCLAIMER - PLEASE READ
This site is in no way related to Lucas Film and any infringment on copyright ortrademark will be removed on request. Any person using this site should be awarethat I assume no responsibility for any injury or damage caused by using tools,materials or processes recommended on this site.
Ant's Graflex Replica
http://www.hu.u-net.com/graflica/ (1 of 2) [9/19/2002 9:34:22 AM]

Ant's Graflex Replica
http://www.hu.u-net.com/graflica/ (2 of 2) [9/19/2002 9:34:22 AM]

PLEASE READ THE DISCLAIMER AT THE BOTTOM OF THIS PAGE
Where to Begin ....So you always wanted to have your very own Lightsaber. When I was a kid the best you got was a torch as ahilt with a plastic tube on it which lit up (not believable from less than a hundred yards). Now you can getmuch better but still not what you'd call a replica.
Many of the props used in the original Star Wars movies (especially A New Hope) were put together the oldfashioned way. Not by CGI, not by first going through a design team but by the prop guys looking around forinspiration. They found inspiration for Luke and Vader's Lightsabers in 1940's press camera flashes.
So, easy, just go to an antiques market and get one then customise it to look just like ..... and there's theproblem, you see you can't. Well not over here in Britain anyway, the Graflex 3 cell camera flash was madein Rochester in the US and I've only seen one, in a specialist camera shop off New Bond St attached to acamera and selling for £500. In the States it's not that much easier unless you're prepared to pay through thenose.
The only alternative is to make one and believe it or not this is not as hard as it sounds. It's difficult but it canbe done and the purpose of this site is to show you how.
DISCLAIMER - PLEASE READ
This site is in no way related to Lucas Film and any infringment on copyright or trademark will beremoved on request. Any person using this site should be aware that I assume no responsibility forany injury or damage caused by using tools, materials or processes recommended on this site.
Ant's Graflex Replica
http://www.hu.u-net.com/graflica/fhome.htm [9/19/2002 9:34:22 AM]

The Gallery ...Here are some pictures of the finished item. This is what you should end up with!
Ant's Graflex Replica - Gallery
http://www.hu.u-net.com/graflica/gallery.htm [9/19/2002 9:34:26 AM]

http://www.hu.u-net.com/graflica/images/graflex5.jpg
http://www.hu.u-net.com/graflica/images/graflex5.jpg [9/19/2002 9:34:27 AM]

http://www.hu.u-net.com/graflica/images/graflex6.jpg
http://www.hu.u-net.com/graflica/images/graflex6.jpg [9/19/2002 9:34:28 AM]

http://www.hu.u-net.com/graflica/images/graflex7.jpg
http://www.hu.u-net.com/graflica/images/graflex7.jpg [9/19/2002 9:34:29 AM]

http://www.hu.u-net.com/graflica/images/graflex8.jpg
http://www.hu.u-net.com/graflica/images/graflex8.jpg [9/19/2002 9:34:29 AM]

http://www.hu.u-net.com/graflica/images/graf1.jpg
http://www.hu.u-net.com/graflica/images/graf1.jpg [9/19/2002 9:34:30 AM]

http://www.hu.u-net.com/graflica/images/graf2.jpg
http://www.hu.u-net.com/graflica/images/graf2.jpg [9/19/2002 9:34:31 AM]

http://www.hu.u-net.com/graflica/images/graf3.jpg
http://www.hu.u-net.com/graflica/images/graf3.jpg [9/19/2002 9:34:32 AM]
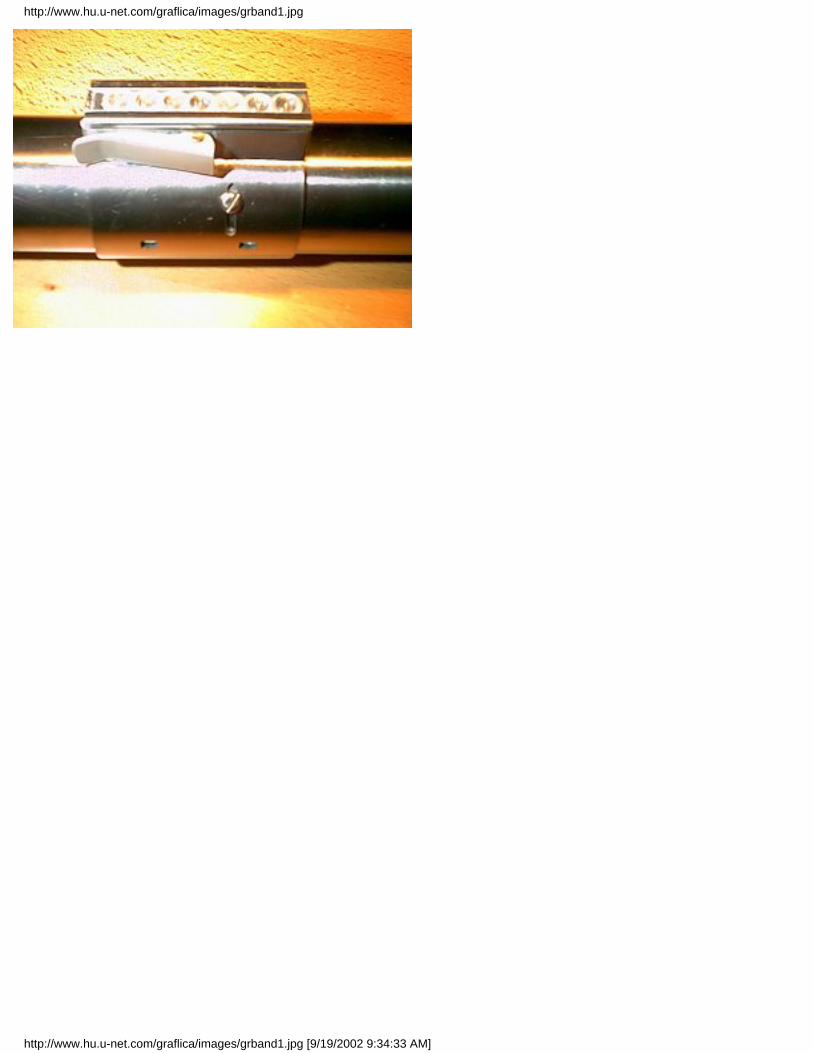
http://www.hu.u-net.com/graflica/images/grband1.jpg
http://www.hu.u-net.com/graflica/images/grband1.jpg [9/19/2002 9:34:33 AM]

http://www.hu.u-net.com/graflica/images/grend1.jpg
http://www.hu.u-net.com/graflica/images/grend1.jpg [9/19/2002 9:34:34 AM]

http://www.hu.u-net.com/graflica/images/grtop1.jpg
http://www.hu.u-net.com/graflica/images/grtop1.jpg [9/19/2002 9:34:35 AM]

http://www.hu.u-net.com/graflica/images/grtop2.jpg
http://www.hu.u-net.com/graflica/images/grtop2.jpg [9/19/2002 9:34:35 AM]

http://www.hu.u-net.com/graflica/images/grtop3.jpg
http://www.hu.u-net.com/graflica/images/grtop3.jpg [9/19/2002 9:34:36 AM]

http://www.hu.u-net.com/graflica/images/grafsab2.jpg
http://www.hu.u-net.com/graflica/images/grafsab2.jpg [9/19/2002 9:34:37 AM]
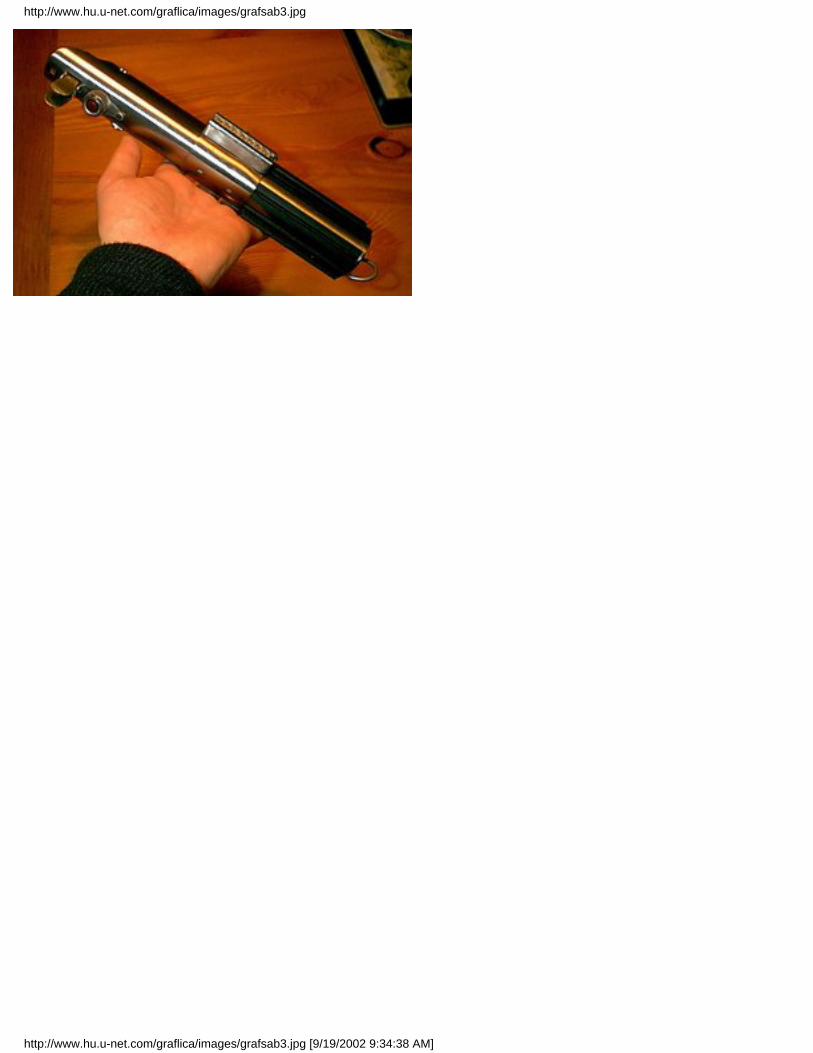
http://www.hu.u-net.com/graflica/images/grafsab3.jpg
http://www.hu.u-net.com/graflica/images/grafsab3.jpg [9/19/2002 9:34:38 AM]

http://www.hu.u-net.com/graflica/images/grafsab6.jpg
http://www.hu.u-net.com/graflica/images/grafsab6.jpg [9/19/2002 9:34:39 AM]
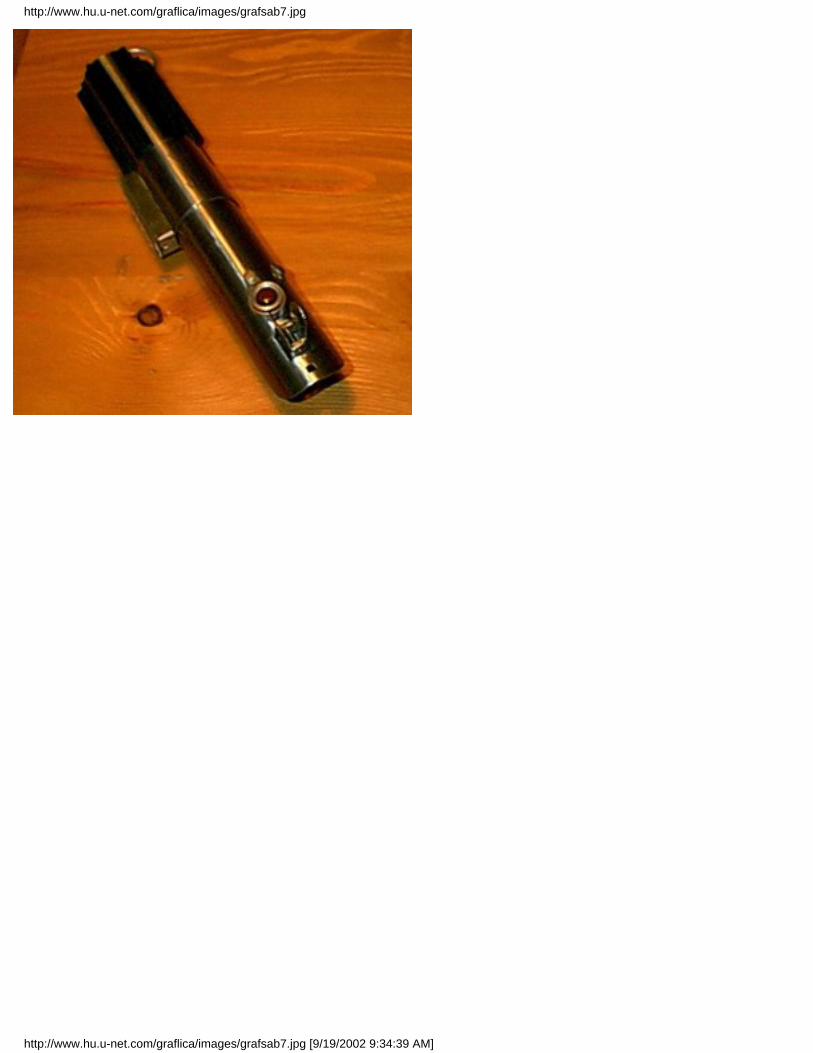
http://www.hu.u-net.com/graflica/images/grafsab7.jpg
http://www.hu.u-net.com/graflica/images/grafsab7.jpg [9/19/2002 9:34:39 AM]

Tools and how to use them...You will need a fairly good set of tools before you begin. If you have never worked with metal before then beaware that it is a slow process making some of the parts for this project.
Your main two tools will be a Dremel and a good set of files. A Dremel is a rotary multi tool, there are otherbrands out there and you should shop around to see if you can get a bargain - they are not cheap but they areessential for some of the cutting work you'll need to do (don't buy a rechargeable, they are not worth theconvenience). When getting one make sure you get some reinforced cutting disks as well otherwise you'll findyou are going through disks very quickly. To go with your Dremel you MUST have some protective eyeware,finishing your project will not be easy if you can't see it!!! Your next main tool will be a large half round file. Thisis another essential, when filing curves change angles as you file. This way you can follow the lines ontemplates much more easily, if you don't you'll get all the wrong curves in the metal and have to start again.Another file I've found useful is a flat course file, this is good for taking off deep cuts of metal quickly, thoughyou'll need to move down to a finer file for finishing up to the edges of templates.
The next most used is a hacksaw, get an old fashioned one like the one in the picture, I've tried a few andthough the others may be more comfortable to use the old ones cut straighter lines. A set of GOOD needle filesare next, try to remember you have a whole set of these and they are good for lots of finishing jobs.
You can't rely on your Dremel for all the drilling jobs, there is no substitute for a power drill and you can't get a13mm drill into a Dremel (I use a cheap rechargable and a mains power drill), you'll need to get your goggleson for the drilling work too.
You will need to cut sheet metal for many parts of this so get a good pair of metal shears or tin snips, I haveused a pair from RS for ages and they are better than anything else I've found, they are here.
You will need to hold the various parts whilst working on them, for this I find a Workmate the best. This is greatfor holding items like the tubing. For smaller bits you will need a small vice.
Ant's Graflex Replica - tools
http://www.hu.u-net.com/graflica/tools.htm [9/19/2002 9:34:40 AM]

http://www.hu.u-net.com/graflica/images/bench.jpg
http://www.hu.u-net.com/graflica/images/bench.jpg [9/19/2002 9:34:41 AM]

Working Tips ...Firstly - SAFETY! You remember the bit about goggles in the tools section? Good - just checking! Use themwhen Dremelling, drilling or any other actions that use high speed bits or cutters, also wear them when cuttingsheet metal, small bits of high speed steel CAN blind you if they hit your eye.
There's nothing more annoying than getting a good cut and a good finish on a piece of metal and then putting anice deep scratch in it. For that reason my biggest tip is COVER IT! This applies most heavily to the main tubeand clamp tube. Once you have a template stuck in place or have made your cuts tape up the metal, even ifonly with masking tape. Just brushing against the tube with a heavy tool can cause a deep scatch which noamount of sanding will get rid of.
The same applies to your tools, it's no good getting the angle of a bend exactly right with a pair of pliers only tofind deep score lines in the metal when you release your grip. So put some tape around any parts of toolswhich you will be using to grip metal, this softens the grip and ensures that they will not mark the metal.
Drilling holes can be disasterous. Always use a center punch to give you a indent to start from, this stops thedrill skipping across the metal. Next use a small drill to give you a pilot hole, from the pilot you can make aproperly centered hole.
Glueing metal to metal is not easy, firstly don't believe the packaging on most glues. Almost all of them listmetal as being something they can glue but we are going for bonding rather than just lightly attaching! Youcould try epoxy but I found it fractured apart when hardened. The best way to find the best for you is to try afew. Remember when glueing anything to clean it first then give it a roughened surface for the glue to key into.
If at first you don't succede..... You will make mistakes, sometimes they will cost you lots of time. Don't let thisget you down - everyone does it, it's part of the deal.
In an ideal world all working environments would be clean, tidy and comfortable, ahem ...
The best tip is HAVE FUN! You are doing this because you enjoy it, you can walk away at any time and no onewill care but you. But then...... that is the path to the dark side.
Ant's Graflex Replica - Tips
http://www.hu.u-net.com/graflica/tips.htm [9/19/2002 9:34:42 AM]

The Parts ...One of the hardest things I found when starting this project was finding the correctly sized parts from which tomake the replica. Hopefully I will remove the long search section which I had to go through and allow you to getright down to work. If you like the hunt (and to be honest I do!) then you could always consider skipping this bit(!) All you need is the dimensions :-)
Main Tube1 1/2" ERW (electrical resistancewelded) steel tubing partno314-0583
RS £8.67
Clamp Tube Cut from same tubing as the main tubeRed Button Custom made Doug Stoneman/EBay Approx $10Test Eye Custom made Doug Stoneman/EBay Approx $10End Plug Metal Hole Plug B&Q £1.50Inner Black Tube 1 1/4" Waste Pipe B&Q £2Emitter Clamp Box U Section Aluminium Rod B&Q - Hardware Section £2Emitter Clamp Lever U Section Aluminium Rod B&Q - Hardware Section £2Emitter End Plug (Black) Camera Film Canister Home -Recharge Socket Pins DIN Plug Tandy (US Radio Shack) £1.09Calculator Bubbles Transparent Rubber Feet B&Q £*Rubber Grips Custom Made Yoda's House $5 per metreEmitter Assembly + various Sheet SteelVarious Parts Nails, panel pins, screws, Foil tape (B&Q), D ring (B&Q)
Ant's Graflex Replica - Parts
http://www.hu.u-net.com/graflica/parts.htm [9/19/2002 9:34:42 AM]

Template ...The following template is from the Reflex site which is now sadly down. To save the file right click on the image.Size the image on printing following the instructions on the template.
Ant's Graflex Replica - Template
http://www.hu.u-net.com/graflica/templ.htm [9/19/2002 9:34:44 AM]

Reference ...The following image I found essential for checking the positioning of parts on the replica. Printed at the rightsize all the dimensions check out against a Graflex.
Ant's Graflex Replica - Reference
http://www.hu.u-net.com/graflica/ref.htm [9/19/2002 9:34:45 AM]
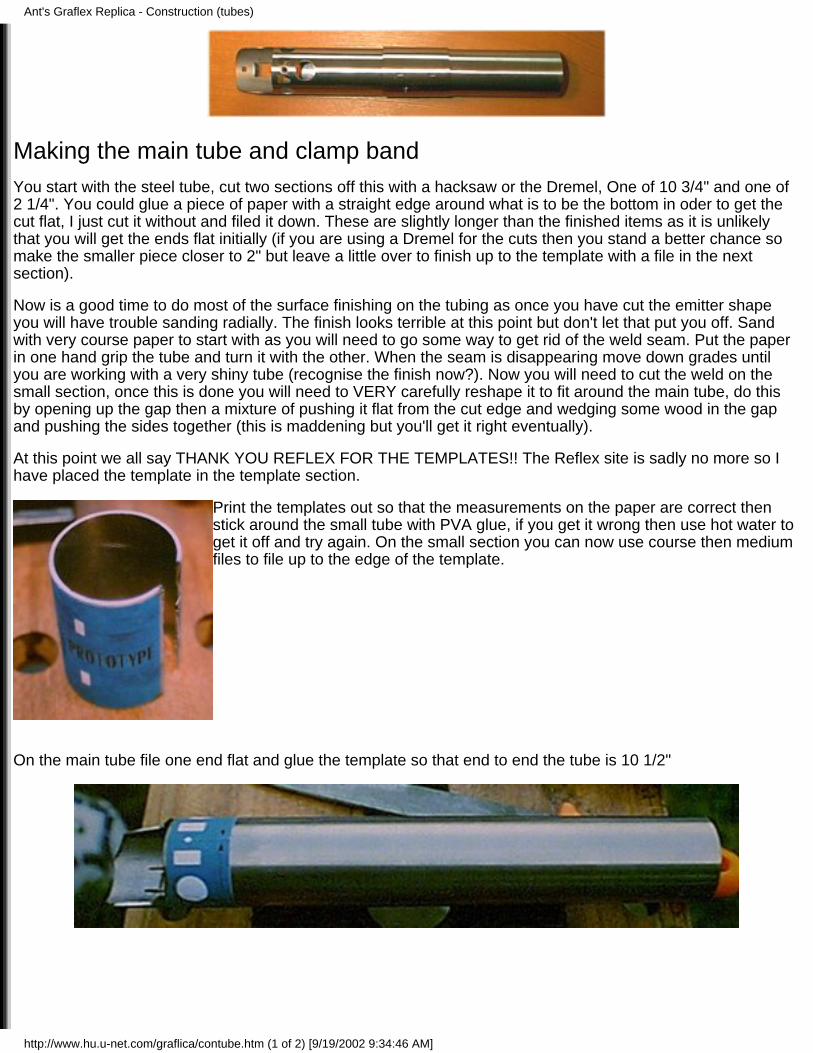
Making the main tube and clamp bandYou start with the steel tube, cut two sections off this with a hacksaw or the Dremel, One of 10 3/4" and one of2 1/4". You could glue a piece of paper with a straight edge around what is to be the bottom in oder to get thecut flat, I just cut it without and filed it down. These are slightly longer than the finished items as it is unlikelythat you will get the ends flat initially (if you are using a Dremel for the cuts then you stand a better chance somake the smaller piece closer to 2" but leave a little over to finish up to the template with a file in the nextsection).
Now is a good time to do most of the surface finishing on the tubing as once you have cut the emitter shapeyou will have trouble sanding radially. The finish looks terrible at this point but don't let that put you off. Sandwith very course paper to start with as you will need to go some way to get rid of the weld seam. Put the paperin one hand grip the tube and turn it with the other. When the seam is disappearing move down grades untilyou are working with a very shiny tube (recognise the finish now?). Now you will need to cut the weld on thesmall section, once this is done you will need to VERY carefully reshape it to fit around the main tube, do thisby opening up the gap then a mixture of pushing it flat from the cut edge and wedging some wood in the gapand pushing the sides together (this is maddening but you'll get it right eventually).
At this point we all say THANK YOU REFLEX FOR THE TEMPLATES!! The Reflex site is sadly no more so Ihave placed the template in the template section.
Print the templates out so that the measurements on the paper are correct thenstick around the small tube with PVA glue, if you get it wrong then use hot water toget it off and try again. On the small section you can now use course then mediumfiles to file up to the edge of the template.
On the main tube file one end flat and glue the template so that end to end the tube is 10 1/2"
Ant's Graflex Replica - Construction (tubes)
http://www.hu.u-net.com/graflica/contube.htm (1 of 2) [9/19/2002 9:34:46 AM]

Use the Dremel to cut the slots which make the "ear"mounting tabs (use the Dremel first on the outsidethen on the inside, this way you avoid overcutting onthe outside of the tube). Next cut almost to the edge ofthe template as shown above, this way you can usethe half round file with more control to finish down tothe line (this is surprisingly quick).
Once you are happy with the shape you can start onthe details on the template. Remember to use a centerpunch and apilot holes when drilling. For the tworectangles start by drilling two holes side by side insidethe rectangle and then work out with needle files to theshape of the template. Go into the corners with atriangular (not square) file. The same process (with
single drilled holes) for the small square hole on top and the rectangles on the short "clamp" tube. For the sloton the clamp tube you will need to drill a hole at one end, cut from here with the Dremel and gradually open thisup to the template with needle files.
It's up to you when you bend up the tabs, I did it at this point but it is probably easier to do this very late so thatyou can refinish with fine sandpaper before you laquer. When you do it carefully push them out from the insidewith a large screwdriver until they have raised enough to grip them with a small pair of pliers (taped upremember) and then bend them to vertical. Now use a half round needle file on the flat edges of this hole towiden it slightly, you are trying to make two slots which the emitter "ears" can be fed through.
By now you should have this (this shows the parts before the holes were cut) .....
Ant's Graflex Replica - Construction (tubes)
http://www.hu.u-net.com/graflica/contube.htm (2 of 2) [9/19/2002 9:34:46 AM]

Making the emitter
The emitter is one of the smaller but quite demanding pieces, this is where we test your sheet cutting abilities:-)
Firstly cut out the paper emitter template left over from the Reflex sheet. From this you will need to cut off theears as we are going to make these seperately, I found the whole template too difficult to cut from the steel inone go. Cut down two rectangles of steel with the shears big enough to fit a single ear onto. Sand your finish onthese now as it easier than trying to do a fiddly little piece afterwards. Next cut around the template with theshears but leave a margin of a few millimeters as you cannot cut into the corners without marking the surface ofthe metal. You can drill the holes now. Next put the piece in the vice and file down to the edge of the template.
Grip the ears in the vice and use a hacksaw to cut down the side of the tabs so that they will bend in as in thepicture. You will need to cut in a little further on one side than the other. Do this on both of the ears and do it onthe same side so that they are identical (not mirror images of each other), now when you put them together asthey will be when in place they should line up without being offset (all this makes more sense when you aredoing it).
You will need to bend a clean angle in the end of the ear where it will attach to the emitter band, to do this youwill need to score a line in the metal with the triangular needle file on the opposite side from the direction youwant to bend it. Once you have a deep score line you should be able to bend it with the pliers.
Finish the edges with sandpaper to round them of a little.
Cut a strip of steel the same width as the Reflex template but a little longer. Now wrap this around a cylinder(look around the house for something approximating the diameter, the bathroom is a good bet) to get a cleancylinder shape.
Next the two bits which fit inside this band. For these cut two small pieces, make these slightlty wider andlonger than they need to be. Push them around the shaft of, say, a hammer and then trim of the two ends whichremain straight (now you should have two curves which approximately match you emitter band). Now the cleverbit, you should have these pieces oversized along the edge of the curve as well. Cut the two ends down withyour shears or scissors, because you are cutting along a curved edge they should splay outwards slightly,giving the effect of a real Graflex emitter band.
Ant's Graflex Replica - Construction (emitter)
http://www.hu.u-net.com/graflica/conemit.htm (1 of 2) [9/19/2002 9:34:48 AM]

Glue all these in place making sure that they fit into the tube and that the holes line up.
Ant's Graflex Replica - Construction (emitter)
http://www.hu.u-net.com/graflica/conemit.htm (2 of 2) [9/19/2002 9:34:48 AM]

Making the clamp
The clamp is very easy to make compared to most of the other parts, the main reason being that it is based ona short section of aluminium square "U" section rod.
Cut a section the same length as the clamp tube. Next cut two pieces ofsteel which will stick to the sides of this and wrap around the ends so thatthey touch each other in the middle of the two ends. To get them to wrapneatly file slots with the tiangular needle file on the inside where you wantto bend them, this will make the bends near 90 degrees rather than acurve.
Cut two sections of the umberella frame and now stick the whole lottogether!
To make the clamp lever take the smaller "U" section aluminium rod and cut a diagonal linefrom the open side up to (but not through) the flat top section. Now cut off just past this andcut horizontally from the cut off end up to the diagonal cut, this gives you the little upturn ofthe lever at the end. Now file all the edges to the profile you want and polish up withsandpaper. Finally drill through from one side the two holes for the pin.
For the activation bubbles cut a small piece of steel (it doesn't have to fit exactly) and cover it with foil tape.Place seven clear rubber feet on this so that they go almost up to the ends (if they have a border around themthen cut this off in a straight line on both sides except for the ones at the ends. Now just slide it into place!
Ant's Graflex Replica - Construction (clamp)
http://www.hu.u-net.com/graflica/conclamp.htm [9/19/2002 9:34:49 AM]

The Finish...Just a quick note on the finish of the tube. You may notice that the tube (and other parts) tarnish slightly whereyou touch them, this I guess is the action of salt and moisture.
I've seen others recommend very fine sanding to avoid this but I just couldn't make it go away. In the end theway I found to get around this was to laquer the affected parts with clear auto laquer.
This a little "make or break" as if it screws up then you will need to use a chemical stripper to get rid of it beforeyou can start again. All I can recommend is that you follow the instructions on the can, if it says shake for fiveminutes then DO IT. I had to make some corrections and still wasn't entirely happy with the finish on the maintube. When I did the clamp band it turned out perfectly, so be careful!
Ant's Graflex Replica - Finish
http://www.hu.u-net.com/graflica/confin.htm [9/19/2002 9:34:49 AM]
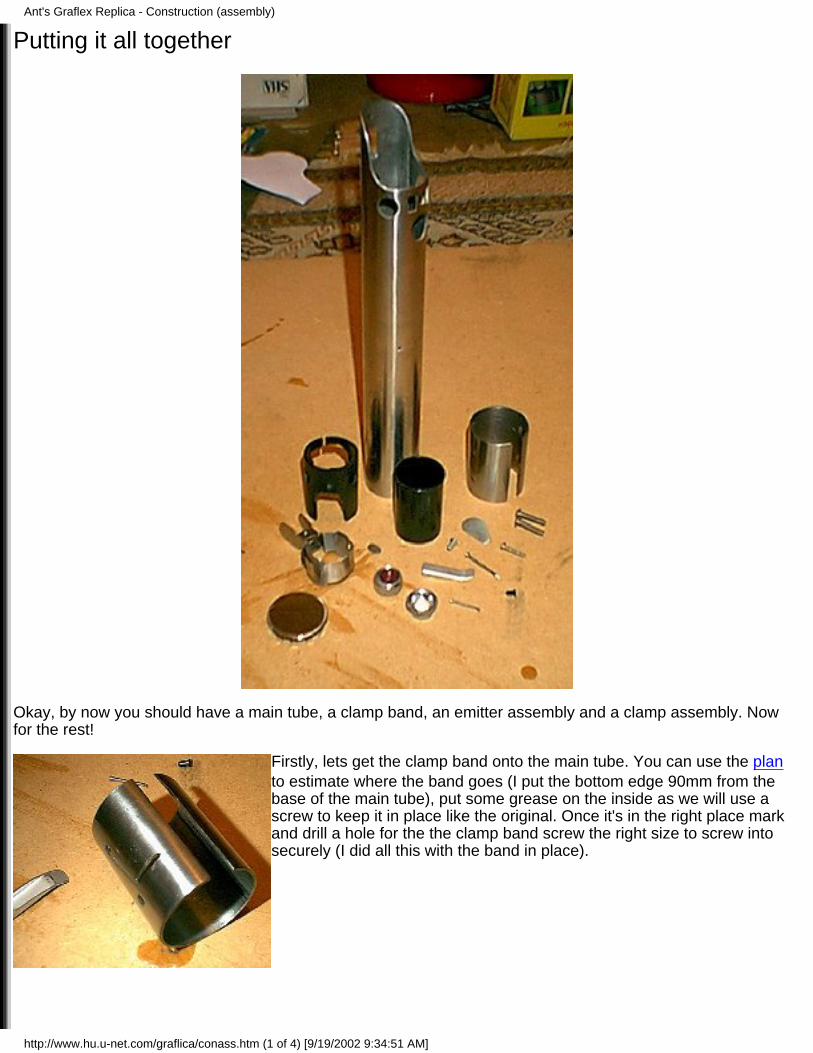
Putting it all together
Okay, by now you should have a main tube, a clamp band, an emitter assembly and a clamp assembly. Nowfor the rest!
Firstly, lets get the clamp band onto the main tube. You can use the planto estimate where the band goes (I put the bottom edge 90mm from thebase of the main tube), put some grease on the inside as we will use ascrew to keep it in place like the original. Once it's in the right place markand drill a hole for the the clamp band screw the right size to screw intosecurely (I did all this with the band in place).
Ant's Graflex Replica - Construction (assembly)
http://www.hu.u-net.com/graflica/conass.htm (1 of 4) [9/19/2002 9:34:51 AM]

Very carefully you can now glue the clamp assembly inplace. If you want to be able to remove it again thenyou'll have to have a think because I didn't do this :]
Now take the black waste tube and cut a section then cut down the side so itcan be opened up (as it's not quite wide enough - but we'll solve that). Drill ahole for the screw above the eye and the two recharge sockets, leave it littlehigher than the edge of the tube to give the correct look. You will need touse a craft knife to trim the edges of the cuts as they are left ragged by thedrill. Now is a good time to cut out the sections for the other holes as well.
Ant's Graflex Replica - Construction (assembly)
http://www.hu.u-net.com/graflica/conass.htm (2 of 4) [9/19/2002 9:34:51 AM]

You can now try this for size with the camera film canister, placethis down a little inside the waste tube when you put them in themain tube. The canister and waste tube should fit perfectly.
Cut the pins from the DIN plug and drill two small holes for themin each of the recharge plug holes, glue them in place withsuperglue. You can also now put a nail through the centre of thefilm canister and put the emitter assembly and the eye in place(use a small nail or panel pin for the emitter hinge).
Cut some detailing like the ones in the picture and glue them in placebefore glueing on the button.
Ant's Graflex Replica - Construction (assembly)
http://www.hu.u-net.com/graflica/conass.htm (3 of 4) [9/19/2002 9:34:51 AM]

Take a strip of steel and bend a right angle in it, nowwrap it around the D-ring, round off the end and drilltwo holes through this tab and the end plug. Screwthem onto the end plug. Glue this in place in thebottom of the tube.
Ant's Graflex Replica - Construction (assembly)
http://www.hu.u-net.com/graflica/conass.htm (4 of 4) [9/19/2002 9:34:51 AM]

Thanks to ...The main thanks for this site go to the excellent Reflex site which is now sadly defuct.
Also deserving a considerable applause are all the helpful people on the excellent Star Wars Prop ReplicasEZboard site .......
Ant's Graflex Replica - Thanks
http://www.hu.u-net.com/graflica/thanks.htm [9/19/2002 9:34:52 AM]