Embed Size (px)
Citation preview

WHAT'S NEW IN STRATUM.PLANNER
MAINTENANCE BUILDS?
Silvon Software, Inc.
From Silvon’s Library
Manual What's New in Stratum.Planner Maintenance Builds?
Document ID ClientReadMe
Software Stratum.Planner 6.0
NOTICE
The information in this document is subject to change without notice.
Silvon Software, Incorporated, makes no warranty of any kind with regard to this material, including, but not limited
to the implied warranties of merchantability, performance, or fitness for a particular purpose. Silvon Software shall
not be liable for errors contained herein or for any direct, incidental, or consequential damages resulting from the
use of this material.
Printed in the United States (May, 2010).
IBM and AS/400 are registered trademarks of International Business Machines Corporation. Microsoft and
Windows are registered trademarks of Microsoft Corporation. All other brand names are trademarks or registered
trademarks of their respective owners.
Copyright 2010, by Silvon Software, Incorporated. All rights reserved. No part of this publication may be
reproduced, transmitted, transcribed, stored in a retrieval system, or translated into any language in any form by any
means, without written permission of Silvon Software, Incorporated.
Corporate Headquarters European Headquarters Pacific Rim
Silvon Software, Inc. Silvon Software, Ltd. Silvon Software/Australia
900 Oakmont Lane 8 The Square c/o Masai Business Analysis
Suite 400 Stockley Park & Consulting Pty Ltd.
Westmont, IL 60559 Uxbridge, Middlesex UB11 1FW 65 Hume Street
www.silvon.com Ph: (630) 655-3313 United Kingdom Crows Nest NSW 2065
Fax: (630) 655-3377 Ph: +44 (0) 203 178 4834 Australia
Toll-Free: (800) 874-5866 Fax: +44 (0) 208 610 6060 Ph: 011.61.2.9016.2892
E-mail: [email protected] Fax: 011.61.2.9016.2893
CONTENTS i
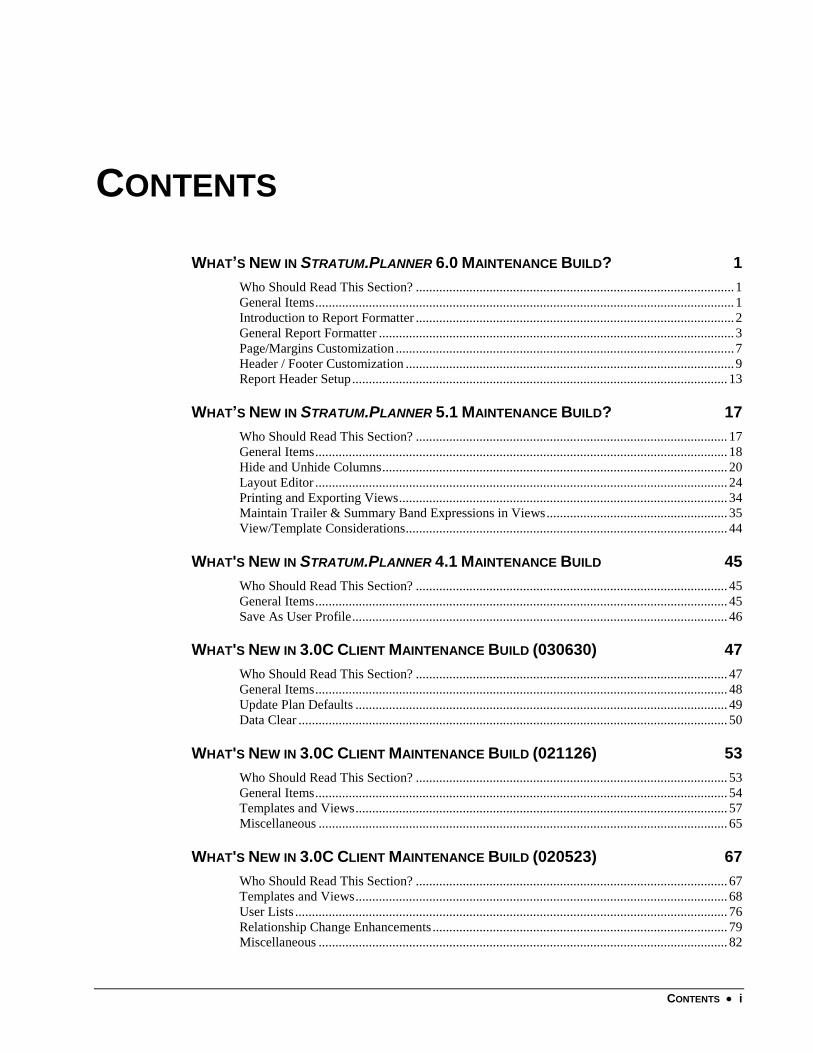
CONTENTS
WHAT’S NEW IN STRATUM.PLANNER 6.0 MAINTENANCE BUILD? 1
Who Should Read This Section? ............................................................................................... 1 General Items ............................................................................................................................. 1 Introduction to Report Formatter ............................................................................................... 2 General Report Formatter .......................................................................................................... 3 Page/Margins Customization ..................................................................................................... 7 Header / Footer Customization .................................................................................................. 9 Report Header Setup ................................................................................................................ 13
WHAT’S NEW IN STRATUM.PLANNER 5.1 MAINTENANCE BUILD? 17
Who Should Read This Section? ............................................................................................. 17 General Items ........................................................................................................................... 18 Hide and Unhide Columns ....................................................................................................... 20 Layout Editor ........................................................................................................................... 24 Printing and Exporting Views .................................................................................................. 34 Maintain Trailer & Summary Band Expressions in Views ...................................................... 35 View/Template Considerations ................................................................................................ 44
WHAT'S NEW IN STRATUM.PLANNER 4.1 MAINTENANCE BUILD 45
Who Should Read This Section? ............................................................................................. 45 General Items ........................................................................................................................... 45 Save As User Profile ................................................................................................................ 46
WHAT'S NEW IN 3.0C CLIENT MAINTENANCE BUILD (030630) 47
Who Should Read This Section? ............................................................................................. 47 General Items ........................................................................................................................... 48 Update Plan Defaults ............................................................................................................... 49 Data Clear ................................................................................................................................ 50
WHAT'S NEW IN 3.0C CLIENT MAINTENANCE BUILD (021126) 53
Who Should Read This Section? ............................................................................................. 53 General Items ........................................................................................................................... 54 Templates and Views ............................................................................................................... 57 Miscellaneous .......................................................................................................................... 65
WHAT'S NEW IN 3.0C CLIENT MAINTENANCE BUILD (020523) 67
Who Should Read This Section? ............................................................................................. 67 Templates and Views ............................................................................................................... 68 User Lists ................................................................................................................................. 76 Relationship Change Enhancements ........................................................................................ 79 Miscellaneous .......................................................................................................................... 82
ii CONTENTS
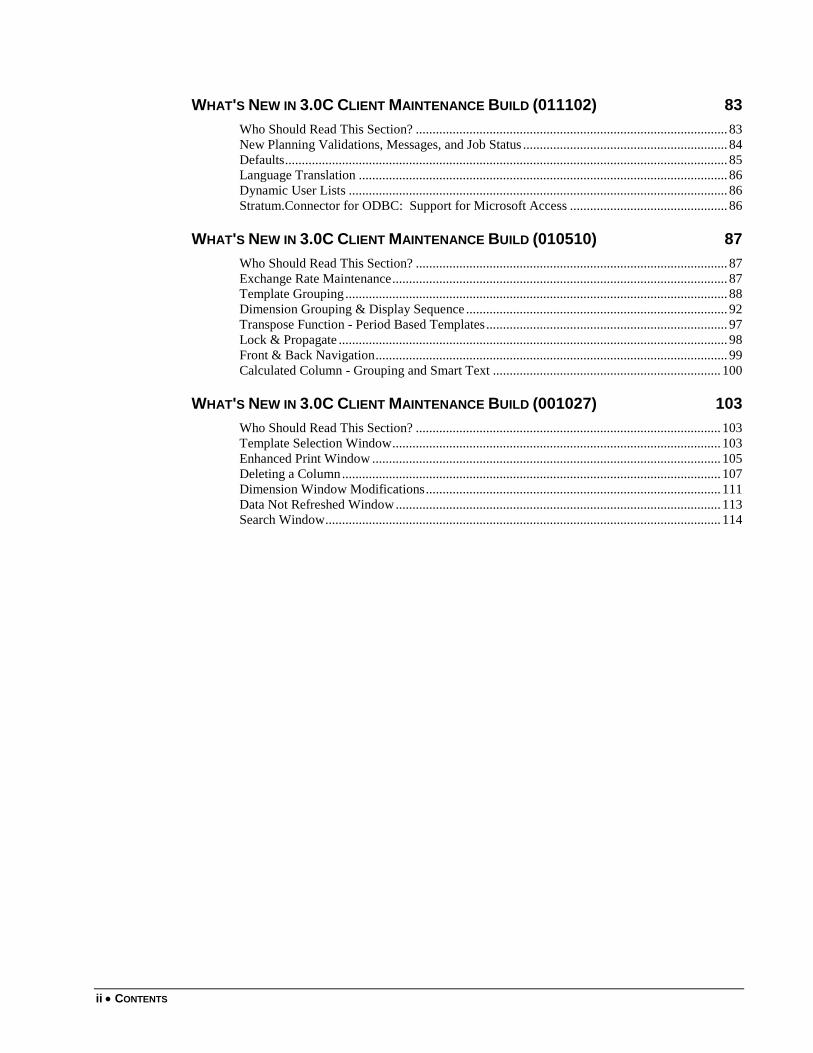
WHAT'S NEW IN 3.0C CLIENT MAINTENANCE BUILD (011102) 83
Who Should Read This Section? ............................................................................................. 83 New Planning Validations, Messages, and Job Status ............................................................. 84 Defaults .................................................................................................................................... 85 Language Translation .............................................................................................................. 86 Dynamic User Lists ................................................................................................................. 86 Stratum.Connector for ODBC: Support for Microsoft Access ............................................... 86
WHAT'S NEW IN 3.0C CLIENT MAINTENANCE BUILD (010510) 87
Who Should Read This Section? ............................................................................................. 87 Exchange Rate Maintenance .................................................................................................... 87 Template Grouping .................................................................................................................. 88 Dimension Grouping & Display Sequence .............................................................................. 92 Transpose Function - Period Based Templates ........................................................................ 97 Lock & Propagate .................................................................................................................... 98 Front & Back Navigation ......................................................................................................... 99 Calculated Column - Grouping and Smart Text .................................................................... 100
WHAT'S NEW IN 3.0C CLIENT MAINTENANCE BUILD (001027) 103
Who Should Read This Section? ........................................................................................... 103 Template Selection Window .................................................................................................. 103 Enhanced Print Window ........................................................................................................ 105 Deleting a Column ................................................................................................................. 107 Dimension Window Modifications ........................................................................................ 111 Data Not Refreshed Window ................................................................................................. 113 Search Window ...................................................................................................................... 114
What’s New in Stratum.Planner 6.0 Maintenance Build? 1
WHAT’S NEW IN STRATUM.PLANNER
6.0 MAINTENANCE BUILD?
Who Should Read This Section? If you are on Stratum.Planner 5.1 or earlier, review the entire “What‟s New in Stratum.Planner 6.0 Maintenance
Build” section of this document.
If you are on a Stratum.Planner version prior to 5.1, review all the client update sections from the release you are
currently running through the "What's New in Stratum.Planner 6.0 Maintenance Build" section of this document.
Additionally, the Stratum.Planner Base Modification Report (Fix Report) for the 6.0 release and all releases since
the release you are currently running should be reviewed for specific changes made to the software. The
Stratum.Planner Base Modification Report can be obtained from Silvon CustomerNET.
Important Note: The use of newer release Stratum.Planner software against older release warehouse tables can
produce unpredictable results. To prevent such a situation, Stratum.Planner verifies that the warehouse being
connected to is of the same or higher release. If the warehouse tables are at an older release state, Stratum.Planner
will display a message and shut down. The warehouse tables must then be upgraded (Database Maintenance –
Upgrade) to the same or greater release than Stratum.Planner before using the more current Stratum.Planner
software.
As in the past, an older release of Stratum.Planner can be run against a newer release of the warehouse tables and
related server software. However, it is strongly recommended that all Administrative functions be done with a
release of Stratum.Planner equal to the release of the warehouse tables.
General Items
Windows 7 Support
Efforts have been taken to test and address Windows 7 related issues in this 6.0 release of Stratum.Planner.
Stratum.Planner 6.0 supports both the 32-bit and 64-bit versions of Windows 7.
2 What's New in Stratum.Planner?
Introduction to Report Formatter
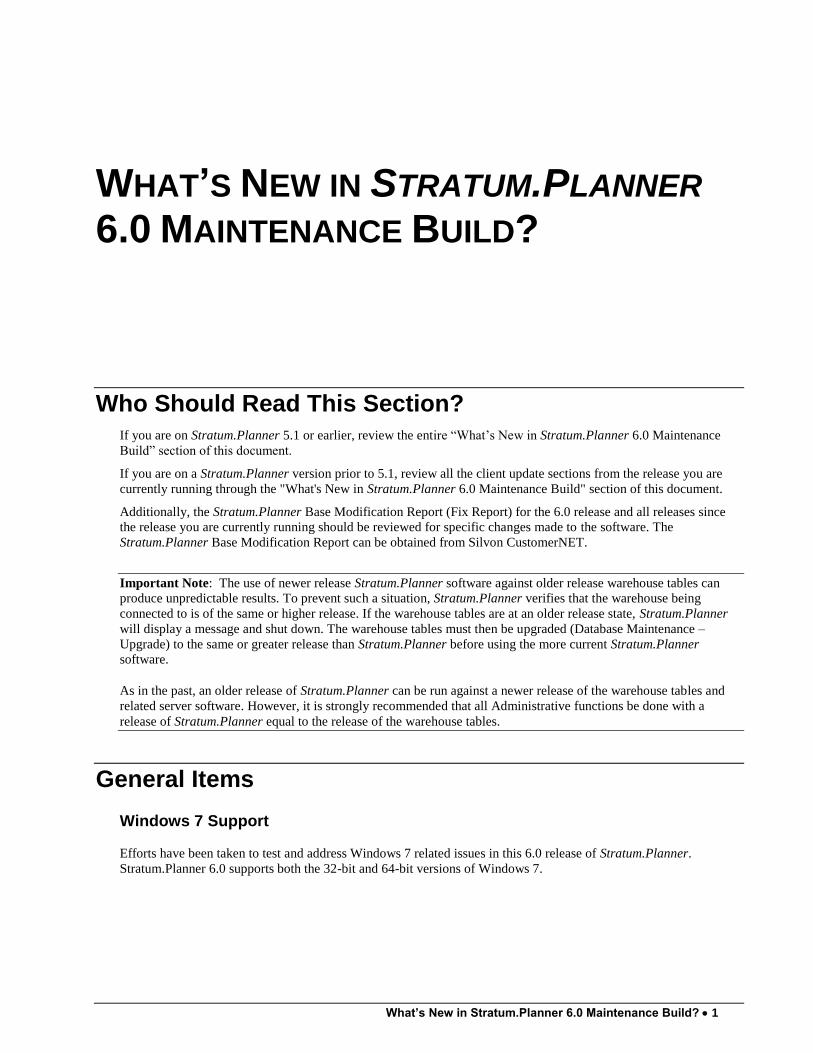
Report Formatter allows you to produce presentation quality reports where you can exercise greater control over the
formatting and contents of the Stratum.Planner outputs. The Report Formatter starts with the premise of supporting
the most common and basic reporting formats used by analysts today: Excel, PDF, Print, and a Preview capability to
review the output before generating the final report.
Page Header
Report Header
Stratum.Planner inquiry results grid
Page Footer
What’s New in Stratum.Planner 6.0 Maintenance Build? 3
General Report Formatter
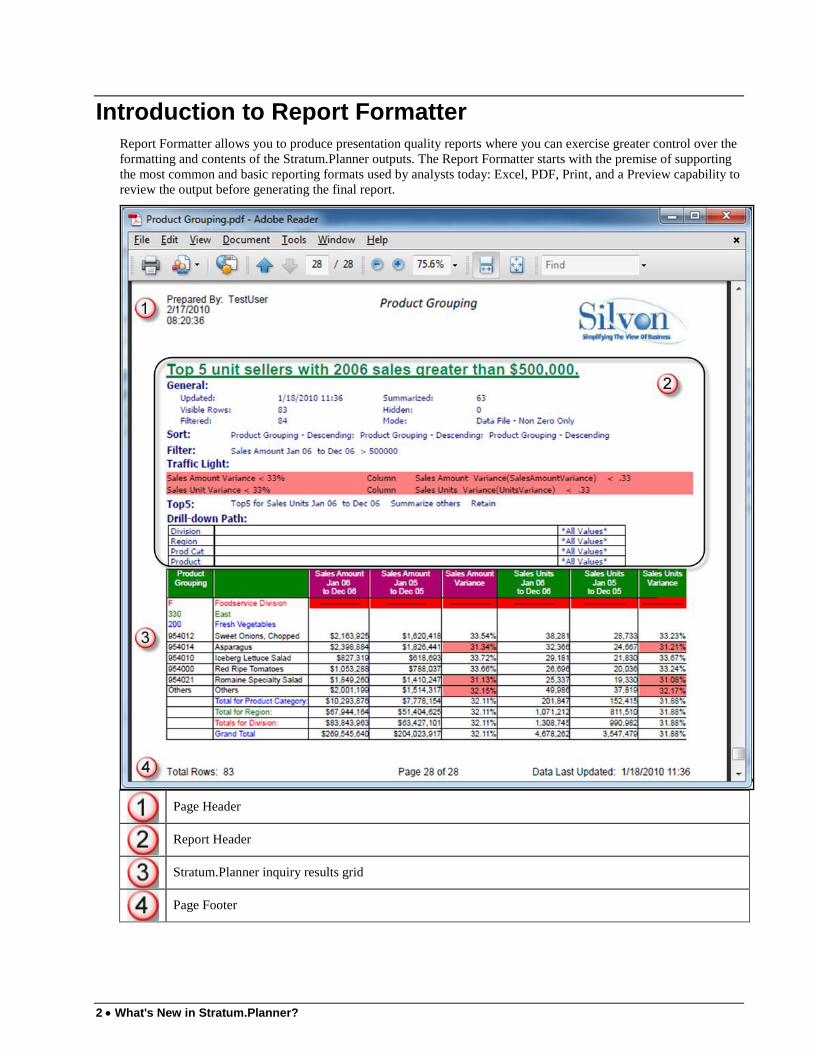
Report Formatter allows you to produce presentation quality reports where you can exercise greater control over the
formatting and contents of the Stratum.Planner outputs. The Report Formatter supports Excel, PDF, Print, and a
Preview capability to review the output before generating the final report.
Printing a Report
To print a report, click the Print button within any Report Formatter window or click the print immediate icon
from the toolbar. Printed reports are automatically sent to your default printer, and will look the same as a PDF
report.

4 What's New in Stratum.Planner?
Previewing my Report
1. With a template or view displaying a data grid or graph, access Report Formatter by clicking the icon
or choosing File | Report Formatter.
2. Click the Print Preview button within any Report Formatter window.
3. Within the Preview, you can also print the report or generate a PDF or Excel report.
Report Preview:
What’s New in Stratum.Planner 6.0 Maintenance Build? 5
Generating a PDF Report
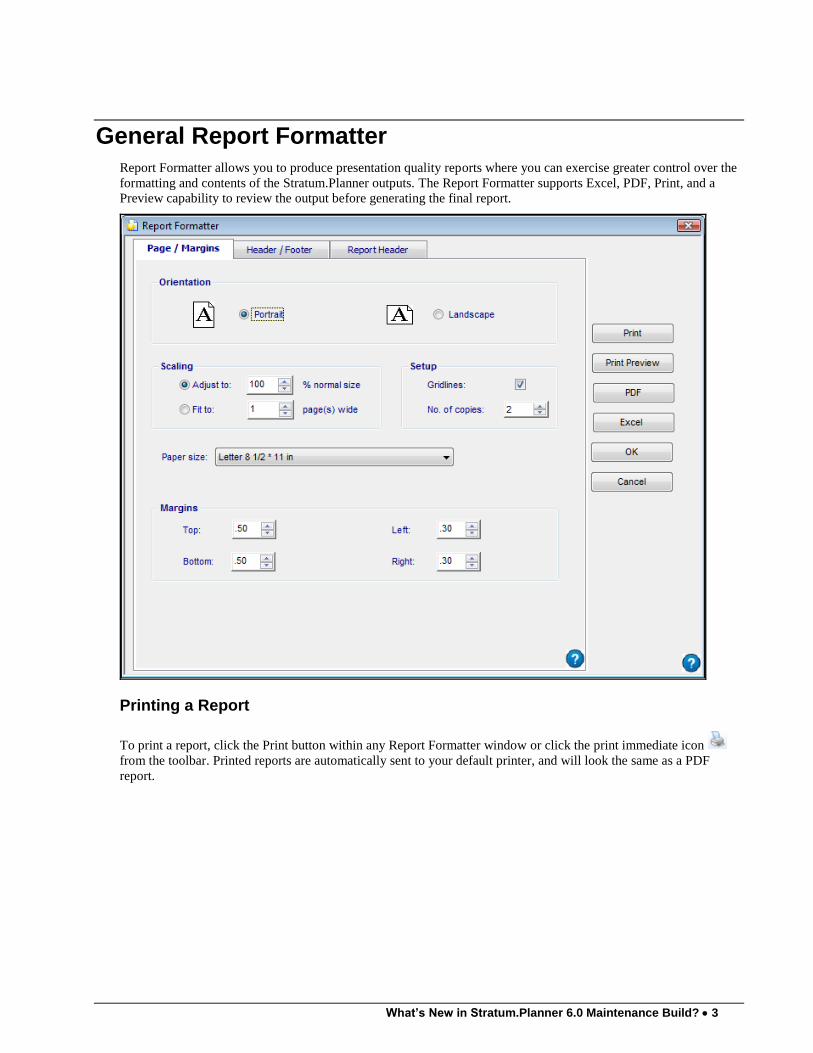
1. Click on the PDF button within any Report Formatter window or choose File | Export/Report | PDF Report.
2. A Save PDF File window will display asking whether you want to Open or Save the file.
3. Click Open to simply open the Acrobat file and review it.
4. Click Save to identify the folder in which to save the Acrobat file. The saved file can then be shared with
others. The resulting file follows Adobe Acrobat® file standards.
Generated PDF Report:
6 What's New in Stratum.Planner?
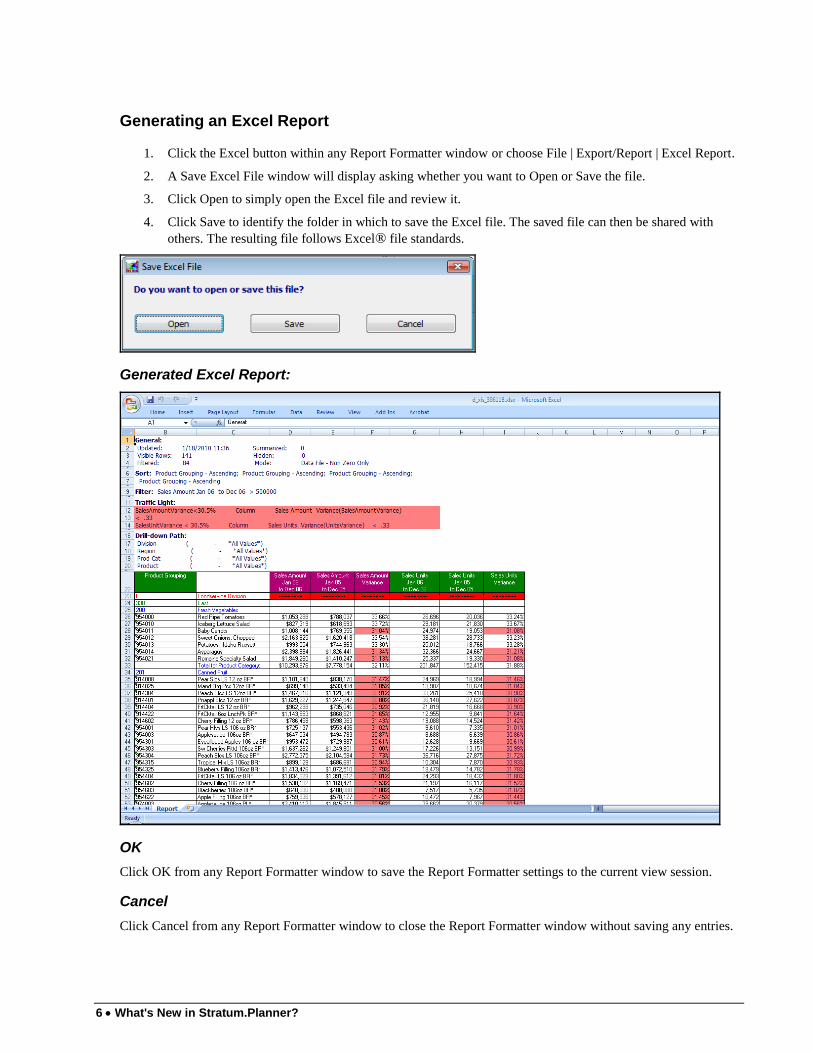
Generating an Excel Report
1. Click the Excel button within any Report Formatter window or choose File | Export/Report | Excel Report.
2. A Save Excel File window will display asking whether you want to Open or Save the file.
3. Click Open to simply open the Excel file and review it.
4. Click Save to identify the folder in which to save the Excel file. The saved file can then be shared with
others. The resulting file follows Excel® file standards.
Generated Excel Report:
OK
Click OK from any Report Formatter window to save the Report Formatter settings to the current view session.
Cancel
Click Cancel from any Report Formatter window to close the Report Formatter window without saving any entries.

What’s New in Stratum.Planner 6.0 Maintenance Build? 7
Page/Margins Customization
Report Formatter provides industry standard reporting characteristics along with some Stratum.Planner-specific
controls to deliver customized reports satisfying a variety of needs. You control the paper orientation, scaling and
size, as well as the margins of the report via the Page / Margins tab.
Page/Margins Window
With a view grid displayed, open the Report Formatter by choosing File | Report Formatter or clicking the Report
Formatter icon . To customize the Page / Margins characteristics of a report, select the Page / Margins tab while
running a template or view.
Report can be generated in Portrait or Landscape.
Adjust report to fit horizontally (wide) on a specified number of pages or to display as a percentage of the
original size.
Control whether or not gridlines are included in report and how many copies of a report are printed.
Three paper sizes supported: Letter, Legal, and A4 210 * 297 mm.
Specify overall page margins.
8 What's New in Stratum.Planner?
Orientation
This option controls how the report displays, and Portrait or Landscape are the available orientation options. The
values are mutually exclusive.
Note: The system considers the orientation when validating the page margins defined.
Scaling
Adjust to: nn % normal size
This option allows you to control the size of the overall report. The percentage input will either increase or decrease
the size of the report. You can make a selection by either keying in the desired value or using the arrow buttons to
adjust by increments of five. The minimum value is “10,” the maximum value is “400,” and the system will not
allow an entry of zero.
Note: This parameter will not impact the sizing of the page headers or page footers.
Fit to: nn pages (s) wide
This option allows you to control how many horizontal pages your report will span. For example, if your report
initially results in the last column spilling over to a second page, setting this parameter to “1” will tell Report
Formatter to reduce the overall size of the report. Report Formatter will automatically determine the size necessary
to fit all the columns of the report within the “1” page wide. You can make a selection by either keying in the
desired value or using the arrow buttons to adjust by increments of one. The minimum value is “1,” the maximum
value is “1000,” and the system will not allow an entry of zero.
Note: This parameter does not control the number of vertical pages in the report.
Setup
Gridlines
This option gives you the flexibility to include the gridlines between the data cells on your Stratum.Planner reports.
No. of copies
This option allows you to print multiple copies of the report for easy distribution. You can make a selection by either
keying in the desired value or using the arrow buttons to adjust by increments of one. The minimum value is “1,” the
maximum value is “1000,” and the system will not allow an entry of zero.
Paper Size
This option allows you to identify your paper source. Several paper sizes are supported and can be selected via the
drop-down selection menu. Valid options are: Letter, Legal, and A4 210 * 297 mm.
Note: The system considers the paper size when validating the page margins defined.
Margins
This option allows you to control the top, bottom, left, and right margins of your generated report. You define the
overall page margins by keying in a value or using the arrow buttons to make a selection. The scroll arrows move in
increments of .10 inches. The minimum margin value is “.20 inches,” the maximum value is “20.00 inches,” and the
system will not allow an entry of zero or a negative number. Report Formatter will validate the margins based on the
paper size, paper orientation, page header size, and the page footer size.
What’s New in Stratum.Planner 6.0 Maintenance Build? 9
Header / Footer Customization
Report Formatter provides industry standard reporting characteristics, along with some Stratum.Planner-specific
controls, to deliver customized reports satisfying a variety of needs. You control the page headers and page footers
of your reports via the Header / Footer tab.
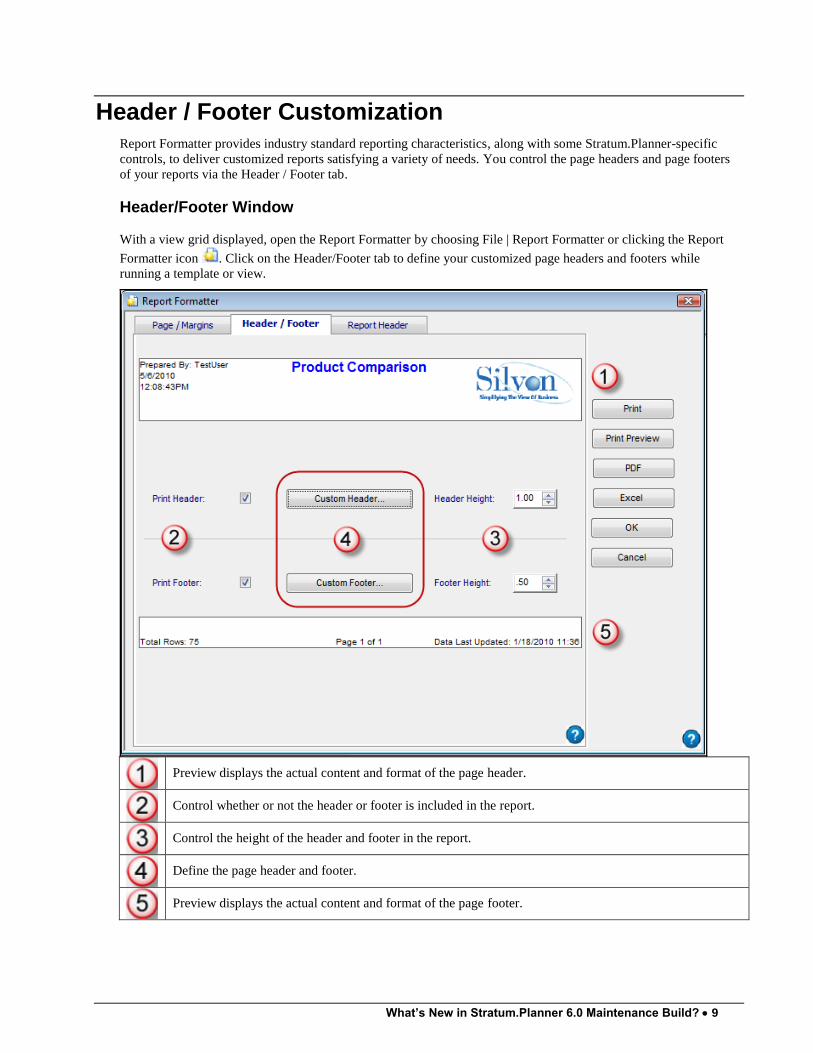
Header/Footer Window
With a view grid displayed, open the Report Formatter by choosing File | Report Formatter or clicking the Report
Formatter icon . Click on the Header/Footer tab to define your customized page headers and footers while
running a template or view.
Preview displays the actual content and format of the page header.
Control whether or not the header or footer is included in the report.
Control the height of the header and footer in the report.
Define the page header and footer.
Preview displays the actual content and format of the page footer.
10 What's New in Stratum.Planner?
Header Preview
The preview area displays the actual content and format of the page header. The height of the preview area will
adjust according to the Header Height setting. The preview area height will stop growing when it fills the available
space on the window. However, the page header height in the report will be based on the actual Header Height
setting. For all header sections, the contents are top justified.
Print Header / Print Footer
These checkboxes offer you the flexibility to determine whether the page header / footer should be included in the
report by selecting or deselecting the Print Header or Print Footer checkbox.
Header Height / Footer Height
These options give you control of the page header and footer‟s height, and then the height is displayed in the
preview area. The system validates the page header and footer heights in conjunction with the paper size, page
margins, and orientation of the report. Adjust the height of the page header and footer by entering a value in the
Header Height or Footer Height fields or using the available scroll arrows which move in increments of .10 inches.
The minimum height value is “.00” inches and the maximum value is “20.00” inches.
Custom Header / Custom Footer
These buttons open the Header and Footer windows to define the contents and format of the page header and footer.
To adjust the page header, click on the Custom Header button. To adjust the page footer, click on the Custom Footer
button.
Footer Preview
The preview area displays the actual content and format of the page footer. The height of the preview area will
adjust according to the Footer Height setting. The preview area height will stop growing when it fills the available
space on the window. However, the page footer height in the report will be based on the actual Footer Height
setting. For all footer sections, the contents are bottom justified.
What’s New in Stratum.Planner 6.0 Maintenance Build? 11
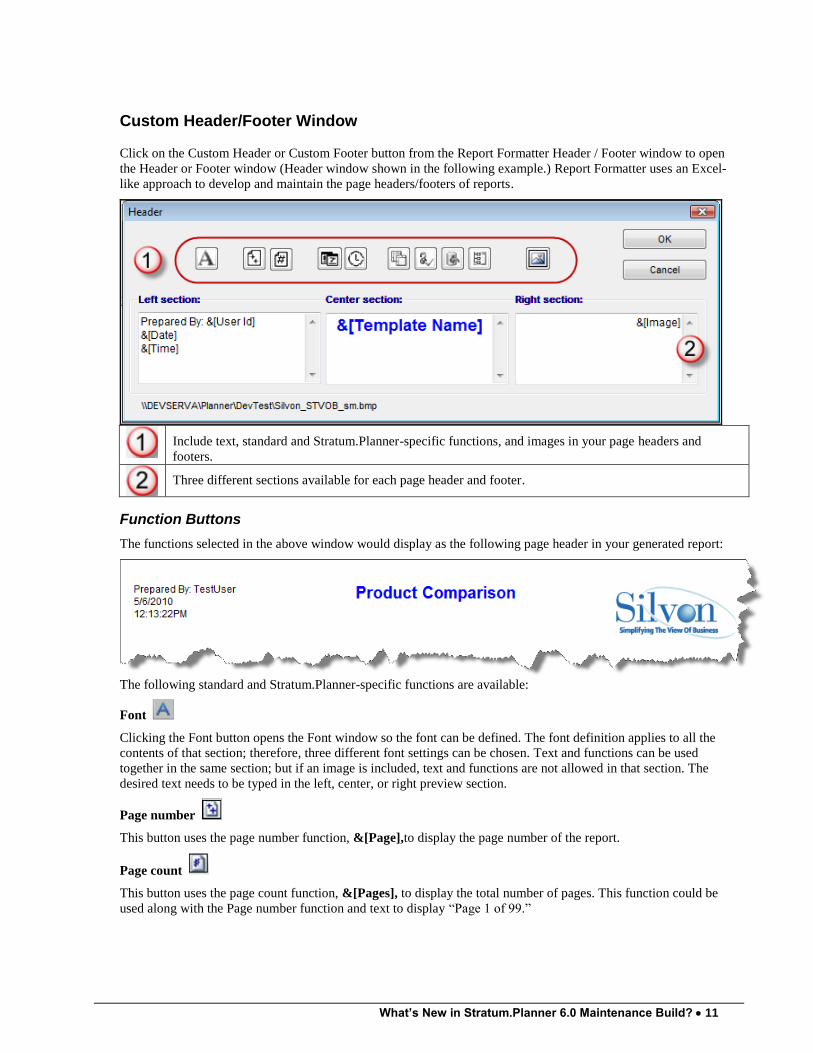
Custom Header/Footer Window
Click on the Custom Header or Custom Footer button from the Report Formatter Header / Footer window to open
the Header or Footer window (Header window shown in the following example.) Report Formatter uses an Excel-
like approach to develop and maintain the page headers/footers of reports.
Include text, standard and Stratum.Planner-specific functions, and images in your page headers and
footers.
Three different sections available for each page header and footer.
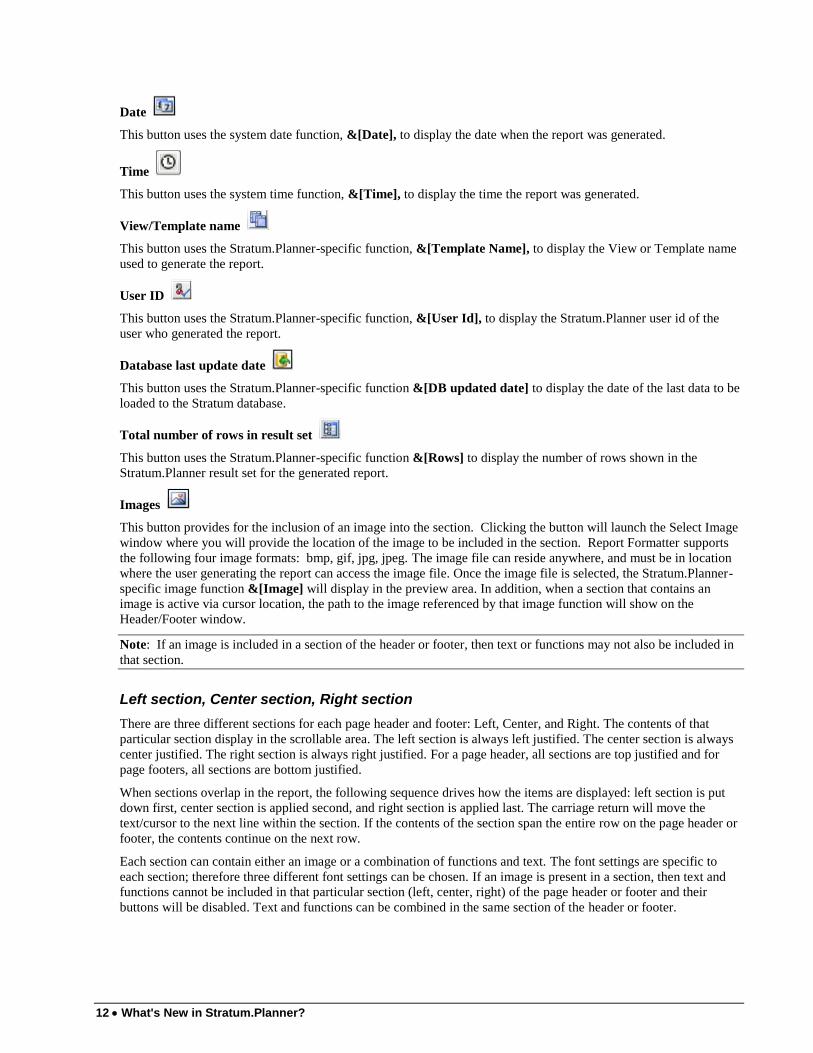
Function Buttons
The functions selected in the above window would display as the following page header in your generated report:
The following standard and Stratum.Planner-specific functions are available:
Font
Clicking the Font button opens the Font window so the font can be defined. The font definition applies to all the
contents of that section; therefore, three different font settings can be chosen. Text and functions can be used
together in the same section; but if an image is included, text and functions are not allowed in that section. The
desired text needs to be typed in the left, center, or right preview section.
Page number
This button uses the page number function, &[Page],to display the page number of the report.
Page count
This button uses the page count function, &[Pages], to display the total number of pages. This function could be
used along with the Page number function and text to display “Page 1 of 99.”
12 What's New in Stratum.Planner?
Date
This button uses the system date function, &[Date], to display the date when the report was generated.
Time
This button uses the system time function, &[Time], to display the time the report was generated.
View/Template name
This button uses the Stratum.Planner-specific function, &[Template Name], to display the View or Template name
used to generate the report.
User ID
This button uses the Stratum.Planner-specific function, &[User Id], to display the Stratum.Planner user id of the
user who generated the report.
Database last update date
This button uses the Stratum.Planner-specific function &[DB updated date] to display the date of the last data to be
loaded to the Stratum database.
Total number of rows in result set
This button uses the Stratum.Planner-specific function &[Rows] to display the number of rows shown in the
Stratum.Planner result set for the generated report.
Images
This button provides for the inclusion of an image into the section. Clicking the button will launch the Select Image
window where you will provide the location of the image to be included in the section. Report Formatter supports
the following four image formats: bmp, gif, jpg, jpeg. The image file can reside anywhere, and must be in location
where the user generating the report can access the image file. Once the image file is selected, the Stratum.Planner-
specific image function &[Image] will display in the preview area. In addition, when a section that contains an
image is active via cursor location, the path to the image referenced by that image function will show on the
Header/Footer window.
Note: If an image is included in a section of the header or footer, then text or functions may not also be included in
that section.
Left section, Center section, Right section
There are three different sections for each page header and footer: Left, Center, and Right. The contents of that
particular section display in the scrollable area. The left section is always left justified. The center section is always
center justified. The right section is always right justified. For a page header, all sections are top justified and for
page footers, all sections are bottom justified.
When sections overlap in the report, the following sequence drives how the items are displayed: left section is put
down first, center section is applied second, and right section is applied last. The carriage return will move the
text/cursor to the next line within the section. If the contents of the section span the entire row on the page header or
footer, the contents continue on the next row.
Each section can contain either an image or a combination of functions and text. The font settings are specific to
each section; therefore three different font settings can be chosen. If an image is present in a section, then text and
functions cannot be included in that particular section (left, center, right) of the page header or footer and their
buttons will be disabled. Text and functions can be combined in the same section of the header or footer.
What’s New in Stratum.Planner 6.0 Maintenance Build? 13
Report Header Setup
Qualify the Stratum.Planner data in your report by including the constraints used to generate the report data.
Through the Report Header, you control which analysis driving features are presented in a report along with some
options for determining where the features are shown in the report. This portion of the report can be displayed
immediately prior to the Stratum.Planner data on the first page, on every page, or on a separate page. The separate
page can be the first and/or the last page of the report. Any combination of the available pieces of information can
be displayed in any of the report header positions.
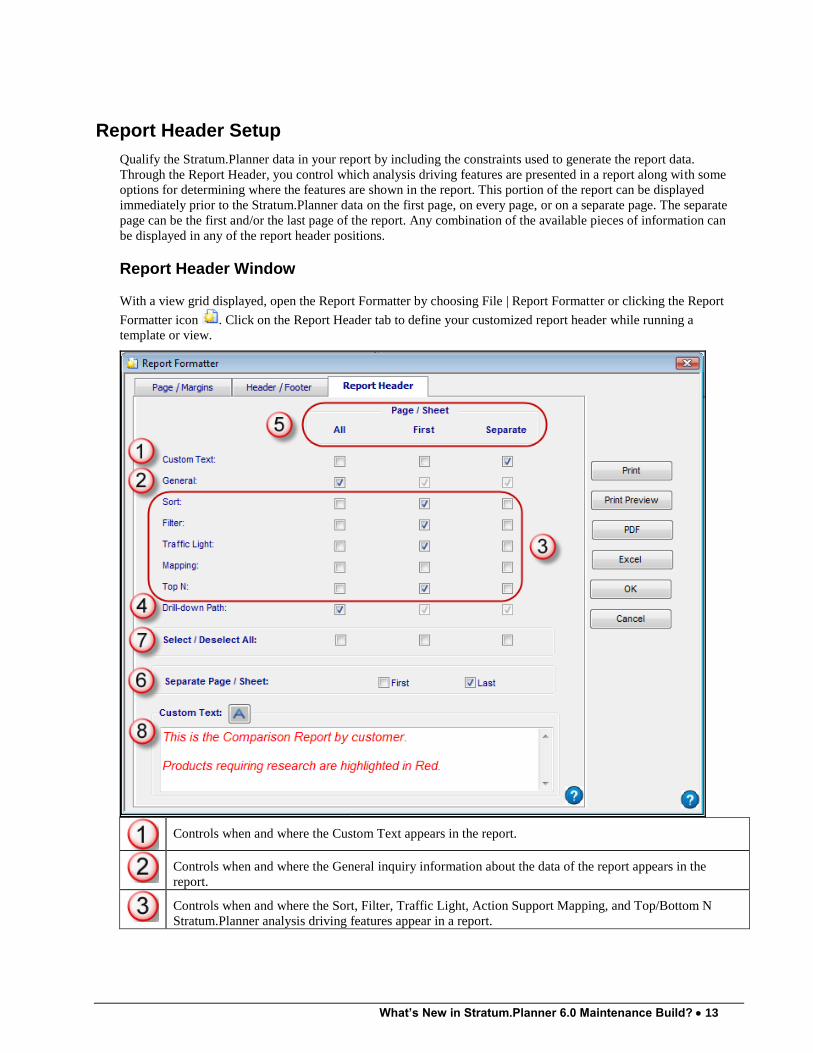
Report Header Window
With a view grid displayed, open the Report Formatter by choosing File | Report Formatter or clicking the Report
Formatter icon . Click on the Report Header tab to define your customized report header while running a
template or view.
Controls when and where the Custom Text appears in the report.
Controls when and where the General inquiry information about the data of the report appears in the
report.
Controls when and where the Sort, Filter, Traffic Light, Action Support Mapping, and Top/Bottom N
Stratum.Planner analysis driving features appear in a report.
14 What's New in Stratum.Planner?
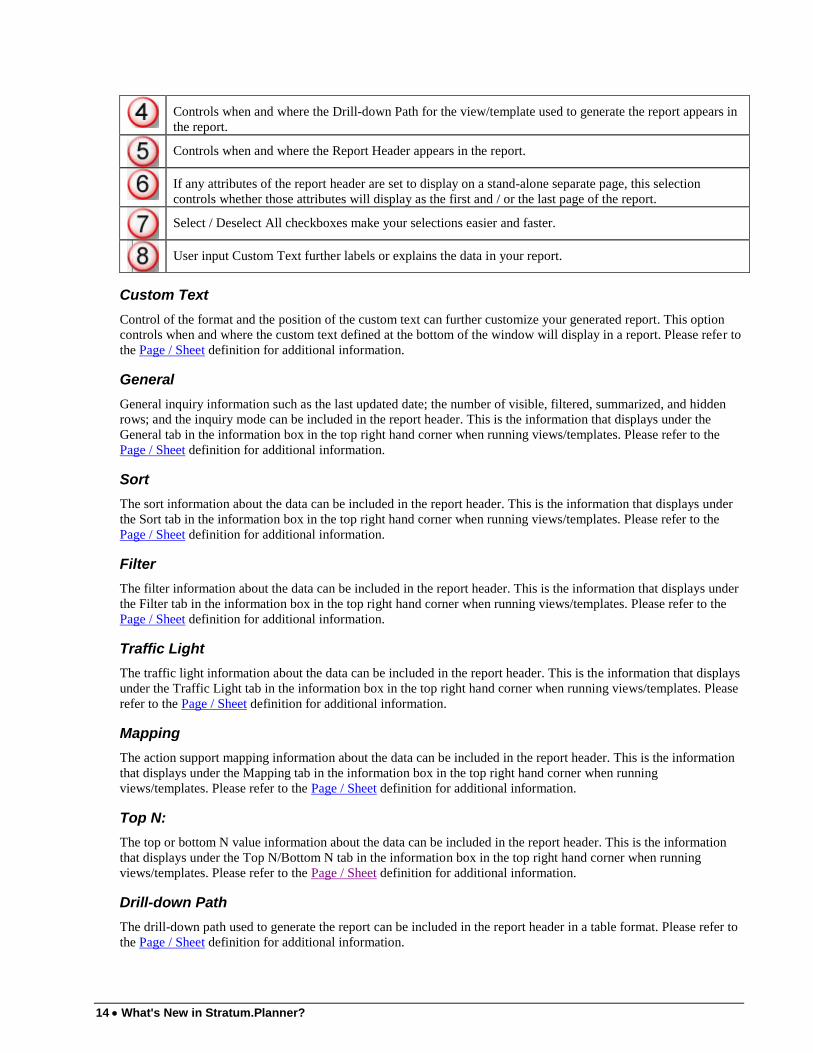
Controls when and where the Drill-down Path for the view/template used to generate the report appears in
the report.
Controls when and where the Report Header appears in the report.
If any attributes of the report header are set to display on a stand-alone separate page, this selection
controls whether those attributes will display as the first and / or the last page of the report.
Select / Deselect All checkboxes make your selections easier and faster.
User input Custom Text further labels or explains the data in your report.
Custom Text
Control of the format and the position of the custom text can further customize your generated report. This option
controls when and where the custom text defined at the bottom of the window will display in a report. Please refer to
the Page / Sheet definition for additional information.
General
General inquiry information such as the last updated date; the number of visible, filtered, summarized, and hidden
rows; and the inquiry mode can be included in the report header. This is the information that displays under the
General tab in the information box in the top right hand corner when running views/templates. Please refer to the
Page / Sheet definition for additional information.
Sort
The sort information about the data can be included in the report header. This is the information that displays under
the Sort tab in the information box in the top right hand corner when running views/templates. Please refer to the
Page / Sheet definition for additional information.
Filter
The filter information about the data can be included in the report header. This is the information that displays under
the Filter tab in the information box in the top right hand corner when running views/templates. Please refer to the
Page / Sheet definition for additional information.
Traffic Light
The traffic light information about the data can be included in the report header. This is the information that displays
under the Traffic Light tab in the information box in the top right hand corner when running views/templates. Please
refer to the Page / Sheet definition for additional information.
Mapping
The action support mapping information about the data can be included in the report header. This is the information
that displays under the Mapping tab in the information box in the top right hand corner when running
views/templates. Please refer to the Page / Sheet definition for additional information.
Top N:
The top or bottom N value information about the data can be included in the report header. This is the information
that displays under the Top N/Bottom N tab in the information box in the top right hand corner when running
views/templates. Please refer to the Page / Sheet definition for additional information.
Drill-down Path
The drill-down path used to generate the report can be included in the report header in a table format. Please refer to
the Page / Sheet definition for additional information.
What’s New in Stratum.Planner 6.0 Maintenance Build? 15
Page / Sheet
The report header information can be displayed immediately prior to the Stratum.Planner data on every page of a
report, on only the first page of a report, and / or on its own separate page of a report. The separate page can be the
first, the last page, or both the first and last page of the report. Any combination of the available items of
information can be displayed in any of the report header positions.
All
If the All checkbox is selected, the item within the Report Header will display on every page of the generated report.
The First and Separate checkboxes will automatically be selected and disabled if All is selected. If All is then
deselected, First and Separate will remain selected, but the checkboxes are enabled.
First
If First is selected, the item will display at the top of only the first page containing data. If First is selected, there is
no impact on the ability to select the All or Separate checkboxes.
Separate
The Report Header will be contained on its own page(s) of the report if Separate is selected. If Separate is selected,
there is no impact to the All or First checkboxes. The First and Last checkboxes within the Separate Page / Sheet
become enabled if Separate is selected for one or more items.
Select / Deselect All
To make selections easier and faster, a Select / Deselect All checkbox is available. By clicking that checkbox, all the
individual options above it are automatically selected or deselected.
Separate Page/Sheet
The Separate Page / Sheet checkboxes are tied to the Separate checkbox above them. If you want the Report Header
to display on stand-alone separate pages from the report data, you must specify whether you want it to display as the
First and / or the Last page of the report. If any of the individual Separate checkboxes are enabled and selected, then
you must make First and / or Last selection. If the only individual Separate checkboxes selected are disabled, then
you have the option to make a First and / or Last selection or choose to not make a selection and not produce the
Report Header on a separate page. If a First and / or Last selection is required, and no selection was made, the
Report Formatter will prompt you to make a selection. The First and Last fields are disabled if Separate is not
selected for at least one of the individual checkboxes.
First
Selecting the First checkbox will display the report header on a separate, first page of the generated report.
Last
Selecting the Last checkbox will display the report header on a separate, last page of the generated report.
Note: First and Last may both be selected if you want to display the Report Header on both a first and last separate
page of the generated report.
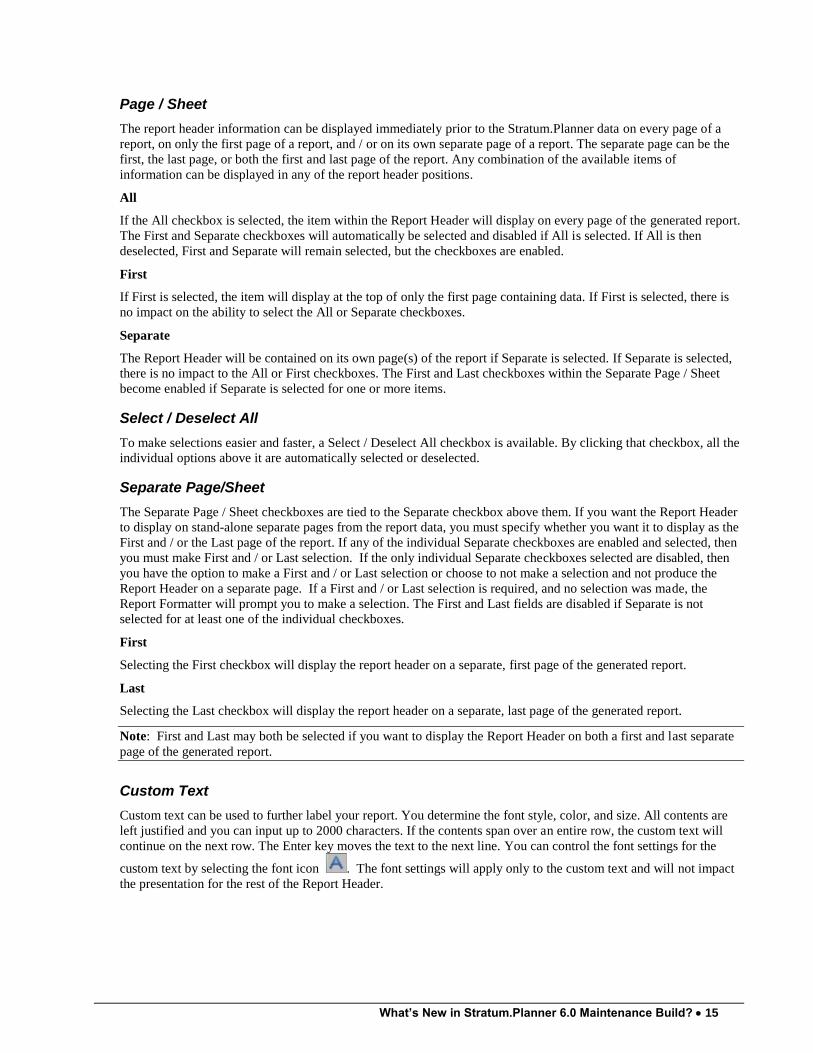
Custom Text
Custom text can be used to further label your report. You determine the font style, color, and size. All contents are
left justified and you can input up to 2000 characters. If the contents span over an entire row, the custom text will
continue on the next row. The Enter key moves the text to the next line. You can control the font settings for the
custom text by selecting the font icon . The font settings will apply only to the custom text and will not impact
the presentation for the rest of the Report Header.

16 What's New in Stratum.Planner?
Notes

What’s New in Stratum.Planner 5.1 Maintenance Build? 17
WHAT’S NEW IN STRATUM.PLANNER
5.1 MAINTENANCE BUILD?
Who Should Read This Section?
If you are on Stratum.Planner 4.1 or earlier, review the entire “What‟s New in Stratum.Planner 5.1 Maintenance
Build” section of this document.
If you are on a Stratum.Planner version prior to 4.1, review all the client update sections from the release you are
currently running through the "What's New in Stratum.Planner 5.1 Maintenance Build" section of this document.
Additionally, the Stratum.Planner Base Modification Report (Fix Report) for the 5.1 release and all releases since
the release you are currently running should be reviewed for specific changes made to the software. The
Stratum.Planner Base Modification Report can be obtained from Silvon CustomerNET.
Important Note: The use of newer release Stratum.Planner software against older release warehouse tables can
produce unpredictable results. To prevent such a situation, Stratum.Planner verifies that the warehouse being
connected to is of the same or higher release. If the warehouse tables are at an older release state, Stratum.Planner
will display a message and shut down. The warehouse tables must then be upgraded (Database Maintenance –
Upgrade) to the same or greater release than Stratum.Planner before using the more current Stratum.Planner
software.
As in the past, an older release of Stratum.Planner can be run against a newer release of the warehouse tables and
related server software. However, it is strongly recommended that all Administrative functions be done with a
release of Stratum.Planner equal to the release of the warehouse tables.
18 What's New in Stratum.Planner?
General Items
Windows Vista Support
Efforts have been taken to test and address Windows Vista related issues in this 5.1 release of Stratum.Planner (as
of the 5.1.2 One-off). To support Windows Vista, Stratum.Planner 5.1 was built upon the new Powerbuilder release
(11.1) which satisfies Microsoft‟s “Works with Windows Vista” requirements. In addition, the Planner online Help
function utilizes a new format that is Vista compatible.
Configuration SQLPKG Settings
Stratum.Planner Configuration process has been changed to retain the value in the “Enable Extended Dynamic
Support” checkbox if the STLIB ODBC Data Source already exists. If this is the first time Configuration is run, the
package support field defaults to “OFF.”
View Query Cancel Button
The query execution process has been modified to generally accept the clicking of the Cancel button. The query will
be stopped on the server side, and control will be returned to the user within Stratum.Planner.
Saving View Files to Network
The View Save As process has been modified to properly save the View (DTV) file to the network location and
name identified on the Save As window. If the View was previously included in a View Group, the original View
will remain in the View Group and not be overlayed by the newly saved View (DTV) file.
Icon and Background/Text Changes
The toolbar icons, some background coloring, and some text fonts/colors have been changed for an updated look and
feel. In additional to the icon images changing, the background color and borders of the icons were changed to more
visibly indicate active/inactive states.
What’s New in Stratum.Planner 5.1 Maintenance Build? 19
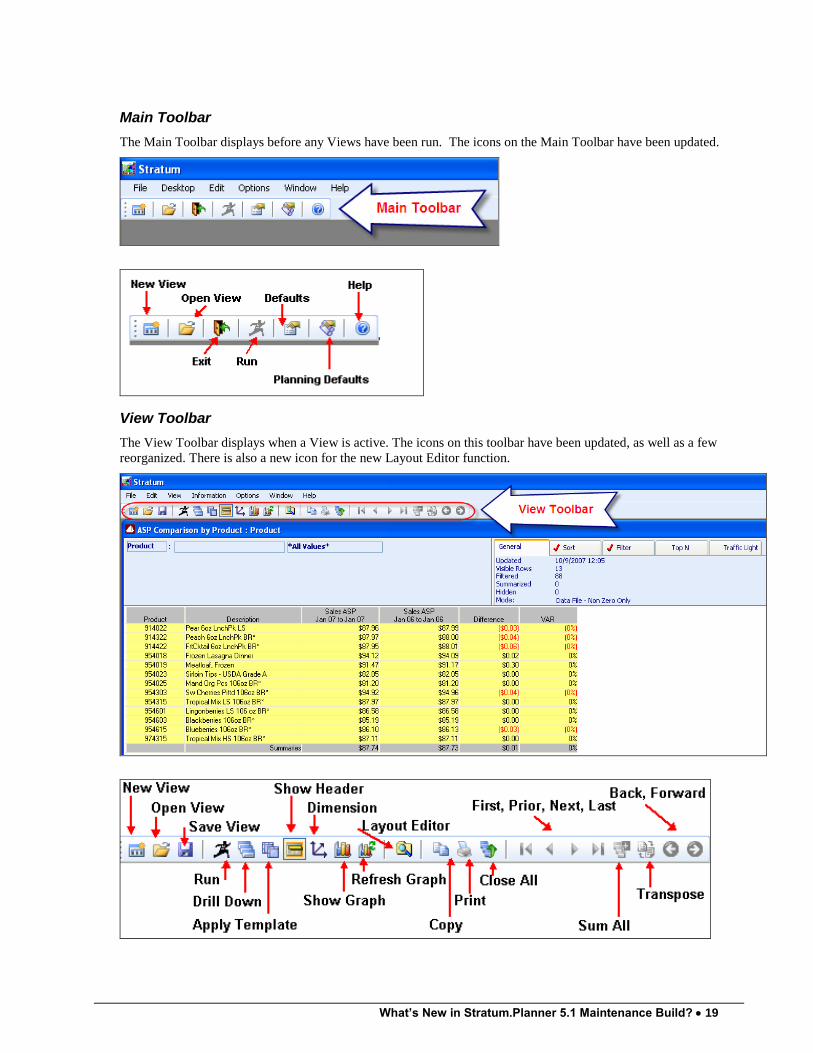
Main Toolbar
The Main Toolbar displays before any Views have been run. The icons on the Main Toolbar have been updated.
View Toolbar
The View Toolbar displays when a View is active. The icons on this toolbar have been updated, as well as a few
reorganized. There is also a new icon for the new Layout Editor function.
20 What's New in Stratum.Planner?
Hide and Unhide Columns
Stratum.Planner was enhanced to allow users to hide and unhide columns within Regular and Period Based Views.
Hidden columns will not print or be included as part of a file export. Columns can be hidden/unhidden using the new
Layout Editor or by accessing the Context menu within the View grid. The following pages will document hiding
and unhiding columns using the Context menu. To access the Context menu, right click on the column and the menu
will pop up.
Note: With the addition of the Hide/Unhide capabilities, we recommend not collapsing columns because collapsed
columns can cause unpredictable results.
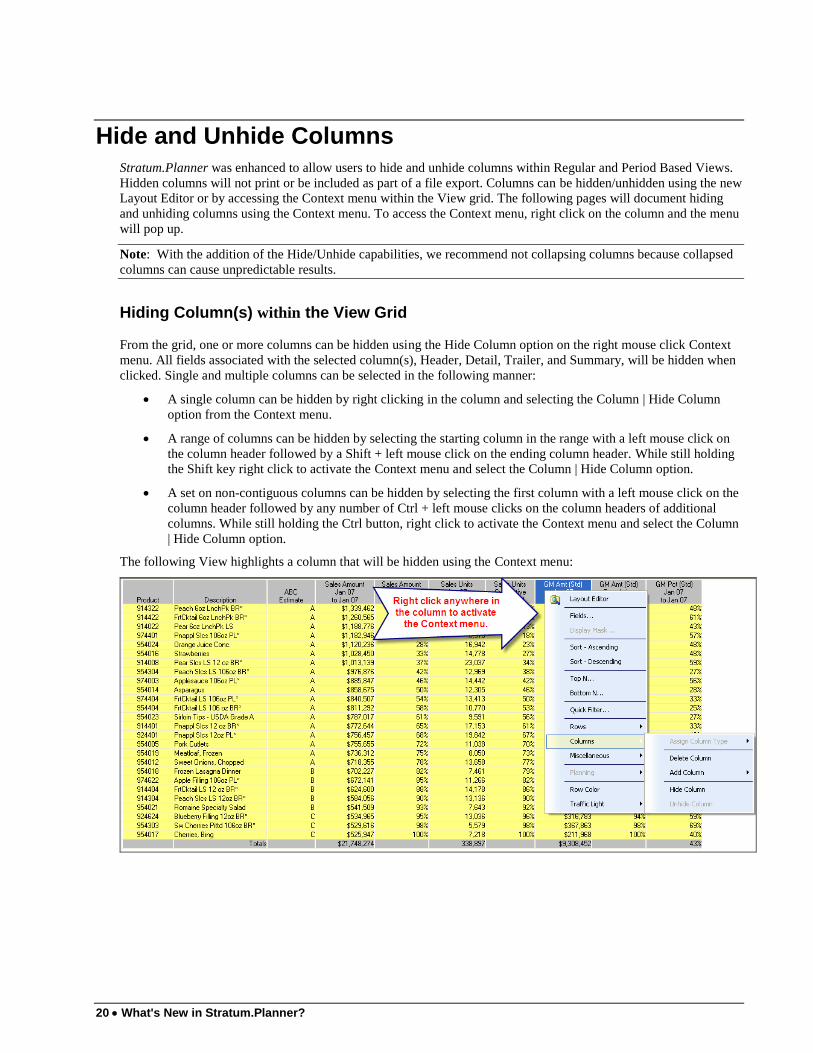
Hiding Column(s) within the View Grid
From the grid, one or more columns can be hidden using the Hide Column option on the right mouse click Context
menu. All fields associated with the selected column(s), Header, Detail, Trailer, and Summary, will be hidden when
clicked. Single and multiple columns can be selected in the following manner:
A single column can be hidden by right clicking in the column and selecting the Column | Hide Column
option from the Context menu.
A range of columns can be hidden by selecting the starting column in the range with a left mouse click on
the column header followed by a Shift + left mouse click on the ending column header. While still holding
the Shift key right click to activate the Context menu and select the Column | Hide Column option.
A set on non-contiguous columns can be hidden by selecting the first column with a left mouse click on the
column header followed by any number of Ctrl + left mouse clicks on the column headers of additional
columns. While still holding the Ctrl button, right click to activate the Context menu and select the Column
| Hide Column option.
The following View highlights a column that will be hidden using the Context menu:

What’s New in Stratum.Planner 5.1 Maintenance Build? 21
Once the column is hidden, the hidden column indicator displays to the left of the hidden column in the View‟s
header band.
Unhide Column(s) within the View Grid
From the grid, one or more columns can be unhidden using the Unhide Column option on the right mouse click
Context menu. The Unhide menu option is only enabled if a hidden column exists to the left of the selected
column(s). Selecting the Unhide Column option will make ALL hidden columns within the selected range or
directly to the left of the selected columns visible. Single and multiple columns can be unhidden in the following
manner:
When selecting a single column, the Unhide Column menu option will be enabled if there are one or more
hidden columns directly to the left of the selected column. Selecting the Unhide Column option will unhide
ALL columns to the left of the selected column up to the next visible column.
Selecting a range of columns in the data grid will enable the Unhide Column menu option only if there are
one or more hidden columns within the selected range or directly to the left of the selected columns. All of
the columns hidden within the selected range, or directly to the left, will be unhidden.
22 What's New in Stratum.Planner?
Unhiding a Range of Hidden Columns
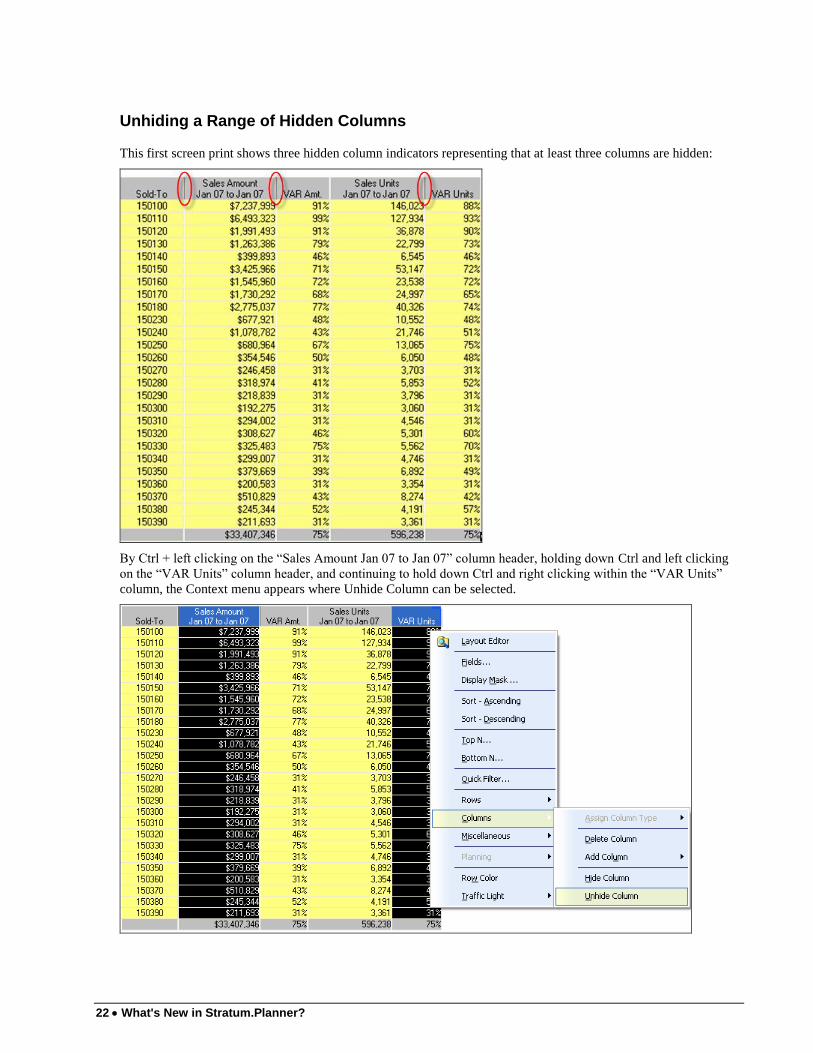
This first screen print shows three hidden column indicators representing that at least three columns are hidden:
By Ctrl + left clicking on the “Sales Amount Jan 07 to Jan 07” column header, holding down Ctrl and left clicking
on the “VAR Units” column header, and continuing to hold down Ctrl and right clicking within the “VAR Units”
column, the Context menu appears where Unhide Column can be selected.
What’s New in Stratum.Planner 5.1 Maintenance Build? 23
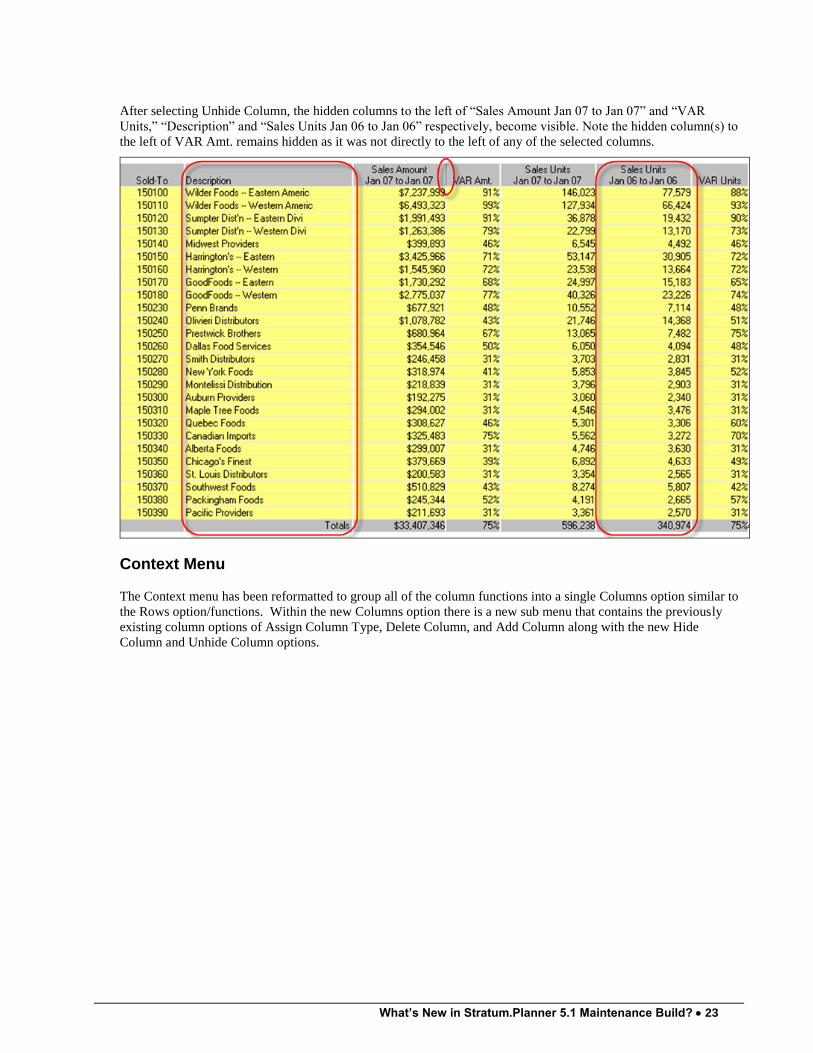
After selecting Unhide Column, the hidden columns to the left of “Sales Amount Jan 07 to Jan 07” and “VAR
Units,” “Description” and “Sales Units Jan 06 to Jan 06” respectively, become visible. Note the hidden column(s) to
the left of VAR Amt. remains hidden as it was not directly to the left of any of the selected columns.
Context Menu
The Context menu has been reformatted to group all of the column functions into a single Columns option similar to
the Rows option/functions. Within the new Columns option there is a new sub menu that contains the previously
existing column options of Assign Column Type, Delete Column, and Add Column along with the new Hide
Column and Unhide Column options.
24 What's New in Stratum.Planner?
Layout Editor
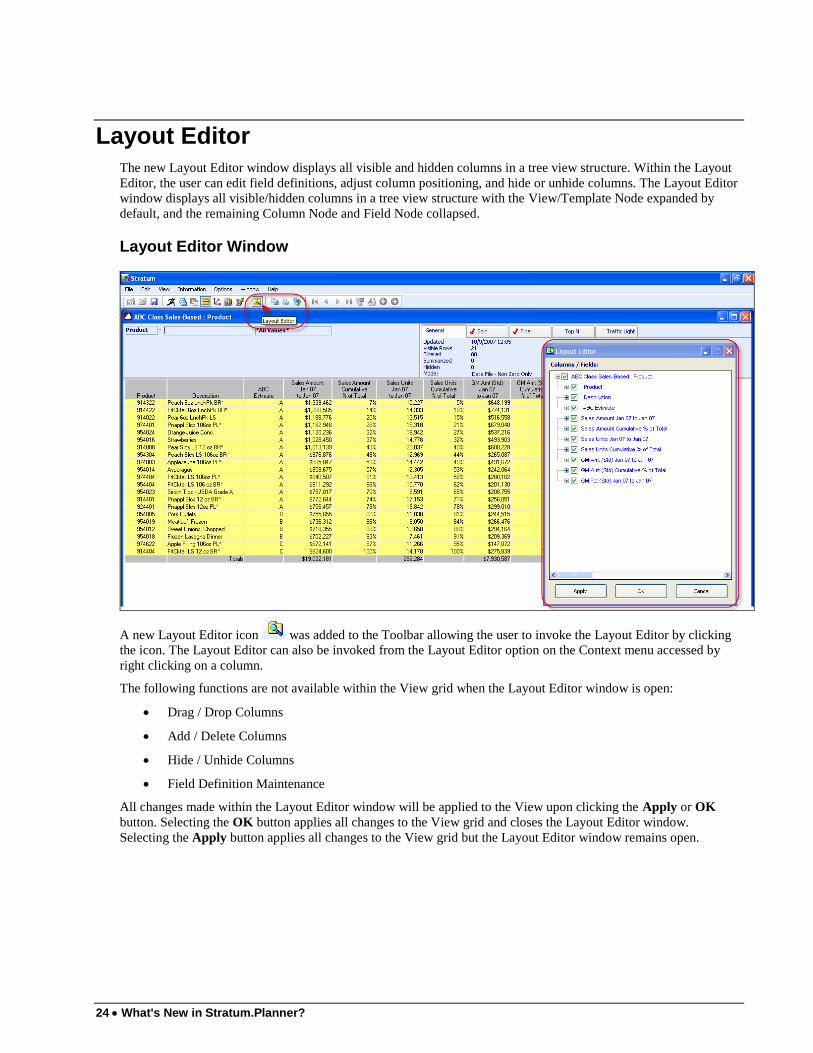
The new Layout Editor window displays all visible and hidden columns in a tree view structure. Within the Layout
Editor, the user can edit field definitions, adjust column positioning, and hide or unhide columns. The Layout Editor
window displays all visible/hidden columns in a tree view structure with the View/Template Node expanded by
default, and the remaining Column Node and Field Node collapsed.
Layout Editor Window
A new Layout Editor icon was added to the Toolbar allowing the user to invoke the Layout Editor by clicking
the icon. The Layout Editor can also be invoked from the Layout Editor option on the Context menu accessed by
right clicking on a column.
The following functions are not available within the View grid when the Layout Editor window is open:
Drag / Drop Columns
Add / Delete Columns
Hide / Unhide Columns
Field Definition Maintenance
All changes made within the Layout Editor window will be applied to the View upon clicking the Apply or OK
button. Selecting the OK button applies all changes to the View grid and closes the Layout Editor window.
Selecting the Apply button applies all changes to the View grid but the Layout Editor window remains open.
What’s New in Stratum.Planner 5.1 Maintenance Build? 25
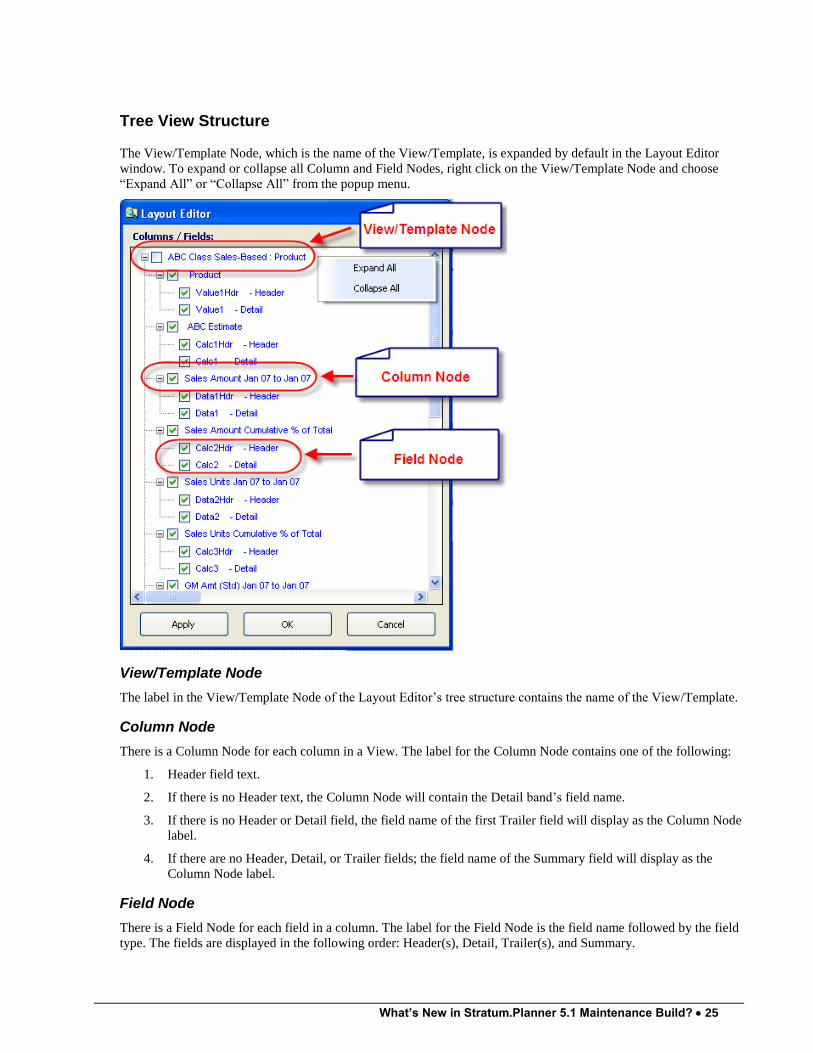
Tree View Structure
The View/Template Node, which is the name of the View/Template, is expanded by default in the Layout Editor
window. To expand or collapse all Column and Field Nodes, right click on the View/Template Node and choose
“Expand All” or “Collapse All” from the popup menu.
View/Template Node
The label in the View/Template Node of the Layout Editor‟s tree structure contains the name of the View/Template.
Column Node
There is a Column Node for each column in a View. The label for the Column Node contains one of the following:
1. Header field text.
2. If there is no Header text, the Column Node will contain the Detail band‟s field name.
3. If there is no Header or Detail field, the field name of the first Trailer field will display as the Column Node
label.
4. If there are no Header, Detail, or Trailer fields; the field name of the Summary field will display as the
Column Node label.
Field Node
There is a Field Node for each field in a column. The label for the Field Node is the field name followed by the field
type. The fields are displayed in the following order: Header(s), Detail, Trailer(s), and Summary.
26 What's New in Stratum.Planner?
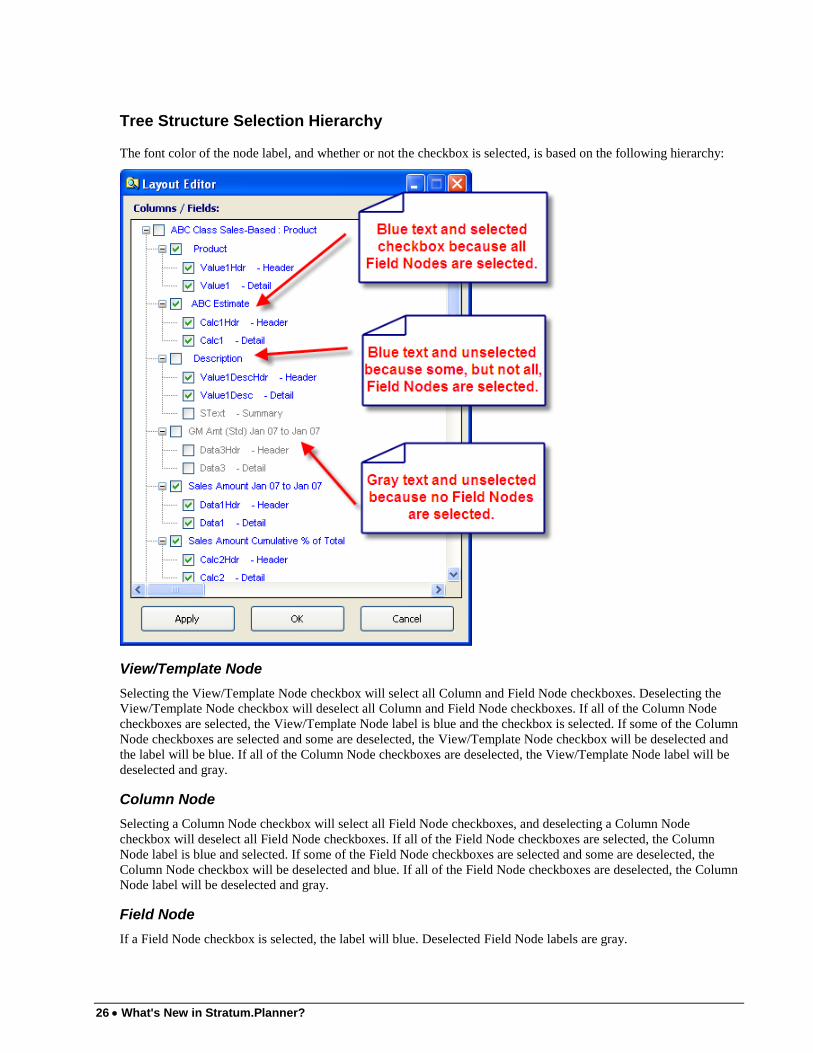
Tree Structure Selection Hierarchy
The font color of the node label, and whether or not the checkbox is selected, is based on the following hierarchy:
View/Template Node
Selecting the View/Template Node checkbox will select all Column and Field Node checkboxes. Deselecting the
View/Template Node checkbox will deselect all Column and Field Node checkboxes. If all of the Column Node
checkboxes are selected, the View/Template Node label is blue and the checkbox is selected. If some of the Column
Node checkboxes are selected and some are deselected, the View/Template Node checkbox will be deselected and
the label will be blue. If all of the Column Node checkboxes are deselected, the View/Template Node label will be
deselected and gray.
Column Node
Selecting a Column Node checkbox will select all Field Node checkboxes, and deselecting a Column Node
checkbox will deselect all Field Node checkboxes. If all of the Field Node checkboxes are selected, the Column
Node label is blue and selected. If some of the Field Node checkboxes are selected and some are deselected, the
Column Node checkbox will be deselected and blue. If all of the Field Node checkboxes are deselected, the Column
Node label will be deselected and gray.
Field Node
If a Field Node checkbox is selected, the label will blue. Deselected Field Node labels are gray.
What’s New in Stratum.Planner 5.1 Maintenance Build? 27
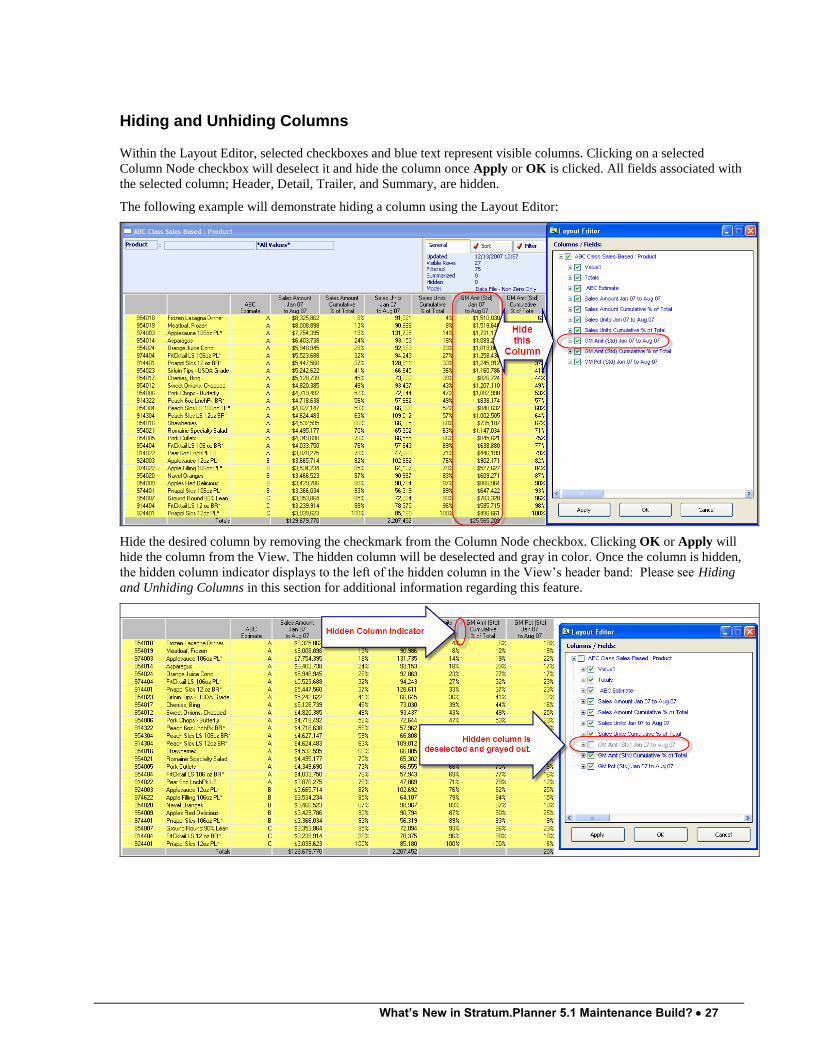
Hiding and Unhiding Columns
Within the Layout Editor, selected checkboxes and blue text represent visible columns. Clicking on a selected
Column Node checkbox will deselect it and hide the column once Apply or OK is clicked. All fields associated with
the selected column; Header, Detail, Trailer, and Summary, are hidden.
The following example will demonstrate hiding a column using the Layout Editor:
Hide the desired column by removing the checkmark from the Column Node checkbox. Clicking OK or Apply will
hide the column from the View. The hidden column will be deselected and gray in color. Once the column is hidden,
the hidden column indicator displays to the left of the hidden column in the View‟s header band: Please see Hiding
and Unhiding Columns in this section for additional information regarding this feature.
28 What's New in Stratum.Planner?
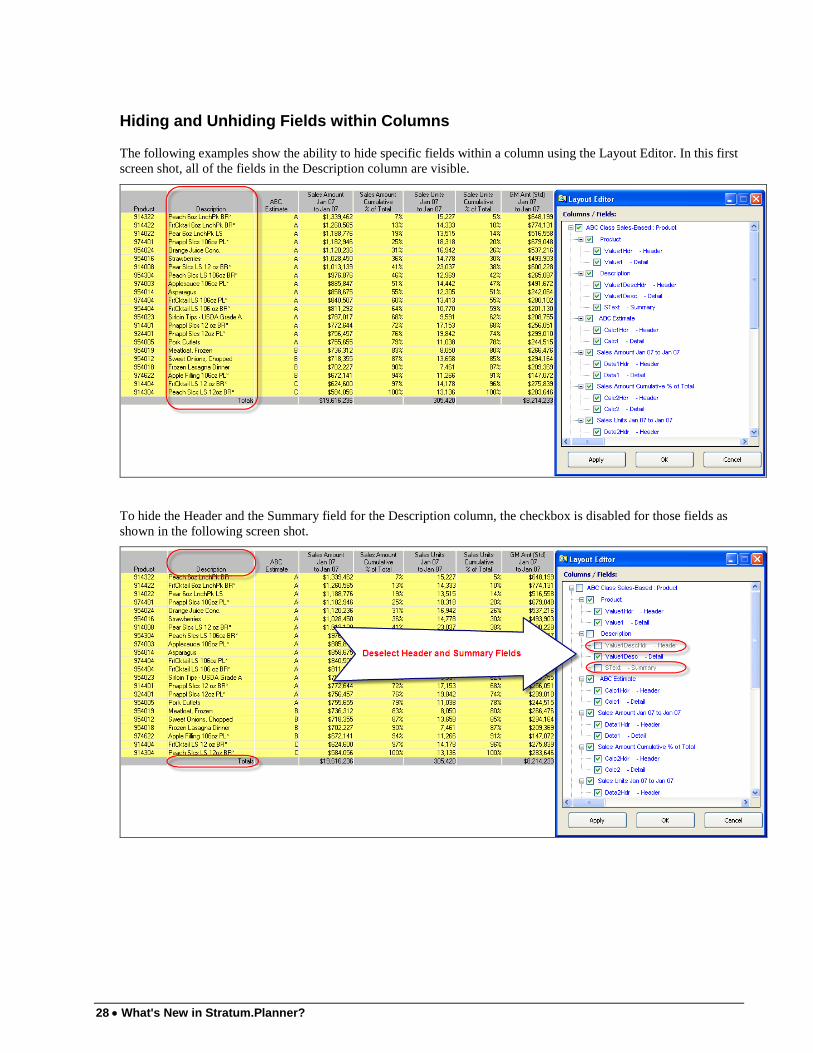
Hiding and Unhiding Fields within Columns
The following examples show the ability to hide specific fields within a column using the Layout Editor. In this first
screen shot, all of the fields in the Description column are visible.
To hide the Header and the Summary field for the Description column, the checkbox is disabled for those fields as
shown in the following screen shot.
What’s New in Stratum.Planner 5.1 Maintenance Build? 29
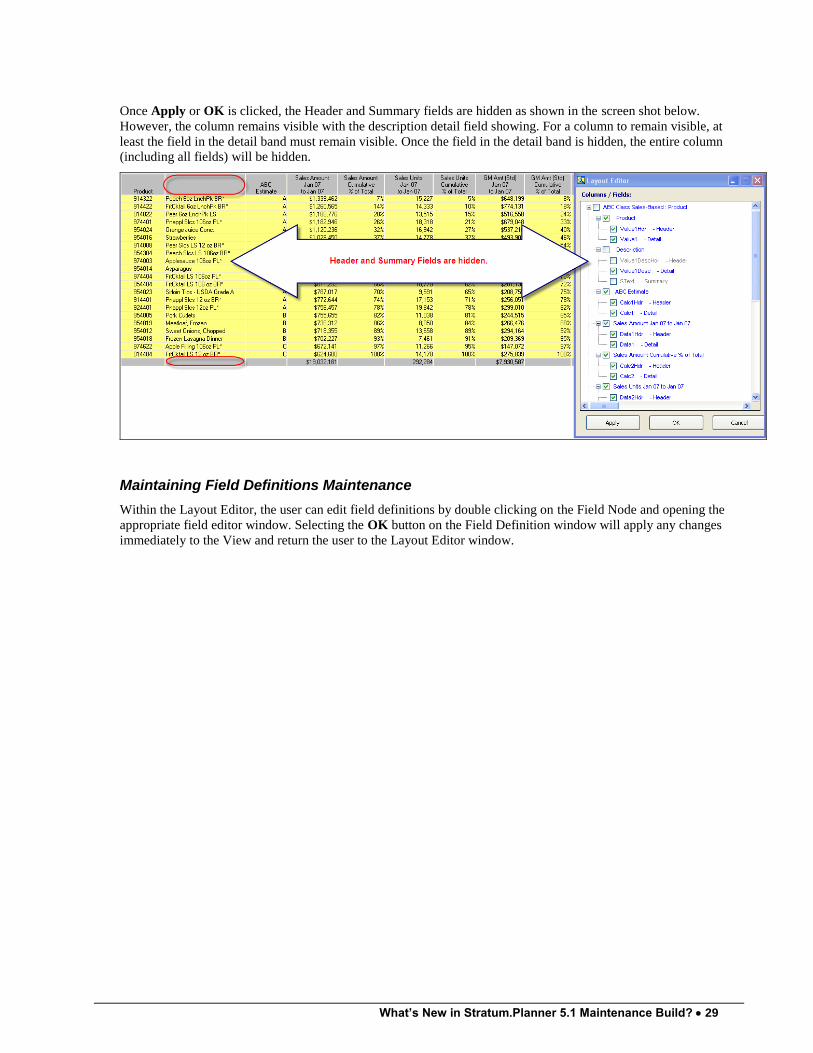
Once Apply or OK is clicked, the Header and Summary fields are hidden as shown in the screen shot below.
However, the column remains visible with the description detail field showing. For a column to remain visible, at
least the field in the detail band must remain visible. Once the field in the detail band is hidden, the entire column
(including all fields) will be hidden.
Maintaining Field Definitions Maintenance
Within the Layout Editor, the user can edit field definitions by double clicking on the Field Node and opening the
appropriate field editor window. Selecting the OK button on the Field Definition window will apply any changes
immediately to the View and return the user to the Layout Editor window.
30 What's New in Stratum.Planner?
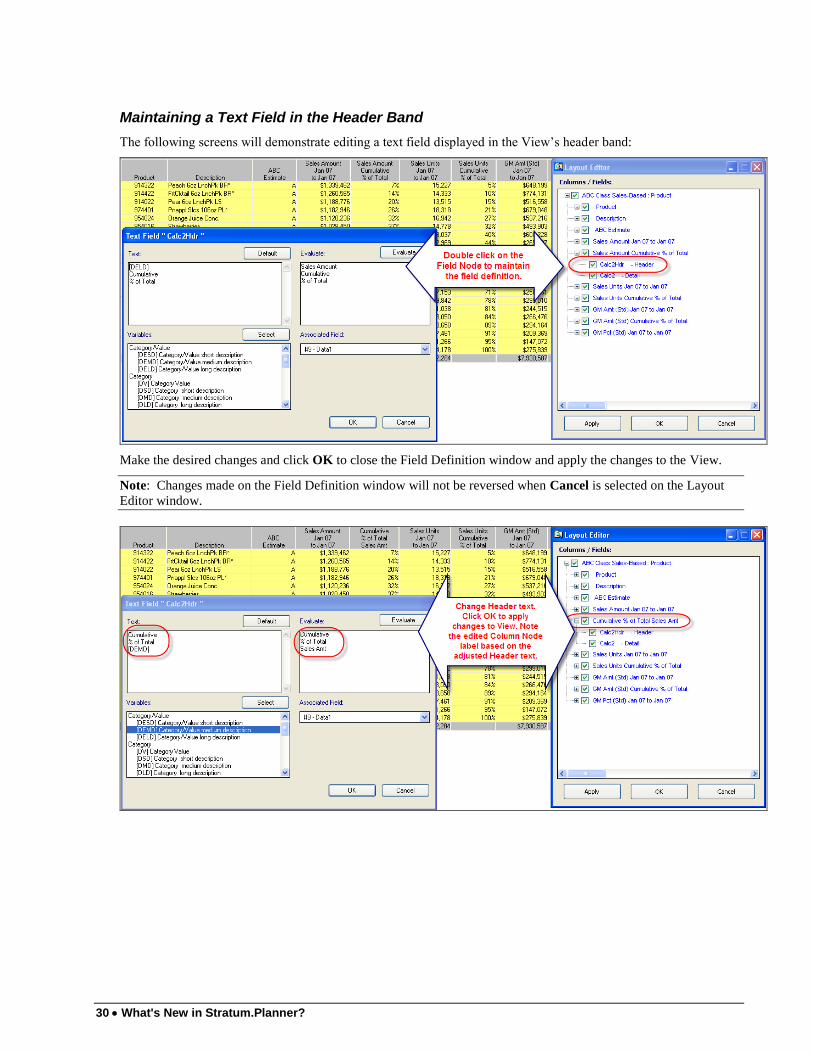
Maintaining a Text Field in the Header Band
The following screens will demonstrate editing a text field displayed in the View‟s header band:
Make the desired changes and click OK to close the Field Definition window and apply the changes to the View.
Note: Changes made on the Field Definition window will not be reversed when Cancel is selected on the Layout
Editor window.
What’s New in Stratum.Planner 5.1 Maintenance Build? 31
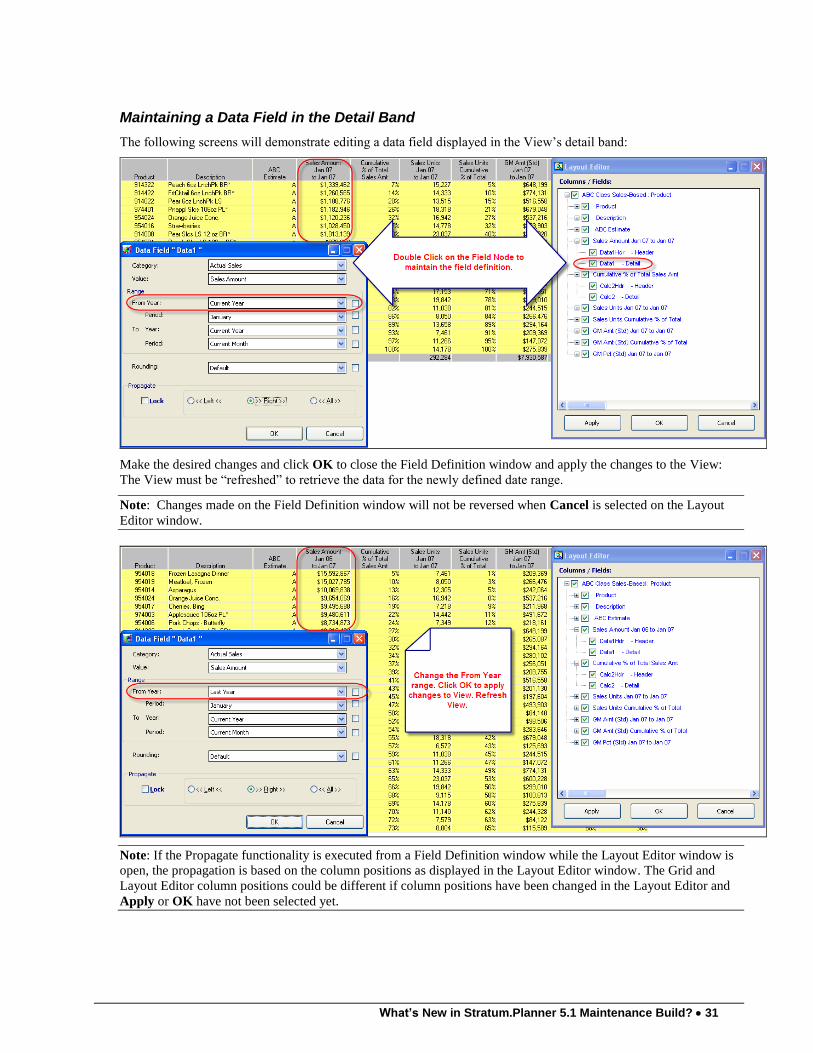
Maintaining a Data Field in the Detail Band
The following screens will demonstrate editing a data field displayed in the View‟s detail band:
Make the desired changes and click OK to close the Field Definition window and apply the changes to the View:
The View must be “refreshed” to retrieve the data for the newly defined date range.
Note: Changes made on the Field Definition window will not be reversed when Cancel is selected on the Layout
Editor window.
Note: If the Propagate functionality is executed from a Field Definition window while the Layout Editor window is
open, the propagation is based on the column positions as displayed in the Layout Editor window. The Grid and
Layout Editor column positions could be different if column positions have been changed in the Layout Editor and
Apply or OK have not been selected yet.
32 What's New in Stratum.Planner?
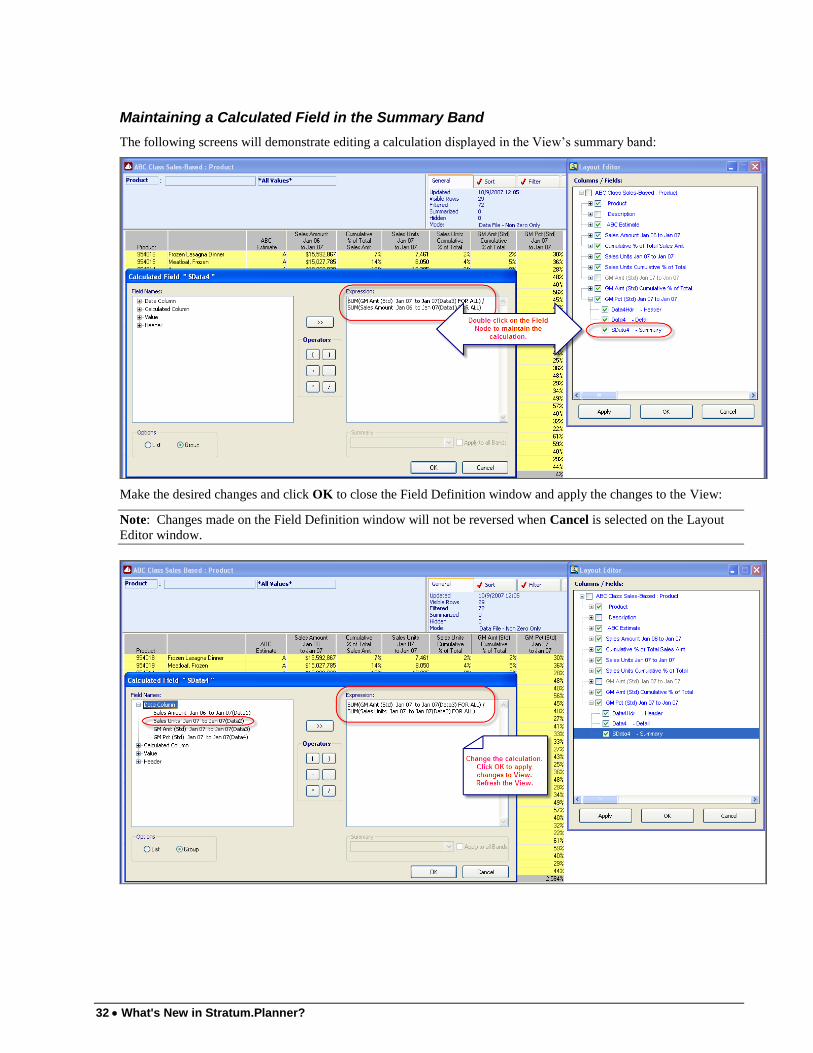
Maintaining a Calculated Field in the Summary Band
The following screens will demonstrate editing a calculation displayed in the View‟s summary band:
Make the desired changes and click OK to close the Field Definition window and apply the changes to the View:
Note: Changes made on the Field Definition window will not be reversed when Cancel is selected on the Layout
Editor window.

What’s New in Stratum.Planner 5.1 Maintenance Build? 33
Repositioning Columns by Dragging and Dropping Them
Within the Layout Editor, the user can adjust column positioning via drag/drop functionality. Entire columns can be
moved by dragging and then dropping the Column Node to the desired position. Field Nodes, which contain fields,
cannot be moved either within a column or across columns.
To move a column to a different location in the View, click on the Column Node to select it and then drag it to the
desired location within the tree structure and release it. It will be repositioned within the Layout Editor tree
structure, but the user must click the Apply or OK button to actually reposition it in the View.
Note: If you want to move a column to the last position within the View, move the column to the second to last
position, and then move the last column up just prior to this column.
The following screens will demonstrate column repositioning using the Drag and Drop feature within the new
Layout Editor:
34 What's New in Stratum.Planner?
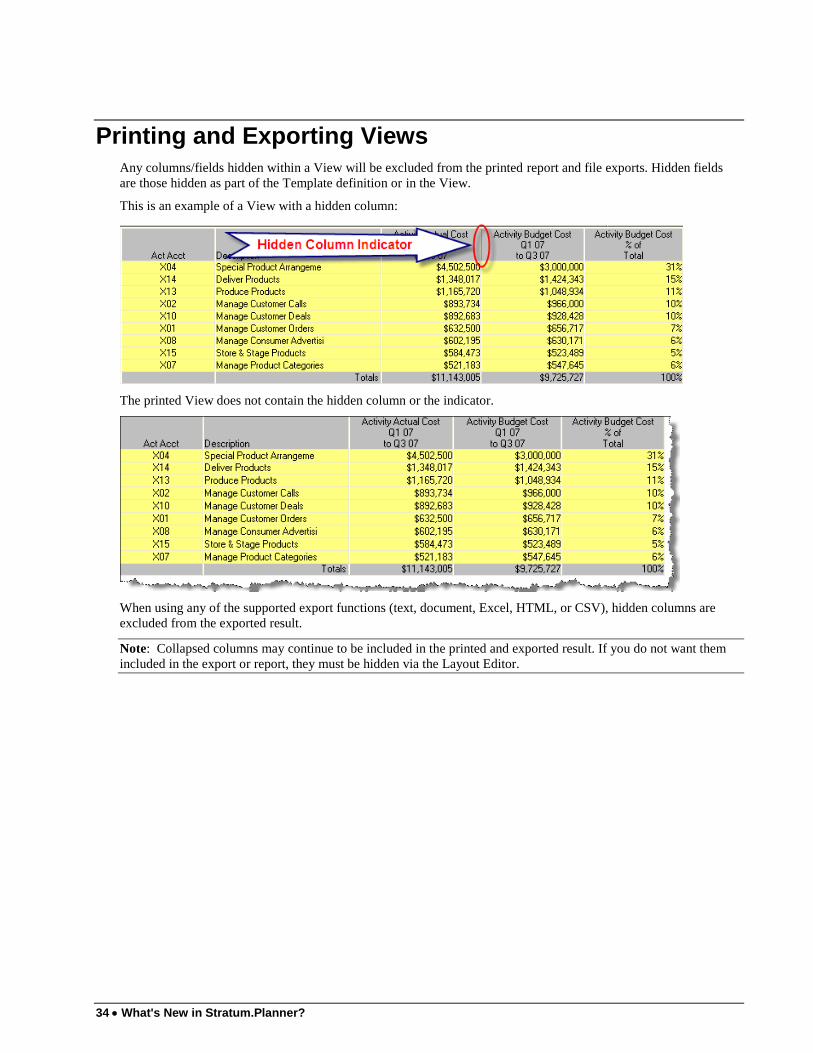
Printing and Exporting Views
Any columns/fields hidden within a View will be excluded from the printed report and file exports. Hidden fields
are those hidden as part of the Template definition or in the View.
This is an example of a View with a hidden column:
The printed View does not contain the hidden column or the indicator.
When using any of the supported export functions (text, document, Excel, HTML, or CSV), hidden columns are
excluded from the exported result.
Note: Collapsed columns may continue to be included in the printed and exported result. If you do not want them
included in the export or report, they must be hidden via the Layout Editor.
What’s New in Stratum.Planner 5.1 Maintenance Build? 35
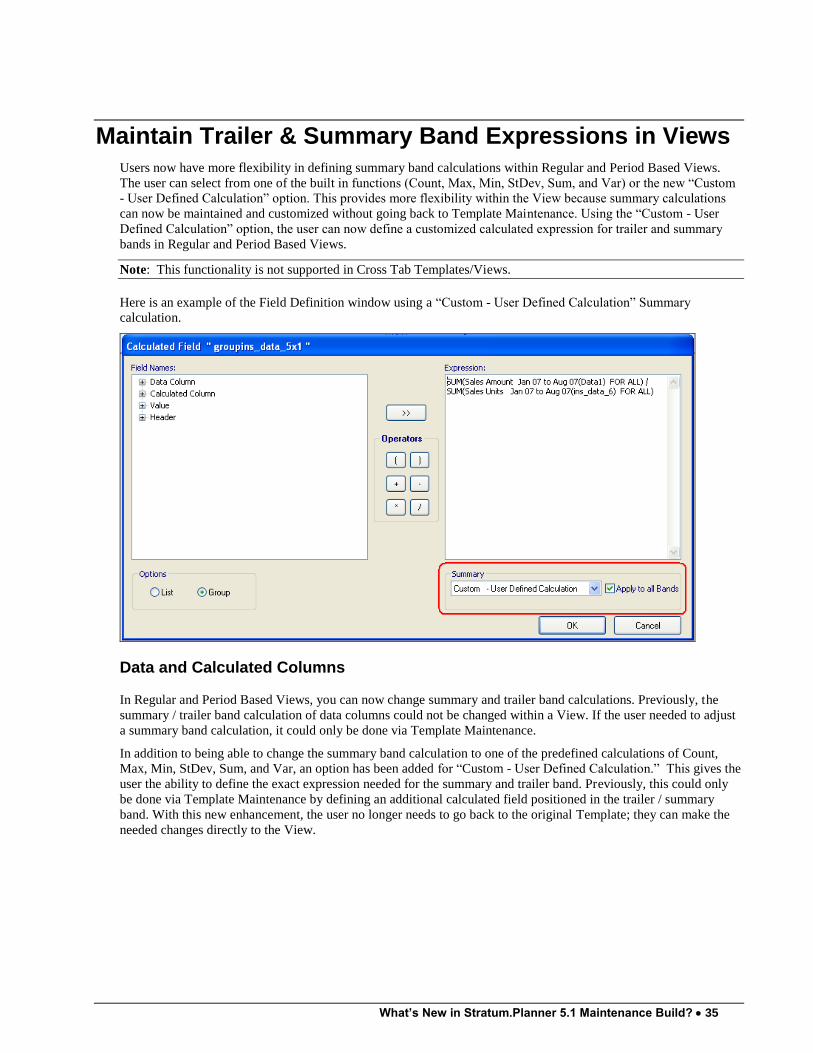
Maintain Trailer & Summary Band Expressions in Views
Users now have more flexibility in defining summary band calculations within Regular and Period Based Views.
The user can select from one of the built in functions (Count, Max, Min, StDev, Sum, and Var) or the new “Custom
- User Defined Calculation” option. This provides more flexibility within the View because summary calculations
can now be maintained and customized without going back to Template Maintenance. Using the “Custom - User
Defined Calculation” option, the user can now define a customized calculated expression for trailer and summary
bands in Regular and Period Based Views.
Note: This functionality is not supported in Cross Tab Templates/Views.
Here is an example of the Field Definition window using a “Custom - User Defined Calculation” Summary
calculation.
Data and Calculated Columns
In Regular and Period Based Views, you can now change summary and trailer band calculations. Previously, the
summary / trailer band calculation of data columns could not be changed within a View. If the user needed to adjust
a summary band calculation, it could only be done via Template Maintenance.
In addition to being able to change the summary band calculation to one of the predefined calculations of Count,
Max, Min, StDev, Sum, and Var, an option has been added for “Custom - User Defined Calculation.” This gives the
user the ability to define the exact expression needed for the summary and trailer band. Previously, this could only
be done via Template Maintenance by defining an additional calculated field positioned in the trailer / summary
band. With this new enhancement, the user no longer needs to go back to the original Template; they can make the
needed changes directly to the View.
36 What's New in Stratum.Planner?
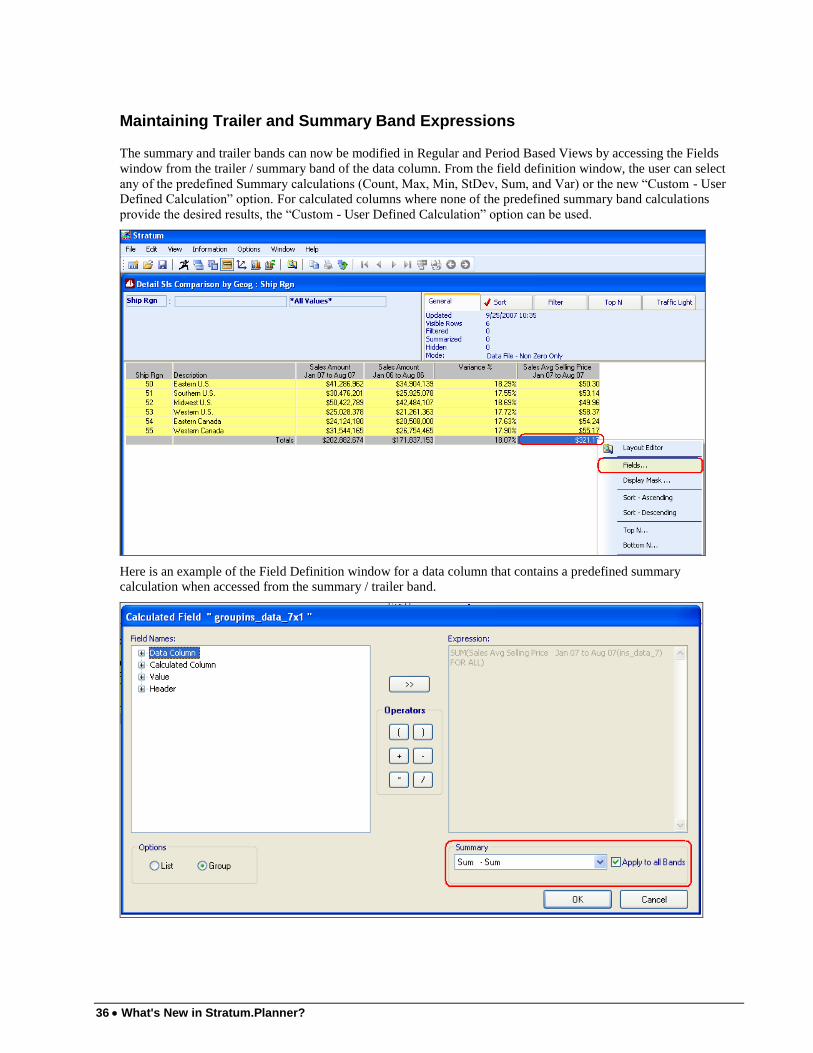
Maintaining Trailer and Summary Band Expressions
The summary and trailer bands can now be modified in Regular and Period Based Views by accessing the Fields
window from the trailer / summary band of the data column. From the field definition window, the user can select
any of the predefined Summary calculations (Count, Max, Min, StDev, Sum, and Var) or the new “Custom - User
Defined Calculation” option. For calculated columns where none of the predefined summary band calculations
provide the desired results, the “Custom - User Defined Calculation” option can be used.
Here is an example of the Field Definition window for a data column that contains a predefined summary
calculation when accessed from the summary / trailer band.
What’s New in Stratum.Planner 5.1 Maintenance Build? 37
Expression
When one of the predefined Summary calculations is selected in the Summary drop-down list, the Expression
portion of the window contains the expression for the selected predefined summary, is display-only, and cannot be
maintained. When “Custom - User Defined Calculation” is selected in the Summary drop-down list, the Expression
portion of the window is input capable and the user must provide a valid expression.
Summary
This field defines the predefined summary calculation. Predefined Summary calculations include Count, Max, Min,
StDev, Sum, and Var. “Custom - User Defined Calculation” can be selected to define a custom calculation.
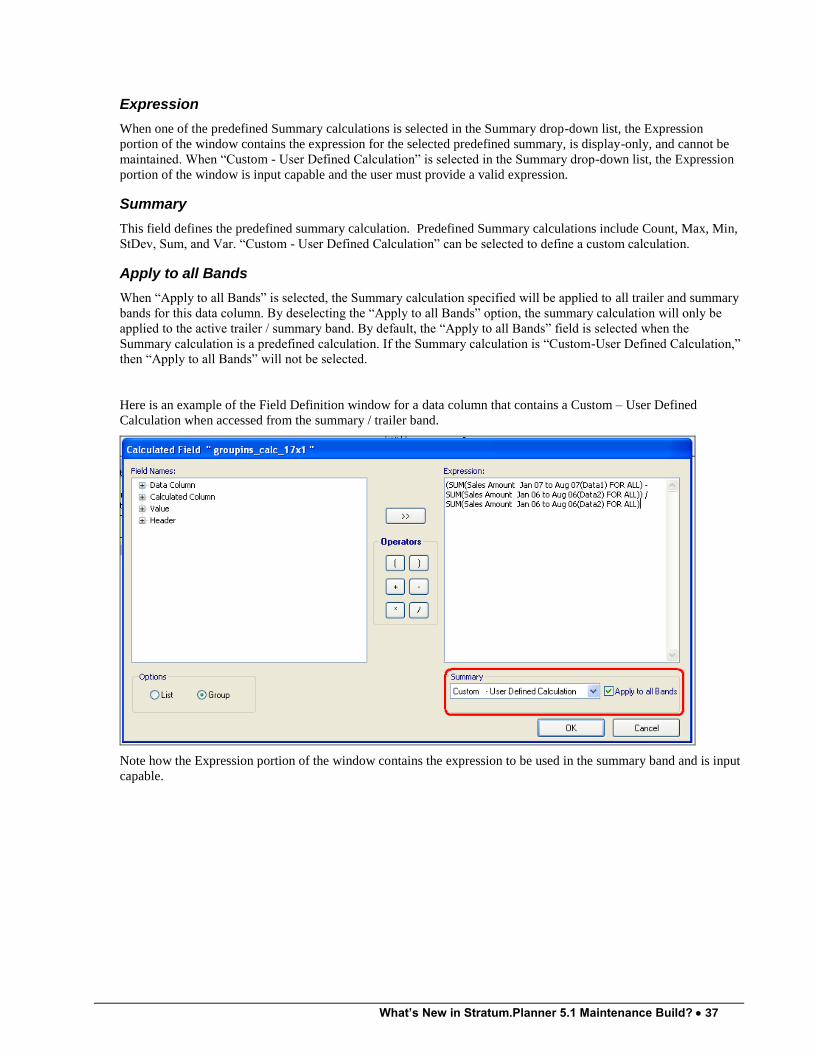
Apply to all Bands
When “Apply to all Bands” is selected, the Summary calculation specified will be applied to all trailer and summary
bands for this data column. By deselecting the “Apply to all Bands” option, the summary calculation will only be
applied to the active trailer / summary band. By default, the “Apply to all Bands” field is selected when the
Summary calculation is a predefined calculation. If the Summary calculation is “Custom-User Defined Calculation,”
then “Apply to all Bands” will not be selected.
Here is an example of the Field Definition window for a data column that contains a Custom – User Defined
Calculation when accessed from the summary / trailer band.
Note how the Expression portion of the window contains the expression to be used in the summary band and is input
capable.
38 What's New in Stratum.Planner?
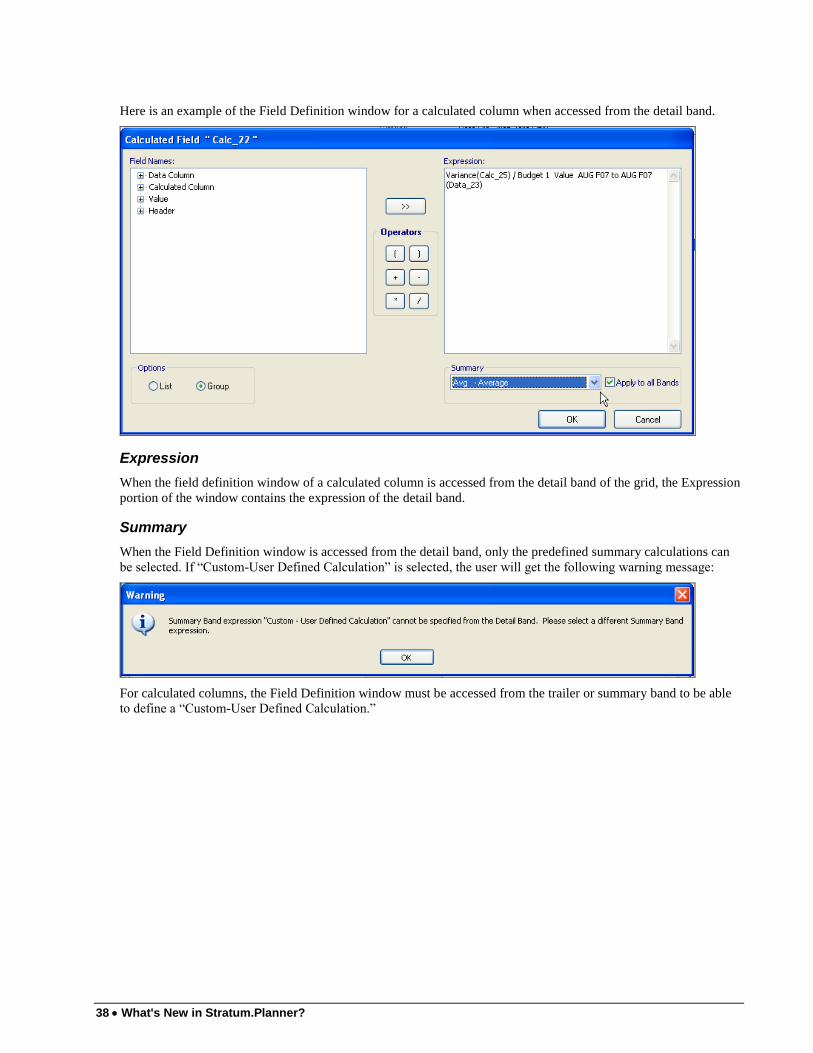
Here is an example of the Field Definition window for a calculated column when accessed from the detail band.
Expression
When the field definition window of a calculated column is accessed from the detail band of the grid, the Expression
portion of the window contains the expression of the detail band.
Summary
When the Field Definition window is accessed from the detail band, only the predefined summary calculations can
be selected. If “Custom-User Defined Calculation” is selected, the user will get the following warning message:
For calculated columns, the Field Definition window must be accessed from the trailer or summary band to be able
to define a “Custom-User Defined Calculation.”
What’s New in Stratum.Planner 5.1 Maintenance Build? 39
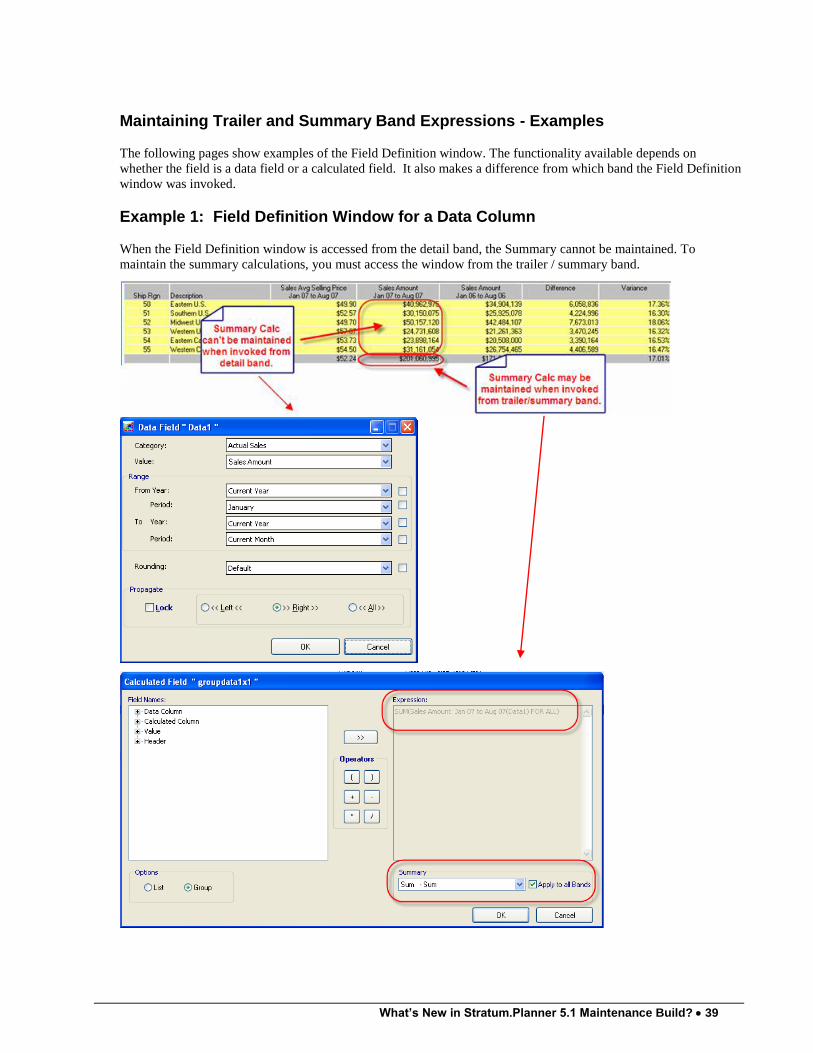
Maintaining Trailer and Summary Band Expressions - Examples
The following pages show examples of the Field Definition window. The functionality available depends on
whether the field is a data field or a calculated field. It also makes a difference from which band the Field Definition
window was invoked.
Example 1: Field Definition Window for a Data Column
When the Field Definition window is accessed from the detail band, the Summary cannot be maintained. To
maintain the summary calculations, you must access the window from the trailer / summary band.
40 What's New in Stratum.Planner?
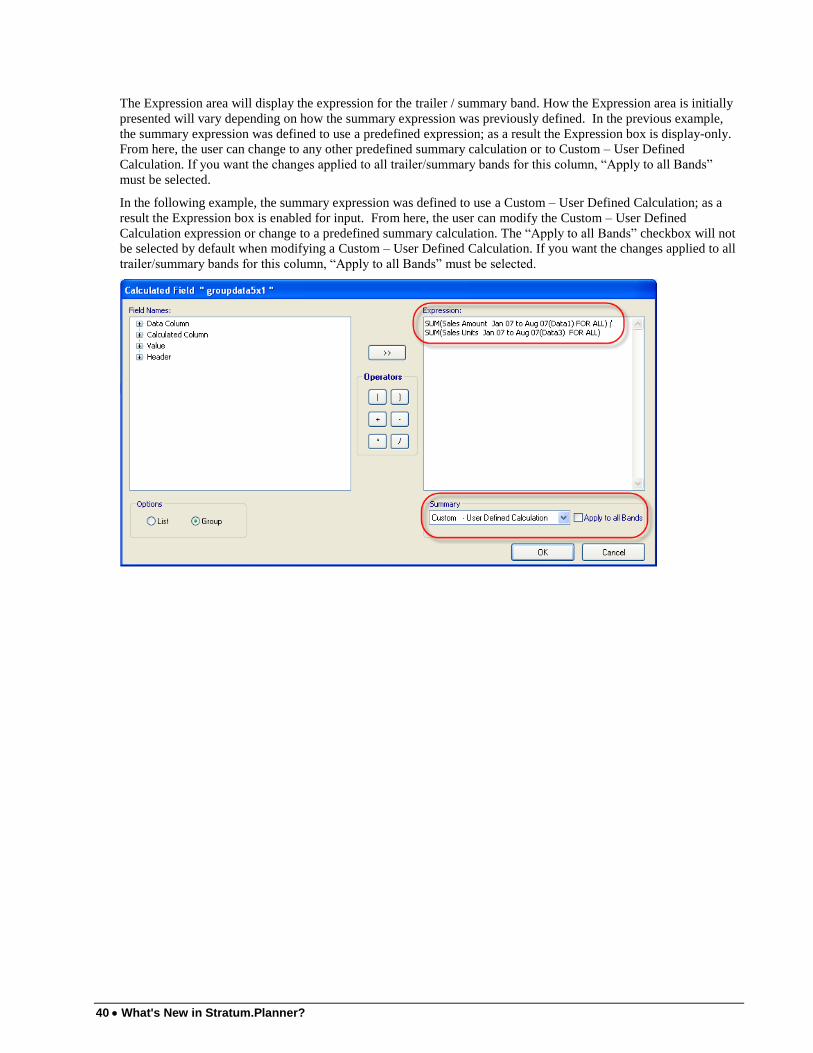
The Expression area will display the expression for the trailer / summary band. How the Expression area is initially
presented will vary depending on how the summary expression was previously defined. In the previous example,
the summary expression was defined to use a predefined expression; as a result the Expression box is display-only.
From here, the user can change to any other predefined summary calculation or to Custom – User Defined
Calculation. If you want the changes applied to all trailer/summary bands for this column, “Apply to all Bands”
must be selected.
In the following example, the summary expression was defined to use a Custom – User Defined Calculation; as a
result the Expression box is enabled for input. From here, the user can modify the Custom – User Defined
Calculation expression or change to a predefined summary calculation. The “Apply to all Bands” checkbox will not
be selected by default when modifying a Custom – User Defined Calculation. If you want the changes applied to all
trailer/summary bands for this column, “Apply to all Bands” must be selected.
What’s New in Stratum.Planner 5.1 Maintenance Build? 41
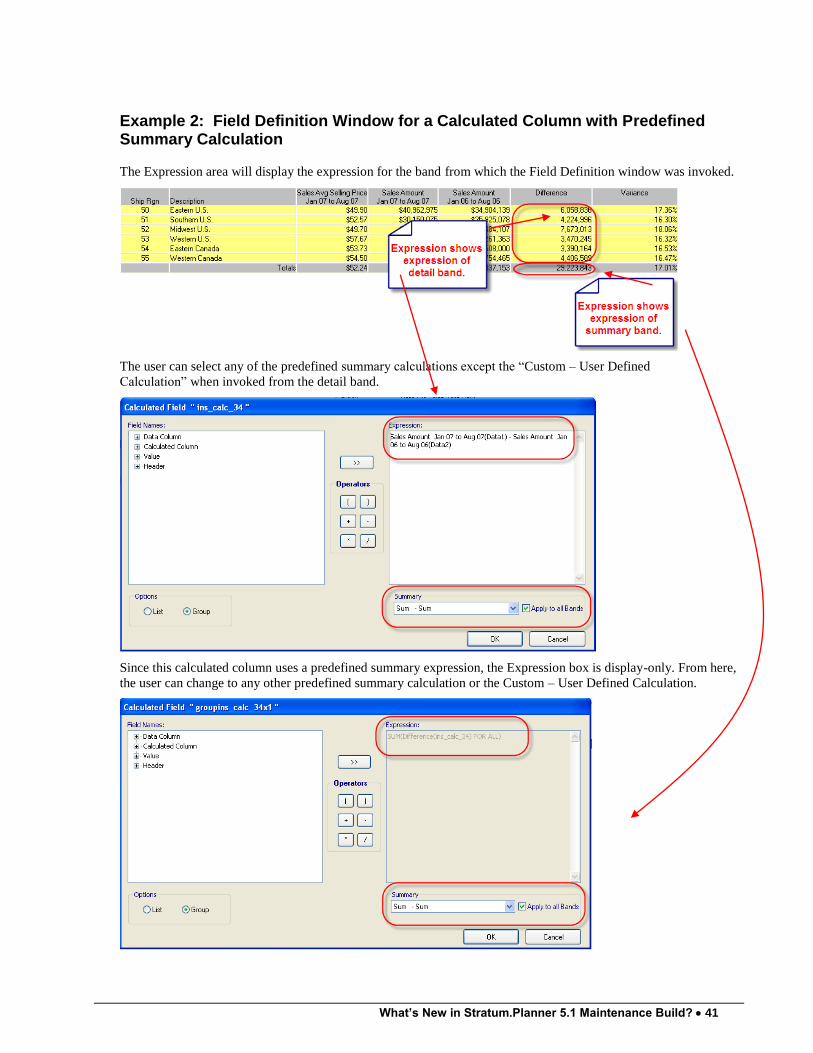
Example 2: Field Definition Window for a Calculated Column with Predefined Summary Calculation
The Expression area will display the expression for the band from which the Field Definition window was invoked.
The user can select any of the predefined summary calculations except the “Custom – User Defined
Calculation” when invoked from the detail band.
Since this calculated column uses a predefined summary expression, the Expression box is display-only. From here,
the user can change to any other predefined summary calculation or the Custom – User Defined Calculation.
42 What's New in Stratum.Planner?
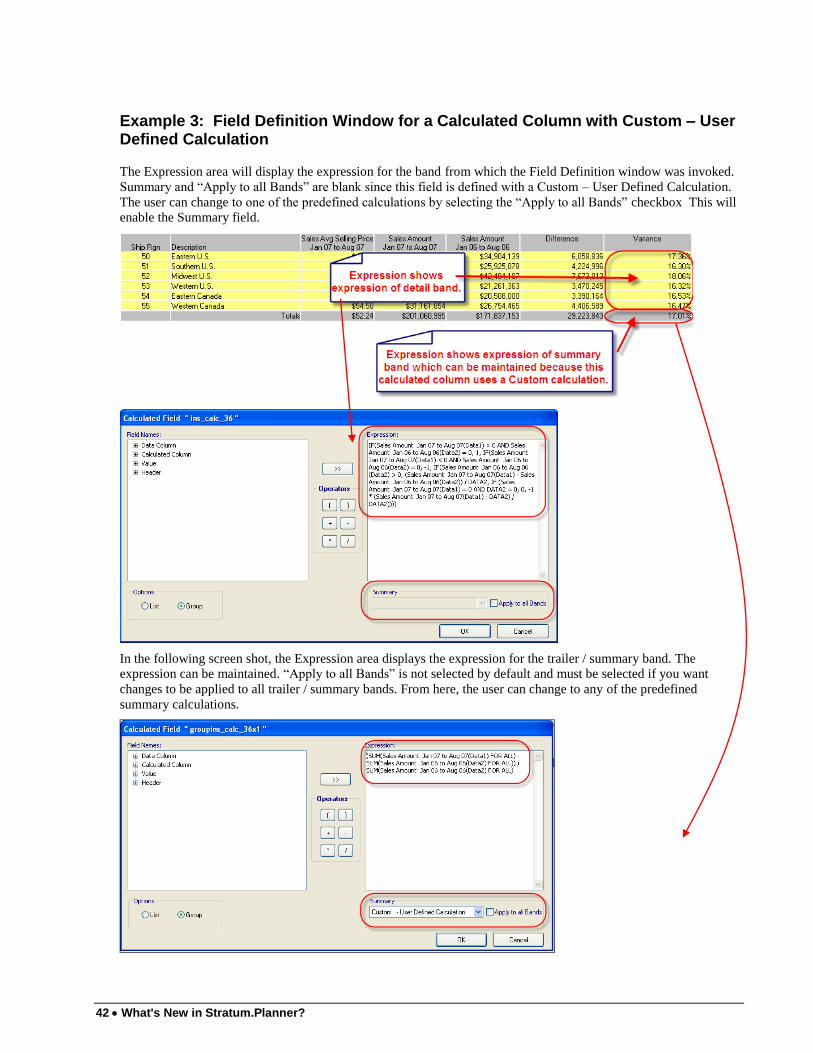
Example 3: Field Definition Window for a Calculated Column with Custom – User Defined Calculation
The Expression area will display the expression for the band from which the Field Definition window was invoked.
Summary and “Apply to all Bands” are blank since this field is defined with a Custom – User Defined Calculation.
The user can change to one of the predefined calculations by selecting the “Apply to all Bands” checkbox This will
enable the Summary field.
In the following screen shot, the Expression area displays the expression for the trailer / summary band. The
expression can be maintained. “Apply to all Bands” is not selected by default and must be selected if you want
changes to be applied to all trailer / summary bands. From here, the user can change to any of the predefined
summary calculations.
What’s New in Stratum.Planner 5.1 Maintenance Build? 43
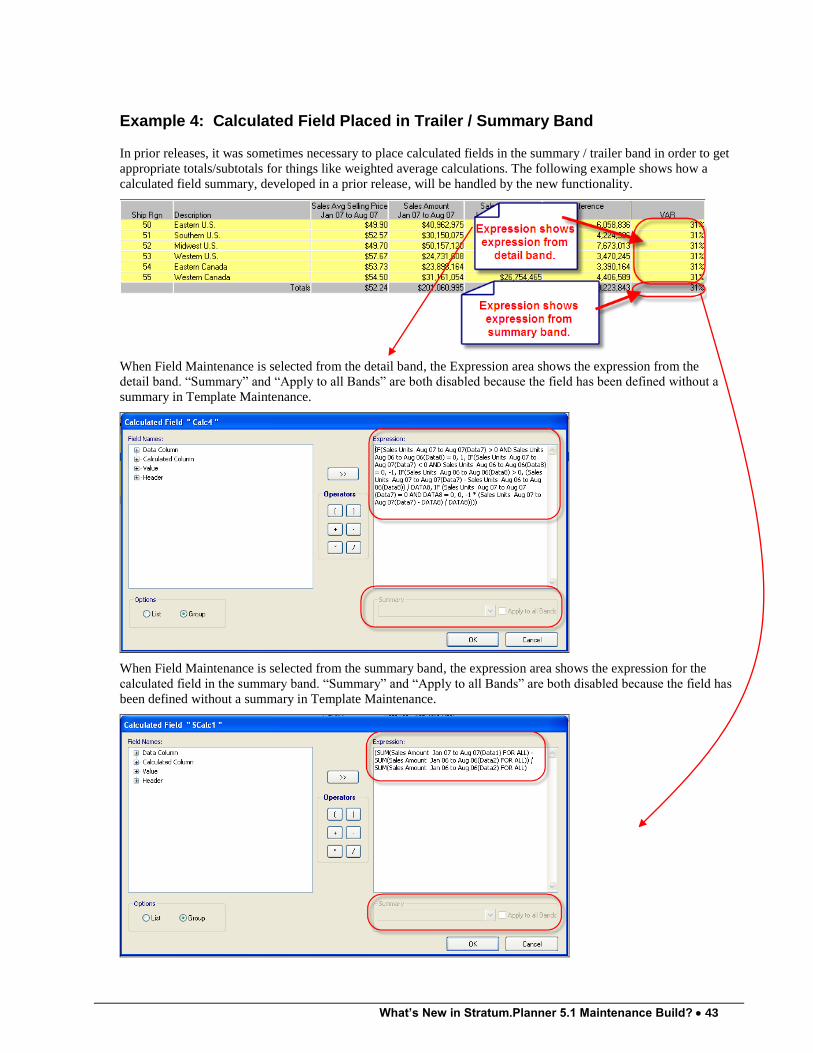
Example 4: Calculated Field Placed in Trailer / Summary Band
In prior releases, it was sometimes necessary to place calculated fields in the summary / trailer band in order to get
appropriate totals/subtotals for things like weighted average calculations. The following example shows how a
calculated field summary, developed in a prior release, will be handled by the new functionality.
When Field Maintenance is selected from the detail band, the Expression area shows the expression from the
detail band. “Summary” and “Apply to all Bands” are both disabled because the field has been defined without a
summary in Template Maintenance.
When Field Maintenance is selected from the summary band, the expression area shows the expression for the
calculated field in the summary band. “Summary” and “Apply to all Bands” are both disabled because the field has
been defined without a summary in Template Maintenance.
44 What's New in Stratum.Planner?
View/Template Considerations
In previous releases of Stratum.Planner, different techniques / work arounds have been used to get desired results in
Views and Templates. With the new functionality introduced in Version 5.1, some of those techniques are no longer
necessary.
With the addition of Hide/Unhide capabilities in Views, users will no longer need to collapse columns.
While collapsed columns are not visible in the grid because of their size, they are visible columns in the
View and appear in the Layout Editor as visible. They are also sometimes included in file exports and
printed reports. The user can hide collapsed columns by deselecting the Column Node in the Layout Editor.
If the user wants to make a collapsed column visible and cannot “un-collapse” the column by resizing it on
the grid, they can hide the column via the Layout Editor, click Apply, then unhide the column and click
Apply. The column will now be visible in the grid.
In prior releases, it was sometimes necessary to place a calculated field in the summary/trailer band of a
column in order to get the desired summary calculation. For example, in order to get a true weighted
average calculation for a column, a separate calculated field was placed in the summary band. With the
new “Custom-User Defined Calculation” option, this can now be done directly in the View without going
back to the original Template and adding a field.
Previously, the expression portion of the Field Definition window could be modified when using a
predefined summary calculation. This allowed the user the ability to “modify” the predefined summary
expression. Planner has been enhanced to allow the user to create a “Custom-User Defined Calculation.”
When upgrading Views to Version 5.1, when the application encounters a summary calculation that has
been modified, it will attempt to keep this change by setting the summary to “Custom – User Defined
Calculation” and keeping the modified expression.
A Template/View should not have multiple data fields defined in the detail band of a column.
Templates/Views defined in this way will produce unpredictable results in the Layout Editor. This is a
technique sometimes used when building Templates where data fields needed for calculations were all
hidden and placed in the same position as the visible data field. To correct this situation in Templates,
assign the hidden data field(s) in the detail band a position value of a column that has no other data fields in
the detail band. To correct this situation in Views:
o First, add a data column to the View. Assign the value of the visible data field to the newly added
column.
o Second, add another data column. Assign the value of the hidden data field to the second added
column. Repeat this step for any additional hidden data fields.
o Third, modify any calculations using the visible or hidden data fields to use the data fields in the
newly added columns.
o Last, delete the original column that contained multiple data fields in the detail band.
The Layout Editor will identify ALL hidden columns in a Template/View and allow ALL users to unhide
the hidden columns. Administrators should keep this in mind if they have any Templates/Views with
hidden columns containing data they do not want their users to access. Administrators may need to explore
a greater use of security to protect certain values and keep users from seeing such data. In addition,
Calculated Category Values may be particularly helpful in dealing with some situations.
What's New in Stratum.Planner 4.1 Maintenance Build 45
WHAT'S NEW IN STRATUM.PLANNER
4.1 MAINTENANCE BUILD
Who Should Read This Section? If you are on 3.0C (030630) or earlier, you should review this section.
General Items
Apply Factor Performance
Changes have been implemented to improve the performance and capacity of the Apply Factor process.
Specifically, the Apply Factor process can now handle much larger row sets and the performance of the process
when selecting a large number of rows (thousands) has been improved. The benefits of the change may not be
noticeable when using the Apply Factor process over a small number of rows.
46 What's New in Stratum.Planner?
Dynamic User List Capacity
The Dynamic User List process has been enhanced to handle user lists with more than 32,726 members.
NOTE: The performance related to the handling of very large user lists is heavily impacted by the processing power
(CPU rating) and amount of memory on the client PC.
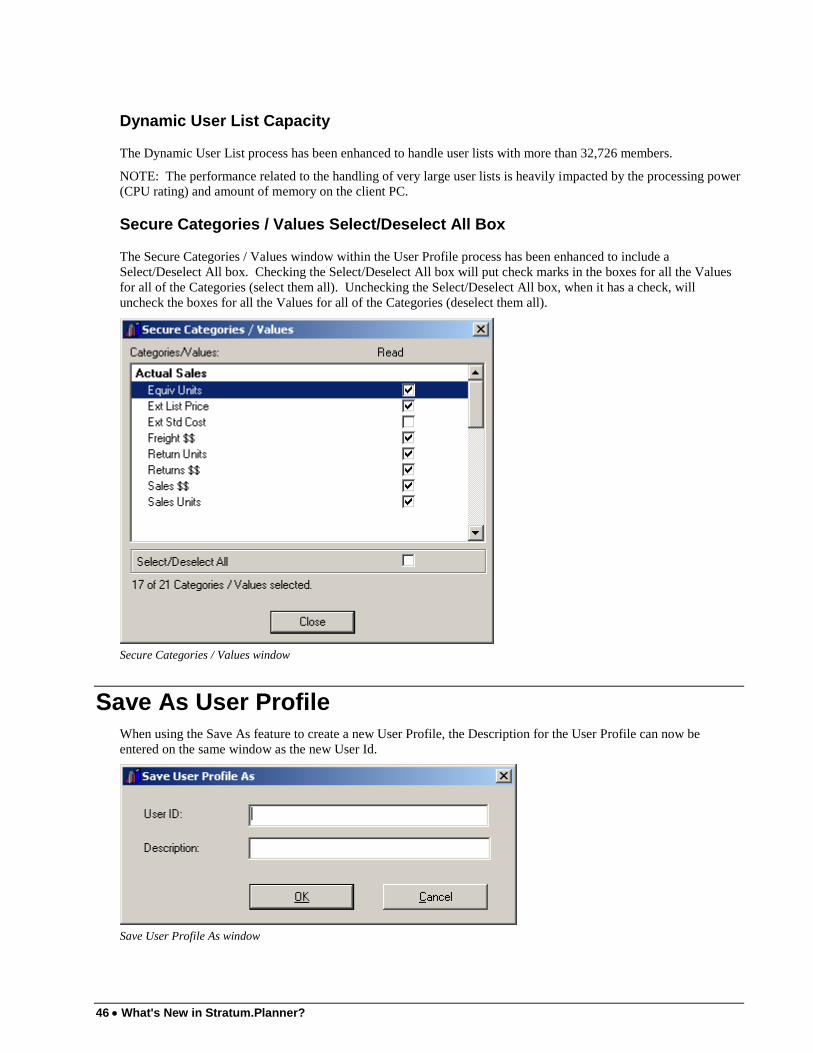
Secure Categories / Values Select/Deselect All Box
The Secure Categories / Values window within the User Profile process has been enhanced to include a
Select/Deselect All box. Checking the Select/Deselect All box will put check marks in the boxes for all the Values
for all of the Categories (select them all). Unchecking the Select/Deselect All box, when it has a check, will
uncheck the boxes for all the Values for all of the Categories (deselect them all).
Secure Categories / Values window
Save As User Profile
When using the Save As feature to create a new User Profile, the Description for the User Profile can now be
entered on the same window as the new User Id.
Save User Profile As window

What's New in 3.0C Client Maintenance Build (030630) 47
WHAT'S NEW IN 3.0C CLIENT
MAINTENANCE BUILD (030630)
Who Should Read This Section? If you are at 3.0C (021126) or earlier, you need to read this section.
48 What's New in Stratum.Planner?
General Items
Product Name Change
A first pass at changing the product name has been conducted on the executable software. References to DBView
have been updated to Stratum.Planner. Also, references to DataTracker have been changed to Stratum. At this
time no changes have been made to the Online Help or User Manuals.
User List Maintenance Window Size
The overall height of the User List Maintenance window has been reduced to more effectively accommodate an 800
x 600 pixel setting and the larger fonts used in Windows XP.
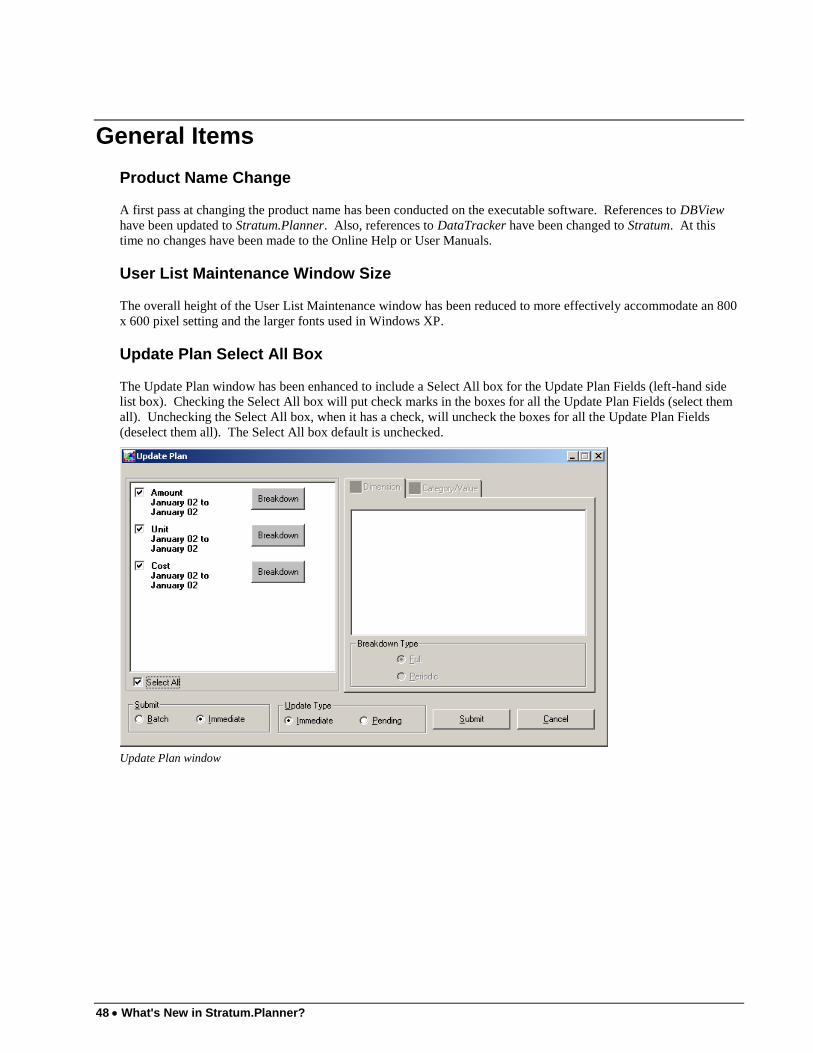
Update Plan Select All Box
The Update Plan window has been enhanced to include a Select All box for the Update Plan Fields (left-hand side
list box). Checking the Select All box will put check marks in the boxes for all the Update Plan Fields (select them
all). Unchecking the Select All box, when it has a check, will uncheck the boxes for all the Update Plan Fields
(deselect them all). The Select All box default is unchecked.
Update Plan window
What's New in 3.0C Client Maintenance Build (030630) 49
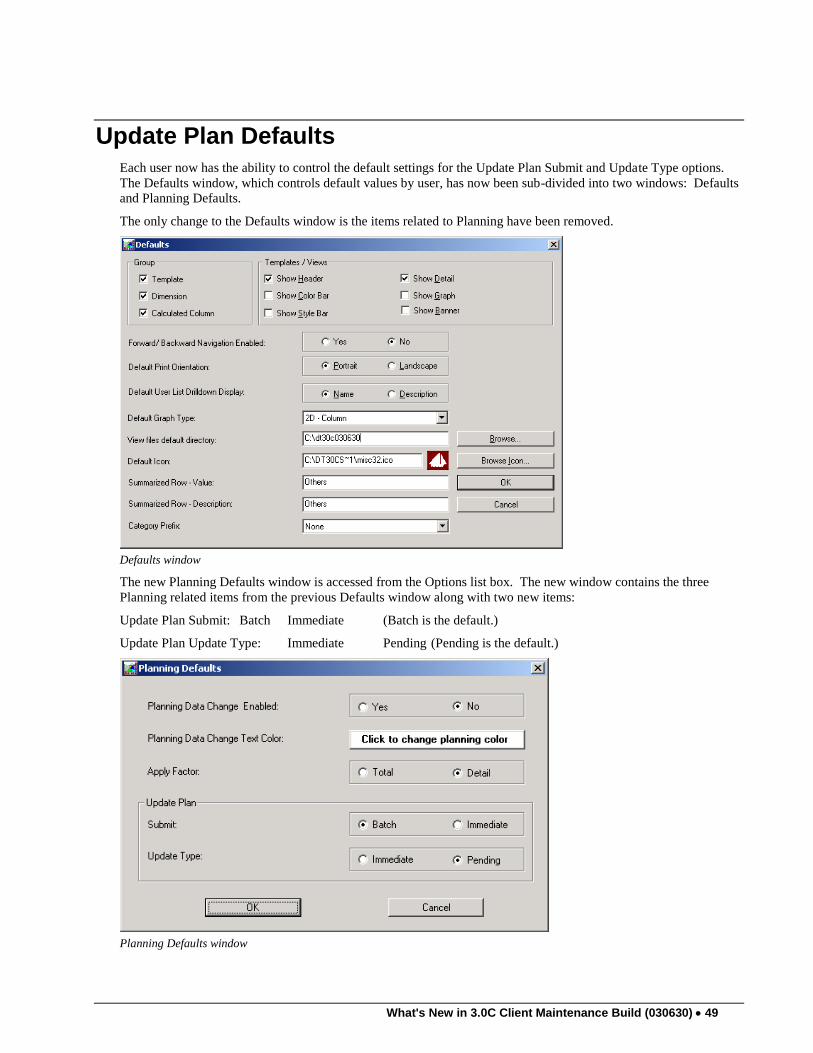
Update Plan Defaults
Each user now has the ability to control the default settings for the Update Plan Submit and Update Type options.
The Defaults window, which controls default values by user, has now been sub-divided into two windows: Defaults
and Planning Defaults.
The only change to the Defaults window is the items related to Planning have been removed.
Defaults window
The new Planning Defaults window is accessed from the Options list box. The new window contains the three
Planning related items from the previous Defaults window along with two new items:
Update Plan Submit: Batch Immediate (Batch is the default.)
Update Plan Update Type: Immediate Pending (Pending is the default.)
Planning Defaults window
50 What's New in Stratum.Planner?
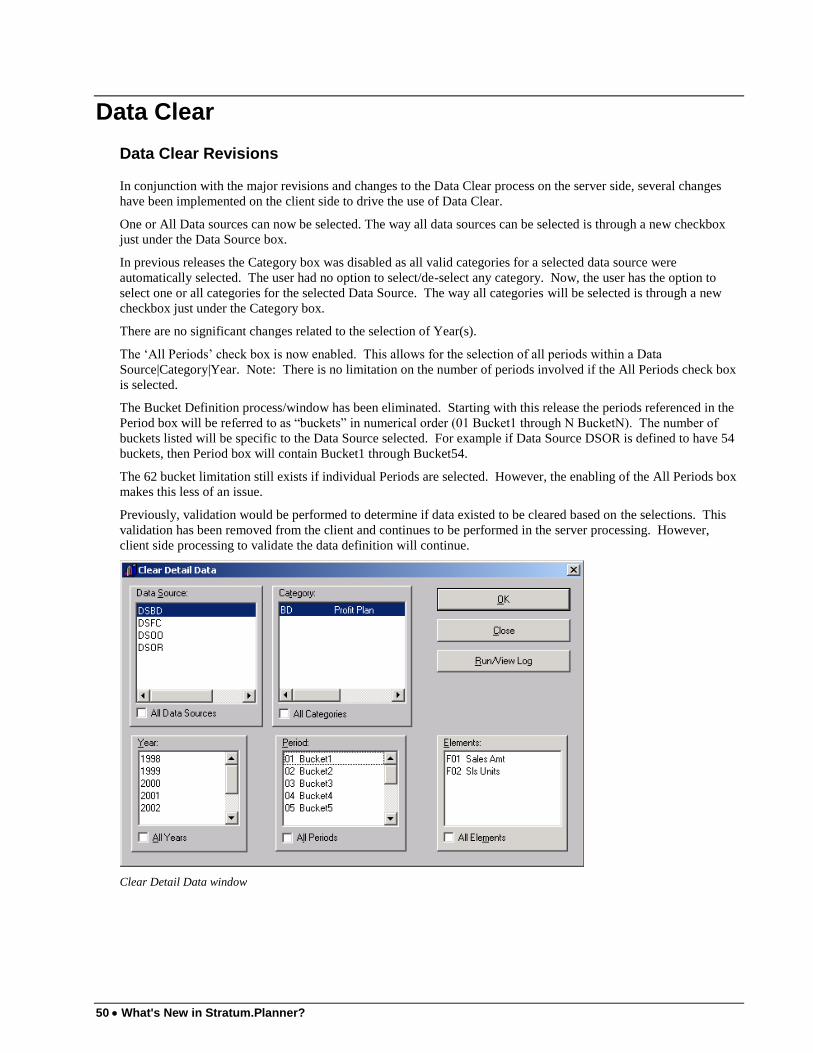
Data Clear
Data Clear Revisions
In conjunction with the major revisions and changes to the Data Clear process on the server side, several changes
have been implemented on the client side to drive the use of Data Clear.
One or All Data sources can now be selected. The way all data sources can be selected is through a new checkbox
just under the Data Source box.
In previous releases the Category box was disabled as all valid categories for a selected data source were
automatically selected. The user had no option to select/de-select any category. Now, the user has the option to
select one or all categories for the selected Data Source. The way all categories will be selected is through a new
checkbox just under the Category box.
There are no significant changes related to the selection of Year(s).
The „All Periods‟ check box is now enabled. This allows for the selection of all periods within a Data
Source|Category|Year. Note: There is no limitation on the number of periods involved if the All Periods check box
is selected.
The Bucket Definition process/window has been eliminated. Starting with this release the periods referenced in the
Period box will be referred to as “buckets” in numerical order (01 Bucket1 through N BucketN). The number of
buckets listed will be specific to the Data Source selected. For example if Data Source DSOR is defined to have 54
buckets, then Period box will contain Bucket1 through Bucket54.
The 62 bucket limitation still exists if individual Periods are selected. However, the enabling of the All Periods box
makes this less of an issue.
Previously, validation would be performed to determine if data existed to be cleared based on the selections. This
validation has been removed from the client and continues to be performed in the server processing. However,
client side processing to validate the data definition will continue.
Clear Detail Data window
What's New in 3.0C Client Maintenance Build (030630) 51
Some specific rules regarding field selection and processing for the Clear Detail Data window:
One or All Data Sources can be selected. The selection of 2 or more Data Sources, without selecting All, is
not permitted.
When All Data Sources are selected, then by default All Categories, Periods, and Elements are selected.
Only the Year box remains active.
When one Data Source is selected, all other boxes remain active.
One of All Categories can be selected for a Data Source. The selection of 2 or more Categories within a
Data Source, without selecting All, is not permitted.
When All Categories are selected for a Data Source, then by default All Periods and Elements are selected.
Only the Year box remains active.
When one Category is selected for a Data Source, the Year, Period, and Elements boxes remains active.
The selection of one, more than one, or all Years has no impact on the other selection boxes.
When active, the selection of one, more than one, or all periods within the Period box is permitted.
When active, the selection of one, more than one, or all elements within the Elements box is permitted.

52 What's New in Stratum.Planner?
Notes

What's New in 3.0C Client Maintenance Build (021126) 53
WHAT'S NEW IN 3.0C CLIENT
MAINTENANCE BUILD (021126)
Who Should Read This Section? If you are at 3.0C (020523) or earlier, you need to read this section.
54 What's New in Stratum.Planner?
General Items
Windows XP support
Efforts have been taken to test and address Windows XP related issues in this release. Additionally, the release is
built upon technology components, such as the 8.0.3 release of Powerbuilder, that have been certified (by Sybase) to
support Windows XP. However, given the newness of Windows XP and new underlying technology releases, it is
reasonable to assume some additional Windows XP and new technology related issues may be uncovered after the
release date.
Client and Server Release Notes Availability
With this release the HTML version of the Client Release Notes have been eliminated from automatically appearing
at the end of the client install/upgrade process. Both the Client and Server Release Notes have been added as a
Release Notes menu option under Help in the DBView module. The Release Notes are available in both the MS
Word and Adobe Acrobat formats.
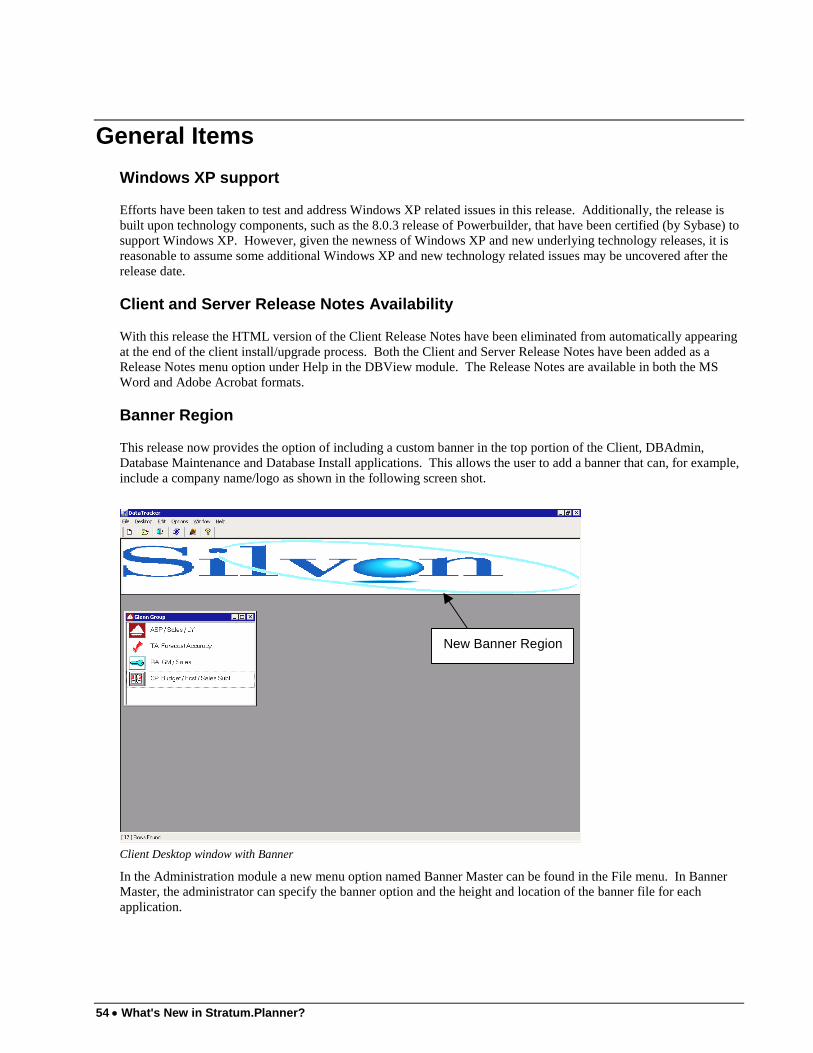
Banner Region
This release now provides the option of including a custom banner in the top portion of the Client, DBAdmin,
Database Maintenance and Database Install applications. This allows the user to add a banner that can, for example,
include a company name/logo as shown in the following screen shot.
New Banner Region
Client Desktop window with Banner
In the Administration module a new menu option named Banner Master can be found in the File menu. In Banner
Master, the administrator can specify the banner option and the height and location of the banner file for each
application.
What's New in 3.0C Client Maintenance Build (021126) 55
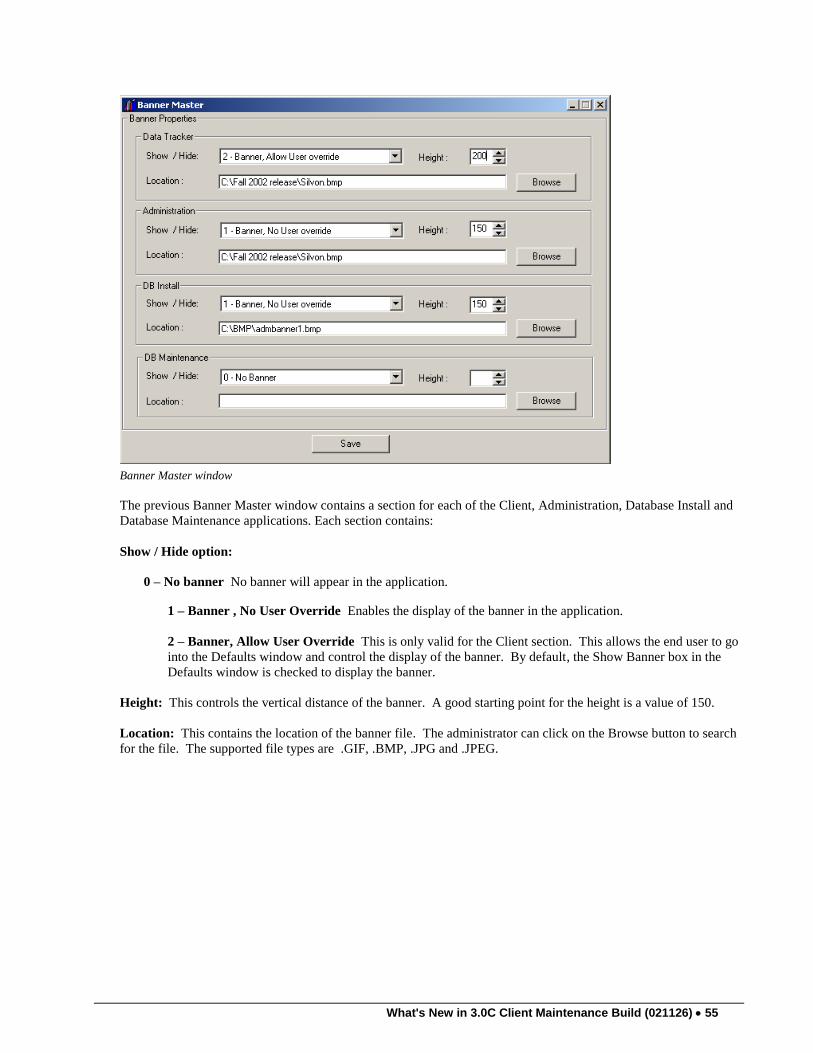
Banner Master window
The previous Banner Master window contains a section for each of the Client, Administration, Database Install and
Database Maintenance applications. Each section contains:
Show / Hide option:
0 – No banner No banner will appear in the application.
1 – Banner , No User Override Enables the display of the banner in the application.
2 – Banner, Allow User Override This is only valid for the Client section. This allows the end user to go
into the Defaults window and control the display of the banner. By default, the Show Banner box in the
Defaults window is checked to display the banner.
Height: This controls the vertical distance of the banner. A good starting point for the height is a value of 150.
Location: This contains the location of the banner file. The administrator can click on the Browse button to search
for the file. The supported file types are .GIF, .BMP, .JPG and .JPEG.

56 What's New in Stratum.Planner?
If the Banner file is not found in the location specified, then a search is done on the default directory for the
existence of a default banner file. A default banner file can be created for each application. The following are the
names to use when creating a default banner file.
Application Default Banner Name
DataTracker Client DTBANNER
Administration ADMBANNER
Database Install DBINSTALLBANNER
Database Maintenance DBMAINTBANNER
The search order of file types is BMP, GIF, JPEG and JPG. For example, there are two default banners with
different file types for the Client application, DTBANNER.GIF and DTBANNER.JPG. In this instance, the
DTBANNER.GIF file will be displayed over the .JPG file.
The Upgrade or Install process will create the new table STCSBN10 to store the Banner Master information.
What's New in 3.0C Client Maintenance Build (021126) 57
Templates and Views
Saving View Print Settings
The margin setting and the zoom size percentage will now be saved when saving a view.
Increase Template Name Size on Template Definition
The Template Name on both the Template Definition window and the Template Definition – Save As windows has
been increased to allow up to 32 character names.
Add a Column Category Prefix
There is now the ability to prefix the header text of an added Data Column with a description of the selected
Category. This prefix could be the Value, Short Description, Medium Description or Long Description of the
Category. This concatenation of the description will happen automatically only for a Data Column added on the fly
to a template/view. This prefix setting will be saved at the user level.
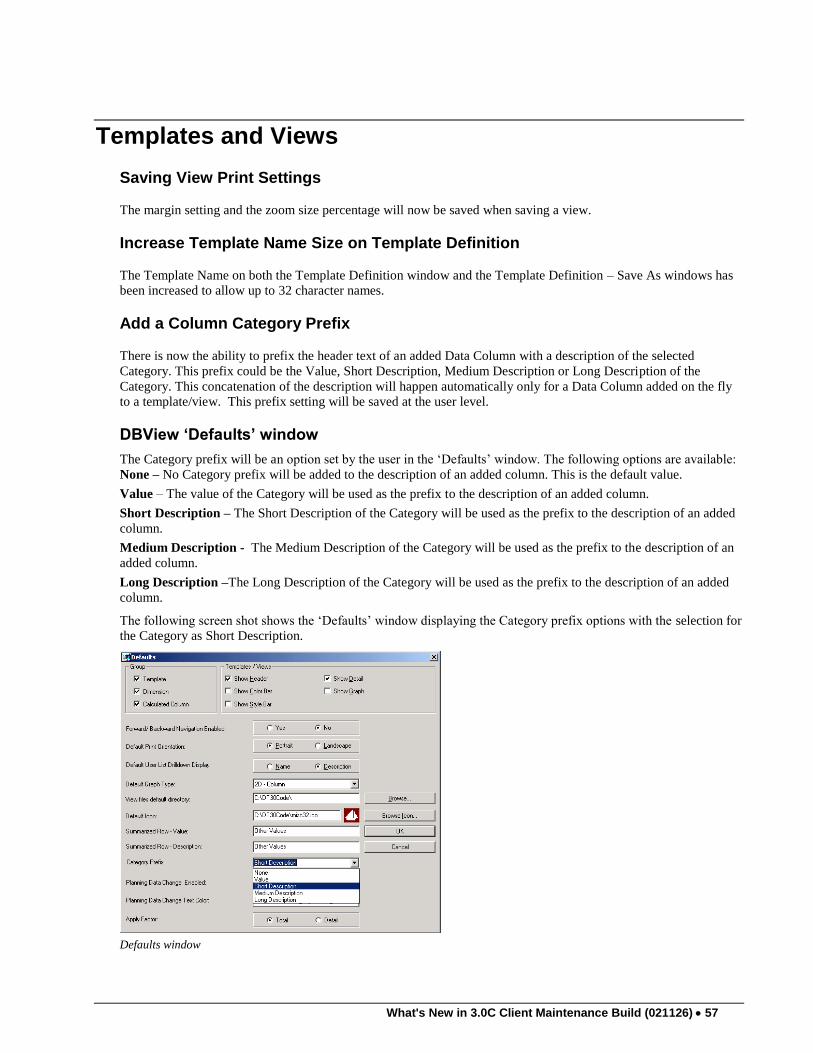
DBView ‘Defaults’ window
The Category prefix will be an option set by the user in the „Defaults‟ window. The following options are available:
None – No Category prefix will be added to the description of an added column. This is the default value.
Value – The value of the Category will be used as the prefix to the description of an added column.
Short Description – The Short Description of the Category will be used as the prefix to the description of an added
column.
Medium Description - The Medium Description of the Category will be used as the prefix to the description of an
added column.
Long Description –The Long Description of the Category will be used as the prefix to the description of an added
column.
The following screen shot shows the „Defaults‟ window displaying the Category prefix options with the selection for
the Category as Short Description.
Defaults window
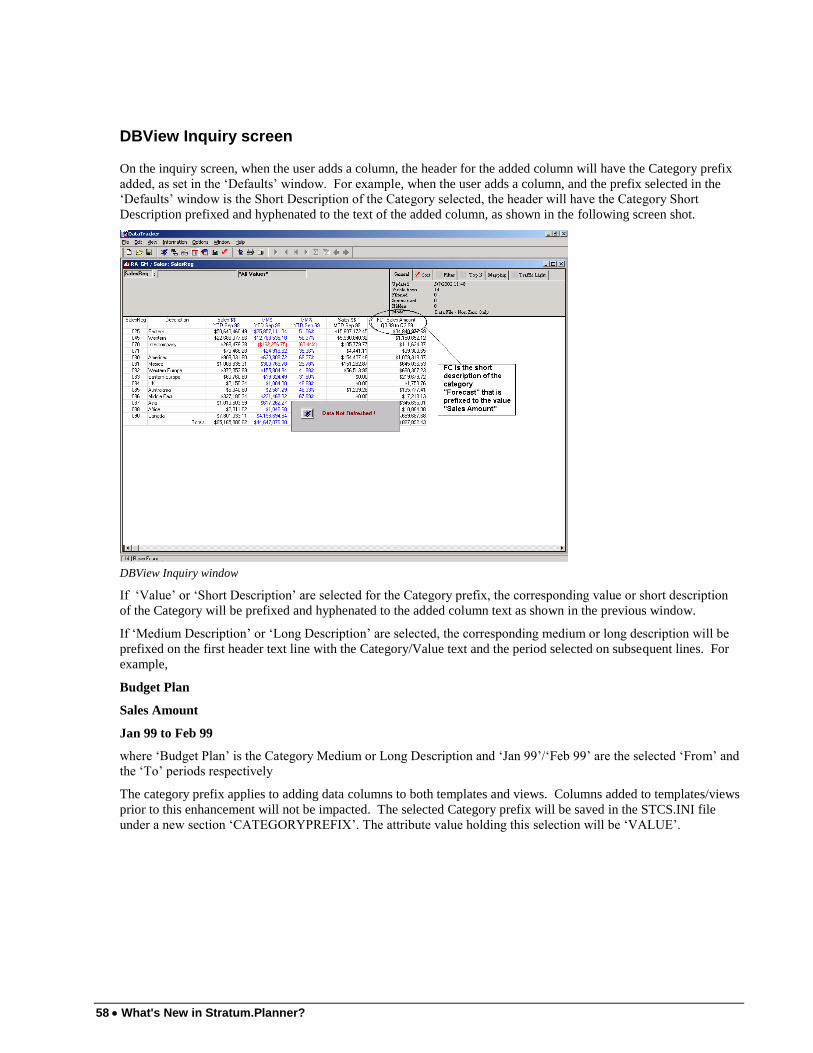
58 What's New in Stratum.Planner?
DBView Inquiry screen
On the inquiry screen, when the user adds a column, the header for the added column will have the Category prefix
added, as set in the „Defaults‟ window. For example, when the user adds a column, and the prefix selected in the
„Defaults‟ window is the Short Description of the Category selected, the header will have the Category Short
Description prefixed and hyphenated to the text of the added column, as shown in the following screen shot.
DBView Inquiry window
If „Value‟ or „Short Description‟ are selected for the Category prefix, the corresponding value or short description
of the Category will be prefixed and hyphenated to the added column text as shown in the previous window.
If „Medium Description‟ or „Long Description‟ are selected, the corresponding medium or long description will be
prefixed on the first header text line with the Category/Value text and the period selected on subsequent lines. For
example,
Budget Plan
Sales Amount
Jan 99 to Feb 99
where „Budget Plan‟ is the Category Medium or Long Description and „Jan 99‟/„Feb 99‟ are the selected „From‟ and
the „To‟ periods respectively
The category prefix applies to adding data columns to both templates and views. Columns added to templates/views
prior to this enhancement will not be impacted. The selected Category prefix will be saved in the STCS.INI file
under a new section „CATEGORYPREFIX‟. The attribute value holding this selection will be „VALUE‟.
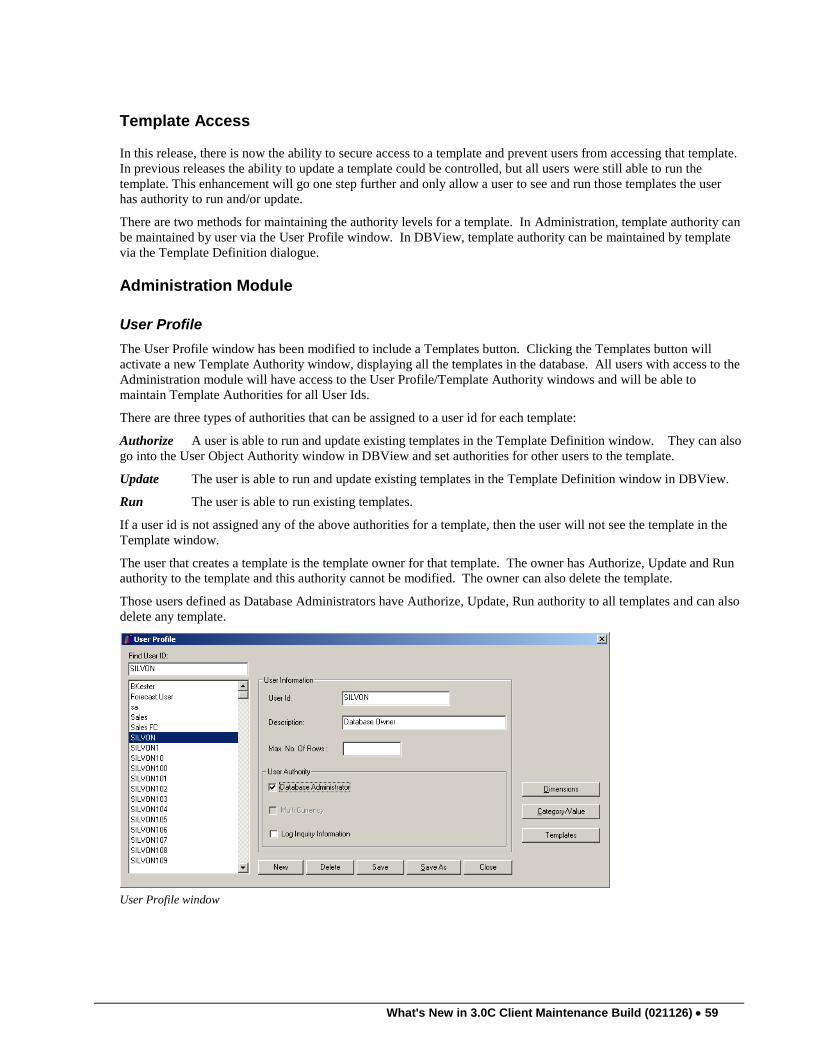
What's New in 3.0C Client Maintenance Build (021126) 59
Template Access
In this release, there is now the ability to secure access to a template and prevent users from accessing that template.
In previous releases the ability to update a template could be controlled, but all users were still able to run the
template. This enhancement will go one step further and only allow a user to see and run those templates the user
has authority to run and/or update.
There are two methods for maintaining the authority levels for a template. In Administration, template authority can
be maintained by user via the User Profile window. In DBView, template authority can be maintained by template
via the Template Definition dialogue.
Administration Module
User Profile
The User Profile window has been modified to include a Templates button. Clicking the Templates button will
activate a new Template Authority window, displaying all the templates in the database. All users with access to the
Administration module will have access to the User Profile/Template Authority windows and will be able to
maintain Template Authorities for all User Ids.
There are three types of authorities that can be assigned to a user id for each template:
Authorize A user is able to run and update existing templates in the Template Definition window. They can also
go into the User Object Authority window in DBView and set authorities for other users to the template.
Update The user is able to run and update existing templates in the Template Definition window in DBView.
Run The user is able to run existing templates.
If a user id is not assigned any of the above authorities for a template, then the user will not see the template in the
Template window.
The user that creates a template is the template owner for that template. The owner has Authorize, Update and Run
authority to the template and this authority cannot be modified. The owner can also delete the template.
Those users defined as Database Administrators have Authorize, Update, Run authority to all templates and can also
delete any template.
User Profile window
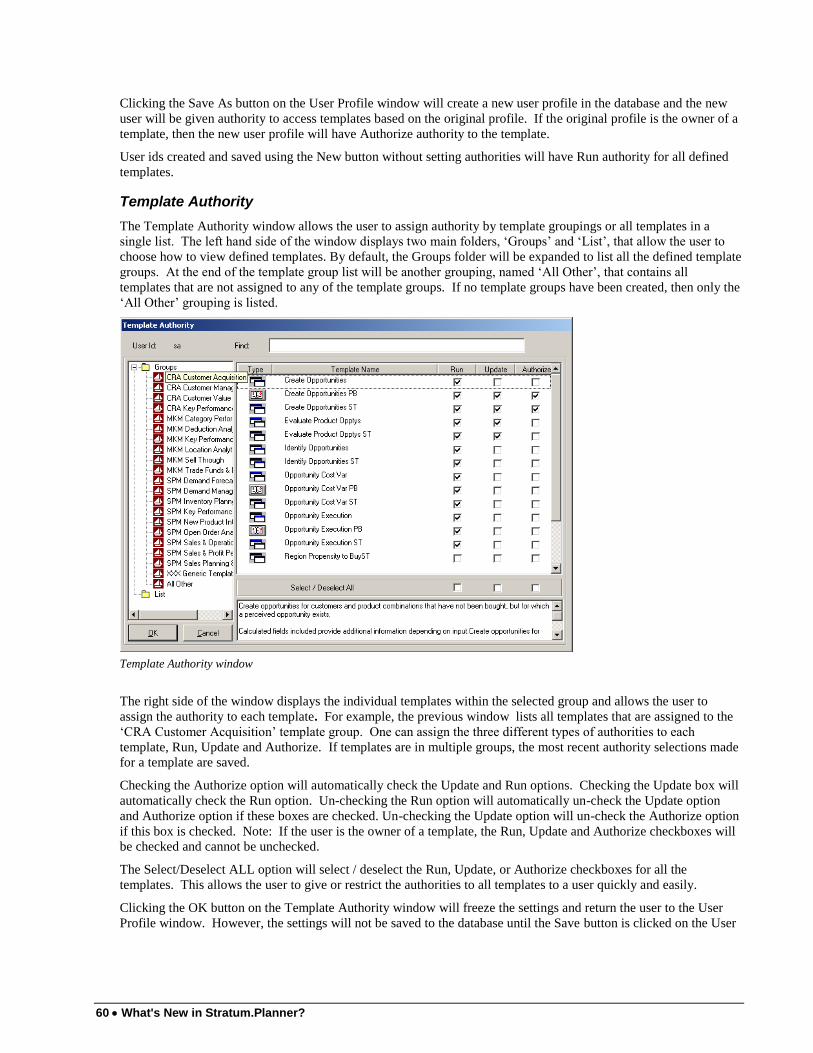
60 What's New in Stratum.Planner?
Clicking the Save As button on the User Profile window will create a new user profile in the database and the new
user will be given authority to access templates based on the original profile. If the original profile is the owner of a
template, then the new user profile will have Authorize authority to the template.
User ids created and saved using the New button without setting authorities will have Run authority for all defined
templates.
Template Authority
The Template Authority window allows the user to assign authority by template groupings or all templates in a
single list. The left hand side of the window displays two main folders, „Groups‟ and „List‟, that allow the user to
choose how to view defined templates. By default, the Groups folder will be expanded to list all the defined template
groups. At the end of the template group list will be another grouping, named „All Other‟, that contains all
templates that are not assigned to any of the template groups. If no template groups have been created, then only the
„All Other‟ grouping is listed.
Template Authority window
The right side of the window displays the individual templates within the selected group and allows the user to
assign the authority to each template. For example, the previous window lists all templates that are assigned to the
„CRA Customer Acquisition‟ template group. One can assign the three different types of authorities to each
template, Run, Update and Authorize. If templates are in multiple groups, the most recent authority selections made
for a template are saved.
Checking the Authorize option will automatically check the Update and Run options. Checking the Update box will
automatically check the Run option. Un-checking the Run option will automatically un-check the Update option
and Authorize option if these boxes are checked. Un-checking the Update option will un-check the Authorize option
if this box is checked. Note: If the user is the owner of a template, the Run, Update and Authorize checkboxes will
be checked and cannot be unchecked.
The Select/Deselect ALL option will select / deselect the Run, Update, or Authorize checkboxes for all the
templates. This allows the user to give or restrict the authorities to all templates to a user quickly and easily.
Clicking the OK button on the Template Authority window will freeze the settings and return the user to the User
Profile window. However, the settings will not be saved to the database until the Save button is clicked on the User

What's New in 3.0C Client Maintenance Build (021126) 61
Profile window. Clicking the Cancel button on the Template Authority window will return the user to the User
Profile window but will not save the settings or changes made.
For example, if the settings shown on the previous Template Authority window screen shot were saved, the user will
have authorize, update, and run authority to the templates, Create Opportunities PB and Create Opportunities ST .
The user will have update and run authority to the Evaluate Product Opptys and Evaluate Product Opptys ST
templates. The user will have no authority to the Region Propensity to BuyST template and will not even see this
template listed. For all the other templates with only the Run box checked, the user will have only run authority.
The user can also assign the authority at the Template group level by clicking on the „Groups‟ folder. The Template
groups are displayed in the right side of the window. The user is then able to check the desired authority options and
this will assign the authority for all templates within a specific group. Assigning authority at the group level will
replace any individual authority saved for a template in that group. Also, for templates in multiple groups, the most
recent group authority assigned is the authority assigned to the template.
Clicking the „List‟ main folder lists all the templates in the database on the right hand side of the window in
alphabetical order. The „Find‟ box allows for easy searching of templates if the user knows the name of the template.
The user can key in the characters to position to the template in the list.
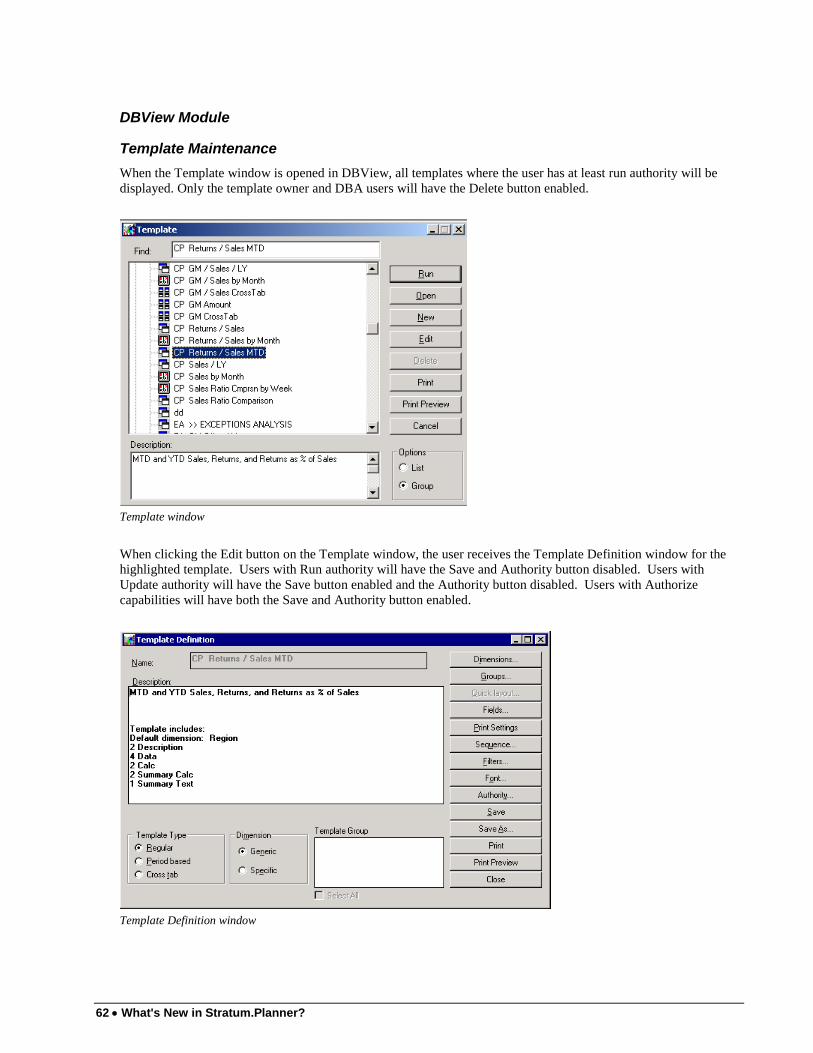
62 What's New in Stratum.Planner?
DBView Module
Template Maintenance
When the Template window is opened in DBView, all templates where the user has at least run authority will be
displayed. Only the template owner and DBA users will have the Delete button enabled.
Template window
When clicking the Edit button on the Template window, the user receives the Template Definition window for the
highlighted template. Users with Run authority will have the Save and Authority button disabled. Users with
Update authority will have the Save button enabled and the Authority button disabled. Users with Authorize
capabilities will have both the Save and Authority button enabled.
Template Definition window
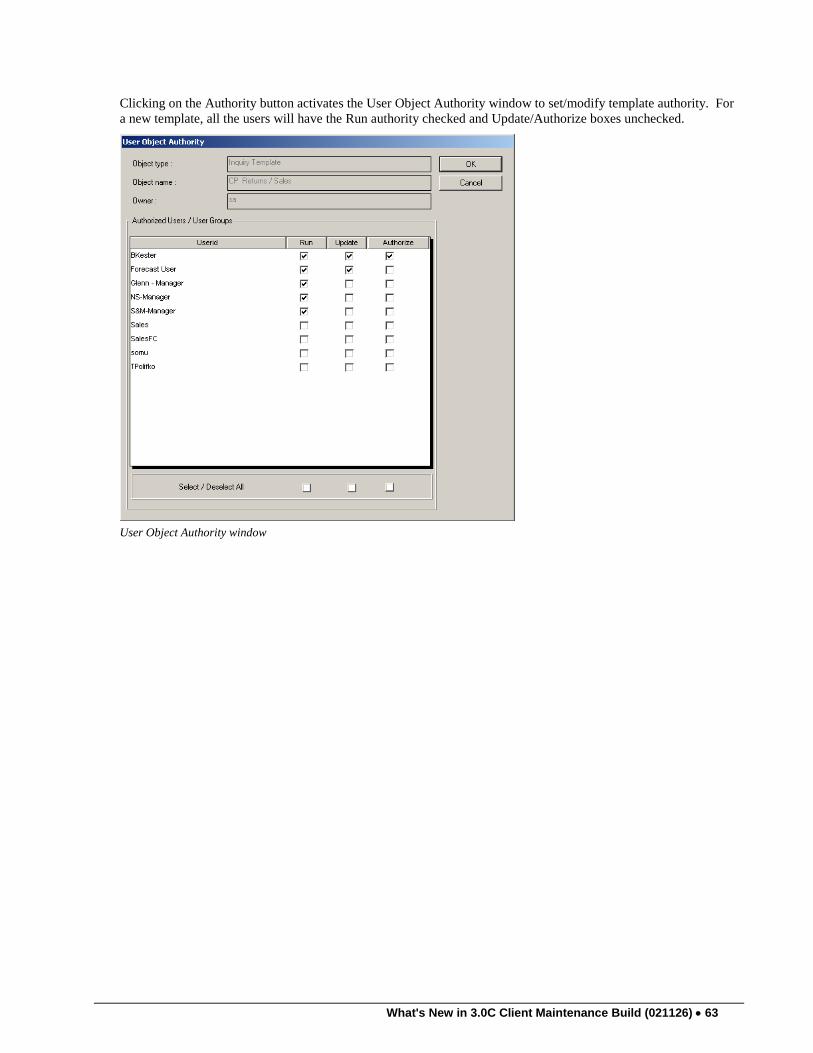
What's New in 3.0C Client Maintenance Build (021126) 63
Clicking on the Authority button activates the User Object Authority window to set/modify template authority. For
a new template, all the users will have the Run authority checked and Update/Authorize boxes unchecked.
User Object Authority window
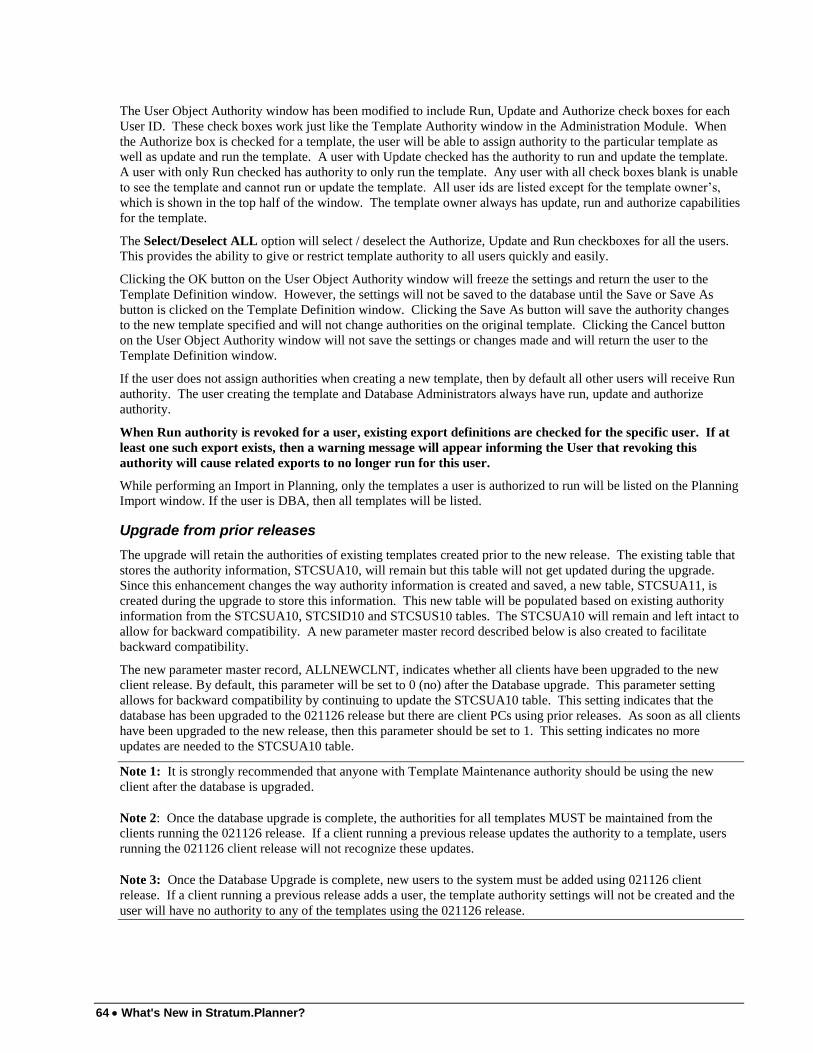
64 What's New in Stratum.Planner?
The User Object Authority window has been modified to include Run, Update and Authorize check boxes for each
User ID. These check boxes work just like the Template Authority window in the Administration Module. When
the Authorize box is checked for a template, the user will be able to assign authority to the particular template as
well as update and run the template. A user with Update checked has the authority to run and update the template.
A user with only Run checked has authority to only run the template. Any user with all check boxes blank is unable
to see the template and cannot run or update the template. All user ids are listed except for the template owner‟s,
which is shown in the top half of the window. The template owner always has update, run and authorize capabilities
for the template.
The Select/Deselect ALL option will select / deselect the Authorize, Update and Run checkboxes for all the users.
This provides the ability to give or restrict template authority to all users quickly and easily.
Clicking the OK button on the User Object Authority window will freeze the settings and return the user to the
Template Definition window. However, the settings will not be saved to the database until the Save or Save As
button is clicked on the Template Definition window. Clicking the Save As button will save the authority changes
to the new template specified and will not change authorities on the original template. Clicking the Cancel button
on the User Object Authority window will not save the settings or changes made and will return the user to the
Template Definition window.
If the user does not assign authorities when creating a new template, then by default all other users will receive Run
authority. The user creating the template and Database Administrators always have run, update and authorize
authority.
When Run authority is revoked for a user, existing export definitions are checked for the specific user. If at
least one such export exists, then a warning message will appear informing the User that revoking this
authority will cause related exports to no longer run for this user.
While performing an Import in Planning, only the templates a user is authorized to run will be listed on the Planning
Import window. If the user is DBA, then all templates will be listed.
Upgrade from prior releases
The upgrade will retain the authorities of existing templates created prior to the new release. The existing table that
stores the authority information, STCSUA10, will remain but this table will not get updated during the upgrade.
Since this enhancement changes the way authority information is created and saved, a new table, STCSUA11, is
created during the upgrade to store this information. This new table will be populated based on existing authority
information from the STCSUA10, STCSID10 and STCSUS10 tables. The STCSUA10 will remain and left intact to
allow for backward compatibility. A new parameter master record described below is also created to facilitate
backward compatibility.
The new parameter master record, ALLNEWCLNT, indicates whether all clients have been upgraded to the new
client release. By default, this parameter will be set to 0 (no) after the Database upgrade. This parameter setting
allows for backward compatibility by continuing to update the STCSUA10 table. This setting indicates that the
database has been upgraded to the 021126 release but there are client PCs using prior releases. As soon as all clients
have been upgraded to the new release, then this parameter should be set to 1. This setting indicates no more
updates are needed to the STCSUA10 table.
Note 1: It is strongly recommended that anyone with Template Maintenance authority should be using the new
client after the database is upgraded.
Note 2: Once the database upgrade is complete, the authorities for all templates MUST be maintained from the
clients running the 021126 release. If a client running a previous release updates the authority to a template, users
running the 021126 client release will not recognize these updates.
Note 3: Once the Database Upgrade is complete, new users to the system must be added using 021126 client
release. If a client running a previous release adds a user, the template authority settings will not be created and the
user will have no authority to any of the templates using the 021126 release.
What's New in 3.0C Client Maintenance Build (021126) 65
Miscellaneous
Database Administrator Authority to User Lists
Users with Database Administrator authority will now have the ability to change and delete any user list.
User List Maintenance
This release no longer allows duplicate User List Names. Previously, the User List author‟s user id was added to the
User List Name to make it unique. To help with choosing a unique User List Name, a “View All User Lists” button
has been added to the User List Maintenance window. This button will bring up a window that lists all existing User
Lists and the corresponding owner.
Search/Find and Sorting
This release contains the addition of a Search/Find function on several windows. The Search/Find function is now
included on the User Profile and Values maintenance windows in Administration. In the Client application, this
enhancement is on the Export Data Definition and Export Group windows. Also, the list of Export Definitions will
now be displayed alphabetically rather than in creation order.
View Group Imports with Same Name
When Exporting and Importing View Groups, enhancements have been implemented to better handle View Groups
with the same name. When a View Group Import is attempted for a View Group with the same name as an existing
View Group, a new message box will be presented asking if the user would like to “replace” the existing View
Group. The user can either “replace” the existing View Group by continuing with the Import or cancel the Import
and leave the existing View Group in place.
When a View Group is replaced on an Import, the views in the Importing View Group will be the only ones
contained in the View Group. If views of the same name exist in the View Group being replaced, they are deleted.
If views of different names exist in the View Group being replaced, they will remain on the system but will not be in
the resulting View Group.

66 What's New in Stratum.Planner?
Notes

What's New in 3.0C Client Maintenance Build (020523) 67
WHAT'S NEW IN 3.0C CLIENT
MAINTENANCE BUILD (020523)
Who Should Read This Section? If you are at 3.0C (011102) or earlier, you need to read this section.

68 What's New in Stratum.Planner?
Templates and Views
Saving Print Settings In Templates And Views
This enhancement provides the ability to save the Print settings in Templates and Views. Below is a list of Print
settings, their defaults, and the description of each setting that can be saved in Templates and Views.
Orientation
Print Header
Print with Grid
No. Of Copies
Add Text to Report
Orientation - The default Orientation Type is set to Portrait/Landscape based on the Orientation set in the Default
window. The default Orientation Type is Portrait.
Print Header - This option is selected by default. While selected, the Page Numbering counts the Header Page.
For example, if the total number of Detail Pages is 5, then the Total Pages will be displayed as 6, with the Header
Page being Number 1. In this case, when you use the Page Range option, your ranges will include the Header Page.
If you ask to print from 1 to 3, for example, you will print the Header Page as page number "Page 1 of 6" and the
Detail Pages as "Page 2 of 6" & “Page 3 of 6".
If you de-select the Print Header Option, then the page numbering will be for the Detail Pages only. In this case,
when you use the Page Range option, your range will not include the Header Page. For example, if you ask to print
from 1 to 3, the Detail Pages will print starting with the page number "Page 1 of 5", "Page 2 of 5" & "Page 3 of 5"
Print With Grid - This option is selected by default. This will affect only the Detail Pages. If the option is
removed, the Detail Pages will print without grid lines.
No. Of Copies - The default is 1. You must specify another number to print more than 1 copy.
Add Text to Report - The default is blank (“”). A maximum of 252 characters can be entered.
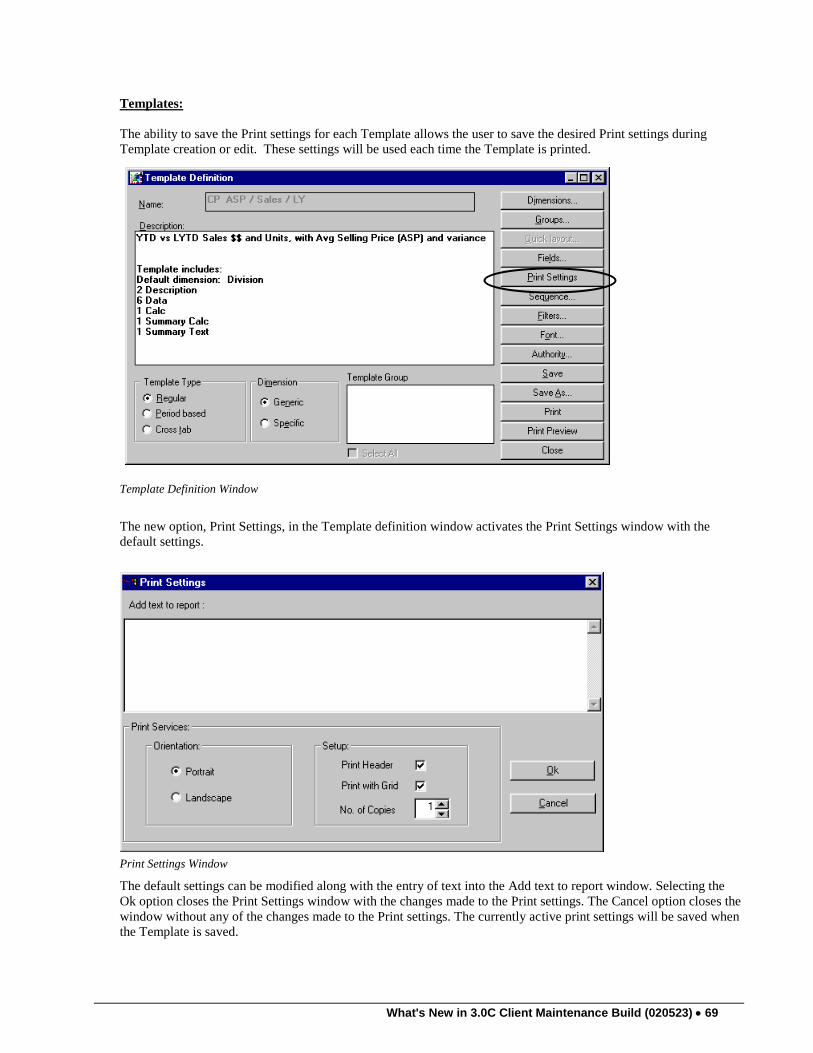
What's New in 3.0C Client Maintenance Build (020523) 69
Templates:
The ability to save the Print settings for each Template allows the user to save the desired Print settings during
Template creation or edit. These settings will be used each time the Template is printed.
Template Definition Window
The new option, Print Settings, in the Template definition window activates the Print Settings window with the
default settings.
Print Settings Window
The default settings can be modified along with the entry of text into the Add text to report window. Selecting the
Ok option closes the Print Settings window with the changes made to the Print settings. The Cancel option closes the
window without any of the changes made to the Print settings. The currently active print settings will be saved when
the Template is saved.
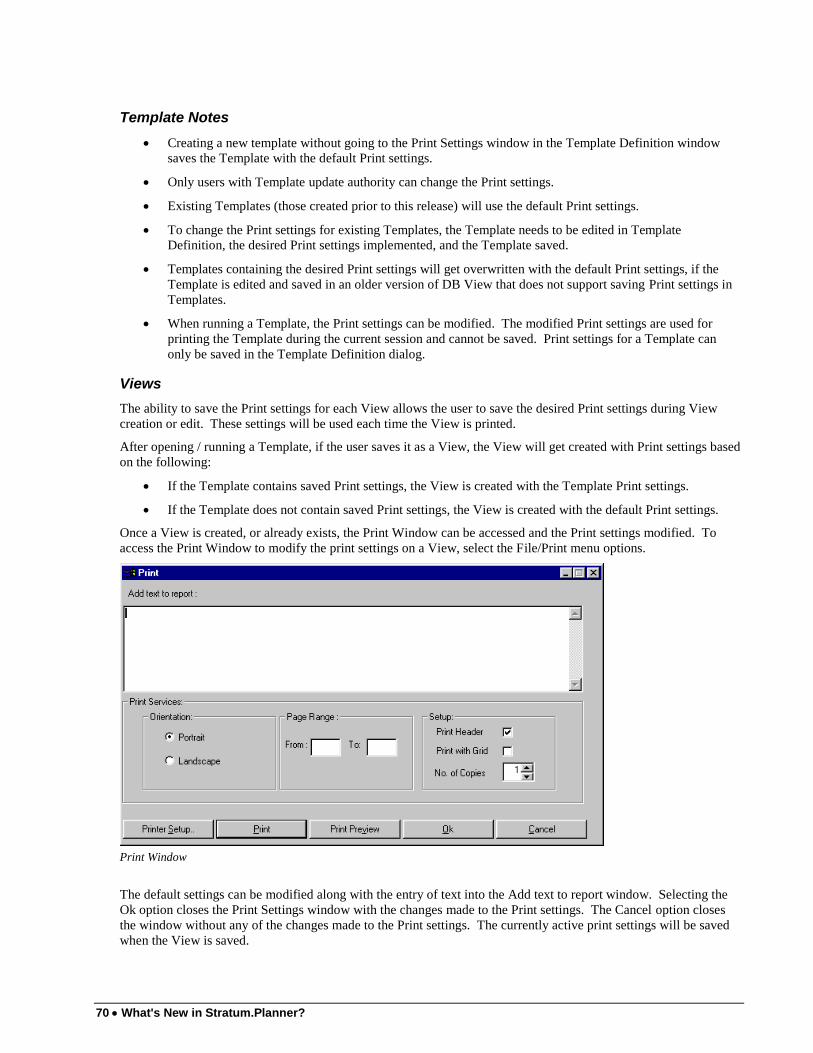
70 What's New in Stratum.Planner?
Template Notes
Creating a new template without going to the Print Settings window in the Template Definition window
saves the Template with the default Print settings.
Only users with Template update authority can change the Print settings.
Existing Templates (those created prior to this release) will use the default Print settings.
To change the Print settings for existing Templates, the Template needs to be edited in Template
Definition, the desired Print settings implemented, and the Template saved.
Templates containing the desired Print settings will get overwritten with the default Print settings, if the
Template is edited and saved in an older version of DB View that does not support saving Print settings in
Templates.
When running a Template, the Print settings can be modified. The modified Print settings are used for
printing the Template during the current session and cannot be saved. Print settings for a Template can
only be saved in the Template Definition dialog.
Views
The ability to save the Print settings for each View allows the user to save the desired Print settings during View
creation or edit. These settings will be used each time the View is printed.
After opening / running a Template, if the user saves it as a View, the View will get created with Print settings based
on the following:
If the Template contains saved Print settings, the View is created with the Template Print settings.
If the Template does not contain saved Print settings, the View is created with the default Print settings.
Once a View is created, or already exists, the Print Window can be accessed and the Print settings modified. To
access the Print Window to modify the print settings on a View, select the File/Print menu options.
Print Window
The default settings can be modified along with the entry of text into the Add text to report window. Selecting the
Ok option closes the Print Settings window with the changes made to the Print settings. The Cancel option closes
the window without any of the changes made to the Print settings. The currently active print settings will be saved
when the View is saved.

What's New in 3.0C Client Maintenance Build (020523) 71
View Notes
Existing Views will use the default Print settings. However, existing Views can be edited, the Print settings
modified, and saved to allow the View to use the saved Print settings going forward.
Views containing the desired Print settings will get overwritten with the default Print settings, if the View
is edited and saved in an older version of DB View that does not support saving Print settings in Views.
Page ranges are not saved and must be entered, as needed, each time a view is printed.
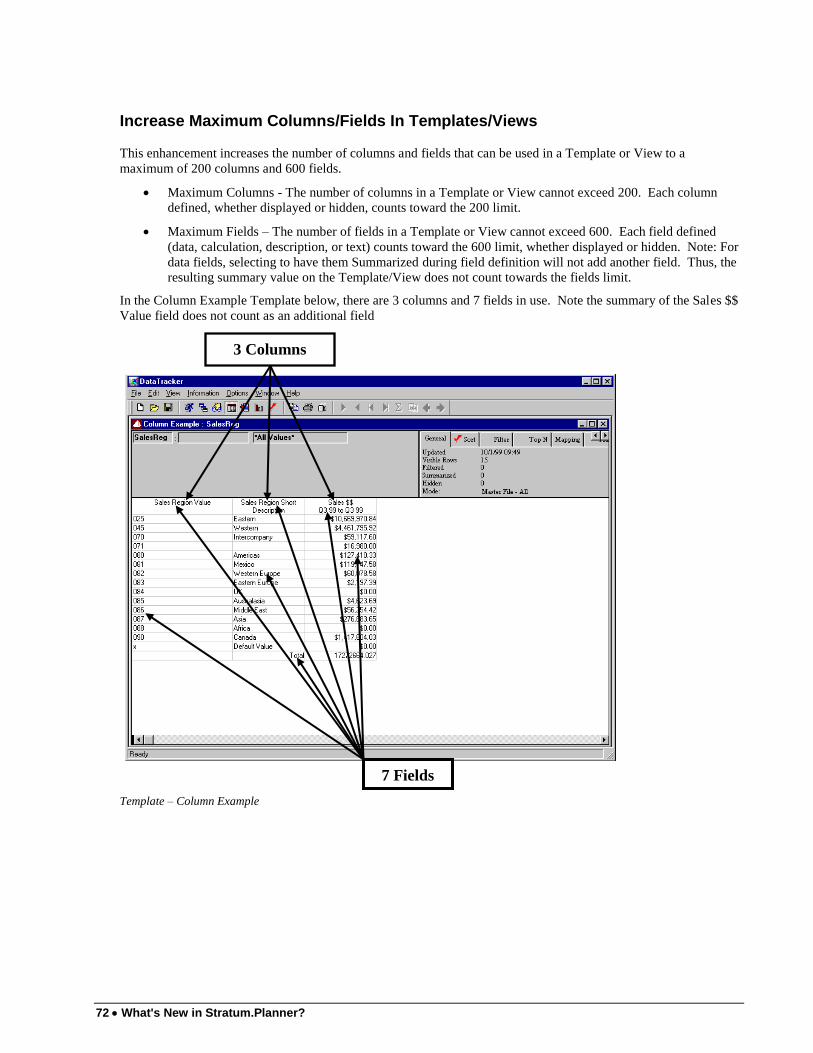
72 What's New in Stratum.Planner?
Increase Maximum Columns/Fields In Templates/Views
This enhancement increases the number of columns and fields that can be used in a Template or View to a
maximum of 200 columns and 600 fields.
Maximum Columns - The number of columns in a Template or View cannot exceed 200. Each column
defined, whether displayed or hidden, counts toward the 200 limit.
Maximum Fields – The number of fields in a Template or View cannot exceed 600. Each field defined
(data, calculation, description, or text) counts toward the 600 limit, whether displayed or hidden. Note: For
data fields, selecting to have them Summarized during field definition will not add another field. Thus, the
resulting summary value on the Template/View does not count towards the fields limit.
In the Column Example Template below, there are 3 columns and 7 fields in use. Note the summary of the Sales $$
Value field does not count as an additional field
Template – Column Example
7 Fields
3 Columns
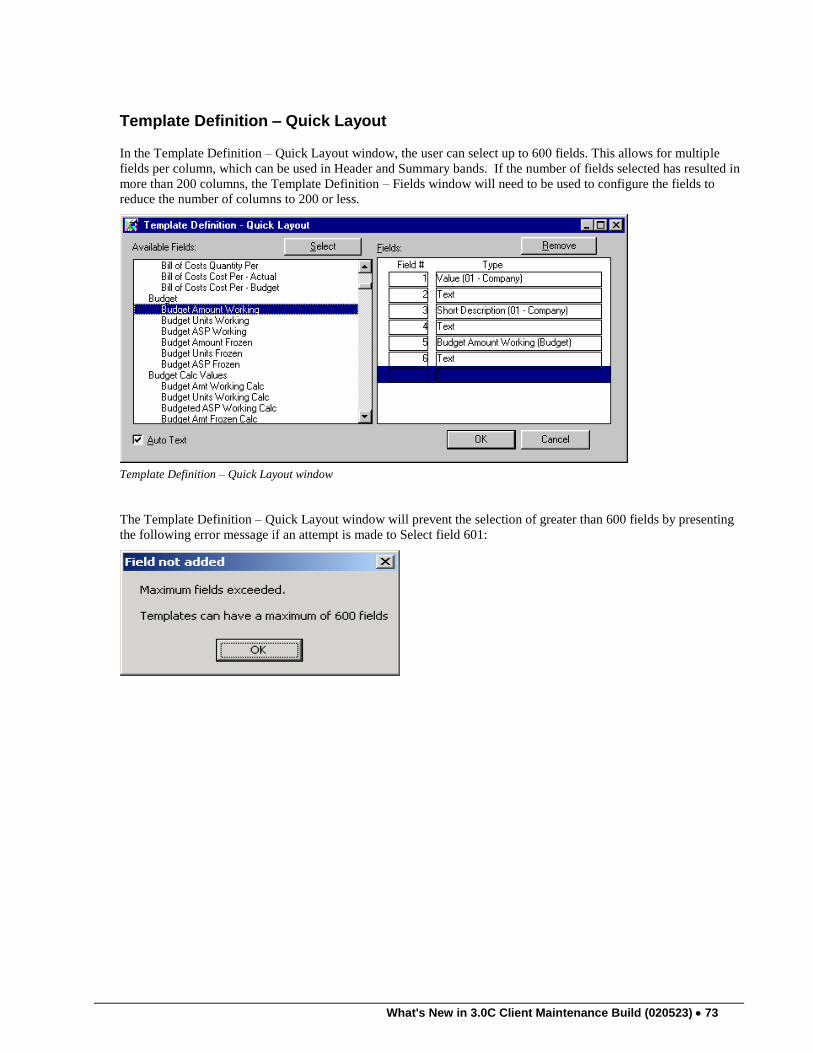
What's New in 3.0C Client Maintenance Build (020523) 73
Template Definition – Quick Layout
In the Template Definition – Quick Layout window, the user can select up to 600 fields. This allows for multiple
fields per column, which can be used in Header and Summary bands. If the number of fields selected has resulted in
more than 200 columns, the Template Definition – Fields window will need to be used to configure the fields to
reduce the number of columns to 200 or less.
Template Definition – Quick Layout window
The Template Definition – Quick Layout window will prevent the selection of greater than 600 fields by presenting
the following error message if an attempt is made to Select field 601:
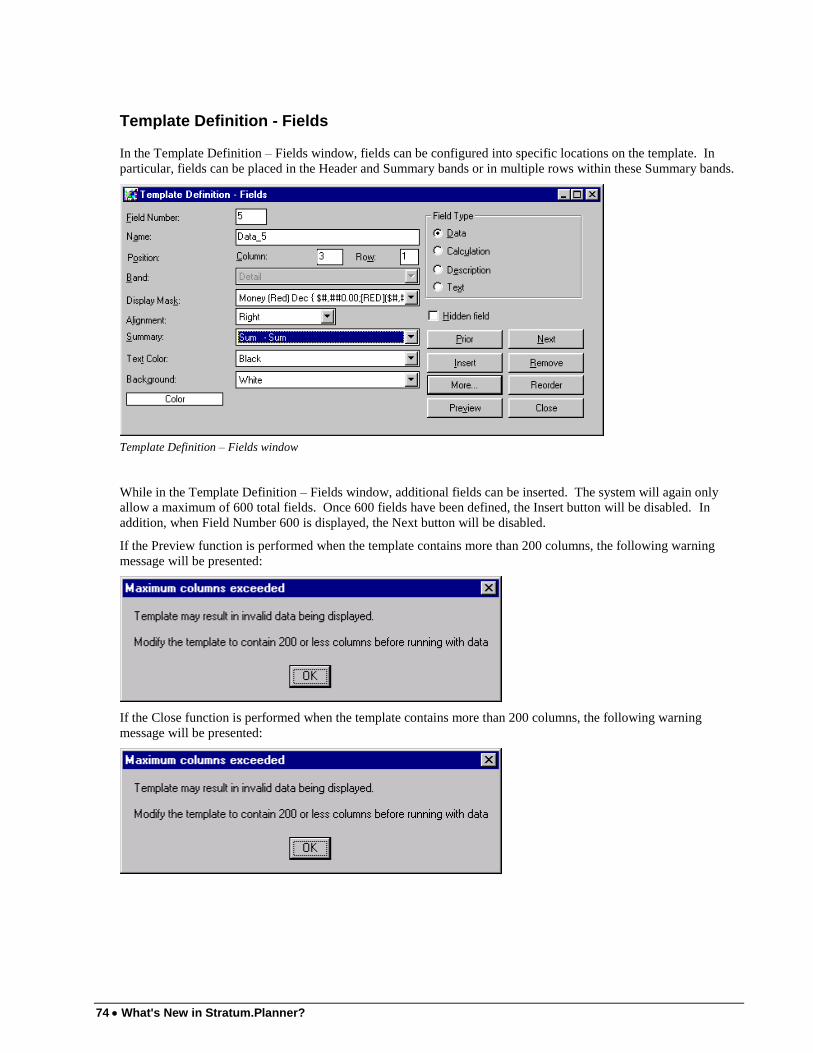
74 What's New in Stratum.Planner?
Template Definition - Fields
In the Template Definition – Fields window, fields can be configured into specific locations on the template. In
particular, fields can be placed in the Header and Summary bands or in multiple rows within these Summary bands.
Template Definition – Fields window
While in the Template Definition – Fields window, additional fields can be inserted. The system will again only
allow a maximum of 600 total fields. Once 600 fields have been defined, the Insert button will be disabled. In
addition, when Field Number 600 is displayed, the Next button will be disabled.
If the Preview function is performed when the template contains more than 200 columns, the following warning
message will be presented:
If the Close function is performed when the template contains more than 200 columns, the following warning
message will be presented:
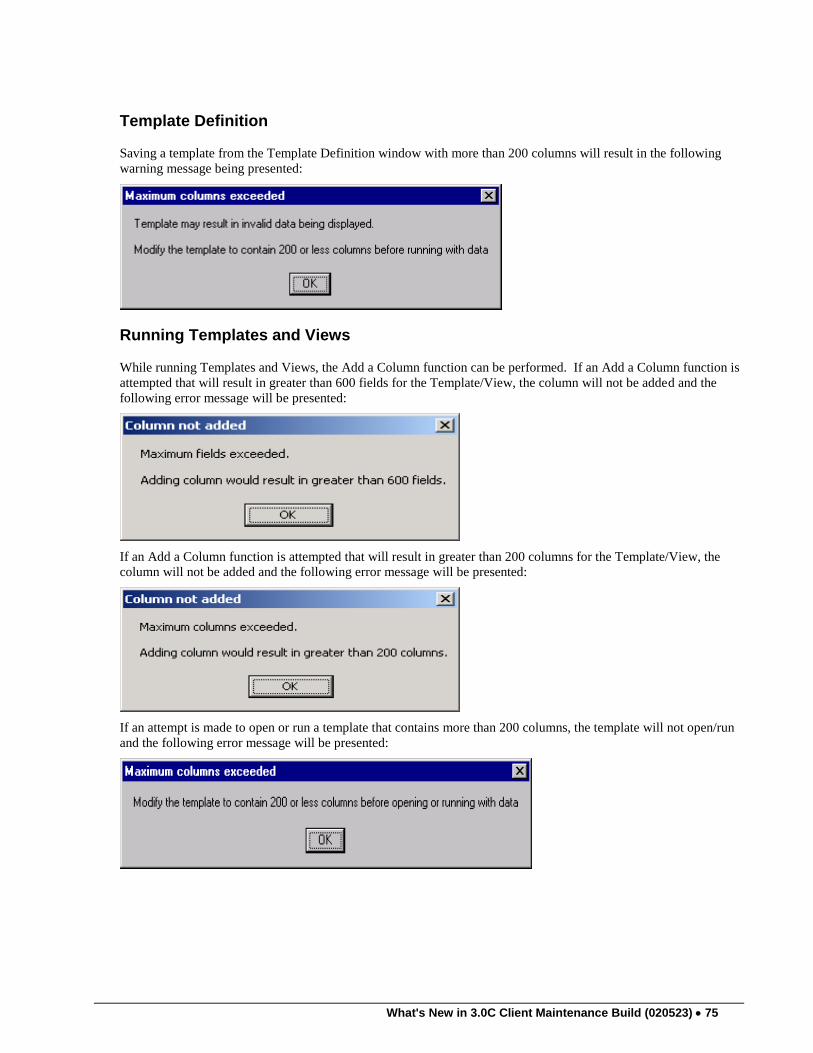
What's New in 3.0C Client Maintenance Build (020523) 75
Template Definition
Saving a template from the Template Definition window with more than 200 columns will result in the following
warning message being presented:
Running Templates and Views
While running Templates and Views, the Add a Column function can be performed. If an Add a Column function is
attempted that will result in greater than 600 fields for the Template/View, the column will not be added and the
following error message will be presented:
If an Add a Column function is attempted that will result in greater than 200 columns for the Template/View, the
column will not be added and the following error message will be presented:
If an attempt is made to open or run a template that contains more than 200 columns, the template will not open/run
and the following error message will be presented:
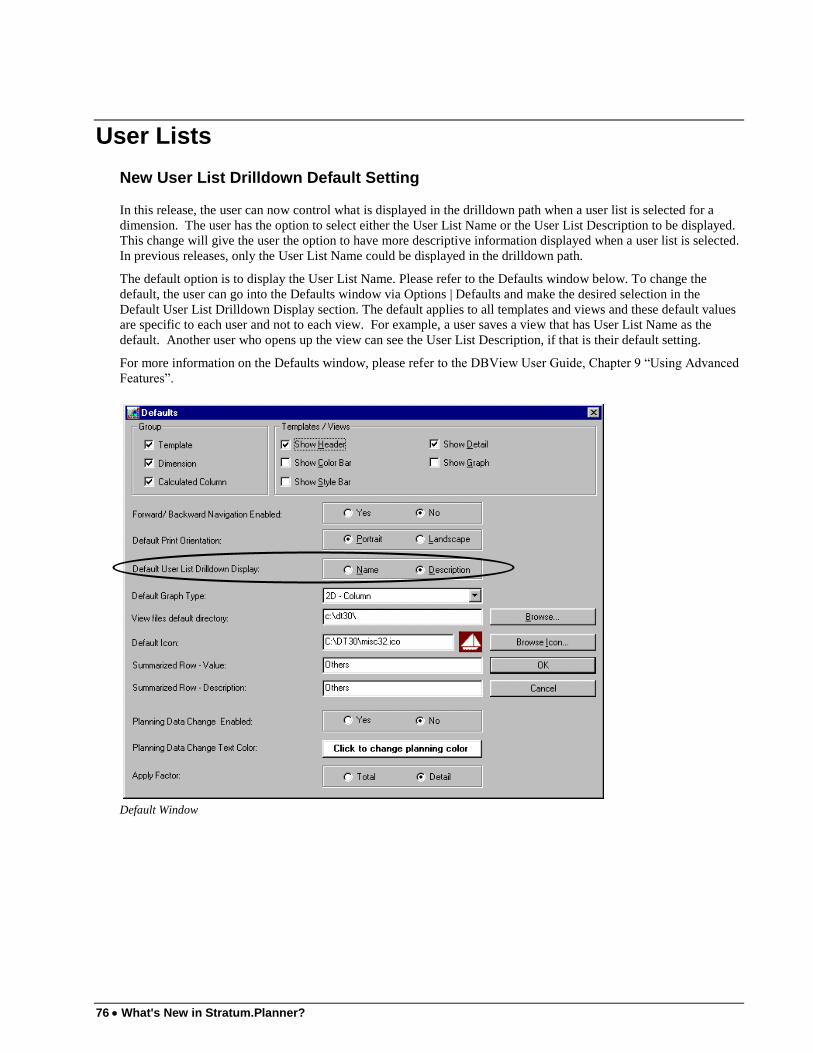
76 What's New in Stratum.Planner?
User Lists
New User List Drilldown Default Setting
In this release, the user can now control what is displayed in the drilldown path when a user list is selected for a
dimension. The user has the option to select either the User List Name or the User List Description to be displayed.
This change will give the user the option to have more descriptive information displayed when a user list is selected.
In previous releases, only the User List Name could be displayed in the drilldown path.
The default option is to display the User List Name. Please refer to the Defaults window below. To change the
default, the user can go into the Defaults window via Options | Defaults and make the desired selection in the
Default User List Drilldown Display section. The default applies to all templates and views and these default values
are specific to each user and not to each view. For example, a user saves a view that has User List Name as the
default. Another user who opens up the view can see the User List Description, if that is their default setting.
For more information on the Defaults window, please refer to the DBView User Guide, Chapter 9 “Using Advanced
Features”.
Default Window

What's New in 3.0C Client Maintenance Build (020523) 77
Below is an example of when the Description is selected as the default. When a User List is selected for a dimension
then the User List Description displays in the dimension drilldown path.
Template window
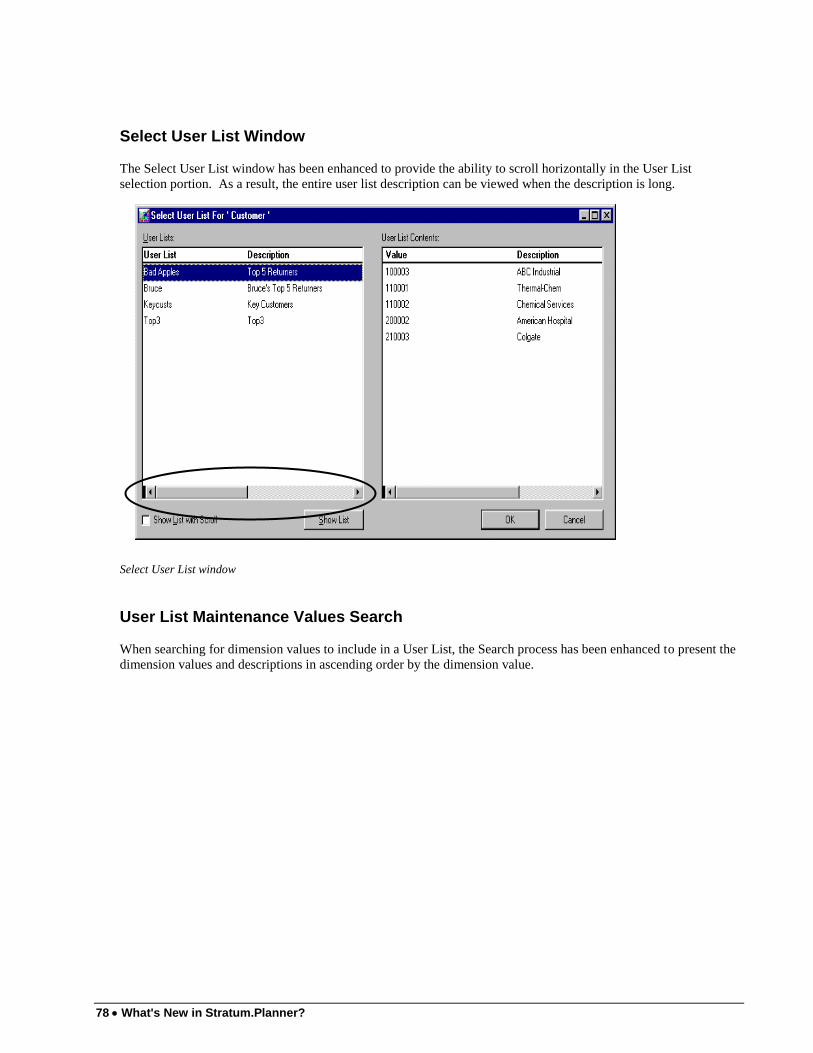
78 What's New in Stratum.Planner?
Select User List Window
The Select User List window has been enhanced to provide the ability to scroll horizontally in the User List
selection portion. As a result, the entire user list description can be viewed when the description is long.
Select User List window
User List Maintenance Values Search
When searching for dimension values to include in a User List, the Search process has been enhanced to present the
dimension values and descriptions in ascending order by the dimension value.
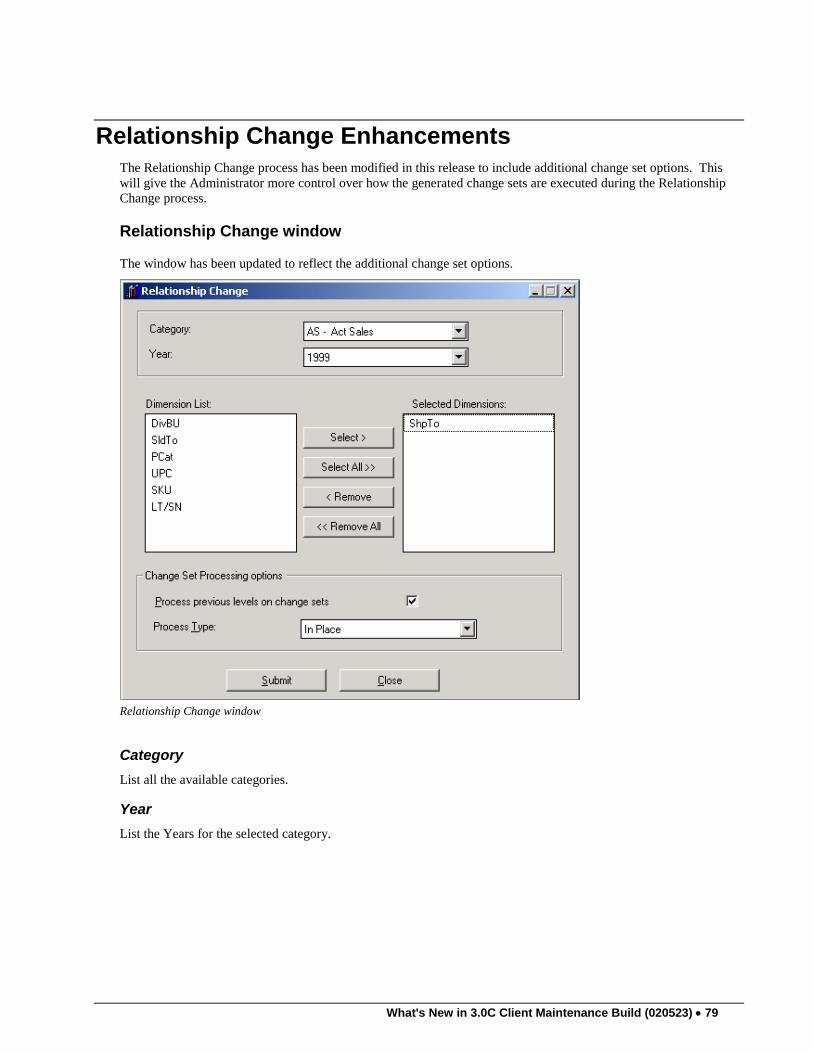
What's New in 3.0C Client Maintenance Build (020523) 79
Relationship Change Enhancements
The Relationship Change process has been modified in this release to include additional change set options. This
will give the Administrator more control over how the generated change sets are executed during the Relationship
Change process.
Relationship Change window
The window has been updated to reflect the additional change set options.
Relationship Change window
Category
List all the available categories.
Year
List the Years for the selected category.
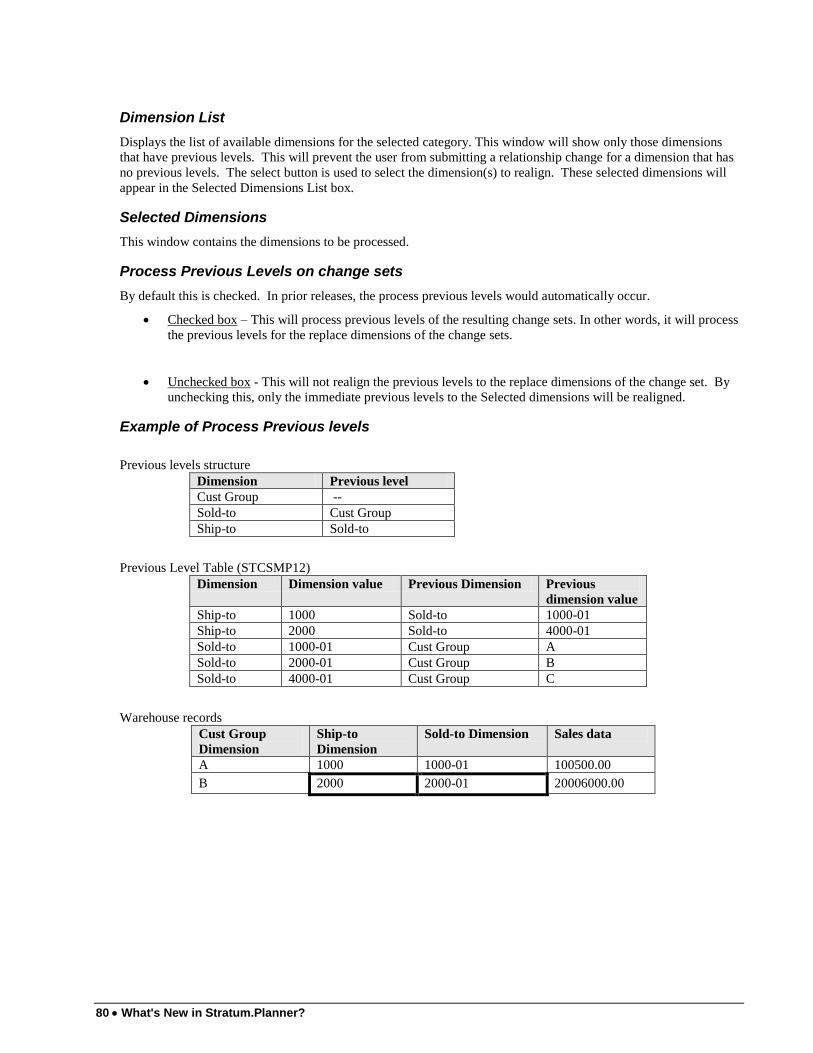
80 What's New in Stratum.Planner?
Dimension List
Displays the list of available dimensions for the selected category. This window will show only those dimensions
that have previous levels. This will prevent the user from submitting a relationship change for a dimension that has
no previous levels. The select button is used to select the dimension(s) to realign. These selected dimensions will
appear in the Selected Dimensions List box.
Selected Dimensions
This window contains the dimensions to be processed.
Process Previous Levels on change sets
By default this is checked. In prior releases, the process previous levels would automatically occur.
Checked box – This will process previous levels of the resulting change sets. In other words, it will process
the previous levels for the replace dimensions of the change sets.
Unchecked box - This will not realign the previous levels to the replace dimensions of the change set. By
unchecking this, only the immediate previous levels to the Selected dimensions will be realigned.
Example of Process Previous levels
Previous levels structure
Dimension Previous level
Cust Group --
Sold-to Cust Group
Ship-to Sold-to
Previous Level Table (STCSMP12)
Dimension Dimension value Previous Dimension Previous
dimension value
Ship-to 1000 Sold-to 1000-01
Ship-to 2000 Sold-to 4000-01
Sold-to 1000-01 Cust Group A
Sold-to 2000-01 Cust Group B
Sold-to 4000-01 Cust Group C
Warehouse records
Cust Group
Dimension
Ship-to
Dimension
Sold-to Dimension Sales data
A 1000 1000-01 100500.00
B 2000 2000-01 20006000.00
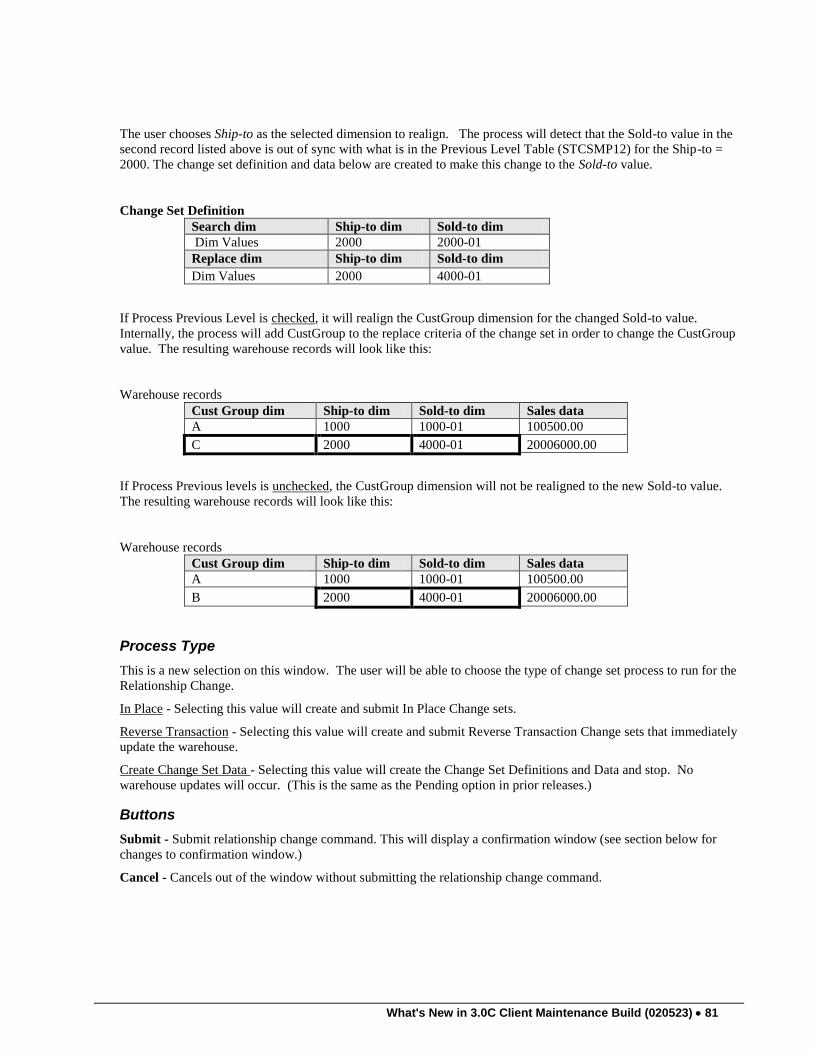
What's New in 3.0C Client Maintenance Build (020523) 81
The user chooses Ship-to as the selected dimension to realign. The process will detect that the Sold-to value in the
second record listed above is out of sync with what is in the Previous Level Table (STCSMP12) for the Ship-to =
2000. The change set definition and data below are created to make this change to the Sold-to value.
Change Set Definition
Search dim Ship-to dim Sold-to dim
Dim Values 2000 2000-01
Replace dim Ship-to dim Sold-to dim
Dim Values 2000 4000-01
If Process Previous Level is checked, it will realign the CustGroup dimension for the changed Sold-to value.
Internally, the process will add CustGroup to the replace criteria of the change set in order to change the CustGroup
value. The resulting warehouse records will look like this:
Warehouse records
Cust Group dim Ship-to dim Sold-to dim Sales data
A 1000 1000-01 100500.00
C 2000 4000-01 20006000.00
If Process Previous levels is unchecked, the CustGroup dimension will not be realigned to the new Sold-to value.
The resulting warehouse records will look like this:
Warehouse records
Cust Group dim Ship-to dim Sold-to dim Sales data
A 1000 1000-01 100500.00
B 2000 4000-01 20006000.00
Process Type
This is a new selection on this window. The user will be able to choose the type of change set process to run for the
Relationship Change.
In Place - Selecting this value will create and submit In Place Change sets.
Reverse Transaction - Selecting this value will create and submit Reverse Transaction Change sets that immediately
update the warehouse.
Create Change Set Data - Selecting this value will create the Change Set Definitions and Data and stop. No
warehouse updates will occur. (This is the same as the Pending option in prior releases.)
Buttons
Submit - Submit relationship change command. This will display a confirmation window (see section below for
changes to confirmation window.)
Cancel - Cancels out of the window without submitting the relationship change command.
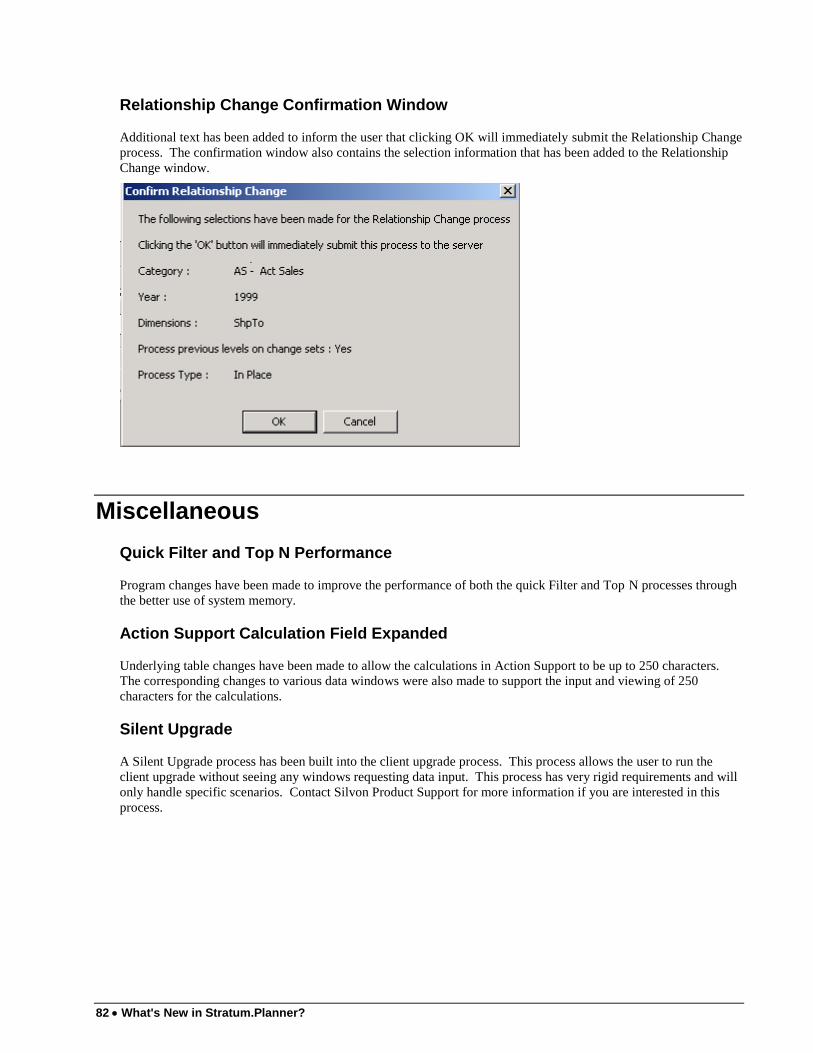
82 What's New in Stratum.Planner?
Relationship Change Confirmation Window
Additional text has been added to inform the user that clicking OK will immediately submit the Relationship Change
process. The confirmation window also contains the selection information that has been added to the Relationship
Change window.
Miscellaneous
Quick Filter and Top N Performance
Program changes have been made to improve the performance of both the quick Filter and Top N processes through
the better use of system memory.
Action Support Calculation Field Expanded
Underlying table changes have been made to allow the calculations in Action Support to be up to 250 characters.
The corresponding changes to various data windows were also made to support the input and viewing of 250
characters for the calculations.
Silent Upgrade
A Silent Upgrade process has been built into the client upgrade process. This process allows the user to run the
client upgrade without seeing any windows requesting data input. This process has very rigid requirements and will
only handle specific scenarios. Contact Silvon Product Support for more information if you are interested in this
process.

What's New in 3.0C Client Maintenance Build (011102) 83
WHAT'S NEW IN 3.0C CLIENT
MAINTENANCE BUILD (011102)
Who Should Read This Section? If you are at 3.0C (010510) or earlier, you need to read this section.
84 What's New in Stratum.Planner?
New Planning Validations, Messages, and Job Status
Nested User List with the Level option
Current Planning does not support the use of Nested User Lists with the Level option. To clarify this limitation,
changes have been implemented to prevent using Planning with Nested User Lists with the Level option in
Templates/Views by not allowing any updates such as:
Edit or Insert of columns or values
Edit or Insert of rows
Apply Factor
Single Quotes in a Dimension Value
Currently Planning does not support the use of single quotes („) in a Dimension value. To clarify this limitation, an
error message has been implemented that will appear if a single quote („) has been entered into a Dimension value
during a Planning session. Planning Update will only be allowed if all Dimension values do not contain single
quotes („).
Planning Update Row Highlighted Message
Planning Update will update the database with the Template/View values based on the status of the rows
highlighted. If no rows are highlighted at the time the Plan Update is executed, the modified data contained in all
the rows of the Template/View will be updated. However, if one or more rows are highlighted when the Plan
Update is executed, only the data contained in the highlighted row(s) will be updated to the database. To help make
sure this feature more clearly understood, a new message will appear during Plan Update if one or more rows have
been highlighted noting, “Only the selected/highlighted rows will be updated. Do you want to continue with Plan
Update?” Upon confirmation, the Plan Update process will proceed. Note, this message will not appear if no rows
have been highlighted.
New Planning Update Job Status
During Plan Updates, various states and conditions are checked to ensure a successful update can be accomplished.
However, in a number of situations the Plan Update will not be able to complete successfully. In some of these
situations, the Plan Update may just need to be resubmitted at a later time. To help identify those situations, a new
Plan Update Job Status of Resubmit has been implemented. When a Plan Update receives a Job Status of Resubmit,
it is likely this update will process successfully by resubmitting it from the Run Log Window at a later time when
there are no other DataTracker processes such as Loads, Change Sets, or other server utilities running.
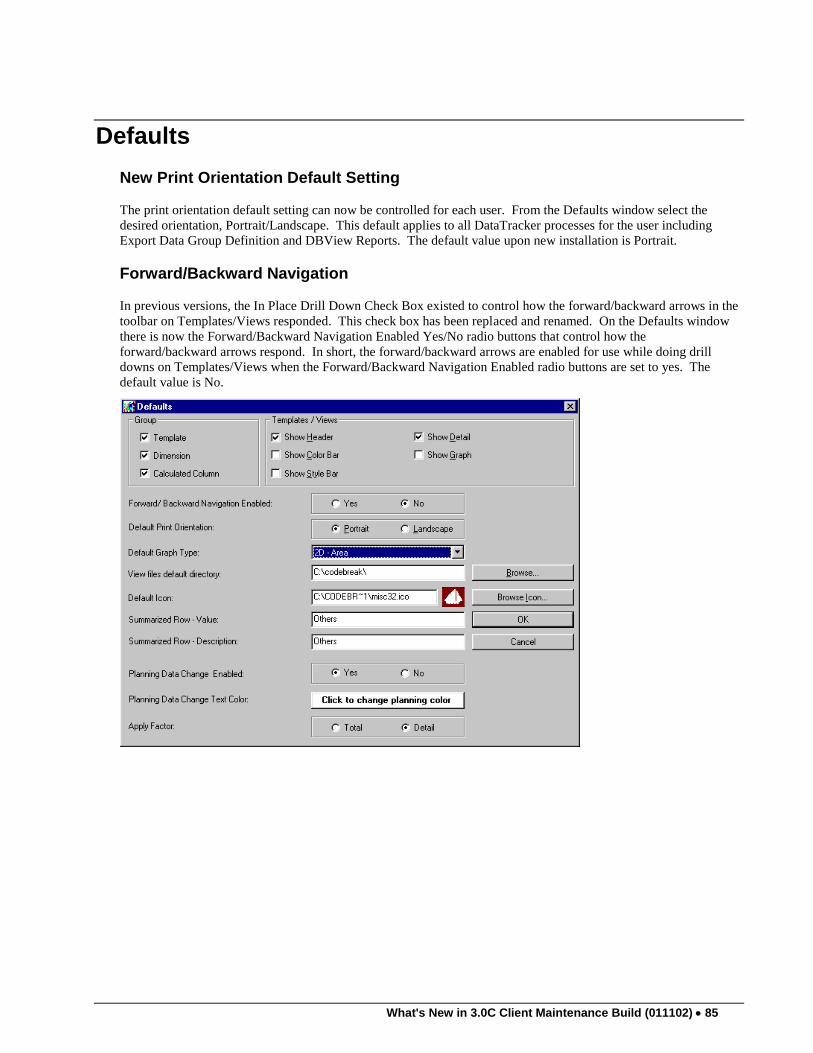
What's New in 3.0C Client Maintenance Build (011102) 85
Defaults
New Print Orientation Default Setting
The print orientation default setting can now be controlled for each user. From the Defaults window select the
desired orientation, Portrait/Landscape. This default applies to all DataTracker processes for the user including
Export Data Group Definition and DBView Reports. The default value upon new installation is Portrait.
Forward/Backward Navigation
In previous versions, the In Place Drill Down Check Box existed to control how the forward/backward arrows in the
toolbar on Templates/Views responded. This check box has been replaced and renamed. On the Defaults window
there is now the Forward/Backward Navigation Enabled Yes/No radio buttons that control how the
forward/backward arrows respond. In short, the forward/backward arrows are enabled for use while doing drill
downs on Templates/Views when the Forward/Backward Navigation Enabled radio buttons are set to yes. The
default value is No.
86 What's New in Stratum.Planner?
Language Translation
French, German, and Spanish Language Support
The literals and messages displayed as part of the client user interface have been retranslated for the French,
German, and Spanish languages as part of this release. All such literals and messages should now be properly
displayed in each of these languages.
Dynamic User Lists
Expansion of Value Field
The size of the value field within a Dynamic User List has been modified to be the same length as the dimension
attribute being tested.
Stratum.Connector for ODBC: Support for Microsoft Access
Stratum.Connector for ODBC has been enhanced to provide compatibility with Microsoft Access. Users of
Microsoft Access will follow the same process of virtual database creation in Stratum.Connector for ODBC as with
other business applications.
Stratum.Connector for ODBC now supports the following business applications:
Business Applications:
Microsoft Access
Microsoft/Query – Excel
Crystal Reports
Cognos Impromptu
Brio
* Contact Silvon Product Support to find out specific product releases supported.
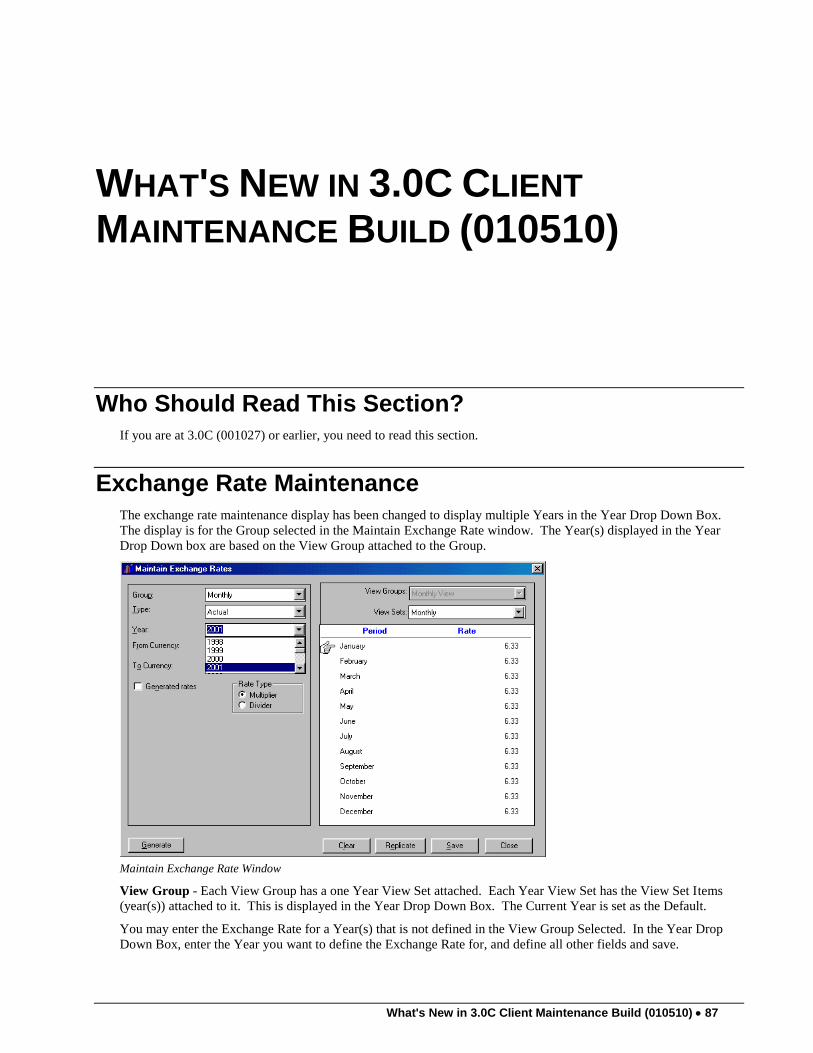
What's New in 3.0C Client Maintenance Build (010510) 87
WHAT'S NEW IN 3.0C CLIENT
MAINTENANCE BUILD (010510)
Who Should Read This Section? If you are at 3.0C (001027) or earlier, you need to read this section.
Exchange Rate Maintenance
The exchange rate maintenance display has been changed to display multiple Years in the Year Drop Down Box.
The display is for the Group selected in the Maintain Exchange Rate window. The Year(s) displayed in the Year
Drop Down box are based on the View Group attached to the Group.
Maintain Exchange Rate Window
View Group - Each View Group has a one Year View Set attached. Each Year View Set has the View Set Items
(year(s)) attached to it. This is displayed in the Year Drop Down Box. The Current Year is set as the Default.
You may enter the Exchange Rate for a Year(s) that is not defined in the View Group Selected. In the Year Drop
Down Box, enter the Year you want to define the Exchange Rate for, and define all other fields and save.

88 What's New in Stratum.Planner?
Template Grouping
DataTracker 3.0 provides you with the ability to group the Templates based on Functional Area or other criteria, and
by Type (Regular, Period Based, Cross Tab).
To Define Group Names:
1. Select File | Group Master in the Main window of the DataTracker Administration Application to display
the Group Master Window.
Group Master Window
2. Select the Template Window by clicking the Template tab.
3. Click the Add Button to create a new Template Group.
4. Enter the ID & Description, and then click Save.
5. Click the Delete button to delete a particular group. If a Template is already assigned to a group, the
following message box will appear. Clicking Yes in the Message Box deletes the group:
Group Template Message Box
Note: Clicking Yes deletes only the Group, not the Templates within the Group. In order to modify the Template
Group Description, change the description and click Save.
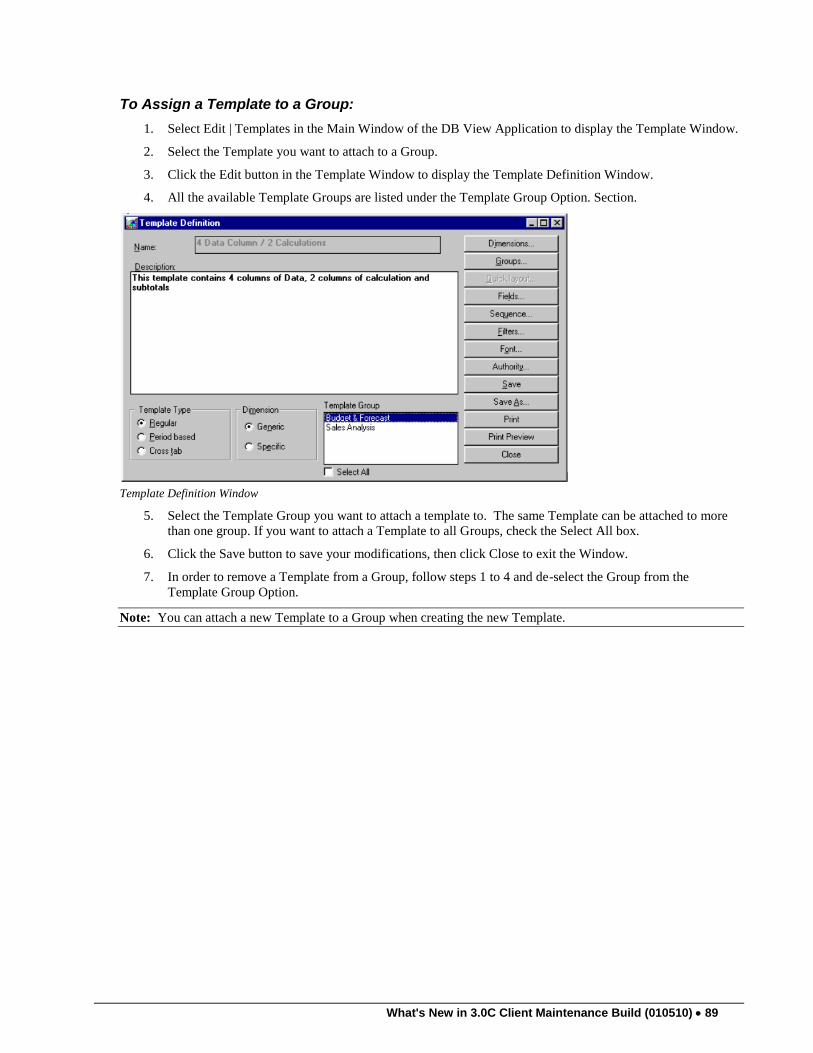
What's New in 3.0C Client Maintenance Build (010510) 89
To Assign a Template to a Group:
1. Select Edit | Templates in the Main Window of the DB View Application to display the Template Window.
2. Select the Template you want to attach to a Group.
3. Click the Edit button in the Template Window to display the Template Definition Window.
4. All the available Template Groups are listed under the Template Group Option. Section.
Template Definition Window
5. Select the Template Group you want to attach a template to. The same Template can be attached to more
than one group. If you want to attach a Template to all Groups, check the Select All box.
6. Click the Save button to save your modifications, then click Close to exit the Window.
7. In order to remove a Template from a Group, follow steps 1 to 4 and de-select the Group from the
Template Group Option.
Note: You can attach a new Template to a Group when creating the new Template.
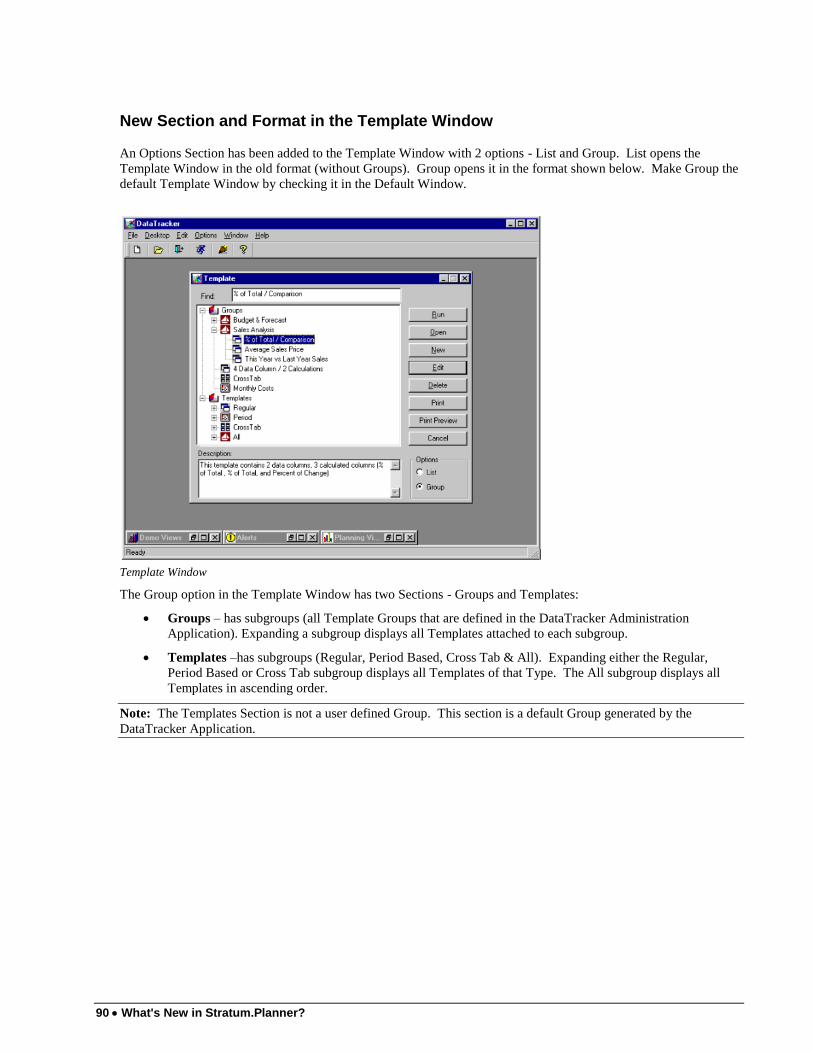
90 What's New in Stratum.Planner?
New Section and Format in the Template Window
An Options Section has been added to the Template Window with 2 options - List and Group. List opens the
Template Window in the old format (without Groups). Group opens it in the format shown below. Make Group the
default Template Window by checking it in the Default Window.
Template Window
The Group option in the Template Window has two Sections - Groups and Templates:
Groups – has subgroups (all Template Groups that are defined in the DataTracker Administration
Application). Expanding a subgroup displays all Templates attached to each subgroup.
Templates –has subgroups (Regular, Period Based, Cross Tab & All). Expanding either the Regular,
Period Based or Cross Tab subgroup displays all Templates of that Type. The All subgroup displays all
Templates in ascending order.
Note: The Templates Section is not a user defined Group. This section is a default Group generated by the
DataTracker Application.
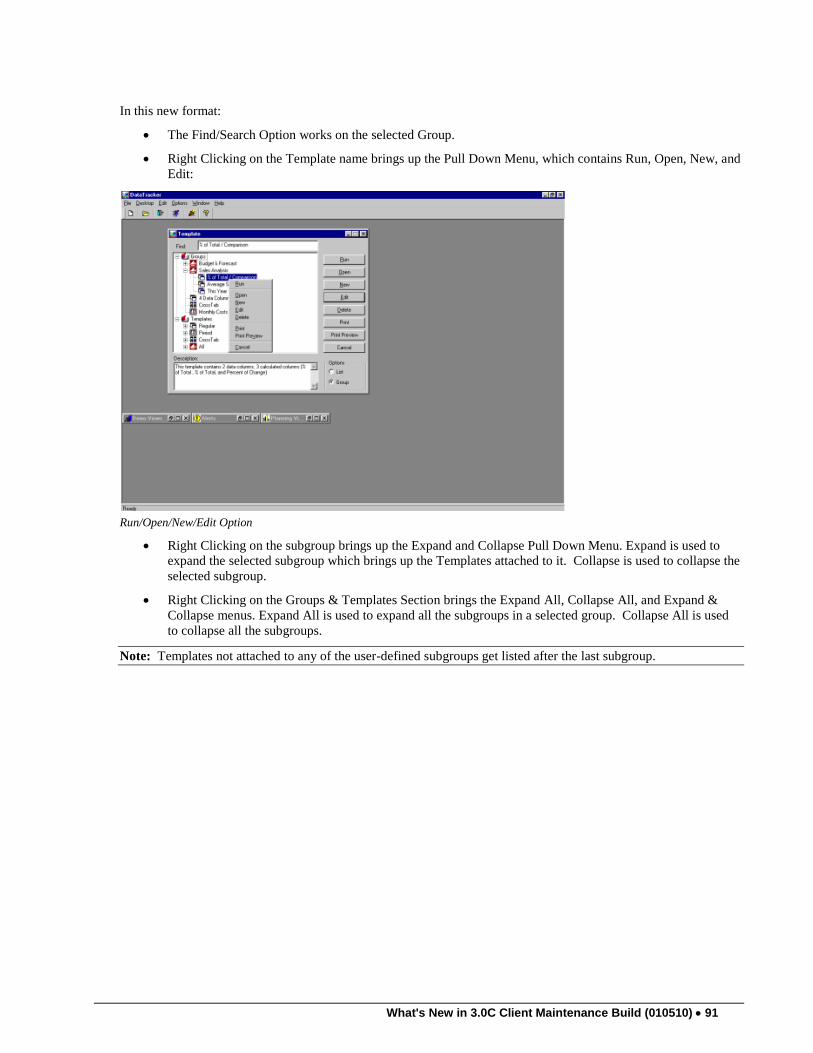
What's New in 3.0C Client Maintenance Build (010510) 91
In this new format:
The Find/Search Option works on the selected Group.
Right Clicking on the Template name brings up the Pull Down Menu, which contains Run, Open, New, and
Edit:
Run/Open/New/Edit Option
Right Clicking on the subgroup brings up the Expand and Collapse Pull Down Menu. Expand is used to
expand the selected subgroup which brings up the Templates attached to it. Collapse is used to collapse the
selected subgroup.
Right Clicking on the Groups & Templates Section brings the Expand All, Collapse All, and Expand &
Collapse menus. Expand All is used to expand all the subgroups in a selected group. Collapse All is used
to collapse all the subgroups.
Note: Templates not attached to any of the user-defined subgroups get listed after the last subgroup.
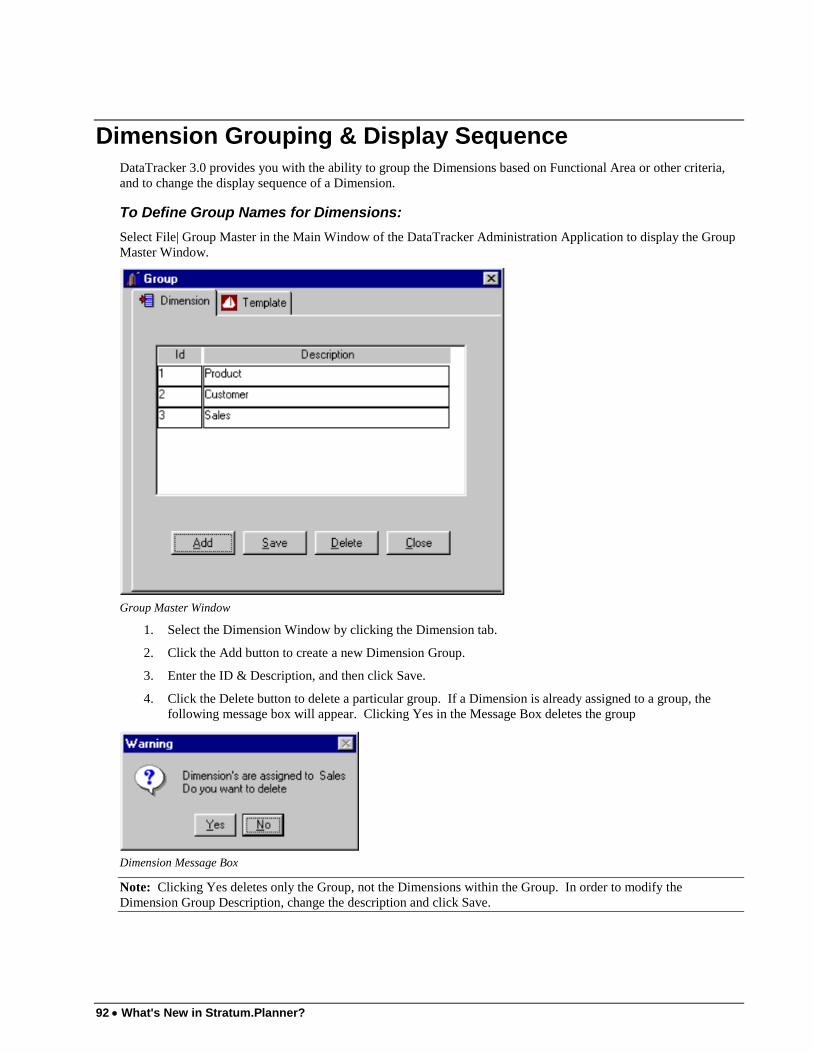
92 What's New in Stratum.Planner?
Dimension Grouping & Display Sequence
DataTracker 3.0 provides you with the ability to group the Dimensions based on Functional Area or other criteria,
and to change the display sequence of a Dimension.
To Define Group Names for Dimensions:
Select File| Group Master in the Main Window of the DataTracker Administration Application to display the Group
Master Window.
Group Master Window
1. Select the Dimension Window by clicking the Dimension tab.
2. Click the Add button to create a new Dimension Group.
3. Enter the ID & Description, and then click Save.
4. Click the Delete button to delete a particular group. If a Dimension is already assigned to a group, the
following message box will appear. Clicking Yes in the Message Box deletes the group
Dimension Message Box
Note: Clicking Yes deletes only the Group, not the Dimensions within the Group. In order to modify the
Dimension Group Description, change the description and click Save.
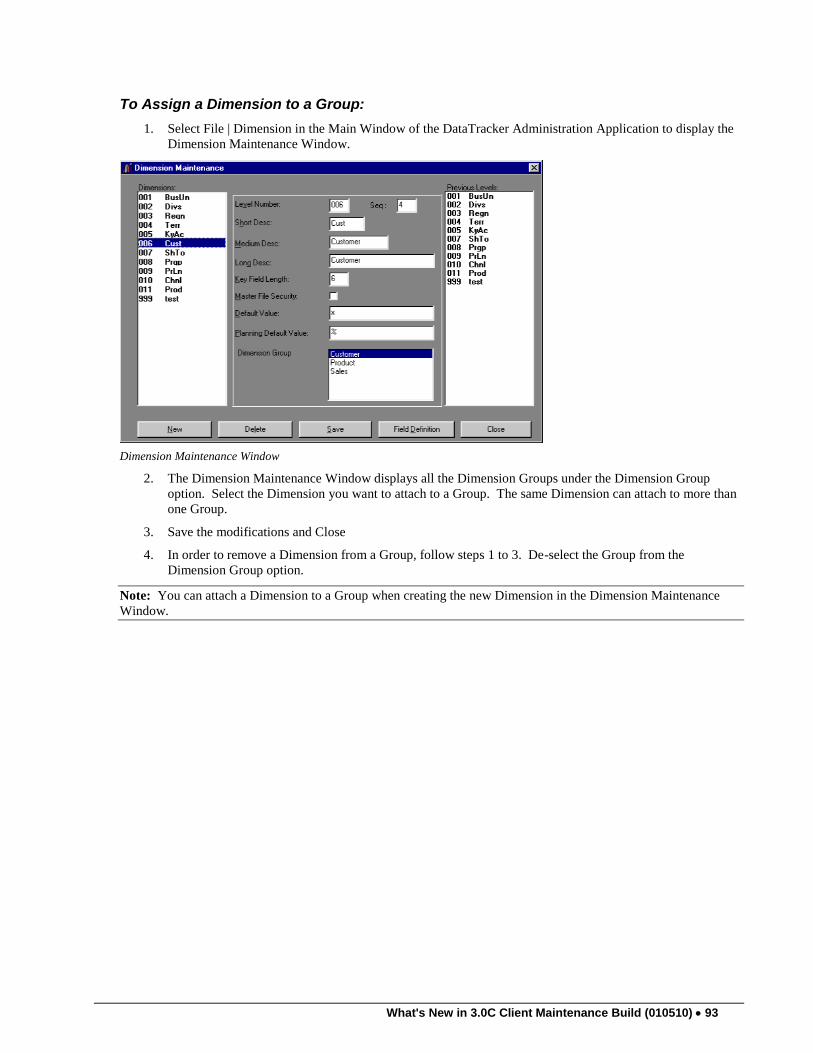
What's New in 3.0C Client Maintenance Build (010510) 93
To Assign a Dimension to a Group:
1. Select File | Dimension in the Main Window of the DataTracker Administration Application to display the
Dimension Maintenance Window.
Dimension Maintenance Window
2. The Dimension Maintenance Window displays all the Dimension Groups under the Dimension Group
option. Select the Dimension you want to attach to a Group. The same Dimension can attach to more than
one Group.
3. Save the modifications and Close
4. In order to remove a Dimension from a Group, follow steps 1 to 3. De-select the Group from the
Dimension Group option.
Note: You can attach a Dimension to a Group when creating the new Dimension in the Dimension Maintenance
Window.
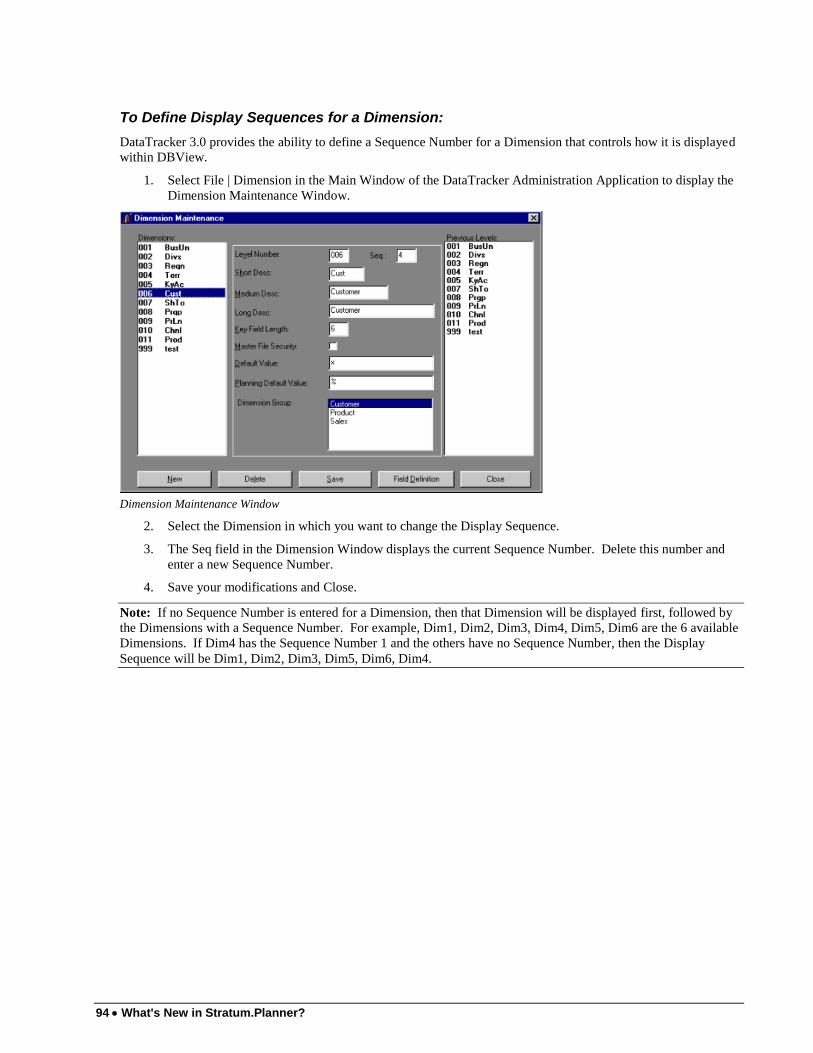
94 What's New in Stratum.Planner?
To Define Display Sequences for a Dimension:
DataTracker 3.0 provides the ability to define a Sequence Number for a Dimension that controls how it is displayed
within DBView.
1. Select File | Dimension in the Main Window of the DataTracker Administration Application to display the
Dimension Maintenance Window.
Dimension Maintenance Window
2. Select the Dimension in which you want to change the Display Sequence.
3. The Seq field in the Dimension Window displays the current Sequence Number. Delete this number and
enter a new Sequence Number.
4. Save your modifications and Close.
Note: If no Sequence Number is entered for a Dimension, then that Dimension will be displayed first, followed by
the Dimensions with a Sequence Number. For example, Dim1, Dim2, Dim3, Dim4, Dim5, Dim6 are the 6 available
Dimensions. If Dim4 has the Sequence Number 1 and the others have no Sequence Number, then the Display
Sequence will be Dim1, Dim2, Dim3, Dim5, Dim6, Dim4.
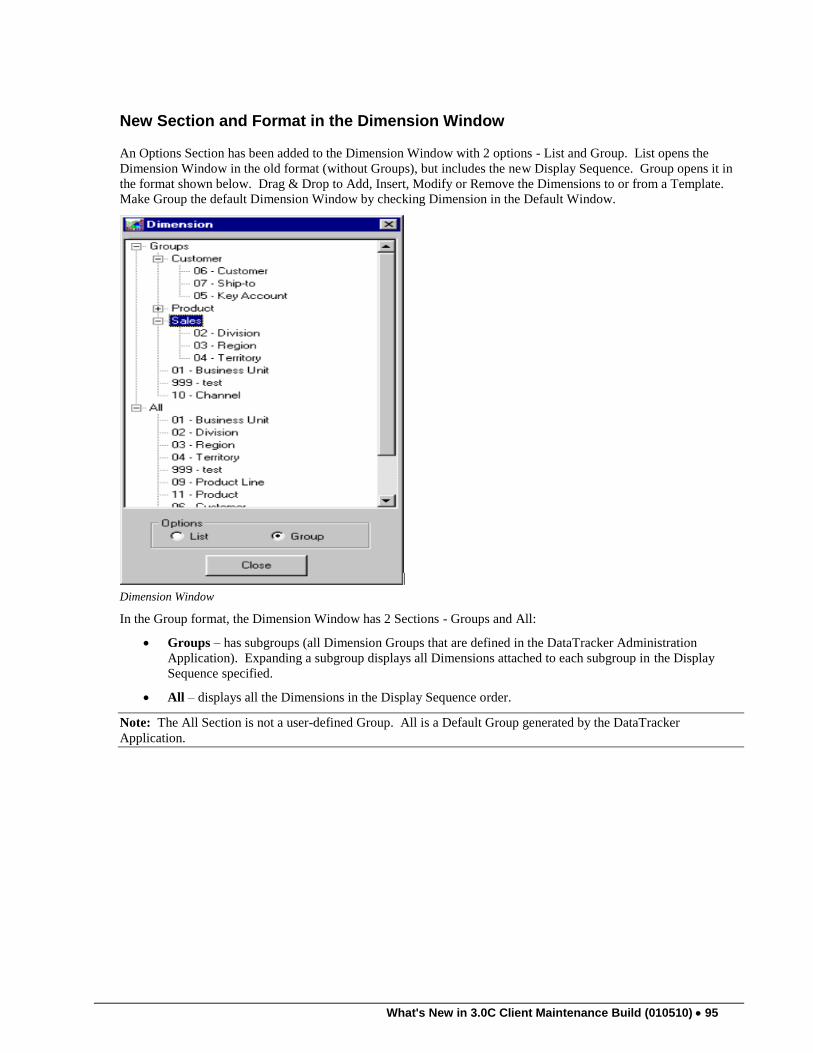
What's New in 3.0C Client Maintenance Build (010510) 95
New Section and Format in the Dimension Window
An Options Section has been added to the Dimension Window with 2 options - List and Group. List opens the
Dimension Window in the old format (without Groups), but includes the new Display Sequence. Group opens it in
the format shown below. Drag & Drop to Add, Insert, Modify or Remove the Dimensions to or from a Template.
Make Group the default Dimension Window by checking Dimension in the Default Window.
Dimension Window
In the Group format, the Dimension Window has 2 Sections - Groups and All:
Groups – has subgroups (all Dimension Groups that are defined in the DataTracker Administration
Application). Expanding a subgroup displays all Dimensions attached to each subgroup in the Display
Sequence specified.
All – displays all the Dimensions in the Display Sequence order.
Note: The All Section is not a user-defined Group. All is a Default Group generated by the DataTracker
Application.
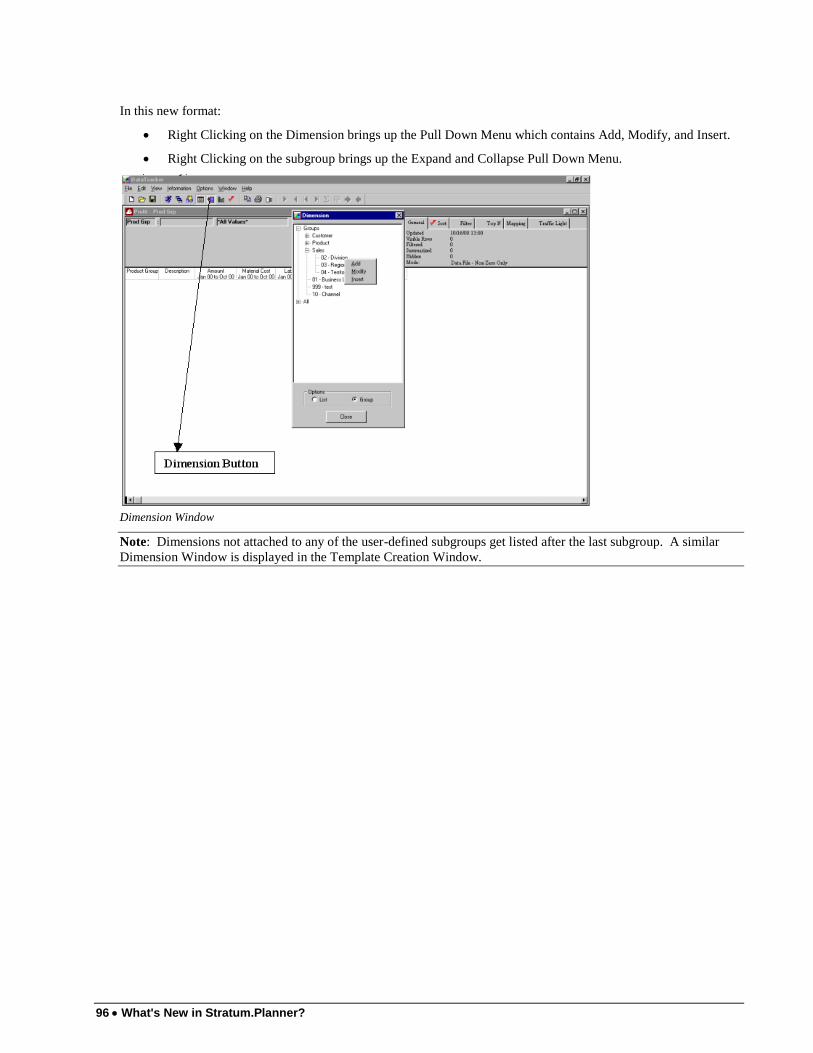
96 What's New in Stratum.Planner?
In this new format:
Right Clicking on the Dimension brings up the Pull Down Menu which contains Add, Modify, and Insert.
Right Clicking on the subgroup brings up the Expand and Collapse Pull Down Menu.
Dimension Window
Note: Dimensions not attached to any of the user-defined subgroups get listed after the last subgroup. A similar
Dimension Window is displayed in the Template Creation Window.
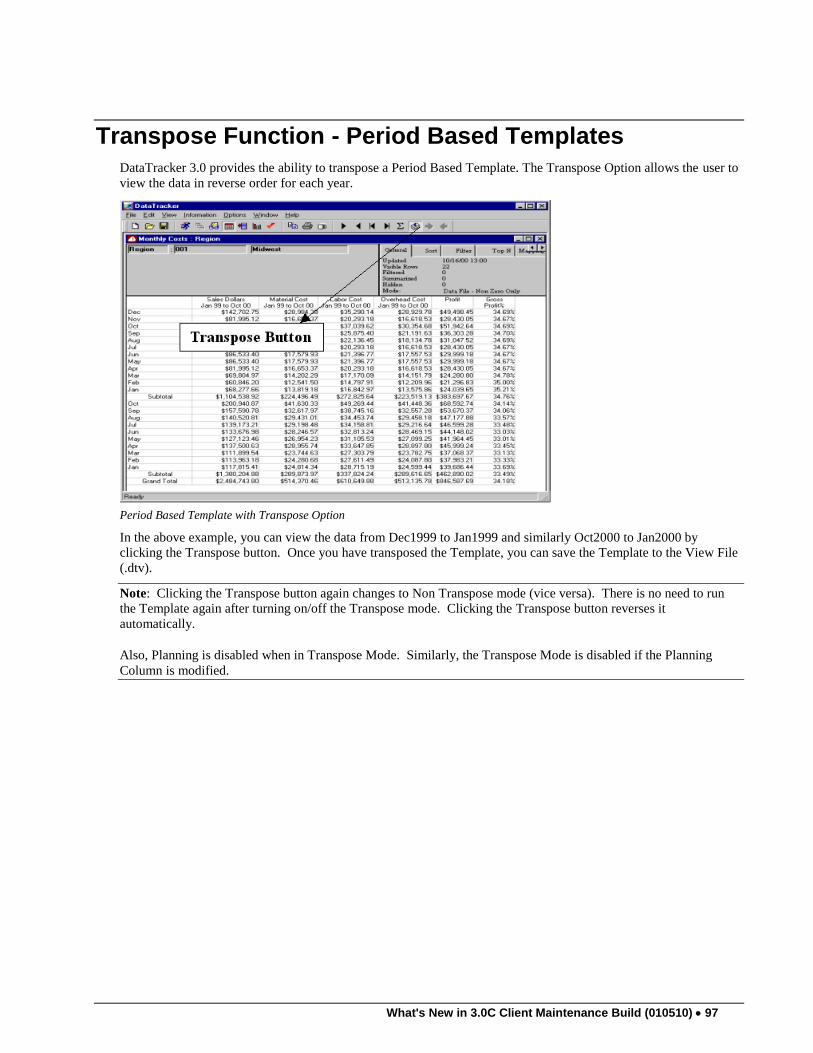
What's New in 3.0C Client Maintenance Build (010510) 97
Transpose Function - Period Based Templates
DataTracker 3.0 provides the ability to transpose a Period Based Template. The Transpose Option allows the user to
view the data in reverse order for each year.
Period Based Template with Transpose Option
In the above example, you can view the data from Dec1999 to Jan1999 and similarly Oct2000 to Jan2000 by
clicking the Transpose button. Once you have transposed the Template, you can save the Template to the View File
(.dtv).
Note: Clicking the Transpose button again changes to Non Transpose mode (vice versa). There is no need to run
the Template again after turning on/off the Transpose mode. Clicking the Transpose button reverses it
automatically.
Also, Planning is disabled when in Transpose Mode. Similarly, the Transpose Mode is disabled if the Planning
Column is modified.

98 What's New in Stratum.Planner?
Lock & Propagate
DataTracker 3.0 provides the ability to lock Data Columns from future propagations. It also provides the ability to
propagate Left, Right and All columns.
Data field detail window
The Lock Option in the Data Field Detail Window allows the user to Lock the Data Column from future
propagations when checked. The Data Column can be locked during the Template creation itself to avoid future
propagation or it can be locked temporarily when needed after opening or running the Template. The locked column
gets modified only if the user modifies the locked column and clicks OK. The user can check and uncheck the Lock
field of the Data Column whenever needed. If the Lock Option in the Data Column is checked during the Template
creation, then the user needs to edit the Template and uncheck the Lock Option in order to remove the column lock
permanently. Similarly, the user must check the Lock Option when editing the Template to permanently lock the
column.
The Data Field Detail Window has Left, Right & All options for Propagation, selected one at a time:
All – Global Propagation. Regardless of which column the user is currently in, selecting this option
propagates the date selections in all columns.
Left –propagates the date selections to the columns left of the current columns.
Right – propagates the date selections to the columns right of the current columns.
Note: Propagation will work only if the box to the right of the date selections is checked.
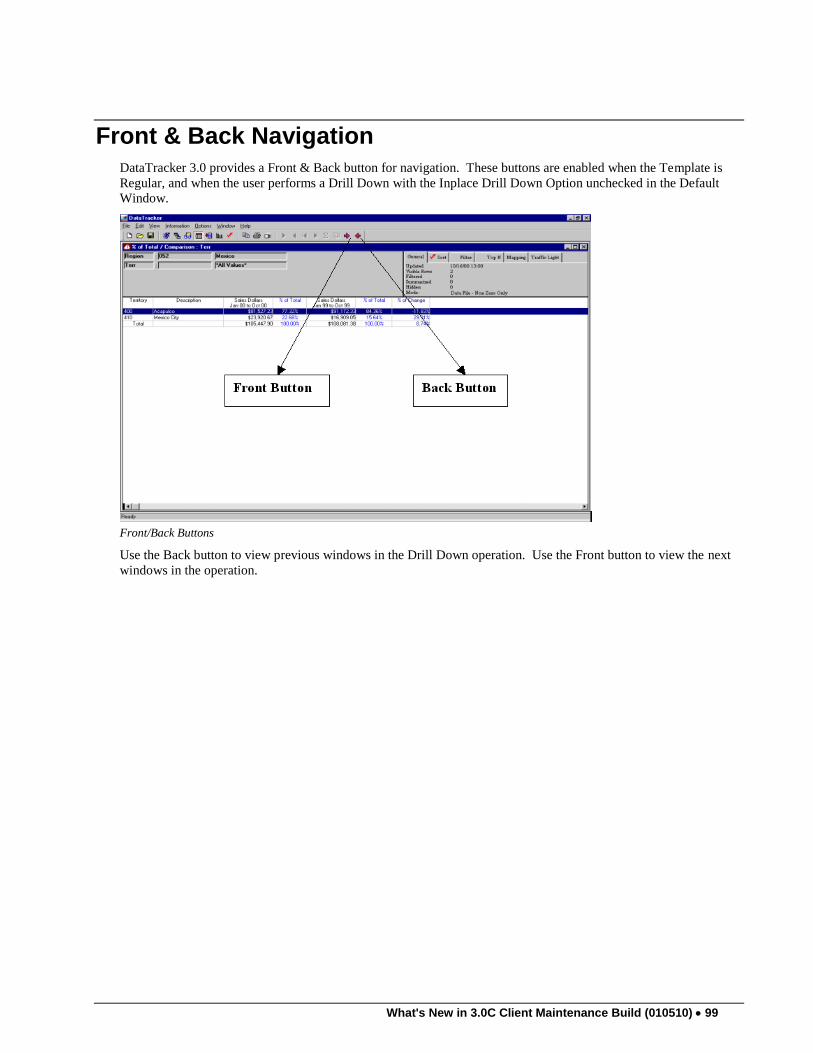
What's New in 3.0C Client Maintenance Build (010510) 99
Front & Back Navigation
DataTracker 3.0 provides a Front & Back button for navigation. These buttons are enabled when the Template is
Regular, and when the user performs a Drill Down with the Inplace Drill Down Option unchecked in the Default
Window.
Front/Back Buttons
Use the Back button to view previous windows in the Drill Down operation. Use the Front button to view the next
windows in the operation.
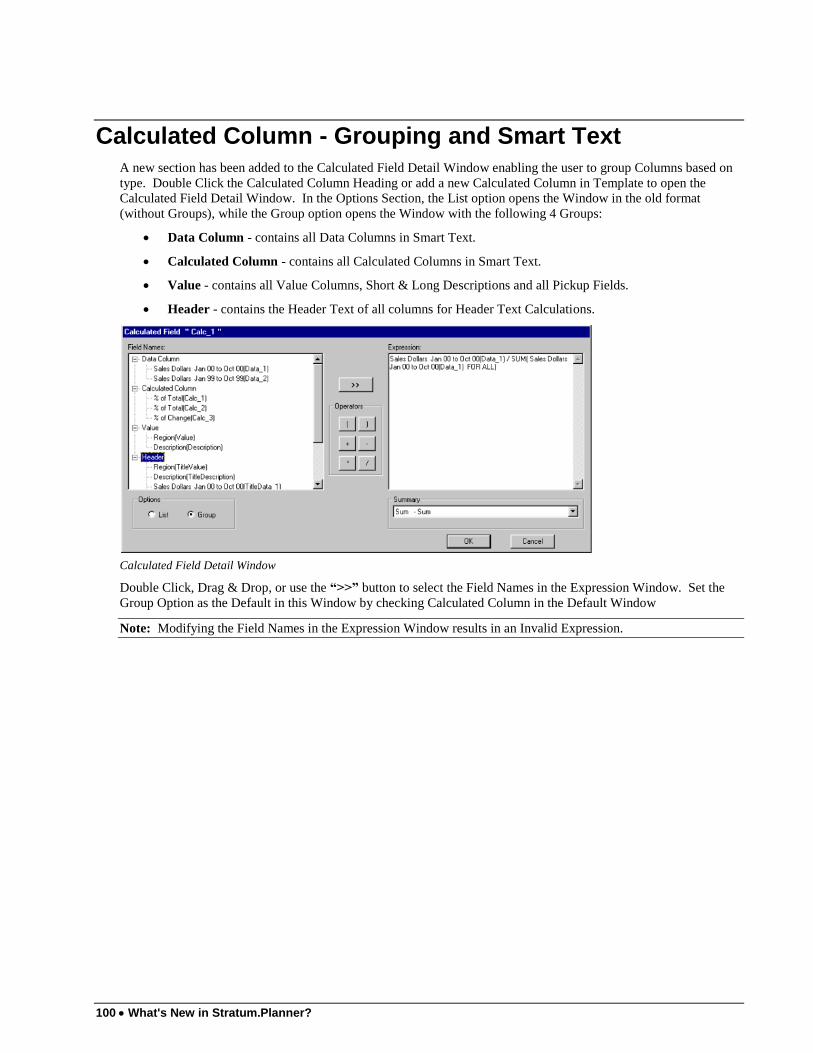
100 What's New in Stratum.Planner?
Calculated Column - Grouping and Smart Text
A new section has been added to the Calculated Field Detail Window enabling the user to group Columns based on
type. Double Click the Calculated Column Heading or add a new Calculated Column in Template to open the
Calculated Field Detail Window. In the Options Section, the List option opens the Window in the old format
(without Groups), while the Group option opens the Window with the following 4 Groups:
Data Column - contains all Data Columns in Smart Text.
Calculated Column - contains all Calculated Columns in Smart Text.
Value - contains all Value Columns, Short & Long Descriptions and all Pickup Fields.
Header - contains the Header Text of all columns for Header Text Calculations.
Calculated Field Detail Window
Double Click, Drag & Drop, or use the “>>” button to select the Field Names in the Expression Window. Set the
Group Option as the Default in this Window by checking Calculated Column in the Default Window
Note: Modifying the Field Names in the Expression Window results in an Invalid Expression.
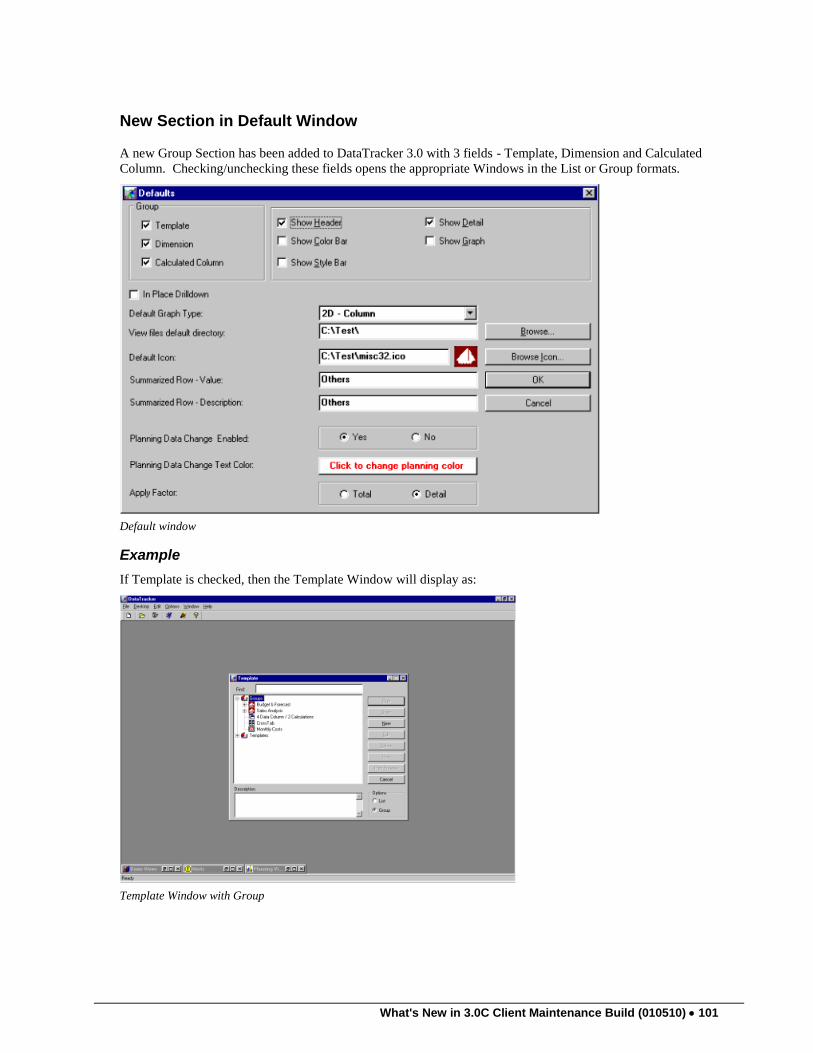
What's New in 3.0C Client Maintenance Build (010510) 101
New Section in Default Window
A new Group Section has been added to DataTracker 3.0 with 3 fields - Template, Dimension and Calculated
Column. Checking/unchecking these fields opens the appropriate Windows in the List or Group formats.
Default window
Example
If Template is checked, then the Template Window will display as:
Template Window with Group
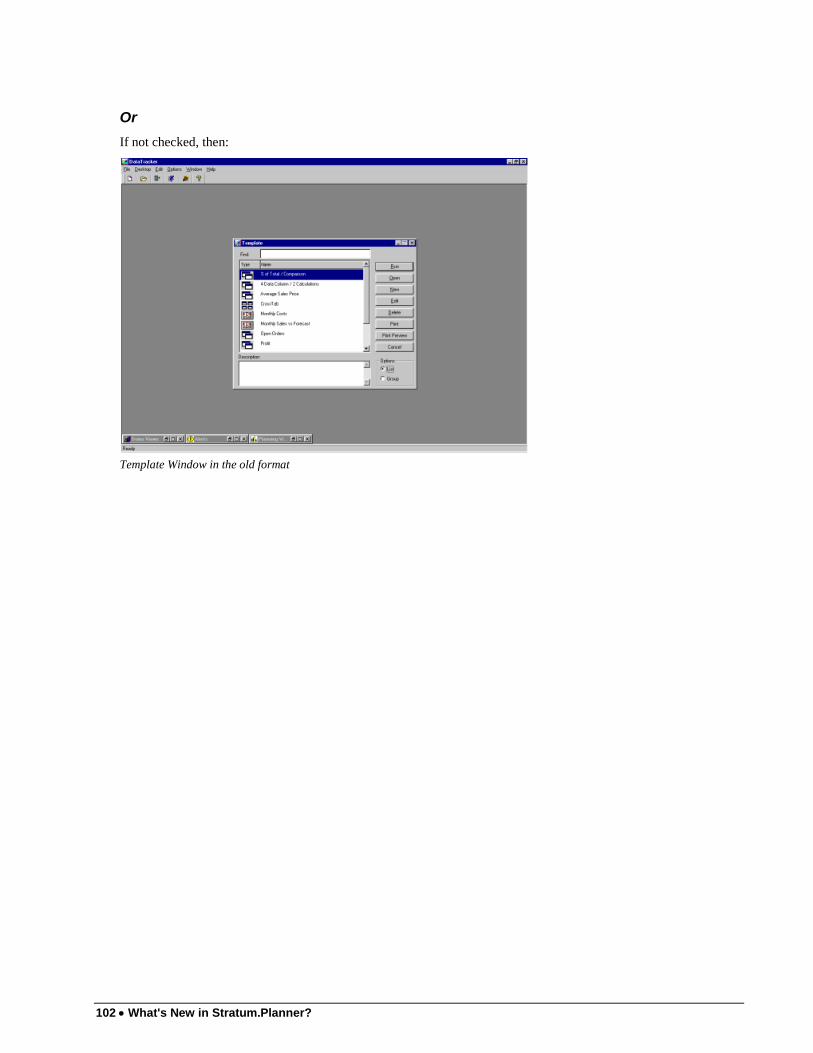
102 What's New in Stratum.Planner?
Or
If not checked, then:
Template Window in the old format
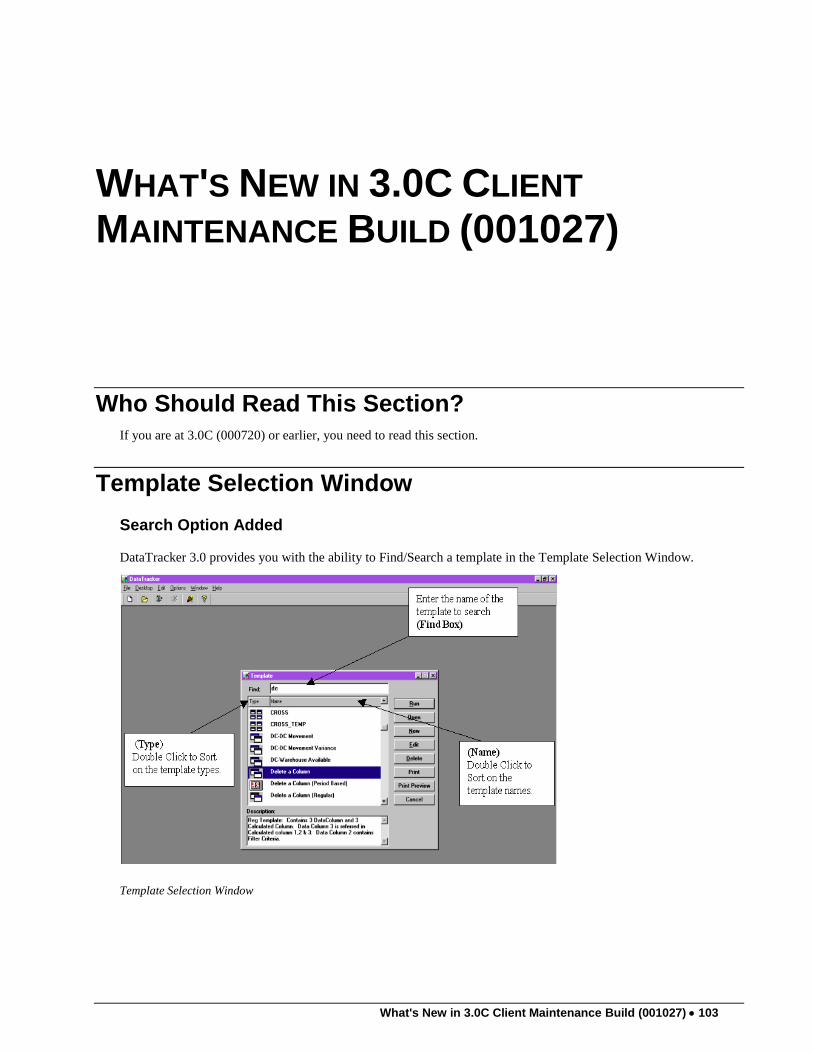
What's New in 3.0C Client Maintenance Build (001027) 103
WHAT'S NEW IN 3.0C CLIENT
MAINTENANCE BUILD (001027)
Who Should Read This Section? If you are at 3.0C (000720) or earlier, you need to read this section.
Template Selection Window
Search Option Added
DataTracker 3.0 provides you with the ability to Find/Search a template in the Template Selection Window.
Template Selection Window
104 What's New in Stratum.Planner?
To Search:
1. Begin by entering characters in the find box. As you enter, the Template Window will highlight the nearest
match found. For example, typing „D‟ will highlight the first template beginning with D, such as “DC-DC
Movement". Typing characters „DE‟ will highlight the nearest match template name, such as “Delete a
Column”.
2. Scroll down until you reach the particular highlighted template. You may also enter the complete name of
the template to highlight it immediately.
To Sort:
1. Based on Type - double click the Type option in the heading. It will sort the list in X-tab, Period Based or
Regular order. Consecutive double clicks on the Type option will sort the list the reverse order (Regular,
Period Based & X-tab).
2. Based on Template Name - double click the Name option in the heading. It will sort the list in ascending
order. Consecutive double clicks on the Name option will sort it in descending order.
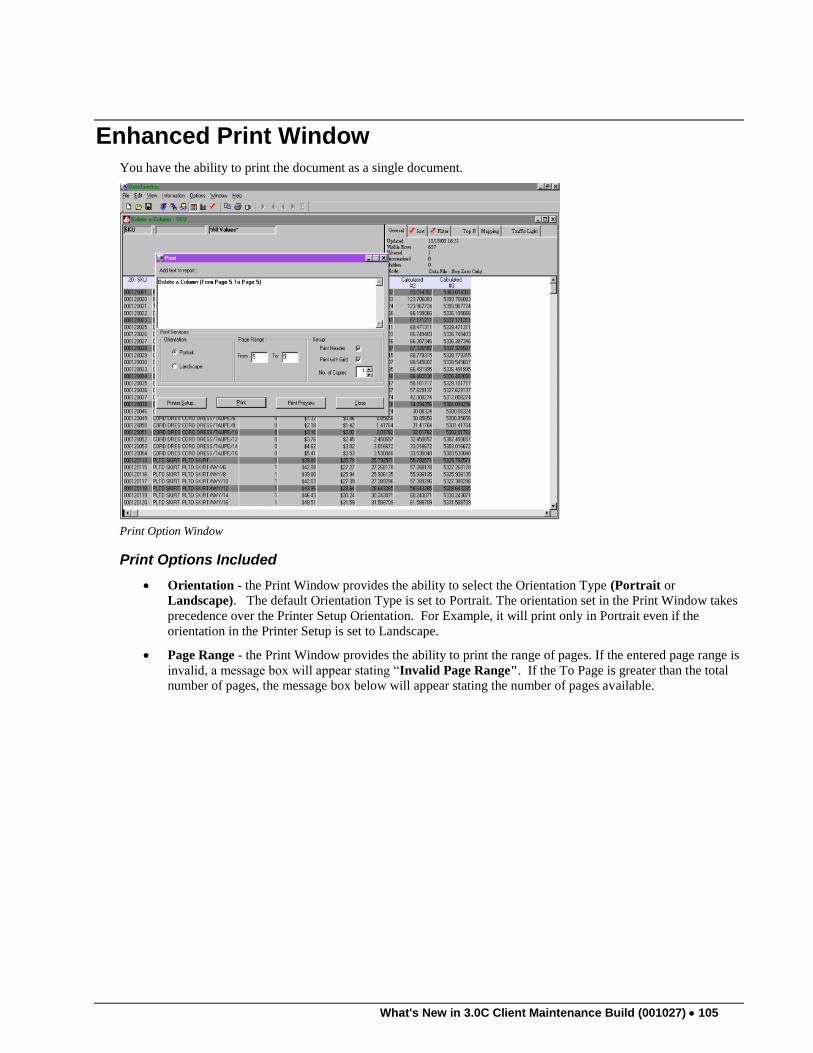
What's New in 3.0C Client Maintenance Build (001027) 105
Enhanced Print Window
You have the ability to print the document as a single document.
Print Option Window
Print Options Included
Orientation - the Print Window provides the ability to select the Orientation Type (Portrait or
Landscape). The default Orientation Type is set to Portrait. The orientation set in the Print Window takes
precedence over the Printer Setup Orientation. For Example, it will print only in Portrait even if the
orientation in the Printer Setup is set to Landscape.
Page Range - the Print Window provides the ability to print the range of pages. If the entered page range is
invalid, a message box will appear stating “Invalid Page Range". If the To Page is greater than the total
number of pages, the message box below will appear stating the number of pages available.
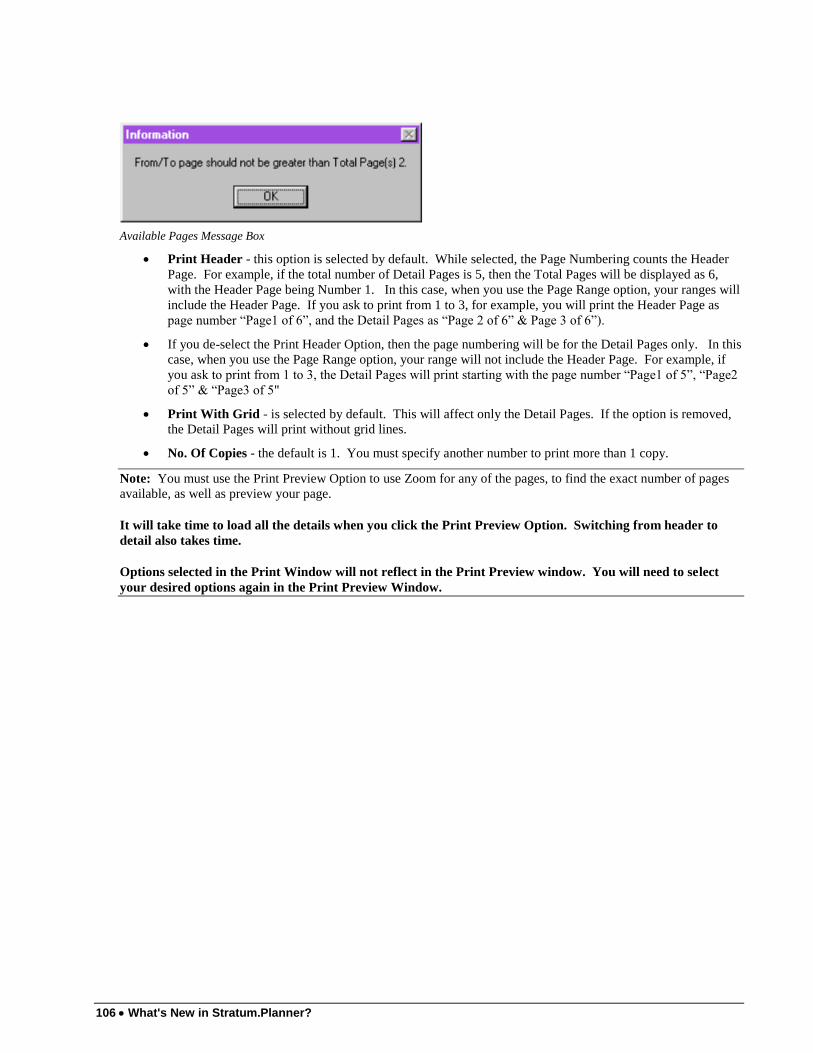
106 What's New in Stratum.Planner?
Available Pages Message Box
Print Header - this option is selected by default. While selected, the Page Numbering counts the Header
Page. For example, if the total number of Detail Pages is 5, then the Total Pages will be displayed as 6,
with the Header Page being Number 1. In this case, when you use the Page Range option, your ranges will
include the Header Page. If you ask to print from 1 to 3, for example, you will print the Header Page as
page number “Page1 of 6”, and the Detail Pages as “Page 2 of 6” & Page 3 of 6”).
If you de-select the Print Header Option, then the page numbering will be for the Detail Pages only. In this
case, when you use the Page Range option, your range will not include the Header Page. For example, if
you ask to print from 1 to 3, the Detail Pages will print starting with the page number “Page1 of 5”, “Page2
of 5” & “Page3 of 5"
Print With Grid - is selected by default. This will affect only the Detail Pages. If the option is removed,
the Detail Pages will print without grid lines.
No. Of Copies - the default is 1. You must specify another number to print more than 1 copy.
Note: You must use the Print Preview Option to use Zoom for any of the pages, to find the exact number of pages
available, as well as preview your page.
It will take time to load all the details when you click the Print Preview Option. Switching from header to
detail also takes time.
Options selected in the Print Window will not reflect in the Print Preview window. You will need to select
your desired options again in the Print Preview Window.
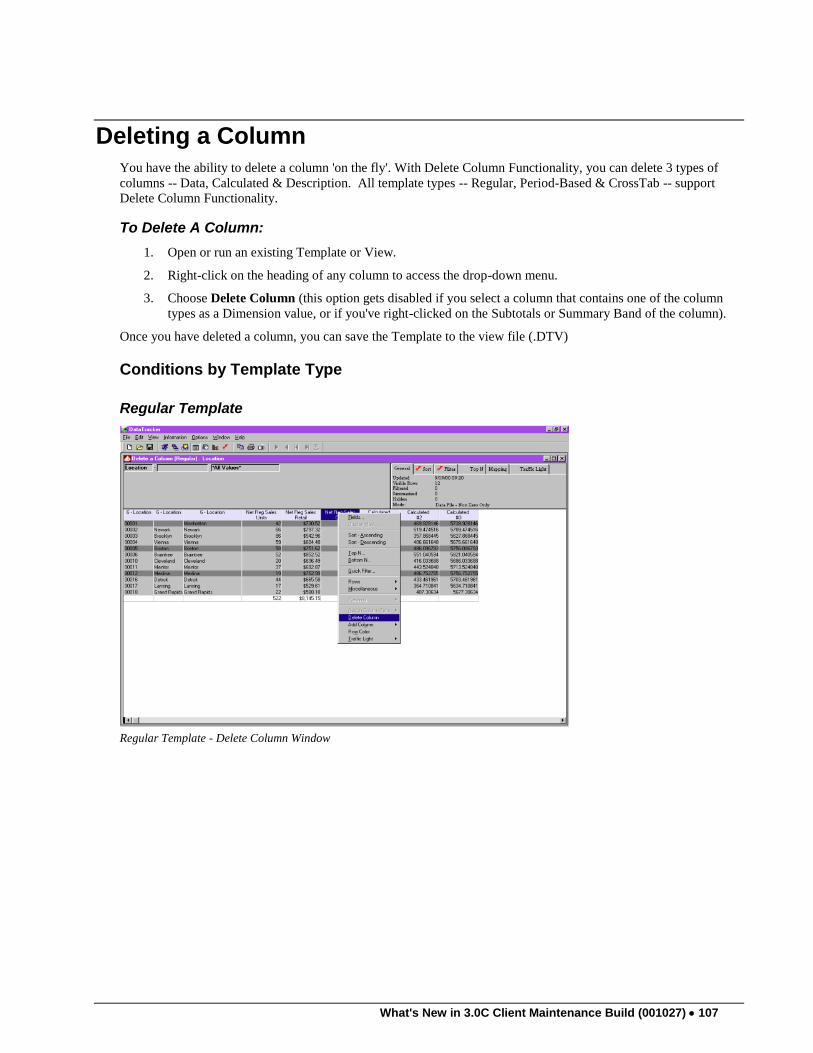
What's New in 3.0C Client Maintenance Build (001027) 107
Deleting a Column
You have the ability to delete a column 'on the fly'. With Delete Column Functionality, you can delete 3 types of
columns -- Data, Calculated & Description. All template types -- Regular, Period-Based & CrossTab -- support
Delete Column Functionality.
To Delete A Column:
1. Open or run an existing Template or View.
2. Right-click on the heading of any column to access the drop-down menu.
3. Choose Delete Column (this option gets disabled if you select a column that contains one of the column
types as a Dimension value, or if you've right-clicked on the Subtotals or Summary Band of the column).
Once you have deleted a column, you can save the Template to the view file (.DTV)
Conditions by Template Type
Regular Template
Regular Template - Delete Column Window
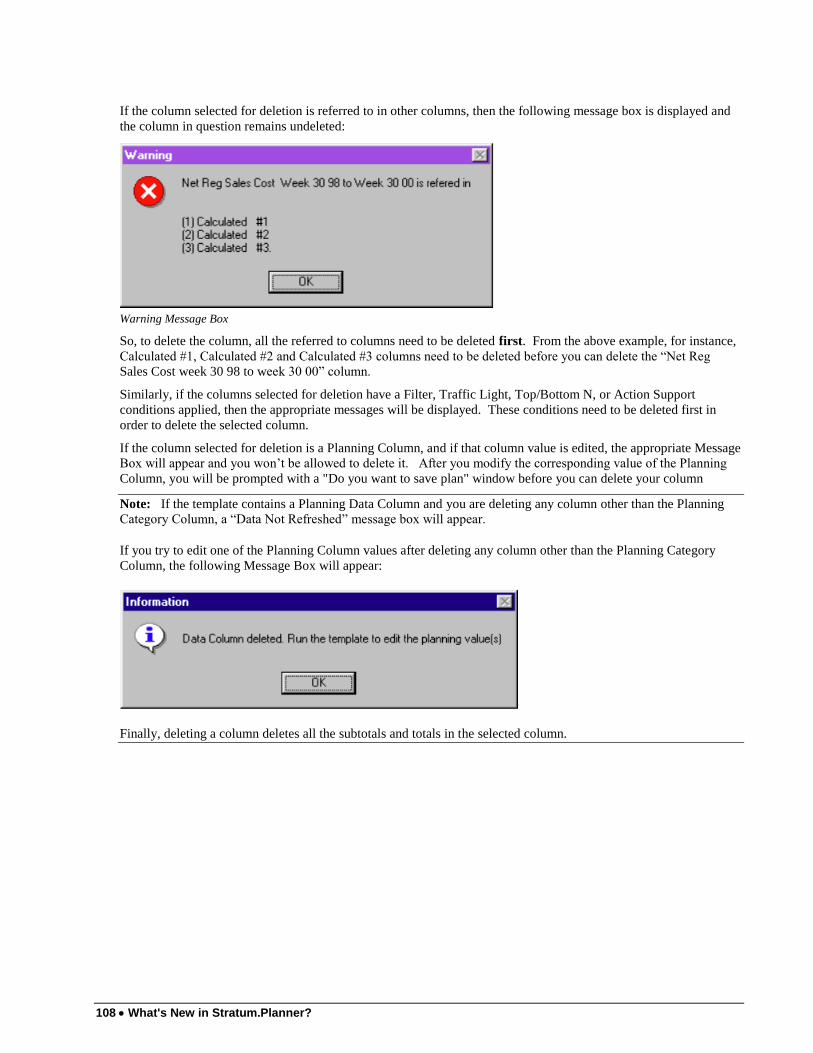
108 What's New in Stratum.Planner?
If the column selected for deletion is referred to in other columns, then the following message box is displayed and
the column in question remains undeleted:
Warning Message Box
So, to delete the column, all the referred to columns need to be deleted first. From the above example, for instance,
Calculated #1, Calculated #2 and Calculated #3 columns need to be deleted before you can delete the “Net Reg
Sales Cost week 30 98 to week 30 00” column.
Similarly, if the columns selected for deletion have a Filter, Traffic Light, Top/Bottom N, or Action Support
conditions applied, then the appropriate messages will be displayed. These conditions need to be deleted first in
order to delete the selected column.
If the column selected for deletion is a Planning Column, and if that column value is edited, the appropriate Message
Box will appear and you won‟t be allowed to delete it. After you modify the corresponding value of the Planning
Column, you will be prompted with a "Do you want to save plan" window before you can delete your column
Note: If the template contains a Planning Data Column and you are deleting any column other than the Planning
Category Column, a “Data Not Refreshed” message box will appear.
If you try to edit one of the Planning Column values after deleting any column other than the Planning Category
Column, the following Message Box will appear:
Finally, deleting a column deletes all the subtotals and totals in the selected column.
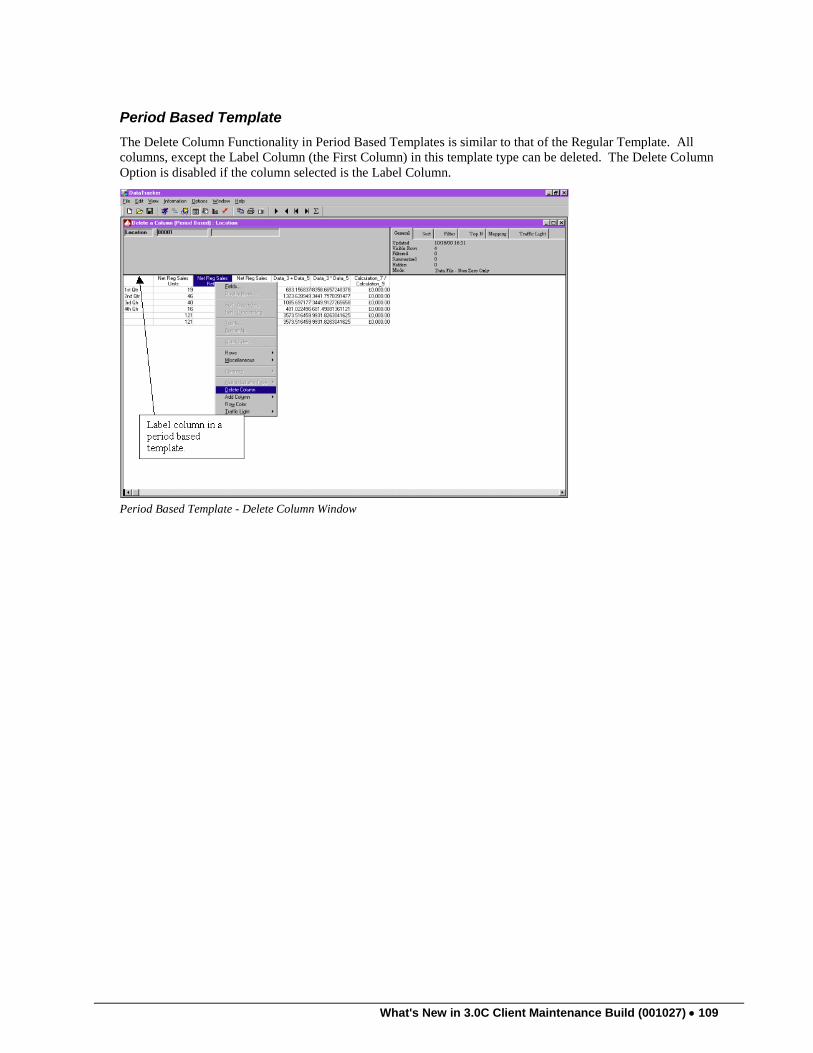
What's New in 3.0C Client Maintenance Build (001027) 109
Period Based Template
The Delete Column Functionality in Period Based Templates is similar to that of the Regular Template. All
columns, except the Label Column (the First Column) in this template type can be deleted. The Delete Column
Option is disabled if the column selected is the Label Column.
Period Based Template - Delete Column Window
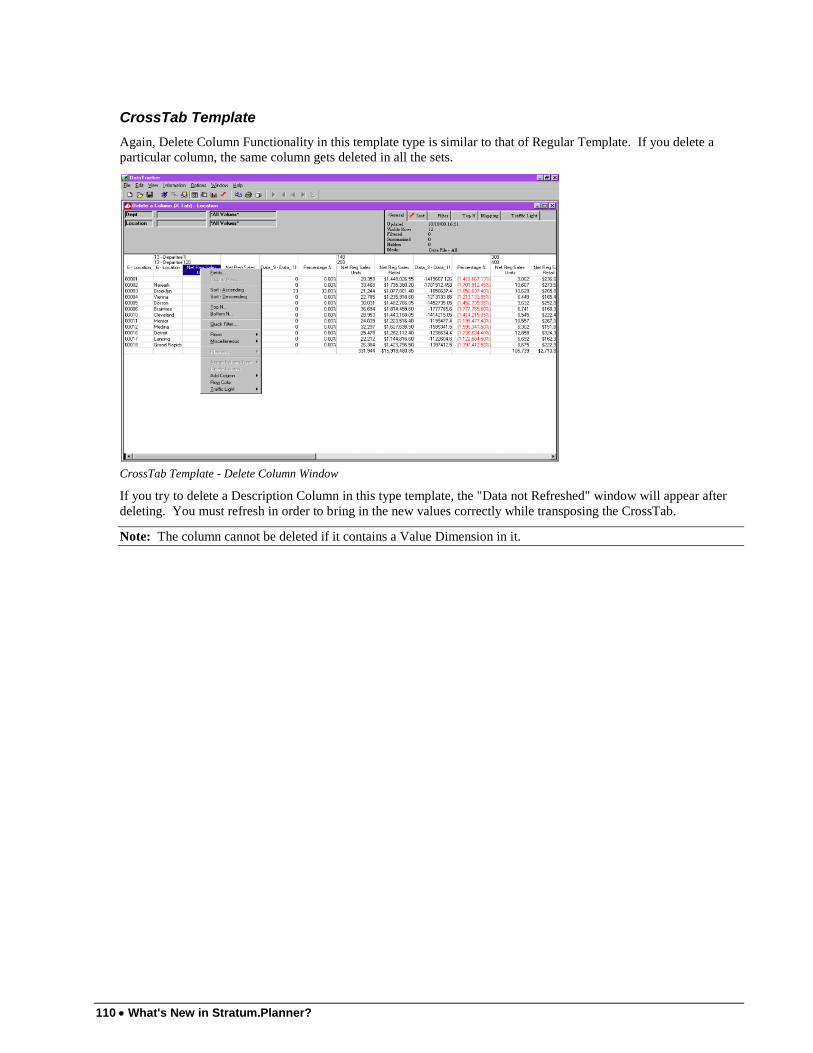
110 What's New in Stratum.Planner?
CrossTab Template
Again, Delete Column Functionality in this template type is similar to that of Regular Template. If you delete a
particular column, the same column gets deleted in all the sets.
CrossTab Template - Delete Column Window
If you try to delete a Description Column in this type template, the "Data not Refreshed" window will appear after
deleting. You must refresh in order to bring in the new values correctly while transposing the CrossTab.
Note: The column cannot be deleted if it contains a Value Dimension in it.
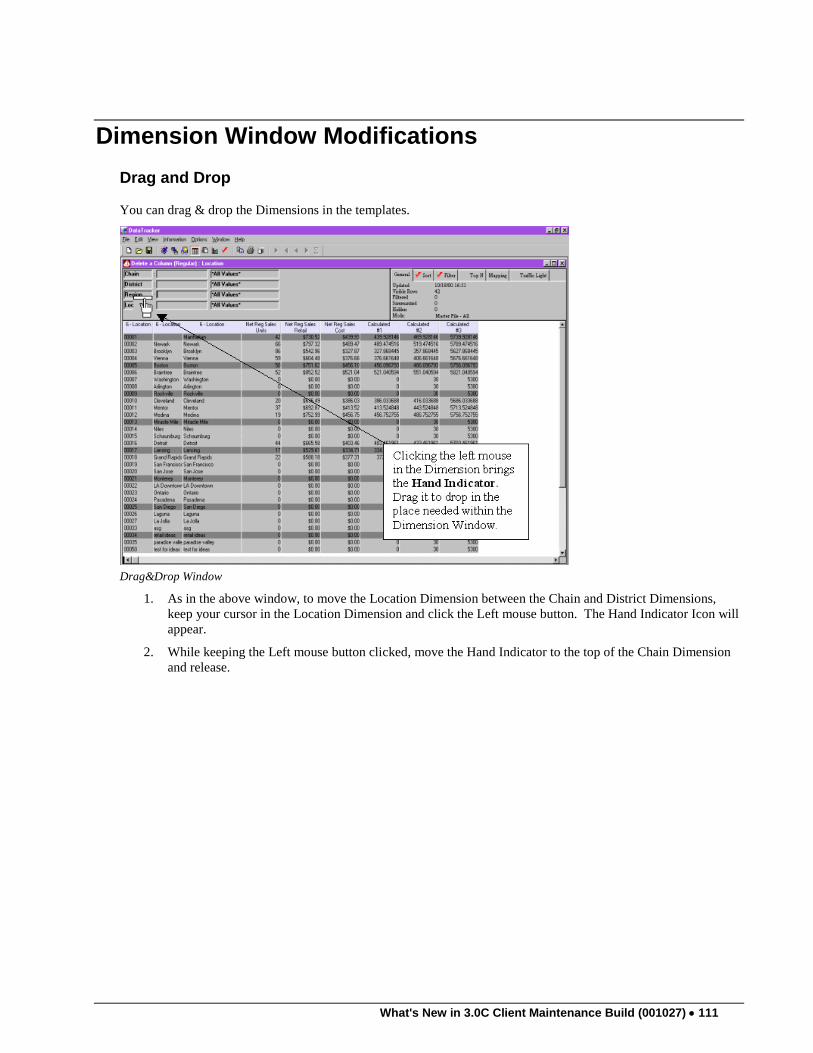
What's New in 3.0C Client Maintenance Build (001027) 111
Dimension Window Modifications
Drag and Drop
You can drag & drop the Dimensions in the templates.
Drag&Drop Window
1. As in the above window, to move the Location Dimension between the Chain and District Dimensions,
keep your cursor in the Location Dimension and click the Left mouse button. The Hand Indicator Icon will
appear.
2. While keeping the Left mouse button clicked, move the Hand Indicator to the top of the Chain Dimension
and release.
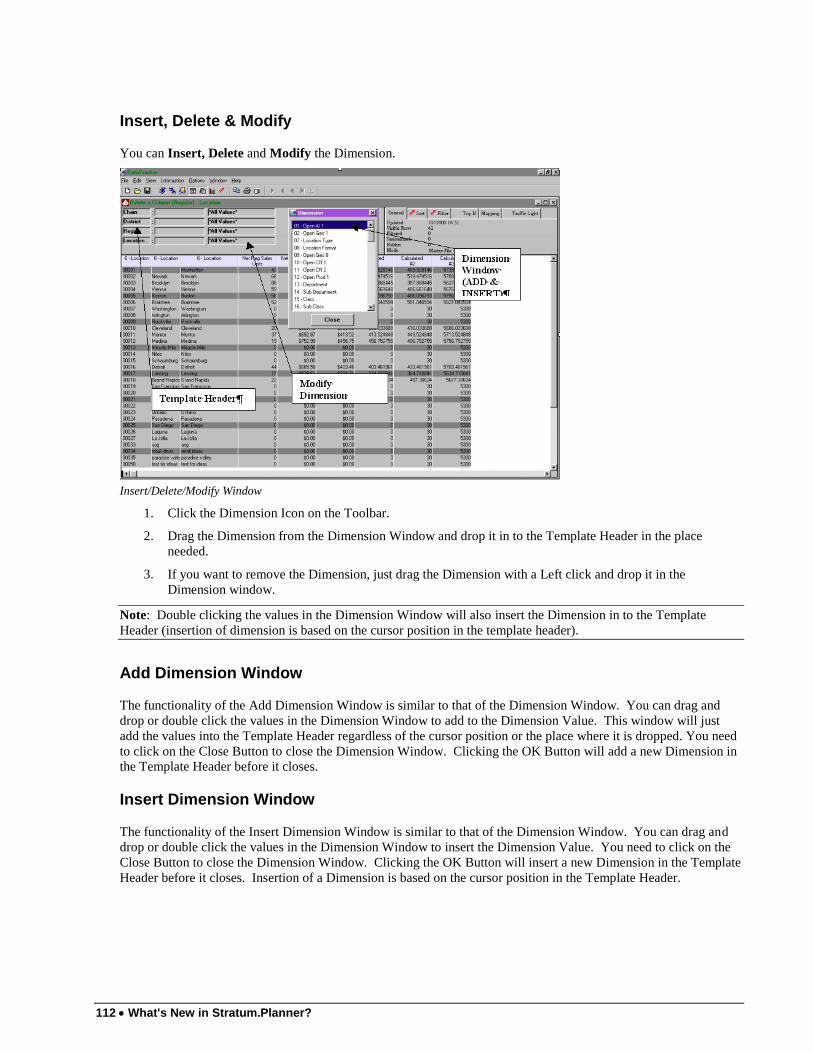
112 What's New in Stratum.Planner?
Insert, Delete & Modify
You can Insert, Delete and Modify the Dimension.
Insert/Delete/Modify Window
1. Click the Dimension Icon on the Toolbar.
2. Drag the Dimension from the Dimension Window and drop it in to the Template Header in the place
needed.
3. If you want to remove the Dimension, just drag the Dimension with a Left click and drop it in the
Dimension window.
Note: Double clicking the values in the Dimension Window will also insert the Dimension in to the Template
Header (insertion of dimension is based on the cursor position in the template header).
Add Dimension Window
The functionality of the Add Dimension Window is similar to that of the Dimension Window. You can drag and
drop or double click the values in the Dimension Window to add to the Dimension Value. This window will just
add the values into the Template Header regardless of the cursor position or the place where it is dropped. You need
to click on the Close Button to close the Dimension Window. Clicking the OK Button will add a new Dimension in
the Template Header before it closes.
Insert Dimension Window
The functionality of the Insert Dimension Window is similar to that of the Dimension Window. You can drag and
drop or double click the values in the Dimension Window to insert the Dimension Value. You need to click on the
Close Button to close the Dimension Window. Clicking the OK Button will insert a new Dimension in the Template
Header before it closes. Insertion of a Dimension is based on the cursor position in the Template Header.
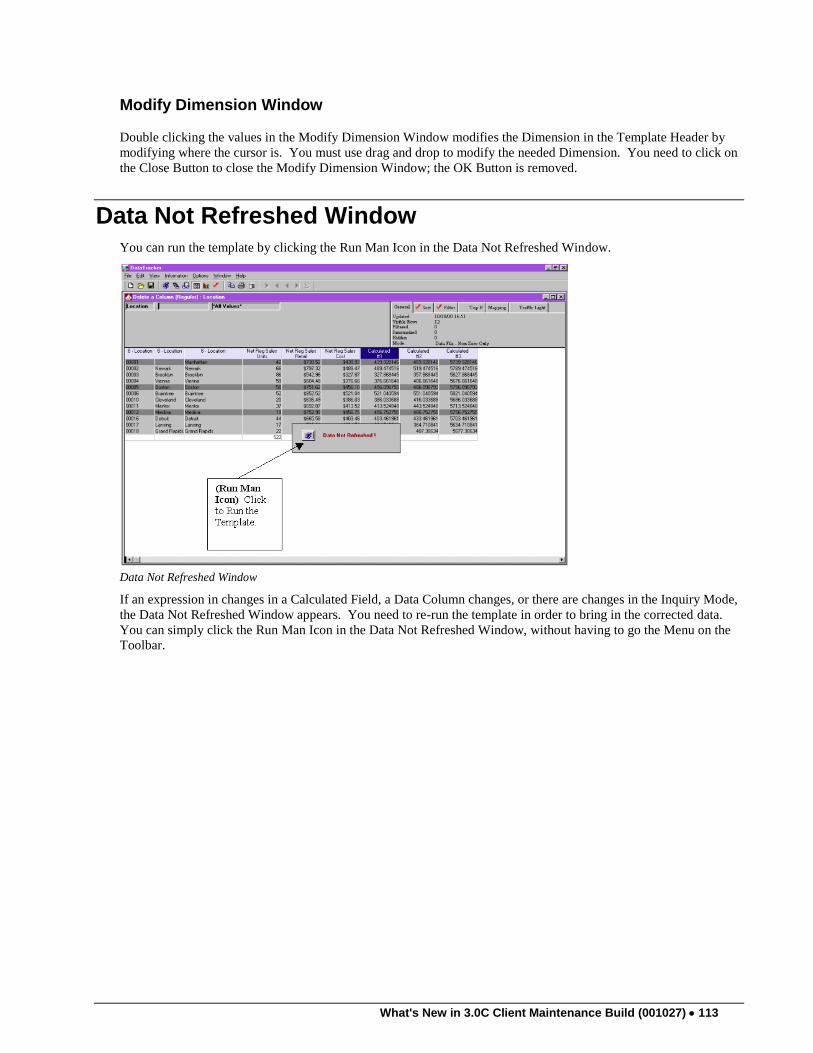
What's New in 3.0C Client Maintenance Build (001027) 113
Modify Dimension Window
Double clicking the values in the Modify Dimension Window modifies the Dimension in the Template Header by
modifying where the cursor is. You must use drag and drop to modify the needed Dimension. You need to click on
the Close Button to close the Modify Dimension Window; the OK Button is removed.
Data Not Refreshed Window
You can run the template by clicking the Run Man Icon in the Data Not Refreshed Window.
Data Not Refreshed Window
If an expression in changes in a Calculated Field, a Data Column changes, or there are changes in the Inquiry Mode,
the Data Not Refreshed Window appears. You need to re-run the template in order to bring in the corrected data.
You can simply click the Run Man Icon in the Data Not Refreshed Window, without having to go the Menu on the
Toolbar.
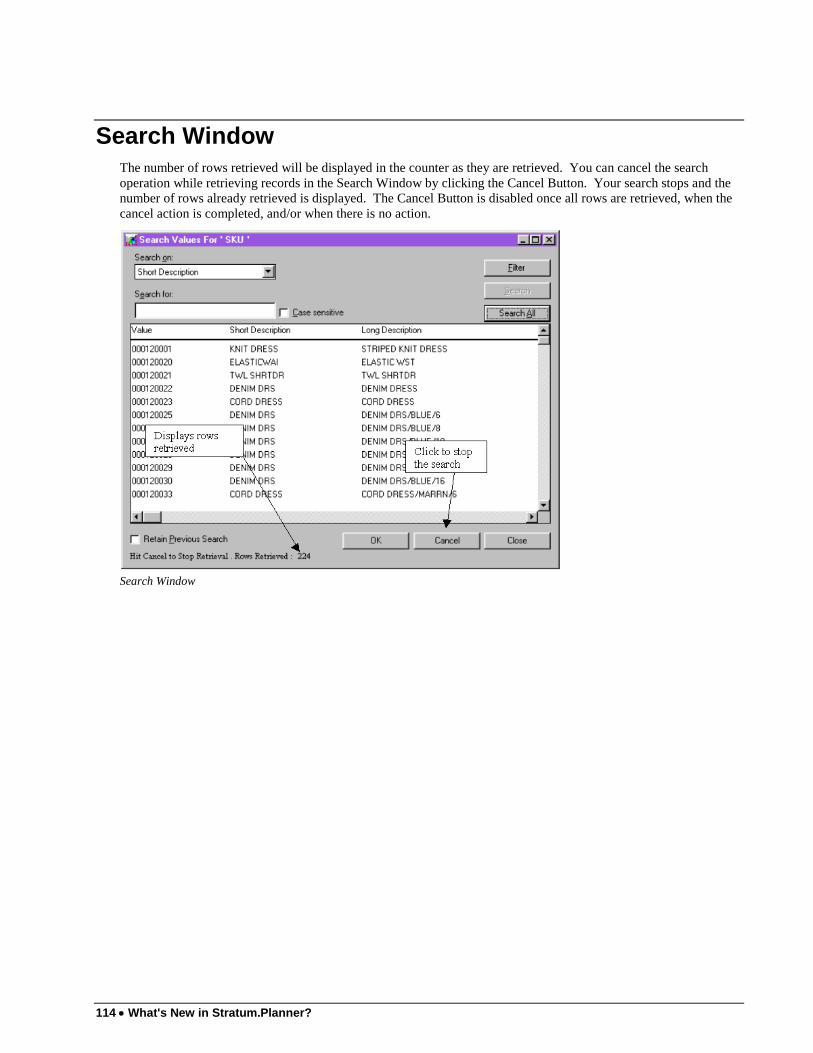
114 What's New in Stratum.Planner?
Search Window
The number of rows retrieved will be displayed in the counter as they are retrieved. You can cancel the search
operation while retrieving records in the Search Window by clicking the Cancel Button. Your search stops and the
number of rows already retrieved is displayed. The Cancel Button is disabled once all rows are retrieved, when the
cancel action is completed, and/or when there is no action.
Search Window

What's New in 3.0C Client Maintenance Build (001027) 115
Notes