Embed Size (px)
Citation preview
1
ArcGIS Components
In this Chapter you will learn
The different components of ArcGIS: ArcMap, ArcCatalog and ArcToolbox
About the differences between ArcView, ArcEditor and ArcInfo
1. Different components of ArcGIS desktop
There are three main components that together make up the ArcGIS Desktop software. All three
components are shown in figure 1.1.
Figure 1.1. (A) ArcMap is
used to display
geographic data, do
analyses and make maps.
(B) Data is organized,
copied and pasted using
ArcCatalog. ArcCatalog
can be accessed by itself,
or as part of the ArcMap
interface (C). Many of the
geospatial analyses and
geoprocessing
capabilities are accessed
through ArcToolbox (D).
2
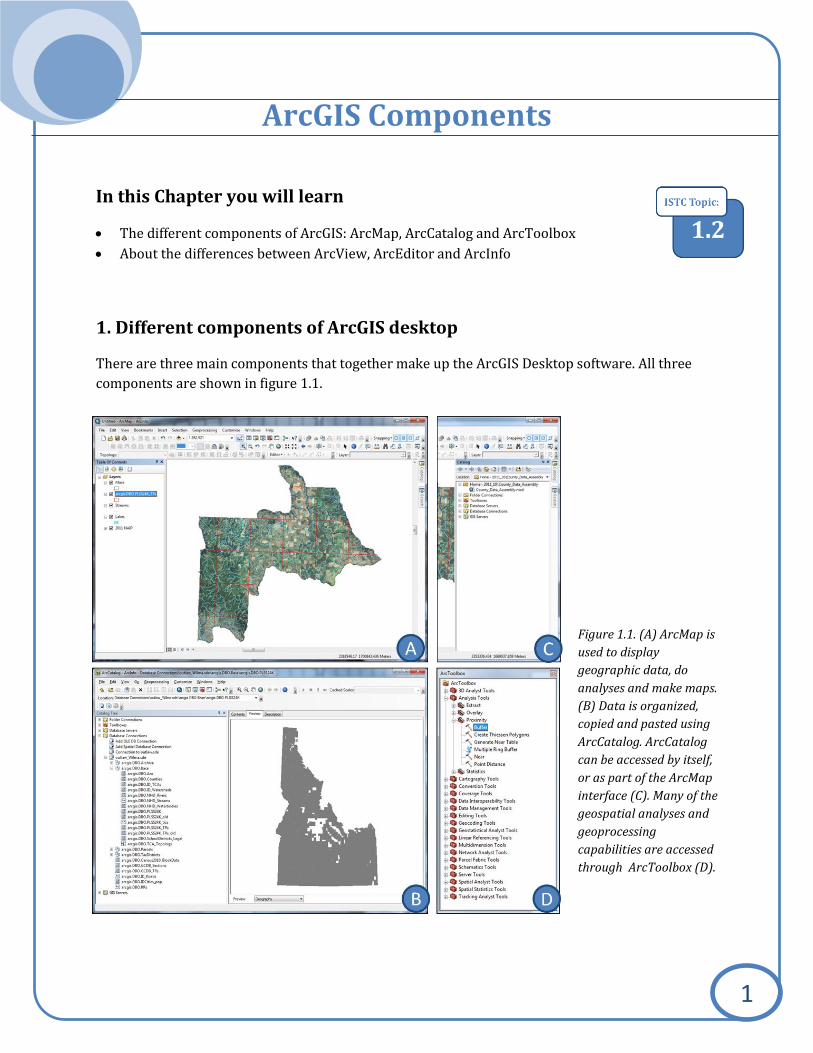
Exercise 1: Starting ArcMap and exploring a map document
1. Go to Start > All Programs > ArcGIS > ArcMap 10 to start the GIS program
2. Open the Downtown_Boise.mxd inside the Topic1_2 folder as shown below
3. The map you see has three
different layers: roads, parcel
and an aerial photo of a small
area in Boise. You can turn layers
on and off by checking, and un-
checking the boxes in front of the
layer name. Remove the check
mark in front of the Parcel layer
and you will no longer see the
parcels.
4. The Roads layer contains line features and the Parcel layer contains polygon features. One
feature would be one line segment, or one road. An important strength of a GIS system is that
features are associated with attributes, or pieces of information about each and every feature.
5. Click on the Identify Tool as shown below and then click on any parcel on your map.
3
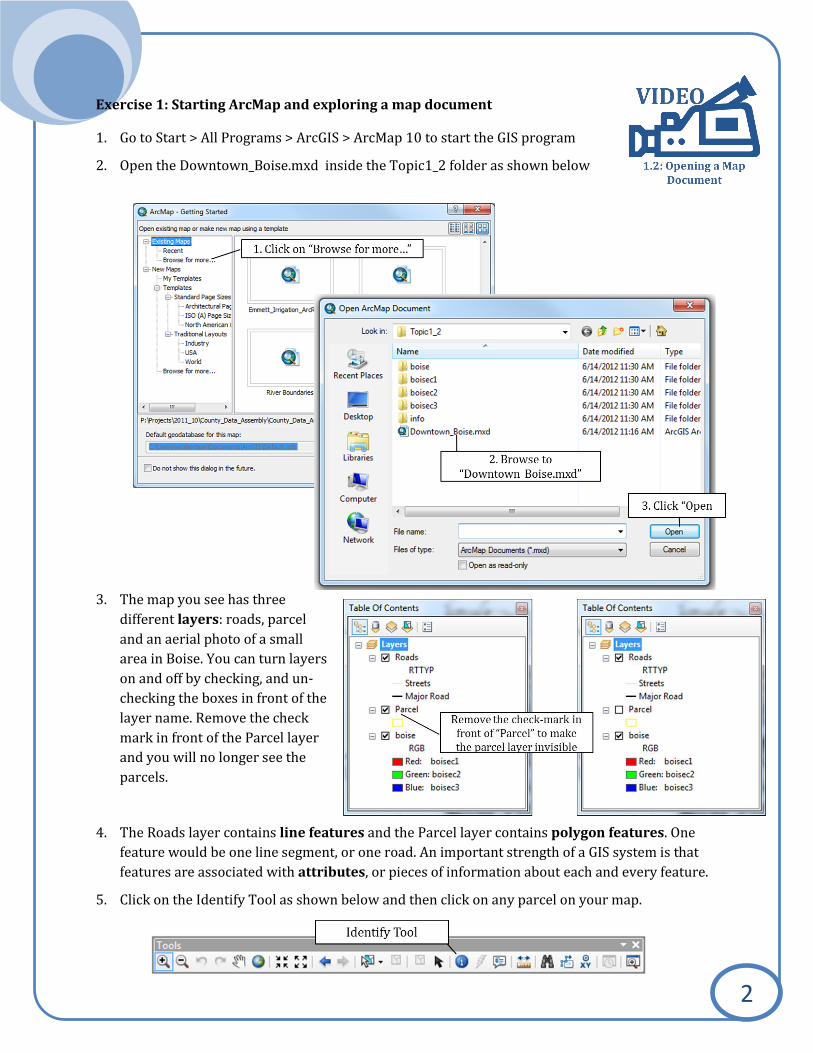
6. As shown on the right, you will see a long list of attributes
associated with the parcel you clicked on. Use the identify tool
and click on a road to see what attributes are associated with
this layer.
7. Rasters only have a limited number of attributes – typically only
one. For example a raster showing the elevation will only have
one attribute, which – no surprise – is elevation. The aerial
photograph on your map has three attributes, as shown below:
Red, Green and Blue that together produce the color image.
8. A map document, which can be identified by its .mxd extension, contains information about (1)
which GIS data you want to display; (2) where this GIS data is located and (3) how you wish to
symbolize this data. Note that the map document does not store actual spatial data, just a path
to where this data resides.
9. ArcMap is often used for composing and printing maps. Click File > Page and Print Setup in the
top-left corner of your screen. This is where you can set your printer and page size. If you were
to print a map (which you are not at this time) you would click on File > Print. Leave the
Downtown_Boise.mxd open if you are planning to move on to exercise 2.
Exercise 2: Exploring ArcCatalog
1. Make sure you are in ArcMap and viewing the Downtown_Boise.mxd map document you
opened in exercise 1. If not, use the instructions in step 2 of the previous exercise (Exercise 1)
to open the Downtown_Boise.mxd right now.
2. ArcGIS software has two versions of ArcCatalog. The “full version” needs to be accessed from
your Start > Programs > ArcGIS > ArcCatalog menu and the “limited version” is conveniently

4
included as a window inside ArcMap. In this exercise we will first explore the “limited version”
inside ArcMap. There are two ways to open the ArcCatalog in ArcMap:
a. Click on the ArcCatalog button as shown below.
b. Or click on “Windows” in the main menu along the top of your screen and click
“Catalog”. Use one of those two ways to open the ArcCatalog window now.
3. Near the top of the ArcCatalog window you will see the Home folder
which is highlighted in blue in the figure on the right. Inside this
folder you will see the GIS layers contained in the
Boise_Downtown.mxd map document.
4. ArcCatalog conveniently places icons in front of each GIS layer that
indicates the type of layer: indicates a raster. is a polygon
layer, a layer with line features and the icon is a map
document.
5. A shapefile is a common GIS data type and it is good to
understand how ArcCatalog displays a shapefile, compared to
what this shapefile looks like when viewed in Windows Explorer.
6. Go to Start > Computer and browse to Topic1_2 folder you
downloaded. Notice that the Roads and Parcels layers each have
many files associated with it. For example, the parcels shapefile
consists of 7 different files, each with a different extension. It is a
good idea to always use ArcCatalog to copy and move GIS data so
that you are always sure that you are copying or moving all the
files that make up one layer.
7. Close ArcMap by clicking File > Exit in the top-left corner of your
screen. When prompted save your changes.

5
8. To open the “full version” of ArcCatalog click on the Start button in the bottom left corner of
your screen and then choose All Programs > ArcGIS > ArcCatalog. This “full version” looks very
similar to the “limited version” of ArcCatalog, but has a couple of added features such as a
contents, preview and description tab.
a. Right-click on “Folder
Connections” and choose
Connect Folder as shown on
the right.
b. Browse to the Topic1_2 folder
and click on it once to
highlight it. Then click OK to
finish the connection as
shown on the right.
c. Once a connection to a folder has been set
up you should see it in all future sessions
of ArcCatalog.
9. In the table of contents inside ArcCatalog click on the + in front of Folder Connections to expose
its contents. Open the Topic1_2 folder and click on the Parcel layer. If you do not see a folder
that contains the data you are looking for use the directions in the blue box below to make a
connection to a folder so that it will appear in the table of contents.
10. With the Parcel layer highlighted in the table of contents click on the Contents, Description and
Previews tab as illustrated in the figure on the next page.
Connecting to a Folder
6
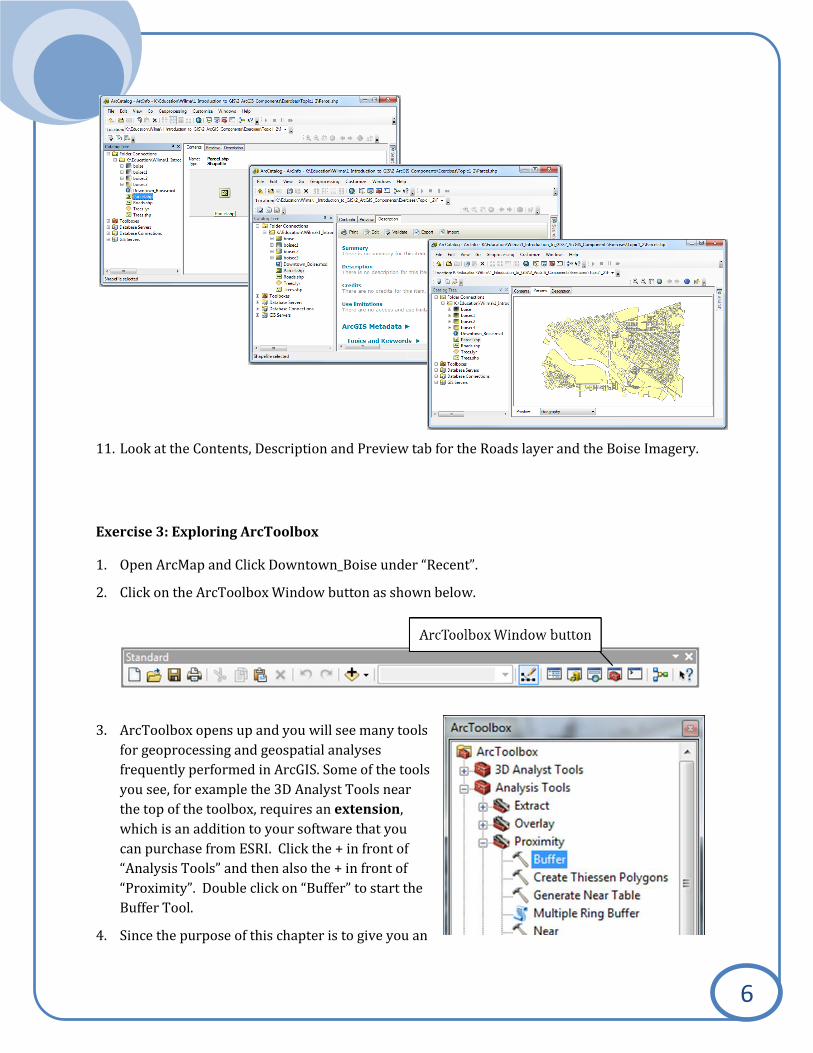
11. Look at the Contents, Description and Preview tab for the Roads layer and the Boise Imagery.
Exercise 3: Exploring ArcToolbox
1. Open ArcMap and Click Downtown_Boise under “Recent”.
2. Click on the ArcToolbox Window button as shown below.
3. ArcToolbox opens up and you will see many tools
for geoprocessing and geospatial analyses
frequently performed in ArcGIS. Some of the tools
you see, for example the 3D Analyst Tools near
the top of the toolbox, requires an extension,
which is an addition to your software that you
can purchase from ESRI. Click the + in front of
“Analysis Tools” and then also the + in front of
“Proximity”. Double click on “Buffer” to start the
Buffer Tool.
4. Since the purpose of this chapter is to give you an
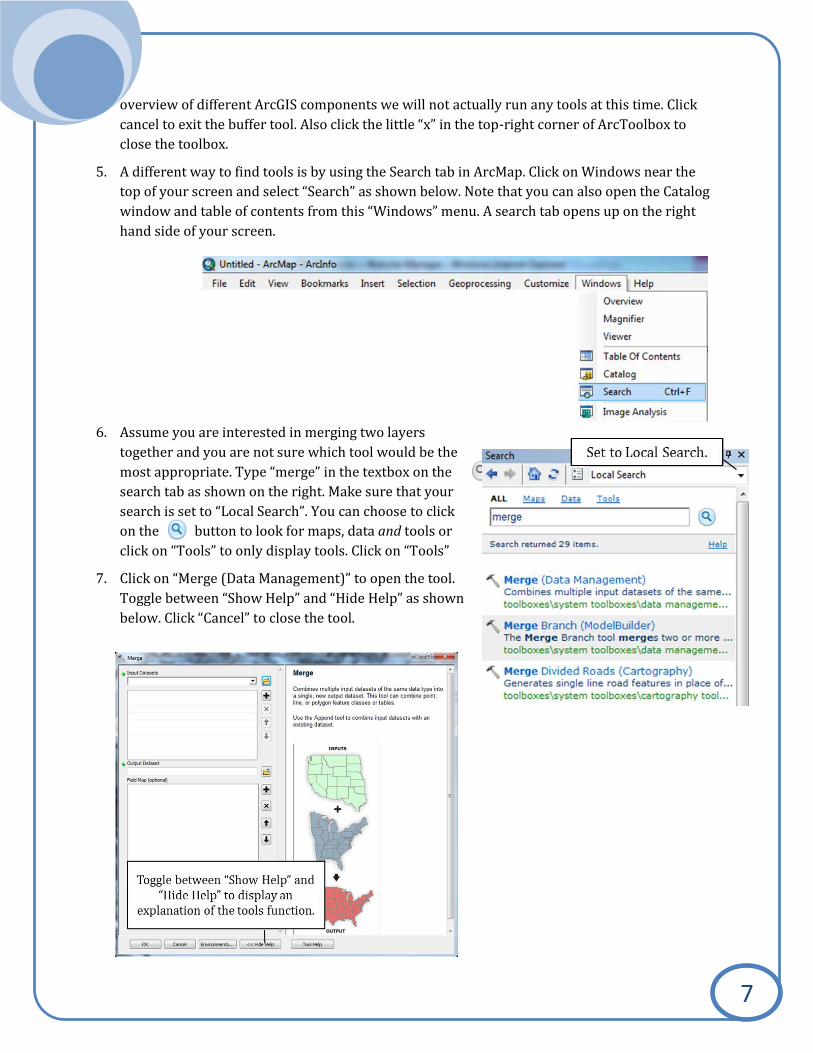
7
overview of different ArcGIS components we will not actually run any tools at this time. Click
cancel to exit the buffer tool. Also click the little “x” in the top-right corner of ArcToolbox to
close the toolbox.
5. A different way to find tools is by using the Search tab in ArcMap. Click on Windows near the
top of your screen and select “Search” as shown below. Note that you can also open the Catalog
window and table of contents from this “Windows” menu. A search tab opens up on the right
hand side of your screen.
6. Assume you are interested in merging two layers
together and you are not sure which tool would be the
most appropriate. Type “merge” in the textbox on the
search tab as shown on the right. Make sure that your
search is set to “Local Search”. You can choose to click
on the button to look for maps, data and tools or
click on “Tools” to only display tools. Click on “Tools”
7. Click on “Merge (Data Management)” to open the tool.
Toggle between “Show Help” and “Hide Help” as shown
below. Click “Cancel” to close the tool.
8
2. Different levels of functionality in ArcGIS Desktop
When purchasing ArcGIS Desktop software you have a choice of three different levels of
functionality: ArcGIS Basic (formerly known as ArcView), ArcGIS Standard (Formerly known as
ArcEditor) and ArcGIS Advanced (formerly known as ArcInfo). Prices vary based on the level of
functionality, for example – at the time of writing – an ArcGIS Basic single-use license costs about
$1,500 while the ArcGIS standard single-use license is around $7,000 US. However, the more
advanced levels do give you more functionality for your money.
ArcGIS Basic allows users to view, symbolize and query data as well as perform many geographic
analyses. The main drawback of ArcGIS Basic is that you can only edit shapefiles, and not any other
types of geographic data such as personal and file geodatabase. Because of this you are unable to
take advantage of many of the features and tools available to you that only work with those
geodatabases. Some counties that have a need for more than one ArcGIS license will typically
purchase an ArcGIS Standard license to edit geodatabases in combination with a cheaper ArcGIS
Basic license for map production, some shapefile editing and other basic map functions. While
ArcGIS Basic cannot edit geodatabases, it will allow users to view them.
ArcGIS Standard includes all the tools and functions found in ArcGIS Basic. Additionally, you can
edit geodatabases which will provide you with more tools to create, edit and ensure the quality of
your data. For example, ArcGIS Standards has the “Traverse Tool” that you can use to enter bearing
and distance descriptions to generate lines and polygons. For some counties this may be a time
saver if legal descriptions can be entered directly into GIS instead of using a separate program.
ArcGIS Advanced includes all functionality of ArcGIS standard plus advanced spatial analyses,
tools for manipulating data and high-end cartographic tools.
For each of those three GIS software packages you can buy either a single-use license which allows
you to install ArcGIS on one computer or a more expensive concurrent-use license that allows you
to install ArcGIS on multiple computers and share the license. This means that at any given time one
person can use ArcGIS, but this person can change depending on who has the greatest need to use it
at any given time.
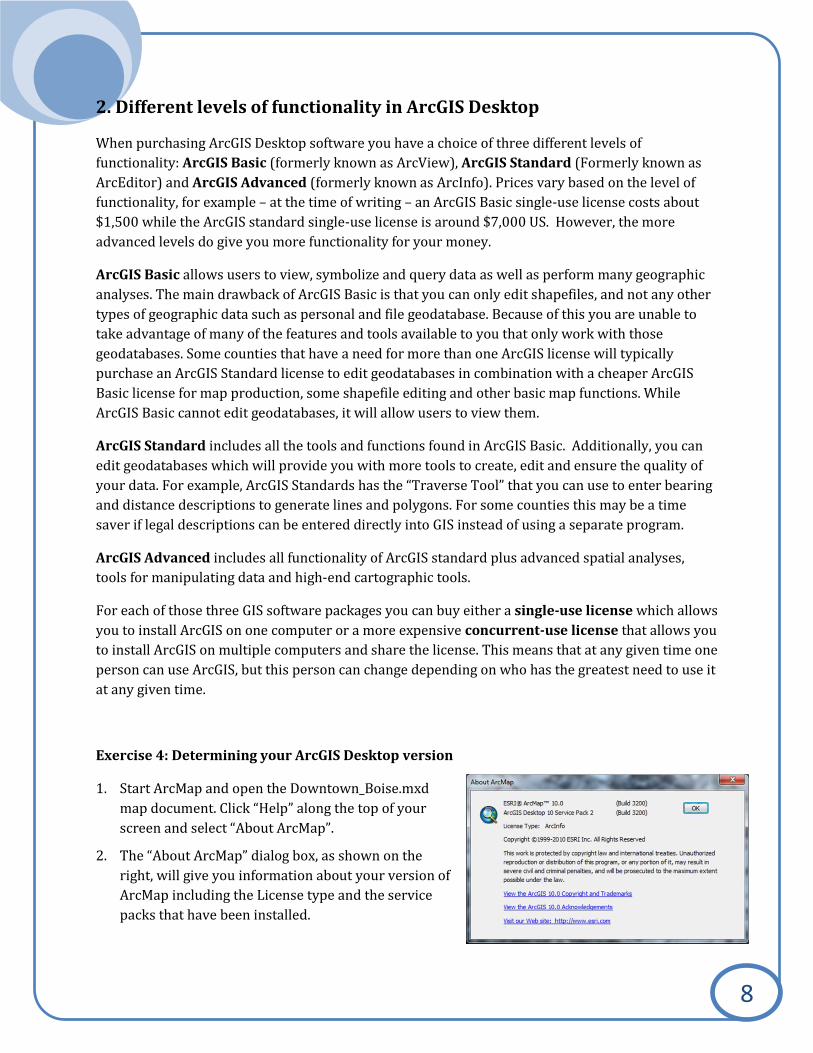
Exercise 4: Determining your ArcGIS Desktop version
1. Start ArcMap and open the Downtown_Boise.mxd
map document. Click “Help” along the top of your
screen and select “About ArcMap”.
2. The “About ArcMap” dialog box, as shown on the
right, will give you information about your version of
ArcMap including the License type and the service
packs that have been installed.