Embed Size (px)
Citation preview

What Else is on the General Site?
Items not displayed earlier in the guide:
- Downloads
General Overview
Firm Site Administrators:
Using Features & Controls
- Users
- Groups
- Controls
- Microsites
- Reporting
Users: Ordering from the Customized Site
- Personalized Items
- Inventory Plans
- Favorite Items

General Overview

The ALL-STATE LEGAL website serves many law firm customers, of many different audiences, each with many different needs.
For this reason, we have taken careful consideration to build aslegal.com as the general foundation that will appeal to every firm, small or large. For added value, some firms will find other specific features and options we’ve built on top of that foundation to be a powerful eProcurement tool. Access to everything is FREE, no matter what your firm size or which options you choose to use.
All features are available to all customers at any time, without charge; however,
here is just a sample of how some of our specific
features and options might typically appeal to certain
audiences.
Solo Practitioners & Small Firms
Medium-Sized Firms & Multi-Location Firms
Large Firms & Multi-Location Firms
Your single source partner with wide selection of legal products, including: Custom Printing Services, Stationery, Paper, Wills, Tabs, Litigation Supplies,
Corporate Kits & Filing Services, Automated & Printed Legal Forms, Mailing & Office Supplies, Cards & Gifts
Any method of ordering you wish, at any time:Online, Phone, Fax, Email
Dedicated Customer Care Center RepresentativesTo make your research or purchasing easier
User Guides, Troubleshooting Guides, and Helpful TemplatesAvailable online for free download anytime you need them
Resource Center, News & EventsStart your research here, with links to articles, events, directories and websites that are related to what
you do and what you need
eProcurement FeaturesApply user levels, access restrictions, control user views according
to office location or group
Corporate Filing Service PackagesIncludes your custom Corporate Kit, PLUS your filing services – you
can even file online if you prefer!
Dynamic Proofs OnlineCreate proofs of your custom printed items online and on-the-fly,
place your final orders at the same time – avoid the excess time and hassle of faxing or mailing proofs and waiting for production to begin
Inventory PlansAllow you to purchase in bulk to save money, while saving space by
storing at ASL warehouses
Intranet EnableLeverage custom settings to
access from your Intranet
Maximize Billable HoursIf you manage it all, don’t
waste billable hours placing orders – order online 24 X 7
and let us take care of the rest for you
Order by Stock NumberChoose from the catalog, and order in one easy step online
Favorite Items ListsMake finding your most frequently ordered items and your future favorites quick and easy, and ordering
even easier

The general website consists of 3 primary silos:
- Brand Management
- Legal Specialty Supplies
- My ALL-STATE (next slide)

MY PROMOTIONSConstant savings with dynamic promotions that are specific to YOUR needs – based upon the items that you purchase.
FAVORITE ITEMSShopping lists of the items you order most frequently. For special controls, you can even customize individual lists for any or all of the users placing orders within your firm – they can only order what you put on their lists.
PERSONALIZED ITEMSStationery products can be viewed, edited, proofed, approved and ordered online – including reorders. Administrators may also control which products their users can access and order.
My ALL-STATE

Ordering from the Customized Website

Begin by logging into the ALL-STATE LEGAL website at http://www.aslegal.com, using the ID and password provided to you by your firm website administrator.
If you need assistance with your user ID or password, click “Need Help?” or call ASL at 800.222.0510.

Depending upon the level of access that has been granted by your firm website administrator, and the products your firm will be purchasing, your users will arrive at either your firm’s
A) The Generic My ALL-STATE page
B) “Personalized Items”
C) “Favorites” or
D) “Inventory Plans” page
We will begin on the next pagewith “Personalized Items”
A B
CD

Upon logging in, you will arrive at your firm’s page for “Personalized Items”, where you will find the stationery products from which you should order.
If you have been granted access to manage orders for all offices, you will see items for all of the office locations.
Otherwise, you will find only the items that are applicable to your office location or department.
The filter menu allows you to sort the items by category as established by your firm website administrator, in this case, Office Location.
Step 1: Begin creating your proof. Select the item for which you wish to begin creating a proof online by clicking the hyperlink or the thumbnail.
If you had saved a proof in a prior session, it would be displayed upon clicking “Saved Proofs”
Personalized Items
Click to begin creating proof

You are now at the “Edit and View Proof” page.
Step 2: Enter your information into the fields as indicated.
Required fields will be marked with an * in red. Any others are considered optional, and will be suppressed when left blank.
If you require other stationery fields that you do not see available, please contact your firm’s manager of your ASL account.
Be sure to check your information for accuracy.
Also be sure to familiarize yourself with the applicable policies on custom orders and rush services.
Step 3: When ready, click on “View Proof” and your proof will be created immediately online. Adobe Reader will launch in a separate window, and will display your proof in PDF format.
If you are not ready to complete your order, you can save your proof online for up to 5 days.

Your proof opens immediately in a separate window as a PDF document.
Review the information for accuracy. If you need to make any modifications, simply close your PDF window, and return to the other window to edit your entry information again. When you are ready, you will click on “View Proof” to open the proof in another window again as a PDF.
You may repeat this process as many times as is necessary until you are satisfied with your final proof.
HELPFUL TIPS:
- Depending upon your own default settings in Adobe Reader, the proof will sometimes open in a magnified view. This can make the proof appear as if it is not there, or distorted. Be sure to change the Zoom setting to see the proof in its appropriate view.
* The proof created online is dynamically rendered in PDF for viewing purposes only, and colors may vary slightly due to monitor and printer settings. The final print output produced at ASL facilities will follow exact color, font, and paper stock specifications.

Step 4: Enter a quantity and “Add to Cart”. Confirm your quantity once you’re on the Cart page. You can edit or delete the item from the cart directly from this page by clicking on the Edit or Delete icons respectively.
You may also add notes to this order that will be printed on the invoice, the packing slip, or both, according to your direction.
Step 5: Now you can “Add More Items” or “Create Order”. Once you hit “Create Order”, you will have the chance to confirm your order and enter specific contact information.
Using this feature will place your order directly from this page, and will skip the remainder of the checkout confirmation process. This should only be used for orders that repetitively use the same contact info.
ONE-CLICK ORDERING:

Step 6: Upon Checkout, you will be prompted to enter the appropriate information needed to process and ship your order.
When entering an “Order Name”, keep in mind that this will also be displayed in your online order tracking/reporting. Naming orders using a scheme of some sort will provide you with the added ability to sort and categorize your previous orders in reporting.
For example, you can precede an order name with cost centers or departments:
CC123456/MPcards
Ship-To Addresses are pre-configured by your ASL Account Specialist for security and quality control purposes. You may have this quickly changed by emailing or calling ASL.

Step 7: You will then be prompted with your order confirmation screen. After you click “Submit Order” your order will be placed and you will be provided with a summary of your order and the option to print your receipt.
In addition, you will receive a confirmation email with your order summary.
To check on the status of your order at any time, your administrator is able to use the “Orders/Reporting” feature to see a list of all orders placed and their status.
(See the “Orders/Reporting” section of this manual for more information)
If your administrator has required approval to your orders, an approval routing email will now be automatically forwarded to your administrator. You do not need to take any further action.

Inventory PlansIf your firm has opted to buy into Inventory Plans (also referred to as Memo Plans or Coupon Plans), you will have access to those plans online.
Inventory Plans store multiple products within each plan in bulk in ASL warehouses. This ensures that your items will be available for you when needed, and enables your firm to save precious space otherwise used for bulky inventory items in-house.
In most cases, the inventory is paid for up front, and all that you have to do is release items from the plan as needed. No payment is collected at the checkout process, and orders will show a $0.00 order amount.
In some cases, firms opt for what is referred to as a “bill-upon-release” plan; in these cases, the user is required to make the releases, but also to go through the payment processing as part of the checkout process.
Step 1: Start by clicking on the Inventory Plans link to the right, and your applicable plans will be displayed. Some firms will control which plans each user will see, usually by office location. Click on the Order # for the products you want to release.
Start by selecting the product within the plan that you need
to release.
The plans to which this user has
access appear in the filter.

The screen will now display the contents of the plan you selected.
The line number corresponds with an internal ASL order reference that identifies each pre-determined release.
The open quantity shows you what is available on this release. You cannot go above the open quantity for that release.
The unit of measure shows you how each product is packaged and ordered. In this instance, there are 8 Reams available on this release.
Unit Price shows the price – it will appear as 0.00 if your firm’s plans have been pre-purchased.
Step 2: To release, simply enter the quantity needed, ensuring it does not exceed the open quantity, and press the “Add to Cart” button. The remainder of the process will take you through the shopping cart and confirmation screens.
TIP: You may combine Personalized Item orders and Inventory Plan releases in the same shopping cart, simply by using the “Add More Items” link on the cart page, then proceeding to the next section to place the remainder of your order.
Just as with standard orders, you can also
add notes to the invoice and/or packing slip.

Other Basics: Automated Rules & Approvals Your firm website administrator has the ability to set certain controls on each user. Depending upon which controls are applied, you may have certain automated rules associated with your orders.
While you, as the user, will not need to be familiar with these features, it may be helpful for you to understand how your views are customized since what you see is not the entire general website.
There are 6 key features that an administrator can use in applying customization to any given user’s permissions:
1. Product Systems Purchasing Approval
2. Spending Threshold
3. Order Approval
4. System Privileges
5. Limit Navigation
6. Restrict Access
This allows you to see everything, but only those product categories with checkboxes will display the “Add to Cart” button. If you attempt to purchase an item, but do not find an “Add to Cart” button, you should check with your firm website administrator, or call ASL Tech Support.
If your firm website administrator has assigned a spending limit, the system will notify you if an order is over the threshold. It will still allow you to place order, but will forward the order to your administrator for approval.
Orders requiring approval are submitted by the user as normal; however, an approval email is automatically routed to the firm website administrator, with a direct link to the order provided for easy approval, which releases the order.
All Users are assigned “User” level by default. Other privileges determine whether or not you are opted-in to promotional emails, and whether or not you may enter your own Ship-to addresses rather than selecting from the pre-configured list.
To access these administrative features, click on “Users” in the left-hand navigation menu.

Other Basics: Specialized Controls
Firm Website Administrator:Unrestricted View, upon login
To reduce any confusion and to make it easier for users to find the appropriate products for their office location, many administrators opt to apply some of the specialized controls. These settings will customize the view of the user, as displayed below.
Restricted User: Customized View, upon login

Other Basics: Specialized Controls
If your firm website administrator has opted to create what are known as “Groups” for your account, the view seen by each user can also be customized to display only the Groups to which you, as the user, are assigned.
In this example, the user “NYUSER” is assigned to the “New York Group”, and the administrator has enabled this control to allow only the products and plans that are part of the “New York” group to be displayed to the user. This eliminates the need for you, as the user, to click and scroll through multitudes of pages to find your products – only those you need are displayed.
Sorting by “ALL” using the Filter will only display “ALL” to which the user
has access. However, if “ALL” is checked in the Admin screen, then all
groups are selected by default and will display to the user.

Firm Site Administrators:Using Features & Controls
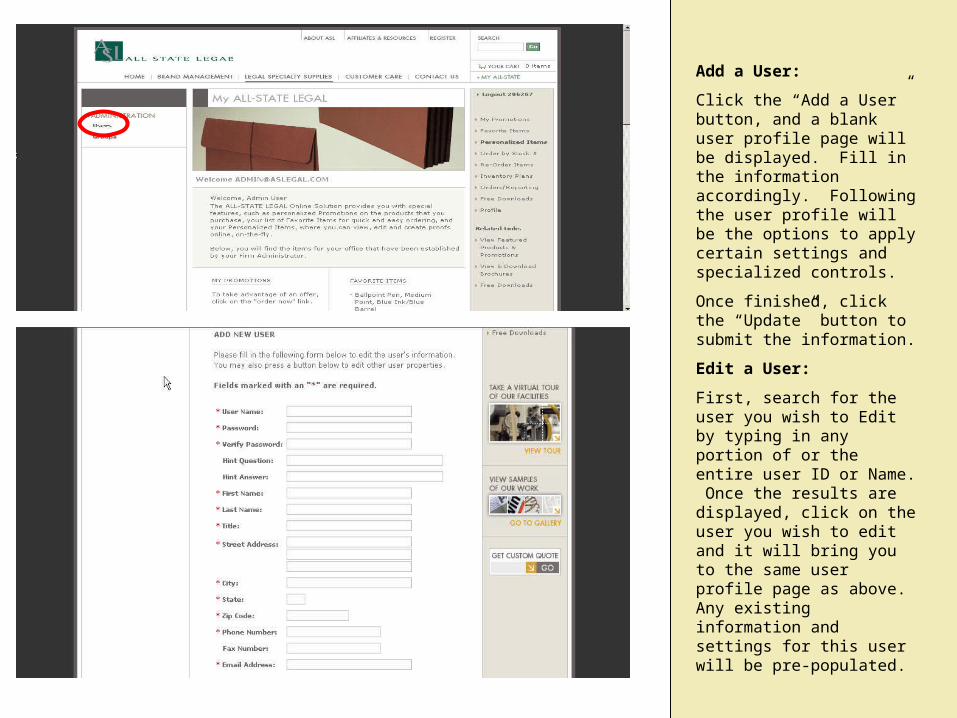
Add a User:
Click the “Add a User” button, and a blank user profile page will be displayed. Fill in the information accordingly. Following the user profile will be the options to apply certain settings and specialized controls.
Once finished, click the “Update” button to submit the information.
Edit a User:
First, search for the user you wish to Edit by typing in any portion of or the entire user ID or Name. Once the results are displayed, click on the user you wish to edit and it will bring you to the same user profile page as above. Any existing information and settings for this user will be pre-populated.

Using the “Groups” Feature
Why Use Groups?
When a firm has many offices, and many users assigned to ordering within each of those offices, assigning controls can sometimes get quite tedious. Most websites may not even be able to accommodate these levels of controls.
Our Groups feature allows you to create groups with contents of users, personalized items, and inventory plans. The Group name is how you will control what the users will see.
Most typically, firms choose to create Groups that define each of the office locations, but these can be anything you prefer.
The example to the left shows an example firm’s current setup. Each office location consists of the users who will be ordering for that location, and the products that they will be ordering for that location.

Using the “Groups” Feature
If you click on the Group named “New York”, you will see the contents that have been established for this group:
- Users responsible for ordering at the NY location
- Personalized Items that are ordered for the NY location
- Inventory Plans that are used by the NY location
When any of these users logs onto the site, they will now only see the products associated with the New York group when browsing the Personalized Items and Inventory Plans sections.
Applying the Groups feature in this instance will alleviate the need for the NY users to scroll through every office location’s products. It also ensures quality control in that it reduces the likelihood that the wrong item might be ordered for that office location.
Using the “Groups” Feature
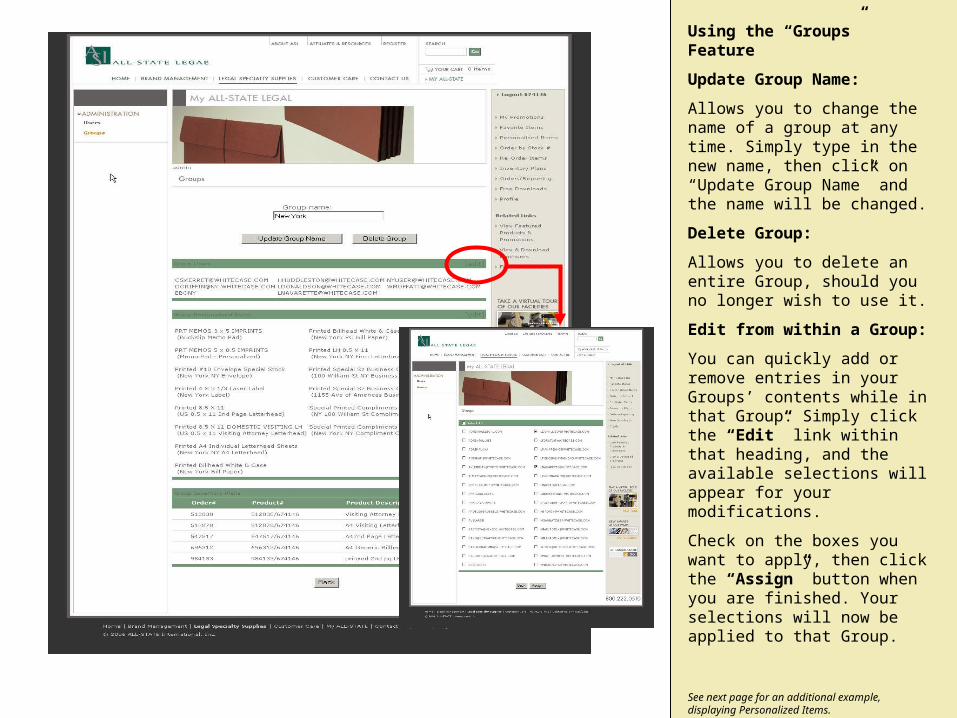
Update Group Name:
Allows you to change the name of a group at any time. Simply type in the new name, then click on “Update Group Name” and the name will be changed.
Delete Group:
Allows you to delete an entire Group, should you no longer wish to use it.
Edit from within a Group:
You can quickly add or remove entries in your Groups’ contents while in that Group. Simply click the “Edit” link within that heading, and the available selections will appear for your modifications.
Check on the boxes you want to apply, then click the “Assign” button when you are finished. Your selections will now be applied to that Group.
See next page for an additional example, displaying Personalized Items.

Using the “Groups” Feature
Edit from within a Group:
You can quickly add or remove entries in your Groups’ contents while in that Group. Simply click the “Edit” button within that heading, and the available selections will appear for your modifications.
To the left is an example of what appears when editing the Personalized Items from within a Group.
Editing Inventory Plans works in the same way.
Due to the large number of products associated to this account, a portion
of the page has been cropped for display purposes – to show one of
the selections for NY custom product. Others are also selected
further on the page, but not displayed here.

Using the “Groups” Feature
Add a New Group:
Click the “Add a new group” link at the top of the Groups page.
Enter a name for the Group.
Click “Create Group”
On the Groups main page, you will see the new Group has been added.
To begin adding users, products and plans to the group you just added, simply click on the Group name and the contents screen will appear. You can begin adding contents by using the “Edit” links within each heading as displayed earlier.

Using the “Groups” Feature
Enabling the Groups as a restriction when setting controls in the “Users” Administration:
Click on “Users” and search for the user you want to modify.
Once you look at that user’s profile and settings, you will see that his/her Groups access has now been changed to Enabled.
The Group to which you assigned the user has also now been selected automatically.
This ensures that when this user now logs onto the site, they will see only the products and plans that are included in the group “Test Group”.
This also works in the opposite way as well:
If you decide to first set up a new user, any Groups that are already created for the account will appear as options to check in the “Restrict Access” section of the Administrative Tool. If you check any of the boxes and finish updating that user, the user will now appear in that Group if you open that Group from the “Groups” menu.

Orders/Reporting
Administrators have the ability to see the orders that have been placed on the account. Restricted users will not have access to the Reporting feature.
You may access this feature by selecting the “Orders/Reporting” link from the right-hand navigation.
On Order History Summary Report is also available, which summarizes by product type all orders and totals for a specified period of time.
Select an order to see its Order Details, as shown above.
You may also sort by date range, status type, or user type.

Free Downloads
This area of the site contains helpful references, guides, tip sheets, order forms, and templates.
For example, ASL periodically places templates for printing labels as requests for assistance become more common.
Other helpful downloads include previous catalogs, brochures, and a Checklist of Items to Consider for New Firms.
This Website User Manual is also available in the Free Downloads area.
New downloads are added regularly, so be sure to visit this area from time to time.


![User’s Guide · Select [Digital Signatures] - [Details] - [General], and check that Konica Minolta, Inc. is displayed in the Name of signer field. Select [View Certificate] - [General],](https://img.pdfslide.us/doc/110x75/5e6bfb710d815151fd4276a3/useras-select-digital-signatures-details-general-and-check-that-konica.jpg)