Embed Size (px)
Citation preview

1
WESD Online
Class Registration
New User Guide
GoSignMeUp Website
Ver 3 08-27-10
Powered by:

2
WESD Online Class Registration New User Guide ©2009 Washington Elementary School District, 4650 W Sweetwater Ave, Glendale, AZ 85304 All rights reserved. No portion of this document may be stored in a retrieval system, transmitted, or reproduced in any way, including, but not lim-ited to, photocopy, photograph, magnetic or other without the prior agreement and written permission of the Washington Elementary School Dis-trict.

1
CREATING A NEW USER ACCOUNT ...................................................................... 2
LOGGING IN TO THE WESD CLASS REGISTRATION SYSTEM ............................... 3
SIGNING UP FOR CLASSES - METHOD 1 ............................................................ 4
SIGNING UP FOR CLASSES - METHOD 2 ............................................................ 6
WITHDRAWING FROM CLASSES ....................................................................... 8
OBTAINING YOUR TRANSCRIPT ............................................................................ 9
WESD Online Class Registration New User Guide
Contents

2
CREATING A NEW USER ACCOUNT
1. Begin by navigating to the following Internet address: http://washington.gosignmeup.com/
2. Click on the link in the middle of the page that reads click here
3. Fill in the User Registration form.
Notes:
Fill in every box with an asterisk.
You must use your WESD e-mail address.
It would be a good idea to use your current WESD username and password.
If you work at more than one school or work site, you can fill in the School 2 or School 3 fields.
4. Click on the Submit button when you have filled in all required fields.

3
LOGGING IN TO THE WESD CLASS REGISTRATION SYSTEM
To log into the WESD Class Registration system, do the following:
1. Navigate to this web address: http://washington.gosignmeup.com/
3. Enter your User Name and Password in the fields.
4. Click on the LOGIN button.
This is your welcome screen. From here, you can browse classes and enroll if you wish.
Follow the directions on the following pages to browse and enroll in classes.
4
SIGNING UP FOR CLASSES - METHOD 1
NOTE: the directions on this page assume you have already signed in to the system.
To see available class offerings, you can click on:
Calendar
Browse Courses
The click here link
Calendar
1. Click on the Calendar link to open a calendar web page that shows all available classes.
You can use the navigation controls at the top of the screen to view current or future months.
2. Click on one of the available classes and it will open into an information screen like the one at bottom right.
This screen gives class details.
3. To register for the class, you can click on the REGISTER button at the BOTTOM of the screen.

5
This screen shows that you have one class pending, but not yet fully enrolled.
4. To complete the enrollment for the class you have to click on the REGISTER button again.
This is the submittal screen. Make certain that all information is correct.
5. When you are ready, click on the SUBMIT button.
This is the confirmation screen. While not required, it’s a good idea to print this screen for your records.
6. Click on the Print button to print the screen.
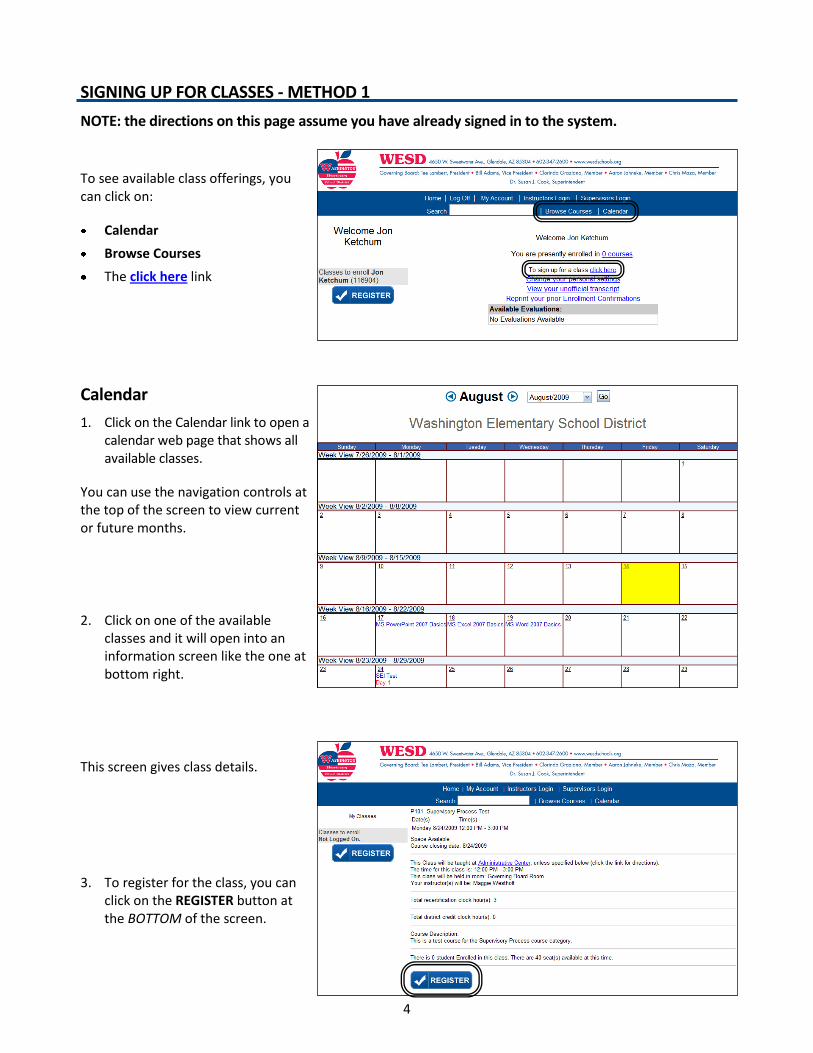
After you have successfully enrolled in a class, this is what your account screen looks like.
Notice that any classes in which you are enrolled appear on the left side of the screen.

6
SIGNING UP FOR CLASSES - METHOD 2
NOTE: the directions on this page assume you have already signed in to the system.
Browse Courses or click here
It really doesn’t matter whether you click on the Browse Courses link or the click here link. Both take you to the same page.
1. Start browsing available classes by clicking on either Browse Courses or the click here link.
This brings you back to the welcome screen.
2. Click on one of the categories at the bottom of the screen. In this example, we’ll click on the Technology link.
In this example, there are three classes available in the Technology category: Excel, PowerPoint, and Word.
3. Click on one of the available classes to get more information or to enroll in the class.
From this screen, you can either get more information about the class or begin the enrollment process.
4. Click on the class name to view class details, or...
Click on the ENROLL button to begin the enrollment process.

7
Notice that the class now appears on the left side of the screen in the registration area.
If you wish, you may continue to browse classes and enroll in additional classes.
2. When you are ready, click on the REGISTER button.
This is the submittal screen. Make certain that all information is correct.
3. When you are ready, click on the SUBMIT button.
The next screen you will see is the confirmation screen.
This is the confirmation screen. While not required, it’s a good idea to print this screen for your records.
4. Click on the Print button to print the screen.
8
After you have successfully enrolled in a class, this is what your account screen looks like.
Notice that any classes in which you are enrolled appear on the left side of the screen.
NOTE: You will receive an e-mail confirmation of every class in which you enroll.
WITHDRAWING FROM CLASSES
To withdraw from a class, please go to http://washington.gosignmeup.com/ and log in with your user
name and password.
Once you are logged in, click on the
link on the left side of the screen that
says, Click Here to cancel a course.
That will take you to a new screen
where you can withdraw from the
course.
Now, click in the circle by the class you
want to cancel and then click on the
big CANCEL button.

9
OBTAINING YOUR TRANSCRIPT
NOTE: to obtain a transcript, you must be signed in to the system
IMPORTANT: The transcript will ONLY contain records from the date this registration system was implemented. Any classes you have taken prior to August 24, 2009 will not appear on your transcript.
Once you have signed into the system (see page 5 for help), the welcome screen appears.
If you have completed classes, your screen will look something like the screen at right.
In the example at right, two class surveys must be completed before a transcript can be viewed. Surveys are very short and will deliver feedback to class instructors.
After you have completed all required surveys, the link to view your transcript appears.
To view your transcript, click on the link: View your unofficial transcript.
This screen will appear. You can change the date range if you wish, but you don’t really need to do anything other than click on the Request Report button.
This is the on screen view of a sample transcript. NOTE: Currently, the Make PDF Document button does not generate a correct printout of a transcript. Until that function is fixed (soon, we hope!), you should print this screen instead of clicking on the button.