Embed Size (px)
Citation preview
Well Water TreatmentCheat Sheet and Check List
Avoid common well water problems by following this Check List.Have questions? Call us at 888-600-5427 and speak with one our
WQA Certified Master Water Specialists.
Visit us online www.CleanWaterStore.com. | Email us at [email protected]
DO THE BASICS
Test Water Chemistry
Check Well Water Flow Rate
Check for Odors
Perform Toilet Flush Tank Check
Water Heater Flush Check
Check for Pipe Corrosion
Determine Diameter of Pipe
INSTALLATION
Buy direct and install yourself OR
Buy direct and hire a plumber OR
Buy from water treatment dealer
Follow a checklist of best
practices
ENJOY HEALTHFUL HIGH-QUALITY WATER
Water meets Health Dept Standards
Great tasting, good for cooking
No odor, stains, or sediment
Non-corrosive to pipes and fixtures
Free of bacteria, viruses or parasites
High quality water for bathing and
laundry
QUALITY CONTROL
Set up maintenance schedule
Test well water annually for
bacteria and nitrate
Test treated water regularly and
keep records
DECIDE ON GOALS
Treat water for one sink for
drinking and/or
Treat water for the entire home?
Eliminate corrosion problems?
Remove stains, sediment, odor?
Improve water pressure?
Disinfect water of bacteria?
LEARN MORE ABOUT PRIVATE
DRINKING WATER WELLS: www.cleanwaterstore.com
http://water.epa.gov/drink/info/well/index.cfm
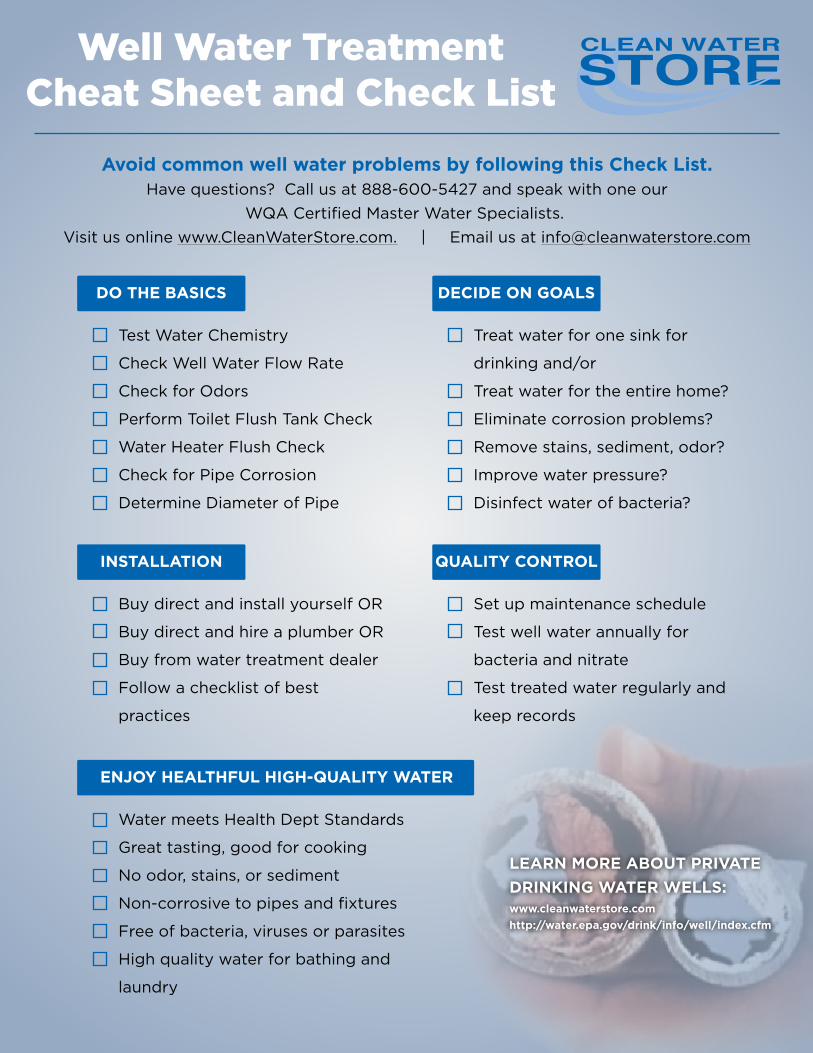
Well Pump & Pressure Tank Diagram
PRESSURETANK
FROSTLINE
CASING Above Ground Installation
1
2
4
5
6
789
10
11
12
13
15
16
14
PUMP
3
1. Check ValveLocated at the top of the pump to prevent back flow into pumpand hold the head of water in the system.
2. Torque ArrestorInstalled directly above Submersible Pump to protect pump andwell components from starting torque damage.
3. Safety RopeA safety line from the top of the well to the pump.
4. Pitless AdapterProvides a watertight sanitary removable connection betweenpump and house. Installed in casing below the frost line toprevent freezing.
5. Watertight Well CapProvides a watertight seal when its inner gasket compresses tooutside diameter of casing. Top of cap removes easily to accesswell for service.
6. Well SealProvides a positive seal inside casing in above-ground installations.
7. Check ValveInstalled near the tank inlet to hold water in the tank duringpump installation when the pump is idle.
8. Tank TeeConnets water line from pump to pressure tank and service linefrom tank to house. Taps are provided to accept Pressure Switch,Pressure Gauge, Drain Valve, Relief Valve, Sniffer Valve, etc.
9. Drain ValveDrain easy draining of the system.
10. Relief ValveProtects against pressure build-up. Should be used on any systemwhere the pump could develop pressure that exceeds the maximumsystem rating.
11. Pressure GaugeMeasures water pressure in Pressure Tank.
12. Pressure SwitchSignals the pump to start when the water systemdrops to a pre-set low pressure, and to stop whenthe high-pressure mark is reached.
13. Safety SwitchFor electric control and distribution to the pump.
14. Pump SaverAdjustable, solid control monitors system loadconditions to protect pump motor from dry well flowloss, rapid cycling, slow recovery, air lock and lockedrotor problems.
15. Lightning ArrestorProtects pump motor and controls from voltagesurges caused by lightning, switching loads andpower line interference.
16. Ball ValveActs as a shutoff valve on the supply line from tankto house.
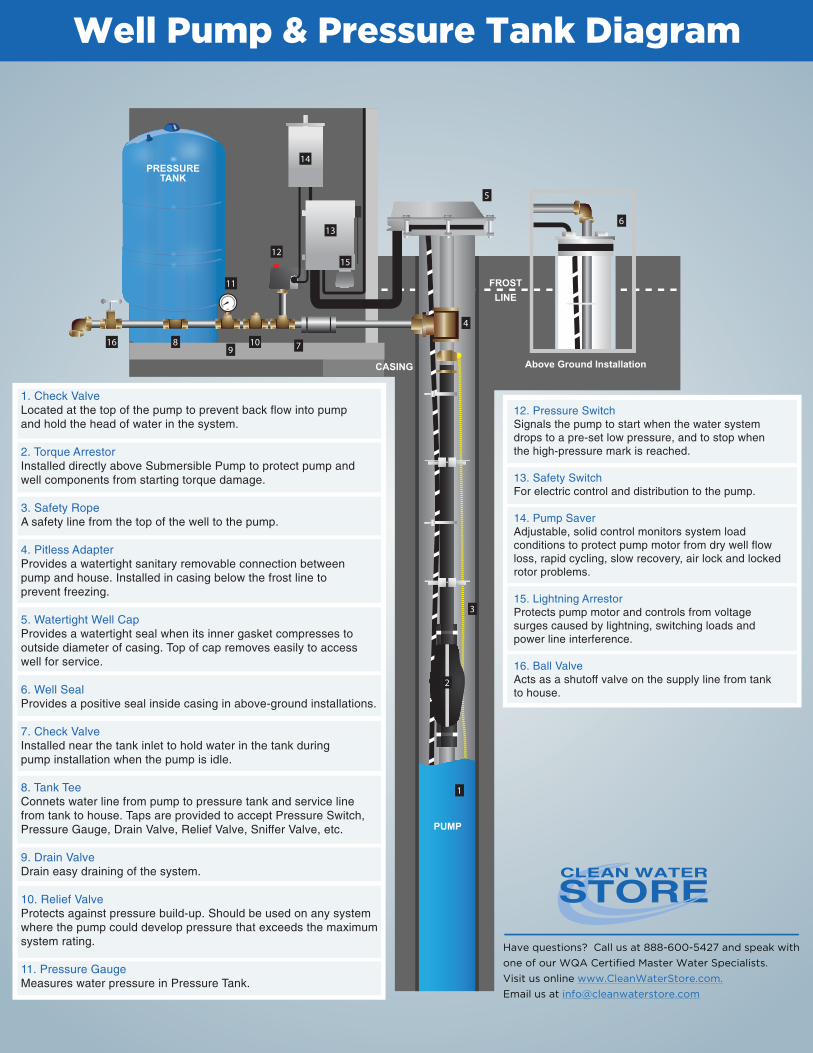
How to Determine Pump Flow RateFor Well Systems with Pressure Tanks:
LEARN MORE ABOUT PRIVATE
DRINKING WATER WELLS: www.cleanwaterstore.com
http://water.epa.gov/drink/info/well/index.cfm
It is easy! All you need is a 1 or 5 gallon bucket and a watch or clock!It takes just a few minutes.
Just follow these steps:
1. Open any hose bib or faucet until pump turns on.
2. Close hose bib or faucet and let pump fill up pressure tank until it turns off.
3. Using a 1 or 5 gal. bucket, open faucet, collect and measure all water discharged until
pump turns on.
4. When pump turns on, immediately close faucet and start timing pump cycle.
5. When pump turns off, record pump cycle time to refill pressure tank in seconds.
6. Divide the number of gallons collected in Step 3 by the number of seconds in Step 5.
7. Multiply the answer from Step 6 by 60.
8. The answer in Step 7 is the average pumping capacity of the pump in gallons per
minute (GPM).
Example: Number of Gallons collected during draw-down of pressure tank (Step 3) =
Number of Seconds in pump cycle to refill pressure tank (Step 5) =
Gallons Per Minute (GPM) = (Gallons collected / seconds in cycle) x 60" GPM =
www.cleanwaterstore.com Clean Water Systems & Stores Inc. © 2017
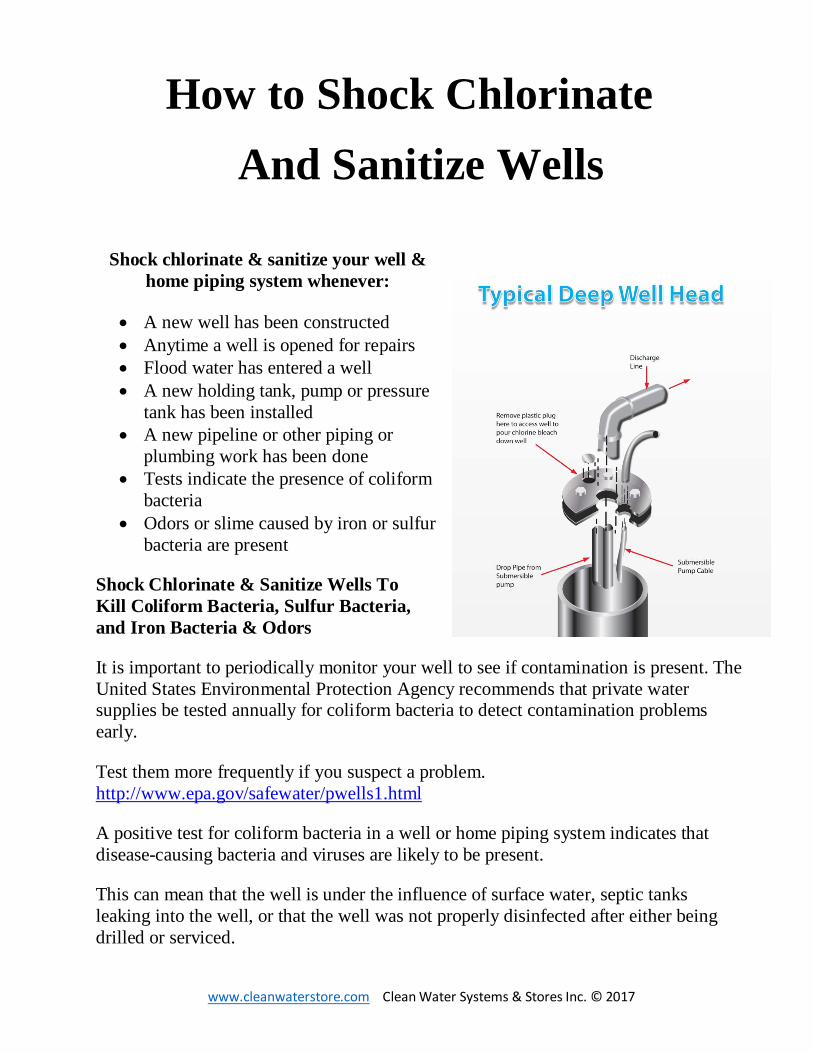
How to Shock Chlorinate And Sanitize Wells
Shock chlorinate & sanitize your well & home piping system whenever:
• A new well has been constructed • Anytime a well is opened for repairs • Flood water has entered a well • A new holding tank, pump or pressure
tank has been installed • A new pipeline or other piping or
plumbing work has been done • Tests indicate the presence of coliform
bacteria • Odors or slime caused by iron or sulfur
bacteria are present
Shock Chlorinate & Sanitize Wells To Kill Coliform Bacteria, Sulfur Bacteria, and Iron Bacteria & Odors
It is important to periodically monitor your well to see if contamination is present. The United States Environmental Protection Agency recommends that private water supplies be tested annually for coliform bacteria to detect contamination problems early.
Test them more frequently if you suspect a problem. http://www.epa.gov/safewater/pwells1.html
A positive test for coliform bacteria in a well or home piping system indicates that disease-causing bacteria and viruses are likely to be present.
This can mean that the well is under the influence of surface water, septic tanks leaking into the well, or that the well was not properly disinfected after either being drilled or serviced.
www.cleanwaterstore.com Clean Water Systems & Stores Inc. © 2017
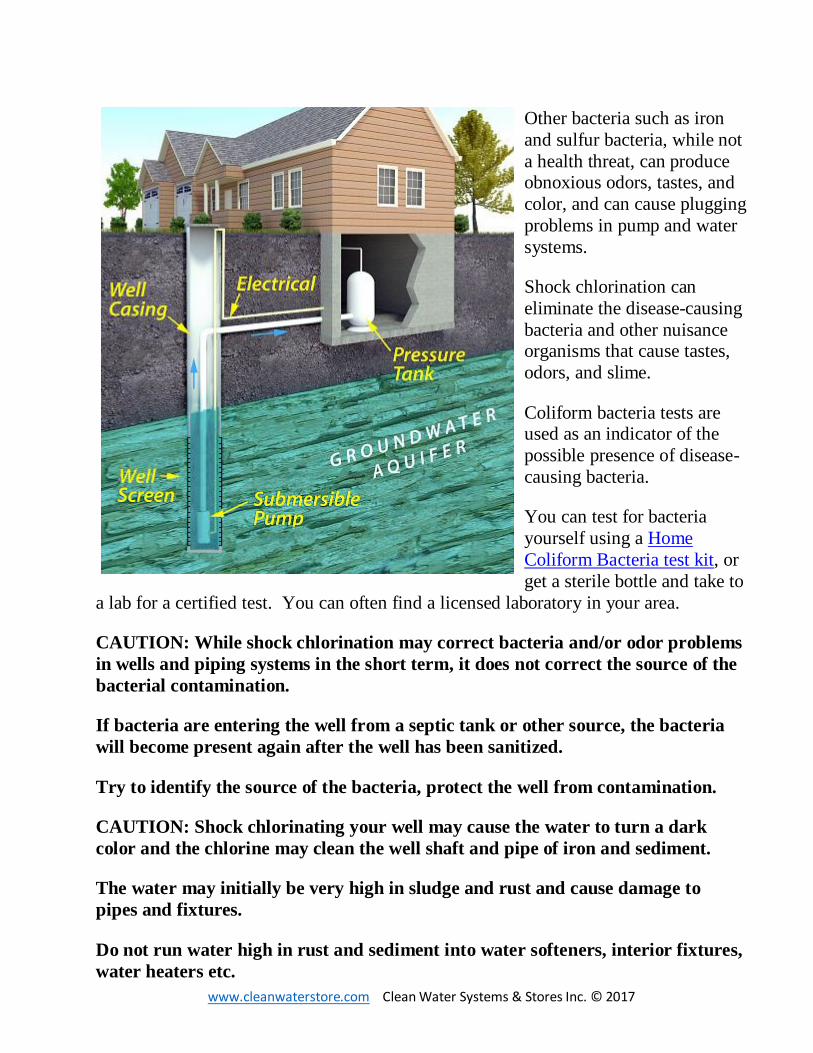
Other bacteria such as iron and sulfur bacteria, while not a health threat, can produce obnoxious odors, tastes, and color, and can cause plugging problems in pump and water systems.
Shock chlorination can eliminate the disease-causing bacteria and other nuisance organisms that cause tastes, odors, and slime.
Coliform bacteria tests are used as an indicator of the possible presence of disease-causing bacteria.
You can test for bacteria yourself using a Home Coliform Bacteria test kit, or get a sterile bottle and take to
a lab for a certified test. You can often find a licensed laboratory in your area.
CAUTION: While shock chlorination may correct bacteria and/or odor problems in wells and piping systems in the short term, it does not correct the source of the bacterial contamination.
If bacteria are entering the well from a septic tank or other source, the bacteria will become present again after the well has been sanitized.
Try to identify the source of the bacteria, protect the well from contamination.
CAUTION: Shock chlorinating your well may cause the water to turn a dark color and the chlorine may clean the well shaft and pipe of iron and sediment.
The water may initially be very high in sludge and rust and cause damage to pipes and fixtures.
Do not run water high in rust and sediment into water softeners, interior fixtures, water heaters etc.
www.cleanwaterstore.com Clean Water Systems & Stores Inc. © 2017
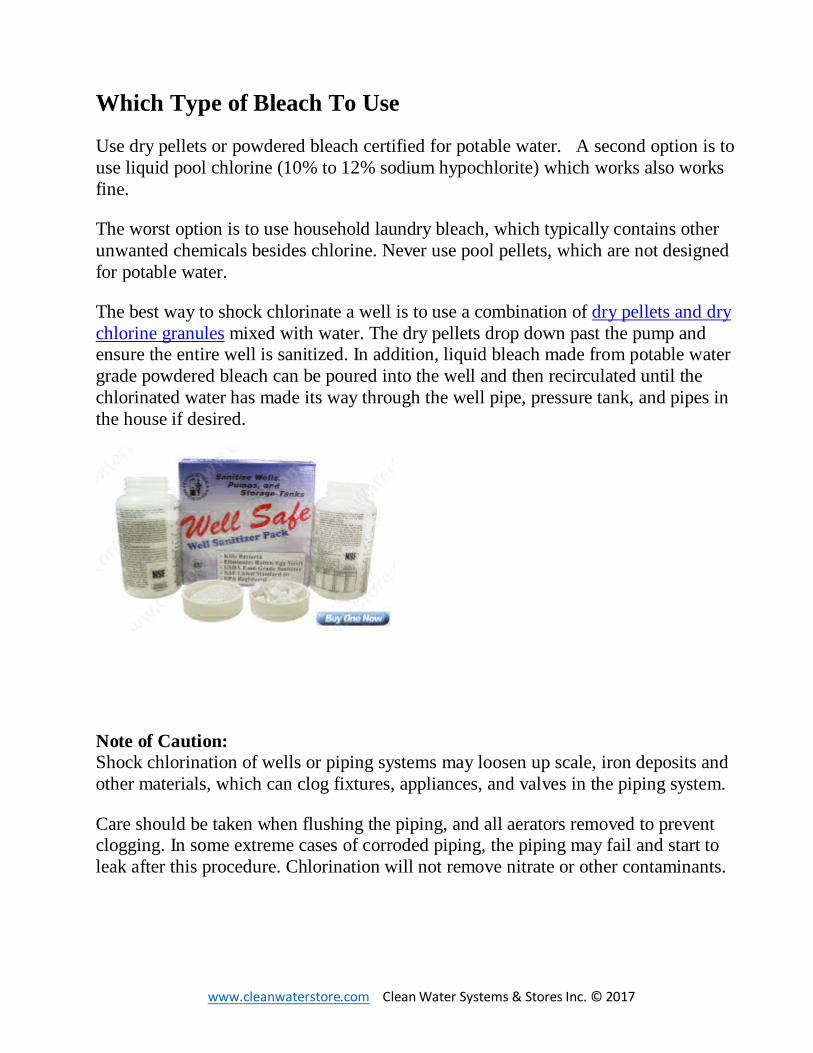
Which Type of Bleach To Use
Use dry pellets or powdered bleach certified for potable water. A second option is to use liquid pool chlorine (10% to 12% sodium hypochlorite) which works also works fine.
The worst option is to use household laundry bleach, which typically contains other unwanted chemicals besides chlorine. Never use pool pellets, which are not designed for potable water.
The best way to shock chlorinate a well is to use a combination of dry pellets and dry chlorine granules mixed with water. The dry pellets drop down past the pump and ensure the entire well is sanitized. In addition, liquid bleach made from potable water grade powdered bleach can be poured into the well and then recirculated until the chlorinated water has made its way through the well pipe, pressure tank, and pipes in the house if desired.
Note of Caution: Shock chlorination of wells or piping systems may loosen up scale, iron deposits and other materials, which can clog fixtures, appliances, and valves in the piping system.
Care should be taken when flushing the piping, and all aerators removed to prevent clogging. In some extreme cases of corroded piping, the piping may fail and start to leak after this procedure. Chlorination will not remove nitrate or other contaminants.
www.cleanwaterstore.com Clean Water Systems & Stores Inc. © 2017
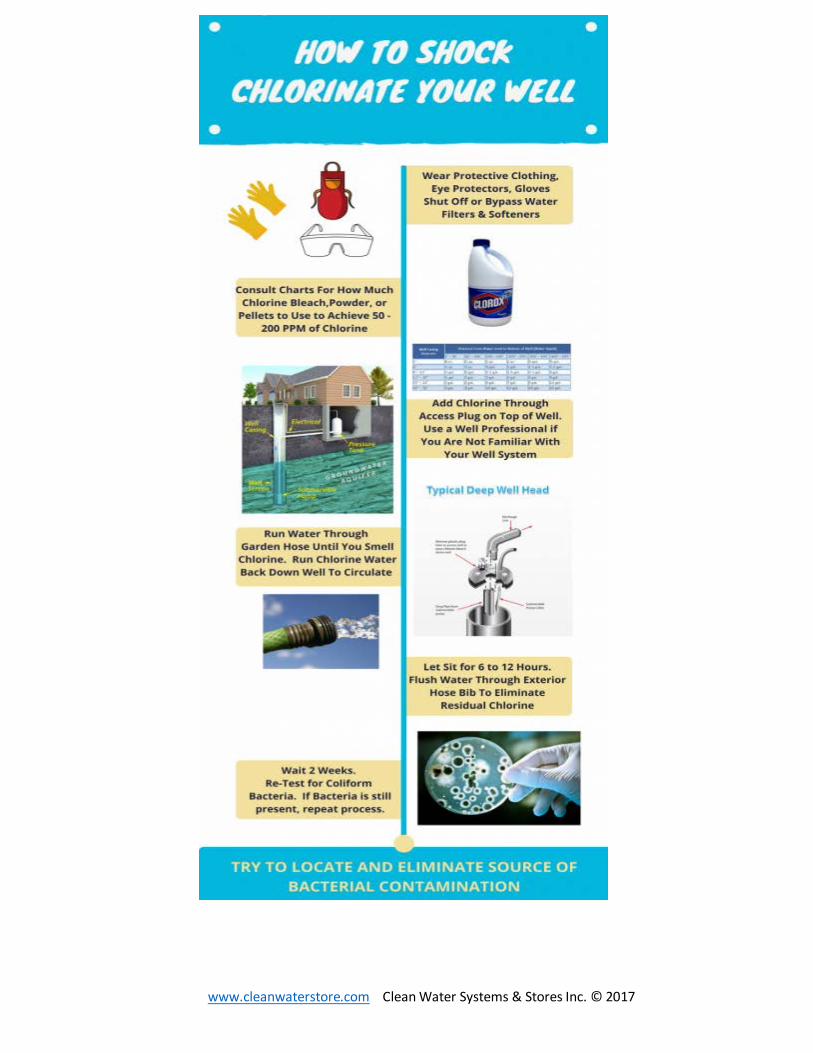
Shock Chlorination Using Dry Pellets or Powdered Bleach
The dry pellet method (70% calcium hypochlorite) can be used for well, storage tank, or cistern sanitation. The amount of tablets and granules used will depend on the amount of water in the system to be sanitized.
Half of the total treatment will be completed with chlorine pellets and the other half will be completed with granular chlorine slurry.
A 100-ppm chlorine concentration is ideal for sanitizing a well. To produce a 100 PPM chlorine concentration, use 2 oz. sanitizer pellets or granules for each 100 gallons of water in the system. (2oz. granules = 70 Pellets) If the water has a high iron or sulfur content more chlorine may be needed to achieve 100-ppm chlorine residual.
Instructions
1. Bypass the water softener, other filters, or purification equipment. Clean the well house, spring house or storage tank or reservoir. Remove debris and scrub or hose off any dirt or other deposits or interior surfaces. Scrub interior surfaces of well house with a strong chlorine solution containing ½ gallon household bleach or 0.2 oz of dry bleach granules to each 5 gallons of water.
2. Remove the small well inspection plug on top of the well. For some wells, particularly for wells completed with pitless adapters and/or underground pressure tanks, there may be a rounded cap that has no inspection hole.
Remove the cap or seal from the casing and, if possible, measure the depth of water in the well, then refer to the table below to determine how much sanitizer should be used. You can also estimate well and water depth from well logs or other records.
CAUTION: well caps and seals are integral to the safety and integrity of your well. They are often regulated by the state and local codes. Be certain to comply with all applicable codes and licensing laws, whenever opening a well.
If you are unsure of any of the following steps, seek the assistance of a qualified or licensed well driller or pump installer or contractor.
www.cleanwaterstore.com Clean Water Systems & Stores Inc. © 2017
4. Mix the determined amount of granules needed in a clean, plastic five (5) gallon container of water and pour the solution down the well to sanitize the upper portion of the well. Do not add water to product – Add product to water. Drop one tablet into the well and listen to hear if the tablet hits the water (you will hear a “plink” sound). If the tablet hits the water, drop the remaining determined number of sanitizing tablets needed into the well.
5. It is necessary to circulate the water in the well to mix the sanitizer thoroughly throughout the entire water system. Connect a hose to an outside sillcock (also known as a hose bib) that is located after the pressure tank and run water back down the well (this also rinses upper portion of well).
After approximately 15 minutes of circulating the water, a strong chlorine odor should be present; if not, repeat steps 4 and 5. Run water through service lines until you detect chlorine odor at all taps.
6. Allow the sanitized water to stand in the system for at least six (6) hours, although overnight is preferred. Open an outside faucet and flush system until water runs chlorine free (no chlorine smell is detected). Repeat flush operation on each faucet in the system.
Do not run high levels of chlorine down the drain into the septic system.
Note: A) Chlorine may make the water run colored, and iron deposits, slime, and organic material may break loose and plug pump screens.
***DO NOT CONTINUE TO RUN PUMP IF WATER DOES NOT FLOW. ***
www.cleanwaterstore.com Clean Water Systems & Stores Inc. © 2017
B) The high level of chlorine required to sanitize a water system is corrosive to most metals and the chlorine solution must not remain in the water system more than thirty-six (36) hours before completely flushing from the system.
7. Return all equipment to the service position.
8. After the chlorine has been left in the well (and the plumbing system if applicable) for a minimum of 6, up to 12 hours, the chlorinated water can be discharged. Large amounts of chlorinated water should not be discharged into the septic tank, or onto lawns or gardens.
9. If possible, discharge as much of the water as possible through an outside faucet with a hose attachment. Do not discharge the chlorinated water into streams or rivers. The small amount of chlorinated water, which remains in the household plumbing, can be discharged into the septic system.
The water should be tested 2 to 3 weeks after sanitizing. If bacteria, iron bacteria, sulfur, or other problems recur, contact your water professional for further treatment.
Use a High Range Chlorine Test Kit
Shock Chlorination Using Liquid Chlorine Bleach:
1. Clean the well house, spring house or storage tank or reservoir.
2. Remove debris and scrub or hose off any dirt or other deposits or interior surfaces.
3. Pump to remove any suspended solids or foreign matter in the water if possible. Scrub interior surfaces with a strong chlorine solution containing ½ gallon household bleach to each 5 gallons of water.
4. Determine how much chlorine to use to disinfect your well by consulting Table 1. If you don’t know your well depth, contact your well driller as they often keep records that will show the depth of the well.
www.cleanwaterstore.com Clean Water Systems & Stores Inc. © 2017
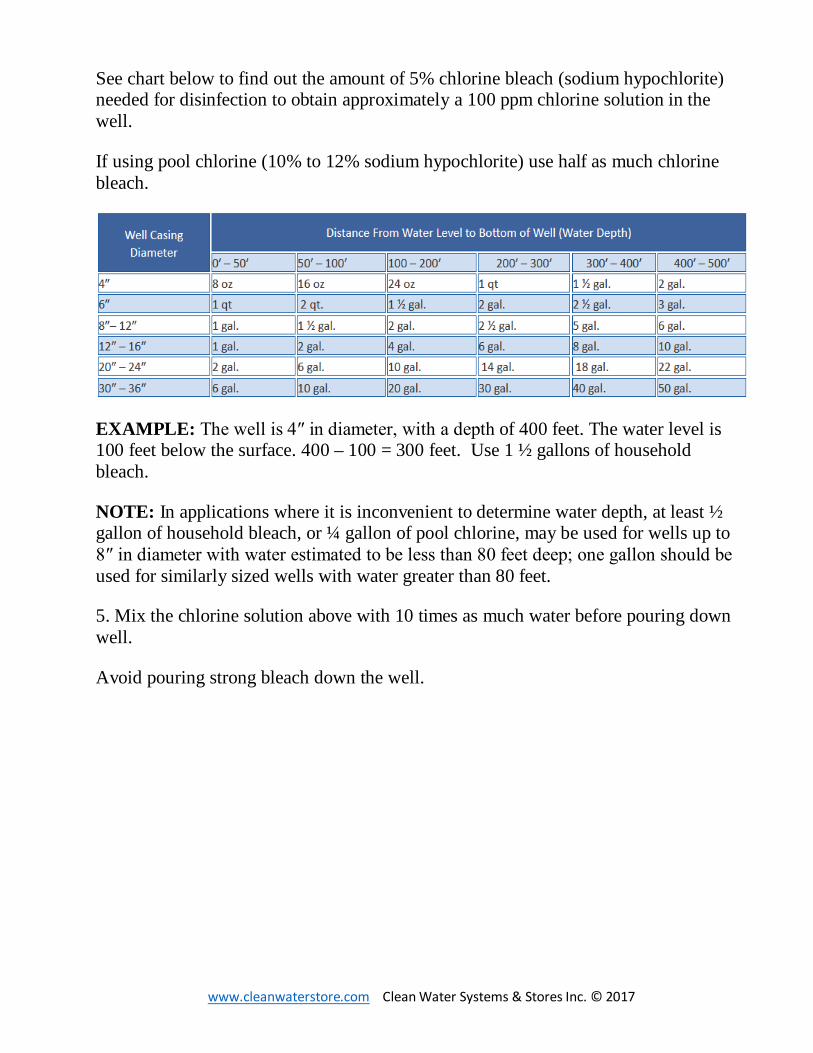
See chart below to find out the amount of 5% chlorine bleach (sodium hypochlorite) needed for disinfection to obtain approximately a 100 ppm chlorine solution in the well.
If using pool chlorine (10% to 12% sodium hypochlorite) use half as much chlorine bleach.
EXAMPLE: The well is 4″ in diameter, with a depth of 400 feet. The water level is 100 feet below the surface. 400 – 100 = 300 feet. Use 1 ½ gallons of household bleach.
NOTE: In applications where it is inconvenient to determine water depth, at least ½ gallon of household bleach, or ¼ gallon of pool chlorine, may be used for wells up to 8″ in diameter with water estimated to be less than 80 feet deep; one gallon should be used for similarly sized wells with water greater than 80 feet.
5. Mix the chlorine solution above with 10 times as much water before pouring down well.
Avoid pouring strong bleach down the well.
www.cleanwaterstore.com Clean Water Systems & Stores Inc. © 2017
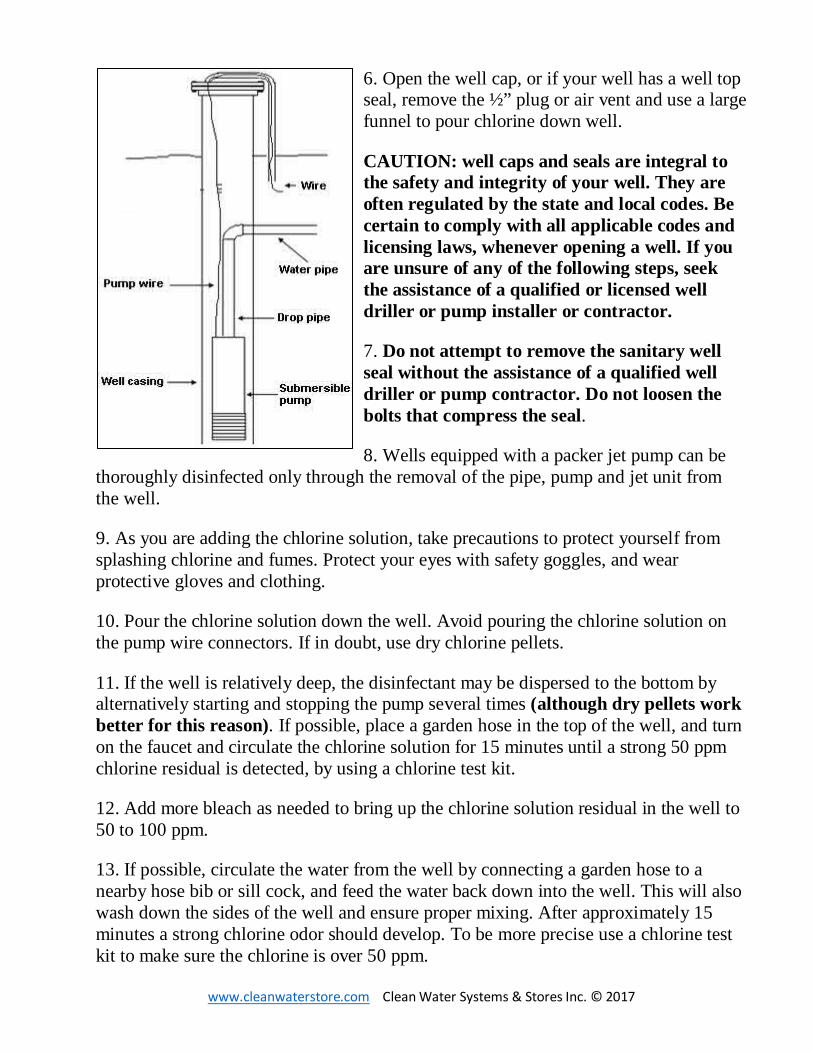
6. Open the well cap, or if your well has a well top seal, remove the ½” plug or air vent and use a large funnel to pour chlorine down well.
CAUTION: well caps and seals are integral to the safety and integrity of your well. They are often regulated by the state and local codes. Be certain to comply with all applicable codes and licensing laws, whenever opening a well. If you are unsure of any of the following steps, seek the assistance of a qualified or licensed well driller or pump installer or contractor.
7. Do not attempt to remove the sanitary well seal without the assistance of a qualified well driller or pump contractor. Do not loosen the bolts that compress the seal.
8. Wells equipped with a packer jet pump can be thoroughly disinfected only through the removal of the pipe, pump and jet unit from the well.
9. As you are adding the chlorine solution, take precautions to protect yourself from splashing chlorine and fumes. Protect your eyes with safety goggles, and wear protective gloves and clothing.
10. Pour the chlorine solution down the well. Avoid pouring the chlorine solution on the pump wire connectors. If in doubt, use dry chlorine pellets.
11. If the well is relatively deep, the disinfectant may be dispersed to the bottom by alternatively starting and stopping the pump several times (although dry pellets work better for this reason). If possible, place a garden hose in the top of the well, and turn on the faucet and circulate the chlorine solution for 15 minutes until a strong 50 ppm chlorine residual is detected, by using a chlorine test kit.
12. Add more bleach as needed to bring up the chlorine solution residual in the well to 50 to 100 ppm.
13. If possible, circulate the water from the well by connecting a garden hose to a nearby hose bib or sill cock, and feed the water back down into the well. This will also wash down the sides of the well and ensure proper mixing. After approximately 15 minutes a strong chlorine odor should develop. To be more precise use a chlorine test kit to make sure the chlorine is over 50 ppm.
www.cleanwaterstore.com Clean Water Systems & Stores Inc. © 2017
14. Water should be pumped from the well into the pressure tank and plumbing system.
15. All water faucets should be turned on in the house and all outside fixtures and hose bibs including fire hydrants, watering troughs, and other supply lines to other buildings, until a 50 PPM chlorine residual is detected.
16. After the chlorine has been left in the well (and the plumbing system if applicable) for a minimum of 6, up to 12 hours, the chlorinated water can be discharged. Large amounts of chlorinated water should not be discharged into the septic tank, or onto lawns or gardens.
If possible, discharge as much of the water as possible through an outside faucet with a hose attachment. Do not discharge the chlorinated water into streams or rivers. The small amount of chlorinated water, which remains in the household plumbing, can be discharged into the septic system, but first flush the water.
18. Backwash water softeners; flush the water heater, and replace all filters if present.
19. For wells and piping systems that have bacterial contamination or have been flooded, re-sample the water and retest for coliform, after all the chlorine residual is gone.
20. The water should be tested 2 to 3 weeks after sanitizing. If bacteria, iron bacteria, sulfur, or other problems recur, contact your well water professional for further treatment.
NOTE: For heavily iron-fouled wells, severe contamination with bio films or slime, or excessive levels of hydrogen sulfide gas, apply a 100 ppm or 200 ppm residual by multiplying the chlorine bleach used by 2 or 4 times.
Frequently Asked Questions About Chlorinating Your Well
What Precautions Should I Take Before A Chlorination is Started? If you are not familiar with your well or well construction, consider hiring a licensed well driller to shock chlorinate.
Should you decide to shock chlorinate your well yourself, take the following precautionary measures:
1. Concentrated chlorine solutions for shock chlorination can be dangerous. Because of the volatile and corrosive nature of the concentrated chlorine
www.cleanwaterstore.com Clean Water Systems & Stores Inc. © 2017
solution, it is important to wear eye goggles, protective clothing, rubber gloves and boots.
2. Mix and add chlorine solution in a well-ventilated area. High chlorine levels in water after shock chlorination. Make sure that your family or pets do not use the water during the chlorination process.
3. Preventing electric shock from the water pump. Before removing the well cap or cover, turn the pump circuit breaker off. Wear waterproof rubber boots.
4. Shock chlorinating your water supply system can potentially damage your pressure tank, some filters and filter media, or water softener, so bypass these systems if possible.
5. Before you begin, shut off water to all carbon filters and reverse osmosis units attached to your household water lines and bypass water softener or iron filter.
When Can I Use the Water Again?
Wait one to two weeks after shock chlorinating the water supply system and then retest for total coliform and E. coli bacteria.
If the test results show the absence of coliform bacteria, the water is safe to drink.
However, if test results show the presence of coliform bacteria, the source(s) of contamination should be identified and eliminated through a licensed well driller/contractor or a continuous disinfection treatment system should be installed.
What Type of Chlorine Bleach Should Be Used?
For best results use a powdered bleach or pellets that is certified for drinking water, or liquid pool chlorine. However, it is also OK to use unscented household chlorine bleach with at least 5% sodium hypochlorite found in supermarkets if you cannot find certified bleach or 10% liquid pool chlorine.