Embed Size (px)
Citation preview

WELCOME TO THEHOBIE WAY OF LIFE
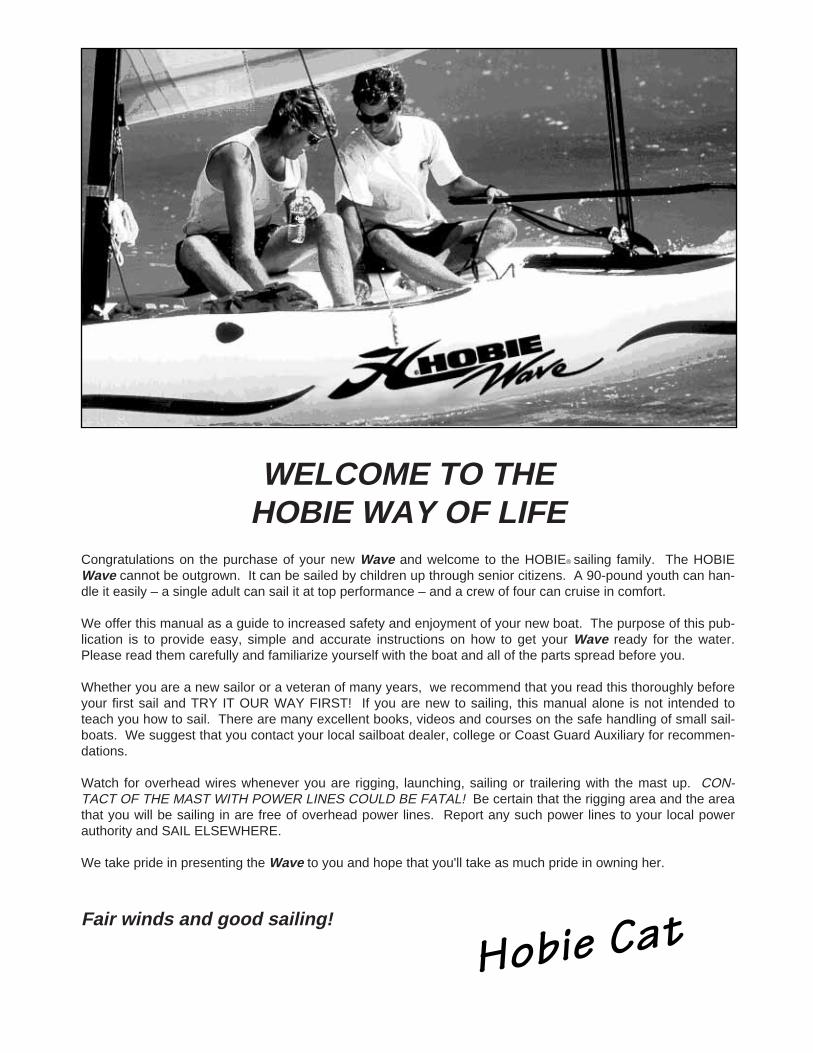
Congratulations on the purchase of your new Wave and welcome to the HOBIE® sailing family. The HOBIEWave cannot be outgrown. It can be sailed by children up through senior citizens. A 90-pound youth can han-dle it easily – a single adult can sail it at top performance – and a crew of four can cruise in comfort.
We offer this manual as a guide to increased safety and enjoyment of your new boat. The purpose of this pub-lication is to provide easy, simple and accurate instructions on how to get your Wave ready for the water.Please read them carefully and familiarize yourself with the boat and all of the parts spread before you.
Whether you are a new sailor or a veteran of many years, we recommend that you read this thoroughly beforeyour first sail and TRY IT OUR WAY FIRST! If you are new to sailing, this manual alone is not intended toteach you how to sail. There are many excellent books, videos and courses on the safe handling of small sail-boats. We suggest that you contact your local sailboat dealer, college or Coast Guard Auxiliary for recommen-dations.
Watch for overhead wires whenever you are rigging, launching, sailing or trailering with the mast up. CON-TACT OF THE MAST WITH POWER LINES COULD BE FATAL! Be certain that the rigging area and the areathat you will be sailing in are free of overhead power lines. Report any such power lines to your local powerauthority and SAIL ELSEWHERE.
We take pride in presenting the Wave to you and hope that you'll take as much pride in owning her.
Fair winds and good sailing!
Hobie Cat

1
This assembly manual takes you step-by-step through the setting-up and sail-ing of your new HOBIE Wave.
This manual will help you understandeach part in detail. For more informa-tion refer to the Wave assembly videotape and your Hobie Cat dealer.
Setting up your Wave PAGE
Wave terminology.................................2
List of parts...........................................3
Knots to use .........................................4
The hulls...............................................4
Trampoline assembly ........................4-6
Tensioning the trampoline ....................6
Mast assembly .....................................7
Stepping the mast .............................7-9
Sail ..................................................9-10
Downhaul and adjustment..................10
Mainsheet...........................................10
Rudder assembly ...............................10
Tiller cross bar....................................11
Setting up the CLUB Wave.........11-12
Please refer to the CLUB WAVE assem-bly page for each item identified by thefollowing "SEE CLUB". This will identifyitems that differ from the standard HobieWave assembly.
Sailing your Wave .......................PAGE
Balancing the boat ...................................13
Steering ....................................................13
Sail power ...........................................13-14
Righting the boat.................................14-15
Turning......................................................14
Launching/landing ..............................14-15
Rudder tuning .....................................15-16
Car topping/trailering ..........................16-17
Safety tips ..................................Back page
2
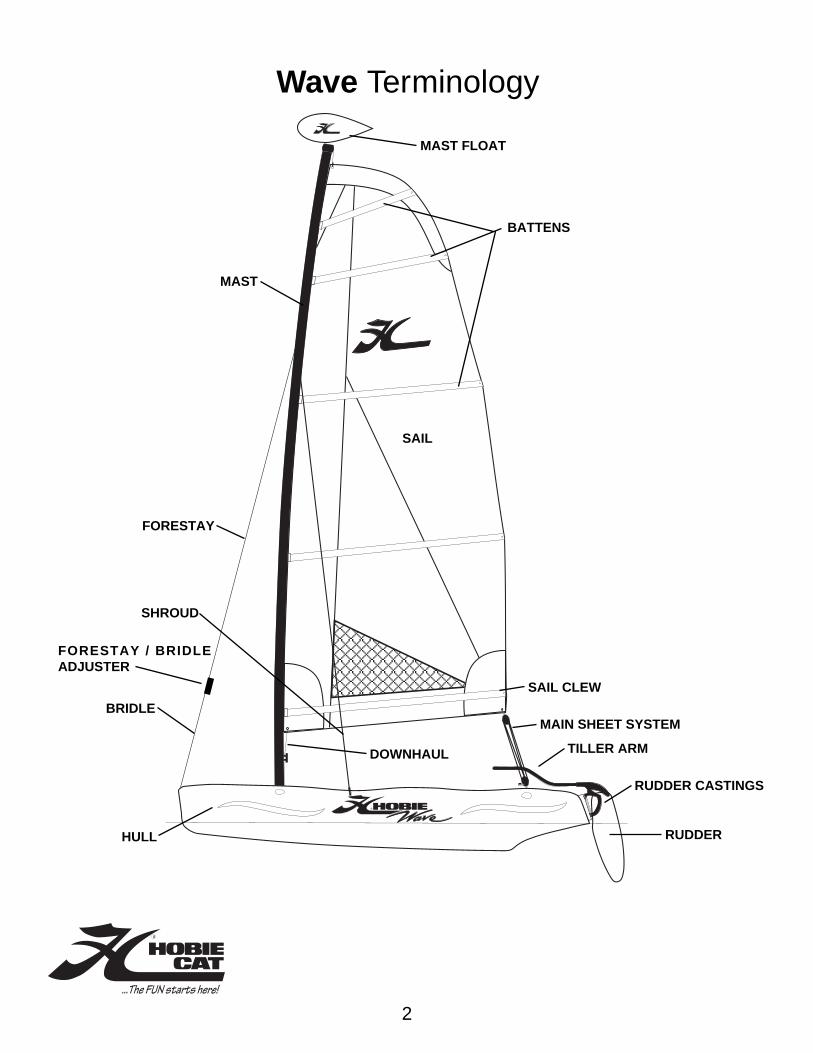
Wave Terminology
MAST
DOWNHAUL
RUDDER CASTINGS
TILLER ARM
SHROUD
HULL
BRIDLE
FORESTAY
SAIL CLEW
MAIN SHEET SYSTEM
RUDDER
SAIL
BATTENS
FORESTAY / BRIDLEADJUSTER
MAST FLOAT

SMALL PARTS DETAIL
➀ Mainsheet system➁ Downhaul line➂ Righting line➃ Forestay wire with adjuster
and bridle wires➄ Shroud wires
NOT SHOWN: Main halyard line
3
LIST OF PARTSYou should have:
➀ (2) Hulls with hardware➁ (1) Front cross bar ➂ (1) Rear cross bar➃ (1) Trampoline➄ (1) Box of small parts➅ (1) Sail, battens and sail bag➆ (2) Rudder assemblies➇ (1) Tiller cross bar
NOT SHOWN:(1) Upper mast section(1) Lower mast section(1) Mast float(1) Trampoline lace rod
(taped to battens)
➆
➁
➅
➀
➄
➇
➂
➀
➃
➁
➄
➂
➀
➃
Check the boat and parts carefully to be sure that all of the parts are presentand that the boat is in good order.
PARTS

ASSEMBLY INSTRUCTIONS
KNOTS TO USE
FIGURE 8 KNOT BOWLINE KNOT HALYARD KNOT CLEATING OFF A LINE
1. 2.
FIGURE 8 KNOTAT END OF LINE
1. THE HULLS
Lay the hulls on the ground on their sides with the bot-toms to the center (graphics down) as in figure 1 . A tarpor pads may be desirable under the hull if the groundsurface is rough. Place the hulls about six feet apart.
There is one plug in the rear of each hull (shown inset).These plugs are used to drain the hulls. The plugsshould be in place before sailing. Remove the plugsafter sailing to drain any water that may have leakedinto the hulls. It is best to travel with and store the boatwith the plugs removed to allow for pressure changesdue to heating, cooling and altitude changes. This willprevent warping of the hull surface.
2. CROSSBARS AND TRAMPOLINEASSEMBLY
Figure 2a shows an example of the assembled trampo-line assembly. To assemble the cross bars and trampo-line onto the hulls, first locate the crossbars and trampo-line. These parts are partly pre-assembled by the facto-ry. "SEE CLUB"
Un-roll the trampoline assembly and position it betweenthe hulls. The front of the trampoline has a rope moldedinto the edge seam and two "D" rings molded onto thetop surface. The sides and rear of the trampoline haveloops and cut outs along the edges. The front crossbarhas a casting with mast step ball located on the top cen-ter. The rear crossbar has (4) webbing straps with vel-cro and a small stainless steel loop fitting on the top andcenter.
FIGURE 1a
FIGURE 2a
4
PLUG

It will not be necessary to detach the cross bars fromthe trampoline during future disassembly and assembly.
Once the trampoline is assembled to the cross barsand they are in position, check to see that the velcrostraps at the rear are loosely fastened.
Lift the front crossbarand insert the left endinto the left hull. Insertonly partially. Lift therear cross bar andinsert the left end intothe left hull. Keep thestraps rolled around therear cross bar as in fig-ure 2d(5). Insert frontand rear completely(see f igure 2e ). Thecross bars have stopsbuilt into the undersidethat will limit the depththe cross bar can beinserted.
Reach up and hold the right end of the front crossbar,and pull it down. This will rotate the left hull to theupright position. Straddle the right hull and rotate it tothe upright position by grabbing the cross bar insert holeon the outboard side and pulling the hull to vertical.
Insert the front cross barpartial ly. Align andinsert the rear cross barpartially. Working frontand rear, wiggle hullonto cross bars unti lful ly inserted as in figure 2f .
Upon first time assembly, you will need to feed the tram-poline into the front cross bar. Remove one of the eyestraps and block fittings withcable located near each end ofthe forward cross bar (figure2b) by loosening the screws justenough to slide the fitting out ofthe bar.
Slide the trampoline into thefront cross bar with the hikingstraps up. Replace the eye strapand block fitting to its originalposition and tighten.
Upon first time assembly it will then be necessary tofeed the trampoline lace rod into the pocket at the rearof the trampoline (figure 2c ). Position it with equalamounts extending from each side of the trampoline.
Position the rear cross bar along the rear of trampoline.Place it with the open track towards the trampoline andthe small stainless steel loop fitting at the center on top.Position the four webbing straps (with velcro) in line withthe openings that the lace rod passes through.
5
FIGURE 2c
FIGURE 2e
FIGURE 2f
FIGURE 2b
Rear Bar
Trampoline and lace rod
Web strap
Velcro Flap
Continue around the rearbar as in figure 2d(2).
FIGURE 2d(2)
FIGURE 2d(1) "SIDE VIEW"
Pass the velcro strapsover the top of the barand away from the tram-poline as in figure 2d(1).
Pass the webbing for-ward then around thelace rod through thetrampoline opening fromtop to bottom as shown infigure 2d(3).
FIGURE 2d(3)
FIGURE 2d(4)
Bring the Webbing backaround the rear bar in theopposite direction.
Repeat the previoussteps for each strap.Then tuck each oneunder the velcro flaps.Fasten the velcro strapsback to their anchorsloosely.
FIGURE 2d(5)

Pass the two trampoline cables from the front crossbarthrough the trampoline side loops to the rear crossbar.
As shown (from the underside of the trampoline ) infigure 2g , on each side at the rear crossbar, locate theline that runs from the rear corner pulley block. Pass theline to the rear trampoline "D" ring and return throughthe small pulley block. Pass the end of the line throughthe trampoline cable end fitting and tie a "figure 8" knotas shown in the knot diagrams on page 4.
FIGURE 2g (rear corner, underside )
FIGURE 2h (top view)
To tension the trampo-line, you wil l use themainsheet system (blockand tackle). Find themainsheet system locat-ed with the small parts.The system line is pre-run by the factory. Attachthe shackle at the bottomof the blocks to the stainless steel loop fitting in the cen-ter of the rear cross bar. Pull the mainsheet hook, at thetop of the system, up to the front of the trampoline. Hookthe mainsheet to the ring fastened to the trampolinecable system at front of trampoline as in figure 3b . (DoNot fasten the mainsheet hook to the "D" ring that isattached to the trampoline) Start on either left or rightside.
Pull tension on the main-sheet until the cable sys-tem ring and hook nearthe "D" ring attached tothe trampoline (FIGURE3c ). Posit ion hook toengage ring thereby con-necting the two ringstogether as in figure 3d .
Release the mainsheettension and unhook fromring. Repeat the processon the opposite side. Besure all "D" rings arepositioned as shown andnot turned or pulled fromends as damage to thetrampoline may result.
Additional tension or reduced tension can be achieved byrepositioning the knot as shown in figure 3f at rear endof cable (after disengaging the forward rings). The cablesshould be tight to make the trampoline area taut. Unhookrings at front, move knot and re-hook forward rings.Repeat until trampoline area is taut. In future assemblythis adjustment will not be necessary unless trampolinebecomes loose once again.
Tighten each velcro strap (4) to support the trampoline atthe rear crossbar.
FIGURE 3d
FIGURE 3f
FIGURE 3b
FIGURE 3c
Figure 2h is the top view of same. Making adjustmentsand re-tying the knot at the pulley block will loosen ortighten the side cables. The cables should be some-what loose at this time. Be sure the "D" rings remain aspictured above and not pulled from one end whenloaded as damage may result.
Pulley block
Cable end
"D" ring
Cross barstop
3. TENSIONING TRAMPOLINE
As shown in figure 3a ,hook the trampoline sidecables onto the threehooks on each hull. (Ifyou are re-assembling,be sure that the main-sheet system is loose ordisconnected from ringat front of trampoline tokeep cables loose).
FIGURE 3a
Adjust knot here
6

Attach the multi-hole adjuster tothe forestay as shown in figure5b with the clevis pin and ringat the end hole of the adjuster(top of the 7 holes). This is theloose adjustment for f irstassembly (photo shows thirdhole down). Shackle the bridlewires (thimble loop end) to thebottom of the adjuster. "SEECLUB" This leaves the springhooks at the very end of theforestay/ adjuster/ bridleassembly.
5. MAST WIRES
The mast will be held in the upright position by two sidewires (shrouds) and one front wire (forestay). Theforestay will attach to two shorter wires (bridles) with a"7 hole" adjuster. Locate the three main (longer) wiresand install onto the mast tang as shown in figure 5ausing the 1/4" threaded shackle provided in the rig kit.The shorter forestay wire goes in the middle of theshackle with one shroud on either side. "SEE CLUB"
4. MAST ASSEMBLY
The mast is in two sections. The bottom section is alu-minum and displays the warnings against sailing andassembling near overhead wires and power lines.Before raising the mast check again that you are in asafe area and always remember this warning. Insert theupper section into the lower section.
Install the mast float to the upper mast section as in fig-ure 4. First time assembly will require the removal of thetwo halyard pulley clevis pins, placement of the floatassembly over the mast top casting and replacing theclevis pins with the screws and nuts provided with thefloat assembly. Be sure the blunt end of the float is fac-ing forward towards blunt side of the mast.
7
FIGURE 5a
6. STEPPING THE MAST
To set the mast into the upright position, position themast base at the mast step ball located on the frontcrossbar as shown in figure 6a(1). The mast top andfloat should be positioned to the rear of the boat in thecenter of the rear crossbar.
FIGURE 6a(1)
FIGURE 5b
FIGURE 6a(2)
Connect the mast base to the step ball by positioningthe step ball inside the mast base cup. Pass the pinthrough the mast base as shown in figure 6a(2).
FIGURE 4

Check to be sure that the wires are not crossed.Connect the left side shroud to the left hull with theopposing hooks as shown in figure 6b and 6c .
Pass the split ring through the small hole in the twohooks to lock them together as in figure 6c .
Slide the vinyl boot over the hook assembly to lock it inplace as in figure 6d . The top of the boot must engagethe wire swage (swage must protrude from top of boot)to prevent them from moving up the wire and possiblyallowing the ring to be exposed. Repeat for right sideshroud.
Check wires to be sure they are not crossed and that theyare free to allow the mast to swing to the upright position.
If you are stepping the mast by yourself or just to makethings easier, pull the sail halyard hook forward, over thetop of the shroud wires, to the bow. Hook into the bridlewire fitting. Loosely tie opposite end of halyard to thecleat at bottom end of the mast. This line will be used tohold mast in the upright position before forestay and bri-dle wires assembly are attached to the bow fittings.
Before continuing, once again check for overheadpower line wires that could contact the mast whenraising.
Stand on the trampoline near the rear crossbar and liftthe mast to your shoulder (figure 6f ).
Face forward on theboat with a wide stancefor stability. Walk for-ward while lifting themast until the sideshrouds go tight pre-venting the mast fromfurther forward move-ment. Lean your weightagainst the mast tohold it in this position.See figure 6g.
Reach down to thehalyard cleat and pullthe halyard line tight.Fasten the line to thecleat in a secure manner as shown in "Knots" on page4.
FIGURE 6cFIGURE 6b
8
FIGURE 6g
FIGURE 6f
FIGURE 6d
As shown in figure 6a(3) below, pass the long pinthrough the mast base. There is a small spring loadedball lock that will keep the pin captive in the mast base.For safety, the pin should remain in the mast base whilesailing.
FIGURE 6a(3)
WARNING!!
Watch for overhead power lines. Never rig,trailer or sail the boat near overhead power
lines. Mast contact with a power line could be fatal.

The halyard line should berunning from the top of themast directly to the bow fitting.Carefully let go of mast to besure that it will stay upright. Ifnot, add tension to halyardline and re-cleat.
This wil l hold mast in theupright position (see figure6h) while you get off the tram-poline to fasten the bridlewires to the bow fittings.
If you have someone helpingyou rig, you can hold the mastupright while they follow thenext step.
See that the forestay wire is not tangled and runs direct-ly from mast tang fitting. Using the quick snap hooks onthe ends of the bridle wires, attach to one bow and thento the other as in figure 6i and 6j . "SEE CLUB" Usethe small plastic balls to grip and pull down on the bridlewires.
Length adjustment of the forestay(figure 6k) is made to tension themast wires. Tighten the forestay untilall wires are somewhat rigid and with-out slop. Use the halyard line attachedto the bow tang and cleated tightly tohold the mast well forward when mak-ing these adjustments. Release onebow bridle snap hook. Make adjust-ments to the clevis pin location in theadjuster and then reattach the bridlehook to the bow fitting. Release thehalyard from the bow fitting and repo-sition it down the rear of the mast and secure to thecleat.
Once this adjustment is made you can assemble anddisassemble using only the quick snap hooks to the bowfittings unless the rig becomes loose after use. NOTE: Itis normal for the shroud on the down wind (leewardside) to be loose while sailing.
7. INSTALLING THE SAIL BATTENS
Unfold the sail and lay it out on the trampoline. Therewill be a small bundle of thin lines tied to the top of thesail. These are the batten tension lines. Tie the battentension lines to one of the the small grommets at theend of each batten pocket as diagramed in figure 7a(one to each batten pocket). Tie the lines using a bow-
line knot as found in the "knots" diagramed on page 4.It is best to tie the lines all to one side of the sail. Inserteach batten (shortest batten at the top to longest battenat the bottom of the sail).
Note that the batten ends have a "V" jam cleat mold-ed into them. These "V" jam cleats will keep the ten-sion line from slipping in only one direction. Notethe hollowed-out side of the cleats. Pull the linefrom the flush side toward the hollowed side.
The upper two battens are narrower and have a differ-ent cleat shape. To be sure these cleats work correctly,position these so that the hollowed out side of the capfaces the bowline that you have tied to the sail grommet.Position the larger caps so that the hollowed sides faceaway from each knot.
Following the diagram in figure 7a , lace the tensionlines through each batten end cap. Pass the linethrough the hole in the cap then through the grommeton the opposite side. For the smaller caps, pass the lineover the "V" cleat, pull tension forcing the batten into thepocket, then pull the line into the cleat to hold it. For thelarger caps, pass the line through the second hole in thecap, then pass the line through the first grommet andback to the "V" cleat. Pull tension on the line forcing thebatten into the pocket and cleat it. Tie a small figure 8knot in the end of each line to prevent the battens fromfalling from the sail if the line releases from the cleat.Tension each batten so that the batten is well seatedand the wrinkles in the batten pockets are removed.Excessive batten tension will cause the sail to be moredifficult to handle.
FIGURE 7a
9
FIGURE 6h
Batten pocket
Start here with abowline knot
Cleat at mouth of each tip
Hollowed-out side of tip
FIGURE 6i FIGURE 6j
FIGURE 6k
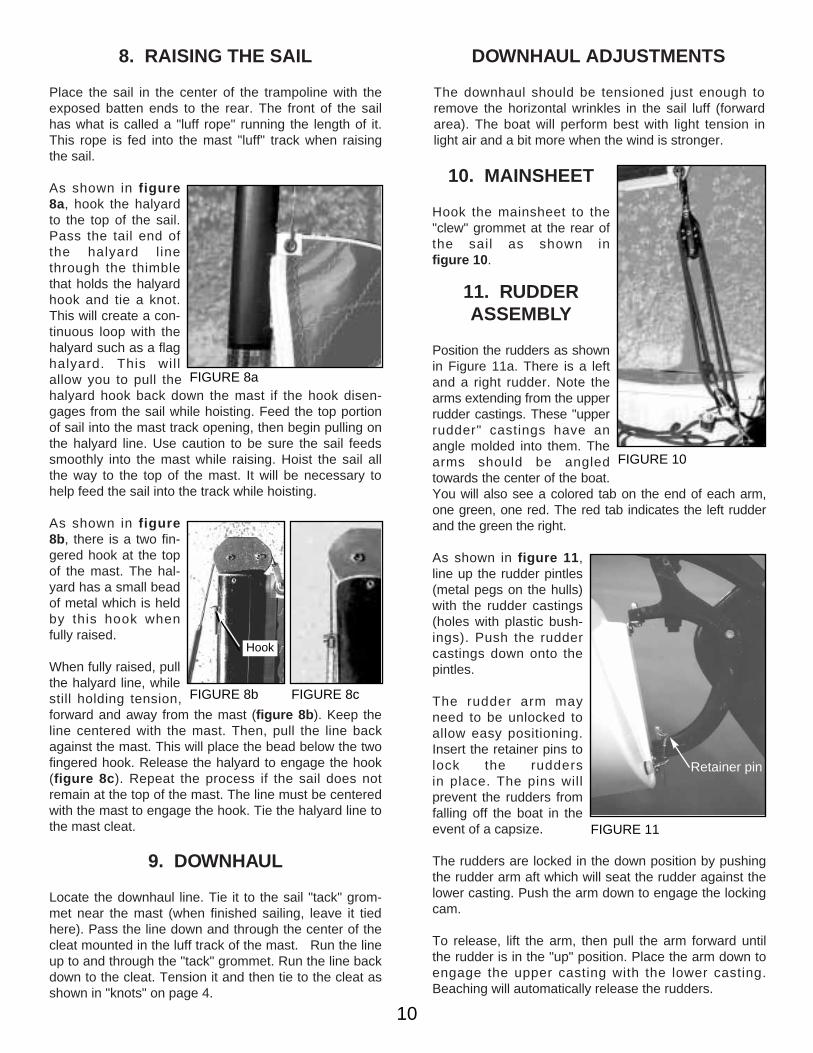
DOWNHAUL ADJUSTMENTS
The downhaul should be tensioned just enough toremove the horizontal wrinkles in the sail luff (forwardarea). The boat will perform best with light tension inlight air and a bit more when the wind is stronger.
8. RAISING THE SAIL
Place the sail in the center of the trampoline with theexposed batten ends to the rear. The front of the sailhas what is called a "luff rope" running the length of it.This rope is fed into the mast "luff" track when raisingthe sail.
As shown in figure8a, hook the halyardto the top of the sail.Pass the tail end ofthe halyard l inethrough the thimblethat holds the halyardhook and tie a knot.This will create a con-tinuous loop with thehalyard such as a flaghalyard. This wil lallow you to pull thehalyard hook back down the mast if the hook disen-gages from the sail while hoisting. Feed the top portionof sail into the mast track opening, then begin pulling onthe halyard line. Use caution to be sure the sail feedssmoothly into the mast while raising. Hoist the sail allthe way to the top of the mast. It will be necessary tohelp feed the sail into the track while hoisting.
As shown in figure8b, there is a two fin-gered hook at the topof the mast. The hal-yard has a small beadof metal which is heldby this hook whenfully raised.
When fully raised, pullthe halyard line, whilestill holding tension,forward and away from the mast (figure 8b ). Keep theline centered with the mast. Then, pull the line backagainst the mast. This will place the bead below the twofingered hook. Release the halyard to engage the hook(figure 8c ). Repeat the process if the sail does notremain at the top of the mast. The line must be centeredwith the mast to engage the hook. Tie the halyard line tothe mast cleat.
10. MAINSHEET
Hook the mainsheet to the"clew" grommet at the rear ofthe sail as shown infigure 10 .
9. DOWNHAUL
Locate the downhaul line. Tie it to the sail "tack" grom-met near the mast (when finished sailing, leave it tiedhere). Pass the line down and through the center of thecleat mounted in the luff track of the mast. Run the lineup to and through the "tack" grommet. Run the line backdown to the cleat. Tension it and then tie to the cleat asshown in "knots" on page 4.
11. RUDDERASSEMBLY
Position the rudders as shownin Figure 11a. There is a leftand a right rudder. Note thearms extending from the upperrudder castings. These "upperrudder" castings have anangle molded into them. Thearms should be angledtowards the center of the boat.You will also see a colored tab on the end of each arm,one green, one red. The red tab indicates the left rudderand the green the right.
As shown in figure 11 ,line up the rudder pintles(metal pegs on the hulls)with the rudder castings(holes with plastic bush-ings). Push the ruddercastings down onto thepintles.
The rudder arm mayneed to be unlocked toallow easy positioning.Insert the retainer pins tolock the rudders in place. The pins willprevent the rudders fromfalling off the boat in theevent of a capsize.
The rudders are locked in the down position by pushingthe rudder arm aft which will seat the rudder against thelower casting. Push the arm down to engage the lockingcam.
To release, lift the arm, then pull the arm forward untilthe rudder is in the "up" position. Place the arm down toengage the upper casting with the lower casting.Beaching will automatically release the rudders.
FIGURE 8b FIGURE 8c
FIGURE 11
FIGURE 10
10
FIGURE 8a
Hook
Retainer pin

12. TILLER CROSSBAR
The rudder arms are connected by a bar called the tillercrossbar. Position the crossbar between the two rud-ders with the elbow connector spring buttons facingdown. Slide each connector partly into the tiller arms.Depress the stainless steel buttons and fully insert theelbow joints into the rudder arms as shown in figure 12 .The buttons will snap into the holes in the rudder armsto secure connection. A small amount of rotation of theconnector may help seat the buttons in the tiller armholes.
Your Wave is now ready to sail!
Please read the sections in the follow-ing pages regarding safety and sailingthe Wave. This additional informationwill help you have more fun with yournew boat!
11
FIGURE 12
CLUB WAVE RIGGINGThe Club Wave is the same as the standard Wave withthe following differences as noted within the standardassembly manual.
2/3. CROSSBARS AND TRAMPOLINEASSEMBLY
The CLUB WAVE incorporates a HOBIE standard threepiece trampoline assembly with lace lines in the centerand rear of the trampoline as shown in figure CLUB1 onthe following page.
Slide the tramp halves into the hull/tramp tracks on eachhull (grommets towards the center and rear of the boat).The use of soap or spray silicone to lube the tramp boltrope is required. Slide the rear lace strip into the rearcrossbar.
Feed the forward edges of the trampoline halfs into theforward crossbar while inserting the crossbars into thehulls. Start with one side. (ie.) Insert the rear crossbarinto the left hull. Feed the left tramp into the forwardcrossbar then insert the forward crossbar into the lefthull. Lift the right hull into position. Working at the front,then rear, then front and back and forth, work the righthull onto the crossbars while feeding the tramp into theforward crossbar until the crossbars are fully seated totheir stops.
Three lace lines are provided. The longer lace line (17')will be tied to the forward of the center lace grommetswith a bowline. Lace the line through all of the centergrommets to the rear of the trampoline as shown (bynumber) in the illustration. Lace the rear of the trampstarting from the outboard ends towards the center.Tension all lace lines and tie off with half hitches at therear/center of the trampoline.
5. MAST WIRES
As shown in figure CLUB2 on the following page, theClub Wave uses seven hole adjusters at the base of theshrouds and the hull connection rather than the hooksused in the standard model. Install the adjusters to thehulls and the shrouds to the seven-hole section of theadjuster. Set the shrouds at the top hole for the initialmast stepping. The bridle wires attach to the bow tang(pad eyes). To install the bridle wires: remove onescrew and loosen the other on each bow tang. Turn thetangs to insert the thimbles and refasten the screws.The bridle connection to the forward adjuster uses astandard screw shackle. Pin the forestay to the top holefor initial mast stepping. After stepping the mast, adjust-ments can be made to tension the wires and for rakingthe mast aft or forward. The top location on the shroudadjuster is standard. Positioning the shrouds lower willrake (lean) the mast aft. This can help handling in higherwinds.
There is a limit to the amount of mast rake aft that ispossible. This will be seen when the main sail block onthe sail clew nears or touches the block attached to therear crossbar when fully sheeted while sailing. Toomuch mast rake will not allow you to sheet the sail prop-erly. It may also be more difficult to tack the boat as themast forward design is intended to help bring the bowsthrough the wind when tacking.

FIGURE CLUB1
FIGURE CLUB2
12

sail and course adjustments above using the "tell tails"to get the most performance out of the sail for all anglesof sailing. The tell tails react to air flowing over the sailand will help you see that the sail is pulled in too tight ortoo loosely. If you pull the sail in too tight, you will stallthe sail power. Ease the sail out until it luffs, then pull itin just a little until it stops luffing. You will adjust the trimwhenever the wind shifts direction or you changecourse.
Refer to the sail trim diagram below for approximate sailsettings for the different points of sail or directions you
SAILING YOUR WAVESafe and sane guideline for the beginner; an easyreview for the experienced.
Always wear a life jacket when boating.
BALANCING THE BOAT
When sailing, sit on the upwind side of the boat (wind onyour back) just in front of the tiller facing the sail.Balance your weight further outboard as the boat beginsto tip or heel over with the wind in the sails. Tuck onefoot under the hiking strap for balance. Use your handthat is forward to hold and control the mainsheet. Useyour hand that is aft to steer.
STEERING
Steer the boat by pushing the tiller away from you toturn towards the wind. Pull the tiller towards you to turnaway from the wind. Keep the movement of the tiller to aminimum to prevent over-steering. This will help youkeep the boat moving in a straight line as you pay atten-tion to other watercraft and sail adjustments.
SAIL POWER
Face the sail in order to pay close attention to the trim oradjustment of the sail. When the front of the sail, justbehind the mast, luffs or flutters in the breeze, you losepower. To start moving, pull the sail in just enough tostop the sail from luffing. There are also short ribbonshanging on either side of the sail. Follow the diagram of
WIND
COMINGABOUT
FALLINGOFF
HEADING UP
WIND
CAN'T SAIL IN THIS
AR
EAClose Hauled Close
Hauled
Close ReachClose Reach
Medium Reach
Broad
Rea
ch
Medium Reach
Broad Reach
Dow
nwin
d R
un
BASIC SAILING AND POINTS OF SAIL
13

into deep enough water to lower the rudders. It is possi-ble to launch in shallow water with the rudders partly up.Try not to steer with too much force on the rudders untilyou lock them in the down position. Keep the sail looseand trimmed out completely. Turn the boat away fromthe wind and push off into deeper water then hop on.Once aboard, trim the sail in quickly to get the boatmoving forward and steer away from the wind slightly toprevent stalling into the wind.
When launching from a beach where the wind is blowingfrom the beach towards the water you simply keep theboat pointed into the wind. Drift backwards with the rud-ders in the up position. Drift the boat away from thebeach backwards and hop on when floating completely.Stay forward as the boat drifts into deeper water. Youcan hold the sail out to catch wind backwards toincrease reverse speed. Then move to the rear andlower the rudders. It will be easiest to lower only onerudder while moving backwards. Then lower the otherwhen the boat begins to move forward again. Be awareof the intended direction you wish to sail when loweringthe rudder and steer the boat as the rudder drops intothe water. There will be a lot of force on the rudder toturn one way or the other when going backwards. Planahead and steer the rudders so that they will be pointingin that direction before dropping it into the water. Steerthe boat while going backwards so the bow turns awayfrom the wind and toward the direction you wish to sail.As the sail begins to fill with wind, the boat will slow thenbegin to move forward. Trim in the sail and off you go.
RIGHTING THE BOAT
A 15 foot length of "righting line" is provided with theboat. Tie each end to the outboard ends of the forwardcrossbar passing through the eye straps. Tie off withbowline knots. Store the excess line in the trampolinepocket.
If you tip the boatover, stay with theboat. The boat willnot sink and iseasy to right. It isnot necessary, butit is easier, to rightthe boat when thebow and the mastare pointed intothe wind as in thefollowing diagram.
There will be lesswind resistanceand better controlin this position. Besure the mainsheetis released, thenswim around to the
will be sailing. Note the "can't sail zone". You cannot sailin this direction due to the fact that the sail will luff con-stantly when pointed into the wind. If you get stuck inirons (or stop pointed into the wind) you will need toreverse the rudder and push the sail forward to back-wind. This will back the boat up. Reverse the ruddersand let the sail out until the boat is positioned moreacross the wind (close reach). Then you can correctlytrim the sail once again and start moving forward.
TURNING
To tack or turn the boat into and across the wind to theopposite direction (also known as "coming about"), fol-low the points of sail guide illustration and take the boatto the close hauled point of sail. This is when you arenearly 35 degrees from sailing straight into the wind.With the boat moving forward and not stalling, push thetiller away from you slowly. When the boat is pointingstraight into the wind the boat will become level. Easethe mainsheet trim out just a little. At this time moveyour body to the other side of the boat, switch handswith tiller and mainsheet and begin to bring the rudderback to straight. As the boat comes across the wind andfalls off onto the opposite, close hauled point of sail,bring the tiller all the way back to the straight positionand pull the mainsail back in for the proper sail trim. Ifyou stall pointing into the wind and you cannot steer theboat, refer back to the sail power description concerninggetting stuck in irons.
When sailing downwind, the turn from one point of sailacross to the other is called a jibe. The jibe is completedby turning away from the wind (falling off) to the oppo-site point of sail rather than into the wind as when tack-ing. Care must be taken when attempting a jibe as theboat will be at full power and you cannot easily de-power it without turning back into the wind. Also, beaware that the boat will be less stable in this maneuveras the sail will now have to swing clear across from fullyout one side of the boat to fully out the other.
To start a jibe, turn the boat away from the wind and letthe sail out slowly. Keep the turn going at a steady rateand begin pulling the sail back in as the boat nears thestraight downwind direction. This will help prevent thesail from slamming all the way across when the sail fillsfrom the opposite side. Duck below the sail to avoid get-ting hit as the wind fills the sail from the opposite sideand swings across the boat. Attempt to control thespeed of the sail while it crosses the deck by maintain-ing some tension on the mainsheet. Then ease themainsheet out quickly as the boat turns past the down-wind direction onto the new point of sail. Trim the sailcorrectly for the desired point of sail.
LAUNCHING THE BOAT
Launching the boat is easiest when the boat can bepointed into the wind to keep it de-powered and floated
14

bottom of the boat. Climb up on the hull and stand up.Using the 15' righting line provided that is tied to thefront crossbar at each end, hold the line while slowlyleaning back away from the trampoline. Lean to approxi-mately 45 degrees for best leverage. As the mast andsail lift out of the water and the upper hull begins to dropback into the water, drop down to your knees then intothe water. Hold onto the righting line near the crossbaror the crossbar itself near the hull that you were stand-ing on. This will prevent the hull from being lifted into theair by momentum which could cause the boat to capsizeonce again. Be well aware of the hull and crossbar com-ing down over your head. Holding the crossbar or right-ing line will also insure that you remain with the boatwhen it is righted. Climb aboard and continue sailing.
DOCKING
Docking the Wave properly will prevent damage. Alwaysdock and rig on the leeward side of a dock (the side thewind reaches last). Come in slowly and always beaware of the wind direction so you can properly de-power the boat when needed. The stronger the wind themore difficult the docking will be. Until you feel confi-dent, you may want to practice with a friend who will remain on the dock and help slow you downif necessary.
BEACH LANDINGS
Landing on a beach is simple. The idea is to reach thebeach in the point of sail nearest straight into the windas possible. This will assure that you can properly de-power the sail once beached.
Approaching a beach when the wind is blowing from thebeach out towards the water will require some planningso that you maintain power. Then turn into shore justbefore the hulls or rudders touch bottom. Plan so thefinal tack towards the location you choose to land is thetack that is nearest straight into the wind. Get a littlecloser to the beach than you need on the pervious tackto account for wind shifts in direction and speed. Thiswill give you a little room for error. This will allow you topoint a little further away from the wind after the tack togain speed before heading up into the beach to de-power at the last moment.
When approaching a beach when the wind is blowingonshore, sail in towards the beach from either side of thelanding spot. Sail in just short of touching the bottom withthe rudders. Allow some distance to turn the boat outtowards the water and into the wind just out from thelanding spot. Turn sharply to head into the wind and stallthe boat. Raise the rudders and drift back onto the beach.
RUDDER TUNING
You may adjust the rake of your rudder blades on yourHobie Wave. The amount of rake in a rudder bladeaffects the "feel" at the tiller. Basically, more forwardblade rake neutralizes the pull on the tiller and less for-ward rake increases the pull on the tiller. Tuning bladesfor a comfortable feel is a matter of individual preferencebut a close to neutral "feel" generally provides the beststeering. The following sketches are of a Hobie 16 rud-der assembly but the adjustments are the same. (Seesketch A .)
1) The first step in making any rudder rake adjustmentis to determine the existing rake. This is done with therudder assembly hangingon the boat's transom,blade down and locked.Using a straight edge orsnap line, extend the cen-terline of the rudder pivotpins down, across theleading edge of the bladeand draw a pencil l inealong that length. Measurethe distance from the pen-cil line to the most forwardspot 12" down theblade from the bottomof the casting. Seesketch A.
Rudder blade rake is pre-set at the factory to 1-1/8". Thisamount will be best for the average sailor and is a goodstarting point from which to begin any adjustments.
15
Sketch A
1-1/8"12"
Forward for lesspull on the tiller
Aft for more pull onthe tiller
2) To make any adjustment to the rake, unlock the tillerarm from the rudder housing and leave it unlocked.
3) If you wish to increase the amount of forward rake inthe rudder blade, turn the rake adjusting screw counter-clockwise using a 3/16" Allen wrench. Determine theincrease in the rake by extending a new line from thecenterline of the pivot pins. Re-measure the distancefrom the pencil line to the leading edge. Continue toadjust and measure until you have the desired amountof forward rake. See sketch B on the following pagefor the location of the adjusting screw.
Always keep the boat pointed into the windwhile beached and keep the sail trimmedout and un-cleated.
Once the rake is changed,the breakaway tensionshould be rechecked. Thetension may be adjusted
by turning the 3/4"internal screw in thehousing. The screwtensions an internalspring. (see sketchE) Turn it clockwiseto increase andcounter clockwise todecrease the tension.
6) Hobie Cat rudderblades are preset to breakaway at 17-26 poundsby testing with a l inearound the rudder bladeseven inches above thelowest tip of the blade.See sketch D .
Sketch E
Standard = 17-26 pounds
Sketch D
IMPORTANT CAR TOPPINGCAUTIONS
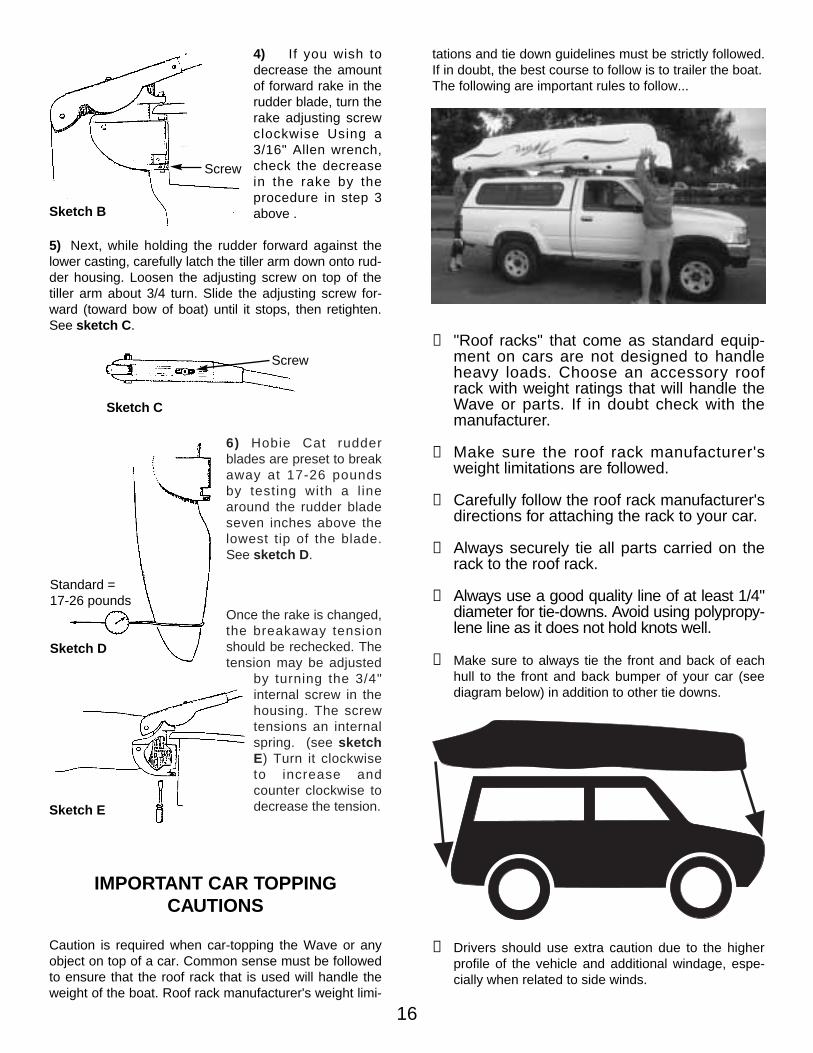
Caution is required when car-topping the Wave or anyobject on top of a car. Common sense must be followedto ensure that the roof rack that is used will handle theweight of the boat. Roof rack manufacturer's weight limi-
tations and tie down guidelines must be strictly followed.If in doubt, the best course to follow is to trailer the boat.The following are important rules to follow...
❶ "Roof racks" that come as standard equip-ment on cars are not designed to handleheavy loads. Choose an accessory roofrack with weight ratings that will handle theWave or parts. If in doubt check with themanufacturer.
❷ Make sure the roof rack manufacturer'sweight limitations are followed.
❸ Carefully follow the roof rack manufacturer'sdirections for attaching the rack to your car.
❹ Always securely tie all parts carried on therack to the roof rack.
❺ Always use a good quality line of at least 1/4"diameter for tie-downs. Avoid using polypropy-lene line as it does not hold knots well.
❻ Make sure to always tie the front and back of eachhull to the front and back bumper of your car (seediagram below) in addition to other tie downs.
❼ Drivers should use extra caution due to the higherprofile of the vehicle and additional windage, espe-cially when related to side winds.
16
Sketch C
Screw
4) If you wish todecrease the amountof forward rake in therudder blade, turn therake adjusting screwclockwise Using a3/16" Allen wrench,check the decreasein the rake by theprocedure in step 3above .
5) Next, while holding the rudder forward against thelower casting, carefully latch the tiller arm down onto rud-der housing. Loosen the adjusting screw on top of thetiller arm about 3/4 turn. Slide the adjusting screw for-ward (toward bow of boat) until it stops, then retighten.See sketch C .
Screw
Sketch B

TRAILERING
CAUTION: Boat and mast should be securely attachedto trailer with adequate tie-down straps. Failure to do socould cause extensive damage or serious injury!
LOADING YOUR TRAILERThe weight of the boat, equipment and additional gearshould never exceed the manufacturer's rated weightcapacity. Proper distribution of the load is of vital impor-tance. Too much weight on the hitch will cause "taildragging" of the towing vehicle, impairing steering andraising headlights into the eyes of oncoming traffic. Toolittle or negative weight on the hitch, and the trailer willsway or "fishtail". The solution to proper distribution isoften adjusting movable gear.
TOWINGExtra caution is necessary when towing any trailer. Theheavier the rig, the more time required to accelerate,pass, and stop. For this reason, the maximum speed forvehicles with trailers is less than without a trailer in moststates. A long rig requires a larger turning radius. Curbsand obstructions should be given wide clearance. Mostboats on trailers obstruct the rear view of the driver.When this happens, an additional rear view mirror onthe right side of the towing vehicle is required by law.
The trailer boatman should be familiar with traffic andhighway laws relating to the towing of trailers. Towing aHobie has particular hazards that should be mentioned.A Hobie is very wide. Obstacles should be given plentyof room when you are passing them. Tie down straps orlashings should be of sufficient size and diameter andplaced on all four corners.
The mast support on a trailer is subject to a lot of side-to-side motion and consequently may fatigue where it iswelded to the trailer. All this can be reduced by tying aline from each bow to the mast support. This will stiffenthe rig up and prolong the life of the trailer.
LAUNCHING AND RETRIEVINGPrepare boat for launching at the top of the ramp orparking facility. Remove all tie-down straps, check boatplugs and fasten boat painter. Do not release winch lineuntil boat is in the water. Back trailer to the left if possi-ble; backing left gives better launching visibility. Avoiddunking wheel bearings wherever possible. Never leavethe towing vehicle unattended on the ramp with only theparking brake set. If vehicle must be left while on theramp, set transmission in "park" or first gear, in additionto setting the parking brake. In retrieving your boat,make sure that the boat is properly placed on the trailer.Pull trailer up steadily to prevent spinning the wheels.
MAINTENANCELights: Most state laws require two red taillights on therear that may be combined with the stop and turn sig-nals. Vehicles over 80 inches in width require clearancelights. If lights are dunked, waterproof light fixturesshould be used. If water is allowed to enter, the lampmay crack and short out the entire system. Water alsopromotes contact corrosion. Always carry spare lamps.The wire coupling to the towing vehicle should be highenough to stay dry. Never rely on the trailer hitch forground connection. Four-pole connectors should beused.
The mast should not extend over three feet behind therear light assembly.
Wheels: Tires should ALWAYS be inflated to manufac-turer's recommended pressure. Always carry a sparewheel and a jack that fit the boat trailer. If wheel bear-ings are always dunked, waterproof bearings and capsshould be considered. If water is allowed into the hub,lubricating grease will float away and bearings will burnout or seize, causing damage and a safety hazard.Waterproofed bearings should be inspected prior toeach boating season, others more often. Special careshould be given when traveling on unimproved road-ways with small diameter wheels.
If a spare wheel is not available, a spare wheel bearingset should be taken on long trips in case the grease sealhas been broken.
FRAME AND ROLLERSRust should not be allowed to accumulate. Remove rustand repaint with anti-rust paint. Some trailers offer gal-vanized coating to prevent rust. Rollers should roll freelyand should not have checks, breaks or flat spots.
TOWING VEHICLEMost vehicles are limited in towing capacity. Towingheavy loads places extra demands on the engine, trans-mission, brakes and other systems vital to the vehicle.Towing "packages" are available through most autodealers and should be considered for heavy boats.
17
❽ Always stop and check the tie-downs shortly afterbeginning any trip and check often on long trips.Check for lines that may become loose or worn.
Not all racks are designed to carry a load the size of theWave. Some racks may require carrying only a por-tion of the boat parts on the roof and the remainingparts in the trunk.
Weight -Two Wave hulls 155 lbs.Mast 30 lbs.Tramp and Xbars 31 lbs.Rudder assembly 29 lbs.Sail with battens 12 lbs.

HOBIE CAT4925 Oceanside Blvd.
Oceanside, CA. 92056Phone (619) 758-9100 Fax (619) 758-1841
For your nearest HOBIE dealer or
for help and information call:
1 (800) HOBIE - 49
Rev
ised
10/
96 #
3845
-001
0
CAUTION / SAFETY TIPS
• Watch for overhead power lines. Never rig,trailer or sail the boat near overhead powerlines. Contact with a power line could be fatal.
• Sail to your experience. Do not try to domore than you can. Do not take the Wave outin the surf and do not head out for the oceanunless you are a real professional.
• Wear a life jacket. Wearing life vests whilesailing is important for everyone. Due to thelarge number of novice sailors that have pur-chased the Wave, it is even more important toreview this safety issue. Wearing a life vest isa smart thing to do. Also, a sailboat could sailaway by itself if a person were to fall over-board. The best advice to a sailor is to staywith the boat. If they happen to fall overboard,or when righting the boat, they should holdonto the boat and not let it get away.
• Learn the right-of-way rules and when in doubt, give way to others.
• Adhere to car roof rack manufacturer's weight limitations and tie down sugges-tions when car-topping the Wave. (Thecombined weight of the Wave hulls and mastis approx. 150 lbs.)
• When trailering the Wave be sure to tie theboat and all the loose parts to the trailer ina secure manner. Stop and check the tiedowns often.
• Hobie Cat does not recommend leaving theWave in the water on a mooring.Accelerated wear to the boat and rigging willbe experienced. Damage to the hull material ispossible. Limitation of the mast rotation andtensioning of the rigging are required to lessenthis wear. Inspect rigging often and tape rig-ging rings and shackles to prevent loosening.