Embed Size (px)
Citation preview


2
Welcome to RM Unify RM Unify is the platform which powers Glow, the online environment for learning in Scotland
designed to provide schools with a set of free tools to support teaching and learning, as well
as an App Library of optional educational content to choose from.
This guide is written for the RM Unify Administrator who will manage RM Unify at a school or
on behalf of a school. It outlines the tasks which are required to support the management of
users, apps and explains the user provisioning processes within RM Unify.
Topics covered within this Guide:
1. User account authentication and provisioning (Page 1 to 7)
Automatic synchronisation of users with SEEMiS
Establishment transfer procedures
2. Managing user accounts (Page 8 to 16)
Creating, deleting, disabling and editing users
Downloading new user passwords
Managing user groups
How to reset a user’s password if you are a teacher
Using CSV downloads
Delegating administrator rights
3. Local Authorities supporting schools (Page 17 to18)
How to manage the schools within your Local Authority
How to purchase apps on behalf of your schools
4. Self-service Account Management (Page 19 to 24)
‘My Profile’ services
Allowing users to reset their own password
5. Management of apps and Launch Pads (Page 26 to 34)
Purchasing apps in the RM Unify App Library
Saved password apps
Installing apps to Establishment Launch Pads
Managing and Editing Launch Pads
6. Staying up-to-date with changes to RM Unify and Glow (Page 35)

3
1. User account authentication and provisioning Automatic synchronisation of users from SEEMiS
RM Unify automatically provisions groups and users based on a feed of MIS person and
group records pushed to RM Unify by SEEMiS.
When a new student or staff member is placed on role at an establishment in
SEEMiS, a user account for that individual gets automatically provisioned in RM
Unify.
When a staff or student is removed from role at one establishment and placed on
role at another in SEEMiS, their RM Unify account gets transferred to the new
establishment automatically.
For individuals at an establishment not recorded in the MIS, RM Unify user
accounts can be provisioned manually via the RM Unify management console.
Year, registration and teaching groups defined for an establishment in SEEMiS
are automatically provisioned as groups in RM Unify. Group membership is also
synced automatically.
When attributes for an individual or group are updated (e.g. student surname
change, teaching group rename etc.) in SEEMiS, the data change gets pushed to
the corresponding RM Unify user or group automatically.
Apps available through the RM Unify App Library can be enabled for the various roles (e.g.
student, teaching staff, non-teaching-staff etc.) in an establishment. Only users belonging to
a role for which an app has been enabled at a given establishment can sign into that app.
Establishment transfer processes When a student or staff member transfers from one establishment to another in SEEMiS,
RM Unify allows their RM Unify user account to move with them. This allows students and
staff to retain their Office 365 account credentials and data when they move schools.
Establishment transfer processes occur when:
A student moves from one school to another e.g. from primary school to secondary school
A member of staff moves to a new school
RM Unify uses unique identifiers for each student and staff member within SEEMiS to
manage the matching process that enables Establishment transfers. There are two types of
transfers. They are:
1. Automatic Establishment transfers
2. Manual Establishment transfers

4
Automatic Establishment transfers occur when a new record is created in SEEMiS prior to
the existing record being deleted. RM Unify will match the records according to the unique
SEEMiS ID, and transfer the account into the new establishment. Establishment transfers
occur when a student or staff member is removed from role at one establishment in SEEMiS
and placed on role at another establishment.
Automatic Establishment transfers occur without the involvement of RM Unify
Administrators. You are able to see a log of the automatic transfers that have occurred
previously. This is explained below in the section of this guide titled ‘Establishment transfer
logs’.
Manual Establishment transfers
Manual transfers are required to transfer the RM Unify user account associated with a
student or staff member placed on role at a new establishment without being removed from
role from their previous establishment in SEEMiS. Such transfers require approval by an
admin at the establishment the individual has been newly enrolled into in SEEMiS and are
listed on the Management Console incoming transfers’ page.

5
Fig 1.0: School Transfers - Manual approval of incoming transfers
Any individuals that shouldn’t be enrolled to this establishment in the MIS should be
‘deferred’ on this page to move them from the ‘pending’ transfers list to the ‘deferred’
transfers list.
o Once the individual is unenrolled from this establishment in the MIS, he/she
will automatically disappear from this page.
For students and staff members that attend multiple schools, the RM Unify account
linked to the individual in SEEMiS should only be approved if this is their primary
establishment.
o If this is their secondary establishment, ‘defer’ the transfer to remove them
from the ‘pending’ transfers list, and create a separate user account for the
individual in this establishment (using either the create user form on the
‘Users’ page or the ‘Sync users from CSV’ page – explained in section 2 of
this guide).
Approve the transfers for students and staff members for which this is their primary
establishment.
Establishment Transfers log
The transfers log page can be used to:
View incoming transfer errors and get advice on which SEEMiS data values caused the
error (providing you with the information needed to correct the data in SEEMiS).
View completed incoming and outgoing transfers from the last year for audit purposes.

6
Fig 1.1: Establishment Transfers Log – Errors requiring attention
Fig 1.2: Establishment transfers log – Approved transfers which require no attention

7
As illustrated by the above screenshots, the displayed transfers can be filtered on the type
and direction of transfers you want to view as well as which role and from what date range.

8
2. Managing user accounts
The management of user accounts within RM Unify is done within the Management Console.
RM Unify Administrator users have full access to the set of tools within the Management
Console. Non-admin staff users require access only to reset student passwords (explained
later in section titled ‘Teachers (non-admin users) resetting student passwords’.
The user management tools within the RM Unify Management Console include:
Viewing and searching groups and users
View the details for a selected user
Creation of new users, where the user is not synced from the MIS
Deleting users from RM Unify
Disabling a user’s access to RM Unify
Change a user’s username
Change a user’s password
Delegating (and revoking) administration rights for staff users
Managing user groups
Download passwords for new users
Managing child Establishments (available to Local Authority Establishment admins
only)
Searching for users
Users can be searched for using their First Name, Last Name, Username or Email Address
(where the email address is stored in RM Unify). Search fields are located at the top of the
Users Grid within the Users and Groups area of the RM Unify Management Console.
Fig 1.3: Multiple user search fields allow you to choose the user attribute you wish to search
against.

9
Search for a user
Only staff members can view users. Staff members without the admin permission can only
view student users. If you wish to delegate Administrator rights to another staff member,
click on ‘Actions’ in the Users Grid, and select ‘Give user admin rights’.
Follow these steps to search for a user:
1. Navigate to the Users and Groups Page in the RM Unify Management Console by
using the panel on the left hand side of the Management Console Dashboard.
2. Select the user type or user Group that you wish to view on the page. User types in
RM Unify are: Student, Teaching Staff, Non-Teaching Staff, Governor, and Other.
Users also belong to other Groups which are synced from the MIS e.g. Registration
groups and Year Groups. You may filter on these too if you wish.
3. If you do not know the user type, you can select all.
4. Select the source that the user is provisioned from. If you do not know the source,
you can select all.
5. Type in an attribute for the user, using the choices that are presented to you in the
search fields, then press Enter on your keyboard
Fig 1.4: User type and user source can be selected to narrow the search
6. The users containing the attribute you searched for will be displayed below the
search fields.

10
Viewing a user’s details
You may view the details of an individual within the Users Grid by clicking ‘Actions’, then
‘View details’. A details page will appear and it will list their Personal and Account Details for
you to see.
Fig 1.5: View the details of a user by clicking ‘Actions’ and ‘view details’.
Creating new users
As an RM Unify Administrator, you may be required to create a new RM Unify account for an
individual that is not synced from the MIS. To create a new user, go to the Management
Console, click on ‘Users’ on the left hand side, the select ‘create user’ from the ‘Actions’
button which is displayed as the top.
Fig. 1.6: To create a user, click ‘Actions’ in the Users page and select ‘Create user’.

11
The ‘Create User’ page will display a number of empty fields for you to complete. Information
marked with a ‘*’ is mandatory.
Note: RM Unify will not allow you to create a user with the same username of an existing
user.
Fig 1.7: The ‘Create User’ page contains a set of minimum information required in order to
create a new (non-MIS synced) user in RM Unify.
Fill in the empty field and click ‘OK’ to create the user.
Creating multiple users via CSV upload
To create a number of new users not synced from the MIS, use the ‘Sync users from CSV’
page to create and upload a CSV file defining the new users. Select ‘Sync users from CSV’
on the left hand side of the Management Console Dashboard. There are instructions
displayed on the right hand side of the ‘Sync Users from CSV’ page which outline the ways
to manage CSV upload as a means of provisioning groups of users.
Deleting and disabling users
If you delete a user in RM Unify, their RM Unify account, and associated accounts in Office
365 and other apps will be permanently removed.
If you disable a user in RM Unify, their RM Unify account is locked, but not deleted. You can
easily re-enable a disabled account at any time, but you are not able to retrieve an account if
it has been deleted.

12
To delete a user, find them in the Users Grid within the Management Console; click the
‘Actions’ button on the right hand side, then select ‘Delete User’ (see below).
Fig. 1.8: Find the user you wish to delete, Select ‘Actions’ and then ‘Delete user’.
Note: Deleting user that is synced from MIS will not delete the record from the MIS.
To Disable or Enable an account, simply click on the ‘Actions’ button next to the user, and
select ‘Enable account’ or ‘Disable Account’ depending on the account status.
Fig 1.9: Click ‘Actions’, then ‘Disable account’ or ‘Enable account’, depending on the
account status
Changing a username and changing a password
RM Unify Administrators can change the username and password of a user. They may also
(as well as non-admin staff), change the password for a group of users at once, e.g. a class.
To change a user’s username, find them in the Users Grid within the Management Console,
click the blue ‘Actions’ button on the right hand side, then select ‘Change username’.
The following page will then be displayed.

13
Fig. 2.0: Enter the new username into the username field.
Enter a new username for the user and click ‘Save’.
To change a user’s password, find them in the Users Grid within the Management Console,
click the blue ‘Actions’ button on the right hand side, then select ‘Change password’.
A change password page will appear. Enter a new password, and confirm it. You have the
option to force the user to change their password upon next login. It is recommended that
you do so for account security reasons. Click ‘save’, and the password will be reset.
Fig. 2.1: Change a user’s password

14
Teachers (non-admin users) resetting student passwords
If you are a staff member in a school, and you do not have admin rights within RM Unify, you
can still access the RM Unify Management Console in order to change student passwords,
including the passwords of an entire class.
Staff can change the password of a group of students e.g. their class by going to the
‘Groups’ section within the RM Unify Management Console (as described in the section
above titled ‘Managing user groups’), and selecting the group of users whose passwords
they wish to change. To change the password of a user or group of users within it, click
‘Actions’ and then ‘change passwords for users in this group’. Alternatively, if you just want
to change one password, you may do so by finding a user, clicking ‘Actions’, then selecting
‘Change password’.
Delegating admin rights to a staff user
Admin users have access to the Management Console to perform system admin tasks and
can purchase new apps via the RM Unify App Library. Delegating admin user rights to more
than one staff member means more staff can make more changes to a school’s RM Unify
account.
To delegate admin rights to a member of staff, find the user within the Users Grid and click
‘Actions’ then ‘Give user admin rights’. Admin rights can be revoked by following the same
process, but selecting ‘revoke admin rights’.
There is no limit to the number of admin users in RM Unify, though we recommend you keep
it to a number which is easily managed by the school. Admin rights can be revoked easily
using the same Actions List to perform this task.
Managing user groups
Each RM Unify user belongs to a group or a number of groups in RM Unify. Groups include:
role (e.g. student, teaching staff etc.), registration groups and teaching groups. The creation
of those groups and their membership of those groups is automatic through the sync that
RM Unify has with SEEMiS. As an RM Unify Administrator, you are not required to manually
configure these groups.
To view your Establishment’s groups, and the users within each group, click on the ‘Groups’
page in the RM Unify Management Console. You can filter Groups according to their type.
This is useful if you are syncing many groups from SEEMiS, and you need to filter out any
unwanted groups from the viewing grid.
Click ‘Actions’ on the group you wish to open, and select ‘view members’ to see who belongs
to it.
15
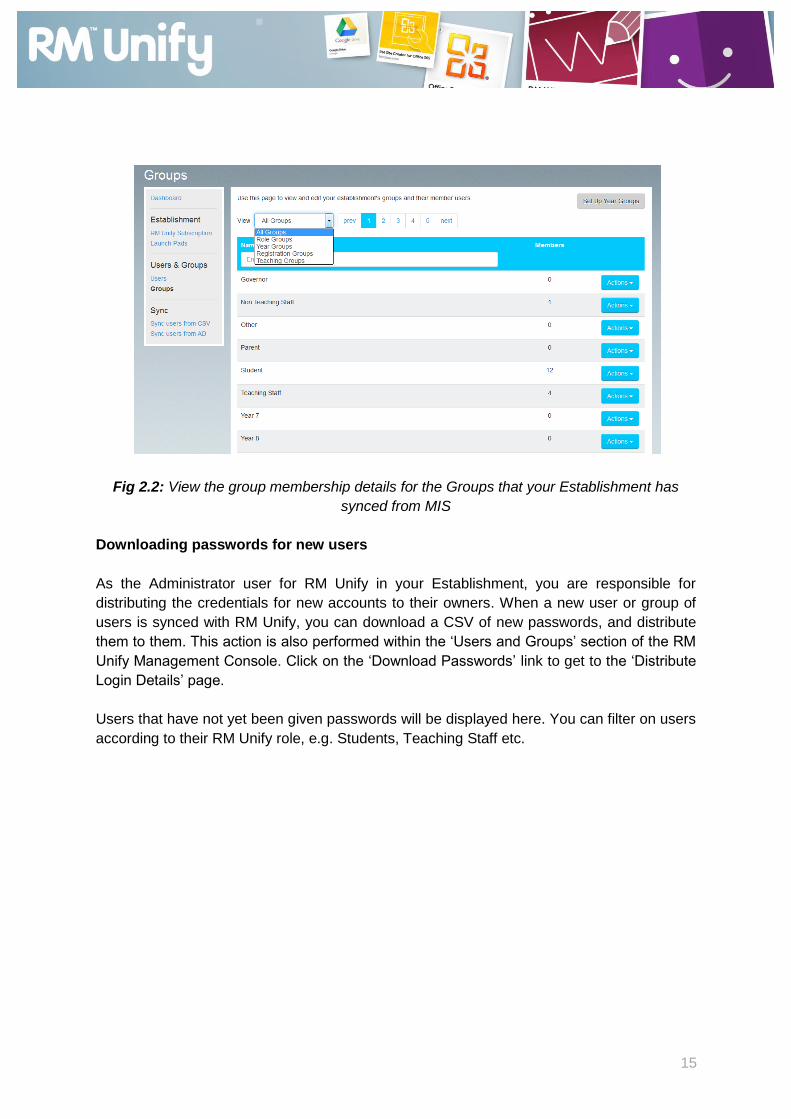
Fig 2.2: View the group membership details for the Groups that your Establishment has
synced from MIS
Downloading passwords for new users
As the Administrator user for RM Unify in your Establishment, you are responsible for
distributing the credentials for new accounts to their owners. When a new user or group of
users is synced with RM Unify, you can download a CSV of new passwords, and distribute
them to them. This action is also performed within the ‘Users and Groups’ section of the RM
Unify Management Console. Click on the ‘Download Passwords’ link to get to the ‘Distribute
Login Details’ page.
Users that have not yet been given passwords will be displayed here. You can filter on users
according to their RM Unify role, e.g. Students, Teaching Staff etc.

16
Fig 2.3: Users that do not yet have passwords for RM Unify will be displayed here.
Click ‘Download New Passwords CSV’ to export passwords for these users, and then
distribute this to the people that need them.

17
3. Local Authorities supporting schools
Local Authorities in Scotland have recognised ‘Parent Establishment’ statuses. The schools
that they support are recognised as ‘Child Establishments’ of the Local Authority in RM
Unify. This allows RM Unify to enable better management of Child Establishments if a Local
Authority is responsible for User Management processes. RM Unify does this by allowing
Administrator users of Local Authority Establishments to manage their schools without
logging into each school every time they need to offer support.
A management console option is available for Local Authorities, named: ‘Manage Child
Establishments’. Click here to view the Child Establishments that sit under your Local
Authority.
Fig 2.4: The ‘Manage Child Establishments’ page will only be visible if your Establishment
has been recognised as a Parent Establishment’.
This page displays the Child Establishments which you as an admin user in the Parent
Establishment are able to manage. Child establishments are displayed in alphabetical order.
You may search for an Establishment using their School Code or Establishment Name. To
access a school, click ‘Manage’ (screen shot below).

18
Fig 2.4: Your Child Establishments will be displayed in Alphabetical order. You can search through them by School Code or Establishment Name.
Once you click ‘Manage’ for a selected child establishment, you’re sent to the Management
Console for that establishment with full admin rights. To return to your own Establishment,
click on the ‘Back to my establishment’ button which will appear at the left hand side of the
RM Unify footer (see image below).
Fig 2.5: Click ‘Back to my establishment’ button in the RM Unify footer to return to your Parent Establishment.
You are able to navigate in and out of your Child Establishments seamlessly, without the need to log in to each one.

19
4. Self-service Account Management
RM Unify enables users to manage certain elements of their own accounts independently.
Specifically, users are able to view their account details in the ‘My Profile’ area of RM Unify,
and they can reset their password without the support of an Administrator user or teacher.
What is ‘My Profile’?
‘My Profile’ is a new feature in RM Unify which allows each user to view a set of information
about their account. For now, this area includes details of their username, role (e.g. Student,
Teaching Staff, etc.) and RM Unify email address. Furthermore, through the ‘My Profile’
area, users are able to set a Home Email Address which will be used for RM Unify to send
password reset details to when the user decides to reset their password.
‘My Profile’ can be found by clicking on the Display Name button at the top right hand side of
any RM Unify page, and selecting ‘My Profile’ from the dropdown buttons displayed.
Fig 2.6: ‘My Profile’ can be found by clicking on the Display Name at the top right hand side
of any RM Unify page, and selecting ‘My Profile’ from the options.
The ‘My Profile’ page homes a user’s home email address. This is an email address which
the user is prompted to enter in order for RM Unify to send password details to when a re-set
password request is submitted. This email address must not be the same email address
which is stored within RM Unify. I.e. Users should not enter their Office 365 or Google Apps
email address which they access via logging into RM Unify.
The ‘My Profile’ page also displays a set of non-editable information. This is to show the user
their username, RM Unify email address and RM Unify role.

20
Fig 2.7: The only editable information in a user’s ‘My Profile’ is Home Email Address
How can users reset their own password using ‘My Profile’?
Non-student users will be prompted to enter a Home Email Address when they login to RM
Unify. Users can ignore this prompt if they do not wish to enter a Home Email Address. If
they do choose to, it will be stored within their ‘My Profile’ page, and will be used next time
the user requests to reset their own password in RM Unify.
A Home Email Address must be stored in RM Unify in order for a user to reset their RM
Unify password. Home Email Addresses are not used for any other purpose.

21
Fig 2.8: When a non-student user logs in to RM Unify for the first time, a prompt to enter a
Home Email Address will appear.
Users may also reset their password directly from the Glow
login page (if RM Unify has a Home Email Address stored for
them).
Users should follow these five steps in order to change their
password from the login page.
1. Click the ‘Forgotten your password’ link in the Sign in box.
You will now be taken straight to a password reset page.
2. Enter your Home Email Address in the box provided on the
page (see below).

22
Fig 2.9: Enter a Home Email Address in the box provided.
Once you have set your Home Email Address, a confirmation (below) will be displayed to let
you know that an email has been generated and sent to your Home Email Address. Emails
could take up to 10 minutes to be received.
Fig 3.0: A confirmation will be displayed to let you know that an email has been sent to your
specified Home Email Address.
3. Go to your Home Email Address inbox and click on the link within the email from RM
Unify to validate the request.

23
Fig 3.1: Click on the link embedded within the email. This link is unique to your account.
4. You will be taken to a page to change your password. Enter a new password for your
RM Unify account. A password meter tool will be displayed to indicate the strength of
new your password.

24
Fig 3.2: Enter a new password and confirm it before clicking ‘Change Password’.
5. You will now receive a confirmation email to let you know that your password has
changed. Your new password is now ready to use.
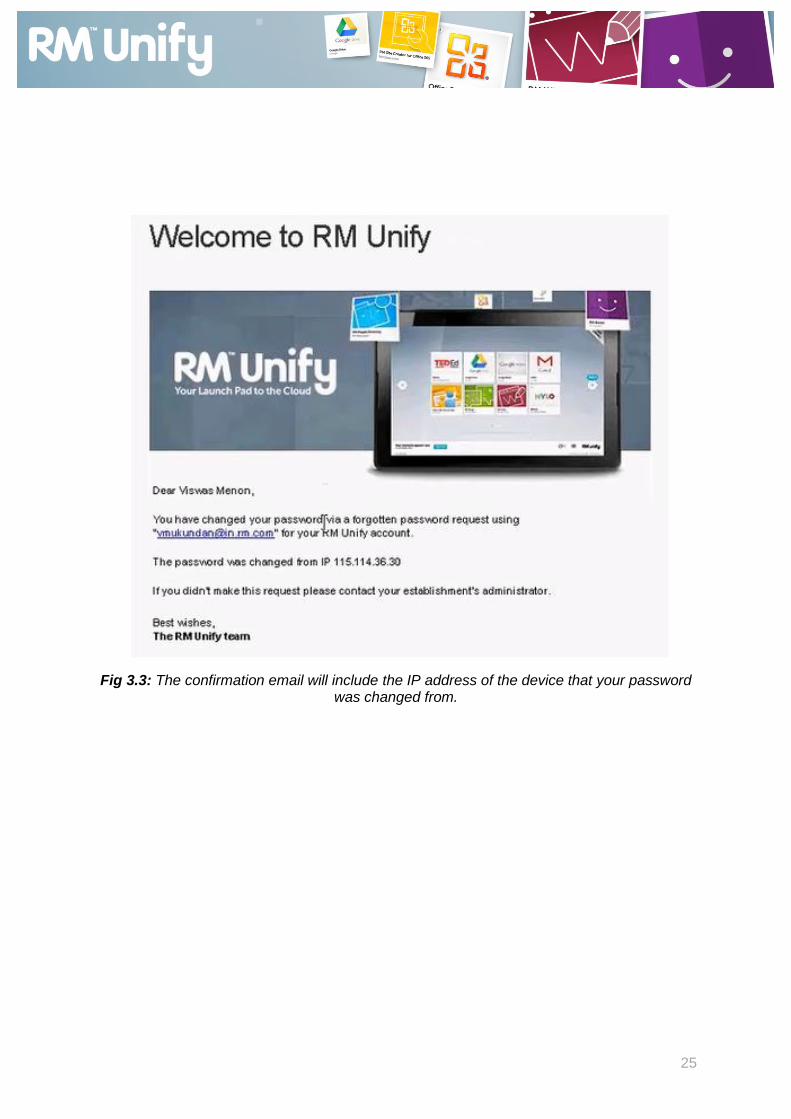
25
Fig 3.3: The confirmation email will include the IP address of the device that your password was changed from.

26
5. Managing apps and Launch Pads
Introduction to the App Library
The App Library provides a secure and convenient environment where you can read about
and choose Cloud-based applications and services for education from a growing list of
suppliers.
In the App Library you can:
buy licenses for apps that require payment
install the apps you’ve bought, and install free apps
Connect licences for subscriptions which you use outside of RM Unify
manage the apps you’ve installed.
Fig 3.4: RM Unify App Library
Buying an app for your school
1. Log on to RM Unify as an RM Unify Administrator.
An RM.com account is required to complete the purchase. You can register at
www.rm.com
2. From the top menu choose App Library.

27
3. Locate the app you want to buy. Those apps which are available for you to buy have
a ‘buy’ sticker label over their Tile.
4. Once you click on the Tile, a page of information about the app is displayed.
5. Read the privacy statement, which you must agree to if you want to buy the app.
Click the ‘I agree to the privacy statement…’ check box if you do.
6. From the ‘Select licence’ drop-down menu, choose the licence type you want.
Fig 3.4: App information pages
7. Click ‘Buy’. You are taken to the RM Unify shopping basket.
8. Follow the on-screen prompts to complete your order.
9. When you’ve finished, click ‘Return to RM Unify’ to go back to the App Library.
The new app will not be available until it is authorised. During this time a progress
bar is displayed.
28
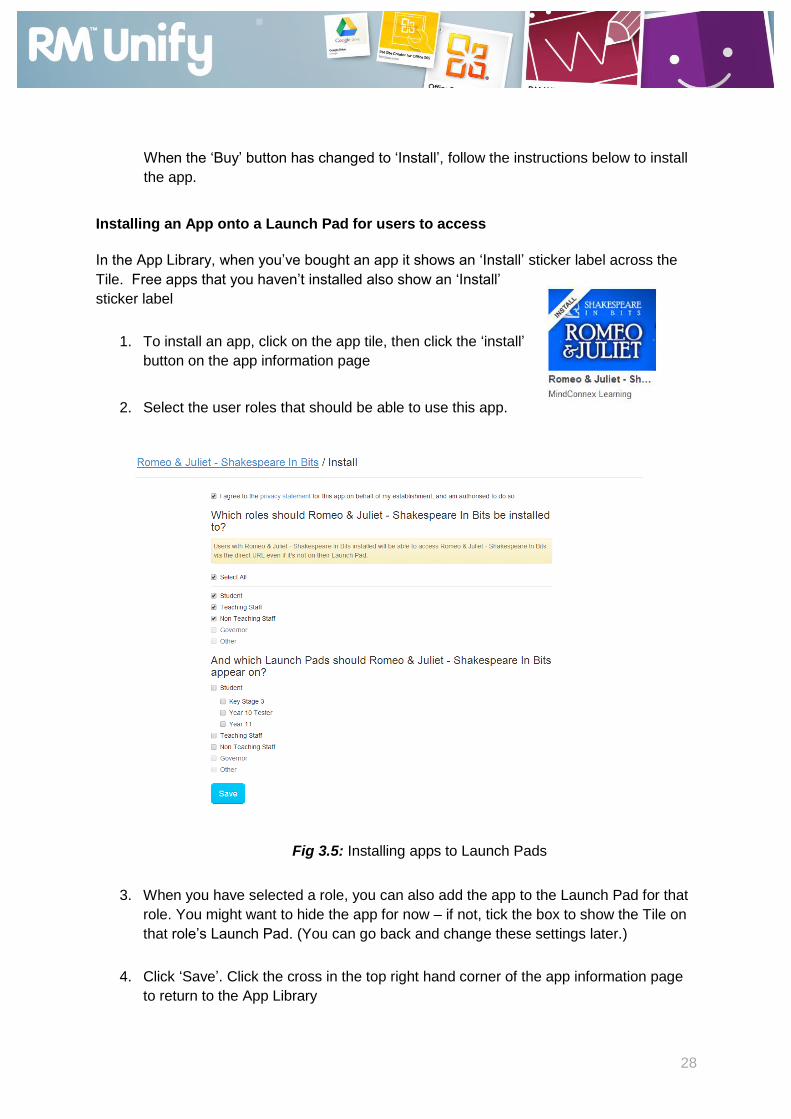
When the ‘Buy’ button has changed to ‘Install’, follow the instructions below to install
the app.
Installing an App onto a Launch Pad for users to access
In the App Library, when you’ve bought an app it shows an ‘Install’ sticker label across the
Tile. Free apps that you haven’t installed also show an ‘Install’
sticker label
1. To install an app, click on the app tile, then click the ‘install’
button on the app information page
2. Select the user roles that should be able to use this app.
Fig 3.5: Installing apps to Launch Pads
3. When you have selected a role, you can also add the app to the Launch Pad for that
role. You might want to hide the app for now – if not, tick the box to show the Tile on
that role’s Launch Pad. (You can go back and change these settings later.)
4. Click ‘Save’. Click the cross in the top right hand corner of the app information page
to return to the App Library
29
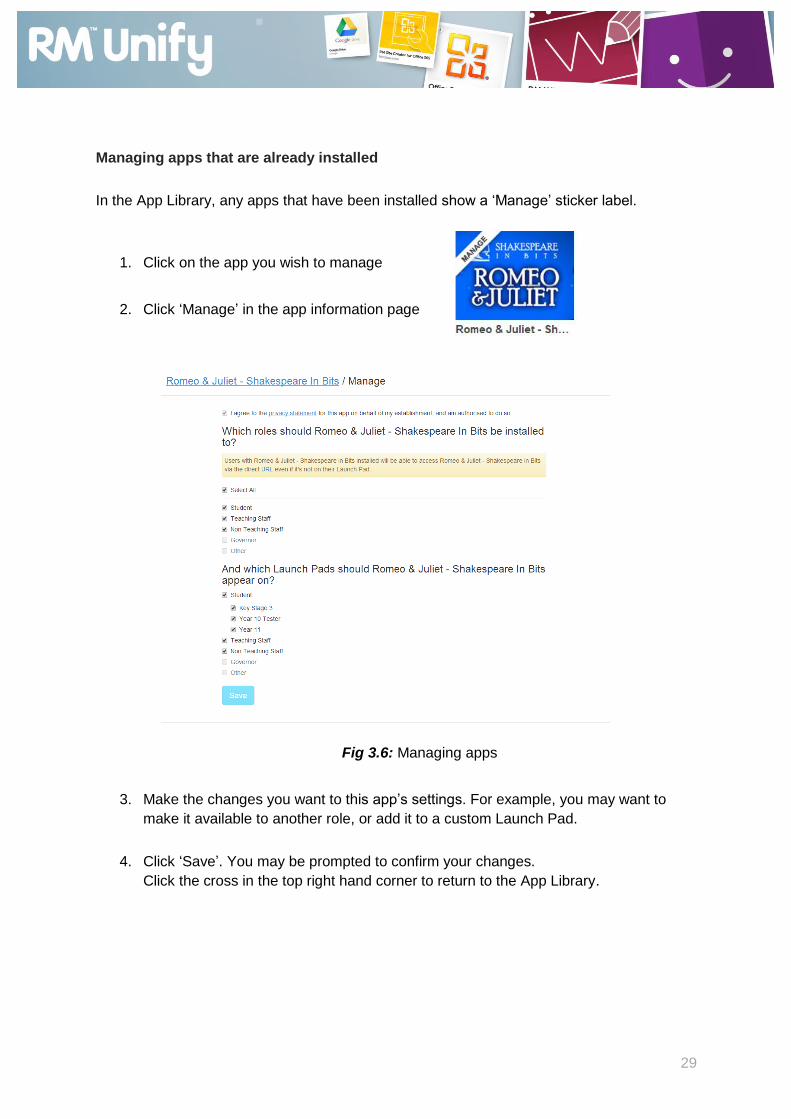
Managing apps that are already installed
In the App Library, any apps that have been installed show a ‘Manage’ sticker label.
1. Click on the app you wish to manage
2. Click ‘Manage’ in the app information page
Fig 3.6: Managing apps
3. Make the changes you want to this app’s settings. For example, you may want to
make it available to another role, or add it to a custom Launch Pad.
4. Click ‘Save’. You may be prompted to confirm your changes.
Click the cross in the top right hand corner to return to the App Library.

30
Saved password apps
Saved password apps provide one way for you to integrate services which your school are
already using into RM Unify. This type of app stores a user’s password upon entering it
once, and then provides single sign on access to that app thereafter.
Saved password apps are free of charge in the RM Unify App Library. Popular saved
password apps include:
Moodle
Prezi
GCSE Pod v2
TES resources
Edmodo
Saved password apps are distinctive in their appearance. When browsing through the App
Library, you will be able to spot saved password apps according to their white colour, and
the key icon located at the bottom left of the Tile.
Adding a saved password app to a Launch Pad
Once you’ve spotted the saved password app you wish to add on behalf of your School, you
will need to take the following steps in order to set it up on your Launch Pad:
Ensure you understand the security message presented to you which explains how
passwords are stored safely and securely. This message will be displayed as soon
as you click ‘install’ on the app information page.
Add in the destination URL for the app login page you wish to access (this process
will be automatically skipped if this is the same login page for all Schools using the
service.
Assign the app to the relevant user roles and Launch Pads.
31
From an Administrator perspective, the work is done, but in order to set up the saved
password functionality, a user must enter their existing username and password for that app
once, prior to launching it via RM Unify.
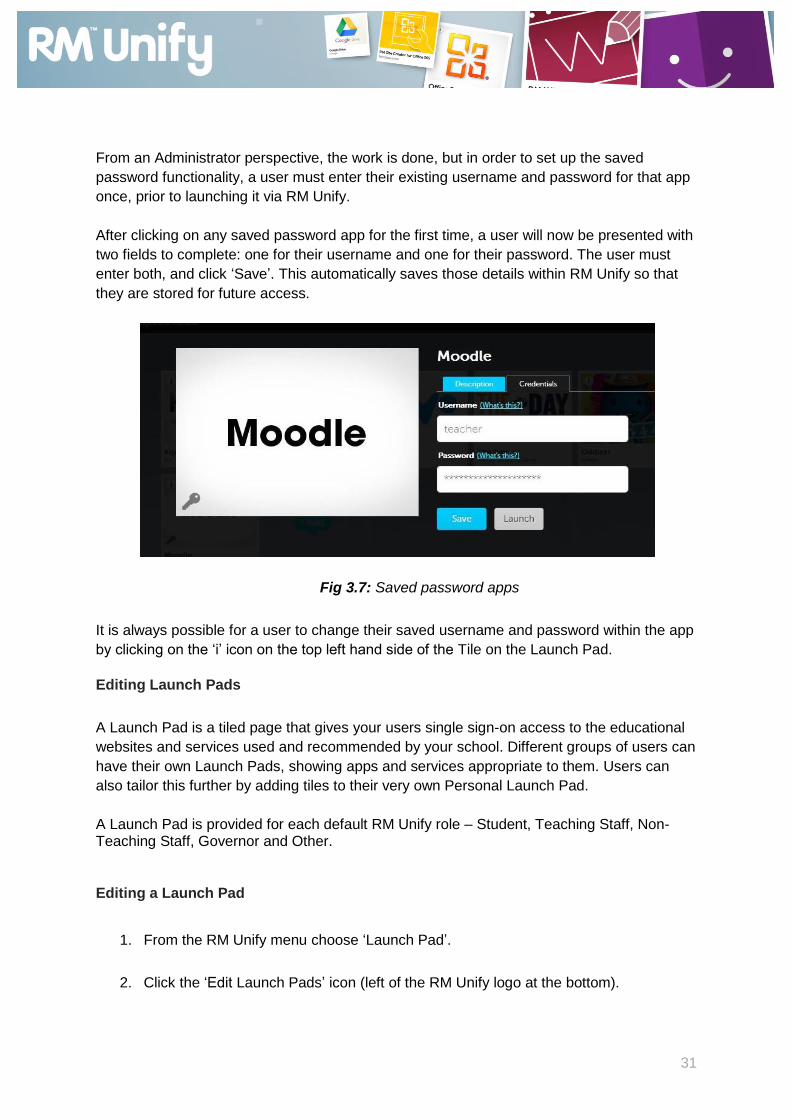
After clicking on any saved password app for the first time, a user will now be presented with
two fields to complete: one for their username and one for their password. The user must
enter both, and click ‘Save’. This automatically saves those details within RM Unify so that
they are stored for future access.
Fig 3.7: Saved password apps
It is always possible for a user to change their saved username and password within the app
by clicking on the ‘i’ icon on the top left hand side of the Tile on the Launch Pad.
Editing Launch Pads
A Launch Pad is a tiled page that gives your users single sign-on access to the educational
websites and services used and recommended by your school. Different groups of users can
have their own Launch Pads, showing apps and services appropriate to them. Users can
also tailor this further by adding tiles to their very own Personal Launch Pad.
A Launch Pad is provided for each default RM Unify role – Student, Teaching Staff, Non-Teaching Staff, Governor and Other.
Editing a Launch Pad
1. From the RM Unify menu choose ‘Launch Pad’.
2. Click the ‘Edit Launch Pads’ icon (left of the RM Unify logo at the bottom).

32
Fig 3.8: Edit Launch Pad icon
3. Choose the default or custom Launch Pad you want to edit.
Fig 3.9: Edit Launch Pad icon
The selected Launch Pad is displayed in a grid format.
4. To rearrange the Tiles on the grid, simply drag and drop them as required.
On this page it’s also possible to remove a Tile from the Launch Pad (but not to add
one). If you click the cross in the top right corner, that app Tile is removed from the
Launch Pad.

33
5. When you’ve finished, click ‘Save Changes’ to save your edited Launch Pad, or
‘Cancel’ to cancel the changes.
Personal Launch Pads
‘My Launch Pad’ is a Launch Pad view which is unique to each of your RM Unify users.
These users can decide which apps are most relevant to them by adding Tiles to My Launch
Pad from those which have been assigned to their User Group.
The Shared Launch Pad will be presented as the default Launch Pad to users when My
Launch Pad is empty. As soon as a Tile is added to My Launch Pad, it becomes the default
Launch Pad view.
1. Click on the ‘Add’ button on an empty tile.
Fig 4.0: My Launch Pad is empty until it is populated
You will be taken straight to the App Library. Depending on User type, restrictions have been
applied to this process (primarily so that students can only see apps which have been
previously purchased and installed by their school Administrator.
Tip – Click on the filter for ‘My Establishment’s apps’ to see only those apps which have
been installed in your school.

34
2. Click on the app you wish to add. The app information screen will be presented to you
3. Click ‘Add to my Launch Pad’
This triggers an automatic process whereby the app is added to My Launch Pad. Close the
app information screen and return to the Launch Pad to see the change.
You can also easily remove a Tile from My Launch Pad.
1. Click on the ‘i icon on the top left hand side of the Tile you wish to remove
2. Click ‘remove from my Launch Pad’
This triggers an automatic process whereby the app is removed from My Launch Pad. Close
the app information screen and return to the Launch Pad to see the change.

35
6. Staying up-to-date with changes to RM Unify and Glow
You can stay up-to-date with the latest developments, new Apps and Releases for RM Unify
and Glow in the following ways:
Via our Trello Board – Add new ideas for product improvements and track
developments month-to-month. www.trello.com/b/qpuOCQTg/rm-unify
Via our Blog – All scheduled software Releases are communicated here, with
comprehensive Release Notes attached. www.rmunify.blogs.rm.com/RM-Unify-Blog
Via Twitter - Follow @rmunify for the latest news on Apps and system improvements