Embed Size (px)
Citation preview
Welcome To
Microsoft World
Microsoft Microsoft ExchangeExchange Server 2003 Server 2003
We Will Cover the following:We Will Cover the following: A. Overview of Exchange. B. Installing Exchange Server 2003. C. Installing and Using Exchange Management Tools
and Utilities D. Creating and Applying Exchange Policies. E. Configuring Exchange Server 2003 for Proactive
Management. F. Adding, Removing, and Updating Exchange Servers. G. Managing Exchange Server 2003 in a Mixed
Environment.
A. Overview of Exchange ServerA. Overview of Exchange Server : :Microsoft Exchange Server is a
massaging and collaborative software product developed by Microsoft Corp. Microsoft Exchange Server provide us :1) Electronic Mail.2) calendaring.3) contacts and tasks.4) support for the mobile 5) web-based access to information. (OWA).
6) supporting data storage.
Exchange Server 2003 & Active Directory Integration :Exchange Server 2003 & Active Directory Integration :
• Exchange Server 2003 is tightly integrated with Active directory, in that Exchange server 2003 uses AD as the storage mechanism for its data although Exchange server 2003 still uses its own database for storing the content of massaging and transaction log.
• The following three directory partitions in Active Directory contain Exchange-related data:
Domain directory partition : Exchange recipient and system objects are stored in the domain directory partition in Active Directory. The domain directory partition is replicated to every domain controller in a particular domain.
Configuration directory partition : Exchange configuration objects, such as administrative groups, global settings, recipient policies, system policies, and address list or address information are stored in the configuration directory partition. The configuration directory partition is replicated to all domain controllers in the forest.
Schema directory partition : Exchange schema modifications (for example, objects, classes and attributes) are stored in the schema directory partition. The schema directory partition is replicated to all domain controllers in the forest.
....
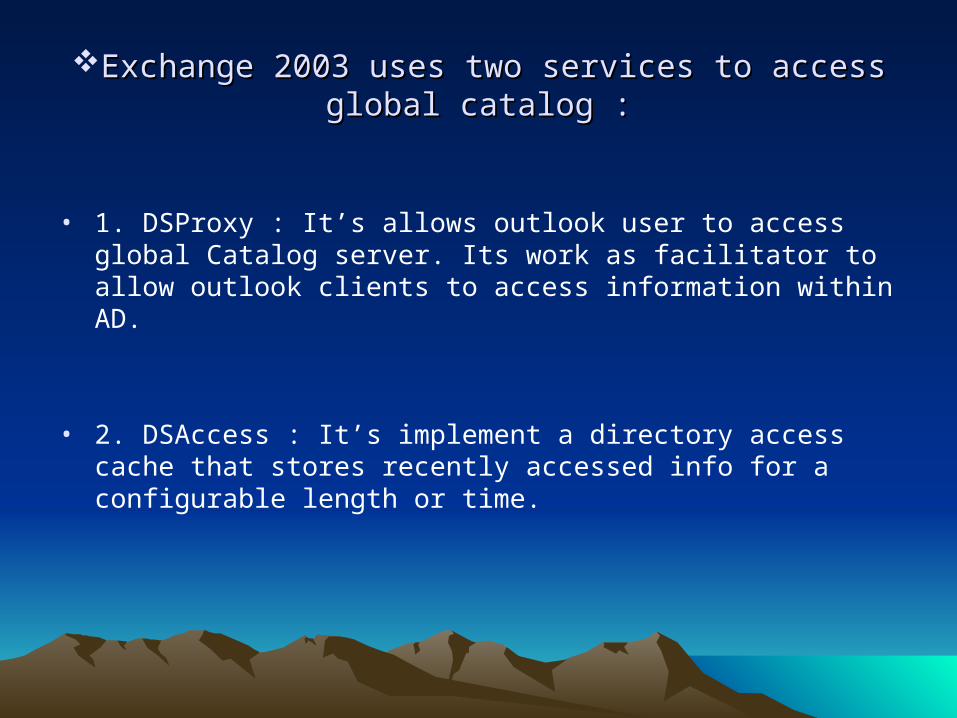
Exchange 2003 uses two services to access global Exchange 2003 uses two services to access global catalog :catalog :
• 1. DSProxy : It’s allows outlook user to access global Catalog server. Its work as facilitator to allow outlook clients to access information within AD.
• 2. DSAccess : It’s implement a directory access cache that stores recently accessed info for a configurable length or time.
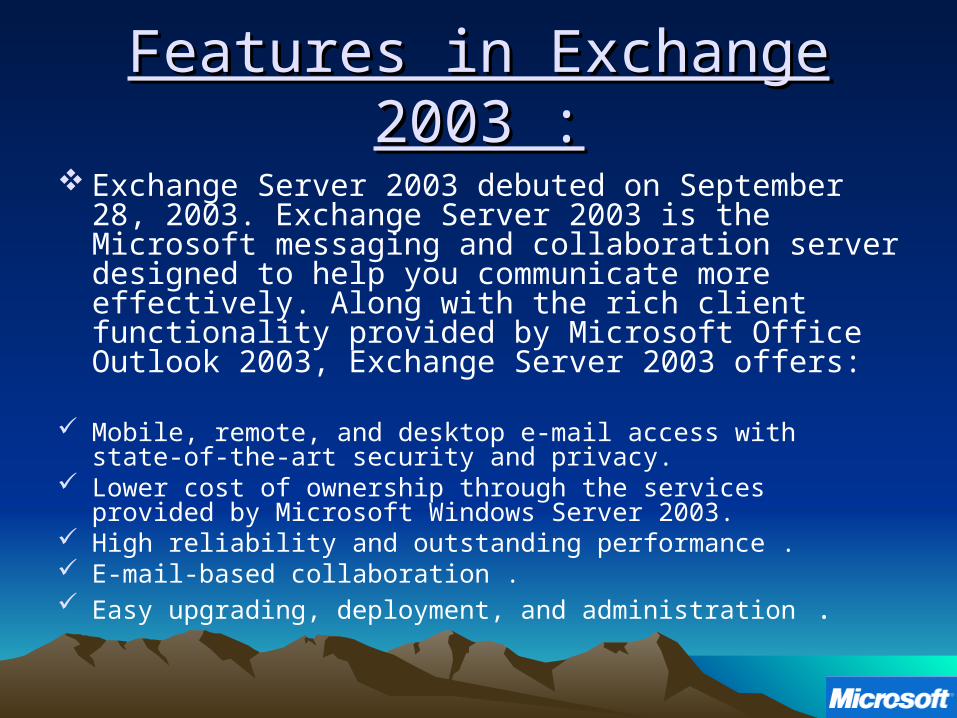
Features in Exchange 2003 :Features in Exchange 2003 :
Exchange Server 2003 debuted on September 28, 2003. Exchange Server 2003 is the Microsoft messaging and collaboration server designed to help you communicate more effectively. Along with the rich client functionality provided by Microsoft Office Outlook 2003, Exchange Server 2003 offers:
Mobile, remote, and desktop e-mail access with state-of-the-art security and privacy.
Lower cost of ownership through the services provided by Microsoft Windows Server 2003.
High reliability and outstanding performance . E-mail-based collaboration . Easy upgrading, deployment, and administration .

System Requirements: System Requirements: Exchange 2003 Enterprise/Standard Exchange 2003 Enterprise/Standard
EditionEditionComponent
Requirement Recommendation
Processor Intel Pentium or compatible 133(MHz) or higher
Intel Pentium or compatible 733-MHz
Operating system
*Microsoft Windows® 2000 Server/ Advanced Server/ Datacenter Server with SP3 or later. *Microsoft Windows Server™ 2003, Standard/Enterprise/Datacenter Edition.
Windows Server 2003
Memory 256 MB 512 MB
Available hard-disk space
500 MB where installed Exchange 2003.200 MB on the system drive.
500 MB where installed Exchange 2003.200 MB on the system drive.
Drive CD drive CD drive
Display VGA or higher resolution monitor VGA or higher resolution monitor
Input device compatible input device compatible input device
File format NTFS NTFS
Exchange 2003 does not run on 64-bit editions of Windows Server 2003 and FAT file system
In this training session we assume that we In this training session we assume that we have a smoothly running DNS server with active have a smoothly running DNS server with active
directory & global catalog.directory & global catalog.
AND
We are going to Learn Exchange Server Setup in a Single Server Topology .
B. Installing Exchange Server 2003B. Installing Exchange Server 2003 : :
• Now we can start the installation. We divide the installation in four steps i.e. :
I. Pre-Installation.
II. Preparing the Forest & Domain.
III. Exchange Server Installation.
IV. Post-Installation Tasks.
I.I. Pre-Installation steps :Pre-Installation steps :
a) Make sure the server is a member of the domain the Exchange server is supposed to operate within.
b) Ensure that the Operating System is completely up to date and all updates / patches have been applied.
c) Ensure that the following components and services be installed and enabled on the server :
Services & components must be installed :Services & components must be installed :
• .NET Framework
• ASP.NET
• Internet Information Services (IIS)
• World Wide Web Publishing Service (www)
• Simple Mail Transfer Protocol (SMTP) service
• Network News Transfer Protocol (NNTP) service
..
d) Ensure that the Windows Server Support Tools have been installed – these are on the Windows 2003 CD - \Support\Tools\suptools.msi.
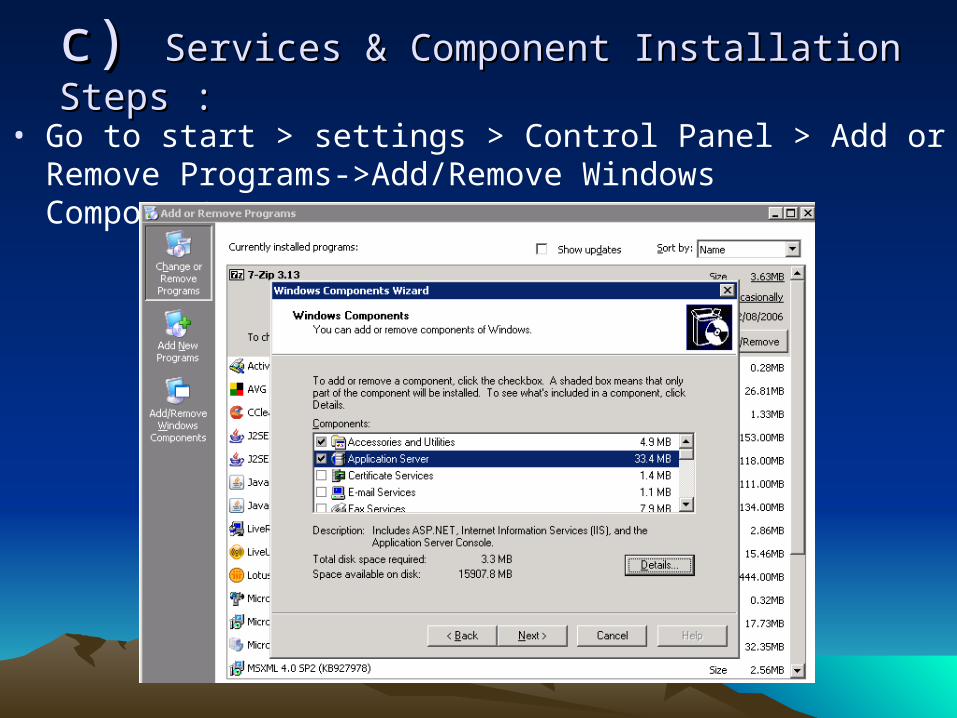
c) c) Services & Component Installation Steps :Services & Component Installation Steps :
• Go to start > settings > Control Panel > Add or Remove Programs->Add/Remove Windows Components :
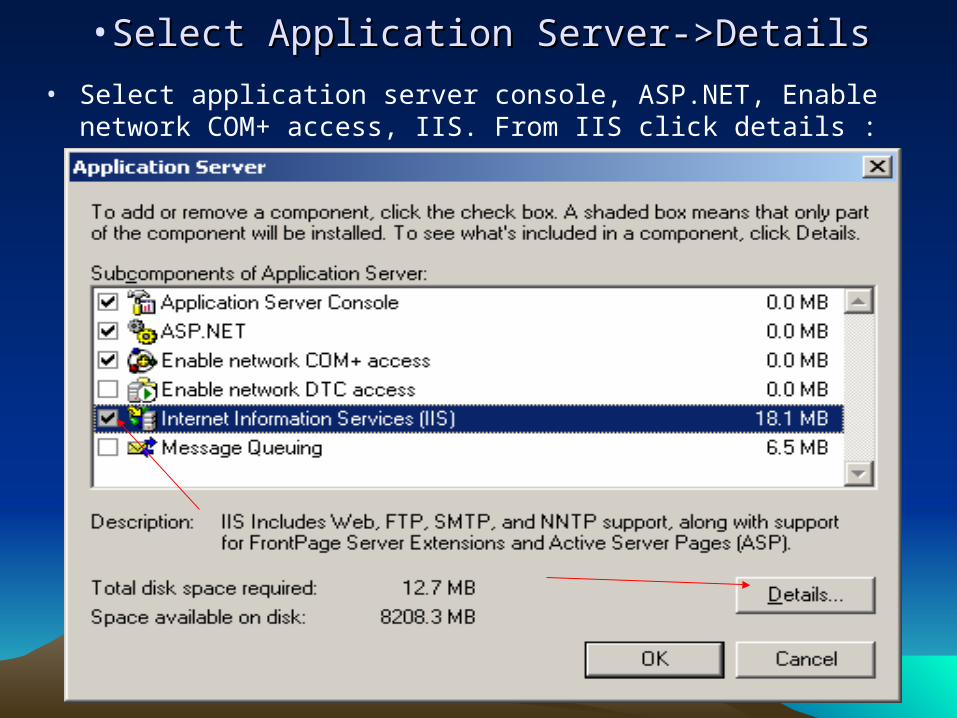
•Select Application Server->DetailsSelect Application Server->Details
• Select application server console, ASP.NET, Enable network COM+ access, IIS. From IIS click details :
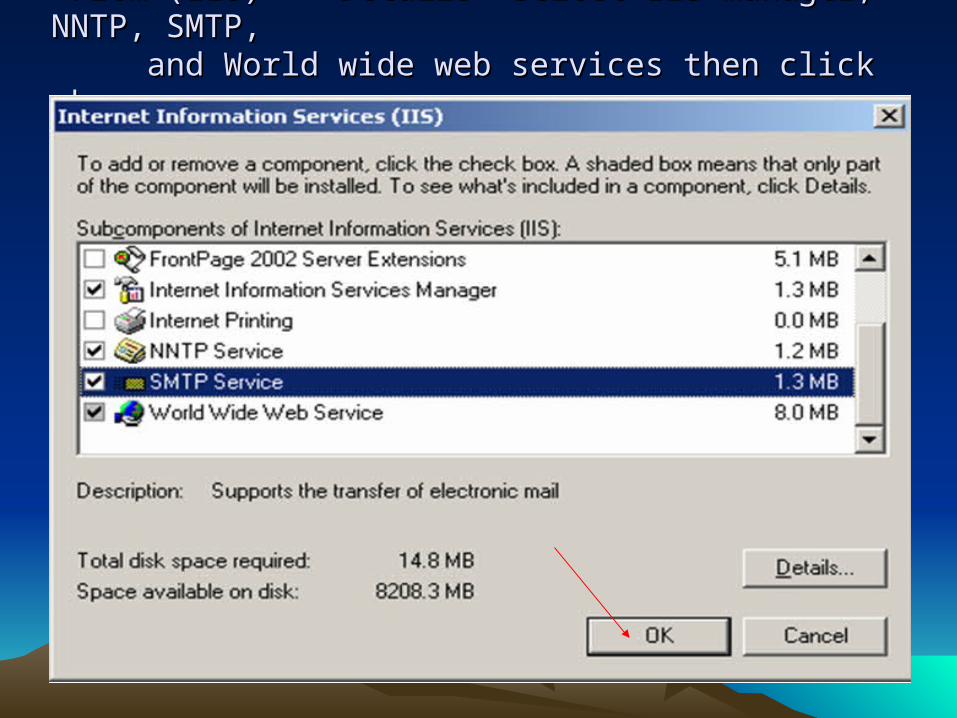
•From (IIS) -> Details->Select IIS manager, NNTP, From (IIS) -> Details->Select IIS manager, NNTP, SMTP, SMTP,
and World wide web services then click ok :and World wide web services then click ok :
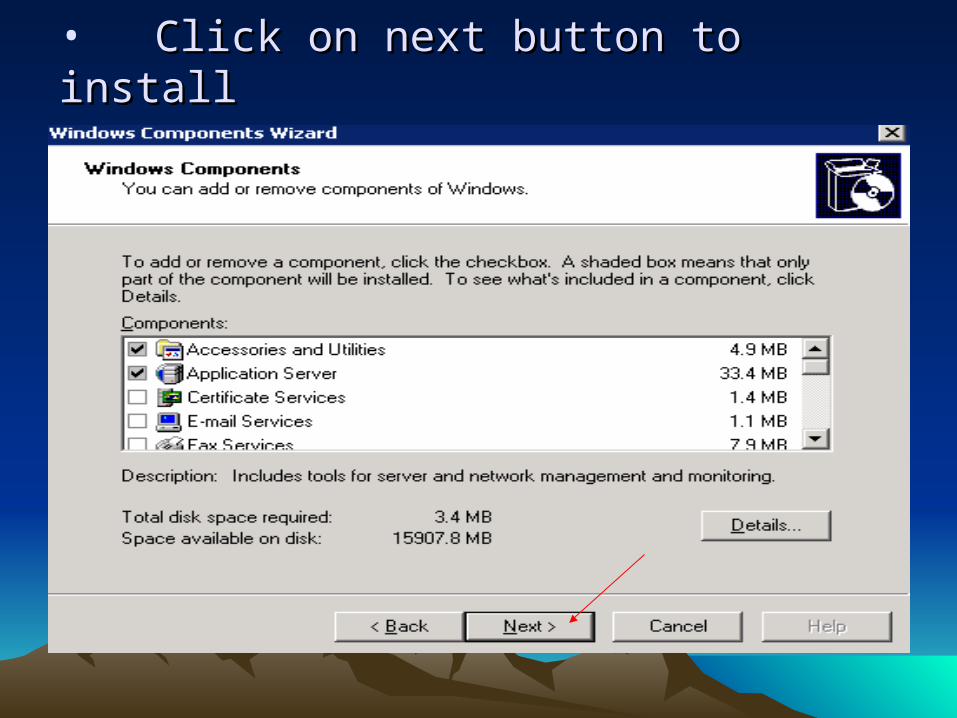
• Click on next button to installClick on next button to install
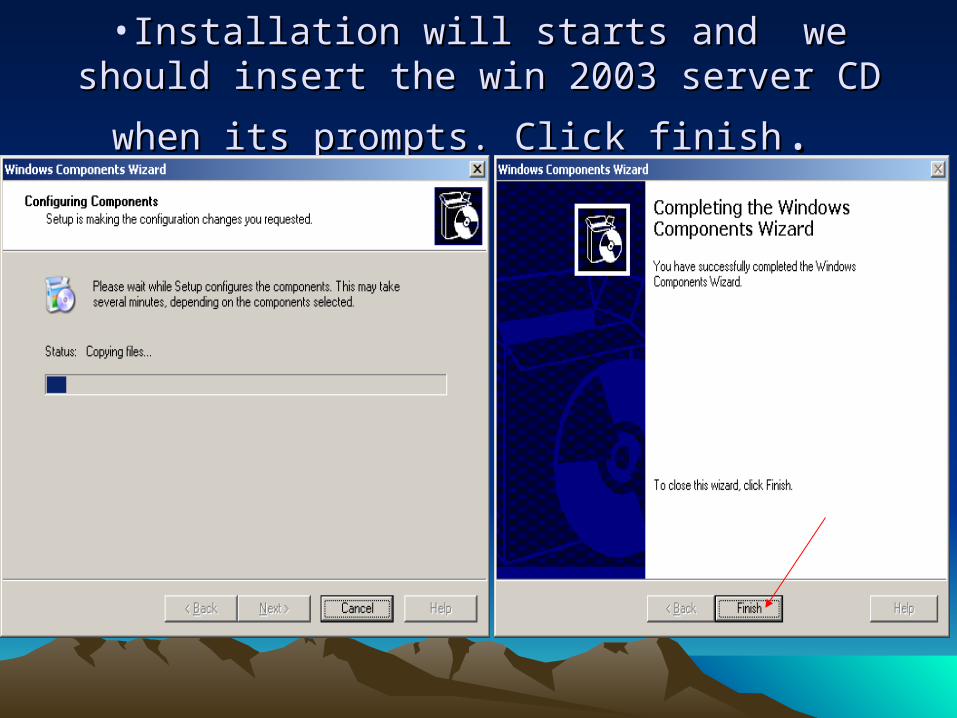
•Installation will starts and we should insert the Installation will starts and we should insert the
win 2003 server CD when its prompts. Click finishwin 2003 server CD when its prompts. Click finish. .
II.II. Preparing the Forest & DomainPreparing the Forest & Domain.. Before you perform the procedure in this topic, consider the following: The account we use to run Forest Prep must be a member of the following
groups:
Enterprise Administrator
Schema Administrator
Domain Administrator
Local Machine Administrator
When you delegate Exchange roles to a security group, it is recommended that you use Global or Universal security groups and not Domain Local security groups.
To decrease replication time, it is recommended that you run Exchange 2003 Forest Prep on a domain controller in your root domain.
Running the forest prep :Running the forest prep :
• To run Exchange 2003 Forest Prep
1. Insert the Exchange CD into your CD-ROM drive.
2. On the Welcome to the Microsoft Exchange Installation Wizard page, click Next.
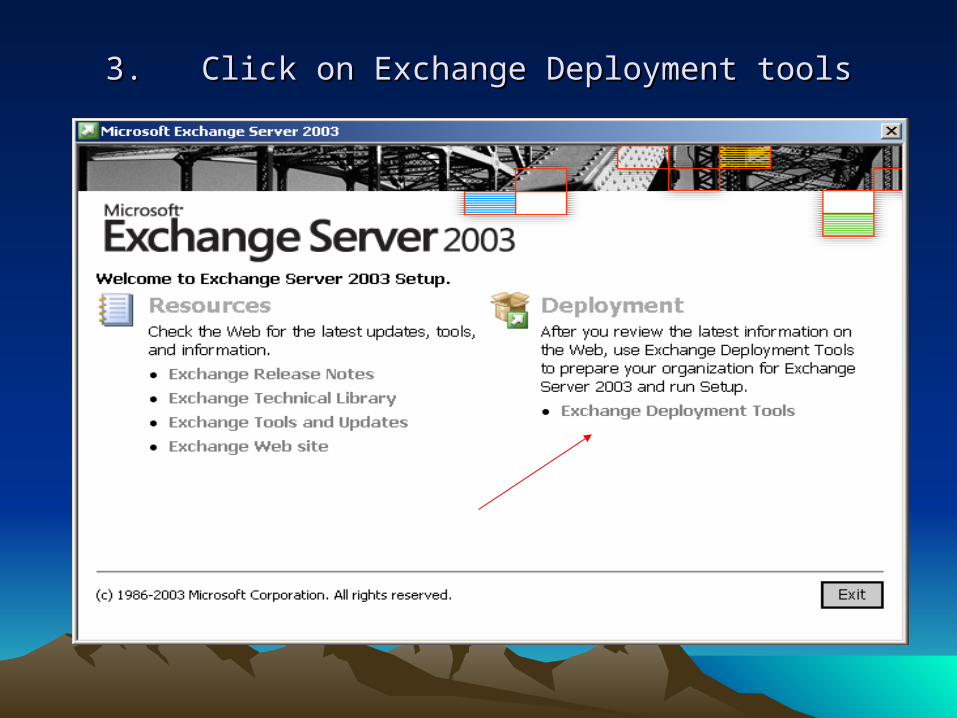
3. Click on Exchange Deployment tools3. Click on Exchange Deployment tools
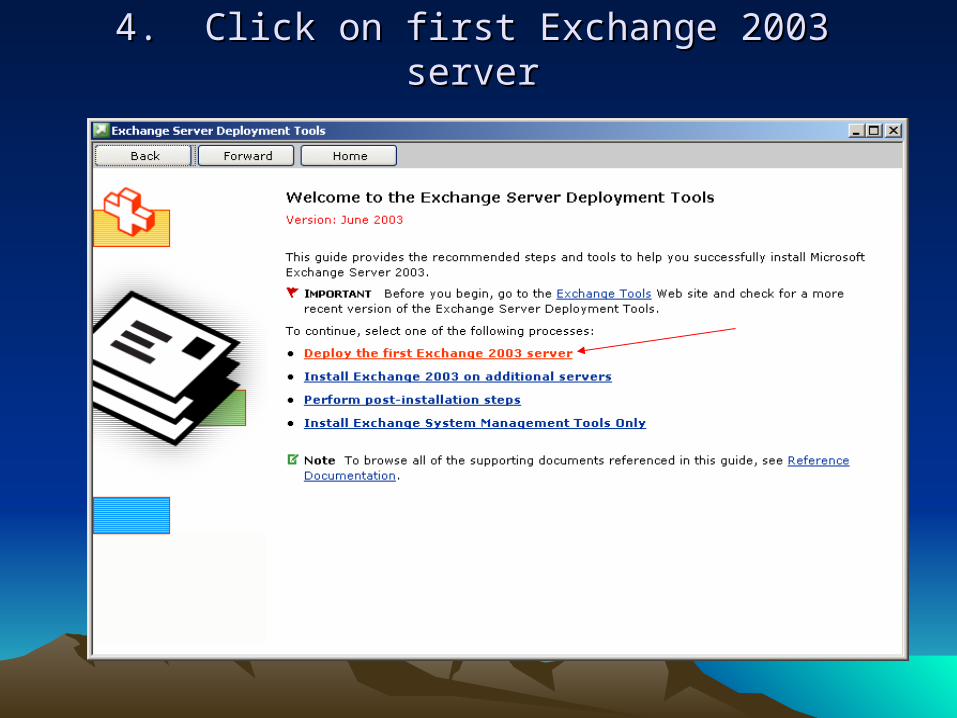
4. Click on first Exchange 2003 server4. Click on first Exchange 2003 server
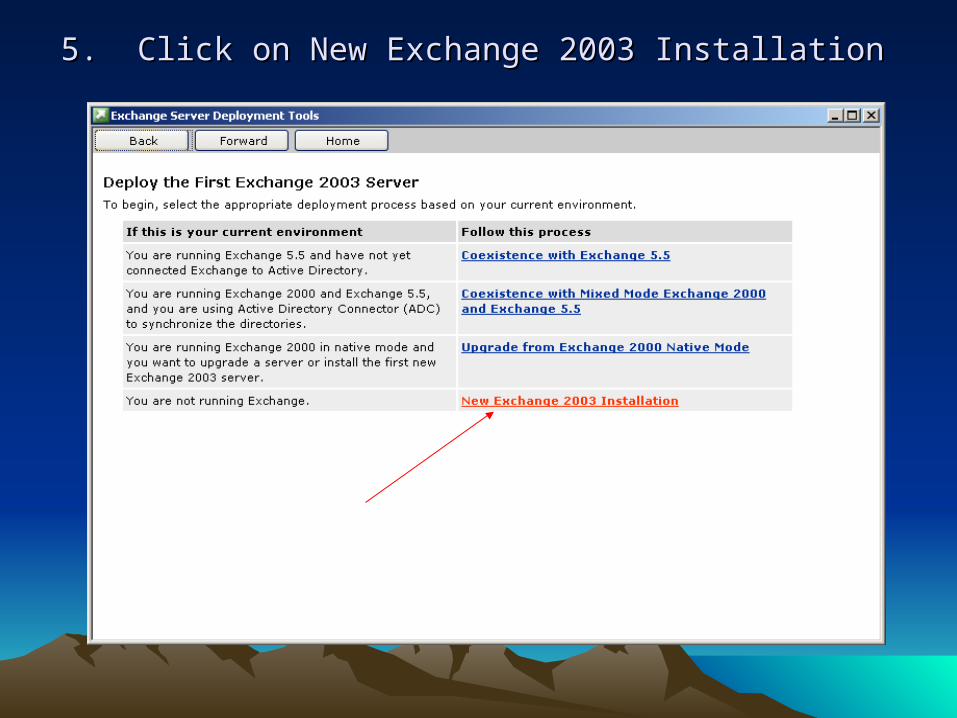
5. Click on New Exchange 2003 Installation5. Click on New Exchange 2003 Installation

6. On the New exchange installation Page we have to run Forest prep , domain 6. On the New exchange installation Page we have to run Forest prep , domain
prep and then Run setup now-accordingly. Click on Run Forest prep nowprep and then Run setup now-accordingly. Click on Run Forest prep now..
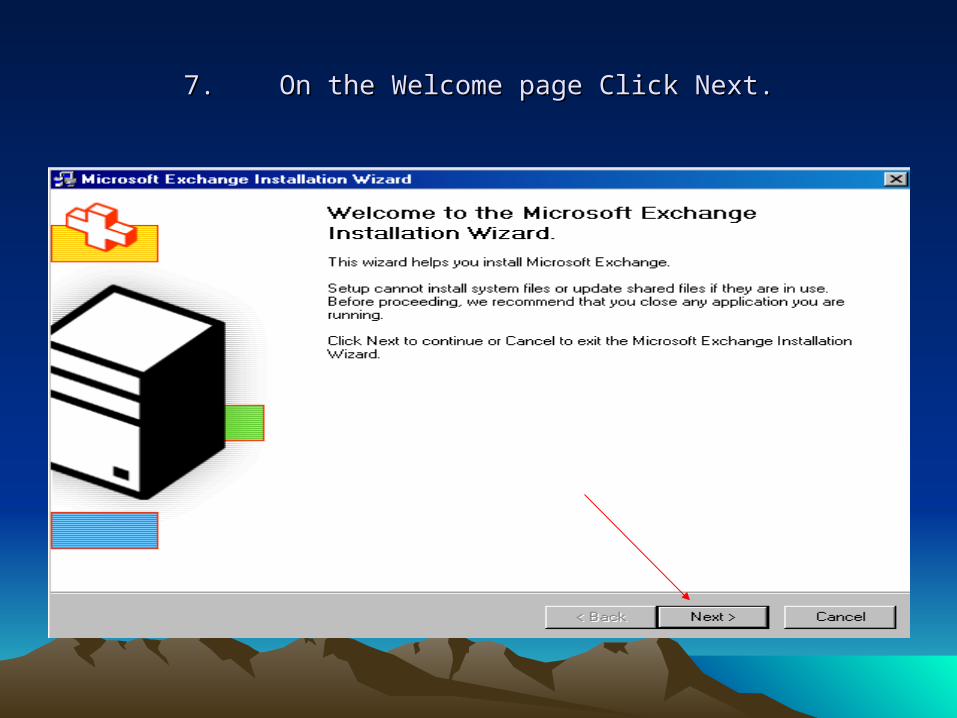
7. On the Welcome page Click Next.7. On the Welcome page Click Next.
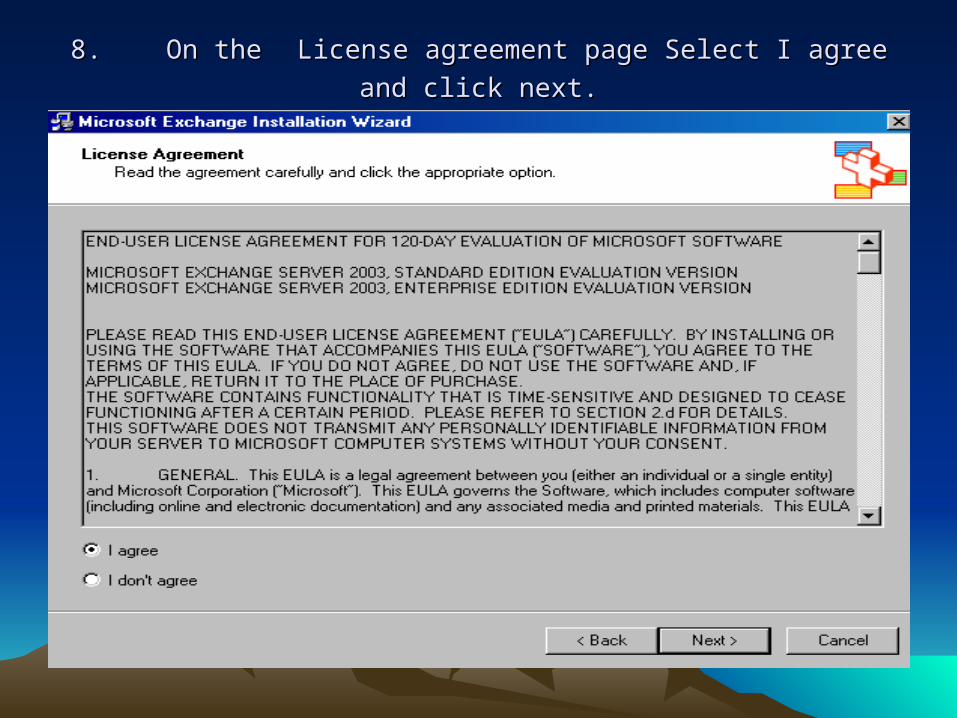
8. On the8. On the License agreement page Select I agree and click next.License agreement page Select I agree and click next.
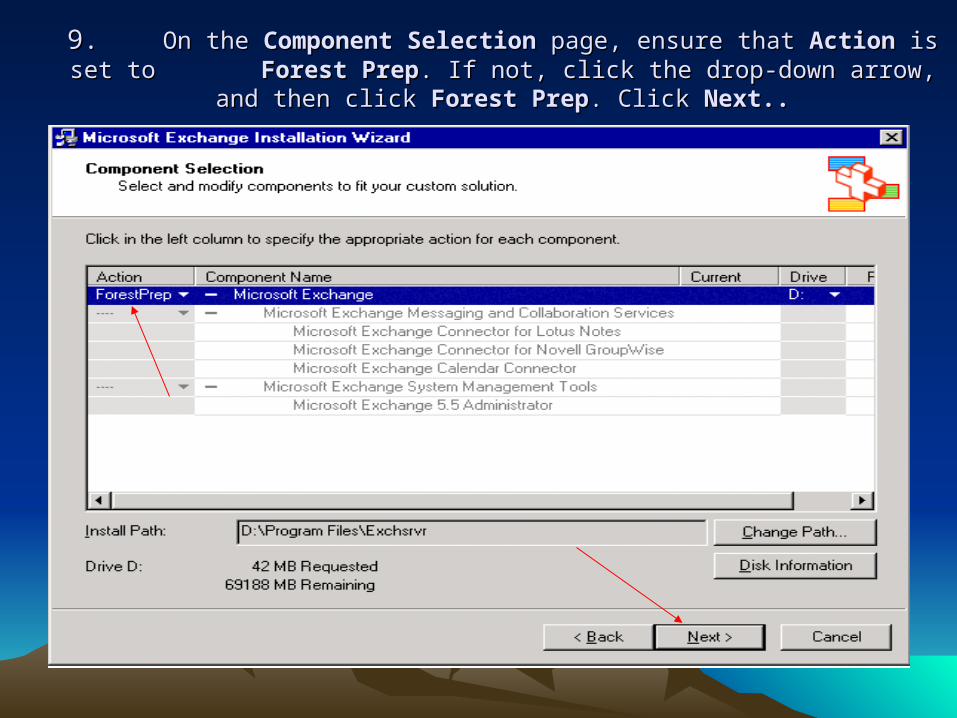
9. 9. On the On the Component SelectionComponent Selection page, ensure that page, ensure that ActionAction is set to is set to Forest Forest PrepPrep. If not, click the drop-down arrow, and then click . If not, click the drop-down arrow, and then click Forest PrepForest Prep. Click . Click Next..Next..
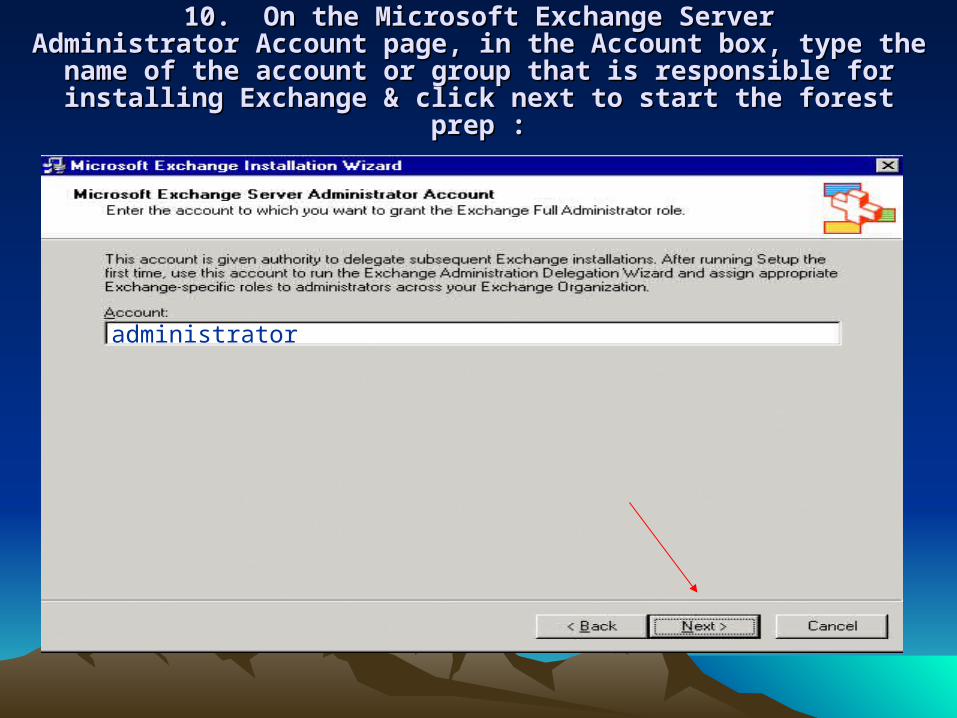
10. On the Microsoft Exchange Server Administrator Account page, in the 10. On the Microsoft Exchange Server Administrator Account page, in the Account box, type the name of the account or group that is responsible Account box, type the name of the account or group that is responsible
for installing Exchange & click next to start the forest prep :for installing Exchange & click next to start the forest prep :
administrator
warningwarning : :
11. After Forest Prep starts, you cannot cancel the process.
12. On the Completing the Microsoft Exchange Wizard page, click Finish.
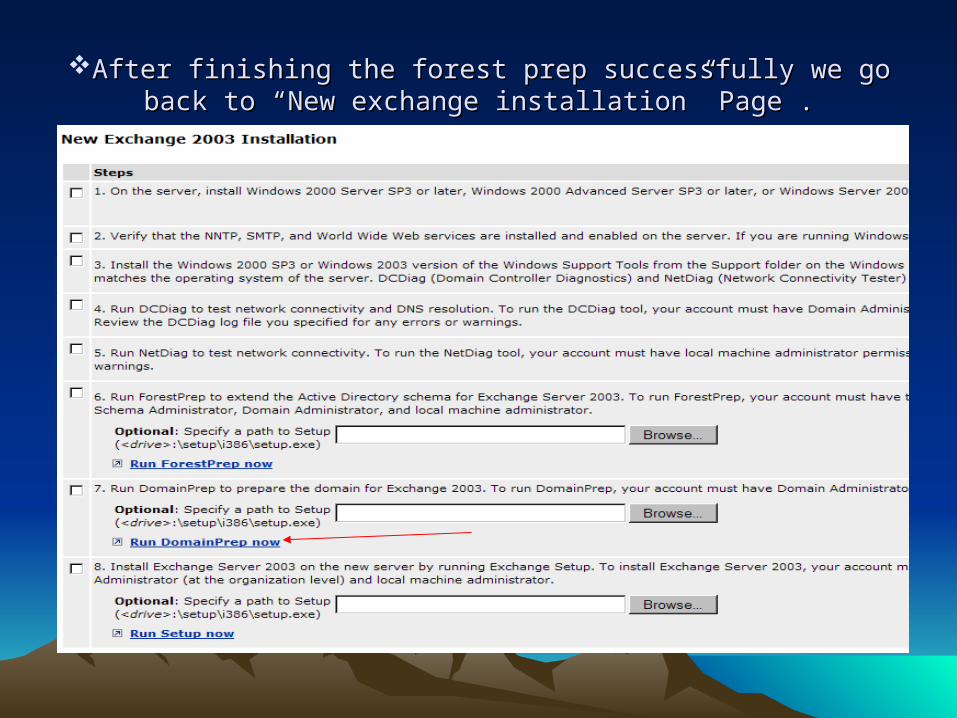
After finishing the forest prep successfully we go back to “New After finishing the forest prep successfully we go back to “New exchange installation” Page .exchange installation” Page .
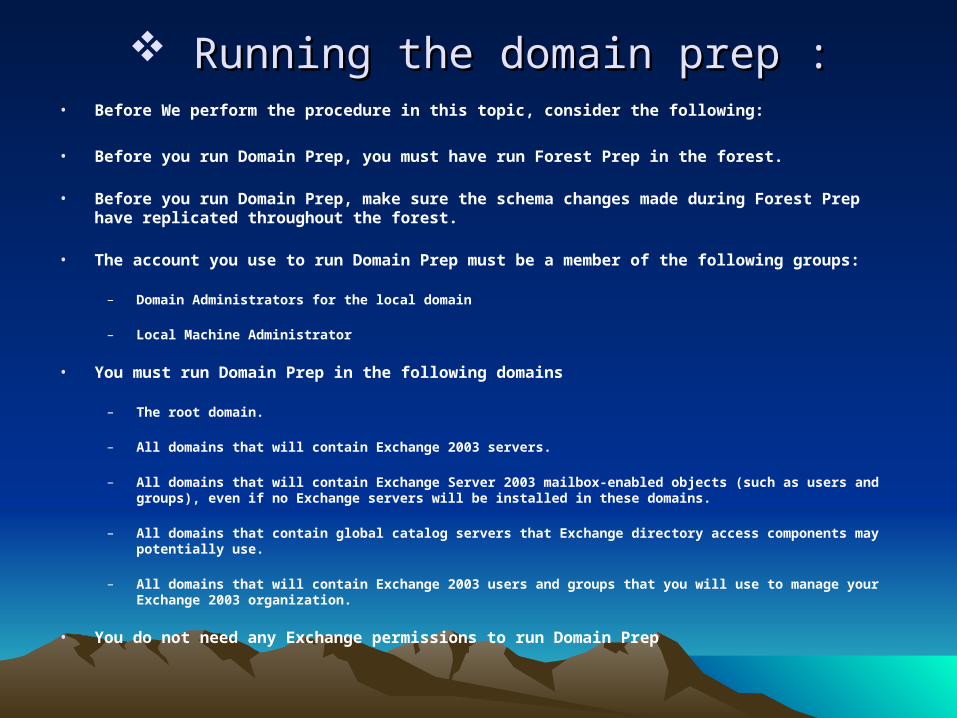
Running the domain prep :Running the domain prep :• Before We perform the procedure in this topic, consider the following:
• Before you run Domain Prep, you must have run Forest Prep in the forest.
• Before you run Domain Prep, make sure the schema changes made during Forest Prep have replicated throughout the forest.
• The account you use to run Domain Prep must be a member of the following groups:
– Domain Administrators for the local domain
– Local Machine Administrator
• You must run Domain Prep in the following domains
– The root domain.
– All domains that will contain Exchange 2003 servers.
– All domains that will contain Exchange Server 2003 mailbox-enabled objects (such as users and groups), even if no Exchange servers will be installed in these domains.
– All domains that contain global catalog servers that Exchange directory access components may potentially use.
– All domains that will contain Exchange 2003 users and groups that you will use to manage your Exchange 2003 organization.
• You do not need any Exchange permissions to run Domain Prep

To run Exchange 2003 Domain Prep Just click on run domain prep To run Exchange 2003 Domain Prep Just click on run domain prep now. now.
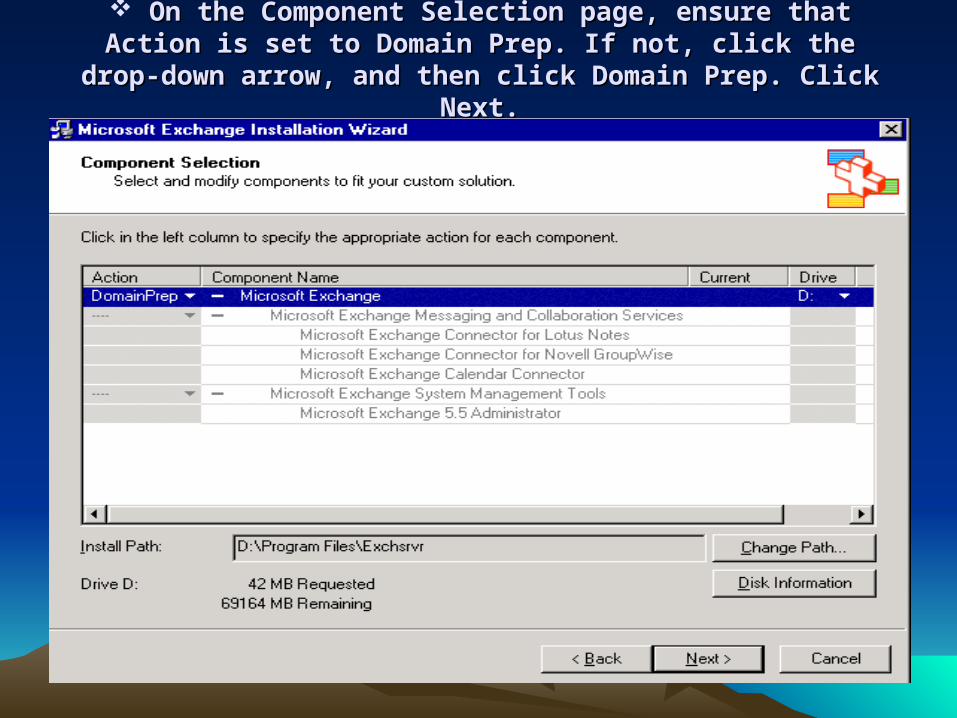
On the Component Selection page, ensure that Action is set to On the Component Selection page, ensure that Action is set to Domain Prep. If not, click the drop-down arrow, and then click Domain Prep. If not, click the drop-down arrow, and then click
Domain Prep. Click Next.Domain Prep. Click Next.
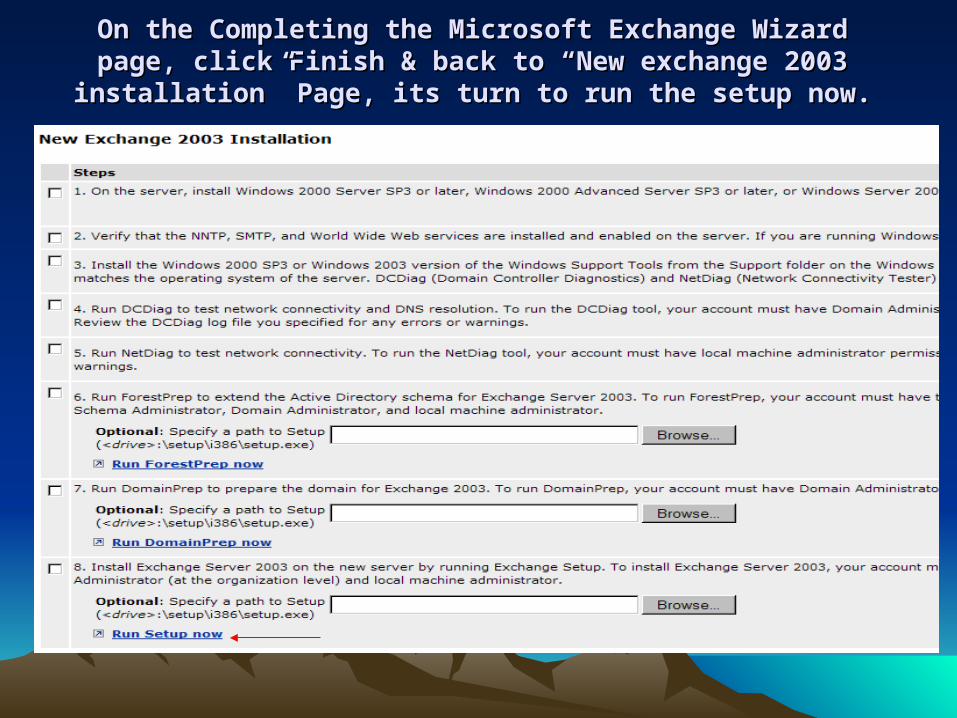
On the Completing the Microsoft Exchange Wizard page, click On the Completing the Microsoft Exchange Wizard page, click Finish & back to “New exchange 2003 installation” Page, its turn Finish & back to “New exchange 2003 installation” Page, its turn
to run the setup now.to run the setup now.
III. Exchange Server Installation.III. Exchange Server Installation.
• To install the first Exchange 2003 server in the forest / Domain, our account must has the following permission :
Exchange Domain server. Exchange Enterprise server. Domain Administrator. Local Administrator. Schema Admin. Enterprise admin.
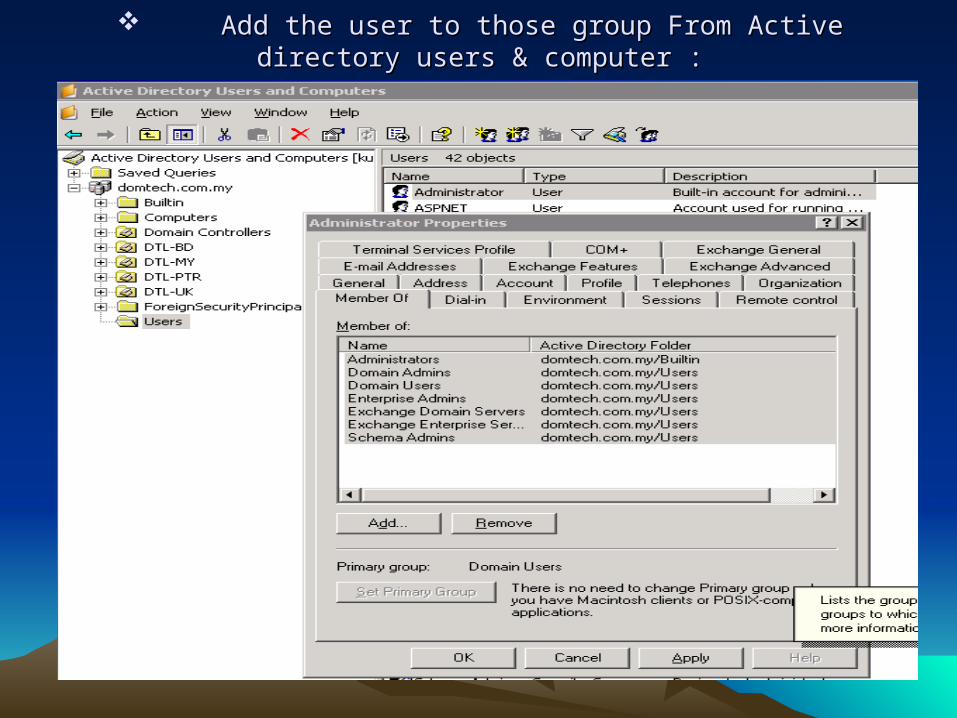
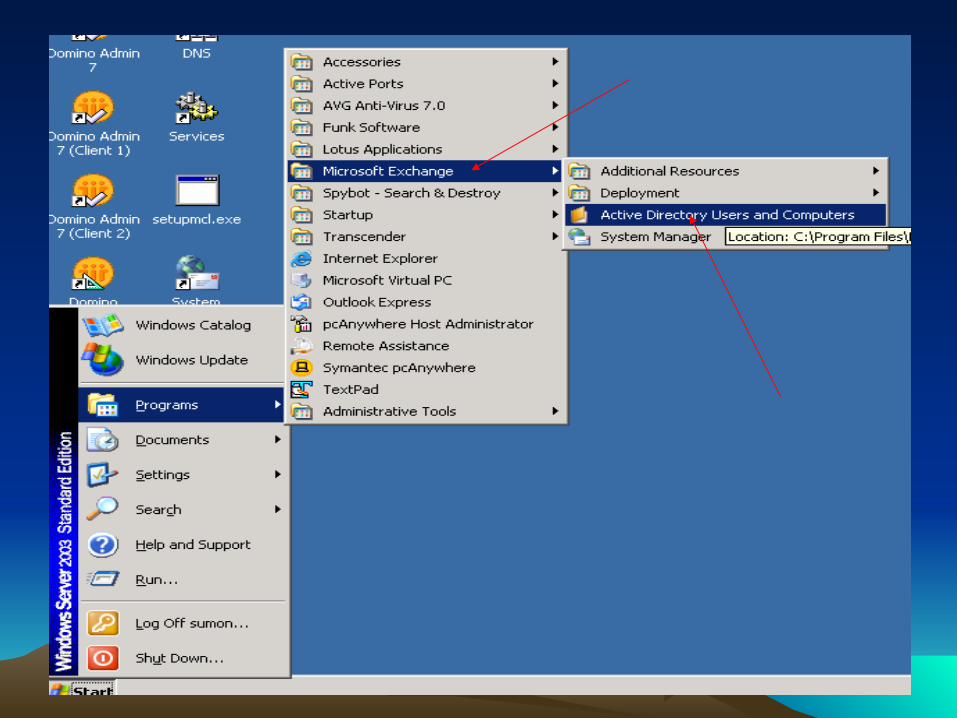
Add the user to those group From Active directory users & Add the user to those group From Active directory users & computer :computer :
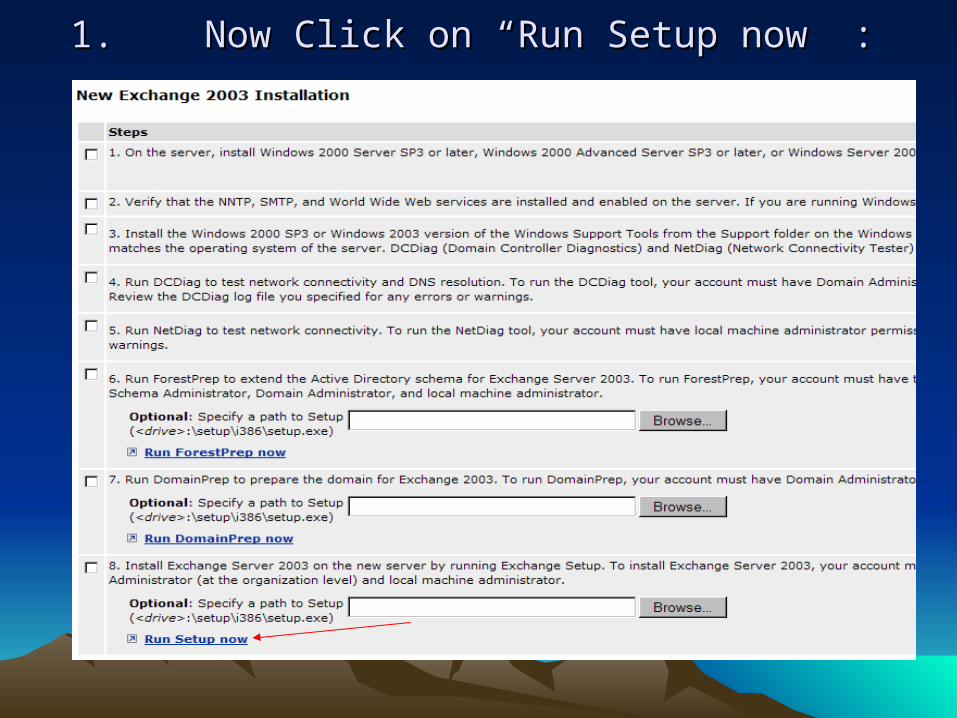
1. Now Click on “Run Setup now” :1. Now Click on “Run Setup now” :
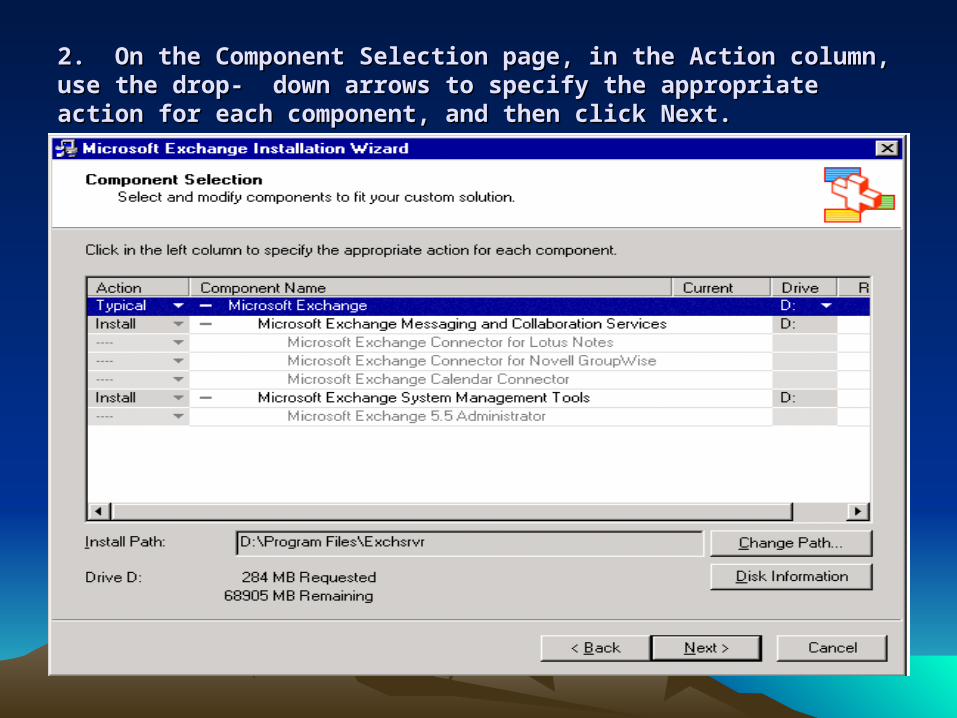
2. On the Component Selection page, in the Action column, use the drop- 2. On the Component Selection page, in the Action column, use the drop- down arrows to specify the appropriate action for each component, and down arrows to specify the appropriate action for each component, and then click Next.then click Next.
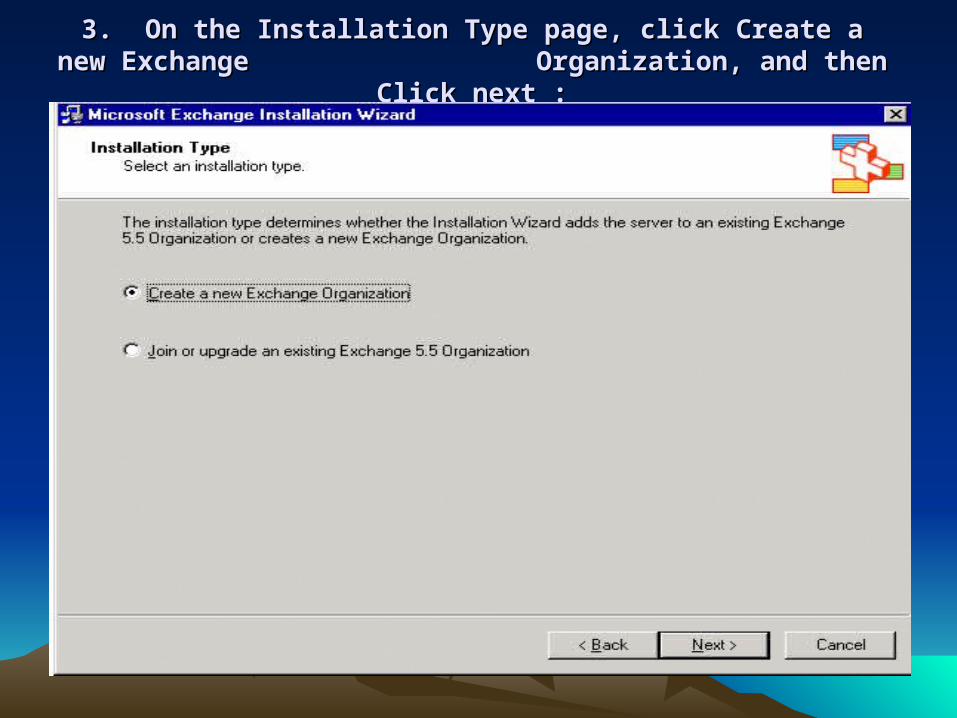
3. On the Installation Type page, click Create a new Exchange 3. On the Installation Type page, click Create a new Exchange Organization, and then Click next :Organization, and then Click next :
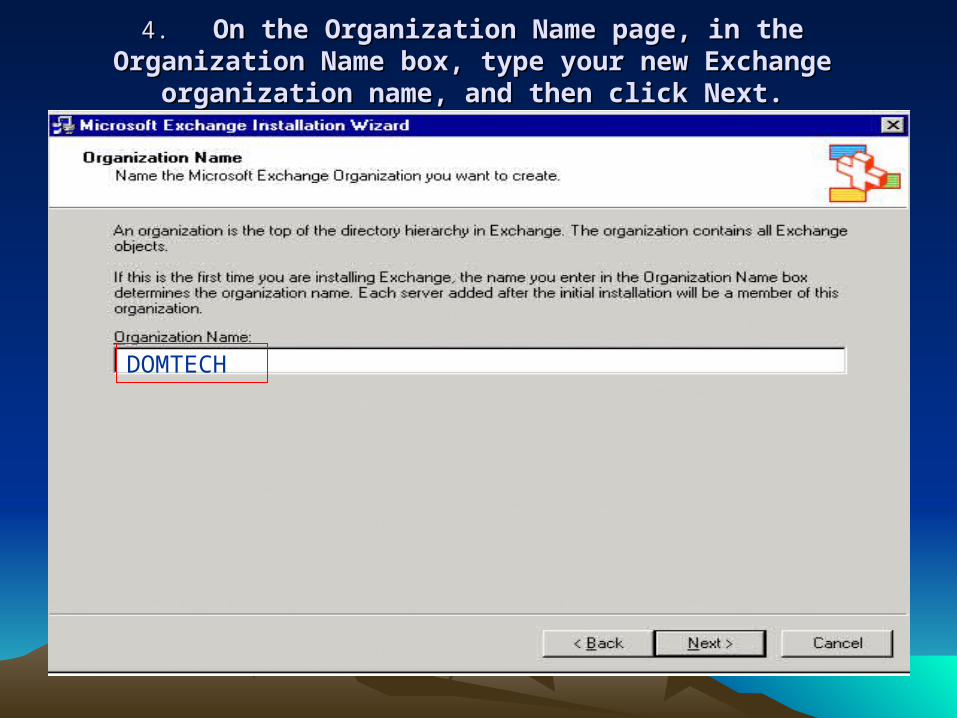
4. 4. On the Organization Name page, in the Organization Name box, On the Organization Name page, in the Organization Name box, type your new Exchange organization name, and then click Next.type your new Exchange organization name, and then click Next.
DOMTECH
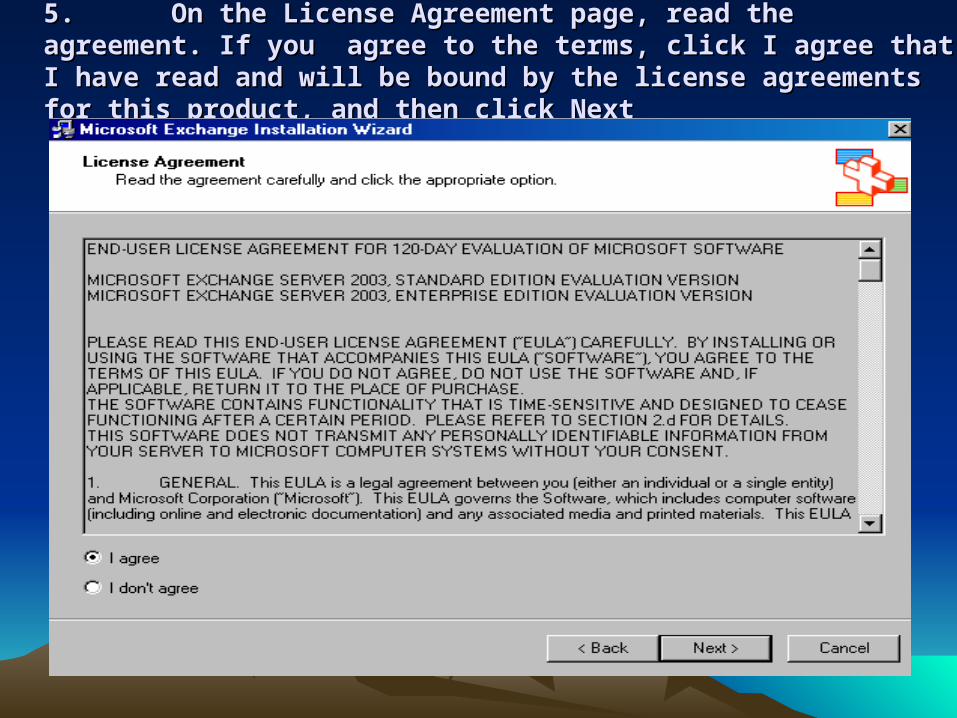
5. On the License Agreement page, read the agreement. If you agree 5. On the License Agreement page, read the agreement. If you agree to the terms, click I agree that I have read and will be bound by the to the terms, click I agree that I have read and will be bound by the license agreements for this product, and then click Nextlicense agreements for this product, and then click Next
.
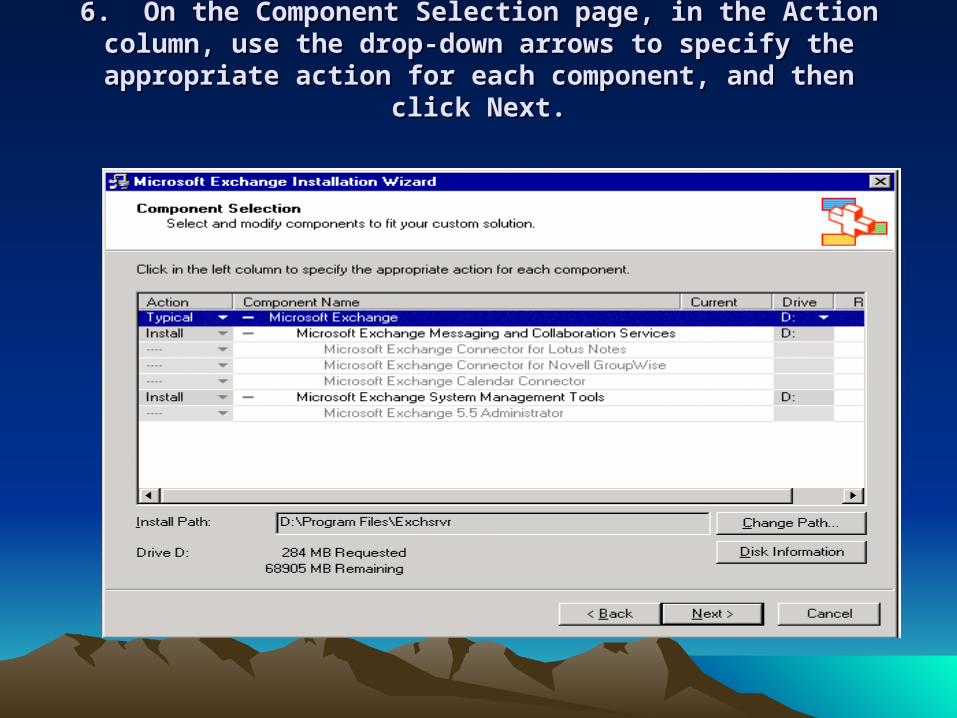
6. On the Component Selection page, in the Action column, use 6. On the Component Selection page, in the Action column, use the drop-down arrows to specify the appropriate action for each the drop-down arrows to specify the appropriate action for each
component, and then click Next.component, and then click Next.
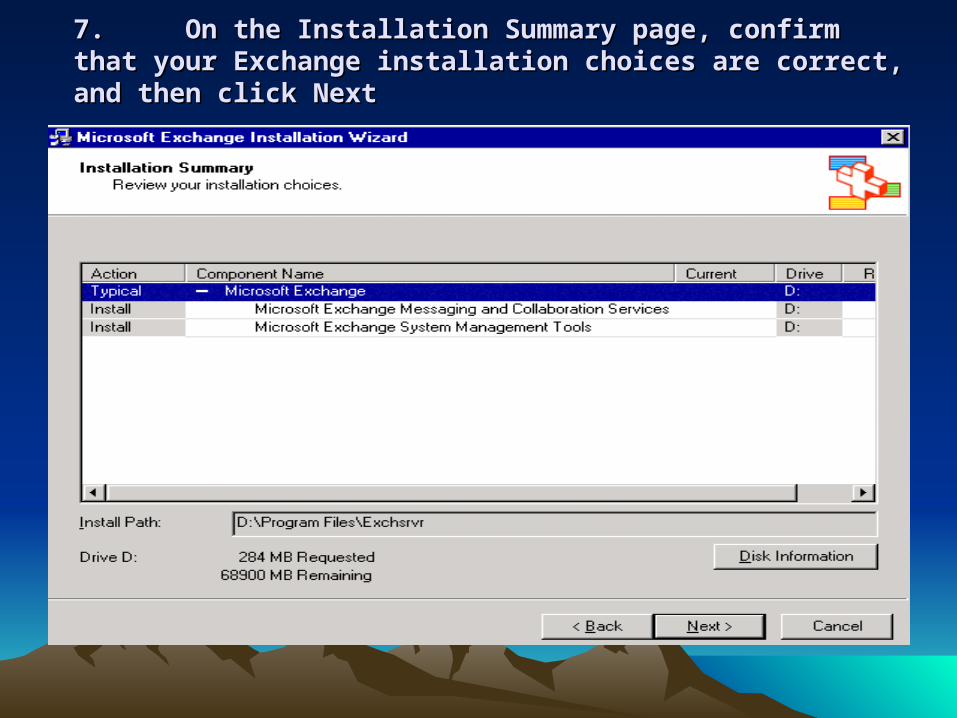
7. On the Installation Summary page, confirm that your 7. On the Installation Summary page, confirm that your Exchange installation choices are correct, and then click NextExchange installation choices are correct, and then click Next
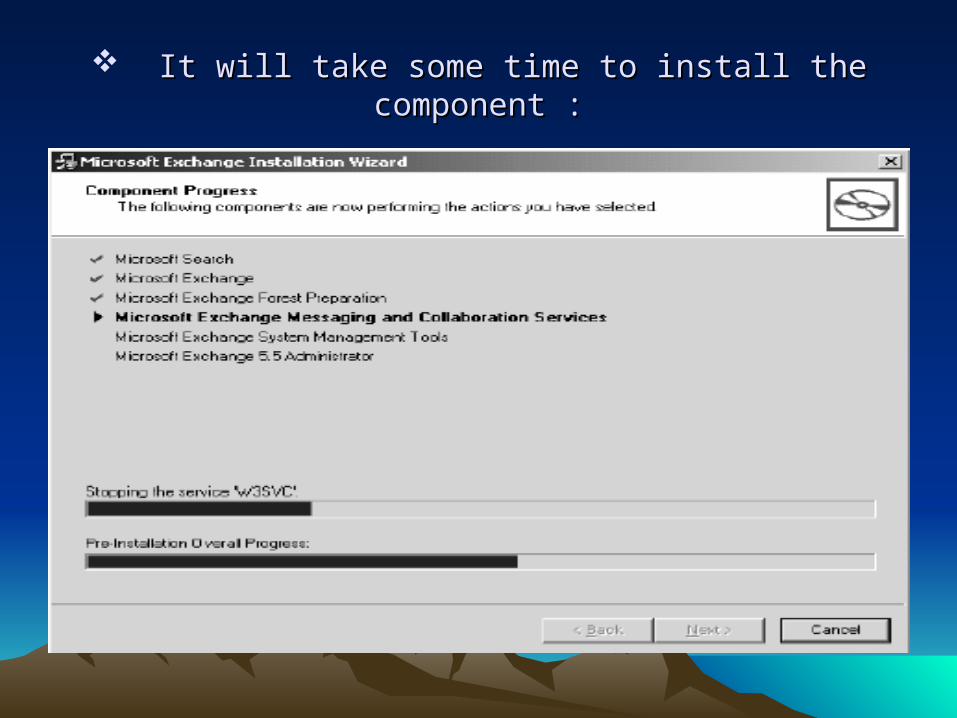
It will take some time to install the component :It will take some time to install the component :

8. 8. On the Completing the Microsoft Exchange Wizard On the Completing the Microsoft Exchange Wizard page, click Finish.page, click Finish.
• We have done the exchange installation.
• Now proceed to post installation steps.
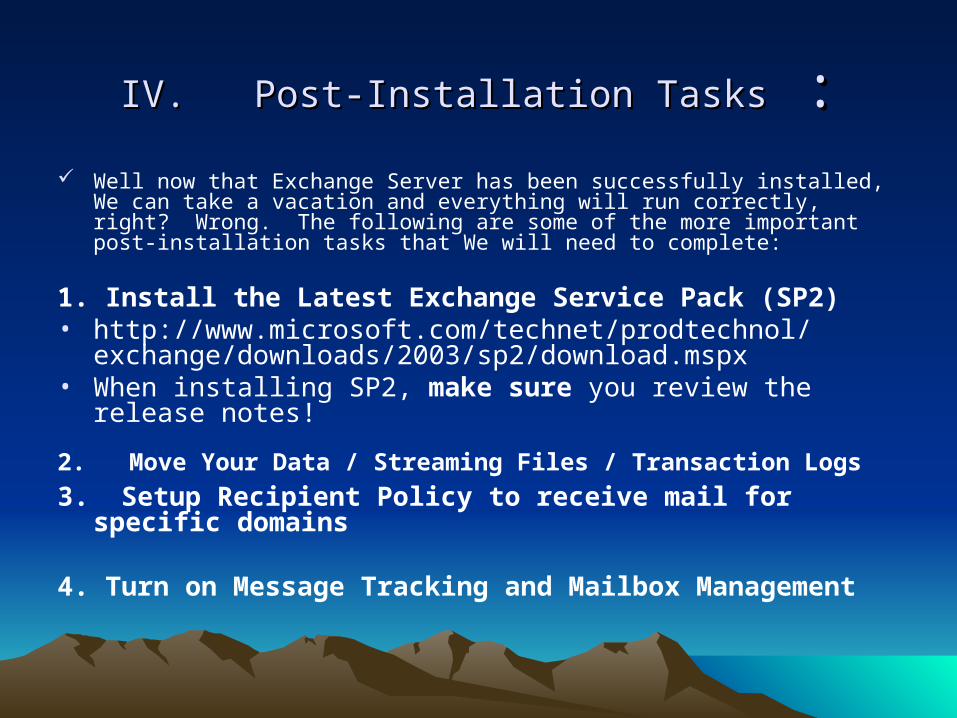
IV. Post-Installation TasksIV. Post-Installation Tasks : : Well now that Exchange Server has been successfully installed, We can take a
vacation and everything will run correctly, right? Wrong. The following are some of the more important post-installation tasks that We will need to complete:
1. Install the Latest Exchange Service Pack (SP2)• http://www.microsoft.com/technet/prodtechnol/exchange/
downloads/2003/sp2/download.mspx• When installing SP2, make sure you review the release notes!
2. Move Your Data / Streaming Files / Transaction Logs 3. Setup Recipient Policy to receive mail for specific domains 4. Turn on Message Tracking and Mailbox Management
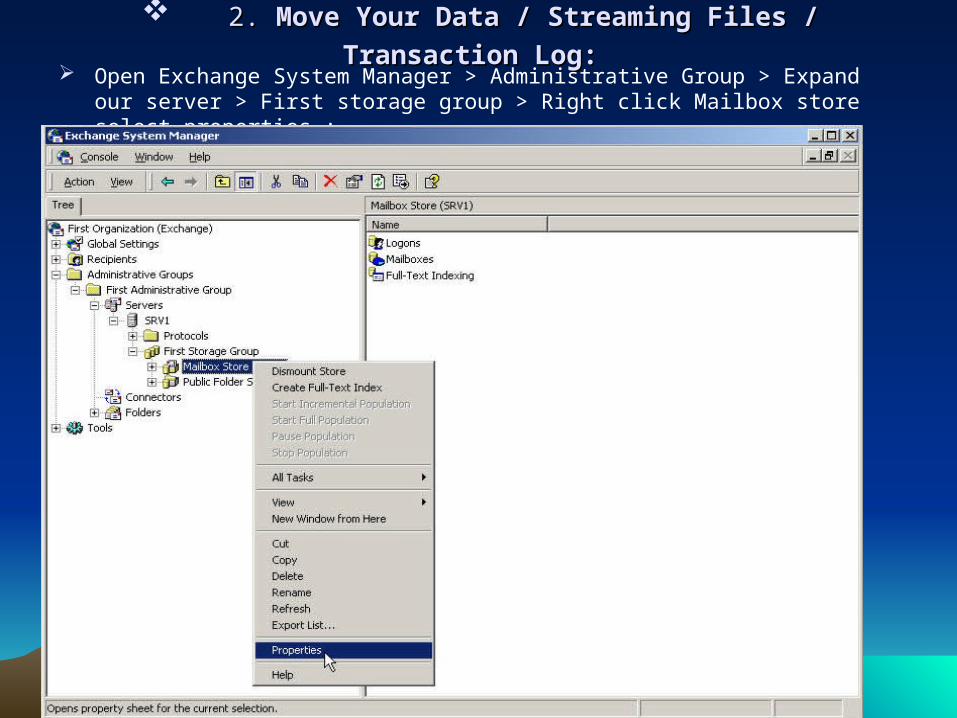
2. 2. Move Your Data / Streaming Files / Transaction Log:Move Your Data / Streaming Files / Transaction Log: Open Exchange System Manager > Administrative Group > Expand our server > First
storage group > Right click Mailbox store select properties :
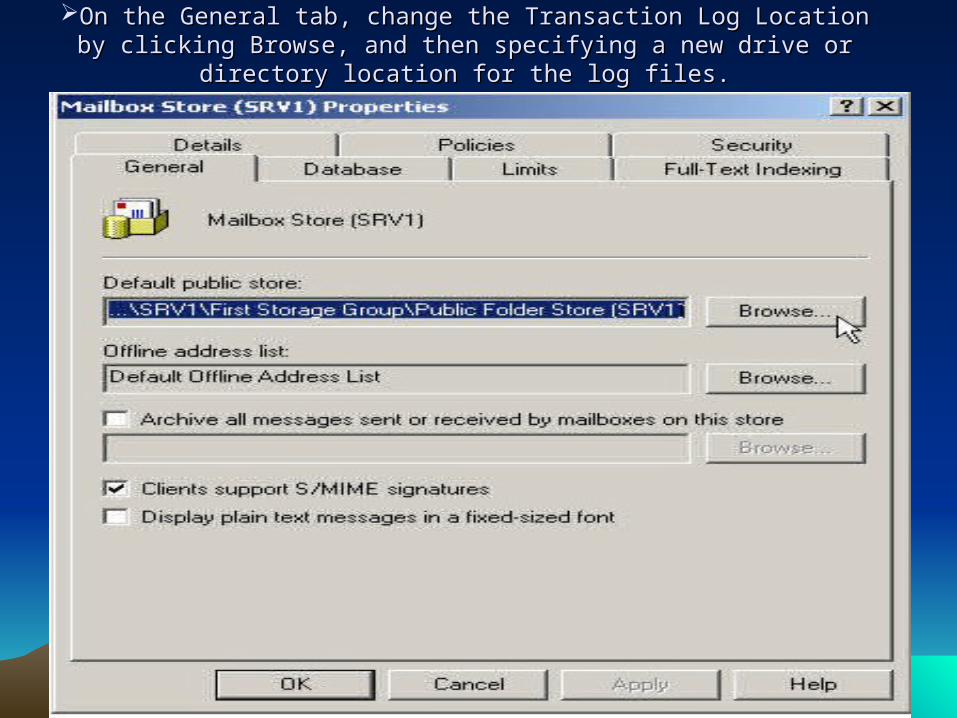
On the General tab, change the Transaction Log Location by clicking Browse, On the General tab, change the Transaction Log Location by clicking Browse, and then specifying a new drive or directory location for the log files.and then specifying a new drive or directory location for the log files.
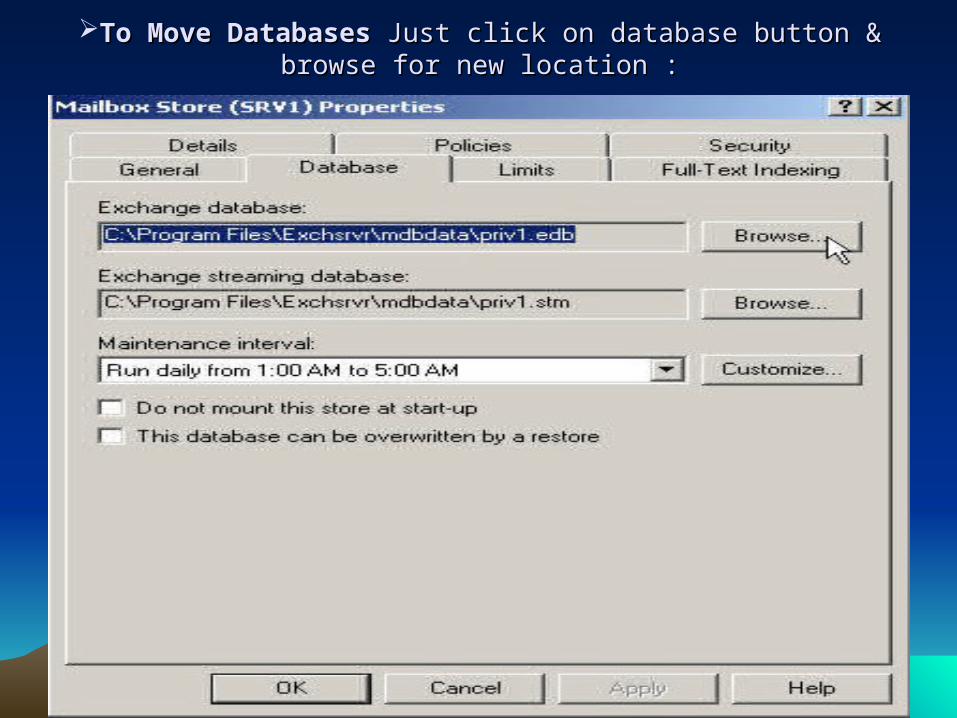
To Move DatabasesTo Move Databases Just click on database button & browse for new Just click on database button & browse for new location :location :
....
• Choose a new location for the databases by clicking Browse, and specifying a new drive or directory location for the database files. With the databases, you can choose to move the Exchange Database (.edb file), Exchange Streaming Database (.stm file) or both. If the databases are still mounted, you receive the following message:
• You are about to perform the following operation(s): -change Exchange database location To perform the requested operation(s), the store must be temporarily dismounted which will make it inaccessible to any user. Do you want to continue?
• Click Yes to dismount the database automatically and move the location.
• When you finish moving the databases, remount the databases manually.
....
• You can move the log files and database files to any directory that you want to create. When you move logs and database files, you may want to create the Exchsrvr\ Mdbdata file structure for consistency reasons, but you are not required to do so.
• You must grant the following default permissions to the new Mdbdata directory that contains the log files and database files:
• Administrators: Full Control Authenticated Users: Read and Execute, List Folder Contents, Read Creator Owner: None Server Operators: Modify, Read and Execute, List Folder Contents, Read, Write System: Full Control
• You may also need to grant the following permissions to the root drive that contains the new Mdbdata directory:
• System: Full Control • During the process of moving log files and database files, your store is
temporarily dismounted, which makes it inaccessible to your users until the process is completed.
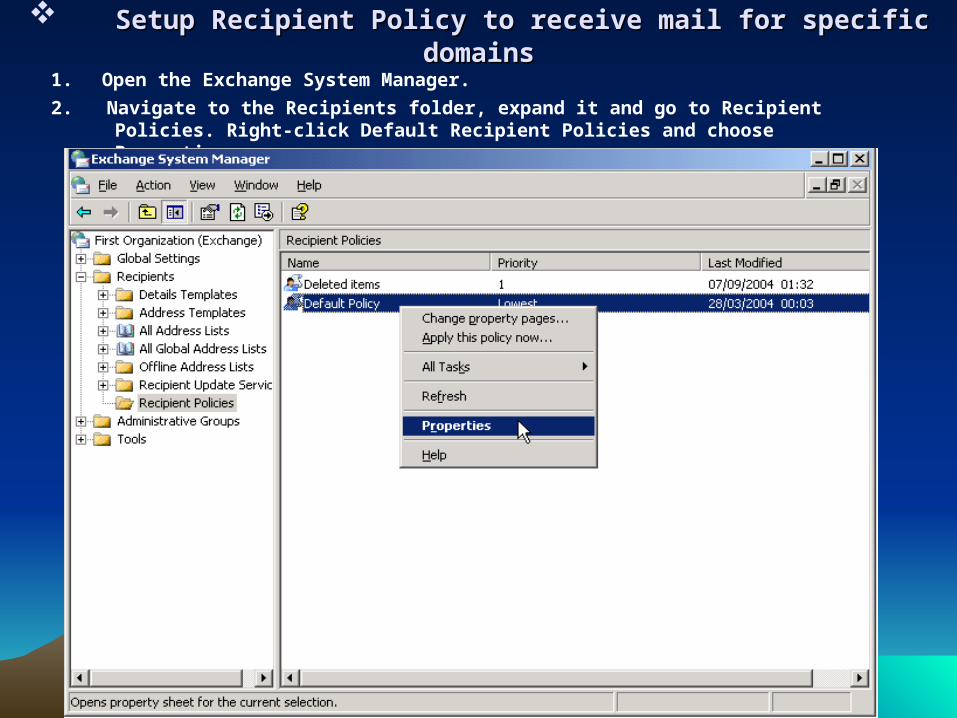
Setup Recipient Policy to receive mail for specific domainsSetup Recipient Policy to receive mail for specific domains
1. Open the Exchange System Manager.
2. Navigate to the Recipients folder, expand it and go to Recipient Policies. Right-click Default Recipient Policies and choose Properties.
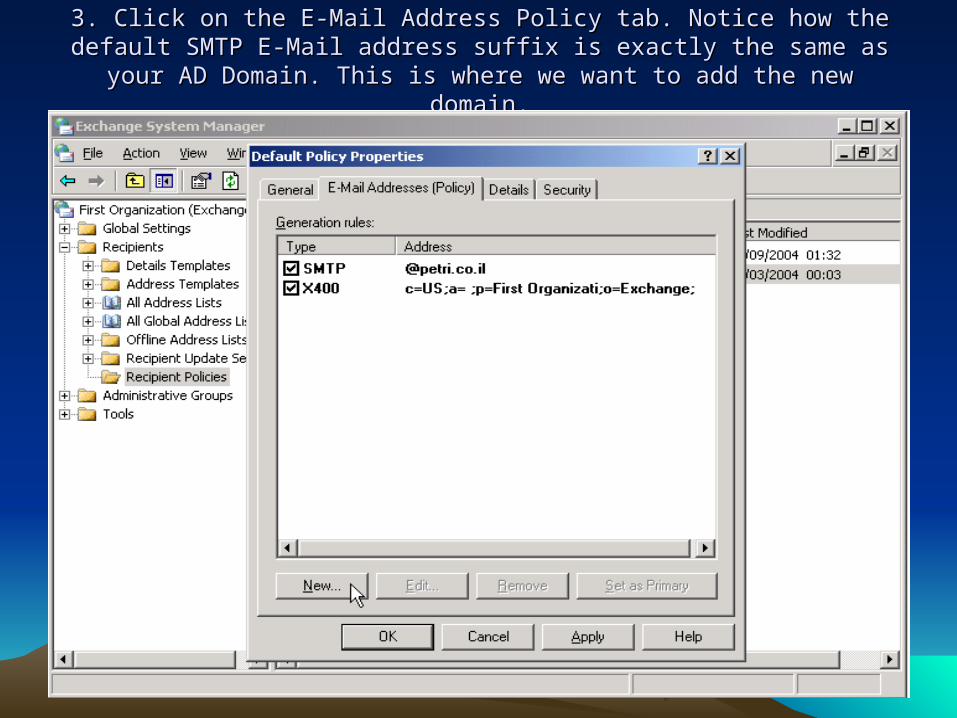
3. Click on the E-Mail Address Policy tab. Notice how the default SMTP E-Mail 3. Click on the E-Mail Address Policy tab. Notice how the default SMTP E-Mail address suffix is exactly the same as your AD Domain. This is where we want address suffix is exactly the same as your AD Domain. This is where we want
to add the new domain.to add the new domain.
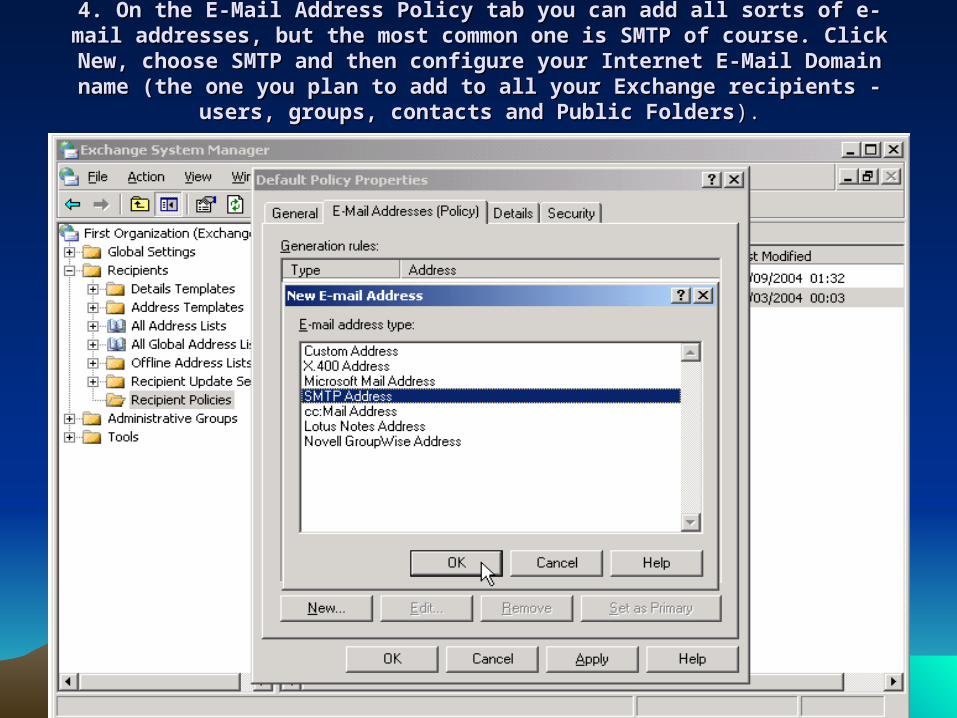
4. On the E-Mail Address Policy tab you can add all sorts of e-mail addresses, but 4. On the E-Mail Address Policy tab you can add all sorts of e-mail addresses, but the most common one is SMTP of course. Click New, choose SMTP and then the most common one is SMTP of course. Click New, choose SMTP and then
configure your Internet E-Mail Domain name (the one you plan to add to all your configure your Internet E-Mail Domain name (the one you plan to add to all your Exchange recipients - users, groups, contacts and Public FoldersExchange recipients - users, groups, contacts and Public Folders).).
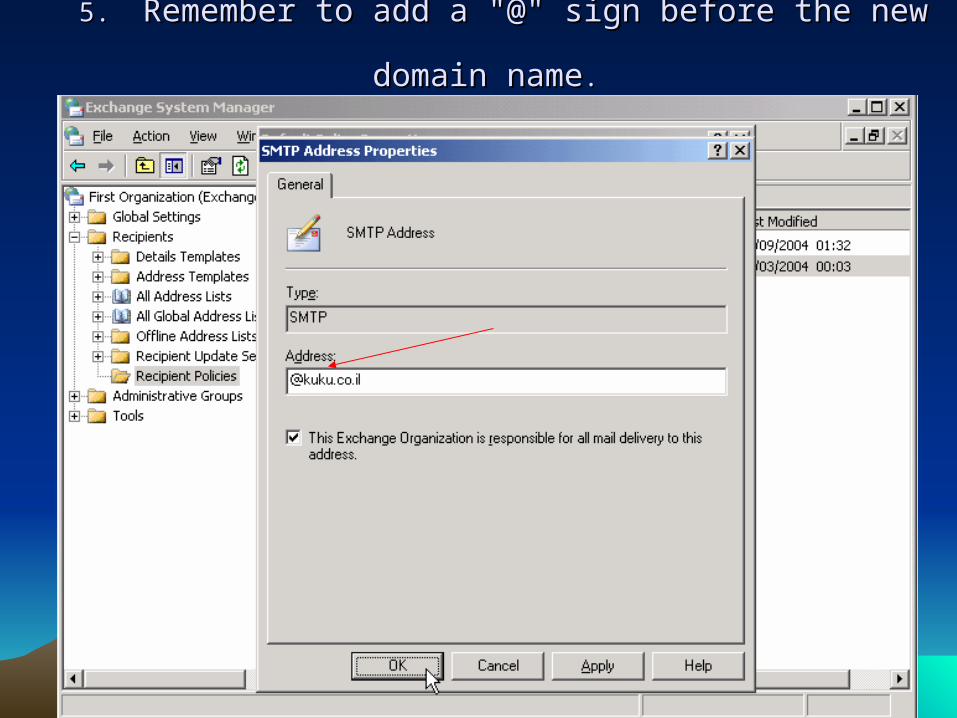
5. 5. Remember to add a "@" sign before the new domain nameRemember to add a "@" sign before the new domain name..

6. we can also select the new e-mail address to be the primary address (i.e. in 6. we can also select the new e-mail address to be the primary address (i.e. in bold, and it will be used as the e-mail address to where the replies to messages bold, and it will be used as the e-mail address to where the replies to messages
sent by your users will be sent). Click ok..sent by your users will be sent). Click ok..
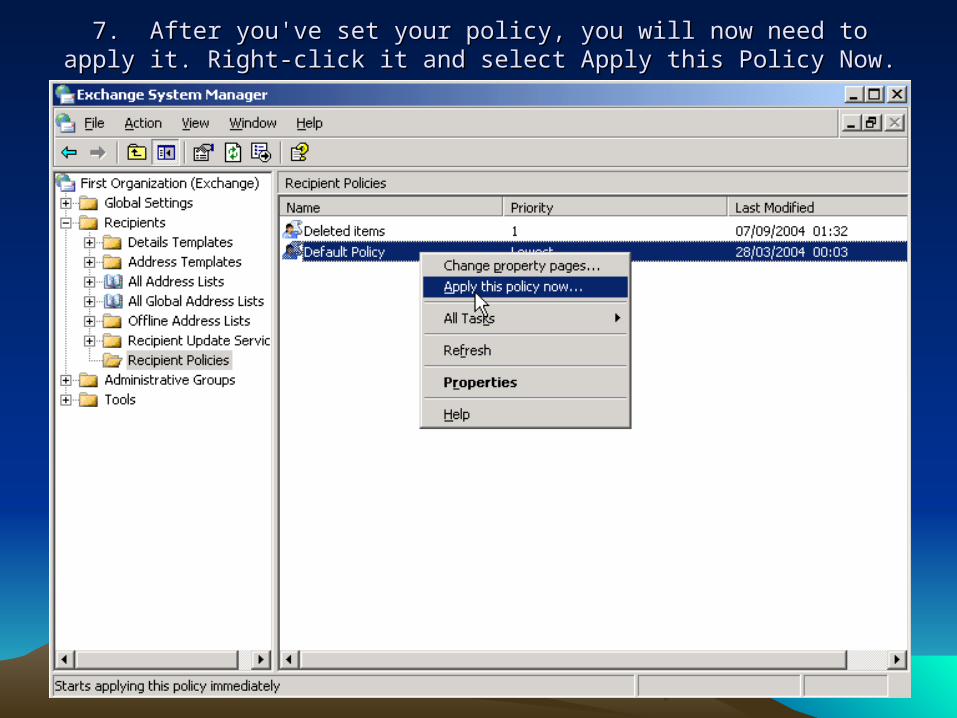
7. After you've set your policy, you will now need to apply it. Right-click it and 7. After you've set your policy, you will now need to apply it. Right-click it and select Apply this Policy Now.select Apply this Policy Now.
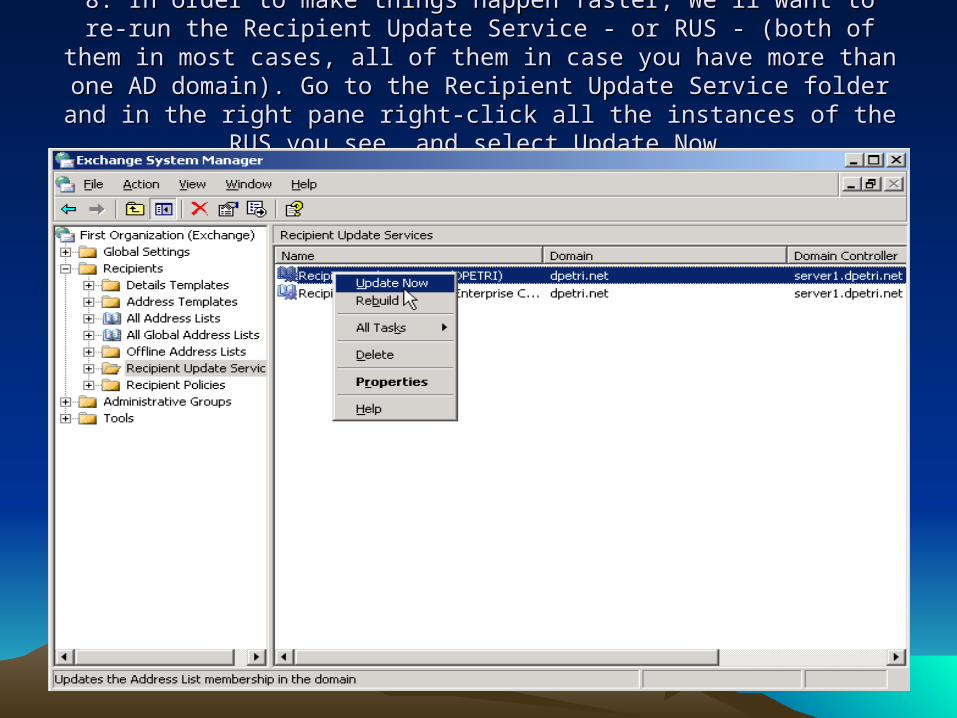
8. In order to make things happen faster, We'll want to re-run the Recipient 8. In order to make things happen faster, We'll want to re-run the Recipient Update Service - or RUS - (both of them in most cases, all of them in case you Update Service - or RUS - (both of them in most cases, all of them in case you
have more than one AD domain). Go to the Recipient Update Service folder have more than one AD domain). Go to the Recipient Update Service folder and in the right pane right-click all the instances of the RUS you see, and select and in the right pane right-click all the instances of the RUS you see, and select
Update Now.Update Now.

9. In order to test the success of the new Recipient Policy, go to one of 9. In order to test the success of the new Recipient Policy, go to one of our recipients and see if the new e-mail address is listed in the our recipients and see if the new e-mail address is listed in the
recipient's properties recipient's properties
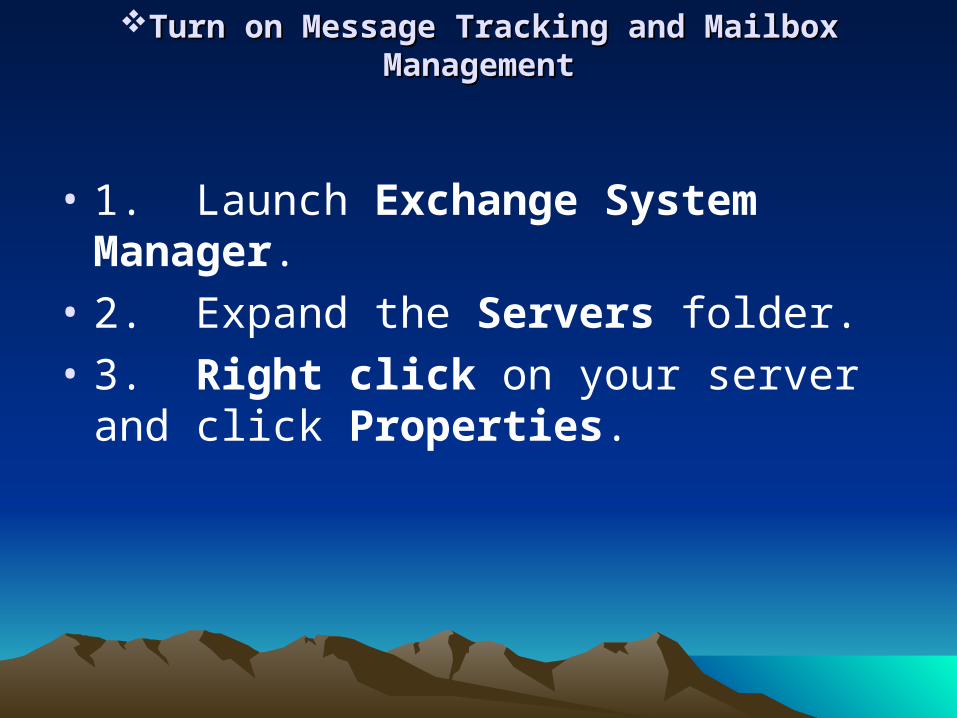
Turn on Message Tracking and Mailbox ManagementTurn on Message Tracking and Mailbox Management
• 1. Launch Exchange System Manager.
• 2. Expand the Servers folder.
• 3. Right click on your server and click Properties.
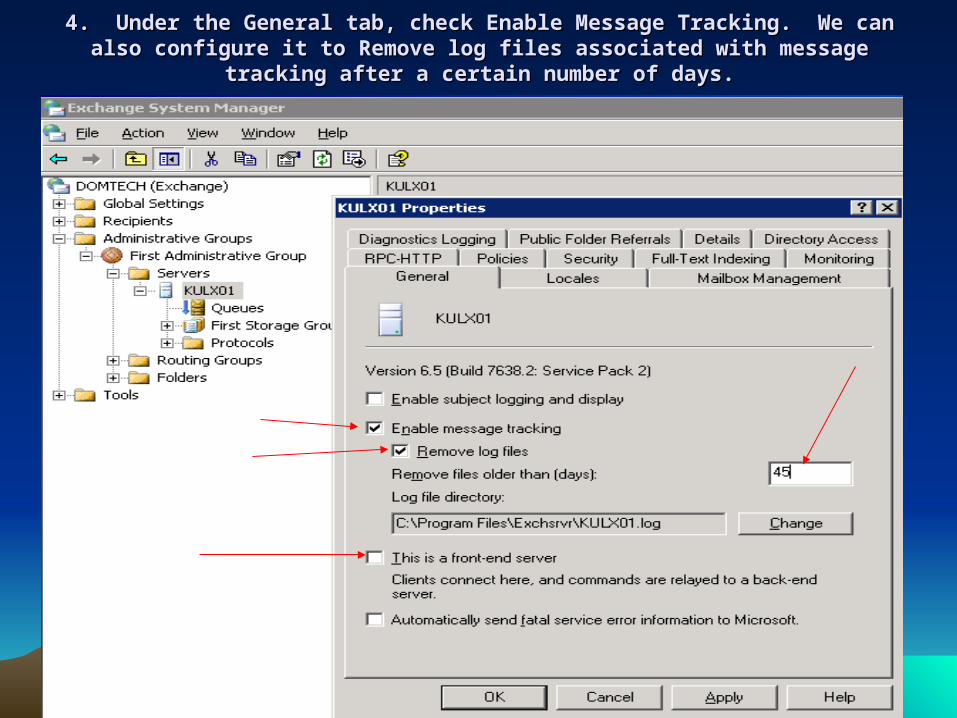
4. Under the General tab, check Enable Message Tracking. We can also configure 4. Under the General tab, check Enable Message Tracking. We can also configure it to Remove log files associated with message tracking after a certain number of it to Remove log files associated with message tracking after a certain number of
days.days.

5. Choose the 5. Choose the Mailbox ManagementMailbox Management tab. tab.Chose when mailbox mgt process run & how to report > Click apply & OkChose when mailbox mgt process run & how to report > Click apply & Ok
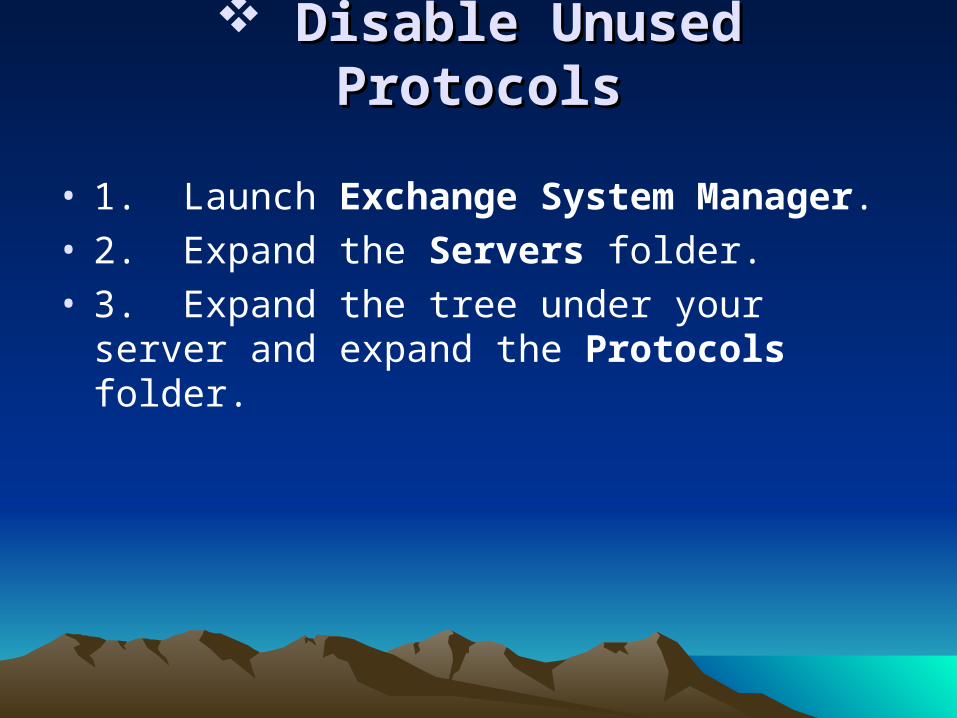
Disable Unused ProtocolsDisable Unused Protocols
• 1. Launch Exchange System Manager.• 2. Expand the Servers folder.• 3. Expand the tree under your server and
expand the Protocols folder.
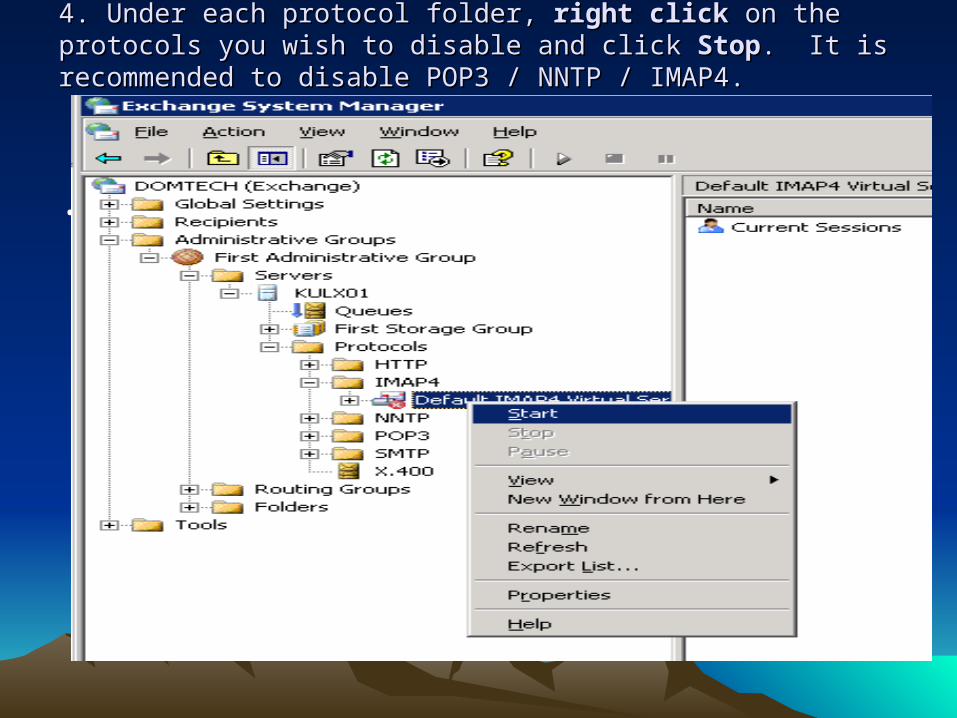
4. Under each protocol folder, 4. Under each protocol folder, right clickright click on the protocols you wish to on the protocols you wish to disable and click disable and click StopStop. It is recommended to disable POP3 / NNTP / . It is recommended to disable POP3 / NNTP / IMAP4.IMAP4.
.
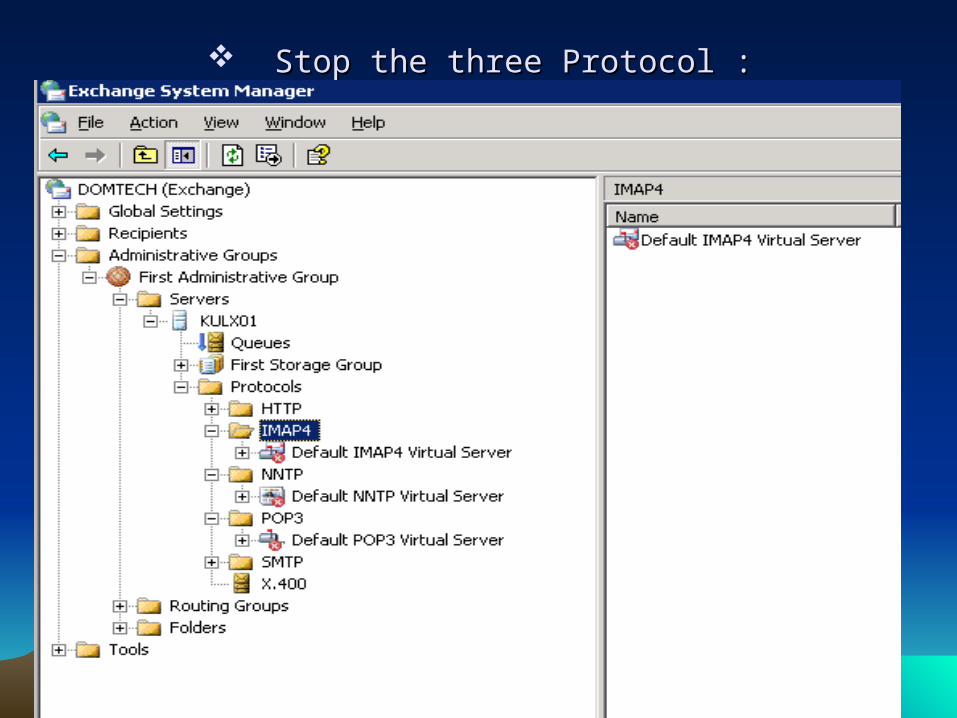
Stop the three Protocol :Stop the three Protocol :
C. C. Creating and Applying Exchange PoliciesCreating and Applying Exchange Policies..• A system policy is a collection of configuration settings that you apply to
one or more servers,
mailbox stores
public folder stores.
..• The system policies that you create for an
administrative group typically apply to objects in that group. However, a system policy can apply to objects outside its own administrative group.
How System Policies Affect Individual Settings :How System Policies Affect Individual Settings :
• System policies use an apply-time implementation to affect configuration changes. You can create a policy, define settings for that policy, associate that policy with one or more servers or public folder stores, and then apply the policy. After you apply the policy, the corresponding settings that are specific to that individual object become unavailable and appear dimmed. This is because the policy, not the individual object, now controls those settings.
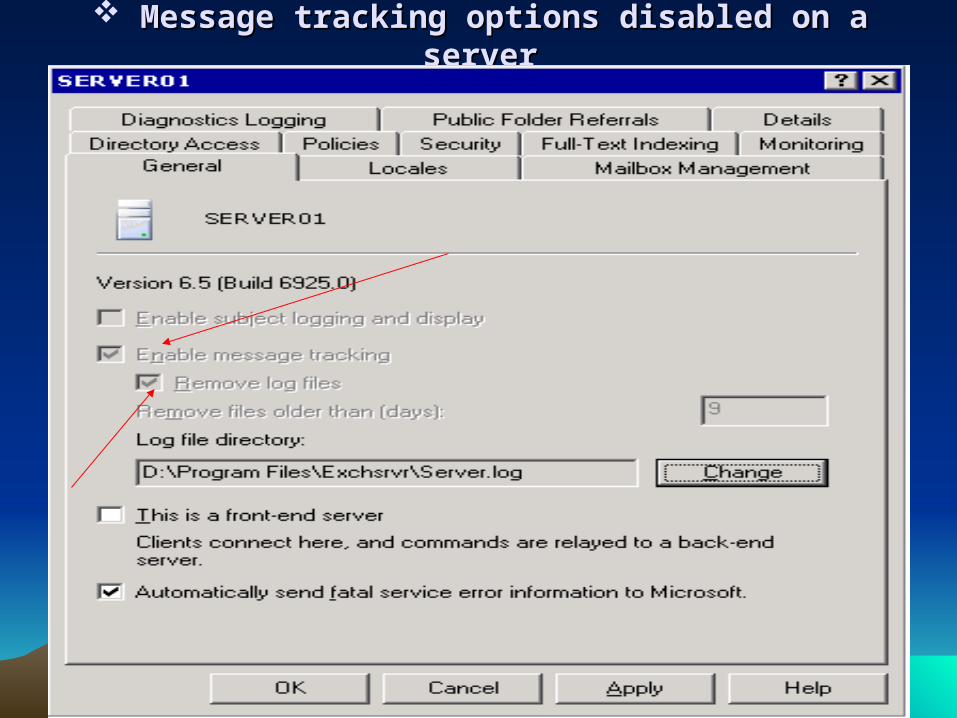
Message tracking options disabled on a serverMessage tracking options disabled on a server
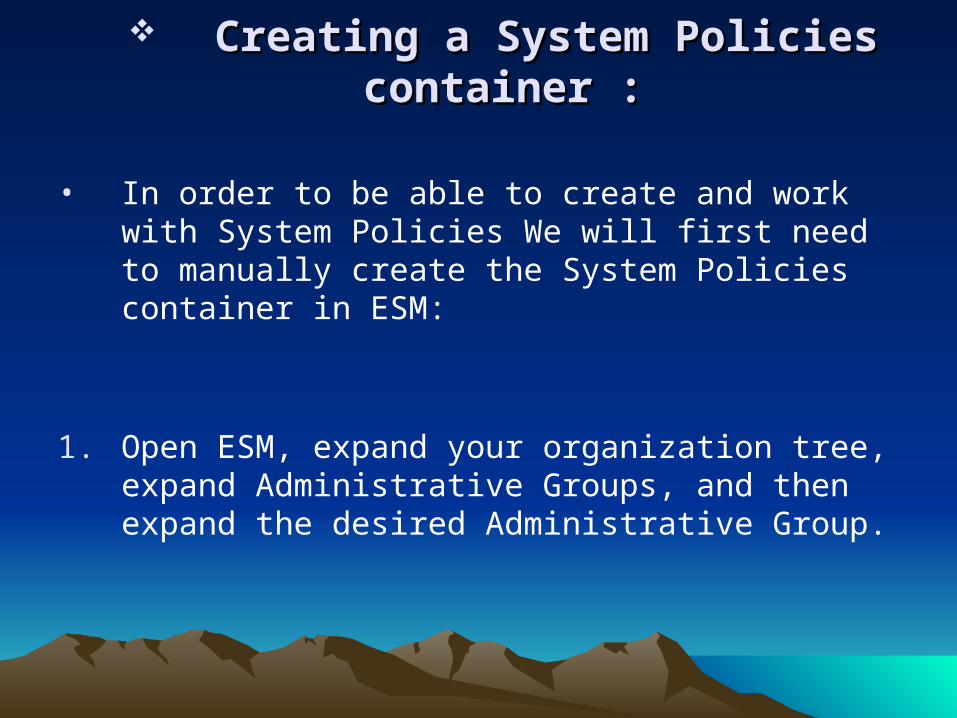
Creating a System Policies container :Creating a System Policies container :
• In order to be able to create and work with System Policies We will first need to manually create the System Policies container in ESM:
1. Open ESM, expand your organization tree, expand Administrative Groups, and then expand the desired Administrative Group.
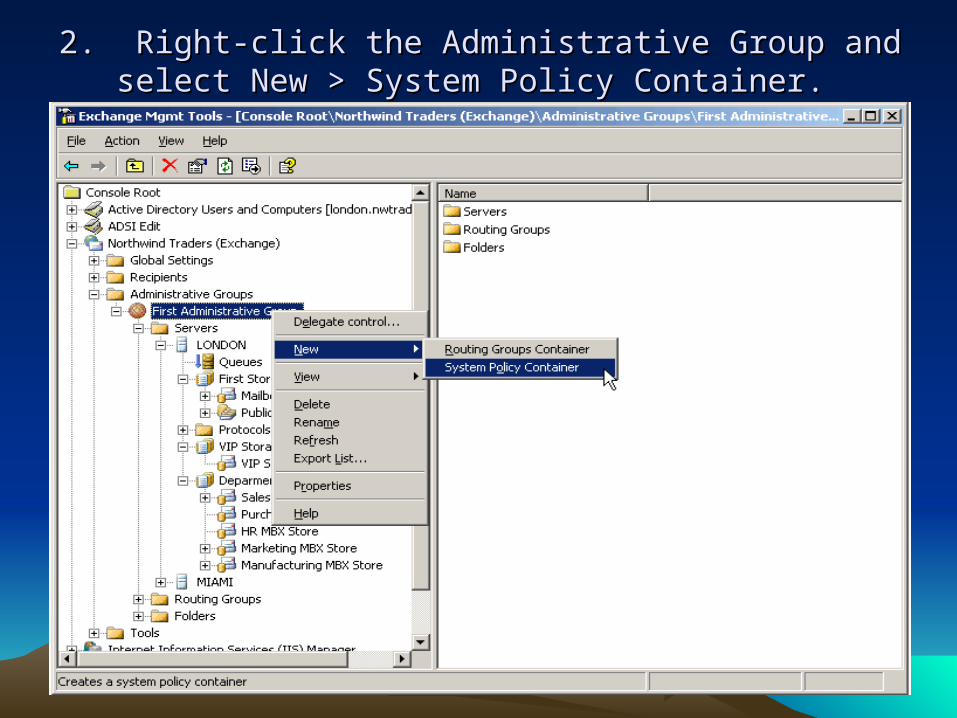
2. Right-click the Administrative Group and select New > 2. Right-click the Administrative Group and select New > System Policy Container. System Policy Container.
....
• The number of settings that can be configured on the Mailbox and Public Folder Stores varies between the store's type. Mailbox Stores have 4 property tabs, while Public Folders, that can be configured to replicate between servers, have the same 4 properties tabs, plus a 5th tab to control some replication settings .
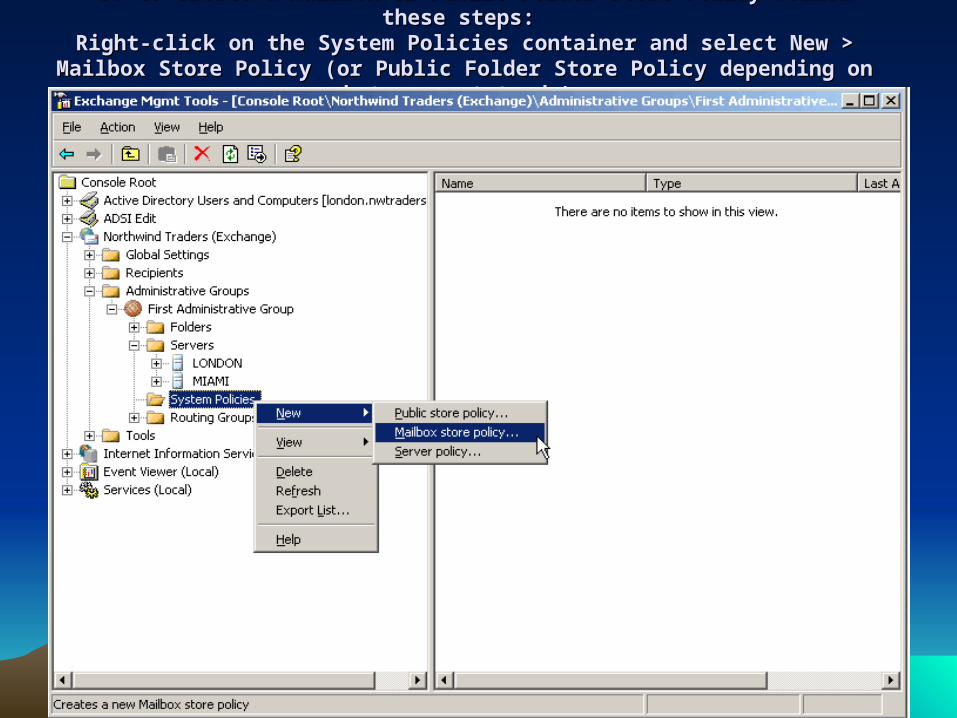
3. to create a Mailbox or Public Folder Store Policy follow these steps: 3. to create a Mailbox or Public Folder Store Policy follow these steps: Right-click on the System Policies container and select New > Mailbox Store Policy Right-click on the System Policies container and select New > Mailbox Store Policy
(or Public Folder Store Policy depending on what we want to do). (or Public Folder Store Policy depending on what we want to do).
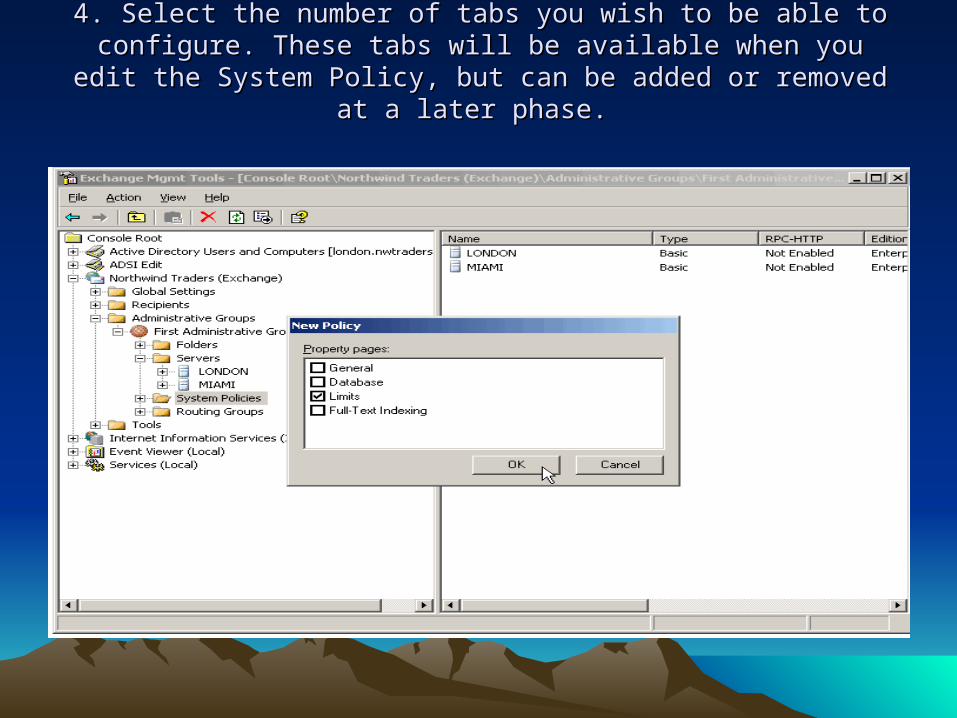
4. Select the number of tabs you wish to be able to configure. These 4. Select the number of tabs you wish to be able to configure. These tabs will be available when you edit the System Policy, but can be tabs will be available when you edit the System Policy, but can be
added or removed at a later phase. added or removed at a later phase.
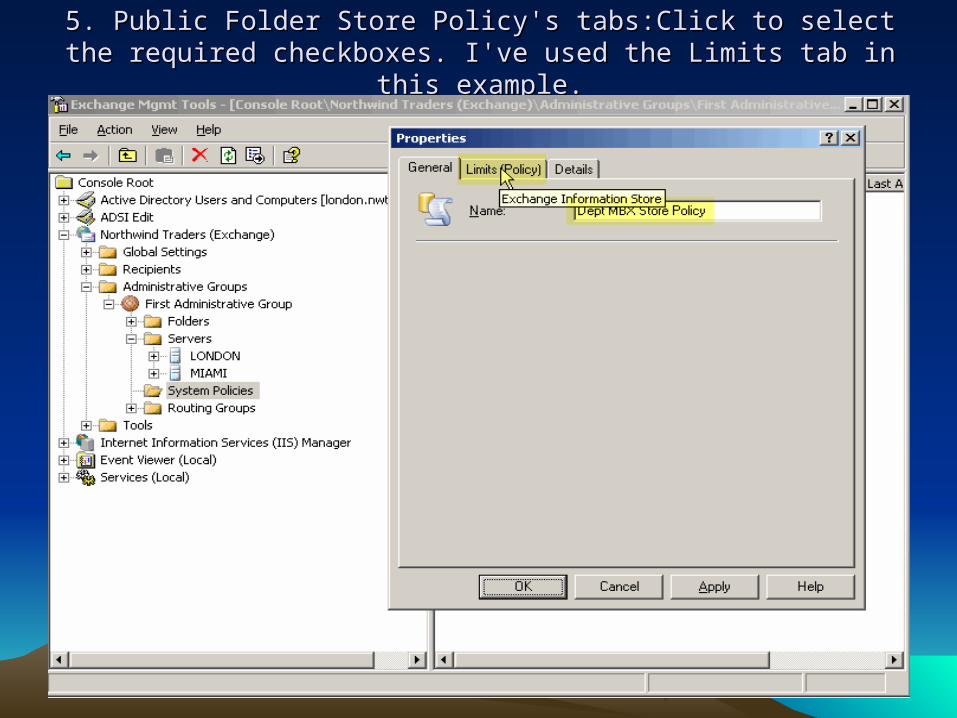
5. Public Folder Store Policy's tabs:Click to select the required 5. Public Folder Store Policy's tabs:Click to select the required checkboxes. I've used the Limits tab in this example.checkboxes. I've used the Limits tab in this example.
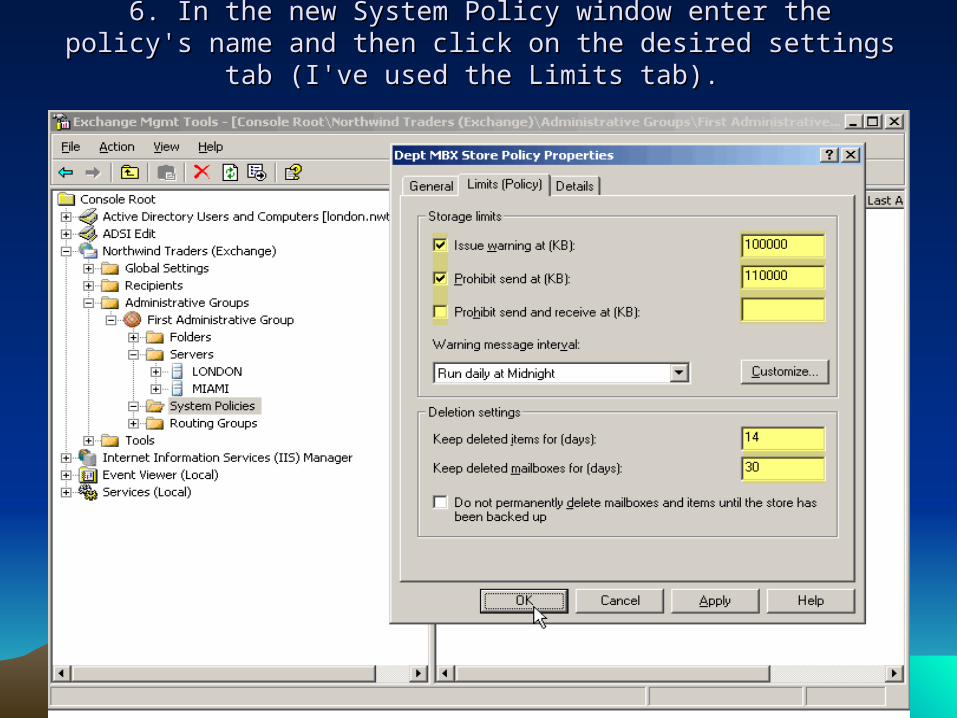
6. In the new System Policy window enter the policy's name and then 6. In the new System Policy window enter the policy's name and then click on the desired settings tab (I've used the Limits tab). click on the desired settings tab (I've used the Limits tab).
....• Note that in in this specific example, in order to set mailbox limits over 2GB you will need to manually edit the information in AD. The UI will not let you specify these sizes.
• Also note that for this specific example, the mailbox limits settings on the User Account in ADUC overwrite the same limits on the Mailbox Store and/or the Mailbox Store System Policy
When done, click Ok When done, click Ok
• Note that the new policy can be seen under the System Policies container.
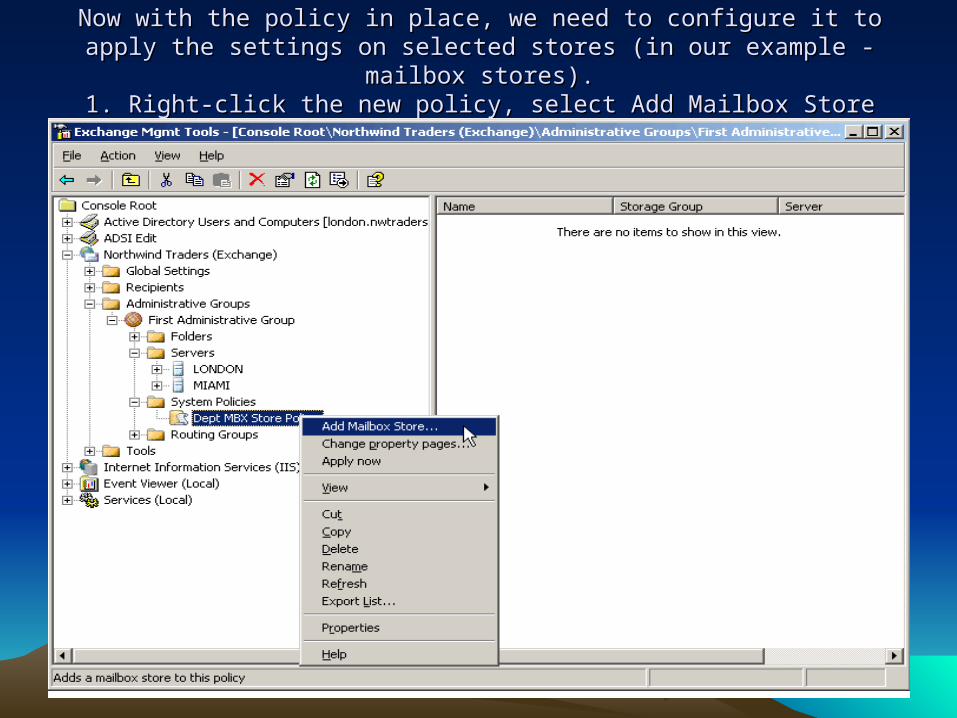
Now with the policy in place, we need to configure it to apply the settings on Now with the policy in place, we need to configure it to apply the settings on selected stores (in our example - mailbox stores).selected stores (in our example - mailbox stores).
1. Right-click the new policy, select Add Mailbox Store1. Right-click the new policy, select Add Mailbox Store
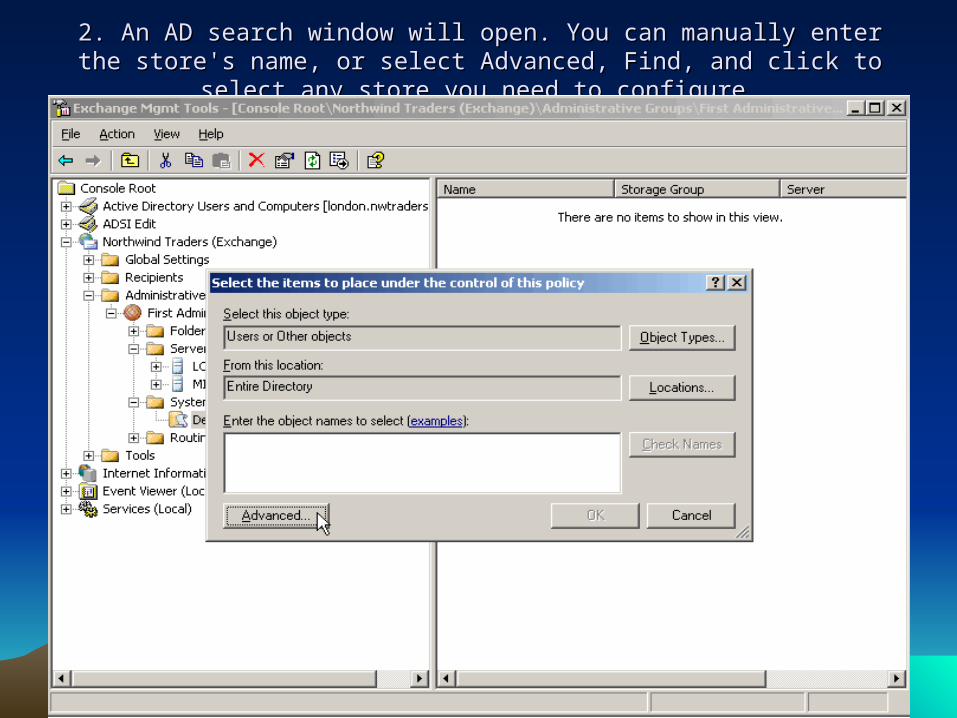
2. An AD search window will open. You can manually enter the store's name, or 2. An AD search window will open. You can manually enter the store's name, or select Advanced, Find, and click to select any store you need to configure.select Advanced, Find, and click to select any store you need to configure.
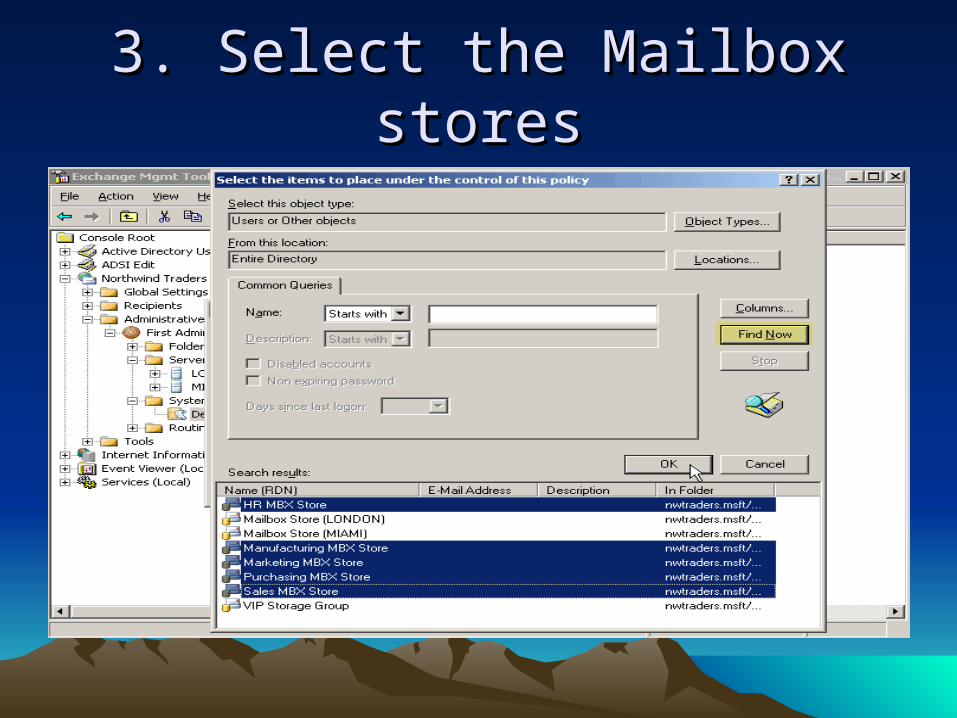
3. Select the Mailbox stores3. Select the Mailbox stores
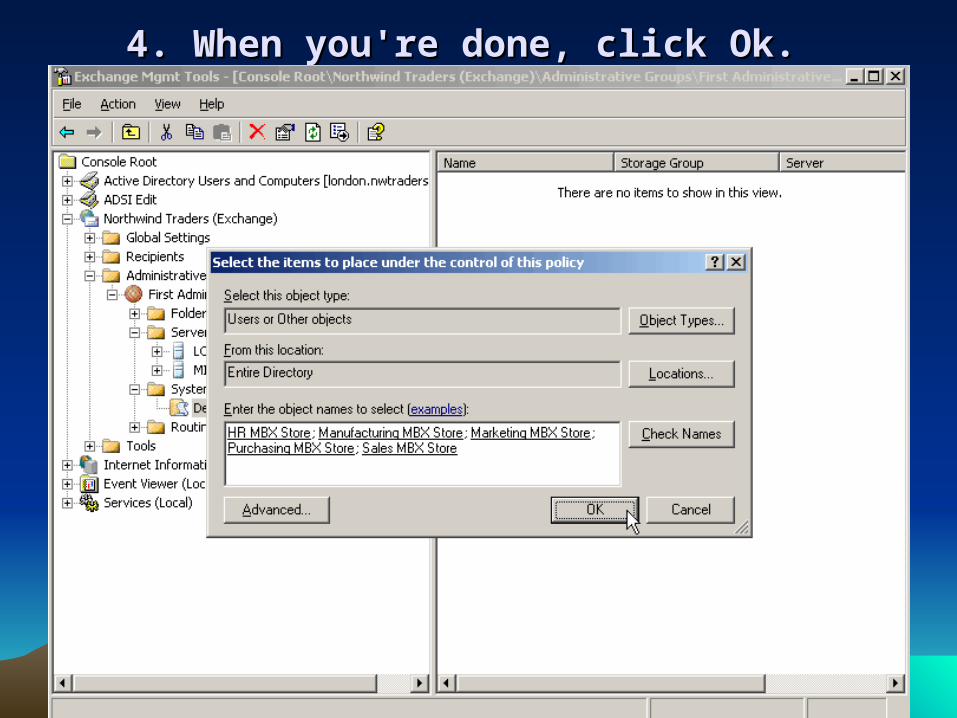
4. When you're done, click Ok. 4. When you're done, click Ok.
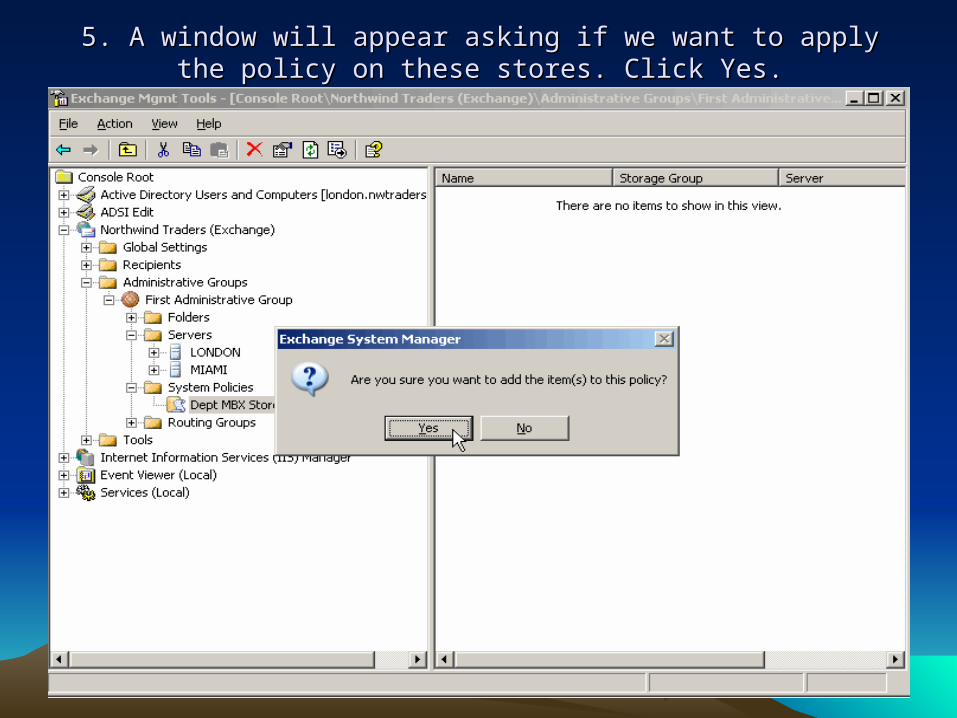
5. A window will appear asking if we want to apply the policy on these 5. A window will appear asking if we want to apply the policy on these stores. Click Yes.stores. Click Yes.
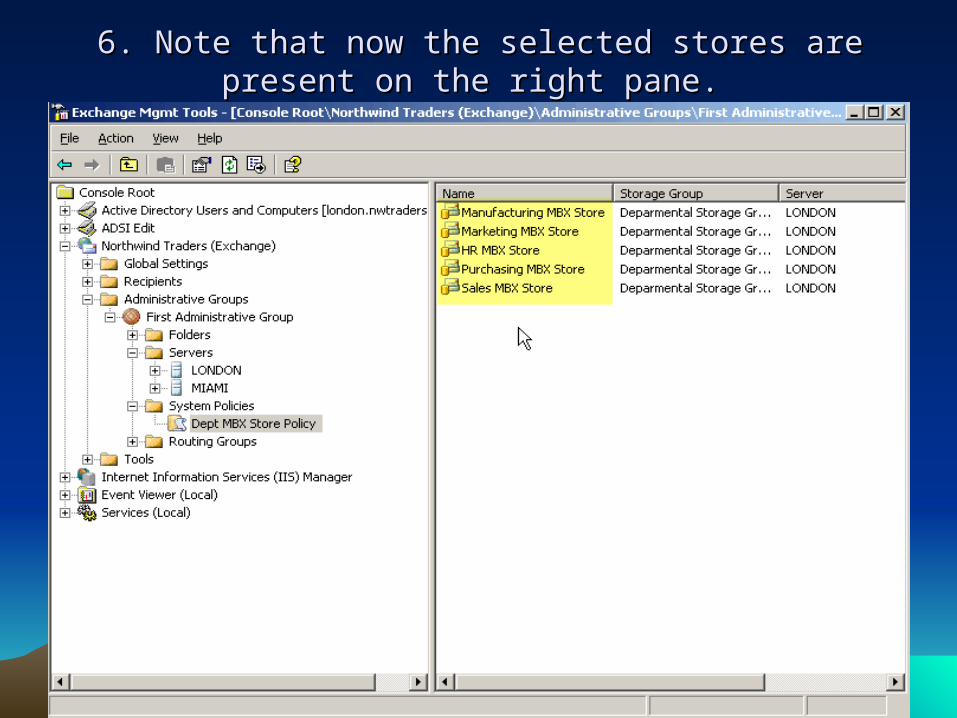
6. Note that now the selected stores are present on the 6. Note that now the selected stores are present on the right pane. right pane.
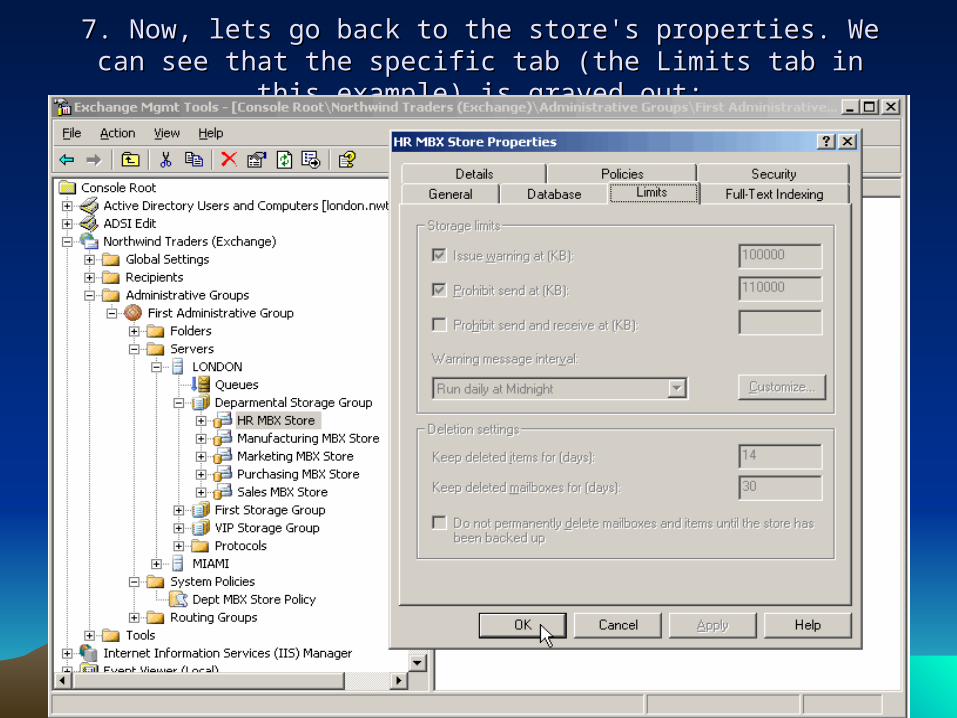
7. Now, lets go back to the store's properties. We can see that the 7. Now, lets go back to the store's properties. We can see that the specific tab (the Limits tab in this example) is grayed out:specific tab (the Limits tab in this example) is grayed out:
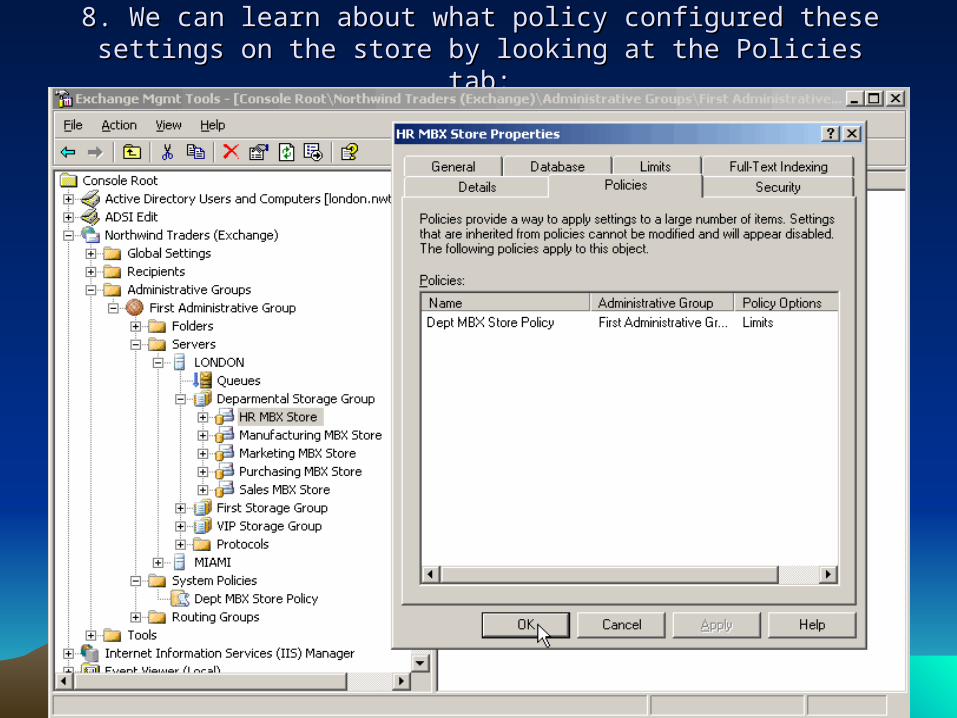
8. We can learn about what policy configured these settings on the 8. We can learn about what policy configured these settings on the store by looking at the Policies tab:store by looking at the Policies tab:
....
• We can remove selected stores from this list whenever you want them not to be under the policy's influence anymore
Configuring Exchange Server 2003 for Proactive Configuring Exchange Server 2003 for Proactive Management.Management.
Creating a new storage group and a new store Configuring resource monitoring on an Exchange server Configuring notifications by using Exchange System Manager Configuring performance logs Configuring alerts by using Performance Logs and Alerts Configuring message tracking Configuring SMTP logging Adding an SMTP virtual server Applying a hot fix
Creating a new storage group and a new storeCreating a new storage group and a new store
• The Recovery Storage Group feature in Microsoft® Exchange Server 2003 allows you to mount a second copy of an Exchange mailbox database on the same server as the original database, or on any other Exchange server in the same Exchange administrative group. This can be done while the original database is running and serving clients. This capability allows you to recover data from an older backup copy of the database without disturbing user access to current data. The recovery storage group can also be useful in various disaster recovery scenarios, most notably the Messaging Dial Tone scenario .
What is dial tone database ?What is dial tone database ?
• The dial tone database supports your users while you recover the original database. The first time that users log on to their mailbox after this database is created, Exchange creates a new, empty mailbox for them. Although the users do not have access to their previous data, they can send and receive messages normally.
• The dial tone database supports your users while you recover the original database. If you have a large Microsoft® Exchange database, it can take several hours to restore it from backup after a disaster. However, by implementing the Messaging Dial Tone strategy you can restore e-mail service more quickly to users (providing them with a basic "dial tone") and then restore users' previous data as it becomes available.
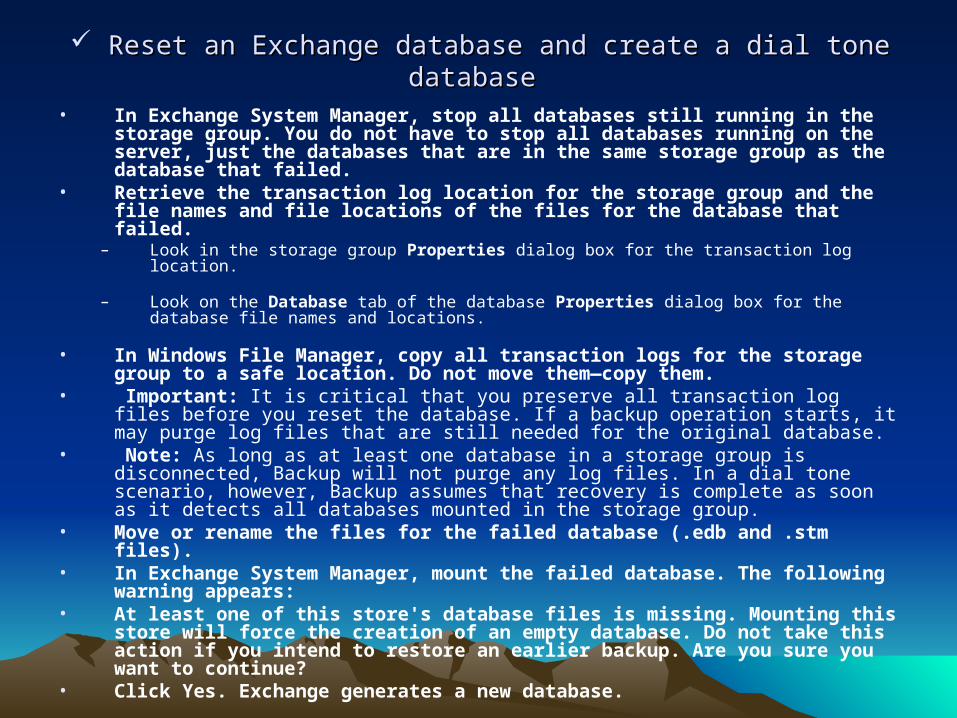
Reset an Exchange database and create a dial tone database Reset an Exchange database and create a dial tone database
• In Exchange System Manager, stop all databases still running in the storage group. You do not have to stop all databases running on the server, just the databases that are in the same storage group as the database that failed.
• Retrieve the transaction log location for the storage group and the file names and file locations of the files for the database that failed.
– Look in the storage group Properties dialog box for the transaction log location.
– Look on the Database tab of the database Properties dialog box for the database file names and locations.
• In Windows File Manager, copy all transaction logs for the storage group to a safe location. Do not move them—copy them.
• Important: It is critical that you preserve all transaction log files before you reset the database. If a backup operation starts, it may purge log files that are still needed for the original database.
• Note: As long as at least one database in a storage group is disconnected, Backup will not purge any log files. In a dial tone scenario, however, Backup assumes that recovery is complete as soon as it detects all databases mounted in the storage group.
• Move or rename the files for the failed database (.edb and .stm files).• In Exchange System Manager, mount the failed database. The following
warning appears: • At least one of this store's database files is missing. Mounting this store will
force the creation of an empty database. Do not take this action if you intend to restore an earlier backup. Are you sure you want to continue?
• Click Yes. Exchange generates a new database.
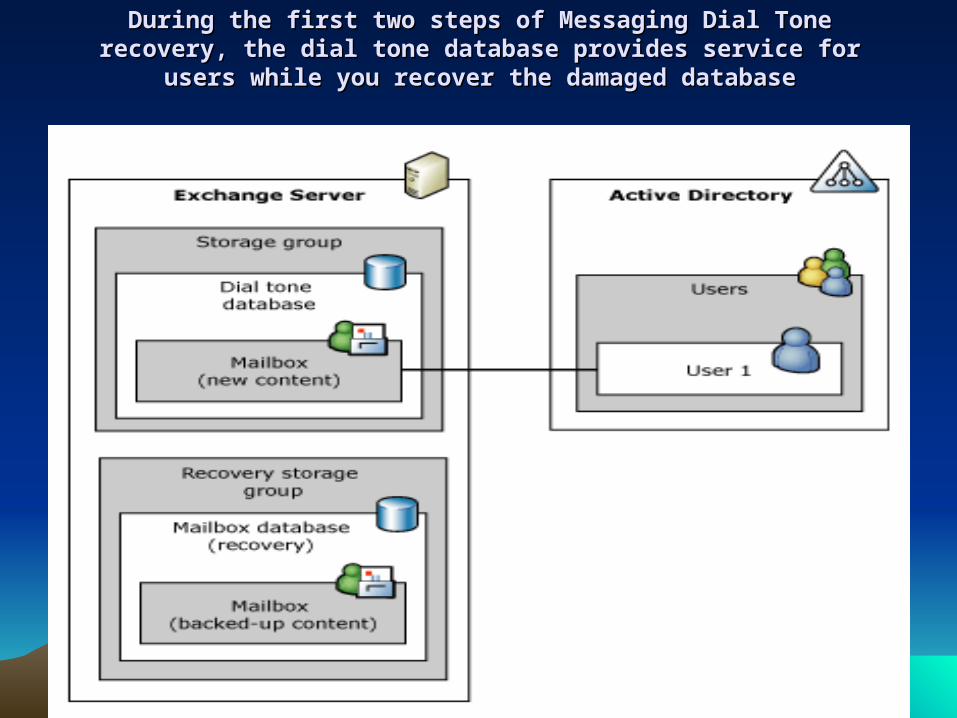
During the first two steps of Messaging Dial Tone recovery, the dial tone During the first two steps of Messaging Dial Tone recovery, the dial tone database provides service for users while you recover the damaged database provides service for users while you recover the damaged
databasedatabase
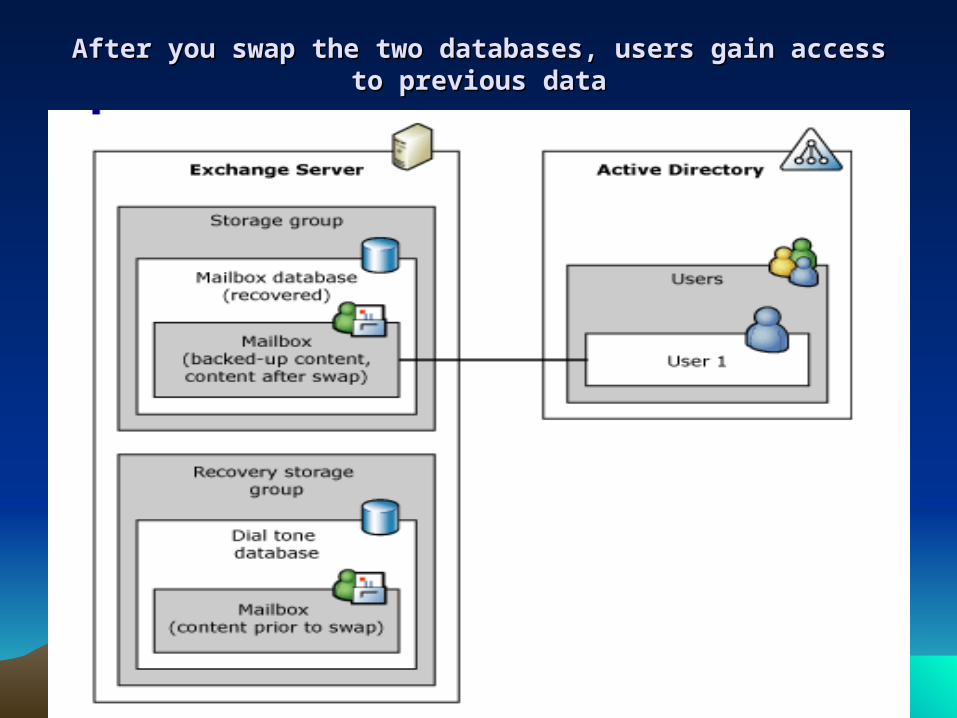
After you swap the two databases, users gain access to previous After you swap the two databases, users gain access to previous datadata
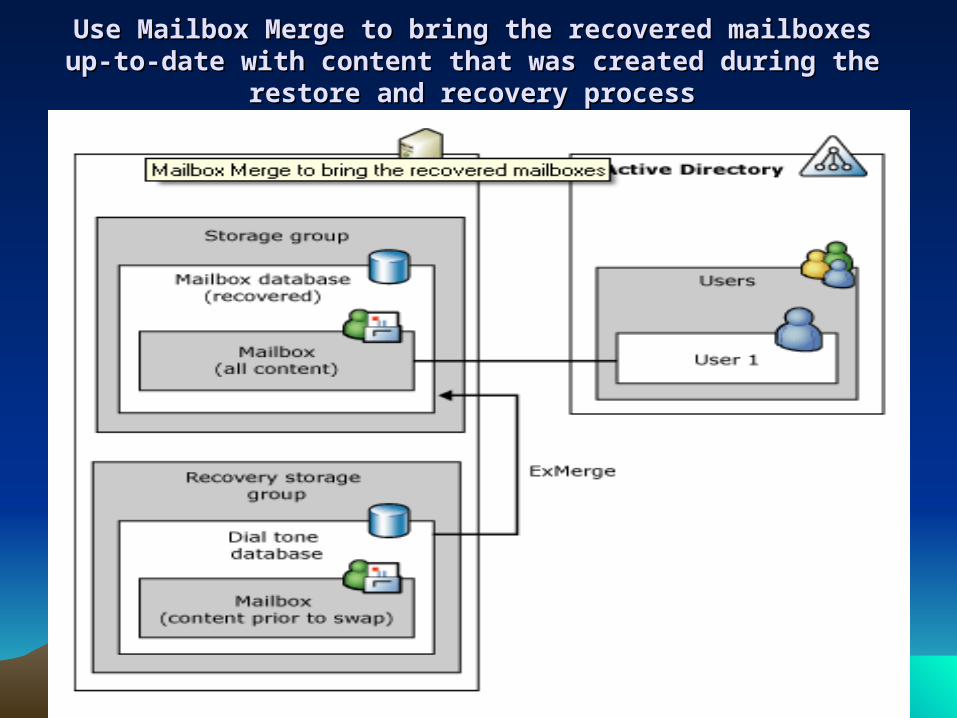
Use Mailbox Merge to bring the recovered mailboxes up-to-date Use Mailbox Merge to bring the recovered mailboxes up-to-date with content that was created during the restore and recovery with content that was created during the restore and recovery
processprocess
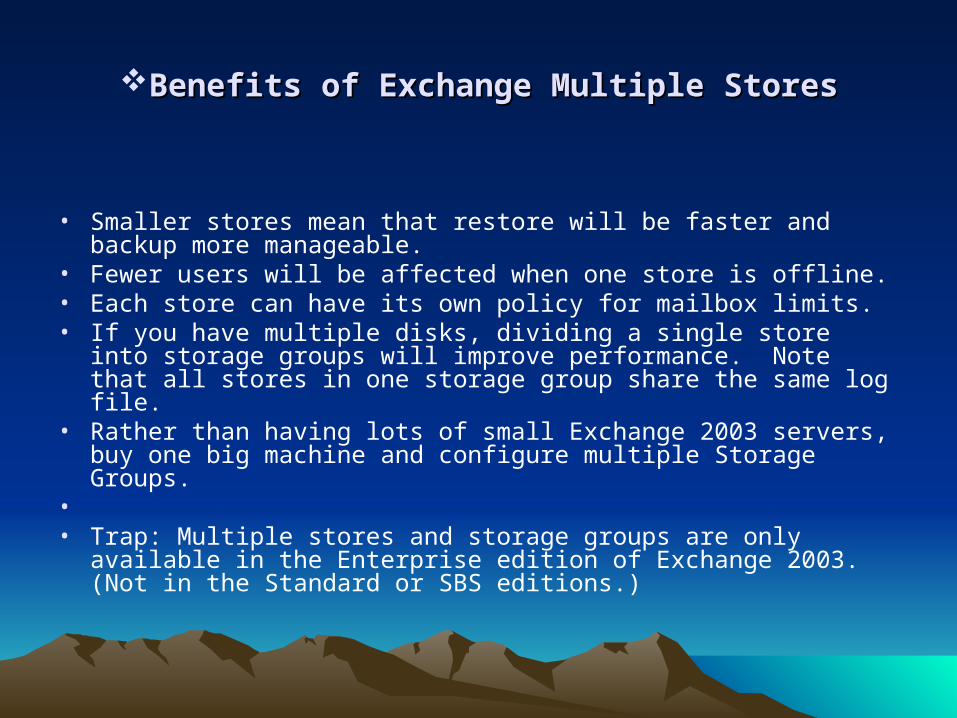
Benefits of Exchange Multiple StoresBenefits of Exchange Multiple Stores
• Smaller stores mean that restore will be faster and backup more manageable.
• Fewer users will be affected when one store is offline. • Each store can have its own policy for mailbox limits. • If you have multiple disks, dividing a single store into storage groups
will improve performance. Note that all stores in one storage group share the same log file.
• Rather than having lots of small Exchange 2003 servers, buy one big machine and configure multiple Storage Groups.
• • Trap: Multiple stores and storage groups are only available in the
Enterprise edition of Exchange 2003. (Not in the Standard or SBS editions.)
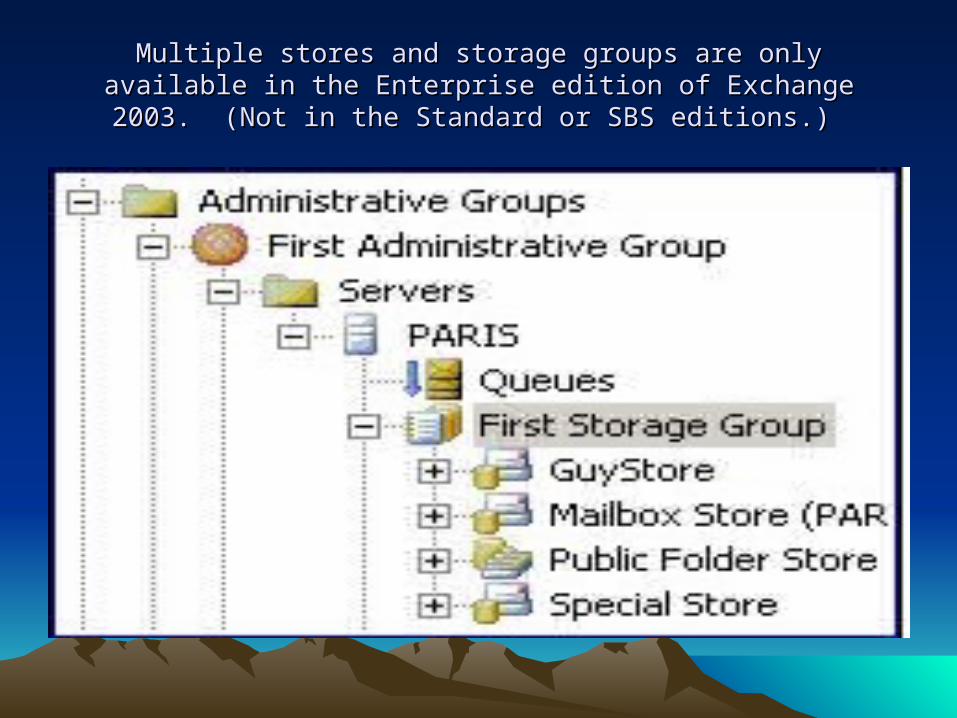
Multiple stores and storage groups are only available in the Enterprise Multiple stores and storage groups are only available in the Enterprise edition of Exchange 2003. (Not in the Standard or SBS editions.) edition of Exchange 2003. (Not in the Standard or SBS editions.)
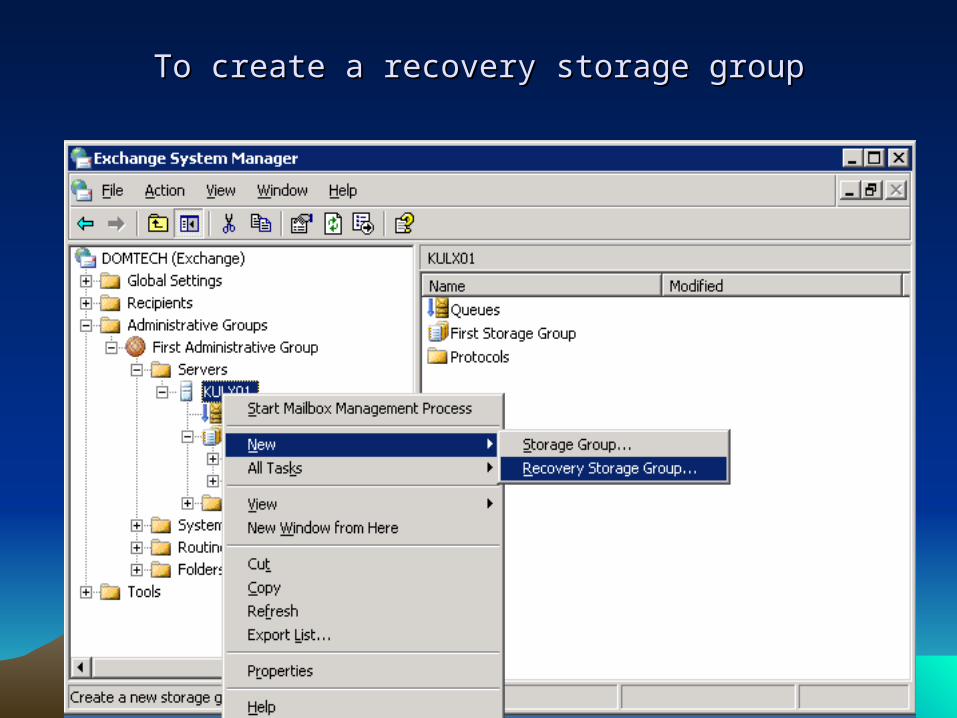
To create a recovery storage groupTo create a recovery storage group
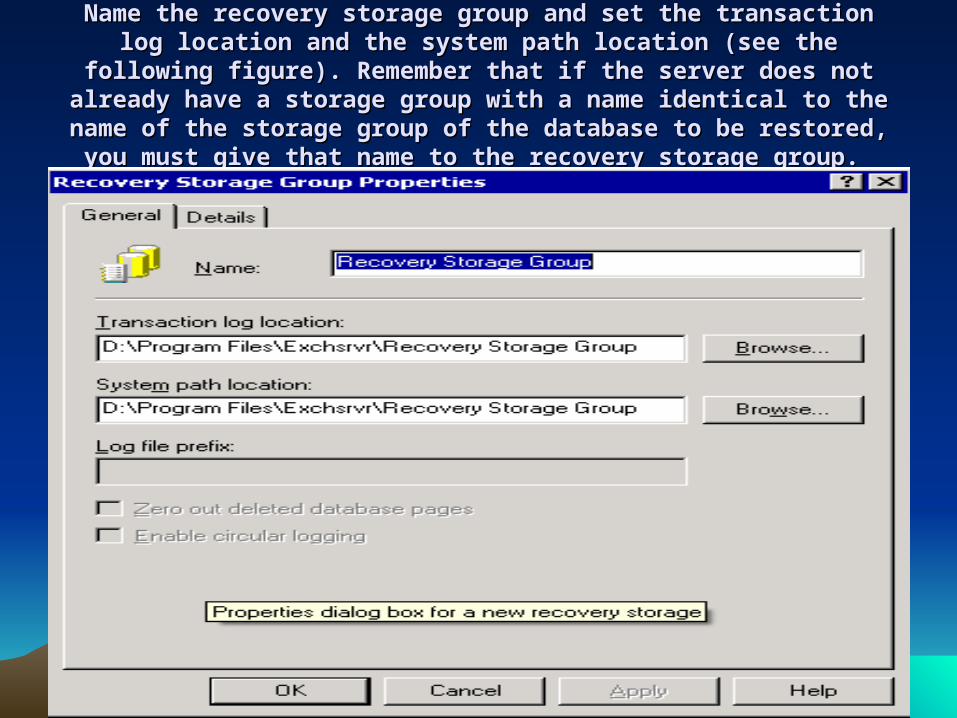
Name the recovery storage group and set the transaction log location and Name the recovery storage group and set the transaction log location and the system path location (see the following figure). Remember that if the the system path location (see the following figure). Remember that if the
server does not already have a storage group with a name identical to the server does not already have a storage group with a name identical to the name of the storage group of the database to be restored, you must give name of the storage group of the database to be restored, you must give
that name to the recovery storage group.that name to the recovery storage group.

How to Add Databases to Be How to Add Databases to Be Restored Restored
• In Exchange System Manager, find the server on which you created the recovery storage group, right-click the recovery storage group and then click Add Database to Recover.
• Exchange automatically determines which databases can be added to the recovery storage group and presents you with a list from which to choose.
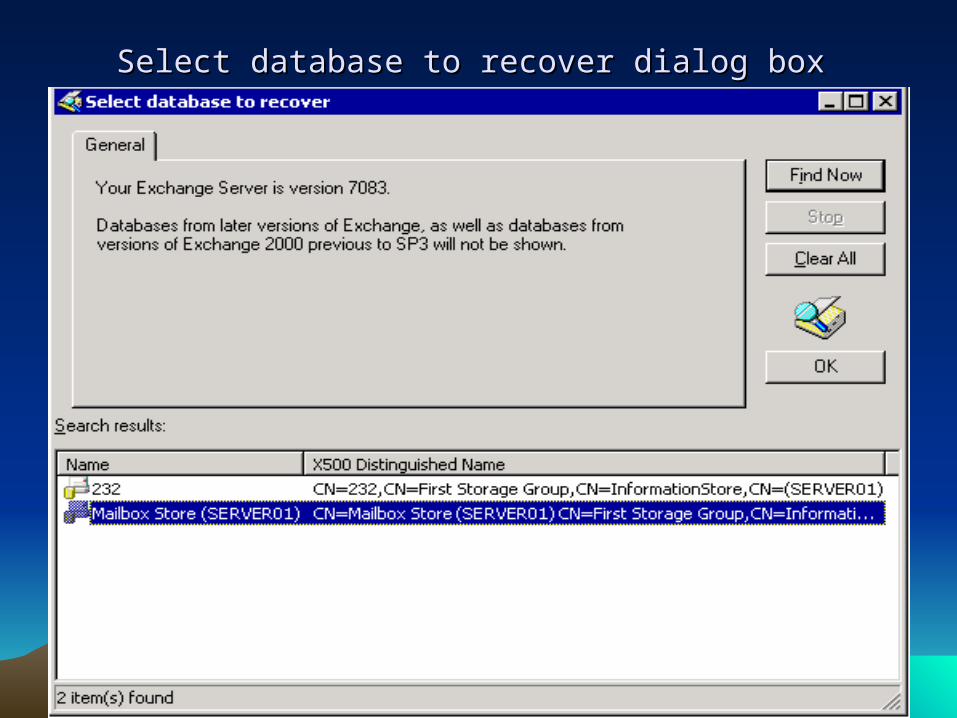
Select database to recover dialog box Select database to recover dialog box
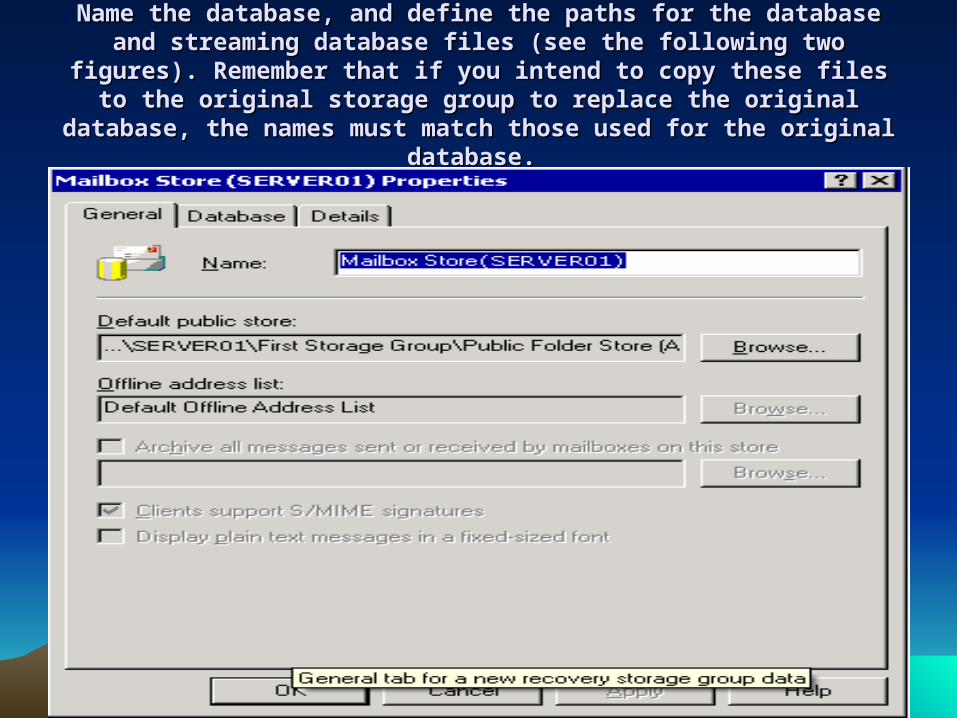
Name the database, and define the paths for the database and streaming Name the database, and define the paths for the database and streaming database files (see the following two figures). Remember that if you database files (see the following two figures). Remember that if you
intend to copy these files to the original storage group to replace the intend to copy these files to the original storage group to replace the original database, the names must match those used for the original original database, the names must match those used for the original
database.database.
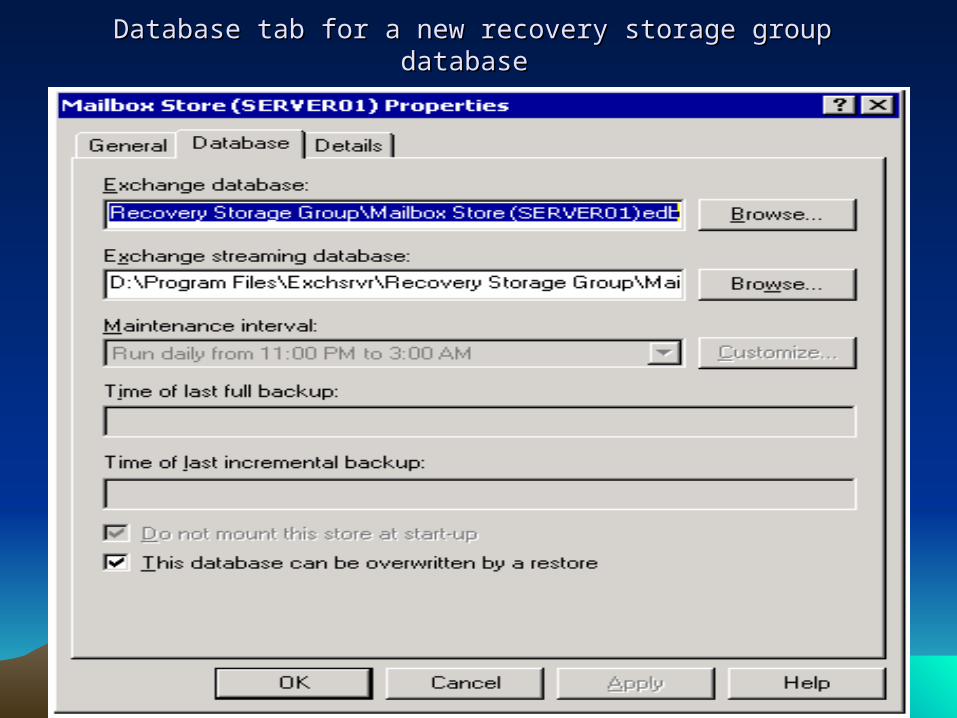
Database tab for a new recovery storage group database Database tab for a new recovery storage group database
Configuring resource monitoring on an Exchange serverConfiguring resource monitoring on an Exchange server
• To Be Continued…. ….