Embed Size (px)
Citation preview
Welcome to CircuitPython!Created by Kattni Rembor
Last updated on 2018-07-16 06:11:05 PM UTC
255
666
8889
1111
111112
1319192121
212222
2222232323
2424252526273033353536363738
38
Guide Contents
Guide ContentsOverview
This guide will get you started with CircuitPython!
What is CircuitPython?CircuitPython is based on Python
Why would I use CircuitPython?
Installing CircuitPythonDownload the latest version!Windows 7 DriversStart the UF2 BootloaderInstalling Mu Editor
Installing Mu for Windows or Mac OS X
Installing Mu for LinuxUsing Mu
Mu Packages
PyCharm and CircuitPythonCreating and Editing Code
Creating CodeEditing Code
Your code changes are run as soon as the file is done saving.
1. Use an editor that writes out the file completely when you save it.2. Eject or Sync the Drive After WritingOh No I Did Something Wrong and Now The CIRCUITPY Drive Doesn't Show Up!!!
Back to Editing Code...Exploring Your First CircuitPython Program
Imports & LibrariesSetting Up The LEDLoop-de-loops
More ChangesNaming Your Program FileConnecting to the Serial ConsoleAre you using Mu?Using Something Else?Interacting with the Serial ConsoleThe REPLReturning to the serial consoleCircuitPython Hardware
Trinket M0Gemma M0Circuit Playground ExpressFeather M0 ExpressMetro M0 Express
What's Next?
© Adafruit Industries https://learn.adafruit.com/welcome-to-circuitpython Page 2 of 72
39394041414242
4343444546
48484848494949
505052525253555557586060
60616363636363636464
6666666666
CircuitPython LibrariesInstalling the CircuitPython Library BundleExpress BoardsNon-Express BoardsExample: ImportError Due to Missing LibraryLibrary Install on Non-Express BoardsUpdating CircuitPython Libraries
Welcome to the Community!Adafruit DiscordAdafruit ForumsAdafruit GithubReadTheDocs
CircuitPython for ESP8266Installing CircuitPython on the ESP8266
Download esptoolDownload Latest CircuitPython FirmwareGet ESP8266 Ready For BootloadingErase ESP8266Program ESP8266
Upload Libraries & Files Using Ampy!Other Stuff To Know!Advanced Serial Console on WindowsWindows 7 DriverWhat's the COM?Install PuttyAdvanced Serial Console on Mac and LinuxWhat's the Port?Connect with screenPermissions on LinuxUninstalling CircuitPython
Backup Your Code
Moving to MakeCodeMoving to ArduinoNon-UF2 Installation
Flashing with Bossac - For Non-Express Feather M0's & Arduino ZeroCommand-Line ahoy!Download Latest CircuitPython FirmwareDownload BOSSATest bossacGet Into the BootloaderRun bossac command
TroubleshootingCPLAYBOOT, TRINKETBOOT, FEATHERBOOT, or GEMMABOOT Drive Not Present
You may have a different board.MakeCodeWindows 10
© Adafruit Industries https://learn.adafruit.com/welcome-to-circuitpython Page 3 of 72
66
6767686869
69
69707070707171
Windows 7
CircuitPython RGB Status LightCIRCUITPY Drive Issues
Easiest Way: Use storage.erase_filesystem()Old Way: For the Circuit Playground Express, Feather M0 Express, and Metro M0 Express:Old Way: For Non-Express Boards with a UF2 bootloader (Gemma M0, Trinket M0):Old Way: For non-Express Boards without a UF2 bootloader (Feather M0 Basic Proto, Feather Adalogger,Arduino Zero):
Running Out of File Space on Non-Express BoardsDelete something!Use tabsMac OSX loves to add extra files.Prevent & Remove Mac OSX Hidden FilesCopy Files on Mac OSX Without Creating Hidden FilesOther Mac OSX Space-Saving Tips
© Adafruit Industries https://learn.adafruit.com/welcome-to-circuitpython Page 4 of 72

Overview
So, you've got this new CircuitPython compatible board. You plugged it in. Maybe it showed up as a disk drive calledCIRCUITPY. Maybe it didn't! Either way, you need to know where to go from here. Well, we've got you covered!
This guide will get you started with CircuitPython!
There are many amazing things about your new board. One of them is the ability to run CircuitPython. You may haveseen that name on the Adafruit site somewhere. Not sure what it is? We can help!
"But I've never coded in my life. There's no way I do it!" You absolutely can! CircuitPython is designed to help you learnfrom the ground up. If you're new to everything, this is the place to start!
This guide will walk you through how to get started with CircuitPython. You'll learn how to install CircuitPython, getupdated to the newest version of CircuitPython, how to setup a serial connection, and how to edit the files.
Welcome to CircuitPython!
© Adafruit Industries https://learn.adafruit.com/welcome-to-circuitpython Page 5 of 72

What is CircuitPython?CircuitPython is a programming language designed to simplify experimenting and learning to program on low-costmicrocontroller boards. It makes getting started easier than ever with no upfront desktop downloads needed. Onceyou get your board set up, open any text editor, and get started editing code. It's that simple.
CircuitPython is based on Python
Python is the fastest growing programming language. It's taught in schools and universities. It's a high-levelprogramming language which means it's designed to be easier to read, write and maintain. It supports modules andpackages which means it's easy to reuse your code for other projects. It has a built in interpreter which means thereare no extra steps, like compiling, to get your code to work. And of course, Python is Open Source Software whichmeans it's free for anyone to use, modify or improve upon.
CircuitPython adds hardware support to all of these amazing features. If you already have Python knowledge, you caneasily apply that to using CircuitPython. If you have no previous experience, it's really simple to get started!
Why would I use CircuitPython?
CircuitPython is designed to run on microcontroller boards. A microcontroller board is a board with a microcontrollerchip that's essentially an itty-bitty all-in-one computer. The board you're holding is a microcontroller board!CircuitPython is easy to use because all you need is that little board, a USB cable, and a computer with a USBconnection. But that's only the beginning.
Other reasons to use CircuitPython include:
You want to get up and running quickly. Create a file, edit your code, save the file, and it runs immediately. There
© Adafruit Industries https://learn.adafruit.com/welcome-to-circuitpython Page 6 of 72

is no compiling, no downloading and no uploading needed.You're new to programming. CircuitPython is designed with education in mind. It's easy to start learning how toprogram and you get immediate feedback from the board.Easily update your code. Since your code lives on the disk drive, you can edit it whenever you like, you can alsokeep multiple files around for easy experimentation.The serial console and REPL. These allow for live feedback from your code and interactive programming.File storage. The internal storage for CircuitPython makes it great for data-logging, playing audio clips, andotherwise interacting with files.Strong hardware support. There are many libraries and drivers for sensors, breakout boards and other externalcomponents.It's Python! Python is the fastest-growing programming language. It's taught in schools and universities.CircuitPython is almost-completely compatible with Python. It simply adds hardware support.
This is just the beginning. CircuitPython continues to evolve, and is constantly being updated. We welcome andencourage feedback from the community, and we incorporate this into how we are developing CircuitPython. That'sthe core of the open source concept. This makes CircuitPython better for you and everyone who uses it!
© Adafruit Industries https://learn.adafruit.com/welcome-to-circuitpython Page 7 of 72

Installing CircuitPythonSome of the CircuitPython compatible boards come with CircuitPython installed. Others are CircuitPython-ready, butneed to have it installed. As well, you may want to update the version of CircuitPython already installed on your board.The steps are the same for installing and updating. Here we will cover how to install or update CircuitPython on yourboard.
Download the latest version!
The first thing you'll want to do is download the most recent version of CircuitPython.
https://adafru.it/vlF
https://adafru.it/vlF
Scroll down to the list of CircuitPython files, and choose the file appropriate to your board. Each file includes the nameof the board it's compatible with. Download the file for your board.
Next, you'll want to plug in your board using a known-good USB data cable. Make sure the USB cable is a data cable!There are some that work only for charging and can lead to a lot of frustration.
Windows 7 Drivers
If you're using Windows 7, use the link below to download the driver package. You will not need to install drivers onMac, Linux or Windows 10.
https://adafru.it/AB0
You only have to install CircuitPython ONCE, after that you are free to code all you like without going throughthis process again until you want to upgrade!
If you're using Windows 7, you need to install a driver before plugging in your board.
© Adafruit Industries https://learn.adafruit.com/welcome-to-circuitpython Page 8 of 72

https://adafru.it/AB0
Start the UF2 Bootloader
Nearly all CircuitPython boards ship with a bootloader called UF2 (USB Flasher version 2) that makes installing andupdating CircuitPython a quick and easy process. The bootloader is the mode your board needs to be in for theCircuitPython .uf2 file you downloaded to work. If the file you downloaded that matches the board name ends in uf2then you want to continue with this section. However, if the file ends in .bin then you have to do a more complexinstallation - go to this page for how to do that. (https://adafru.it/Bed)
Find the reset button on your board. It's a small, black button, and on most of the boards, it will be the only buttonavailable. (On Circuit Playground Express, it's the smaller button located in the center of the board.)
Tap this button twice to enter the bootloader. If it doesn't work on the first try, don't be discouraged. The rhythm of thetaps needs to be correct and sometimes it takes a few tries. If you have a Circuit Playground Express, and it's fresh-out-of-the-bag try pressing the button once.
Once successful, the RGB LED on the board will flash red and then stay green. A new drive will show up on yourcomputer. The drive will be called boardnameBOOT where boardname is a reference to your specific board. Forexample, a Feather will have FEATHERBOOT and a Trinket will have TRINKETBOOT etc. Going forward we'll just callthe boot drive BOOT
The board is now in bootloader mode! This is what we need to install or update CircuitPython.
Now find the file you downloaded. Drag that file to the BOOT drive on your computer.
© Adafruit Industries https://learn.adafruit.com/welcome-to-circuitpython Page 9 of 72

The lights should flash again, BOOT will disappear and a new drive will show up on your computer called CIRCUITPY .
Congratulations! You've successfully installed or updated CircuitPython!
© Adafruit Industries https://learn.adafruit.com/welcome-to-circuitpython Page 10 of 72

Installing Mu EditorMu is a simple code editor that works with the Adafruit CircuitPython boards. It's written in Python and works onWindows, MacOS, Linux and Raspberry Pi. The serial console is built right in so you get immediate feedback from yourboard's serial output!
Installing Mu for Windows or Mac OS X
To install Mu for Windows or Mac OS X, head over to the Download Mu (https://adafru.it/BI8) page and follow theinstructions.
It's that simple!
Installing Mu for Linux
Each Linux distro is a little different, so use this as a guideline!
1. Mu require python version 3. If you haven't installed python yet, do so via your command line using somethinglike sudo apt-get install python3
2. You'll also need pip3 (or pip if you only have python3 installed) - try running pip3 --version . If that didn't work, youran sudo apt-get install python3-pip
3. Finally, run pip3 install mu_editor
4. You can now run mu directly from the command line
You can also follow the instructions found here to install Mu using Python (https://adafru.it/BI9) and install Mu on aRaspberry Pi (https://adafru.it/BIb).
Using Mu
The first time you start Mu, you will be prompted to
select your 'mode' - you can always change your mind
later. For now please select Adafruit!
The current mode is displayed in the lower right corner
of the window, next to the "gear" icon. If the mode says
"Microbit" or something else, click on that and then
choose "Adafruit" in the dialog box that appears.
Mu is our recommended editor - please use it (unless you are an experienced coder with a favorite editoralready!)
© Adafruit Industries https://learn.adafruit.com/welcome-to-circuitpython Page 11 of 72

Mu attempts to auto-detect your board, so please plug
in your CircuitPython device and make sure it shows up
as a CIRCUITPY drive before starting Mu
Now you're ready to code! Lets keep going....
Mu Packages
Mu is currently being developed. So there are lots of changes being made! Current versions are available from links atthe bottom of this page (https://adafru.it/Be5). However, use at your own risk! These are not stable versions and comewith no guarantees of working.
© Adafruit Industries https://learn.adafruit.com/welcome-to-circuitpython Page 12 of 72

PyCharm and CircuitPythonPyCharm (https://adafru.it/xNC) is a full featured Python editor including super helpful things like code completion anderror highlighting. It's available for free in a Community Edition.
Recently, they added a MicroPython plugin (https://adafru.it/Bex) that enables use of the REPL from within the editor.CircuitPython isn't officially supported, however we have some steps to make it work!
Download (https://adafru.it/Bey) and install PyCharm on your computer. Then, plug in your board and follow the stepsbelow!
Create a new project or open an existing project.
© Adafruit Industries https://learn.adafruit.com/welcome-to-circuitpython Page 13 of 72
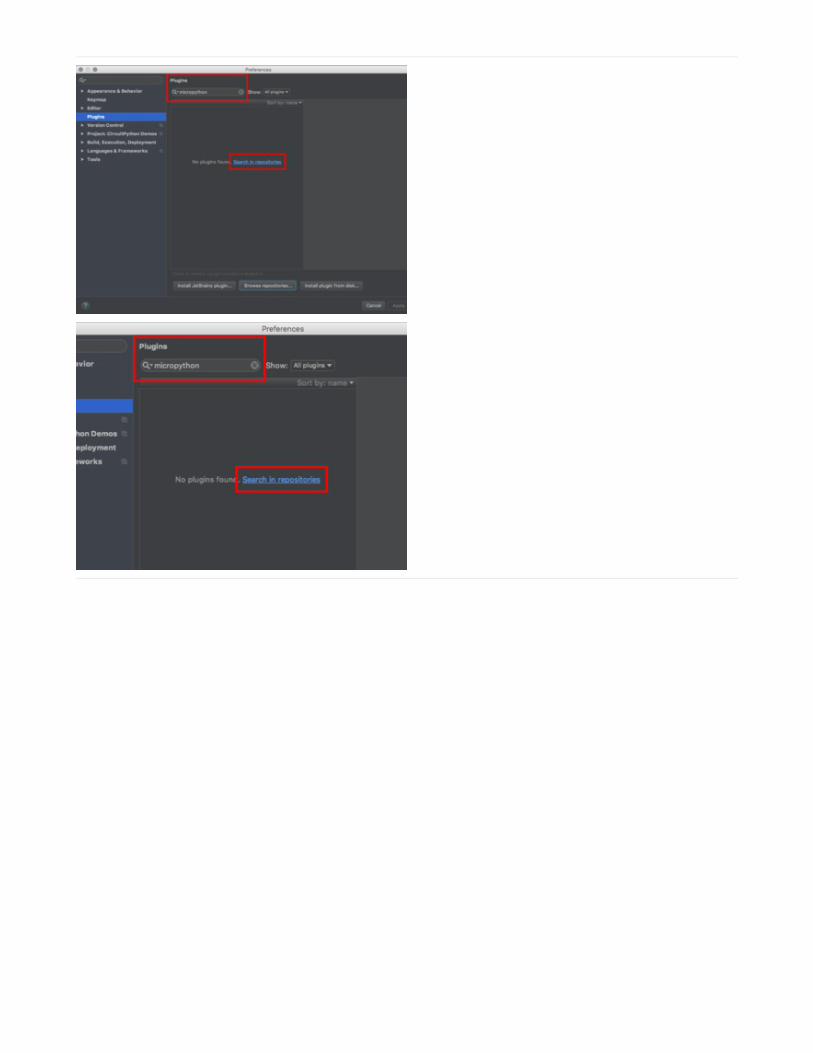
Open PyCharm Preferences/Settings. Click on Plugins
and search for "micropython". Click on Search in
repositories.
© Adafruit Industries https://learn.adafruit.com/welcome-to-circuitpython Page 14 of 72
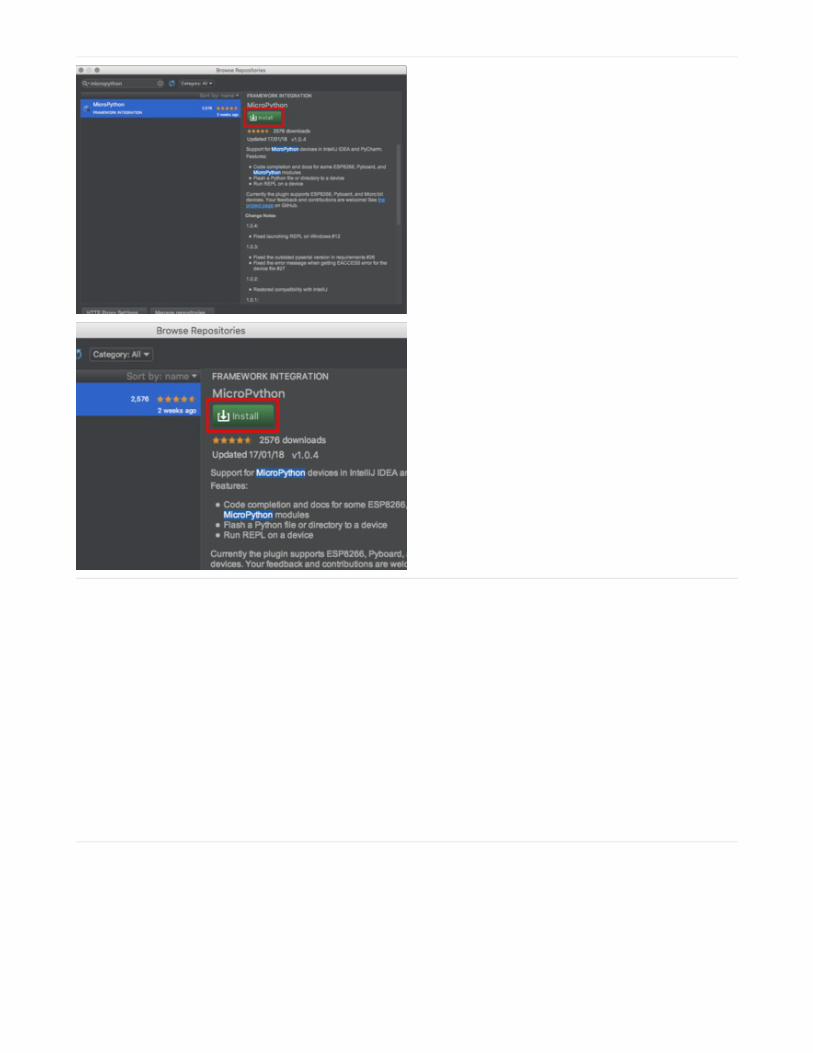
Click Install.
Once it's finished installing, click Restart PyCharm.
© Adafruit Industries https://learn.adafruit.com/welcome-to-circuitpython Page 15 of 72
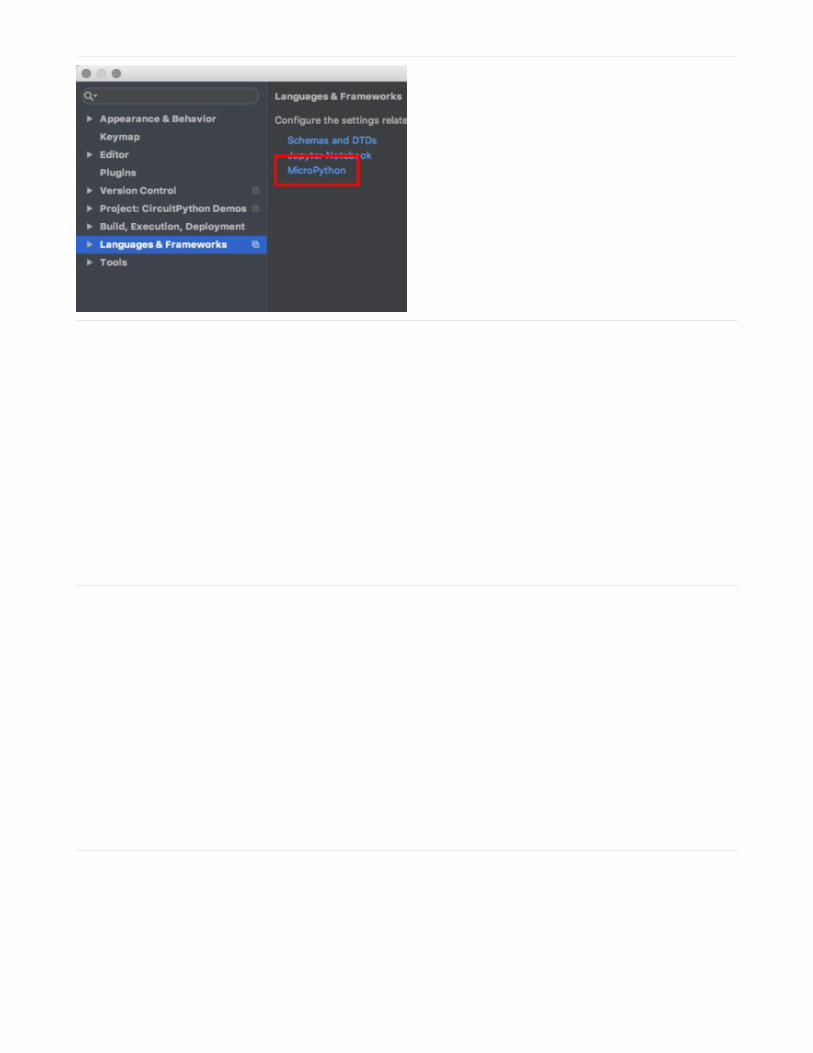
Once restarted, open Preferences/Settings. Click on
Languages & Frameworks and choose MicroPython.
Choose your project directory from the list.
Choose ESP8266 from the list of Device Names.
For now, you'll use this option regardless of what board
you are using.
© Adafruit Industries https://learn.adafruit.com/welcome-to-circuitpython Page 16 of 72
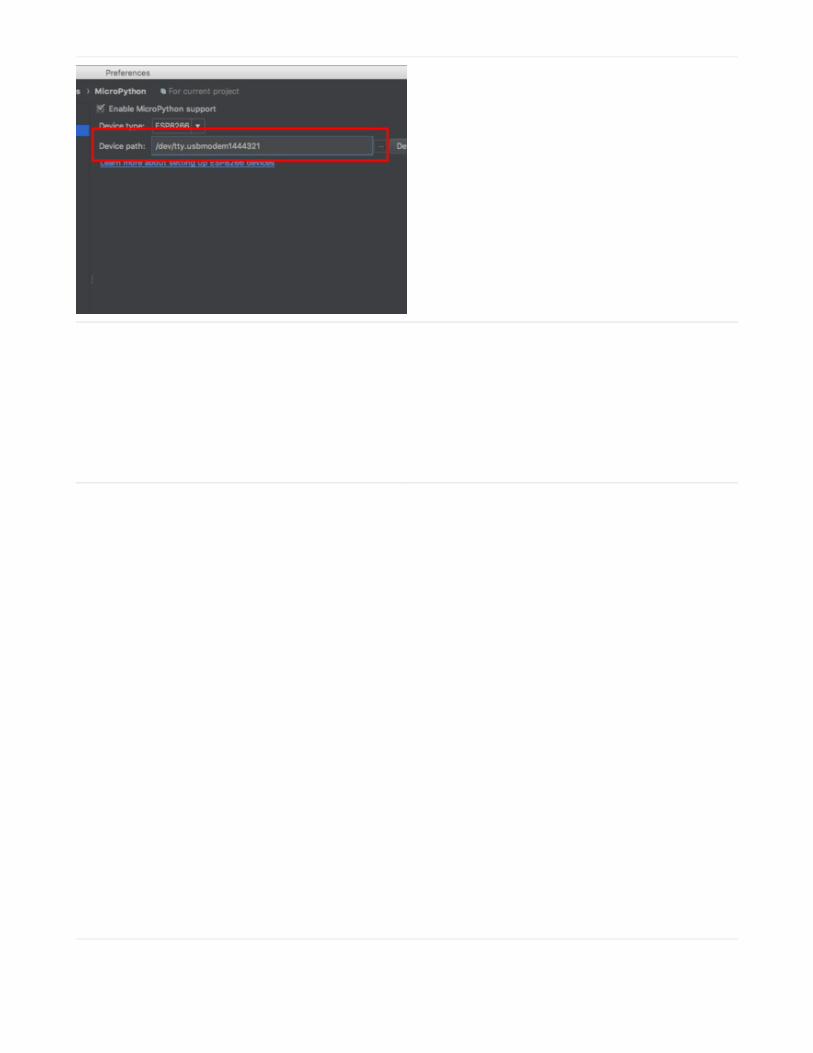
You'll need to manually add your Device Path. This is
the path to your serial connection. Once entered, click
Ok.
If you need help finding your device's serial connection,
see Advanced Serial Console on
Windows (https://adafru.it/AAH) and Advanced Serial
Console on Mac and Linux (https://adafru.it/AAI).
Now, open any Python file from the project directory you
chose.
A message may pop up stating, "Packages required for
ESP8266 support not found," followed by a list of
packages. Click Install Requirements on this message to
install the required packages.
Now, you can click on the Tools menu and you should
find a MicroPython menu. Highlight this, and you'll find
MicroPython REPL available.
© Adafruit Industries https://learn.adafruit.com/welcome-to-circuitpython Page 17 of 72

The REPL will open at the bottom of the PyCharm
window. Now you can begin coding!
To change the Device Path, follow the steps above starting with manually adding the Device Path.
The PyCharm REPL will not work with multiple boards at the same time. Going through the steps above on multipleprojects did not result in consistently being able to open multiple REPL connections at the same time.
If you want to use the built in REPL with a different board, you'll need to go in and change the Device Path tothe path that matches the board you'd like to use.
The "Remove All Files from MicroPython Device" and "Flash Project" features do not work, but could corruptyour board. Do not try to use these functions. Remember, CircuitPython isn't officially supported and thesteps above are a workaround.
© Adafruit Industries https://learn.adafruit.com/welcome-to-circuitpython Page 18 of 72

Creating and Editing CodeOne of the best things about CircuitPython is how simple it is to get code up and running. In this section, we're going tocover how to create and edit your first CircuitPython program.
To create and edit code, all you'll need is an editor. There are many options. We strongly recommend using Mu! It'sdesigned for CircuitPython, and it's really simple and easy to use, with a built in serial console!
If you don't or can't use Mu, there are basic text editors built into every operating system such as Notepad on Windows,TextEdit on Mac, and gedit on Linux. However, many of these editors don't write back changes immediately to files thatyou edit. That can cause problems when using CircuitPython. See the Editing Code (https://adafru.it/id3) section below.If you want to skip that section for now, make sure you do "Eject" or "Safe Remove" on Windows or "sync" on Linuxafter writing a file if you aren't using Mu. (This is not a problem on MacOS.)
Creating Code
Open your editor, and create a new file. If you are using
Mu, click the New button in the top left
Copy and paste the following code into your editor:
import boardimport digitalioimport time
led = digitalio.DigitalInOut(board.D13)led.direction = digitalio.Direction.OUTPUT
while True: led.value = True time.sleep(0.5) led.value = False time.sleep(0.5)
© Adafruit Industries https://learn.adafruit.com/welcome-to-circuitpython Page 19 of 72
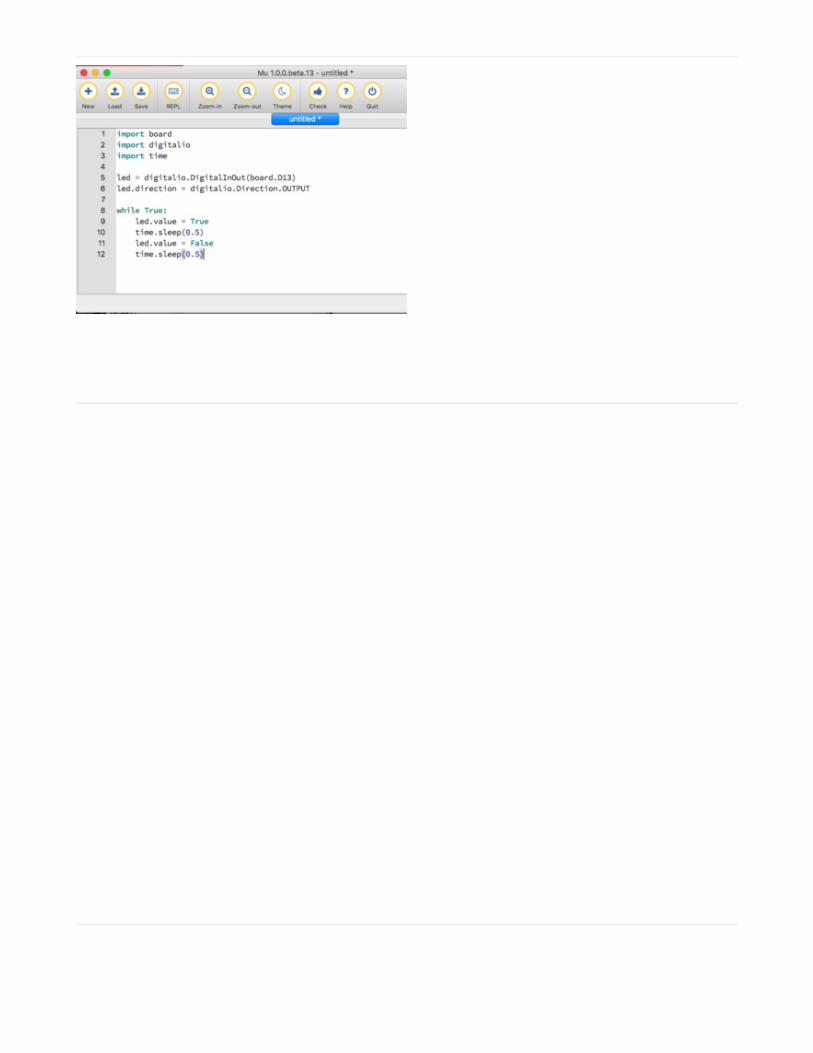
It will look like this - note that under the while True: line,
the next four lines have spaces to indent them, but
they're indented exactly the same amount. All other
lines have no spaces before the text.
Save this file as code.py on your CIRCUITPY drive.
© Adafruit Industries https://learn.adafruit.com/welcome-to-circuitpython Page 20 of 72

On each board you'll find a tiny red LED. It should now be blinking. Once per second
Congratulations, you've just run your first CircuitPython program!
Editing Code
To edit code, open the code.py file on your CIRCUITPY
drive into your editor.
Make the desired changes to your code. Save the file.
That's it!
Your code changes are run as soon as the file is done saving.
There's just one warning we have to give you before we continue...
The CircuitPython code on your board detects when the files are changed or written and will automatically re-start yourcode. This makes coding very fast because you save, and it re-runs.
However, you must wait until the file is done being saved before unplugging or resetting your board! On Windowsusing some editors this can sometimes take up to 90 seconds, on Linux it can take 30 seconds to complete becausethe text editor does not save the file completely. Mac OS does not seem to have this delay, which is nice!
This is really important to be aware of. If you unplug or reset the board before your computer finishes writing the file toyour board, you can corrupt the drive. If this happens, you may lose the code you've written, so it's important to backupyour code to your computer regularly.
There are a few ways to avoid this:
1. Use an editor that writes out the file completely when you save it.
Recommended editors:
mu (https://adafru.it/Be6) is an editor that safely writes all changes (it's also our recommended editor!)emacs (https://adafru.it/xNA) is also an editor that will fulIy write files on save (https://adafru.it/Be7)vim (https://adafru.it/ek9) / vi safely writes all changesSublime Text (https://adafru.it/xNB) safely writes all changesThe PyCharm IDE (https://adafru.it/xNC) is safe if "Safe Write" is turned on in Settings->System Settings-
Don't Click Reset or Unplug!
© Adafruit Industries https://learn.adafruit.com/welcome-to-circuitpython Page 21 of 72

>Synchronization (true by default).If you are using Atom (https://adafru.it/fMG), install this package (https://adafru.it/Be8) so that it will always writeout all changes to files on CIRCUITPY .Visual Studio Code (https://adafru.it/Be9) appears to safely write all changesgedit on Linux appears to safely write all changes
We don't recommend these editors:
notepad (the default Windows editor) and Notepad++ can be slow to write, so we recommend the editors above!If you are using notepad, be sure to eject the drive (see below)IDLE does not force out changes immediatelynano (on Linux) does not force out changesAnything else - we haven't tested other editors so please use a recommended one!
2. Eject or Sync the Drive After Writing
If you are using one of our not-recommended-editors, not all is lost! You can still make it work.
On Windows, you can Eject or Safe Remove the CIRCUITPY drive. It won't actually eject, but it will force the operatingsystem to save your file to disk. On Linux, use the sync command in a terminal to force the write to disk.
Oh No I Did Something Wrong and Now The CIRCUITPY Drive Doesn't Show Up!!!
Don't worry! Corrupting the drive isn't the end of the world (or your board!). If this happens, follow the steps foundon the Troubleshooting page of every board guide to get your board up and running again.
Back to Editing Code...
Now! Let's try editing the program you added to your board. Open your code.py file into your editor. We'll make asimple change. Change the first 0.5 to 0.1 . The code should look like this:
Leave the rest of the code as-is. Save your file. See what happens to the LED on your board? Something changed! Doyou know why? Let's find out!
Exploring Your First CircuitPython Program
First, we'll take a look at the code we're editing.
Here is the original code again:
import boardimport digitalioimport time
led = digitalio.DigitalInOut(board.D13)led.direction = digitalio.Direction.OUTPUT
while True: led.value = True time.sleep(0.1) led.value = False time.sleep(0.5)
© Adafruit Industries https://learn.adafruit.com/welcome-to-circuitpython Page 22 of 72

Imports & Libraries
Each CircuitPython program you run needs to have a lot of information to work. The reason CircuitPython is so simpleto use is that most of that information is stored in other files and works in the background. These files are calledlibraries. Some of them are built into CircuitPython. Others are stored on your CIRCUITPY drive in a folder called lib.
The import statements tells the board that you're going to use a particular library in your code. In this example, weimported three libraries: board , digitalio , and time . All three of these libraries are built into CircuitPython, so noseparate files are needed. That's one of the things that makes this an excellent first example. You don't need any thingextra to make it work! board gives you access to the hardware on your board, digitalio lets you access that hardwareas inputs/outputs and time let's you pass time by 'sleeping'
Setting Up The LED
The next two lines setup the code to use the LED.
Your board knows the red LED as D13 . So, we initialise that pin, and we set it to output. We set led to equal the rest ofthat information so we don't have to type it all out again later in our code.
Loop-de-loops
The third section starts with a while statement. while True: essentially means, "forever do the following:". while True:
creates a loop. Code will loop "while" the condition is "true" (vs. false), and as True is never False, the code will loopforever. All code that is indented under while True: is "inside" the loop.
Inside our loop, we have four items:
import boardimport digitalioimport time
led = digitalio.DigitalInOut(board.D13)led.direction = digitalio.Direction.OUTPUT
while True: led.value = True time.sleep(0.5) led.value = False time.sleep(0.5)
import boardimport digitalioimport time
led = digitalio.DigitalInOut(board.D13)led.direction = digitalio.Direction.OUTPUT
© Adafruit Industries https://learn.adafruit.com/welcome-to-circuitpython Page 23 of 72

First, we have led.value = True . This line tells the LED to turn on. On the next line, we have time.sleep(0.5) . This line istelling CircuitPython to pause running code for 0.5 seconds. Since this is between turning the led on and off, the ledwill be on for 0.5 seconds.
The next two lines are similar. led.value = False tells the LED to turn off, and time.sleep(0.5) tells CircuitPython to pausefor another 0.5 seconds. This occurs between turning the led off and back on so the LED will be off for 0.5 secondstoo.
Then the loop will begin again, and continue to do so as long as the code is running!
So, when you changed the first 0.5 to 0.1 , you decreased the amount of time that the code leaves the LED on. So itblinks on really quickly before turning off!
Great job! You've edited code in a CircuitPython program!
More Changes
We don't have to stop there! Let's keep going. Change the second 0.5 to 0.1 so it looks like this:
Now it blinks really fast! You decreased the both time that the code leaves the LED on and off!
Now try increasing both of the 0.1 to 1 . Your LED will blink much more slowly because you've increased the amountof time that the LED is turned on and off.
Well done! You're doing great! You're ready to start into new examples and edit them to see what happens! Thesewere simple changes, but major changes are done using the same process. Make your desired change, save it, andget the results. That's really all there is to it!
Naming Your Program File
CircuitPython looks for a code file on the board to run. There are four options: code.txt, code.py, main.txt and main.py.CircuitPython looks for those files, in that order, and then runs the first one it finds. While we suggest using code.py asyour code file, it is important to know that the other options exist. If your program doesn't seem to be updating as youwork, make sure you haven't created another code file that's being read instead of the one you're working on.
while True: led.value = True time.sleep(0.5) led.value = False time.sleep(0.5)
while True: led.value = True time.sleep(0.1) led.value = False time.sleep(0.1)
© Adafruit Industries https://learn.adafruit.com/welcome-to-circuitpython Page 24 of 72

Connecting to the Serial ConsoleOne of the staples of CircuitPython (and programming in general!) is something called a "print statement". This is a lineyou include in your code that causes your code to output text. A print statement in CircuitPython looks like this:
print("Hello, world!")
This line would result in:
Hello, world!
However, these print statements need somewhere to display. That's where the serial console comes in!
The serial console receives output from your CircuitPython board sent over USB and displays it so you can see it. Thisis necessary when you've included a print statement in your code and you'd like to see what you printed. It is alsohelpful for troubleshooting errors, because your board will send errors and the serial console will print those too.
The serial console requires a terminal program. A terminal is a program that gives you a text-based interface to performvarious tasks.
Are you using Mu?
If so, good news! The serial console is built into Mu and will autodetect your board making using the REPL really reallyeasy.
Please note that Mu does yet not work with nRF52 or ESP8266-based CircuitPython boards, skip down to the nextsection for details on using a terminal program.
First, make sure your CircuitPython board is plugged in.
If you are using Windows 7, make sure you installed the
drivers (https://adafru.it/Amd).
Once in Mu, look for the Serial button in the menu and click it.
© Adafruit Industries https://learn.adafruit.com/welcome-to-circuitpython Page 25 of 72

Using Something Else?
If you're not using Mu to edit, are using ESP8266 or nRF52 CircuitPython, or if for some reason you are not a fan of thebuilt in serial console, you can run the serial console as a separate program.
Windows requires you to download a terminal program, check out this page for more details (https://adafru.it/AAH)
Mac and Linux both have one built in, though other options are available for download, check this page for moredetails (https://adafru.it/AAI)
© Adafruit Industries https://learn.adafruit.com/welcome-to-circuitpython Page 26 of 72

Interacting with the Serial ConsoleOnce you've successfully connected to the serial console, it's time to start using it.
The code you wrote earlier has no output to the serial console. So, we're going to edit it to create some output.
Open your code.py file into your editor, and include a print statement. You can print anything you like! Just includeyour phrase between the quotation marks inside the parentheses. For example:
Save your file.
Now, let's go take a look at the window with our connection to the serial console.
Excellent! Our print statement is showing up in our console! Try changing the printed text to something else.
Keep your serial console window where you can see it. Save your file. You'll see what the serial console displays when
import boardimport digitalioimport time
led = digitalio.DigitalInOut(board.D13)led.direction = digitalio.Direction.OUTPUT
while True: print("Hello, CircuitPython!") led.value = True time.sleep(1) led.value = False time.sleep(1)
© Adafruit Industries https://learn.adafruit.com/welcome-to-circuitpython Page 27 of 72

the board reboots. Then you'll see your new change!
The Traceback (most recent call last): is telling you the last thing your board was doing before you saved your file. This isnormal behavior and will happen every time the board resets. This is really handy for troubleshooting. Let's introducean error so we can see how it is used.
Delete the e at the end of True from the line led.value = True so that it says led.value = Tru
Save your file. You will notice that your red LED will stop blinking, and you may have a colored status LED blinking atyou. This is because the code is no longer correct and can no longer run properly. We need to fix it!
Usually when you run into errors, it's not because you introduced them on purpose. You may have 200 lines of code,and have no idea where your error could be hiding. This is where the serial console can help. Let's take a look!
© Adafruit Industries https://learn.adafruit.com/welcome-to-circuitpython Page 28 of 72

The Traceback (most recent call last): is telling you that the last thing it was able to run was line 10 in your code. The nextline is your error: NameError: name 'Tru' is not defined . This error might not mean a lot to you, but combined with knowingthe issue is on line 10, it gives you a great place to start!
Go back to your code, and take a look at line 10. Obviously, you know what the problem is already. But if you didn't,you'd want to look at line 10 and see if you could figure it out. If you're still unsure, try googling the error to get somehelp. In this case, you know what to look for. You spelled True wrong. Fix the typo and save your file.
Nice job fixing the error! Your serial console is streaming and your red LED Is blinking again.
The serial console will display any output generated by your code. Some sensors, such as a humidity sensor or athermistor, receive data and you can use print statements to display that information. You can also use print statementsfor troubleshooting. If your code isn't working, and you want to know where it's failing, you can put print statements invarious places to see where it stops printing.
The serial console has many uses, and is an amazing tool overall for learning and programming!
© Adafruit Industries https://learn.adafruit.com/welcome-to-circuitpython Page 29 of 72

The REPLThe other feature of the serial connection is the Read-Evaluate-Print-Loop, or REPL. The REPL allows you to enterindividual lines of code and have them run immediately. It's really handy if you're running into trouble with a particularprogram and can't figure out why. It's interactive so it's great for testing new ideas.
To use the REPL, you first need to be connected to the serial console. Once that connection has been established,you'll want to press Ctrl + C.
If there is code running, it will stop and you'll see Press any key to enter the REPL. Use CTRL-D to reload. Follow thoseinstructions, and press any key on your keyboard.
The Traceback (most recent call last): is telling you the last thing your board was doing before you pressed Ctrl + C andinterrupted it. The KeyboardInterrupt is you pressing Ctrl + C. This information can be handy when troubleshooting, butfor now, don't worry about it. Just note that it is expected behavior.
If there is no code running, you will enter the REPL immediately after pressing Ctrl + C. There is no information aboutwhat your board was doing before you interrupted it because there is no code running.
Either way, once you press a key you'll see a >>> prompt welcoming you to the REPL!
© Adafruit Industries https://learn.adafruit.com/welcome-to-circuitpython Page 30 of 72

If you have trouble getting to the >>> prompt, try pressing Ctrl + C a few more times.
The first thing you get from the REPL is information about your board.
This line tells you the version of CircuitPython you're using and when it was released. Next, it gives you the type ofboard you're using and the type of microcontroller the board uses. Each part of this may be different for your boarddepending on the versions you're working with.
This is followed by the CircuitPython prompt.
From this prompt you can run all sorts of commands and code. The first thing we'll do is run help() . This will tell uswhere to start exploring the REPL. To run code in the REPL, type it in next to the REPL prompt.
Type help() next to the prompt in the REPL.
Then press enter. You should then see a message.
First part of the message is another reference to the version of CircuitPython you're using. Second, a URL for theCircuitPython related project guides. Then... wait. What's this? To list built-in modules, please do `help("modules")`.
Remember the libraries you learned about while going through creating code? That's exactly what this is talking about!
© Adafruit Industries https://learn.adafruit.com/welcome-to-circuitpython Page 31 of 72

This is a perfect place to start. Let's take a look!
Type help("modules") into the REPL next to the prompt, and press enter.
This is a list of all the core libraries built into CircuitPython. We discussed how board contains all of the pins on theboard that you can use in your code. From the REPL, you are able to see that list!
Type import board into the REPL and press enter. It'll go to a new prompt. It might look like nothing happened, but that'snot the case! If you recall, the import statement simply tells the code to expect to do something with that module. Inthis case, it's telling the REPL that you plan to do something with that module.
Next, type dir(board) into the REPL and press enter.
© Adafruit Industries https://learn.adafruit.com/welcome-to-circuitpython Page 32 of 72

This is a list of all of the pins on your board that are available for you to use in your code. Each board's list will differslightly depending on the number of pins available. Do you see D13 ? That's the pin you used to blink the red LED!
The REPL can also be used to run code. Be aware that any code you enter into the REPL isn't saved anywhere. Ifyou're testing something new that you'd like to keep, make sure you have it saved somewhere on your computer aswell!
Every programmer in every programming language starts with a piece of code that says, "Hello, World." We're going tosay hello to something else. Type into the REPL:
print("Hello, CircuitPython!")
Then press enter.
That's all there is to running code in the REPL! Nice job!
You can write single lines of code that run stand-alone. You can also write entire programs into the REPL to test them.As we said though, remember that nothing typed into the REPL is saved.
There's a lot the REPL can do for you. It's great for testing new ideas if you want to see if a few new lines of code willwork. It's fantastic for troubleshooting code by entering it one line at a time and finding out where it fails. It lets you seewhat libraries are available and explore those libraries.
Try typing more into the REPL to see what happens!
Returning to the serial console
When you're ready to leave the REPL and return to the serial console, simply press Ctrl + D. This will reload your boardand reenter the serial console. You will restart the program you had running before entering the REPL. In the consolewindow, you'll see any output from the program you had running. And if your program was affecting anything visual onthe board, you'll see that start up again as well.
© Adafruit Industries https://learn.adafruit.com/welcome-to-circuitpython Page 33 of 72

You can return to the REPL at any time!
© Adafruit Industries https://learn.adafruit.com/welcome-to-circuitpython Page 34 of 72

CircuitPython Hardware
Now it's time to do something great with what you've learned! Every CircuitPython board is perfect for projects.However, each one excels in different areas. We're going to give you some details about each board, and highlightLearn guides where each one is used. You can try these out or get ideas for your own project!
Trinket M0
The Adafruit Trinket M0 (https://adafru.it/zya) is the smallest CircuitPython board we carry. But don't let that fool you! It'sa tiny board with a lot of power. We wanted to design a microcontroller board that was small enough to fit into anyproject, and low cost enough to use without hesitation. Planning to test a proof of concept and need a CircuitPythonboard to throw in? Not ready to disassemble the project you worked so hard to design to extract the board you usedlast time? Trinket M0 has you covered. It's the lowest cost CircuitPython board available but it easily holds its own withthe bigger boards!
Trinket M0 ships with CircuitPython and comes with demo code already on the board. You can open and edit themain.py file found on the CIRCUITPY drive to get started, or create your own! The Trinket M0guide (https://adafru.it/Bez) gives you everything you need to know about your board. Check out theCircuitPython (https://adafru.it/ABS) section to find a huge list of examples to try.
You can use Trinket M0 to make the Chilled Drinkibot (https://adafru.it/BeA) which uses the Trinket to controlthermoelectric cooling of a beverage. Or build a spooky Halloween project that turns your candy bucket into a
© Adafruit Industries https://learn.adafruit.com/welcome-to-circuitpython Page 35 of 72

Screaming Cauldron (https://adafru.it/BeB)!
Gemma M0
The Adafruit Gemma M0 (https://adafru.it/ytb) is a tiny CircuitPython board with just enough built-in to build manysimple projects. It's designed to be worked into your wearable projects, with big holes around the outside for sewing(and they're alligator clip friendly too!). Gemma M0 will super-charge your wearables and is easier to use than ever.There are capacitive touch pads, an on-off switch and an RGB DotStar LED built right into the board so there's plentyyou can do without adding a thing. Add conductive thread and LEDs and you'll have a blinky wearable in no time!
Like Trinket, Gemma M0 ships with CircuitPython and has demo code already on the board. You can open and edit themain.py file on the CIRCUITPY drive, or create your own! The Gemma M0 guide (https://adafru.it/BeC) shows you all theinfo about your board, and has a great list of CircuitPython examples (https://adafru.it/zAl) to try out.
Use Gemma M0 to create a pair of Clockwork Goggles (https://adafru.it/BeD) with fun light patterns on NeoPixel rings.Or accessorise with this 3D printed Sheikah Pendant (https://adafru.it/BeE) to add a bit of light to your next costume!
Circuit Playground Express
The Adafruit Circuit Playground Express (https://adafru.it/wpF) is the next step towards a perfect introduction toelectronics and programming. It's packed full of sensors, LEDs, buttons and switches, and it's super easy to get startedwith! This board is super versatile. Whether you're new to electronics and programming, or a seasoned veteran, Circuit
© Adafruit Industries https://learn.adafruit.com/welcome-to-circuitpython Page 36 of 72

Playground Express is an amazing board to work with. With so much built into the board, you can learn how differenttypes of electronics work and learn to program them all without purchasing any other parts. All you need is a USBcable and the board! But, that's just the beginning. Many of the pads around the outside of the board function inmultiple ways allowing you to wire other things to the board. For example, you could wire up a servo or apotentiometer. The possibilities are endless!
The Circuit Playground Express guide (https://adafru.it/BeF) has tons of information on all the fantastic features of theboard. The CircuitPython section (https://adafru.it/AFI) of the guide has an extensive list of examples using the built-infeatures of the CircuitPython and the board. There is also a section called Python Playground (https://adafru.it/BeG)with more demos and a Drum Machine project (https://adafru.it/BeH) to try out.
You can turn your Circuit Playground Express into a capacitive touch tone Piano in the Key of Lime (https://adafru.it/BeI)using the touch pads on the board. Use the built in accelerometer to make a UFO Flying Saucer (https://adafru.it/BeJ)complete with lights and alien sounds using your board, and some extra supplies from around the house or a 3Dprinted saucer!
Feather M0 Express
The Adafruit Feather M0 Express (https://adafru.it/wfb) is the first Feather designed specifically for CircuitPython. It'spart of a line of Adafruit Feather development boards (https://adafru.it/BeK) designed to work standalone or stacked,and is powered by USB or lithium ion battery so it works for both stationary and on-the-go projects. Feather M0Express comes with two headers for use with a solderless breadboard, or you can solder wires directly to the pins onthe board. This allows for prototyping while you're working on your project and permanent installation when you'reready. One of the things that makes the Feather M0 Express amazing is the the huge array of boards calledFeatherwings (https://adafru.it/BeL) which are designed to fit right on the Feather. There are CircuitPython libraries formany of these boards and more are being written all the time.
Feather M0 Express ships CircuitPython-ready with the UF2 bootloader installed and ready for you to installCircuitPython when you receive your board. Create your first program, save it to the board, and off you go! The FeatherM0 Express guide (https://adafru.it/BeM) has all the details about your board, and a CircuitPythonsection (https://adafru.it/BeN) to get you started.
Feather M0 Express can be used to power all kinds of projects. Build a CircuitPython Painter (https://adafru.it/BeO) POVLED wand using 3D printed parts and DotStar strips. Create an engraved edge-lit LED Acrylic Sign (https://adafru.it/BeP)with NeoPixels. There are guides to go with the Featherwings that explain how to use them with CircuitPython, like theOLED Display (https://adafru.it/BeQ) and Adalogger Featherwing (https://adafru.it/BeR).
© Adafruit Industries https://learn.adafruit.com/welcome-to-circuitpython Page 37 of 72

Metro M0 Express
Metro M0 Express (https://adafru.it/xoa) is the first Metro board designed to work with CircuitPython. This is not abeginner board. If you're just getting started, we'd recommend one of the previous boards. It has a lot of the samefeatures as Feather M0 Express, as well as some development specific features (like the SWD port built in!). The MetroM0 Express is designed to work with the Arduino form-factor, so if you've already got Arduino shields, this board wouldbe great for you. There are CircuitPython libraries for some shields already. It has 25 GPIO pins (the most of any ofthese boards!) so it's great if you're looking for a lot of options.
Metro M0 Express ships CircuitPython-ready with the UF2 bootloader installed and is ready for you to installCircuitPython when you receive your board. Create your first program, save it to the board, and you're good to go! TheMetro M0 Express guide (https://adafru.it/BeS) gives you all the details about your board, and the CircuitPythonsection (https://adafru.it/BeT) is available to get you started.
All sensors and breakout boards with CircuitPython libraries will work with the Metro M0 Express running CircuitPython.Find the guide for your sensor and follow the guide to find out how to wire it up. There are a ton of options available.
What's Next?
Now you're ready to jump into some more Learn Guides or simply get started with a brand new project. Great job, andgood luck!
© Adafruit Industries https://learn.adafruit.com/welcome-to-circuitpython Page 38 of 72

CircuitPython LibrariesEach CircuitPython program you run needs to have a lot of information to work. The reason CircuitPython is so simpleto use is that most of that information is stored in other files and works in the background. These files are calledlibraries. Some of them are built into CircuitPython. Others are stored on your CIRCUITPY drive in a folder called lib .Part of what makes CircuitPython so awesome is its ability to store code separately from the firmware itself. Storingcode separately from the firmware makes it easier to update both the code you write and the libraries you depend.
Your board may ship with a lib folder already, its in the base directory of the drive. If not, simply create the folderyourself.
CircuitPython libraries work in the same was as regular Python modules so the Python docs (https://adafru.it/rar) are agreat reference for how it all should work. In Python terms, we can place our library files in the lib directory because itspart of the Python path by default.
One downside of this approach of separate libraries is that they are not built in. To use them, one needs to copy themto the CIRCUITPY drive before they can be used. Fortunately, we provide a bundle full of our libraries.
Our bundle and releases also feature optimized versions of the libraries with the .mpy file extension. These files takeless space on the drive and have a smaller memory footprint as they are loaded.
Installing the CircuitPython Library Bundle
We're constantly updating and improving our libraries, so we don't (at this time) ship our CircuitPython boards with thefull library bundle. Instead, you can find example code in the guides for your board that depends on external libraries.Some of these libraries may be available from us at Adafruit, some may be written by community members!
Either way, as you start to explore CircuitPython, you'll want to know how to get libraries on board.
You can grab the latest Adafruit CircuitPython 2.x Bundle release by clicking this button:
© Adafruit Industries https://learn.adafruit.com/welcome-to-circuitpython Page 39 of 72

https://adafru.it/y8E
https://adafru.it/y8E
If you need another version, you can also visit the bundle release page (https://adafru.it/Ayy) which will let you selectexactly what version you're looking for, as well as information about changes.
Either way, download the version that matches your CircuitPython run-time. For example, if you're running v2.2download the v2 bundle. If you're running 3.0, download the v3 bundle. There's also a py bundle which contains theuncompressed python files, you probably don't want that!
After downloading the zip, extract its contents. This is usually done by double clicking on the zip. On Mac OSX, itplaces the file in the same directory as the zip.
When you open the folder, you'll see a large number of mpy files and folders
Express Boards
If you are using a Feather M0 Express, Metro M0 Express or Circuit Playground Express (or any other "Express" board)your CircuitPython board comes with at least 2 MB of Flash storage. This is plenty of space for all of our library files sowe recommend you just install them all! (If you have a Gemma M0 or Trinket M0 or other non-Express board, skipdown to the next section)
On Express boards, the lib directory can be copied directly to the CIRCUITPY drive.
Just drag the entire lib folder into the CIRCUITPY drive, and 'replace' any old files if your operating system promptsyou
© Adafruit Industries https://learn.adafruit.com/welcome-to-circuitpython Page 40 of 72

Non-Express Boards
If you are using Trinket M0 or Gemma M0, you will need to load the libraries individually, due to file spacerestrictions. If you are using a non-express board, or you would rather load libraries as you use them, you'll first want tocreate a lib folder on your CIRCUITPY drive. Open the drive, right click, choose the option to create a new folder, andcall it lib . Then, open the lib folder you extracted from the downloaded zip. Inside you'll find a number of folders and.mpy files. Find the library you'd like to use, and copy it to the lib folder on CIRCUITPY.
Example: ImportError Due to Missing Library
If you choose to load libraries as you need them, you may write up code that tries to use a library you haven't yetloaded. We're going to demonstrate what happens when you try to utilise a library that you don't have loaded on yourboard, and cover the steps required to resolve the issue. This demonstration will only return an error if you do nothave the required library loaded into the lib folder on your CIRCUITPY drive.
Let's use a modified version of the blinky example.
Save this file. Nothing happens to your board. Let's check the serial console to see what's going on.
We have an ImportError . It says there is no module named 'simpleio' . That's the one we just included in our code!
Click the link above to download the correct bundle. Extract the lib folder from the downloaded bundle file. Scroll downto find simpleio.mpy . This is the library file we're looking for! Follow the steps above to load an individual library file.
The LED starts blinking again! Let's check the serial console.
import boardimport timeimport simpleio
led = simpleio.DigitalOut(board.D13)
while True: led.value = True time.sleep(0.5) led.value = False time.sleep(0.5)
© Adafruit Industries https://learn.adafruit.com/welcome-to-circuitpython Page 41 of 72

No errors! Excellent. You've successfully resolved an ImportError !
If you run into this error in the future, follow along with the steps above and choose the library that matches the oneyou're missing.
Library Install on Non-Express Boards
If you have a Trinket M0 or Gemma M0, you'll want to follow the same steps in the example above to install libraries asyou need them. You don't always need to wait for an ImportError as you probably know what library you added to yourcode. Simply open the lib folder you downloaded, find the library you need, and drag it to the lib folder on yourCIRCUITPY drive.
For these boards, your internal storage is from the chip itself. So, these boards don't have enough space for all of thelibraries. If you try to copy over the entire lib folder you won't have enough space on your CIRCUITPY drive.
You may end up running out of space on your Trinket M0 or Gemma M0 even if you only load libraries as you needthem. There are a number of steps you can use to try to resolve this issue. You'll find them in the Troubleshooting pagein the Learn guides for your board.
Updating CircuitPython Libraries
Libraries are updated from time to time, and it's important to update the files you have on your CIRCUITPY drive.
To update a single library, follow the same steps above. When you drag the library file to your lib folder, it will ask if youwant to replace it. Say yes. That's it!
If you'd like to update the entire bundle at once, drag the lib folder to your CIRUCITPY drive. Different operatingsystems will have a different dialog pop up. You want to tell it to replace the current folder. Then you're updated andready to go!
A new library bundle is released every time there's an update to a library. Updates include things like bug fixes andnew features. It's important to check in every so often to see if the libraries you're using have been updated.
© Adafruit Industries https://learn.adafruit.com/welcome-to-circuitpython Page 42 of 72

Welcome to the Community!
CircuitPython is a programming language that's super simple to get started with and great for learning. It runs onmicrocontrollers and works out of the box. You can plug it in and get started with any text editor. The best part?CircuitPython comes with an amazing, supportive community.
Everyone is welcome! CircuitPython is Open Source. This means it's available for anyone to use, edit, copy and improveupon. This also means CircuitPython becomes better because of you being a part of it. It doesn't matter whether this isyour first microcontroller board or you're a computer engineer, you have something important to offer the AdafruitCircuitPython community. We're going to highlight some of the many ways you can be a part of it!
Adafruit Discord
The Adafruit Discord server is the best place to start. Discord is where the community comes together to volunteer andprovide live support of all kinds. From general discussion to detailed problem solving, and everything in between,
© Adafruit Industries https://learn.adafruit.com/welcome-to-circuitpython Page 43 of 72

Discord is a digital maker space with makers from around the world.
There are many different channels so you can choose the one best suited to your needs. Each channel is shown onDiscord as "#channelname". There's the #projecthelp channel for assistance with your current project or help comingup with ideas for your next one. There's the #showandtell channel for showing off your newest creation. Don't be afraidto ask a question in any channel! If you're unsure, #general is a great place to start. If another channel is more likely toprovide you with a better answer, someone will guide you.
The CircuitPython channel is where to go with your CircuitPython questions. #circuitpython is there for new users anddevelopers alike so feel free to ask a question or post a comment! Everyone of any experience level is welcome to joinin on the conversation. We'd love to hear what you have to say!
The easiest way to contribute to the community is to assist others on Discord. Supporting others doesn't always meananswering questions. Join in celebrating successes! Celebrate your mistakes! Sometimes just hearing that someoneelse has gone through a similar struggle can be enough to keep a maker moving forward.
The Adafruit Discord is the 24x7x365 hackerspace that you can bring your granddaughter to.
Visit https://adafru.it/discord ()to sign up for Discord. We're looking forward to meeting you!
Adafruit Forums
The Adafruit Forums (https://adafru.it/jIf) are the perfect place for support. Adafruit has wonderful paid support folks toanswer any questions you may have. Whether your hardware is giving you issues or your code doesn't seem to beworking, the forums are always there for you to ask. You need an Adafruit account to post to the forums. You can usethe same account you use to order from Adafruit.
While Discord may provide you with quicker responses than the forums, the forums are a more reliable source ofinformation. If you want to be certain you're getting an Adafruit-supported answer, the forums are the best place to be.
There are forum categories that cover all kinds of topics, including everything Adafruit. The Adafruit CircuitPython andMicroPython (https://adafru.it/xXA) category under "Supported Products & Projects" is the best place to post yourCircuitPython questions.
© Adafruit Industries https://learn.adafruit.com/welcome-to-circuitpython Page 44 of 72

Be sure to include the steps you took to get to where you are. If it involves wiring, post a picture! If your code is givingyou trouble, include your code in your post! These are great ways to make sure that there's enough information to helpyou with your issue.
You might think you're just getting started, but you definitely know something that someone else doesn't. The greatthing about the forums is that you can help others too! Everyone is welcome and encouraged to provide constructivefeedback to any of the posted questions. This is an excellent way to contribute to the community and share yourknowledge!
Adafruit Github
Whether you're just beginning or are life-long programmer who would like to contribute, there are ways for everyoneto be a part of building CircuitPython. GitHub is the best source of ways to contribute toCircuitPython (https://adafru.it/tB7) itself. If you need an account, visit https://github.com/ (https://adafru.it/d6C)and signup.
If you're new to GitHub or programming in general, there are great opportunities for you. Head over toadafruit/circuitpython (https://adafru.it/tB7) on GitHub, click on "Issues (https://adafru.it/Bee)", and you'll find a list thatincludes issues labeled "good first issue (https://adafru.it/Bef)". These are things we've identified as something thatsomeone with any level of experience can help with. These issues include options like updating documentation,providing feedback, and fixing simple bugs.
Already experienced and looking for a challenge? Checkout the rest of the issues list and you'll find plenty of ways to
© Adafruit Industries https://learn.adafruit.com/welcome-to-circuitpython Page 45 of 72

contribute. You'll find everything from new driver requests to core module updates. There's plenty of opportunities foreveryone at any level!
When working with CircuitPython, you may find problems. If you find a bug, that's great! We love bugs! Posting adetailed issue to GitHub is an invaluable way to contribute to improving CircuitPython. Be sure to include the steps toreplicate the issue as well as any other information you think is relevant. The more detail, the better!
Testing new software is easy and incredibly helpful. Simply load the newest version of CircuitPython or a library ontoyour CircuitPython hardware, and use it. Let us know about any problems you find by posting a new issue to GitHub.Software testing on both current and beta releases is a very important part of contributing CircuitPython. We can'tpossibly find all the problems ourselves! We need your help to make CircuitPython even better.
On GitHub, you can submit feature requests, provide feedback, report problems and much more. If you have questions,remember that Discord and the Forums are both there for help!
ReadTheDocs
ReadTheDocs (https://adafru.it/Beg) is a an excellent resource for a more in depth look at CircuitPython. This is whereyou'll find things like API documentation and details about core modules. There is also a Design Guide that includescontribution guidelines for CircuitPython.
RTD gives you access to a low level look at CircuitPython. There are details about each of the coremodules (https://adafru.it/Beh). Each module lists the available libraries. Each module library page lists the availableparameters and an explanation for each. In many cases, you'll find quick code examples to help you understand howthe modules and parameters work, however it won't have detailed explanations like the Learn Guides. If you want helpunderstanding what's going on behind the scenes in any CircuitPython code you're writing, ReadTheDocs is there tohelp!
© Adafruit Industries https://learn.adafruit.com/welcome-to-circuitpython Page 46 of 72

© Adafruit Industries https://learn.adafruit.com/welcome-to-circuitpython Page 47 of 72

CircuitPython for ESP8266We have two 'strains' of CircuitPython, the primary one is the ATSAMD21/51-based boards that have native USBconnectivity. Native USB means that the board can show up as a disk drive called CIRCUITPY and hold all your files onit.
There's also CircuitPython for boards like the ESP8266 and nRF52832, these are really nice chips with WiFi andBluetooth, respectively, built in. But they do not have native USB! That means there is no way for the chip to appear asa disk drive. You can still use them with CircuitPython but its a lot tougher, so we don't recommend them for beginners.(When USB-native versions of these chips come out, we'll take a look at making them show up like a drive!)
Here's what you have to know about using non-native chips for CircuitPython:
You only get a REPL connection! No HID keyboard/mouse or other USB interfaceNo disk drive for drag-n-drop file moving, files must be moved via a special tool such as ampy that 'types' the filein for you via the REPLLoading CircuitPython requires command line tools
Installing CircuitPython on the ESP8266
To use CircuitPython with the ESP8266 you'll need to first flash it with the latest firmware.
Download esptool
First install the esptool.py software which enables firmware flashing on the ESP8266. The easiest way to install thistool is from Python's pip package manager. If you don't have it already you'll need to install Python2.7 (https://adafru.it/fa7) (make sure you check the box to put Python in your system path when installing onWindows) and then run the following command in a terminal: pip install esptool
Note on Mac OSX and Linux you might need to run the command as root with sudo, like: sudo pip install esptool
If you receive an error that esptool.py only supports Python 2.x try running again with the pip2 command instead of pip(likely your system is using Python 3 and the pip command is getting confused which version to use).
Download Latest CircuitPython Firmware
Next download the latest CircuitPython ESP8266 firmware file (https://adafru.it/vlF). You can automatically downloadthe latest binary by clicking here:
https://adafru.it/vlF
https://adafru.it/vlF
© Adafruit Industries https://learn.adafruit.com/welcome-to-circuitpython Page 48 of 72

Get ESP8266 Ready For Bootloading
Now you'll need to put the ESP8266 into its firmware flashing mode. Each ESP8266 board is slightly different:
For a raw ESP8266 module you'll need to wire up buttons to ground for the GPIO0 and RESET pins. Hold theGPIO0 button down (or connect the line to ground) and while still holding GPIO0 to ground press and release theRESET button (or connect and release the line from ground), then release GPIO0.For the HUZZAH ESP8266 breakout (https://adafru.it/f9X) buttons for GPIO0 and RESET are built in to theboard. Hold GPIO0 down, then press and release RESET (while still holding GPIO0), and finally release GPIO0.For the Feather HUZZAH ESP8266 (https://adafru.it/n6A) you don't need to do anything special to go intofirmware flashing mode. This board is built to detect when the serial port is opened for flashing and automaticallyconfigure the ESP8266 module to receive firmware. Be sure to first install the SiLabs CP210xdriver (https://adafru.it/jCs) on Windows and Mac OSX to make the board's serial port visible! On Windows youwant the normal VCP driver, not the 'with Serial Enumeration' driver.
Erase ESP8266
It's recommended to erase the entire flash memory of the ESP8266 board before uploading firmware. Run thefollowing command in a terminal to perform this erase:
Where ESP8266_PORTNAME is the path or name of the serial port that is connected to the ESP8266. The exact nameof the device varies depending on the type of serial to USB converter chip so you might need to look at the serial portswith and without the device connected to find its name.
Program ESP8266
Now put the ESP8266 back into firmware flashing mode and run the following command to load the downloadedfirmware file:
esptool.py --port ESP8266_PORTNAME erase_flash
© Adafruit Industries https://learn.adafruit.com/welcome-to-circuitpython Page 49 of 72

Again set ESP8266_PORTNAME to the path or name of the serial port that is connected to the ESP8266. In additionset firmware.bin to the name or path to the firmware file you would like to load.
Once the tool finishes flashing the firmware (you'll usually see a blue light on the ESP8266 module flashing during thisprocess) press the RESET button on the ESP8266 board or disconnect and reconnect it to your computer. You shouldbe all set to start using the latest CircuitPython firmware on the board!
Note that if you see an error that "detect is not a valid flash_size parameter" you might be using an older version ofesptool.py. To upgrade to the latest version run the following command pip install --upgrade esptool
Upload Libraries & Files Using Ampy!
The biggest difference you'll find with ESP8266 is that you need to use a special tool to move files around. Check outampy by reading this guide. It's about MicroPython but CircuitPython is nearly identical so the the overall installationand usage is identical!
https://adafru.it/q9C
https://adafru.it/q9C
Other Stuff To Know!
The REPL works as you'd expect, so check out that introductory page.File storage is in the same chip as CircuitPython so if you update, you may lose your files! Keep backups.Libraries and API are also the same as for other CircuitPython boards.Note that the ESP8266 does not have a ton of pins available, and only one analog input with 0-1.0V range. Thereis no UART port available (it's the one used for the REPL!)
esptool.py --port ESP8266_PORTNAME --baud 115200 write_flash --flash_size=detect 0 firmware.bin
© Adafruit Industries https://learn.adafruit.com/welcome-to-circuitpython Page 50 of 72

There are no analog outputs.For SPI and I2C, you can use them! But you will need to use bitbangio (https://adafru.it/zcx) to create the busobjects
© Adafruit Industries https://learn.adafruit.com/welcome-to-circuitpython Page 51 of 72

Advanced Serial Console on WindowsWindows 7 Driver
If you're using Windows 7, use the link below to download the driver package. You will not need to install drivers onMac, Linux or Windows 10.
https://adafru.it/AB0
https://adafru.it/AB0
What's the COM?
First, you'll want to find out which serial port your board is using. When you plug your board in to USB on yourcomputer, it connects to a serial port. The port is like a door through which your board can communicate with yourcomputer using USB.
We'll use Windows Device Manager to determine which port the board is using. The easiest way to determine whichport the board is using is to first check without the board plugged in. Open Device Manager. Click on Ports (COM &LPT). You should find something already in that list with (COM#) after it where # is a number.
Now plug in your board. The Device Manager list will refresh and a new item will appear under Ports (COM & LPT).You'll find a different (COM#) after this item in the list.
© Adafruit Industries https://learn.adafruit.com/welcome-to-circuitpython Page 52 of 72

Sometimes the item will refer to the name of the board. Other times it may be called something like USB Serial Device,as seen in the image above. Either way, there is a new (COM#) following the name. This is the port your board is using.
Install Putty
If you're using Windows, you'll need to download a terminal program. We're going to use PuTTY.
The first thing to do is download the latest version of PuTTY (https://adafru.it/Bf1). You'll want to download the Windowsinstaller file. It is most likely that you'll need the 64-bit version. Download the file and install the program on yourmachine. If you run into issues, you can try downloading the 32-bit version instead. However, the 64-bit version willwork on most PCs.
Now you need to open PuTTY.
Under Connection type: choose the button next to Serial.In the box under Serial line, enter the serial port you found that your board is using.In the box under Speed, enter 115200. This called the baud rate, which is the speed in bits per second that datais sent over the serial connection. For boards with built in USB it doesn't matter so much but for ESP8266 andother board with a separate chip, the speed required by the board is 115200 bits per second. So you might aswell just use 115200!
If you want to save those settings for later, use the options under Load, save or delete a stored session. Enter a namein the box under Saved Sessions, and click the Save button on the right.
© Adafruit Industries https://learn.adafruit.com/welcome-to-circuitpython Page 53 of 72

Once your settings are entered, you're ready to connect to the serial console. Click "Open" at the bottom of thewindow. A new window will open.
If no code is running, the window will either be blank or will look like the window above. Now you're ready to see theresults of your code.
Great job! You've connected to the serial console!
© Adafruit Industries https://learn.adafruit.com/welcome-to-circuitpython Page 54 of 72

Advanced Serial Console on Mac and LinuxConnecting to the serial console on Mac and Linux uses essentially the same process. Neither operating system needsdrivers installed. On MacOSX, Terminal comes installed. On Linux, there are a variety such as gnome-terminal (calledTerminal) or Konsole on KDE.
What's the Port?
First you'll want to find out which serial port your board is using. When you plug your board in to USB on yourcomputer, it connects to a serial port. The port is like a door through which your board can communicate with yourcomputer using USB.
We're going to use Terminal to determine what port the board is using. The easiest way to determine which port theboard is using is to first check without the board plugged in. On Mac, open Terminal and type the following:
ls /dev/tty.*
Each serial connection shows up in the /dev/ directory. It has a name that starts with tty. . The command ls shows youa list of items in a directory. You can use * as a wildcard, to search for files that start with the same letters but end insomething different. In this case, we're asking to see all of the listings in /dev/ that start with tty. and end in anything.This will show us the current serial connections.
For Linux, the procedure is the same, however, the name is slightly different. If you're using Linux, you'll type:
ls /dev/ttyACM*
The concept is the same with Linux. We are asking to see the listings in the /dev/ folder, starting with ttyACM andending with anything. This will show you the current serial connections. In the example below, the error is indicatingthat are no current serial connections starting with ttyACM .
© Adafruit Industries https://learn.adafruit.com/welcome-to-circuitpython Page 55 of 72

Now, plug your board. Using Mac, type:
ls /dev/tty.*
This will show you the current serial connections, which will now include your board.
Using Mac, a new listing has appeared called /dev/tty.usbmodem141441 . The tty.usbmodem141441 part of this listing isthe name the example board is using. Yours will be called something similar.
Using Linux, type:
ls /dev/ttyACM*
This will show you the current serial connections, which will now include your board.
© Adafruit Industries https://learn.adafruit.com/welcome-to-circuitpython Page 56 of 72

Using Linux, a new listing has appeared called /dev/ttyACM0 . The ttyACM0 part of this listing is the name the exampleboard is using. Yours will be called something similar.
Connect with screen
Now that you know the name your board is using, you're ready connect to the serial console. We're going to use acommand called screen . The screen command is included with MacOS. Linux users may need to install it using theirpackage manager. To connect to the serial console, use Terminal. Type the following command, replacing board_name
with the name you found your board is using:
screen /dev/tty.board_name 115200
The first part of this establishes using the screen command. The second part tells screen the name of the board you'retrying to use. The third part tells screen what baud rate to use for the serial connection. The baud rate is the speed inbits per second that data is sent over the serial connection. In this case, the speed required by the board is 115200 bitsper second.
© Adafruit Industries https://learn.adafruit.com/welcome-to-circuitpython Page 57 of 72

Press enter to run the command. It will open in the same window. If no code is running, the window will be blank.Otherwise, you'll see the output of your code.
Great job! You've connected to the serial console!
Permissions on Linux
If you try to run screen and it doesn't work, then you may be running into an issue with permissions. Linux keeps trackof users and groups and what they are allowed to do and not do, like access the hardware associated with the serialconnection for running screen . So if you see something like this:
then you may need to grant yourself access. There are generally two ways you can do this. The first is to just runscreen using the sudo command, which temporarily gives you elevated privileges.
Once you enter your password, you should be in:
The second way is to add yourself to the group associated with the hardware. To figure out what that group is, use thecommand ls -l as shown below. The group name is circled in red.
© Adafruit Industries https://learn.adafruit.com/welcome-to-circuitpython Page 58 of 72

Then use the command adduser to add yourself to that group. You need elevated privileges to do this, so you'll needto use sudo . In the example below, the group is adm and the user is ackbar.
You'll need to logout and log back in. Then you can verify that you have been added to the group using the commandgroups .
And now you should be able to run screen without using sudo .
And you're in:
© Adafruit Industries https://learn.adafruit.com/welcome-to-circuitpython Page 59 of 72

Uninstalling CircuitPythonA lot of our boards can be used with multiple programming languages. For example, the Circuit Playground Expresscan be used with MakeCode, Code.org CS Discoveries, CircuitPython and Arduino.
Maybe you tried CircuitPython and want to go back to MakeCode or Arduino? Not a problem
You can always remove/re-install CircuitPython whenever you want! Heck, you can change your mind every day!
Backup Your Code
Before uninstalling CircuitPython, don't forget to make a backup of the code you have on the little disk drive. Thatmeans your main.py or code.py any other files, the lib folder etc. You may lose these files when you removeCircuitPython, so backups are key! Just drag the files to a folder on your laptop or desktop computer like you wouldwith any USB drive.
Moving to MakeCode
If you want to go back to using MakeCode, its really easy. Visit makecode.adafruit.com (https://adafru.it/Bea) and findthe program you want to upload. Click Download to download the .uf2 file that is generated by MakeCode.
Now double-click your CircuitPython board until you see the onboard LED(s) turn green and the ...BOOT directoryshows up.
Then find the downloaded MakeCode .uf2 file and drag it to the ...BOOT drive.
© Adafruit Industries https://learn.adafruit.com/welcome-to-circuitpython Page 60 of 72

Your MakeCode is now running and CircuitPython has been removed. Going forward you only have to single click thereset button
Moving to Arduino
If you want to change your firmware to Arduino, it's also pretty easy.
Start by plugging in your board, and double-clicking reset until you get the green onboard LED(s) - just like withMakeCode
Within Arduino IDE, select the matching board, say Circuit Playground Express
Select the correct matching Port:
© Adafruit Industries https://learn.adafruit.com/welcome-to-circuitpython Page 61 of 72

Create a new simple Blink sketch example:
Make sure the LED(s) are still green, then click Upload to upload Blink. Once it has uploaded successfully, the serialPort will change so re-select the new Port!
Once Blink is uploaded you should no longer need to double-click to enter bootloader mode, Arduino will automaticallyreset when you upload
// the setup function runs once when you press reset or power the boardvoid setup() { // initialize digital pin 13 as an output. pinMode(13, OUTPUT);}
// the loop function runs over and over again forevervoid loop() { digitalWrite(13, HIGH); // turn the LED on (HIGH is the voltage level) delay(1000); // wait for a second digitalWrite(13, LOW); // turn the LED off by making the voltage LOW delay(1000); // wait for a second}
© Adafruit Industries https://learn.adafruit.com/welcome-to-circuitpython Page 62 of 72

Non-UF2 Installation
Flashing with Bossac - For Non-Express Feather M0's & Arduino Zero
Our older Feather M0 boards don't come with UF2, instead they come with a simpler bootloader called bossa. This isalso what is installed on Arduino Zero's and other Zero-compatible boards that use the ATSAMD21. It is the onlymethod you can use if your CircuitPython installation file is a .bin rather than a .uf2
Command-Line ahoy!
Flashing with bossac requires the use of your computer's command line interface. On windows, that's the cmd orpowershell tool. On mac and linux, use Terminal!
Download Latest CircuitPython Firmware
The first thing you'll want to do is download the most recent version of CircuitPython.
https://adafru.it/vlF
https://adafru.it/vlF
Once downloaded, save the .bin file onto your desktop, you'll need it soon!
If you are running Windows 7, you must install the driver set (we cover it on this page) (https://adafru.it/Bfd) so you haveaccess to the COM port.
Download BOSSA
Once you have a firmware image you'll need to download a special version of the BOSSA tool that can load firmwareon SAMD21 boards. This tool is actually used internally by the Arduino IDE when it programs these boards, howeveryou can use it yourself to load custom firmware
Be aware you must use this special 1.7.0 or higher version of bossac to program SAMD21 boards! If you find an olderversion of BOSSA it won't work because it doesn't support the SAMD21 chip. To flash with bossac (BOSSA's commandline tool) first download the latest version from here (https://adafru.it/Bfe). The ming32 version is for Windows, apple-
darwin for Mac OSX and various linux options for Linux.
bossac works with .bin files only, it will not work with .uf2 files!
Test bossac
Open a terminal and navigate to the folder with the bossac tool. Then check the tool runs by running it with the --help
option:
This installation page is only required if you do not have UF2 bootloader installed (e.g. boardBOOT drag-n-drop)! This page is for non-Express Feather M0's, Arduino Zero's & M0's, and other custom ATSAMD21boards.
© Adafruit Industries https://learn.adafruit.com/welcome-to-circuitpython Page 63 of 72
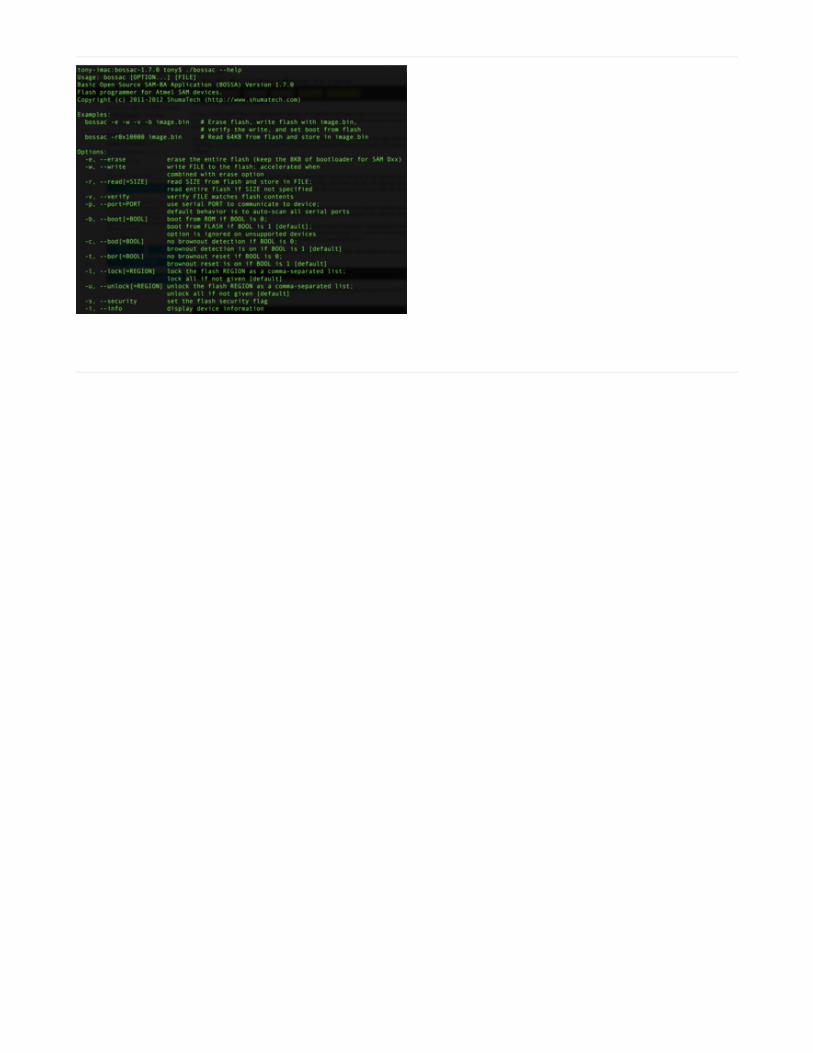
Open a terminal and navigate to the folder with the
bossac tool. Then check the tool runs by running it with
the --help option with bossac --help
Or if you're using Linux or Mac OSX you'll need to add a
./ to specify that bossac is run from the current directory
like ./bossac --help
Make sure you see BOSSA version 1.7.0 or higher! If
you see a lower version then you accidentally
downloaded an older version of the tool and it won't
work to flash SAMD21 chips. Go back and grab the
latest release from this BOSSA GitHub
repository (https://adafru.it/s1B) as mentioned above.
Get Into the Bootloader
You'll have to 'kick' the board into the bootloader manually. Do so by double-clicking the reset button. The red "#13"LED should pulse on and off. If you are using an Arduino Zero, make sure you are connected to the native USB portnot the debugging/programming port.
One special note, if you're using the Arduino M0 from Arduino.org you'll need to replace its bootloader with theArduino Zero bootloader so it can work with BOSSA. To do this install the Arduino/Genuino Zero board in the ArduinoIDE board manager and then follow these steps to burn the Arduino Zero bootloader (https://adafru.it/s1D) (using theprogramming port on the board). Once you've loaded the Arduino Zero bootloader you should be able to use the M0with bossac as described below.
Run bossac command
With your board plugged in and running the bootloader you're ready to flash CircuitPython firmware onto the board.Copy the firmware .bin file to the same directory as the bossac tool, then in a terminal navigate to that location and runthe following command:
bossac -e -w -v -R adafruit-circuitpython-feather_m0_express-2.1.0.bin
Replace the filename with the name of your downloaded .bin - it will vary based on your board!
This will e rase the chip, w rite the given file, v erify the write and R eset the board. On linux or Mac OS X you mayneed to run this command with sudo ./bossac ...
After BOSSA loads the firmware you should see output similar to the following:
© Adafruit Industries https://learn.adafruit.com/welcome-to-circuitpython Page 64 of 72

After reset, CircuitPython should be running and the CIRCUITPY drive will appear. You can always manually reset theboard by clicking the reset button, sometimes that is needed to get it to 'wake up'. Express boards may cause awarning of an early eject of a USB drive but just ignore it. Nothing important was being written to the drive!
© Adafruit Industries https://learn.adafruit.com/welcome-to-circuitpython Page 65 of 72

TroubleshootingFrom time to time, you will run into issues when working with CircuitPython. Here are a few things you may encounterand how to resolve them.
CPLAYBOOT, TRINKETBOOT, FEATHERBOOT, or GEMMABOOT Drive NotPresent
You may have a different board.
Only Adafruit Express boards and the Trinket M0 and Gemma M0 boards ship with the UF2 bootloader (https://adafru.it/zbX)installed. Feather M0 Basic, Feather M0 Adalogger, and similar boards use a regular Arduino-compatible bootloader, which does not show a boardnameBOOT drive.
MakeCode
If you are running a MakeCode (https://adafru.it/zbY) program on Circuit Playground Express, press the reset button justonce to get the CPLAYBOOT drive to show up. Pressing it twice will not work.
Windows 10
Did you install the Adafruit Windows Drivers package by mistake? You don't need to install this package on Windows 10for most Adafruit boards. The old version (v1.5) can interfere with recognizing your device. Go to Settings -> Apps anduninstall all the "Adafruit" driver programs.
Windows 7
The latest version of the Adafruit Windows Drivers (version 2.0.0.0 or later) will fix the missing boardnameBOOT driveproblem on Windows 7. To resolve this, first uninstall the old versions of the drivers:
Unplug any boards. In Uninstall or Change a Program (Control Panel->Programs->Uninstall a program), uninstalleverything named "Windows Driver Package - Adafruit Industries LLC ...".
Now install the new 2.0.0.0 (or higher) Adafruit Windows Drivers Package:
https://adafru.it/AB0
https://adafru.it/AB0
© Adafruit Industries https://learn.adafruit.com/welcome-to-circuitpython Page 66 of 72

When running the installer, you'll be shown a list of drivers to choose from. You can check and uncheck theboxes to choose which drivers to install.
You should now be done! Test by unplugging and replugging the board. You should see the CIRCUITPY drive, andwhen you double-click the reset button (single click on Circuit Playground Express running MakeCode), you should seethe appropriate boardnameBOOT drive.
Let us know in the Adafruit support forums (https://adafru.it/jIf) or on the Adafruit Discord (https://adafru.it/Beb) if thisdoes not work for you!
CircuitPython RGB Status Light
The Feather M0 Express, Metro M0 Express, Gemma M0, and Trinket M0 all have a single NeoPixel or DotStar RGBLED on the board that indicates the status of CircuitPython. Here's what the colors and blinking mean:
steady GREEN: code.py (or code.txt , main.py , or main.txt ) is runningpulsing GREEN: code.py (etc.) has finished or does not existYELLOW: Circuit Python is in safe mode: it crashed and restartedWHITE: REPL is runningBLUE: Circuit Python is starting up
Colors with multiple flashes following indicate a Python exception and then indicate the line number of the error. Thecolor of the first flash indicates the type of error:
GREEN: IndentationErrorCYAN: SyntaxErrorWHITE: NameErrorORANGE: OSErrorPURPLE: ValueErrorYELLOW: other error
These are followed by flashes indicating the line number, including place value. WHITE flashes are thousands' place,BLUE are hundreds' place, YELLOW are tens' place, and CYAN are one's place. So for example, an error on line 32would flash YELLOW three times and then CYAN two times. Zeroes are indicated by an extra-long dark gap.
CIRCUITPY Drive Issues
© Adafruit Industries https://learn.adafruit.com/welcome-to-circuitpython Page 67 of 72

You may find that you can no longer save files to your CIRCUITPY drive. You may find that your CIRCUITPY stopsshowing up in your file explorer, or shows up as NO_NAME . These are indicators that your filesystem has issues.
First check - have you used Arduino to program your board? If so, CircuitPython is no longer able to provide the USBservices. Reset the board so you get a boardnameBOOT drive rather than a CIRCUITPY drive, copy the latest versionof CircuitPython ( .uf2 ) back to the board, then Reset. This may restore CIRCUITPY functionality.
If still broken - When the CIRCUITPY disk is not safely ejected before being reset by the button or being disconnectedfrom USB, it may corrupt the flash drive. It can happen on Windows, Mac or Linux.
In this situation, the board must be completely erased and CircuitPython must be reloaded onto the board.
Easiest Way: Use storage.erase_filesystem()
Starting with version 2.3.0, CircuitPython includes a built-in function to erase and reformat the filesystem. If you have anolder version of CircuitPython on your board, you can update to the newest version (https://adafru.it/Amd) to do this.
1. Connect to the CircuitPython REPL (https://adafru.it/Bec) using Mu or a terminal program.2. Type:
CIRCUITPY will be erased and reformatted, and your board will restart. That's it!
Old Way: For the Circuit Playground Express, Feather M0 Express, and Metro M0 Express:
If you are running a version of CircuitPython before 2.3.0, and you don't want to upgrade, or you can't get to the REPL,you can do this.
1. Download the correct erase file:
https://adafru.it/AdI
https://adafru.it/AdI
https://adafru.it/AdJ
https://adafru.it/AdJ
https://adafru.it/AdK
https://adafru.it/AdK
https://adafru.it/AYe
https://adafru.it/AYe
You WILL lose everything on the board when you complete the following steps. If possible, make a copy ofyour code before continuing.
>>> import storage>>> storage.erase_filesystem()
© Adafruit Industries https://learn.adafruit.com/welcome-to-circuitpython Page 68 of 72

2. Double-click the reset button on the board to bring up the boardnameBOOT drive. 3. Drag the erase .uf2 file to the boardnameBOOT drive. 4. The onboard NeoPixel will turn blue, indicating the erase has started. 5. After approximately 15 seconds, the NeoPixel will start flashing green. 6. Double-click the reset button on the board to bring up the boardnameBOOT drive. 7. Drag the appropriate latest release of CircuitPython (https://adafru.it/Amd) .uf2 file tothe boardnameBOOT drive.
It should reboot automatically and you should see CIRCUITPY in your file explorer again.
If the LED flashes red during step 5, it means the erase has failed. Repeat the steps starting with 2.
If you haven't already downloaded the latest release of CircuitPython for your board, check out the installationpage (https://adafru.it/Amd). You'll also need to install your libraries and code!
Old Way: For Non-Express Boards with a UF2 bootloader (Gemma M0, Trinket M0):
If you are running a version of CircuitPython before 2.3.0, and you don't want to upgrade, or you can't get to the REPL,you can do this.
1. Download the erase file:
https://adafru.it/AdL
https://adafru.it/AdL
2. Double-click the reset button on the board to bring up the boardnameBOOT drive. 3. Drag the erase .uf2 file to the boardnameBOOT drive. 4. The boot LED will start flashing again, and the boardnameBOOT drive will reappear. 5. Drag the appropriate latest release CircuitPython (https://adafru.it/Amd) .uf2 file to the boardnameBOOT drive.
It should reboot automatically and you should see CIRCUITPY in your file explorer again.
If you haven't already downloaded the latest release of CircuitPython for your board, check out the installationpage (https://adafru.it/Amd) You'll also need to install your libraries and code!
Old Way: For non-Express Boards without a UF2 bootloader (Feather M0 Basic Proto,Feather Adalogger, Arduino Zero):
If you are running a version of CircuitPython before 2.3.0, and you don't want to upgrade, or you can't get to the REPL,you can do this.
Just follow these directions to reload CircuitPython using bossac (https://adafru.it/Bed), which will erase and re-createCIRCUITPY .
Running Out of File Space on Non-Express Boards
The file system on the board is very tiny. (Smaller than an ancient floppy disk.) So, its likely you'll run out of space butdon't panic! There are a couple ways to free up space.
The board ships with the Windows 7 serial driver too! Feel free to delete that if you don't need it or have alreadyinstalled it. Its ~12KiB or so.
© Adafruit Industries https://learn.adafruit.com/welcome-to-circuitpython Page 69 of 72

Delete something!
The simplest way of freeing up space is to delete files from the drive. Perhaps there are libraries in the lib folder thatyou aren't using anymore or test code that isn't in use.
Use tabs
One unique feature of Python is that the indentation of code matters. Usually the recommendation is to indent codewith four spaces for every indent. In general, we recommend that too. However, one trick to storing more human-readable code is to use a single tab character for indentation. This approach uses 1/4 of the space for indentation andcan be significant when we're counting bytes.
Mac OSX loves to add extra files.
Luckily you can disable some of the extra hidden files that Mac OSX adds by running a few commands to disablesearch indexing and create zero byte placeholders. Follow the steps below to maximize the amount of space availableon OSX:
Prevent & Remove Mac OSX Hidden Files
First find the volume name for your board. With the board plugged in run this command in a terminal to list all thevolumes:
Look for a volume with a name like CIRCUITPY (the default for CircuitPython). The full path to the volume isthe /Volumes/CIRCUITPY path.
Now follow the steps from this question (https://adafru.it/u1c) to run these terminal commands that stop hidden filesfrom being created on the board:
Replace /Volumes/CIRCUITPY in the commands above with the full path to your board's volume if it's different. At thispoint all the hidden files should be cleared from the board and some hidden files will be prevented from being created.
However there are still some cases where hidden files will be created by Mac OSX. In particular if you copy a file that
ls -l /Volumes
mdutil -i off /Volumes/CIRCUITPYcd /Volumes/CIRCUITPYrm -rf .{,_.}{fseventsd,Spotlight-V*,Trashes}mkdir .fseventsdtouch .fseventsd/no_log .metadata_never_index .Trashescd -
© Adafruit Industries https://learn.adafruit.com/welcome-to-circuitpython Page 70 of 72

was downloaded from the internet it will have special metadata that Mac OSX stores as a hidden file. Luckily you canrun a copy command from the terminal to copy files without this hidden metadata file. See the steps below.
Copy Files on Mac OSX Without Creating Hidden Files
Once you've disabled and removed hidden files with the above commands on Mac OSX you need to be careful to copyfiles to the board with a special command that prevents future hidden files from being created. Unfortunatelyyou cannot use drag and drop copy in Finder because it will still create these hidden extended attribute files in somecases (for files downloaded from the internet, like Adafruit's modules).
To copy a file or folder use the -X option for the cp command in a terminal. For example to copy a foo.mpy file to theboard use a command like:
Or to copy a folder and all of its child files/folders use a command like:
Other Mac OSX Space-Saving Tips
If you'd like to see the amount of space used on the drive and manually delete hidden files here's how to do so. Firstlist the amount of space used on the CIRCUITPY drive with the df command:
Lets remove the ._ files first.
cp -X foo.mpy /Volumes/CIRCUITPY
cp -rX folder_to_copy /Volumes/CIRCUITPY
© Adafruit Industries https://learn.adafruit.com/welcome-to-circuitpython Page 71 of 72

Whoa! We have 13Ki more than before! This space can now be used for libraries and code!
© Adafruit Industries Last Updated: 2018-07-16 06:11:04 PM UTC Page 72 of 72