Embed Size (px)
Citation preview
Welcome to Mobile Beta Management
Welcome to Applause!Your success is our priority and we want to make sure Mobile Beta Management (MBM) enables you to execute successful beta programs. This Getting Started Guide is designed to familiarize you with the dashboard and get you up and running as quickly as possible.
If you have any additional questions, or run into any technical issues there are a number of resources available to you, including:
Online Help: http://help.applause.comEmail Support: [email protected] (available Monday - Friday, 9:00-5:00 EST)
Table of Contents:Step 1: Add a New AppStep 2: Invite Additional Team MembersStep 3: Add Beta Participants and Create Distribution GroupsStep 4: Customize Look and FeelStep 5: Integrate Mobile Beta Management SDKStep 6: Upload a BuildStep 7: OTA Build DistributionThe Mobile Beta Management DashboardReviewing SessionsReviewing Feedback, Bug, and Crash ReportsIntegrating with Bug Tracking Systems
2234456
89
7
10
Welcome to Mobile Beta Management
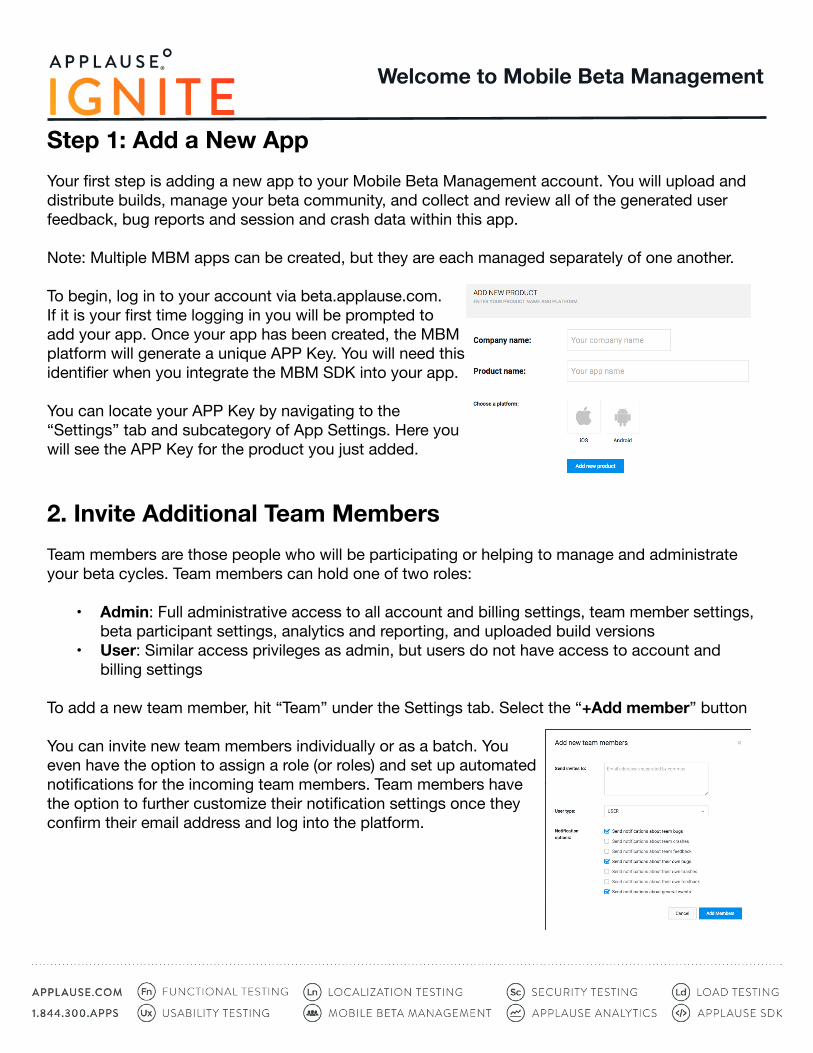
Step 1: Add a New AppYour first step is adding a new app to your Mobile Beta Management account. You will upload and distribute builds, manage your beta community, and collect and review all of the generated user feedback, bug reports and session and crash data within this app.
Note: Multiple MBM apps can be created, but they are each managed separately of one another.
To begin, log in to your account via beta.applause.com. If it is your first time logging in you will be prompted to add your app. Once your app has been created, the MBM platform will generate a unique APP Key. You will need this identifier when you integrate the MBM SDK into your app.
You can locate your APP Key by navigating to the “Settings” tab and subcategory of App Settings. Here you will see the APP Key for the product you just added.
2. Invite Additional Team MembersTeam members are those people who will be participating or helping to manage and administrate your beta cycles. Team members can hold one of two roles:
• Admin: Full administrative access to all account and billing settings, team member settings, beta participant settings, analytics and reporting, and uploaded build versions
• User: Similar access privileges as admin, but users do not have access to account and billing settings
To add a new team member, hit “Team” under the Settings tab. Select the “+Add member” button
You can invite new team members individually or as a batch. You even have the option to assign a role (or roles) and set up automated notifications for the incoming team members. Team members have the option to further customize their notification settings once they confirm their email address and log into the platform.
Welcome to Mobile Beta Management
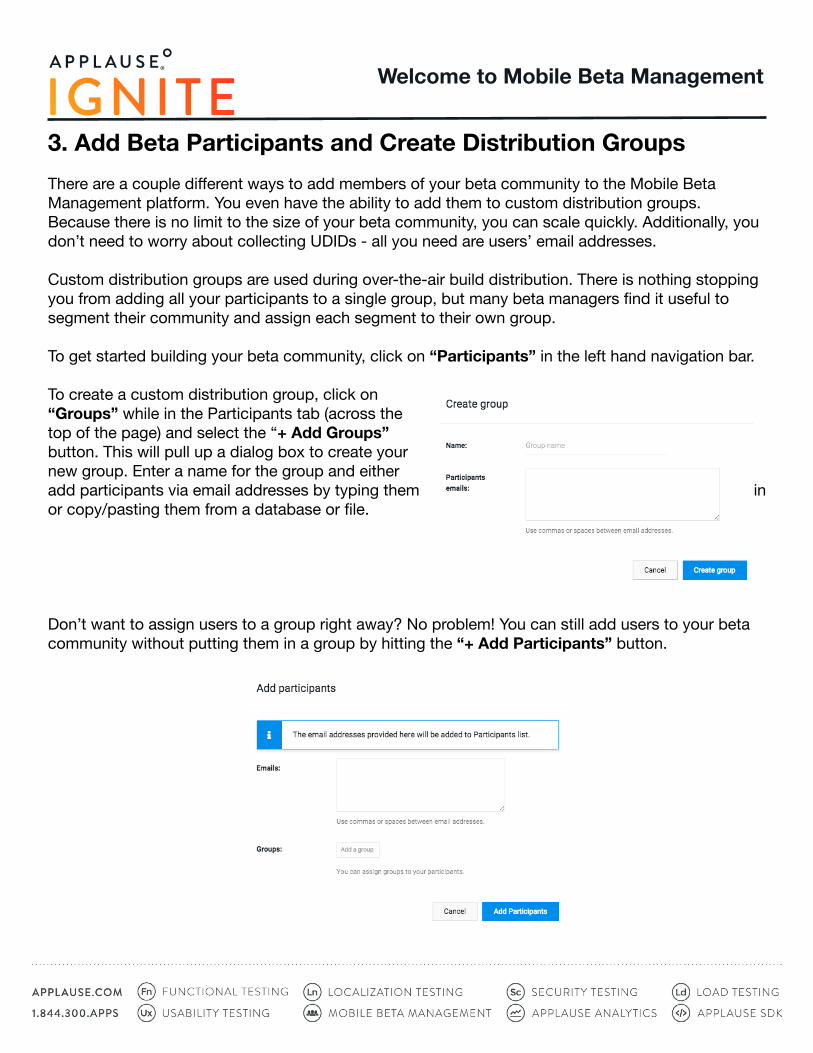
3. Add Beta Participants and Create Distribution GroupsThere are a couple different ways to add members of your beta community to the Mobile Beta Management platform. You even have the ability to add them to custom distribution groups. Because there is no limit to the size of your beta community, you can scale quickly. Additionally, you don’t need to worry about collecting UDIDs - all you need are users’ email addresses.
Custom distribution groups are used during over-the-air build distribution. There is nothing stopping you from adding all your participants to a single group, but many beta managers find it useful to segment their community and assign each segment to their own group.
To get started building your beta community, click on “Participants” in the left hand navigation bar.
To create a custom distribution group, click on “Groups” while in the Participants tab (across the top of the page) and select the “+ Add Groups” button. This will pull up a dialog box to create your new group. Enter a name for the group and either add participants via email addresses by typing them in or copy/pasting them from a database or file.
Don’t want to assign users to a group right away? No problem! You can still add users to your beta community without putting them in a group by hitting the “+ Add Participants” button.
Welcome to Mobile Beta Management
4. Customize Look and FeelMobile Beta Management offers the ability to customize the look and feel of everything participant-facing. This includes emails and the in-app Mobile Beta Management UI so that anything your participants interact with are branded as your own - they will never know you are using a separate tool.
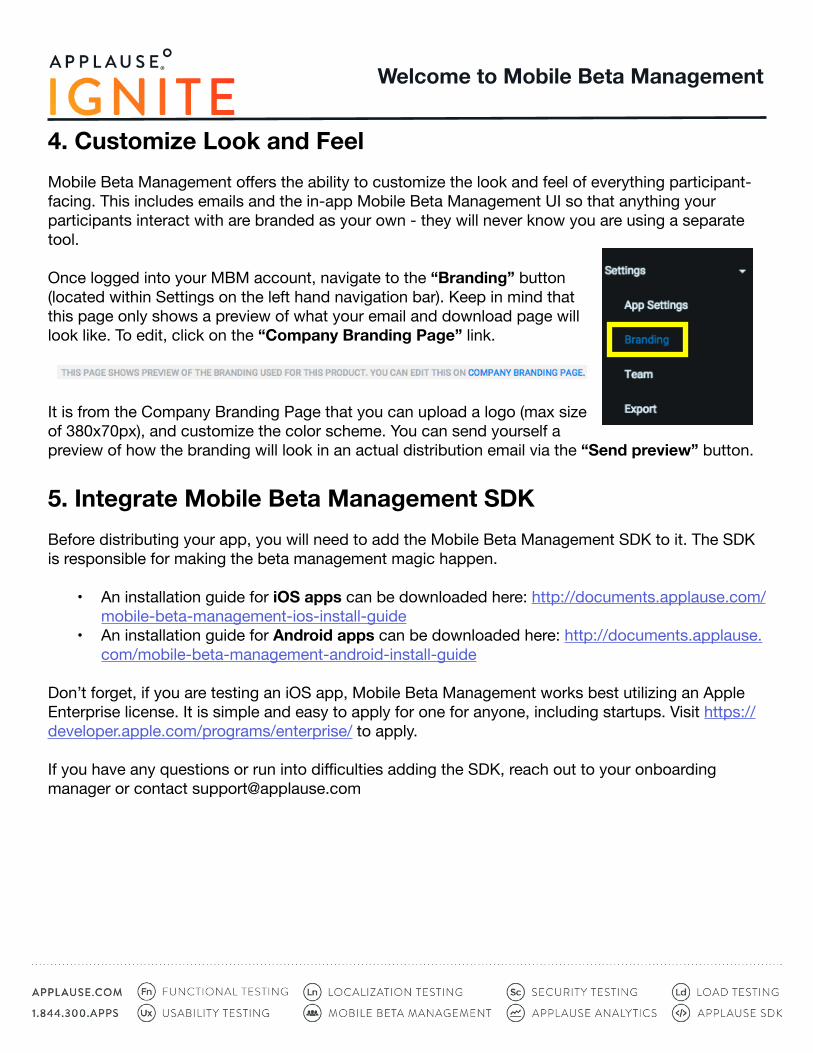
Once logged into your MBM account, navigate to the “Branding” button (located within Settings on the left hand navigation bar). Keep in mind that this page only shows a preview of what your email and download page will look like. To edit, click on the “Company Branding Page” link.
It is from the Company Branding Page that you can upload a logo (max size of 380x70px), and customize the color scheme. You can send yourself a preview of how the branding will look in an actual distribution email via the “Send preview” button.
5. Integrate Mobile Beta Management SDKBefore distributing your app, you will need to add the Mobile Beta Management SDK to it. The SDK is responsible for making the beta management magic happen.
• An installation guide for iOS apps can be downloaded here: http://documents.applause.com/mobile-beta-management-ios-install-guide
• An installation guide for Android apps can be downloaded here: http://documents.applause.com/mobile-beta-management-android-install-guide
Don’t forget, if you are testing an iOS app, Mobile Beta Management works best utilizing an Apple Enterprise license. It is simple and easy to apply for one for anyone, including startups. Visit https://developer.apple.com/programs/enterprise/ to apply.
If you have any questions or run into difficulties adding the SDK, reach out to your onboarding manager or contact [email protected]
Welcome to Mobile Beta Management
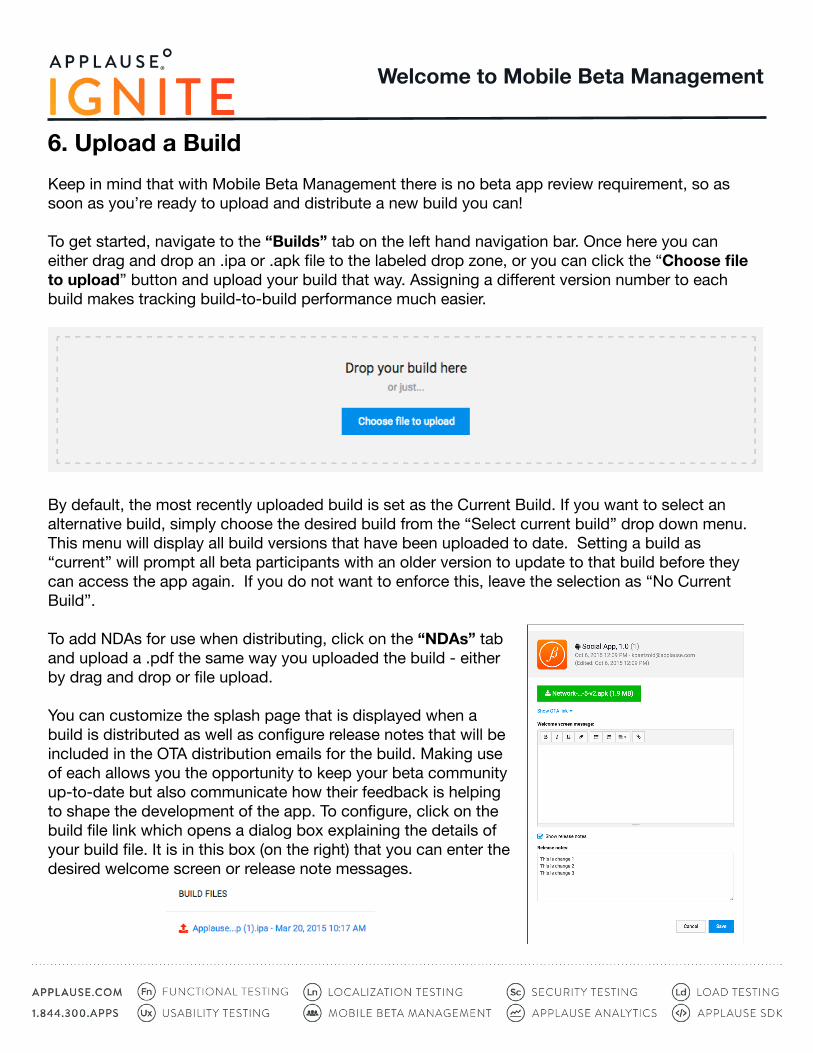
6. Upload a BuildKeep in mind that with Mobile Beta Management there is no beta app review requirement, so as soon as you’re ready to upload and distribute a new build you can!
To get started, navigate to the “Builds” tab on the left hand navigation bar. Once here you can either drag and drop an .ipa or .apk file to the labeled drop zone, or you can click the “Choosefileto upload” button and upload your build that way. Assigning a different version number to each build makes tracking build-to-build performance much easier.
By default, the most recently uploaded build is set as the Current Build. If you want to select an alternative build, simply choose the desired build from the “Select current build” drop down menu. This menu will display all build versions that have been uploaded to date. Setting a build as “current” will prompt all beta participants with an older version to update to that build before they can access the app again. If you do not want to enforce this, leave the selection as “No Current Build”.
To add NDAs for use when distributing, click on the “NDAs” tab and upload a .pdf the same way you uploaded the build - either by drag and drop or file upload.
You can customize the splash page that is displayed when a build is distributed as well as configure release notes that will be included in the OTA distribution emails for the build. Making use of each allows you the opportunity to keep your beta community up-to-date but also communicate how their feedback is helping to shape the development of the app. To configure, click on the build file link which opens a dialog box explaining the details of your build file. It is in this box (on the right) that you can enter the desired welcome screen or release note messages.

Welcome to Mobile Beta Management
7. OTA Build DistributionYou’ve added your app, branded your emails and in-app messaging, uploaded your build, and attached your NDAs. Now it’s time to distribute your build to your beta community. To get started, select “Distribution” on the left side navigation bar. Once here, select the “Distribute App” button.
Keep in mind that the bottom portion of this page shows your distribution history so you can keep track of the dates, versions, builds and number of participants for builds you have already sent out.
The “Distribute App” button opens a dialog box that allows you to select the build, NDA, and user tags (these are your user groups) that you would like to send the build to. If an NDA is included, users will have to formally accept the NDA before they are allowed to download and install the build.
By clicking “Next” you will be presented with a confirmation screen that reports the build file you are sending, and the number of participants the build will be going to. To proceed, hit the “Distribute” button.
Welcome to Mobile Beta Management
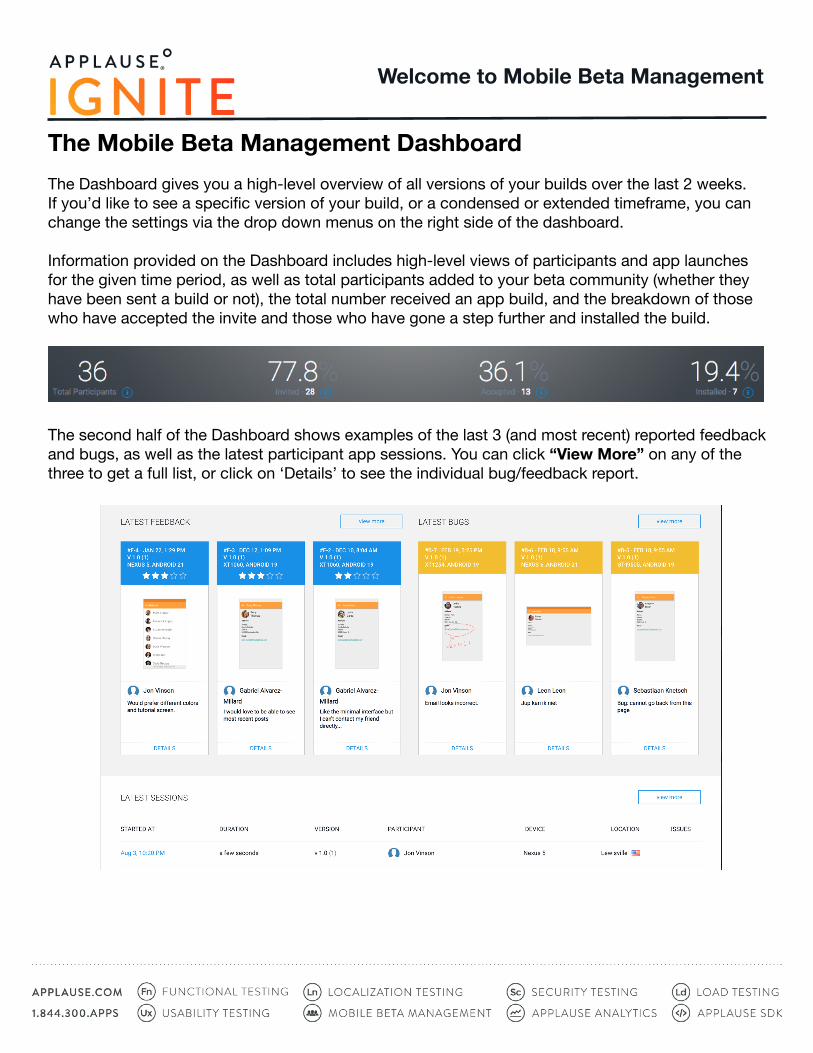
The Mobile Beta Management DashboardThe Dashboard gives you a high-level overview of all versions of your builds over the last 2 weeks. If you’d like to see a specific version of your build, or a condensed or extended timeframe, you can change the settings via the drop down menus on the right side of the dashboard.
Information provided on the Dashboard includes high-level views of participants and app launches for the given time period, as well as total participants added to your beta community (whether they have been sent a build or not), the total number received an app build, and the breakdown of those who have accepted the invite and those who have gone a step further and installed the build.
The second half of the Dashboard shows examples of the last 3 (and most recent) reported feedback and bugs, as well as the latest participant app sessions. You can click “View More” on any of the three to get a full list, or click on ‘Details’ to see the individual bug/feedback report.
Welcome to Mobile Beta Management
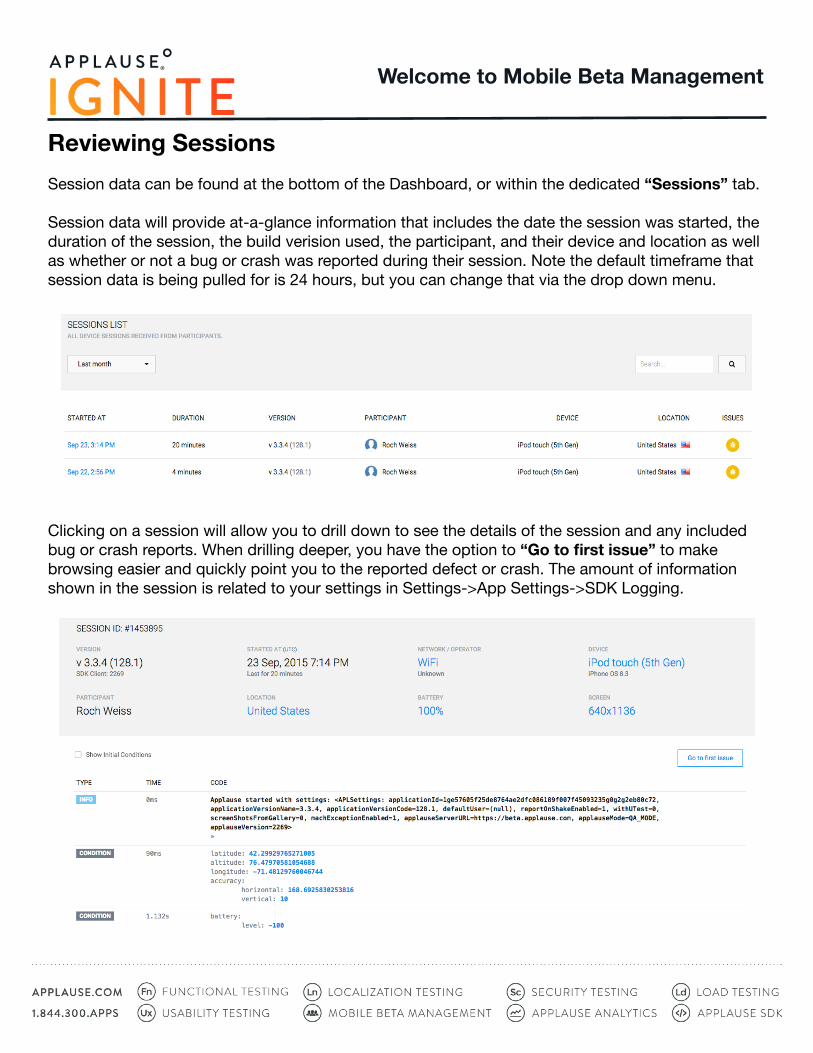
Reviewing SessionsSession data can be found at the bottom of the Dashboard, or within the dedicated “Sessions” tab.
Session data will provide at-a-glance information that includes the date the session was started, the duration of the session, the build verision used, the participant, and their device and location as well as whether or not a bug or crash was reported during their session. Note the default timeframe that session data is being pulled for is 24 hours, but you can change that via the drop down menu.
Clicking on a session will allow you to drill down to see the details of the session and any included bug or crash reports. When drilling deeper, you have the option to“Gotofirstissue”to make browsing easier and quickly point you to the reported defect or crash. The amount of information shown in the session is related to your settings in Settings->App Settings->SDK Logging.
Welcome to Mobile Beta Management
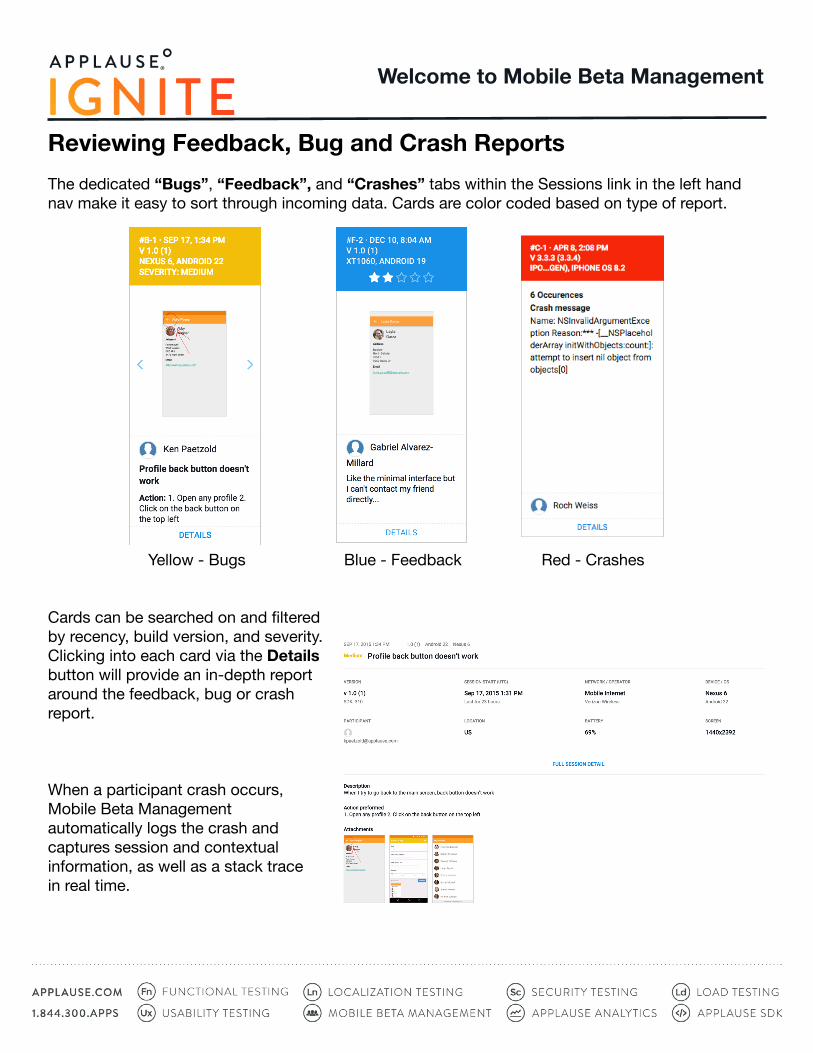
Reviewing Feedback, Bug and Crash ReportsThe dedicated “Bugs”, “Feedback”, and “Crashes” tabs within the Sessions link in the left hand nav make it easy to sort through incoming data. Cards are color coded based on type of report.
Yellow - Bugs Blue - Feedback Red - Crashes
Cards can be searched on and filtered by recency, build version, and severity. Clicking into each card via the Details button will provide an in-depth report around the feedback, bug or crash report.
When a participant crash occurs, Mobile Beta Management automatically logs the crash and captures session and contextual information, as well as a stack trace in real time.
Welcome to Mobile Beta Management
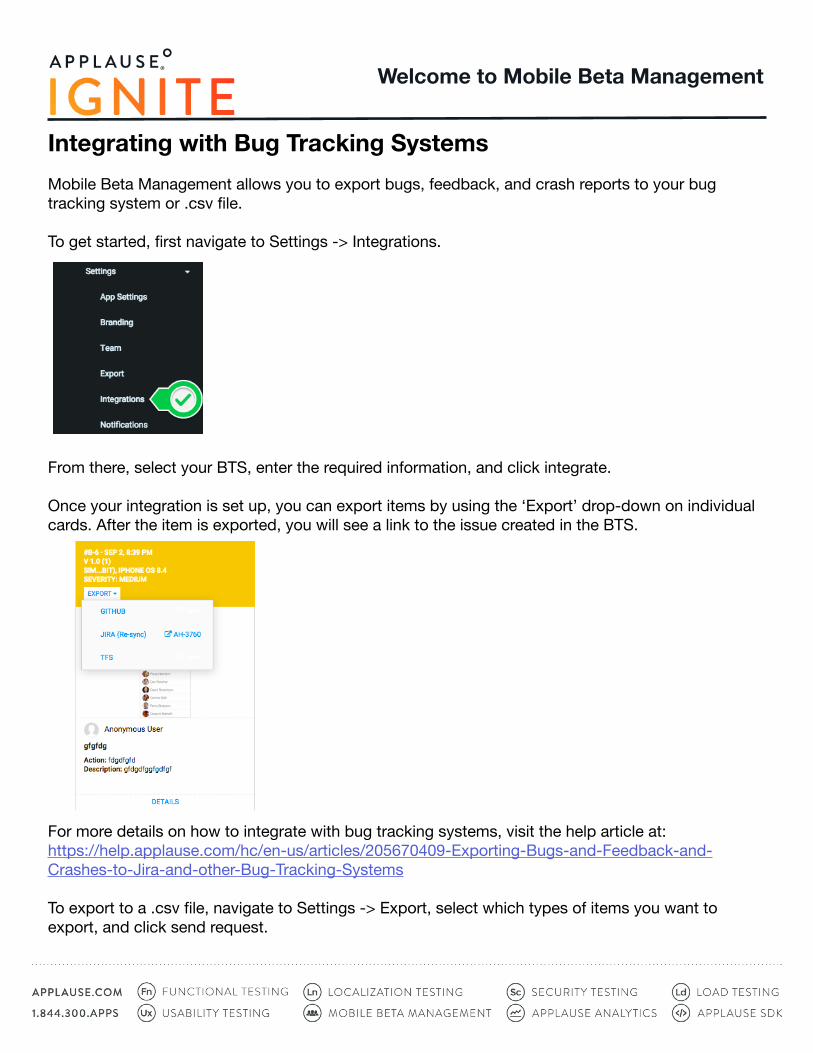
Integrating with Bug Tracking SystemsMobile Beta Management allows you to export bugs, feedback, and crash reports to your bug tracking system or .csv file.
To get started, first navigate to Settings -> Integrations.
From there, select your BTS, enter the required information, and click integrate.
Once your integration is set up, you can export items by using the ‘Export’ drop-down on individual cards. After the item is exported, you will see a link to the issue created in the BTS.
For more details on how to integrate with bug tracking systems, visit the help article at:https://help.applause.com/hc/en-us/articles/205670409-Exporting-Bugs-and-Feedback-and-Crashes-to-Jira-and-other-Bug-Tracking-Systems
To export to a .csv file, navigate to Settings -> Export, select which types of items you want to export, and click send request.