Embed Size (px)
Citation preview
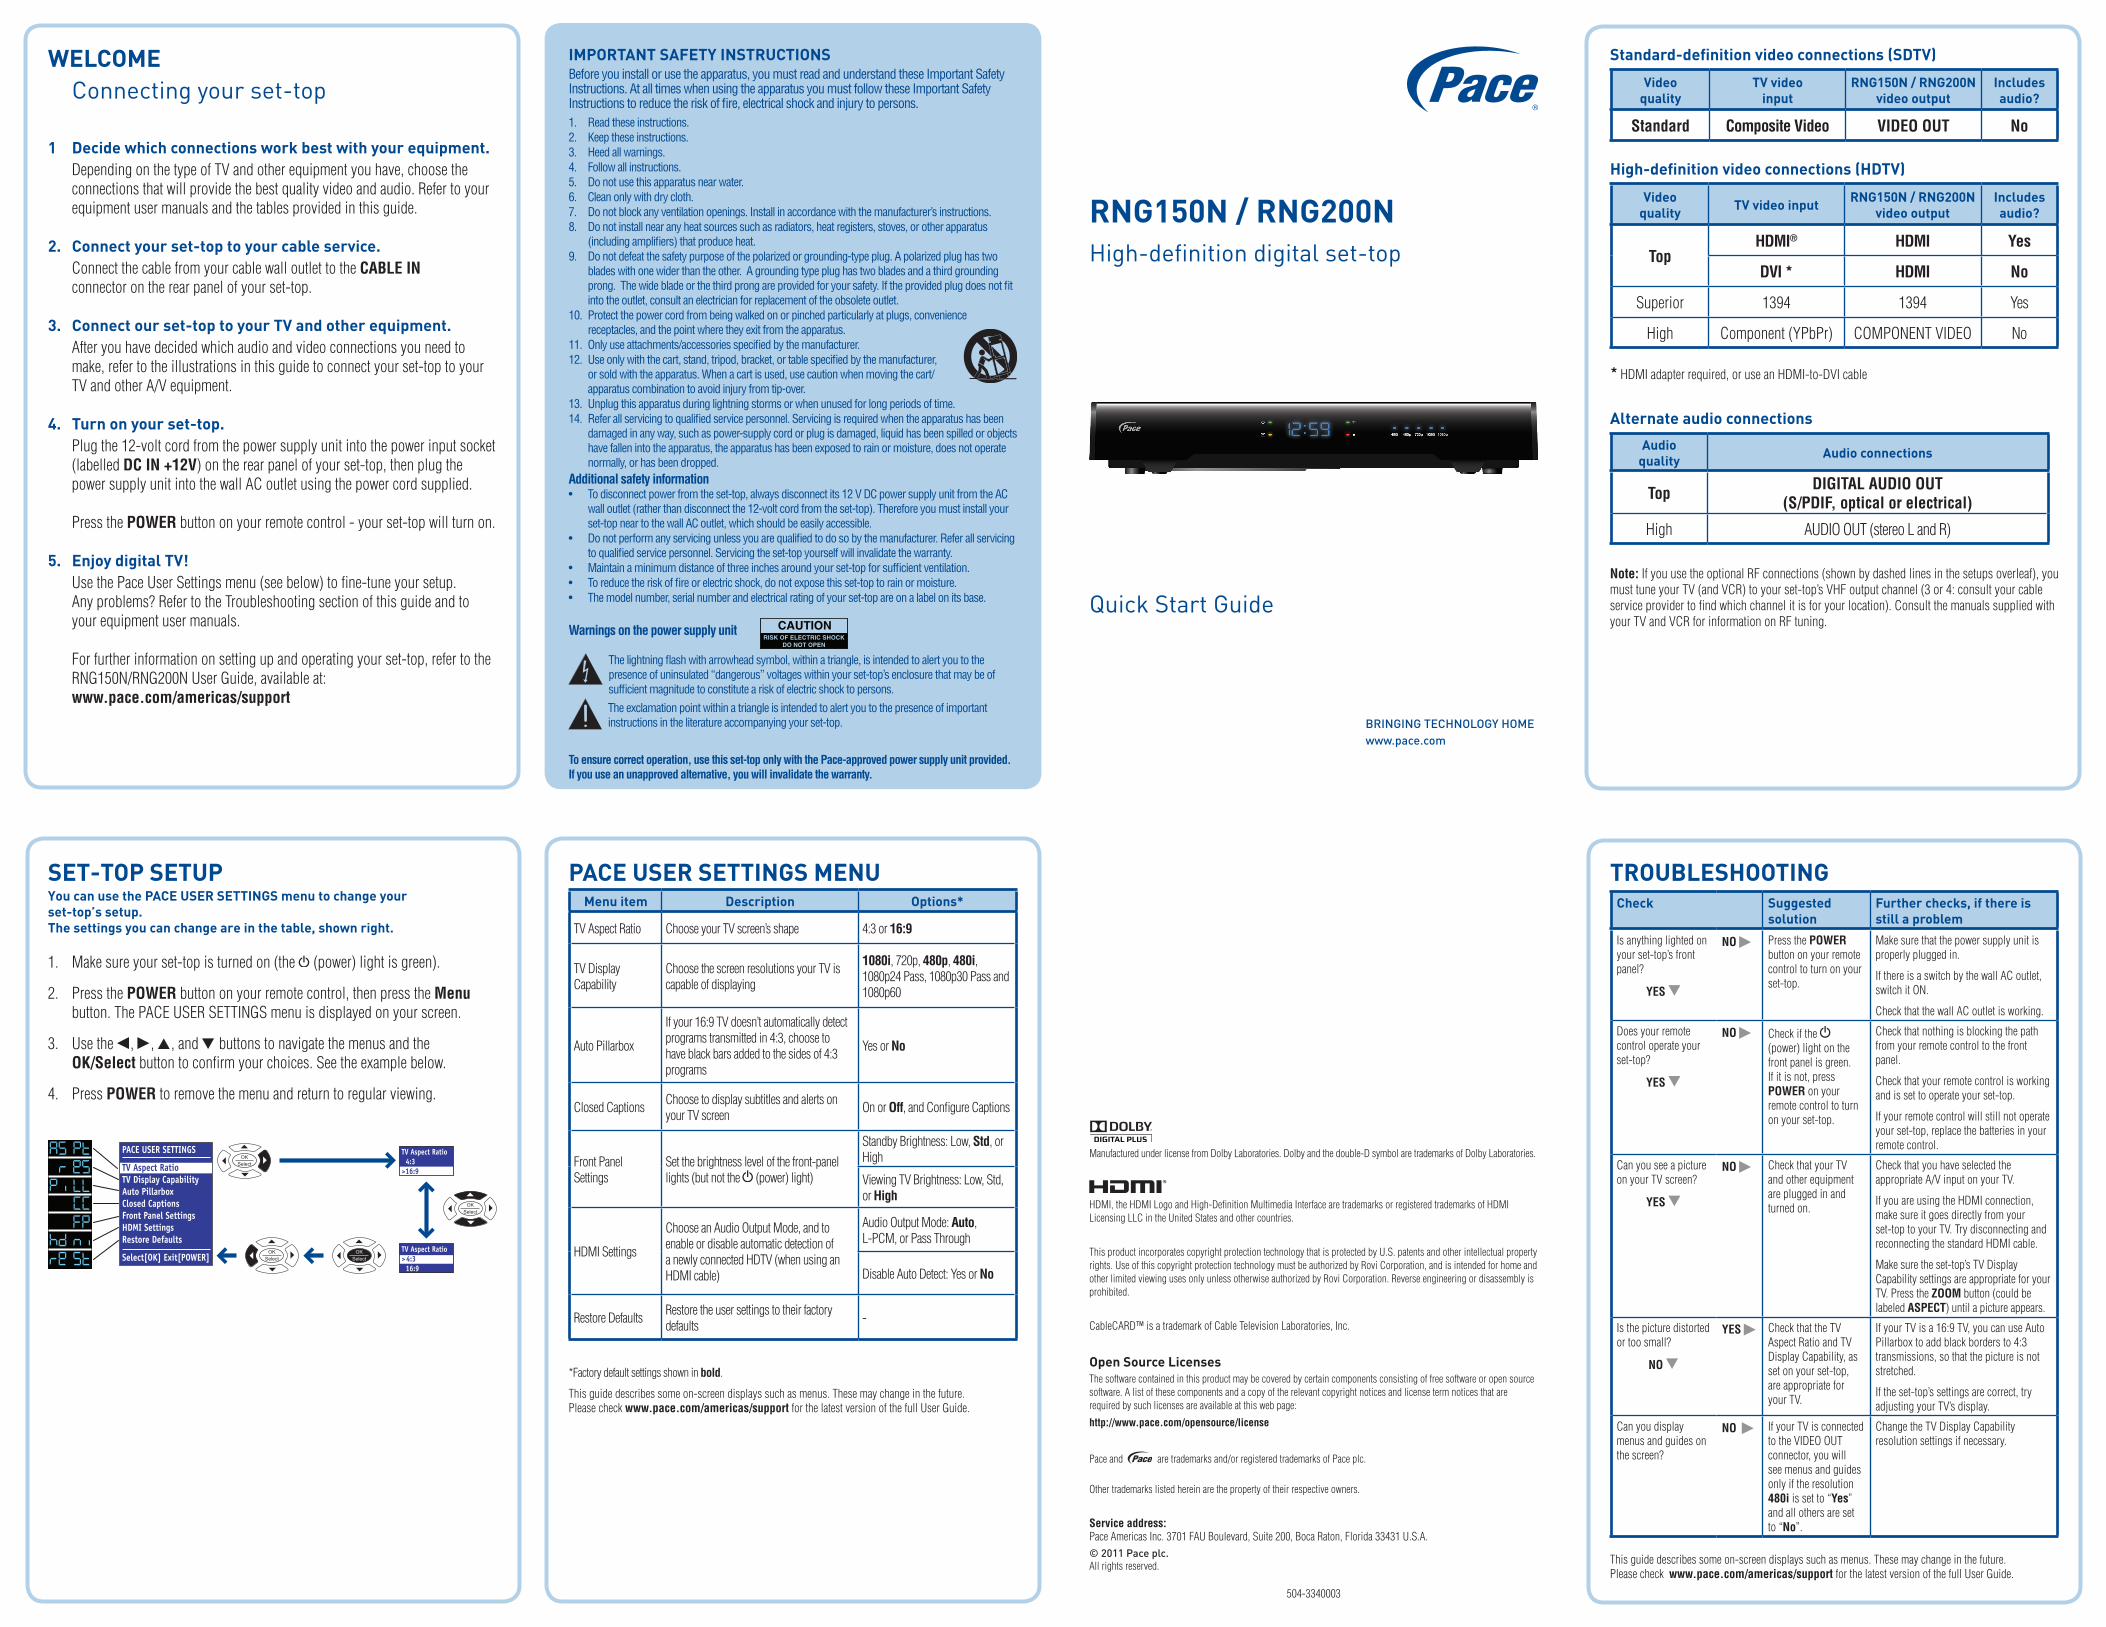
WELCOMEConnecting your set-top
1 Decidewhichconnectionsworkbestwithyourequipment. DependingonthetypeofTVandotherequipmentyouhave,choosethe
connectionsthatwillprovidethebestqualityvideoandaudio.Refertoyourequipmentusermanualsandthetablesprovidedinthisguide.
2. Connectyourset-toptoyourcableservice. ConnectthecablefromyourcablewalloutlettotheCABLE IN
connectorontherearpanelofyourset-top.
3. Connectourset-toptoyourTVandotherequipment. Afteryouhavedecidedwhichaudioandvideoconnectionsyouneedto
make,refertotheillustrationsinthisguidetoconnectyourset-toptoyourTVandotherA/Vequipment.
4. Turnonyourset-top. Plugthe12-voltcordfromthepowersupplyunitintothepowerinputsocket
(labelledDC IN +12V)ontherearpanelofyourset-top,thenplugthepowersupplyunitintothewallACoutletusingthepowercordsupplied.
PressthePOWERbuttononyourremotecontrol-yourset-topwillturnon.
5. EnjoydigitalTV! UsethePaceUserSettingsmenu(seebelow)tofine-tuneyoursetup.
Anyproblems?RefertotheTroubleshootingsectionofthisguideandtoyourequipmentusermanuals.
Forfurtherinformationonsettingupandoperatingyourset-top,refertotheRNG150N/RNG200NUserGuide,availableat:www.pace.com/americas/support
TROUBLESHOOTINGCheck Suggested
solutionFurtherchecks,ifthereisstillaproblem
Isanythinglightedonyourset-top’sfrontpanel?
YES D
NOR PressthePOWERbuttononyourremotecontroltoturnonyourset-top.
Makesurethatthepowersupplyunitisproperlypluggedin.
IfthereisaswitchbythewallACoutlet,switchitON.
CheckthatthewallACoutletisworking.
Doesyourremotecontroloperateyourset-top?
YES D
NOR Checkifthe (power)lightonthefrontpanelisgreen.Ifitisnot,pressPOWERonyourremotecontroltoturnonyourset-top.
Checkthatnothingisblockingthepathfromyourremotecontroltothefrontpanel.
Checkthatyourremotecontrolisworkingandissettooperateyourset-top.
Ifyourremotecontrolwillstillnotoperateyourset-top,replacethebatteriesinyourremotecontrol.
CanyouseeapictureonyourTVscreen?
YES D
NOR CheckthatyourTVandotherequipmentarepluggedinandturnedon.
CheckthatyouhaveselectedtheappropriateA/VinputonyourTV.
IfyouareusingtheHDMIconnection,makesureitgoesdirectlyfromyourset-toptoyourTV.TrydisconnectingandreconnectingthestandardHDMIcable.
Makesuretheset-top’sTVDisplayCapabilitysettingsareappropriateforyourTV.PresstheZOOMbutton(couldbelabeledASPECT)untilapictureappears.
Isthepicturedistortedortoosmall?
NO D
YESR CheckthattheTVAspectRatioandTVDisplayCapability,assetonyourset-top,areappropriateforyourTV.
IfyourTVisa16:9TV,youcanuseAutoPillarboxtoaddblackbordersto4:3transmissions,sothatthepictureisnotstretched.
Iftheset-top’ssettingsarecorrect,tryadjustingyourTV’sdisplay.
Canyoudisplaymenusandguidesonthescreen?
NOR IfyourTVisconnectedtotheVIDEOOUTconnector,youwillseemenusandguidesonlyiftheresolution480iissetto“Yes”andallothersaresetto“No”.
ChangetheTVDisplayCapabilityresolutionsettingsifnecessary.
RNG150N/RNG200N
Quick Start Guide
Thisguidedescribessomeon-screendisplayssuchasmenus.Thesemaychangeinthefuture.Pleasecheckwww.pace.com/americas/supportforthelatestversionofthefullUserGuide.
ManufacturedunderlicensefromDolbyLaboratories.Dolbyandthedouble-DsymbolaretrademarksofDolbyLaboratories.
®
HDMI,theHDMILogoandHigh-DefinitionMultimediaInterfacearetrademarksorregisteredtrademarksofHDMILicensingLLCintheUnitedStatesandothercountries.
ThisproductincorporatescopyrightprotectiontechnologythatisprotectedbyU.S.patentsandotherintellectualpropertyrights.UseofthiscopyrightprotectiontechnologymustbeauthorizedbyRoviCorporation,andisintendedforhomeandotherlimitedviewingusesonlyunlessotherwiseauthorizedbyRoviCorporation.Reverseengineeringordisassemblyisprohibited.
CableCARD™isatrademarkofCableTelevisionLaboratories,Inc.
OpenSourceLicensesThesoftwarecontainedinthisproductmaybecoveredbycertaincomponentsconsistingoffreesoftwareoropensourcesoftware.Alistofthesecomponentsandacopyoftherelevantcopyrightnoticesandlicensetermnoticesthatarerequiredbysuchlicensesareavailableatthiswebpage:
http://www.pace.com/opensource/license
Paceand aretrademarksand/orregisteredtrademarksofPaceplc.
Othertrademarkslistedhereinarethepropertyoftheirrespectiveowners.
Service address:PaceAmericasInc.3701FAUBoulevard,Suite200,BocaRaton,Florida33431U.S.A.
© 2011 Pace plc. Allrightsreserved.
504-3340003
High-definition digital set-top
Standard-definitionvideoconnections(SDTV)
Videoquality
TVvideoinput
RNG150N/RNG200Nvideooutput
Includesaudio?
Standard Composite Video VIDEO OUT No
High-definitionvideoconnections(HDTV)
Videoquality TVvideoinput RNG150N/RNG200N
videooutputIncludesaudio?
TopHDMI® HDMI Yes
DVI * HDMI No
Superior 1394 1394 Yes
High Component(YPbPr) COMPONENTVIDEO No
*HDMIadapterrequired,oruseanHDMI-to-DVIcable
Alternateaudioconnections
Audioquality Audioconnections
TopDIGITAL AUDIO OUT
(S/PDIF, optical or electrical)
High AUDIOOUT(stereoLandR)
Note:IfyouusetheoptionalRFconnections(shownbydashedlinesinthesetupsoverleaf),youmusttuneyourTV(andVCR)toyourset-top’sVHFoutputchannel(3or4:consultyourcableserviceprovidertofindwhichchannelitisforyourlocation).ConsultthemanualssuppliedwithyourTVandVCRforinformationonRFtuning.
IMPORTANTSAFETYINSTRUCTIONSBefore you install or use the apparatus, you must read and understand these Important Safety Instructions. At all times when using the apparatus you must follow these Important Safety Instructions to reduce the risk of fire, electrical shock and injury to persons.1. Read these instructions.2. Keep these instructions.3. Heed all warnings.4. Follow all instructions.5. Do not use this apparatus near water.6. Clean only with dry cloth.7. Do not block any ventilation openings. Install in accordance with the manufacturer’s instructions.8. Do not install near any heat sources such as radiators, heat registers, stoves, or other apparatus
(including amplifiers) that produce heat.9. Do not defeat the safety purpose of the polarized or grounding-type plug. A polarized plug has two
blades with one wider than the other. A grounding type plug has two blades and a third grounding prong. The wide blade or the third prong are provided for your safety. If the provided plug does not fit into the outlet, consult an electrician for replacement of the obsolete outlet.
10. Protect the power cord from being walked on or pinched particularly at plugs, convenience receptacles, and the point where they exit from the apparatus.
11. Only use attachments/accessories specified by the manufacturer.12. Use only with the cart, stand, tripod, bracket, or table specified by the manufacturer,
or sold with the apparatus. When a cart is used, use caution when moving the cart/apparatus combination to avoid injury from tip-over.
13. Unplug this apparatus during lightning storms or when unused for long periods of time.14. Refer all servicing to qualified service personnel. Servicing is required when the apparatus has been
damaged in any way, such as power-supply cord or plug is damaged, liquid has been spilled or objects have fallen into the apparatus, the apparatus has been exposed to rain or moisture, does not operate normally, or has been dropped.
Additional safety information• To disconnect power from the set-top, always disconnect its 12 V DC power supply unit from the AC
wall outlet (rather than disconnect the 12-volt cord from the set-top). Therefore you must install your set-top near to the wall AC outlet, which should be easily accessible.
• Do not perform any servicing unless you are qualified to do so by the manufacturer. Refer all servicing to qualified service personnel. Servicing the set-top yourself will invalidate the warranty.
• Maintain a minimum distance of three inches around your set-top for sufficient ventilation.• To reduce the risk of fire or electric shock, do not expose this set-top to rain or moisture.• The model number, serial number and electrical rating of your set-top are on a label on its base.
Warnings on the power supply unit
The lightning flash with arrowhead symbol, within a triangle, is intended to alert you to the presence of uninsulated “dangerous” voltages within your set-top’s enclosure that may be of sufficient magnitude to constitute a risk of electric shock to persons.
The exclamation point within a triangle is intended to alert you to the presence of important instructions in the literature accompanying your set-top.
To ensure correct operation, use this set-top only with the Pace-approved power supply unit provided. If you use an unapproved alternative, you will invalidate the warranty.
SET-TOPSETUPYoucanusethePACEUSERSETTINGSmenutochangeyourset-top’ssetup.Thesettingsyoucanchangeareinthetable,shownright.
1. Makesureyourset-topisturnedon(the (power)lightisgreen).
2. PressthePOWERbuttononyourremotecontrol,thenpresstheMenu button.ThePACEUSERSETTINGSmenuisdisplayedonyourscreen.
3. UsetheL,R,U,andDbuttonstonavigatethemenusandtheOK/Selectbuttontoconfirmyourchoices.Seetheexamplebelow.
4. PressPOWERtoremovethemenuandreturntoregularviewing.
OKSelect
OKSelect
OKSelect
OKSelect
TV Aspect Ratio 4:3>16:9
TV Aspect Ratio> 4:3 16:9
PACE USER SETTINGS
TV Aspect RatioTV Display CapabilityAuto PillarboxClosed CaptionsFront Panel SettingsHDMI SettingsRestore Defaults
Select[OK] Exit[POWER]
PACEUSERSETTINGSMENUMenuitem Description Options*
TVAspectRatio ChooseyourTVscreen’sshape 4:3or16:9
TVDisplayCapability
ChoosethescreenresolutionsyourTViscapableofdisplaying
1080i,720p,480p,480i, 1080p24Pass,1080p30Passand1080p60
AutoPillarbox
Ifyour16:9TVdoesn’tautomaticallydetectprogramstransmittedin4:3,choosetohaveblackbarsaddedtothesidesof4:3programs
YesorNo
ClosedCaptionsChoosetodisplaysubtitlesandalertsonyourTVscreen
OnorOff,andConfigureCaptions
FrontPanelSettings
Setthebrightnesslevelofthefront-panellights(butnotthe (power)light)
StandbyBrightness:Low,Std,orHigh
ViewingTVBrightness:Low,Std,orHigh
HDMISettings
ChooseanAudioOutputMode,andtoenableordisableautomaticdetectionofanewlyconnectedHDTV(whenusinganHDMIcable)
AudioOutputMode:Auto,L-PCM,orPassThrough
DisableAutoDetect:YesorNo
RestoreDefaultsRestoretheusersettingstotheirfactorydefaults
-
*Factorydefaultsettingsshowninbold.
Thisguidedescribessomeon-screendisplayssuchasmenus.Thesemaychangeinthefuture.Pleasecheckwww.pace.com/americas/supportforthelatestversionofthefullUserGuide.
BRINGING TECHNOLOGY HOMEwww.pace.com
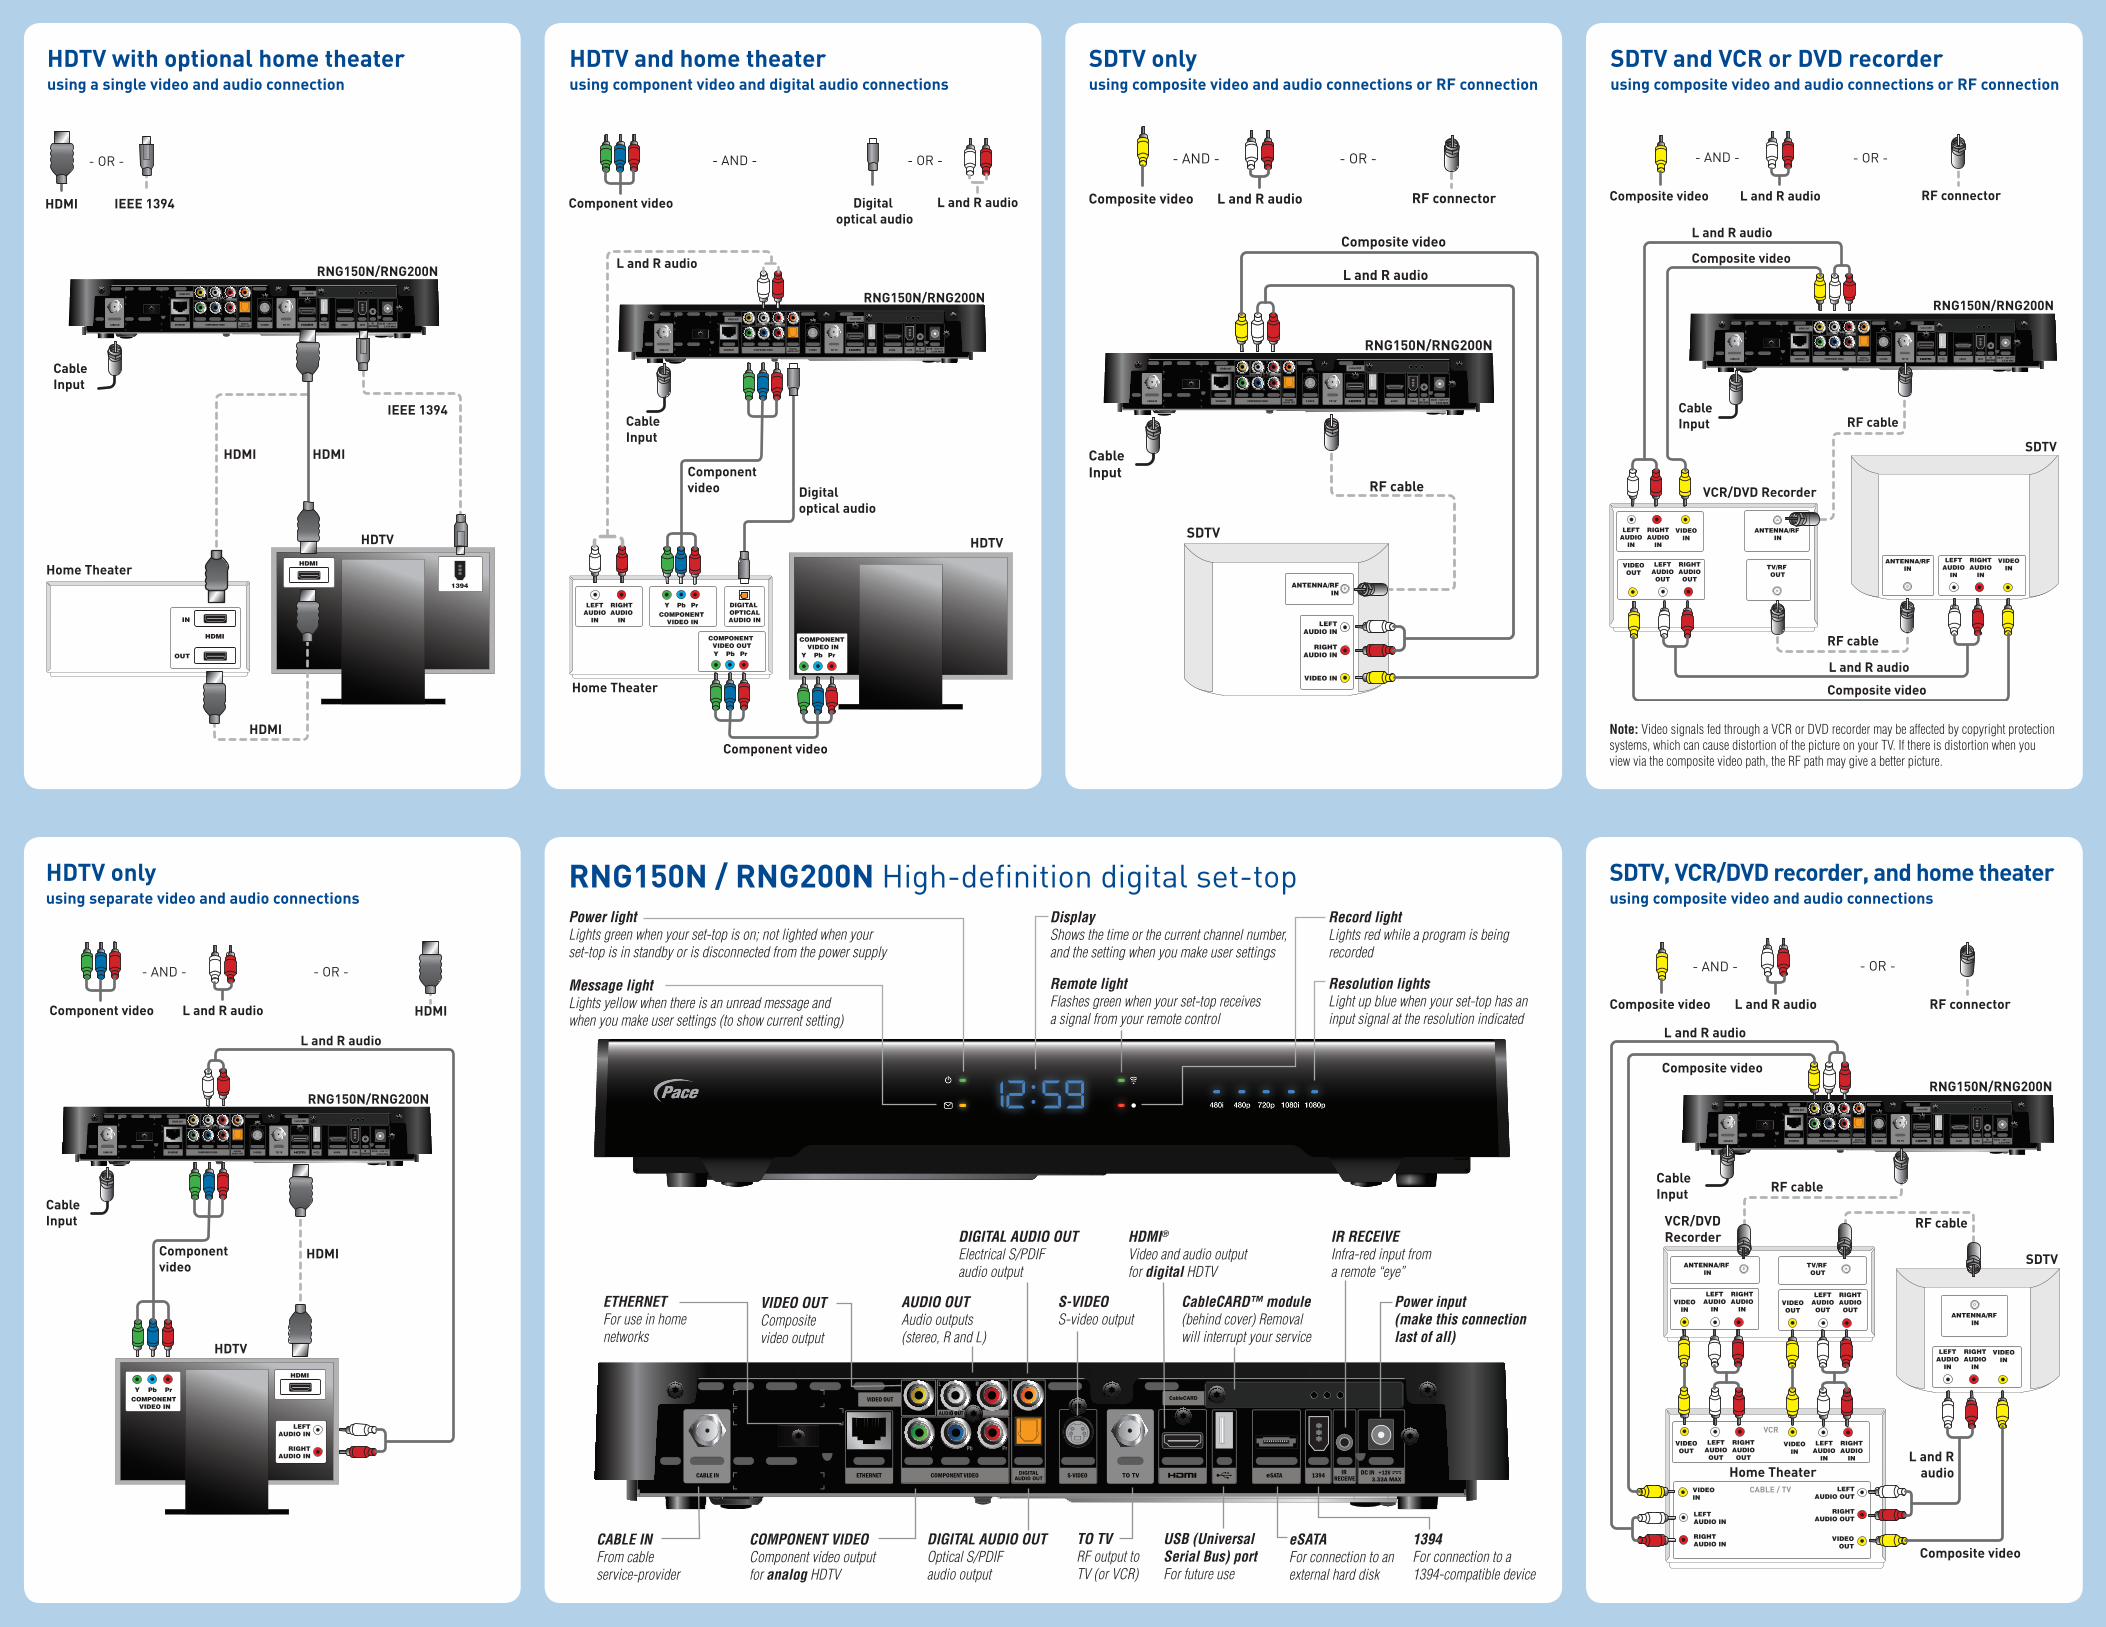
DIGITALAUDIO OUT
COMPONENT VIDEOComponent video output for analog HDTV
AUDIO OUTAudio outputs (stereo, R and L)
CABLE INFrom cable service-provider
VIDEO OUTComposite video output
Power input (make this connection last of all)
DIGITAL AUDIO OUTElectrical S/PDIF audio output
ETHERNETFor use in home networks
HDMI®
Video and audio output for digital HDTV
USB (Universal Serial Bus) portFor future use
IR RECEIVEInfra-red input from a remote “eye”
1394For connection to a 1394-compatible device
CableCARD™ module (behind cover) Removal will interrupt your service
RNG150N/RNG200NHigh-definition digital set-top
HDTVwithoptionalhometheaterusingasinglevideoandaudioconnection
SDTVonlyusingcompositevideoandaudioconnectionsorRFconnection
HDTVonlyusingseparatevideoandaudioconnections
HDTVandhometheaterusingcomponentvideoanddigitalaudioconnections
SDTVandVCRorDVDrecorderusingcompositevideoandaudioconnectionsorRFconnection
DIGITALAUDIO OUT
HDMI
IN
OUT
Home Theater
HDTV
CableInput
- OR -
IEEE 1394HDMI
HDMI
1394
HDMIHDMI
IEEE 1394
HDMI
RNG150N/RNG200N
PbY PrCOMPONENT
VIDEO IN
LEFTAUDIO IN
RIGHTAUDIO IN
HDTV
CableInput
Component video L and R audio
- OR -- AND -
HDMI
HDMI
L and R audio
Componentvideo
HDMI
DIGITALAUDIO OUT
RNG150N/RNG200N
DIGITALAUDIO OUT
LEFTAUDIO
IN
RIGHTAUDIO
IN
DIGITAL OPTICALAUDIO IN
PbY Pr
HDTV
CableInput
Component video L and R audio
Home Theater
COMPONENT VIDEO IN
PbY Pr
COMPONENT VIDEO OUT
PbY Pr
COMPONENT VIDEO IN
- OR -- AND -
Digital optical audio
Digital optical audio
Componentvideo
Component video
L and R audio
RNG150N/RNG200N
LEFTAUDIO IN
RIGHTAUDIO IN
CableInput
SDTV
Composite video L and R audio
VIDEO IN
ANTENNA/RF IN
RF connector
- OR -- AND -
Composite video
L and R audio
RF cable
DIGITALAUDIO OUT
RNG150N/RNG200NDIGITAL
AUDIO OUT
LEFTAUDIO
IN
RIGHTAUDIO
IN
SDTV
CableInput
VCR/DVD Recorder
Composite video L and R audio
VIDEOIN
LEFTAUDIO
IN
RIGHTAUDIO
IN
VIDEOINLEFT
AUDIOOUT
RIGHTAUDIOOUT
VIDEOOUT
ANTENNA/RF IN
ANTENNA/RFINTV/RF
OUT
RF connector
- OR -- AND -
Composite video
Composite video
L and R audio
L and R audio
RF cable
RF cable
RNG150N/RNG200N
DIGITALAUDIO OUT
SDTV
CableInput
VCR/DVD Recorder
- AND -
Composite video L and R audio
LEFTAUDIO
IN
RIGHTAUDIO
IN
LEFTAUDIO
IN
RIGHTAUDIO
IN
VIDEOIN
VIDEOIN
LEFTAUDIOOUT
RIGHTAUDIOOUT
VIDEOOUT
LEFTAUDIOOUT
RIGHTAUDIOOUT
VIDEOOUT
LEFTAUDIO
IN
RIGHTAUDIO
IN
VIDEOIN
LEFTAUDIO OUT
RIGHTAUDIO OUT
VIDEOOUT
LEFTAUDIO IN
RIGHTAUDIO IN
VIDEOIN
CABLE / TV
VCR
Home Theater
ANTENNA/RF IN
TV/RF OUT
ANTENNA/RF IN
RF connector
- OR -
Composite video
L and R audio
RF cable
RF cable
Composite video
L and Raudio
RNG150N/RNG200N
Power lightLights green when your set-top is on; not lighted when your set-top is in standby or is disconnected from the power supply
Remote lightFlashes green when your set-top receives a signal from your remote control
Resolution lightsLight up blue when your set-top has an input signal at the resolution indicated
Message lightLights yellow when there is an unread message and when you make user settings (to show current setting)
TO TVRF output to TV (or VCR)
S-VIDEOS-video output
DIGITAL AUDIO OUTOptical S/PDIF audio output
eSATAFor connection to an external hard disk
Record lightLights red while a program is being recorded
DisplayShows the time or the current channel number, and the setting when you make user settings
Note:VideosignalsfedthroughaVCRorDVDrecordermaybeaffectedbycopyrightprotectionsystems,whichcancausedistortionofthepictureonyourTV.Ifthereisdistortionwhenyouviewviathecompositevideopath,theRFpathmaygiveabetterpicture.
SDTV,VCR/DVDrecorder,andhometheaterusingcompositevideoandaudioconnections