Embed Size (px)
Citation preview

18/04/2010 1
WEIGHT INDICATORWEIGHT INDICATORWEIGHT INDICATORWEIGHT INDICATOR
WIDRA SPRL
Rue Z Gramme, 26
Zoning « Les Plennesses «
4821 ANDRIMONT
Function keys
when this key is pressed, the display registers "0", which frees one of the
stored entry weights by introducing the corresponding sequence number.
N.B.
WIDRA W90WIDRA W90WIDRA W90WIDRA W90
M

18/04/2010 2
All that you need to do is to log in 9999 + E
in order to have a revolving memory print-out
for input weighing
No No suite Kg 1 0 0 2 0 0 3 0 0 4 0 0 5 0 0 6 0 0 7 0 0 8 0 0 9 0 0 10 0 0 11 0 0 12 0 0 13 0 0 14 0 0 15 0 0 16 0 0 17 0 0 18 0 0 19 0 0 20 0 0 21 0 0 22 0 0 23 0 0 24 0 0 25 0 0 26 0 0 27 0 0 28 0 0 29 0 0 30 0 0
F1

18/04/2010 3
for output weighing
for single weighing at the time of weighing on exit
for alterning the serial number and clearing input weighing
memories
F2
F3
F4
18/04/2010 4
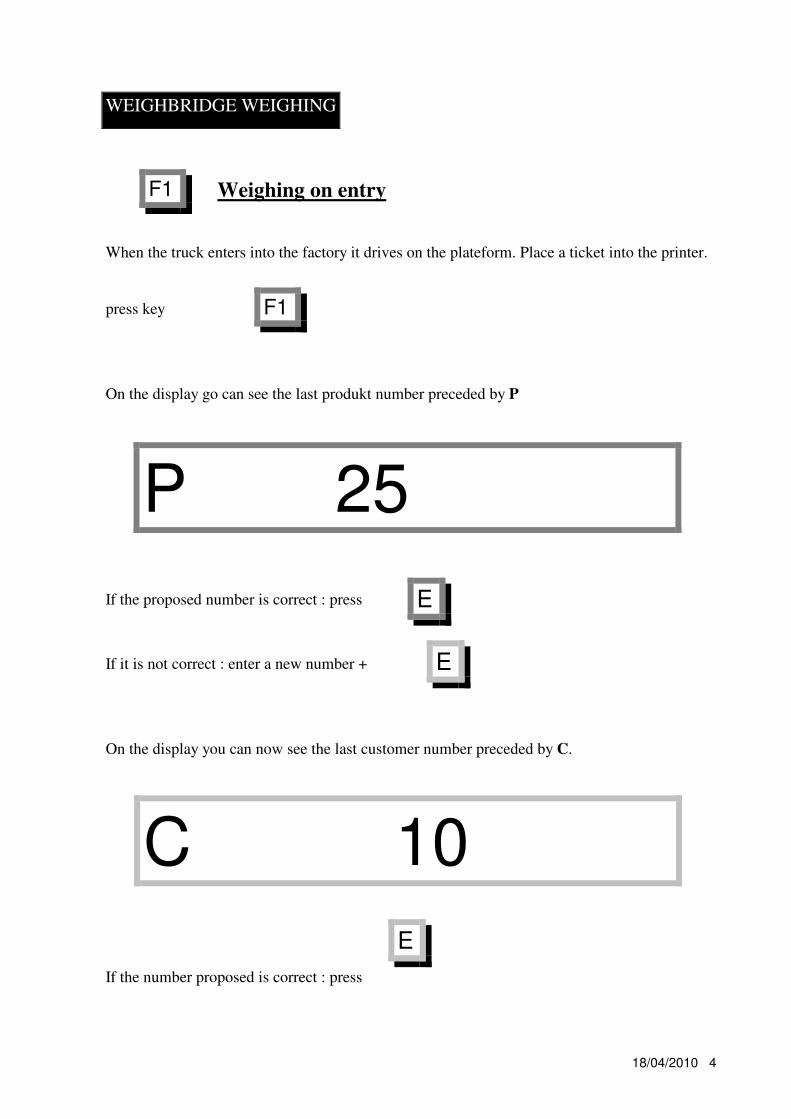
Weighing on entry
When the truck enters into the factory it drives on the plateform. Place a ticket into the printer.
press key
On the display go can see the last produkt number preceded by P
If the proposed number is correct : press
If it is not correct : enter a new number +
On the display you can now see the last customer number preceded by C.
If the number proposed is correct : press
WEIGHBRIDGE WEIGHING
F1
F1
P 25
E
E
C 10
E
18/04/2010 5
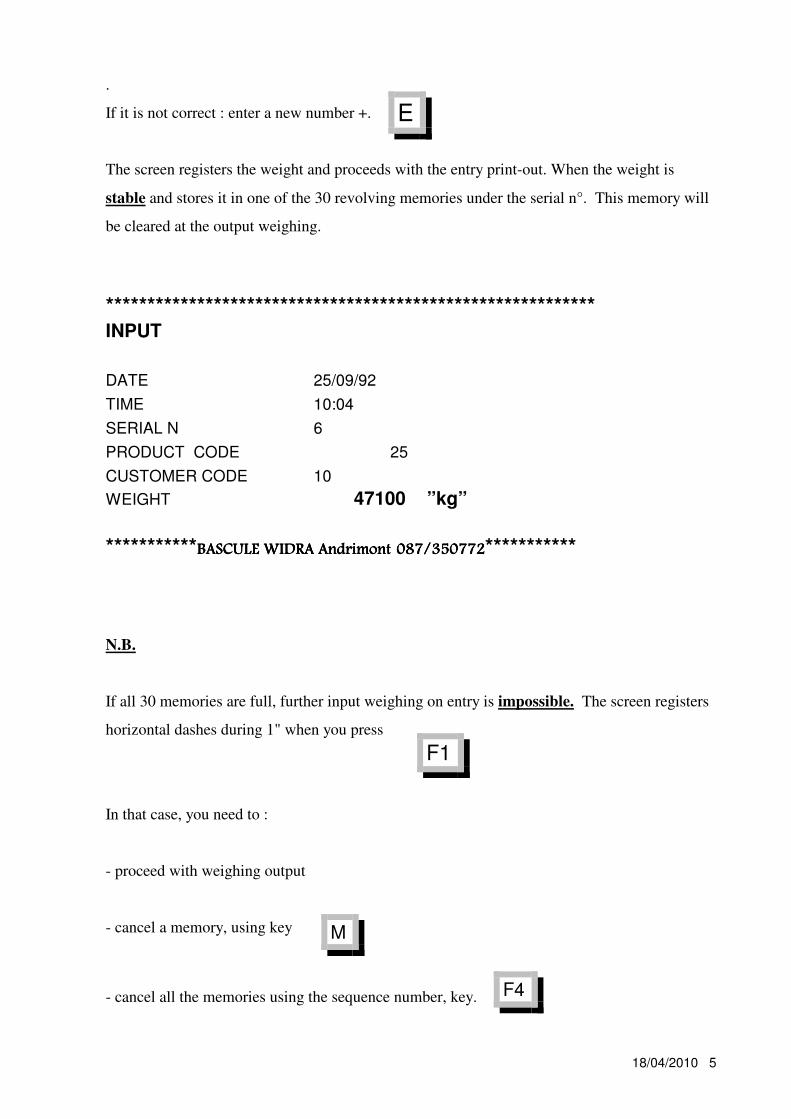
.
If it is not correct : enter a new number +.
The screen registers the weight and proceeds with the entry print-out. When the weight is
stable and stores it in one of the 30 revolving memories under the serial n°. This memory will
be cleared at the output weighing.
*********************************************************** INPUT
DATE 25/09/92
TIME 10:04
SERIAL N 6
PRODUCT CODE 25
CUSTOMER CODE 10
WEIGHT 47100 ”kg”
***********BASCULE WIDRA AndrimontBASCULE WIDRA AndrimontBASCULE WIDRA AndrimontBASCULE WIDRA Andrimont 087/350772087/350772087/350772087/350772***********
N.B.
If all 30 memories are full, further input weighing on entry is impossible. The screen registers
horizontal dashes during 1" when you press
In that case, you need to :
- proceed with weighing output
- cancel a memory, using key
- cancel all the memories using the sequence number, key.
E
F1
M
F4

18/04/2010 6
Weighing output
If a lorry which was weighed on entry returns to be weighed on exit.
Press key
The screen displays "0" preceded by the letter S (exit)
Take the weighing ticket printed at the time of weighing on entry, note the serial number and
- enter the ticket in the printer
- enter the serial number +
*********************************************************** INPUT OUTPUT
DATE 25/09/92 25/09/92
TIME 10:04 10 :32
SERIAL N 6 6
PRODUCT CODE 25
CUSTOMER CODE 10
WEIGHT 47100 ”kg” 51000 ”kg”
************BASCULE WIDRA AndrimontBASCULE WIDRA AndrimontBASCULE WIDRA AndrimontBASCULE WIDRA Andrimont 087/350 772087/350 772087/350 772087/350 772***************
F2
F2
S 0
E
18/04/2010 7
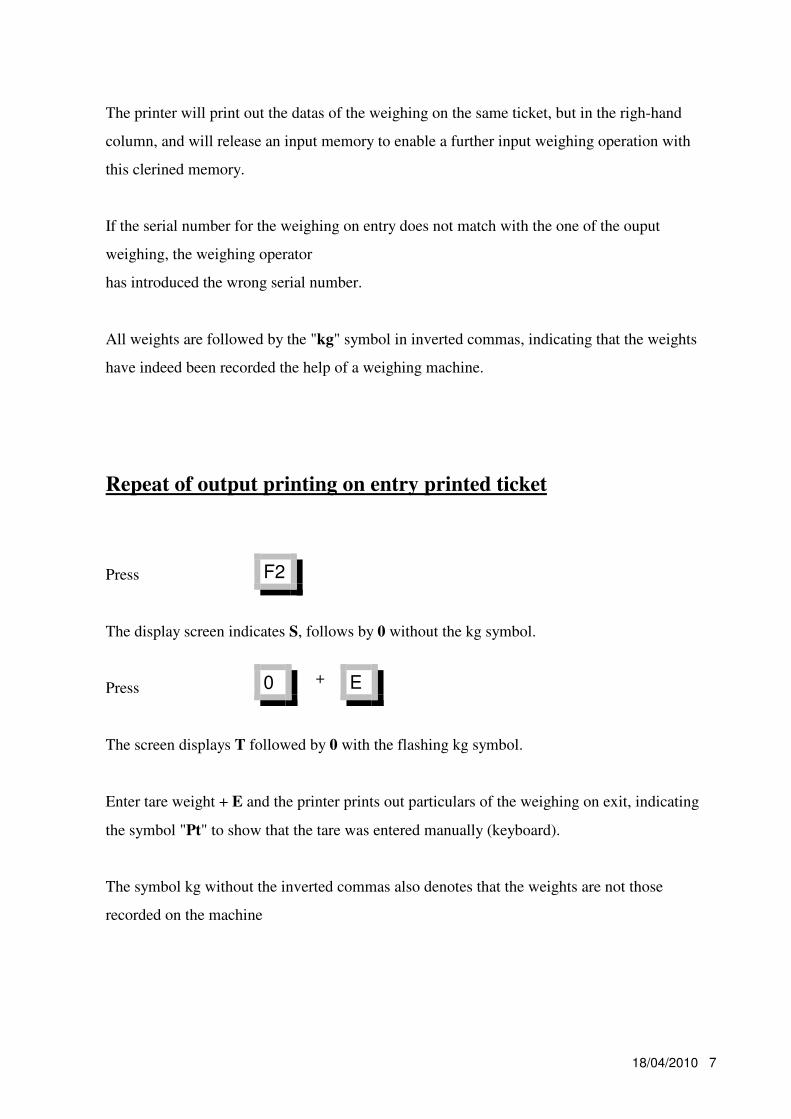
The printer will print out the datas of the weighing on the same ticket, but in the righ-hand
column, and will release an input memory to enable a further input weighing operation with
this clerined memory.
If the serial number for the weighing on entry does not match with the one of the ouput
weighing, the weighing operator
has introduced the wrong serial number.
All weights are followed by the "kg" symbol in inverted commas, indicating that the weights
have indeed been recorded the help of a weighing machine.
Repeat of output printing on entry printed ticket
Press
The display screen indicates S, follows by 0 without the kg symbol.
Press
The screen displays T followed by 0 with the flashing kg symbol.
Enter tare weight + E and the printer prints out particulars of the weighing on exit, indicating
the symbol "Pt" to show that the tare was entered manually (keyboard).
The symbol kg without the inverted commas also denotes that the weights are not those
recorded on the machine
F2
0 E +

18/04/2010 8
Single weighing operation
Manual introduction of the tare data enables a lorry to be weighed on exit without having been
weighed on entry.
Press Key.
The screen displays « 0 » kg preceded by the letter « t » tare
Enter the correct knowned tara value +
The printer will print out the weighing datas
*********************************************************** OUTPUT
DATE 25/09/92
TIME 10:04
SERIAL N 6
WEIGHT 47100 ”kg”
KNOWN TARA ‘’Pt ’’ 1000 kg
NET WEIGHT 3710 kg
************* BASCULE WIDRA Andrimont 087/350772 BASCULE WIDRA Andrimont 087/350772 BASCULE WIDRA Andrimont 087/350772 BASCULE WIDRA Andrimont 087/350772 *************
F3
F 3
t O kg
E

18/04/2010 9
N.B.
The kg symbol for the tare and the net weight is without the inverted commas, which means
that the tare particulars were introduced manually.
The "PT" symbol also registers this.
Serial number
This enables you to visualize or modify the serial number for the next weighing operation.
Press key
The display screen indicates the next serial number.
You can now : a) confirm this number by E
b) alter this number + E, which will cancel all
entry weights data stored in the memories.
F4
F4
1

18/04/2010 10
No Serial n° Kg 1 0 0 2 0 0 3 0 0 4 0 0 5 0 0 6 0 0 7 0 0 8 0 0 9 0 0 10 0 0 11 0 0 12 0 0 13 0 0 14 0 0 15 0 0 16 0 0 17 0 0 18 0 0 19 0 0 20 0 0 21 0 0 22 0 0 23 0 0 24 0 0 25 0 0 26 0 0 27 0 0 28 0 0 29 0 0 30 0 0

18/04/2010 11
Special functions
Date - time
Enables you to djust the date and time.
Press key
The display screen indicates the stored date preceded by d (date)
You can now :
a) confirm the data with E
b) correct it + E
The screen will display the stored time preceded by H
You can now :
a) confirm the time with E
b) correct it + E
7
d 101292
H 1446

18/04/2010 12
Print-out without date - time particulars
Enables you to make print-outs without date and time particulars.
This function is cancelled once services are restored following a power out.
Press.
The display screen will indicate the stored date.
Instaed of entering the date, enter O + E.
Memory-stored data on weighing on entry
Enables you to print out memory-stored data on input weighing.
Feed an A4 sheet of paper into the printer.
Press M + 9999 + E.
The printer will print out memory-stored weighing data.
7

18/04/2010 13
No Serial n° Kg 1 0 0 2 0 0 3 0 0 4 0 0 5 0 0 6 0 0 7 0 0 8 0 0 9 0 0 10 0 0 11 0 0 12 0 0 13 0 0 14 0 0 15 0 0 16 0 0 17 0 0 18 0 0 19 0 0 20 0 0 21 0 0 22 0 0 23 0 0 24 0 0 25 0 0 26 0 0 27 0 0 28 0 0 29 0 0 30 0 0

18/04/2010 14
Deleting 1 memory
If one or more of the memories printed is no longer in use for ex. the truck left the factory
without weighing it is possible to liberate this memory like this :
press M + serial number to delete in the memory + E
Ex: M + 126 + E :
No Serial N° Kg 1 125 1900 2 0 0 3 127 4020 4 0 0 5 0 0 6 0 0 7 0 0 8 0 0 9 0 0 10 0 0 11 0 0 12 0 0 13 0 0 14 0 0 15 0 0 16 0 0 17 0 0 18 0 0 19 0 0 20 0 0 21 0 0 22 0 0 23 0 0 24 0 0 25 0 0 26 0 0 27 0 0 28 0 0 29 0 0 30 0 0

18/04/2010 15
(serail number modification).
If all the memories must be deleted press F4 + 1 + E
No Serial n° Kg 1 0 0 2 0 0 3 0 0 4 0 0 5 0 0 6 0 0 7 0 0 8 0 0 9 0 0 10 0 0 11 0 0 12 0 0 13 0 0 14 0 0 15 0 0 16 0 0 17 0 0 18 0 0 19 0 0 20 0 0 21 0 0 22 0 0 23 0 0 24 0 0 25 0 0 26 0 0 27 0 0 28 0 0 29 0 0 30 0 0

18/04/2010 16
N.B.
The new weighing machine in your possession is a precision instrument which must be treated
accordingly. In order to ensure probleme-free use over a period of years, you are advised to
observe the pointers listed in the "maintenance"section.
This machine has been precision-regulated. You are requested to keep calibration values in a
safe place so that you can pass then on to our technician at the time the machine is serviced, or
in the event of a problem.
At 220 volts, the indicator performs a test of the display panel and indicates the following three
(3) values before displaying particulars of the weight :
n° of installated program (short while)
platform dead weight
zero drift
If the indicator fails to register "0" with nothing on the weighing table, press key and it
will return to zero if the weight is within the -1% to 3% of capacity zero.
INSTRUCTIONS FOR THE USE OF THE WIDRA TYPE W 9O WEIGHT INDICATOR
1103
0-1-2- ---
t 4752 kg
o 4 kg
->O<-

18/04/2010 17
Front view, consisting of :
20 keys
WIDRA
>T
PT
M F1 F2 F3 F4
1 2 3
4 5 6
7 8 9
0 EC
8.8.8.8.8.8.8. kg
W90
>O<
Left
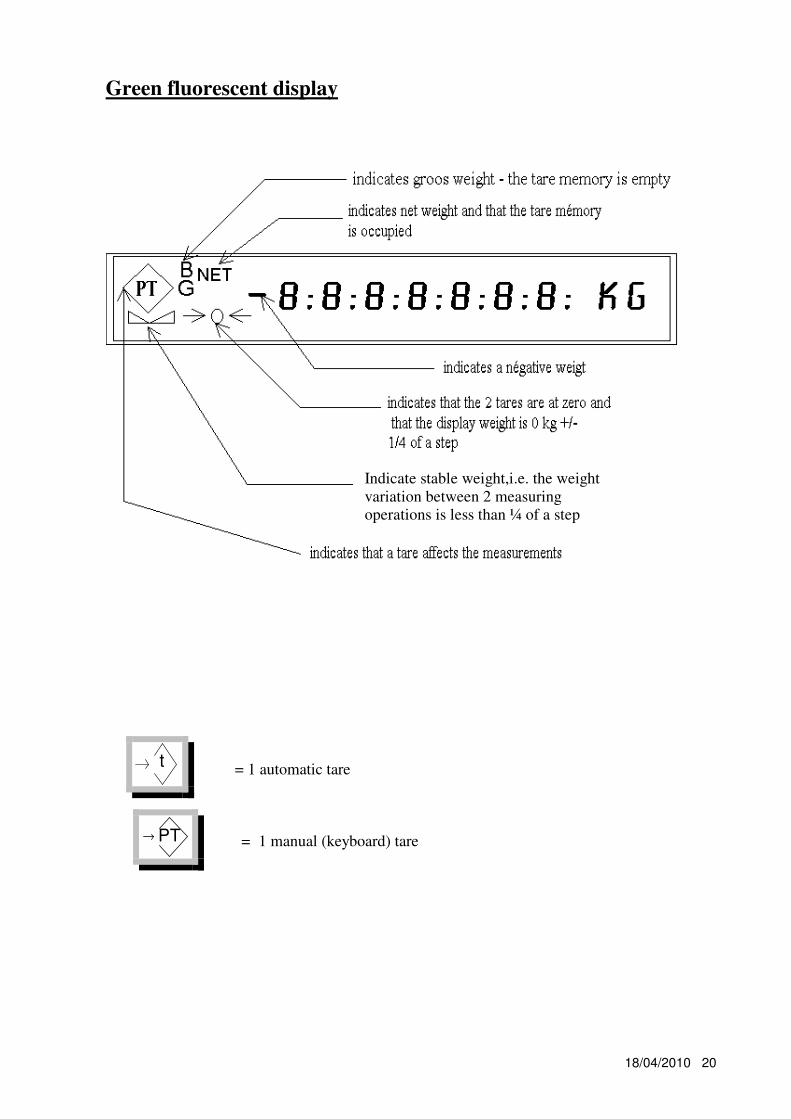
when this key is pressed and when 1 gross weight is displayed the
indicator is set at zero if the indication or accumulation is between
+ 3% and -1% of the bottom of the scale. The automatic tracking
zero will remain at zero if the load is less than 0,4 of a step.
when this key is pressed when the weight on display is stable the
positive weight displayed is regarded as a tare and is deducted
from the weight shown by the scales and :
deletion of the symbol B
appearance of the symbol NET
t
t

18/04/2010 18
appearance of the symbol T
when this key is pressed once again, the tare is set at zero,
the gross weight is displayed on the indicator and :
appearance of the symbol B
deletion of the other symbols
when this key is pressed, the displayed weight becomes 0 and the
kg symbol flashes, enabling you to :
a) press K "E" to get out of this function mode and redisplay
the gross weight
b) enter a tare + E, using the keyboard. This will be deducted
from the weight originally displayed with :
deletion of the symbol B
appearance of the symbol NET
appearance of the symbol PT
PT

18/04/2010 19
When this key is pressed once again, the displayed weight becomes 0 and the kg symbol
flashes, enabling operation (a) or (b) as described above to be performed.
function key
Right
for digital value entry
press this key to cancel keyboard entry
press this key to confirm keyboard entry
function key
function key
function key
function key
M
1 9
C
E
F1
F2
F3
F4
18/04/2010 20
Green fluorescent display
Indicate stable weight,i.e. the weight
variation between 2 measuringoperations is less than ¼ of a step
= 1 automatic tare
= 1 manual (keyboard) tare
t
PT

18/04/2010 21
Rear view
comprises :
- with fuse and filter
Power supply must be 220 volts + max. 10%, - 15% with earth
Both must be very specific to the weighing system (most important).
The 220 volt power supply must be connected to the same source and the earth must be
common to all appliances which run into the weighing system.
1 sector connector
Load cell connector Siemens
A B
4
3
2
1
Load cell outlet -
eath
Load cell opwer supply -
Load cell -
Load cell outlet +
Load cell power +
eath
Load cell +
18/04/2010 22
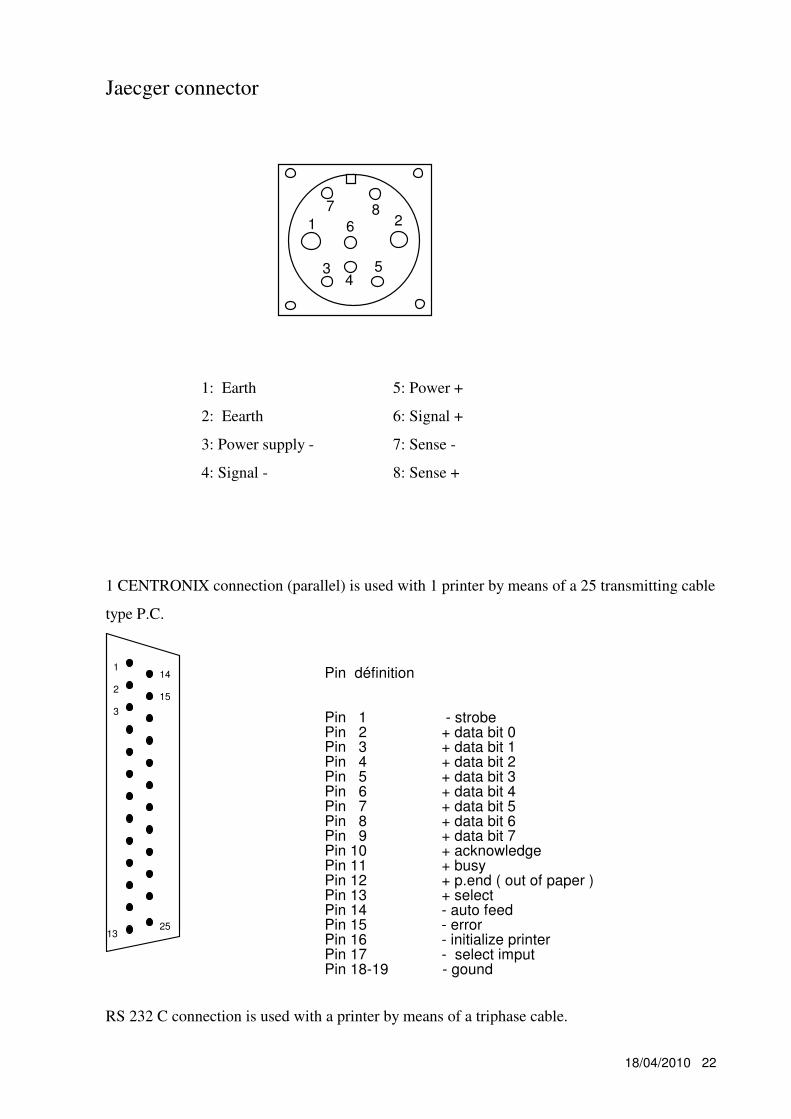
Jaecger connector
1 2
34
5
6
7 8
1: Earth 5: Power +
2: Eearth 6: Signal +
3: Power supply - 7: Sense -
4: Signal - 8: Sense +
1 CENTRONIX connection (parallel) is used with 1 printer by means of a 25 transmitting cable
type P.C.
Pin définition
Pin 1 - strobe Pin 2 + data bit 0Pin 3 + data bit 1Pin 4 + data bit 2 Pin 5 + data bit 3 Pin 6 + data bit 4Pin 7 + data bit 5Pin 8 + data bit 6Pin 9 + data bit 7
Pin 12 + p.end ( out of paper )Pin 11 + busyPin 10 + acknowledge
Pin 13 + selectPin 14 - auto feedPin 15 - errorPin 16 - initialize printerPin 17 - select imputPin 18-19 - gound
1
2
3
14
15
1325
RS 232 C connection is used with a printer by means of a triphase cable.

18/04/2010 23
1
2
14
15
3
16
4
17
5
18
6
19
7
20
8
21
9
11
25
22
10
23
12
24
13
green
green
broun broun
W90 Indicator Serial Printer
DB 25/M
W90 -COM2 PRINTER
16
3
1shield
7
20
8
DB25/M
RS 422/485 connection to printer is type 2 or 4 threads.
Indicator Printer
Pin 6 - Tx + *
Pin 18 - Tx - * folowing periferal
RS 422/485-232
Pin 11 - Rx +
Pin 23 - Rx -

18/04/2010 24
Indicator P.C.
Pin 2 T x D Pin 3 R x D
Pin 3 R x D Pin 2 T x D
Pin 7 G N D Pin 7 G N D
Connection of 2 threads with pins *
RS 232 C connection to a P.C.
Indicator P.C
Pin 2 T x D Pin 3 R x D
Pin 3 R x D Pin 2 T x D
Pin 7 G N D Pin 7 G N D
18/04/2010 25
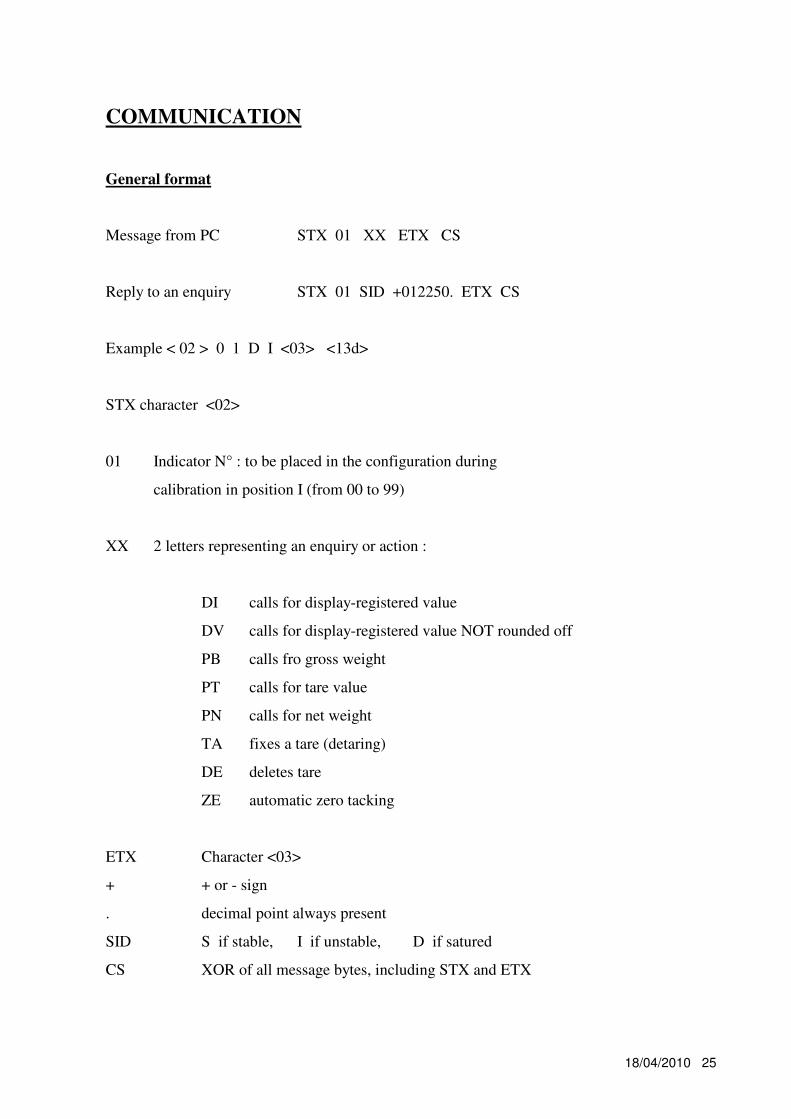
COMMUNICATION
General format
Message from PC STX 01 XX ETX CS
Reply to an enquiry STX 01 SID +012250. ETX CS
Example < 02 > 0 1 D I <03> <13d>
STX character <02>
01 Indicator N° : to be placed in the configuration during
calibration in position I (from 00 to 99)
XX 2 letters representing an enquiry or action :
DI calls for display-registered value
DV calls for display-registered value NOT rounded off
PB calls fro gross weight
PT calls for tare value
PN calls for net weight
TA fixes a tare (detaring)
DE deletes tare
ZE automatic zero tacking
ETX Character <03>
+ + or - sign
. decimal point always present
SID S if stable, I if unstable, D if satured
CS XOR of all message bytes, including STX and ETX

18/04/2010 26
Note
All values are rounded off to the nearest step except DV
Response time is no more than 0,4 seconds. Message response is cancelled in the event of a
saturated display.
8 bit + 1 stop bit without parity, baud rate selectable on 1200 to 9600 baud by dil switch.
DIL SWITCH (in the indicator)
SW1 SW2
ON ON 1200baud
ON OFF 2400 baud
OFF ON 4800 baud
OFF OFF 9600 baud
SW3 no action
SW4
ON automatic zero tracking
OFF no automatic zero tracking
Multi-station RS 485 connection to a P.C.
Compulsory 2 wire connection
Indicator PC
Pin 6 Rx Tx +
folowingperipheral
Pin 18 Rx Tx - RS 422/485-252
N.B. in machine programming, a different number needs to be given to each network
machine.

18/04/2010 27
Electromagnetic type
connection idem printer RS 232/422/485
L.E.D. (OP5)type
Standard B.C.D. output 3 wire cable connection (3 X 0,5 = max.35 m)
Round connector
Pin 1 + 5 v
Pin 2 date
Pin 3 clock
Pin 4 free
Repeater

18/04/2010 28
1. Load cell
Use type LP/LIYMCY 7 x 0,75 mm².
The protective cable sheathing ensures major inensitivity to radiated disturbance.
Lenght without amplifier : 100 metres.
2. R.S. 232
This type of connection is permitted up to maximum distances of 100 metres and, in many
cases, less than 100 metres; depending on the configuration (standard CCITT 24 v, maximum
15 metres!).
A single test at the customer'ss expense will be enough to determine the reliability of such a
connection at distances of above 15 metres.
Transmission cable must be type TPVP, twisted and provided with protective sheating (per
pair).
3. RS 422/485
Transmission cable still type TPVP, twisted and provided with protective sheating (per pair).
Beyond 100 metres, provision will need to be made for the inclusion of a line amplifier
(repeater).
N.B.
Widra can supply you with these cables and advise on the approximative lenghts required.
Installation of connection lines

18/04/2010 29
4. Cable installation
Cables must be correctly installed. Care must be taken to steer clear of any sources of
interference, such a neon lighting tubes, transformers, engines lift etc...
All connections must be made inside splice boxes, which must remain accessible at all times.
5. Essential precautions
Many data-processing problems are due to variations in voltage and micro power cuts.
Like all computerized systems, weight indicators are sensitive to this type of occurence.
In the event of a voltage variation of +/- 10%, we warmly advice you to connect up the whole
network providing power from the computer and the indicator to voltage regulators with special
reserved lines.
If you are using a P.C., it is essential to provide a NO BREAK system for the entire installation,
so as to safeguard date during operation. In any case, you will need to provide a top quality
common earth.
WIDRA accepts no liability for any abnormal or excessive electrical situations which may
occur.
Resetting at zero
If the ->O<- button fails to reset the machine at zero with nothing on the weighing table, zero
resetting can be achieved by doing the following :
- recording the displayed weight data

18/04/2010 30
- cutting the power supply and then restoring it
- entering code " " while the figures are being run off
- the display screen's indicating the memorized tare
- increasing or decreasing this displayed weight value + E
N.B.
This is not the normal procedure : please warn us in time so that me may take the necessary
action.
5 5

18/04/2010 31
Error message
The following error messages are displayed in the event of abnormal functioning :
Ram is not valid or calibration has not been carried
out.
In that case, the system will continue blocked
The bottom of the scale divided by the step is > 4 000
The converter is owerloaded
Converter is demanged
Err 101
Err 201
Err 300
Err 101

18/04/2010 32
Table of contents
2 Fonction keys
4 Weighbridge weighing : weighing on entry
6 weighing on exit
7 Repeat of output printing o entry printed ticket
8 Single wieghing operation
9 Serial number
10 Special functions
11 Print-out without date-time particular
12 Memory-stored data on weighing on entry
14 Deleting 1 memory
16 Instruction for the use of the widra type w 90 weight indicator
17 Front view
20 Green fluorescent display
21 Rear view
24 Communication
26 Repeater
27 Installation of connection lines
29 Resetting at zero
30 Error message


![[XLS] · Web view0 0 0 0 0 0 0 0 0 0 0 0 0 0 0 0 0 0 0 0 0 0 0 0 7 2 0 0 0 0 0 0 0 0 0 0 0 5 4 0 0 0 0 0 0 0 0 0 0 0 5 4 0 0 0 0 0 0 0 0 0 0 0 5 4 0 0 0 0 0 0 0 0 0 0 0 5 4 0 0 0 0](https://img.pdfslide.us/doc/110x75/5aad015d7f8b9a8d678d9907/xls-view0-0-0-0-0-0-0-0-0-0-0-0-0-0-0-0-0-0-0-0-0-0-0-0-7-2-0-0-0-0-0-0-0-0-0.jpg)


![Material Models For Thermoplastics In LS-DYNA® From ... · [LSDYNA MANUAL] 7 Ph.D-thesis of F. Kunkel Injection molded PP T16 (Hostacom XBR 169G) specimen milled out in W0 and W90](https://img.pdfslide.us/doc/110x75/5e6e46d451b6fa28e74c42b3/material-models-for-thermoplastics-in-ls-dyna-from-lsdyna-manual-7-phd-thesis.jpg)