Embed Size (px)
Citation preview
Week 3 - TutorialInteractive Digital Moving Image Production | CU3003NI | - Pratik Man Singh Pradhan

DIGITAL SLR CINEMATOGRAPHY

Agendas
Why use DSLRs for filming?
Getting started with filming using DSLRs
Basic cinematography concepts and DSLRs
Advanced setups: taking it to the next level
Post-production
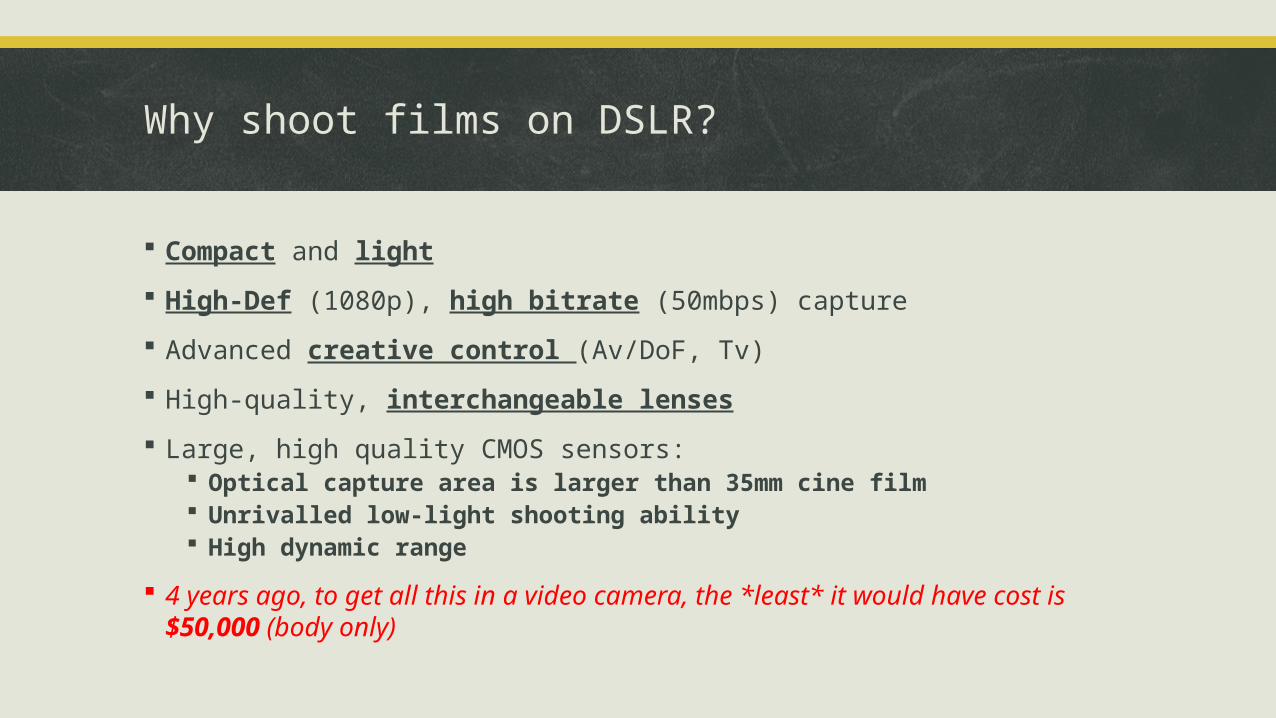
Why shoot films on DSLR?
Compact and light
High-Def (1080p), high bitrate (50mbps) capture
Advanced creative control (Av/DoF, Tv)
High-quality, interchangeable lenses
Large, high quality CMOS sensors: Optical capture area is larger than 35mm cine film Unrivalled low-light shooting ability High dynamic range
4 years ago, to get all this in a video camera, the *least* it would have cost is $50,000 (body only)
Demos
Vincent Laforet - “Reverie” – the clip that started it all. Shot on 5D Mark II – no colour grading.
Shane Hurlbut, ASC – “The Last Three Minutes”. Shot on 5D Mark II.
Phillip Bloom – “Sofia’s People”. Shot on 5D Mark II with just one lens, a Zeiss ZF 50mm f1.4 – no lighting or colour grading.
Recent big DSLR productions
"if you’re [not] using the 5D [Mark II], you aren’t making your movie the best it can be.“
Iron Man 2 Captain America Black Swan (filmed in Australia!)
AFI Movie of the Year 1 Academy Award & 4 nominations including Best Achievement in Cinematography and
Best Motion Picture of House – Season 6 Finale (clip), and ALL of (current) Season 7

Getting Started
The minimum you’ll need (kits from $600!): A DSLR body with HD 720p or better
Full frame (35mm) vs crop sensor (“APS-C”) 5d Mark II 7D 60D 550D A lens
Prime Zoom

Sensor Sizes
35mm Full Frame (5D mkII, Nikon D3s)
APS-C (“crop”)(7D, RED One - $25,000)
Broadcast Camcorder (Sony EX3 - $10,000)
Light from lens falling on focal plane
“Full frame” sensor imaging area
“Crop” sensor imaging area (1.5-1.6x “zoom”)
Why use Primes
“Faster” than zooms (esp. “kit” lenses)(Generally) better optics & image qualityMany primes are comparatively cheap
E.g. Samyang 14mm f/2.8, 35mm & 85mm f/1.4 + Canon 50mm f/1.8 for less than the price of a 24-70 f/2.8 zoom - & is optically superior in every way
Zooming (while filming) is usually avoided (unless you are Stanley Kubrick, Baz Luhrmann, Alfred Hitchcock, Steven Spielberg, Martin Scorsese, Andrei Tarkovsky, Robert Altman, Francis Ford Coppola, Peter Bogdanovich, Quentin Tarantino… )
But… need lens changes/less convenient…so less suitable for documentary/event work which needs flexibility

Adapting Old/Cheap Lenses
Many old lenses can be attached with adaptors – this is a great way to pick up a bargain lens!
You will usually lose electronic control - so most adapted lenses need a manual aperture ring!
This adaptor has electronic connectors… BUT…
Cinematography
Focal lengthExposure – Light, aperture, ISO, ND filtersShutter speed & frame rateTechnical stuff
Focal Length
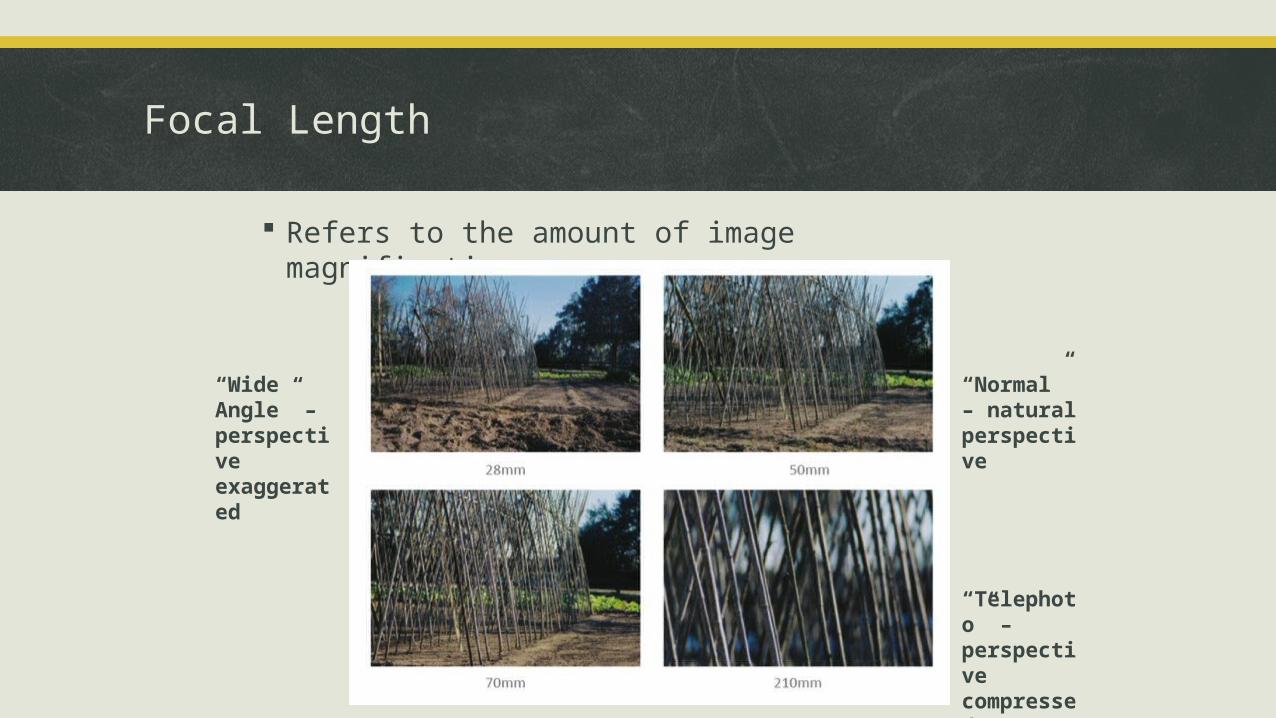
Refers to the amount of image magnification.
“Wide Angle” – perspective exaggerated
“Normal” – natural perspective
“Telephoto” –perspective compressed
Video Exposure
Exposure - controlling the recorded video image for correct brightness and contrast.
Lighting is the foundation of exposure. If you can control the light, you can use the camera’s exposure controls for creativity and finesse - rather than just to get a shot.
Aperture, ISO and ND filters are used for controlling exposure in-camera. Not shutter speed (though it does affect exposure).
Video Exposure (Continued)
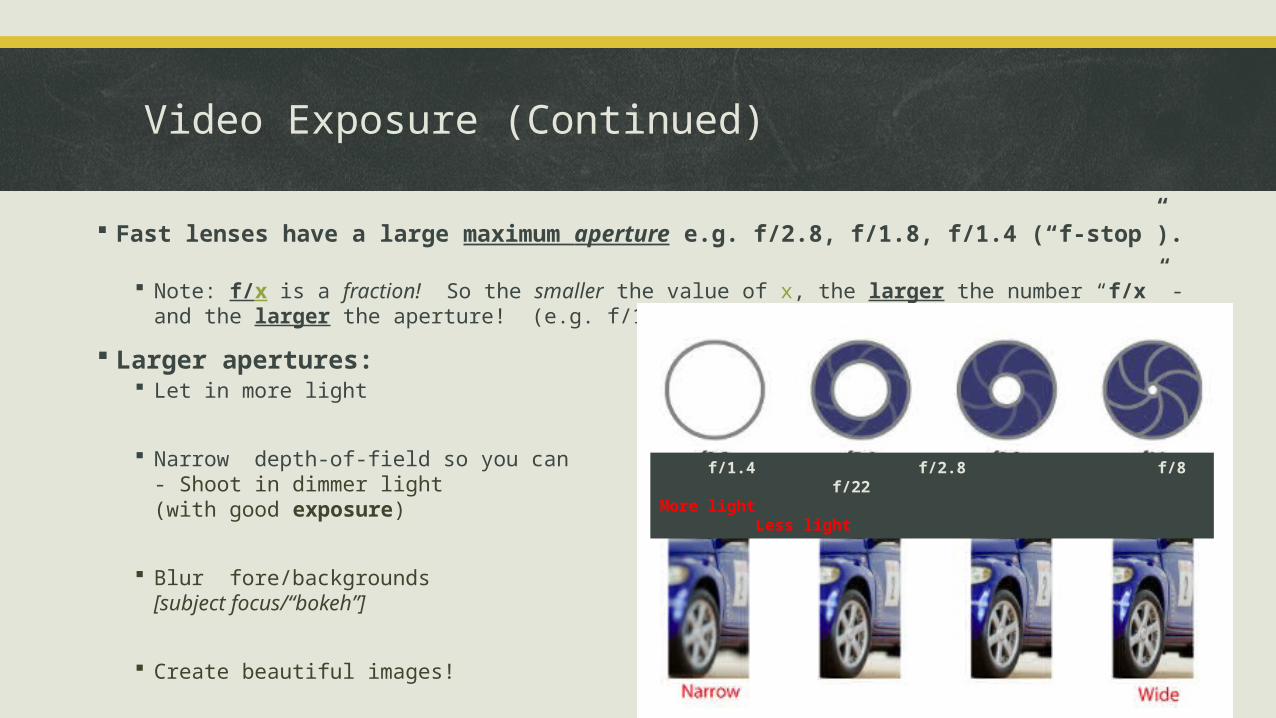
Fast lenses have a large maximum aperture e.g. f/2.8, f/1.8, f/1.4 (“f-stop”). Note: f/x is a fraction! So the smaller the value of x, the larger the number “f/x” - and the larger
the aperture! (e.g. f/1.4 > f/2.8)
Larger apertures: Let in more light
Narrow depth-of-field so you can- Shoot in dimmer light(with good exposure)
Blur fore/backgrounds [subject focus/“bokeh”]
Create beautiful images!
f/1.4 f/2.8 f/8 f/22More light Less light
Video Exposure (Continued)
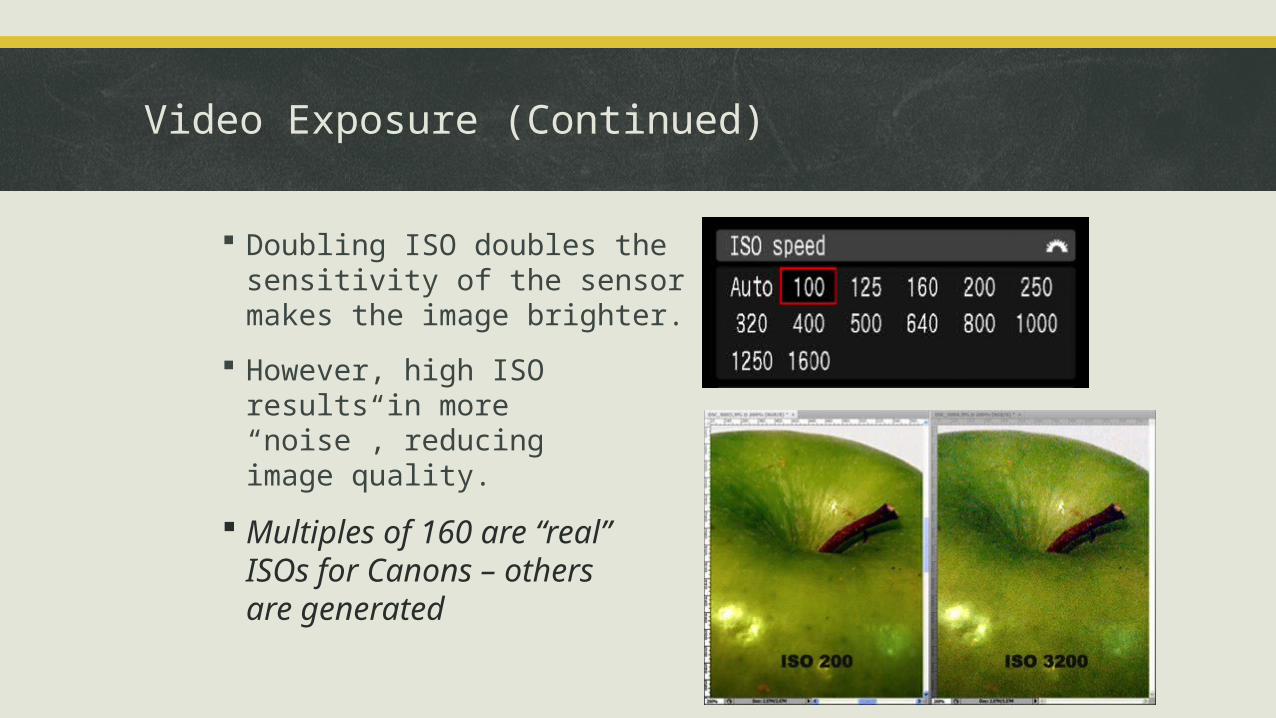
Doubling ISO doubles the sensitivity of the sensor and makes the image brighter.
However, high ISO results in more “noise”, reducing image quality.
Multiples of 160 are “real” ISOs for Canons – others are generated
Video Exposure (Continued)
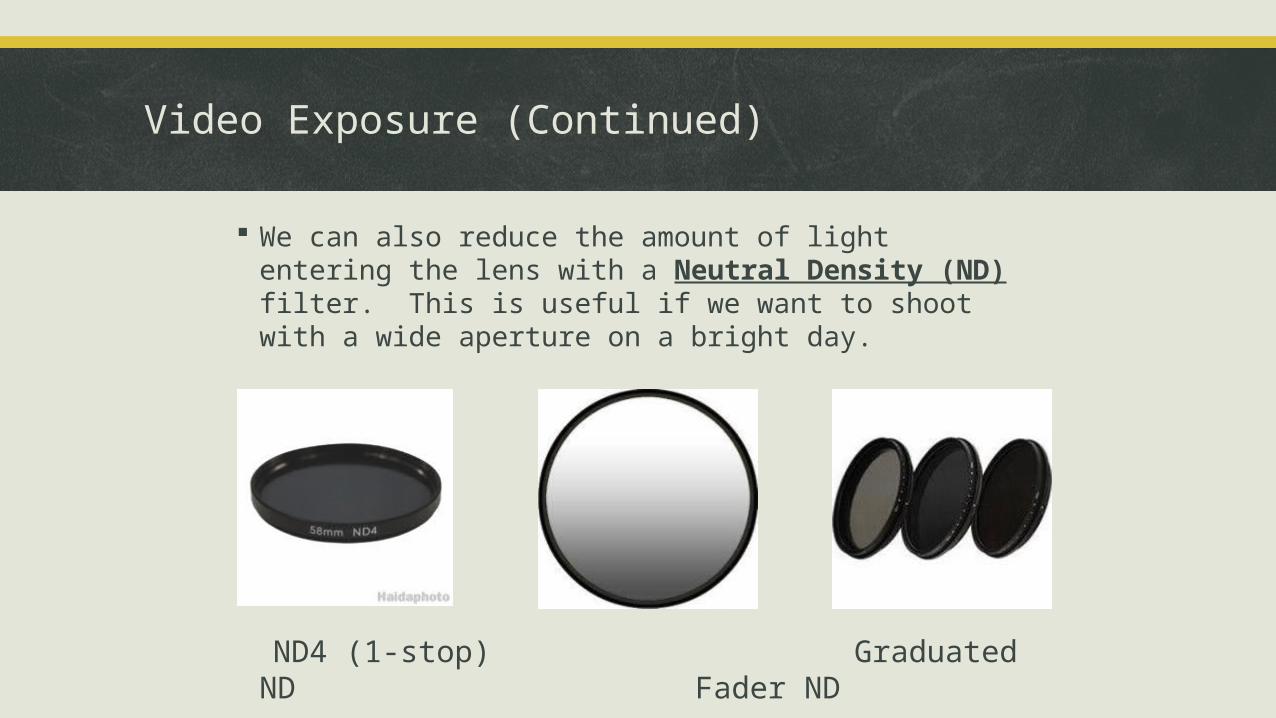
We can also reduce the amount of light entering the lens with a Neutral Density (ND) filter. This is useful if we want to shoot with a wide aperture on a bright day.
ND4 (1-stop) Graduated ND Fader ND
What about Shutter Speed?
The shutter speed of each frame is limited by the frame rate. (Shooting) at 24 fps, the LONGEST exposure possible is 1/24s.
To mimic the appearance of film, shoot as close as possible to half your frame rate. E.g. at 24 fps, set your shutter to 1/50s.
You can increase your shutter speed, for a stroboscopic, choppy appearance (e.g. Saving Private Ryan, Gladiator).

Frame Rate
Most standard film is shot at 24 fps. PAL is 25 fps. To mimic the look of cinematic film, use a setting as close as possible to 24 fps.
The 7D can shoot at 60 fps. This can be slowed down to 24/25 fps for flawless “slow-mo” – or even further with software (demo).
Video on frame rate and shutter speed.

Technical Stuff
Compression – How the original video data is reduced for storage. Currently, all DSLR video is compressed (lossy)
Codec – how the video data is encoded. H.264 (Canon) is more efficient than MJPEG (Nikon) Bitrate – how much data is used to store video
Advance DSLR Setups
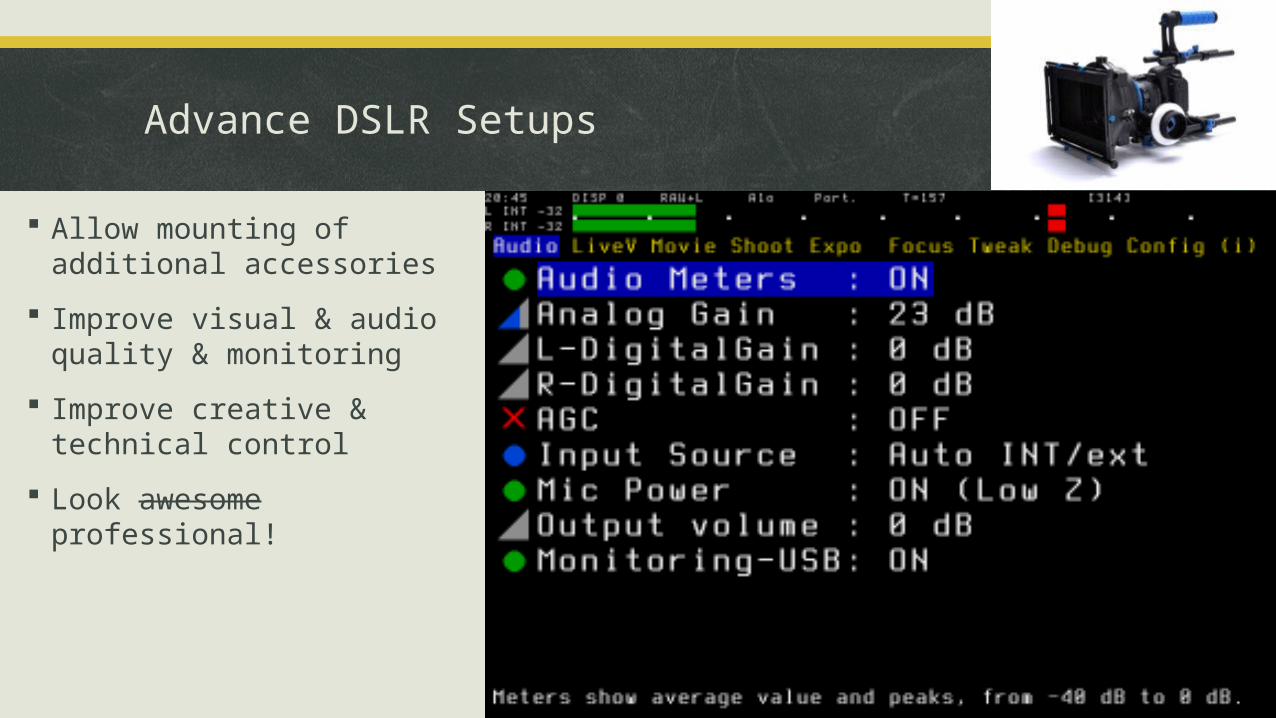
Allow mounting of additional accessories
Improve visual & audio quality & monitoring
Improve creative & technical control
Look awesome professional!

Advance Considerations
Support/mounting systems
High quality audio capture & recording
Manually controlling focus
Controlling video and audio
Monitoring video and audio
Support/Mounting Systems
Shake and blur are distracting!
Sturdy tripod & fluid head – almost essential I recommend WeiFang EI-717AH head.
Sturdy “Rig” – for shoulder/handheld work Weight and/or contact points minimise shake I use this collapsible shoulder rig. Or you can make one for a few dollars. Works fine!
Stabilisers/Steadicams.
15mm cinematic rails for mounting accessories.
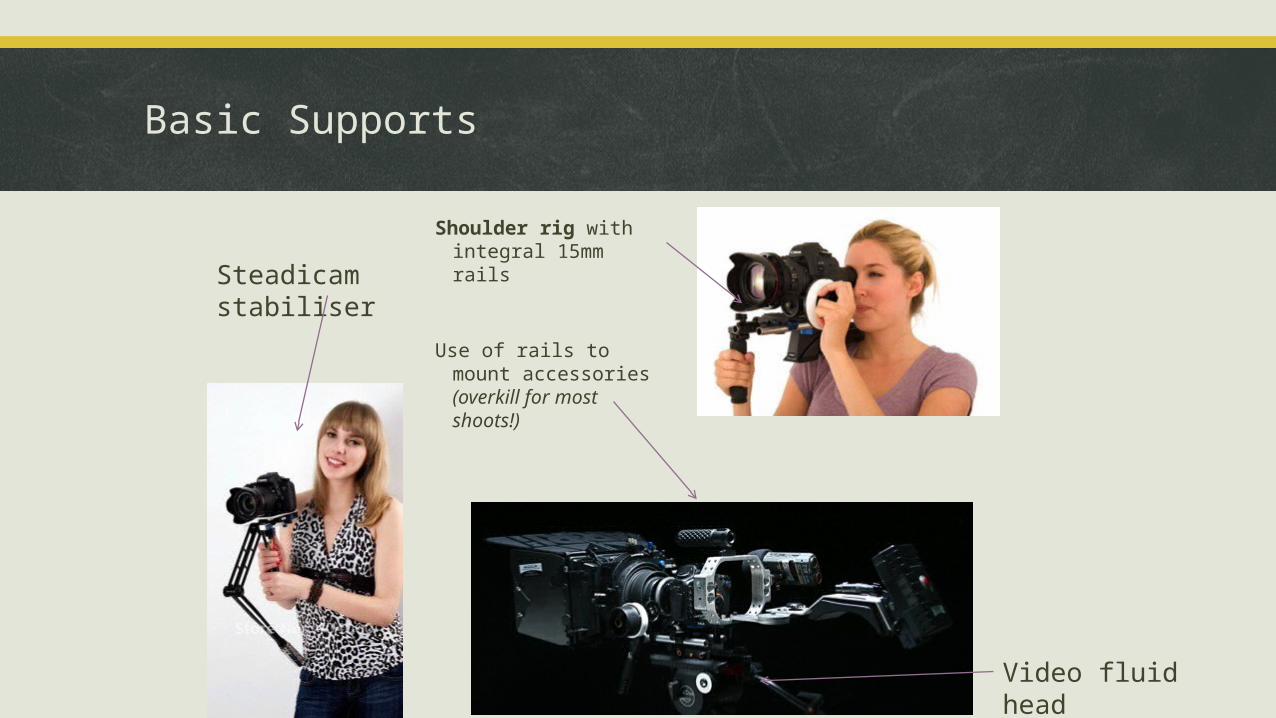
Basic Supports
Shoulder rig with integral 15mm rails
Use of rails to mount accessories (overkill for most shoots!)
Steadicam stabiliser
Video fluid head
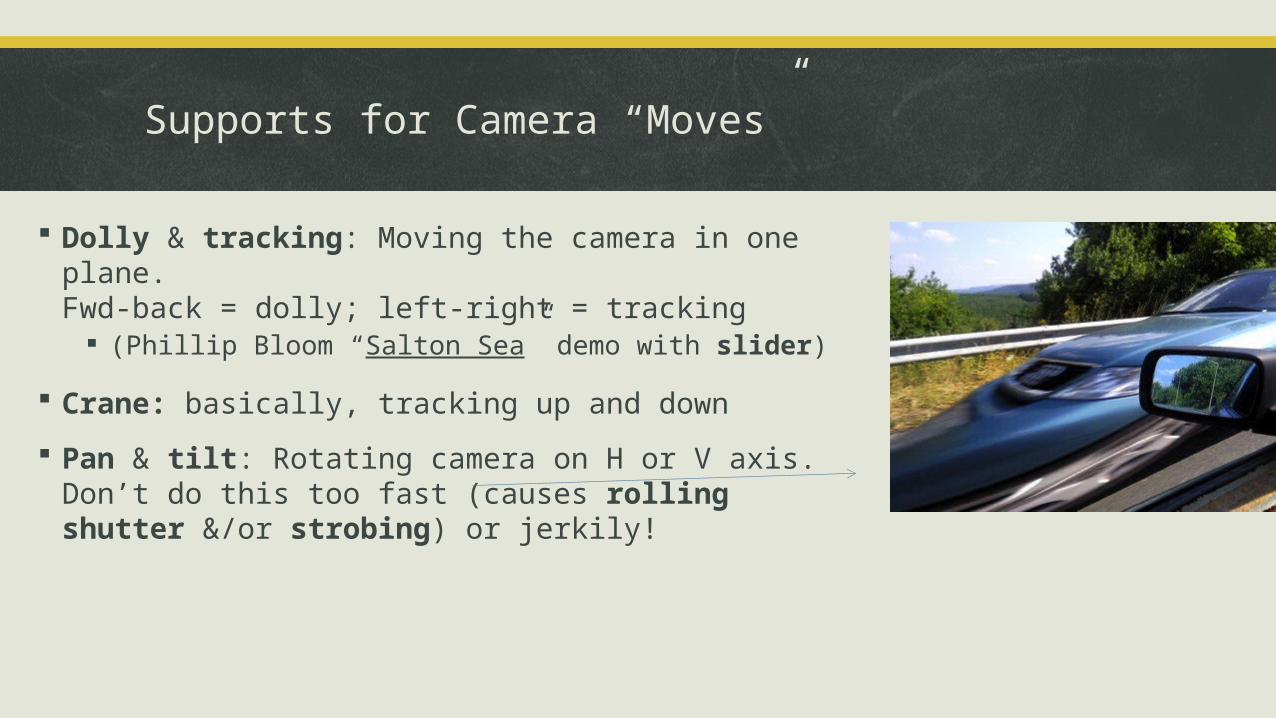
Supports for Camera “Moves”
Dolly & tracking: Moving the camera in one plane. Fwd-back = dolly; left-right = tracking
(Phillip Bloom “Salton Sea” demo with slider)
Crane: basically, tracking up and down
Pan & tilt: Rotating camera on H or V axis. Don’t do this too fast (causes rolling shutter &/or strobing) or jerkily!

Supports for Camera Moves
Tripod dolly
Slider
Crane
Fluid head for pan/tilt
Skateboard as dolly
(you can DIY most of these!)
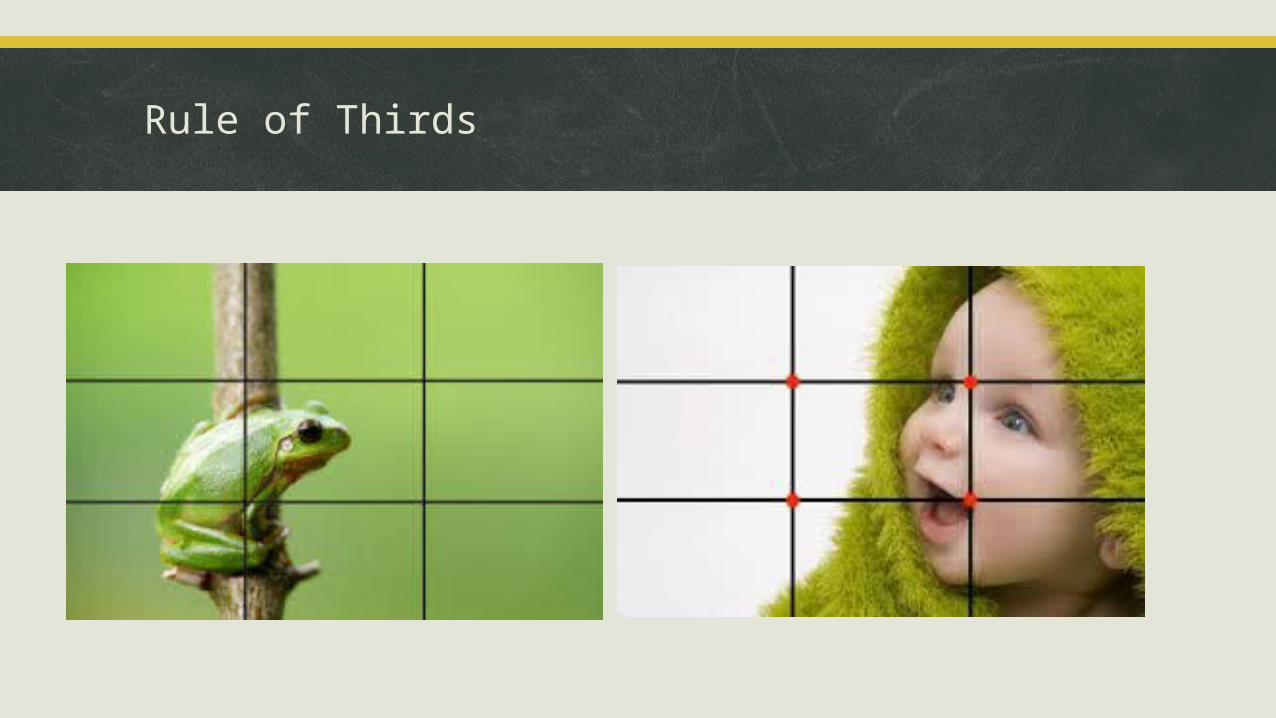
Rule of Thirds
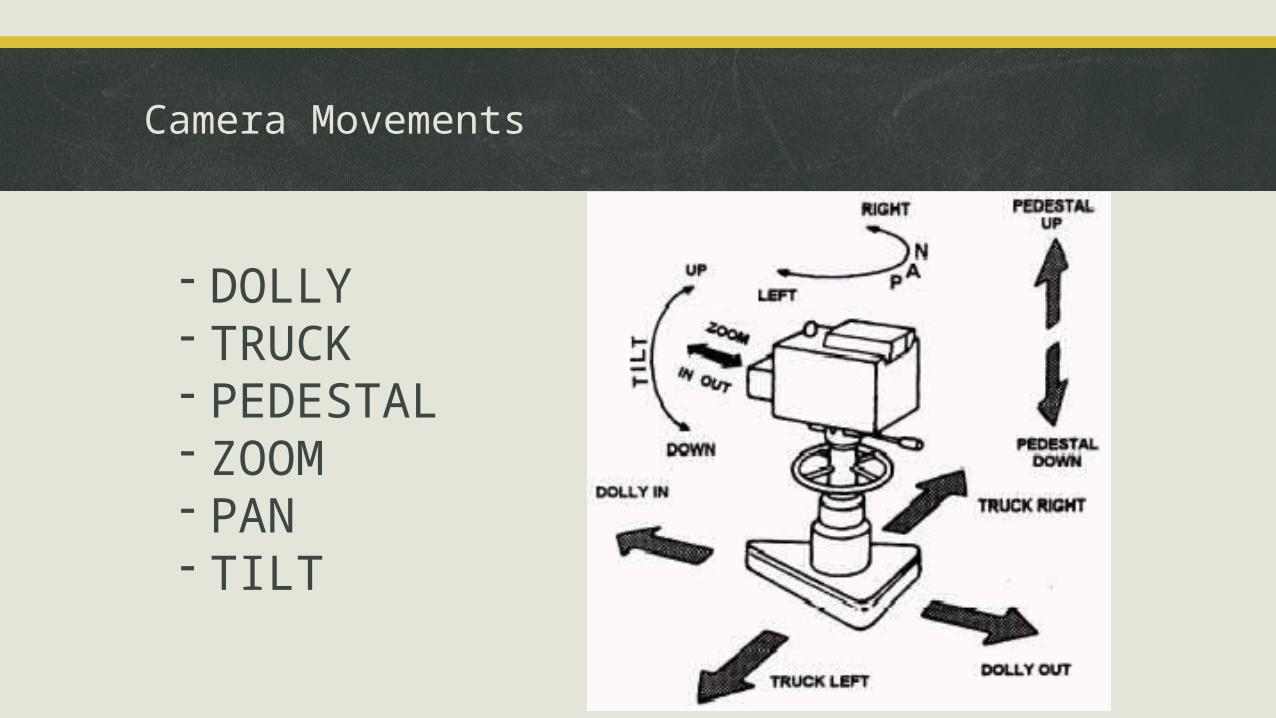
Camera Movements
- DOLLY- TRUCK- PEDESTAL- ZOOM- PAN- TILT
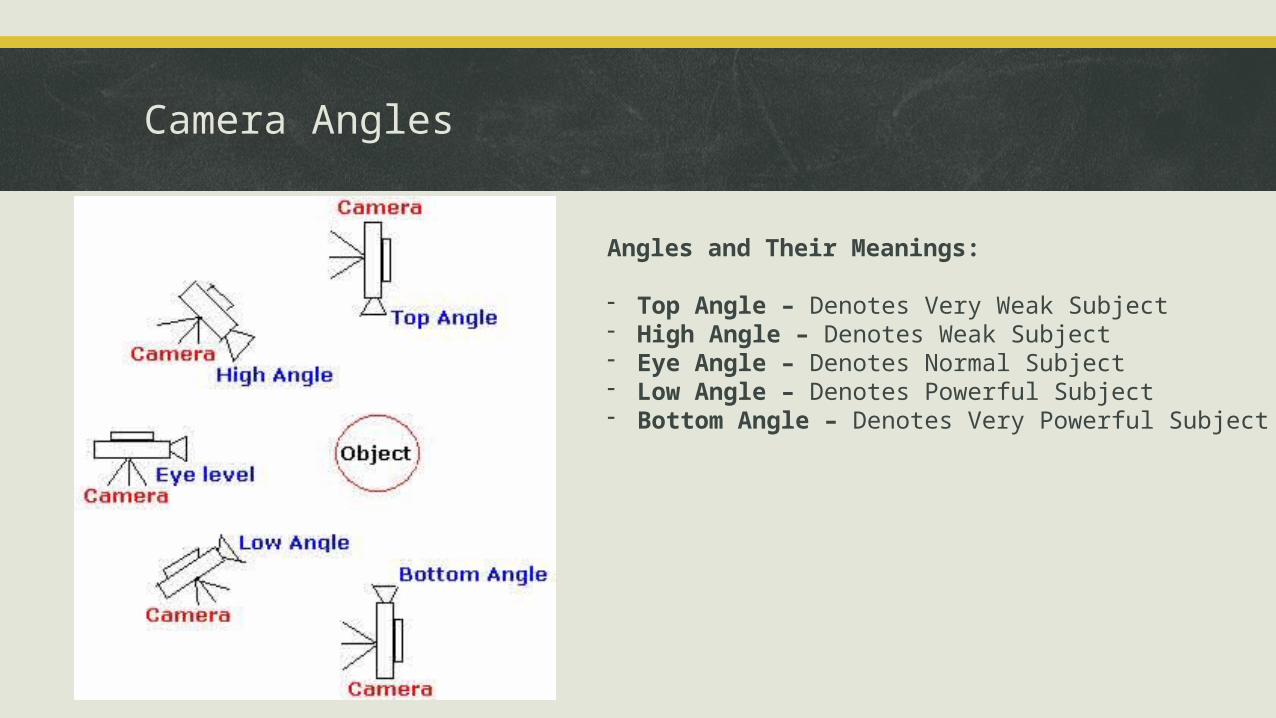
Camera Angles
Angles and Their Meanings:
- Top Angle – Denotes Very Weak Subject- High Angle – Denotes Weak Subject- Eye Angle – Denotes Normal Subject- Low Angle – Denotes Powerful Subject- Bottom Angle – Denotes Very Powerful Subject
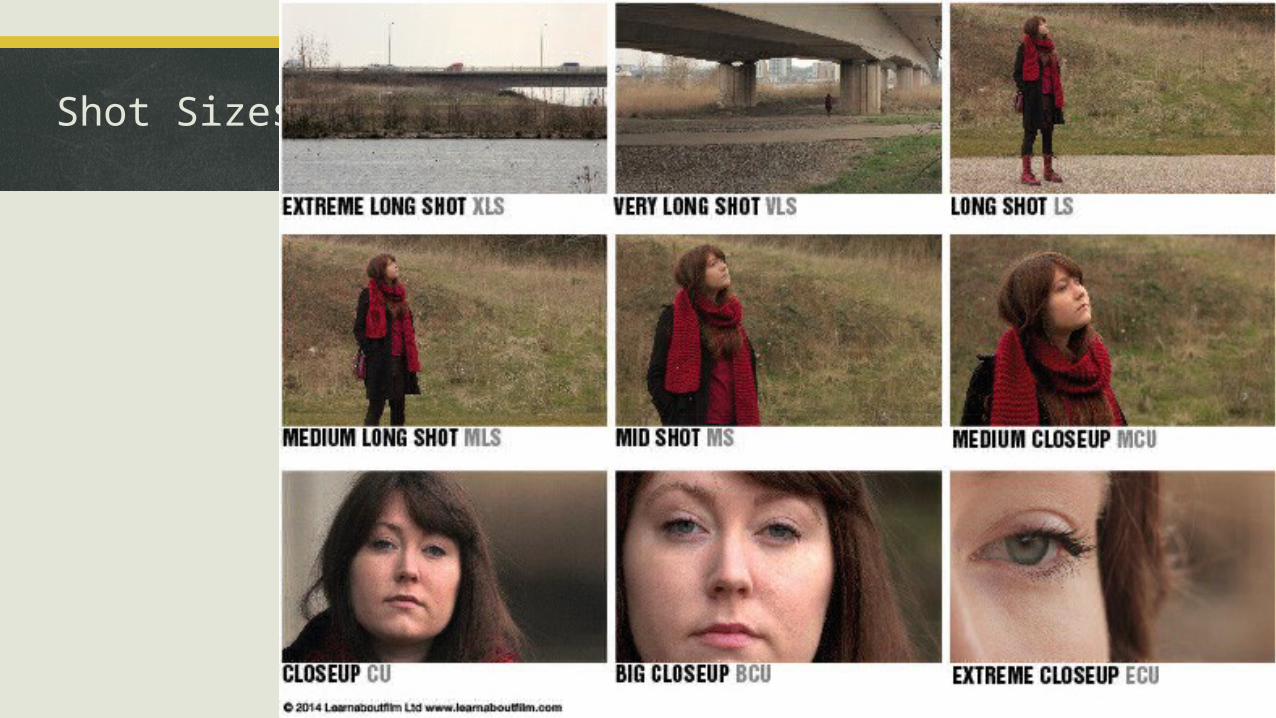
Shot Sizes
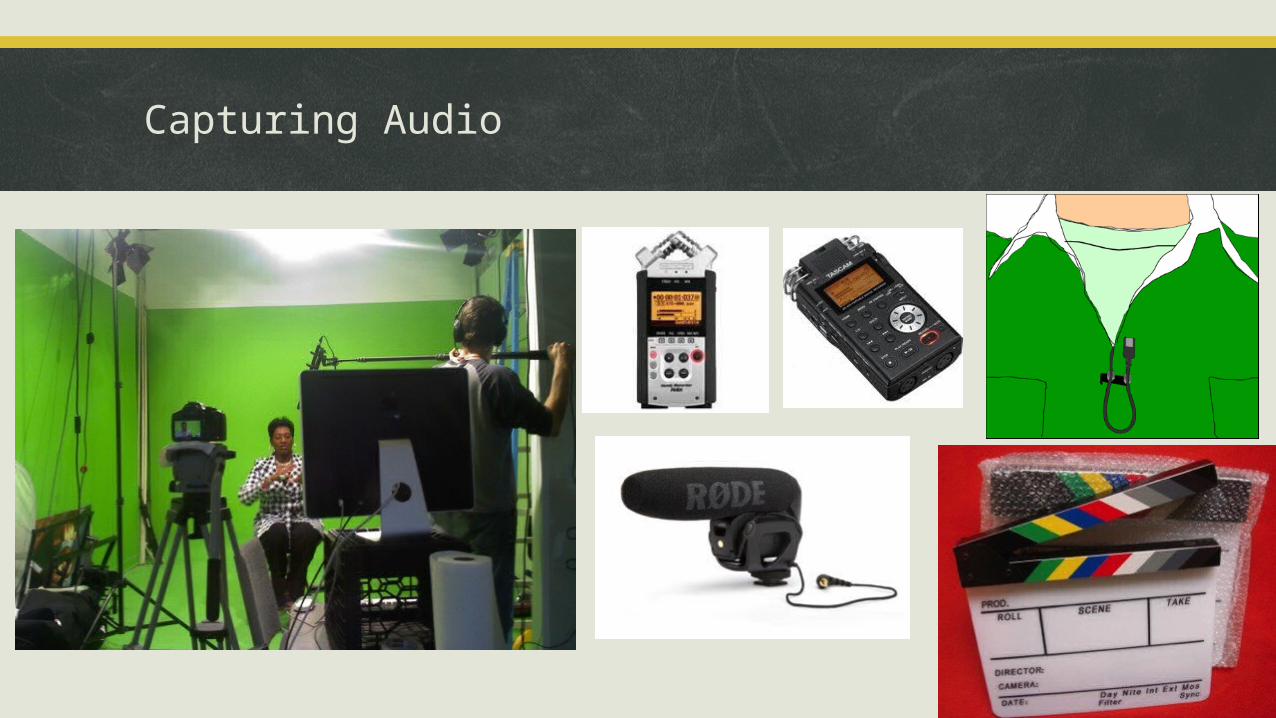
Capturing Audio
Audio is arguably more important than video for quality filmmaking. Viewers will tolerate poorly-shot images; but rarely poor sound!
Turn off Automatic Gain in camera (AGC)!Use external microphone (Lavalier/shotgun)Mic setup e.g. boom, shockmount, windshieldBoost S:NR - use amp/recorder (Juicedlink/Zoom)Use shielded cabling for longer cables (XLR)Sync with slate/clapper board (acrylic/iPad/DIY)
Capturing Audio
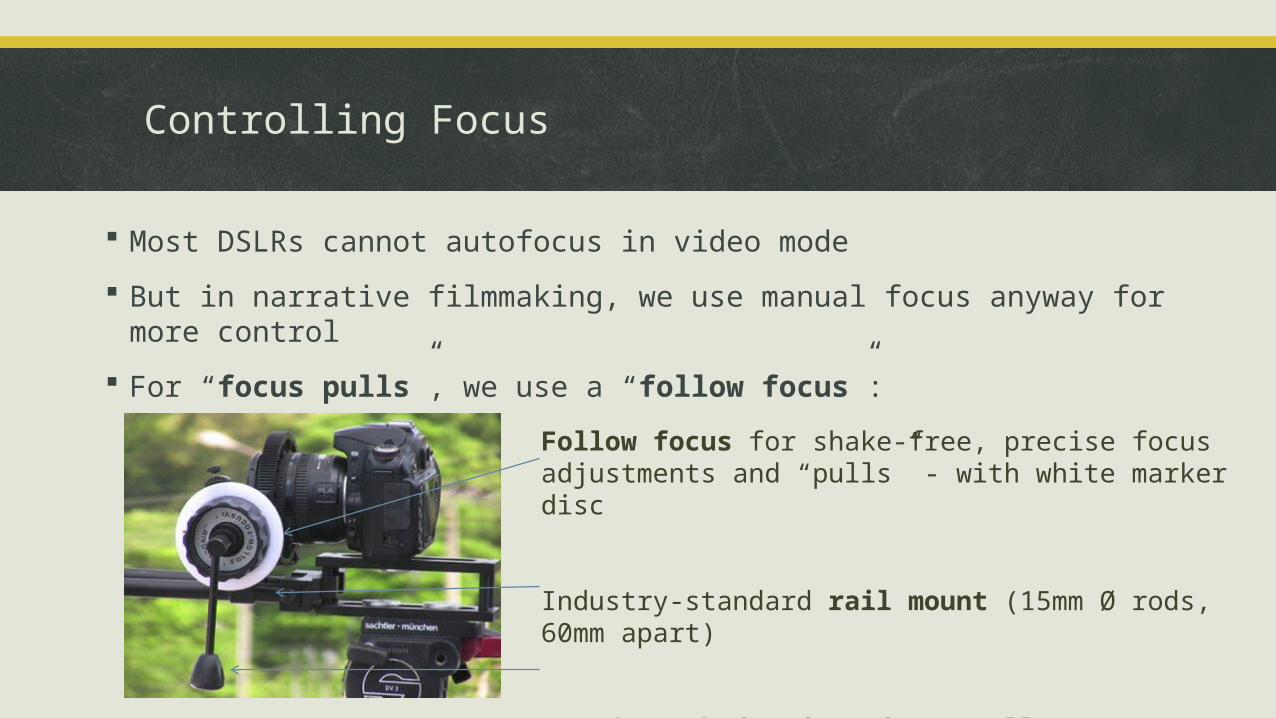
Controlling Focus
Most DSLRs cannot autofocus in video mode
But in narrative filmmaking, we use manual focus anyway for more control
For “focus pulls”, we use a “follow focus”:
Follow focus for shake-free, precise focus adjustments and “pulls” - with white marker disc
Industry-standard rail mount (15mm Ø rods, 60mm apart)
Speed crank for fast focus pull
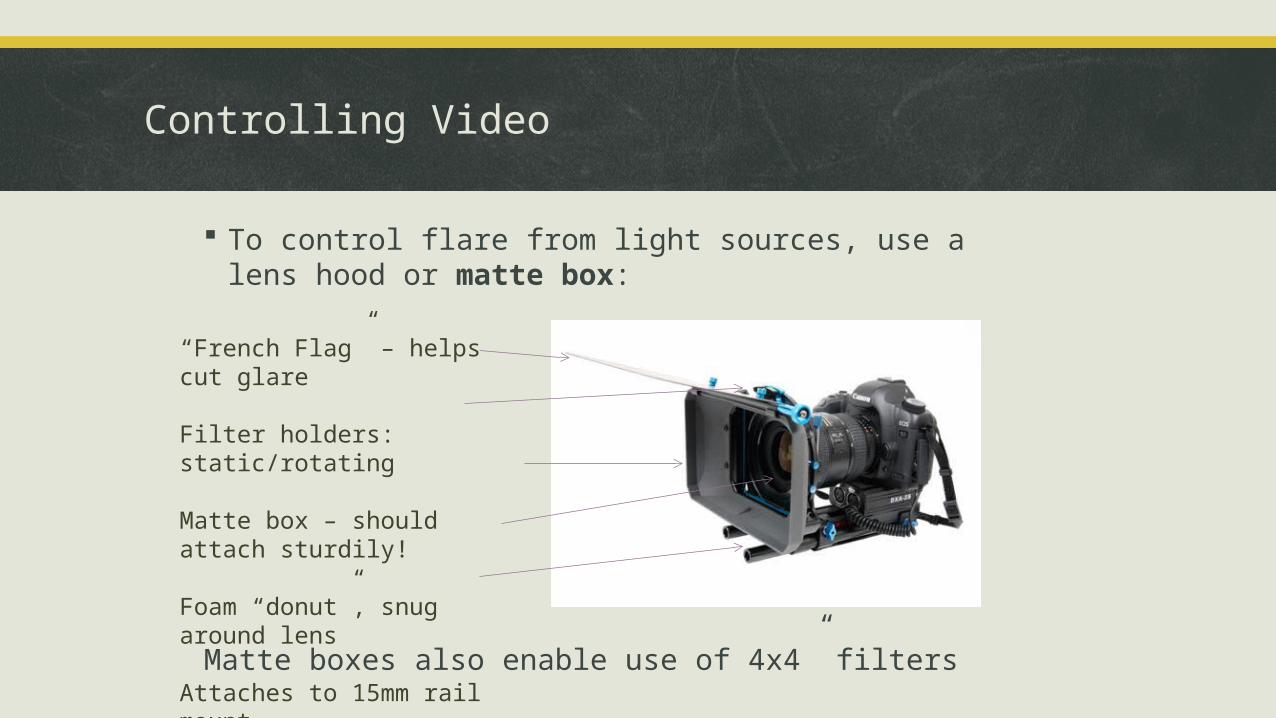
Controlling Video
To control flare from light sources, use a lens hood or matte box:
Matte boxes also enable use of 4x4” filters
“French Flag” – helps cut glare
Filter holders: static/rotating
Matte box – should attach sturdily!
Foam “donut”, snug around lens
Attaches to 15mm rail mount
Controlling Video (Continued)
Always shoot in M (Manual) setting
Need to White Balance - because we are shooting compressed video (not RAW).
To improve final dynamic range, use “Picture Styles” (Canon) to flatten contrast. I recommend Technicolor Cinestyle (free!)
Colour-correct in “Post-” (Colour Grading) with Cinestyle Look-Up-Table (LUT) (also free!)

Monitoring Audio and Video
Monitoring video: External field monitor or loupe for camera LCD Use “zebra stripes” and live histogram – not in
standard camera… but…
Monitoring audio: Use headphones – closed ear, flat response is best Use level meters - not in standard camera… but…

Magic Lantern for Canon DSLR
Some talented programmers have written free software for Canon cameras that improves control and monitoring of video & audio: http://magiclantern.wikia.com/
Audio level monitor (int/ext mics)
Live exposure histogram
“Zebra stripes” (shows over/underexposed areas in image)
Focus distance
Other data

Post-Production
One you have shot your footage, it needs to be edited! Some options & tips… Free, open source video editor: Lightworks
Used to edit “The King’s Speech” (Winner of 4 2011 Academy Awards incl. Best Motion Picture) Other options: Adobe Premiere Pro
CS5 can edit DSLR video natively – saves hours Apple Final Cut Pro
Free plugin imports Canon files for best quality Converts to 4.2.2 Apple Prores colour space

Colour Grading
Shoot flat for detail in highlights & shadows
Colour grading: for hue, saturation & contrast
Summary - and tips!
To get started you just need a DSLR and lens:Install free Technicolor Cinestyle picture styleUse free Magic Lantern firmwareUse free editor (http://lightworksbeta.com/)Use free music (e.g. http://mobygratis.com/ or http://creativecommons.org/) for audio
Shoot and practice!

Summary - and tips! (Continued)
If you have a few extra dollars: Buy a tripod and external shotgun microphoneMake a rig, shock mount and boom pole (even cranes, sliders and dollies if you want to!)Use a digital audio recorder (e.g. your phone)
Shoot and practice some more!

More Information
Online DSLR filmmaker communityhttp://cinema5d.com/
How-to Guidehttp://nofilmschool.com/dslr/
Latest News (Blog)http://www.eoshd.com/

THE END