Embed Size (px)
DESCRIPTION
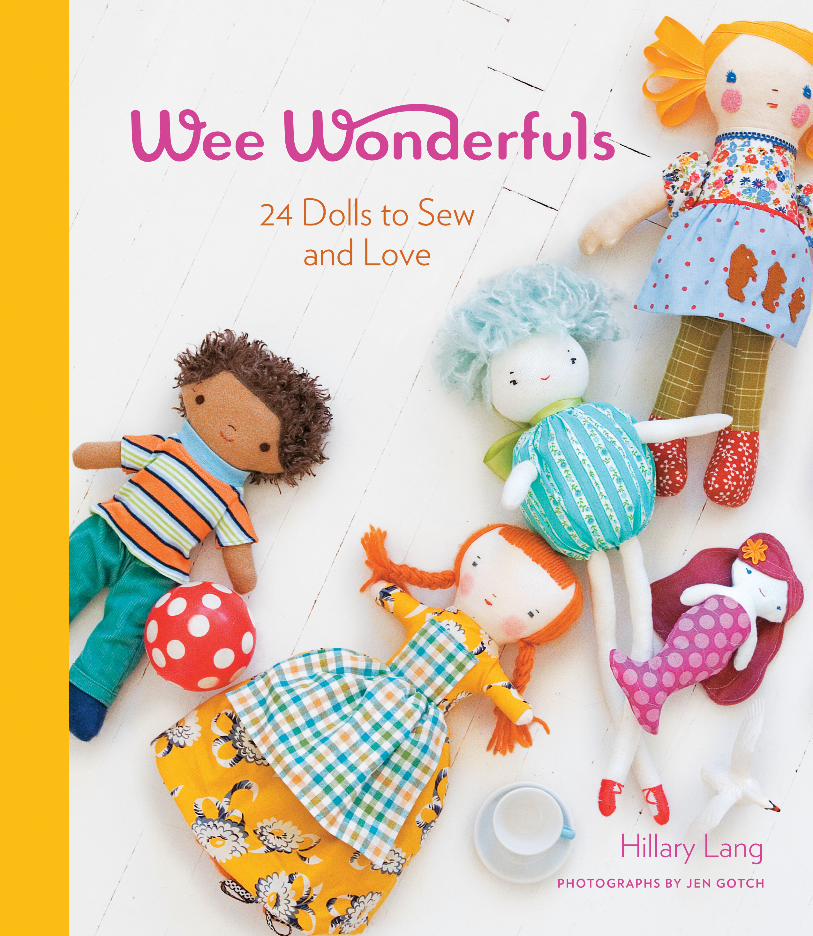
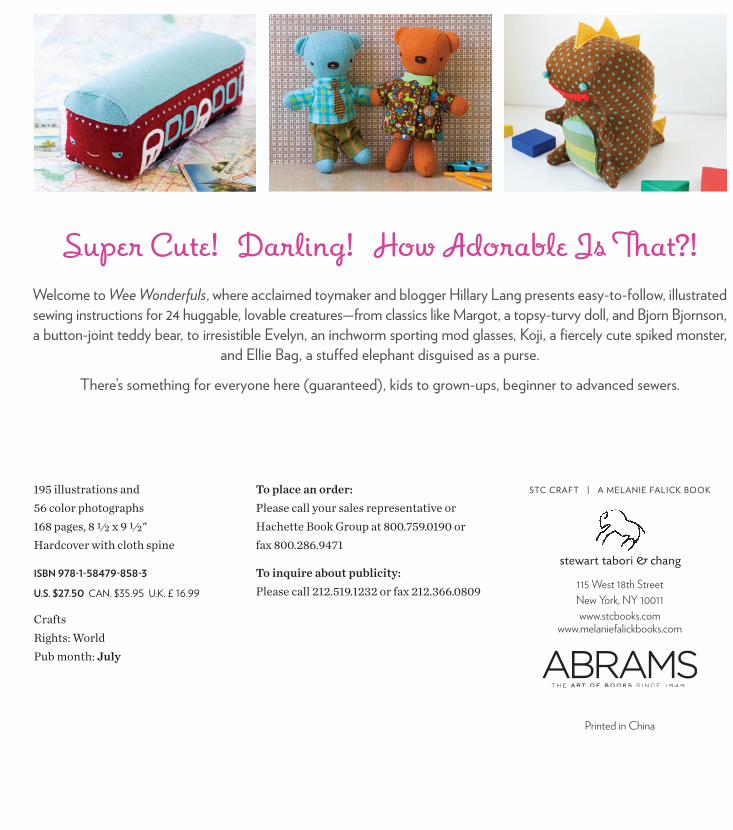
Super cute! Darling! How adorable is that?! Welcome to the world of Wee Wonderfuls. In this charming collection, acclaimed toymaker and popular blogger Hillary Lang presents a captivating gang of 24 huggable, lovable creatures to sew—from classics like Margot, a topsy-turvy doll, and the button-jointed teddy bear Bjorn Bjornson, to irresistible Evelyn, a wool felt inchworm decked out in mod glasses and a kerchief, and Koji, a fiercely cute spiked softie monster. There’s something for everyone here—from kids to grown-ups and from beginning sewers to advanced dollmakers. Each pattern includes clear illustrations and pattern templates to ensure perfect results.
Citation preview

24 Toys to Sew and Love
Hillary Lang PhotograPhs by Jen gotch
S TC C R A F T | A M E L A N I E FA L I C K B O O K S TE WART, TAB O RI & CHAN G | N E W YO RK

24 Toys to Sew and Love
Hillary Lang PhotograPhs by Jen gotch
S TC C R A F T | A M E L A N I E FA L I C K B O O K S TE WA RT, TA B O RI & CH A N G | N E W YO RK

When I sew I like to get a big reaction. And nothing in my 25 years of sewing has ever been as satisfying as making toys. I made my first stuffed animal when my son Oscar was born and I was immediately hooked! My flexible sched-ule as a stay-at-home mom allowed me to fully embrace my crafty side, and quickly I realized I had a certain knack for it. As a kid I had sur-rounded myself with beloved friends like Holly Hobbie, My Friend Mandy, and Ginny dolls. I’d also spent hours reading stories about the se-cret lives of toys, like the Lonely Doll, Velveteen Rabbit, and Corduroy. This early initiation was coming in handy.
In 2004 I started a blog called Wee Wonderfuls to document my toy-making and other crafty efforts. I was no expert. Though I knew my way around a sewing machine and patterns, I was new to toy-making. But the supportive community on my blog gave me the confidence to keep at it when I struggled through a project, and reminded me to still have fun. When readers started asking for my patterns, I began to publish them. It was so exciting to see how someone else could follow my directions and create a doll that was both like mine and had its own unique personality. And all of that led me to create this book in which I present my first collection of 24 toys together. In it I have included everything from a topsy-turvy doll like the one I coveted as a child to a fiercely cute monster with spikes to an elephant purse—and all manner of characters in between.
Introduction
super cute! darling! how adorable is that?!
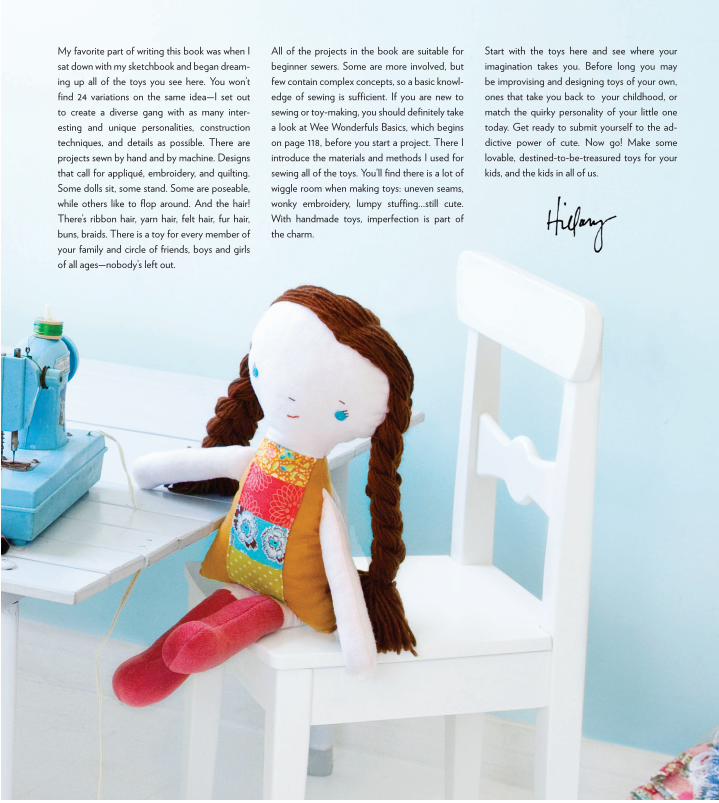
My favorite part of writing this book was when I sat down with my sketchbook and began dream-ing up all of the toys you see here. You won’t fi nd 24 variations on the same idea—I set out to create a diverse gang with as many inter-esting and unique personalities, construction techniques, and details as possible. There are projects sewn by hand and by machine. Designs that call for appliqué, embroidery, and quilting. some dolls sit, some stand. some are poseable, while others like to fl op around. And the hair! There’s ribbon hair, yarn hair, felt hair, fur hair, buns, braids. There is a toy for every member of your family and circle of friends, boys and girls of all ages—nobody’s left out.
All of the projects in the book are suitable for beginner sewers. some are more involved, but few contain complex concepts, so a basic knowl-edge of sewing is suffi cient. If you are new to sewing or toy-making, you should defi nitely take a look at Wee Wonderfuls Basics, which begins on page 118, before you start a project. There I introduce the materials and methods I used for sewing all of the toys. You’ll fi nd there is a lot of wiggle room when making toys: uneven seams, wonky embroidery, lumpy stuffi ng...still cute. With handmade toys, imperfection is part ofthe charm.
start with the toys here and see where your imagination takes you. Before long you may be improvising and designing toys of your own, ones that take you back to your childhood, or match the quirky personality of your little one today. Get ready to submit yourself to the ad-dictive power of cute. now go! Make some lovable, destined-to-be-treasured toys for your kids, and the kids in all of us.

Wee WOnDeRFuLs 6 Wee WOnDeRFuLs 7
Wee WOnDeRFuLs 6 Wee WOnDeRFuLs 7
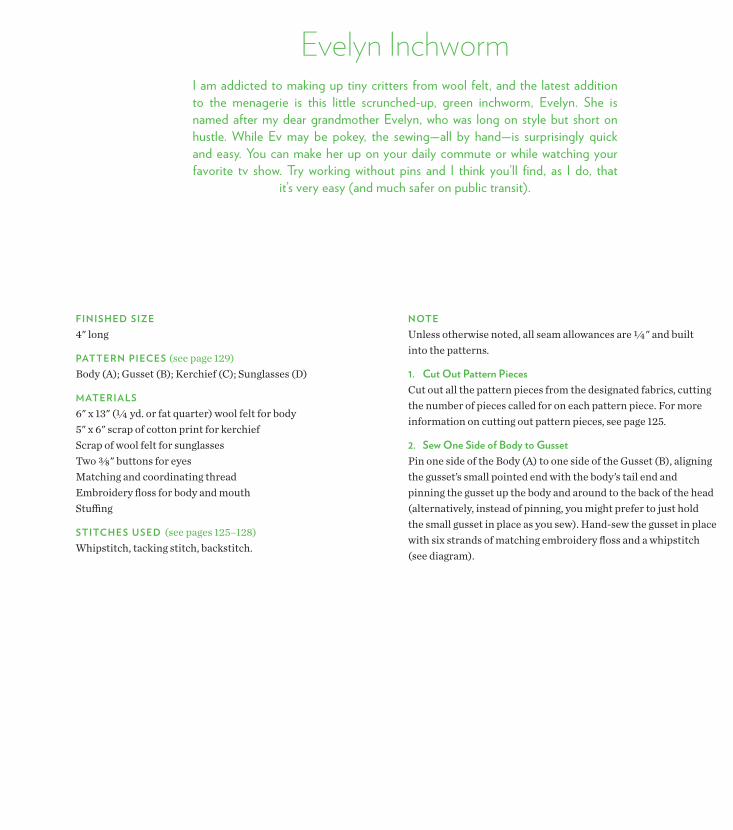
finished size 4" long
Pattern Pieces (see page 129)Body (A); Gusset (B); Kerchief (C); Sunglasses (D)
Materials 6" x 13" (1/4 yd. or fat quarter) wool felt for body 5" x 6" scrap of cotton print for kerchief Scrap of wool felt for sunglasses Two 3/8" buttons for eyes Matching and coordinating thread Embroidery floss for body and mouth Stuffing
stitches Used (see pages 125–128)Whipstitch, tacking stitch, backstitch.
Evelyn InchwormI am addicted to making up tiny critters from wool felt, and the latest addition to the menagerie is this little scrunched-up, green inchworm, evelyn. she is named after my dear grandmother evelyn, who was long on style but short on hustle. While ev may be pokey, the sewing—all by hand—is surprisingly quick and easy. You can make her up on your daily commute or while watching your favorite tv show. Try working without pins and I think you’ll find, as I do, that
it’s very easy (and much safer on public transit).
note Unless otherwise noted, all seam allowances are 1/4" and built into the patterns.
1. cut out Pattern PiecesCut out all the pattern pieces from the designated fabrics, cutting the number of pieces called for on each pattern piece. For more information on cutting out pattern pieces, see page 125.
2. sew one side of body to gussetPin one side of the Body (A) to one side of the Gusset (B), aligning the gusset’s small pointed end with the body’s tail end and pinning the gusset up the body and around to the back of the head (alternatively, instead of pinning, you might prefer to just hold the small gusset in place as you sew). Hand-sew the gusset in place with six strands of matching embroidery floss and a whipstitch (see diagram).
Wee WOnDeRFuLs 8 Wee WOnDeRFuLs 9

Wee WOnDeRFuLs 8 Wee WOnDeRFuLs 9
finished size 12" tall
Pattern Pieces (see pages 158-159)Head (A); Head Gusset (B); Body Front (C); Body Back (D); Ear (E); Arm (F); Leg (G); Foot (H); Nose (I); Tail (J)
Materials 1/2 yd. of fake fur for body and head Scrap of wool felt for nose Two 1/4" buttons or scraps of wool felt for eyes Four ⅞" buttons for joints Matching and coordinating thread Embroidery floss for facial features and sewing button joints Doll needle Stuffing
stitches Used (see pages 125–128)Ladder stitch, whipstitch, backstitch.
noteUnless otherwise noted, all seam allowances are 1/4" and built into the patterns.
1. cut out Pattern Pieces Cut out all the pattern pieces from the designated fabrics, cutting the number of pieces called for on each pattern piece and transferring all pattern markings to the cut pieces (note that you’ll transfer the face template to your toy in Step 9 after stuffing it). For more information on cutting out patterns and transferring pattern markings, see pages 122–123.
2. sew head Sew the darts on the top of each Head (A) piece with right sides together (see diagram). Then, with right sides together, sew the two head pieces together along the front edge under the nose and down the chin (see diagram).
Next pin the Head Gusset (B) to one of the Head (A) pieces with right sides together, starting by aligning the dot at the center of the gusset’s nose end with the head’s center-front seam line (see diagram). Pin the gusset out from the center-front point, turning the head to match the gusset. Starting at the center-front point, sew the gusset to the head (see diagram). Then pin and sew the other head piece to the other side of the gusset in the same way. Turn the head right side out and stuff it firmly (see page 121).
Bjorn Bjornson I’m not always a fan of traditional-looking teddy bears, but I do love the classic button-joint style. so for Bjorn I tried to match that construction style with a more modern aesthetic. I think he turned out just perfect—at least perfect for the kooky bear collector in my life (hi, Mom!). With a long doll needle, button joints are a snap and make the arms and legs wonderfully poseable. If making Bjorn for a child under
three, skip the buttons; instead, sew the arms and legs in place.
115 West 18th Street New York, NY 10011www.stcbooks.com
www.melaniefalickbooks.com
sTC CRAFT | A MeLAnIe FALICk BOOk
Welcome to Wee Wonderfuls, where acclaimed toymaker and blogger Hillary Lang presents easy-to-follow, illustrated sewing instructions for 24 huggable, lovable creatures—from classics like Margot, a topsy-turvy doll, and Bjorn Bjornson, a button-joint teddy bear, to irresistible evelyn, an inchworm sporting mod glasses, koji, a fiercely cute spiked monster,
and ellie Bag, a stuffed elephant disguised as a purse.
There’s something for everyone here (guaranteed), kids to grown-ups, beginner to advanced sewers.
Super Cute! Darling! How Adorable Is That?!
195 illustrations and 56 color photographs 168 pages, 8 1/2 x 9 1/2" Hardcover with cloth spine
isbn 978-1-58479-858-3
U.s. $27.50 CAn. $35.95 u.k. £ 16.99
Crafts Rights: World Pub month: July
To place an order: Please call your sales representative or Hachette Book Group at 800.759.0190 or fax 800.286.9471
To inquire about publicity: Please call 212.519.1232 or fax 212.366.0809
Printed in China

24 Toys to Sew and Love
Hillary Lang PhotograPhs by Jen gotch
S TC C R A F T | A M E L A N I E FA L I C K B O O K S TE WART, TAB O RI & CHAN G | N E W YO RK

Wee WOnDeRFuLs 10 Wee WOnDeRFuLs 11