Embed Size (px)
Citation preview
wedi Fundo | Bodenelement
Assembly Instruction – Fundo floor elementNotice de Montage – Receveur Fundo
Montageanleitung
Montageanleitung | Assembly Instructions | Notice de Montage
wedi Fundo
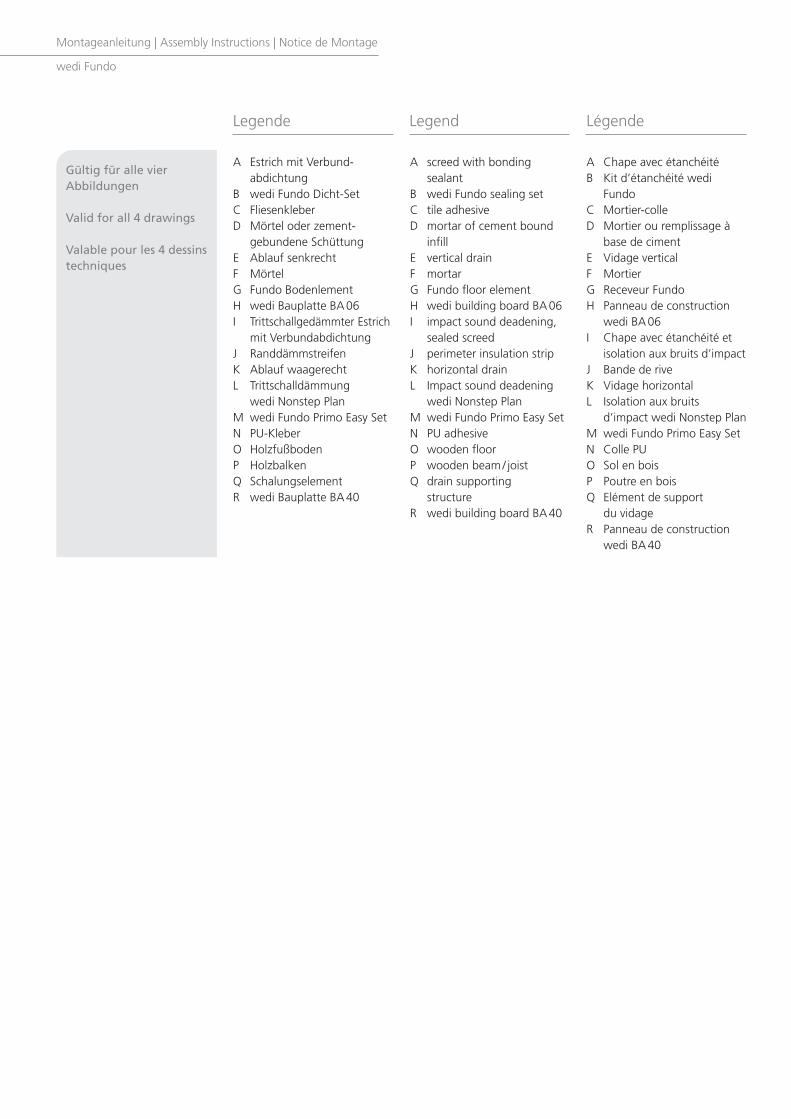
Gültig für alle vier Abbildungen
Valid for all 4 drawings
Valable pour les 4 dessinstechniques
A Estrich mit Verbund -abdichtung
B wedi Fundo Dicht-SetC FliesenkleberD Mörtel oder zement -
gebundene SchüttungE Ablauf senkrechtF MörtelG Fundo BodenlementH wedi Bauplatte BA 06I Trittschallgedämmter Estrich
mit VerbundabdichtungJ RanddämmstreifenK Ablauf waagerechtL Trittschalldämmung
wedi Nonstep PlanM wedi Fundo Primo Easy SetN PU-KleberO HolzfußbodenP HolzbalkenQ SchalungselementR wedi Bauplatte BA 40
A screed with bonding sealant
B wedi Fundo sealing setC tile adhesiveD mortar of cement bound
infillE vertical drainF mortarG Fundo floor elementH wedi building board BA 06I impact sound deadening,
sealed screedJ perimeter insulation stripK horizontal drainL Impact sound deadening
wedi Nonstep PlanM wedi Fundo Primo Easy SetN PU adhesiveO wooden floorP wooden beam / joistQ drain supporting
structureR wedi building board BA 40
A Chape avec étanchéitéB Kit d’étanchéité wedi
FundoC Mortier-colleD Mortier ou remplissage à
base de cimentE Vidage verticalF MortierG Receveur FundoH Panneau de construction
wedi BA 06I Chape avec étanchéité et
isolation aux bruits d’impactJ Bande de riveK Vidage horizontalL Isolation aux bruits
d’impact wedi Nonstep PlanM wedi Fundo Primo Easy SetN Colle PUO Sol en boisP Poutre en boisQ Elément de support
du vidageR Panneau de construction
wedi BA 40
Legende Legend Légende
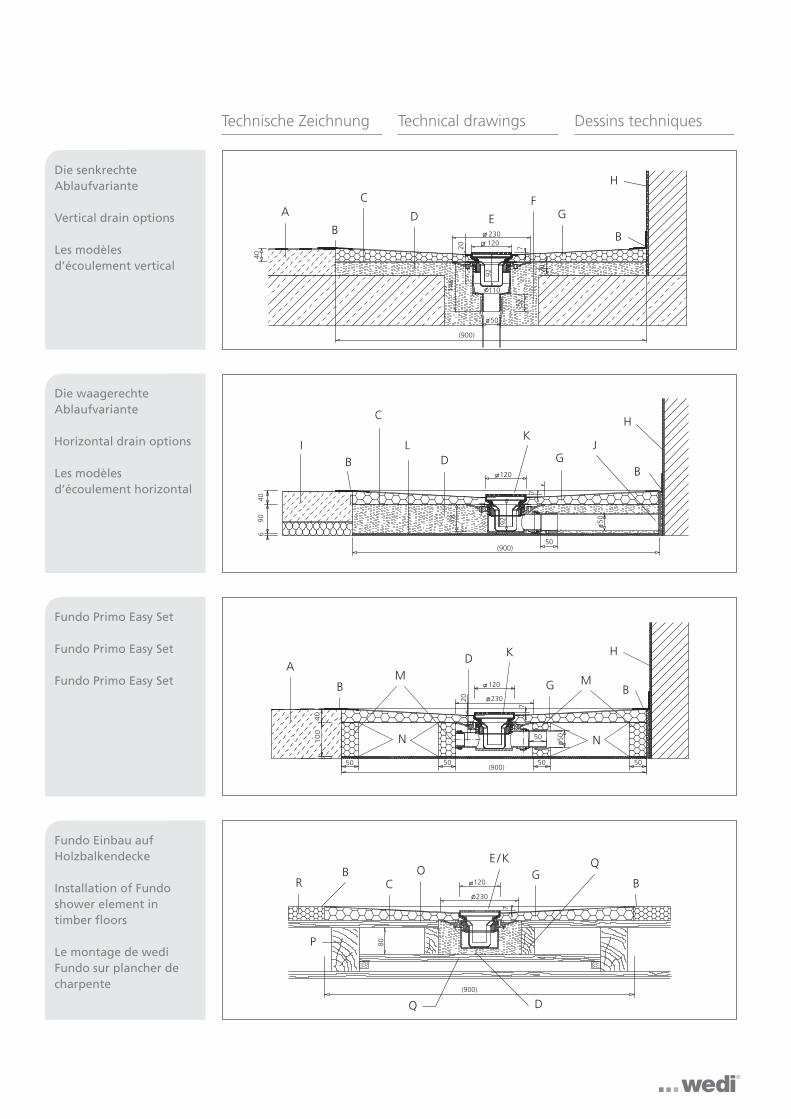
Technische Zeichnung Technical drawings Dessins techniques
Die senkrechte Ablaufvariante
Vertical drain options
Les modèles d’écoulement vertical
Die waagerechte Ablaufvariante
Horizontal drain options
Les modèles d’écoulement horizontal
Fundo Primo Easy Set
Fundo Primo Easy Set
Fundo Primo Easy Set
Fundo Einbau auf Holzbalkendecke
Installation of Fundo shower element in timber floors
Le montage de wediFundo sur plancher decharpente
A
B
C
D E
FG
B
H
IB
C
LD
K
GJ
B
H
A
BM M
N N
KD
B
H
G
RB
CO
E / KG
Q
B
DQ
P
Montageanleitung | Assembly Instructions | Notice de Montage
wedi Fundo
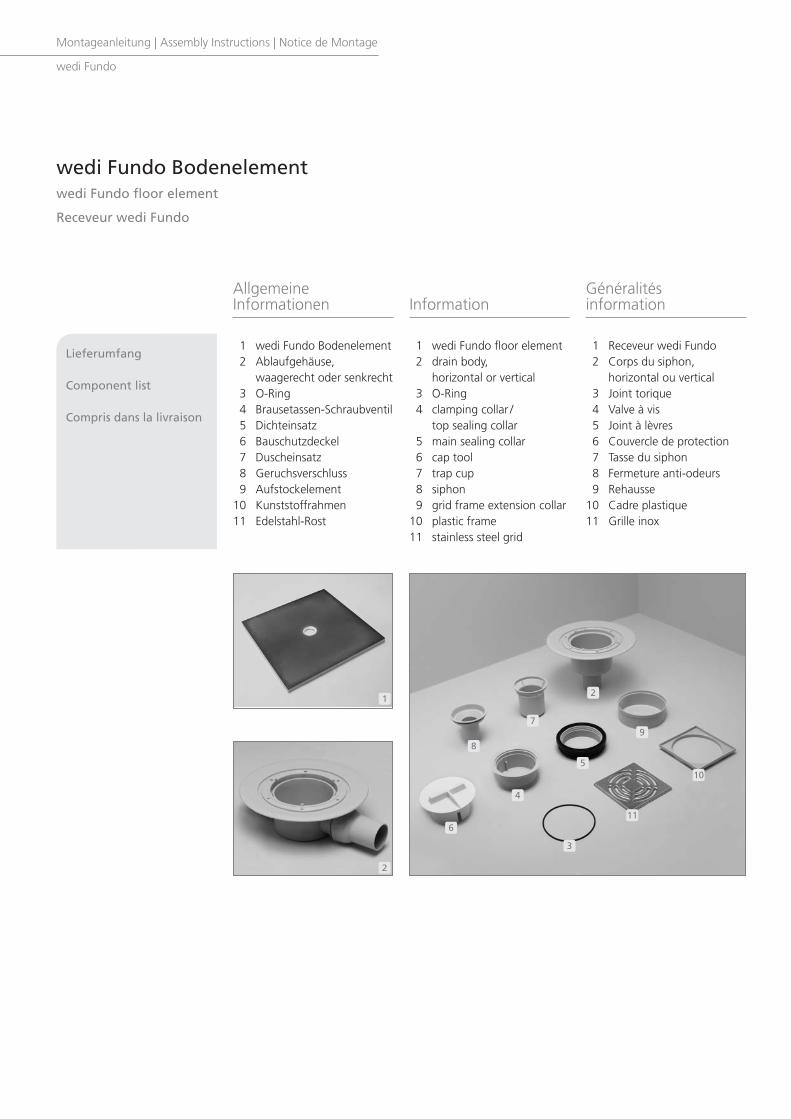
AllgemeineInformationen
1 wedi Fundo Bodenelement2 Ablaufgehäuse,
waagerecht oder senkrecht3 O-Ring4 Brausetassen-Schraubventil5 Dichteinsatz6 Bauschutzdeckel7 Duscheinsatz8 Geruchsverschluss9 Aufstockelement
10 Kunststoffrahmen11 Edelstahl-Rost
Information
1 wedi Fundo floor element2 drain body,
horizontal or vertical3 O-Ring4 clamping collar /
top sealing collar5 main sealing collar6 cap tool7 trap cup8 siphon9 grid frame extension collar
10 plastic frame11 stainless steel grid
Généralitésinformation
1 Receveur wedi Fundo2 Corps du siphon,
horizontal ou vertical3 Joint torique4 Valve à vis5 Joint à lèvres6 Couvercle de protection7 Tasse du siphon8 Fermeture anti-odeurs9 Rehausse
10 Cadre plastique11 Grille inox
wedi Fundo Bodenelementwedi Fundo floor element
Receveur wedi Fundo
1
2
2
7
89
5
4
6
3
11
10
Lieferumfang
Component list
Compris dans la livraison
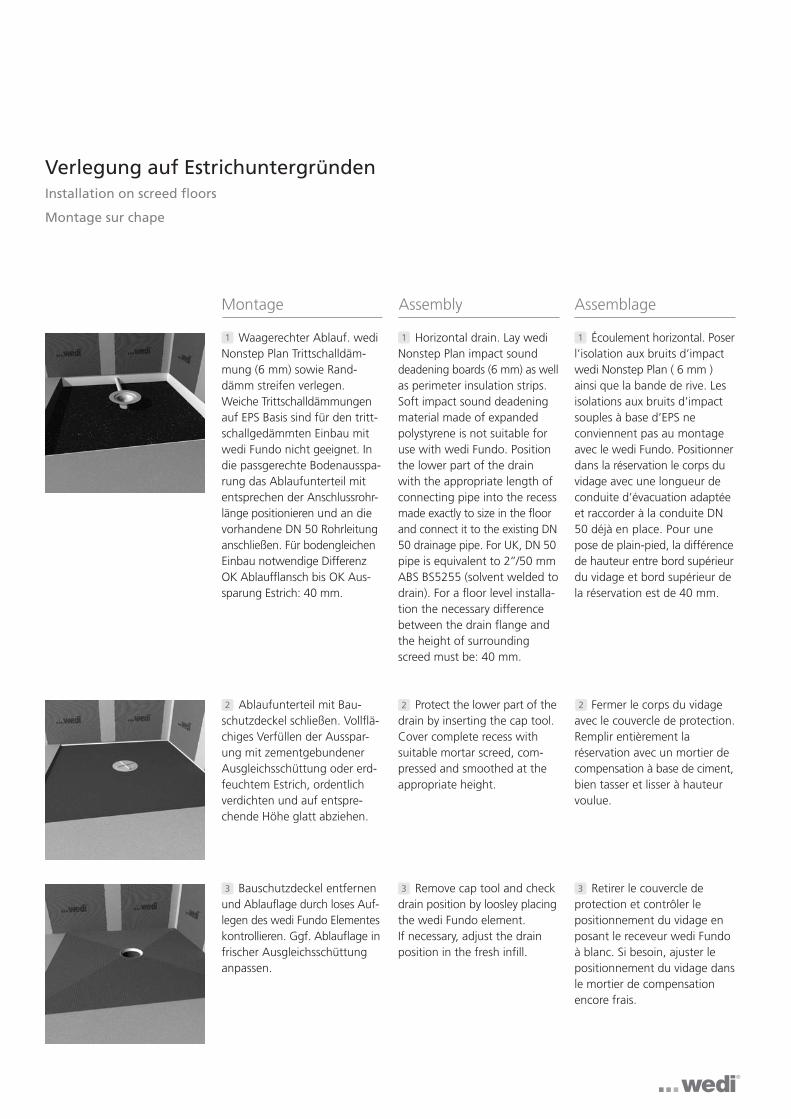
Montage Assembly Assemblage
Waagerechter Ablauf. wediNonstep Plan Trittschalldäm-mung (6 mm) sowie Rand-dämm streifen verlegen.Weiche Trittschalldämmungenauf EPS Basis sind für den tritt-schallgedämmten Einbau mitwedi Fundo nicht geeignet. Indie passgerechte Bodenausspa-rung das Ablaufunterteil mitentsprechen der Anschlussrohr-länge positionieren und an dievorhandene DN 50 Rohrleitunganschließen. Für bodengleichenEinbau notwendige DifferenzOK Ablaufflansch bis OK Aus-sparung Estrich: 40 mm.
Ablaufunterteil mit Bau-schutzdeckel schließen. Voll flä-chiges Verfüllen der Ausspar-ung mit zementgebundenerAusgleichsschüttung oder erd-feuchtem Estrich, ordentlichverdichten und auf entspre-chende Höhe glatt abziehen.
1
2
Horizontal drain. Lay wediNonstep Plan impact sounddeadening boards (6 mm) as wellas perimeter insulation strips.Soft impact sound deadeningmaterial made of expanded polystyrene is not suitable foruse with wedi Fundo. Positionthe lower part of the drainwith the appropriate length ofconnecting pipe into the recessmade exactly to size in the floorand connect it to the existing DN50 drainage pipe. For UK, DN 50pipe is equivalent to 2’’/50 mmABS BS5255 (solvent welded todrain). For a floor level installa-tion the necessary differencebetween the drain flange andthe height of surroundingscreed must be: 40 mm.
Protect the lower part of thedrain by inserting the cap tool.Cover complete recess withsuitable mortar screed, com-pressed and smoothed at theappropriate height.
1
2
Écoulement horizontal. Poserl’isolation aux bruits d’impactwedi Nonstep Plan ( 6 mm )ainsi que la bande de rive. Les isolations aux bruits d’impactsouples à base d’EPS ne conviennent pas au montageavec le wedi Fundo. Positionnerdans la réservation le corps duvidage avec une longueur deconduite d’évacuation adaptéeet raccorder à la conduite DN50 déjà en place. Pour unepose de plain-pied, la différencede hauteur entre bord supérieurdu vidage et bord supérieur dela réservation est de 40 mm.
Fermer le corps du vidageavec le couvercle de protection.Remplir entièrement la réservation avec un mortier decompensation à base de ciment,bien tasser et lisser à hauteurvoulue.
1
2
Verlegung auf EstrichuntergründenInstallation on screed floors
Montage sur chape
Bauschutzdeckel entfernenund Ablauflage durch loses Auf-legen des wedi Fundo Elementeskontrollieren. Ggf. Ablauflage infrischer Ausgleichsschüttunganpassen.
3 Remove cap tool and checkdrain position by loosley placingthe wedi Fundo element. If necessary, adjust the drainposition in the fresh infill.
3 Retirer le couvercle de protection et contrôler le positionnement du vidage enposant le receveur wedi Fundoà blanc. Si besoin, ajuster lepositionnement du vidage dansle mortier de compensation encore frais.
3
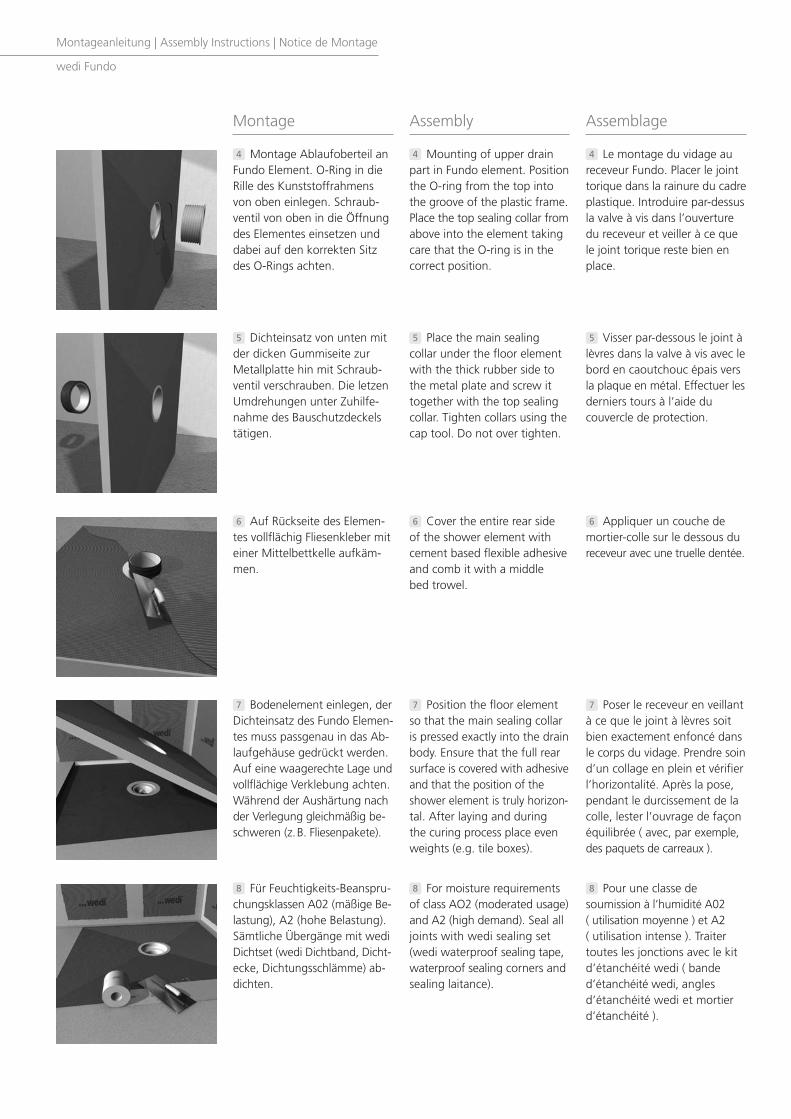
Montage Ablaufoberteil anFundo Element. O-Ring in dieRille des Kunststoffrahmensvon oben einlegen. Schraub-ventil von oben in die Öffnungdes Elementes einsetzen unddabei auf den korrekten Sitzdes O-Rings achten.
Montage Assembly Assemblage
Auf Rückseite des Elemen-tes vollflächig Fliesenkleber miteiner Mittelbettkelle aufkäm-men.
Bodenelement einlegen, derDichteinsatz des Fundo Elemen-tes muss passgenau in das Ab-laufgehäuse gedrückt werden.Auf eine waagerechte Lage undvollflächige Verklebung achten.Während der Aushärtung nachder Verlegung gleichmäßig be-schweren (z. B. Fliesenpakete).
4
6
7
Mounting of upper drainpart in Fundo element. Positionthe O-ring from the top intothe groove of the plastic frame.Place the top sealing collar fromabove into the element takingcare that the O-ring is in thecorrect position.
Cover the entire rear side of the shower element with cement based flexible adhesiveand comb it with a middlebed trowel.
Position the floor elementso that the main sealing collaris pressed exactly into the drainbody. Ensure that the full rearsurface is covered with adhesiveand that the position of theshower element is truly horizon-tal. After laying and during the curing process place evenweights (e.g. tile boxes).
4
6
7
Le montage du vidage aureceveur Fundo. Placer le jointtorique dans la rainure du cadreplastique. Introduire par-dessusla valve à vis dans l’ouverturedu receveur et veiller à ce quele joint torique reste bien enplace.
Appliquer un couche demortier-colle sur le dessous dureceveur avec une truelle dentée.
Poser le receveur en veillantà ce que le joint à lèvres soitbien exactement enfoncé dansle corps du vidage. Prendre soind’un collage en plein et vérifierl’horizontalité. Après la pose,pendant le durcissement de lacolle, lester l’ouvrage de façonéquilibrée ( avec, par exemple,des paquets de carreaux ).
4
6
7
Montageanleitung | Assembly Instructions | Notice de Montage
wedi Fundo
Dichteinsatz von unten mitder dicken Gummiseite zurMetallplatte hin mit Schraub-ventil verschrauben. Die letzenUmdrehungen unter Zuhilfe-nahme des Bauschutzdeckelstätigen.
5 Place the main sealing collar under the floor elementwith the thick rubber side tothe metal plate and screw it together with the top sealing collar. Tighten collars using thecap tool. Do not over tighten.
5 Visser par-dessous le joint àlèvres dans la valve à vis avec lebord en caoutchouc épais versla plaque en métal. Effectuer lesderniers tours à l’aide du couvercle de protection.
5
Für Feuchtigkeits-Beanspru-chungsklassen A02 (mäßige Be-lastung), A2 (hohe Belastung).Sämtliche Übergänge mit wediDichtset (wedi Dichtband, Dicht-ecke, Dichtungsschlämme) ab-dichten.
8 For moisture requirementsof class AO2 (moderated usage)and A2 (high demand). Seal alljoints with wedi sealing set(wedi waterproof sealing tape,waterproof sealing corners andsealing laitance).
8 Pour une classe de soumission à l’humidité A02 ( utilisation moyenne ) et A2 ( utilisation intense ). Traitertoutes les jonctions avec le kit d’étanchéité wedi ( banded’étanchéité wedi, anglesd’étanchéité wedi et mortierd’étanchéité ).
8
Montage Assembly Assemblage
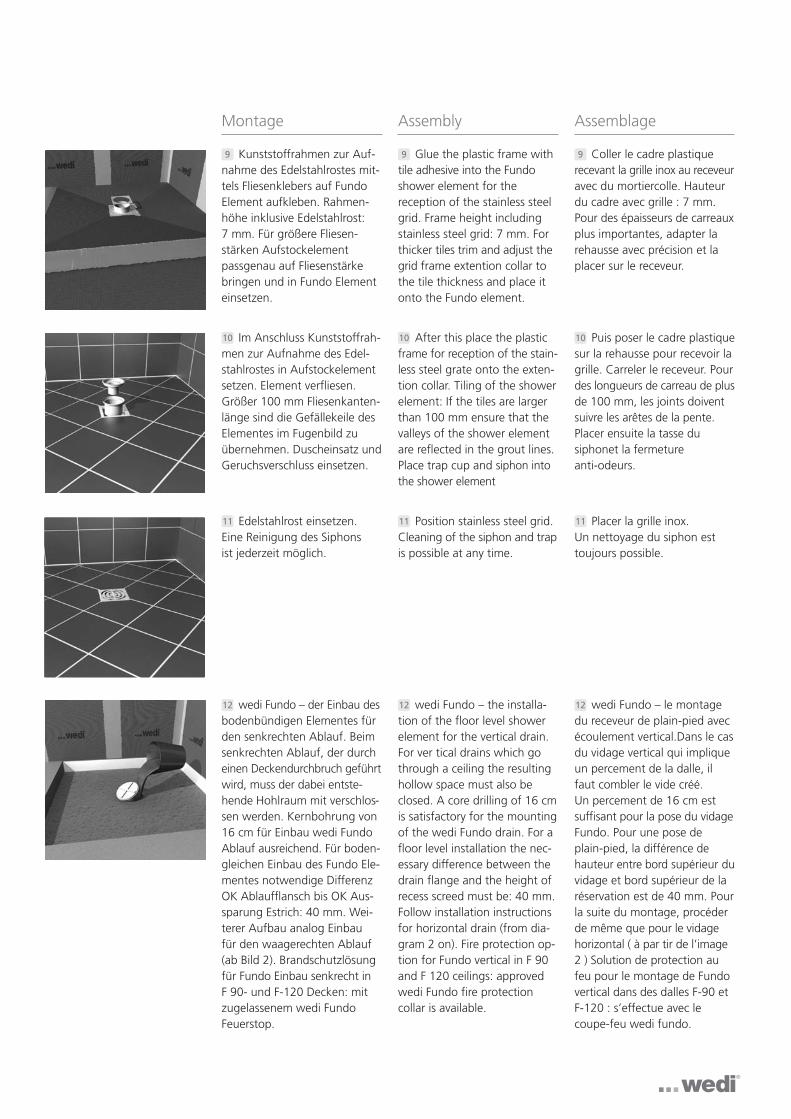
Kunststoffrahmen zur Auf-nahme des Edelstahlrostes mit-tels Fliesenklebers auf FundoElement aufkleben. Rahmen-höhe inklusive Edelstahlrost: 7 mm. Für größere Fliesen -stärken Aufstockelement passgenau auf Fliesenstärkebringen und in Fundo Elementeinsetzen.
Edelstahlrost einsetzen.Eine Reinigung des Siphons ist jederzeit möglich.
9
11
Glue the plastic frame withtile adhesive into the Fundoshower element for the reception of the stainless steelgrid. Frame height includingstainless steel grid: 7 mm. Forthicker tiles trim and adjust thegrid frame extention collar tothe tile thickness and place itonto the Fundo element.
Position stainless steel grid.Cleaning of the siphon and trapis possible at any time.
9
11
Coller le cadre plastique recevant la grille inox au receveuravec du mortiercolle. Hauteurdu cadre avec grille : 7 mm.Pour des épaisseurs de carreauxplus importantes, adapter la rehausse avec précision et laplacer sur le receveur.
Placer la grille inox. Un nettoyage du siphon esttoujours possible.
9
12
After this place the plasticframe for reception of the stain-less steel grate onto the exten-tion collar. Tiling of the showerelement: If the tiles are largerthan 100 mm ensure that thevalleys of the shower elementare reflected in the grout lines.Place trap cup and siphon intothe shower element
Im Anschluss Kunststoff rah-men zur Aufnahme des Edel-stahlrostes in Aufstockelementsetzen. Element verfliesen.Größer 100 mm Fliesenkanten-länge sind die Gefällekeile desElementes im Fugenbild zuübernehmen. Duscheinsatz undGeruchsverschluss einsetzen.
Puis poser le cadre plastiquesur la rehausse pour recevoir lagrille. Carreler le receveur. Pourdes longueurs de carreau de plusde 100 mm, les joints doiventsuivre les arêtes de la pente.Placer ensuite la tasse du siphonet la fermeture anti-odeurs.
wedi Fundo – der Einbau desbodenbündigen Elementes fürden senkrechten Ablauf. Beimsenkrechten Ablauf, der durcheinen Deckendurchbruch geführtwird, muss der dabei entste-hende Hohlraum mit verschlos-sen werden. Kernbohrung von16 cm für Einbau wedi FundoAblauf ausreichend. Für boden-gleichen Einbau des Fundo Ele-mentes notwendige DifferenzOK Ablaufflansch bis OK Aus-sparung Estrich: 40 mm. Wei-terer Aufbau analog Einbau für den waagerechten Ablauf(ab Bild 2). Brandschutzlösung für Fundo Einbau senkrecht in F 90- und F-120 Decken: mitzugelassenem wedi Fundo Feuerstop.
wedi Fundo – the installa-tion of the floor level showerelement for the vertical drain.For ver tical drains which gothrough a ceiling the resultinghollow space must also beclosed. A core drilling of 16 cmis satisfactory for the mountingof the wedi Fundo drain. For afloor level installation the nec-essary difference between thedrain flange and the height ofrecess screed must be: 40 mm.Follow installation instructionsfor horizontal drain (from dia-gram 2 on). Fire protection op-tion for Fundo vertical in F 90and F 120 ceilings: approvedwedi Fundo fire protection collar is available.
wedi Fundo – le montagedu receveur de plain-pied avecécoulement vertical.Dans le casdu vidage vertical qui impliqueun percement de la dalle, il faut combler le vide créé. Un percement de 16 cm estsuffisant pour la pose du vidageFundo. Pour une pose de plain-pied, la différence dehauteur entre bord supérieur duvidage et bord supérieur de laréservation est de 40 mm. Pourla suite du montage, procéderde même que pour le vidagehorizontal ( à par tir de l’image2 ) Solution de protection aufeu pour le montage de Fundovertical dans des dalles F-90 etF-120 : s’effectue avec lecoupe-feu wedi fundo.
11
10
1212
10 10
Verlegung auf HolzuntergründenInstallation instructions onto wooden floors
Montage sur plancher en bois
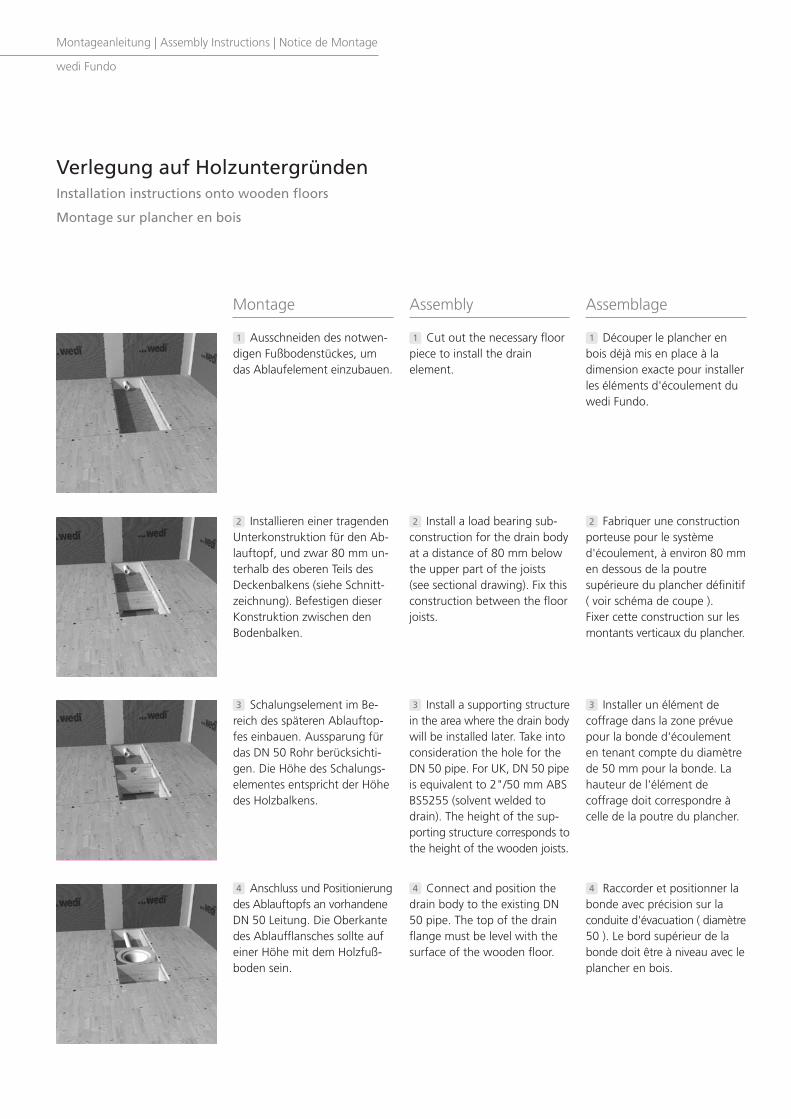
Ausschneiden des notwen-digen Fußbodenstückes, umdas Ablaufelement einzubauen.
Installieren einer tragendenUnterkonstruktion für den Ab-lauftopf, und zwar 80 mm un-terhalb des oberen Teils desDeckenbalkens (siehe Schnitt-zeichnung). Befestigen dieserKonstruktion zwischen denBodenbalken.
Anschluss und Positionierungdes Ablauftopfs an vorhandeneDN 50 Leitung. Die Oberkantedes Ablaufflansches sollte aufeiner Höhe mit dem Holzfuß-boden sein.
2
4
Cut out the necessary floorpiece to install the drain element.
Install a load bearing sub-construction for the drain bodyat a distance of 80 mm belowthe upper part of the joists (see sectional drawing). Fix this construction between the floorjoists.
Connect and position thedrain body to the existing DN50 pipe. The top of the drainflange must be level with thesurface of the wooden floor.
2
4
Découper le plancher enbois déjà mis en place à la dimension exacte pour installerles éléments d'écoulement duwedi Fundo.
Fabriquer une constructionporteuse pour le systèmed'écoulement, à environ 80 mmen dessous de la poutre supérieure du plancher définitif( voir schéma de coupe ). Fixer cette construction sur les montants verticaux du plancher.
Raccorder et positionner labonde avec précision sur laconduite d'évacuation ( diamètre50 ). Le bord supérieur de labonde doit être à niveau avec leplancher en bois.
2
4
Montage Assembly Assemblage
Montageanleitung | Assembly Instructions | Notice de Montage
wedi Fundo
Schalungselement im Be-reich des späteren Ablauftop-fes einbauen. Aussparung fürdas DN 50 Rohr berücksichti-gen. Die Höhe des Schalungs-elementes entspricht der Höhedes Holzbalkens.
3 Install a supporting structurein the area where the drain bodywill be installed later. Take intoconsideration the hole for theDN 50 pipe. For UK, DN 50 pipeis equivalent to 2"/50 mm ABSBS5255 (solvent welded todrain). The height of the sup-porting structure corresponds tothe height of the wooden joists.
3 Installer un élément de coffrage dans la zone prévuepour la bonde d'écoulementen tenant compte du diamètrede 50 mm pour la bonde. Lahauteur de l'élément de coffrage doit correspondre àcelle de la poutre du plancher.
3
1 1 1
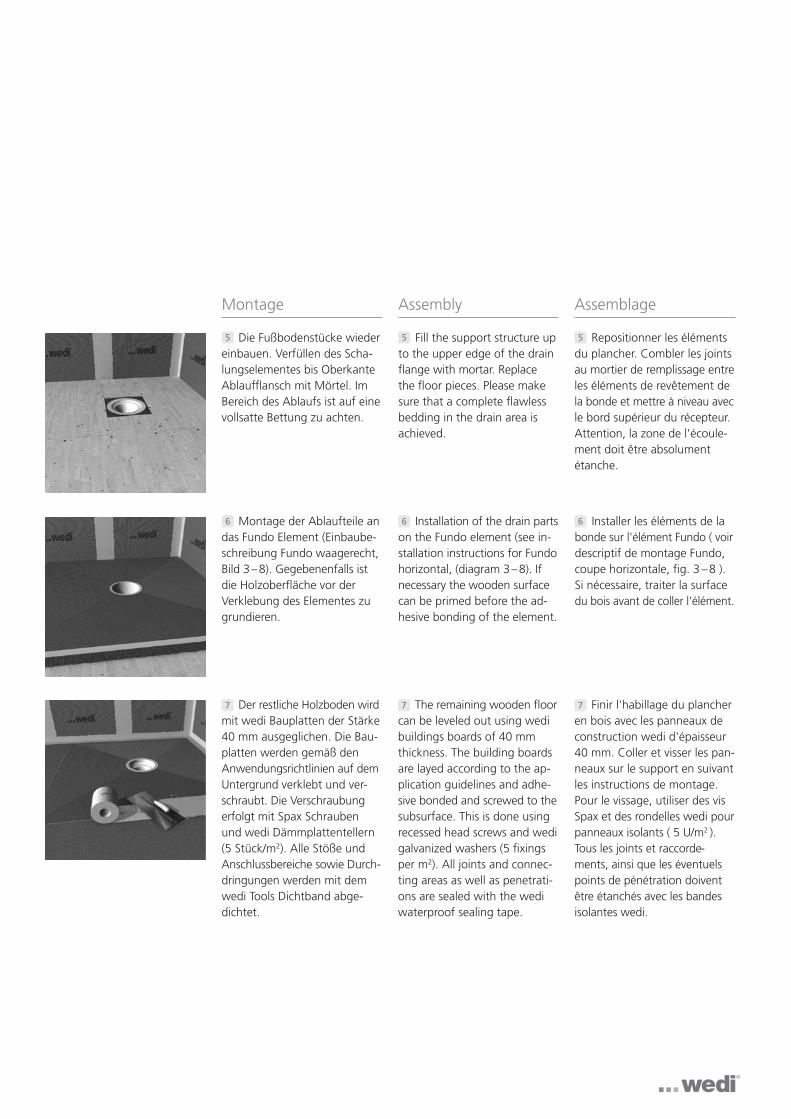
Die Fußbodenstücke wiedereinbauen. Verfüllen des Scha-lungselementes bis OberkanteAblaufflansch mit Mörtel. ImBereich des Ablaufs ist auf einevollsatte Bettung zu achten.
Montage Assembly Assemblage
Montage der Ablaufteile andas Fundo Element (Einbaube-schreibung Fundo waagerecht,Bild 3 –8). Gegebenenfalls istdie Holzoberfläche vor der Verklebung des Elementes zugrundieren.
5
6
Fill the support structure upto the upper edge of the drainflange with mortar. Replace the floor pieces. Please makesure that a complete flawless bedding in the drain area isachieved.
Installation of the drain partson the Fundo element (see in-stallation instructions for Fundohorizontal, (diagram 3 –8). Ifnecessary the wooden surfacecan be primed before the ad-hesive bonding of the element.
5
6
Repositionner les élémentsdu plancher. Combler les jointsau mortier de remplissage entreles éléments de revêtement dela bonde et mettre à niveau avecle bord supérieur du récepteur.Attention, la zone de l'écoule-ment doit être absolumentétanche.
Installer les éléments de labonde sur l'élément Fundo ( voirdescriptif de montage Fundo,coupe horizontale, fig. 3 –8 ).Si nécessaire, traiter la surfacedu bois avant de coller l'élément.
5
6
Der restliche Holzboden wirdmit wedi Bauplatten der Stärke40 mm ausgeglichen. Die Bau-platten werden gemäß denAnwendungsrichtlinien auf demUntergrund verklebt und ver-schraubt. Die Verschraubung erfolgt mit Spax Schraubenund wedi Dämmplattentellern (5 Stück/m2). Alle Stöße undAnschlussbereiche sowie Durch-dringungen werden mit demwedi Tools Dichtband abge-dichtet.
The remaining wooden floorcan be leveled out using wedibuildings boards of 40 mmthickness. The building boardsare layed according to the ap-plication guidelines and adhe-sive bonded and screwed to thesubsurface. This is done usingrecessed head screws and wedigalvanized washers (5 fixingsper m2). All joints and connec-ting areas as well as penetrati-ons are sealed with the wediwaterproof sealing tape.
Finir l'habillage du plancheren bois avec les panneaux deconstruction wedi d'épaisseur40 mm. Coller et visser les pan-neaux sur le support en suivantles instructions de montage.Pour le vissage, utiliser des visSpax et des rondelles wedi pourpanneaux isolants ( 5 U/m2 ).Tous les joints et raccorde-ments, ainsi que les éventuelspoints de pénétration doiventêtre étanchés avec les bandesisolantes wedi.
7 7 7

Montageanleitung | Assembly Instructions | Notice de Montage
wedi Fundo
Das Fundo Primo Easy Set wirdals Baukasten geliefert. Mit demFundo Primo Easy Set könnenbodengleiche Duschen wediFundo schnell und einfach auf passende Höhe gebracht werden. Es ist kein auf wendigesAuffüllen mit Mörtel undEstrich nötig.
The Fundo Primo Easy Set isdelivered as a building set.wedi Fundo floor-level showerscan be installed to the correctheight quickly and easily withthe aid of the Easy Set. Time-consuming filling with mortarand screed is now eliminated.
wedi Fundo Primo Easy SetDas schnelle und einfache Unterbausystem für bodengleiche Duschen
The quick and easy subconstruction system for floor-level showers
Simple et rapide, le système de rehausse pour receveurs de douche plain-pied
GenerelleInformationen
GeneralInformation
Informations générales
Hinweis
Note
Remarque
Le Fundo Primo Easy Set est livrésous forme de kit à monter. Lekit Easy Set permet de rehausserfacilement et rapidement les receveurs de douche wedi Fundoà la hauteur souhaitée, sansavoir recours à une chape deremplissage au mortier.
AllgemeineInformationen Information
Généralitésinformation
Das Unterbauset gibt es für folgende Fundo Abmessungenmit zentralem Ablauf: • 900 x 900 mm• 900 x 1200 mm • 900 x 1800 mm• 1200 x 1200 mm• 1000 x 1000 mm• 1500 x 1500 mm
sowie für Fundo Abmessungenmit dezentralem Ablauf: • 900 x 1800 mm
Gesamtaufbauhöhe: • 140 mm
The subconstruction set isavailable for the wedi Fundosquare design including centraldrain for the dimensions: • 900 x 900 mm• 900 x 1200 mm • 900 x 1800 mm• 1200 x 1200 mm• 1000 x 1000 mm• 1500 x 1500 mm
and for Fundo dimensions withoffset drain: • 900 x 1800 mm
Overall construction height: • 140 mm
Il est adapté aux modèles carrés de dimensions ( avec écoulement centré ) : • 900 x 900 mm• 900 x 1200 mm• 900 x 1800 mm• 1200 x 1200 mm• 1000 x 1000 mm• 1500 x 1500 mm
ainsi que Fundo ( excentré ) :• 900 x 1800 mm
Hauteur totale du montage :• 140 mm
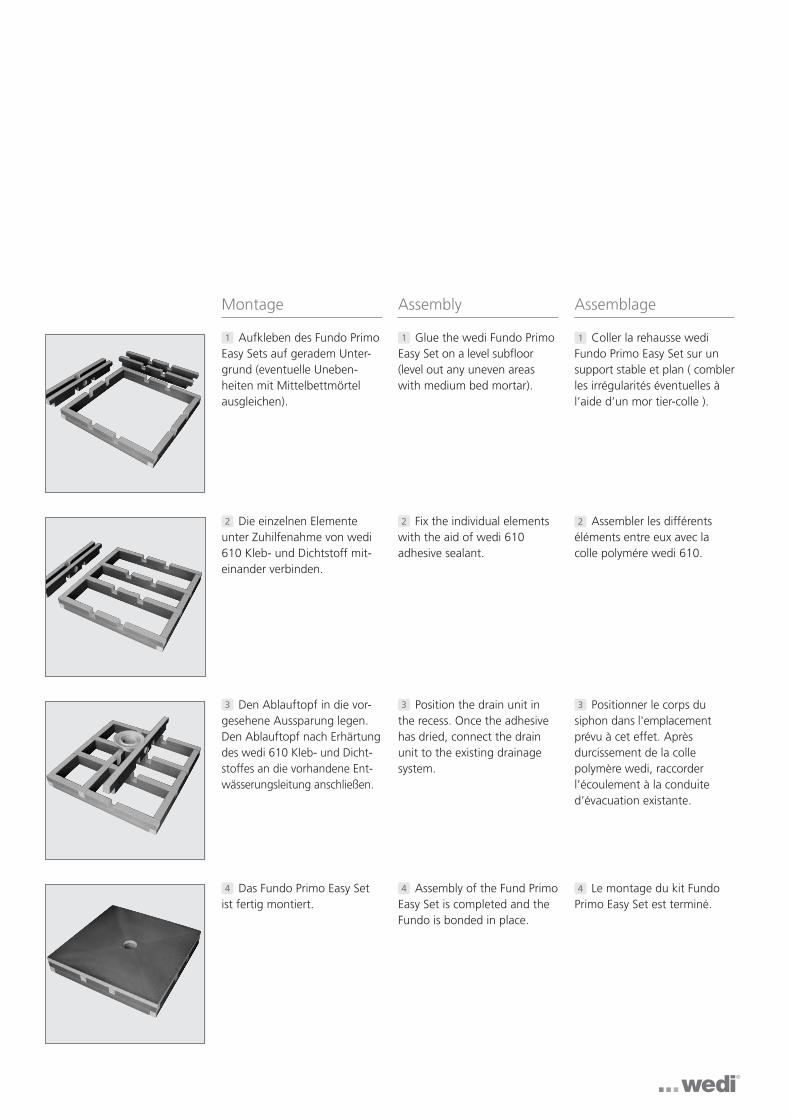
Den Ablauftopf in die vor-gesehene Aussparung legen.Den Ablauftopf nach Erhärtungdes wedi 610 Kleb- und Dicht-stoffes an die vorhandene Ent-wässerungsleitung anschließen.
Montage Assembly Assemblage
Das Fundo Primo Easy Setist fertig montiert.
3
4
Position the drain unit inthe recess. Once the adhesivehas dried, connect the drainunit to the existing drainagesystem.
Assembly of the Fund PrimoEasy Set is completed and theFundo is bonded in place.
3
4
Positionner le corps du siphon dans l'emplacementprévu à cet effet. Après durcissement de la colle polymère wedi, raccorderl’écoulement à la conduited’évacuation existante.
Le montage du kit FundoPrimo Easy Set est terminé.
3
4
Aufkleben des Fundo PrimoEasy Sets auf geradem Unter-grund (eventuelle Uneben -heiten mit Mittelbettmörtelausgleichen).
1 Glue the wedi Fundo PrimoEasy Set on a level subfloor(level out any uneven areaswith medium bed mortar).
1 Coller la rehausse wediFundo Primo Easy Set sur unsupport stable et plan ( comblerles irrégularités éventuelles àl’aide d’un mor tier-colle ).
1
Die einzelnen Elementeunter Zuhilfenahme von wedi610 Kleb- und Dichtstoff mit-einander verbinden.
2 Fix the individual elementswith the aid of wedi 610 adhesive sealant.
2 Assembler les différents éléments entre eux avec lacolle polymére wedi 610.
2

D 0
3/10
K 0
3/10
A 9
0153
000
Tec
hnis
che
Änd
erun
gen
vorb
ehal
ten.
Sub
ject
to
tech
nica
l mod
ifica
tions
. So
us r
éser
ve d
e m
odifi
catio
ns t
echn
ique
s.
wedi GmbHHollefeldstraße 51 · 48282 Emsdetten · GermanyTelephone +49 2572 156-0 · Telefax +49 2572 [email protected] · www.wedi.de