Embed Size (px)
Citation preview

Unit 2
51
Unit Objectives
This unit includes the knowledge and skills required to familiarize you with the most frequently used functions of an operating system. Elements include the ability to install and run software, control the workspace (desktop), perform file management and change system settings (display, date and time settings, etc.).
Lesson Topic8 Looking at Operating Systems
9 Looking at the Windows Desktop
10 Starting Windows Applications
11 Looking at Files and Folders
12 Using the Recycle Bin
13 Customizing System Settings
14 Installing and Uninstalling Programs
Using Microsoft Windows Vista

Unit 1: Recognizing Computers
Unit 2: Using Microsoft W
indows Vista
L e s s o n 8 L o o k i n g a t O p e r a t i n g S y s t e m s
Lesson 8 Looking atOperating Systems
ObjectivesIn this lesson, you will look at the operating system and how it affects what you can do on the computer. On completion, you should be familiar with:
what an operating system is identifying different operating systems how operating systems interact with other computers
capabilities and limitations of operating systems common problems related to operating systems
Skills1-3.1.1 Identify the purpose of an operating system1-3.1.2 Identify different operating systems1-3.1.3 Identify that a computer user may interact with multiple operating systems while performing everyday
tasks1-3.1.4 Identify the capabilities and limitations imposed by the operating system including levels of user rights
(administrative rights, etc.) which determine what a user can and cannot do (install software, download files, change system settings, etc.)
1-3.1.5 Identify and solve common problems related to operating systems
Looking at Operating Systems1-3.1.1 1-3.1.2 1-3.1.3 1-3.1.4 1-3.1.5
An operating system or environment is a collection of programs designed to control the computer’s interaction and communication with the user. It performs two important functions:
manages the input devices (keyboard and mouse), output devices (monitor and printer), and storage devices (hard, flash, and optical drives)
manages the files stored on the computer and recognizes the file types to complete tasks
Every computer requires an operating system to function. A computer must load the operating system into memory before it can load any application program.
Examples of operating systems include DOS, Windows, Unix, Linux, and the Mac OS.
DOS was the original operating system for the PC; it stands for Disk Operating System. It was text-based software and required single line commands to perform functions for managing files.
With the exception of a system using the Unix operating system, all other computers use a graphical operating system like Windows or Mac OS. This is the standard for operating systems and the display capabilities make working with design elements on the screen much easier.
The graphical user interface (GUI), also known as “gooey,” enables you to use a pointing device to point and select functions. Many of these functions or commands appear as buttons or have a picture or symbol, known as an icon, to represent the task. Software vendors design their programs to use the same buttons, symbols, or pictures for commonly used functions (such as copy, paste, bold, save, print, and so on) to reduce time needed to learn new software.
52 7300-1 v1.00 © 2009 CCI Learning Solutions Inc.

Unit 2: Using Microsoft W
indows Vista
L o o k i n g a t O p e r a t i n g S y s t e m s L e s s o n 8
Microsoft Windows VistaVista is an operating system for PCs. Windows products include a WYSIWYG (What You See Is What You Get) screen display, which provides an instant preview of what is available. The following is an example of the first screen you will see when you start the computer and the operating system loads into memory.
Mac OSThis operating system is designed for Apple Macintosh computers. It uses the graphics interface so that working on the computer will be much easier and faster. This was one of the original graphic user interface systems and set the standard for true WYSIWYG programs. Newer versions of the Macintosh operating systems use Unix as its underlying structure, providing a very secure and stable operating environment.
7300-1 v1.00 © 2009 CCI Learning Solutions Inc. 53

Unit 1: Recognizing Computers
Unit 2: Using Microsoft W
indows Vista
L e s s o n 8 L o o k i n g a t O p e r a t i n g S y s t e m s
UnixThis operating system was released in the early 1970s by programmers for programmers. The system was designed with portability in mind for multiple uses and users. The main drawback to this operating system is that it is based on one-line commands controlling the functions. This system is very popular with universities and scientific or research organizations.
LinuxThis operating system is based on Unix with a graphical user interface. This system is readily available and very popular for use with high-end servers, and also with entrepreneurial software developers.
Handheld Operating SystemsThese operating systems work with a PDA device; the options for each system vary depending on the type of handheld device.
Embedded Operating SystemsThese operating systems manage and control operations for the specific types of equipment for which they are designed, such as a vehicle, a machine that controls robotic manufacturing, or a piece of medical equipment. When turned on, the embedded operating system follows a process similar to those used in typical computing devices, but it recognizes the purpose of the specialized equipment.
Some manufacturers are embedding a modified version of Windows for their programs so they simulate a PC environment, such as with point of sale systems used in restaurants and retail stores.
Using Different Operating SystemsAs noted, a computer may have an OS other than Windows installed. Many organizations recognize that not all users at one site will use the same operating system or computer type. Consequently, operating systems are designed to interact with each other to share data or communicate.
An organization will have a network system to manage and control the resources and data for that network that may be a combination of one or more servers with varying operating systems, as well as devices to secure these servers and the data stored there. One of the network operating systems will be set to identify the hardware that a person is using as well as this person’s rights to network access. This can be internal during business hours, or external if the person has remote access to the network. For example, John Smith uses a PC notebook at work to log on to the network and the Internet to view his messages. At home, John uses a Mac notebook to access the Internet and then the company’s network via remote access. The company’s network recognizes the user as John Smith and enables him to access his messages at home, even though he uses a different operating system there. He will also be able to work on documents on the home notebook, even though they were created or modified on the PC notebook at work.
John may also be a sales person who travels a lot and uses a PDA to send and receive messages. All messages are processed through the network, even when he is working on the PDA in a remote location. John needs to identify himself to the network and, once logged on, can interact with the network as if he were in the office.
Equipment with embedded operating systems interact with larger systems that may also have network operating systems installed. Take the example of someone who takes their vehicle to the dealership for maintenance. The mechanic will connect the vehicle’s operating system to a computer that is connected to a server at the vehicle vendor’s head office. Updates can then occur between the server and the vehicle’s operating system.
54 7300-1 v1.00 © 2009 CCI Learning Solutions Inc.

Unit 2: Using Microsoft W
indows Vista
L o o k i n g a t O p e r a t i n g S y s t e m s L e s s o n 8
Identifying Capabilities and LimitationsOperating systems have advantages and disadvantages; how applicable these are depend on the type of system you have and what your requirements are. Following are some examples of capabilities and limitations with operating systems: You can save files using names that are up to 255 characters long, enabling a detailed description of a file’s
contents. If you are using a PC, you cannot include certain characters (\ / : * < > ? |), whereas on an Mac only the
colon cannot be used in file names. You can open two or more programs at the same time; the only restriction is the amount of RAM available to
process changes to files in each program. You can customize an operating system to your preference by changing the background, the color, or the
screensaver. On a network environment, your customization options may be restricted; for example, you may not be allowed to change system settings as this could lead to hardware problems, or you may have to adhere to company standards for colors, background picture, and so on. In some school environments, the network is set to provide a standard format for the operating system so that any custom changes revert to default when the computer is shut down.
On a stand-alone computer, you may be able to install programs or download items from the Internet. In an organization, you may not have access to perform such tasks. (You may also be restricted from activities on a stand-alone computer if you do not have administrative rights for that computer.)
Your access to files that could modify part or all of a network could be restricted. For example, you may be able to view the contents of folders for other departments but you cannot move or delete any of these files. You can make a copy of the file to your own folder but you cannot do anything to the original.
Common Issues with Operating SystemsSome aspects of every operating system can give rise to problems. These may include: Incompatibility between a software application and the operating system may prevent software programs
from working. For example, you may be able to install and use older software on newer operating systems, but you cannot run a software program designed for a newer operating system on a system with an older operating system.
An error message may appear indicating that a device does not work, usually because the operating system cannot identify the hardware. Many hardware vendors provide newer versions of drivers or the installation files so the new operating system can recognize your device.
Problems with operating system files can arise from power failures, shutting down the computer incorrectly, installing too much software on your system or installing it incorrectly, a virus infecting your system, or a conflict between the software and the operating system. Operating system files have specific tasks built into the setup for each device or software program. Never delete any program files from the folders where they reside. If you see an error message indicating that a file is missing or corrupted, you will need to reinstall the software for that file.
If your system displays many error messages or requires you to restart the computer several times, you should check with someone who is experienced with computers to reinstall or upgrade the operating system on your system. This is also true if the computer asks you to start the operating system in “safe” mode; this is an indicator that there is something wrong with the operating system and it may need to be installed again.
The operating system or an application program may fail after an update. In the case of the operating system, you may need to uninstall the update to the operating system to see if the problem still exists. You may need an IT specialist to assist with the latter.
If you see an error message indicating you do not have access to a particular PC, drive, software program, file, or folder, it generally means that the login ID you have used is incorrect, or that network restrictions have been placed on your ID. For example, you may only have three attempts to enter the password correctly; after that, you will need to contact the network administrator to reset the password or unlock your account.
7300-1 v1.00 © 2009 CCI Learning Solutions Inc. 55

Unit 1: Recognizing Computers
Unit 2: Using Microsoft W
indows Vista
L e s s o n 8 L o o k i n g a t O p e r a t i n g S y s t e m s
SummaryIn this lesson, you looked at the operating system and how it affects what you can do on the computer. You should now be familiar with:
what an operating system is identifying different operating systems how operating systems interact with other
computers
capabilities and limitations of operating systems common problems related to operating systems
Review Questions 1. An operating system is a collection of programs designed to control the computer’s interaction and
communication with the user.a. True b. False
2. An example of interaction between operating systems is the transfer of data between a notebook and a PDA.a. True b. False
3. If you changed the background color yesterday and it is the original color again today, why did the color not remain with the preference you chose?a. You do not have rights to change the background color.b. The computer was set to revert to the original color when it was shut down.c. You cannot change anything in the operating system.d. Any of the abovee. a or c
4. It is crucial that you do not change any of the operating system files without working with an IT specialist.a. True b. False
5. What should you try if you cannot open an application program after updating Windows?a. Uninstall the Windows updateb. Uninstall the application programc. Make sure the file is validd. Any of the abovee. a or c
56 7300-1 v1.00 © 2009 CCI Learning Solutions Inc.

Unit 2: Using Microsoft W
indows Vista
L o o k i n g a t t h e W i n d o w s D e s k t o p L e s s o n 9
Lesson 9 Looking at theWindows Desktop
ObjectivesIn this lesson, you will be introduced to the Windows desktop and how to navigate around in Windows. On successful completion, you will be familiar with:
how to start and exit Windows what the Windows desktop is how to use the Start button
how to use the taskbar how to manipulate windows
Skills1-3.2.1 Shut down, restart, log on and log off the computer1-3.2.2 Identify elements of the operating system desktop1.3.2.3 Manipulate windows1.3.2.4 Start and run programs
Looking at the Windows Desktop1-3.2.1 1-3.2.2 1-3.2.3 1-3.2.4
Once Windows loads, the desktop will look similar to the following screen. You will notice several objects or icons on the desktop that will vary from one system to another depending on how the system was set up.
7300-1 v1.00 © 2009 CCI Learning Solutions Inc. 57

Unit 2: Using Microsoft W
indows Vista
L e s s o n 9 L o o k i n g a t t h e W i n d o w s D e s k t o p
58 7300-1 v1.00 © 2009 CCI Learning Solutions Inc.
1
4
3
5 6 7 8
2
1
2
Desktop Icons
Mouse Pointer
3
4
Windows Sidebar
Windows SidebarDesktop
5
6
Start Button
Quick Launch Toolbar
7
8
Taskbar
Notification Area

Unit 2: Using Microsoft W
indows Vista
L o o k i n g a t t h e W i n d o w s D e s k t o p L e s s o n 9
Desktop IconsThese are “shortcuts” you can select to open frequently used programs, folders, or files.
DesktopThis is the work area or screen on which windows, icons, menus, dialog boxes, and the Sidebar appear. You can customize the appearance of the desktop using features such as wallpaper, themes, pictures, or solid colors, and you can create shortcuts that will take you directly to frequently used folders, files, programs, or Web pages.
Windows SidebarThis area displays mini-programs or gadgets, such as a clock, a calendar, RSS feeds, weather updates, and so on. You can hide or turn off the Sidebar, if you wish.
Start ButtonThis is used to start programs, open documents, find items on your computer, and get help, as well as log off and shut down your computer.
Quick Launch ToolbarThis is another area for shortcuts that launch programs, open documents, or open folders.
TaskbarThe taskbar is where the Start button, taskbar notification area, and sometimes Quick Launch toolbar or other toolbars reside. As you open a program or file, a button will appear here for each open item. The taskbar is an integral part of Windows’ multitasking features.
Taskbar Notification AreaSmall icons in this area, sometimes called the System Tray, indicate program status, or provide another shortcut to open programs.
Using the Start ButtonThe Start button is the primary means of starting programs, finding files, accessing online help, logging off the network, switching between users, or shutting down the computer. You can use the mouse or the keyboard to navigate through the Start menu.
To activate the Start button, you can:
Click the Start button, or
press , or
press + .
A u (triangle) with a command indicates that a submenu will display when you select this item. For example, when you point at the All Programs command, Vista displays a list of all programs available on your system.
To return to the main Start menu, click the Back command.
Items with a (folder) icon indicate there is another submenu with options for selection. These are listed alphabetically; you can use the vertical scroll bar to move up or down the list.
7300-1 v1.00 © 2009 CCI Learning Solutions Inc. 59
1
4
3
2
4
1
2
3
Recently Used Programs(dynamic items that change automatically based on programs used most frequently)
Useful System Folders
Search Box
Pinned Program Area (shown in a boldface)

Unit 2: Using Microsoft W
indows Vista
L e s s o n 9 L o o k i n g a t t h e W i n d o w s D e s k t o p
Items can be selected from the Start menu using the mouse or keyboard. If using the mouse, click the Start button once. Then click the appropriate command to display another menu
or activate that command.
If using the keyboard, press the key to display the Start menu. Then press the key to move to the first command in the list, use the arrow directional keys to navigate to the required command, and when it is highlighted, press to activate it.
Exiting the Computer Properly From a security perspective, it is extremely important to save your files, close the programs, and log off the computer when you finish working to prevent unauthorized access to your files and, more importantly, to your company’s network.
Alternatively, you can shut down the computer completely using the Shut Down command to prevent others from using it. Never turn off your computer without closing your files and open software programs in the correct manner; this will protect the software and data files from being corrupted or lost.
The options to exit Windows are at the bottom of the Start menu:
Power StateThis reduces the power to the computer without completely shutting it down, putting the computer into a temporary “sleep” mode. When you restart the computer and log on, you will return to where you left off.
Lock This hides your desktop and shows the logon screen. To return to where you were, select your user account. In a work environment, this hides your desktop from others and prevents them from using the computer if you are not present.
Shut Down This displays several options including:
Switch User Switches to another user account without logging out of the current account.
Log Off Closes all open items, logs out of the current user account, and returns to the log on screen.
Lock Hides the desktop behind a log on screen.
Restart Closes all open items and restarts the computer; also called a reboot or warm boot.
Sleep Puts the computer in a state where it consumes less power without losing your place on the screen; the computer does not shut down in this mode. If you are using a desktop computer, the Sleep command appears as Standby.
Hibernate Available only on notebooks, this saves what is on the desktop and then shuts down the computer completely so it consumes no power. When you restart the computer and log on, the desktop returns to where you left it.
Shut Down Closes all open items and shuts down the computer.
Always allow Windows to complete the Shut Down or Restart process properly. Reactivating the computer before Windows has completed these processes may cause files to be corrupted and result in a message, the next time you turn on the computer, indicating the machine was not shut down properly.
Depending on the Power Options scheme and configuration, your computer may be able to go into Sleep or Standby mode, where the monitor or hard disk turns off after a set interval of time. If a power failure occurs while the computer is in this state, you will lose any unsaved information, so be sure to save your work every time you leave the computer, even if you will not be gone for long. To turn off Standby and return to normal mode, simply move the mouse or press a key on the keyboard.
Standby is generally used when you want to leave your computer on but will not be using it for a length of time; for example, you are working on some letters and need to attend a staff meeting but don’t want to lose your place in your work. Hibernation is generally only used on notebooks because the need to close the notebook and take it somewhere else is not compatible with Standby mode.
60 7300-1 v1.00 © 2009 CCI Learning Solutions Inc.
2 31
1
2
3
Power State
Lock
Shut Down Options

Unit 2: Using Microsoft W
indows Vista
L o o k i n g a t t h e W i n d o w s D e s k t o p L e s s o n 9
Restarting the ComputerYou may sometimes find that the computer does not respond to a request. When this happens, you need to reboot or restart using the Task Manager.
To display the Task Manager, use one of the following methods:
Press the + + or + + key combination to display a screen with options to lock the computer, switch user, log off, change the password, or start the Task Manager. Click Start Task Manager.
Right-click the taskbar and then click Task Manager.
You can use the Task Manager to switch programs, start a program, check which programs are running and their status, or safely close a program when problems are occurring, such as it is no longer responding. The Task Manager is an advanced application; the other tabs in this feature should only be used by an experienced user or network administrator.
If the Task Manager does not respond or close down the applications appropriately, you will need to press the + + key combination again to restart the computer. If you can activate the Start menu, you can
also use the Restart option from the Shut Down command.
Exercise1 Click the Start button, and then click the Shut Down Options button.
2 Click Switch User.
Vista now displays a screen with the names of all users who have access to this computer.
3 Click your account, and then log on with your password.
4 Click the Start button, click the Shut Down Options button, and then click Shut Down.
5 Allow the computer to shut down completely, pause a few seconds and then turn it back on. Log on with your user account and password.
You will now start a program and then, for demonstration purposes, use the Task Manager to end it.
6 Click Start, All Programs, Accessories, and then WordPad.
7 Right-click a blank area of the taskbar and select Task Manager.
8 Ensure the Applications tab is active.
9 In Task Manager, click Document - WordPad and then End Task.
This closes the WordPad program.
10 Close the Task Manager.
7300-1 v1.00 © 2009 CCI Learning Solutions Inc. 61
Note: Do not end any processes unless you are very familiar with the service, subsystem or executable program that you want to terminate. If you end a system service, it may cause some part of the operating system to not function properly.

Unit 2: Using Microsoft W
indows Vista
L e s s o n 9 L o o k i n g a t t h e W i n d o w s D e s k t o p
Using the Taskbar1-3.2.2
By default, the taskbar is at the bottom of the Windows desktop. It includes the Start button, toolbars, a notification area, the clock, and a taskbar button for each open program.
The Notification Area displays the time and provides quick access to programs such as the volume control or an antivirus program. It can also show shortcuts with information about the status of activities. You can choose which icons to show or hide.
You can move the taskbar or change the way it’s displayed as follows:
Hover the mouse pointer over a blank area of the taskbar and drag it to any side of the screen.
Hover the mouse pointer over the toolbar handle ( ) to the right of the Start button and then click and drag to show more or less of the taskbar. The mouse pointer changes to (horizontal double-headed arrow) as you hover it over the toolbar handle; as you drag the toolbar, the mouse pointer changes to .
To change the size of the taskbar, hover the mouse over an edge of the taskbar; when the pointer changes to (vertical double-headed arrow), click and drag the taskbar to the desired height.
To prevent changes or movement of the taskbar, right-click any blank area of the taskbar and click Lock the Taskbar. All handles and symbols disappear.
To customize the properties for the taskbar, right-click the area you want to customize or right-click the Start button, and then click Properties.
Exercise1 Right-click the time in the Notification Area. Select Properties from the shortcut menu.
2 On the Notification Area tab, in the Icons area, uncheck Hide inactive icons and click OK.
3 Right-click the time in the Notification Area and select Properties from the shortcut menu.
4 Place a check mark in the Hide inactive icons check box and click OK.
5 Click the to expand the Notification Area.
6 Move the mouse away from the Notification Area and it automatically collapses; if not, click the button to collapse.
62 7300-1 v1.00 © 2009 CCI Learning Solutions Inc.
1 Quick Launch ToolbarStart Button 2 3 Notification AreaTaskbar Buttons 4
1 32 4

Unit 2: Using Microsoft W
indows Vista
L o o k i n g a t t h e W i n d o w s D e s k t o p L e s s o n 9
Now move and then resize the taskbar.
7 Right-click in any blank area of the taskbar and select Lock the Taskbar to turn on this feature.
8 Hover the mouse pointer over the taskbar, and try to drag the taskbar to the left edge of the desktop.
Notice that you cannot make any changes; in fact, there should be no taskbar handle displayed.
9 Right-click in any blank area of the taskbar. Select Lock the Taskbar to turn off this feature, and then try dragging the toolbar handle to the right of the Quick Launch toolbar to the left or right to change the width.
10 Hover the mouse pointer over the top border. When a double-headed arrow appears, click and drag to make the taskbar slightly larger.
11 Resize the taskbar back to its original size and then lock the taskbar.
Looking at a Typical Window1-3.2.2 1-3.2.3
When programs or folders are opened, they appear on the desktop in individual “windows.” You can have multiple windows displayed on the screen, but each window will share similar features.
Back and Forward ButtonsAllow you to navigate back or forward to display different views of files and folders.
Title BarDisplays the name of the currently active feature or application program (for example, Computer).
Command BarProvides commands you can use to organize, view, or protect your data.
Address Bar
7300-1 v1.00 © 2009 CCI Learning Solutions Inc. 63
1 2 3 4
7
8
5 6
9
10
1
2
3
4
Back/Forward Navigation ButtonsTitle Bar
Address Bar
Command Bar
5 Search Box
6 Control Buttons 8
9
10Contents Pane
Navigation Pane
Details Pane
Favorite Links 7

Unit 2: Using Microsoft W
indows Vista
L e s s o n 9 L o o k i n g a t t h e W i n d o w s D e s k t o p
Facilitates quick and easy navigation. Also known as the eyebrow menu or breadcrumb trail, this feature allows you to click the name of any folder visible in the trail so that you can go to that folder, or click the arrow that appears next to any item and see other items at the same level in the folder hierarchy.
Search BoxProvides an area into which you can enter criteria to search for a file or folder.
Control ButtonsChange the way currently open windows are displayed, as follows:
(Minimize) Temporarily closes the window, replacing it as a button on the taskbar. Click the button on the taskbar to open or restore the window.
(Maximize) Displays the window full screen.
(Restore Down) Restores the window to the size it was before it was maximized.
(Close) Closes the window. (If you see a box that only displays a (Close) or (Help) button, you are seeing a feature window, with a message about what you must do before the computer will allow you to do anything else.)
Favorite LinksDisplays folders or locations you use often as links that will take you directly to them.
Navigation PaneDisplays folders and drives that you can double-click in order to see their contents.
Contents PaneDisplays the contents of the folder or drive selected in the Navigation Pane.
Details PaneDisplays properties or details about the selected file or folder in the Contents pane.
Exercise1 Click Start, and then click Computer.
2 Click the (Maximize) button at the top right corner of the window.
3 Click the (Minimize) button.
Notice that the window seems to have disappeared but it actually was moved to the taskbar.
4 Click the Computer button on the taskbar to redisplay the window.
The window is now maximized, occupying the entire screen, and the (Restore Down) button appears.
5 Click the (Restore Down) button.
6 Click the (Close) button.
The Computer window is now closed from the screen.
Moving a Window You can move a window anywhere on the desktop using the mouse or keyboard.
Hover the mouse pointer anywhere on the title bar and then drag the window to a new location.
With the keyboard, press + to activate the control icon; it is not visible on the screen but the menu appears once it’s activated. Press the key to select the Move command and press . Using the arrow direction keys, move the window to the new location and then press to exit the action.
You can only move a window that is not full screen. Maximized windows cannot be moved as they occupy the entire screen.
64 7300-1 v1.00 © 2009 CCI Learning Solutions Inc.

Unit 2: Using Microsoft W
indows Vista
L o o k i n g a t t h e W i n d o w s D e s k t o p L e s s o n 9
Sizing a Window On occasion you may want to change the size of the window so that you can see more or less of multiple windows. You can use the mouse or the keyboard to size a window.
Position the mouse pointer anywhere on the border (side) to be sized. When you see the mouse cursor change to a (vertical double-headed arrow) for the top or bottom border, or (horizontal double-headed arrow) for the left or right border, drag the mouse to the desired size.
To size the vertical and horizontal sides at the same time, position the mouse cursor on any corner of the window, and then drag to the desired size for the window when you see or (diagonal double-headed arrow). Some windows are set to a specific size and cannot be altered.
With the keyboard, press + to activate the control icon; it is not visible on the screen but the menu appears once it’s activated. Press the key to select the Size command and press . Using the appropriate arrow direction key for the side you want to size, press that direction key until the window is the size you want, and then press to exit the action. You will need to repeat this action for every side to be sized.
Using Scroll BarsIf a window is too small to display all the contents, scroll bars will automatically appear vertically on the right side of a window, or horizontally at the bottom.
A scroll bar consists of three parts: an arrow button at each end of the scroll bar, a scroll box, and the scroll area. The scroll box is also called a thumb or an elevator. The position of the scroll box within the scroll area provides an approximate gauge of where the information currently displayed in the window is in relation to the entire window’s contents.
Use one of the following methods to move around with the scroll bars:
Click in the lighter shaded area above or below the scroll box to display the previous or subsequent screen of information.
Click the arrow at either end of the vertical scroll bar once to display a line of information in that direction.
Click the arrow at either end of the horizontal scroll bar once to display a column of information in that direction.
Click and hold down the mouse button on the arrow at either end of the scroll bar to have the screen scroll in that direction.
Drag the scroll box to a specific area in the scroll area to move directly to that location. Depending on the program, you may also see a tip showing where the cursor will be placed when you release the mouse button.
Exercise1 Click Start, and then Computer.
2 If necessary, restore the Computer window.
3 Point the mouse pointer on the title bar of the Computer window.
4 Click and drag the window to a new position on the desktop.
5 Practice moving the window around to several different locations.
7300-1 v1.00 © 2009 CCI Learning Solutions Inc. 65
Scroll Box

Unit 2: Using Microsoft W
indows Vista
L e s s o n 9 L o o k i n g a t t h e W i n d o w s D e s k t o p
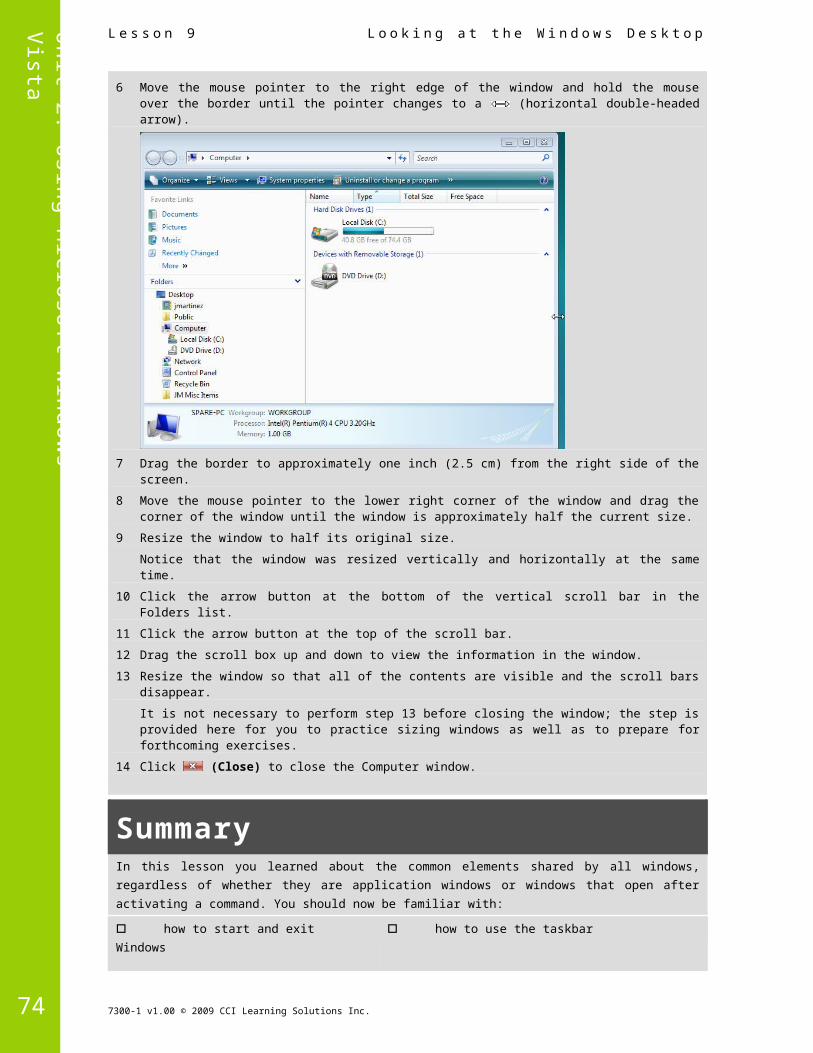
6 Move the mouse pointer to the right edge of the window and hold the mouse over the border until the pointer changes to a (horizontal double-headed arrow).
7 Drag the border to approximately one inch (2.5 cm) from the right side of the screen.
8 Move the mouse pointer to the lower right corner of the window and drag the corner of the window until the window is approximately half the current size.
9 Resize the window to half its original size.
Notice that the window was resized vertically and horizontally at the same time.
10 Click the arrow button at the bottom of the vertical scroll bar in the Folders list.
11 Click the arrow button at the top of the scroll bar.
12 Drag the scroll box up and down to view the information in the window.
13 Resize the window so that all of the contents are visible and the scroll bars disappear.
It is not necessary to perform step 13 before closing the window; the step is provided here for you to practice sizing windows as well as to prepare for forthcoming exercises.
14 Click (Close) to close the Computer window.
SummaryIn this lesson you learned about the common elements shared by all windows, regardless of whether they are application windows or windows that open after activating a command. You should now be familiar with:
how to start and exit Windows what the Windows desktop is how to use the Start button
how to use the taskbar how to manipulate windows
66 7300-1 v1.00 © 2009 CCI Learning Solutions Inc.

Unit 2: Using Microsoft W
indows Vista
L o o k i n g a t t h e W i n d o w s D e s k t o p L e s s o n 9
Review Questions 1. The best way to shut down the computer is simply to press the power switch on the computer case to turn it
off.a. True b. False
2. Use the Task Manager to: a. End a program that has stopped responding b. Check the power usage on your computer c. Check which programs are running and their status d. Any of the above e. a or c
3. To see the programs installed on your system, which option from the Start button would you use? a. Documents b. All Programsc. Searchd. List of Quick Start items
4. If you wanted to make the window smaller than the full screen, which button would you use? a.b.c.d.
5. What would you do to move the window? a. Click and drag the Control Icon to move to the new location b. Click and drag the Title bar to move to the new location c. Click anywhere in the window to move to the new location d. Click on the button
7300-1 v1.00 © 2009 CCI Learning Solutions Inc. 67

Unit 2: Using Microsoft W
indows Vista
L e s s o n 1 0 S t a r t i n g W i n d o w s A p p l i c a t i o n s
Lesson 10 Starting Windows Applications
ObjectivesIn this lesson, you will look at how to start application programs and how to access help in Windows. On completion, you will be able to:
start an application program move between open application programs start an application using the Run command
access online help understand the Help screens determine the version of Windows
Skills
1-3.2.2 Identify elements of the operating system desktop1.3.2.4 Start and run programs
Starting Application Programs1-3.2.2 1-3.2.4
The most common way to start a program is from the All Programs menu. Another way is to select the shortcut for the application program on the desktop or the Quick Launch toolbar. Programs installed on the computer usually appear in the All Programs menu, unless otherwise specified. Not all applications will create a shortcut on the desktop or in the Quick Launch toolbar.
An application program might also create an option in the Startup folder during the time of installation, which means it will automatically run each time you start Windows; this is the case, for example, with Windows Live Messenger, QuickTime, and most antivirus programs. These items appear in the taskbar notification area as seen here:
Each application program contains its own set of control icons that allow you to manage the application window. Depending on the program, there may also be a set of control icons for the window that contains the document, as seen in the following:
In this type of program, you can manipulate the document without changing how the application window looks. For example, you can minimize an Excel file you are working on to create a new file or to open an existing file, as seen here:
68 7300-1 v1.00 © 2009 CCI Learning Solutions Inc.

Unit 2: Using Microsoft W
indows Vista
S t a r t i n g W i n d o w s A p p l i c a t i o n s L e s s o n 1 0
Only one set of controls appears and it is with the active file, as shown with the new file in this screen; the minimized workbook shows the name of the file but it will not display its control buttons until you make that file active. You can close each file without affecting the Excel application, which continues to display its own set of controls.
Working with Multiple WindowsWorking with multiple windows and multiple programs at the same time is called multitasking. Vista provides you with several ways of switching between the programs and organizing the open windows.
Each program you have open appears in its own window. As you open each program, it creates a new window on top of the other windows currently open and a new button is added to the taskbar to identify it. You can move or switch from one program to another by clicking the appropriate button on the taskbar.
Using the keyboard, press + or + to switch between the active programs on the taskbar. You can also press + to display a small window with icons representing each open program. The icon with the box around it is the current selection. Press and hold
as you press to toggle from one program icon to another. Release both keys when you select the appropriate program icon.
Using the Run Command Occasionally you may need to start a program that was not or does not need to be installed on your system and is not in the Start menu; for example, a network administrator helping you with some troubleshooting on your machine might instruct you to open a program to help diagnose the problem. In this case, you can access the program using the Run command; you will need to know what the command is before it can be used.
Whenever possible, use the Start menu to start a command; alternatively, you can activate a program from its desktop icon. The Run command should be used only when you need to run a specific program from another drive or start some troubleshooting commands (which is beyond the scope of this course).
To activate the Run command, use one of the following methods:
Click Start, type: run in the search field, and then press .
Click Start, All Programs, Accessories, Run.
Press + .
7300-1 v1.00 © 2009 CCI Learning Solutions Inc. 69

Unit 2: Using Microsoft W
indows Vista
L e s s o n 1 0 S t a r t i n g W i n d o w s A p p l i c a t i o n s
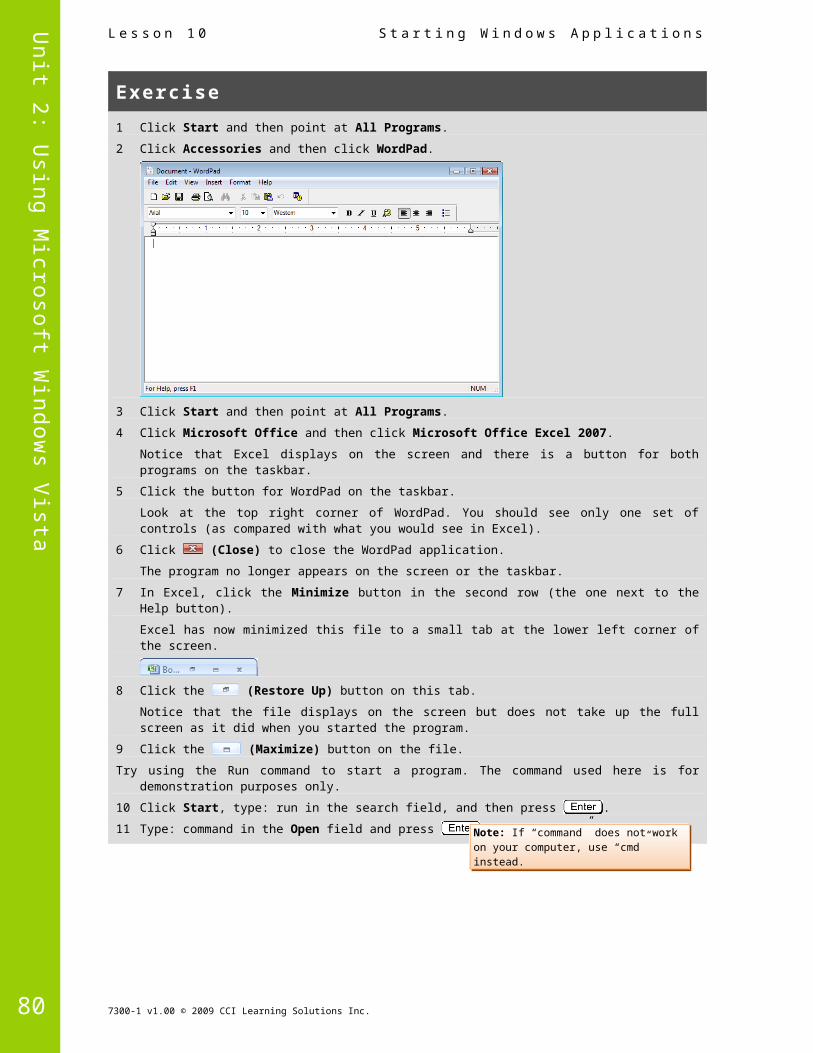
Exercise1 Click Start and then point at All Programs.
2 Click Accessories and then click WordPad.
3 Click Start and then point at All Programs.
4 Click Microsoft Office and then click Microsoft Office Excel 2007.
Notice that Excel displays on the screen and there is a button for both programs on the taskbar.
5 Click the button for WordPad on the taskbar.
Look at the top right corner of WordPad. You should see only one set of controls (as compared with what you would see in Excel).
6 Click (Close) to close the WordPad application.
The program no longer appears on the screen or the taskbar.
7 In Excel, click the Minimize button in the second row (the one next to the Help button).
Excel has now minimized this file to a small tab at the lower left corner of the screen.
8 Click the (Restore Up) button on this tab.
Notice that the file displays on the screen but does not take up the full screen as it did when you started the program.
9 Click the (Maximize) button on the file.
Try using the Run command to start a program. The command used here is for demonstration purposes only.
10 Click Start, type: run in the search field, and then press .
11 Type: command in the Open field and press .
70 7300-1 v1.00 © 2009 CCI Learning Solutions Inc.
Note: If “command” does not work on your computer, use “cmd” instead.

Unit 2: Using Microsoft W
indows Vista
S t a r t i n g W i n d o w s A p p l i c a t i o n s L e s s o n 1 0
If you were going to enter a command, you would do so now at the location of the flashing cursor.
12 Click the Microsoft Excel button on the Taskbar. Then click (Close) at the top right corner to close the Excel application.
Only the Command window appears on the screen.
13 Type: exit at the command line and press .
You should now be back at the desktop.
14 Press + on the keyboard and hold down the key while releasing the key.
If your computer is Vista Aero Glass capable, the windows currently open on your Desktop will be displayed in Flip 3D mode.
15 While still holding down the key, press the key a few more times.
The Flip 3D mode cycles through each window.
16 Release the (and ) key to put the windows back into 2D mode.
Using Windows Help and Support1-3.2.4
Windows provides an extensive online Help system that displays step-by-step procedures, definitions for terms, and hypertext links to other related topics. Web Help is available for additional online support via the Internet.
To activate Help, use one of the following methods: select Help and Support from the Start menu, or
press , or
click the (Help) button in any dialog box, if available
The Windows Help and Support window contains navigation and search tools, as well as links to a variety of resources, such as assistance in Finding an Answer, Asking Someone, or Obtaining Information from Microsoft.
7300-1 v1.00 © 2009 CCI Learning Solutions Inc. 71
Hint: You could also have clicked the Close button for this window.

Unit 2: Using Microsoft W
indows Vista
L e s s o n 1 0 S t a r t i n g W i n d o w s A p p l i c a t i o n s
The toolbar at the top of each Help window includes buttons that assist when working with Help.
1 Arrows Enable you to retrace steps through the Help system.
4ContentsDisplays the current location in the table of contents, from which you can navigate up or down the hierarchy of a topic of interest.
2
Home Returns you to the Help and Support home page.
5 AskTakes you to a page with links to other resources, such as Windows communities, newsgroups, or the Microsoft Knowledge Base.
3 Print
Prints the currently displayed topic.6 Options
Provides additional commands such as adjusting the size of help text or finding a word or phrase in the currently displayed Help page.
The first time you use Windows Help and Support, you will be asked if you wish to obtain the latest online content. Unless you are using a dial-up connection, you should accept this option. Remember that online help content is not stored on your computer; it is only available when you are connected to the Internet.
72 7300-1 v1.00 © 2009 CCI Learning Solutions Inc.
1
2
3
4
5
6
1 2 3 4 5 6
ToolbarLinks for navigating Help to locate the answer for yourselfLinks for navigating Help to gain assistance from others in resolving the answerLinks for accessing additional information from MicrosoftAdditional Help resources
Settings for searching Offline or Online
1
2
3
4
5
6

Unit 2: Using Microsoft W
indows Vista
S t a r t i n g W i n d o w s A p p l i c a t i o n s L e s s o n 1 0
Using the Table of Contents Vista provides an option to use a table of contents to find help on specific topics. Here, the topics are grouped into types of task or activity. To activate the Table of Contents within Help, do one of the following:
In the Windows Help and Support window, click Table of Contents, or
on the Help toolbar, click (Browse Help).
These categories will link you to specific features or options available in Windows Vista. As you move from one page to another, you will see symbols similar to the following:
a link that opens a window with a description for this topic
a link that displays a window with more options for this topic
You should also notice that Vista displays a hierarchy of the topics selected with more options to find information on specific topics:
Getting Additional Technical SupportIf you cannot find help on a specific topic online, a number of other options for technical support are available:
Contact Microsoft. A list of numbers and ways to contact them are available in the Help menu from any Microsoft application program; you can also use the online help option to find technical support information.
Go to a computer store that provides technical support. This does not have to be the store where you purchased the computer. Technicians charge an hourly fee for repairs or training.
Hire a consultant who can come to your site to fix the computer or provide you with training or assistance on the problem. Consultants also charge an hourly fee, which may include travel time.
Take additional courses on Windows to study advanced skills and troubleshooting techniques. Check your Yellow Pages or go online to locate courses offered in your area. Pricing for courses will vary depending on the training facility.
Search the Internet for any groups that specialize in Windows Vista or have a community area such as a blog where they share information with each other.
When you require further technical support, you may be asked which version of Windows you are using. It is important to tell technical support the version you are using so they can provide you with the correct support for that version.
7300-1 v1.00 © 2009 CCI Learning Solutions Inc. 73
Unit 2: Using Microsoft W
indows Vista
L e s s o n 1 0 S t a r t i n g W i n d o w s A p p l i c a t i o n s
To display the version of Windows for technical support, use one of the following methods:
click the Start button and click Control Panel. In the Control Panel window, click System Maintenance, and then click System, or
click the Start button and click Control Panel. In the Control Panel window, click System Maintenance and under the Welcome Center, click Find which version of Windows you are using.
To set the Start menu to display the version of Windows, click Start and click Control Panel. In the Control Panel window, click Appearance and Personalization. In the Taskbar and Start Menu options, click Customize the Start menu. Click Classic Start menu and then click OK.
Exercise1 Click Start and then click Help and Support.
The Windows Help and Support window displays.
2 Type: Vista in the Search Help field and click the button, or press .
The search results will find the top 30 results on the word “Vista.” Notice that Windows breaks it down by category to help you identify the area about which you may want more assistance.
3 In the list of topics, click What’s new in Windows Vista Business.
The information appears in a window with a variety of links for more help on specific topics. Displayed at the right side is a list that is much like a table of contents.
4 Click Pictures in the table of contents list to display the help topic.
74 7300-1 v1.00 © 2009 CCI Learning Solutions Inc.

Unit 2: Using Microsoft W
indows Vista
S t a r t i n g W i n d o w s A p p l i c a t i o n s L e s s o n 1 0
5 In the Pictures area, click the Working with digital pictures link.
6 Click the flash memory card link in green.
Text links in blue will move quickly to another window with more information on the clicked item. Text links in green will display a definition of the text for easy reference.
Up to this point, you have been moving forward to find and read more information on specific topics. As you move from window to window, the Back and Forward buttons appear.
7 Click (Back) to go back one window.
8 Click the Click to open Windows Photo Gallery link in the Pictures area.
Notice that Windows has now opened a window for this feature. Items in the Help mode with a green arrow will open or activate that option for viewing purposes.
9 Click on the (Close) button to close the Windows Photo Gallery window.
10 In the Windows Help and Support toolbar, click (Browse Help).
7300-1 v1.00 © 2009 CCI Learning Solutions Inc. 75

Unit 2: Using Microsoft W
indows Vista
L e s s o n 1 0 S t a r t i n g W i n d o w s A p p l i c a t i o n s
11 Click Maintenance and performance in the Contents list.
12 Click the Keeping your computer up to date link.
13 Click the What are updates? link.
You are now reading a description of what updates are and why you need to apply them to your system.
14 Click (Back) to return to the previous help page.
15 Click (Forward) to return to the definition page for updates.
16 Click (Home) to return to the Windows Help and Support page.
17 Close the Windows Help and Support window.
SummaryIn this lesson, you learned how to start application programs as well as how to access help in Windows. You should now be able to:
start an application program move between open application programs start an application using the Run command
access online help understand the Help screens determine the version of Windows
Review Questions 1. The most common way to start an application program is to use the Start button on the desktop.
a. True b. False
2. Multitasking is a process whereby Windows allows you to work on multiple programs or documents at the same time. a. True b. False
3. How can you activate the Help feature? a. Select Help and Support from the Start menu b. Click a Help icon or button if it is displayed on the screenc. Press d. Any of the above
4. What is the difference between a text link that is shown in blue as opposed to one that is shown in green?a. Text links in blue jump to a new page with more help links whereas green text links jump to a new page
with definitions.b. Blue text links jump to a new page with more help details whereas green text links display the definition
in the same window.c. Blue text links jump to a new page with more help details whereas green text links display a glossary of
terms.d. There is no difference between blue and green text links.
5. If you cannot find online help on a Vista topic, what options are available to you for further help?a. Check with a technical person, either at your site or a computer dealer.b. Contact Microsoft.c. Search the Internet for groups of people who may have experienced the same problem or issue.d. Hire a consultant to help you or take training courses that target the features you want to learn.e. Any of the above
76 7300-1 v1.00 © 2009 CCI Learning Solutions Inc.

Unit 2: Using Microsoft W
indows Vista
L o o k i n g a t F i l e s a n d F o l d e r s L e s s o n 1 1
Lesson 11 Looking atFiles and Folders
ObjectivesIn this lesson, you will look at the different ways files or folders display and how to manipulate them. On successful completion, you will be familiar with:
what a file or folder is how to recognize a file or folder on the desktop how to recognize the drives available selecting files or folders moving files or folders copying files or folders
changing the view for drives, files or folders how to create, customize, or change a folder’s properties renaming files or folders viewing file or folder properties finding files
Skills
1-3.2.5 Manipulate desktop folders and icons/shortcuts1.3.2.6 Manage files1-3.2.7 Identify precautions one should take when manipulating files
Understanding Files and Folders1-3.2.5 1-3.2.6 1-3.2.7
A file is created using a specific program; the type of program determines what type of file it is.
Application FileThis type of file includes very detailed instructions for the microprocessor on what tasks to perform (such as read, write, calculate) and is usually stored in a folder named for that program, which in turn resides in the Program Files folder on your hard drive.
Data FileThis type of file contains information you have entered and saved in one of the applications you have on your computer. For example, you might have a budget file in Excel, a letter file in Word, a database in Access, and so on. These files can be stored anywhere.
System FileThis type of file also contains detailed instructions for the microprocessor on what tasks to perform, except that they are part of the operating system. Many of these files are hidden to protect them from being changed or deleted.
Regardless of the file type, all files appear with an icon that includes a symbol of the associated program. Shown are examples of icons that appear beside an application file (Outlook), a data file (Excel), and a system file (Windows):
7300-1 v1.00 © 2009 CCI Learning Solutions Inc. 77

Unit 2: Using Microsoft W
indows Vista
L e s s o n 1 1 L o o k i n g a t F i l e s a n d F o l d e r s
A folder is a container for programs and files and a method of organizing information; it’s something like a hanging folder in a file cabinet within which you can organize other folders and files. A folder that you create is represented by a yellow icon that looks like a file folder. You can create folders using Windows or an application program.
Another way to think of files and folders is as an inverted hierarchy or tree structure, much like a “family tree.” At the top level is the Windows Desktop. Each level below that may contain more folders and files. Consider the example shown here:
This structure shows the Desktop at the top level with a folder underneath called Documents, along with two other folders at the same level called Contacts and Desktop. This folder is created automatically for every valid user account; in this example, the user is Jane Martinez. Within this Documents folder is a subfolder called ABC Company, which contains another folder called Proposals. Inside the Proposals folder are two files: a Word file called “Proposal - Aug 28” and an Excel file called “Financials at Jul 31.” To tell someone where the August 28 Proposal file is located, you would write it as follows:
C:\Users\Jane Martinez\Documents\ABC Company\Proposals\Proposal – Aug 28.docx
This is known as the path because you are stating the exact route to follow to get to the location of this file. The C: indicates the drive where the file is located and the backslash (\) indicates “go to this level”; this is followed by each folder name and finally the file name. You can also use the forward slash (/) symbol; Windows will recognize it as performing the same action as the backslash symbol.
There are no limitations on where you can store a file, or to the number of folders you can create. The only consideration is how many subfolders you require for all the types of files you use.
Think again about a filing cabinet where you keep hard copies of your documentation. Keeping all your documents in one folder called “Documents” could seem simple, but without some kind of organization or hierarchy it could take a lot of time to find any particular file within that folder. On the other hand, you have to be careful not to set up too many different levels as then you will spend all your time “drilling down” through the levels to find the file you require.
There is no one correct method for setting up a filing system on your computer; just be sure to follow the company’s standards or create a structure that is logical to you and to others who are sharing the computer. One option is to ensure each person who will be using the system save files in his/her own folder as set up when the person logs on to the computer with his/her own account. If saving files to a network drive where others may share this file, you may need to create your own folder on that drive for you and others to use.
The more important your data is, the more crucial it will be for you to have backups or copies. This will protect against potential loss due to theft, fire, or hardware failure. Windows provides a Backup tool, or you can purchase a third-party product to handle this task. If your data is on a network drive, the network administrator will likely have this process set up to occur on a regular basis. However, if you save files to the hard drive on your computer, the network backup does not backup your hard drive and you will need to ensure you put a copy of these working files on the network, or create your own backup.
To begin working with files and folders, use one of the following methods:
Click Start and then click Computer, or
click Start, Accessories, and then click Windows Explorer, or
click Start, type: expl in the Search box, and click Windows Explorer, or
double-click the Computer icon on the Windows Desktop, or
right-click the Start button and click Explore, or
press + .
78 7300-1 v1.00 © 2009 CCI Learning Solutions Inc.

Unit 2: Using Microsoft W
indows Vista
L o o k i n g a t F i l e s a n d F o l d e r s L e s s o n 1 1
Storage DevicesDisplays all drives available for storing or retrieving files such as the local hard drive, the optical drive, and any network drive(s).
(Expand)Displays more folders or items at this level; you may see several of these arrows depending on the way the structure is set up.
(Collapse)Allows you to hide items or “collapse” the structure at this level; you may see several of these arrows based on the structure set up.
Split BarClick on and drag this bar to show more or less of the Folders list.
Files or folders can be saved and displayed anywhere in Windows, including on the Desktop for quick access. Consider the following when viewing files or folders:
An icon similar to one of these indicates that a data file or folder is saved in this location. If a data file, the miniature icon in the upper left corner represents the program needed to view or modify the document. The text below the icon is the file or folder name If you delete this icon, you will delete the actual file or folder.
A similar icon with a small arrow at the lower left corner represents a shortcut to the location where this data file or folder is saved. The arrow tells you that this is a shortcut only. If you delete this icon from the desktop, only the shortcut is deleted not the actual file.
An icon with a program symbol on it indicates that it is a shortcut to an application program file. If you delete this icon, you are only deleting the shortcut, not the actual file that starts the program.
7300-1 v1.00 © 2009 CCI Learning Solutions Inc. 79
1
2 3
4
5
6
7
8
1
2
3
4
Favorite Links
Navigation Pane
Command Bar
Split Bar
5 Storage Devices
6 Contents Pane 8 Details Pane
Folders List7
Unit 2: Using Microsoft W
indows Vista
L e s s o n 1 1 L o o k i n g a t F i l e s a n d F o l d e r s
Creating Folders1-3.2.5 1-3.2.6
You can create folders at any level, including directly on the Windows Desktop. To create a folder, use one of the following methods:
On the Command bar, click and then click New Folder, or
right-click the location (i.e., drive or folder) in the Folders list for the new folder, and then click New, Folder, or
right-click a blank area of the Contents pane and then click New, Folder.
Navigate to the location for the new folder before activating the New Folder command. The Address bar (also known as the Breadcrumb bar) displays the path or location as a reminder.
Windows does not restrict where you create folders, or whether another folder shares the same name in another location. Keep the folder name unique to prevent accidental deletion or replacement of files and folders. You can rename or move the folder to another location, as appropriate.
To create a shortcut to a folder, use one of the following methods:
Right-click the location (drive or folder) in the Folders list for the new folder, and then click New, Shortcut, or
right-click a blank area of the Contents pane and then click New, Shortcut.
ExerciseThe following exercises require that you have downloaded the student data files to be used with this content. If you have not already done so, please follow the data file instructions in the Preface before proceeding.
1 From the desktop, double-click the 7300 Student Data folder.
Review the screen so you can identify the structure of the folders on the left side of the window. Notice that there are no Collapse or Expand arrows displayed in the Folders list.
2 Point at the 7300 Student Data item in the Folders list.
The Expand arrow should now appear at the left of this folder in this area.
3 Click the Collapse arrow at the left of the 7300 Student Data folder.
Notice the list of items in the Contents pane remains the same but the folder in the Folders list shows only 7300 Student Data and not the list of folders as in step 1.
4 Click the Expand arrow at the left of 7300 Student Data.
Try creating some folders in different locations.
80 7300-1 v1.00 © 2009 CCI Learning Solutions Inc.

Unit 2: Using Microsoft W
indows Vista
L o o k i n g a t F i l e s a n d F o l d e r s L e s s o n 1 1
5 In the Folders list, click Unit 2 - Windows.
6 Click and then click New Folder.
You should now have a new item in the Contents pane similar to the following:
7 Type your first and last name for the new folder and press .
You have just created a new folder within the Unit 2 - Windows folder. The new folder should look something like this:
8 Double-click your new folder to view the contents inside (it should be empty).
9 In the Contents pane, right-click to display the shortcut menu, click New, and then click Folder.
10 Type: Personal and press .
You have just created a new folder that resides within the folder with your name in the Unit 2 - Windows folder.
Try creating a shortcut to the Student Data folder as a quick method to navigate to the entire set of data files for this courseware. You will create this shortcut inside your new folder.
11 In the Contents pane, right-click to display the shortcut menu, click New, and then click Shortcut.
12 Click the Browse button.
13 Click 7300 Student Data and then click OK.
14 Click Next.
15 Click Finish to keep the name for this shortcut the same as recommended by Windows.
The contents of your folder should appear similar to:
16 Point at your folder name in the Folders list and, when the Expand button appears, click it.
Notice that the subfolder appears but not the shortcut; both show in the Contents pane.
Now create some subfolders in another folder on the Desktop.
17 In the Folders list, click the Unit 2 - Windows folder to display the contents of this folder.
18 In the Contents pane, right-click, click New, and then Folder.19 Type: Worksheets as the name of the new folder and press .
20 Repeat steps 18 and 19 to create the Documents, Misc, and Slide Shows folders, as shown:
7300-1 v1.00 © 2009 CCI Learning Solutions Inc. 81
Hint: When adding new folders, be sure to right-click in a blank area of the Contents pane to select the New, Folder. If necessary, make the Computer window bigger to show a blank area.

Unit 2: Using Microsoft W
indows Vista
L e s s o n 1 1 L o o k i n g a t F i l e s a n d F o l d e r s
Renaming a Folder The name of a folder can be as long or short as required (up to 255 characters), although with longer names, the entire title may not be visible in certain views.
To change a folder’s name, use one of the following methods:
Click the folder icon to select it and then press to activate the Edit mode, or
click the folder icon, then click inside the folder name to activate the Edit mode, or
right-click the folder and then click Rename from the shortcut menu.
Whenever you see the folder name highlighted as shown here, you are in Edit mode. Once the name is highlighted, you can type in a new name for the folder. Alternatively, you can use the mouse pointer or arrow keys to move the cursor to the exact location in the folder name where you would like to insert or delete characters.
Exercise1 Ensure you are viewing the Unit 2 - Windows folder in the Folders list and the items appear in the
Contents pane.
You will now rename the Documents folder created in the previous exercise to prevent confusion between this folder and the Windows folder that share the same name.
2 Click the Documents folder in the Contents pane to select it. Then point at the name Documents and click once more.
3 Type: General Documents to rename this folder and then press .
You have now successfully changed the name of this folder.
Changing Folder OptionsYou can change the appearance of the folder to suit your preferences by changing the properties. You can also change the way you view folders and files, and display file types or extensions.
To change the properties for a folder, select the folder and on the Command bar, click and then Folder and Search Options.
TasksSpecifies whether or not to display the Details and Preview pane for a folder. The default is to show them. Choosing the Windows classic folders option turns them off to give more room to display files.
Browse folders Specifies whether each folder will open in the same window, or in a different window so you can switch between the windows.
Click items as follows Provides options on whether to single- or double-click to open items.
82 7300-1 v1.00 © 2009 CCI Learning Solutions Inc.

Unit 2: Using Microsoft W
indows Vista
L o o k i n g a t F i l e s a n d F o l d e r s L e s s o n 1 1
Changing the View There are different ways to display information for files or folders. Occasionally you may want to sort files in a specific order, or to see more information for the files or folders. Select the view options using one of the following methods:
Click the arrow of the button on the Command bar, or
right-click in a blank area of the Contents pane and then View, or
on the Command bar, click the Views button to cycle through the different views.
Extra Large IconsShows files and folders as very large icons, which can be helpful for visually impaired users; file and folder names display below the icon.
Large IconsDisplays files and folders as large icons with file or folder names below the icon, and is helpful when you want to preview picture files.
Medium IconsDisplays files and folders as medium-sized icons with the names below the icons, and is helpful when you want an overview of folders or files in a certain location.
7300-1 v1.00 © 2009 CCI Learning Solutions Inc. 83

Unit 2: Using Microsoft W
indows Vista
L e s s o n 1 1 L o o k i n g a t F i l e s a n d F o l d e r s
Small Icons Lists files and folders as smaller icons with the names displayed to the right. The main difference between this view and the List view is how the contents are sorted. In this view, the contents are sorted alphabetically in multiple columns from left to right. In the List view, the contents are sorted alphabetically in multiple columns starting with the first column.
List Displays the contents of a folder as a list of names preceded by small icons. This view is useful if your folder contains many files and you want to scan the list for a file name. Files and folders can be arranged in the same options as with other views.
Details Lists the contents of the open folder and provides detailed information about the files and folders inside it, including name, type, size, and date modified; this view also shows files in groups.
TilesDisplays files and folders as medium-sized icons with the filenames to the right of the icon. The file format and file size also display.
Whenever you can see the column headings in the Contents pane, you can use these buttons to sort the contents or to manipulate the view further, as follows:
To adjust the width of a column, position the mouse pointer over the vertical line at the right of the column you want to adjust; the mouse pointer changes to display (thick cross hair with double horizontal arrows). Click and drag to the left or right to make the column narrower or wider.
To sort the contents by item type, click the Type column heading. An up arrow symbol means the items are sorted in ascending order (that is, A–Z or 0–9); a down arrow symbol means the items are sorted in descending order (that is, Z–A or 9–0).
Viewing the File Extensions You may see file extensions or types such as .doc, .exe, or .bmp with file names. To keep things simple, the default setting in Windows is to hide file extensions. In general, the icon to the left of the file name is a visual reminder of the software program.
Having the extensions displayed is helpful to see how the file was saved, or to provide a quick method of organizing files (for example, to see which pictures use the .jpg format rather than .gif or .bmp).
To display the file extensions at all times for the files, on the Command bar, click . Click Folder and Search Options and then on the View tab, in the Advanced settings list, uncheck Hide extensions for known file types.
84 7300-1 v1.00 © 2009 CCI Learning Solutions Inc.

Unit 2: Using Microsoft W
indows Vista
L o o k i n g a t F i l e s a n d F o l d e r s L e s s o n 1 1
When you need to see hidden files, you can uncheck the Hide protected operating systems (Recommended) option. Important files such as system files or the data file for your e-mail are hidden to prevent them from being deleted or changed inadvertently. You may need to display these when you are making a backup of these files.
Exercise1 From the Command bar, click and then Folder and Search Options.
2 On the General tab, in the Click items as follows area, click Single-click to open an item (point to select).
3 Ensure Underline icon titles only when I point at them is selected and then click OK.
4 In the Contents pane, position the mouse pointer over a file.
Notice that the file is now highlighted and the name is underlined. This is a visual indicator that you can single-click this file to open it. Simply pointing to an item selects it, and everything that used to require you to double-click now only requires a single-click.
5 In the Contents pane, point at the Slide Shows folder and then click to open it.
6 Click the (Back) button to return to the previous view.
Now set the file extensions to display for all files.
7 On the Command bar, click and then click Folder and Search Options.
8 Click the View tab and then in the Advanced settings list, click Hide extensions for known file types to turn this feature off. Then click OK.
9 With the Unit 2 – Windows folder still selected in the Folders list, on the Command bar, click the down arrow for and then click Medium Icons.
10 On the Command bar, click the down arrow for and then click Details.
11 Click the Type column heading to sort the contents by the file type.
12 On the Command bar, click and then click Folder and Search Options.
13 Click the View tab and then in the Advanced settings area, click Hide extensions for known file types to turn this feature back on. Then click OK.
7300-1 v1.00 © 2009 CCI Learning Solutions Inc. 85

Unit 2: Using Microsoft W
indows Vista
L e s s o n 1 1 L o o k i n g a t F i l e s a n d F o l d e r s
The files are now sorted with folders listed first, followed by files alphabetized according to the name of the software program they were created in.
14 Place the mouse pointer on the vertical line between the Name column and the Date modified column. When the mouse pointer turns into a , drag it to adjust the width of the column until you can see the full name for every file.
15 Try changing the view to other styles to see how this affects the view. Make List the last view style you use.
Selecting Files or Folders1-3.2.5 1-3.2.6
As you work with programs and files, you may need to reorganize your files to find documents quickly. Before performing any actions such as copying, moving, or deleting, you must select the file or folder.
Consider the following methods of selecting files or folders:
To select one file or folder, point to that file or folder.
To select all the files and folders in this location, click and click Select All, or press + .
To select multiple files or folders that are consecutive, point to the first file or folder in the list, press and hold the key, and then point to the last file or folder in the list.
To select files using the lasso method, point at the right of the first file or folder to be selected, then click and drag up or down to select the rest of the files or folders in the selection. A box will appear as confirmation of the selection, along with the files or folders being highlighted.
To select multiple files or folders that are non-consecutive, point to the first file or folder to be selected, press and hold the key, and then point at each file or folder to be selected.
At any time files or folders are selected, if you need to change any part of the selection, use either the or key to deselect specific parts of the selection.
To de-select or turn off the selection of any files or folders, click anywhere away from the selection.
86 7300-1 v1.00 © 2009 CCI Learning Solutions Inc.

Unit 2: Using Microsoft W
indows Vista
L o o k i n g a t F i l e s a n d F o l d e r s L e s s o n 1 1
ExerciseEvery exercise will now use the single-click option for working with files and folders. If your system is not set for this, please go to the previous exercise and perform steps 1 to 3, 11 and 13 before proceeding with this exercise.
1 Ensure the Unit 2 - Windows folder is selected in the Folders list.
2 In the Contents pane, hover the mouse pointer over the first file (the logo) to select it, press and then point to the Letter to Henry Warburn file.
3 Click in a blank area of the Contents pane to de-select the list.
You will now select files in random order.
4 Position the mouse pointer over the Annual Sales Report file to select it, press and hold the key, and then point at the History of the Internet file.
These two files are now selected.
5 Click in a blank area to deselect the list.
Now try the lasso technique to select files.
6 Position the mouse pointer over a blank space to the right of the Water Presentation file, and then press the left mouse button as you drag down and slightly to the left of the News with RSS file.
7 When the files are selected, release the mouse.
8 Click anywhere away from the selection to de-select the list.
You will now select all contents in this location.
9 Press + .
10 Click anywhere away from the selection to de-select the list.
7300-1 v1.00 © 2009 CCI Learning Solutions Inc. 87

Unit 2: Using Microsoft W
indows Vista
L e s s o n 1 1 L o o k i n g a t F i l e s a n d F o l d e r s
Copying and Moving Files or Folders 1-3.2.5 1-3.2.6
Files or folders may be copied or moved from one drive location to another, from one folder to another, or to the desktop. Use the Folders list to see the hierarchical structure of the folders and subfolders, and to quickly navigate between the different folders or drives.
Copying Files or Folders When you copy a file or folder, the original remains in the source location and a copy is placed in the destination location—the same information will be in both locations. For example, suppose you want a copy of a file from the network to edit. The new file, with your edits, should be the version everyone in the office uses from now on, so you must make a copy of your file to replace the network copy.
To do this, you must first select the files or folders. Then, to copy a file or folder, use one of the following methods:
Click and then Copy, navigate to the new location and then click , Paste, or
press + , move to the new location and then press + , or
right-click the selection and then click Copy, navigate to the new location, right-click and then click Paste, or
if you are copying files from one drive to another, Windows will automatically copy the selection as you drag the selection to the new location, or
if you are copying files in the same drive, press as you drag the selected file or folder to the new location.
As Windows copies the files from the original location to the new one, it will check to see if there are other files with the same name as the one you are copying into this location. If so, you will see a message similar to the screen shown:
Always double-check whether you want the new file to be copied over the existing file. You can choose to keep both copies and let Windows create a file with a number at the end of the filename to indicate that it is a copy. In this example, the original file will be named logo.jpg and the copy in the same location will be named logo (2).jpg.
Exercise1 Ensure you are viewing the contents of the Unit 2 - Windows folder.
2 Select all the files in this folder.
3 On the Command bar, click and then Copy.
4 In the Folders list, click the the folder with your name.
5 On the Command bar, click and then Paste.
The files are now copied from the student data folder to your folder.
88 7300-1 v1.00 © 2009 CCI Learning Solutions Inc.

Unit 2: Using Microsoft W
indows Vista
L o o k i n g a t F i l e s a n d F o l d e r s L e s s o n 1 1
Moving Files or Folders When you move a file or folder, it physically moves to the destination location. When you move a folder, all the contents in that folder (such as the subfolders and files) move as well.
After selecting the files or folders to move, use one of the following methods:
Click and then Cut, move to the new location and then click , Paste, or
press + , move to the new location and then press + , or
right-click the selection and then click Cut, move to the new location, right-click, and then click Paste, or
drag the selected files or folders to the new location on the same drive. For different drives, Windows will automatically copy the selection unless you press the key as you drag.
Exercise1 Ensure you are in your folder. Change the view to Details and then click the Type column to sort the files
by file format.
2 Select all the Microsoft Office Word files and then press + .
3 In the Folders list, click the General Documents folder and then press + .
The Microsoft Office Word data files are moved to this folder.
4 Ensure you are viewing the contents of your folder in the Contents pane, and then repeat step 3 moving the Microsoft Office Excel files into Worksheets, PowerPoint Presentation files into Slide Shows, and the remaining data files into the Misc folder.
Your folder should then display the Personal folder and shortcut only, as all files are organized into appropriate folders.
Suppose you now want to move your folder to another location, which in this case will be Documents.
5 In the Folders list, click and drag your folder up so it hovers over the Documents folder in the Favorite Links area.
6 Release the mouse when the Documents folder highlights as seen in the above screen.
You have now successfully moved your folder to the Documents folder.
Renaming Files or FoldersYou can rename a file or folder to make it more descriptive. Whenever you see a black line around the name of a file or folder, this means you are in Edit mode and can now change the text shown in the box. Edit mode can be activated either by pressing the key or by clicking once inside a selected file or folder name.
Remember the two limitations for file or folder naming conventions: a maximum of 255 characters; and the following characters \ / : * ” < > | cannot be used in the file or folder name.
Be very careful not to rename any program files or folders and ensure you keep the same extension for the file. Otherwise, Windows will display an error message indicating the file type is not recognizable and may not be accessible if you accept the new name.
7300-1 v1.00 © 2009 CCI Learning Solutions Inc. 89
Hint: Resize the Type column to see the names of the programs.

Unit 2: Using Microsoft W
indows Vista
L e s s o n 1 1 L o o k i n g a t F i l e s a n d F o l d e r s
To activate the Rename feature using single-click, use one of the following methods:
Point at the file or folder to select it and then press .
Right-click the file or folder and then click Rename.
To activate the Rename feature using double-click, use one of the following methods:
Click the file or folder to select it, and then press .
Click the file or folder to select it, and then click once in the file or folder name.
Right-click the file or folder and then click Rename.
Exercise1 In the Unit 2 – Windows folder, click the Misc folder.
2 In the Contents pane, point at the logo file and press .
3 Click at the beginning of the file name, type: TEC (include a space) and then press .
The file is now renamed as “TEC logo” and is now listed again alphabetically.
4 Point at the Sales and Revenue Report file to select it.
5 Right-click and then click Rename.
6 Double-click the word “and”, type: & (include a space) and press .
The file is renamed.
Viewing File or Folder Properties1-3.2.6
Each file or folder has a property sheet you can use to determine the size, when it was created, last modified, or last accessed. The number of tabs that appear when viewing the properties for a file or folder depend on the folder and file type, or the network connection and access rights.
To display the properties for a file or folder, use one of the following methods:
Select the file or folder, then on the Command bar, click and click Properties, or
right-click the file or folder and then click Properties.
Viewing Folder Properties General Displays information such as the folder type, location, size, contents, date information, and attributes such as read-only or hidden.
Sharing Allows you to share the folder and files with other users on your network.
Security Shows who on your network has access rights to this folder and the type of rights they are assigned; you can change the rights for your own user ID, but only the network administrator can change rights for other people who share this file or folder.
Previous Versions Displays copies of the file created by a Windows backup as part of a restore point.
Customize Allows you to select or change options for how the folder appears, such
90 7300-1 v1.00 © 2009 CCI Learning Solutions Inc.

Unit 2: Using Microsoft W
indows Vista
L o o k i n g a t F i l e s a n d F o l d e r s L e s s o n 1 1
as changing the folder icon.
Viewing File PropertiesGeneral Displays information such as file type, location, size, date created, date last modified, date last accessed, and attributes such as read-only or hidden.
Security Displays who has access rights to this file; to add people who can share this file, check with your network administrator.
Details Displays a list of general information about the file such as who the author was, keywords that can be used to search for this file, when it was created, total number of words in this document, and so on.
Previous Versions Displays copies of the file created by a Windows backup as part of a restore point.
Exercise1 Ensure you are viewing the folder structure of Unit 2 - Windows in the Folders list.
2 Right-click the Worksheets folder and then click Properties.
3 Take a few moments to scan the contents of each tab in this dialog box.
4 On the Customize tab, click Change Icon in the Folder icons area.
5 Scroll through the selection of icons, click one. Then click OK.
6 Click Cancel to exit the folder properties.
7 Click the Worksheets folder, right-click the Department Budget file, and then click Properties.
8 Click the Details tab.
7300-1 v1.00 © 2009 CCI Learning Solutions Inc. 91

Unit 2: Using Microsoft W
indows Vista
L e s s o n 1 1 L o o k i n g a t F i l e s a n d F o l d e r s
9 Position the mouse cursor to the right of Title and, when the text field box appears, click in the box and type: Sales Department Budget.
10 In the Tags field box, type: yearly budget and then click OK to exit the file properties.
You should notice that the file name does not change but the details you entered for the file now appear at the bottom in the Details pane.
Finding Files 1-3.2.6
You can search for a file or folder in various disk drives or folders on your system using specific criteria, such as name, type, size, date created, date last modified, and so on.
To activate the Search feature, use one of the following methods:
Enter the search criteria in .
For specific criteria, ensure the cursor is in the Search field and press + to display the Advanced Search toolbar.
You can then click the button at the right of the Advanced Search to display fields to enter your search criteria.
92 7300-1 v1.00 © 2009 CCI Learning Solutions Inc.
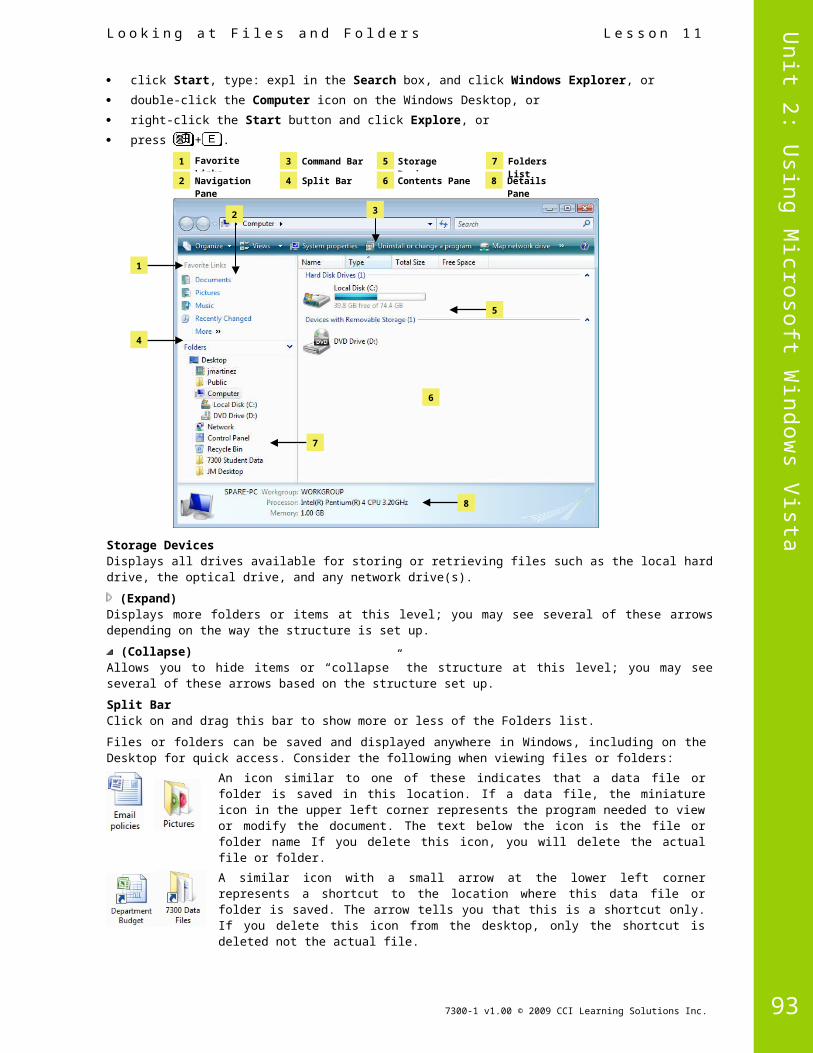
Unit 2: Using Microsoft W
indows Vista
L o o k i n g a t F i l e s a n d F o l d e r s L e s s o n 1 1
Exercise1 Click the General Documents folder in the Unit 2 - Windows folder.
2 Click in the Search field and type: letter.
Notice that, as you begin entering the text, Windows displays any file it finds that matches the criteria, including any subfolders within your folder. Windows also displays a new folder in the Folders list confirming the search it made for the specified folder. For example: .
Now try performing an advanced search. Once you activate this feature, you will search for pictures and then for some files that were modified after a specific date.
3 Click in the Search field and then press + .
4 On the Advanced Search toolbar, click and then click the arrow to the right of the Advanced Search field.
5 In the Location field, click the down arrow and change this to Choose search locations. Then in the list, click the 7300 Student Data folder and click OK.
6 Ensure the Date field shows as Date modified.
7 In the field to the right of this one, click the arrow and then click is after.
8 In the last field for the date search, click the arrow and in the calendar, click the date of May 1, 2009.
Note: To move from one month to another, click the appropriate arrow on either side of the current month.
9 Click the Search button.
10 Turn off the search by clicking the Unit 2 - Windows folder in the Folders list.
11 Close Windows Explorer.
7300-1 v1.00 © 2009 CCI Learning Solutions Inc. 93

Unit 2: Using Microsoft W
indows Vista
L e s s o n 1 1 L o o k i n g a t F i l e s a n d F o l d e r s
SummaryIn this lesson, you looked at the different ways files or folders display and how to manipulate them. You should now be familiar with:
what a file or folder is how to recognize a file or folder on the desktop how to recognize the drives available selecting files or folders moving files or folders copying files or folders
changing the view for drives, files or folders how to create, customize or change a folder’s
properties renaming files or folders viewing file or folder properties finding files
Review Questions 1. A data file can be any type of document containing information you have entered and saved.
a. True b. False
2. How can showing the path for a folder or file be helpful? a. It tells you which drive the file or folder is stored in.b. It tells you whether the file or folder is stored on a network. c. It tells you the name of the folder and how many levels you must go through to get to it. d. Any of the above
3. An item on the desktop that has an arrow on the lower left corner is a shortcut to the actual file location. a. True b. False
4. There is no difference between copying and moving files or folders. a. True b. False
5. Why might you want to change the details for a file’s properties? a. To add more information to help find the fileb. To change or update the name of the filec. To prevent anyone else from looking at the file contentsd. Any of the abovee. Only a or b
94 7300-1 v1.00 © 2009 CCI Learning Solutions Inc.

Unit 2: Using Microsoft W
indows Vista
U s i n g t h e R e c y c l e B i n L e s s o n 1 2
Lesson 12 Using theRecycle Bin
ObjectivesIn this lesson, you will look at how to delete files or folders to the Recycle Bin and how to restore deleted items. You will also look at some ways to help resolve problems you may have with files or folders. On completion, you will be familiar with:
deleting files or folders what the Recycle Bin is restoring files from the Recycle Bin
emptying the Recycle Bin identifying common problems with accessing files
Skills
1-3.2.5 Manipulate desktop folders and icons/shortcuts1-3.2.6 Manage files1-3.2.7 Identify precautions one should take when manipulating files1-3.2.8 Solve common problems associated with working with files
Looking at the Recycle Bin 1-3.2.6
The Recycle Bin is a temporary storage area for files and folders that you delete from the local hard disk. Files and folders deleted from an external disk (such as a flash drive, memory card, or virtual storage device) or from a network drive are permanently deleted and cannot be restored from the Recycle Bin.
The Recycle Bin has an icon on the desktop for easy access, but is also accessible from the file management tools Windows Explorer and Computer. The Recycle Bin can look like either of the following:
Indicates there is something in the Recycle Bin that can be restored or emptied.
Indicates the Recycle Bin is empty.
If the computer is shared by multiple users, a separate Recycle Bin exists for each user who is set up on this computer.
To permanently delete a file and bypass the Recycle bin, press and hold the key while deleting the file.
Deleting Files and Folders When you no longer need files or folders, or want to save disk space, delete these items.
Always check the contents of a folder before you delete the entire folder. This is especially crucial if the folder was stored on a network drive or external disk, as they are not moved to the Recycle Bin.
To delete a file or folder, select the required file or folder and then use one of the following methods:
Click and then Delete, or
select the file or folder and then press , or
right-click and click Delete, or
drag the item to the Recycle Bin folder.
7300-1 v1.00 © 2009 CCI Learning Solutions Inc. 95

Unit 2: Using Microsoft W
indows Vista
L e s s o n 1 2 U s i n g t h e R e c y c l e B i n
Exercise1 In the Unit 2 - Windows folder click the Misc folder to open it, point at the IC3 Web Site file and then press
.
2 Click Yes to delete this file.
3 Right-click the Misc folder in the Folders list and then click Delete. Click Yes to confirm the deletion.
The entire folder was deleted, including the two files that were still in that folder.
Restoring a File or Folder You can restore a deleted file or folder to its original location. You can only restore the entire folder, including its contents.
To restore a file or folder from within the Recycle Bin feature, use one of the following methods:
Select the file or folder to be restored, and then click , or
to restore multiple files or folders, select the appropriate files or folders, and then click , or
if you want to restore all items, click , or
right-click the selected files or folders, and then click Restore.
Exercise1 On the desktop, open the Recycle Bin.
2 Select the Misc folder, and then on the Command bar, click .
3 Point at the IC3 Web Site file, and then on the Command bar, click .
4 In the Folders list, navigate to the Unit 2 - Windows folder.
The Misc folder appears in the contents list.
5 Click Misc to see which files are stored here.
Emptying the Recycle BinDeleted files remain in the Recycle Bin until you empty it or it is full; in the latter case, Windows will automatically delete older files and folders to free up enough space for new items. When a file or folder is deleted from the Recycle Bin, they are permanently deleted.
To empty the Recycle Bin, use one of the following methods:
On the Command bar, click , or
right-click in a blank area of the Recycle Bin window and click Empty Recycle Bin, or
right-click the Recycle Bin icon on the desktop and then click Empty Recycle Bin. Use this option only when you are sure that you will not want to restore anything from the Recycle Bin.
96 7300-1 v1.00 © 2009 CCI Learning Solutions Inc.
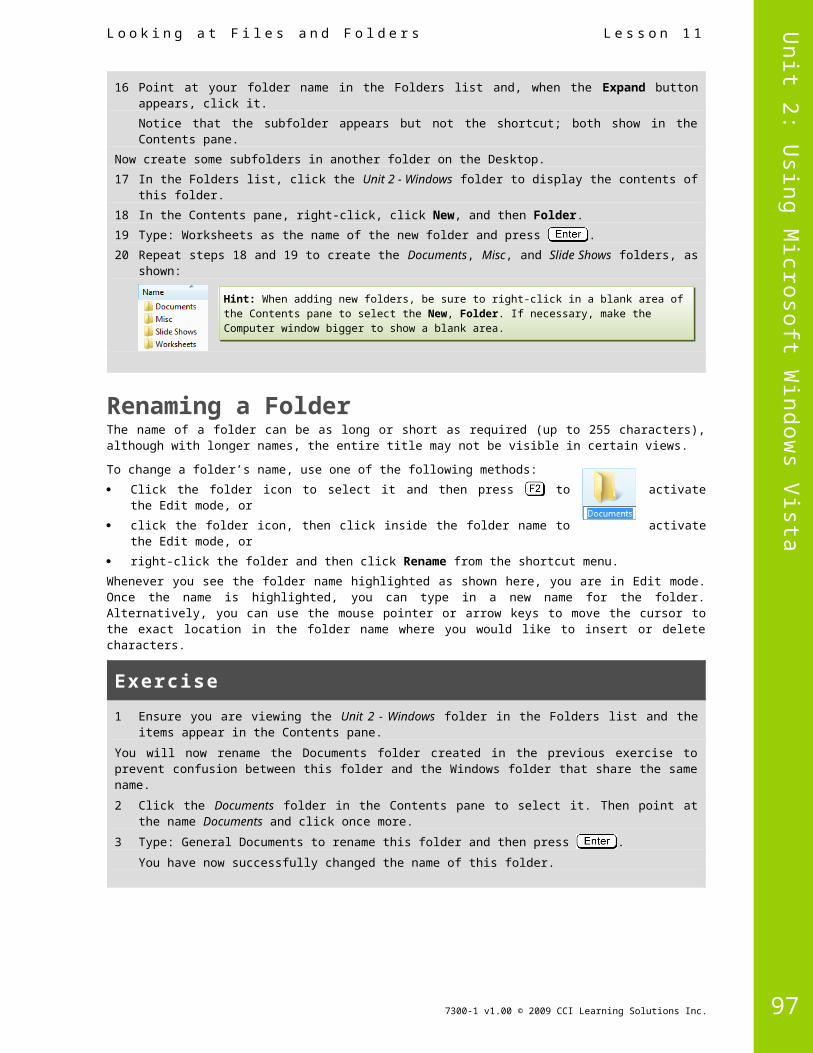
Unit 2: Using Microsoft W
indows Vista
U s i n g t h e R e c y c l e B i n L e s s o n 1 2
Exercise1 In the Folders list, click the Recycle Bin.
2 On the Command bar, click .
3 Click Yes.
Notice the Contents pane is now blank, and the Recycle Bin icon on the Desktop is also empty.
Identifying Common Problems with Files
1-3.2.7 1-3.2.8
When working with files, you may occasionally encounter a problem accessing, using, or finding a file. Following are some ways to identify problems and resolve issues:
Use a standard naming convention when saving files. Try to ensure each file name is unique and do not overwrite any files unless you are sure you do not need the original version. Try to adhere to any file management standards that have been set so others can find files and folders easily. For instance, if you are working with several files saved on your hard drive, on completion move the files to the appropriate folders on the network so that others can access them.
If you display the file extensions or file types with the file names, be careful not to change these extensions or, if you rename the file, be careful to type the file extension correctly.
Also when renaming files, keep in mind the characters you cannot use.
When moving files, be careful in selecting the appropriate file. You may want to use a method other than dragging to prevent accidentally moving something that should not be moved.
When you need a file on a portable storage device such as a memory card, consider copying it from the hard drive to the storage device. This ensures that you have a copy of the original as well as one on the storage device in case you lose the portable device or it does not work.
Always delete files to the Recycle Bin if there is a possibility you may need them at a later date. This may also include copying a file from a network drive to your hard drive, which will then move the file into the Recycle Bin if you delete it at a later date.
Carefully read any error messages Windows displays about files before closing that message. This will help identify what could be causing problems with accessing that file. For example, if you cannot access a file, or if you can only view the list of files in that location but cannot open them, read the message to determine if the file exists. If the message indicates the file no longer exists in this location, perform a search for the file to see if it was moved or renamed.
If you see an error message indicating that you are low on space on the hard drive, first delete data files you do not need or use. Then uninstall any application programs you no longer use. Be very careful with this option and choose only those application programs you recognize. Do not uninstall a program if you do not recognize the program name; always check with a technical specialist before attempting any further action.
7300-1 v1.00 © 2009 CCI Learning Solutions Inc. 97

Unit 2: Using Microsoft W
indows Vista
L e s s o n 1 2 U s i n g t h e R e c y c l e B i n
Be very careful when using passwords with confidential or sensitive files; ensure you choose a password that is logical but not easy to guess. You will see an error message if an incorrect password is entered.
If you cannot make changes to a file, it is likely the file has been set to read-only status. Depending on how this attribute was set, you can turn it off by de-selecting it in the file’s properties. Some programs provide the ability to apply this feature to files (such as PDF files); if that is the case, you will not be able to change this attribute without having a password or using the correct program. A file set as read-only usually indicates this when you try to open it.
There is no absolute method to prevent your files from being corrupted. Corruption can occur due to hardware failure, power surges, software or hardware incompatibilities, software issues, or viruses. If the error message indicates the file may be corrupted, try opening the file on another computer to see if you can duplicate the message. It may be a problem with the hardware and not the actual file. For instance, if you can open a file from a USB memory key on another system, it may be that the USB port on your system is not working correctly.
Hidden files can display onscreen when you change the options for the folders. Be very careful when using this option and consider changing these files back to hidden status once you have completed the necessary actions, such as backing them up.
A message similar to the following means Windows cannot find a program on your system that will automatically accept or open this file, perhaps because you do not have the software installed:
In most cases, use the Select a program from a list of installed programs option to choose another program that is already installed on your system to try and open this file. If you are unsure which program to use, check with your network administrator or a technical specialist prior to selecting a program in this dialog box.
SummaryIn this lesson, you looked at how to delete files to the Recycle Bin and how to restore deleted files. You also looked at some ways to help resolve problems you may have with files. You should now be familiar with:
deleting files or folders what the Recycle Bin is restoring files from the Recycle Bin
emptying the Recycle Bin identifying some common problems with
accessing files
98 7300-1 v1.00 © 2009 CCI Learning Solutions Inc.

Unit 2: Using Microsoft W
indows Vista
U s i n g t h e R e c y c l e B i n L e s s o n 1 2
Review Questions 1. The Recycle Bin is a temporary storage area for files and folders that have been deleted from the hard drive.
a. True b. False
2. When you empty the Recycle Bin, you can still restore these files or folders. a. True b. False
3. Always be careful when renaming a file that displays a file type or file extension to ensure you do not accidentally change the file to become unrecognizable to a program in Windows. a. True b. False
4. How can corruption of a file occur? a. Virusb. Hardware Failure c. Power Surges d. Software Issues e. Any of the abovef. b or c
5. An error message indicating the system cannot associate the file with a program means you do not have a software program that can open that file type.a. True b. False
7300-1 v1.00 © 2009 CCI Learning Solutions Inc. 99

Unit 2: Using Microsoft W
indows Vista
L e s s o n 1 3 C u s t o m i z i n g t h e S y s t e m S e t t i n g s
Lesson 13 CustomizingSystem Settings
ObjectivesIn this lesson, you will learn how to use the Control Panel to customize the appearance or behavior of different system options. On completion, you will be familiar with:
what the Control Panel is changing or customizing the desktop display changing the date or time
changing or customizing mouse settings changing or customizing multimedia devices working with printers installed on your system
Skills
1-3.3.1 Display control panels/system preferences1-3.3.2 Identify different control panel/system preference settings1-3.3.3 Change simple settings1-3.3.4 Display and update a list of installed printers1-3.3.5 Identify precautions regarding changing system settings
Using the Control Panel1-3.3.1 1-3.3.2 1-3.3.3 1-3.3.4 1-3.3.5
The Control Panel is the area in Windows where you can access features to either install or customize the settings for devices on your system.
Use one of the following methods to access the Control Panel:
Click Start, Control Panel; or
in Windows Explorer, click Computer in the Folders list, then click in the Command bar; or
in Windows Explorer, click Control Panel in the Folders list.
100 7300-1 v1.00 © 2009 CCI Learning Solutions Inc.

Unit 2: Using Microsoft W
indows Vista
C u s t o m i z i n g t h e S y s t e m S e t t i n g s L e s s o n 1 3
System and MaintenanceProvides options for maintaining system integrity and performing data backups.
SecurityProvides options for security purposes such as checking for antivirus updates and scanning downloads.
Network and InternetAllows you to set up or modify how your system connects to a network or the Internet, and to share files with others.
Hardware and SoundEnables you to set up or modify the way hardware items such as sound devices will work.
ProgramsProvides access to system management tasks such as installing and uninstalling programs.
Mobile PCProvides options for managing your notebook such as how long the screen display should continue in battery mode.
User AccountsProvides options for setting the computer up to be used by more than one person.
Appearance and PersonalizationAllows you to customize your screen with screen savers, desktop backgrounds, and so on.
Clock, Language, and RegionProvides access so you can change dates, times, currency, or numbers to reflect regional standards or languages.
Ease of AccessProvides options for changing accessibility specifications, such as turning on voice recognition or altering visual displays.
Additional Options Allows you to set or modify requirements for additional software installed on your machine, such as QuickTime or special monitor drivers.
Some of the more commonly used features in Control Panel include changing options for the: desktop background screen saver mouse or keyboard
date or time sounds that accompany specific actions in Windows audio volume
If you prefer to see icons for Control Panel items, you can switch the display to the Classic View:
7300-1 v1.00 © 2009 CCI Learning Solutions Inc. 101

Unit 2: Using Microsoft W
indows Vista
L e s s o n 1 3 C u s t o m i z i n g t h e S y s t e m S e t t i n g s
The Control Panel has a number of features that you should not use unless you are very comfortable with the computer. Be sure you fully understand what each option can do and when you might want to use it before attempting any changes. If you choose not to work with someone who has advanced knowledge, record the original settings before making any changes so that you will have the option of returning to them if the changes you make do not work. For example, if you change the device driver for an output device such as a printer, be sure to record what the original device driver was in case the printer does not work after you make a change. This is very important if you choose to change any of the security options such as the firewall or for the Internet.
Note that, because some of these features can affect how the computer works, they may be deactivated and therefore will not display on the Control Panel. Your network administrator will set access to these features according to organization standards. For example, a school administrator may allow students to customize the background for the system but the User Accounts feature never appears in the Control Panel window, or a retail store may set the background so that it will always display the company logo and cannot be changed in the Control Panel.
Customizing the Desktop DisplayCustomizing the desktop display includes changing the background, screen saver, desktop appearance, or screen resolution. To change the display, use one of the following options:
Click Start, Control Panel, Appearance and Personalization, Personalization or
right-click a blank area of the desktop, click Personalize, and then click the display option to change, or
if in Classic View, click Personalization in the Control Panel window.
Exercise1 Right-click a blank area of the desktop, and click Personalize.
2 Click Desktop Background.
102 7300-1 v1.00 © 2009 CCI Learning Solutions Inc.

Unit 2: Using Microsoft W
indows Vista
C u s t o m i z i n g t h e S y s t e m S e t t i n g s L e s s o n 1 3
3 Click the Location field and then click Solid Colors. Pick a light color such as the light grey in the first row. Click OK.
The background, behind the Personalization window, should have changed to the color you’ve chosen.
4 Click Screen Saver.
5 Click the arrow for the Screen saver field and click Bubbles.
Windows displays a preview of this screen saver. Take note that some screen savers are transparent such as this one, which still shows what you were working on before the screen saver activated.
6 Change the Wait time to be 1 minute. Click OK.
7 Do not touch your mouse for at least 1 minute so you can view the screen saver.
8 Close the Personalization window.
7300-1 v1.00 © 2009 CCI Learning Solutions Inc. 103
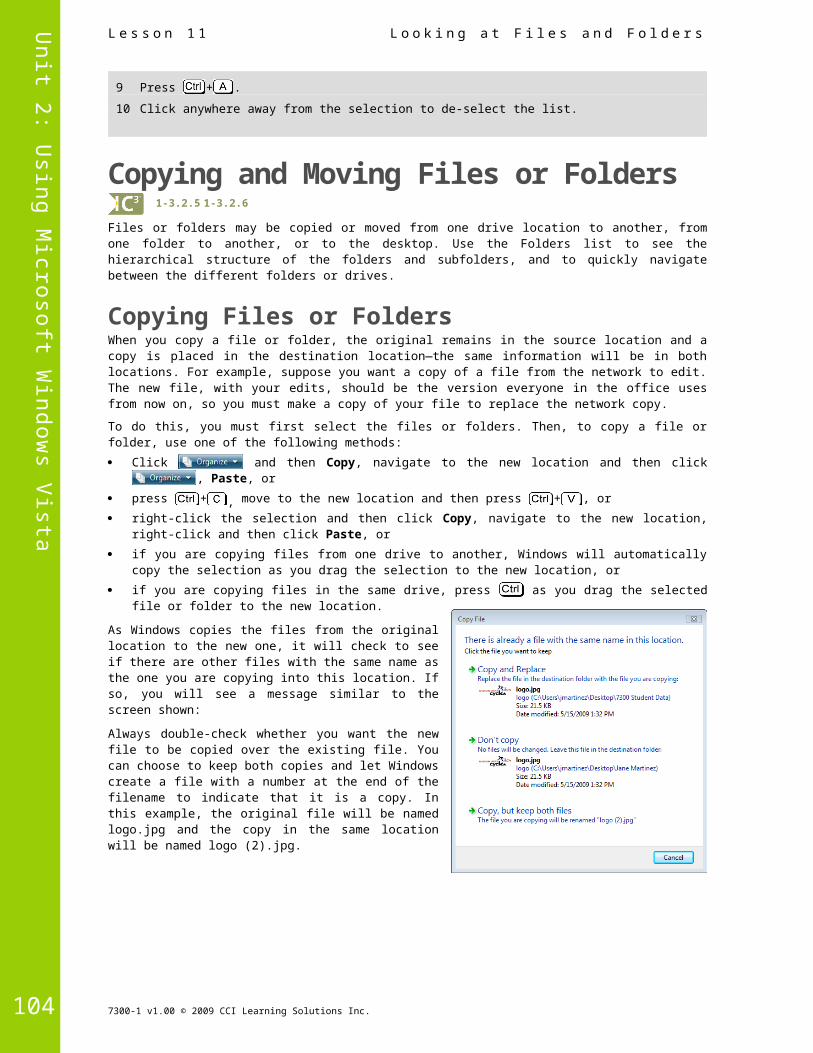
Unit 2: Using Microsoft W
indows Vista
L e s s o n 1 3 C u s t o m i z i n g t h e S y s t e m S e t t i n g s
Changing the Date and Time By default, the current time displays in the notification area; when you hover the mouse pointer over the time, a screen tip also displays the current date. The operating system uses the date and time settings to identify when you create or modify files. These date and time settings are obtained from a battery-operated clock inside the computer (its internal clock), which should be current. If you are connected to a network, the time may be determined by the server and only the network administrator can change it permanently. If you are connected to the Internet, it will also synchronize its clock with a time server on the Internet. You can set this by selecting the Internet Time tab in the Date and Time window.
To view the current date and time, click the time in the notification area:
You can change the date or time using one of the following methods:
Click Start, Control Panel, Clock, Language, and Region, and then click Date and Time or Set the time and date, or
if in Classic View, click Start, Control Panel, and then click Date and Time, or
click the time in the notification area and then click Change date and time settings.
Date and TimeChanges the existing time and date, or the existing time zone, and provides an option for setting Daylight Saving Time automatically, if you wish.
Additional ClocksDisplays additional clocks in the notification area so you can see the time in different parts of the world.
Internet TimeSynchronizes the time on your computer with a time server on the Internet.
104 7300-1 v1.00 © 2009 CCI Learning Solutions Inc.

Unit 2: Using Microsoft W
indows Vista
C u s t o m i z i n g t h e S y s t e m S e t t i n g s L e s s o n 1 3
Exercise1 Click the time in the notification area and then click Change date and time settings.
2 Click the Additional Clocks tab.
3 Click the first Show this clock option to turn it on and then change the time zone to somewhere other than your current location.
4 In the Enter display name field, type a large city for that time zone, such as Seattle, Toronto, Edinburgh, or Beijing.
5 Click OK.
6 Point at the time in the notification area.
Customizing the Mouse You can customize features for the mouse such as the double-click speed, motion speed, or mouse pointers. These options will vary based on the type of mouse or pointing device installed. Another reason you may need to customize the mouse would be if you have a new pointing device or need to update the device driver for your existing one. To make these changes, use one of the following methods:
Click Start, Control Panel, Hardware and Sound, Mouse; or
right-click anywhere on the desktop and then click Personalize, Mouse Pointers.
If you are using a notebook without a mouse, you may have an additional tab to customize the glide pad or touchpad included with the notebook.
7300-1 v1.00 © 2009 CCI Learning Solutions Inc. 105

Unit 2: Using Microsoft W
indows Vista
L e s s o n 1 3 C u s t o m i z i n g t h e S y s t e m S e t t i n g s
Exercise1 Click Start, Control Panel, Hardware and Sound, Mouse.
2 On the Buttons tab, drag the Double Click Speed slider slightly towards the Fast side, and then double-click the picture of the folder to test the speed. Drag the slider towards the left for the Double Click Speed, and then double-click the folder again to test the speed.
3 Click the Pointers tab.
Hint: Take note of the settings before proceeding with the following steps as you will be asked to reset them to the original settings at the end of the exercise.
4 In the Scheme area, click the down arrow, scroll through the list of schemes, and select one.
5 Click the Pointer Options tab.
6 In the Motion area, slow the mouse speed by dragging the slider slightly to the left, and then click Apply.
7 In the Motion area, increase the mouse speed by dragging the slider slightly to the right, and then click Apply.
8 Move the mouse around and notice the mouse pointer and mouse motion. Adjust the slider until you find the desired speed, and then click Apply.
9 Under Snap To, place a check mark next to Automatically move pointer to the default button in a dialog box. Click OK.
10 Click Start, Control Panel, Hardware and Sound, Mouse.
Notice that the mouse pointer’s default position is over the OK button.
11 Following steps 4 to 9, return the mouse options to the previous settings. Then click OK.
12 Close the Control Panel window.
Customizing the KeyboardIf you have a different keyboard than the one provided with the computer, such as a cordless keyboard or a keyboard for a different language, you can customize it to suit your needs. Windows provides options to assist users with special needs when they are entering information or troubleshooting keyboard problems.
To customize the keyboard, click Start, Control Panel, Hardware and Sound, Keyboard.
The type and number of options that appear in this dialog box may vary depending on the type of keyboard you have installed on your system.
106 7300-1 v1.00 © 2009 CCI Learning Solutions Inc.

Unit 2: Using Microsoft W
indows Vista
C u s t o m i z i n g t h e S y s t e m S e t t i n g s L e s s o n 1 3
Exercise1 Click Start, Control Panel, Hardware and Sound, Keyboard.
2 Click the Speed tab, if not already active.
Select the speed at which you want the keys to react when held down. You can also set the speed for the cursor in a text field or application program.
3 Drag the slider arrow in the Repeat rate field to halfway on the slider.
4 In the Click here and hold down a key to test repeat rate, press the key.
How did you find the speed? Was it too slow for you?
5 Drag the slider arrow in the Repeat rate field to your preference.
6 Drag the slider arrow in the Cursor blink rate to two notches before the Fast end.
7 Click on Apply to set this speed.
8 Click the Hardware tab.
Use this to see if your keyboard is working properly. If not, click the Properties button to see the driver associated with this keyboard and then use the Change Settings button.
9 Click OK to leave the keyboard options.
10 Close the Control Panel window.
Changing the Volume If your system has a sound card and speakers hooked up, a (speaker) icon appears in the notification area. When you point at this icon, it displays a screen indicating where the volume level is currently set.
To display the volume window, click the icon.
To adjust the volume when playing sounds or to mute any sounds, click this icon and drag the slider up or down.
To change or set more options, click the sound icon and then click Mixer.
7300-1 v1.00 © 2009 CCI Learning Solutions Inc. 107

Unit 2: Using Microsoft W
indows Vista
L e s s o n 1 3 C u s t o m i z i n g t h e S y s t e m S e t t i n g s
You can also go to the Sound feature in the Hardware and Sound area of the Control Panel, select the speaker device you want to customize, and adjust the volume level or other options for your speakers.
Depending on the type of microphone, use the Recording tab to set up how to record sounds on your computer.
Also in the Sounds tab, you can apply sounds to certain Windows events.
108 7300-1 v1.00 © 2009 CCI Learning Solutions Inc.

Unit 2: Using Microsoft W
indows Vista
C u s t o m i z i n g t h e S y s t e m S e t t i n g s L e s s o n 1 3
ExerciseThe following exercise assumes that a sound device is installed on your system and you can hear the sounds. If not, simply review the following steps for what can be done with sound devices.
1 Click Start, Control Panel, Hardware and Sound, Sound.
2 Click the sound device in the list and then click Configure.
Depending on your speakers, you may be able to use this option to configure how and where the speakers sound. We will not go further here as this is a demonstration only.
3 Click Cancel.
4 Ensure the speaker type is still selected in the list and then click Properties.
5 Click each of the tabs to see what options are available for your speakers, how they were set up, and how they could be changed.
6 Click Cancel.
7 In the Sound window, click the Sounds tab.
8 Ensure Windows Default is selected in the Sound Scheme field.
9 In the Program events area, click Critical Stop to select it.
10 Click the Test button to hear the sound.
11 Click the icon in the taskbar and increase the volume level.
12 Click Test again to hear the sound.
13 Scroll down the list until you see Exit Windows and select it.
14 Click Test to hear the sound.
15 Click OK to exit the Sounds window.
16 Close the Control Panel window.
Accessibility SettingsIf you have devices installed on the computer to assist a person with physical disabilities, use the Ease of Access option to customize these devices.
Click the option in this window to customize the device to your requirements.
7300-1 v1.00 © 2009 CCI Learning Solutions Inc. 109
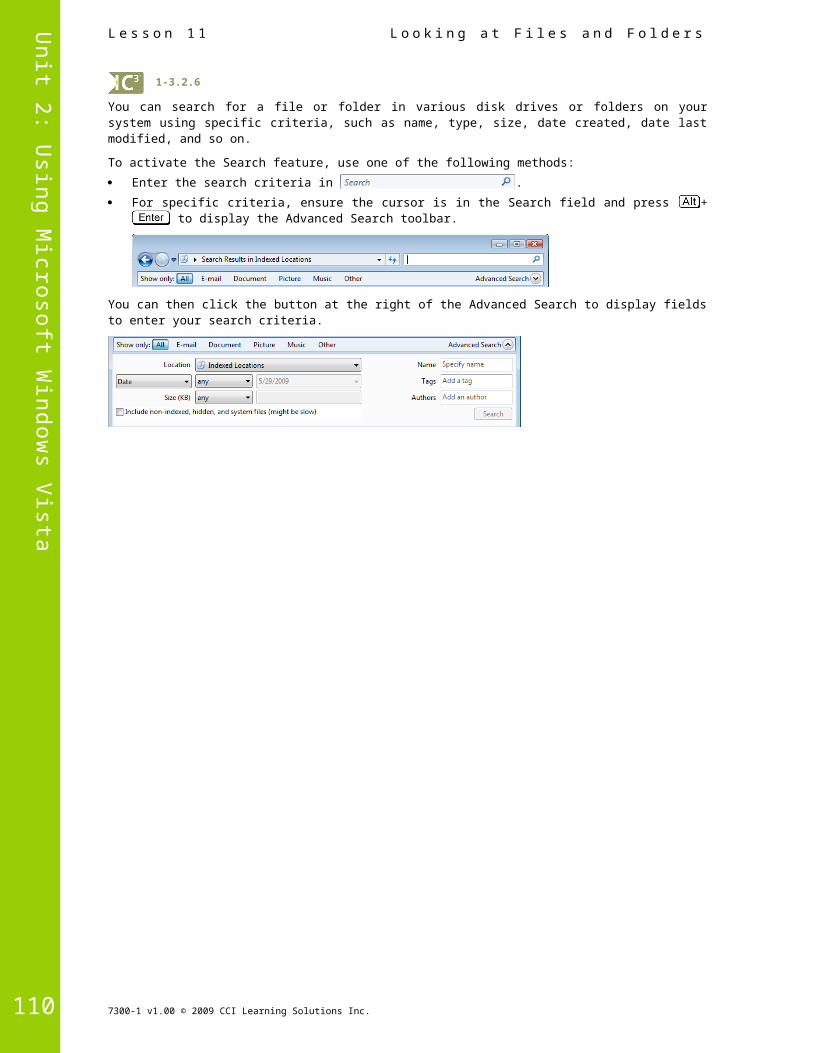
Unit 2: Using Microsoft W
indows Vista
L e s s o n 1 3 C u s t o m i z i n g t h e S y s t e m S e t t i n g s
Security SettingsWindows Vista includes a number of settings for security purposes, such as firewall protection, antispyware software, and program updates. You can make changes to each of these options as appropriate; if you are unsure about any of them, work with a technical specialist or record the settings before making any changes so that you can revert to the original settings if your changes don’t work.
To activate security options, click Start, Control Panel, Security, Security Center.
ExerciseThe following exercise is only a demonstration of what can be changed. You will not change the actual settings as these will vary from one computer to another.
1 Click Start, Control Panel, Security, and then Security Center.
2 Click the down arrow for Automatic updating.
3 Read the information shown here and then click the up arrow to close this box.
4 Click the down arrow for the Malware protection option.
5 View some of the other options to see how the security may be set up on your computer.
6 Close the Windows Security Center window.
7 Close the Control Panel window.
Looking at PrintersWhen you print a document, the software program or Windows sends the document to print in the background so you can continue to work on that document, other documents in the same program, or with different programs. Once a document has been sent to print, you can use the print queue to check the printing status of documents or to cancel a print request.
110 7300-1 v1.00 © 2009 CCI Learning Solutions Inc.

Unit 2: Using Microsoft W
indows Vista
C u s t o m i z i n g t h e S y s t e m S e t t i n g s L e s s o n 1 3
To view the printers available, click Start, Control Panel, and listed below the Hardware and Sound option, click Printers.
The printer with the check mark is the default printer; all documents print on this printer unless otherwise specified. To change this, use one of the following methods:
Select the printer and then on the toolbar, click , or
right-click it in the list and then click Set as Default Printer.
To see what may be printing or what is in the queue to be printed, use one of the following methods:
Select the printer and then on the toolbar, click , or
click the printer to view its status.
You can add a printer using , which prompts you with screens for each step required to add a new printer.
Each printer is slightly different, with some offering more options than others. The quality may also vary with each printer. To check the features of a printer, use one of the following methods:
Select the printer and then on the toolbar, click , or
right-click the selected printer and then click Printing Preferences, or
right-click the selected printer and then click Properties.
Exercise1 Click Start, Control Panel, and in the Hardware and Sound option, click Printer.
2 Right-click the printer set as your default printer and then click Properties.
3 Review the options available for your printer. When complete, close the dialog boxes.
SummaryIn this lesson, you looked at how to use the Control Panel to customize the appearance or behavior of different system options. You should now be familiar with:
what the Control Panel is changing or customizing the desktop display changing the date or time
changing or customizing mouse settings changing or customizing multimedia devices working with printers installed on your system
7300-1 v1.00 © 2009 CCI Learning Solutions Inc. 111

Unit 2: Using Microsoft W
indows Vista
L e s s o n 1 3 C u s t o m i z i n g t h e S y s t e m S e t t i n g s
Review Questions 1. How can you access the Control Panel?
a. From the Start menub. From a file management toolc. By pressing + d. Any of the abovee. Only a or b
2. If you cannot access certain commands in Control Panel, what is the most likely cause? a. You do not have access rights to these commands. b. You have selected the wrong command. c. Windows has restricted your access based on what you used last. d. Any of the above
3. The date and time on a computer is determined by the internal clock of the computer, which can be controlled by the network. a. True b. False
4. Reasons why you might want to change the options for the mouse include: a. You have a new mouse with customizable buttons. b. You need to change or update the mouse driver. c. You want to decrease the speed of the double-click action. d. Any of the abovee. a or b
5. To view which options are available for your printer, which option would you use?a. Printing Preferencesb. See what’s printingc. Propertiesd. Default Printere. Any of the abovef. a or c
112 7300-1 v1.00 © 2009 CCI Learning Solutions Inc.

Unit 2: Using Microsoft W
indows Vista
I n s t a l l i n g a n d U n i n s t a l l i n g P r o g r a m s L e s s o n 1 4
Lesson 14 Installing andUninstalling Programs
ObjectivesIn this lesson, you will look at how to manage application programs, and specifically how to install and uninstall programs. On completion, you will be familiar with:
how to install a new program what to do if the new program doesn’t work
how to uninstall a program
Skills
1-3.3.6 Install and uninstall software1-3.3.7 Identify and troubleshoot common problems associated with installing and running applications
Managing Application Programs1-3.3.6 1-3.3.7
Windows guides you through the process for installing and removing programs. Before you install a program, check your system to see if that program is already installed. If so, it may have been customized and, if you reinstall it, the customization may be lost.
If a program that you’re sure has been installed on your computer does not appear in the Start menu, it may be a result of the way it was installed previously or it may have been deleted from the Start menu. Use the Programs and Features command in the Programs category of the Control Panel to check if the program is on the list.
7300-1 v1.00 © 2009 CCI Learning Solutions Inc. 113
Unit 2: Using Microsoft W
indows Vista
L e s s o n 1 4 I n s t a l l i n g a n d U n i n s t a l l i n g P r o g r a m s
Installing a New ProgramYou can install programs from a number of different sources such as a hard drive, an optical drive, a USB drive, or the Internet. How you purchase the software will determine the installation process.
Some programs will automatically start the install when you insert the CD or DVD; this is the case if there is an Autorun file included with the installation program, which will lead you through a step-by-step installation process. Other programs may require you to start the installation process yourself.
Programs from the Internet fall into one of two categories: either you can download the program file for installation, or you can subscribe to a software as a service (SaaS) option with the software vendor. Either option entitles you to updates just as if you purchased the software on some physical type of media, such as a CD.
One consideration with software from any source is to make a backup or copy of the original. As the licensed owner of that software, you are allowed to make one copy for backup purposes. You may want to use the backup copy to install the software so that you can keep the original media intact and store it in a safe location. Software can be costly and it makes sense to protect your investment.
If you are downloading software from the Internet, always save it and scan it for viruses prior to installing it. It is rare that software from a reputable vendor will have problems; however, if you download software from a site that is not the vendor’s official Web site, there could be spyware or viruses included in the download file.
When the software vendor notifies you of updates to the program, these updates usually are not critical for you to install immediately; however, be sure to read the notice to decide whether you want to install the update. You might receive notices from the vendor in one of the following ways:
an e-mail with a link to the Web site where you can download the update to your system
a CD or other media that you can install much the same way as you installed the program initially.
a command, button, or link in the program that enables you to check for updates. (Usually this option links you to the vendor’s Web site; once activated, a check for updates begins and a list of update options is displayed, from which you can choose what you want to install.)
ExerciseThe program used here provides an example for installing and uninstalling a program. This is not an endorsement for any program but merely a demonstration of how software programs can be installed.
1 Navigate to the data files location and then click the RapidTyping_Setup_2.9 file.
2 Click Next.
Always read the full license so you are aware of your rights and what you can do with this program. With some application programs such as shareware, the software vendor will make the program available to you for use but also include items such as add-on toolbars, or advertisements as a way to pay for the time and effort in creating this program. You may see the choice to install these, or they may automatically be part of the installation. The intent here is that once you purchase a valid license of the program, the additional items will no longer appear.
3 Read the license agreement and then click I Agree.
Be sure to read what options come with the system during the installation as you may not want all these installed. For instance, if the only language you plan to use is English, you may not want to install all the different language files.
4 Click Next to accept the defaults here.
This Choose Install Location screen confirms where the program will be installed on your system. If an earlier version of the program already exists on your system and you want to keep it in addition to the new program, change the location shown here. You can also type in a new folder that the program will then create for you.
5 Click Next to accept the default shown here.
114 7300-1 v1.00 © 2009 CCI Learning Solutions Inc.

Unit 2: Using Microsoft W
indows Vista
I n s t a l l i n g a n d U n i n s t a l l i n g P r o g r a m s L e s s o n 1 4
The Choose Start Menu Folder screen provides the option to enter a new name for the program if you do not want the default provided. This is what will appear in the Start menu once the program has finished installing.
6 Click Install to begin the process.
7 Click View Homepage to deselect this and then click Finish.
You will now set up options for how this program will work on your system.
Notice how in keeping the Language Files option selected in step 5 you now see the different languages available with this program.
8 Select the language you want to use (we will use English in our example) and then click Next.
9 Enter your name as the person who will be using this program and then click Next.
You can then choose from the type of keyboard you have connected on your system.
10 Select the correct keyboard type for your system (we are using Type #1) and then click Next.
You can choose how much animation you want to appear as you work with this program.
11 Leave the default as is and then click Next.
With this program, you can now choose whether you are tested on words per minute or characters per minute.
12 Leave the default as shown and then click Finish.
The install is now complete and the program is ready for you to use.
13 Click Close to exit this program.
Now try installing a program from an online source. In this case, you will download and install a gadget to the Sidebar for Windows Vista.
14 Click Start and then click Internet.
15 In the Address Bar, type: http://vista.gallery.microsoft.com and press .
16 Click Windows Vista in the panel at the left.
17 Click Mail and IM in the panel at the left.
18 In the list, click Download for the Twitter Explorer option.
7300-1 v1.00 © 2009 CCI Learning Solutions Inc. 115
Hint: Twitter is an example of a blog program where you share information with others members. Blogging is discussed in more detail in the Living Online module.

Unit 2: Using Microsoft W
indows Vista
L e s s o n 1 4 I n s t a l l i n g a n d U n i n s t a l l i n g P r o g r a m s
19 Click Open.
20 Click Run to begin the installation process.
21 Close the Web browser and then click Install.
When the installation is complete, you should have an item similar to the following in the Windows Sidebar.
Why Isn’t the Program Working? Sometimes, a program may not work after installation, or problems may occur during installation. Following are some of the problems you may encounter and what to do about them:
If you are unable to install or download a program to your system, you may not have the appropriate rights with your user account. There might be an error message indicating this, or the program simply might not install. If this happens, contact your network administrator to have the rights changed or to request that the administrator install it for you.
If you do have the appropriate rights but the installation stops and an error message is displayed, there may be some kind of defect or damage to your copy of the program. Alternatively, it could be a result of lack of space on your hard drive, a missing file, or a conflict between software programs. Be sure to read the error message carefully to help with possible resolutions.
If you are using the backup copy and installation does not start at all, try to install from the original media. If that works, the backup copy is defective. If the installation does not start from the original media, contact the software vendor and request a replacement.
An installation can also fail when there are hardware conflicts. If this is the case, it’s likely that an error message would display indicating something is missing, such as a driver file, or that your computer cannot find the specified hardware.
Software conflicts are also a very common reason for an installation to fail. Not all software programs are compatible with one another, even if they are all designed for the Windows environment. Even when Vista gives you the option to install an older version of a program, this does not ensure that the older version will work properly, or at all, on the latest operating system.
If the installation was successful but you cannot access existing files in the new program check if the new program has some tools to allow you to convert files from an older format into the new program. If this is not a solution, check what format the files are in and if there is another format you can use for these files.
If the software installation was successful but you are having problems viewing different parts of the program, check the system requirements to ensure your computer has everything necessary for the new program to run properly.
116 7300-1 v1.00 © 2009 CCI Learning Solutions Inc.

Unit 2: Using Microsoft W
indows Vista
I n s t a l l i n g a n d U n i n s t a l l i n g P r o g r a m s L e s s o n 1 4
If the software installation was successful but another program that used to work no longer works, this may be a result of incompatibility or new system or driver files. A new software program may not be compatible with the your version of the other program, such as a custom contact management program no longer recognizes or accepts links from within that program to Word 2007. Occasionally software programs share system or driver files which may be overwritten when a new software program installs. As a result, programs that use the same file no longer work as they do not recognize the new system or driver file. Another example of incompatibility would be if a newer printer driver is installed on your system which works fine with the new programs, but the custom contact management program does not recognize this printer driver.
If you are not able to download the software from the vendor’s Web site, check that the site is not down for maintenance, or that the software or download key sent to you has not expired. When purchasing software as a service, the vendor may indicate that there is a time limit within which you must download the program; this is meant to protect the vendor from theft via multiple downloads. To resolve these types of issues, call the vendor’s technical support line or send them an e-mail clearly outlining the problem.
The aforementioned problems are typical of what you may encounter when installing software; however, there are so many different software vendors that you may face many different scenarios when installing software. No one solution will work for all situations.
Nevertheless, you can take the following steps before installation to reduce the chance that problems will occur:
Before purchasing and installing any program, check the system requirements for the program. Ensure you have more than the minimum requirements, including more than the minimum amount of free space on the hard disk specified by the software vendor.
Also check that the software you are using is compatible with your operating system. As an example, many older programs designed for previous versions of Windows do not work well with Windows Vista due to significant changes in the technology.
Close all programs before installing the new program. In some cases, you will see a message reminding you to do this before proceeding with an installation.
If the installation program completes but the program does not work correctly, uninstall the program using the correct uninstall procedure. Reboot the system to ensure the uninstall was successful, and then try the installation again.
Before attempting any changes to the system settings, check with technical support to make sure you should make these changes or to get their suggestions for other possible resolutions.
Uninstalling a Program Always uninstall a program from your system when you no longer require it, and always use the Uninstall a program command using the Windows Control Panel. Once you select the program to uninstall, you can then use the button in Windows or, alternatively, use the Uninstall option included with the software program to remove the program properly from your system.
Do not just delete program files using the Windows Explorer. When you install a program, configuration information is added to the Windows Registry so that the operating system will identify this program. If you delete program files improperly, the obsolete configuration information is left in the Registry. This can lead to problems with other software programs, if you re-install this program at a later date, or if you upgrade this program with a new version.
Exercise1 Click Start, Control Panel, and in the Programs options, click Uninstall a program.
2 Scroll in the list and select the RapidTyping program. Then on the Command bar, click .
7300-1 v1.00 © 2009 CCI Learning Solutions Inc. 117

Unit 2: Using Microsoft W
indows Vista
L e s s o n 1 4 I n s t a l l i n g a n d U n i n s t a l l i n g P r o g r a m s
3 Click Next.
4 Confirm the location where this program was installed (we used the default during the installation exercise; if you changed this at that time, you will need to confirm that location is displayed here before proceeding further) and click Uninstall.
5 Click Yes.
Your Web browser opens to the Rapid Typing Web site.
Some software vendors want to know why you no longer want to use their program when you uninstall it. This aids in their future marketing as well as research and development.
6 Close the Web browser without making any entries.
7 Click Finish.
Notice the program no longer appears in the Uninstall or Change a program window.
Now uninstall the Windows gadget for Twitter.
8 At the top of the Sidebar on your desktop, point at the following:
9 Click the +.
10 Right-click the Twitter icon.
118 7300-1 v1.00 © 2009 CCI Learning Solutions Inc.
Note: If you see a message regarding the User Account Control, click Continue to continue with the uninstall process.

Unit 2: Using Microsoft W
indows Vista
I n s t a l l i n g a n d U n i n s t a l l i n g P r o g r a m s L e s s o n 1 4
11 Click Uninstall.
12 Click Uninstall.
13 Close the Gadgets window to return to the desktop.
You should no longer see the Twitter gadget in the Sidebar.
14 Close any other open windows.
SummaryIn this lesson, you learned how to manage application programs, and specifically how to install and uninstall programs. You should now be familiar with:
how to install a new program what to do if the new program doesn’t work
how to uninstall a program
Review Questions 1. Before installing a program onto your computer, check to ensure the program is not already installed.
a. True b. False
2. If you are downloading a program from the Internet, what process should you take before installing the program?a. Check that the purchase of the software is complete.b. Save the file and run the installation from the Web site.c. Save the file and run a virus/spyware scan on the file.d. Any of the abovee. a or b
3. If the installation of the software fails, what could be the reason? a. The optical media is defective. b. You need more hard disk space than was suggested in the list of system requirements. c. There is a software conflict, perhaps between Windows and the new program. d. Any of the abovee. Only a or c
4. Before installing a new program, what steps should you take? a. Check the system requirements to make sure you have more than the minimum suggested. b. Close any programs currently open before starting the installation. c. Check the version of software to make sure it is the latest to match the Windows version installed. d. Any of the abovee. a or c
5. When you no longer use a program, you should remove it or uninstall it from the computer. a. True b. False
7300-1 v1.00 © 2009 CCI Learning Solutions Inc. 119