Embed Size (px)
Citation preview
Word 2007 Cheat SheetMicrosoft Word 2007's new interface is likely to confound veteran Word users. Here's everything you need to know to make the switch.
Making the switch to Word 2007 can be exceedingly disorienting -- like coming home and finding out that not only has all your furniture been rearranged, but the house itself has been moved to the next parish.
Despair not. We're here to help. We'll guide you through all the major changes in the interface, offer tips and tricks for getting the most out of Word 2007, and clue you in on how to use the best of the new features. When you're done, not only will you know where the new virtual furniture is, but you'll also know the way around your new neighborhood -- and you might very well find it a better place than your old one.
Get the Lay of the Land
When making the move to Word 2007, throw away everything you know about the interface. Just about everything has changed. Whether you're opening files, changing the document view or using the menu, you're about to enter a brave new world. Here's a quick guided tour to the Word 2007 interface:
The all-new Word 2007 interface.
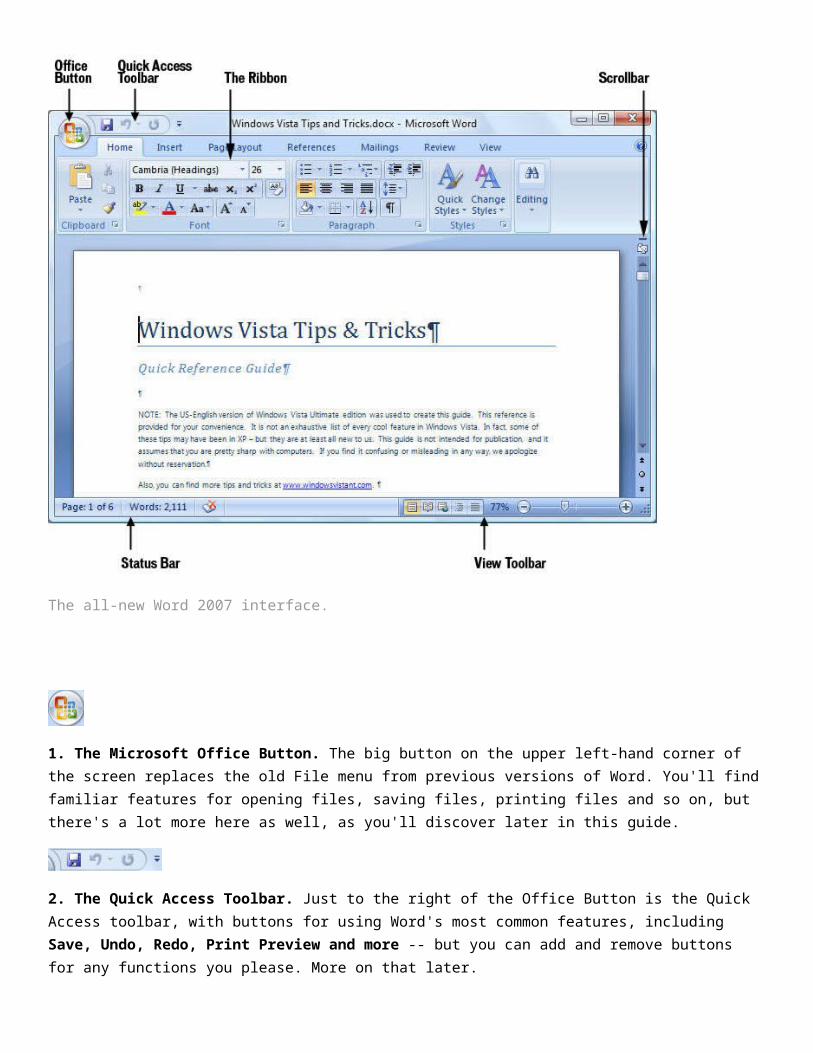
1. The Microsoft Office Button. The big button on the upper left-hand corner of the screen replaces the old File menu from previous versions of Word. You'll find familiar features for opening files, saving files, printing files and so on, but there's a lot more here as well, as you'll discover later in this guide.
2. The Quick Access Toolbar. Just to the right of the Office Button is the Quick Access toolbar, with buttons for using Word's most common features, including Save, Undo, Redo, Print Preview and more -- but you can add and remove buttons for any functions you please. More on that later.
3. The Ribbon. Love it or hate it, the Ribbon is the main way you'll work with Word. Instead of old-style menus, in which menus have submenus, submenus have sub-submenus and so on, the Ribbon groups buttons for common tasks together in tabs on a graphical interface. So, for example, when you click the Insert tab, a Ribbon appears with buttons for items that you can insert into a document, such as clip art, a hyperlink, a picture or a table. Even if you hate the Ribbon, it can be your friend; check out the section "Learn to Love the Ribbon" for details.
4. The Scrollbar. This is largely unchanged from previous versions of Word; use it to scroll up and down. There are a couple of minor changes -- at the top, there's a small button that looks like a minus sign that lets you split your screen in two, and just below that, there's a small icon that displays or hides a ruler when you click it.
5. The View Toolbar. The View toolbar, which used to be on the lower left-hand side of the screen in earlier versions of Word, moves over to the right in Word 2007. It lets you choose between print layout, full screen, Web layout, outline and draft views, just as it did in earlier Word versions. There's also a nice addition -- a slider that lets you zoom in or out on your document.
6. The Status Bar. This is in the same place as in earlier Word versions and has the same function -- to display information such as the number of pages in your document. It has one nice little extra: It displays the word count of your document as well. If you highlight an area of text, it will display the number of words in the highlighted area.
Learn to Love the Ribbon
At first, the Ribbon may be off-putting, but the truth is, once you learn to use it, you'll find that it's far easier to use than the old Word interface. It does take some getting used to, though.
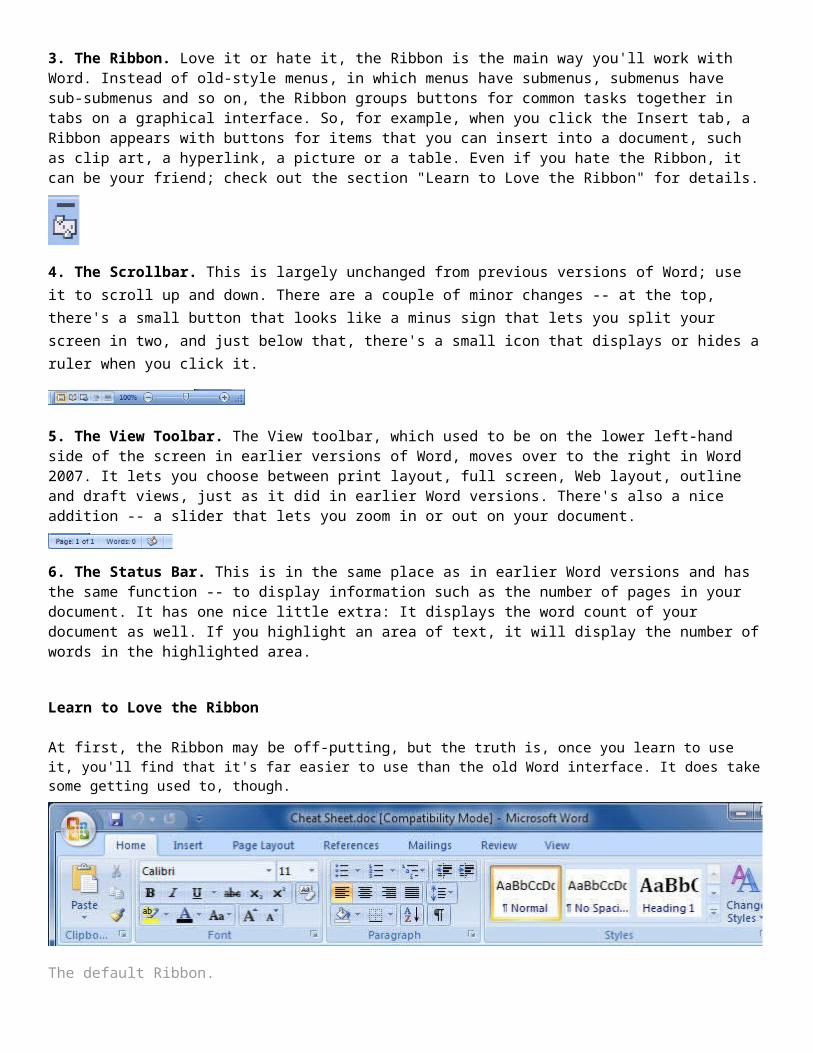
The default Ribbon.
The Ribbon, by default, is divided into seven tabs, with an optional eighth one (Developer) that you can display by clicking the Office Button and choosing Word Options > Popular > Show Developer tab in the Ribbon.
Here's a rundown of the tabs and what each one does:
Home: This contains the most-used Word features, such as changing fonts and font attributes, customizing paragraphs, using styles, and finding and replacing text.
Insert: As you might guess, this one handles anything you might want to insert into a document, such as tables, pictures, charts, hyperlinks, bookmarks, headers and footers, WordArt ... well, you get the idea.
Page Layout: Here's where you'll change margins, page size and orientation, set up columns, align objects, add effects and so on. There are some gray areas between this tab and the Home tab. For example, on the Page Layout tab you set paragraph spacing and indents, while on the Home tab you set paragraph alignment and can also set spacing between lines.
References: This tab handles tables of contents, footnotes, bibliographies, indexes and similar material. It also lets you insert a "Table of Authorities," which sounds like something straight out of a Soviet bureaucracy but in fact is a list of references in a legal document.
Mailings: As the name says, this is where you'll go for anything to do with mailings, from something as simple as creating labels to the more daunting task of mail merges.
Review: Need to check spelling and grammar, look up a word in a thesaurus, work in markup mode, review other people's markups or compare documents? This is the tab for you.
View: Here's where to go when you want to change the view in any way, including displaying a ruler and gridlines, zooming in and out, splitting a window and so on.
Developer: If you write code or create forms and applications for Word, this is your tab. It also includes macro handling, so power users might also want to visit here every once in a while.
Each tab along the Ribbon is organized to make it easy to get your work done. As you can see below, each tab is organized into a series of groups that contain related commands for getting something done -- in our example, handling fonts. Inside each group is a set of what Microsoft calls command buttons, which carry out commands, display menus and so on -- in the example, the featured command button changes the font size. There's also a small diagonal arrow in the bottom right corner of some groups that Microsoft calls a dialog box launcher. Click it to display more options related to the group.
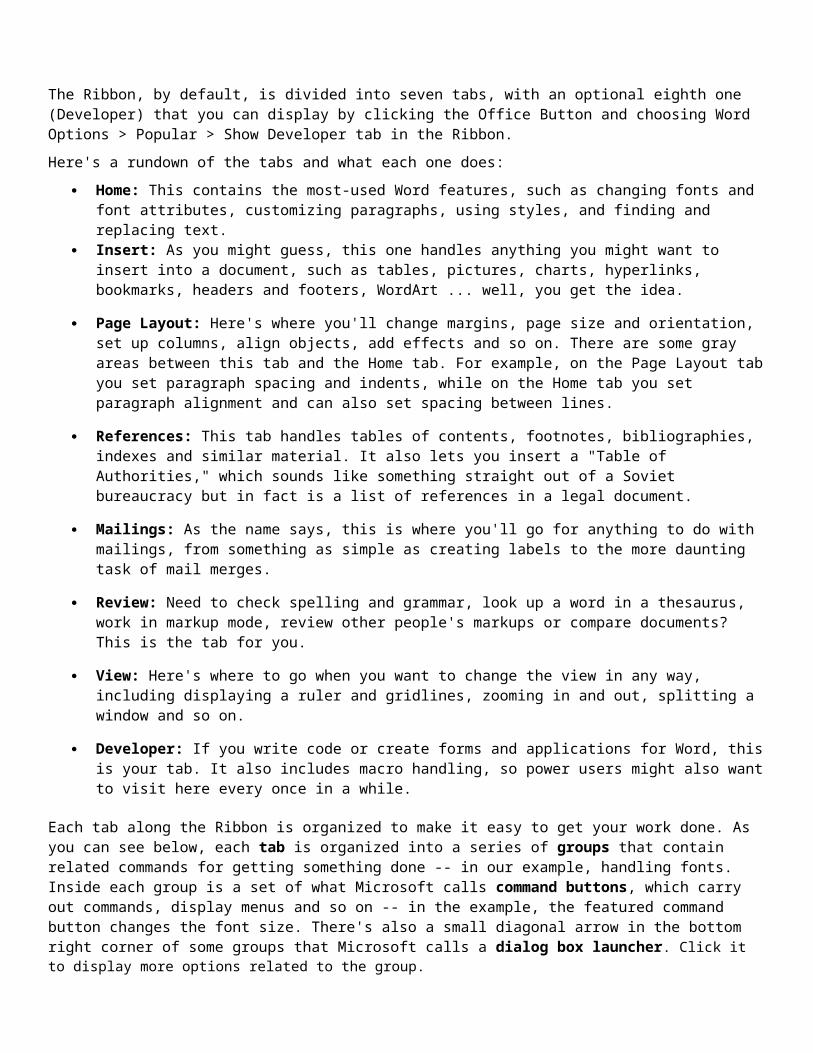
Ribbon organization.
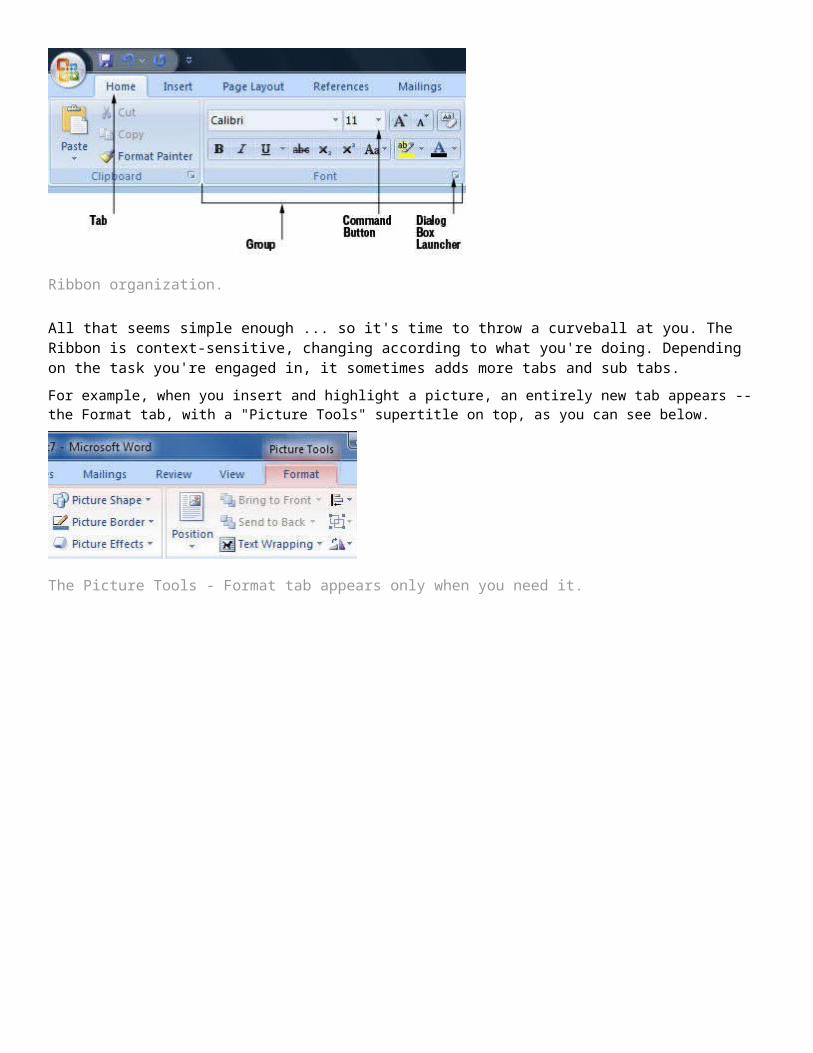
All that seems simple enough ... so it's time to throw a curveball at you. The Ribbon is context-sensitive, changing according to what you're doing. Depending on the task you're engaged in, it sometimes adds more tabs and sub tabs.
For example, when you insert and highlight a picture, an entirely new tab appears -- the Format tab, with a "Picture Tools" supertitle on top, as you can see below.
The Picture Tools - Format tab appears only when you need it.
Other "now you see them, now you don't" tabs include Blog Post, Chart Tools, Table Tools and SmartArt Tools -- all of which appear in response to various actions you take in Word.
The Office Button and Quick Access Toolbar: You’re New Best Friends
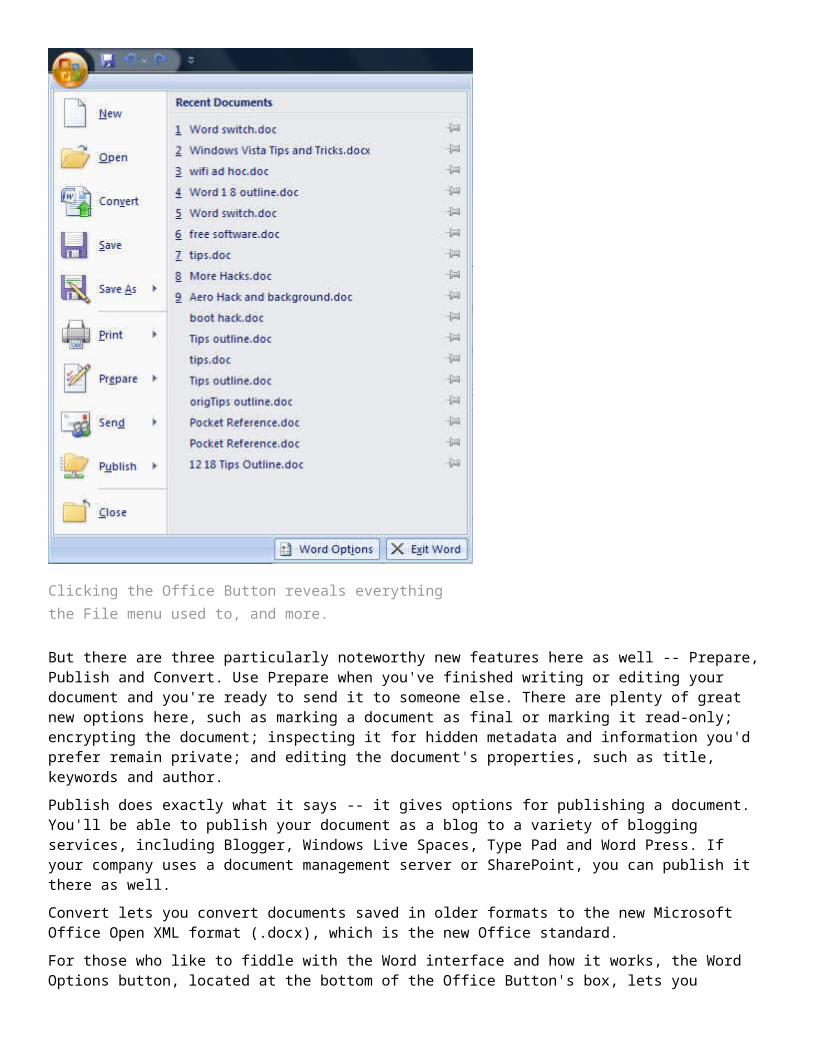
There are two more new Word tools that you'll want to get to know -- the Office Button and the Quick Access toolbar. Think of the Office Button as a greatly expanded File menu from the Word 2003 days -- the File menu on steroids. As you can see in the nearby figure, it's where to go for the various Open, Save, New, Print and related options and also includes a list of all your recently opened files.

Clicking the Office Button reveals everything the File menu used to, and more.
But there are three particularly noteworthy new features here as well -- Prepare, Publish and Convert. Use Prepare when you've finished writing or editing your document and you're ready to send it to someone else. There are plenty of great new options here, such as marking a document as final or marking it read-only; encrypting the document; inspecting it for hidden metadata and information you'd prefer remain private; and editing the document's properties, such as title, keywords and author.
Publish does exactly what it says -- it gives options for publishing a document. You'll be able to publish your document as a blog to a variety of blogging services, including Blogger, Windows Live Spaces, Type Pad and Word Press. If your company uses a document management server or SharePoint, you can publish it there as well.
Convert lets you convert documents saved in older formats to the new Microsoft Office Open XML format (.docx), which is the new Office standard.
For those who like to fiddle with the Word interface and how it works, the Word Options button, located at the bottom of the Office Button's box, lets you customize Word in many ways, including its display and editing options. It has many of the features that you accessed via Tools > Options in previous versions of Word. One thing you won't find, however, is the plethora of customizable toolbars that were in previous versions. There's just one customizable toolbar in Word 2007, but you'll love it.
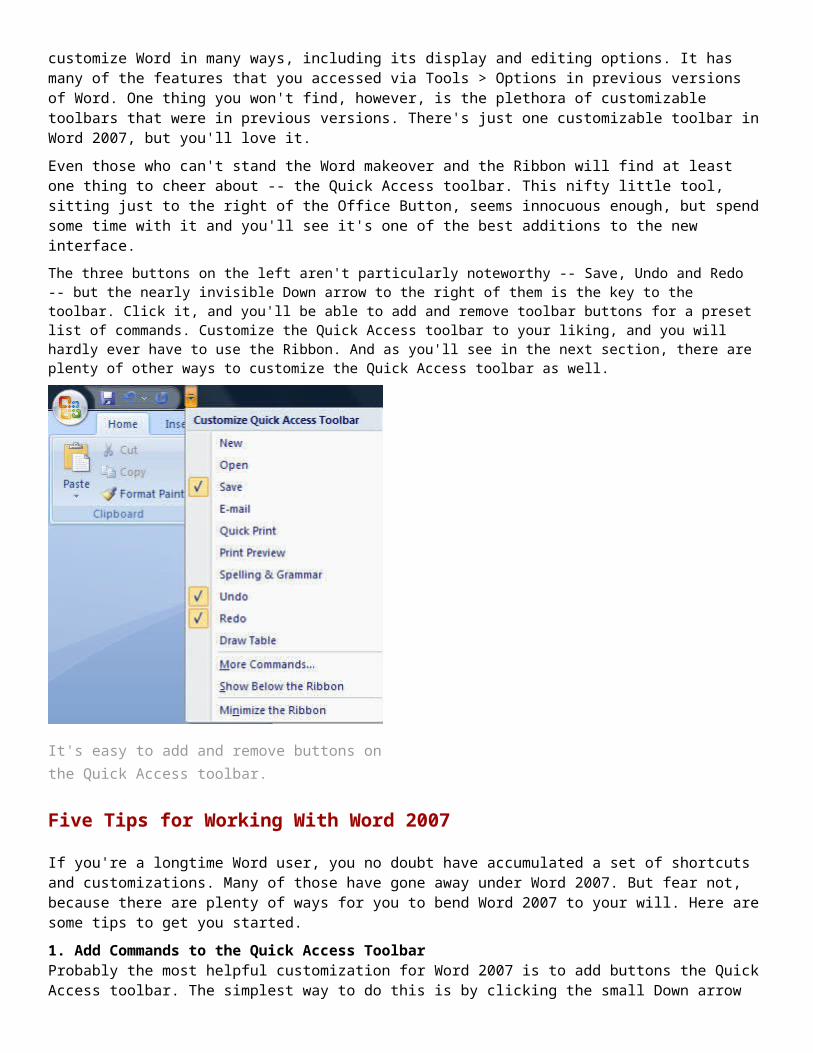
Even those who can't stand the Word makeover and the Ribbon will find at least one thing to cheer about -- the Quick Access toolbar. This nifty little tool, sitting just to the right of the Office Button, seems innocuous enough, but spend some time with it and you'll see it's one of the best additions to the new interface.
The three buttons on the left aren't particularly noteworthy -- Save, Undo and Redo -- but the nearly invisible Down arrow to the right of them is the key to the toolbar. Click it, and you'll be able to add and remove toolbar buttons for a preset list of commands. Customize the Quick Access toolbar to your liking, and you will hardly ever have to use the Ribbon. And as you'll see in the next section, there are plenty of other ways to customize the Quick Access toolbar as well.
It's easy to add and remove buttons on the Quick Access toolbar.
Five Tips for Working With Word 2007
If you're a longtime Word user, you no doubt have accumulated a set of shortcuts and customizations. Many of those have gone away under Word 2007. But fear not, because there are plenty of ways for you to bend Word 2007 to your will. Here are some tips to get you started.
1. Add Commands to the Quick Access ToolbarProbably the most helpful customization for Word 2007 is to add buttons the Quick Access toolbar. The simplest way to do this is by clicking the small Down arrow to the right of the Quick Access toolbar and selecting a new button to add. But this is quite limited, because there are only a small number of commands you can add in this way.
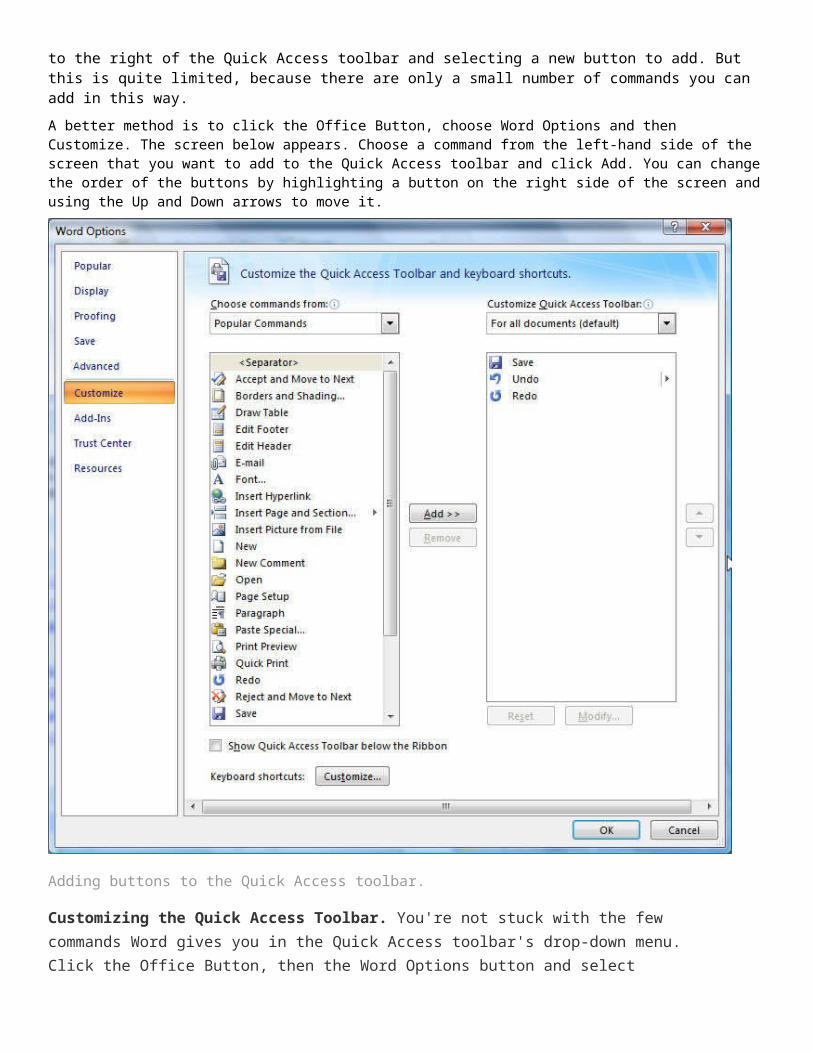
A better method is to click the Office Button, choose Word Options and then Customize. The screen below appears. Choose a command from the left-hand side of the screen that you want to add to the Quick Access toolbar and click Add. You can change the order of the buttons by highlighting a button on the right side of the screen and using the Up and Down arrows to move it.
Adding buttons to the Quick Access toolbar.
Customizing the Quick Access Toolbar. You're not stuck with the few commands Word gives you in the Quick Access toolbar's drop-down menu. Click the Office Button, then the Word Options button and select Customize; you'll be presented with all the options you see here.
The list of commands you see on the left may seem somewhat limited at first. That's because Word is showing you only the most popular commands. There are plenty of others you can add. Click the drop-down menu under "Choose commands from" at the top of the screen, and you'll see other lists of commands -- All Commands, Home Tab and so on. Select any option, and there will be plenty of commands you can add.
Finally, there's an even easier way to add a command. Right-click any object on the Ribbon and choose "Add to Quick Access Toolbar." You can add not only individual commands in this way, but also entire groups -- for example, the Font group.
2. Use Keyboard ShortcutsIf you're a fan of Word 2003's keyboard shortcuts, take heart -- the same ones work in 2007. So keep using
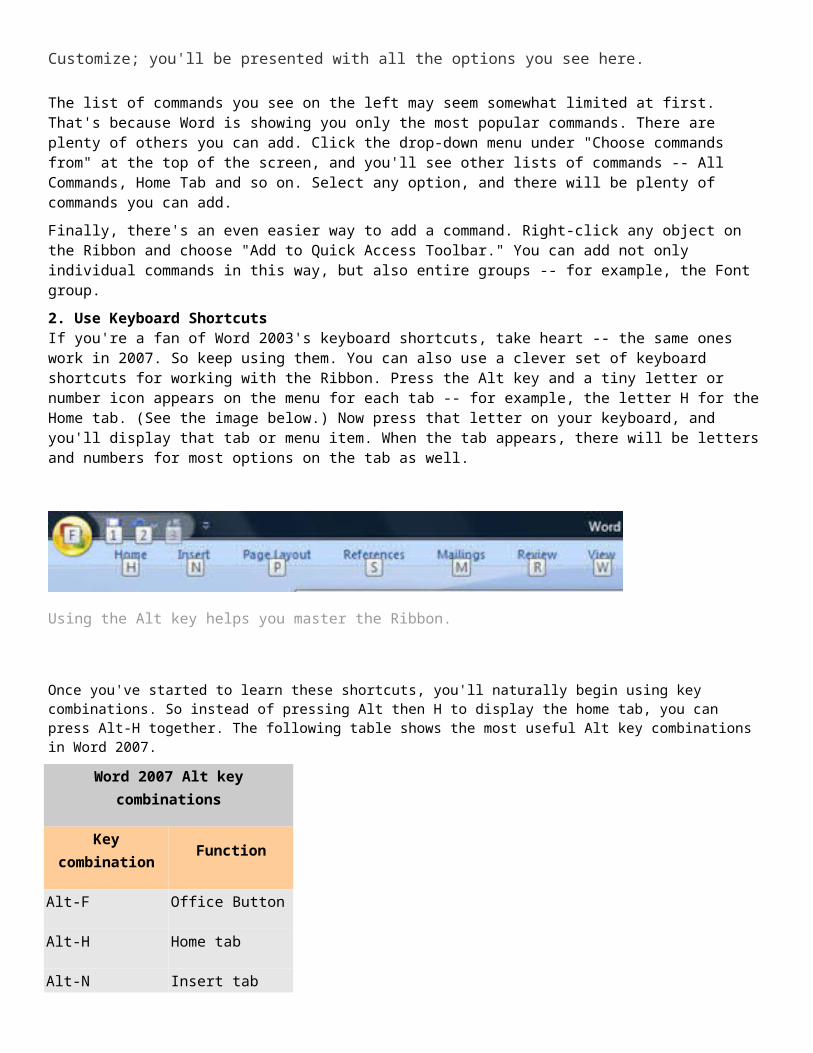
them. You can also use a clever set of keyboard shortcuts for working with the Ribbon. Press the Alt key and a tiny letter or number icon appears on the menu for each tab -- for example, the letter H for the Home tab. (See the image below.) Now press that letter on your keyboard, and you'll display that tab or menu item. When the tab appears, there will be letters and numbers for most options on the tab as well.
Using the Alt key helps you master the Ribbon.
Once you've started to learn these shortcuts, you'll naturally begin using key combinations. So instead of pressing Alt then H to display the home tab, you can press Alt-H together. The following table shows the most useful Alt key combinations in Word 2007.
Word 2007 Alt key combinations
Key combination Function
Alt-F Office Button
Alt-H Home tab
Alt-N Insert tab
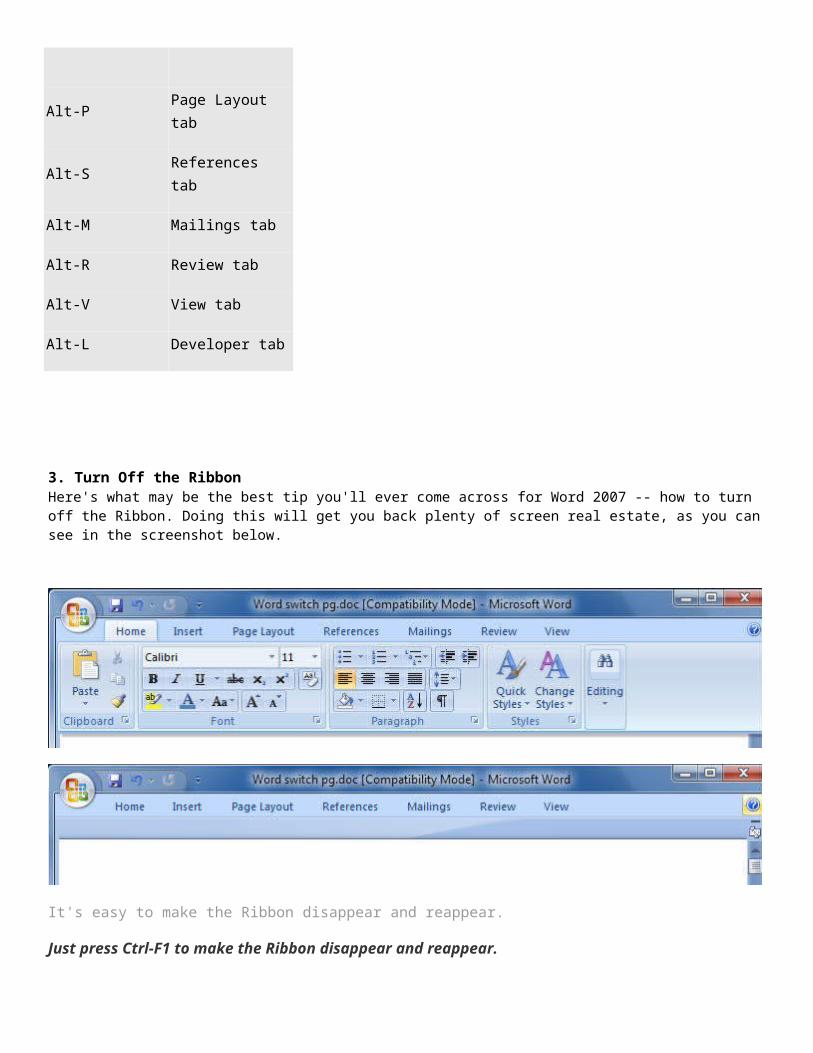
Alt-P Page Layout tab
Alt-S References tab
Alt-M Mailings tab
Alt-R Review tab
Alt-V View tab
Alt-L Developer tab
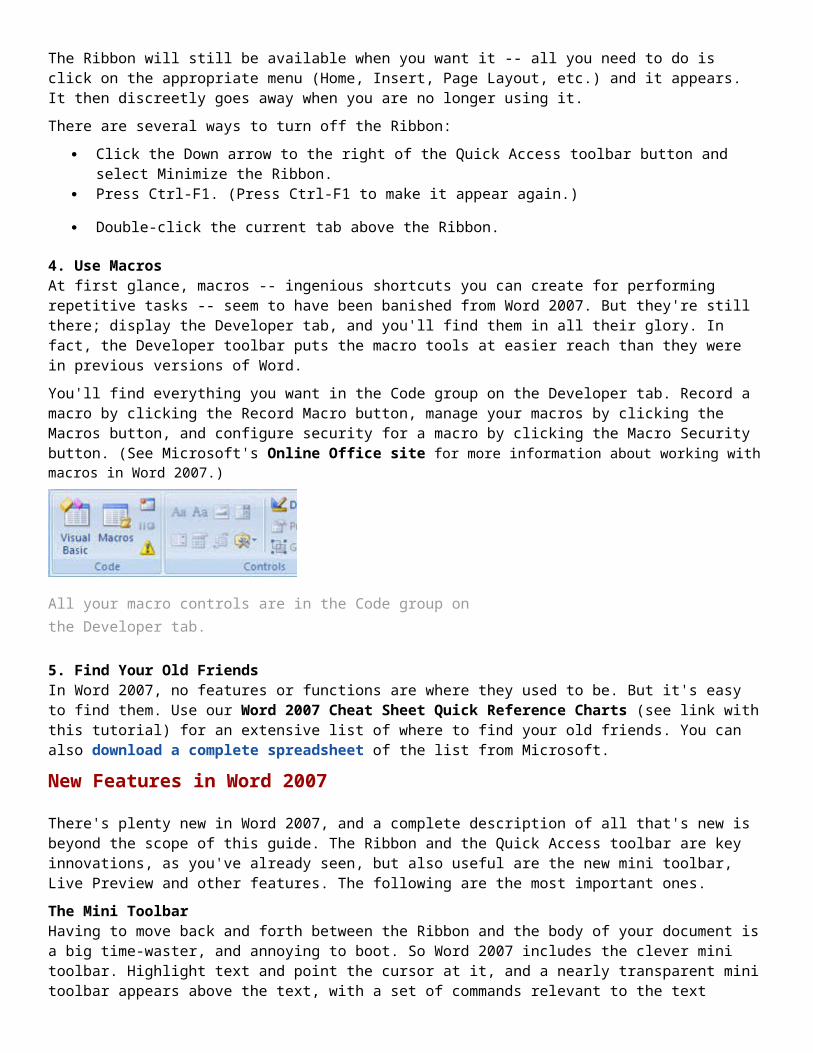
3. Turn Off the RibbonHere's what may be the best tip you'll ever come across for Word 2007 -- how to turn off the Ribbon. Doing this will get you back plenty of screen real estate, as you can see in the screenshot below.
It's easy to make the Ribbon disappear and reappear.
Just press Ctrl-F1 to make the Ribbon disappear and reappear.
The Ribbon will still be available when you want it -- all you need to do is click on the appropriate menu (Home, Insert, Page Layout, etc.) and it appears. It then discreetly goes away when you are no longer using it.
There are several ways to turn off the Ribbon:
Click the Down arrow to the right of the Quick Access toolbar button and select Minimize the Ribbon. Press Ctrl-F1. (Press Ctrl-F1 to make it appear again.)
Double-click the current tab above the Ribbon.
4. Use MacrosAt first glance, macros -- ingenious shortcuts you can create for performing repetitive tasks -- seem to have been banished from Word 2007. But they're still there; display the Developer tab, and you'll find them in all their glory. In fact, the Developer toolbar puts the macro tools at easier reach than they were in previous versions of Word.
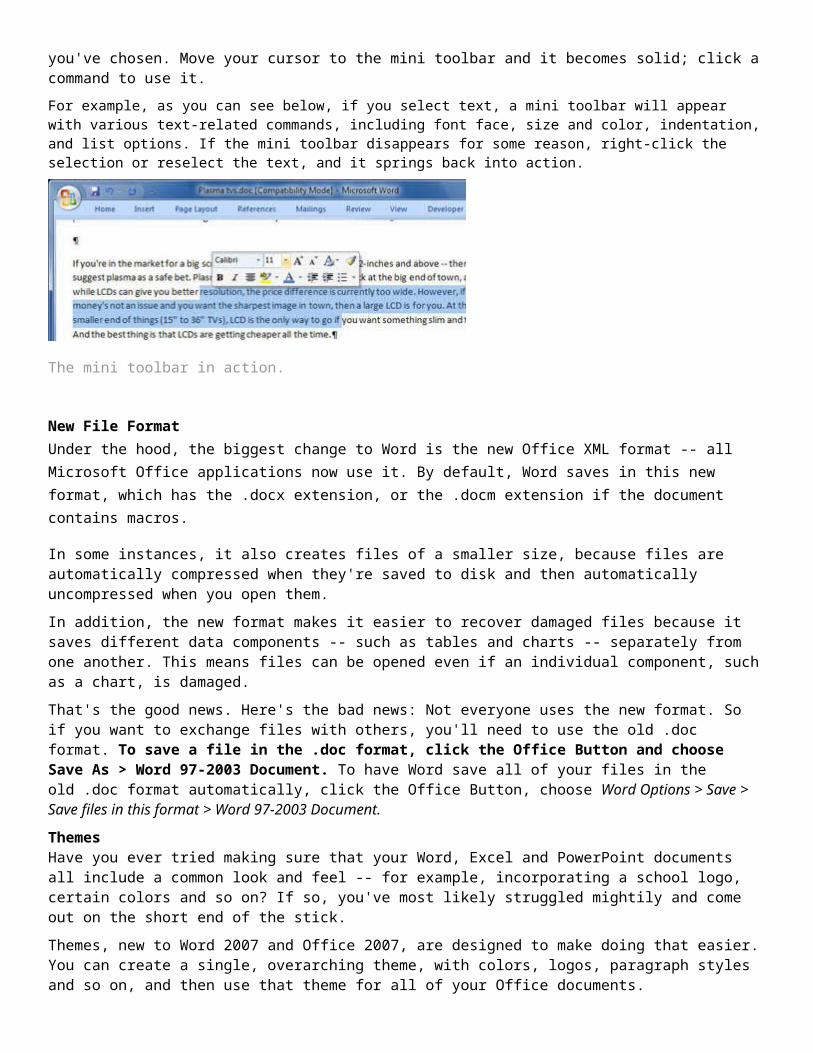
You'll find everything you want in the Code group on the Developer tab. Record a macro by clicking the Record Macro button, manage your macros by clicking the Macros button, and configure security for a macro by clicking the Macro Security button. (See Microsoft's Online Office site for more information about working with macros in Word 2007.)
All your macro controls are in the Code group on the Developer tab.
5. Find Your Old FriendsIn Word 2007, no features or functions are where they used to be. But it's easy to find them. Use our Word
2007 Cheat Sheet Quick Reference Charts (see link with this tutorial) for an extensive list of where to find your old friends. You can also download a complete spreadsheet of the list from Microsoft.
New Features in Word 2007
There's plenty new in Word 2007, and a complete description of all that's new is beyond the scope of this guide. The Ribbon and the Quick Access toolbar are key innovations, as you've already seen, but also useful are the new mini toolbar, Live Preview and other features. The following are the most important ones.
The Mini ToolbarHaving to move back and forth between the Ribbon and the body of your document is a big time-waster, and annoying to boot. So Word 2007 includes the clever mini toolbar. Highlight text and point the cursor at it, and a nearly transparent mini toolbar appears above the text, with a set of commands relevant to the text you've chosen. Move your cursor to the mini toolbar and it becomes solid; click a command to use it.
For example, as you can see below, if you select text, a mini toolbar will appear with various text-related commands, including font face, size and color, indentation, and list options. If the mini toolbar disappears for some reason, right-click the selection or reselect the text, and it springs back into action.
The mini toolbar in action.
New File FormatUnder the hood, the biggest change to Word is the new Office XML format -- all Microsoft Office applications now use it. By default, Word saves in this new format, which has the .docx extension, or the .docm extension if the document contains macros.
In some instances, it also creates files of a smaller size, because files are automatically compressed when they're saved to disk and then automatically uncompressed when you open them.
In addition, the new format makes it easier to recover damaged files because it saves different data components -- such as tables and charts -- separately from one another. This means files can be opened even if an individual component, such as a chart, is damaged.
That's the good news. Here's the bad news: Not everyone uses the new format. So if you want to exchange files with others, you'll need to use the old .doc format. To save a file in the .doc format, click the Office Button and choose Save As > Word 97-2003 Document. To have Word save all of your files in the old .doc format automatically, click the Office Button, choose Word Options > Save > Save files in this format > Word 97-2003 Document.
ThemesHave you ever tried making sure that your Word, Excel and PowerPoint documents all include a common look and feel -- for example, incorporating a school logo, certain colors and so on? If so, you've most likely struggled mightily and come out on the short end of the stick.
Themes, new to Word 2007 and Office 2007, are designed to make doing that easier. You can create a single, overarching theme, with colors, logos, paragraph styles and so on, and then use that theme for all of your Office documents.
Themes may sound suspiciously like templates, but they're somewhat different. You can have multiple templates that use the same theme. So, for example, you could create a theme that includes your school logo, colors and font choice. You could then have one template in that style for letters, another for budget proposals and many others for different purposes.
To use Themes, select the Page Layout tab and click the Themes button to choose a new theme. You can also customize any theme and create new ones.
You'll find Themes on the Page Layout tab.
One important caveat: Be aware that themes only work if you're using Word's new Office XML format; they won't work on old-style .doc files.
Quick PartsIf you need to create sophisticated documents that include complex headers and footers, objects such as decorative text callouts, and fields for dates, file names, bar codes and the like, you'll appreciate the new Quick Parts feature. To insert just about any object, field or style, click the Insert tab, then click Quick Parts and choose what you want to insert.
Choose "Document Property" for objects that relate to the entire document, such as Author, Company and Keywords. Choose Field to insert a field such as the number of words or the page number, and choose Building Blocks Organizer to see every single Quick Part available.
Live PreviewIf you often change formatting in your documents and text, you'll welcome the new Live Preview feature. Highlight the text or area of a document you want to change. Then, on the Ribbon, move your cursor over the format you want to apply. The text you highlighted will change so that you can see how it will look with the new formatting. Move the cursor away to revert to the original formatting, or move it over a different format to preview different formatting. When you find formatting you want to apply, click it.
Get a preview of style changes with Live
For example, if you are considering changing the font size of 10-point text, highlight the text. On the Home tab of the Ribbon, click the font size drop-down menu and hover your mouse over the text size you're considering changing the text to. You'll see the text in the new size. You can choose that text size by clicking it, preview other sizes or leave the text as is.