Embed Size (px)
Citation preview
C:\Program Files\Adobe\FrameMaker8\UniData 7.2\7.2rebranded\webservices\Front.fmMarch 11, 2010 10:46 am
Beta Beta Beta Beta Beta Beta Beta Beta Beta Beta Beta Beta Beta Beta Beta Beta
Web Services Developer
UDT-720-WSD-1
ii Web Services De
C:\Program Files\Adobe\FrameMaker8\UniData 7.2\7.2rebranded\webservices\Front.fmMarch 11, 2010 10:46 am
Beta Beta Beta Beta Beta Beta Beta Beta Beta Beta Beta Beta Beta
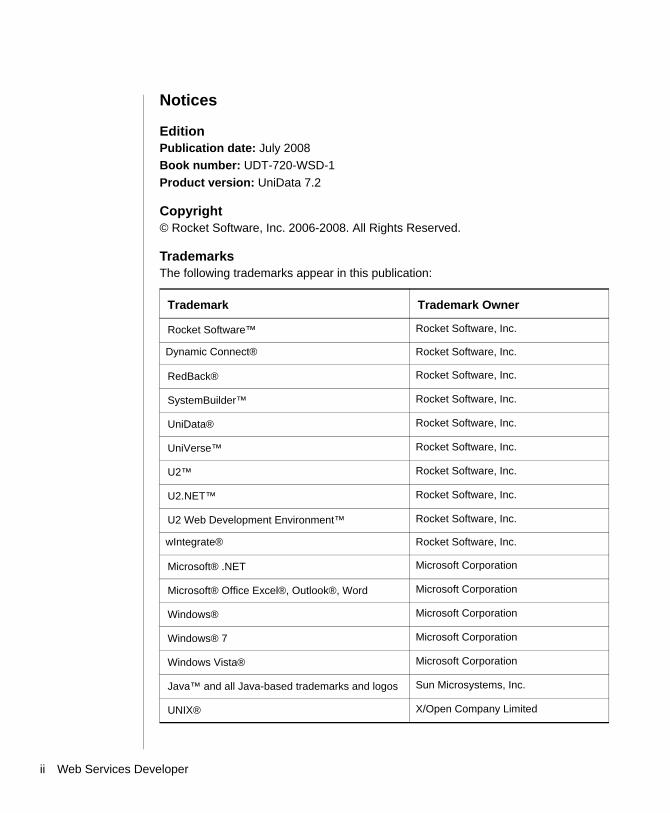
Notices
EditionPublication date: July 2008Book number: UDT-720-WSD-1Product version: UniData 7.2
Copyright© Rocket Software, Inc. 2006-2008. All Rights Reserved.
TrademarksThe following trademarks appear in this publication:
Trademark Trademark Owner
Rocket Software™ Rocket Software, Inc.
Dynamic Connect® Rocket Software, Inc.
RedBack® Rocket Software, Inc.
SystemBuilder™ Rocket Software, Inc.
UniData® Rocket Software, Inc.
UniVerse™ Rocket Software, Inc.
U2™ Rocket Software, Inc.
U2.NET™ Rocket Software, Inc.
U2 Web Development Environment™ Rocket Software, Inc.
wIntegrate® Rocket Software, Inc.
Microsoft® .NET Microsoft Corporation
Microsoft® Office Excel®, Outlook®, Word Microsoft Corporation
Windows® Microsoft Corporation
Windows® 7 Microsoft Corporation
Windows Vista® Microsoft Corporation
Java™ and all Java-based trademarks and logos Sun Microsystems, Inc.
UNIX® X/Open Company Limited
veloper
The above trademarks are property of the specified companies in the United States, other countries, or both. All other products or services mentioned in this document may be covered by the trademarks, service marks, or product names as designated by the companies who own or market them.
License agreementThis software and the associated documentation are proprietary and confidential to Rocket Software, Inc., are furnished under license, and may be used and copied only in accordance with the terms of such license and with the inclusion of the copyright notice. This software and any copies thereof may not be provided or otherwise made available to any other person. No title to or ownership of the software and associated documentation is hereby transferred. Any unauthorized use or reproduction of this software or documentation may be subject to civil or criminal liability. The information in the software and documentation is subject to change and should not be construed as a commitment by Rocket Software, Inc.
Restricted rights notice for license to the U.S. Government: Use, reproduction, or disclosure is subject to restrictions as stated in the “Rights in Technical Data-General” clause (alternate III), in FAR section 52.222-14. All title and ownership in this computer software remain with Rocket Software, Inc.
NoteThis product may contain encryption technology. Many countries prohibit or restrict the use, import, or export of encryption technologies, and current use, import, and export regulations should be followed when exporting this product.
Please be aware: Any images or indications reflecting ownership or branding of the product(s) documented herein may or may not reflect the current legal ownership of the intellectual property rights associated with such product(s). All right and title to the product(s) documented herein belong solely to Rocket Software, Inc. and its subsidiaries, notwithstanding any notices (including screen captures) or any other indications to the contrary.
Contact informationRocket Software275 Grove Street Suite 3-410Newton, MA 02466-2272 USA Tel: (617) 614-4321 Fax: (617) 630-7100Web Site: www.rocketsoftware.com
Web Services Developer iii
Table of Contents
:\ProgMarch
Table of Contents
Beta Beta Beta Beta Beta Beta Beta Beta Beta Beta Beta Beta Beta Beta Beta Beta
PrefaceOrganization of This Manual . . . . . . . . . . . . . . . iiDocumentation Conventions. . . . . . . . . . . . . . . . iii
Chapter 1 Installing U2 Web Services Development Tool Installation Process . . . . . . . . . . . . . . . . . . 1-3
Chapter 2 Adding and Connecting to Servers Add a UniData or UniVerse Server. . . . . . . . . . . . . . 2-3
Connect to the UniData or UniVerse Database . . . . . . . . 2-5Create SOAP Server . . . . . . . . . . . . . . . . . . 2-8
Define SSL Settings. . . . . . . . . . . . . . . . . 2-13Set Connection Properties . . . . . . . . . . . . . . . 2-14
Chapter 3 Creating a Query Web Service Creating a Query Web Service Using a Drag-and-Drop Operation . . . . 3-3
Adding an Input Parameter . . . . . . . . . . . . . . 3-6Creating a Query Web Service Using the Wizard . . . . . . . . . 3-9Executing the Web Service . . . . . . . . . . . . . . . . 3-19
Chapter 4 Creating a Subroutine Web Service Creating a Subroutine Web Service Using a Drag-and-Drop Operation . . 4-3
Define Subroutine Parameters . . . . . . . . . . . . . 4-7Creating a Subroutine Web Service Using the Wizard . . . . . . . . 4-14Executing the Web Service . . . . . . . . . . . . . . . . 4-28
Chapter 5 Miscellaneous Features Displaying Properties . . . . . . . . . . . . . . . . . . 5-3
Displaying Server Properties . . . . . . . . . . . . . . 5-3Displaying Account Properties . . . . . . . . . . . . . 5-4
ram Files\Adobe\FrameMaker8\UniData 7.2\7.2rebranded\webservices\webservicesTOC.doc (bookTOC.template)10 2010 3:45 pm
Displaying File Properties . . . . . . . . . . . . . . . 5-4Displaying File Dictionaries . . . . . . . . . . . . . . . . 5-6Displaying SOAP Server Logs . . . . . . . . . . . . . . . 5-7Displaying Cached Services . . . . . . . . . . . . . . . . 5-8
Chapter 6 Accessing the Web Services Programatically Viewing the Web Service URL . . . . . . . . . . . . . 6-2View the WSDL File . . . . . . . . . . . . . . . . 6-3
Programming a Web Services Client . . . . . . . . . . . . . 6-4Generating a Client Proxy in IBM Websphere Application Developer . 6-4Generating a Client Proxy in Visual Studio.Net . . . . . . . . 6-4
Chapter 7 Deploying Web ServicesExporting Web Services . . . . . . . . . . . . . . . 7-2Deploying the SOAP Server . . . . . . . . . . . . . . 7-4Define Security between the Client and the SOAP Server . . . . . 7-8Set Connection Properties . . . . . . . . . . . . . . . 7-10Define UniData Database Connection Security . . . . . . . . 7-12
Running and Stopping the SOAP Server . . . . . . . . . . . . 7-15Monitoring a Remote SOAP Server . . . . . . . . . . . . . 7-16
Table of Contents v
C:\Program Files\Adobe\FrameMaker8\UniData 7.2\7.2rebranded\webservices\Preface3/10/10
PrefaceIBM U2 Web Services Developer is designed for customers to provide a simple and easy environment to publish their UniData database resource as web services, with minimum knowledge of XML, SOAP, WSDL, and so forth.
The IBM U2 Web Services Developer Tool allows you to select different database resources, and publish them as web services, such as subroutines and query commands. You can also configure and monitor the U2 Web Service Server.
i IBM U2 Web Services Developer
C:\Program Files\Adobe\FrameMaker8\UniData
Organization of This ManualThis manual contains the following:
Chapter 1, “Installing U2 Web Services Development Tool,” describes the step-by-step instructions to install U2 Web Services Development.
Chapter 2, “Adding and Connecting to Servers,” describes how to create UniData and SOAP servers, and how to connect to those servers.
Chapter 3, “Creating a Query Web Service,” describes how to create a web service using UniQuery or UniData SQL .
Chapter 4, “Creating a Subroutine Web Service,” describes how to create a web service using a UniBasic subroutine.
Chapter 5, “Miscellaneous Features,” describes miscellanous features of the IBM U2 Web Services Developer.
Chapter 6, “Accessing the Web Services Programatically,” describes how to access Web Services programatically.
Chapter 7, “Deploying Web Services,” describes how to select a SOAP server defined locally and generate a deployment package.
ii
C:\Program Files\Adobe\FrameMaker8\UniData 7.2\7.2rebranded\webservices\Preface3/10/10
Documentation ConventionsThis manual uses the following conventions:
Convention Usage
Bold In syntax, bold indicates commands, function names, and options. In text, bold indicates keys to press, function names, menu selections, and MS-DOS commands.
UPPERCASE In syntax, uppercase indicates UniData commands, keywords, and options; UniBasic statements and functions; and SQL statements and keywords. In text, uppercase also indicates UniVerse identifiers such as file names, account names, schema names, and Windows file names and paths.
Italic In syntax, italic indicates information that you supply. In text, italic also indicates UNIX commands and options, file names, and paths.
Courier Courier indicates examples of source code and system output.
Courier Bold In examples, courier bold indicates characters that the user types or keys the user presses (for example, <Return>).
[ ] Brackets enclose optional items. Do not type the brackets unless indicated.
{ } Braces enclose nonoptional items from which you must select at least one. Do not type the braces.
itemA | itemB A vertical bar separating items indicates that you can choose only one item. Do not type the vertical bar.
... Three periods indicate that more of the same type of item can optionally follow.
? A right arrow between menu options indicates you should choose each option in sequence. For example, “Choose File -> Exit” means you should choose File from the menu bar, then choose Exit from the File menu.
I Item mark. For example, the item mark ( I ) in the following string delimits elements 1 and 2, and elements 3 and 4: 1I2F3I4V5
Documentation Conventions
iii IBM U2 Web Services Developer
C:\Program Files\Adobe\FrameMaker8\UniData
The following conventions are also used:
Syntax definitions and examples are indented for ease in reading.All punctuation marks included in the syntax—for example, commas, parentheses, or quotation marks—are required unless otherwise indicated.Syntax lines that do not fit on one line in this manual are continued on subsequent lines. When entering syntax, type the entire syntax entry, including the continuation lines, on the same input line.
F Field mark. For example, the field mark ( F ) in the following string delimits elements FLD1 and VAL1: FLD1FVAL1VSUBV1SSUBV2
V Value mark. For example, the value mark ( V ) in the following string delimits elements VAL1 and SUBV1: FLD1FVAL1VSUBV1SSUBV2
S Subvalue mark. For example, the subvalue mark ( S ) in the following string delimits elements SUBV1 and SUBV2: FLD1FVAL1VSUBV1SSUBV2
T Text mark. For example, the text mark ( T ) in the following string delimits elements 4 and 5: 1F2S3V4T5
Convention Usage
Documentation Conventions (Continued)
iv
:\ProgMarch
1Administering UniData on Windows NT or Windows 20000
1Chapter
ram Fi10 201
Beta Beta Beta Beta Beta Beta Beta Beta Beta Beta Beta Beta Beta Beta Beta Beta Beta
Installing U2 Web Services Development Tool
Installation Process . . . . . . . . . . . . . . . . . . 1-4
les\Adobe\FrameMaker8\UniData 7.2\7.2rebranded\webservices\Ch1TOC.fm0 3:45 pm Administering UniData on Windows NT or Windows 2000
C:\Program Files\Adobe\FrameMaker8\UniData
The chapter describes how to install the IBM U2 Web Services Developer.
To access the IBM U2 Web Services Developer, you must have UniData 7.1.8 or greater, with connection pooling licensed.
1-2
C:\Program Files\Adobe\FrameMaker8\UniData 7.2\7.2rebranded\webservices\Ch1.fm3/10/10
Installation Process
1. Log On As an AdministratorYou must log on with Administrator privileges to install IBM U2 Web Service Developer. Either log on to the Administrator account on the Windows system, or log on as a member of the local Administrators group.
2. Exit Other ApplicationsBefore proceeding, exit any other Windows applications you may have open.
3. Load the UniData Client CDPlace the UniData Client CD in your CD-ROM drive. Make sure you have the UniData Product Configuration sheet that is included with your media. You will need this form when you license the product after installation.
1-3 IBM U2 Web Services Developer
C:\Program Files\Adobe\FrameMaker8\UniData
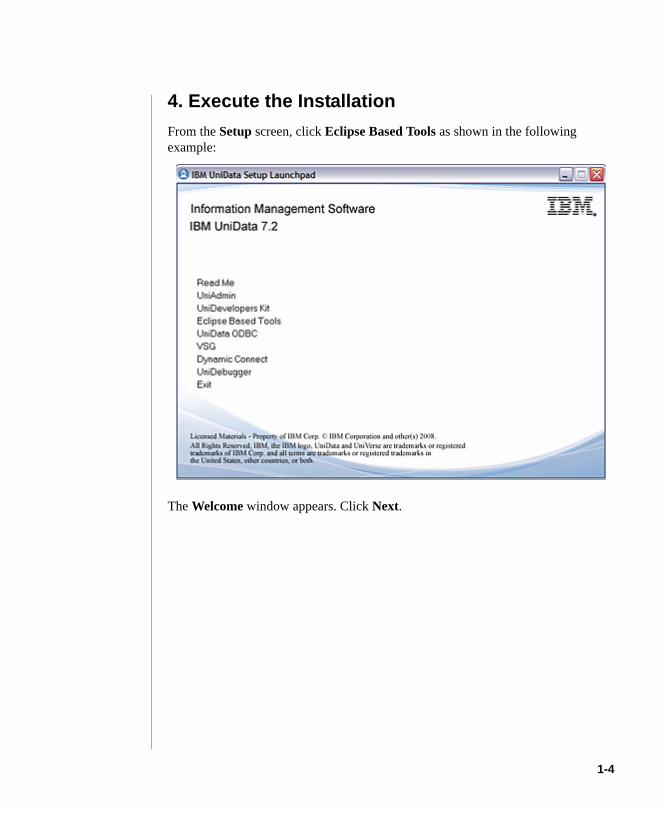
4. Execute the InstallationFrom the Setup screen, click Eclipse Based Tools as shown in the following example:
The Welcome window appears. Click Next.
1-4

C:\Program Files\Adobe\FrameMaker8\UniData 7.2\7.2rebranded\webservices\Ch1.fm3/10/10
5. Review License AgreementThe License Agreement dialog box appears, as shown in the following example:
Review the license agreement. If you agree with the terms, select I accept the terms of the license agreement. If you do not agree, select I do not accept the terms of the license agreement. If you agree with the terms of the license agreement, click Next. to proceed with the installation.
1-5 IBM U2 Web Services Developer
C:\Program Files\Adobe\FrameMaker8\UniData
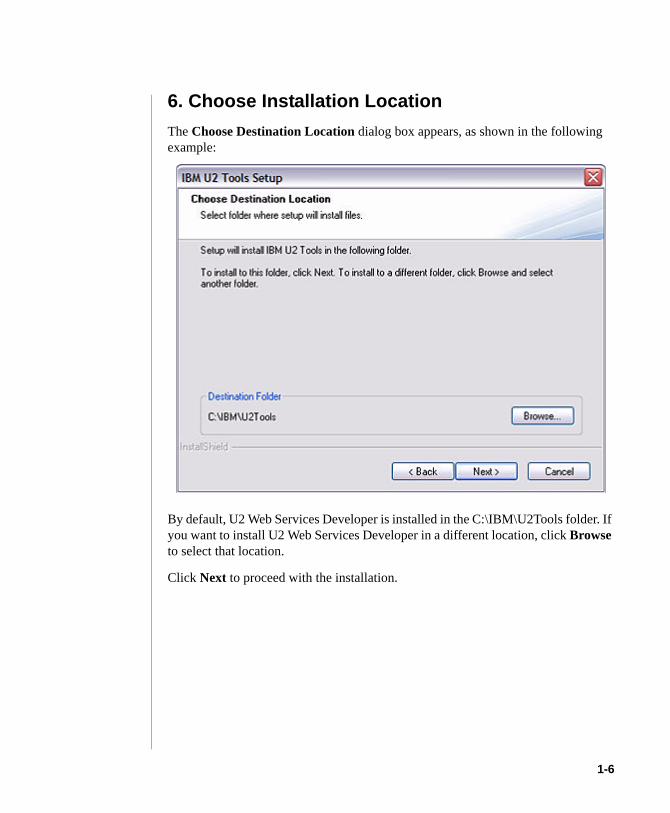
6. Choose Installation LocationThe Choose Destination Location dialog box appears, as shown in the following example:
By default, U2 Web Services Developer is installed in the C:\IBM\U2Tools folder. If you want to install U2 Web Services Developer in a different location, click Browse to select that location.
Click Next to proceed with the installation.
1-6
C:\Program Files\Adobe\FrameMaker8\UniData 7.2\7.2rebranded\webservices\Ch1.fm3/10/10
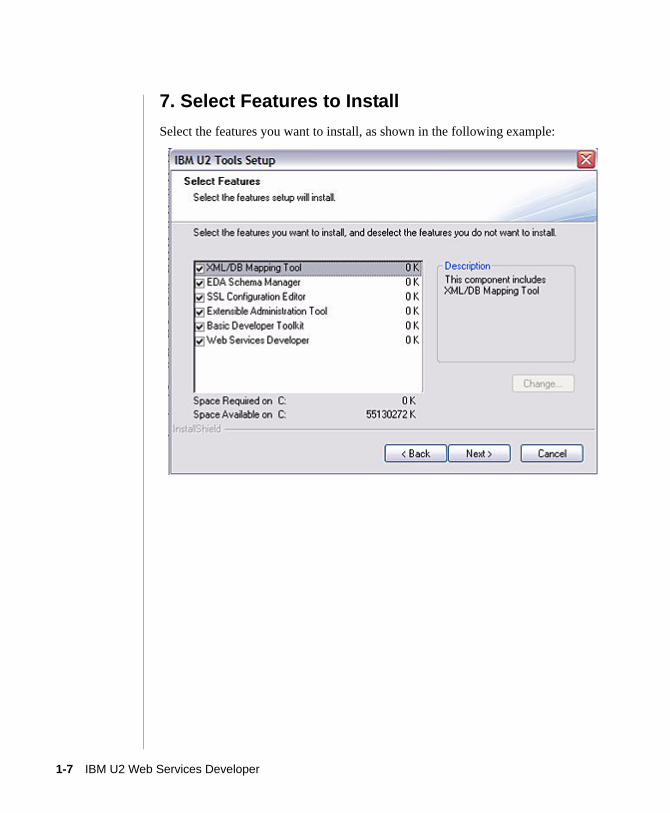
7. Select Features to InstallSelect the features you want to install, as shown in the following example:
1-7 IBM U2 Web Services Developer
C:\Program Files\Adobe\FrameMaker8\UniData
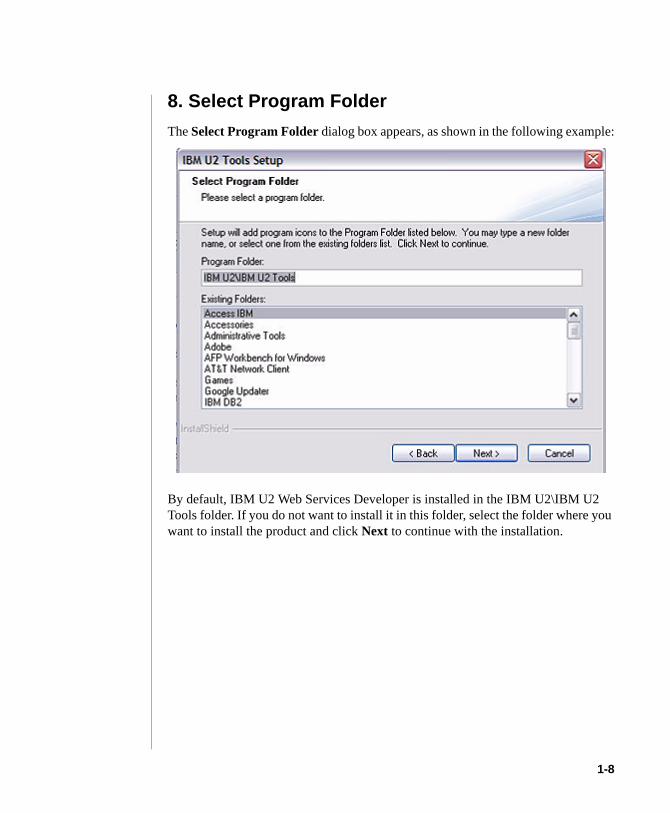
8. Select Program FolderThe Select Program Folder dialog box appears, as shown in the following example:
By default, IBM U2 Web Services Developer is installed in the IBM U2\IBM U2 Tools folder. If you do not want to install it in this folder, select the folder where you want to install the product and click Next to continue with the installation.
1-8
C:\Program Files\Adobe\FrameMaker8\UniData 7.2\7.2rebranded\webservices\Ch1.fm3/10/10
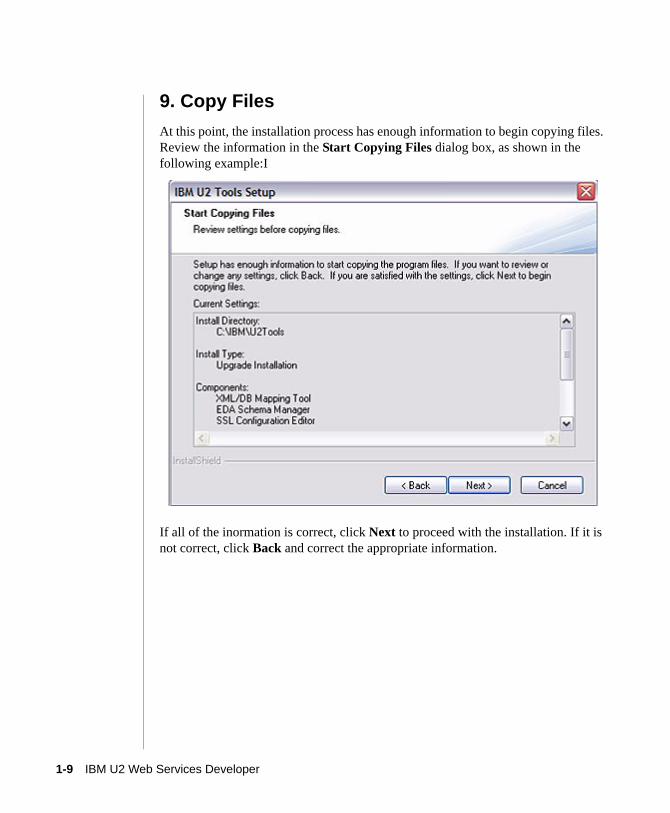
9. Copy FilesAt this point, the installation process has enough information to begin copying files. Review the information in the Start Copying Files dialog box, as shown in the following example:I
If all of the inormation is correct, click Next to proceed with the installation. If it is not correct, click Back and correct the appropriate information.
1-9 IBM U2 Web Services Developer
C:\Program Files\Adobe\FrameMaker8\UniData
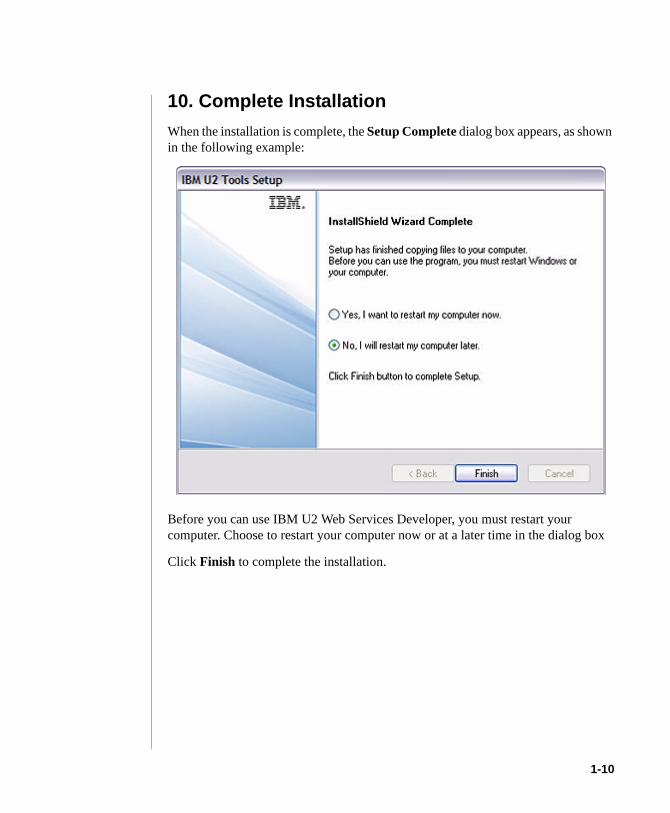
10. Complete InstallationWhen the installation is complete, the Setup Complete dialog box appears, as shown in the following example:
Before you can use IBM U2 Web Services Developer, you must restart your computer. Choose to restart your computer now or at a later time in the dialog box
Click Finish to complete the installation.
1-10
:\ProgMarch
1Administering UniData on Windows NT or Windows 20000
2Chapter
ram Fi10 201
Beta Beta Beta Beta Beta Beta Beta Beta Beta Beta Beta Beta Beta Beta Beta Beta Beta
Adding and Connecting to Servers
Add a UniData or UniVerse Server . . . . . . . . . . . . . 2-4 Connect to the UniData or UniVerse Database . . . . . . . . 2-6Create SOAP Server. . . . . . . . . . . . . . . . . . 2-9 Define SSL Settings . . . . . . . . . . . . . . . . 2-14 Set Connection Properties . . . . . . . . . . . . . . 2-15
les\Adobe\FrameMaker8\UniData 7.2\7.2rebranded\webservices\Ch2TOC.fm0 3:45 pm Administering UniData on Windows NT or Windows 2000
C:\Program Files\Adobe\FrameMaker8\UniData
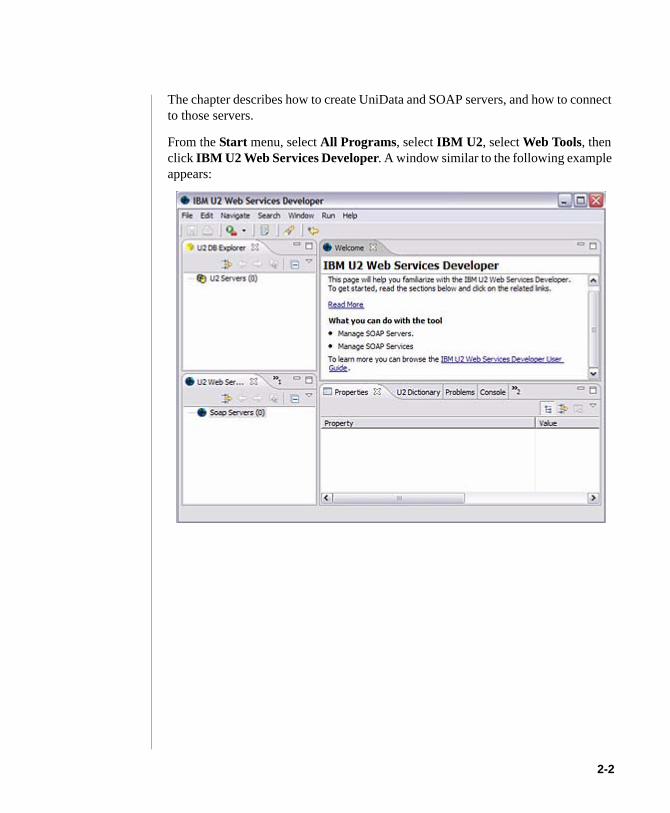
The chapter describes how to create UniData and SOAP servers, and how to connect to those servers.
From the Start menu, select All Programs, select IBM U2, select Web Tools, then click IBM U2 Web Services Developer. A window similar to the following example appears:
2-2
C:\Program Files\Adobe\FrameMaker8\UniData 7.2\7.2rebranded\webservices\Ch2.fm3/10/10
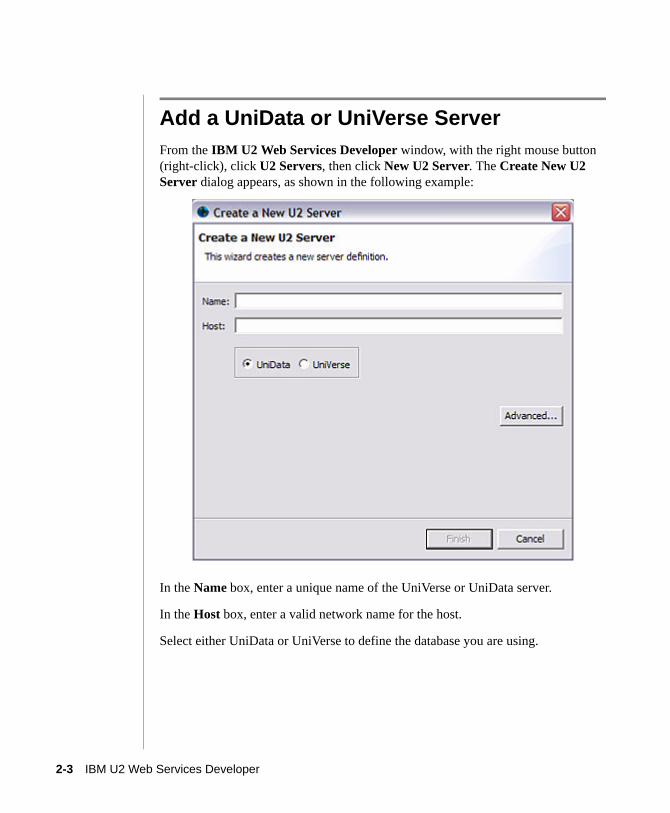
Add a UniData or UniVerse ServerFrom the IBM U2 Web Services Developer window, with the right mouse button (right-click), click U2 Servers, then click New U2 Server. The Create New U2 Server dialog appears, as shown in the following example:
In the Name box, enter a unique name of the UniVerse or UniData server.
In the Host box, enter a valid network name for the host.
Select either UniData or UniVerse to define the database you are using.
2-3 IBM U2 Web Services Developer
C:\Program Files\Adobe\FrameMaker8\UniData
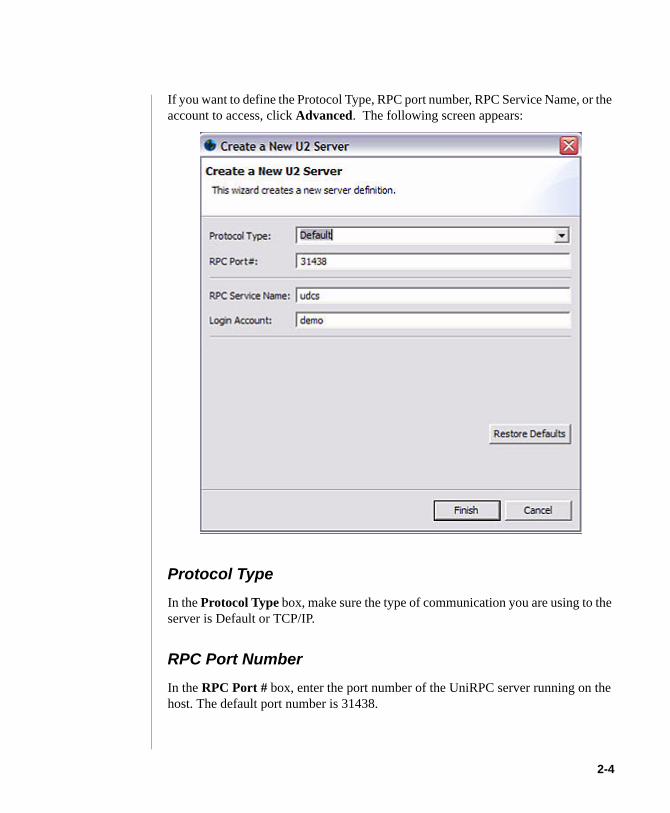
If you want to define the Protocol Type, RPC port number, RPC Service Name, or the account to access, click Advanced. The following screen appears:
Protocol TypeIn the Protocol Type box, make sure the type of communication you are using to the server is Default or TCP/IP.
RPC Port NumberIn the RPC Port # box, enter the port number of the UniRPC server running on the host. The default port number is 31438.
2-4

C:\Program Files\Adobe\FrameMaker8\UniData 7.2\7.2rebranded\webservices\Ch2.fm3/10/10
RPC Service Name
In the RPC Service Name box, enter the name of the RPC service on your system. For UniData, this is normally udcs.
Login Account
In the Login Account box, enter the name of the account to which you want to log on when accessing UniData.
Click Finish. The server you added appears in the U2 DB Explorer portion of the IBM U2 Web Services Developer window under U2 Servers, as shown in the following example:
Connect to the UniData or UniVerse DatabaseMake sure that UniVerse or UniData are running, and the unirpc daemon is started on the remote host.
2-5 IBM U2 Web Services Developer
C:\Program Files\Adobe\FrameMaker8\UniData
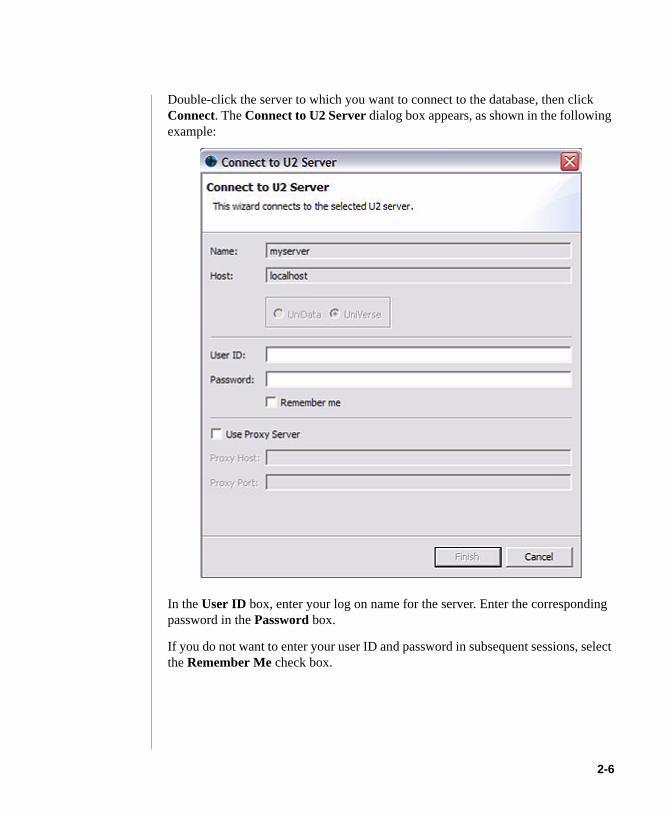
Double-click the server to which you want to connect to the database, then click Connect. The Connect to U2 Server dialog box appears, as shown in the following example:
In the User ID box, enter your log on name for the server. Enter the corresponding password in the Password box.
If you do not want to enter your user ID and password in subsequent sessions, select the Remember Me check box.
2-6
C:\Program Files\Adobe\FrameMaker8\UniData 7.2\7.2rebranded\webservices\Ch2.fm3/10/10
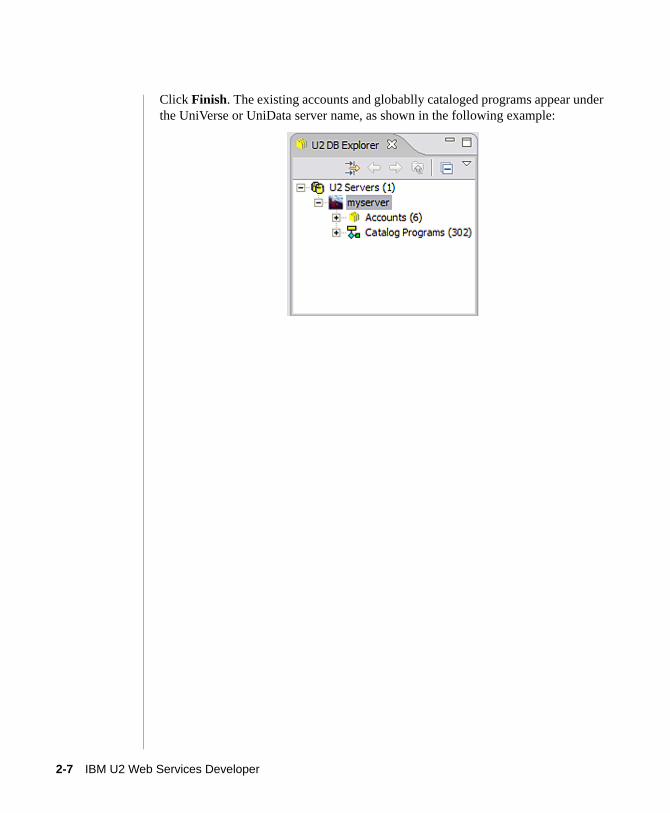
Click Finish. The existing accounts and globablly cataloged programs appear under the UniVerse or UniData server name, as shown in the following example:
2-7 IBM U2 Web Services Developer
C:\Program Files\Adobe\FrameMaker8\UniData
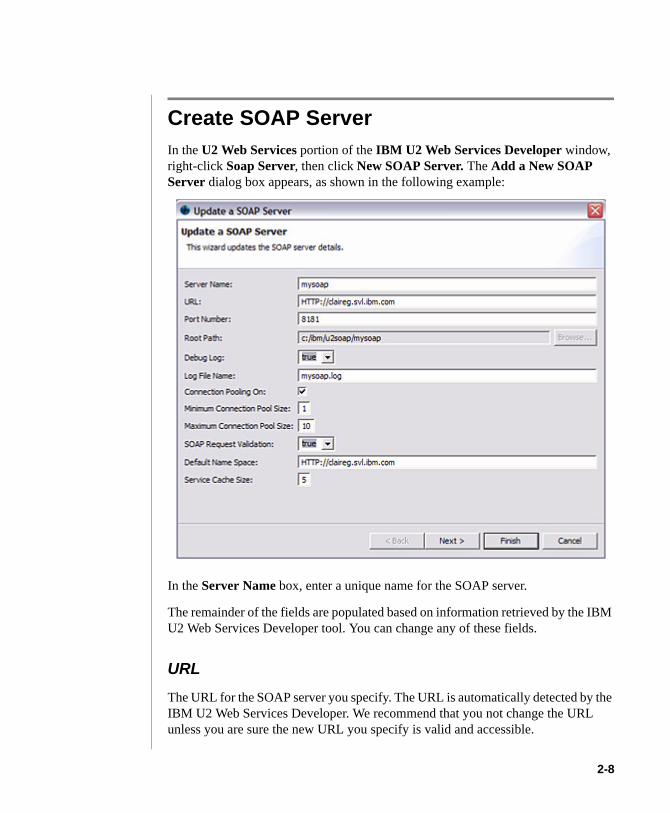
Create SOAP ServerIn the U2 Web Services portion of the IBM U2 Web Services Developer window, right-click Soap Server, then click New SOAP Server. The Add a New SOAP Server dialog box appears, as shown in the following example:
In the Server Name box, enter a unique name for the SOAP server.
The remainder of the fields are populated based on information retrieved by the IBM U2 Web Services Developer tool. You can change any of these fields.
URL
The URL for the SOAP server you specify. The URL is automatically detected by the IBM U2 Web Services Developer. We recommend that you not change the URL unless you are sure the new URL you specify is valid and accessible.
2-8
C:\Program Files\Adobe\FrameMaker8\UniData 7.2\7.2rebranded\webservices\Ch2.fm3/10/10
Port Number
The port number on which the server will listen.
Note: IBM recommends that you not change the port number unless that port number is used by another service.
Root Path
The path to the root directory where the definitions to the web services are stored.
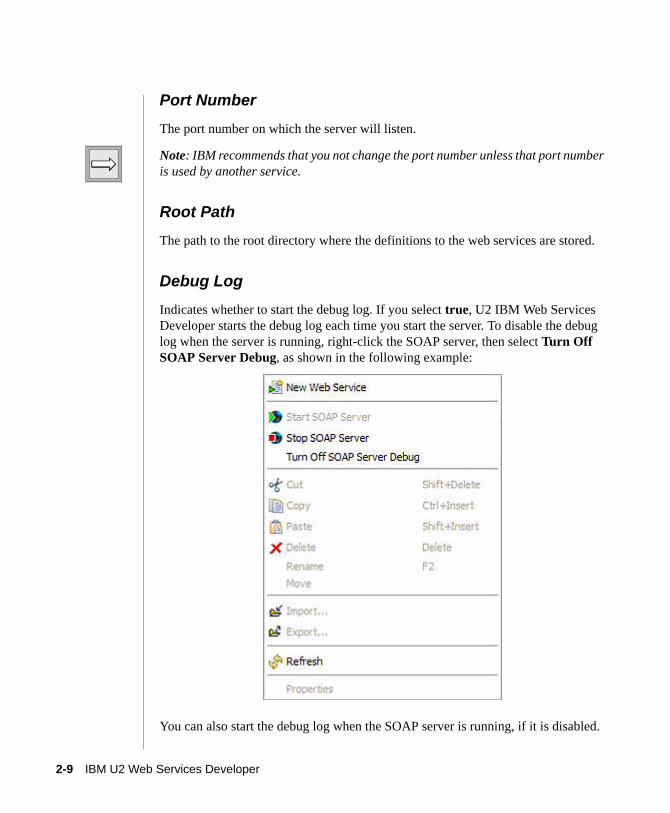
Debug Log
Indicates whether to start the debug log. If you select true, U2 IBM Web Services Developer starts the debug log each time you start the server. To disable the debug log when the server is running, right-click the SOAP server, then select Turn Off SOAP Server Debug, as shown in the following example:
You can also start the debug log when the SOAP server is running, if it is disabled.
2-9 IBM U2 Web Services Developer
C:\Program Files\Adobe\FrameMaker8\UniData
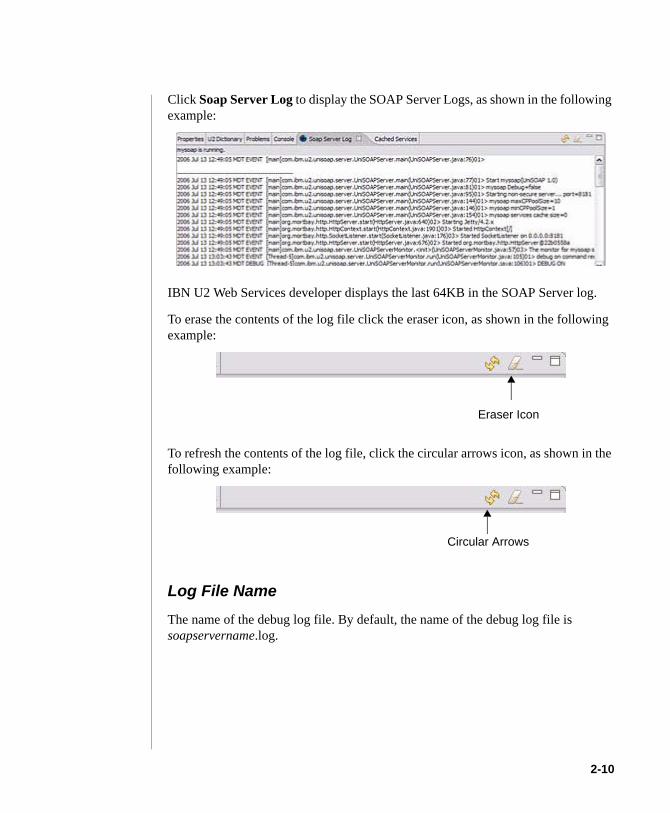
Click Soap Server Log to display the SOAP Server Logs, as shown in the following example:
IBN U2 Web Services developer displays the last 64KB in the SOAP Server log.
To erase the contents of the log file click the eraser icon, as shown in the following example:
To refresh the contents of the log file, click the circular arrows icon, as shown in the following example:
Log File Name
The name of the debug log file. By default, the name of the debug log file is soapservername.log.
Eraser Icon
Circular Arrows
2-10
C:\Program Files\Adobe\FrameMaker8\UniData 7.2\7.2rebranded\webservices\Ch2.fm3/10/10
Connection Pooling On
The Connection Pooling On setting determines if UniData uses connection pooling with the U2 Web Services Developer. The term connection pooling refers to the technology that pools permanent connections to data sources for multiple threads to share. It improves application performance by saving the overhead of making a fresh connection each time one is required. Instead of physically terminating a connection when it is no longer needed, connections are returned to the pool and an available connection is given to the next thread with the same credentials.
Connection Pooling in enabled by default. If you do not want to use Connection Pooling, clear the Connection Pooling On check box.
Note: IBM recommends using Connection Pooling for superior performance and scability.
Connection Pool Size
You can set the minimum and maximum size of the connection pool. If you do not define these sizes, the minimum size defaults to 1 and the maximum size defaults to 10. The minimum size determines the initial size of the connection pool.
The size of the connection pool changes dynamically between the minimum and maximum sizes you specify, depending on the system demands. When there are no pooled connections available, UniData either creates another connection, if the maximum connection pool size has not been reached, or keeps the thread waiting in the queue until a pooled connection is released or the request times out. If a pooled connection is idle for a specified time, it is disconnected.
SOAP Request ValidationSpecifies whether the server needs to validate the SOAP request before processing. If this value is set to true, you may experience slight performance degradation, but will have an extra layer of security.
Default Name Space
The name space for the Web Services you define.
2-11 IBM U2 Web Services Developer
C:\Program Files\Adobe\FrameMaker8\UniData
Service Cache Size
For performance purposes, you can set this value to a number greater than 0 to indicate the number of web service definitions you want to keep in the cache. If you set this value, the SOAP Server will always try to read the web service definition from the cache first. If you do not set this value, the SOAP Server reloads the web service each time from disk.
If you are developing a web service, we recommend keeping this value at 0. This setting forces the SOAP Server to reload the new web service definition each time.
Select the Cached Services tab to display the web services currently loaded in cache.
Click Next.
2-12
C:\Program Files\Adobe\FrameMaker8\UniData 7.2\7.2rebranded\webservices\Ch2.fm3/10/10
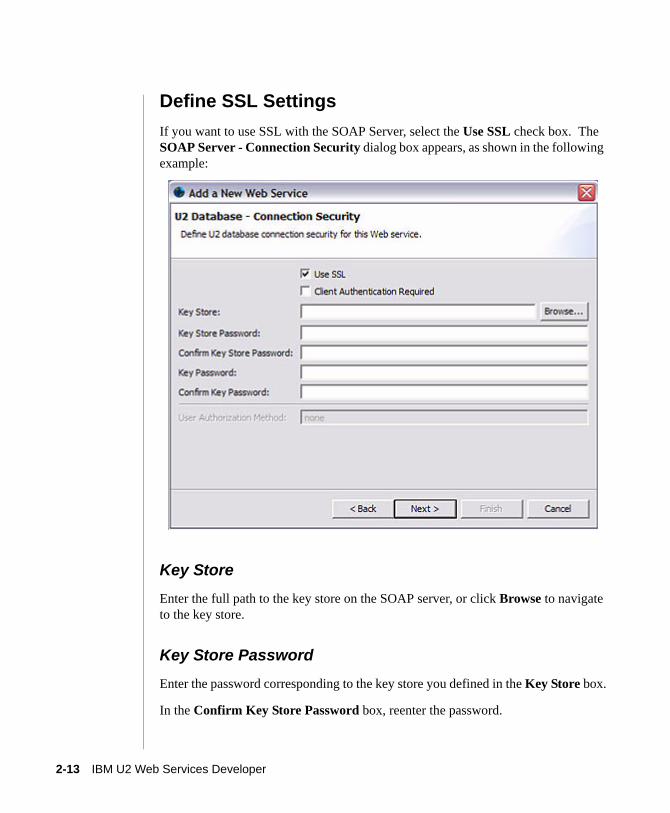
Define SSL SettingsIf you want to use SSL with the SOAP Server, select the Use SSL check box. The SOAP Server - Connection Security dialog box appears, as shown in the following example:
Key StoreEnter the full path to the key store on the SOAP server, or click Browse to navigate to the key store.
Key Store PasswordEnter the password corresponding to the key store you defined in the Key Store box.
In the Confirm Key Store Password box, reenter the password.
2-13 IBM U2 Web Services Developer
C:\Program Files\Adobe\FrameMaker8\UniData
Key Password
Enter the encryption key password, if one exists, in the Key Password box. Reenter the password in the Confirm Key Password box.
Enable Authentication
If you want the client to send its certification for authentication, select the Need Client Authentication check box.
Click Next.
For detailed information about SSL, see UniBasic Extensions.
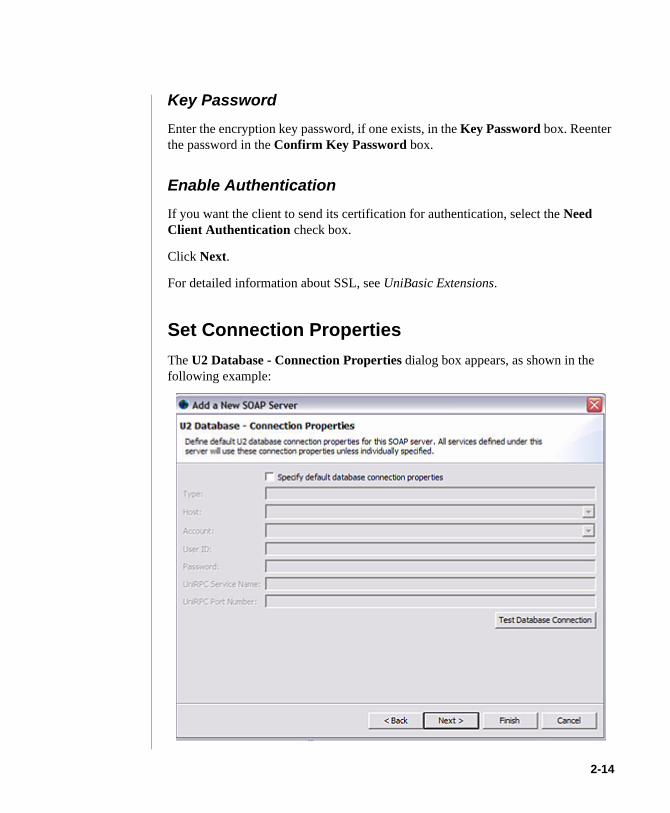
Set Connection PropertiesThe U2 Database - Connection Properties dialog box appears, as shown in the following example:
2-14
C:\Program Files\Adobe\FrameMaker8\UniData 7.2\7.2rebranded\webservices\Ch2.fm3/10/10
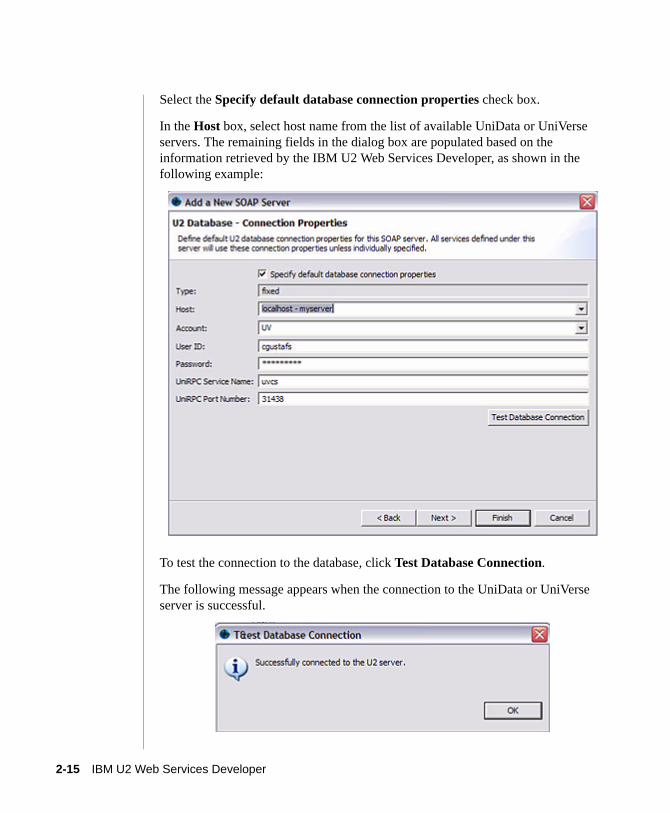
Select the Specify default database connection properties check box.
In the Host box, select host name from the list of available UniData or UniVerse servers. The remaining fields in the dialog box are populated based on the information retrieved by the IBM U2 Web Services Developer, as shown in the following example:
To test the connection to the database, click Test Database Connection.
The following message appears when the connection to the UniData or UniVerse server is successful.
2-15 IBM U2 Web Services Developer
C:\Program Files\Adobe\FrameMaker8\UniData
From the U2 Database - Connection Properties dialog box, click Finish.
2-16
:\ProgMarch
1Administering UniData on Windows NT or Windows 20000
3 Chapter
ram Fi10 201
Beta Beta Beta Beta Beta Beta Beta Beta Beta Beta Beta Beta Beta Beta Beta Beta Beta
Creating a Query Web Service
Creating a Query Web Service Using a Drag-and-Drop Operation . . . 3-3 Adding an Input Parameter . . . . . . . . . . . . . . 3-6Creating a Query Web Service Using the Wizard . . . . . . . . . 3-9Executing the Web Service . . . . . . . . . . . . . . . 3-19
les\Adobe\FrameMaker8\UniData 7.2\7.2rebranded\webservices\Ch3TOC.fm0 3:45 pm Administering UniData on Windows NT or Windows 2000
C:\Program Files\Adobe\FrameMaker8\UniData
This chapter describes how to create a web service using UniQuery or UniData SQL.
Note: You cannot publish a query that requires interactive user input as a web service.
3-2
C:\Program Files\Adobe\FrameMaker8\UniData 7.2\7.2rebranded\webservices\Ch3.fm3/10/10
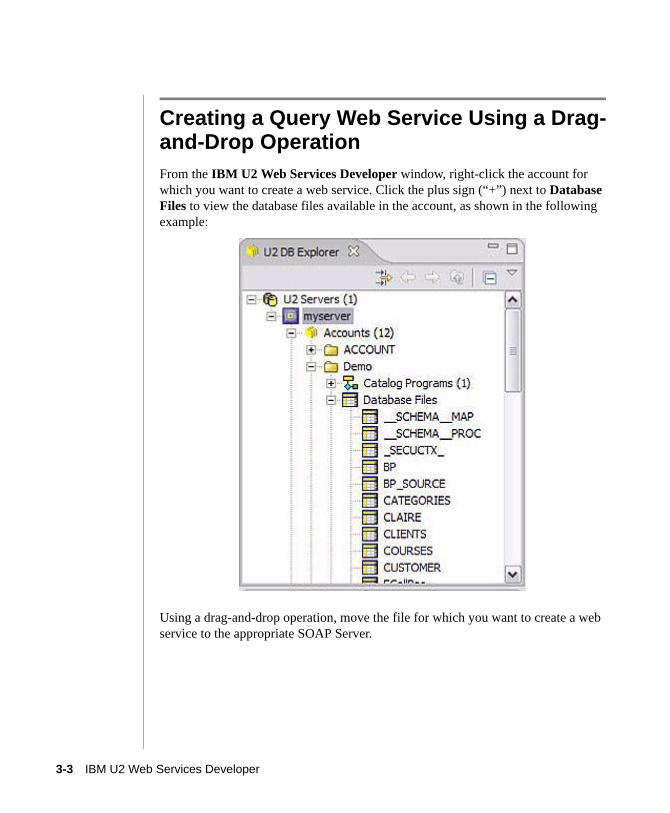
Creating a Query Web Service Using a Drag-and-Drop OperationFrom the IBM U2 Web Services Developer window, right-click the account for which you want to create a web service. Click the plus sign (“+”) next to Database Files to view the database files available in the account, as shown in the following example:
Using a drag-and-drop operation, move the file for which you want to create a web service to the appropriate SOAP Server.
3-3 IBM U2 Web Services Developer
C:\Program Files\Adobe\FrameMaker8\UniData
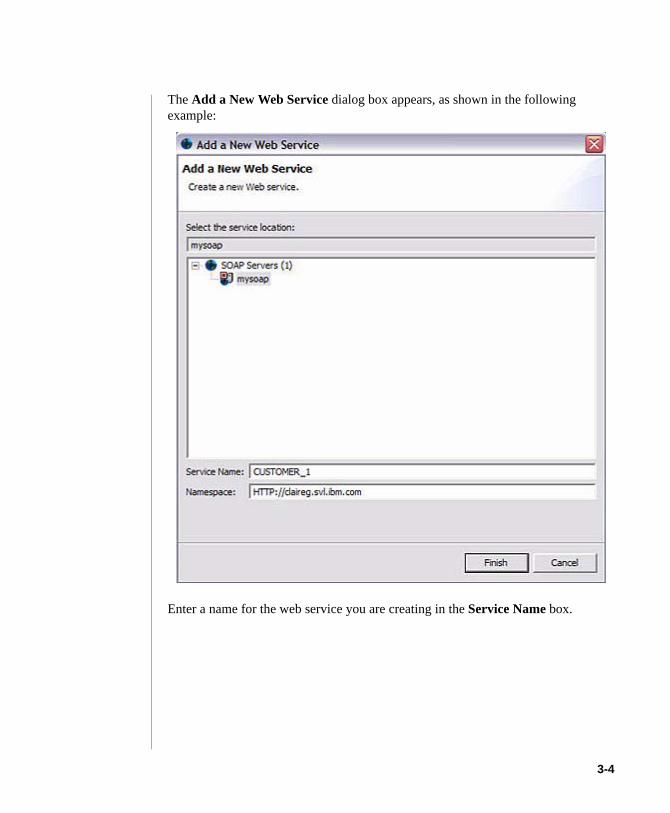
The Add a New Web Service dialog box appears, as shown in the following example:
Enter a name for the web service you are creating in the Service Name box.
3-4
C:\Program Files\Adobe\FrameMaker8\UniData 7.2\7.2rebranded\webservices\Ch3.fm3/10/10
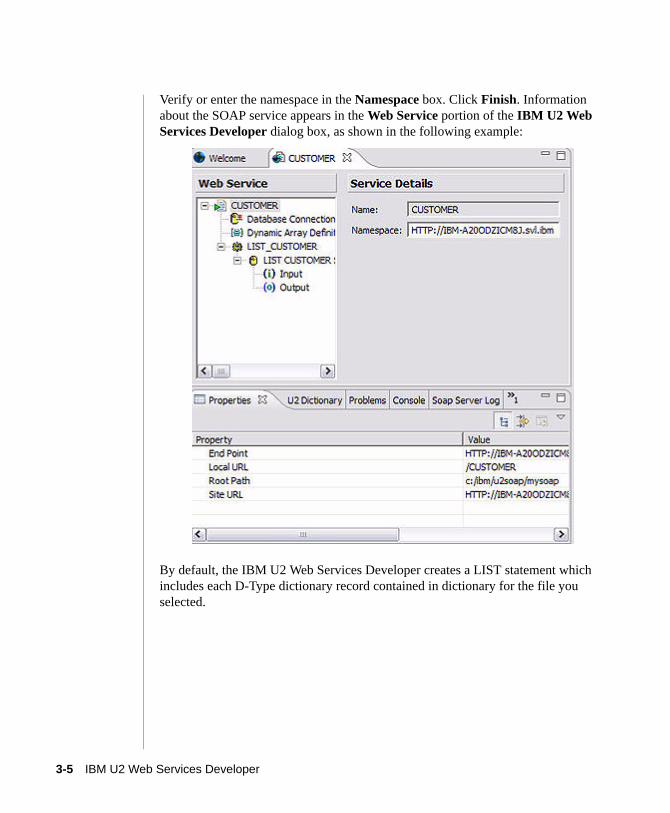
Verify or enter the namespace in the Namespace box. Click Finish. Information about the SOAP service appears in the Web Service portion of the IBM U2 Web Services Developer dialog box, as shown in the following example:
By default, the IBM U2 Web Services Developer creates a LIST statement which includes each D-Type dictionary record contained in dictionary for the file you selected.
3-5 IBM U2 Web Services Developer

C:\Program Files\Adobe\FrameMaker8\UniData
Click the query statement to view the details for the statement. The Query Details dialog box appears, as shown in the following example:
UniData and UniVerse only support the UniQuery or UniVerse RetrieVe LIST and SORT commands, or the SQL SELECT command.
Adding an Input ParameterIf you want to add an input parameter, modify the statement that appears in the Command Text box, as shown in the following example:
3-6
C:\Program Files\Adobe\FrameMaker8\UniData 7.2\7.2rebranded\webservices\Ch3.fm3/10/10
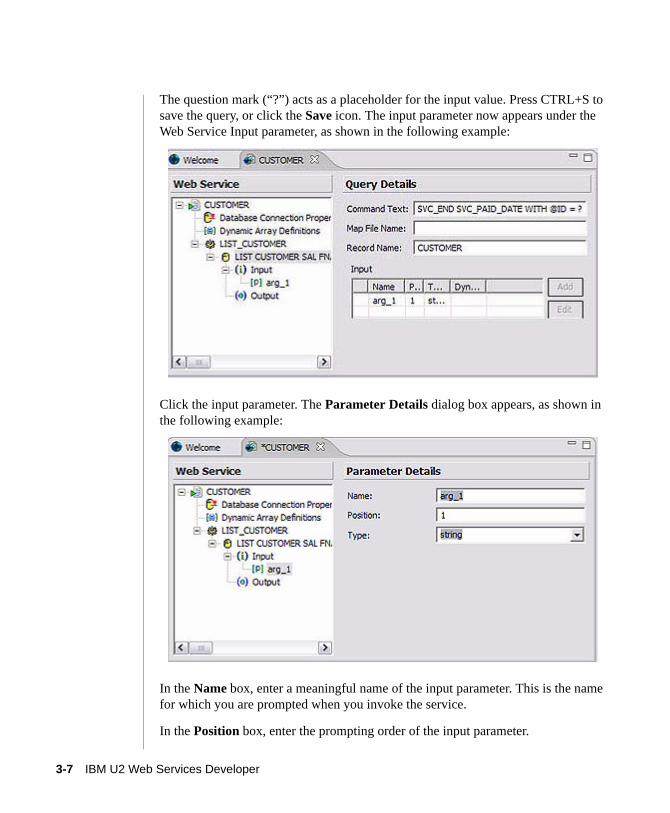
The question mark (“?”) acts as a placeholder for the input value. Press CTRL+S to save the query, or click the Save icon. The input parameter now appears under the Web Service Input parameter, as shown in the following example:
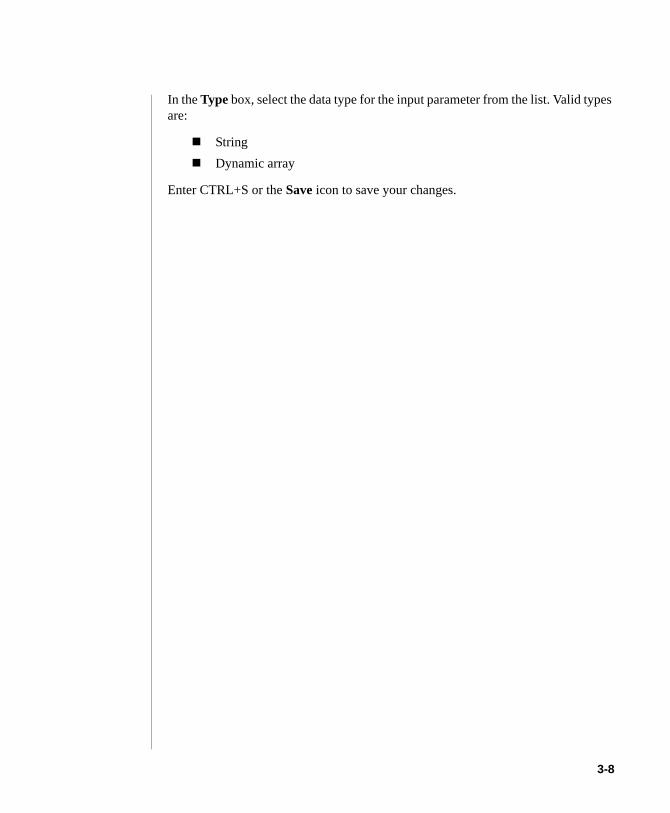
Click the input parameter. The Parameter Details dialog box appears, as shown in the following example:
In the Name box, enter a meaningful name of the input parameter. This is the name for which you are prompted when you invoke the service.
In the Position box, enter the prompting order of the input parameter.
3-7 IBM U2 Web Services Developer
C:\Program Files\Adobe\FrameMaker8\UniData
In the Type box, select the data type for the input parameter from the list. Valid types are:
StringDynamic array
Enter CTRL+S or the Save icon to save your changes.
3-8
C:\Program Files\Adobe\FrameMaker8\UniData 7.2\7.2rebranded\webservices\Ch3.fm3/10/10
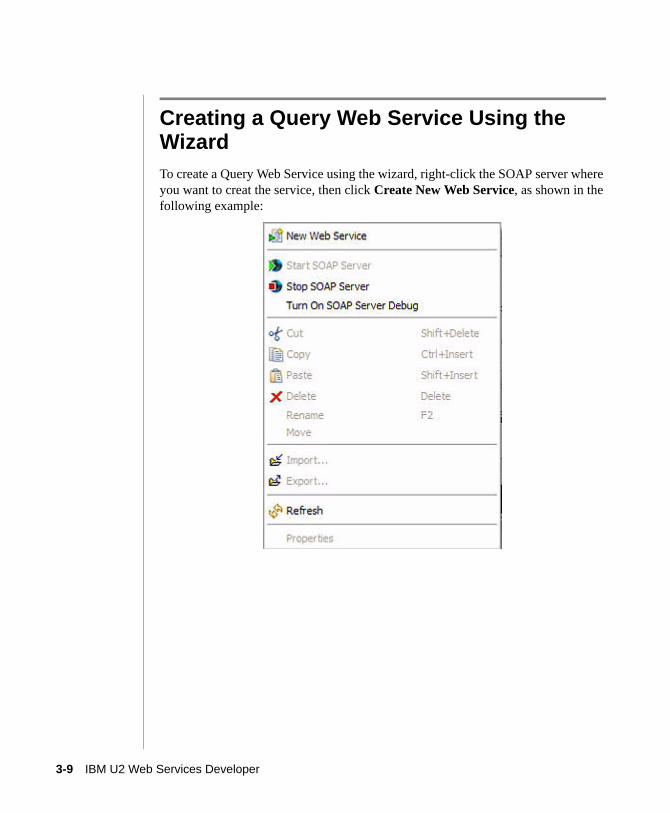
Creating a Query Web Service Using the WizardTo create a Query Web Service using the wizard, right-click the SOAP server where you want to creat the service, then click Create New Web Service, as shown in the following example:
3-9 IBM U2 Web Services Developer
C:\Program Files\Adobe\FrameMaker8\UniData
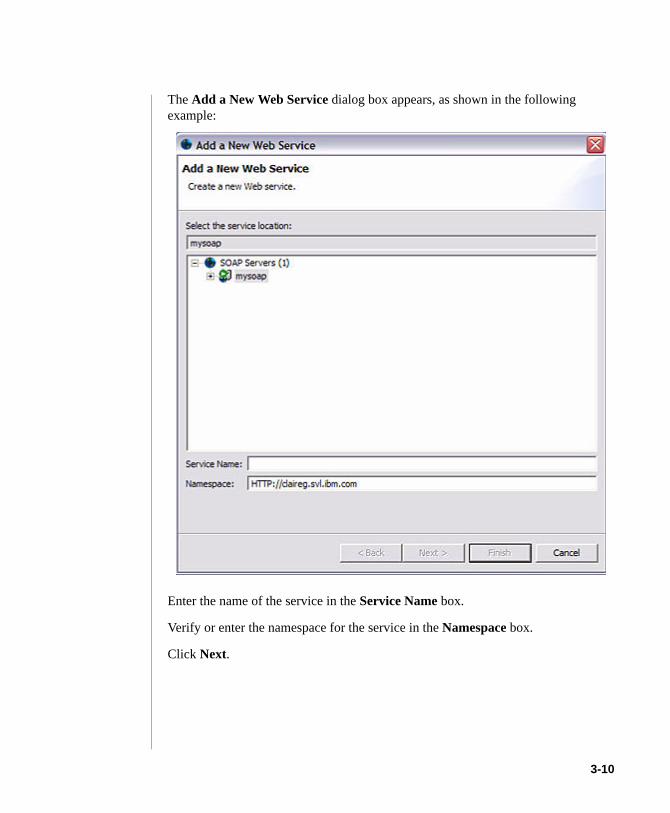
The Add a New Web Service dialog box appears, as shown in the following example:
Enter the name of the service in the Service Name box.
Verify or enter the namespace for the service in the Namespace box.
Click Next.
3-10
C:\Program Files\Adobe\FrameMaker8\UniData 7.2\7.2rebranded\webservices\Ch3.fm3/10/10
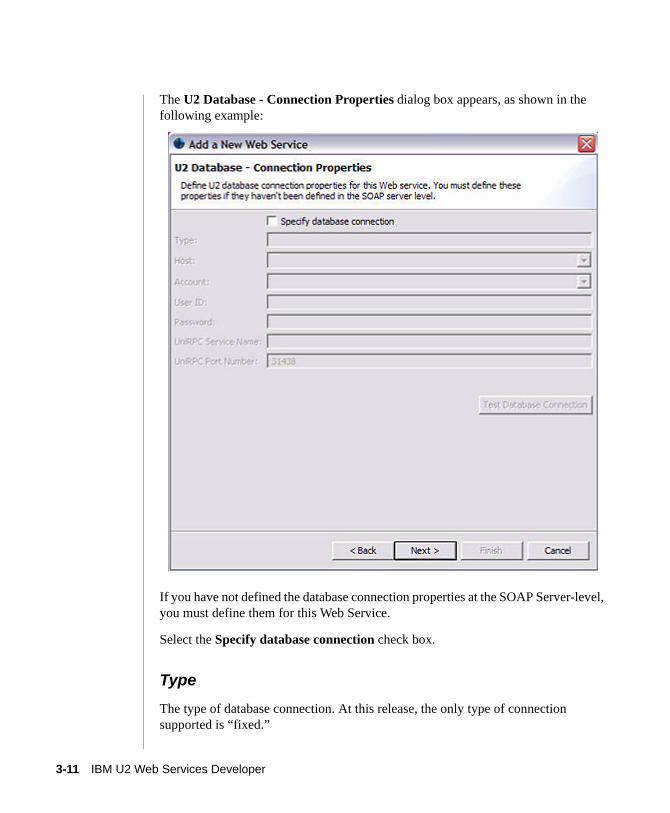
The U2 Database - Connection Properties dialog box appears, as shown in the following example:
If you have not defined the database connection properties at the SOAP Server-level, you must define them for this Web Service.
Select the Specify database connection check box.
Type
The type of database connection. At this release, the only type of connection supported is “fixed.”
3-11 IBM U2 Web Services Developer
C:\Program Files\Adobe\FrameMaker8\UniData
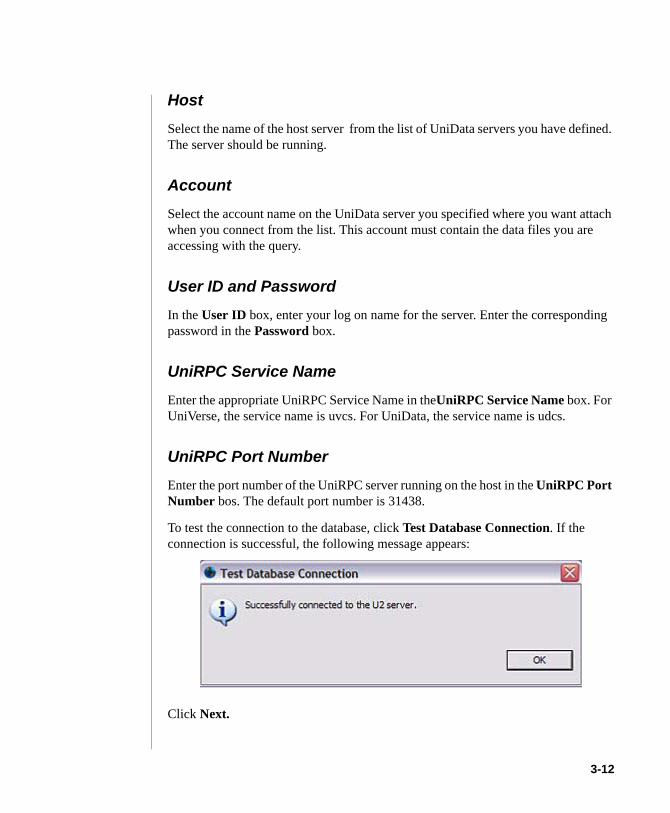
Host
Select the name of the host server from the list of UniData servers you have defined. The server should be running.
Account
Select the account name on the UniData server you specified where you want attach when you connect from the list. This account must contain the data files you are accessing with the query.
User ID and Password
In the User ID box, enter your log on name for the server. Enter the corresponding password in the Password box.
UniRPC Service Name
Enter the appropriate UniRPC Service Name in theUniRPC Service Name box. For UniVerse, the service name is uvcs. For UniData, the service name is udcs.
UniRPC Port Number
Enter the port number of the UniRPC server running on the host in the UniRPC Port Number bos. The default port number is 31438.
To test the connection to the database, click Test Database Connection. If the connection is successful, the following message appears:
Click Next.
3-12
C:\Program Files\Adobe\FrameMaker8\UniData 7.2\7.2rebranded\webservices\Ch3.fm3/10/10
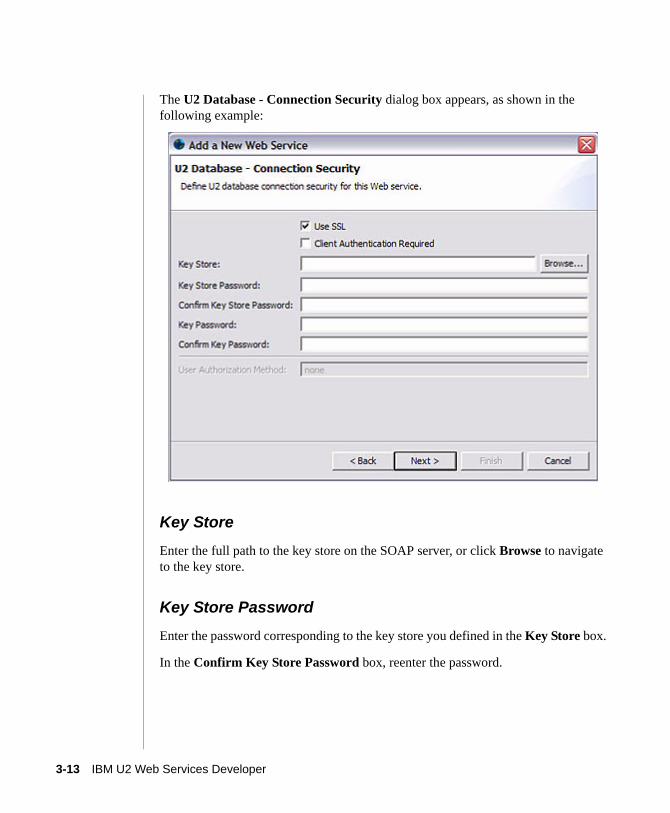
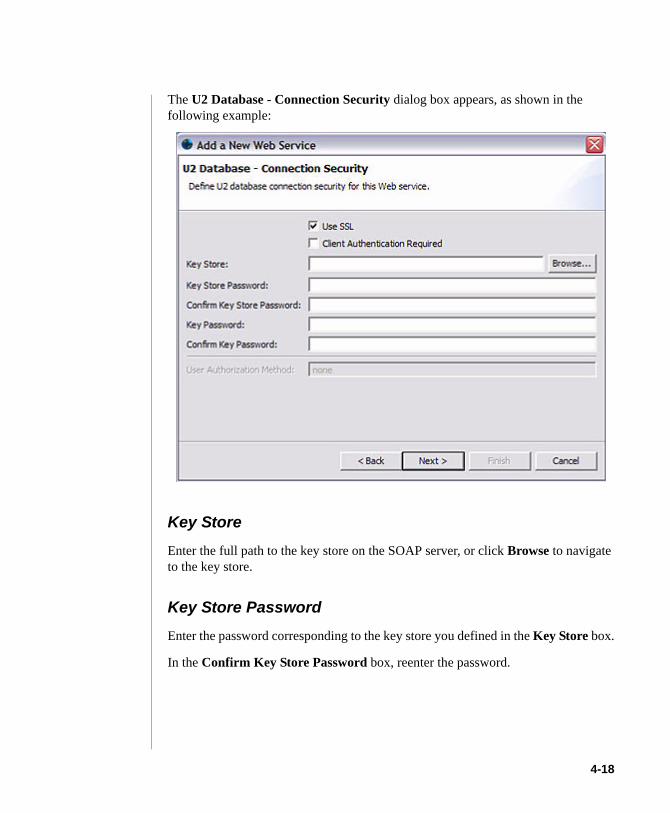
The U2 Database - Connection Security dialog box appears, as shown in the following example:
Key StoreEnter the full path to the key store on the SOAP server, or click Browse to navigate to the key store.
Key Store PasswordEnter the password corresponding to the key store you defined in the Key Store box.
In the Confirm Key Store Password box, reenter the password.
3-13 IBM U2 Web Services Developer
C:\Program Files\Adobe\FrameMaker8\UniData
Key Password
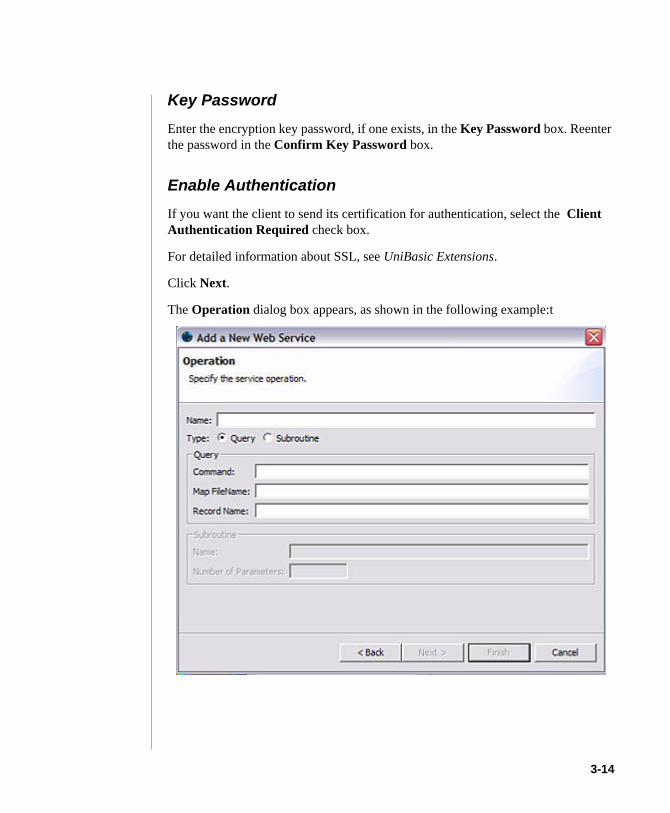
Enter the encryption key password, if one exists, in the Key Password box. Reenter the password in the Confirm Key Password box.
Enable Authentication
If you want the client to send its certification for authentication, select the Client Authentication Required check box.
For detailed information about SSL, see UniBasic Extensions.
Click Next.
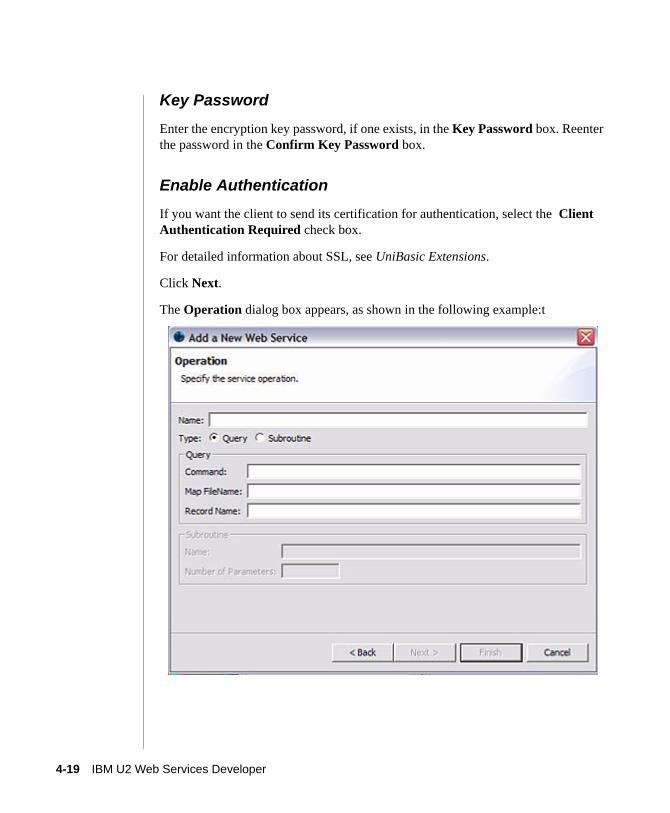
The Operation dialog box appears, as shown in the following example:t
3-14
C:\Program Files\Adobe\FrameMaker8\UniData 7.2\7.2rebranded\webservices\Ch3.fm3/10/10
Name
Enter the name for the Web Service you are creating in the Name box.
Type
Select Query as the type of Web Service you are creating.
Define Query
In the Query area of the Operation dialog box, define the Query Command, Map File Name, and Record Name for the Web Service.
Query Command
Enter the UniQuery or UniData SQL statement in the Command box. At this release U2 IBM Web Services Developer only support the UniQuery’s LIST and SORT commands, or the UniData SQL SELECT statement.
If you want to add an input parameter, use a question mark (“?”) as a placeholder for the input value. Press CTRL+S to save the query, or click the Save icon. The input parameter appears under the Web Service Input parameter
Map File Name
The name of the mapping file you want to use, located in the _XML_ directory. This field is optional. See Using UniQuery for detailed information about the mapping file.
Record Name
The name of the root element in the XML document the web service creates for the query you specify. If you have two or more query operations within the same web service using the same data file, make sure the record name is different for each operation.
3-15 IBM U2 Web Services Developer
C:\Program Files\Adobe\FrameMaker8\UniData
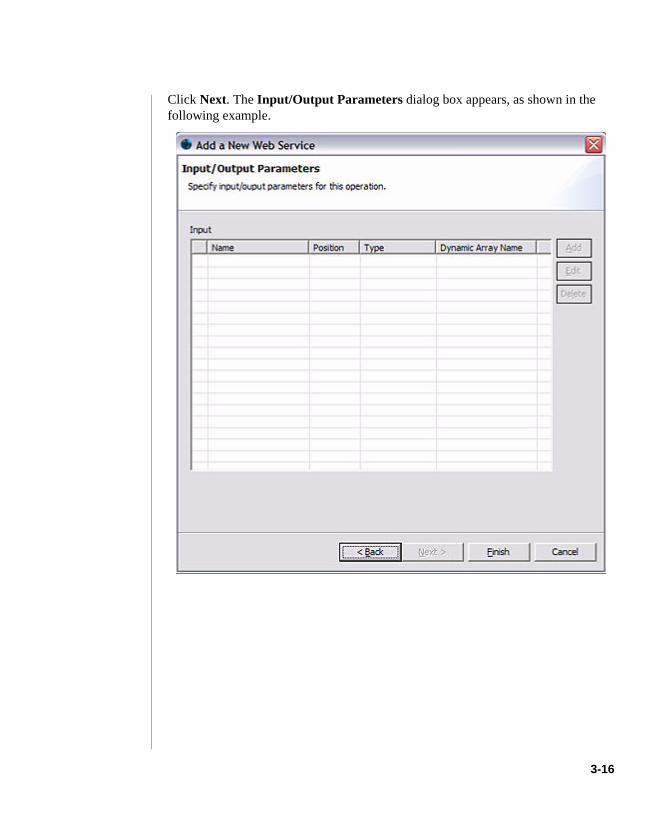
Click Next. The Input/Output Parameters dialog box appears, as shown in the following example.
3-16
C:\Program Files\Adobe\FrameMaker8\UniData 7.2\7.2rebranded\webservices\Ch3.fm3/10/10
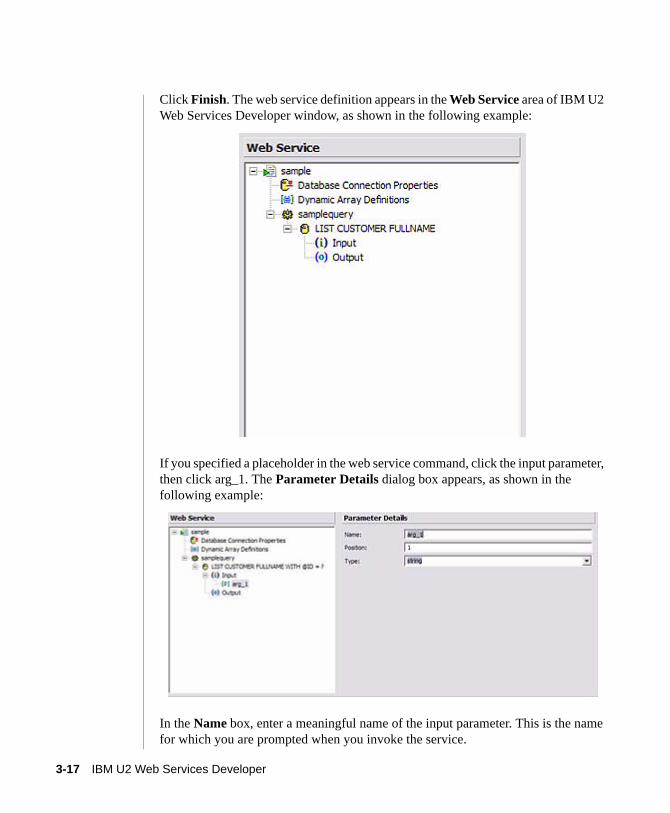
Click Finish. The web service definition appears in the Web Service area of IBM U2 Web Services Developer window, as shown in the following example:
If you specified a placeholder in the web service command, click the input parameter, then click arg_1. The Parameter Details dialog box appears, as shown in the following example:
In the Name box, enter a meaningful name of the input parameter. This is the name for which you are prompted when you invoke the service.
3-17 IBM U2 Web Services Developer
C:\Program Files\Adobe\FrameMaker8\UniData
In the Position box, enter the prompting order of the input parameter.
In the Type box, select the data type for the input parameter from the list. Valid types are:
StringDynamic array
Enter CTRL+S or the Save icon to save your changes.
3-18
C:\Program Files\Adobe\FrameMaker8\UniData 7.2\7.2rebranded\webservices\Ch3.fm3/10/10
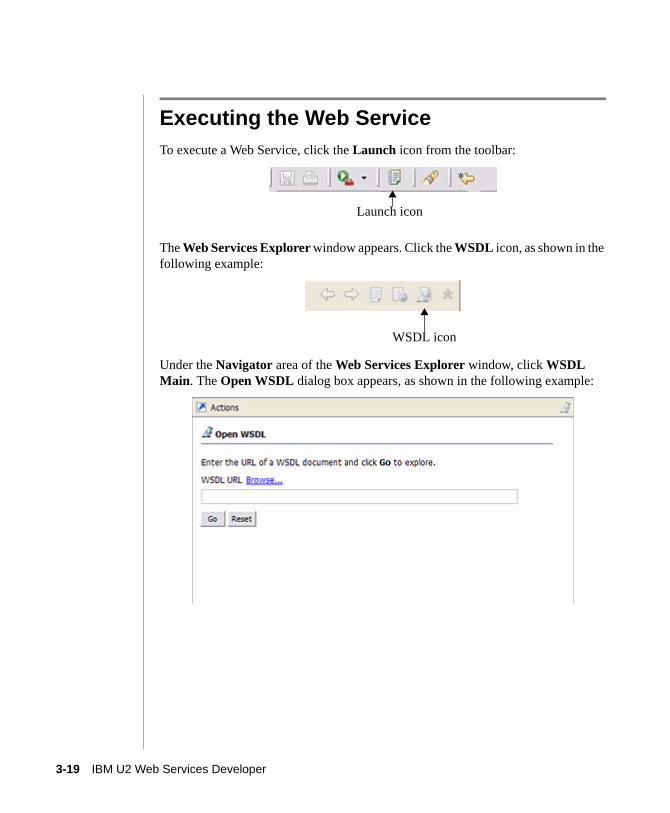
Executing the Web ServiceTo execute a Web Service, click the Launch icon from the toolbar:
The Web Services Explorer window appears. Click the WSDL icon, as shown in the following example:
Under the Navigator area of the Web Services Explorer window, click WSDL Main. The Open WSDL dialog box appears, as shown in the following example:
Launch icon
WSDL icon
3-19 IBM U2 Web Services Developer
C:\Program Files\Adobe\FrameMaker8\UniData
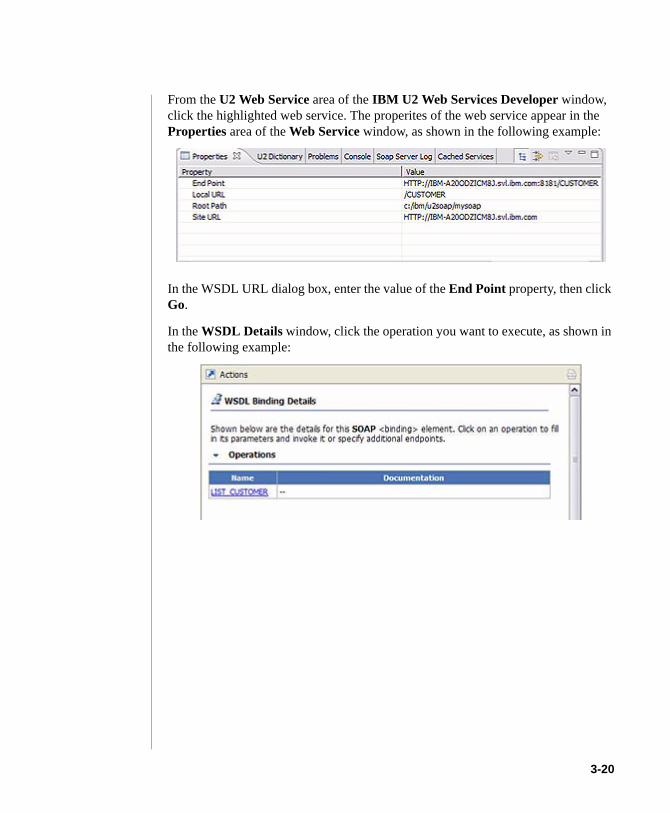
From the U2 Web Service area of the IBM U2 Web Services Developer window, click the highlighted web service. The properites of the web service appear in the Properties area of the Web Service window, as shown in the following example:
In the WSDL URL dialog box, enter the value of the End Point property, then click Go.
In the WSDL Details window, click the operation you want to execute, as shown in the following example:
3-20
C:\Program Files\Adobe\FrameMaker8\UniData 7.2\7.2rebranded\webservices\Ch3.fm3/10/10
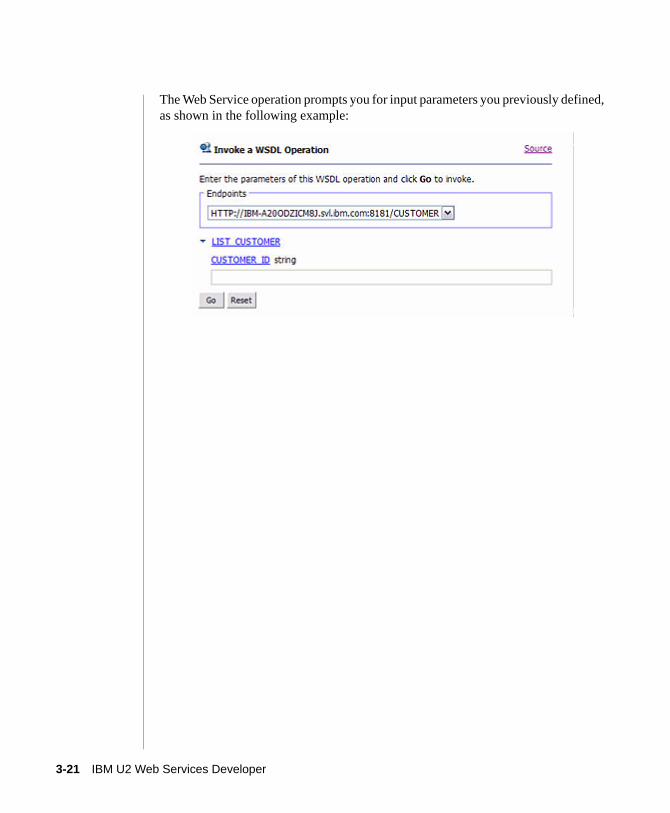
The Web Service operation prompts you for input parameters you previously defined, as shown in the following example:
3-21 IBM U2 Web Services Developer
C:\Program Files\Adobe\FrameMaker8\UniData
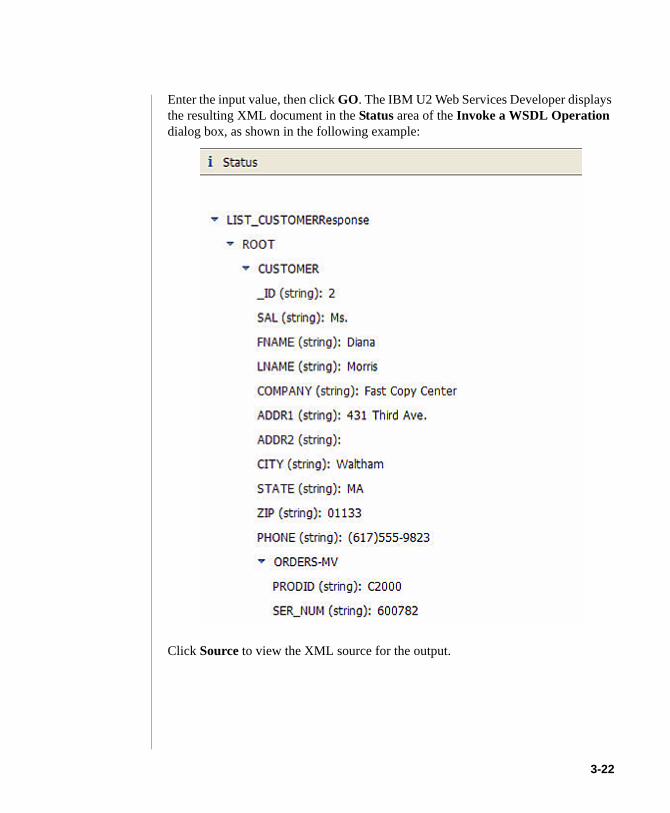
Enter the input value, then click GO. The IBM U2 Web Services Developer displays the resulting XML document in the Status area of the Invoke a WSDL Operation dialog box, as shown in the following example:
Click Source to view the XML source for the output.
3-22
:\ProgMarch
1Administering UniData on Windows NT or Windows 20000
4 Chapter
ram Fi10 201
Beta Beta Beta Beta Beta Beta Beta Beta Beta Beta Beta Beta Beta Beta Beta Beta Beta
Creating a Subroutine Web Service
Creating a Subroutine Web Service Using a Drag-and-Drop Operation . . 4-3 Define Subroutine Parameters . . . . . . . . . . . . . 4-7Creating a Subroutine Web Service Using the Wizard . . . . . . . 4-14Executing the Web Service . . . . . . . . . . . . . . . 4-28
les\Adobe\FrameMaker8\UniData 7.2\7.2rebranded\webservices\Ch4TOC.fm0 3:45 pm Administering UniData on Windows NT or Windows 2000

C:\Program Files\Adobe\FrameMaker8\UniData
This chapter describes how to create a web service using a UniBasic subroutine.
Note: You cannot publish a subroutine that requires interactive user input as a web service.
4-2
C:\Program Files\Adobe\FrameMaker8\UniData 7.2\7.2rebranded\webservices\Ch4.fm3/10/10
Creating a Subroutine Web Service Using a Drag-and-Drop OperationFrom the IBM U2 Web Services Developer window, right-click the account for which you want to create a web service. Click the plus sign (“+”) next to Cataloged Program to view the subroutines available in the account, as shown in the following example:
Note: You must catalog the subroutine before you start the IBM U2 Web Services Developer. Subroutines may be cataloged globally, locally, or directly.
For information about cataloging UniBasic programs, see the UniData Commands Reference. For information about cataloging UniVerse BASIC programs, see the UniVerse User Reference.
In this example, we are using the following subroutine:
SUBROUTINE CUSTOMERSUB(ID, REC)OPEN "CUSTOMER" TO F.CUST ELSE REC = ""READ REC FROM F.CUST, ID ELSE REC = ""CLOSE F.CUSTRETURN
4-3 IBM U2 Web Services Developer
C:\Program Files\Adobe\FrameMaker8\UniData
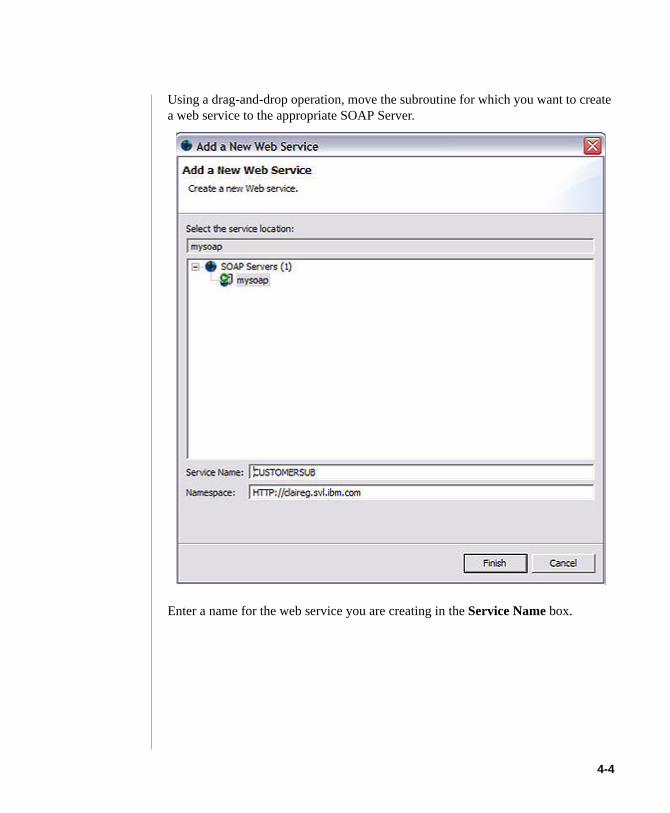
Using a drag-and-drop operation, move the subroutine for which you want to create a web service to the appropriate SOAP Server.
Enter a name for the web service you are creating in the Service Name box.
4-4
C:\Program Files\Adobe\FrameMaker8\UniData 7.2\7.2rebranded\webservices\Ch4.fm3/10/10
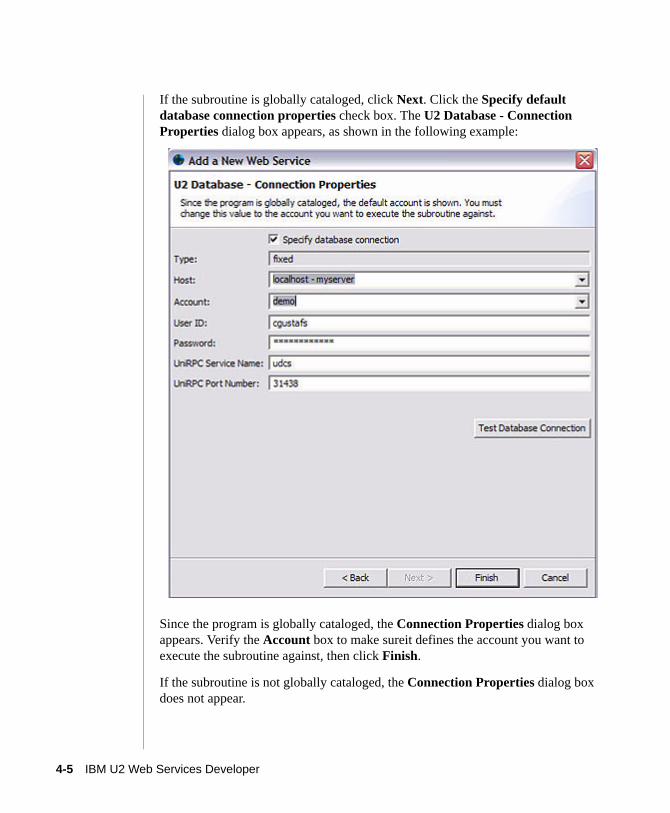
If the subroutine is globally cataloged, click Next. Click the Specify default database connection properties check box. The U2 Database - Connection Properties dialog box appears, as shown in the following example:
Since the program is globally cataloged, the Connection Properties dialog box appears. Verify the Account box to make sureit defines the account you want to execute the subroutine against, then click Finish.
If the subroutine is not globally cataloged, the Connection Properties dialog box does not appear.
4-5 IBM U2 Web Services Developer
C:\Program Files\Adobe\FrameMaker8\UniData
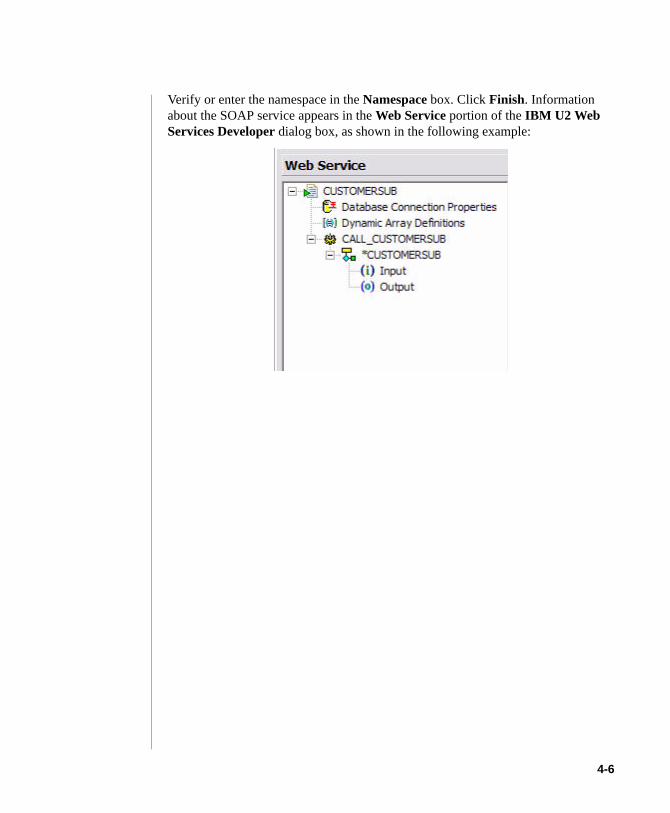
Verify or enter the namespace in the Namespace box. Click Finish. Information about the SOAP service appears in the Web Service portion of the IBM U2 Web Services Developer dialog box, as shown in the following example:
4-6
C:\Program Files\Adobe\FrameMaker8\UniData 7.2\7.2rebranded\webservices\Ch4.fm3/10/10
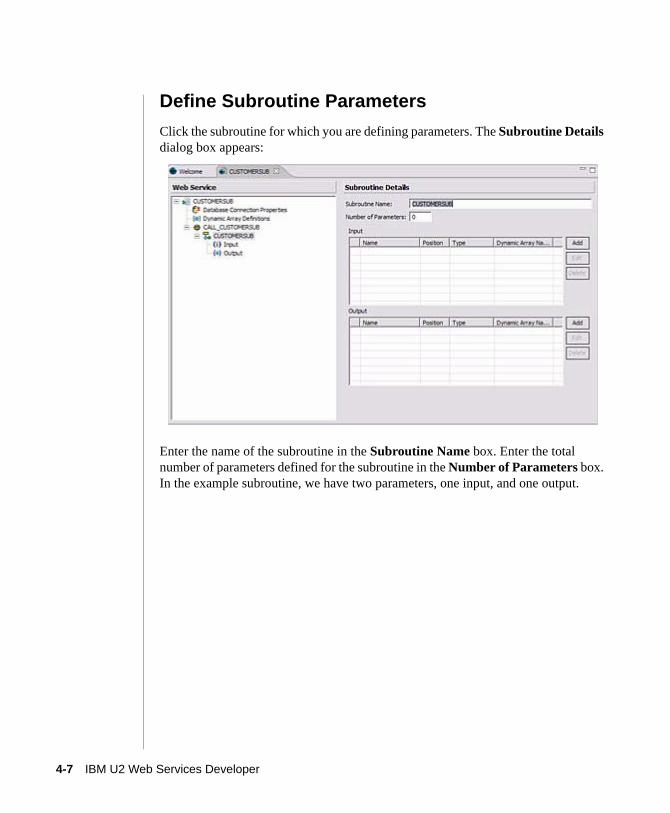
Define Subroutine ParametersClick the subroutine for which you are defining parameters. The Subroutine Details dialog box appears:
Enter the name of the subroutine in the Subroutine Name box. Enter the total number of parameters defined for the subroutine in the Number of Parameters box. In the example subroutine, we have two parameters, one input, and one output.
4-7 IBM U2 Web Services Developer
C:\Program Files\Adobe\FrameMaker8\UniData
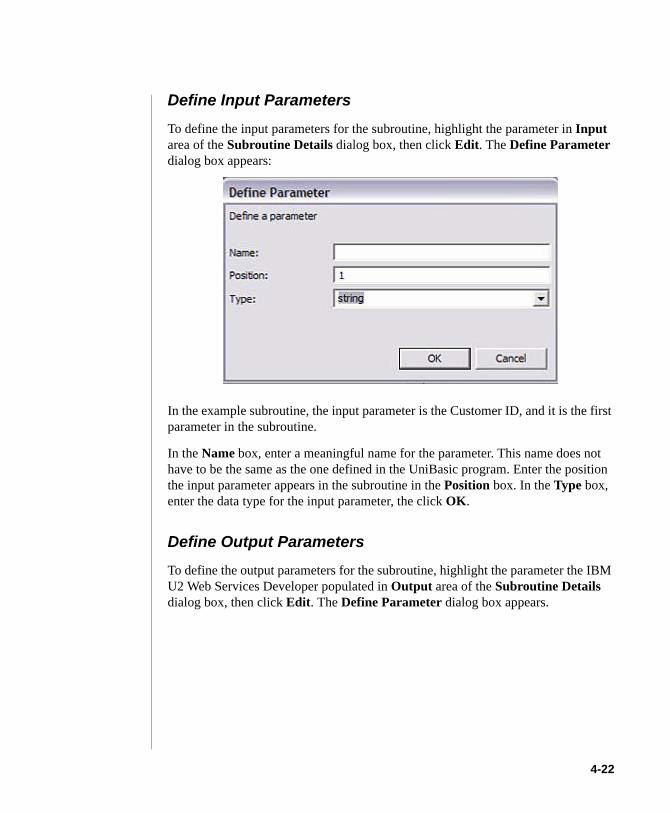
Define Input Parameters
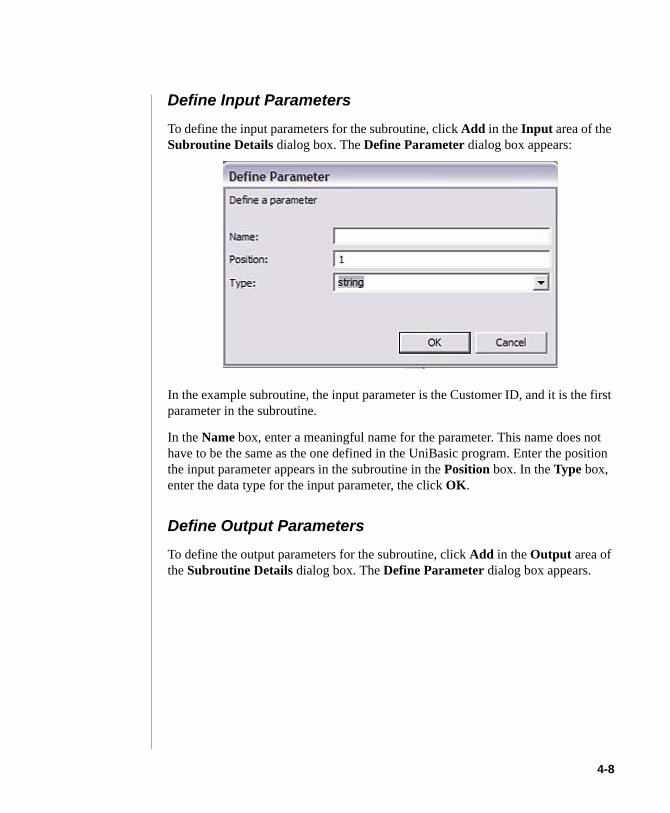
To define the input parameters for the subroutine, click Add in the Input area of the Subroutine Details dialog box. The Define Parameter dialog box appears:
In the example subroutine, the input parameter is the Customer ID, and it is the first parameter in the subroutine.
In the Name box, enter a meaningful name for the parameter. This name does not have to be the same as the one defined in the UniBasic program. Enter the position the input parameter appears in the subroutine in the Position box. In the Type box, enter the data type for the input parameter, the click OK.
Define Output ParametersTo define the output parameters for the subroutine, click Add in the Output area of the Subroutine Details dialog box. The Define Parameter dialog box appears.
4-8
C:\Program Files\Adobe\FrameMaker8\UniData 7.2\7.2rebranded\webservices\Ch4.fm3/10/10
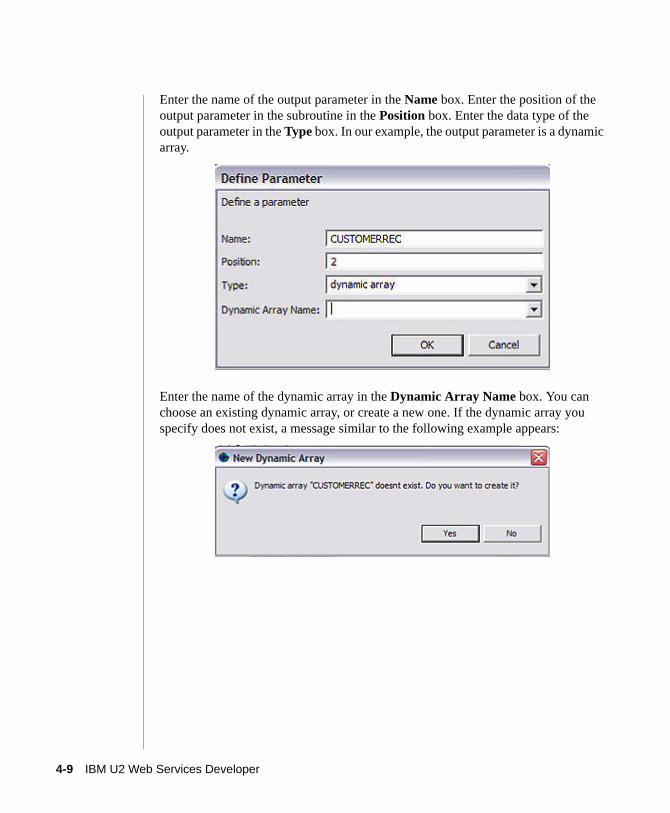
Enter the name of the output parameter in the Name box. Enter the position of the output parameter in the subroutine in the Position box. Enter the data type of the output parameter in the Type box. In our example, the output parameter is a dynamic array.
Enter the name of the dynamic array in the Dynamic Array Name box. You can choose an existing dynamic array, or create a new one. If the dynamic array you specify does not exist, a message similar to the following example appears:
4-9 IBM U2 Web Services Developer
C:\Program Files\Adobe\FrameMaker8\UniData
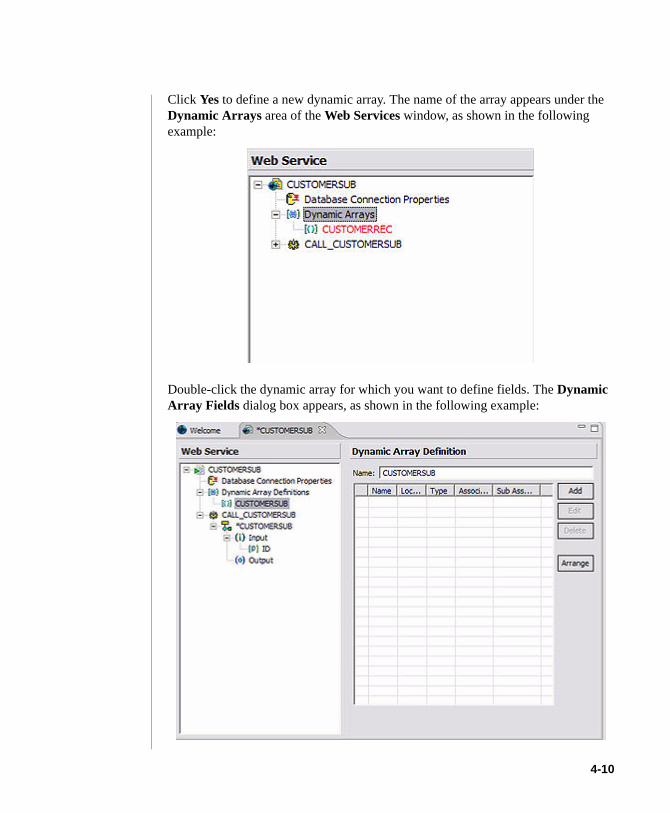
Click Yes to define a new dynamic array. The name of the array appears under the Dynamic Arrays area of the Web Services window, as shown in the following example:
Double-click the dynamic array for which you want to define fields. The Dynamic Array Fields dialog box appears, as shown in the following example:
4-10
C:\Program Files\Adobe\FrameMaker8\UniData 7.2\7.2rebranded\webservices\Ch4.fm3/10/10
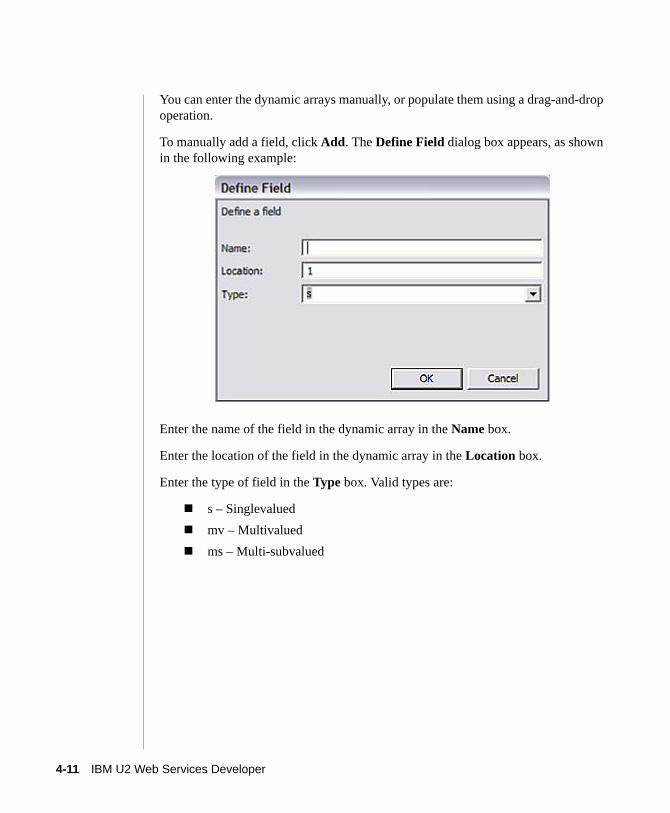
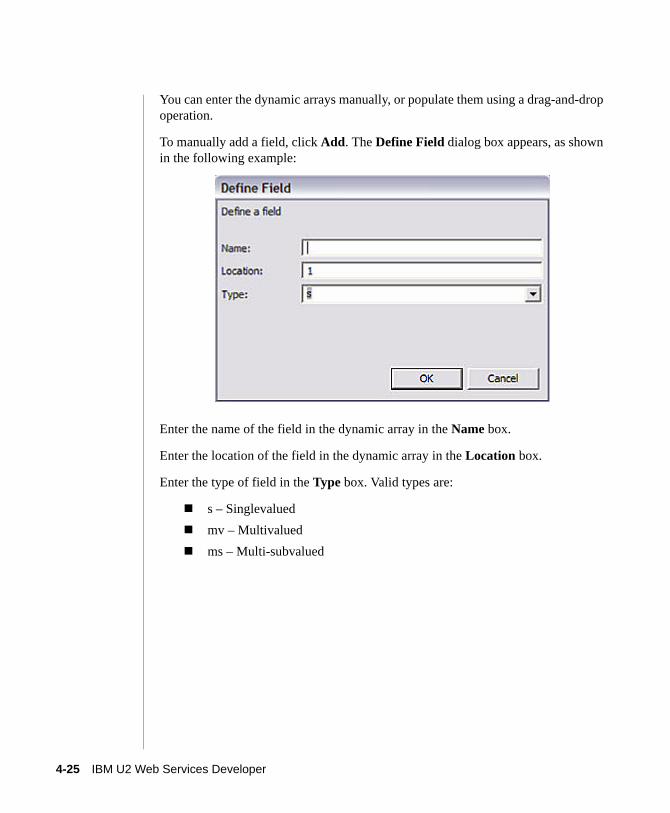
You can enter the dynamic arrays manually, or populate them using a drag-and-drop operation.
To manually add a field, click Add. The Define Field dialog box appears, as shown in the following example:
Enter the name of the field in the dynamic array in the Name box.
Enter the location of the field in the dynamic array in the Location box.
Enter the type of field in the Type box. Valid types are:
s – Singlevaluedmv – Multivaluedms – Multi-subvalued
4-11 IBM U2 Web Services Developer
C:\Program Files\Adobe\FrameMaker8\UniData
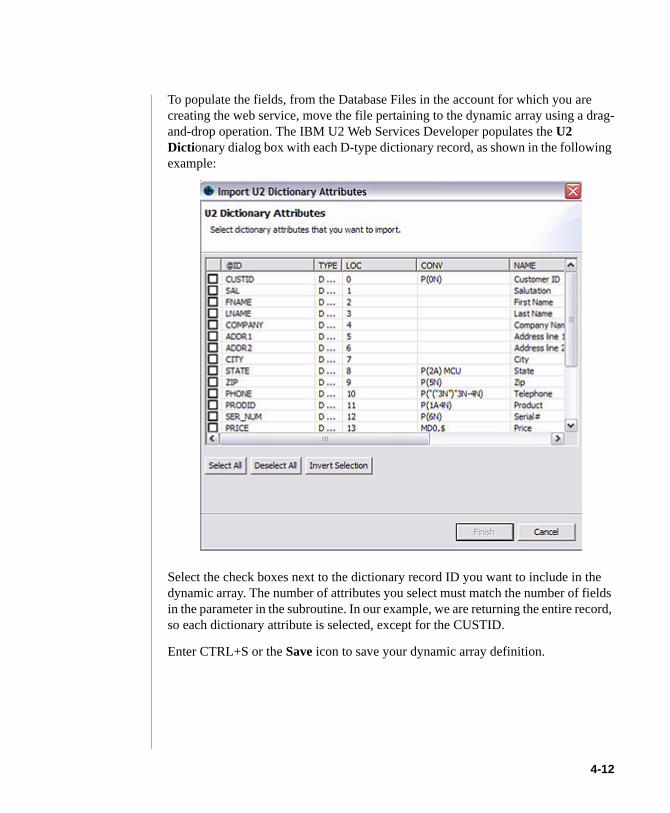
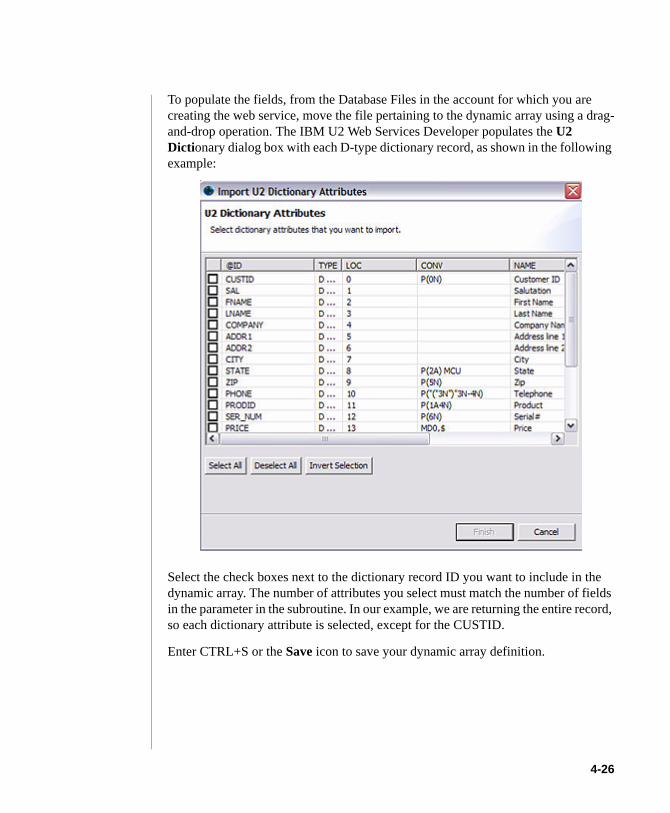
To populate the fields, from the Database Files in the account for which you are creating the web service, move the file pertaining to the dynamic array using a drag-and-drop operation. The IBM U2 Web Services Developer populates the U2 Dictionary dialog box with each D-type dictionary record, as shown in the following example:
Select the check boxes next to the dictionary record ID you want to include in the dynamic array. The number of attributes you select must match the number of fields in the parameter in the subroutine. In our example, we are returning the entire record, so each dictionary attribute is selected, except for the CUSTID.
Enter CTRL+S or the Save icon to save your dynamic array definition.
4-12
C:\Program Files\Adobe\FrameMaker8\UniData 7.2\7.2rebranded\webservices\Ch4.fm3/10/10
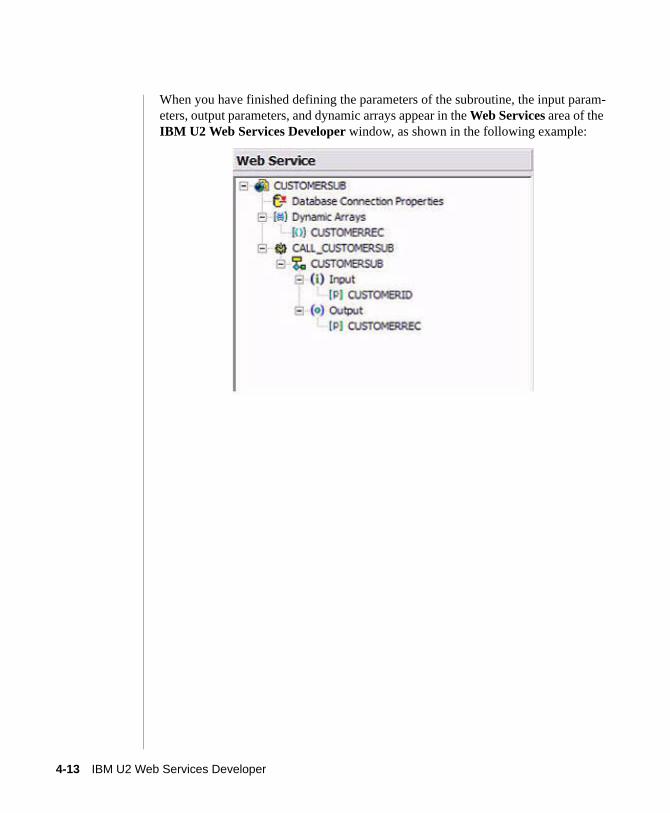
When you have finished defining the parameters of the subroutine, the input param-eters, output parameters, and dynamic arrays appear in the Web Services area of the IBM U2 Web Services Developer window, as shown in the following example:
4-13 IBM U2 Web Services Developer
C:\Program Files\Adobe\FrameMaker8\UniData
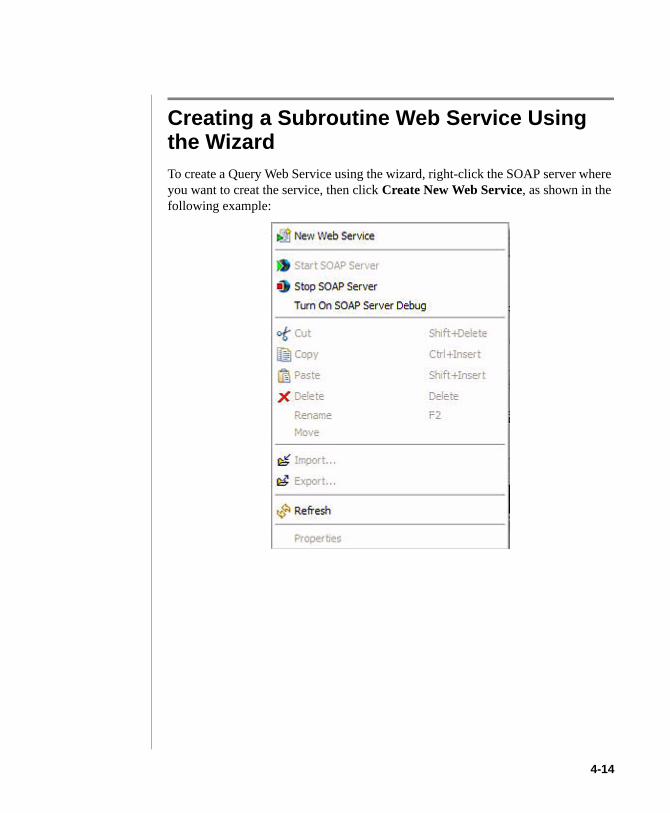
Creating a Subroutine Web Service Using the WizardTo create a Query Web Service using the wizard, right-click the SOAP server where you want to creat the service, then click Create New Web Service, as shown in the following example:
4-14
C:\Program Files\Adobe\FrameMaker8\UniData 7.2\7.2rebranded\webservices\Ch4.fm3/10/10
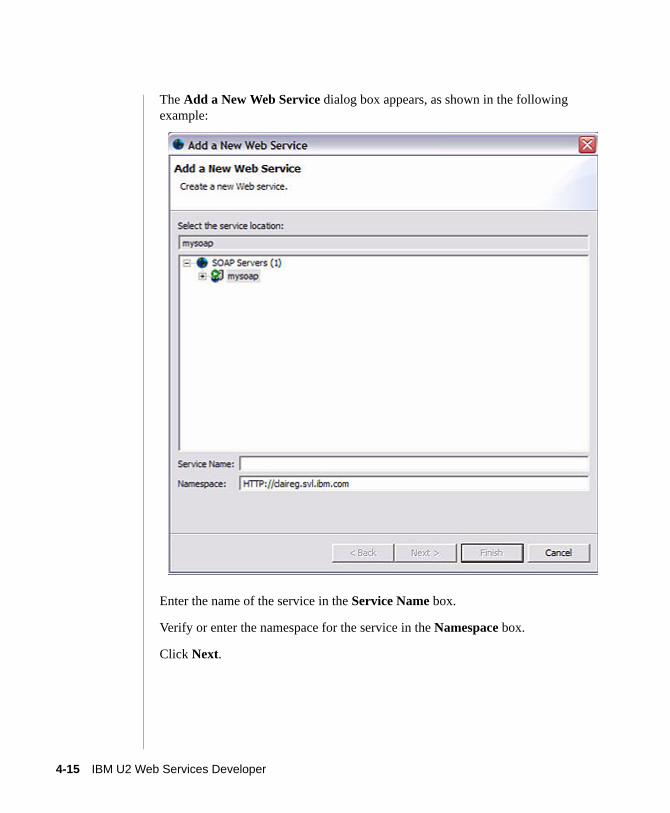
The Add a New Web Service dialog box appears, as shown in the following example:
Enter the name of the service in the Service Name box.
Verify or enter the namespace for the service in the Namespace box.
Click Next.
4-15 IBM U2 Web Services Developer
C:\Program Files\Adobe\FrameMaker8\UniData
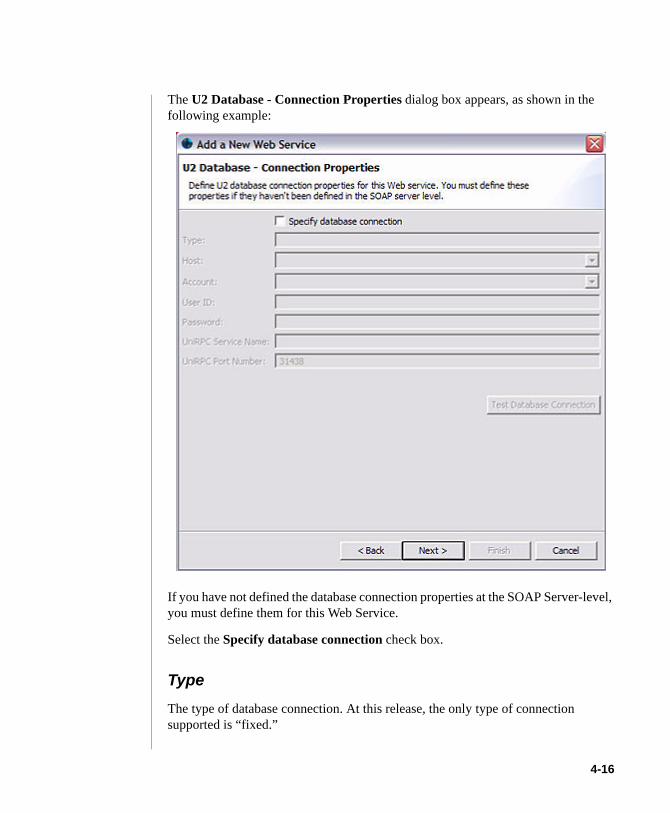
The U2 Database - Connection Properties dialog box appears, as shown in the following example:
If you have not defined the database connection properties at the SOAP Server-level, you must define them for this Web Service.
Select the Specify database connection check box.
Type
The type of database connection. At this release, the only type of connection supported is “fixed.”
4-16
C:\Program Files\Adobe\FrameMaker8\UniData 7.2\7.2rebranded\webservices\Ch4.fm3/10/10
Host
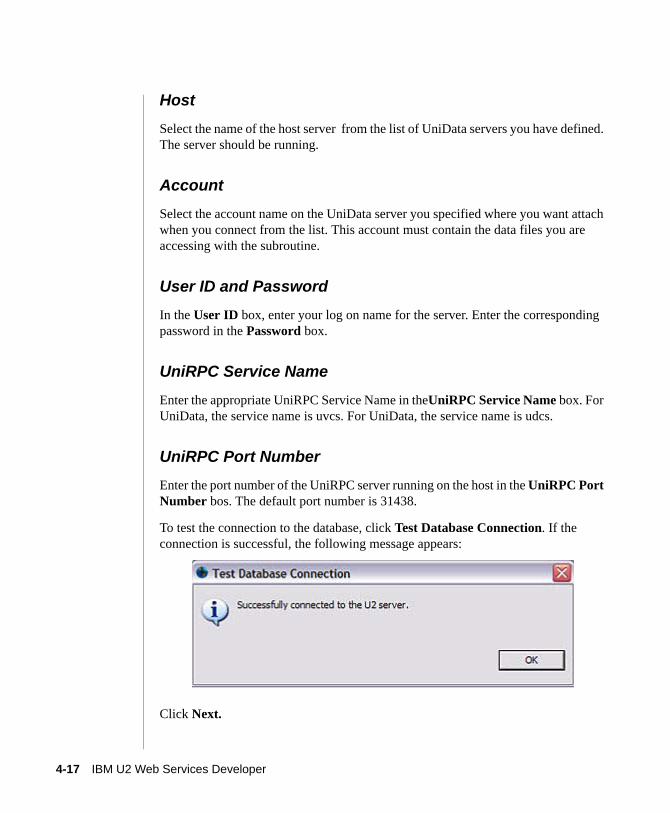
Select the name of the host server from the list of UniData servers you have defined. The server should be running.
Account
Select the account name on the UniData server you specified where you want attach when you connect from the list. This account must contain the data files you are accessing with the subroutine.
User ID and Password
In the User ID box, enter your log on name for the server. Enter the corresponding password in the Password box.
UniRPC Service Name
Enter the appropriate UniRPC Service Name in theUniRPC Service Name box. For UniData, the service name is uvcs. For UniData, the service name is udcs.
UniRPC Port Number
Enter the port number of the UniRPC server running on the host in the UniRPC Port Number bos. The default port number is 31438.
To test the connection to the database, click Test Database Connection. If the connection is successful, the following message appears:
Click Next.
4-17 IBM U2 Web Services Developer
C:\Program Files\Adobe\FrameMaker8\UniData
The U2 Database - Connection Security dialog box appears, as shown in the following example:
Key StoreEnter the full path to the key store on the SOAP server, or click Browse to navigate to the key store.
Key Store PasswordEnter the password corresponding to the key store you defined in the Key Store box.
In the Confirm Key Store Password box, reenter the password.
4-18
C:\Program Files\Adobe\FrameMaker8\UniData 7.2\7.2rebranded\webservices\Ch4.fm3/10/10
Key Password
Enter the encryption key password, if one exists, in the Key Password box. Reenter the password in the Confirm Key Password box.
Enable Authentication
If you want the client to send its certification for authentication, select the Client Authentication Required check box.
For detailed information about SSL, see UniBasic Extensions.
Click Next.
The Operation dialog box appears, as shown in the following example:t
4-19 IBM U2 Web Services Developer
C:\Program Files\Adobe\FrameMaker8\UniData
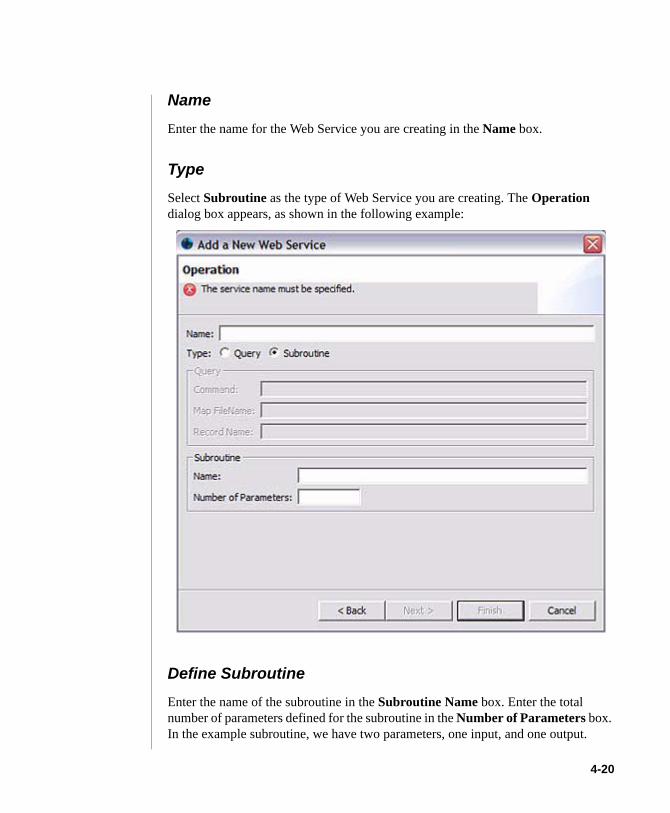
Name
Enter the name for the Web Service you are creating in the Name box.
Type
Select Subroutine as the type of Web Service you are creating. The Operation dialog box appears, as shown in the following example:
Define Subroutine
Enter the name of the subroutine in the Subroutine Name box. Enter the total number of parameters defined for the subroutine in the Number of Parameters box. In the example subroutine, we have two parameters, one input, and one output.
4-20
C:\Program Files\Adobe\FrameMaker8\UniData 7.2\7.2rebranded\webservices\Ch4.fm3/10/10
Click Next.
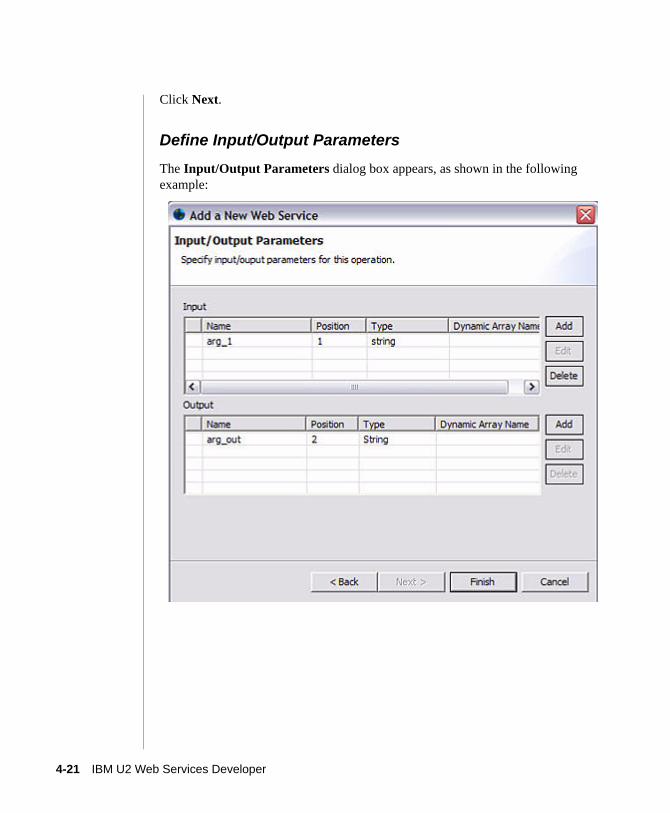
Define Input/Output Parameters
The Input/Output Parameters dialog box appears, as shown in the following example:
4-21 IBM U2 Web Services Developer
C:\Program Files\Adobe\FrameMaker8\UniData
Define Input Parameters
To define the input parameters for the subroutine, highlight the parameter in Input area of the Subroutine Details dialog box, then click Edit. The Define Parameter dialog box appears:
In the example subroutine, the input parameter is the Customer ID, and it is the first parameter in the subroutine.
In the Name box, enter a meaningful name for the parameter. This name does not have to be the same as the one defined in the UniBasic program. Enter the position the input parameter appears in the subroutine in the Position box. In the Type box, enter the data type for the input parameter, the click OK.
Define Output ParametersTo define the output parameters for the subroutine, highlight the parameter the IBM U2 Web Services Developer populated in Output area of the Subroutine Details dialog box, then click Edit. The Define Parameter dialog box appears.
4-22

C:\Program Files\Adobe\FrameMaker8\UniData 7.2\7.2rebranded\webservices\Ch4.fm3/10/10
Enter the name of the output parameter in the Name box. Enter the position of the output parameter in the subroutine in the Position box. Enter the data type of the output parameter in the Type box. In our example, the output parameter is a dynamic array.
Enter the name of the dynamic array in the Dynamic Array Name box. You can choose an existing dynamic array, or create a new one. If the dynamic array you specify does not exist, a message similar to the following example appears:
4-23 IBM U2 Web Services Developer

C:\Program Files\Adobe\FrameMaker8\UniData
Click Yes to define a new dynamic array. The name of the array appears under the Dynamic Arrays area of the Web Services window, as shown in the following example:
Double-click the dynamic array for which you want to define fields. The Dynamic Array Fields dialog box appears, as shown in the following example:
4-24
C:\Program Files\Adobe\FrameMaker8\UniData 7.2\7.2rebranded\webservices\Ch4.fm3/10/10
You can enter the dynamic arrays manually, or populate them using a drag-and-drop operation.
To manually add a field, click Add. The Define Field dialog box appears, as shown in the following example:
Enter the name of the field in the dynamic array in the Name box.
Enter the location of the field in the dynamic array in the Location box.
Enter the type of field in the Type box. Valid types are:
s – Singlevaluedmv – Multivaluedms – Multi-subvalued
4-25 IBM U2 Web Services Developer
C:\Program Files\Adobe\FrameMaker8\UniData
To populate the fields, from the Database Files in the account for which you are creating the web service, move the file pertaining to the dynamic array using a drag-and-drop operation. The IBM U2 Web Services Developer populates the U2 Dictionary dialog box with each D-type dictionary record, as shown in the following example:
Select the check boxes next to the dictionary record ID you want to include in the dynamic array. The number of attributes you select must match the number of fields in the parameter in the subroutine. In our example, we are returning the entire record, so each dictionary attribute is selected, except for the CUSTID.
Enter CTRL+S or the Save icon to save your dynamic array definition.
4-26

C:\Program Files\Adobe\FrameMaker8\UniData 7.2\7.2rebranded\webservices\Ch4.fm3/10/10
When you have finished defining the parameters of the subroutine, the input param-eters, output parameters, and dynamic arrays appear in the Web Services area of the IBM U2 Web Services Developer window, as shown in the following example:
4-27 IBM U2 Web Services Developer

C:\Program Files\Adobe\FrameMaker8\UniData
Executing the Web ServiceTo execute the Web Service, click the Launch icon from the toolbar:
The Web Services Explorer window appears. Click the WSDL icon, as shown in the following example:
Under the Navigator area of the Web Services Explorer window, click WSDL Main. The Open WSDL dialog box appears, as shown in the following example:
Launch icon
WSDL icon
4-28
C:\Program Files\Adobe\FrameMaker8\UniData 7.2\7.2rebranded\webservices\Ch4.fm3/10/10
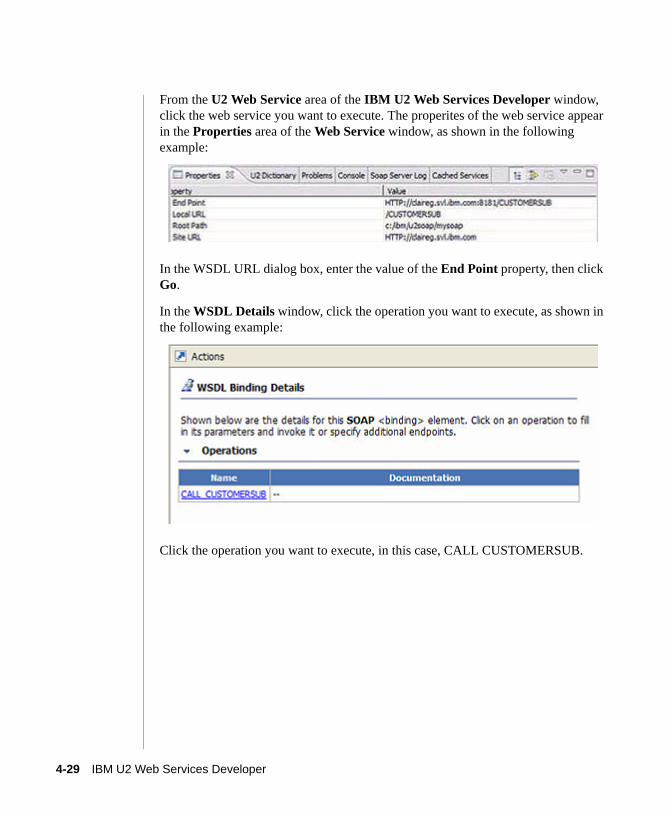
From the U2 Web Service area of the IBM U2 Web Services Developer window, click the web service you want to execute. The properites of the web service appear in the Properties area of the Web Service window, as shown in the following example:
In the WSDL URL dialog box, enter the value of the End Point property, then click Go.
In the WSDL Details window, click the operation you want to execute, as shown in the following example:
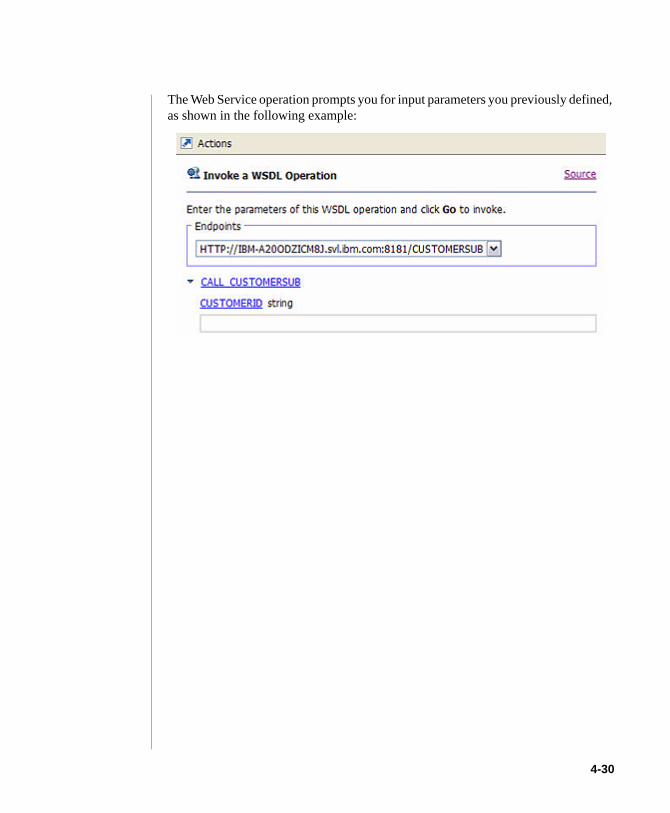
Click the operation you want to execute, in this case, CALL CUSTOMERSUB.
4-29 IBM U2 Web Services Developer
C:\Program Files\Adobe\FrameMaker8\UniData
The Web Service operation prompts you for input parameters you previously defined, as shown in the following example:
4-30
C:\Program Files\Adobe\FrameMaker8\UniData 7.2\7.2rebranded\webservices\Ch4.fm3/10/10
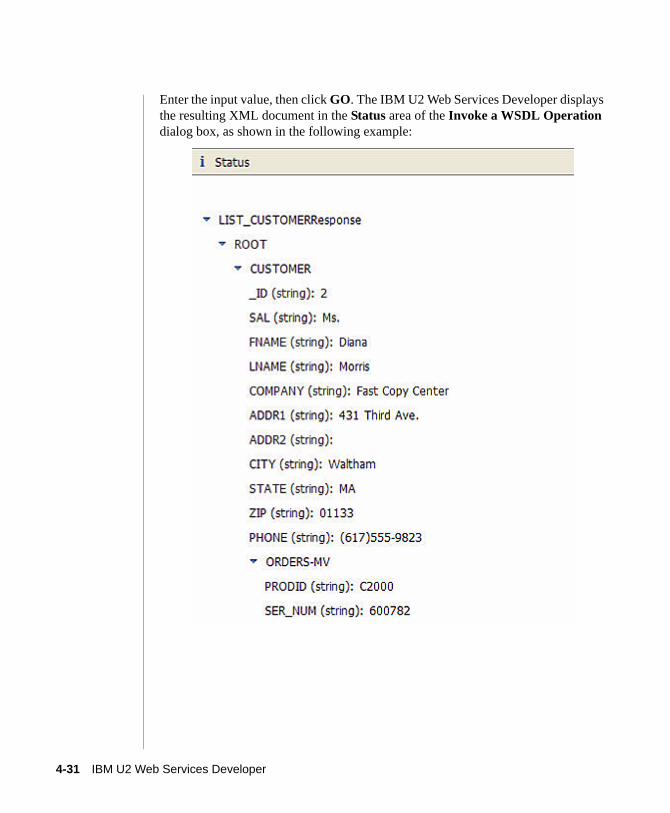
Enter the input value, then click GO. The IBM U2 Web Services Developer displays the resulting XML document in the Status area of the Invoke a WSDL Operation dialog box, as shown in the following example:
4-31 IBM U2 Web Services Developer
:\ProgMarch
1Administering UniData on Windows NT or Windows 20000
5 Chapter
ram Fi10 201
Beta Beta Beta Beta Beta Beta Beta Beta Beta Beta Beta Beta Beta Beta Beta Beta Beta
Miscellaneous Features
Displaying Properties . . . . . . . . . . . . . . . . . 5-3 Displaying Server Properties. . . . . . . . . . . . . . 5-3 Displaying Account Properties . . . . . . . . . . . . . 5-4 Displaying File Properties . . . . . . . . . . . . . . 5-4Displaying File Dictionaries . . . . . . . . . . . . . . . 5-6Displaying SOAP Server Logs . . . . . . . . . . . . . . 5-7Displaying Cached Services . . . . . . . . . . . . . . . 5-8
les\Adobe\FrameMaker8\UniData 7.2\7.2rebranded\webservices\Ch5TOC.fm0 3:45 pm Administering UniData on Windows NT or Windows 2000
C:\Program Files\Adobe\FrameMaker8\UniData 7.2\7.2rebranded\webservices\Ch5.fm3/10/10
This chapter describes miscellenous features of the IBM U2 Web Services Developer.
5-2 IBM U2 Web Services Developer
C:\Program Files\Adobe\FrameMaker8\UniData
Displaying PropertiesYou can display the properties of a server, account or file in the Properties area to of the IBM U2 Web Services Developer window.
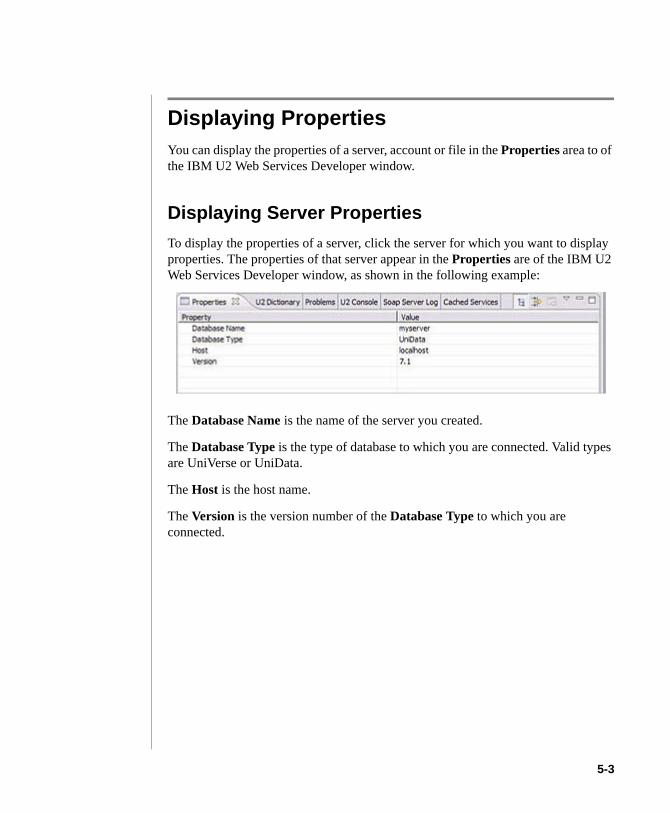
Displaying Server PropertiesTo display the properties of a server, click the server for which you want to display properties. The properties of that server appear in the Properties are of the IBM U2 Web Services Developer window, as shown in the following example:
The Database Name is the name of the server you created.
The Database Type is the type of database to which you are connected. Valid types are UniVerse or UniData.
The Host is the host name.
The Version is the version number of the Database Type to which you are connected.
5-3
C:\Program Files\Adobe\FrameMaker8\UniData 7.2\7.2rebranded\webservices\Ch5.fm3/10/10
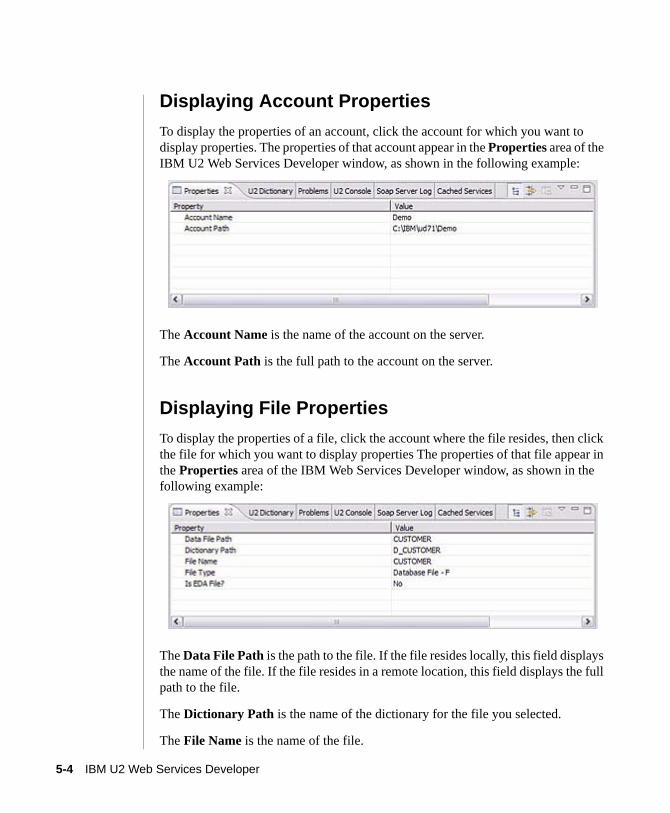
Displaying Account PropertiesTo display the properties of an account, click the account for which you want to display properties. The properties of that account appear in the Properties area of the IBM U2 Web Services Developer window, as shown in the following example:
The Account Name is the name of the account on the server.
The Account Path is the full path to the account on the server.
Displaying File PropertiesTo display the properties of a file, click the account where the file resides, then click the file for which you want to display properties The properties of that file appear in the Properties area of the IBM Web Services Developer window, as shown in the following example:
The Data File Path is the path to the file. If the file resides locally, this field displays the name of the file. If the file resides in a remote location, this field displays the full path to the file.
The Dictionary Path is the name of the dictionary for the file you selected.
The File Name is the name of the file.
5-4 IBM U2 Web Services Developer
C:\Program Files\Adobe\FrameMaker8\UniData
The File Type is the type of file.
Is EDA File indicates whether the file is an EDA file or not. This option is only valid on a UniData database.
5-5
C:\Program Files\Adobe\FrameMaker8\UniData 7.2\7.2rebranded\webservices\Ch5.fm3/10/10
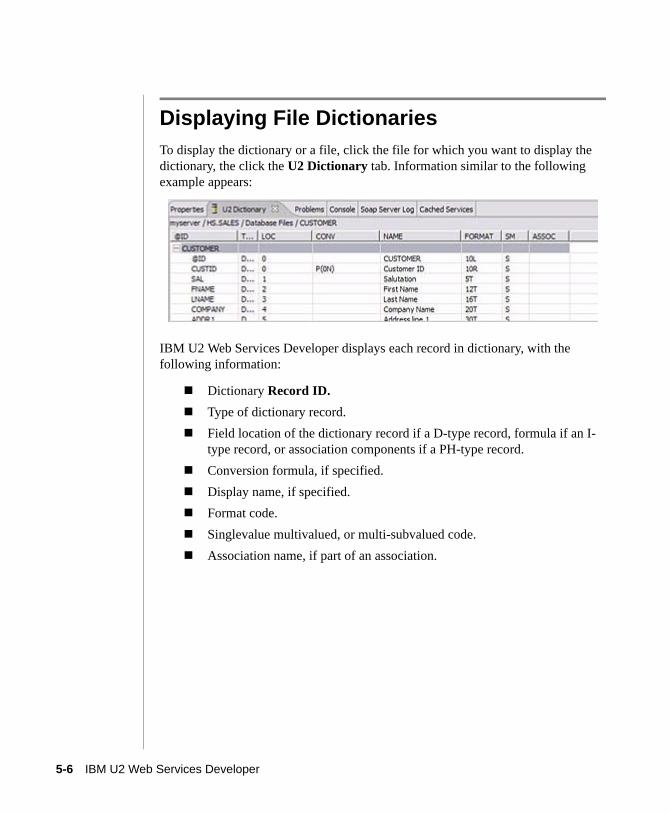
Displaying File DictionariesTo display the dictionary or a file, click the file for which you want to display the dictionary, the click the U2 Dictionary tab. Information similar to the following example appears:
IBM U2 Web Services Developer displays each record in dictionary, with the following information:
Dictionary Record ID.Type of dictionary record.Field location of the dictionary record if a D-type record, formula if an I-type record, or association components if a PH-type record.Conversion formula, if specified.Display name, if specified.Format code.Singlevalue multivalued, or multi-subvalued code.Association name, if part of an association.
5-6 IBM U2 Web Services Developer
C:\Program Files\Adobe\FrameMaker8\UniData
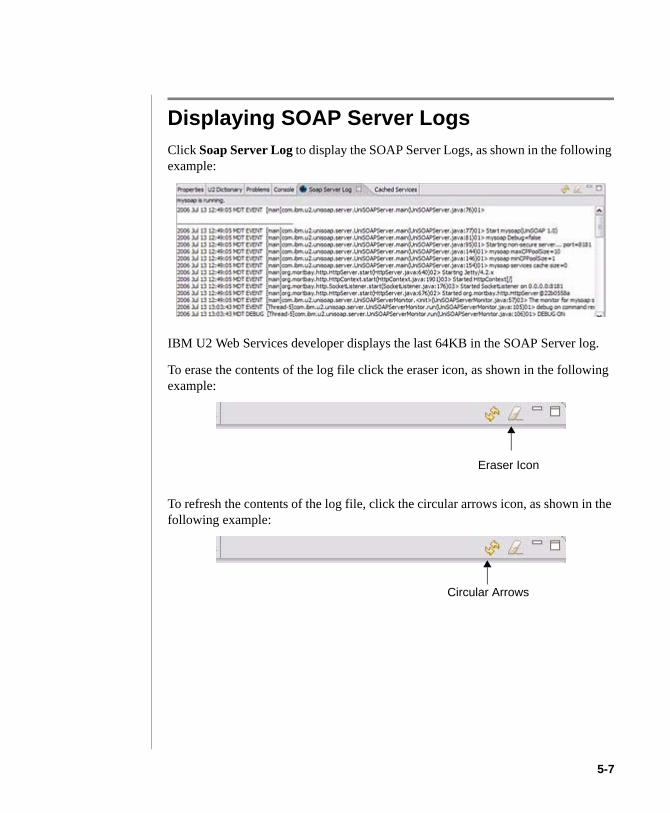
Displaying SOAP Server LogsClick Soap Server Log to display the SOAP Server Logs, as shown in the following example:
IBM U2 Web Services developer displays the last 64KB in the SOAP Server log.
To erase the contents of the log file click the eraser icon, as shown in the following example:
To refresh the contents of the log file, click the circular arrows icon, as shown in the following example:
Eraser Icon
Circular Arrows
5-7
C:\Program Files\Adobe\FrameMaker8\UniData 7.2\7.2rebranded\webservices\Ch5.fm3/10/10
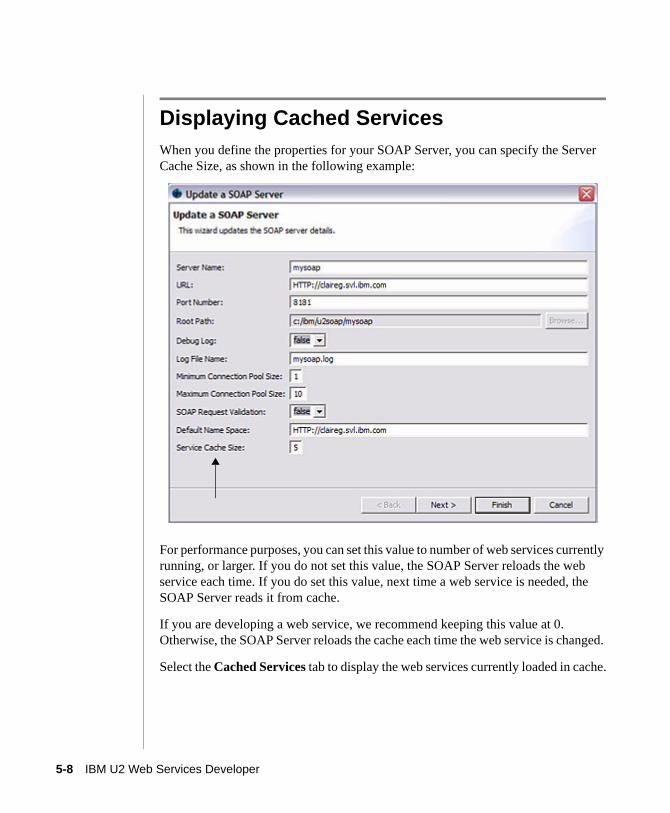
Displaying Cached ServicesWhen you define the properties for your SOAP Server, you can specify the Server Cache Size, as shown in the following example:
For performance purposes, you can set this value to number of web services currently running, or larger. If you do not set this value, the SOAP Server reloads the web service each time. If you do set this value, next time a web service is needed, the SOAP Server reads it from cache.
If you are developing a web service, we recommend keeping this value at 0. Otherwise, the SOAP Server reloads the cache each time the web service is changed.
Select the Cached Services tab to display the web services currently loaded in cache.
5-8 IBM U2 Web Services Developer

:\ProgMarch
1Administering UniData on Windows NT or Windows 20000
6 Chapter
ram Fi10 201
Beta Beta Beta Beta Beta Beta Beta Beta Beta Beta Beta Beta Beta Beta Beta Beta Beta
Accessing the Web Services Programatically
Viewing the Web Service URL . . . . . . . . . . . . . 6-2 View the WSDL File . . . . . . . . . . . . . . . . 6-3Programming a Web Services Client . . . . . . . . . . . . 6-4 Generating a Client Proxy in IBM Websphere Application
Developer . . . . . . . . . . . . . . . . . . . 6-4 Generating a Client Proxy in Visual Studio.Net . . . . . . . . 6-4
les\Adobe\FrameMaker8\UniData 7.2\7.2rebranded\webservices\Ch6TOC.fm0 3:45 pm Administering UniData on Windows NT or Windows 2000
C:\Program Files\Adobe\FrameMaker8\UniData 7.2\7.2rebranded\webservices\Ch6.fm3/10/10
The chapter describes how to access Web Services programatically.
A defined Web Service is identified by its URL. The format of the URL is:
SOAPserverURL/virtual_directory_path/servicename
SOAPserverURL is defined when you create a new SOAP server.
virtual_directory_path is a path relative to the configurable root directory of the SOAP server.
servicename is the name of the web service.
You can identify the URL for the Web Service from the IBM U2 Web Services Developer.
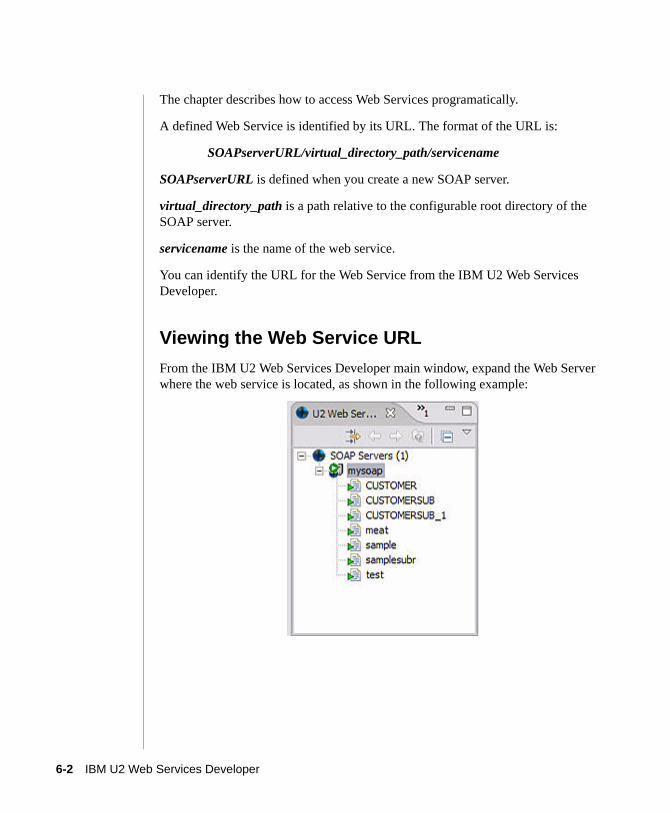
Viewing the Web Service URLFrom the IBM U2 Web Services Developer main window, expand the Web Server where the web service is located, as shown in the following example:
6-2 IBM U2 Web Services Developer
C:\Program Files\Adobe\FrameMaker8\UniData
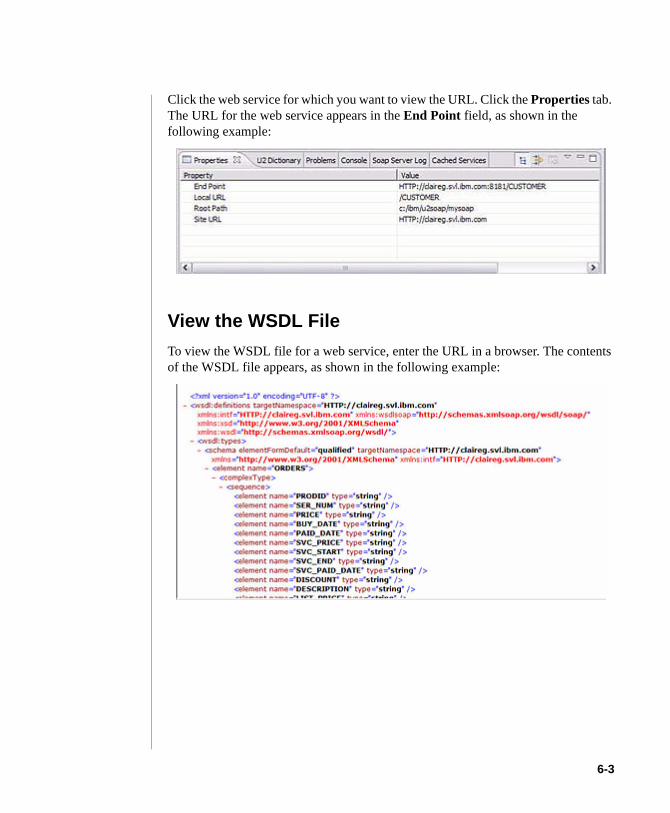
Click the web service for which you want to view the URL. Click the Properties tab. The URL for the web service appears in the End Point field, as shown in the following example:
View the WSDL FileTo view the WSDL file for a web service, enter the URL in a browser. The contents of the WSDL file appears, as shown in the following example:
6-3
C:\Program Files\Adobe\FrameMaker8\UniData 7.2\7.2rebranded\webservices\Ch6.fm3/10/10
Programming a Web Services ClientTo write a Web Services client program, you create an object of a proxy class, then call the methods for that object.
Many software tools can accept a WSDL file and generate proxy classes in many kinds of languages, including Java, C#, VB.NET, and so forth.
Proxy classes can be generated automatically because the definition contained in a WSDL file gives a complete description of the interfaces to the Web service you define, including the XML schemas of the input and output data, the SOAP bindings to these schemas, the transportation protocol, and so forth.
The proxy classes include a service proxy class, as well as several classes that represent data structures used in the Web Services. These classes are self-explanatory.
Generating a Client Proxy in IBM Websphere Application DeveloperTo generate a Web Service client proxy in IBM Websphere Application Developer, select New from the menu, choose Web service client and the project type, then follow the instructions from the wizard. Provide the URL of the WSDL file. For more information, see the documentation for the IBM Websphere Application Developer.
Generating a Client Proxy in Visual Studio.NetTo generate a Web Service client proxy in Visual Studio.NET, start a new project, then add a Web Reference. The Add Web Reference wizard prompts for the URL for the WSDL file. After providing the URL, the wizard generates a set of proxy classes for the current project. For more information, see the documentation or Visual Studio .NET.
6-4 IBM U2 Web Services Developer

:\ProgMarch
1Administering UniData on Windows NT or Windows 20000
7 Chapter
ram Fi10 201
Beta Beta Beta Beta Beta Beta Beta Beta Beta Beta Beta Beta Beta Beta Beta Beta Beta
Deploying Web Services
Exporting Web Services . . . . . . . . . . . . . . . 7-2 Deploying the SOAP Server . . . . . . . . . . . . . . 7-4 Define Security between the Client and the SOAP Server . . . . 7-8 Set Connection Properties . . . . . . . . . . . . . . 7-10 Define UniData Database Connection Security . . . . . . . . 7-12Running and Stopping the SOAP Server . . . . . . . . . . . 7-15Monitoring a Remote SOAP Server . . . . . . . . . . . . . 7-16
les\Adobe\FrameMaker8\UniData 7.2\7.2rebranded\webservices\Ch7TOC.fm0 3:45 pm Administering UniData on Windows NT or Windows 2000
C:\Program Files\Adobe\FrameMaker8\UniData 7.2\7.2rebranded\webservices\Ch7.fm3/10/10
The U2 Web Services Developer deployment feature enables you to select a SOAP server defined locally and generate a deployment package, in the form of a zip file, that contains the following:
? WSDL files? The runsoapserver and stopsoapserver scripts? All required files for a runtime SOAP server
The zip file contains both a .bat and .sh script which enables you to deploy your web services on any platform.
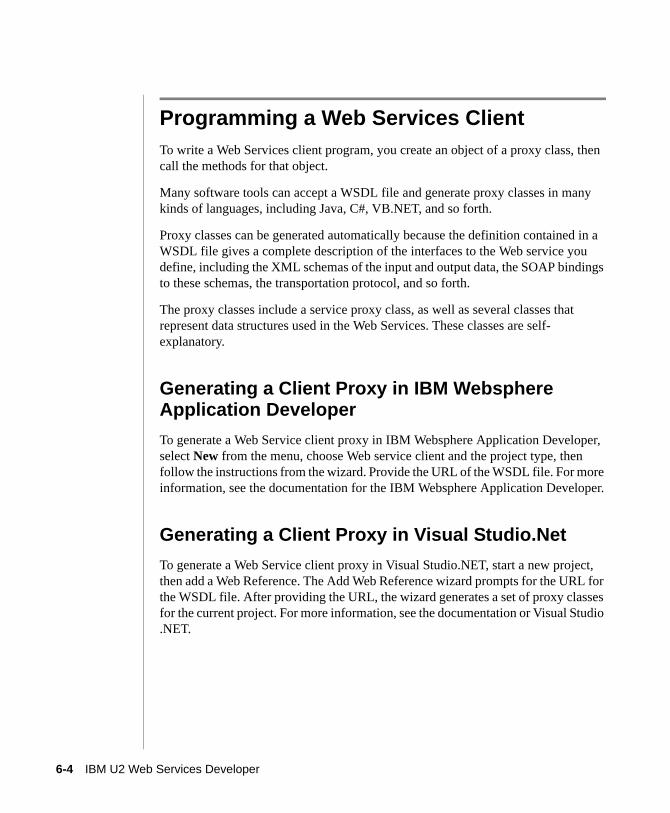
Exporting Web ServicesTo create the zip file to deploy your web services, right-click the SOAP server which contains the web service you want to deploy, as shown in the following example:
7-2 IBM U2 Web Services Developer
C:\Program Files\Adobe\FrameMaker8\UniData
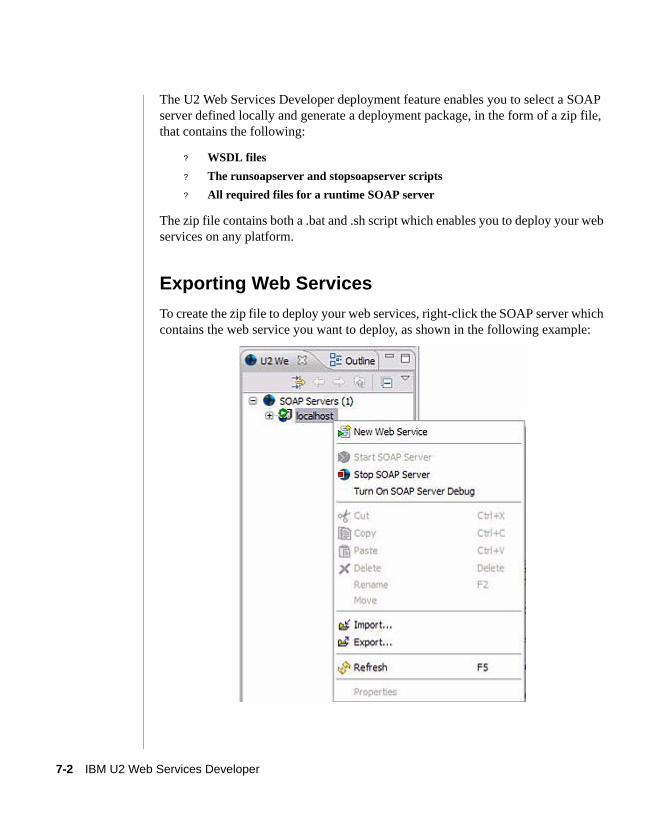
Click Export. The Export SOAP Servers dialog box appears, as shown in the following example:
In the Available SOAP Servers section, select the SOAP servers you want to export.
Enter the path for the zip file you want to create in the Archive File box, or click Browse to search for the location. By default, the U2 Web Services developer places the zip file in C:\IBM\U2Tools\soapservername.zip.
7-3
C:\Program Files\Adobe\FrameMaker8\UniData 7.2\7.2rebranded\webservices\Ch7.fm3/10/10
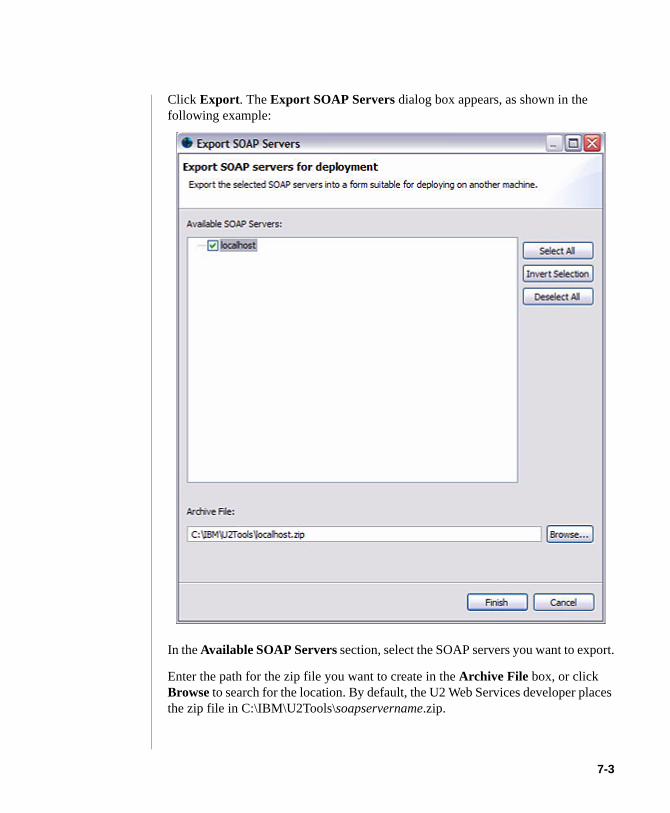
The following example shows sample contents of the zip file after the U2 Web Services Developer exports the SOAP server:
Deploying the SOAP ServerUnzip the zip file on the target machine. From the directory where you unzipped the file, execute the rundeploytool command.
rundeploytool current_directory target_directory
For example:
rundeploytool . C:\temp\myservice
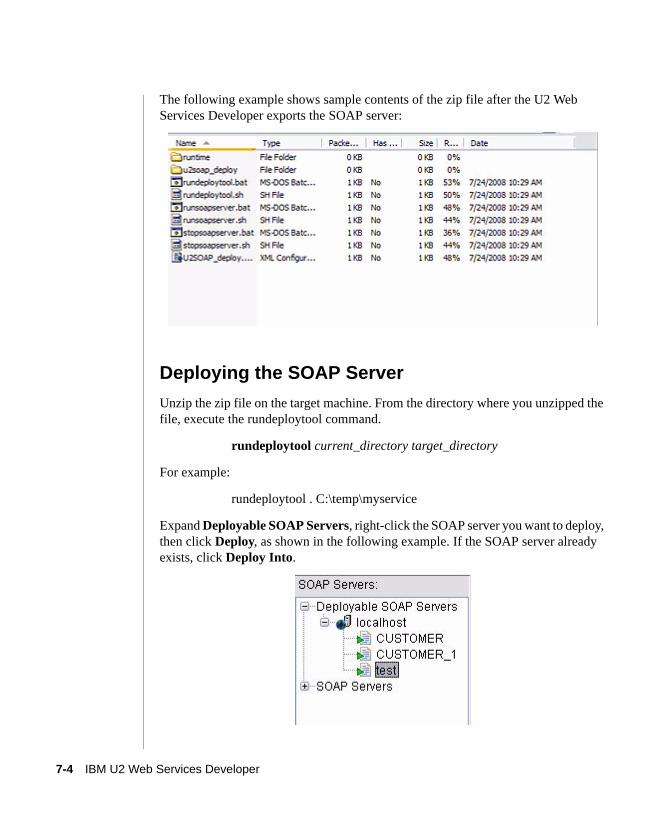
Expand Deployable SOAP Servers, right-click the SOAP server you want to deploy, then click Deploy, as shown in the following example. If the SOAP server already exists, click Deploy Into.
7-4 IBM U2 Web Services Developer
C:\Program Files\Adobe\FrameMaker8\UniData
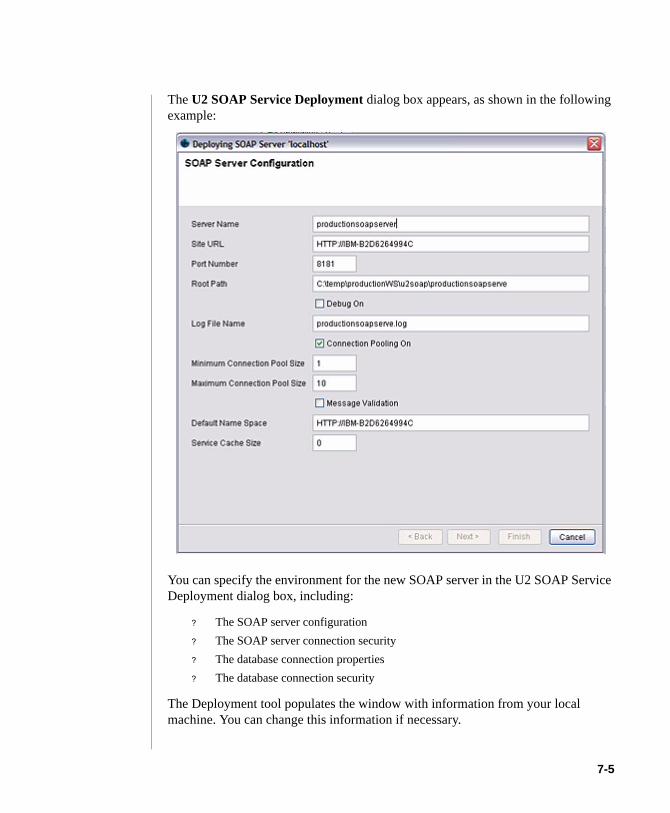
The U2 SOAP Service Deployment dialog box appears, as shown in the following example:
You can specify the environment for the new SOAP server in the U2 SOAP Service Deployment dialog box, including:
? The SOAP server configuration? The SOAP server connection security? The database connection properties? The database connection security
The Deployment tool populates the window with information from your local machine. You can change this information if necessary.
7-5
C:\Program Files\Adobe\FrameMaker8\UniData 7.2\7.2rebranded\webservices\Ch7.fm3/10/10
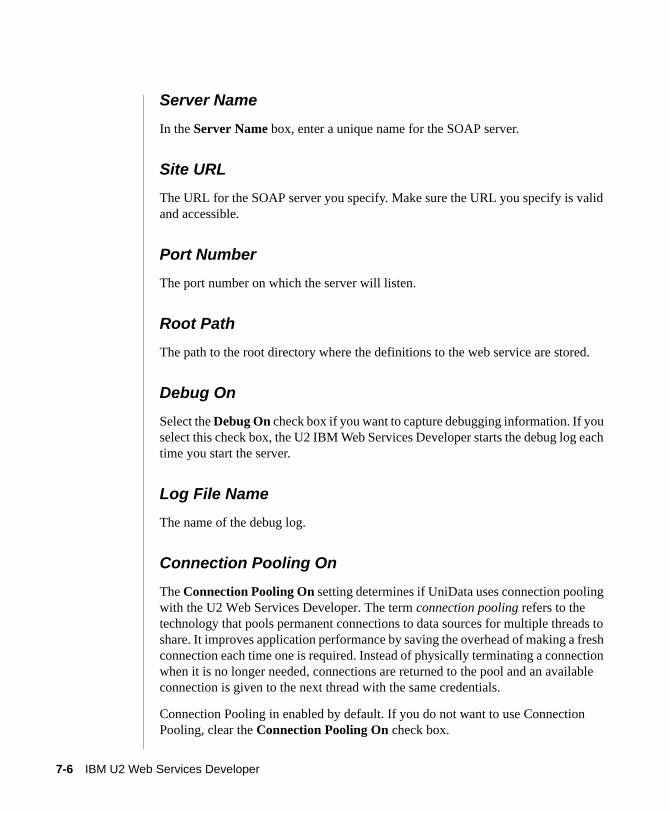
Server Name
In the Server Name box, enter a unique name for the SOAP server.
Site URL
The URL for the SOAP server you specify. Make sure the URL you specify is valid and accessible.
Port Number
The port number on which the server will listen.
Root Path
The path to the root directory where the definitions to the web service are stored.
Debug On
Select the Debug On check box if you want to capture debugging information. If you select this check box, the U2 IBM Web Services Developer starts the debug log each time you start the server.
Log File NameThe name of the debug log.
Connection Pooling On
The Connection Pooling On setting determines if UniData uses connection pooling with the U2 Web Services Developer. The term connection pooling refers to the technology that pools permanent connections to data sources for multiple threads to share. It improves application performance by saving the overhead of making a fresh connection each time one is required. Instead of physically terminating a connection when it is no longer needed, connections are returned to the pool and an available connection is given to the next thread with the same credentials.
Connection Pooling in enabled by default. If you do not want to use Connection Pooling, clear the Connection Pooling On check box.
7-6 IBM U2 Web Services Developer
C:\Program Files\Adobe\FrameMaker8\UniData
Note: IBM recommends using Connection Pooling for superior performance and scability.
Connection Pool Size
You can set the minimum and maximum size of the connection pool. If you do not define these sizes, the minimum size defaults to 1 and the maximum size defaults to 10. The minimum size determines the initial size of the connection pool.
The size of the connection pool changes dynamically between the minimum and maximum sizes you specify, depending on the system demands. When there are no pooled connections available, UniData either creates another connection, if the maximum connection pool size has not been reached, or keeps the thread waiting in the queue until a pooled connection is released or the request times out. If a pooled connection is idle for a specified time, it is disconnected.
Message Validation
Checks the SOAP request again the schema defined in the WSDL file. This option is time consuming. By default, message validation is not selected.
Default Name Space
The name space for the Web Services you define.
Server Cache SizeFor performance purposes, you can set this value to a number greater than 0 to indicate the number of web service definitions you want to keep in the cache. If you set this value, the SOAP Server will always try to read the web service definition from the cache first. If you do not set this value, the SOAP Server reloads the web service each time from disk.
If you are developing a web service, we recommend keeping this value at 0. This setting forces the SOAP Server to reload the new web service definition each time. Select the Cached Services tab to display the web services currently loaded in cache.
Click Next.
7-7
C:\Program Files\Adobe\FrameMaker8\UniData 7.2\7.2rebranded\webservices\Ch7.fm3/10/10
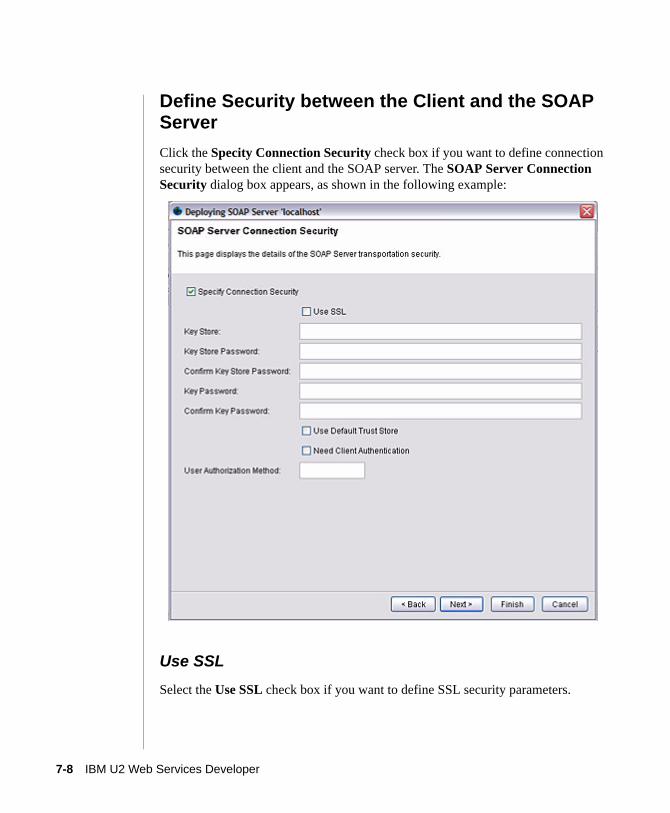
Define Security between the Client and the SOAP ServerClick the Specity Connection Security check box if you want to define connection security between the client and the SOAP server. The SOAP Server Connection Security dialog box appears, as shown in the following example:
Use SSLSelect the Use SSL check box if you want to define SSL security parameters.
7-8 IBM U2 Web Services Developer
C:\Program Files\Adobe\FrameMaker8\UniData
Key Store
Enter the full path to the key store on the SOAP server.
Key Store Password
Enter the password corresponding to the key store you defined in the Key Store box.
In the Confirm Key Store Password box, reenter the password.
Key Password
Enter the encryption key password, if one exists, in the Key Password box. Reenter the password in the Confirm Key Password box.
Enable Authentication
If you want the client to send its certification for authentication, select the Need Client Authentication check box.
Click Finish.
7-9
C:\Program Files\Adobe\FrameMaker8\UniData 7.2\7.2rebranded\webservices\Ch7.fm3/10/10
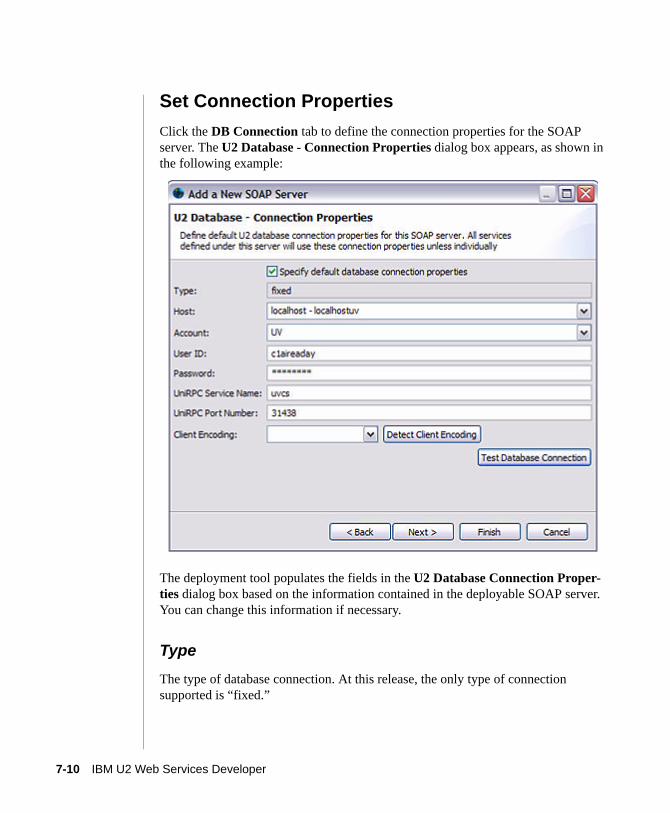
Set Connection PropertiesClick the DB Connection tab to define the connection properties for the SOAP server. The U2 Database - Connection Properties dialog box appears, as shown in the following example:
The deployment tool populates the fields in the U2 Database Connection Proper-ties dialog box based on the information contained in the deployable SOAP server. You can change this information if necessary.
Type
The type of database connection. At this release, the only type of connection supported is “fixed.”
7-10 IBM U2 Web Services Developer
C:\Program Files\Adobe\FrameMaker8\UniData
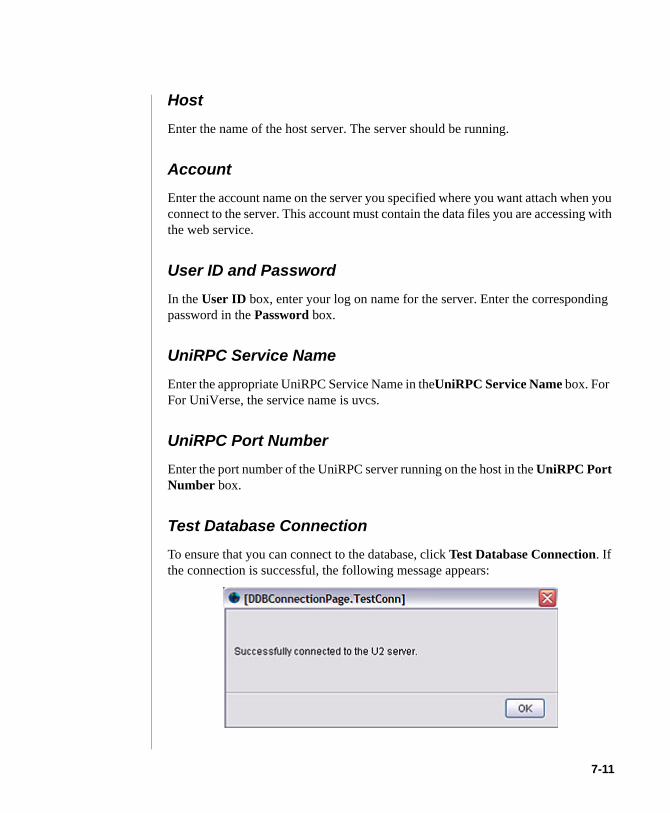
Host
Enter the name of the host server. The server should be running.
Account
Enter the account name on the server you specified where you want attach when you connect to the server. This account must contain the data files you are accessing with the web service.
User ID and Password
In the User ID box, enter your log on name for the server. Enter the corresponding password in the Password box.
UniRPC Service Name
Enter the appropriate UniRPC Service Name in theUniRPC Service Name box. For For UniVerse, the service name is uvcs.
UniRPC Port Number
Enter the port number of the UniRPC server running on the host in the UniRPC Port Number box.
Test Database ConnectionTo ensure that you can connect to the database, click Test Database Connection. If the connection is successful, the following message appears:
7-11
C:\Program Files\Adobe\FrameMaker8\UniData 7.2\7.2rebranded\webservices\Ch7.fm3/10/10
Use Connection Properties for Subsequent Servers
If you want to use the connection properties you specified for subsequent SOAP servers you deploy, select the Use this database connection and security for subsc-quent SOAP services during deployment check box.
Click Next.
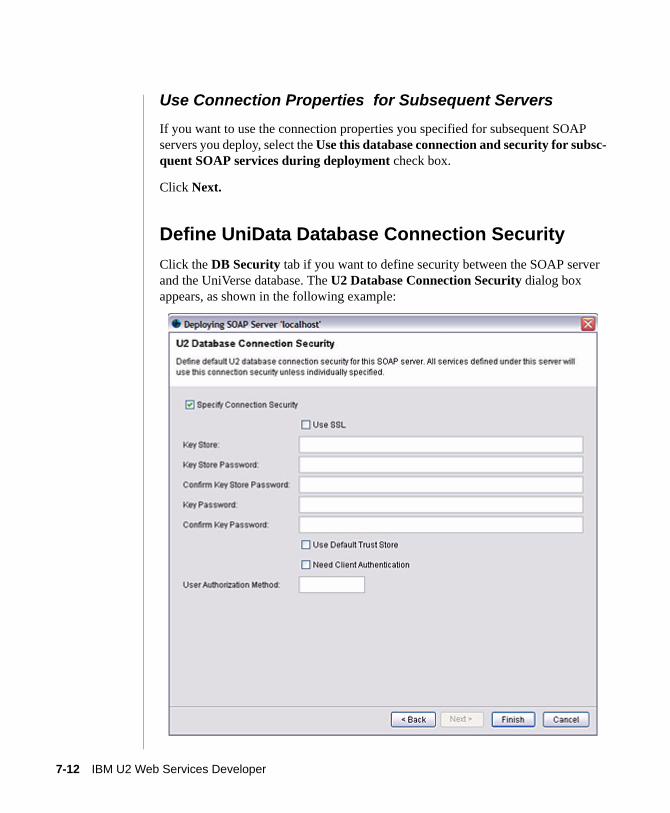
Define UniData Database Connection SecurityClick the DB Security tab if you want to define security between the SOAP server and the UniVerse database. The U2 Database Connection Security dialog box appears, as shown in the following example:
7-12 IBM U2 Web Services Developer
C:\Program Files\Adobe\FrameMaker8\UniData
Key Store
Enter the full path to the key store on the SOAP server, or click Browse to navigate to the key store.
Key Store Password
Enter the password corresponding to the key store you defined in the Key Store box.
In the Confirm Key Store Password box, reenter the password.
Key Password
Enter the encryption key password, if one exists, in the Key Password box. Reenter the password in the Confirm Key Password box.
Use Default Trust Store
Enable Authentication
If you want the client to send its certification for authentication, select the Need Client Authentication check box.
Click Next.
For detailed information about SSL, see UniData Security Features.
7-13
C:\Program Files\Adobe\FrameMaker8\UniData 7.2\7.2rebranded\webservices\Ch7.fm3/10/10
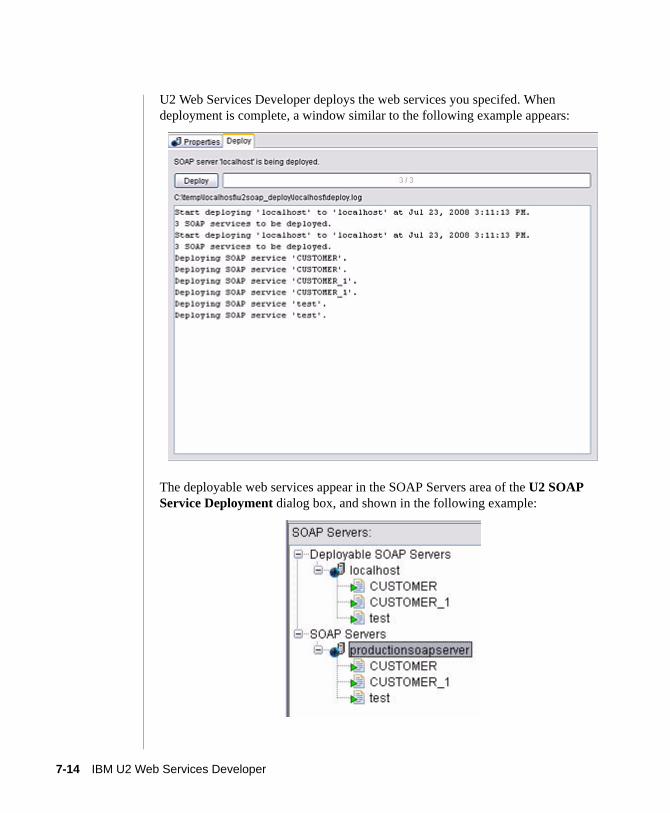
U2 Web Services Developer deploys the web services you specifed. When deployment is complete, a window similar to the following example appears:
The deployable web services appear in the SOAP Servers area of the U2 SOAP Service Deployment dialog box, and shown in the following example:
7-14 IBM U2 Web Services Developer
C:\Program Files\Adobe\FrameMaker8\UniData
Running and Stopping the SOAP ServerTo run the SOAP server, in the target directory enter:
runsoapserver soap_server_name
To stop the SOAP server, in the target directory enter:
stopsoapserver soap_server_name
7-15
C:\Program Files\Adobe\FrameMaker8\UniData 7.2\7.2rebranded\webservices\Ch7.fm3/10/10
Monitoring a Remote SOAP ServerThrough the U2 Web Services Developer, you can monitor a remote SOAP server. Complete the following steps to set up remote monitoring:
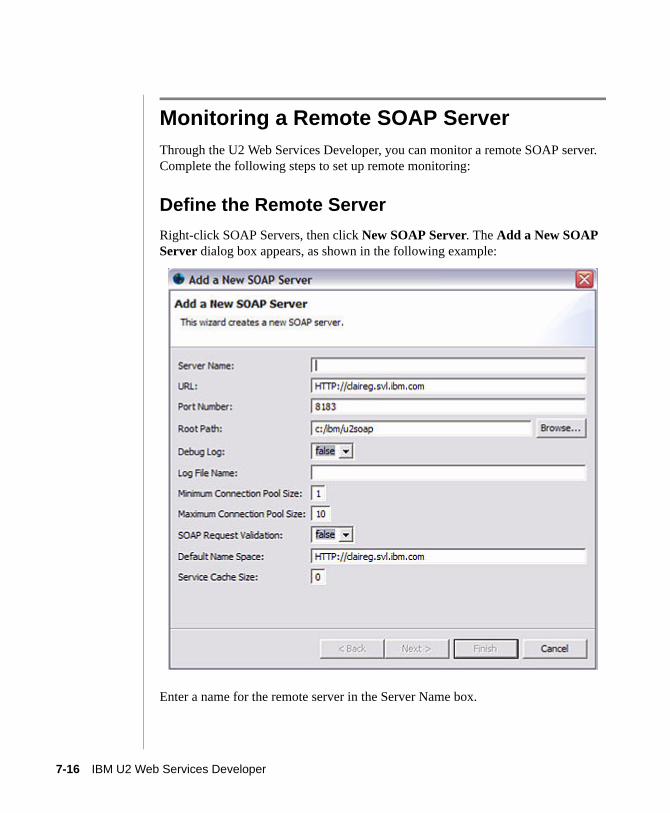
Define the Remote ServerRight-click SOAP Servers, then click New SOAP Server. The Add a New SOAP Server dialog box appears, as shown in the following example:
Enter a name for the remote server in the Server Name box.
7-16 IBM U2 Web Services Developer
C:\Program Files\Adobe\FrameMaker8\UniData
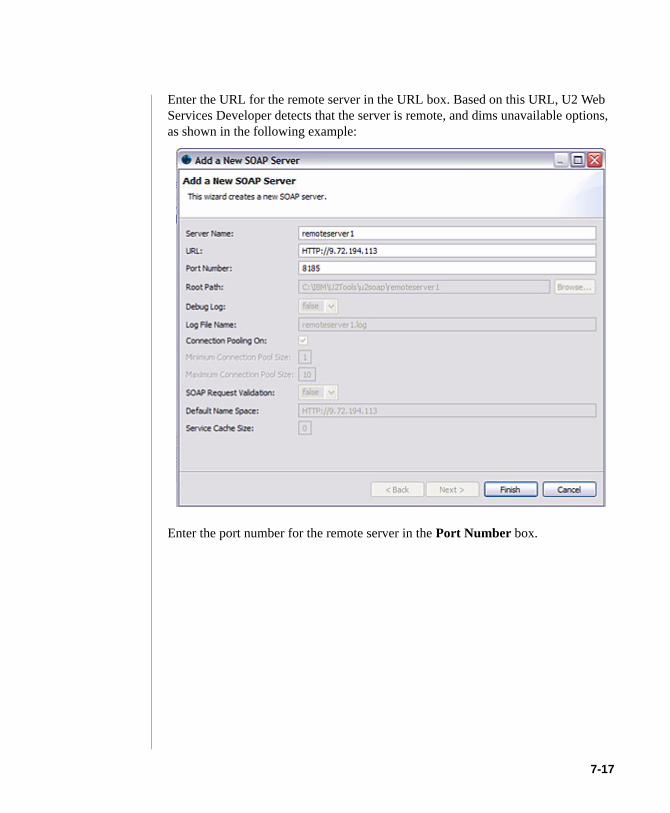
Enter the URL for the remote server in the URL box. Based on this URL, U2 Web Services Developer detects that the server is remote, and dims unavailable options, as shown in the following example:
Enter the port number for the remote server in the Port Number box.
7-17
C:\Program Files\Adobe\FrameMaker8\UniData 7.2\7.2rebranded\webservices\Ch7.fm3/10/10
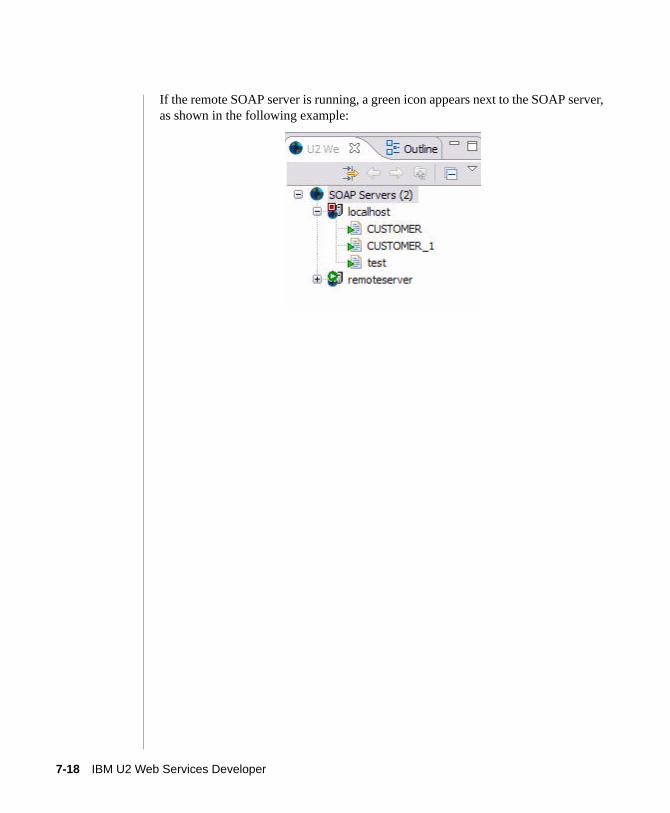
If the remote SOAP server is running, a green icon appears next to the SOAP server, as shown in the following example:
7-18 IBM U2 Web Services Developer
C:\Program Files\Adobe\FrameMaker8\UniData
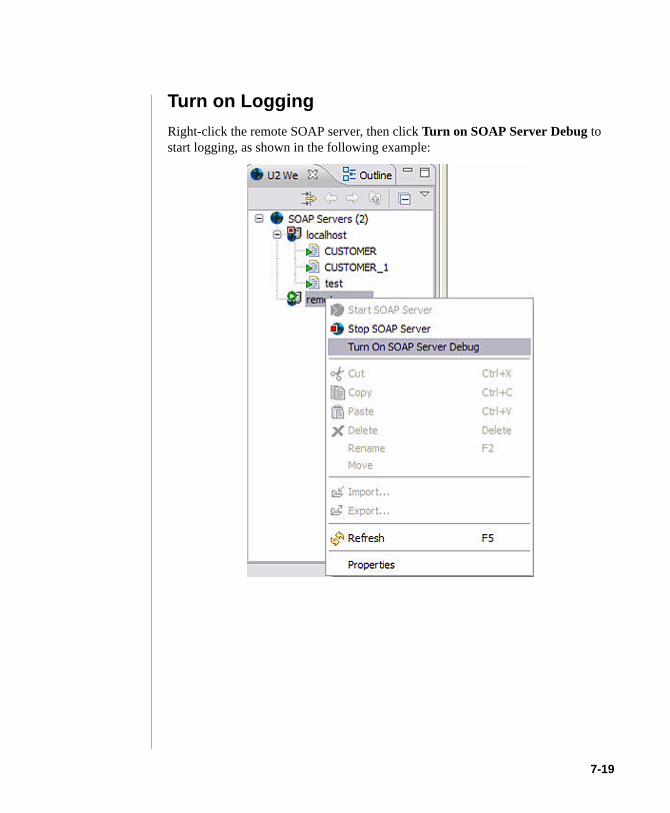
Turn on LoggingRight-click the remote SOAP server, then click Turn on SOAP Server Debug to start logging, as shown in the following example:
7-19

C:\Program Files\Adobe\FrameMaker8\UniData 7.2\7.2rebranded\webservices\Ch7.fm3/10/10
U2 Web Services Developer displays the log fromthe remote server as shown in the following example:
Stop the Remote SOAP ServerTo stop the remote SOAP server, right-click the remote server you want to stop, then click Stop SOAP server.
Note: You cannot start the remote SOAP server from U2 Web Service Developer.
7-20 IBM U2 Web Services Developer