Embed Size (px)
Citation preview

WEBSURV INSTRUCTIONS
Locator Instructions Print Date: 11/15/2011 Page 1 of 22
LOCATOR INSTRUCTIONS Overview Add Locator Guidance Add Postal Address Add Institution Address Add Location Address Add International Address Change Primary Address Edit Address Remove Address View/Add/Edit Telephone Numbers View/Add/Edit Email Addresses
OVERVIEW Locators in WEBSURV refer to ways to locate a person or organization. The locator may be an address (postal, institution, location or international), telephone number or email address. Add Locator Guidance Several types of address may now be entered: • Postal – address that include street, city, state, zip information • Institution – person resides in a facility so the search is on the facility name and the
address of the facility is associated to the person. • Location – complete address information is not known; may only have the county,
city or state for where the person resides. • International – if the person lives outside the USA.
Address Type - Postal 1. Postal Addresses are reviewed and standardized at entry by the system. Please
accept a standardized address if available and appropriate. Users can override address by providing the county name and using the address as entered.
2. Entry of Postal Address Guidance: Street Names w/ abbreviations - Street names containing abbreviations will
frequently return without a match from the geocoder. For example, please use Martin L King (not MLK) in the street name. Also, if a street has a state name, please spell it out as well, ex. MO should be Missouri.
Number Named Streets - Where streets are named with numbers instead of names, the numbers should always be listed as a number. Frequently numbers from 1 – 10 are spelled out (First, Second etc). These will return without a match from the geocoder. Change these names to their numeric equivalent (1st, 2nd etc).
Directional prefixes - Use directional prefixes whenever one is available. If there is an available directional prefix (N S E W), and a prefix isn’t provided, possible duplicate locations may be found. (e.g. 123 N Main St, 123 S Main St are the same if you exclude the direction).

WEBSURV INSTRUCTIONS
Locator Instructions Print Date: 11/15/2011 Page 2 of 22
City Names - Always use a city name that is in the dropdown list. Standard abbreviations for Saint and Mount are used (St and Mt). No punctuation is used in the city name list.
State - Always use the state abbreviation from the dropdown list. No punctuation is used in the state name list.
All Address Types 3. Locator Roles: Home – assigned to the Person’s Home address, telephone, or email. Home
should not be assigned to Organizations. Business – assigned to Person’s or Organization business address, telephone, or
email Mailing – assigned to PO Boxes only; do not enter street address with PO Box,
enter two addresses. Medical Practice – assigned to Person’s or Organization address, telephone, or
email for a medical practice Message – assigned to locators for message purposes Work – assigned to Person’s or Organization work address, telephone, or email.
1. It is helpful to enter begin date and end dates. You can use the date of report or the
current date as the begin date (as of date) when adding the locator. If you add a second address, you should end date the first one. If multiple locators are associated to the person/organization, it is hard to determine which is the current locator.
2. Addresses, Telephones and Email Addresses cannot be changed. Items on a locator record that can be changed are Type, Primary Indicator, Sensitive Indicator, Begin Date, and End Date.

WEBSURV INSTRUCTIONS
Locator Instructions Print Date: 11/15/2011 Page 3 of 22
Add Postal Address The following preconditions must be met:
1. Successful log into WEBSURV application. 2. Search and select party
Steps Screens 1. Click the + next to Locators to
expand the Locators tree.
2. The tree is expanded. 3. Click on Addresses

WEBSURV INSTRUCTIONS
Locator Instructions Print Date: 11/15/2011 Page 4 of 22
4. The Addresses screen for the person is displayed.
5. Click on Add Address
6. The screen is expanded to include
address entry fields. 7. Enter Address Type (POSTAL)
8. Select Type 9. Check Save As Primary if
appropriate 10. Check Save As Sensitive if
appropriate. 11. Enter Begin Date and/or End Date
if known 12. Enter Address Information 13. Click Save

WEBSURV INSTRUCTIONS
Locator Instructions Print Date: 11/15/2011 Page 5 of 22
14. Validation of address information is performed and messages returned if needed.
Address Verification NOTE: If the address that was entered has already been verified and entered into the database, the application will go straight to Step 16. 15. Validations passed. The address
verification screen is returned. a. If an address is available in
the verification results and the address is appropriate, click the address link to select it and go to step 10.
b. If the address in the verification results is not appropriate or there are no verification results, enter the county and select Use this address.
16. The Data Saved for … Screen is
returned.

WEBSURV INSTRUCTIONS
Locator Instructions Print Date: 11/15/2011 Page 6 of 22
Add Institution Address 17. Click Add Address.
18. The screen is expanded to include
address entry fields. 19. Enter Address Type
(INSTITUTION)
20. Select Type 21. Check Save As Primary if
appropriate 22. Check Save As Sensitive if
appropriate. 23. Enter Begin Date and/or End Date
if known 24. Click Search

WEBSURV INSTRUCTIONS
Locator Instructions Print Date: 11/15/2011 Page 7 of 22
25. The Search Organization Screen is returned.
26. Enter Search Criteria and click Search
27. Select the organization by clicking
the name in the grid.
28. The Address Screen is returned
with the institution shown. 29. Click Save

WEBSURV INSTRUCTIONS
Locator Instructions Print Date: 11/15/2011 Page 8 of 22
30. The Data Saved Screen is returned.
Add Location Address 31. Click on Add Address
32. The screen is expanded to include
address entry fields. 33. Enter Address Type (LOCATION)

WEBSURV INSTRUCTIONS
Locator Instructions Print Date: 11/15/2011 Page 9 of 22
34. Select Type 35. Check Save As Primary if
appropriate 36. Check Save As Sensitive if
appropriate. 37. Enter Begin Date and/or End Date
if known 38. Select Location
39. The screen is refreshed with
appropriate fields available. a. If IN STATE, state is set to
MO. City and/or County must be entered.
b. If OUT STATE, State must be selected. City and/or County may be entered.
c. If OUT OF COUNTRY, Country must be entered.
40. Enter appropriate information and click Save.
41. The Data Saved Screen is
returned. HINT: Click Refresh Tree to update the count on the Addresses node.

WEBSURV INSTRUCTIONS
Locator Instructions Print Date: 11/15/2011 Page 10 of 22
Add International Address 42. Click on Add Address
43. The screen is expanded to include
address entry fields. 44. Enter Address Type
(INTERNATIONAL)
45. Select Type 46. Check Save As Primary if
appropriate 47. Check Save As Sensitive if
appropriate. 48. Enter Begin Date and/or End Date
if known 49. Select Country 50. Enter Address Information 51. Click Save

WEBSURV INSTRUCTIONS
Locator Instructions Print Date: 11/15/2011 Page 11 of 22
52. The Data Saved Screen is returned.
HINT: Click Refresh Tree to update the count on the Addresses node.
Change Primary Address Change Primary Address 53. Click the ‘N” in the grid.
54. The record is changed to a Y and
the previous primary was set to N. The new Primary Address is moved to the first record in the grid.

WEBSURV INSTRUCTIONS
Locator Instructions Print Date: 11/15/2011 Page 12 of 22
Edit Address (any type) 55. Click Edit in the grid.
56. The address screen is expanded
and the address information is shown in entry fields.
57. Enter new information. 58. Click Save. NOTE: The only items that can be changed are Type, Save as Primary, Save as Sensitive, Begin Date, End Date, and Routing.
59. The Data Saved Screen is
returned. 60. Click on Addresses in tree.
WEBSURV INSTRUCTIONS
Locator Instructions Print Date: 11/15/2011 Page 13 of 22
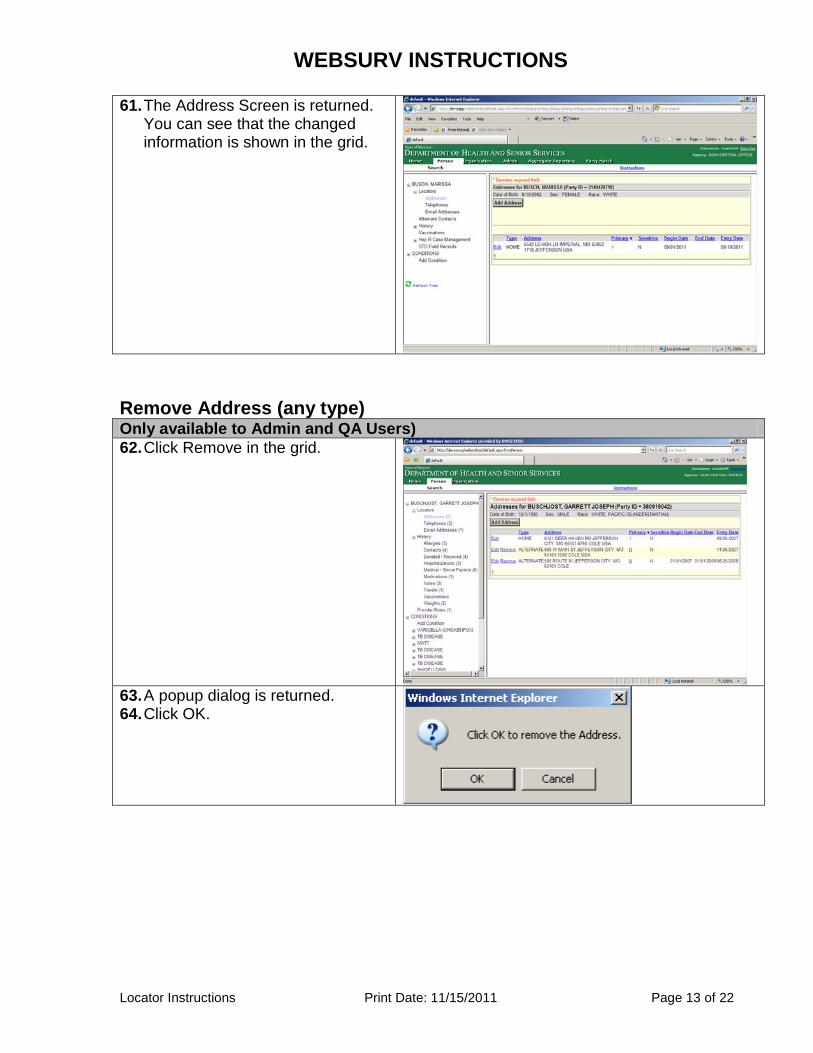
61. The Address Screen is returned. You can see that the changed information is shown in the grid.
Remove Address (any type) Only available to Admin and QA Users) 62. Click Remove in the grid.
63. A popup dialog is returned. 64. Click OK.
WEBSURV INSTRUCTIONS
Locator Instructions Print Date: 11/15/2011 Page 14 of 22
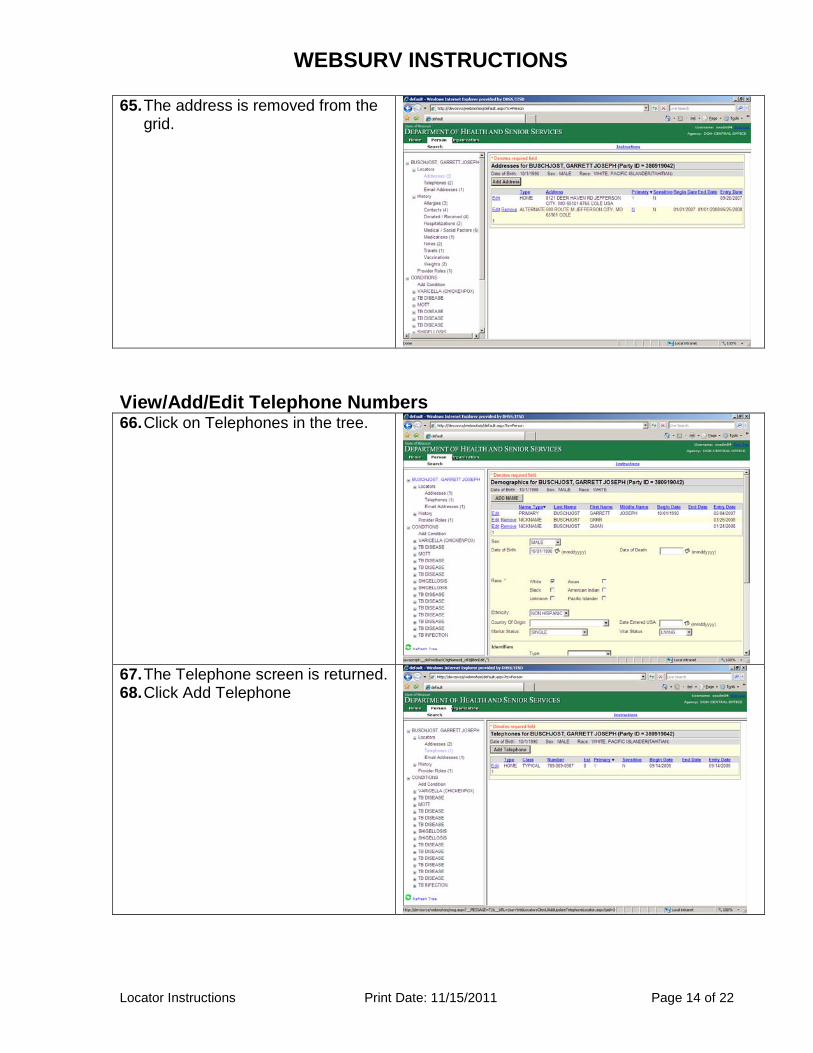
65. The address is removed from the grid.
View/Add/Edit Telephone Numbers 66. Click on Telephones in the tree.
67. The Telephone screen is returned. 68. Click Add Telephone

WEBSURV INSTRUCTIONS
Locator Instructions Print Date: 11/15/2011 Page 15 of 22
69. The Telephone Screen is expanded to include entry fields.
70. Enter information and click Add to List.
71. Validation of telephone
information is performed and messages returned if needed.
72. Validation passed. 73. The telephone is added to the list. 74. Repeat step 15 until all
telephones are entered. 75. Click Save.
WEBSURV INSTRUCTIONS
Locator Instructions Print Date: 11/15/2011 Page 16 of 22
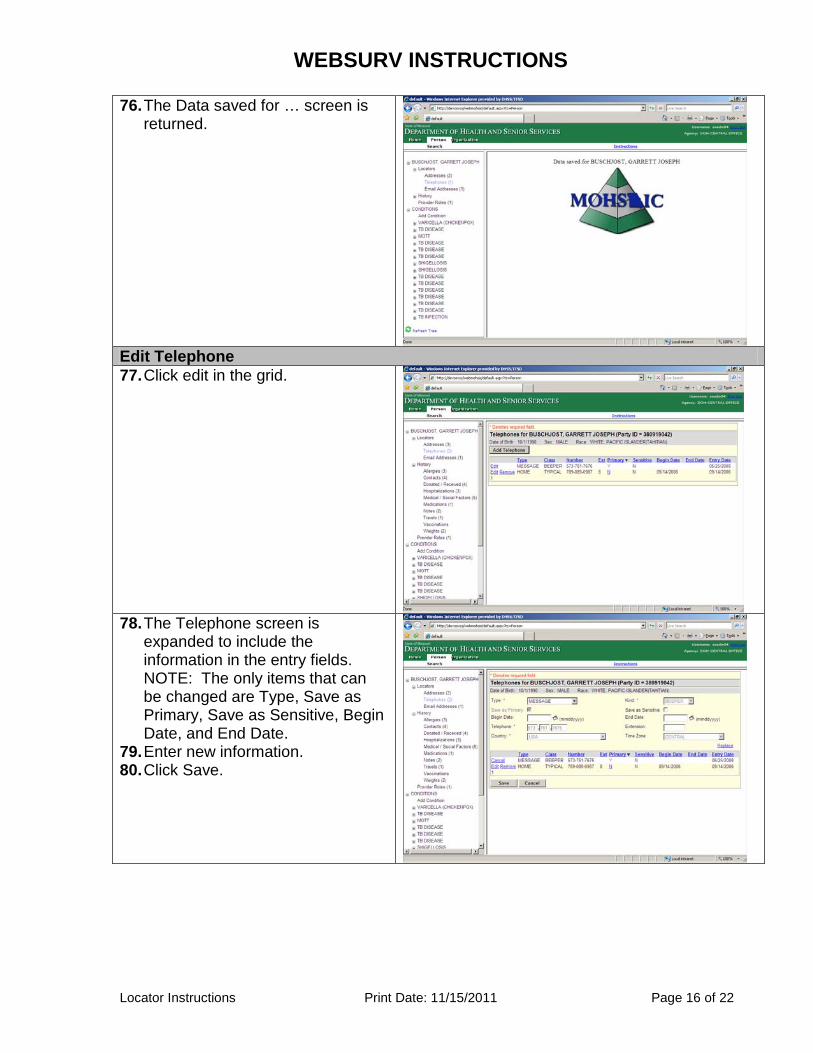
76. The Data saved for … screen is returned.
Edit Telephone 77. Click edit in the grid.
78. The Telephone screen is
expanded to include the information in the entry fields. NOTE: The only items that can be changed are Type, Save as Primary, Save as Sensitive, Begin Date, and End Date.
79. Enter new information. 80. Click Save.

WEBSURV INSTRUCTIONS
Locator Instructions Print Date: 11/15/2011 Page 17 of 22
81. The information is saved to the grid.
Remove Telephone (after initial save, remove is only available to Admin and QA Users) 82. Click Remove in the grid.
83. A pop up dialog is returned. 84. Click OK.
WEBSURV INSTRUCTIONS
Locator Instructions Print Date: 11/15/2011 Page 18 of 22
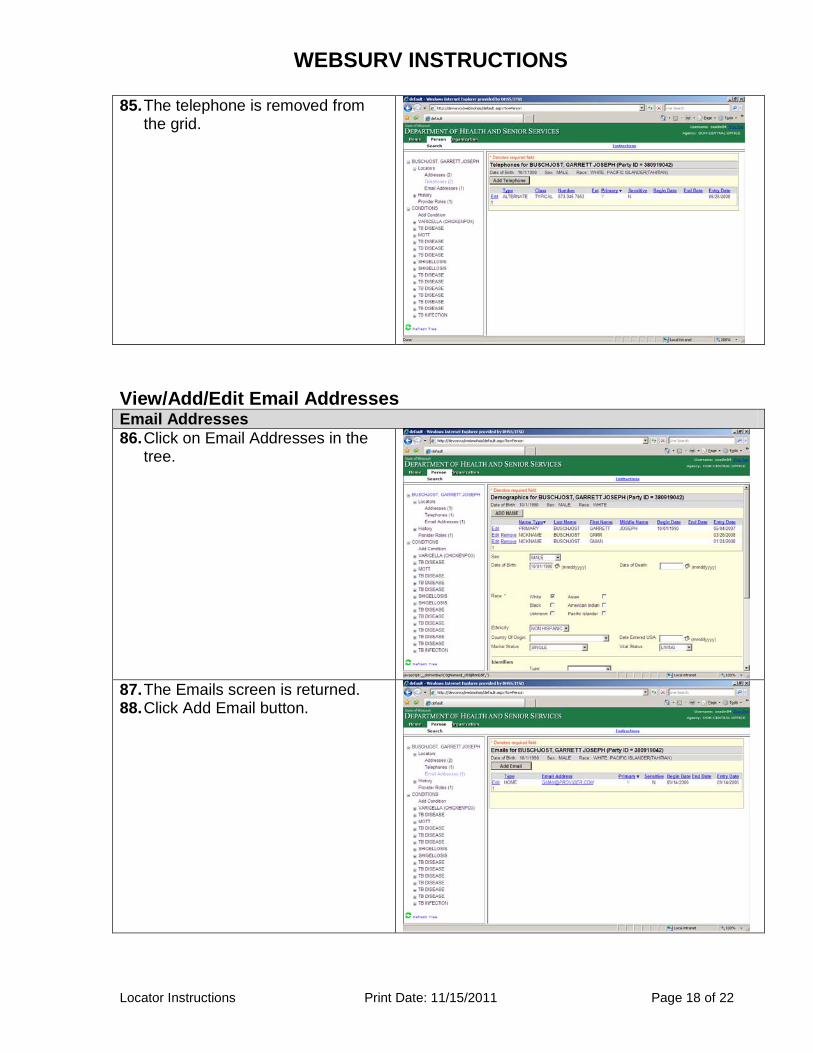
85. The telephone is removed from the grid.
View/Add/Edit Email Addresses Email Addresses 86. Click on Email Addresses in the
tree.
87. The Emails screen is returned. 88. Click Add Email button.

WEBSURV INSTRUCTIONS
Locator Instructions Print Date: 11/15/2011 Page 19 of 22
89. The Emails screen is expanded to include entry fields.
90. Enter email information and click add to list.
91. Validation of email information is
performed and messages returned if needed.
92. Validation passed. 93. The email address is added to the
list. 94. Repeat step 15 until all emails are
entered. 95. Click Save.

WEBSURV INSTRUCTIONS
Locator Instructions Print Date: 11/15/2011 Page 20 of 22
96. The Data saved for … screen is returned.
Edit Email Address 97. Click Edit in the grid.
98. The Email screen is expanded to
include the information in the entry fields. NOTE: The only items that can be changed are Type, Save as Primary, Save as Sensitive, Begin Date, and End Date.
99. Enter new information. 100. Click Save.
WEBSURV INSTRUCTIONS
Locator Instructions Print Date: 11/15/2011 Page 21 of 22
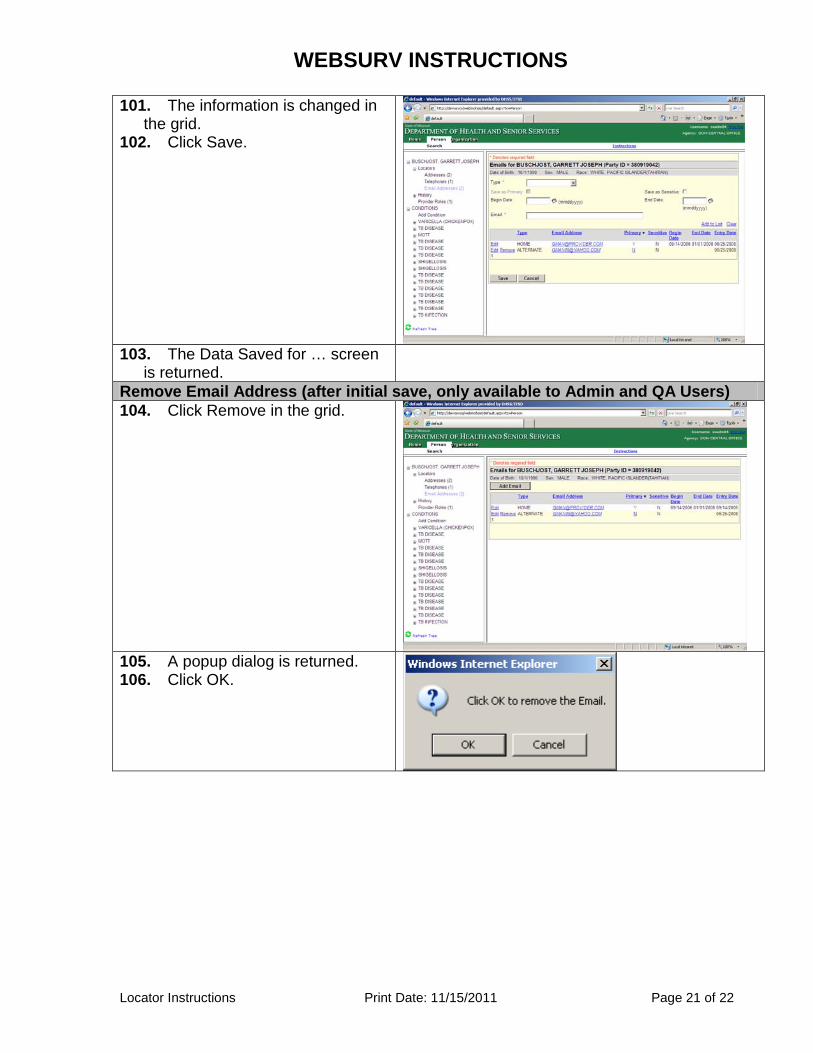
101. The information is changed in the grid.
102. Click Save.
103. The Data Saved for … screen
is returned.
Remove Email Address (after initial save, only available to Admin and QA Users) 104. Click Remove in the grid.
105. A popup dialog is returned. 106. Click OK.

WEBSURV INSTRUCTIONS
Locator Instructions Print Date: 11/15/2011 Page 22 of 22
107. The address is removed from the grid.