Embed Size (px)
Citation preview

Web-based Employee Work-time Scheduling System
ABSTRACT
This project is the design and implementation of an interactive World Wide Web-
based system for automating employee work-time scheduling. This system can be used
by any private or public company for hiring full-time or part-time employees. Depending
on the requirements of the employer for each timeslot, a schedule is generated. The
project also provides the management with the ability to change the schedule once it is in
effect. This is a platform-independent tool, which includes the creation and maintenance
of a database to provide flexibility for management.
i

TABLE OF CONTENTS
Abstract ……………………………………………………………… i
Table of Contents…………………………………………………………… ii
List of Tables ……………………………………………………………… iv
List of Figures………………………………………………………………. v
Introduction and Background …………………………………………….… 1
Changes made since Proposal ……………………………………………… 5
Definitions ……………………………………………………… 5
Problems with Original Algorithm ……………………………… 5 Revised Algorithm ……………………………………………… 16 Narrative ……………………………………………………………… 18 Introduction ……………………………………………………… 18 Major Components of Supervisor Interface ……………………… 19 Major Components of Employee Interface ……………………… 38 Project Environment ……………………………………………………… 40 System Overview ……………………………………………………… 41 Overview of the Entire System ……………………………… 41 Table Description ……………………………………………… 44 Implementation ……………………………………………………… 47 Modules Related to Supervisor Interface ……………………… 47 Modules Related to Employee Interface ……………………… 53 Algorithm Description ……………………………………………… 54 Requirements of the Supervisor ………………………………. 54
ii
Assigning Userid ………………………………………………. 54 Common Actions for both the Scheduling Techniques ………. 55 Scheduling Technique for Creating 1st Version of Schedule ………. 56 Scheduling Technique for Creating 2nd Version of Schedule ………. 58 Results and Evaluation of Project Metrics ………………………………. 59 Results ………………………………………………………………. 59 Future Work ………………………………………………………. 60 References ………………………………………………………………. 61 Appendix A. Data Flow Diagram ………………………………………. 62 Appendix B. Data Dictionary ………………………………………………. 64 Appendix C. User Manual ………………………………………………. 67 Appendix D. Source Code ………………………………………………. 72
iii

LIST OF TABLES
Table 2.2.1. Requirements Table …………………………………………… 6 Table 2.2.2. Availability Table …………………………………………… 6 Table 2.2.3. Employees Available Hours ………………….………………… 6 Table 2.2.4 . Requirements Table …………………………………………… 7 Table 2.2.5. Availability Table …………………………………………… 7 Table 2.2.6. Employees Available Hours ……………….…………………… 8 Table 2.2.7. Requirements Table …………………………………………… 8 Table 2.2.8. Availability Table …………………………………………… 9 Table 2.2.9. Employees Available Hours …………………………………… 9 Table 2.2.10. Requirements Table …………………………………………… 10 Table 2.2.11. Availability Table …………………………………………… 10 Table 2.2.12. Employees Available Hours …………………………………… 11 Table 2.2.13. Requirements Table …………………………………………… 11 Table 2.2.14. Availability Table …………………………………………… 12 Table 2.2.15. Employees Available Hours …………………………………… 12 Table 2.2.16. Requirements Table …………………………………………… 13 Table 2.2.17. Availability Table …………………………………………… 13 Table 2.2.18. Employees Available Hours …………………………………… 13 Table 2.2.19. Requirements Table …………………………………………… 14 Table 2.2.20. Availability Table …………………………………………… 14 Table 2.2.21. Employees Available Hours …………………………………… 15
iv
LIST OF FIGURES
Figure 1. Supervisor Main-menu Form …………………………………. 21
Figure 2. Data-Submission Option-list Form for the Supervisor …. 22
Figure 3. Requirement Form for Designating Number of Employees for
Each time slot …………………………………………………. 23
Figure 4. Total-hours-requirement Information Form …………………. 24
Figure 5. Hour Allotment Form …………………………………………. 25
Figure 6. Name Submission Form …………………………………. 26
Figure 7. Absence Record Form…………………………………………. 27
Figure 8. Create 1st Version of Schedule Form …………………………. 28
Figure 9. Create 2nd Version of Schedule Form …………………………. 29
Figure 10. Individual Employee Schedule Form …………………………. 30
Figure 11. View the Schedule by Name Form …………………………. 31
Figure 12. View the Schedule by Userid Form …………………………. 32
Figure 13. Make Modifications Form …………………………………. 33
Figure 14. Report Option-list Form …………………………………. 34
Figure 15. Employee Absence Trend Report …………………………. 36
Figure 16. Requirement vs. Availability Analysis Report …………. 37
Figure 17. Individual Employee Work-time Report …………………. 39
Figure 18. Schematic Diagram of the System …………………………. 43
Figure 19. Data Flow Diagram …………………………………………. 63
v

1. INTRODUCTION AND BACKGROUND
Time is something everybody cares about. Every organization needs proper
scheduling of employees for better control over their daily activities. Automation of
employee scheduling is one of the most valuable productivity improvements an
organization can make to save a considerable amount of time. For many educational and
non-educational firms, employee scheduling is the core operational function; any
improvement in this function has a big impact on the efficiency of operation. In many
organizations, scheduling is still done with pencil and paper, often combined with cards,
colored tags and large pegboards. In the hands of competent administrators, these paper-
based systems may support the basic staffing requirements. However, paper-based
scheduling systems have some serious drawbacks.
1.1 Problem Description
Currently in the Mary & Jeff Bell Library, TAMU-CC, all the departments use
paper-based scheduling. The scheduling task is cumbersome especially in the Circulation
Department, the Media Center and the Library Instruction Center. The administrators
must schedule more then 15-student workers on at least seven sessions in a year. These
include the semester for spring, summer-1, summer-2 and fall, and three interim periods.
Each time the parameters differ in terms of the number of students to be scheduled for
each time-slot, the availability of the students, and the library-hours of operation.
Administrators must be very careful and may need assistance in reviewing the student
workers’ availability and in preparing the schedule to ensure that the schedule created is
accurate. Otherwise, toward the end of the process, it might be realized that the
scheduling done so far is incorrect, and the procedure has to be repeated from the
1

beginning. Currently the administrators have to start by scheduling 3-4 students
randomly. Then, they pick up the next slot of 3-4 students successively, ensuring that
each student is really available for a particular time slot. This current procedure is very
time consuming and tedious for administrators. The administrators have also found that
as the number of students to be scheduled increases, the complexity of the process
increases dramatically. An administrator must maintain logbooks for archiving the past
records to evaluate the absenteeism trends. As a result, a paper-based scheduling system
becomes very difficult to use for planning and analysis because of the detail and accuracy
required. All of these problems are fundamental properties of a paper-based scheduling
system. The administrators are forced to shoulder the burden of making the system
actually work. These limits and inefficiencies are unavoidable in the absence of an
automated computer-based scheduling system.
1.2 General Requirements for Algorithm Design:
1. The schedule should be built only if the required number of employees for
each time slot and the base hours to be given to employees data is already
submitted by the Supervisor, otherwise it should display empty overall and
individual schedules.
2. The system must be able to schedule the exact number of employees required
by the Supervisor for each time slot.
3. All the employees must be scheduled for exact assigned hours.
4. If possible, every employee should be scheduled in such a way that each
employee can work continuously for four hours. After that, the employee
must not be scheduled for the next time slot.
2

5. Priority of scheduling of employees must be done by seniority. The most
senior employee should be given the first preference of choosing among the
groups of the final individual schedule. The next senior employee should be
given the next preference, and so on.
6. After the final schedule is built by the system, the Supervisor must be able to
modify any part of the schedule by either increasing an employee’s hours and
availability so that the employee can get continuous hours, or by removing an
employee from a particular time slot there by decreasing the hours of work
allotted to that employee.
1.3 Benefits of the Project
The main goal of this project is to automate the current scheduling system in three
departments in the Mary & Jeff Bell Library, i.e., the Circulation Department, the Media
Center and the Library Instruction Center. In fact, the project is created for 24-hours
automated scheduling so that the clients are not limited to the departments of the Mary &
Jeff Bell Library, TAMU-CC only, but any organization can use the product for
scheduling any number of employees for a desire period of time. The computer-based
scheduling system is an efficient and cost-effective alternative compared to a manual
paper-based system. In a computer-based automated system, the data can be accessed
whenever there is a need to create a new schedule. The data is dynamic, easy to store,
and can be viewed by the administrator, all the employees, and the system administrator.
It provides built-in mechanisms to avoid unnecessary overtime. The automated
computer-based system ensures that all the relevant information – actual organization
operational time, employee requirements, etc. can be applied correctly and consistently to
3

make the best scheduling decisions. It also eliminates the errors that arise when
scheduling data must be hand-keyed into other electronic systems. The final product is
capable of providing a rich scheduling database needed by administrators for effective
planning, analysis and budgeting. In short, an automated scheduling system is leveraged
in ways that simply aren’t conceivable with a paper-based system. The web-based
employee work-time scheduling system schedules the right person at the right time.
4

2. CHANGES MADE SINCE PROPOSAL
2.1 Definitions:
2.1.1 Critical Slot: A Critical slot is a time-slot for which the difference of available
Employees and required Employees for a particular time-slot is zero.
2.1.2 Near Critical Slot: A Near Critical slot is a time-slot for which the difference
of available Employees and required Employees for a particular time-slot is exactly one.
2.1.3 Normal Slot: A Normal slot is a time-slot for which the difference of available
Employees and required Employees is more than one.
2.2 Problems with Original Algorithm:
In the proposal for this project, employees were given the option of choosing time
slots for the whole week. After submitting the time slot data, employees were given an
acknowledgement message and were transferred to the Main menu. During the
scheduling procedure Critical slots are scheduled. After scheduling the Critical slots,
Near Critical and Normal slots are scheduled, starting with the first available employee
for each time slot. This continues until all the requirements become zero. As each
employee is scheduled in a slot, the requirement for that time slot is decreased, the
employee’s remaining time available is decreased, and the total hours of continuous work
for that employee is increased.
For example: Assume that each slot is for four hours of work and the total
requirement is for 96 hours of work. Table 2.2.1 represents the actual requirements for
each slot, table 2.2.2 represents the availability of employees for each slot, and table 2.2.3
shows the total hours an individual employee is available. All employees must be
scheduled for 16 hours and there are 6 employees.
5
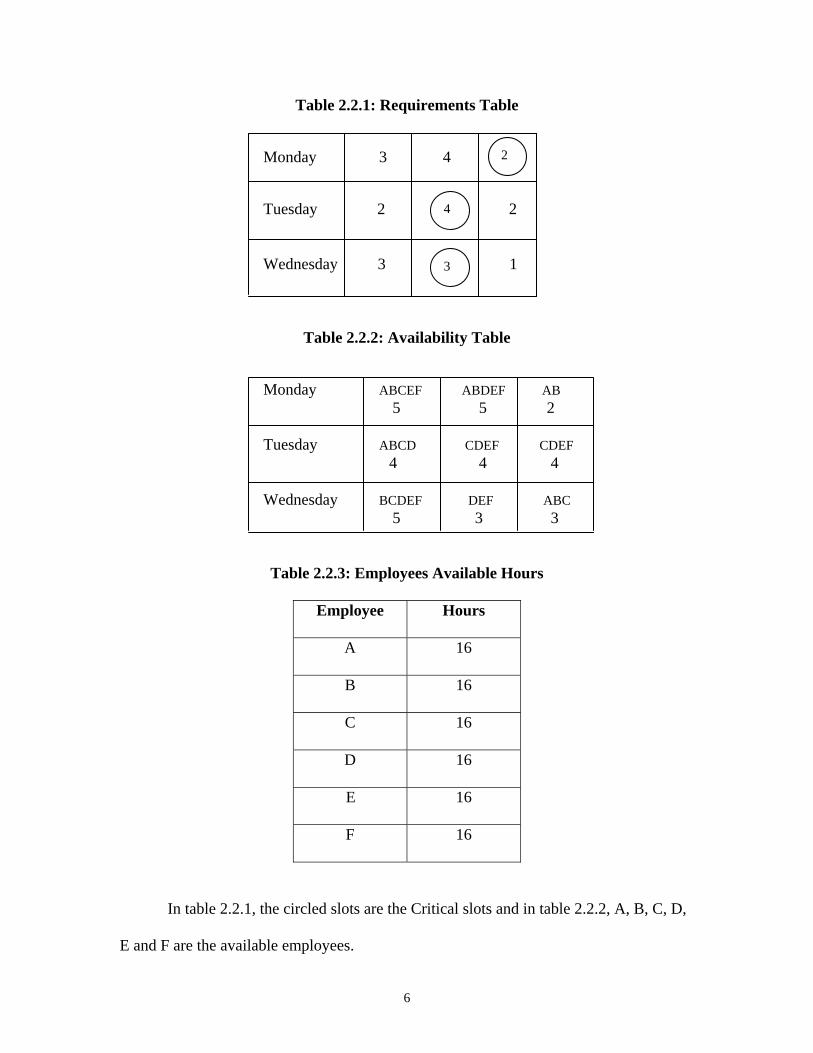
Table 2.2.1: Requirements Table
Monday 3 4 2
Tuesday 2 4 2 Wednesday 3 3 1
Table 2.2.2: Availability Table
Monday ABCEF ABDEF AB 5 5 2 Tuesday ABCD CDEF CDEF 4 4 4 Wednesday BCDEF DEF ABC 5 3 3
2
4
3
Table 2.2.3: Employees Available Hours
Employee Hours
A 16
B 16
C 16
D 16
E 16
F 16
In table 2.2.1, the circled slots are the Critical slots and in table 2.2.2, A, B, C, D,
E and F are the available employees.
6
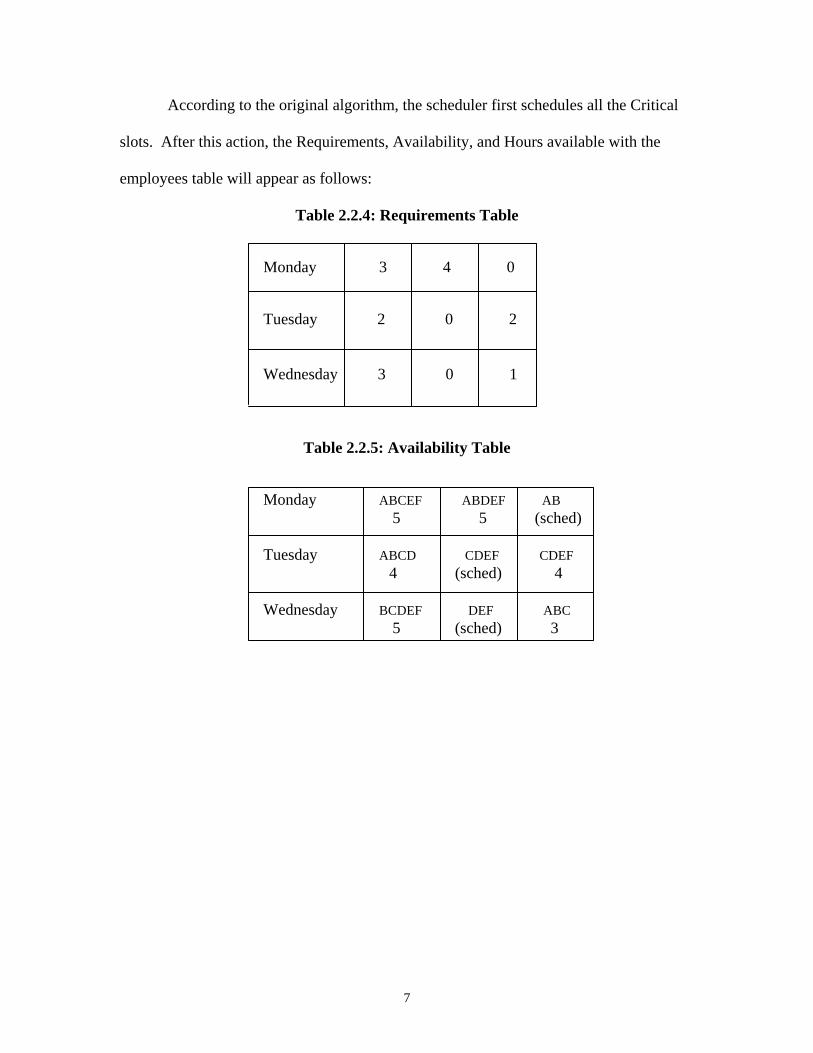
According to the original algorithm, the scheduler first schedules all the Critical
slots. After this action, the Requirements, Availability, and Hours available with the
employees table will appear as follows:
Table 2.2.4: Requirements Table
Monday 3 4 0
Tuesday 2 0 2 Wednesday 3 0 1
Table 2.2.5: Availability Table
Monday ABCEF ABDEF AB 5 5 (sched) Tuesday ABCD CDEF CDEF 4 (sched) 4 Wednesday BCDEF DEF ABC 5 (sched) 3
7

Table 2.2.6: Employees Available Hours
Employee Hours
A 12
B 12
C 12
D 8
E 8
F 8
Now the scheduler must schedule all the Near Critical slots (where the Required –
Available employee value is exactly one). In this case, the only Near Critical slot is the
2nd slot of Monday. So, the scheduler will start from the first available employee on
Monday and will schedule the employees until the requirement decreases to zero. So,
A,B,D and E will be scheduled and F will not be scheduled.
After this action, the Requirements, Availability, and Hours available with the
employees table will appear as follows:
Table 2.2.7: Requirements Table
Monday 3 0 0
Tuesday 2 0 2 Wednesday 3 0 1
8

Table 2.2.8: Availability Table
Monday ABCEF ABDE AB 5 (sched) (sched) Tuesday ABCD CDEF CDEF 4 (sched) 4 Wednesday BCDEF DEF ABC 5 (sched) 3
Table 2.2.9: Employees Available Hours
Employee Hours
A 8
B 8
C 12
D 4
E 4
F 8
When the scheduling procedure has been completed for all the Critical and Near
Critical slots, the scheduler will start with the first Normal slot. In this case, it is the first
slot of Monday. So, the scheduler will start with the first available employee and will
continue scheduling available employees until the requirement for that slot reaches zero.
Then, the scheduler will start with the second Normal slot and will continue up to the last
9

Normal slot. Let us walk through the Normal slots and look deeper to see what happens
when the scheduler uses this algorithm.
2.2.1 Scheduling for Monday 1st slot:
Scheduler will schedule A, B and C but not E and F for this slot as A, B and C’s
userid are the earlier ones. After this action, the Requirements, Availability, and
Employee Available Hours will appear as follows:
Table 2.2.10: Requirements Table
Monday 0 0 0
Tuesday 2 0 2 Wednesday 3 0 1
Table 2.2.11: Availability Table
Monday ABC ABDE AB (sched) (sched) (sched) Tuesday ABCD CDEF CDEF 4 (sched) 4 Wednesday BCDEF DEF ABC 5 (sched) 3
10

Table 2.2.12: Employees Available Hours
Employee Hours
A 4
B 4
C 8
D 4
E 4
F 8
2.2.2 Scheduling for Tuesday 1st slot:
The scheduler will again schedule from first available user and so, it will schedule
A and B. After this action, the Requirements, Availability, and the Employees Available
Hours will appear as follows:
Table 2.2.13: Requirements Table
Monday 0 0 0
Tuesday 0 0 2 Wednesday 3 0 1
11
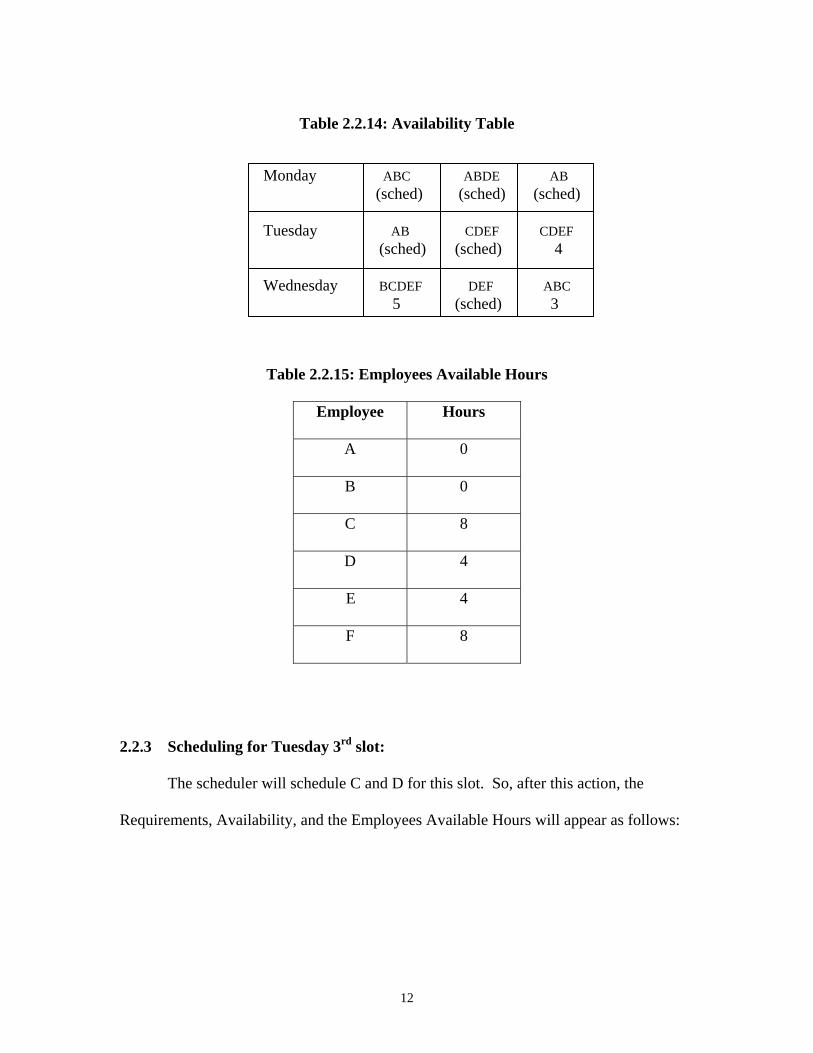
Table 2.2.14: Availability Table
Monday ABC ABDE AB (sched) (sched) (sched) Tuesday AB CDEF CDEF (sched) (sched) 4 Wednesday BCDEF DEF ABC 5 (sched) 3
Table 2.2.15: Employees Available Hours
Employee Hours
A 0
B 0
C 8
D 4
E 4
F 8
2.2.3 Scheduling for Tuesday 3rd slot:
The scheduler will schedule C and D for this slot. So, after this action, the
Requirements, Availability, and the Employees Available Hours will appear as follows:
12

Table 2.2.16: Requirements Table
Monday 0 0 0
Tuesday 0 0 0 Wednesday 3 0 1
Table 2.2.17: Availability Table
Monday ABC ABDE AB (sched) (sched) (sched) Tuesday AB CDEF CD (sched) (sched) (sched) Wednesday BCDEF DEF ABC 5 (sched) 3
Table 2.2.18: Employees Available Hours
Employee Hours
A 0
B 0
C 4
D 0
E 4
F 8
13

2.2.4 Scheduling for Wednesday 1st slot:
The scheduler will schedule C, E and F in this slot because they are the only
employees left with hours. So, B and D will not be scheduled even though they are
available. After this action, the Requirements, Availability, and the Employees Available
Hours will appear as follows:
Table 2.2.19: Requirements Table
Monday 0 0 0
Tuesday 0 0 0 Wednesday 0 0 1
Table 2.2.20: Availability Table
Monday ABC ABDE AB (sched) 5 (sched) Tuesday ABC CDEF CD (sched) (sched) (sched) Wednesday CEF DEF ABC (sched) (sched) 3
14

Table 2.2.21: Employees Available Hours
Employee Hours
A 0
B 0
C 0
D 0
E 0
F 4
2.2.5 Scheduling for Wednesday 3rd slot:
The scheduler will not schedule any employee for this slot as the only available
employees are A, B and C and they have already scheduled for their allotted hours.
Employee F is not available for this slot. So, the scheduling procedure will fail at this
point.
Even though initially, the difference of availability and requirements for all the
slots was greater than or equal to zero, there is a problem for the last slot.
If the scheduler had scheduled F for Monday 1st slot instead of A, B or C, then, it
could have scheduled A, B or C in the last slot. But, the scheduler is using a first come
first serve method. It does not use back tracking.
In fact, this was a very simple problem. We have not yet considered the
“continuous four hours of work criteria”. In this example, we have just considered the
slots of four hours. In reality, when this scheduler was used to schedule the employees
15

with real data, it scheduled successfully for the earlier time slots because at that time,
most employees were available. But as soon as the employees with the earlier userids
were allotted all their hours, the scheduler started failing. In the actual data file the
scheduler initially has 8400 data values to evaluate. So, if the scheduler must look
forward before it schedules any employee, then, it will have to look forward for the 8399
data values before scheduling the first employee. This must be repeated for all the
remaining time slots. That is a lot of forward looking and back tracking and takes an
unreasonable amount of time to schedule the employees for the week. Because of lot of
back tracking on a large amount of data values, it becomes almost impossible to test the
behavior of the scheduler. The underlying problem is that the original algorithm
attempted to simultaneously satisfy too many constraints. To overcome this difficulty,
the revised algorithm was followed and implemented successfully.
2.3 Revised Algorithm:
The revised algorithm presupposes employee availability. The administrator will
submit the work requirements and the maximum number of hours each employee may
work. The scheduler will create various overall schedules based on the administrator’s
requirements and the maximum hours for the employees. Employee availability is not
considered. Instead, all individual schedules are created. When the creation process is
completed, each employee will be allowed to choose one of the individual schedules.
Employees will choose the schedules based on job seniority with the most senior
employee choosing first. When the first employee chooses a schedule, it will be removed
from the set of choices. This procedure will continue until all of the individual schedules
have been chosen. In this case, it can be assured that the administrator will definitely get
16

the required number of employees for all the time slots. Two different algorithms have
been developed to create the individual schedules. The administrator can choose which
algorithm to use. These algorithms assure that no employee will work more than four
continuous hours. But still, during the final stages of scheduling, the individual schedule
may require an employee to work an isolated time slot. To overcome this problem, the
administrator is given the ability to modify any portion of the overall schedule. A form is
provided to allow the administrator to either increase a employee’s hours and availability
so that the employee can get continuous hours, or to remove an employee from a time
slot there by decreasing the hours of work allotted to that employee. The need to modify
a schedule due to isolated slots occurs very seldom and requires only small amount of
work to eliminate it.
17

3. NARRATIVE
3.1 Introduction:
The Employee Work-time Scheduling System is a Web-based application. It
contains information about the number of employees hired during a particular session, the
number of hours allotted to each employee, the number of employees required for each
time slot, the total number of hours of work needed by the supervisor, and the number of
times the particular employee is absent during the particular session.
This project involved the design and implementation of an interface to the
employee work-time database and World Wide Web. This software system provides
instant, up-to-date information about employee scheduling for the whole week.
Schedules will be created for the circulation department, the Media Center, and the
Library Instruction Center at Bell library, TAMU-CC. Automating the scheduling
process will greatly reduce the time spent by the Supervisor. This system is developed
and implemented with user-friendly features. This includes navigating with the mouse to
select a button that initiates an action to retrieve data from the database. In addition to
this, for an update on the Employee Work-time Database, the system requires the user to
undergo a security check.
There are basically two types of users associated with the scheduling process, the
Supervisor and the Employee. The process can be divided into main two interfaces, one
to be used by the Supervisor and one to be used by the Employees.
18

3.2 Major Components of Supervisor Interface:
The major components of the supervisor interface consists of sixteen forms and
three reports that are explained below:
3.2.1 Personal Authentication Form.
This form prompts the Supervisor to enter userid and password. The valid
Supervisor user is transferred automatically to the Supervisor Main-menu Form.
Supervisors can change their passwords by choosing the “Change Password” button.
This transfers the Supervisor to the Change of Password Form. If the Supervisor submits
an incorrect userid or password, an appropriate error message will be displayed and the
Supervisor is transferred automatically back to the Personal Authentication Form.
From this page, the Supervisor can return to the home page of the Bell Library.
3.2.2 Change of Password Form.
This form prompts the Supervisor to enter the current userid, and password and
then asks for the new password. The Supervisor then is prompted to confirm the new
password. The system shows a message to the Supervisor after the change of password is
completed. This page returns the Supervisor back to the Personal Authentication Form.
3.2.3 Supervisor Main-menu Form.
Only a Supervisor who has passed through the authentication phase has access to
this form. Figure-1 displays the Supervisor Main-menu Form. The Supervisor has ten
main options.
1. The “Submit Data” option transfers the Supervisor to the Data-submission
Option- list Form.
19

2. If the Supervisor has already submitted the required data, the “Create 1st
Version of Schedule” option transfers the Supervisor to the Get Schedule
Form.
3. The “Create 2nd Version of Schedule” option transfers the Supervisor to the
Get Schedule Form.
4. The “View the Schedule of Individual Employee” option transfers the
Supervisor to the Individual Employee Schedule Form.
5. The “Make Modifications” option will transfer the Supervisor to the Make
modifications Form.
6. The “View Reports” option transfers the Supervisor to the Report Option-list
Form.
7. The “View Schedule by Userid” option transfers the Supervisor to the Current
Employee Schedule Report by Userids.
8. The “View Schedule by Name” option transfers the Supervisor to the Current
Employee Schedule Report by Names.
9. The “Clear All Data” option clears all the existing data from the system and
transfers the Supervisor back to the Supervisor Main-menu Form.
10. The “Logoff” option will transfer the Supervisor automatically to the home
page of the Scheduler Procedure.
20

Figure 1: Supervisor Main-menu Form.
21

3.2.4 Data-submission Option-list Form for the Supervisor.
This form allows the Supervisor to select the type of the data that needs to be
submitted. Figure-2 displays the Data-submission Option-list Form for the
Supervisor. The Supervisor has the following four options on this form.
1. The “Submit Requirement” option transfers the Supervisor to the Requirement
Form for Designating Number of Employees for Each time slot.
2. The “Submit Hours” option transfers the Supervisor to the Hour Allotment Form.
3. The “Submit Absence” option transfers the Supervisor to the Absence Record
Form.
4. The “Submit Names” option transfers the Supervisor to the Name Submission
Form.
Figure 2: Data-submission Option-list Form for the Supervisor.
22

3.2.5 Requirement Form for Designating Number of Employees for Each time slot.
Only the Supervisor has access to this form. Figure-3 displays the
Requirement Form for Designating Number of Employees for Each time slot. It
is used to enter the number of Employees required for each time slot. By default,
all the values for every time slot is zero, and the Supervisor can specify a non-
zero number wherever required. When the Supervisor has designated the required
number of employees for each time slot and submitted the data, the Total-hours-
requirement Information Form is displayed. This form is provided with a link to
the Supervisor Main-menu Form.
Figure 3: Requirement Form for Designating Number of Employees for Each time
slot.
23

3.2.6 Total-hours-requirement Information Form.
This form provides the Supervisor with information about how many
actual hours of work that must be assigned to the designated employees. Figure-4
displays the Total-hours-requirement Information Form. This information is
useful in determining the number of hours to be given to each employee. This
form provides a link to the Supervisor Main-menu Form.
Figure 4: Total-hours-requirement Information Form.
24

3.2.7 Hour Allotment Form.
In this form, the Supervisor can designate the base hours to be given to
each employee. Figure-5 displays the Hour Allotment Form. The system decides
the number of employees required according to the base hour submission and
displays the appropriate message to the Supervisor. All the Employees hired are
assigned initially base hours, except the last employee. The last employee gets
the remainder of the total required hours and the base hours. This form submits
the hours in the hours table for all the employees. This form is provided with a
link to the Supervisor Main-menu Form.
Figure 5: Hour Allotment Form.
25
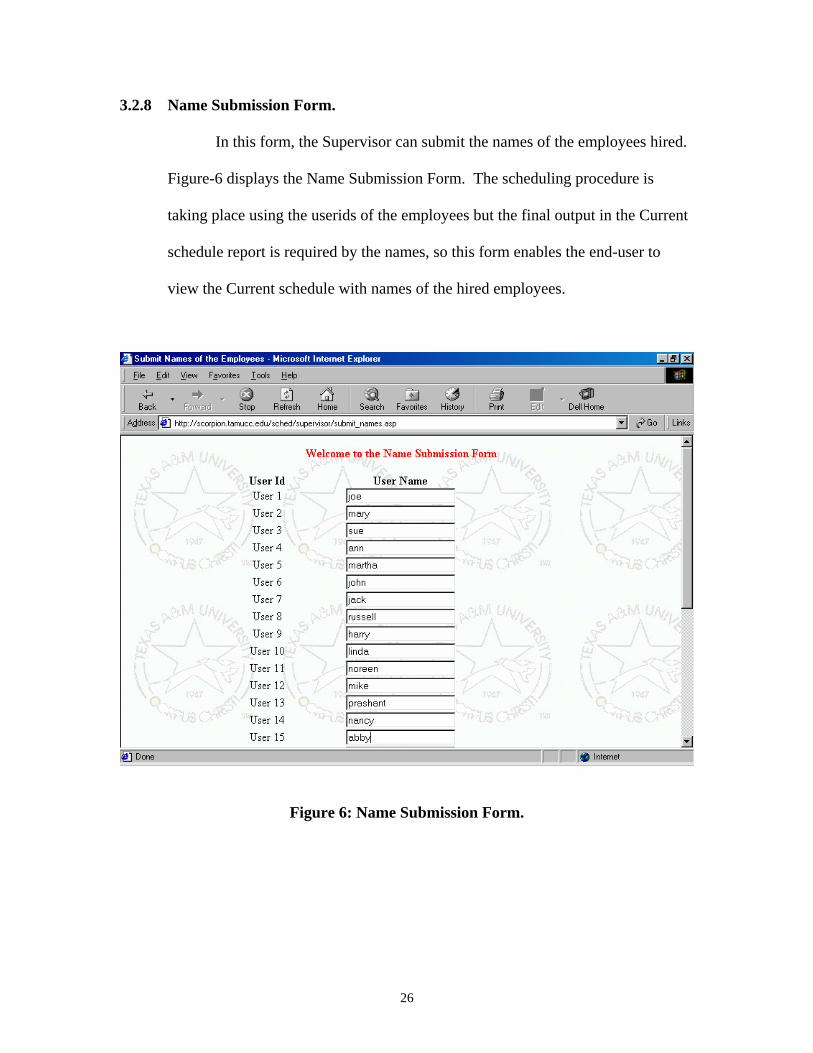
3.2.8 Name Submission Form.
In this form, the Supervisor can submit the names of the employees hired.
Figure-6 displays the Name Submission Form. The scheduling procedure is
taking place using the userids of the employees but the final output in the Current
schedule report is required by the names, so this form enables the end-user to
view the Current schedule with names of the hired employees.
Figure 6: Name Submission Form.
26

3.2.9 Absence Record Form.
Only the Supervisor has access to this form. Figure-7 displays the Absence
Record Form. The Supervisor can view the current absences for each Employee, and can
specify the number of absences for each Employee in this form. The Supervisor has to
re-enter the number of absences each time the Employee remains absent. This form also
provides a link to the Supervisor Main-menu Form.
Figure 7: Absence Record Form.
27

3.2.10 Create 1st Version of Schedule Form.
This form first of all erases the existing schedule and makes the system
ready to create the new schedule. Figure-8 displays the Create 1st Version of
Schedule Form. Then it creates the new schedule using specific algorithm
associated with this schedule using the data submitted. It displays proper message
to the Supervisor at the end and displays the users and their hours left for which
the system could not schedule them, if any. The “Back” button transfers the
Supervisor back to the Supervisor Main-menu Form.
Figure 8: Create 1st Version of Schedule Form.
28

3.2.11 Create 2nd Version of Schedule Form.
This form also erases the existing schedule and makes the system ready to
create the new schedule. Figure-9 displays the Create 2nd Version of Schedule
Form. Then it creates the new schedule using specific algorithm associated with
this schedule using the data submitted. It displays proper message to the
Supervisor at the end and displays the users and their hours left for which the
system could not schedule them, if any. The “Back” button transfers the
Supervisor back to the Supervisor Main-menu Form.
Figure 9: Create 2nd Version of Schedule Form.
29

3.2.12 Individual Employee Schedule Form.
The Supervisor can view the schedule of the individual employees after
the complete schedule has been determined. Figure-10 displays the Individual
Employee Schedule Form. This form allows the Supervisor to choose the userid
of the employee and then transfers the Supervisor to the individual schedule
report of that particular employee.
Figure 10: Individual Employee Schedule Form.
30

3.2.13 View the Schedule by Name Form.
This form displays the entire schedule by the names of the employees hired
and scheduled. Figure-11 displays the “View Schedule by Name Form”. The
“View Employee Userid” button on this form displays the userids and names of
the employees in another window. The “Back” button transfers the Supervisor
back to the Supervisor Main-menu Form.
Figure 11: View the Schedule by Name Form.
31
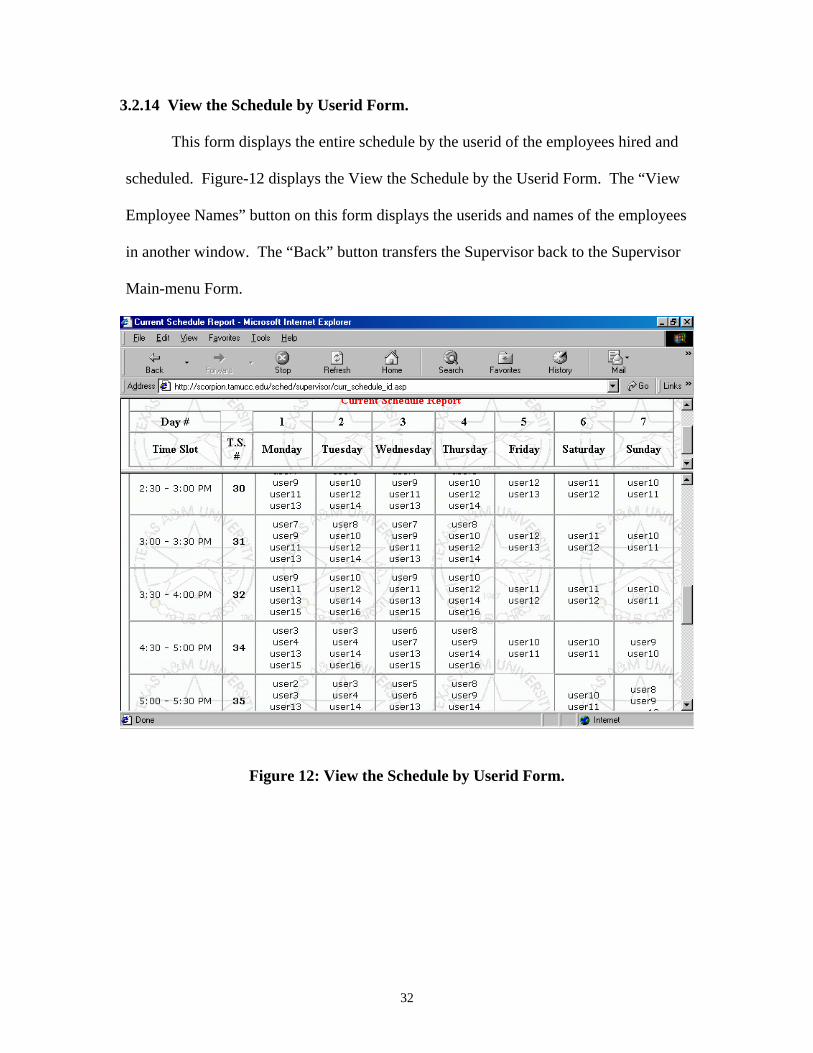
3.2.14 View the Schedule by Userid Form.
This form displays the entire schedule by the userid of the employees hired and
scheduled. Figure-12 displays the View the Schedule by the Userid Form. The “View
Employee Names” button on this form displays the userids and names of the employees
in another window. The “Back” button transfers the Supervisor back to the Supervisor
Main-menu Form.
Figure 12: View the Schedule by Userid Form.
32
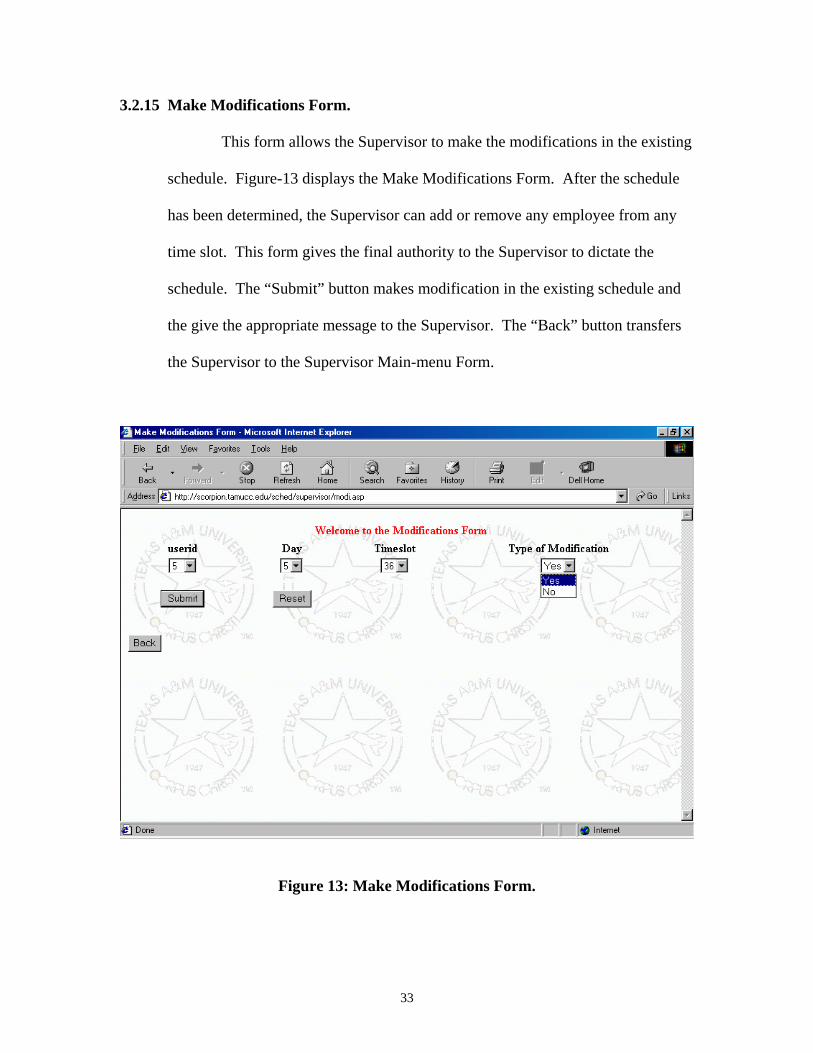
3.2.15 Make Modifications Form.
This form allows the Supervisor to make the modifications in the existing
schedule. Figure-13 displays the Make Modifications Form. After the schedule
has been determined, the Supervisor can add or remove any employee from any
time slot. This form gives the final authority to the Supervisor to dictate the
schedule. The “Submit” button makes modification in the existing schedule and
the give the appropriate message to the Supervisor. The “Back” button transfers
the Supervisor to the Supervisor Main-menu Form.
Figure 13: Make Modifications Form.
33

3.2.16 Report Option-list Form.
Figure-14 displays the Report Option-list Form. The Supervisor has
options to select various reports: The “View current schedule” option transfers the
Supervisor to the Current Schedule Report Page. The “Absence Trend” option
transfers the Supervisor to the Employee-absence-trend Report Page. The “View
Analysis” option transfers the Supervisor to the Requirement vs. Availability
Analysis Report Page. This form is provided with a link to the Supervisor Main-
menu Form.
Figure 14: Report Option-list Form.
34

3.2.17 Current Schedule Report.
This report contains the detailed schedule for each time slot for the whole
week. The report is the primary end product of interest to the client. The
Supervisor can print the current schedule, and also has a “Back” button, which
transfers the Supervisor automatically to the Report Option-list Form. The “View
Employee Userid” button on this form displays a new window on the existing
screen. This enables the Supervisor to view all the scheduled employees’ userids.
35

3.2.18 Employee Absence Trend Report.
This report shows the current trend of absences for each employee. Figure-15
displays the Employee Absence Trend Report. The report shows the number of times
each employee was absent during the session. This report also has a “Back” button,
which transfers the Supervisor automatically to the Report Option-list Form.
Figure 15: Employee Absence Trend Report.
36
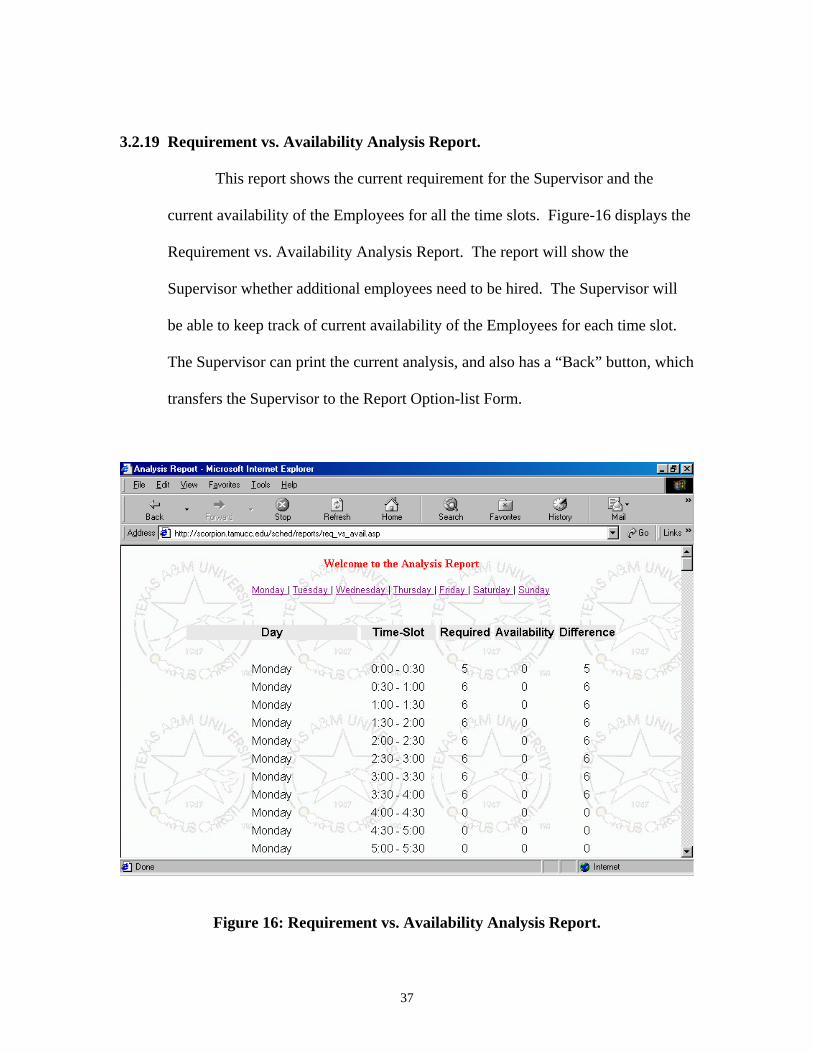
3.2.19 Requirement vs. Availability Analysis Report.
This report shows the current requirement for the Supervisor and the
current availability of the Employees for all the time slots. Figure-16 displays the
Requirement vs. Availability Analysis Report. The report will show the
Supervisor whether additional employees need to be hired. The Supervisor will
be able to keep track of current availability of the Employees for each time slot.
The Supervisor can print the current analysis, and also has a “Back” button, which
transfers the Supervisor to the Report Option-list Form.
Figure 16: Requirement vs. Availability Analysis Report.
37

3.3 Major Components of Employee Interface:
The major components of the Employee interface consists of three forms and one
report that are explained below:
3.3.1 Personal Authentication Form.
This form authenticates the Employee. A valid Employee is transferred
automatically to the Employee Main-menu Form. This form is the same as of the
Personal Authentication Form for the Supervisor. All the options provided are also the
same. For details, please refer to the Personal Authentication Form for the Supervisor.
3.3.2 Change of Password Form.
This form is also the same as the Change of Password Form for the Supervisor.
All the options provided are also the same. For details, please refer to the Change of
Password Form for the Supervisor.
3.3.3 Employee Main-menu Form.
Only a valid Employee has access to this Form. The Employee has two options on
this Form.
1. The “View Schedule” option transfers the Employee to the Individual Employee
Work-time Report Page, once the Supervisor determines the final schedule.
2. The “Logoff” option transfers the user to the home page of the Scheduler
procedure.
3.3.4 Individual Employee Work-time Report.
Once authenticated, the Employee is able to view the Work-time Report. Figure-
17 displays the Individual Employee Work-time Report. This report shows the current
38
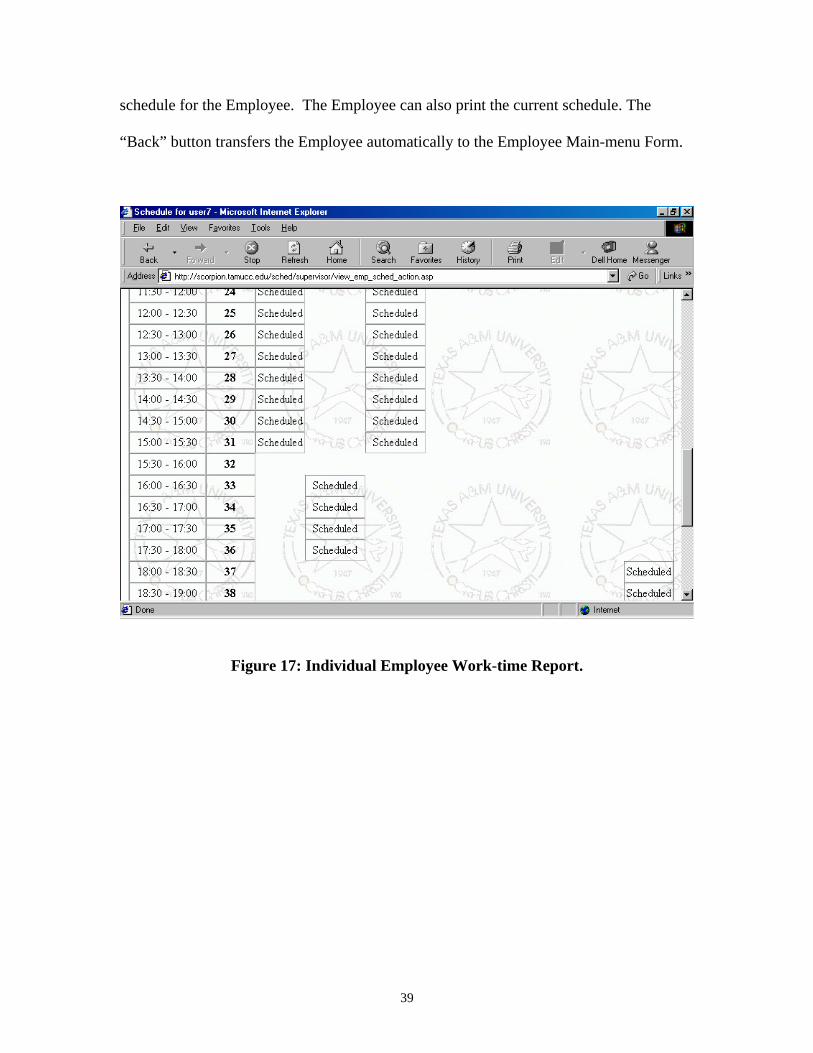
schedule for the Employee. The Employee can also print the current schedule. The
“Back” button transfers the Employee automatically to the Employee Main-menu Form.
Figure 17: Individual Employee Work-time Report.
39

4. PROJECT ENVIRONMENT
The following components are used for this project:
Software:
• Hypertext Markup Language (HTML) is used to generate all the front-end
documents.
• JavaScript is used for input-data validation [6].
• Active Server Pages (ASP) is used to access the MS-Access 97 database [1,2,3,4,7,9].
• SQL *Plus is used for querying the database.
• MS-Access 97 is used to create and maintain database.
Hardware:
• This project is implemented on a Windows NT server. This operating system is
implemented on Hewlett-Packard Net Server machines.
40

5. SYSTEM OVERVIEW
5.1 Overview of the Entire System
The overview of the system is shown in Figure-18. This project is implemented
using various Web-related and database-related components. The functional description
of each component is as follows:
5.1.1 User Computer.
This is the client-side part of the system. Two types of users can access this
system from virtually any computer with Internet access. This system can be accessed as
HTML pages by the Web browser and can be best viewed using Internet Explorer version
5.0.
5.1.2 Java Scripts.
The system uses Java scripts that run on the client-side machine. The Java scripts
are used mainly for the dynamic page activities, e.g., for displaying important alert
messages, etc.
5.1.3 Internet Information Server.
This is the Web server that runs under the Windows NT operating system. The
Internet Information Server (IIS) sends the HTML pages to the client-side machine. It is
also used to execute the Active Server Pages (ASP) scripts on the same Windows NT
machine. Web applications are configured and run in their own process space using the
fundamental crash-protection characteristic of the IIS [1].
5.1.4 Active Server Pages Scripts.
The ASP scripts are used extensively throughout the project development to
generate dynamic HTML pages. ASP scripts use SQL statements to access an Microsoft-
41

Access database. Since the target audience is a medium-sized population, i.e., at the most
30 users can be involved in the system at a time; the major goals while building the ASP
scripts was efficiency, a high degree of user interaction, and security. To view the result
that the ASP scripts generate, the scripts have to be executed on the server side [1].
5.1.5 MS-Access Database.
This system uses and maintains an MS-Access database on the server to store the
data submitted by the different users [5].
42

User Computer
11
HTML Pages
Windows NT Server
Browser
Internet Information Server
ASP Scripts
Microsoft Access Database
Java Scripts
INTERNET INFORMATION SERVER (IIS) PROCESSING:
INTERNET INFORMATION SERVER
A S P INTERNET
W W W ADO
ASP SCRIPTS
ODBC
SQL
HTML
Figure – 18: Schematic Diagram of the System
43

5.2 Table Description:
The Web-based Employee Work-Time Scheduling System uses six tables. Five of
these six tables are independent of each other and are updated without affecting the other
tables. The Data-Dictionary for the database that explains the function of each of the
fields in each of the tables that are used is provided in Appendix - B. A detailed
description of the tables that are used in this system follows:
5.2.1 Password table:
This table contains the userid and the password for the Supervisor and the
Employees. This table is updated whenever the Change of Password action is successful.
Following are the fields of the Password table.
Userid Passwd
5.2.2 Requirements table:
This table contains the Supervisor’s requirements for the number of Employees
for each time-slot of each day. This table is having 48 time slots for each day of the
week. So, it has 336 data values. This table is updated whenever the Supervisor submits
the Requirement form. Following are the fields of the Requirements table.
Day Timeslot Requirements
5.2.3 Availability table:
This table contains the Employee availability data. It is updated whenever the
Supervisor submits the Create schedule action. There is one column for each employee,
which is updated whenever the employee is scheduled. This one column is having 336
44

data values. So, for all the 25 users, this table is having total 8400 data values.
Following are the fields of the Availability table.
Day Timeslot User01 User02 User03 . . User25 Total
5.2.4 Analysis table:
This table contains the difference of Availability and the Requirements for each
time-slot of each day. So, it has 336 data values in the difference column. This table
uses the Requirement values and the Availability values. This table is updated whenever
the Supervisor selects the “View Analysis” option in the Report Option-list Form.
Following are the fields of the Analysis table.
Day Timeslot Difference
5.2.5 Absences table:
This table contains the absence record for each employee during the term. It is
updated whenever the Supervisor selects the Submit Absence option in the Submit Data
Form. Following are the fields of the Absences table.
Userid Absence
45

5.2.6 Hours table:
This table contains the record of the assigned hours for each employee during the term. It
is updated whenever the Supervisor selects the Submit Hours option in the Submit Data
Page. Following are the fields of the Hours table.
Userid Hours Name
46

6. IMPLEMENTATION
This chapter illustrates the details of implementation. Two different types of
users will interact with this system, so there are two different interfaces. There are
separate modules for each type of activity. Generally each module deals with the
database independently. The source code of entire project can be found in the attached
CDROM.
6.1 Modules Related to the Supervisor Interface:
6.1.1 Personal Authentication Form.
Input: userid, password, button values.
Function: This module verifies the userid and the password provided by the user with
the Password table. If the provided data is correct, then the control passes to
the next page. It sets the login variable for the current session. Depending on
the button input, control transfers to the Supervisor Main-menu Form or the
Change of Password Form. If the provided data is incorrect, then it displays
an error message.
Tables: Password.
Output: Login variables in the ASP session set. An error message, Change of
Password form, or the Employee Main-menu Form is displayed.
47

6.1.2 Change of Password Form.
Input: userid, password, new password, confirm new password.
Function: This module allows the user to change the current password. The module
compares the new password with the confirm new password as entered. If
they match, then the Password table is updated with the new password for that
user, and the system gives a confirmation message. Otherwise, it displays an
error message.
Tables: Password.
Output: The confirmation message is displayed and the Password table is updated, or
an error message is displayed.
6.1.3 Supervisor Main-menu Form.
Input: Create Schedule button value.
Function: This is the starting point for the Supervisor interface for scheduling.
1. The submit Data link provides the following four options: Submit
Requirements, Submit Hours, Submit Absences, and Submit Names.
2. If the required data is already submitted by the Supervisor, then the
functional Create 1st Version of Schedule or Create 2nd Version of
Schedule buttons invoke the main ASP script and the schedule is built in
the Availability table using the existing data available in the
Requirements, and the Hours tables. The final schedule is built by
updating the Availability table.
3. The functional Schedule by Name and Schedule by Userid buttons provide
direct links to the schedules built using employees names and userids.
48

4. The functional View Schedule of Individual Employee button enables the
Supervisor to view the schedule of particular employee.
5. The Make Modifications button enables the Supervisor to modify the
existing schedule by scheduling any employee for any time slot or by
unscheduling any employee for any time slot.
6. View Report provides the following three options: View Analysis, View
Absence trend, and View Current schedule.
7. The functional Clear All Data zero out all the values from Analysis,
Hours, Availability and Absences table and prepares the system to start the
new schedule for the next session.
The detailed description of the algorithm that is used by the script is
provided in the “Algorithm Description” section.
Tables: Requirements, Availability, Analysis, Hours.
Output: Confirmation message is displayed. The schedule is built and the Availability
table is updated, or an error message is displayed.
6.1.4 Submit Data
6.1.4.1 Requirements Form.
Input: Number of Employees required for each time-slot.
Function: This module enables the Supervisor to specify the requirements for each time
slot. The Supervisor can submit the non-zero number of employees for the
time slots wherever required. The data for each time-slot on the form is stored
in the Requirements table.
Tables: Requirements.
49

Output: The total number of hours of work required by the Supervisor is displayed.
The Requirements table is updated.
6.1.4.2 Hour Allotment Form.
Input: Base number of hours to be given to all the employees.
Function: This module enables the Supervisor to select on the form the base number of
hours to be given all the employees. The data is stored in the Hours table.
Tables: Hours.
Output: A confirmation message is displayed on the screen. The Hours table is
updated.
6.1.4.3 Absence Record Form.
Input: Number of days the particular employee remained absent.
Function: This module invokes the script that displays the current absences for each
employee by accessing the Absences table. Then Absence field in the
Absences table is updated using the input value for days absent.
Table: Absences.
Output: A confirmation message is displayed on the screen. The Absences table is
updated.
6.1.4.4 Name Submission Form.
Input: Name of the employees according to the userid.
Function: This module enables the Supervisor to submit the names of the hired
employees. Then the name field in the Hours and the Absences table is
updated using the input value for name.
Table: Hours, Absences.
50
Output: The Hours and the Absences tables are updated.
6.1.5 Create Schedule Form.
Input: Requirements table, Hours table.
Function: This form contains a button for creating the actual schedule. When this button
is activated, depending on the type of the schedule selected, i.e. Create 1st
Version of Schedule or Create 2nd Version of Schedule, the appropriate ASP
script is executed and the schedule is built in the Availability table.
Table: Requirements, Hours, and Availability.
Output: The actual schedule is built in the Availability table and proper message is
displayed. The system also displays the userid of the employees and the
amount of hours it could not schedule them.
6.1.6 Make Modifications Form.
Input: values of userid, day, time slot, and type of modification from drop down
menu.
Function: This form allows the Supervisor to modify any portion of the final schedule.
The Supervisor can either increase an employee’s hours and availability so
that the employee can get continuous hours, or to remove an employee from a
time slot thereby decreasing the hours of work allotted that employee. The
Availability and the Analysis tables are updated.
Tables: Availability, and Analysis.
Output: An appropriate message is displayed.
51

6.1.7 View Reports
6.1.7.1 Current Schedule Report.
Input: Availability table.
Function: If the system has already determined the schedule, then this module uses the
data from the Availability table, and displays the current schedule using an
ASP script. Otherwise, it displays an empty schedule.
Tables: Availability.
Output: The current schedule is displayed on the screen.
6.1.7.2 Employee Absence Trend Report.
Input: Absences table.
Function: This module runs the ASP Script and displays the absence report using the
“Absences” table.
Tables: Absences.
Output: Current Employee Absence trend report is displayed on the screen.
6.1.7.3 Analysis Report.
Input: Requirements, Availability table.
Function: This module runs the ASP Script and uses the Requirements and the
Availability tables. Using these two tables and the script, the module
determines the current difference of the Requirement and the Availability for
each time-slot. The result is stored in the Analysis table.
Tables: Requirements, Availability, and Analysis.
Output: An HTML page containing the values of the Analysis table is displayed on the
screen.
52

6.2 Modules Related to the Employee Interface:
6.2.1 Personal Authentication Form.
This module is the same as the Personal Authentication module for the
Supervisor. The Employee Main-menu Form with the following two options
is displayed for the authenticated users: View Schedule, and Logoff.
6.2.2 Change of Password Form.
This module is the same as the module 6.1.2 - Change of Password
module for the Supervisor.
6.2.3 View Schedule.
Input: Availability table.
Function: If the system has already determined the schedule, then this module uses
the data from the Availability table, and displays the Individual Work-time
Schedule using a script. Otherwise, it displays an empty schedule.
Tables: Availability.
Output: The current Individual Work-time schedule is displayed on the screen for
a particular Employee.
53

7. ALGORITHM DESCRIPTION
7.1 Requirements of the Supervisor:
Following is the summary of the requirements of the Administrator, which was
discussed in detail in section 1.2.
1. The Supervisor must be able to schedule the required number of employees for each
time slot on all the days.
2. The system must be capable of scheduling the employees for 24 hours a day, 7 days a
week for the entire session.
3. The employees must be scheduled for exactly the assigned number of hours.
4. The employees should be scheduled for continuous four hours and then the employee
must not be scheduled for the next time slot. A break of at least 30 minutes is
required after each four hours.
5. The senior employee should get priority in choosing the schedule.
7.2 Assigning userid:
Each schedule is associated with one userid. Each employee will choose
from a list of available individual schedules. The userid associated with the
chosen schedule will be assigned to the employee. For example, if a particular
employee chooses the schedule, which is associated with the userid “user6”, that
employee’s userid will be “user6”. The most senior employee will be given the
first opportunity to choose among the individual schedules. Then the next most
senior employee will be allowed to choose from the rest of the individual
schedules. This procedure continues until all the employees are hired for all the
individual schedules. Each employee will be supplied a temporary password by
54

the Supervisor. This will allow employees to change their passwords, or to look
at their individual schedules.
7.3 Common Actions for both Scheduling Techniques:
In both scheduling techniques, before scheduling any employee for any time
slot, the following checks are made:
• The required number of employees for that particular time slot must be
greater then zero.
• The employee must not have been already scheduled for all of the allotted
hours.
• Assure that the employee has not been made unavailable for the time slot
because four continuous hours are adjacent.
If all the above criteria are satisfied, then, the employee will be scheduled for
that time slot, and following actions will take place:
• Decrement the required number of employees for that time slot.
• Decrement the time required to be scheduled for that employee, i.e., the
assigned hours for that employee.
• Increment the continuous hours of work until that amount is less than or
equal to four hours and save of it for that employee.
• If the employee is already scheduled for continuous four hours, make him
unavailable for the next time slot.
55

7.4 Scheduling Technique for Creating 1st Version of Schedule:
In this scheduling technique, the system executes the script with following
logic:
1. The script first of all, determines the number of hired employees by checking
the hours table and the required table. It calculates the absolute integer
number of users that must be scheduled for the session.
2. The script starts scheduling user1 on Monday for four continuous hours from
the time slot where the required is non zero. At the same time, it also
schedules user1 on Wednesday.
3. The script now schedules user2 on Tuesday for four continuous hours from
the time slot where the required is non zero. At the same time, it also
schedules user2 on Thursday.
4. The script schedules all the odd userids, i.e., user1, user3, user5,….on
Monday and Wednesday. It also schedules all the even userids, i.e., user2,
user4, user6,….on Tuesday and Thursday. This procedure continues for all
the hired employees. There will be still some requirements for the later time
slots of Monday through Thursday while scheduling using this technique. At
this time, all the userids are scheduled for two days for four continuous hours.
5. Now the script starts scheduling the last userid on Friday for four continuous
hours or for the remaining hours of that userid. It decrements the userid and
starts scheduling the second lowest userid on Friday from where the required
is non zero. This procedure continues for Saturday and Sunday as well. At
56

this time, all the time slots for Friday to Sunday are scheduled and some of the
employees with later userids are also scheduled for all of their allotted hours.
6. Now the script comes back at the last slot of Monday and will start scheduling
in upward direction until it reaches the time slot where the required is non
zero. It schedules user1 on last slot of Monday, moves upwards and schedules
user1 for four continuous hours. Then it tries to schedule user2 on the
remaining slots of Monday where the required is non zero. The same
procedure continues till Thursday with increasing userid and increasing day
number.
7. Scheduling in this technique allotted the hours to all the employees with an
efficiency of 99.9 % on the four real-time data samples. The requirement for
each allotted time slot is satisfied with an efficiency of 99.85 % on those
samples. At the end, the system displays the users and the hours for which the
system could not schedule. The system updates the requirement table with the
original requirements of the Supervisor and the hours table by the original
base-hour given to all the employees so that if the Supervisor wants to create
schedule with another technique, the system is ready with the data.
8. During the sixth step of scheduling procedure, as the system has to schedule
the employees for only the remaining requirements in the middle portion of
each day. This might schedule some employees in scattered slots. If the
Supervisor wants to change this, the Make Modification Form is provided.
The Supervisor can either increase an employee’s hours and availability, or
57

the Supervisor can remove an employee from a time slot. This form gives the
Supervisor, the ability to change any portion of the overall schedule.
7.5 Scheduling technique for Creating 2nd Version of Schedule:
This scheduling technique is very similar to the Scheduling technique for Creating
1st Version of Schedule. The difference however, is in step 6 as this the most sensitive
step. In this section, only the step 6 is described. The script executes as follows:
Instead of scheduling from the last slot of Monday and going towards Thursday as per
technique 1, the script starts scheduling user1 on the Thursday and moves towards
Monday. So, the day numbers are also decreasing along with the time slots. This
technique is similar to technique 1, but for some requirement data, a better schedule with
fewer scattered slots may be generated. The Supervisor can determine which schedule is
the most desirable by executing the scripts for both the techniques.
58

8. RESULTS AND EVALUATION OF PROJECT METRICS
8.1 Results:
This project consisted of the design and implementation of an on-line Employee
Work-time Scheduling System for the Circulation Department, the Media Center and the
Library Instruction Center of the Mary & Jeff Bell Library at Texas A&M University-
Corpus Christi. The scheduling system keeps track of a Supervisor’s current needs for all
the time slots to be scheduled, the current number of hours for all the employees, and the
current absences for each employee. The system enables the Supervisor to generate a
work schedule by two techniques based on the information provided. The Supervisor is
also able to modify any portion of the final schedule. The final schedule can be viewed
by using the userid or by using the actual employee names. The system also provides the
Supervisor with the absence trend for each employee. Finally, the system also displays
the statistics for the entire schedule built, i.e., the total hours for which the scheduler was
successful, the actual amount of hours for each individual employee is scheduled, the
amount of hours for which the particular employee is not scheduled. The system also
maintains a database that keeps track of all the current values. This system provides the
end users with an interface to integrate a database application through the World Wide
Web incorporating some security features.
The interface is very user-friendly and self-explanatory. The system is capable of
allotting hours to the users with an efficiency of 99.9 % on the four real-time test data and
is capable of fulfilling the Administrator’s requirements with an efficiency of 99.85 % on
those four test data. The system appears to be very robust. The estimated time for the
scheduler to generate the final schedule is 2 to 2.5 minutes (excluding the data-entry time
59

and the modification process). As a whole, it takes a maximum of 25 to 30 minutes to
finish the entire procedure. In the worst case during testing, the Supervisor had to make
17 modifications out of approximately 10,000 data values for all the employees. In the
best case, the Supervisor had to make 8 modifications. This is an overall average system
efficiency of 99.87 %. This project includes more then 35 scripts (excluding HTML
pages). Most of the Scripts were written in ASP using VBScript and JavaScript, with
notepad editor. As a rough estimate, it has more than 2000 lines of code. These figures
do not include the scripts written for the Original Algorithm and the scripts written for
testing purposes.
8.2 Future Work:
Several enhancements can be made to this system. If the system can be kept on
faster processors then, the forward-looking and back-tracking principle can be
implemented, so that the amount of delay in developing actual schedules can be
minimized. In this case, the employee availability can be considered and thus, the system
can provide richer scheduling.
Payroll system can be automated and incorporated with the automated scheduling
operation. A Payroll generator can be implemented so that the Supervisor can get the
time sheets for all the employees at regular two weeks intervals.
This system is designed to schedule maximum of 25 users because of limitations
of the database properties. Stronger database can be used to schedule efficiently more
than 25 users.
60

9. REFERENCES
1. Fedorov, A. and Francis, B., Professional Active Server Pages 2.0. Birmingham,
England: Wrox Press Ltd., 1998.
2. Homer, A., Professional ASP techniques for webmasters. Birmingham, England.
Wrox Press Ltd., 1998.
3. Weissinger, A., ASP in a nutshell: a desktop quick reference. Sebastopol, CA:
O’Reilly & Associates, 1999.
4. Williams, A., Barber, K. and Newkirk, P., Active Server Pages. Coriolis, Albany,
1998.
5. Elmasri, R. and Navathe, S., Fundamentals of Database Systems. 3rd ed., New Delhi:
Pearsons Education Inc., Addison Wesley Publications, 2000.
6. McComb, G., JavaScript Sourcebook. New York: Wiley Computer Publishing, John
Wiley and Sons, 1996.
7. Walther, S. and Banick, S., Active Server Pages 2.0: Unleashed. Sams Techmedia
Publications, New Delhi, 1999.
8. World Wide Web – http://www.askasp.com/. The EZShare Inc., 1999 ©.
9. World Wide Web – http://www.aspfree.com/. The ASP Developer Team, 1999 ©.
61

APPENDIX A
CONTROL-FLOW DIAGRAM
62

PERSONAL AUTHENTICATION CHANGE PASSWORD E EMPLOYEE SUPERVISOR SUPERVISOR MAIN-MENU SUBMIT DATA SUBMIT REQUIREMENTS TOTAL HOURS INFO REPORT OPTION-LIST FORM SUBMIT HOURS SUBMIT ABSENCES EMPLOYEE MAIN-MENU *** REPORT PAGE *** MAKE MODIFICATION FORM EMPLOYEE SCHEDULE
Figure – 19: Control-Flow Diagram
Userid: Passwd:
OK CANCEL CHANGE
Userid: Passwd: New Passwd: Confirm New Passwd:
OK CANCEL
SUBMIT DATA
CREATE SCHEDULE
VIEW REPORTS
LOGOFF
REQUIREMENTS
ABSENCES
HOURS
OK CANCEL
OK
OK CANCEL
OK CANCEL
ANALYSIS
ABSENCES
SCHEDULE
QUIT
CLOSE
MY SCHEDULE
LOGOFF
CLOSE
M
M
M
NAMES
SUBMIT
MODIFICATION
63

APPENDIX B
DATA DICTIONARY
64

1. Password table:
This table has the following attributes:
a. Userid: Represents the userid for the Supervisor and all the Employees
related to the System.
b. Passwd: Represents the password for the Supervisor and all the Employees
related to the System.
2. Requirements table:
This table has the following attributes:
a. Day: Represents the day of the week for which the requirements must
be specified. Monday is Day 1; Tuesday is Day 2 and so on.
b. Timeslot: Represents the time-slot of the particular day for which the
requirements must be specified. It is a numerical field.
Each day has 48 time-slots, 30 minutes each.
c. Require: Represents the number of Employees required for each time-slot of
each day.
3. Availability table:
a. Day: Represents the day for which the Employee is available for
work. Monday is Day 1; Tuesday is Day 2, and so on.
b. Timeslot: Represents the time-slot of the particular day for which the
Employee is available for work. It is a numerical
Field. Each day has 48 time-slots, 30 minutes each.
c. User01: Represents the availability for a particular user. This attribute
65
represents the availability information for user01.
d. Total: Represents total number of available Employees for each time-slot
of each day.
4. Analysis table:
a. Day: Represents the day for which the analysis is being determined.
Monday is Day 1; Tuesday is Day 2, and so on.
b. Timeslot: Represents the time-slot of the particular day for which the
analysis is being determined. Each day has 48 time-slots, 30
minutes each.
c. Diff: Represents the numerical difference of available number of
Employees and the number of Employees required for each time-
slot of the particular day.
5. Absences table:
a. Userid: Represents the userid for the Employees related to the system.
b. Absence: Represents the number of time-slots the particular Employee
remained absent during the term.
6. Hours table:
a. Userid: Represents the userid for the Employees related to the system.
b. Name: Represents the name of the particular Employee.
c. Hours: Represents the number of hours assigned to the particular
Employee for work during the term.
66

APPENDIX C
USER MANUAL
67
USER MANUAL
The Web-based Employee Work-time Scheduling System can be used by two
types of users: the Supervisor and the Employee. This system provides instant schedules
for the Employee work-time, based on the requirement criteria set up by the Supervisor.
The system is designed to schedule up to 25 employees, 7 days a week, 24 hours a day.
The User Manual consists of the basic steps to be followed in order to perform the
scheduler task each session.
If following steps are taken in order, the Supervisor will be able to generate the
schedule successfully.
1. The exact address of the scheduler system is: http://scorpion.tamucc.edu/sched/login.asp
2. Login to the system using correct userid and password. On the login page, the option
of “Change Password” provides you the facility of changing password. Periodic
change of password is highly recommended.
3. You should be at the Main-menu Form. Select the “Clear All Data” submit button to
clear all the existing data of the previous session and to make the system ready for the
new session. The system will give you confirmation when the task is performed.
4. Select the “Submit Data” button on the Main-menu Form. The system will display
the types of data to be submitted.
5. Select the “Submit Requirement” button and enter the required number of employees
for all the time slots. The system will ask you for confirmation. At this point, if you
want to modify any of the submitted values, the back button on the confirmation form
should be selected. The system will allow you to change any of the values. When the
submit button on the confirmation form is activated, the system will accept the data
68

and will display the number of hours of work you submitted. You may return to to
the Main-Menu Form via back button.
6. Select the “Submit Data” button on the Main-menu Form. Then, select the “Submit
Hours” button. The system will ask you to choose a base-hour. All the employees
but the last will be allotted the base-hours for the week upon submission. The system
will display the number of employees required, and the hours given to all those
employees. You may change the base-hour.
7. Select the “Create 1st Version of Schedule” button on the Main-menu Form. This is
an extra safety feature in the system. If you have forgotten to clear previous data
from the system, this button will perform the task. This will make ensure that the
system is ready before actual scheduling begins. The system will display a
confirmation message upon completing the task.
8. Select the “Create 1st Version of Schedule Now” button. This will actually build the
new schedule using the data submitted. When the system has built the schedule, it
will display a completion message, the number of users not completely scheduled,
and the number of hours for which they are not scheduled.
9. If you wish to see the schedule, the “View the Schedule by Userid” button on the
Main-menu Form should be selected.
10. Select the “View the Schedule of Individual Employee” button on the Main-menu
Form. The system will provide a drop down menu to allow you to select the userid
for which the Individual schedule needs to be displayed.
11. Choose “View the Schedule of Individual Employee” for all the users and find out the
slots where the user is scheduled for only one or two consecutive slots. Each time
69

note down the userid, day, time slot, type of modification to be done (i.e. to remove
the user from those time slots thereby decreasing user’s hours and requirement at
those slots or to add the user in immediate above and/or below time slots thereby
increasing user’s continuous hours of work, allotted hours and requirement).
However, this process should be undertaken only if you wish to make changes.
Otherwise, the scheduling procedure is over at this time. Note down the total number
of modifications to be done using the 1st version of the schedule and also look for the
over all feasibility of the Individual schedules. When the entire procedure is done,
select the back button, which will transfer you to the Main-menu Form.
12. If you wish to generate a 2nd Version of the schedule, then choose the “Create 2nd
Version of the Schedule” button the Main-menu Form.
13. Determine the Version of the schedule that should be adopted. The system will be
holding the version of the schedule most recently generated. You may have to re
create the previous schedule if the most recently created version is unacceptable. In
this case, the proper button (i.e. “Create 1st Version of the Schedule” or the “Create
2nd Version of the Schedule”) should be activated on the Main-menu Form.
14. If you wish to make changes recorded in step 11, then select the “Make Modification”
button on the Main-menu Form. The system will ask to select the userid, day, time
slot and type of modification to be done. Supply the system with this data and upon
submission, the system will display proper message. This procedure should be
continued for all the modifications that need to be done.
15. Select the “View Schedule by Userid” button and then, select the “View Statistics”
button, which will display the hours given to all the employees and the total actual
70

hours for which the scheduler built the schedule. You will have all the Individual
schedules at this time.
16. Now ask the most senior employee to pick up one Individual schedule whichever is
favorable. Assign the employee the userid for which the user has selected the
Individual schedule. Also supply the user with temporary password.
17. You should now ask the next senior employee to pick up one an Individual schedule
and assign a userid and temporary password. This procedure should be repeated for
all employees.
18. Select the “Submit Data” button and then select the “Submit Names” button. The
system will ask you to submit the names for all the employees with their associated
userids. Submit names to the system.
19. Now you will also be able to view the final schedules using employee names.
20. Employees can change their passwords and can view their Individual schedules.
For Technical Support please contact:
Systems Office, Mary & Jeff Bell Library – TAMU-CC.
Scheduler System Developer:
Gandhi, Prashant. – E-Mail: [email protected]
71