Embed Size (px)
Citation preview
Web Agent Option Pack Guide r12.5
CA SiteMinder®
This Documentation, which includes embedded help systems and electronically distributed materials, (hereinafter referred to as the “Documentation”) is for your informational purposes only and is subject to change or withdrawal by CA at any time.
This Documentation may not be copied, transferred, reproduced, disclosed, modified or duplicated, in whole or in part, without the prior written consent of CA. This Documentation is confidential and proprietary information of CA and may not be disclosed by you or used for any purpose other than as may be permitted in (i) a separate agreement between you and CA governing your use of the CA software to which the Documentation relates; or (ii) a separate confidentiality agreement between you and CA.
Notwithstanding the foregoing, if you are a licensed user of the software product(s) addressed in the Documentation, you may print or otherwise make available a reasonable number of copies of the Documentation for internal use by you and your employees in connection with that software, provided that all CA copyright notices and legends are affixed to each reproduced copy.
The right to print or otherwise make available copies of the Documentation is limited to the period during which the applicable license for such software remains in full force and effect. Should the license terminate for any reason, it is your responsibility to certify in writing to CA that all copies and partial copies of the Documentation have been returned to CA or destroyed.
TO THE EXTENT PERMITTED BY APPLICABLE LAW, CA PROVIDES THIS DOCUMENTATION “AS IS” WITHOUT WARRANTY OF ANY KIND, INCLUDING WITHOUT LIMITATION, ANY IMPLIED WARRANTIES OF MERCHANTABILITY, FITNESS FOR A PARTICULAR PURPOSE, OR NONINFRINGEMENT. IN NO EVENT WILL CA BE LIABLE TO YOU OR ANY THIRD PARTY FOR ANY LOSS OR DAMAGE, DIRECT OR INDIRECT, FROM THE USE OF THIS DOCUMENTATION, INCLUDING WITHOUT LIMITATION, LOST PROFITS, LOST INVESTMENT, BUSINESS INTERRUPTION, GOODWILL, OR LOST DATA, EVEN IF CA IS EXPRESSLY ADVISED IN ADVANCE OF THE POSSIBILITY OF SUCH LOSS OR DAMAGE.
The use of any software product referenced in the Documentation is governed by the applicable license agreement and such license agreement is not modified in any way by the terms of this notice.
The manufacturer of this Documentation is CA.
Provided with “Restricted Rights.” Use, duplication or disclosure by the United States Government is subject to the restrictions set forth in FAR Sections 12.212, 52.227-14, and 52.227-19(c)(1) - (2) and DFARS Section 252.227-7014(b)(3), as applicable, or their successors.
Copyright © 2012 CA. All rights reserved. All trademarks, trade names, service marks, and logos referenced herein belong to their respective companies.
CA Technologies Product References
This document references the following CA Technologies products:
■ SiteMinder®
Contact CA Technologies
Contact CA Support
For your convenience, CA Technologies provides one site where you can access the information that you need for your Home Office, Small Business, and Enterprise CA Technologies products. At http://ca.com/support, you can access the following resources:
■ Online and telephone contact information for technical assistance and customer services
■ Information about user communities and forums
■ Product and documentation downloads
■ CA Support policies and guidelines
■ Other helpful resources appropriate for your product
Providing Feedback About Product Documentation
If you have comments or questions about CA Technologies product documentation, you can send a message to [email protected].
To provide feedback about CA Technologies product documentation, complete our short customer survey which is available on the CA Support website at http://ca.com/docs.

Contents 5
Contents
Chapter 1: Introduction 7
Features Provided by the Web Agent Option Pack ...................................................................................................... 7
Chapter 2: Installation Requirements and Considerations 8
General Option Pack Installation Requirements .......................................................................................................... 8
Required Linux Libraries ........................................................................................................................................ 8
Components Required for SiteMinder Federation ..................................................................................................... 10
Components Required for eTelligent Rules................................................................................................................ 10
Version Compatibility ................................................................................................................................................. 10
Environment Variables Added by the Installation...................................................................................................... 11
Java Virtual Machine Installation Error on Solaris can be Ignored (149886) ............................................................. 11
Web Agent Option Pack on JBOSS Requires Workaround (147357, 149394) ............................................................ 11
Chapter 3: Install the Web Agent Option Pack 13
Installation Modes...................................................................................................................................................... 13
Run the Web Agent Option Pack Installer .................................................................................................................. 13
Move smvariable.dll file for eTelligent Rules ............................................................................................................. 15
Next Step After Installation ........................................................................................................................................ 16
Chapter 4: Deploy Federation Web Services for Federation 19
Federation Web Services Application Overview ........................................................................................................ 19
Properties File for Federation Web Services .............................................................................................................. 20
Set up the LoggerConfig.properties File ..................................................................................................................... 21
Deploy Federation Web Services as a Web Application............................................................................................. 23
Set Up ServletExec to Work with Federation Web Services ............................................................................... 24
Set Up WebLogic to Work with Federation Web Services .................................................................................. 30
Set Up WebSphere to Work with Federation Web Services ............................................................................... 36
Configure JBOSS or Tomcat to Work with Federation Web Services ................................................................. 43
Chapter 5: Unattended Mode Installation 49
How to Run an Unattended Mode Installation .......................................................................................................... 49
Prepare an Unattended Mode Installation ......................................................................................................... 49
Run an Unattended Mode Installation................................................................................................................ 50
Stop an Unattended Mode Installation in Progress ............................................................................................ 51
6 Web Agent Option Pack Guide
Chapter 6: Uninstall the Web Agent Option Pack 53
Uninstall the Web Agent Option Pack from Windows Systems ................................................................................. 53
Uninstall the Web Agent Option Pack from UNIX Systems ........................................................................................ 53
Chapter 7: Upgrade the Web Agent Option Pack 55
Mixed-Version Upgrade Considerations .................................................................................................................... 55
Perform an Option Pack Upgrade .............................................................................................................................. 58
Index 59
Chapter 1: Introduction 7
Chapter 1: Introduction
This section contains the following topics:
Features Provided by the Web Agent Option Pack (see page 7)
Features Provided by the Web Agent Option Pack
The Web Agent Option Pack is a stand-alone component that must be installed separately from SiteMinder. The component installs Federation Web Services (FWS) and support for eTelligent Rules POST variables on an application server or web server.
Note: Unlike the Web Agent Option Pack, the Policy Server Option Pack is no longer a stand-alone component. The Policy Server Option pack is included with the Policy Server installation.
The Web Agent Option Pack supports the following SiteMinder features:
Federation Manager (Legacy and Partnership)
Legacy Federation
Legacy Federation (formerly Federation Security Services).
Legacy federation is based on configuring SiteMinder objects, such as affiliate domains, authentication schemes, and policies to protect federated resources.
Note: For more information, see Federation Manager Guide: Legacy Federation.
Partnership Federation
Partnership federation is based on configuring federated partnerships. The partnership model does not require configuration of SiteMinder–specific objects, such as domains, realms, and policies.
Note: For more information, see Federation Manager Guide: Partnership Federation.
eTelligent Rules
eTelligent Rules are policy expressions that combine Boolean operators and user-defined variables and that are evaluated at runtime. As policy expressions, eTelligent Rules allow administrators to implement fine-grained access control of protected resources on a SiteMinder–protected website. To support POST variables, the Web Agent Option Pack is required.
Note: For more information about eTelligent Rules, see the Policy Server Configuration Guide.
General Option Pack Installation Requirements
8 Web Agent Option Pack Guide
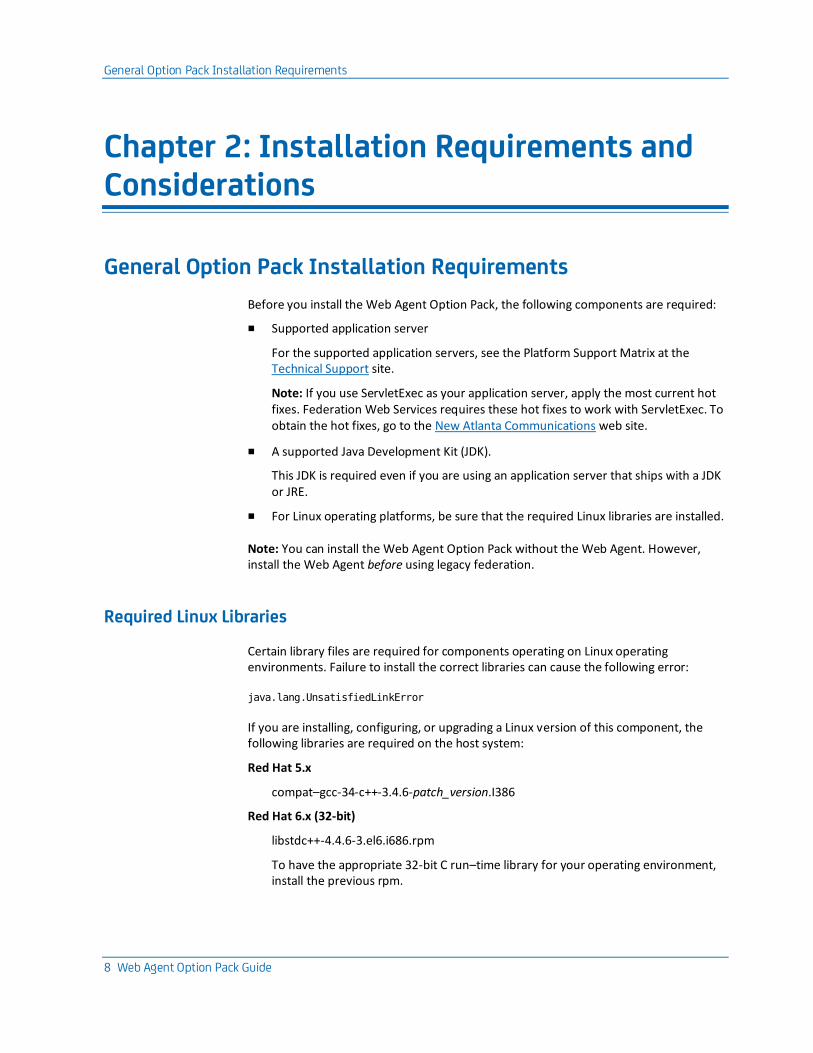
Chapter 2: Installation Requirements and Considerations
General Option Pack Installation Requirements
Before you install the Web Agent Option Pack, the following components are required:
■ Supported application server
For the supported application servers, see the Platform Support Matrix at the Technical Support site.
Note: If you use ServletExec as your application server, apply the most current hot fixes. Federation Web Services requires these hot fixes to work with ServletExec. To obtain the hot fixes, go to the New Atlanta Communications web site.
■ A supported Java Development Kit (JDK).
This JDK is required even if you are using an application server that ships with a JDK or JRE.
■ For Linux operating platforms, be sure that the required Linux libraries are installed.
Note: You can install the Web Agent Option Pack without the Web Agent. However, install the Web Agent before using legacy federation.
Required Linux Libraries
Certain library files are required for components operating on Linux operating environments. Failure to install the correct libraries can cause the following error:
java.lang.UnsatisfiedLinkError
If you are installing, configuring, or upgrading a Linux version of this component, the following libraries are required on the host system:
Red Hat 5.x
compat–gcc-34-c++-3.4.6-patch_version.I386
Red Hat 6.x (32-bit)
libstdc++-4.4.6-3.el6.i686.rpm
To have the appropriate 32-bit C run–time library for your operating environment, install the previous rpm.
General Option Pack Installation Requirements
Chapter 2: Installation Requirements and Considerations 9
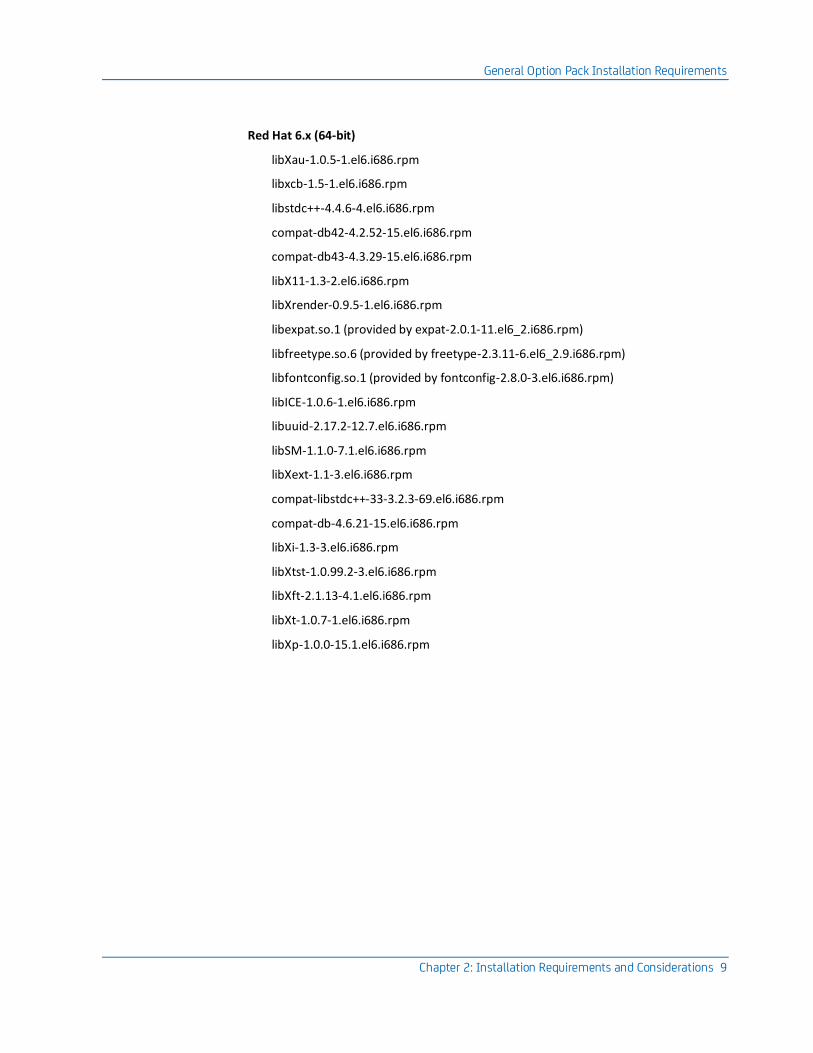
Red Hat 6.x (64-bit)
libXau-1.0.5-1.el6.i686.rpm
libxcb-1.5-1.el6.i686.rpm
libstdc++-4.4.6-4.el6.i686.rpm
compat-db42-4.2.52-15.el6.i686.rpm
compat-db43-4.3.29-15.el6.i686.rpm
libX11-1.3-2.el6.i686.rpm
libXrender-0.9.5-1.el6.i686.rpm
libexpat.so.1 (provided by expat-2.0.1-11.el6_2.i686.rpm)
libfreetype.so.6 (provided by freetype-2.3.11-6.el6_2.9.i686.rpm)
libfontconfig.so.1 (provided by fontconfig-2.8.0-3.el6.i686.rpm)
libICE-1.0.6-1.el6.i686.rpm
libuuid-2.17.2-12.7.el6.i686.rpm
libSM-1.1.0-7.1.el6.i686.rpm
libXext-1.1-3.el6.i686.rpm
compat-libstdc++-33-3.2.3-69.el6.i686.rpm
compat-db-4.6.21-15.el6.i686.rpm
libXi-1.3-3.el6.i686.rpm
libXtst-1.0.99.2-3.el6.i686.rpm
libXft-2.1.13-4.1.el6.i686.rpm
libXt-1.0.7-1.el6.i686.rpm
libXp-1.0.0-15.1.el6.i686.rpm
Components Required for SiteMinder Federation
10 Web Agent Option Pack Guide
Components Required for SiteMinder Federation
The following components are required for SiteMinder Federation (Legacy and Partnership):
■ Policy Server
■ Application server or web server
Note: An application server with built–in web server, such as JBOSS, WebLogic or WebSphere, is required to deploy Federation Web Services. Alternately, a web server with an application server plug-in, such as ServletExec, can be used.
■ Web Agent Option Pack
Note: Refer to the Federation Release Notes for any known issues regarding federation features and the Web Agent Option Pack.
Components Required for eTelligent Rules
The following components are required for eTelligent Rules:
■ Policy Server
■ Web Agent Option Pack
The Web Agent Option Pack is required to support eTelligent Rules that contain POST variables.
Version Compatibility
If the Web Agent and Web Agent Option Pack are installed on the same server, they must both be the same version, including the Service Pack and CR version. However, the Web Agent Option Pack can operate with Policy Servers of different, but compatible versions. To learn which Policy Server versions the Web Agent Option Pack is compatible with, see the SiteMinder Platform Support Matrix.
Important! When different compatible versions of the Web Agent Option Pack and Policy Server are mixed, federation functionality is limited to that of the lesser of the two components. Thus, if the Policy Server supports a federation feature but the Web Agent Option Pack does not, a request that requires that functionality may be rejected or the functionality ignored. The same is also true if the Web Agent Option pack supports a feature and the Policy Server does not.
More information:
Mixed-Version Upgrade Considerations (see page 55)
Environment Variables Added by the Installation
Chapter 2: Installation Requirements and Considerations 11
Environment Variables Added by the Installation
The installation of the Web Agent Option Pack sets the following environment variables:
■ NETE_WA_OPACK = “INSTALLED”
■ NETE_WA_PATH = $NETE_WA_ROOT$$/$bin;$NETE_WA_ROOT$$/$bin$/$thirdparty; $NETE_JRE_ROOT$$/$bin;$NETE_JRE_ROOT$$/$bin$/$server
Java Virtual Machine Installation Error on Solaris can be Ignored (149886)
Symptom:
You are doing a console mode installation of a SiteMinder product on a Solaris platform. The following error message displays: "Unable to install the Java Virtual Machine included with this installer."
Solution:
Ignore this error message. The error is a third-party issue and it has no functional impact.
Web Agent Option Pack on JBOSS Requires Workaround (147357, 149394)
Symptom:
On the JBoss 5.1.2 server, system JARs are overriding application-specific JARs, such as those JARs for the Web Agent Option Pack.
Solution:
Prevent the Web Agent Option Pack XML API files from being overwritten by JBOSS system JARS.
Important! This workaround only applies to the supported version of JBOSS 5.1.2.
Web Agent Option Pack on JBOSS Requires Workaround (147357, 149394)
12 Web Agent Option Pack Guide
Add the following filter package in two places in the war-deployers-jboss-beans.xml file:
<property name="filteredPackages">javax.servlet,org.apache.commons.
logging,javax.xml.parsers,org.xml.sax,org.w3c.dom</property>
The filter package allows the use of the Web Agent Option Pack XML API files instead of the JBOSS system files.
Follow these steps:
1. Locate the war-deployers-jboss-beans.xml file located in the directory:
/deployers/jbossweb.deployer/META-INF/
2. Find the following entry:
<property name="filteredPackages">javax.servlet,org.apache.
commons.logging</property>
3. Change the entry to:
<property name="filteredPackages">javax.servlet,org.apache.commons.
logging,javax.xml.parsers,org.xml.sax,org.w3c.dom</property>
This entry in the file is on one line.
4. Find the second instance of the entry in step 2 and replace it with the entry in step 3.
Add the filter package in both places in the XML file.
5. Save the XML file.
Chapter 3: Install the Web Agent Option Pack 13
Chapter 3: Install the Web Agent Option Pack
This section contains the following topics:
Installation Modes (see page 13) Run the Web Agent Option Pack Installer (see page 13) Move smvariable.dll file for eTelligent Rules (see page 15) Next Step After Installation (see page 16)
Installation Modes
The Web Agent Option Pack can be installed on a Web server running ServletExec or other supported application server, such as WebLogic, WebSphere, or JBoss.
You can install the Web Agent Option Pack in one of the following modes:
■ GUI Mode
GUI mode uses a graphical installation wizard to install the Web Agent Option Pack.
■ Console Mode (UNIX platforms only)
Uses command line questions about the installation in a UNIX console window.
■ Unattended Mode
Installs the Web Agent Option Pack without user intervention. Use the unattended installation mode to automate additional installations on other machines in your network.
Note: You must install the Web Agent Option Pack using GUI or Console mode before running an unattended installation. The initial installation creates a properties file that contains the installation settings for the unattended installation.
Run the Web Agent Option Pack Installer
The Web Agent Option Pack can be installed as a stand-alone product. The installer attempts to find an installed Web Agent, but if it cannot, it prompts you to continue or cancel. Continuing prompts you for an installation path. Then the installer installs the Option Pack in the location that you specify.
Run the Web Agent Option Pack Installer
14 Web Agent Option Pack Guide
Install the Web Agent Option Pack using the method for your platform:
■ Windows systems: install in GUI mode.
Important! If you are installing the Web Agent Option Pack on a Windows system immediately after installing the Web Agent, reboot your system first.
■ UNIX systems: install in GUI or console mode.
To install in console mode, you execute the Option Pack binary with the -i console command argument.
Follow these steps:
1. Stop the Web or application server and exit any applications that are running.
2. Log in to the CA Technical Support site.
3. Click Download Center.
4. Search the Download Center for the installation kit you need.
5. Run the installation program according to your platform.
■ Windows: Double-click the executable.
■ UNIX: At the command prompt, type one of the following commands:
■ GUI Mode
./binary_filename
■ Console Mode
./binary_filename -i console
Example: To run the installation in GUI mode on a Solaris platform, enter: ./ca-wa-opack-r12.5-sol.bin
Note: If needed, use the chmod command to add execute permissions to the installation file, for example:
chmod +x ca-wa-opack-r12.5-sol.bin
6. Follow the installation dialogs and prompts to complete the installation.
To re–install the Option Pack, run the executable again.
More information:
Version Compatibility (see page 10)
Move smvariable.dll file for eTelligent Rules
Chapter 3: Install the Web Agent Option Pack 15
Move smvariable.dll file for eTelligent Rules
After you install the Web Agent option pack on your web server, move the smvariable.dll files if your environment meets all of the following criteria:
■ You want to use eTelligent rules.
■ You are using the Windows 2008 R2 (64-bit) operating environment.
■ You are using an IIS 7.x Web Agent.
Perform this procedure for each installation of your Web Agent Option pack.
Follow these steps:
1. Move the dll file for 32-bit applications by doing the following steps:
a. Locate the following file:
C:\Program Files\CA\webagent\win32\bin\non_stub\smvariable.dll
b. Move the previous file into the following directory:
C:\Program Files\CA\webagent\win32\bin
2. Move the dll for 64-bit applications by doing the following steps:
a. Locate the following file:
C:\Program Files\CA\webagent\win64\bin\non_stub\smvariable.dll
b. Move the previous file into the following directory:
C:\Program Files\CA\webagent\win64\bin
The smvariable.dll files have been moved to accommodate eTelligent rules.
Next Step After Installation
16 Web Agent Option Pack Guide
Next Step After Installation
After you complete the Web Agent Option pack installation, you can configure the features that you want.
eTelligent Rules
Configure eTelligent rules according to the instructions in the Policy Server Configuration Guide.
Federation
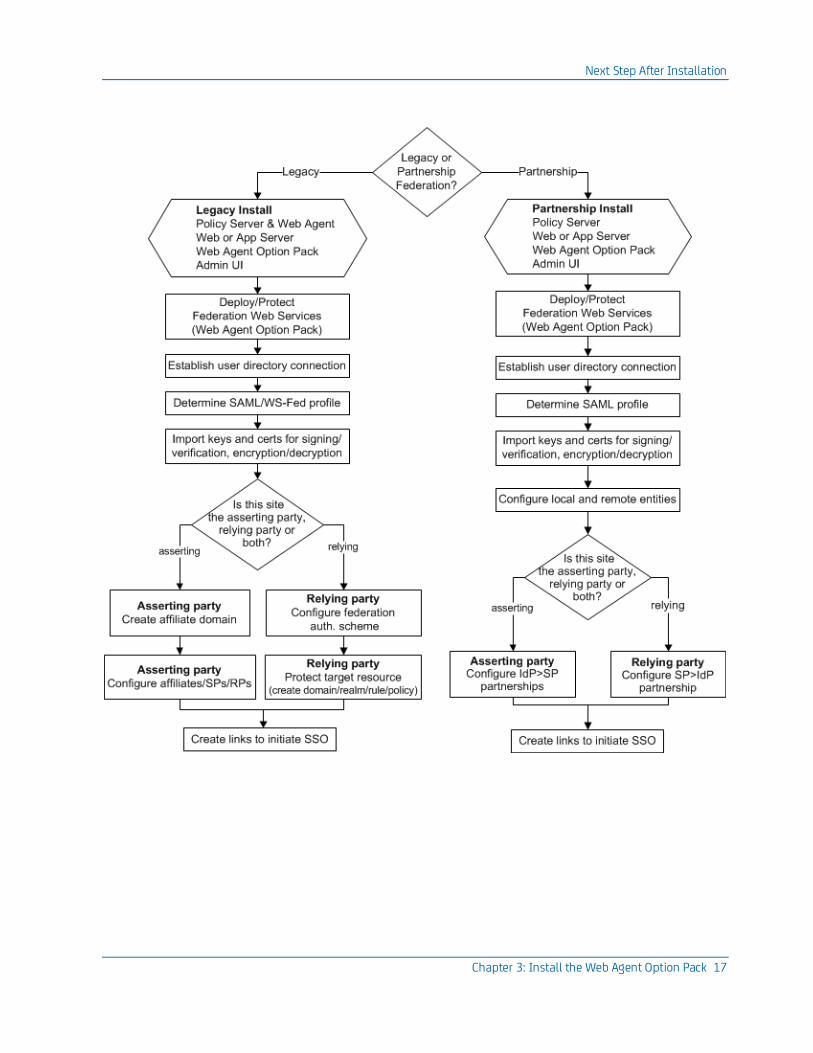
For Federation Manager, configure the components to establish successful federated partnerships. Most of these components are configurable using the Administrative UI.
The following flow chart highlights the general process for legacy federation and partnership federation.
Next Step After Installation
Chapter 3: Install the Web Agent Option Pack 17
Next Step After Installation
18 Web Agent Option Pack Guide
See the following guides for detailed instructions on required components and configuration procedures:
Legacy and partnership federation
Federation in Your Enterprise
Legacy federation
Federation Manager Guide: Legacy Federation
Legacy federation refers to the product known as Federation Security Services.
Partnership federation
Federation Manager Guide: Partnership Federation
Partnership Federation refers to partnership model of federation, previously available only with the standalone Federation Manager product.
Chapter 4: Deploy Federation Web Services for Federation 19
Chapter 4: Deploy Federation Web Services for Federation
This section contains the following topics:
Federation Web Services Application Overview (see page 19) Properties File for Federation Web Services (see page 20) Set up the LoggerConfig.properties File (see page 21) Deploy Federation Web Services as a Web Application (see page 23)
Federation Web Services Application Overview
Federation Web Services (FWS) is a collection of servlets that are packaged as a web application in accordance with the Java Servlet API 2.3 specification. The Federation Web Services application is installed with the Web Agent Option Pack. The application is deployed within an application server, or deployed inside the Tomcat web server, which is embedded in the SPS federation gateway.
The web application is rooted at a specific URL within the web server, http://www.your_webserver.com/affwebservices/. URLs for the servlets included with the FWS application have this same root.
The Federation Web Services application provides these services:
■ Assertion Retrieval Service (SAML 1.x)
■ SAML credential collector (SAML 1.x)
■ Intersite Transfer Service (SAML 1.x)
■ Artifact Resolution Service (SAML 2.0)
■ Assertion Consumer Service (SAML 2.0)
■ Security Token Consumer Service (WS-Federation)
■ AuthnRequest service (SAML 2.0)
■ Single Sign-on service (SAML 2.0 and WS-Federation)
■ Single Logout Service (SAML 2.0)
■ Signout Service (WS-Federation)
Properties File for Federation Web Services
20 Web Agent Option Pack Guide
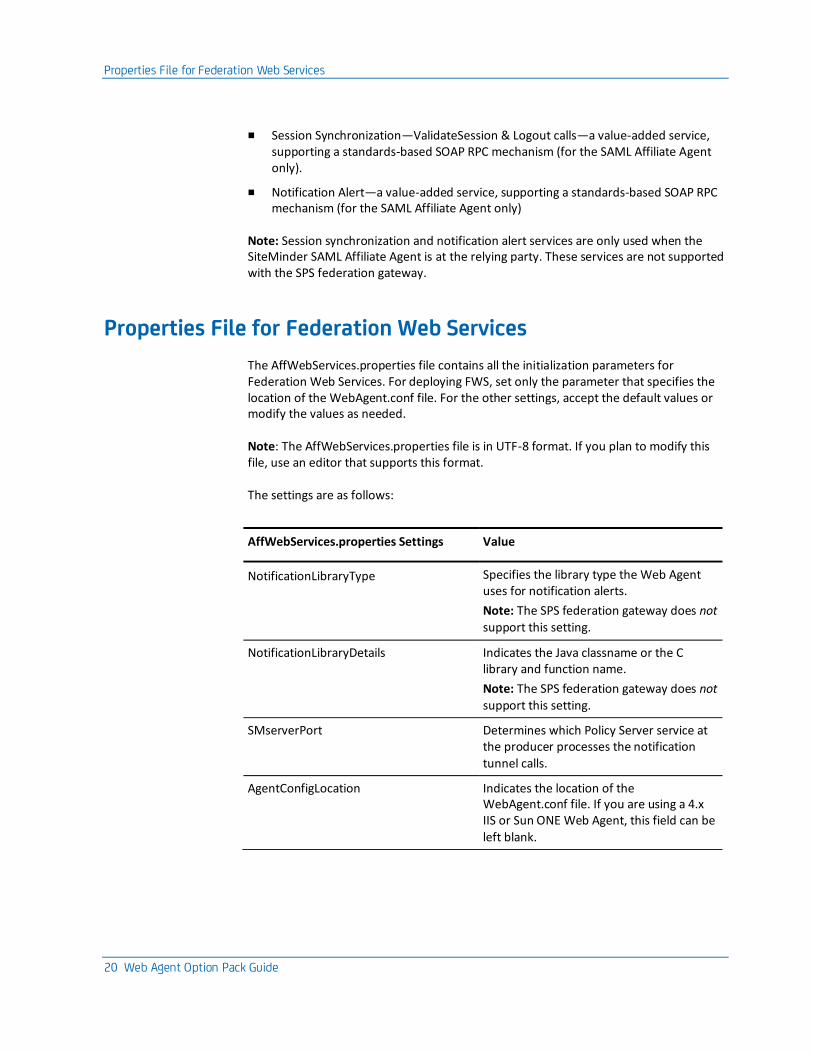
■ Session Synchronization—ValidateSession & Logout calls—a value-added service, supporting a standards-based SOAP RPC mechanism (for the SAML Affiliate Agent only).
■ Notification Alert—a value-added service, supporting a standards-based SOAP RPC mechanism (for the SAML Affiliate Agent only)
Note: Session synchronization and notification alert services are only used when the SiteMinder SAML Affiliate Agent is at the relying party. These services are not supported with the SPS federation gateway.
Properties File for Federation Web Services
The AffWebServices.properties file contains all the initialization parameters for Federation Web Services. For deploying FWS, set only the parameter that specifies the location of the WebAgent.conf file. For the other settings, accept the default values or modify the values as needed.
Note: The AffWebServices.properties file is in UTF-8 format. If you plan to modify this file, use an editor that supports this format.
The settings are as follows:
AffWebServices.properties Settings Value
NotificationLibraryType Specifies the library type the Web Agent uses for notification alerts.
Note: The SPS federation gateway does not
support this setting.
NotificationLibraryDetails Indicates the Java classname or the C library and function name.
Note: The SPS federation gateway does not support this setting.
SMserverPort Determines which Policy Server service at the producer processes the notification tunnel calls.
AgentConfigLocation Indicates the location of the WebAgent.conf file. If you are using a 4.x IIS or Sun ONE Web Agent, this field can be left blank.
Set up the LoggerConfig.properties File
Chapter 4: Deploy Federation Web Services for Federation 21
The installed location of the AffWebServices.properties file is in the following locations:
■ For a web or application server
web_agent_or_webagent_option_pack_home/affwebservices/WEB-INF/classes
■ For the SPS federation gateway:
sps_home/secure-proxy/Tomcat/webapps/affwebservices/WEB-INF/classes
web_agent_home
Indicates the installed location of the Web Agent.
sps_home
Indicates the installed location of CA SiteMinder SPS.
Set up the LoggerConfig.properties File
The LoggerConfig.properties file lets you enable logging so the Federation Web Services application can record the following information:
■ Assertion retrieval
■ Session management
■ Notification alert information
■ Trace messages
The log file shows activity at the asserting party and the relying party, depending on how your site is configured.
Note: The LoggerConfig.properties file is in UTF-8 format. If you plan to modify this file, use an editor that supports this format.
Set up the LoggerConfig.properties File
22 Web Agent Option Pack Guide
The installed location of the LoggerConfig.properties file is:
■ For the Web Agent, the location is
web_agent_home/affwebservices/WEB-INF/classes
■ For an application server
deployment_directory/affwebservices/WEB-INF/classes
■ For the SPS federation gateway:
sps_home/secure-proxy/Tomcat/webapps/affwebservices/WEB-INF/classes
web_agent_home
Indicates the installed location of the Web Agent.
deployment_directory
Indicates the default deployment directory for your application server.
sps_home
Indicates the installed location of CA SiteMinder SPS.
Modify the settings as needed. If a value is not specified, the default value for the default locale is used.
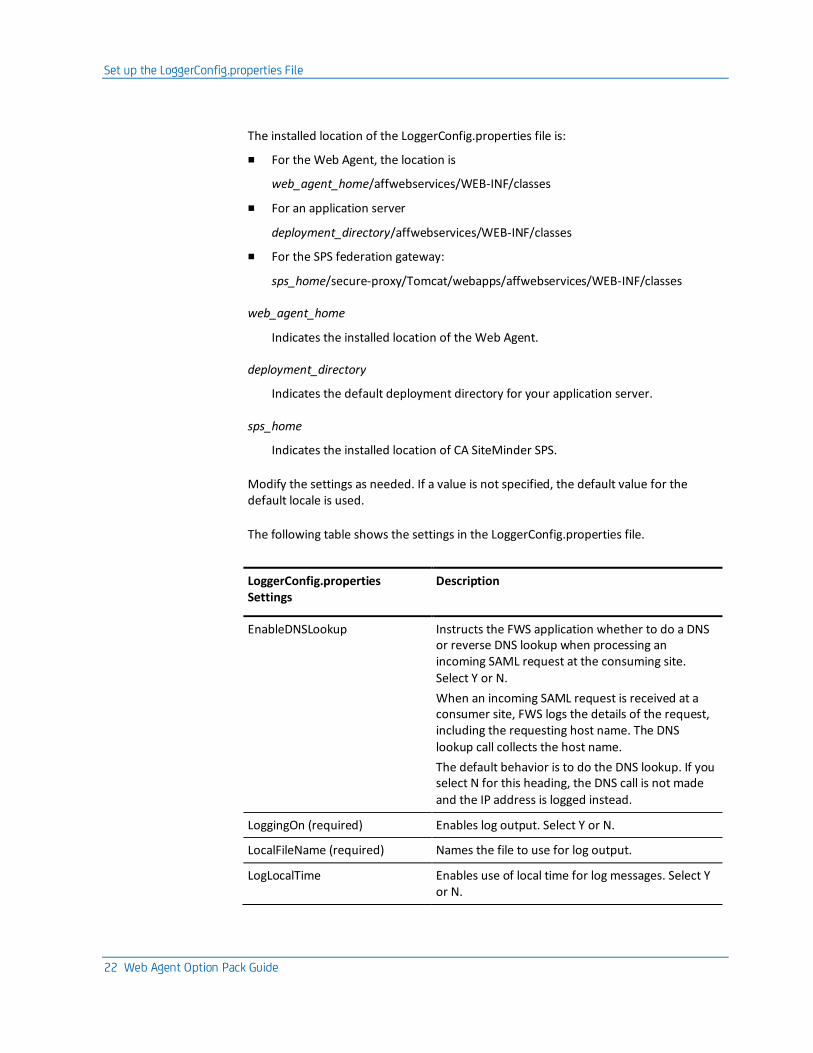
The following table shows the settings in the LoggerConfig.properties file.
LoggerConfig.properties Settings
Description
EnableDNSLookup Instructs the FWS application whether to do a DNS or reverse DNS lookup when processing an incoming SAML request at the consuming site. Select Y or N.
When an incoming SAML request is received at a consumer site, FWS logs the details of the request, including the requesting host name. The DNS lookup call collects the host name.
The default behavior is to do the DNS lookup. If you select N for this heading, the DNS call is not made
and the IP address is logged instead.
LoggingOn (required) Enables log output. Select Y or N.
LocalFileName (required) Names the file to use for log output.
LogLocalTime Enables use of local time for log messages. Select Y or N.

Deploy Federation Web Services as a Web Application
Chapter 4: Deploy Federation Web Services for Federation 23
LoggerConfig.properties Settings
Description
LogRollover Defines the type of rollover functionality. Select Y or N then define the LogSize or LogCount parameter.
LogSize Specifies the maximum file size, in megabytes, when rolling over log files by size.
LogCount Specifies how many log output files to leave when roll-over is enabled.
TracingOn Enables trace log output. Select Y or N.
TraceFileName Names the file to use for trace log output.
TraceConfig Specifies the trace configuration file. For more information, see Trace Logging.
TraceRollover Defines the type of rollover functionality for tracing. Select Y or N and then specify a TraceSize or TraceCount value.
TraceSize Specifies the maximum file size, in megabytes, when rolling over trace log files by size.
TraceCount Specifies how many trace log output files to leave when roll-over is enabled.
TraceFormat Specifies the trace output file format (default,
fixed-width fields, delimited format, XML)
TraceDelim Defines the character to use as a delimiter when
using fixed-width fields as the trace format.
Deploy Federation Web Services as a Web Application
If you are using the Web Agent Option Pack, deploy the Federation Web Services (FWS) application into operation.
Configure one of the following application servers to work with FWS:
■ Set Up ServletExec to Work with Federation Web Services (see page 24).
■ Set Up WebLogic to Work with Federation Web Services (see page 30).
Deploy Federation Web Services as a Web Application
24 Web Agent Option Pack Guide
■ Set Up WebSphere to Work with Federation Web Services (see page 36).
■ Set Up a JBOSS or Tomcat to Work with Federation Web Services.
If you are using the SPS federation gateway, Federation Web Services is already deployed on the embedded Tomcat server.
Set Up ServletExec to Work with Federation Web Services
For the Federation Web Services (FWS) application to work with ServletExec, deploy Federation Web Services as a web application for ServletExec. Deploy the FWS application at the asserting and relying party.
Note: SiteMinder r12.5 is shipped with a ServletExec license key file named ServletExec_AS_6_license_key.txt. If you do not have this license key, contact CA Technical Support. From this license file, copy the license key and enter it in the ServletExec License dialog of the ServletExec Administration Console. For instructions on licensing ServletExec, see ServletExec documentation, available at the New Atlanta Communication http://www.newatlanta.com website.

Deploy Federation Web Services as a Web Application
Chapter 4: Deploy Federation Web Services for Federation 25
The following illustration shows a sample configuration of SiteMinder and ServletExec. ServletExec, the Web Agent Option Pack, and the Web Agent are installed on the same server; however, this setup is not required.
Important! Apply the most current hot fixes for ServletExec. Federation Web Services requires the hot fixes to work with ServletExec. To obtain the hot fixes, go to the New Atlanta Communication website.
Follow these steps:
1. Open the ServletExec Administration Console.
2. Under Web Applications, select manage.
The Manage Web Applications dialog opens.
3. Click Add a Web Applications.
Deploy Federation Web Services as a Web Application
26 Web Agent Option Pack Guide
4. Enter the following information:
a. Application Name: affwebservices
b. URL Context Path: /affwebservices/
c. Location: affwebservices_home
Example:
C:\program files\ca\webagent\affwebservices
5. Click Submit.
6. Exit the ServletExec Console.
Source the Environment Script on a UNIX Operating Environments
After you install the Web Agent Option Pack on a UNIX system, the installation program creates an environment script (ca-wa-opack-env.sh).
Source the environment script so the library path of the application server points to the location of the Web Agent Option Pack /bin directory.
Source the script by entering the following command at the command line:
. ./ca-wa-opack-env.sh
Setting the correct library path lets the option pack and the web or application server to work together.
After you source the script, the library path is set. The variable name for the library path differs depending on the operating system. Example of several library paths:
Solaris/Linux
LD_LIBRARY_PATH=/webagent_option_pack_home/bin
HP-UX
SHLIB_PATH=/webagent_option_pack_home/bin
AIX
LIBPATH=/webagent_option_pack_home/bin
Important! The application server startup script can reset the library path. Ensure that the path to the Web Agent Option Pack is the first entry in the path.
Deploy Federation Web Services as a Web Application
Chapter 4: Deploy Federation Web Services for Federation 27
The path to the Web Agent Option Pack environment script points to one of the following locations:
■ The installation directory of the web agent option pack. The default location is: /webagent_option_pack_home/bin.
■ The installation directory of the web agent.
If you install the option pack on the same system as the web agent, the script resides in the web agent directory. For any UNIX installation, the default location is /web_agent_home/bin.
Modify the FWS Properties File for a ServletExec Deployment
The AffWebServices.properties file contains all the initialization parameters for Federation Web Services. For deploying FWS, set only the parameter that specifies the location of the WebAgent.conf file.
To configure the AffWebServices.properties file
1. Navigate to the AffWebServices.properties file. For ServletExec, go to web_agent_home/affwebservices/WEB-INF/classes.
2. Set the AgentConfigLocation parameter to the location of the WebAgent.conf file at each partner site.
■ Windows example:
C:\\Program Files\\ca\\webagent\\bin\\IIS\\WebAgent.conf
Note: Federation Web Services is a Java component, so the Windows paths must contain double backslashes.
■ UNIX example:
server_home/servers/https-hostname/config/WebAgent.conf
■ Windows example for the SPS federation gateway
sps_home\\proxy-engine\\conf\\defaultagent\\WebAgent.conf
■ UNIX example for the SPS federation gateway
sps_home/proxy-engine/conf/defaultagent/WebAgent.conf
3. Repeat this procedure for each application server where the Web Agent Option Pack is installed.
4. Accept the default values for the rest of the settings.
Enable ServletExec to Write to the IIS File System
The IIS server user account must have proper rights for IIS to allow a plug-in to write to its file system. For ServletExec to write to the federation log files, the anonymous user account that is associated with ServletExec must have permissions to write to the file system.
Deploy Federation Web Services as a Web Application
28 Web Agent Option Pack Guide
Follow these steps:
1. Open the IIS Internet Information Services Manager on the system where ServletExec is installed.
2. Navigate to Web Sites, Default Web Site.
The set of applications is displayed in the right pane.
3. Select ServletExec and right-click Properties.
4. Select the Directory Security tab in the Properties dialog.
5. Click Edit in the Authentication and access control section.
The Authentication Methods dialog opens.
6. Set the controls as follows.
a. Select Enable Anonymous Access.
For anonymous access, enter a name and password of a user account that has the permissions to right to the Windows file system. To grant this right to a user account, see Windows documentation. For example, you can use the IUSR Internet Guest account for anonymous access.
b. Clear Basic authentication.
c. Clear Integrated Windows authentication.
7. If prompted, apply the security changes to all child components of the web server.
8. Restart the web server.
The user account that is associated with ServletExec can now write to the IIS file system.
Follow these steps:
1. Open Control Panel, Administrative Tools, Local Security Policy, Local Policies, User Rights Assignment.
The Local Security Settings dialog displays.
2. Double-click Act as part of the operating system.
The Act as part of the operating system Properties dialog opens.
3. Add the anonymous user account to the Local Security Setting dialog.
4. Click OK.
5. Exit from the control panel.
Optionally, we strongly recommend that you look at the Agent Configuration Object for the Web Agent protecting the IIS Web Server. This object verifies that the SetRemoteUser parameter is set to yes to preventing any anonymous user from writing to the file system.
Deploy Federation Web Services as a Web Application
Chapter 4: Deploy Federation Web Services for Federation 29
Ensure the IIS Default Web Site Exists
The Web Agent requires the IIS Web Server to have a Default Web Site for proper installation. The Default Web Site is automatically installed with the IIS Web Server. If this website does not exist, install the SiteMinder virtual directories to a different website on IIS. To install the SiteMinder virtual directories to a different website on IIS, edit the Metabase.
A technical note on the site describes the Technical Support site changes that are needed. To find the note:
1. Go to the main Support page.
2. Select Literature, Tech Notes.
3. Select the document titled METABASE -3 Error.
The documents are listed in alphabetical order.
Deploy Federation Web Services as a Web Application
30 Web Agent Option Pack Guide
Set Up WebLogic to Work with Federation Web Services
To enable Federation Web Services (FWS) for a SiteMinder/WebLogic configuration, deploy the FWS application.
Note: For a list of supported version of WebLogic, see the SiteMinder r12.5 Platform Support Matrix on the Technical Support site.
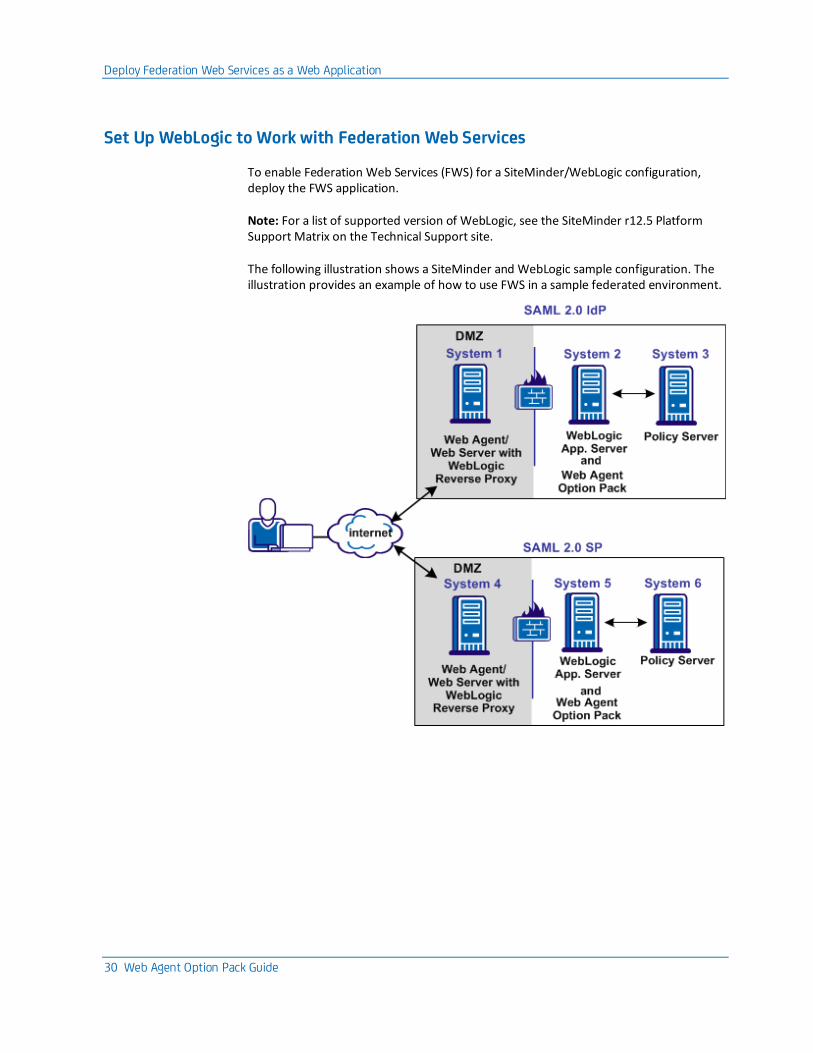
The following illustration shows a SiteMinder and WebLogic sample configuration. The illustration provides an example of how to use FWS in a sample federated environment.
Deploy Federation Web Services as a Web Application
Chapter 4: Deploy Federation Web Services for Federation 31
In this environment, deploy the FWS application on System 2 and System 5.
Important! Complete the deployment procedure for the Web Agent at the asserting party and the relying party.
After installing the software components on the systems in the illustration, deploy the FWS application. Deploy the application on System 2 for the asserting party and on System 5 for the relying party.
To deply the FWS application
1. Set the LD_LIBRARY_PATH Variable
2. Create a SmHost.conf File
3. Create a WebAgent.conf File
4. Modify the AffWebServices.properties File
5. Configure the WebLogic Reverse Proxy Plug-in.
6. Deploy the FWS Application on WebLogic.
Important! For the FWS application to work with WebLogic Server, review the weblogic.xml file in the WEB-INF directory. Verify that the prefer-web-inf-classes parameter in the weblogic.xml file is set to true.
For instructions on reviewing the weblogic.xml file, go to Deploy the FWS Application on WebLogic (see page 35).
Source the Environment Script on a UNIX Operating Environments
After you install the Web Agent Option Pack on a UNIX system, the installation program creates an environment script (ca-wa-opack-env.sh).
Source the environment script so the library path of the application server points to the location of the Web Agent Option Pack /bin directory.
Source the script by entering the following command at the command line:
. ./ca-wa-opack-env.sh
Setting the correct library path lets the option pack and the web or application server to work together.
Deploy Federation Web Services as a Web Application
32 Web Agent Option Pack Guide
After you source the script, the library path is set. The variable name for the library path differs depending on the operating system. Example of several library paths:
Solaris/Linux
LD_LIBRARY_PATH=/webagent_option_pack_home/bin
HP-UX
SHLIB_PATH=/webagent_option_pack_home/bin
AIX
LIBPATH=/webagent_option_pack_home/bin
Important! The application server startup script can reset the library path. Ensure that the path to the Web Agent Option Pack is the first entry in the path.
The path to the Web Agent Option Pack environment script points to one of the following locations:
■ The installation directory of the web agent option pack. The default location is: /webagent_option_pack_home/bin.
■ The installation directory of the web agent.
If you install the option pack on the same system as the web agent, the script resides in the web agent directory. For any UNIX installation, the default location is /web_agent_home/bin.
Create an SmHost.conf File
The FWS application requires an SmHost.conf file. However, the Web Agent Option Pack does not install this file, so you must create it.
To create an SmHost.conf
1. Go to the directory /webagent_option_pack_home/bin
2. Run the smreghost.exe.
For instructions on running smreghost.exe, see the Web Agent Installation Guide.
3. Put the SmHost.conf file in the following directory on Systems 2 and 5:
/webagent_option_pack_home/config
Deploy Federation Web Services as a Web Application
Chapter 4: Deploy Federation Web Services for Federation 33
Create a WebAgent.conf File
The FWS application requires the WebAgent.conf file. However, the Web Agent Option Pack does not install this file, so you must create it.
To create a WebAgent.conf file
1. Copy the WebAgent.conf file from System 1 to the following directory on System 2 and System 5:
/webagent_option_pack_home/config
webagent_option_pack_home
Defines the installed location of the Web Agent Option Pack on System 2 or System 5.
2. Modify the WebAgent.conf file by:
a. Setting the EnableWebAgent parameter to YES.
b. Modifying other configuration parameters to suit FWS.
The following sample shows a WebAgent.conf file for the FWS application:
# WebAgent.conf - configuration file for the Federation Web Services Application
#agentname="agent_name, IP_address"
HostConfigFile="/webagent_option_pack/config/SmHost.conf"
AgentConfigObject="agent_config_object_name"
EnableWebAgent="YES"
Note: The Agent Configuration Object referenced in this WebAgent.conf file must be a new object that you create. Do not specify the object in use by the Web Agent installed in your environment.
Deploy Federation Web Services as a Web Application
34 Web Agent Option Pack Guide
Modify the FWS Properties File
The AffWebServices.properties file contains all the initialization parameters for Federation Web Services. For deploying FWS, set only the parameter that specifies the location of the WebAgent.conf file.
Follow these steps:
1. Navigate to the AffWebServices.properties file. Locate this file in the following directory:
web_agent_optionpack_home/affwebservices/WEB-INF/classes
2. Set the AgentConfigLocation parameter to the location of the WebAgent.conf file at each partner site.
■ Windows example:
C:\\Program Files\\CA\\webagent_optionpack\\config\\WebAgent.conf
Note: Federation Web Services is a Java component, so the Windows paths must contain double backslashes.
■ UNIX example:
web_agent_optionpack_home/config/WebAgent.conf
■ Windows example for the SPS federation gateway
sps_home\\proxy-engine\\conf\\defaultagent\\WebAgent.conf
■ UNIX example for the SPS federation gateway
sps_home/proxy-engine/conf/defaultagent/WebAgent.conf
3. Repeat this procedure for each application server where the Web Agent Option Pack is installed.
4. Accept the default values for the rest of the settings in the properties file.
Deploy Federation Web Services as a Web Application
Chapter 4: Deploy Federation Web Services for Federation 35
Configure the WebLogic Reverse Proxy Plug-in
To set up the WebLogic Reverse Proxy plug-in:
1. On System 1, configure the WebLogic reverse proxy plug-in on the Apache Web Server.
For more information, see WebLogic documentation.
2. Add the following aliases to the configuration file of the web server.
This example uses the Apache httpd.conf file.
<IfModule mod_weblogic.c>
WebLogicHost <WebLogic_Machine_IP Address>
WebLogicPort <WebLogic_Machine_Port_Number>
</IfModule>
<Location /affwebservices>
SetHandler weblogic-handler
Debug ALL
</Location>
Deploy the FWS Application on WebLogic
Deploy the FWS application on System 2 and System 5.
Important! For the FWS application to work with WebLogic Server, review the weblogic.xml file in the WEB-INF directory. Verify that the prefer-web-inf-classes parameter is set to true.
The weblogic.xml file is located in the directory webagent\affwebservices\WEB-INF.
The following code excerpt shows how to set the prefer-web-inf-classes parameter:
<weblogic-web-app>
<container-descriptor>
<prefer-web-inf-classes>true</prefer-web-inf-classes>
</container-descriptor>
</weblogic-web-app>
In addition, verify that the precompile parameter is set to true, as listed following:
<jsp-descriptor>
<precompile>true</precompile>
<jsp-descriptor>
Deploy Federation Web Services as a Web Application
36 Web Agent Option Pack Guide
Follow these steps: to deploy FWS
1. Use the WebLogic Server Console and deploy FWS. The FWS application is installed in:
/webagent_option_pack_home/affwebservices/
For more information about deploying a web application, see the WebLogic documentation.
2. Test that the FWS application is working. Open a web browser and enter:
http://fqhn:port_number/affwebservices/assertionretriever
fqhn
Defines the fully qualified host name.
port_number
Defines the port number of the server where the Federation Web Services application is installed.
For example:
http://myhost.ca.com:81/affwebservices/assertionretriever
If Federation Web Services is operating correctly, you see the following message:
Assertion Retrieval Service has been successfully initialized.
The requested servlet accepts only HTTP POST requests.
This message indicates that Federation Web Services is listening for data activity. The FWS application is now deployed for the WebLogic server.
If Federation Web Services is not operating correctly, a message that the Assertion Retrieval Service has failed displays. If the service fails, review the Federation Web Services log.
Note: For instructions on enabling trace logging for the FWS application, see Trace Logging.
Set Up WebSphere to Work with Federation Web Services
To enable FWS in a federated environment for a SiteMinder/WebSphere Application Server (WAS) configuration, deploy the FWS application.
On Systems 2 and 5, deploy FWS. These systems must also have WAS and the associated WAS Fix Pack, if applicable. On Systems 1 and 4, install the Web Agent and the WAS Proxy Plug-in. Enable SSL between the proxy and the WAS.
Deploy Federation Web Services as a Web Application
Chapter 4: Deploy Federation Web Services for Federation 37
The following illustration shows a SiteMinder and WebSphere sample configuration.
Prerequisites:
■ Install WAS on systems that have the WebSphere Application Server installed.
■ Complete the deployment procedure for the Web Agent at the asserting party and the relying party.
After installing the software components on the systems in the illustration, deploy FWS on System 2 and System 5 by following these steps:
1. Set the WebSphere LD_LIBRARY_PATH variable.
2. Create a SmHost.conf file.
3. Create a WebAgent.conf file.
4. Modify the AffWebServices.properties file.
5. Copy option pack library files to WebSphere.
6. Deploy a Federation Web Services WAR File in WebSphere.

Deploy Federation Web Services as a Web Application
38 Web Agent Option Pack Guide
Source the Environment Script on a UNIX Operating Environments
After you install the Web Agent Option Pack on a UNIX system, the installation program creates an environment script (ca-wa-opack-env.sh).
Source the environment script so the library path of the application server points to the location of the Web Agent Option Pack /bin directory.
Source the script by entering the following command at the command line:
. ./ca-wa-opack-env.sh
Setting the correct library path lets the option pack and the web or application server to work together.
After you source the script, the library path is set. The variable name for the library path differs depending on the operating system. Example of several library paths:
Solaris/Linux
LD_LIBRARY_PATH=/webagent_option_pack_home/bin
HP-UX
SHLIB_PATH=/webagent_option_pack_home/bin
AIX
LIBPATH=/webagent_option_pack_home/bin
Important! The application server startup script can reset the library path. Ensure that the path to the Web Agent Option Pack is the first entry in the path.
The path to the Web Agent Option Pack environment script points to one of the following locations:
■ The installation directory of the web agent option pack. The default location is: /webagent_option_pack_home/bin.
■ The installation directory of the web agent.
If you install the option pack on the same system as the web agent, the script resides in the web agent directory. For any UNIX installation, the default location is /web_agent_home/bin.
Deploy Federation Web Services as a Web Application
Chapter 4: Deploy Federation Web Services for Federation 39
Create an SmHost.conf File
The FWS application requires the SmHost.conf file. However, the Web Agent Option Pack does not install this file, so you must create it.
To create an SmHost.conf file
1. Create an SmHost.conf file by running smreghost.exe, which is located in the following directory:
/webagent_option_pack_home/bin
2. Put the SmHost.conf file in the following directory on System 2 and System 5:
/webagent_option_pack_home/config
Create a WebAgent.conf File
The FWS application requires the WebAgent.conf file; however, the Web Agent Option Pack does not install this file so you must create it.
To create a WebAgent.conf file
1. Copy the WebAgent.conf file from System 1 to the following directory on System 2 and System 5:
/webagent_option_pack_home/config
where,
webagent_option_pack_home
Defines the installed location of the Web Agent Option Pack on System 2 and System 5.
2. Modify the WebAgent.conf file by:
a. Setting the EnableWebAgent parameter to YES.
b. Modifying any other configuration parameters to suit the environment for the FWS application.
The following sample shows a WebAgent.conf file for the FWS application:
# WebAgent.conf - configuration file for the Federation Web Services Application
#agentname="<agent_name>, <IP_address>"
HostConfigFile="/<webagent_option_pack>/config/SmHost.conf"
AgentConfigObject="<agent_config_object_name>"
EnableWebAgent="YES"
Note: The Agent Configuration Object referenced in this WebAgent.conf file must be a new object that you create. Do not specify the object in use by the Web Agent installed in your environment.
Deploy Federation Web Services as a Web Application
40 Web Agent Option Pack Guide
Modify the FWS Properties File
The AffWebServices.properties file contains all the initialization parameters for Federation Web Services. For deploying FWS, set only the parameter that specifies the location of the WebAgent.conf file.
Follow these steps:
1. Navigate to the AffWebServices.properties file. Locate this file in the following directory:
web_agent_optionpack_home/affwebservices/WEB-INF/classes
2. Set the AgentConfigLocation parameter to the location of the WebAgent.conf file at each partner site.
■ Windows example:
C:\\Program Files\\CA\\webagent_optionpack\\config\\WebAgent.conf
Note: Federation Web Services is a Java component, so the Windows paths must contain double backslashes.
■ UNIX example:
web_agent_optionpack_home/config/WebAgent.conf
■ Windows example for the SPS federation gateway
sps_home\\proxy-engine\\conf\\defaultagent\\WebAgent.conf
■ UNIX example for the SPS federation gateway
sps_home/proxy-engine/conf/defaultagent/WebAgent.conf
3. Repeat this procedure for each application server where the Web Agent Option Pack is installed.
4. Accept the default values for the rest of the settings in the properties file.
Copy Web Agent Option Pack Libraries to WebSphere
To copy the Web Agent Option Pack library files on System 2 and System 5
1. Copy the following files from the directory \webagent_option_pack\bin
■ smcommonutil.dll
■ smerrlog.dll
■ smfedclientcomponent.dll
Deploy Federation Web Services as a Web Application
Chapter 4: Deploy Federation Web Services for Federation 41
■ smjavaagentapi.dll
■ libetpki_openssl_ssl.a (AIX only)
■ libetpki_openssl_crypto.a (AIX only)
2. Place the copied libraries in the following directory:
\WebSphere_home\AppServer\bin
Deploy a Federation Web Services WAR File in WebSphere
To deploy the FWS WAR file
1. Create a WAR file of the Federation Web Services application. The application is installed in:
\webagent_option_pack\affwebservices\
For more information about creating a WAR file, see WebSphere documentation.
2. Deploy the WAR file using WebSphere Administrator Console.
For more information, see WebSphere documentation.
Important! If you make subsequent changes to any of the properties files in the affwebservices directory, recreate a WAR file and redeploy this file in the application server.
3. From the WebSphere Administrator Console, go to Applications, Enterprise Applications.
4. Select the name of the web services WAR file, such as affwebservices_war.
5. On the Configuration tab:
a. Set the Classloader Mode.
There are two possible modes for class loading:
■ Classes loaded with the parent class loader first (default)
■ Classes loaded with the local class loader first
The mode you select is implementation-dependent. In releases before 7.0, these modes were named PARENT_FIRST and PARENT_LAST. See the WebSphere documentation for further information.
b. Set WAR Classloader Policy to Application.
c. Save the settings.
Deploy Federation Web Services as a Web Application
42 Web Agent Option Pack Guide
6. Test that the Federation Web Services application is working by opening a web browser and entering:
http://fqhn:port_number/affwebservices/assertionretriever
where,
fqhn
Defines the fully qualified host name.
port_number
Defines the port number of the server where the Federation Web Services application is installed.
For example:
http://myhost.ca.com:81/affwebservices/assertionretriever
If Federation Web Services is operating correctly, the following message appears:
Assertion Retrieval Service has been successfully initialized.
The requested servlet accepts only HTTP POST requests.
This message indicates that Federation Web Services is listening for data activity.
When the Federation Web Services is not operating correctly, a message states that the Assertion Retrieval Service has failed. If the Assertion Retrieval Service fails, verify the Federation Web Services log.
Note: For more information about enabling trace logging for the FWS application, see Trace Logging.
Deploy Federation Web Services as a Web Application
Chapter 4: Deploy Federation Web Services for Federation 43
Configure JBOSS or Tomcat to Work with Federation Web Services
To use a JBoss or Tomcat Application Server in a SiteMinder federated environment, deploy the FWS application on the application server.
The following illustration shows the deployment with JBOSS or Tomcat. On Systems 1 and 4, the Web Agent is installed with the JBOSS or Tomcat Connector for proxy support. SSL is enabled between the proxy and the application server. On Systems 2 and 5, FWS is deployed with the application server by way of the Web Agent Option Pack.
The process for deploying FWS is as follows:
1. Source the Environment Script on a UNIX Operating Environment.
2. Create an SmHost.conf file.
3. Create a WebAgent.conf file.
4. Modify the AffWebServices properties file.
5. Deploy the FWS WAR file in the application server.
The following sections detail each step in the process.
Deploy Federation Web Services as a Web Application
44 Web Agent Option Pack Guide
Source the Environment Script on a UNIX Operating Environments
After you install the Web Agent Option Pack on a UNIX system, the installation program creates an environment script (ca-wa-opack-env.sh).
Source the environment script so the library path of the application server points to the location of the Web Agent Option Pack /bin directory.
Source the script by entering the following command at the command line:
. ./ca-wa-opack-env.sh
Setting the correct library path lets the option pack and the web or application server to work together.
After you source the script, the library path is set. The variable name for the library path differs depending on the operating system. Example of several library paths:
Solaris/Linux
LD_LIBRARY_PATH=/webagent_option_pack_home/bin
HP-UX
SHLIB_PATH=/webagent_option_pack_home/bin
AIX
LIBPATH=/webagent_option_pack_home/bin
Important! The application server startup script can reset the library path. Ensure that the path to the Web Agent Option Pack is the first entry in the path.
The path to the Web Agent Option Pack environment script points to one of the following locations:
■ The installation directory of the web agent option pack. The default location is: /webagent_option_pack_home/bin.
■ The installation directory of the web agent.
If you install the option pack on the same system as the web agent, the script resides in the web agent directory. For any UNIX installation, the default location is /web_agent_home/bin.

Deploy Federation Web Services as a Web Application
Chapter 4: Deploy Federation Web Services for Federation 45
Create an SmHost.conf File
The FWS application requires the SmHost.conf file. However, the Web Agent Option Pack does not install this file, so you must create it.
1. Create an SmHost.conf file by running smreghost.exe, which is located in the following directory:
/webagent_option_pack/bin
2. Put the SmHost.conf file in the following directory on System 2 and System 5:
/webagent_option_pack/config
Create a WebAgent.conf File
The FWS application requires the WebAgent.conf file. However, the Web Agent Option Pack does not install this file, so you must create it.
1. Copy the WebAgent.conf file from System 1 to the following directory on System 2 and System 5:
/webagent_option_pack/config
where,
webagent_option_pack
Defines the installed location of the Web Agent Option Pack on System 2 and System 5.
2. Modify the WebAgent.conf file as follows:
a. Set the EnableWebAgent parameter to YES.
b. Modify any other configuration parameters to suit the environment for the FWS application.
The following sample shows a WebAgent.conf file for the FWS application:
# WebAgent.conf - configuration file for the Federation Web Services Application
#agentname="agent_name, IP_address"
HostConfigFile="/web_agent_home/config/SmHost.conf"
AgentConfigObject="agent_config_object_name"
EnableWebAgent="YES"
Note: The Agent Configuration Object referenced in this WebAgent.conf file must be a new object that you create. Do not specify the object in use by the Web Agent installed in your environment.
Deploy Federation Web Services as a Web Application
46 Web Agent Option Pack Guide
Modify the FWS Properties File
The AffWebServices.properties file contains all the initialization parameters for Federation Web Services. For deploying FWS, set only the parameter that specifies the location of the WebAgent.conf file.
Follow these steps:
1. Navigate to the AffWebServices.properties file. Locate this file in the following directory:
web_agent_optionpack_home/affwebservices/WEB-INF/classes
2. Set the AgentConfigLocation parameter to the location of the WebAgent.conf file at each partner site.
■ Windows example:
C:\\Program Files\\CA\\webagent_optionpack\\config\\WebAgent.conf
Note: Federation Web Services is a Java component, so the Windows paths must contain double backslashes.
■ UNIX example:
web_agent_optionpack_home/config/WebAgent.conf
■ Windows example for the SPS federation gateway
sps_home\\proxy-engine\\conf\\defaultagent\\WebAgent.conf
■ UNIX example for the SPS federation gateway
sps_home/proxy-engine/conf/defaultagent/WebAgent.conf
3. Repeat this procedure for each application server where the Web Agent Option Pack is installed.
4. Accept the default values for the rest of the settings in the properties file.
Deploy an FWS WAR File in JBoss or Tomcat
To deploy the FWS application for a JBOSS or Tomcat server
1. Open a command window and navigate to the affwebservices directory, which is located in:
/webagent_option_pack/affwebservices/.
2. Create a WAR file by entering the command:
jar cvf affwebservices.war *
For more information about deploying a Web application, see the documentation for your application server.
Deploy Federation Web Services as a Web Application
Chapter 4: Deploy Federation Web Services for Federation 47
3. Copy the affwebservices.war file to the appropriate server location:
JBOSS
JBOSS_home/server/default/deploy/
JBOSS_home is the installed location of the JBOSS application server.
Important! For JBOSS, deploy affwebservices in an exploded state. Refer to https://access.redhat.com/knowledge/solutions/34813.
Tomcat
Tomcat_home/webapps
Tomcat_home is the installed location of the Tomcat application server.
4. Restart the application server.
5. After the server has restarted, access the JBOSS or Tomcat Administrative Console. All the services that affwebservices supports appear on the main Console page.
6. Test that the FWS application is working by opening a web browser and entering the following URL:
http://fqhn:port_number/affwebservices/assertionretriever
fqhn
Represents the fully qualified host name and
port_number
Specifies the port number of the server where the Federation Web Services application is installed.
For example:
http://myhost.ca.com:81/affwebservices/assertionretriever
If FWS is operating correctly, the following message is displayed:
Assertion Retrieval Service has been successfully initialized.
The requested servlet accepts only HTTP POST requests.
This message indicates that FWS is listening for data activity. The FWS application is now deployed for the application server.
When FWS is not operating correctly, a message states that the Assertion Retrieval Service has failed. If there is a failure, review the FWS log.
Note: For more information about enabling trace logging for the FWS application, see Trace Logging.

Chapter 5: Unattended Mode Installation 49
Chapter 5: Unattended Mode Installation
This section contains the following topics:
How to Run an Unattended Mode Installation (see page 49)
How to Run an Unattended Mode Installation
After the Web Agent Option Pack is installed on one system, you can automate installations on other Web or application servers using the Web Agent Option Pack's unattended mode installation. An unattended mode installation lets you install or uninstall the Web Agent Option Pack without any user intervention.
To run an unattended mode installation, you must:
1. Run an installation in GUI or Console mode to install the unattended installation properties file.
2. Modify the properties file.
3. Run the unattended installation.
This chapter covers the following topics:
■ Prepare an Unattended Mode Installation (see page 49)
■ Run an Unattended Mode Installation
■ Stop an Unattended Mode Installation in Progress
Prepare an Unattended Mode Installation
An unattended mode installation uses the ca-wa-opack-installer.properties file to propagate the Option Pack installation set-up across all servers in your network. You can define the installation parameters in the properties file then copy the properties file and the Web Agent Option Pack executable file to any applicable server in your network. After the files are copied, you can run an unattended installation.
To prepare an unattended mode installation
1. Run an initial installation of the Web Agent Option Pack in GUI or Console mode.
This installation will install the ca-wa-opack-installer.properties file.
How to Run an Unattended Mode Installation
50 Web Agent Option Pack Guide
2. Open the ca-wa-opack-installer.properties file, and if needed, modify the settings.
The properties file is in the directory web_agent_opack_home/install_config_info.
USER_INSTALL_DIR
Specifies the Web Agent Option Pack's installation location.
USER_REQUESTED_RESTART
Specifies restarting the machine after installation.
Note: These default values were saved in the properties file during the initial installation.
3. Save the properties file.
Run an Unattended Mode Installation
You can run an unattended mode installation.
Follow these steps:
1. Be sure that you have completed the preparation steps.
2. Copy the following files to a local directory on the system where you want to install the option pack.
■ Web Agent Option Pack executable or binary
■ ca-wa-opack-version-windows_platform.exe
■ ca-wa-opack-version-operating_system.bin
■ ca-wa-opack-installer.properties
3. Open a console window and navigate to the location where you copied the files.
4. Execute the following command:
webagent_option_pack_executable -f properties_file -i silent
Windows example:
ca-wa-opack-r12.5-win32.exe -f ca-wa-opack-installer.properties -i silent
Solaris example:
./ca-wa-opack-r12.5-sol.bin -f ca-wa-opack-installer.properties -i silent
Note: These examples assume that you are running the installation from the directory containing the executable and properties files. If you are not running the installation from this directory, specify the full path to these files. If there are spaces in the directory path, enclose the entire path in quotation marks.
How to Run an Unattended Mode Installation
Chapter 5: Unattended Mode Installation 51
The progress of the unattended installation is displayed. When the installation is complete, the command prompt is redisplayed.
5. Determine that the installation completed successfully by viewing the log file CA_SiteMinder_Option_Pack_r12.5_for_Web_Agent_ InstallLog.log. This file is located in the directory web_agent_opack_home/install_config_info.
Stop an Unattended Mode Installation in Progress
Follow these steps:
Windows
Open the Windows Task Manager, and stop the following two processes:
■ ca-wa-opack-r12.5-win32.exe
■ wa_option_pack.exe
UNIX
Type Ctrl+C.

Chapter 6: Uninstall the Web Agent Option Pack 53
Chapter 6: Uninstall the Web Agent Option Pack
This section contains the following topics:
Uninstall the Web Agent Option Pack from Windows Systems (see page 53) Uninstall the Web Agent Option Pack from UNIX Systems (see page 53)
Uninstall the Web Agent Option Pack from Windows Systems
Uninstall the Web Agent Option Pack to remove it from your Windows system.
Follow these steps:
1. Stop the web server.
2. Exit any applications that are running.
3. Open the Windows Control Panel.
4. Double-click Add or Remove Programs.
5. Select CA SiteMinder Option Pack for Web Agent.
6. Click Remove.
7. Confirm the action.
8. Click Uninstall.
9. Stop and restart the web server.
Uninstall the Web Agent Option Pack from UNIX Systems
You can uninstall the Web Agent Option Pack from UNIX systems in GUI or console mode. To uninstall in console mode, execute the Option Pack binary file with the command argument "-i console".
Follow these steps:
1. Stop the Web server, and exit any applications that are running.
2. Open a console window.
Uninstall the Web Agent Option Pack from UNIX Systems
54 Web Agent Option Pack Guide
3. Add the location of the JDK to the PATH environment variable, as follows:
PATH=/jdk_home/bin:${PATH}
export PATH
Note: jdk_home is the location of the JDK. This step eliminates the error message which states that the Java virtual machine cannot be found.
4. Navigate to the installed location of the Web Agent.
Example: /opt/ca/webagent/
5. At the prompt, type one of the following commands:
GUI Mode: ./ca-wa-opack-uninstall.sh
Console Mode: ./ca-wa-opack-uninstall.sh -i console
6. Review the dialog box that prompts you to confirm the removal of the Option Pack; then click Uninstall.
The Web Agent Option Pack is now removed from your system.
Chapter 7: Upgrade the Web Agent Option Pack 55
Chapter 7: Upgrade the Web Agent Option Pack
This section contains the following topics:
Mixed-Version Upgrade Considerations (see page 55) Perform an Option Pack Upgrade (see page 58)
Mixed-Version Upgrade Considerations
To simplify migrations and upgrades, the Web Agent Option Pack can operate with Policy Servers of different, compatible versions. This mixed-version support allows you to keep Web Agents at their current version while you upgrade Policy Servers and other Web Agents. However, mixed-version environments are not recommended for permanent use because they limit the federation functionality to that of the lesser of the two components.
Mixed-Version Upgrade Considerations
56 Web Agent Option Pack Guide
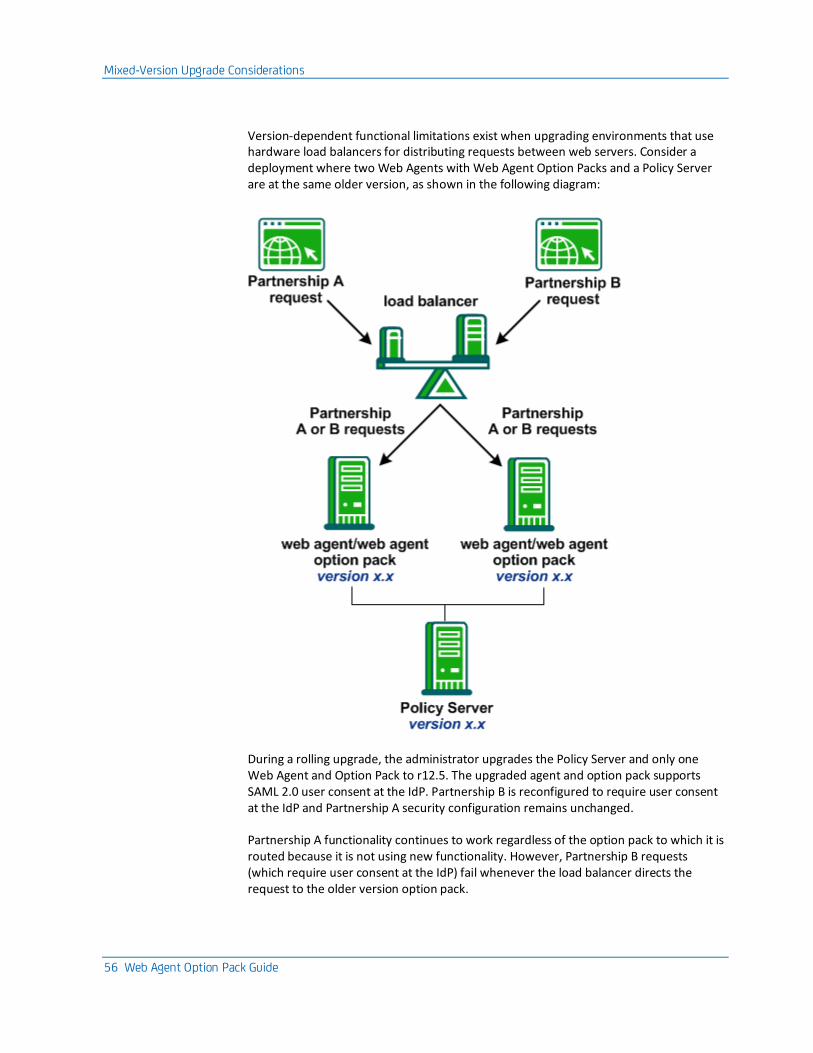
Version-dependent functional limitations exist when upgrading environments that use hardware load balancers for distributing requests between web servers. Consider a deployment where two Web Agents with Web Agent Option Packs and a Policy Server are at the same older version, as shown in the following diagram:
During a rolling upgrade, the administrator upgrades the Policy Server and only one Web Agent and Option Pack to r12.5. The upgraded agent and option pack supports SAML 2.0 user consent at the IdP. Partnership B is reconfigured to require user consent at the IdP and Partnership A security configuration remains unchanged.
Partnership A functionality continues to work regardless of the option pack to which it is routed because it is not using new functionality. However, Partnership B requests (which require user consent at the IdP) fail whenever the load balancer directs the request to the older version option pack.
Mixed-Version Upgrade Considerations
Chapter 7: Upgrade the Web Agent Option Pack 57
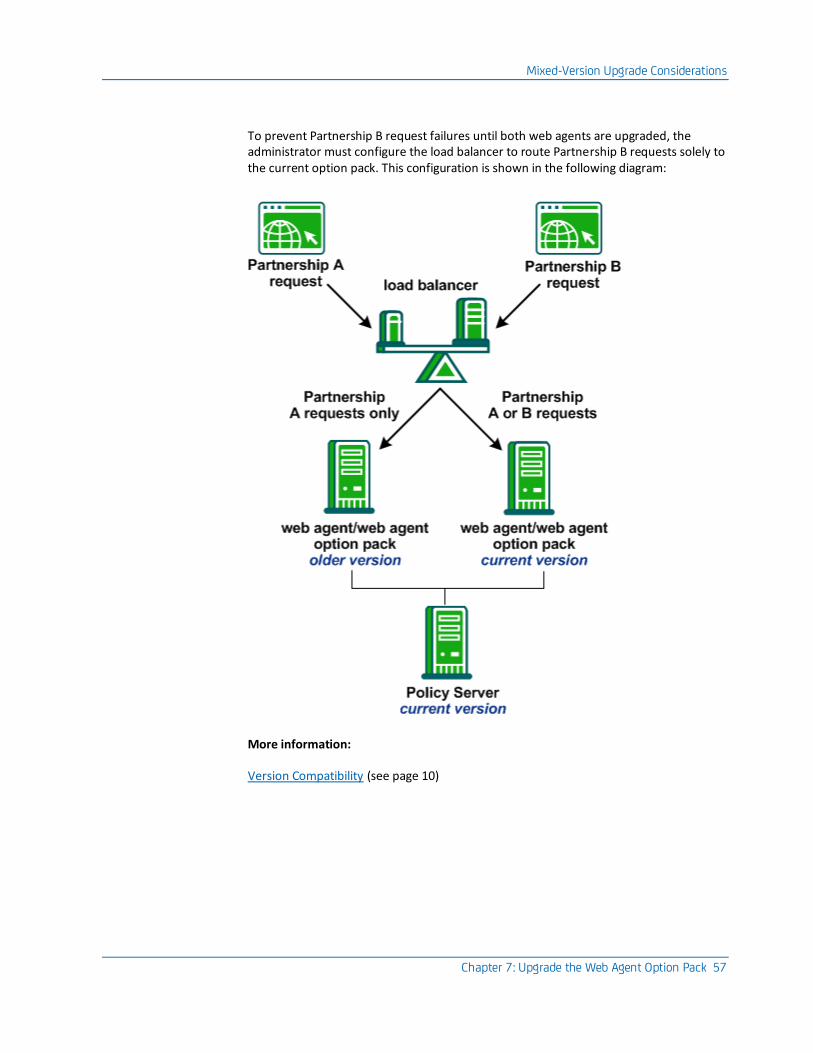
To prevent Partnership B request failures until both web agents are upgraded, the administrator must configure the load balancer to route Partnership B requests solely to the current option pack. This configuration is shown in the following diagram:
More information:
Version Compatibility (see page 10)
Perform an Option Pack Upgrade
58 Web Agent Option Pack Guide
Perform an Option Pack Upgrade
Consider the following points before upgrading the Web Agent Option Pack:
■ The Web Agent Option Pack version must be compatible with the Policy Server version. To learn which Policy Server versions the Web Agent Option Pack is compatible with, see the SiteMinder Platform Support Matrix.
■ When different compatible versions of the Web Agent Option Pack and Policy Server are mixed, federation functionality is limited to that of the lesser of the two components.
■ If the Web Agent and Web Agent Option Pack are installed on the same system, they must be the same version, including the Service Pack and CR version.
Important! When upgrading, the program automatically creates new back-up configuration files and overwrites the existing configuration files.
To upgrade the Web Agent Option Pack
1. Run the Web Agent Option Pack installation program. The installation program can be run as an upgrade.
For more information, see the installation instructions (see page 13).
2. Follow the prompts to upgrade the system.
More information:
Version Compatibility (see page 10)
Index 59
Index
C
CA Technologies Product References • 3 Components Required for eTelligent Rules • 10 Components Required for SiteMinder Federation •
10 Configure JBOSS or Tomcat to Work with Federation
Web Services • 43 Configure the WebLogic Reverse Proxy Plug-in • 35 Contact CA Technologies • 3 Copy Web Agent Option Pack Libraries to
WebSphere • 40 Create a WebAgent.conf File • 33, 39, 45 Create an SmHost.conf File • 32, 39, 45
D
Deploy a Federation Web Services WAR File in WebSphere • 41
Deploy an FWS WAR File in JBoss or Tomcat • 46 Deploy Federation Web Services as a Web
Application • 23 Deploy Federation Web Services for Federation • 19 Deploy the FWS Application on WebLogic • 35
E
Enable ServletExec to Write to the IIS File System • 27
Ensure the IIS Default Web Site Exists • 29 Environment Variables Added by the Installation •
11
F
Features Provided by the Web Agent Option Pack • 7 Federation Web Services Application Overview • 19
G
General Option Pack Installation Requirements • 8
H
How to Run an Unattended Mode Installation • 49
I
Install the Web Agent Option Pack • 13 Installation Modes • 13
Installation Requirements and Considerations • 8 Introduction • 7
J
Java Virtual Machine Installation Error on Solaris can be Ignored (149886) • 11
M
Mixed-Version Upgrade Considerations • 55 Modify the FWS Properties File • 34, 40, 46 Modify the FWS Properties File for a ServletExec
Deployment • 27 Move smvariable.dll file for eTelligent Rules • 15
N
Next Step After Installation • 16
P
Perform an Option Pack Upgrade • 58 Prepare an Unattended Mode Installation • 49 Properties File for Federation Web Services • 20
R
Required Linux Libraries • 8 Run an Unattended Mode Installation • 50 Run the Web Agent Option Pack Installer • 13
S
Set Up ServletExec to Work with Federation Web Services • 24
Set up the LoggerConfig.properties File • 21 Set Up WebLogic to Work with Federation Web
Services • 30 Set Up WebSphere to Work with Federation Web
Services • 36 Source the Environment Script on a UNIX Operating
Environments • 26, 31, 38, 44 Stop an Unattended Mode Installation in Progress •
51
U
Unattended Mode Installation • 49 Uninstall the Web Agent Option Pack • 53
60 Web Agent Option Pack Guide
Uninstall the Web Agent Option Pack from UNIX Systems • 53
Uninstall the Web Agent Option Pack from Windows Systems • 53
Upgrade the Web Agent Option Pack • 55
V
Version Compatibility • 10
W
Web Agent Option Pack on JBOSS Requires Workaround (147357, 149394) • 11